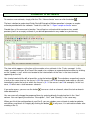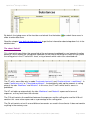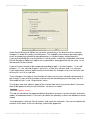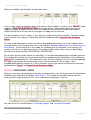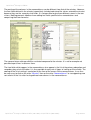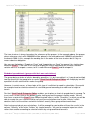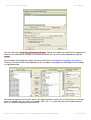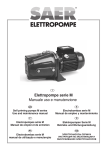
1
®
Quick Devis Enterprise Edition
User’s Manual
USER’S MANUAL
Warning: Some parts of this documentation have been translated in an electronic way. We apologize for the
inconvenience. The complete documentation properly translated will be available in English soon. You’ll be automatically
informed when you’ll try to reach the help file from Quick Devis® Enterprise Edition
®
Quick Devis Enterprise Edition © IAES (1991-2001) © QUOTALYS (2001-2007)
Page 1/210
®
Quick Devis Enterprise Edition
User’s Manual
SUMMARY
Preamble.............................................................................................................................................. 9
Copyright............................................................................................................................................ 11
License............................................................................................................................................... 12
Installation de Quick Devis® Enterprise Edition ................................................................................. 13
Computer requirements .................................................................................................................. 13
Selecting the language ................................................................................................................... 13
Installing on the user’s computer .................................................................................................... 14
Installation on a TSE or on a CITRIX™ server ............................................................................... 15
Installation des licences ..................................................................................................................... 16
Choosing the copy protection solution ............................................................................................ 16
Installation a computer identifier based protection.......................................................................... 16
Installation a dongle based protection ............................................................................................ 18
Installing a network protection ........................................................................................................ 21
Meaning of the terms.......................................................................................................................... 22
Registering your license ..................................................................................................................... 23
Création d’un devis............................................................................................................................. 24
Common functions ............................................................................................................................. 26
New estimate .............................................................................................................................. 26
Open estimate............................................................................................................................. 26
Close estimate ............................................................................................................................ 26
Save............................................................................................................................................ 26
Save as ....................................................................................................................................... 26
Print area .................................................................................................................................... 27
Page setup.................................................................................................................................. 27
Print preview ............................................................................................................................... 27
Report generator ......................................................................................................................... 27
Access databases ....................................................................................................................... 27
Ms Word functions ...................................................................................................................... 27
Export Ms Excel .......................................................................................................................... 27
Declare an estimate .................................................................................................................... 28
Calculate ..................................................................................................................................... 28
Calculate costs............................................................................................................................ 28
Calculate selling prices ............................................................................................................... 28
Global calculation........................................................................................................................ 28
Reindex the estimate .................................................................................................................. 28
Setting of detailed view or nomenclatures................................................................................... 29
New estimates settings ............................................................................................................... 29
Get settings form another estimate ............................................................................................. 31
Compact current estimate ........................................................................................................... 32
Repair current estimate............................................................................................................... 32
Compact an estimate or a database ........................................................................................... 32
®
Quick Devis Enterprise Edition © IAES (1991-2001) © QUOTALYS (2001-2007)
Page 2/210
®
Quick Devis Enterprise Edition
User’s Manual
Delete an estimate or a database ............................................................................................... 32
Repair an estimate or a database ............................................................................................... 33
Compact an estimate .................................................................................................................. 33
Expand an estimate .................................................................................................................... 33
Performance and safety .............................................................................................................. 33
Recover an estimate ................................................................................................................... 34
Upgrade QD from the Web ......................................................................................................... 35
The tasks manager and the B.o.Q. .................................................................................................... 36
Reindex the estimate .................................................................................................................. 37
New task ..................................................................................................................................... 37
New sub task............................................................................................................................... 38
Remove task or branch ............................................................................................................... 38
Copy a task or a branch .............................................................................................................. 38
Cut a task or a branch................................................................................................................. 38
Paste a task or a branch ............................................................................................................. 38
Collapse / Expand branches ....................................................................................................... 39
Expand all branches.................................................................................................................... 39
Insert row .................................................................................................................................... 39
Delete row................................................................................................................................... 39
Cut .............................................................................................................................................. 40
Copy............................................................................................................................................ 40
Paste........................................................................................................................................... 40
Erase........................................................................................................................................... 40
Font name................................................................................................................................... 41
Font size ..................................................................................................................................... 41
Colors of the Font........................................................................................................................ 41
Bold / Italic / Underlined .............................................................................................................. 42
Alignment .................................................................................................................................... 42
Fonts ........................................................................................................................................... 42
Colour markers............................................................................................................................ 42
Adjust spacing............................................................................................................................. 42
Tasks fonts.................................................................................................................................. 42
Alignment of tasks....................................................................................................................... 43
Define fonts................................................................................................................................. 43
Column width .............................................................................................................................. 44
Zoom........................................................................................................................................... 44
Search......................................................................................................................................... 44
Print............................................................................................................................................. 45
Show gridlines............................................................................................................................. 45
Freeze / Unfreeze panes............................................................................................................. 45
Summary data............................................................................................................................. 45
Remove all options...................................................................................................................... 46
Remove all forced prices............................................................................................................. 46
Link this task ............................................................................................................................... 47
Remove the link for this task ....................................................................................................... 47
Automatically create links between tasks.................................................................................... 47
Remove all links .......................................................................................................................... 50
Scenarios with quantities ............................................................................................................ 50
Tasks sharing.............................................................................................................................. 51
The detailed view ............................................................................................................................... 54
Select all ..................................................................................................................................... 55
Cut row........................................................................................................................................ 55
®
Quick Devis Enterprise Edition © IAES (1991-2001) © QUOTALYS (2001-2007)
Page 3/210
®
Quick Devis Enterprise Edition
User’s Manual
Copy row..................................................................................................................................... 55
Paste row .................................................................................................................................... 55
Copy cell ..................................................................................................................................... 55
Paste cell .................................................................................................................................... 55
Insert line .................................................................................................................................... 55
Insert before ................................................................................................................................ 56
Delete rows ................................................................................................................................. 56
Glossary...................................................................................................................................... 56
Replace by the article whose reference is mentioned ................................................................. 56
Copy down .................................................................................................................................. 57
Copy first row of task................................................................................................................... 57
Display all rows from B.o.Q......................................................................................................... 57
Find current row in its original database...................................................................................... 57
Search......................................................................................................................................... 57
Bold / Italic / Underlined .............................................................................................................. 58
Colour markers............................................................................................................................ 58
Show gridlines............................................................................................................................. 58
Cancel......................................................................................................................................... 58
Record article in database .......................................................................................................... 58
Update article in database .......................................................................................................... 59
Update rows ................................................................................................................................ 59
Insert a frame of articles from Excel............................................................................................ 60
Set up searching prefixes............................................................................................................ 61
The Nomenclatures ............................................................................................................................ 62
Select sorting key........................................................................................................................ 63
Display only significant rows ....................................................................................................... 63
Find current row in its original database...................................................................................... 63
Search......................................................................................................................................... 63
The overhead expenses workbook .................................................................................................... 64
The ‘Workforce’ tab......................................................................................................................... 66
The ‘Material’ tab ............................................................................................................................ 66
The ‘Manufacturers’ tab .................................................................................................................. 68
The ‘Families’ tab............................................................................................................................ 68
The ‘User fields’ tab ........................................................................................................................ 69
The ‘Currency tab’ .......................................................................................................................... 70
The ‘Owner fields’ tab ..................................................................................................................... 71
The free tabs .................................................................................................................................. 71
The sheet ‘Calcul1’ ......................................................................................................................... 72
Designing a sheet of sale ............................................................................................................... 73
Choosing the environment mode .................................................................................................... 75
Overhead sheet only ................................................................................................................... 75
Overhead sheet and coefficients................................................................................................. 75
Coefficients only.......................................................................................................................... 76
Calculated coefficients ................................................................................................................ 77
Conclusion .................................................................................................................................. 77
Calculate workforce rates............................................................................................................ 78
Building you sheets of sale using Microsoft Excel™....................................................................... 78
Setting up iterations ........................................................................................................................ 78
The arrange view ............................................................................................................................... 80
The options ........................................................................................................................................ 81
Calculations ................................................................................................................................ 81
Display Settings .......................................................................................................................... 81
®
Quick Devis Enterprise Edition © IAES (1991-2001) © QUOTALYS (2001-2007)
Page 4/210
®
Quick Devis Enterprise Edition
User’s Manual
Rounding settings ....................................................................................................................... 82
Display tree view ......................................................................................................................... 83
Settings ....................................................................................................................................... 84
Setting detailed view and nomenclatures ........................................................................................... 86
Fitting of the columns .................................................................................................................. 86
Definition of free fields................................................................................................................. 87
Implementation of drop-down lists............................................................................................... 88
Names of columns reserved ....................................................................................................... 89
Posting of lines in the form of columns........................................................................................ 90
Outline and management of profile ............................................................................................. 91
Columns of the nomenclatures.................................................................................................... 91
Working with public databases........................................................................................................... 93
Web addresses ........................................................................................................................... 93
Update databases from the Web................................................................................................. 93
Rebates editor............................................................................................................................. 96
The data model .................................................................................................................................. 99
The various types of databases ....................................................................................................... 101
Setting directories ......................................................................................................................... 101
Types of supported databases ..................................................................................................... 102
Groups data base...................................................................................................................... 103
Standard articles data base ...................................................................................................... 103
Articles data base with forced prices......................................................................................... 103
Virtual data base ....................................................................................................................... 103
Articles data base with external rebates and forced selling prices ............................................ 104
Articles database with extended fields dans forced selling prices............................................. 104
Articles database with extended fields, external rebates and forced selling prices ................... 104
Other kinds of database which cannot be created by the user.................................................. 105
Summary of the features of the different data bases .................................................................... 105
Mode of identification of the articles.............................................................................................. 106
Bases with external rebates.......................................................................................................... 106
The databases with dates............................................................................................................. 107
The utility of the coefficients under material and workforce .......................................................... 107
Using Ms Word documents in articles........................................................................................... 108
Using Excel like workbooks in articles .......................................................................................... 108
Créating databases....................................................................................................................... 108
Removing databases .................................................................................................................... 109
Managing access rights ................................................................................................................ 109
The articles manager........................................................................................................................ 111
Functions of research ................................................................................................................... 111
Cut windows ................................................................................................................................. 112
Insertion of articles in the minutes ................................................................................................ 113
Editing databases ......................................................................................................................... 113
Creation or edition of a tree structure ........................................................................................... 115
Assumption of responsibility of documents Microsoft Word™ ...................................................... 117
Assumption of responsibility of tables of calculations ................................................................... 117
Export of a base of articles towards Microsoft Excel..................................................................... 117
Functions of the manager of articles............................................................................................. 118
To open base ............................................................................................................................ 118
To insert the selection ............................................................................................................... 118
To replace the selection ............................................................................................................ 118
Die to select the articles ............................................................................................................ 118
Selection of posting................................................................................................................... 118
®
Quick Devis Enterprise Edition © IAES (1991-2001) © QUOTALYS (2001-2007)
Page 5/210
®
Quick Devis Enterprise Edition
User’s Manual
Posting and edition of the tree structure.................................................................................... 119
To export basevers ms Excel™ ................................................................................................ 119
Requests of modification........................................................................................................... 119
To create a new article.............................................................................................................. 119
To delete an article.................................................................................................................... 119
To optimize the base of articles................................................................................................. 119
To lock the articles with the importation .................................................................................... 120
To recognize the articles by their reference .............................................................................. 120
Editer the table of calculations of the article.............................................................................. 120
To destroy the table of calculations of the article ...................................................................... 120
Editer the document Microsoft Word™ of the article ................................................................. 120
To remove a Word™ document ................................................................................................ 120
To mask the fields languages not used..................................................................................... 120
To mask the extended fields not used....................................................................................... 120
To name a wide field or a linguistic field.................................................................................... 121
To remove the name wide field or a linguistic field.................................................................... 121
To take into account the coefficients ......................................................................................... 121
Le gestionnaire de groupes.............................................................................................................. 122
Searching functions ...................................................................................................................... 123
Window’s sizes ............................................................................................................................. 124
Inserting groups in detailed view .................................................................................................. 125
Editing databases ......................................................................................................................... 126
Creating or editing a tree view structure ....................................................................................... 127
Embeded spreadsheets (groups with their own calculations) ....................................................... 128
Passing paramteers from a parent group to a child group ............................................................ 130
Functions of the group manager................................................................................................... 130
To open base ............................................................................................................................ 131
To insert the selection ............................................................................................................... 131
To replace the selection ............................................................................................................ 131
Die to select the groups ............................................................................................................ 131
Selection of posting................................................................................................................... 131
Posting and edition of the tree structure.................................................................................... 131
To import a list of groups to format ms Excel ............................................................................ 131
Editing the group’s Microsoft Word™ document ....................................................................... 132
Removing a Word™ document ................................................................................................. 133
Export whole database to Ms Excel™....................................................................................... 133
Export current group to Ms Excel™ .......................................................................................... 133
Import a groupe from Ms Excel™.............................................................................................. 134
Create a new empty group........................................................................................................ 134
Create a new derivated group ................................................................................................... 134
Remove a group........................................................................................................................ 134
Remove an article ..................................................................................................................... 134
Seek article in it’s original database .......................................................................................... 134
To optimize the base of groups ................................................................................................. 134
To check the integrity of the base ............................................................................................. 135
To post or mask the details ....................................................................................................... 135
Print area .................................................................................................................................. 135
Print preview ............................................................................................................................. 135
To print...................................................................................................................................... 135
Page-setting.............................................................................................................................. 135
To cancel .................................................................................................................................. 136
To cut/To copy/To stick/To erase .............................................................................................. 136
®
Quick Devis Enterprise Edition © IAES (1991-2001) © QUOTALYS (2001-2007)
Page 6/210
®
Quick Devis Enterprise Edition
User’s Manual
Name and size of police force................................................................................................... 136
Fat//Italic Underlined ................................................................................................................. 136
Colors of the cells...................................................................................................................... 136
Alignment .................................................................................................................................. 136
To center on several columns ................................................................................................... 136
Options of alignment ................................................................................................................. 136
Options of edge......................................................................................................................... 136
Working of the numbers ............................................................................................................ 137
Management of the lines and columns...................................................................................... 137
Adjustment height and width ..................................................................................................... 137
Protection of the cells................................................................................................................ 137
Limits of the table ...................................................................................................................... 137
To seek/To replace ................................................................................................................... 137
To stick a variable ..................................................................................................................... 137
To register a variable ................................................................................................................ 137
Unit, Quantity, Made out ........................................................................................................... 137
Check box ................................................................................................................................. 137
Drop-down list ........................................................................................................................... 138
Zoom......................................................................................................................................... 139
The glossary..................................................................................................................................... 140
Setting prefixes ................................................................................................................................ 143
Set up searching prefixes.......................................................................................................... 143
The workbooks of the detailed view ................................................................................................. 144
The request language ...................................................................................................................... 145
Managing the estimates ................................................................................................................... 149
Explanations about the mechanism .............................................................................................. 149
Example of application.................................................................................................................. 151
Creation of the base of management ........................................................................................ 151
Configuration of the miters ........................................................................................................ 152
Configuration of the columns .................................................................................................... 153
Implementing formulation.......................................................................................................... 155
Test of operation ....................................................................................................................... 156
Coupling with Quick Devis® Enterprise Edition......................................................................... 157
Design of an estimate master ................................................................................................... 158
Test of operation ....................................................................................................................... 164
Automatic classification of the estimates................................................................................... 164
Fonctionnalités du module de gestion .......................................................................................... 165
New base of management ........................................................................................................ 165
To open base of management .................................................................................................. 165
To close the base...................................................................................................................... 165
To open the............................................................................................................................... 165
To leave .................................................................................................................................... 166
To remove ................................................................................................................................. 166
New........................................................................................................................................... 166
To refresh the data.................................................................................................................... 166
To change the ........................................................................................................................... 166
Numbers of the.......................................................................................................................... 167
Authorizations ........................................................................................................................... 168
To configure the columns.......................................................................................................... 168
Names of the miters .................................................................................................................. 170
To carry out a backup copy....................................................................................................... 171
Parameters of safeguard........................................................................................................... 171
®
Quick Devis Enterprise Edition © IAES (1991-2001) © QUOTALYS (2001-2007)
Page 7/210
®
Quick Devis Enterprise Edition
User’s Manual
To purge in accordance with the ............................................................................................... 171
To optimize the base................................................................................................................. 172
Edition of an estimate ................................................................................................................... 172
The filters...................................................................................................................................... 175
The simplified management tools ................................................................................................. 176
Technique tips .............................................................................................................................. 177
The Reports Generator .................................................................................................................... 179
Reports generator ..................................................................................................................... 179
Load profile ............................................................................................................................... 180
Reset profile .............................................................................................................................. 180
Kind of profile ............................................................................................................................ 180
Zoom......................................................................................................................................... 181
Show descriptions or task items on sub-totals .......................................................................... 181
Rounding levels......................................................................................................................... 181
Amounts in words...................................................................................................................... 181
Adjust line spacing .................................................................................................................... 182
First page header ...................................................................................................................... 182
Next pages headers .................................................................................................................. 183
Bottom pages ............................................................................................................................ 183
Insert / Delete rows ................................................................................................................... 183
Cell format................................................................................................................................. 183
Paste a name ............................................................................................................................ 184
Set borders ............................................................................................................................... 184
Insert an image ......................................................................................................................... 184
Display all columns ................................................................................................................... 184
Hide columns ............................................................................................................................ 184
Cut ............................................................................................................................................ 184
Copy.......................................................................................................................................... 184
Paste......................................................................................................................................... 184
Font names ............................................................................................................................... 184
Font size ................................................................................................................................... 185
Bold / Italic / underlined............................................................................................................. 185
Alignment .................................................................................................................................. 185
Colours...................................................................................................................................... 185
Tree view to be printed.............................................................................................................. 185
Managing Page breaks ............................................................................................................. 186
Setting columns......................................................................................................................... 186
Display B.o.Q. rows or all the rows ........................................................................................... 186
Show gridlines........................................................................................................................... 186
Save profile ............................................................................................................................... 186
Print........................................................................................................................................... 186
Page settings ............................................................................................................................ 187
Print preview ............................................................................................................................. 188
Quit ........................................................................................................................................... 188
Export to Microsoft Excel .......................................................................................................... 189
Export to Microsoft Word........................................................................................................... 189
To launch an Excel file with Macro............................................................................................ 189
Automated mails .............................................................................................................................. 194
The safety of the estimates .............................................................................................................. 197
The formats of estimates files .......................................................................................................... 198
Converting an Excel file to a database ............................................................................................. 199
Create an empty frame ............................................................................................................. 199
®
Quick Devis Enterprise Edition © IAES (1991-2001) © QUOTALYS (2001-2007)
Page 8/210
®
Quick Devis Enterprise Edition
User’s Manual
Convert a frame ........................................................................................................................ 200
Converting an Excel file to an estimate ............................................................................................ 201
Convert an Excel file to an estimate.......................................................................................... 202
Installing a license server ................................................................................................................. 203
Getting license codes................................................................................................................ 203
Seizure of the codes licenses ................................................................................................... 205
Démarrage et arrêt du service .................................................................................................. 205
Monitoring licenses on server ................................................................................................... 206
Setting up clients’ computers .................................................................................................... 207
Troubleshooting ............................................................................................................................... 209
Preamble
Thank you to have installed Quick Devis® Enterprise Edition.
Quick Devis® Enterprise Edition is intended for building estimates in all spheres of activity that
require handling of material, sub contracting or workforce and whenever you have to build bills of
quantities.
If has a customizable user interface which can handle up to 60 user defined fields allowing to quickly
adapt the product to most of the estimating methods. Additionally, it allows any computing method,
whatever complex, in order to calculate the selling prices. For this purpose it uses Excel™ like
workbooks.
This manual was designed for users not having any preliminary knowledge of the product. It is also
used as reference handbook for the users having received a formation or having a good knowledge
of Quick Devis® Enterprise Edition.
The manual does not explain what an estimate is nor the different evaluation techniques but simply
the method of construction and evaluation of the estimates under Quick Devis® Enterprise Edition.
The general features like the creation of an estimate or the design of a bill of quantities are developed
there in a teaching way. In this manual, each function is described precisely in a technical way.
A reasonable knowledge of your operating system is desirable for correct use of the software
because the user's manual does not develop the use of the system’s tools which are for example the
opening of a window or the recording of a file. For more information, consult the handbook of your
operating system.
The manual does not give training; it does not treat various tricks to optimize the estimating process
and in general, does not approach the various techniques of estimating. The computing methods of
the overhead costs in particular are approached in a technical way, without development of their
finality.
If you cannot take part in a training course, we advise you to read the downloadable training manuals
on http://www.iaes-software.com/docs.htm (these documents are often available only in English or
French)
If you are not informed any of the product and you do not have time to read this handbook, we advise
you, to save time, to start by approaching Quick Devis® Free Edition which is a very simplified
version of Quick Devis® Enterprise Edition and which guarantees a catch in fast hand. When you
understand the operation of Quick Devis® Free Edition, you will have solids tricks to discover the
®
Quick Devis Enterprise Edition © IAES (1991-2001) © QUOTALYS (2001-2007)
Page 9/210
®
Quick Devis Enterprise Edition
User’s Manual
complementary functionalities which Quick Devis® Enterprise Edition offers. Quick Devis® Free
Edition can be downloaded on http://www.quick-devis.net
®
Quick Devis Enterprise Edition © IAES (1991-2001) © QUOTALYS (2001-2007)
Page 10/210
®
Quick Devis Enterprise Edition
User’s Manual
Copyright
Quick Devis® Enterprise Edition is published by Quotalys ltd - 15 Rectory Road - Farnborough Hants - GU14 7BU (United Kingdom)
The data contained in this manual can be modified without notice. The names of companies,
amounts, coefficients and parameters employed have only one value of example and are purely
fictitious. The use of existing names would be completely fortuitous.
Quick Devis® Enterprise Edition and its documentation cannot be reproduced, even partially,
whatever the method, without prior written consent of Quotalys ltd. It is also prohibited to reverse
whole or part of the program to understand its operation.
Quick Devis® is a trade mark. Copyright© Quotalys 2001-2006 all rights reserved - © IAES 19912001. The rights on Quick Devis® Enterprise Edition and its documentation belong exclusively to
Quotalys ltd.
Various marks are quoted in Quick Devis® Enterprise Edition or in its documentation:
CITRIX is a trade mark of Citrix Systems Inc
IBM, PC and PS are trade marks of International Business Machines Corporation
Windows, Excel, Word, Access, Visual BASIC, Visual C++ are trade marks of Microsoft
Corporation.
Generally the marks quoted are properties of their respective companies. For further information
about the rights governing the distribution of Quick Devis®, consult the License chapter in this
manual or contact:
[email protected]
[email protected]
®
Quick Devis Enterprise Edition © IAES (1991-2001) © QUOTALYS (2001-2007)
Page 11/210
®
Quick Devis Enterprise Edition
User’s Manual
License
By buying a Quick Devis® Enterprise Edition license, Quotalys ltd concedes you the right to use a
copy of the software.
This right is neither exclusive, nor transferable. You have the right to install Quick Devis® Enterprise
Edition on as many computers as wish but you do not have the right to employ simultaneously Quick
Devis® Enterprise Edition on different computers with the same licence; you must acquire a licence
for each computer running the software simultaneously.
The manual of Quick Devis® Enterprise Edition and the software which comes with it are provided 'as
is’ without any explicit or implicit guarantee. In spite of the efforts made to provide documentation as
exhaustive as possible and to publish software as reliable as possible, certain functions may not have
been sufficiently developed or some errors may appear
Quotalys ltd or its distributors could not be made responsible for unspecified direct or indirect damage
resulting from a defect of the handbook and/or software.
Some countries or states may restrict the above warranty limitation. In such case, the user is invited
to uninstall Quick Devis® Enterprise Edition if this limitation does not satisfy him. Since most parts of
Quick Devis® Enterprise Edition are still developed in France, in the event of litigation in respect of
the software warranty, whatever the address of the plaintiff, French law will apply and must be
instituted in the commercial court of Creteil (France).
Important: By installing Quick Devis® Enterprise Edition you agree with all of the clauses in this
manual. If you disagree with any clause, please, do not install Quick Devis® Enterprise Edition.
®
Quick Devis Enterprise Edition © IAES (1991-2001) © QUOTALYS (2001-2007)
Page 12/210
®
Quick Devis Enterprise Edition
User’s Manual
Installation de Quick Devis® Enterprise Edition
Selon les distributeurs Quick Devis® Enterprise Edition peut vous être livré sur un support physique
(CD ROM) ou bien sous une forme dématérialisée. Il est également disponible sur www.quickdevis.net où il peut être téléchargé gratuitement. Une simple identification en ligne vous sera alors
demandée.
According to distributors' Quick Devis® Enterprise Edition can be delivered on a physical support (CD
ROM) or in a dematerialized form. It is also available on www.quick-devis.net where it can be
downloaded for free. A simple identification is required.
Computer requirements
Before installing the product, we advise you to read this chapter in order to take note of the requested
hardware for a correct exploitation of Quick Devis® Enterprise Edition.
Quick Devis® Enterprise Edition was designed to run under Microsoft Windows 2000, Microsoft
Windows XP, Microsoft Windows 2003 or Microsoft Windows Vista.
The basic configurations advised for Quick Devis® Enterprise Edition are as follows:
•
•
•
IBM PC/PS or compatible with processor Pentium III 1 Ghz minimum
256 Mo of RAM
60 Mo free on the hard disk
These configurations constitute the minima advised to obtain acceptable performances. Quick
Devis® Enterprise Edition, can nevertheless operate on smaller configurations. However, it will be
particularly slow on such configurations and the disk accesses to emulate virtual memory will be
frequent; The stability of the application could then be affected.
The disk capacity above mentioned is the approximate space that the software will occupy on the
hard disk, including the cache requested for the opening of the estimates. The estimates and the
databases being bulky files, it is advised to have a higher space for ‘comfortable’ exploitation.
To install Quick Devis® Enterprise Edition, launch the file qd607ee.exe which you will have
downloaded first at http://www.quick-devis.net
Selecting the language
Quick Devis® Enterprise Edition automatically detects the language at the time of the installation if
you have a system set up for English (USA), French (France), German (Germany), Spanish (Spain),
Italian (Italy) or Portuguese (Portugal). For all the other configurations, a menu will propose to you to
select the language when you launch the file qd607ee.exe
If your system is set up according to one of the six regional settings above and that you wish to install
the application in a language different from that of your system, you can temporarily change your
®
Quick Devis Enterprise Edition © IAES (1991-2001) © QUOTALYS (2001-2007)
Page 13/210
®
Quick Devis Enterprise Edition
User’s Manual
local settings in the control panel to assign the language of your choice. Then, install Quick Devis®
Enterprise Edition and reset your original settings.
You also can, without changing your regional parameters, launch the file qd607ee.exe using the
menu ‘Start / Launch’ with the following switches:
•
EN (English), FR (French), DE (German), ES (Spanish), IT (Italian), PT (Portuguese)
Example: qd607ee.exe /ES to install Quick Devis® Enterprise Edition in Spanish whatever the local
settings of your system.
In this last installation mode where you specify the language using a switch, the language used by
qd607ee.exe during the installation procedure will be always that of your system but the language of
Quick Devis® Enterprise Edition will be that specified by your switch.
Installing on the user’s computer
When the installation procedure is launched, follow simply the instructions which are posted to the
screen.
When Quick Devis® Enterprise Edition has been installed successfully; the following menus appear
in the ‘Start’ menu. The program group is named ‘Quick Devis® V6’.
•
•
•
•
•
•
•
•
Quick Devis® Enterprise Edition (the program itself)
Database converter (to create Quick Devis databases from many different sources)
Spreadsheet converter (to convert Excel™ files into Quick Devis® Enterprise Edition files)
Management tools (to monitor your estimates built on one or several computers)
Licenses manager (to manage the licenses and set up the protection devices)
QDToolbox® for Microsoft Excel™ (to access Quick Devis® Enterprise Edition databases
directly from Microsoft Excel™)
User’s manual QDToolbox®
Uninstall Quick Devis® Enterprise Edition
If you do not have all the rights on your computer, it is advised to open an ‘Admin’ session before
launching the installation because your user profile may be parameterized to refuse the registration of
new components. Contact your administrator for further information.
If you installed Quick Devis® Enterprise Edition and the above menus do not appear in 'Start’ menu,
it is probably because your computer requires ‘Admin’ rights to install Quick Devis® Enterprise
Edition. In such a case, uninstall the software, get the rights and reinstall the application.
To always profit from the last evolutions of Quick Devis® Enterprise Edition, you will be informed
each time you will launch Quick Devis® by a small window which will appear at the bottom right of the
screen when new versions are published. You will just have to click on this window to update your
software.
Note: Quick Devis® Enterprise Edition cannot be installed on the same computer as Quick Devis®
Free Edition. If you install a version, it will replace the other automatically.
®
Quick Devis Enterprise Edition © IAES (1991-2001) © QUOTALYS (2001-2007)
Page 14/210
®
Quick Devis Enterprise Edition
User’s Manual
Installation on a TSE or on a CITRIX™ server
Installing Quick Devis® Enterprise Edition on a TSE or CITRIX server is rigorously identical to that
described in the preceding chapter.
However, an additional file named QDCITRIX.INF will have to be placed in the installation directory of
the software (default C:\program files\Quick Devis V6\)
You can create this file using any text editor like the Windows Wordpad for example. The file should
contain only the two following lines:
[ STATUS ]
Citrix=installed
While recording, ensure that the file has a suffix INF because the Windows Wordpad affects
automatically TXT suffixes.
Whether you use TSE or CITRIX, this file must be used. To check that the necessary parameter
setting is well taken into account, you can launch Quick Devis® Enterprise Edition starting from a
user computer. A CITRIX logo must appear on splash screen.
Note: TSE or CITRIX allow only the administration of networked licences and do not allow the use of
USB dongles or computer identifiers.
®
Quick Devis Enterprise Edition © IAES (1991-2001) © QUOTALYS (2001-2007)
Page 15/210
®
Quick Devis Enterprise Edition
User’s Manual
Installation des licences
Quick Devis® Enterprise Edition can be evaluated during 30 days after the first installation. Beyond,
you will have to register a license code to continue to use it or to obtain an extension of the probation
period from your dealer who will email you an extension code.
Choosing the copy protection solution
To protect the software, you can choose from 3 solutions:
1. A computer identifier
2. An USB dongle or protection device
3. Floating licenses installed on a server
The first solution is adapted best to the portable configurations because it requires neither physical
device, nor connection network. It consists of the inscription of a code related to a physical identifier
of the computer. Quick Devis® Enterprise Edition will only launch on the computer having the
identifier. This solution obliges you to contact your dealer to obtain a new code when you change
your computer.
The second solution is most flexible, it enables you to install the software on as many computers as
you wish and to activate the computer of your choice by plugging the dongle there. It requires a USB
port available.
The third solution lets you optimize your licences by installing them on a server. You can then install
Quick Devis® Enterprise Edition on as many computers as wished. The server will automatically limit
the simultaneous use according to the number of subscribed licences. This last solution is proposed
starting from three licences.
Whatever the protection solution you will retain, you will have to obtain licenses codes by contacting
your dealer, by requesting a code via the appropriate tool or by transmitting an email to
[email protected].
Installation a computer identifier based protection
This kind of protection is not available under TSE or CITRIX™ but only when Quick Devis®
Enterprise Edition is installed on an end user’s computer.
If you choose a protection bases on a computer identifier, launch the module ‘License manager’ in
the ‘Start / Quick Devis’ menu.
®
Quick Devis Enterprise Edition © IAES (1991-2001) © QUOTALYS (2001-2007)
Page 16/210
®
Quick Devis Enterprise Edition
User’s Manual
Click on the button ‘Ask for or modify a V6 license code for this key’ located at the left of the 12
hexadecimal characters code which identifies your computer, at the bottom of the window. This code
always begins by the letter E.
Then fulfil every field, check the boxes of the modules which interest you (all the modules are
provided as default) and transmit the request by mail, fax or on line clicking on the appropriate
buttons. When you will receive your unlocking code (28 characters code), you will just have to launch
the licenses management module again and to click on the button ‘Write the license code on this
computer’.
®
Quick Devis Enterprise Edition © IAES (1991-2001) © QUOTALYS (2001-2007)
Page 17/210
®
Quick Devis Enterprise Edition
User’s Manual
When you enter the code, click on the button ‘Record’. Your license is then installed. If you make an
error, you will be able to try to register up to 4 invalid codes after which, your key will be neutralized
and you will have to call your dealer who will give you a code to recover your rights.
To prevent Quick Devis® Enterprise Edition from trying to reach other protection modes, you can
specify the order of research of protections. The option ‘only a local logical key' will allow a faster
launching of the program.
Your licence is now operational. If you had time limited or loan licenses previously, it will be
necessary for you to remove them by clicking on the button ‘Remove temporary licenses’ in order to
prevent Quick Devis® Enterprise Edition from taking into account these licenses.
Installation a dongle based protection
This kind of protection is not available under TSE or CITRIX™ but only when Quick Devis®
Enterprise Edition is installed on an end user’s computer.
If you choose a dongle based protection, contact you dealer who will send a dongle and an
associated license code to you. To install them, proceed as follows:
Launch the ‘License management’ module from the ‘Start / Quick Devis’ menu and, before plugging
the USB dongle, click on the button ‘Set up to handle USB keys’
®
Quick Devis Enterprise Edition © IAES (1991-2001) © QUOTALYS (2001-2007)
Page 18/210
®
Quick Devis Enterprise Edition
User’s Manual
After a few seconds, the driver will be installed and the following message will be posted:
Then insert the dongle in one of the available USB ports, await detection by the system and press the
‘Ok’ button. This will automatically quit the licenses manager.
When Windows requests it, run the driver installation wizard by while clicking on the ‘Next’ button and
specifying ‘automatic installation’ (default option). No CD support will be required because the drivers
were installed on your system when you asked for a USB configuration.
When the driver’s installation is finished, click simply on the ‘Close’ button.
If you start again the licenses manager using the ‘Start / Quick Devis / Licenses manager’ menu, you
should then see the code identifying your key in the window reserved for the physical local keys. This
code has 12 hexadecimal characters and always starts with letter A.
®
Quick Devis Enterprise Edition © IAES (1991-2001) © QUOTALYS (2001-2007)
Page 19/210
®
Quick Devis Enterprise Edition
User’s Manual
Drivers’ installation troubles: If the installation procedure of the driver fails, it may be that you do not
have sufficient rights to install drivers on your computer. Get admin rights and try again after you
uninstall the driver. To remove an USB driver, just launch the licenses manager tool and click on the
button ‘Set up to handle // keys’.
When the dongle is installed and you can visualize his code in the identifier window, you just have
then to enter the 28 character code license code associated with your key.
Often, this step of entry of the license code is not necessary because the keys delivered to you can
include these codes in an internal way. To know if it is necessary or not enter a code, try to start
Quick Devis® Enterprise Edition without carrying out this step. If it starts, you finished the setting of
your license.
If you have to enter a 28 caharacters code, launch the ‘Licenses manager’ module again and click on
the button ‘Write the license code on this computer’
When you enter the code, click on the button ‘Record’. Your license is then installed. If you make an
error, you will be able to try to register up to 4 invalid codes after which, your key will be neutralized
and you will have to call your dealer who will give you a code to recover your rights.
To prevent Quick Devis® Enterprise Edition from trying to reach other protection modes, you can
specify the order of research of protections. The option ‘First a local physical key' will allow a faster
launching of the program.
®
Quick Devis Enterprise Edition © IAES (1991-2001) © QUOTALYS (2001-2007)
Page 20/210
®
Quick Devis Enterprise Edition
User’s Manual
Your licence is now operational. If you had time limited or loan licenses previously, it will be
necessary for you to remove them by clicking on the button ‘Remove temporary licenses’ in order to
prevent Quick Devis® Enterprise Edition from taking into account these licenses.
The 28 characters codes are located in the user’s profile so that the user is the only one being able to
use the associated key. However, if you wish that the dongle become portable without having to enter
the code on each computer likely to use it, you can store this 28 characters code directly in the
dongle.
To do this, launch Quick Devis® Enterprise Edition using the ‘Start / Quick Devis’ menu and click the
‘? / License information’ menu.
Click on the button ‘Store license code in the local key’. Then, your dongle will become portable and
will work on any computer on which Quick Devis® Enterprise Edition is installed with a USB driver.
Installing a network protection
This kind of protection requires a license server. Please read the chapter ‘Installing a license server’
at the bottom of this manual for further information.
®
Quick Devis Enterprise Edition © IAES (1991-2001) © QUOTALYS (2001-2007)
Page 21/210
®
Quick Devis Enterprise Edition
User’s Manual
Meaning of the terms
Before approaching Quick Devis® Enterprise Edition, it is important to determine the meaning of the
terms employed in this user’s manual and in the program itself.
Tasks manager: the term ‘Tasks manager’ indicates the condensed view of the B.o.Qs.
B.o.Q: “Bill of Quantities” indicates the frame which is transmitted to the customer; it is also
often called “Customer’s view” or “Customer’s frame”. It is the first retail level of an estimate.
Under Quick Devis® Enterprise Edition, the term ‘B.o.Q’ indicates the view in which the
customer’s form is visible, it acts as a non non-condensed view contrary to the mode ‘Tasks
manager’.
Detailed view: “Detailed view” indicates the detail of a single task of the ‘B.o.Q’; it is in the
“detailed view” that you will enter material costs and times associated to workforce.
Nomenclatures: “Nomenclatures” indicates a view of the estimate reclassified according to
various sorting criteria (Manufacturers, Families, etc…)
Overhead expenses datasheet: “Overhead expenses datasheet”, “Overhead costs datasheet”
or “Environment” indicates the worksheet which allows entering the duties which are not
quantified in the “detailed view” such as the site facility expenses. It is also in the “Overhead
expenses datasheet” that you will calculate the margins and the workforce rates.
®
Quick Devis Enterprise Edition © IAES (1991-2001) © QUOTALYS (2001-2007)
Page 22/210
®
Quick Devis Enterprise Edition
User’s Manual
Registering your license
When launching Quick Devis® Enterprise Edition for the first time, you will be prompted to register
your license. You can delay this registration by clicking the ‘Remind me after 3 days’ button or ignore
it definitely by clicking then ‘Never register’ button.
To register your license, click the “Register” button and complete the registration Web form. The data
will only be used to build statistics and to improve the quality of support. Quotalys Ltd warrants the
confidentiality of collected data.
You have to be connected to the Internet to register your license of Quick Devis® Enterprise Edition.
®
Quick Devis Enterprise Edition © IAES (1991-2001) © QUOTALYS (2001-2007)
Page 23/210
®
Quick Devis Enterprise Edition
User’s Manual
Création d’un devis
To create a new estimate, simply click the ‘File / New estimate’ menu or click the button
.
The best solution to understand Quick Devis® Enterprise Edition operation is to open a sample
estimate provided with the software. To do this, click the “? / Open sample estimate“ menu.
Provide then a file name and a location. You will get an estimate which conforms to a model
previously built or an empty estimate if you did not parameterize any model as a preliminary.
The view which appears at the time of the creation of an estimate is the ‘Tasks manager’. In this
mode, you can build your B.o.Q and if the need arise, collapse or expand whole branches by clicking
on the symbols + and - which are located at the intersections of the lines in the tree structure
appearing on the left.
You should now build the bill of quantities using the buttons
. These buttons respectively create
a task on the same level as the cursor is (B if the cursor is on A for example) and create a sub-task
immediately under the task on which the cursor is (A.1 if the cursor is on A for example). In this last
case, ‘A’ which was a task becomes a branch.
If you make errors, you can use the button
to be deleted first.
to erase a task or a branch; select the task or branch
You can manually change the proposed items by entering directly the desired text in the “Item”
column. You can specify the columns “Description”, “Unit” and “Quantity” in the same way.
When you finish the configuration of your B.o.Q. you can reindex your estimate in order to optimize
calculations and check its integrity by clicking the button
. In any case, it is advised to reindex after
creating a B.o.Q.
®
Quick Devis Enterprise Edition © IAES (1991-2001) © QUOTALYS (2001-2007)
Page 24/210
®
Quick Devis Enterprise Edition
User’s Manual
You can either work on your B.o.Q in customer’s view mode (B.o.Q) or in condensed mode (Tasks
manager). To activate the customer’s view mode, click the ‘B.o.Q’ tab at the bottom of the window.
In this mode, you will be able, if the need arise, to insert lines under the tasks to add comments or to
conform the estimate to a form imposed customer. For that, use the functions ‘Insert rows’ and
‘Delete rows’ of the ‘Edit’ menu.
The functions of the B.o.Q view are described in an exhaustive way in the chapter The Bill of
Quantities. The ones of the ‘Tasks manager’ view are described in the Chapter The tasks manager.
®
Quick Devis Enterprise Edition © IAES (1991-2001) © QUOTALYS (2001-2007)
Page 25/210
®
Quick Devis Enterprise Edition
User’s Manual
Common functions
Many functions of Quick Devis® Enterprise Edition are accessible from most of the views and have a
similar behaviour whatever the view in progress is. These functions are described below:
New estimate
“File” menu
This function lets you create an empty estimate or an estimate in conformity with one of the
models defined using the “Configure an estimate” function of the “?” menu. To allow creation,
you will have to provide a file name for the new estimate.
If, using the function “Configure an estimate”, you defined several models; a window will
prompt you to select the model to be used when calling this function.
Open estimate
“File” menu
This function lets you open an existing estimate file. The estimates will have as a .DVZ suffix
or .DEV suffix.
The first are compressed estimates with .ZIP format, the seconds are expanded estimates with
Microsoft Access format.
For further information on the differences between .DEV and .DVZ files, read the chapter The
formats of estimates files in this manual
When you create a new empty estimate, an expanded file (.DEV) is automatically created; it is
then transformed into a compressed file (.DVZ) with the first recording.
If you wish to open an estimate file under Microsoft Access, you will have to first expand it if it
is a .DVZ file. To do that, use the function “Compact and expand tools” form the “Tools” menu.
Close estimate “File” menu
This function lets you close the current estimate. You will be prompted for recording if
requested.
Save
“File” menu
This function lets you record on disc the current estimate under its original name. For further
information on the principles of recording used by Quick Devis® Enterprise Edtion, read the
chapter The safety of the estimates in this manual.
Save as
“File” menu
This function lets you record on disc the current estimate under a name different from its
original name. For further information on the principles of recording used by Quick Devis®
Enterprise Edtion, read the chapter The safety of the estimates in this manual.
®
Quick Devis Enterprise Edition © IAES (1991-2001) © QUOTALYS (2001-2007)
Page 26/210
®
Quick Devis Enterprise Edition
Print area
User’s Manual
“File” menu
This function lets you set the print area according to the selected cells when calling the
function. It can be used in the “B.o.Q.” view and the “Overhead sheet” view.
You can also manually change the print area using the “Page setup” function.
Page setup
“File” menu
This function lets you define the various usual parameters of page-setting. However, not all
settings are valid for all the views.
Certain editions, in the B.o.Q. view, are already parameterized and some of their settings
cannot be changed.
Print preview
“File” menu
This function lets you visualize on the screen the printout according to the current print area
and page settings.
Report generator
“File” menu
This function launches the reports generator which lets you produce different formats of the
reports. The functionalities of the report generator are described in the chapter The Reports
Generator in this manual.
Access databases
“Data” menu
This function lets you open the databases. Its operation is described in the chapters The
Articles Manager and The Groups manager in this manual.
Ms Word functions
menu ‘fichier’
This function displays a new menu bar which allows interaction with Microsoft Word™. This
lets you access the automated Microsoft Word templates which use data from the
management tools. Its operation is described in the chapter Automated mails in this manual.
This function requires Microsoft Word 97 or greater.
Export Ms Excel
”File” menu
This function lets you export the current view to Microsoft Excel. Data exported according to
views are as follows:
•
•
•
•
B.o.Q: All columns and all rows
Detailed view: The current task or the current selection
Nomenclatures: The entire nomenclatures or the current selection
Overhead sheet: The entire workbook
This function requires Microsoft Excel 97 or greater.
®
Quick Devis Enterprise Edition © IAES (1991-2001) © QUOTALYS (2001-2007)
Page 27/210
®
Quick Devis Enterprise Edition
User’s Manual
“Tools” menu
Declare an estimate
This function lets you interact with the centralized management database to specify various
customers’ information, the kinds of projects, the characteristics of the estimate, etc in order to
allow the exploitation of these data in the management database, in the reports generator and
in the standard mails. Its operation is described in the chapter ‘Managing estimates’.
Calculate
“Calculation” menu
This function computes data in the current view without running a global recalculation. This will
be useful if you handle important estimates on weak computers: it will avoid computing the
entire estimate when, for example; you simply need to refresh the overhead sheet data.
Calculate costs
“Calculation” menu
This function computes the cost prices of an estimate in order to refresh the columns
‘Expenses' of the B.o.Q. Use it if #N/A appears in the ‘Expenses’ columns of the B.o.Q in order
to get valid costs. This function is not available in ‘Coefficients only’ mode.
Calculate selling prices
“Calculation” menu
This function computes all data of an estimate, the costs and the selling prices. It refreshes all
views. Use it if #N/A appears in the B.o.Q. in order to get valid selling prices. The function
computes expenses (costs) when necessary. It is not available in ‘Coefficients only’ mode.
Global calculation
“Calculation” menu
This function recomputes all data of an estimate, the costs and the selling prices. It refreshes
all the views. Use it if #N/A appears in the B.o.Q. in order to get valid selling prices. This
function is available only in ‘Coefficients only’. In this mode, a calculation of the costs
generates automatically a calculation of the selling prices because both are bound by fixed
coefficients.
Reindex the estimate
“Tools“ menu
This function lets you rebuild the estimate from the data stored in memory and on the disc; it
also checks the integrity of the estimate. You will call it if a message invites you to do so after
the detection of an anomaly in the estimate. It is a safety measure to call the function when
you finish an estimate in order to guarantee its integrity.
Quick Devis® Enterprise Edtion has algorithms which control the integrity of the estimate each
time a recalculation is launched and before every printing request. However, if you obtain an
error message when recalculating or when printing, first try to reindex your estimate.
An estimate built under Quick Devis® Enterprise Edition is a database which contains the
whole of the links between the various tasks. In order to display a user interface pleasant to
use, the software transposes the data from this database into a spreadsheet which is used as
the user’s interface. Each time you carry out an important change as for example to copy and
paste a whole branch, Quick Devis® Enterprise Edition do the job in the database but also in
the workbooks, using simple copy and paste operations as you would do under Microsoft
Excel™. However, such multiple operations in a spreadsheet do not offer the robustness of a
®
Quick Devis Enterprise Edition © IAES (1991-2001) © QUOTALYS (2001-2007)
Page 28/210
®
Quick Devis Enterprise Edition
User’s Manual
database and can sometimes display wrongly (missing borders, badly adapted colors, etc).
The ‘Reindex’ was designed to correct these problems. Thus do not hesitate to launch it after
each important change or if Quick Devis® Enterprise Edition ask for it.
No matter what can happen, these possible displaying problems cannot affect calculations
because they are always realized on the basis of the database. The spreadsheet is used only
as an interface. Before each printing request or each access to the report generator, Quick
Devis® Enterprise Edition checks that the data of the spreadsheet are perfectly in conformity
with those of the database. In the event of problem, it will ask you to reindex the estimate and
will refuse to reach the function requested.
Setting of detailed view or nomenclatures
“Options“ menu
This function is intended to define the order, the format, the colors and the behavior of the
columns in the detailed view and the nomenclatures. It is described in the chapter Setting
detailed view and nomenclatures.
New estimates settings
“Tools” menu
This function lets you append up to 100 models of estimate which will be used as a basis for
the new estimates to be created. A model estimate is a parameterized estimate with its
currencies, colors, rates etc; the model will be automatically duplicated to a new estimate at
the time of creation. That is exactly as if you loaded the model file and recorded it under the
new name.
The function also lets you define the behavior of the computer regarding to the management
database which will let you trace the estimating activity of the computer.
Managing templates estimates
A template estimate built under Quick Devis® Enterprise Edition is a standard estimate which
will have been parameterized to be used as model. This estimate should not be declared in a
management database so that its copies, created by the function ‘New estimate’ can be
declared in a management database.
To ensure that an estimate does not refer to a management database, use the function ‘Reset
the management data’ of the ‘Tools’ menu
®
Quick Devis Enterprise Edition © IAES (1991-2001) © QUOTALYS (2001-2007)
Page 29/210
®
Quick Devis Enterprise Edition
User’s Manual
If you place more than one estimate in this list, Quick Devis® Enterprise Edition will prompt
you, for each creation of estimate to specify from which model the new estimate must be
derived. If only one estimate remains in the list, Quick Devis® Enterprise Edition will create a
new estimate in conformity with the model without prompting the user to select it.
If you do not specify any estimate in the list, Quick Devis® Enterprise Edition will create an
empty estimate with the standard formats and it will then be necessary to provide all its
settings. You also can load these parameters from another estimate using the “Get settings
from another estimate” function.
To add an estimate to the list, click the “Append file” button and select the estimate to be
appended. To remove an estimate from the list, select it first and click the “Remove the file”
button.
It can sometimes be interesting to associate to the model a more explicit text than the name of
the model file. To do so, click delicately on the file name in the list and enter the text you wish
to substitute it with. If after that you want to retrieve which file name is associated to the text,
use the horizontal scroll bar to see the right side of the list.
When you check ‘Prompt for a name when creating’ box, Quick Devis® Enterprise Edition will
require the name of the file to create each time you call the function ‘New estimate’. If you do
not check the box, it will create a temporary file without prompting. The name of the file will
then be prompted with the first recording, as Microsoft Excel™ does. This last solution lets you
name the estimate file according to its number which can be given by the management
database. If the temporary estimate is declared in a management database, Quick Devis®
Enterprise Edition will propose a name made up of the estimate’s number followed by the first
characters of its description.
®
Quick Devis Enterprise Edition © IAES (1991-2001) © QUOTALYS (2001-2007)
Page 30/210
®
Quick Devis Enterprise Edition
User’s Manual
It is advised to let Quick Devis® Enterprise Edition prompt for a file name at the creation
because, if the computer crashes before you record the file, if you did not check the box, you
will not have the name of the file, thus you will not be able to recover it. However, if you
immediately start Quick Devis® Enterprise Edition again after the incident, it will recover the
last abnormally closed temporary file and will communicate its file name to you.
Interacting with a management database
The function ‘New estimates settings’ also lets you specify the behavior of the computer
regarding to the management database. There are two kinds of management modes which
you can activate through the box ‘Activate simplified management tools’. These two kinds are
described in the chapter the ‘Managing the estimates’.
Whatever the mode of management, you can specify the management database to be used by
clicking on the text area designed for this purpose.
The box “Ask for declaration” which is active only when complete management is activated
prompts the user to immediately declare his estimate after having created it. This declaration is
never an obligation and the user can cancel the process of declaration. This in particular
enables him to create an estimate without being connected to the management database and
to postpone the declaration.
If you ask for declaration, you will be able, by checking the box ‘Automatically record data to
the management database’ make so that the updates of the data of the estimate to the
management are automatic and do not require any intervention of the user. For that, you have
three options:
•
Using a button in the menu toolbar (the option displays a button
which updates the
management database when the user clicks it.
When calculating selling prices (the update is made each time the selling prices are
calculated)
When recording the estimates (the update is made when the estimate is recorded)
•
•
If the box ‘Automatically record data to the management database’ is not checked, the user will
have to call the declaration windows by clicking the button
in order to update the
management database.
The box ‘Open the estimates through the management list’ lets you replace the standard
Windows’ open file function by the list of the estimates declared in the management database.
This function offering multiples criterions to sort and find an estimate easily and does not
require knowing the file name of it.
The button ‘Automatic numbering’ displays a window in which you can set up the numbering
rules. This function is not accessible if the administrator of the management database made so
that the users cannot impose their own rules. The principle of these rules is described in the
chapter ‘Numbering rules’.
Get settings form another estimate
®
“Tools” menu
Quick Devis Enterprise Edition © IAES (1991-2001) © QUOTALYS (2001-2007)
Page 31/210
®
Quick Devis Enterprise Edition
User’s Manual
This function is particularly useful to configure an estimate according to another and
particularly to pick the parameters in a model. Most of the parameters can be loaded, including
the overhead sheets.
You must provide the source estimate name by clicking in the “From the estimate:” list box and
then select the data you wish to import by checking the appropriate boxes.
You can thus create empty estimates and import your working environment from a model.
However, it is easier to declare your model estimate using the “New estimates settings” in the
“Tools” menu. This way, the new estimates created will inherit automatically their parameters
from your model.
The most current parameters are checked for this function when the window opens.
Compact current estimate
“Tools” menu
This function lets you optimize the current estimate in order to reduce its size and to speed up
its calculations.
Repair current estimate
“Tools” menu
This function lets you repair the current estimate. Call it if Quick Devis® Enterprise Edtion
reports that the estimate is damaged. If the repairing process fails, close the estimate and try
to repair it calling the “Repair an estimate or a database” function in the “Tools” menu.
Compact an estimate or a database
“Tools” menu
This function lets you optimize an estimate or a database in order to reduce its size and to
increase the speed of access to it. Quick Devis® Enterprise Edtion automatically creates a
backup copy of the old version. It will prompt you to delete this copy at the in end of process.
Delete an estimate or a database
®
“Tools” menu
Quick Devis Enterprise Edition © IAES (1991-2001) © QUOTALYS (2001-2007)
Page 32/210
®
Quick Devis Enterprise Edition
User’s Manual
This function replaces the standard functions of the operating system to let you delete an
estimate or a database directly from Quick Devis® Enterprise Edition. You cannot remove an
estimate or a database which is in use.
Repair an estimate or a database
“Tools” menu
This function lets you repair an estimate or a database which could not be opened for
example. Quick Devis® Enterprise Edition automatically creates a backup copy of the old
version. It will prompt you to delete this copy at the in end of process
If you repair an estimate, you will be prompted to destroy the B.o.Q. sheet and the overhead
sheet. Check the associated boxes only if the repairing process fails. Quick Devis® Enterprise
Edition will automatically recreate the deleted sheets form their image in the file when opening
the estimate.
“Tools” menu
Compact an estimate
The compression of the estimates is managed automatically and the compression is made
when recording the estimate. However, if you need to manually compress a .DEV file to a
.DVZ file without having to open it, you can use this function and simply provide the name of
the file which must be compressed.
Expand an estimate
“Tools” menu
The compression of the estimates is managed automatically. An estimate having a .DVZ suffix
is stored in a compressed format whereas an estimate having a .DEV suffix is expanded. If
you need to read the contents of an estimate under Microsoft Access, you will have to expand
it. Then, use this function and provide the name of the file to be expanded.
Performance and safety
“Tools” menu
To change the settings this function must be called when no estimate is open. If an estimate is
open, the function displays the file name of the image of the estimate in the cache directory.
In order to accelerate the calculations and to guarantee an optimal safety, the estimates are
always stored on a local disk drive while they are open. This disk drive must be as fast as
possible. In the “Disk unit” list box, you can choose the cache location and place it in the root
®
Quick Devis Enterprise Edition © IAES (1991-2001) © QUOTALYS (2001-2007)
Page 33/210
®
Quick Devis Enterprise Edition
User’s Manual
of the disc or in the user’s profile. Choose this last option if several users with different profiles
have to work on the same computer.
In order to allow restoration of previous data of any estimate, Quick Devis® creates a safety
stack whose size (expressed as a number of estimates) can be specified. When the stack
reaches the specified value, the oldest estimate is deleted and replaced by most recent (First
In/First Out). The larger the stack, the better the safety. On the other hand, the space occupied
on the disc is more important.
If you do not know how to use these parameters, let Quick Devis® Enterprise Edtion determine
them according to your system (default values). You can reset the automatic parameters by
clicking the “Restore the default values” button.
The function also lets you specify the time before reduction of the opened databases. Indeed,
Quick Devis® Enterprise Edition can automatically reduce the databases windows in order to
improve the visibility. When a database is open but is not used any more during a period
specified by the drop-down list, it is reduced to a simple bar. To use it, it should first be
or
according to the view you want to restore
restored by clicking on the buttons , ,
(the first button restores the view used before the reduction). After the double of the specified
period, the base is completely disconnected what makes it possible to other users to open it to
carry out maintenance actions for example. This status of disconnection is materialized by the
button . The button
indicates a reduced but connected status. A click on one of the
buttons restores the connection before displaying the data.
If you share your databases on a local area network, it is advised to use this function in order
to give access for maintenance in the event of a user would forget to close a database. If, on
the other hand, your databases are not shared, you can specify ‘Never’ in the list.
Recover an estimate
“Tools” menu
This function lets you recover and estimate from its track; to recover an abnormally closed
estimate or to recover the old version of an estimate which would have, for example, been
optimized. The function has three lists:
•
•
•
Last files used or repaired
Last files before recovery
Last recorded files
Each time you record an estimate, Quick Devis® Enterprise Edition leaves a track in the “Last
recorded files” list. You can recover these tracks by reaching the corresponding list and
clicking the “Restore the file” button.
The tracks of the last files used appear in the leftmost list and thus allow you to recover a file
even if you did not save it intentionally because any file that crosses the cache directory leaves
a track in this list.
Lastly, if Quick Devis® Enterprise Edition automatically recovered files following a power
supply failure for example, the original estimates (before repairing) are stored in the second list
to allow recovery.
®
Quick Devis Enterprise Edition © IAES (1991-2001) © QUOTALYS (2001-2007)
Page 34/210
®
Quick Devis Enterprise Edition
User’s Manual
If you wish to empty the lists to free space on your disc (by thus losing temporary safety), click
the “Kill all files” button. You can also erase the files one by one by selecting them and clicking
the “Delete the file” button.
The size, expressed in a number of files of these lists is determined by the function
‘Performance and safety’
Upgrade QD from the Web
“?” menu
Use this function to update Quick Devis® Enterprise Edition with the latest available version.
The function must be called when no estimate is loaded because the update requires the
closing of the program.
If you to are connected permanently to the Internet, you do not have to call this function
because Quick Devis® Enterprise Edition automatically detects the presence of updates and
proposes to upgrade the program if an update is available. Click the information window which
appears at the bottom right of your screen.
You can choose to upgrade to official versions or to beta versions by using the function
‘Upgrade settings’ of the ‘Options’ menu. The subscription to the beta versions enables you to
access to more recent but less validated evolutions.
®
Quick Devis Enterprise Edition © IAES (1991-2001) © QUOTALYS (2001-2007)
Page 35/210
®
Quick Devis Enterprise Edition
User’s Manual
The tasks manager and the B.o.Q.
The ‘tasks manager’ view is a condensed vision of the ‘B.o.Q’. Often, the ‘B.o.Q’ is the customer’s
view with all its comments and setting whereas the ‘Tasks manager’ is the cost engineer’s view with
only one line per task or chapter. These two views interact between them; a modification in one is
automatically reported in the other one.
The majority of the global functions are accessible from both views. However, the functions relating to
the formatting are present only in the ‘B.o.Q’ view.
Here is a hardcopy of the ‘tasks manager’ view:
In this view, the chapters and the taks use all the same font and the depth of the tree structure is
shown using different colors. Each task is condensed on one line and the line is vis-à-vis at the item
task in the tree structure locatet on the left.
In the estimate above, one distinguishes a tree structure containing 3 levels of overlap corresponding
to totals and sub-totals. Quick Devis® Enterprise Edition supports up to 8 levels of overlap.
Below is a view of the B.o.Q:
®
Quick Devis Enterprise Edition © IAES (1991-2001) © QUOTALYS (2001-2007)
Page 36/210
®
Quick Devis Enterprise Edition
User’s Manual
A B.o.Q. generally consists of a sheet of spreadsheet associated with a tree structure which carries
the chapters, sub-chapters and the tasks (details).
To build a B.o.Q. in the ‘Tasks manager’ tab or in the ‘B.o.Q’ tab you will have to use the functions of
the ‘Organization’ menu.
Recommendation: After having built your B.o.Q., it is advised to call the ‘Reindex’ function.
Reindex the estimate
‘Tools’ menu
This function ensures the integrity of the estimate by ‘redrawing’ it form the tree structure of the
estimate stored in the file. Although Quick Devis® Enterprise Edition checks the integrity
before each printing function. It is advised to call the function after each important change
made in the tree structure (copy and paste of branches, bulk copies from an estimate to
another, destruction of branches...)
Here the various functions of the ‘Organization’ menu which let you build and to structure a B.o.Q:
New task
®
“Organization” menu (shift + F4)
Quick Devis Enterprise Edition © IAES (1991-2001) © QUOTALYS (2001-2007)
Page 37/210
®
Quick Devis Enterprise Edition
User’s Manual
This function lets you create a new task under the task on which the cursor is. The task thus
created is placed on the same overlapping level as the task from which the function was
called.
You cannot create more than 253 tasks in the same branch.
New sub task
“Organization” menu (shift + F5)
This function lets you create a new sub-task which will be placed at the overlapping level
immediately after the one where the cursor is. The initial task becomes automatically a branch
which handles the new sub-task created.
If the task on which the cursor was at the time of the call contained detailed rows, these rows
are automatically transferred in the new sub-task.
You cannot exceed 8 overlapping levels.
Remove task or branch
“Organization” menu (shift + F6)
This function lets you remove a task or a whole branch. It applies to the task (or the branch) on
which the cursor is. The destruction is irreversible and all data connected to the task or the
branch are removed (even the contents of the “detailed view”)
Copy a task or a branch
“Organization” menu (shift + F11)
This function lets you copy to the internal clipboard, the task or the branch on which the cursor
is. All data relating to the selected task or branch are copied to the clipboard, including the
rows that compose the detailed view.
The function also copies the part of spreadsheet corresponding to the copied tasks, including
their colours, sizes and font names.
The internal clipboard is kept permanently in the user’s profile; so that it remains available for
the following sessions of Quick Devis® Enterprise Edtion.
The function authorizes the copy of data within the same estimate but also lets you pass data
from one estimate to the other if you open several estimates simultaneously.
Cut a task or a branch
“Organization” menu (shift + F10)
This function is strictly identical to the function “Copy a task or a branch” except that it deletes
the task or the branch after the copy is made. This function cannot be cancelled.
Paste a task or a branch
“Organization” menu (shift + F12)
This function lets you paste the tasks or the branches previously placed in the internal
clipboard using the “Copy a task or a branch” and “Cut a task or a branch” functions. All data
relating to the task or the branch stored in the clipboard are pasted in the estimate at the
cursor position, including the rows composing the detailed view, the colours, the sizes and the
font names.
®
Quick Devis Enterprise Edition © IAES (1991-2001) © QUOTALYS (2001-2007)
Page 38/210
®
Quick Devis Enterprise Edition
User’s Manual
You can paste the task or the branch below the cursor position (same level) or as a child of the
branch where the cursor is (next level).
If the colours, sizes and font names were different in the source estimate and in the target
estimate, it is recommended that you reindex after calling this function in order to restore the
homogeneity of the attributes across the estimate.
The function authorizes the pasting of data within the same estimate but also lets you pass
data from one estimate to the other if you open several estimates simultaneously.
Collapse / Expand branches
You can collapse or expand branches to visualize their structure by clicking on the signs + and
– located at the intersection of the lines which handles the branches and the tasks. These
symbols are visible in the tree structure at the left of the estimate.
This function does not hide the lines in the B.o.Q. The status Expanded / Collapsed of the
branches is saved in the file when saving the estimate.
Expand all branches “Organization” menu
Rather than expanding branches one by one, you can call this function to expand all the
branches in an estimate at once.
To enter data in the B.o.Q. you can type exactly as you would do in a spreadsheet after placing the
cursor in the “Item”, “Description”, “Unit” and “Quantity” columns.
The sizes of the cells are as follows:
Item
Description
Unit
Quantity
15 characters
255 characters
10 characters
0 to 9’999’999’999.99
You can edit the above cells by double clicking them or by pressing the F2 key.
If you have to add comments in the B.o.Q. you can insert lines under the lines created by Quick
Devis® Enterprise Edtion. To do so, you can use the following functions:
Insert row
“Edit” menu (ctrl + L or shift + F1)
This function inserts a line on top of the line on which the cursor is if no preliminary selection is
made. If several lines are selected, the function inserts the number of lines appearing in the
selection on top of the first selected cell.
It is imperative that the first cell of the selection is on a zone placed between two tasks or
branches to allow insertion. It is impossible to insert lines before a total or a branch.
Delete row
“Edit” menu (ctrl + D or shift + F2)
This function deletes the line on which the cursor is if no preliminary selection was made. If
several lines were selected, the function deletes these lines.
®
Quick Devis Enterprise Edition © IAES (1991-2001) © QUOTALYS (2001-2007)
Page 39/210
®
Quick Devis Enterprise Edition
User’s Manual
The lines to be deleted must be between two tasks or branches; you cannot delete a selection
across tasks.
The standard functions Cut / Copy / Paste are provided to manage data in the columns “Description”
and “Unit”.
“Edit” menu (ctrl + X)
Cut
This function copies and deletes the selected cells. The copy is placed in a clipboard which is
operative during the current session. The function cannot be cancelled in the B.o.Q.
Copy
“Edit” menu (ctrl + C)
This function copies the selected cells. The copy is placed in a clipboard which is operative
during the current session.
Paste
“Edit” menu (ctrl + V)
This function pastes the cells copied using the “Cut” or “Copy” functions. You cannot paste if
the target has a smaller size than these of the source area. The height of the lines is
automatically adjusted according to their contents.
Erase
“Edit” menu (Del)
This function erases the contents of the selected cells and readjusts the height of the lines
automatically.
Note: You can enter data in the column “Item” in any line, even if the line does not match a task row.
You cannot do so in the columns “Unit” and “Quantity”.
Typing data in lines which do not match tasks in the column “Item” lets you produce apparent
chapters without having to put sub-totals on them.
Below is an example employing this kind of chapter in which the B.3 chapter is virtual, it does not
correspond to a real chapter but simply consists of a line which was added under the B.2 task.
Only the chapters B, C and D in our example constitute true chapters generating sub totals.
®
Quick Devis Enterprise Edition © IAES (1991-2001) © QUOTALYS (2001-2007)
Page 40/210
®
Quick Devis Enterprise Edition
User’s Manual
Fictitious
chapter
The column “Description” of the B.o.Q. supports many formatting functions similar to those usually
found in spreadsheet programs.
Font name
This function lets you specify the font name of the selected cells. You can choose from the
drop-down list or type it directly. This function is applicable to the “Description” column only.
Font size
This function lets you specify the font size of the selected cells. You can choose from the dropdown list or type it directly. This function is applicable to the “Description” column only
Colors of the Font
This function lets you define the font colour of the selected cells. It is applicable to the
“Description” column only.
You have to select a colour or to cancel to continue working after a call to this function. To
select a colour, click simply on the desired colour, to cancel, press the right button of the
mouse or click on the basic colour located at the top of the list.
®
Quick Devis Enterprise Edition © IAES (1991-2001) © QUOTALYS (2001-2007)
Page 41/210
®
Quick Devis Enterprise Edition
Bold / Italic / Underlined
User’s Manual
(ctrl + G, ctrl + I, ctrl + U)
This function lets you change the face of the selected cells. It is applicable to the “Description”
column only.
Alignment
This function lets you align left, center or right the texts appearing in the selected cells. It is
applicable to the “Description” column only.
Fonts
“Format” menu
This function lets you define the characteristics of the fonts appearing in the selected cells. It is
applicable to the “Description” column only.
You can define with this function, the name, size and colour of the font.
Colour markers
This button shows the “colour markers” menu bar.
To use the markers in the B.o.Q. click on the colour of your choice, then click on the first point
where you wish to place the mark and, without releasing the left button of the mouse, drag the
cursor up to the second point and release the button.
To remove a colour mark, click on the white marker with a red cross and simply click on the
mark to be removed.
Quick Devis® Enterprise Edtion has formatting functions which apply to the entire B.o.Q. They let you
adjust the height of the line spaces, assign specific fonts to the tasks, totals and sub-totals or adjust
the zoom factor.
Adjust spacing
”Format” menu
This function lets you adjust the height of the lines which are between the tasks.
The lines in the “Description” column adjust automatically to allow the visualization of their
entire text.
Tasks fonts “Format” menu
This function lets you define the fonts for various kinds of tasks appearing in an estimate:
•
•
•
Simple tasks
Sub-totals
Grand total
®
Quick Devis Enterprise Edition © IAES (1991-2001) © QUOTALYS (2001-2007)
Page 42/210
®
Quick Devis Enterprise Edition
User’s Manual
Note that the font colour of the simple tasks is always black except for the column
“Description” where you can set the colour of each cell. The font of the other kinds of tasks can
be coloured as you wish.
Alignment of tasks “Format” menu
This function lets you set the alignment of sub-totals and grand total.
Define fonts
“Format” menu
This function lets you define specific fonts for every overlapping level in an estimate (chapter,
sub-chapter, etc.)
®
Quick Devis Enterprise Edition © IAES (1991-2001) © QUOTALYS (2001-2007)
Page 43/210
®
Quick Devis Enterprise Edition
User’s Manual
To specify each font name, click successively the frames from top to bottom, corresponding to
levels 0 to 7 and select the desired names, sizes, colours, faces and alignments using the
tools at the bottom of the window. Then press the “Apply” button to accept.
Applying fonts to a B.o.Q. does not assign automatically these fonts when you create new
tasks; if you create a task after having applied fonts, it will always inherit the format of the task
from which it was created and not the format specified by the “Define fonts” function. It could
thus be necessary to call the function again after structuring the B.o.Q.
Column width
“Format” menu
This function lets you adjust the width of the selected columns. You can specify a value or use
the standard value by checking the appropriate box. You can change this standard value by
clicking the “Change default” button.
“Format” menu
Zoom
This function lets you define the zoom factor used to display the B.o.Q. The values can be
from 50% to 150% of the standard view.
If requested, you can search for a text in the B.o.Q:
Search
“Edit” menu
Use this function to search a text in the entire bill of quantities sheet.
You can select the search order by initially scanning the lines or initially the columns. You can
also specify if the searched cell must contain only the specified text. Lastly, you can specify if
the case of the characters must be respected.
®
Quick Devis Enterprise Edition © IAES (1991-2001) © QUOTALYS (2001-2007)
Page 44/210
®
Quick Devis Enterprise Edition
User’s Manual
Printing functions, specific to the B.o.Q. are available:
Print
“File” menu
This function lets you print the B.o.Q in various frames:
The first option will print the print area defined using the “Set print area” function in accordance
with the page attributes defined with the “Page setup” function.
The three other options let you print the complete B.o.Q. with three different standard contents.
The page attributes are automatically adapted for these three editions so that the page is filled
out best.
The “Preview” button lets you visualize the edition before printing it.
The “Page setup” button lets you change the settings of the page; this button is active only for
the first option.
Show gridlines
“Window” menu
Use this function to display grid lines in the bill of quantities.
Freeze / Unfreeze panes “Window” menu
If you freeze the panes, the two first lines of the B.o.Q. will scroll with the document. If you do
not freeze them, those lines will stay at the top of the document.
Summary data
“Calculation” menu (F12)
This function lets you “weight” a task, a branch or an entire estimate. The displayed
breakdown always refers to the task or the branch on which the cursor is when the function is
called.
If you wish such a breakdown of the entire estimate, place the cursor on its first line or on its
grand total line.
You can print the displayed breakdown by clicking the “Print” button or export it to Microsoft
Excel by clicking the “Send to Ms Excel” button.
®
Quick Devis Enterprise Edition © IAES (1991-2001) © QUOTALYS (2001-2007)
Page 45/210
®
Quick Devis Enterprise Edition
User’s Manual
Les onglets ‘Gestion des postes’ et ‘Bordereau offrent un nombre important de fonctions étendues
qui permettent notamment de créer des liens ou d’effectuer des traitements spécifiques. Ces
fonctions sont décrites ci-après :
Remove all options ‘Organization’ menu
This function lets you disable the option toggle of all the tasks of an estimate so that all tasks
are taken into account in the basic solution. The options appear in the ‘B.o.Q’ at the bottom of
the document whereas in the ‘Tasks manager’, they appear in their initial position and are
displayed in the tree structure with the symbol .
Resetting all options will assign the quantity one (1) to each branch or tasks which was an
option and had a zero value (0) as a quantity so that these tasks or chapters are again taken
into account in the total price.
Use the button
to set again chapters or tasks as options.
Remove all forced prices ‘Organization’ menu
This function lets you reset the forced status of all tasks in the B.o.Q or in the details.
In the B.o.Q.
Forced prices are shown with a specific color. Their forced status can be removed manually by
placing the cursor on the cell and by pressing the <DEL> key.
To force a price or a coefficient in the B.o.Q, just place the cursor on the cell which contains
the value and type the forced value. You cannot force directly a selling price in the B.o.Q. In
order to force a selling price, force the value in the ‘Expenses’ column and force its coefficient
to null.
In the details
®
Quick Devis Enterprise Edition © IAES (1991-2001) © QUOTALYS (2001-2007)
Page 46/210
®
Quick Devis Enterprise Edition
User’s Manual
The forced prices are shown in the detailed view in a specific column named ‘Forced price per
unit’. This column can be displayed or hidden using the function ‘Settings columns in detailed
view and nomenclatures’. When a price is forced in the detail of a task, the corresponding
amount appears in red in the corresponding ‘Expenses’ column of the B.o.Q.
Link this task
‘Organization’ menu
This function lets you establish a link between the selected task and another task of the B.o.Q.
so that the values of the one involve the valorization of the other automatically.
To create a link, place the cursor on the line to be linked and call the function. The shape of
the cursor will change. Move it on the task to which you wish to bind your task and click the left
button of the mouse.
The links are displayed as red wires which appear only when the cursor is placed on a linked
task for a timer greater than one second.
Remove the link for this task
‘Organization’ menu
This function lets you remove the link of the task on which the cursor is located in order to
quote the task with values different than those of its parent task.
The function copies automatically the contents of the parent task to the targeted task. So you
just have to type your changes if the contents of the task are close to the one of its parent task.
(Change of a labour work time for example).
Automatically create links between tasks ‘Organization’ menu
This function is intended to automatically establish links between the tasks of a B.o.Q in order
to reduce the number of tasks to be evaluated. For that, it is based on the comparison of the
descriptions of the tasks.
Various analysis options are available in order to optimize the creation of links in all types of
schedules.
®
Quick Devis Enterprise Edition © IAES (1991-2001) © QUOTALYS (2001-2007)
Page 47/210
®
Quick Devis Enterprise Edition
User’s Manual
Comparison of the cells
Comparison radio button lets you take into account only the first cell of the tasks by being
unaware of the possible comments which follow it or to take into account all the cells, taking
the comments into account.
In the above sample, if you compare only the first cell, the tasks 10.2 and 10.4 will be linked.
Instead of that, if you tale into account all the cells, they will not be linked because the text
below the line 10.2 will be taken into account in the comparison.
Take the unit into account
If you take the unit into account, the tasks having as similar description but different units will
not be linked.
Take the chapter’s label into account
If you check this box, Quick Devis® Enterprise Edition will require the matching of the
chapters’ descriptions. Here is an example:
Here, the tasks A.1.1 / A.2.1 and A.1.2 / A.2.2 will not be linked if the box is checked because
the chapters which carry the tasks do not match. If the box is not checked, the tasks will be
linked.
Take the previous comment into account
In many B.o.Qs, one wishes to discriminate lines which carry the same description without
wishing creating heads of chapter at the top of each set so as not to generate superfluous subtotals. Here an example:
®
Quick Devis Enterprise Edition © IAES (1991-2001) © QUOTALYS (2001-2007)
Page 48/210
®
Quick Devis Enterprise Edition
User’s Manual
In that kind of B.o.Q, we wish to link the tasks 1.3.1 to 1.4.1 but not to link them to 1.3.4. But
the descriptions ‘Vannes PVC’ and ‘Vannes acier’ are only comments not chapters.
By checking the box ‘Take prevoius comment into account’, we get the desired links. The tasks
are then properly linked but, of course, the tasks 1.3.6 / 1.4.6 et 1.3.3 / 1.4.3 will be also linked
one to one because, graphically, they belong both to similar comments (One side the ‘vannes
acier’ and on the other side, the ‘vannes PVC’).
To avoid manual linking for these 4 tasks, you can mark them as belonging to a group (the
1.3.1, 1.3.2, 1.3.1, 1.3.5, 1.4.1, 1.4.2, 1.4.4 and 1.4.5) by preceding them by a symbol that
Quick Devis® Enterprise Edition would recognize. This can be a hyphen (-), a dot (.), a space (
), two spaces ( ) or three spaces ( ) as shown in the example below:
®
Quick Devis Enterprise Edition © IAES (1991-2001) © QUOTALYS (2001-2007)
Page 49/210
®
Quick Devis Enterprise Edition
User’s Manual
In this example, we used a dot as the first character of the tasks belonging to a group.
If you specify, in the appropriate list, that a dot should be used in the comparison, you will get
the desired links. The tasks 1.3.3 / 1.3.6 / 1.4.3 and 1.4.6 will be linked to each others using
the same link even it they belong, graphically, to groups having different comments.
Take the case into account
If this box is checked, the case of the letters will be taken into account in the comparison.
‘Aaaa’ and ‘AAA’ will then not be linked.
Set range
This button lets you define the range for linking process. You can create link in a part of an
estimate (a chapter) by selecting the appropriate branch.
Remove all links
‘Organization’ menu
This function lets you remove all the links in an estimate so that you can quote each task.
Contrary to the manual removal of the links using the function ‘Remove the link for this task’,
this global function does not copy the lines of the parents’ tasks into the tasks which were
linked to them.
Scenarios with quantities
‘Organization’ menu (Task manager only)
Quick Devis® Enterprise Edition lets you study simultaneously up to five quantitative scenarios
within an estimate. This function is particularly intended for the estimates in which quantities
are communicated by the customer but the payment of the services is carried out on a unit
basis.
In such a case, it is judicious to make your estimation with the quantities which you plan to
implement rather than with the quantities suggested by your customer. You will make a study
®
Quick Devis Enterprise Edition © IAES (1991-2001) © QUOTALYS (2001-2007)
Page 50/210
®
Quick Devis Enterprise Edition
User’s Manual
with a scenario which will contain your own quantities then you will lock the coefficients
resulting from this study (by changing the mode of environment). Then, you will be able to
replace the quantities of the customer in the B.o.Q in order to build your bid in accordance with
its request. This will not change the unit prices since the coefficients will have been locked.
Then, the expected margin will be quite in conformity with your scenario and not with that
subjected by your customer.
This approach is particularly adapted with the renewal of call-off contracts. You can easily
obtain the quantities actually used within the framework of your contract by calling the function
‘Sorting and nomenclatures on multiple estimates’ and by selecting all the estimates made out
within this contract during the reference period of time. The quantities resulting from these
nomenclatures will constitute the basis of your own scenario.
Call the function from the tasks manager and just check the box located on the top of the
window to display the columns at the right of the schedule:
The various buttons let you copy the quantities of the estimate towards one of the scenarios or
copy the quantities of a scenario towards the quantities of the estimate. You can for example
place the quantities of your customer in the #1 scenario and yours in the #2 scenario. The
function ‘Transfer the #2 simulation to the estimates quantities’ will let you study your scenario
and the function ‘Transfer the #1 simulation to the estimate quantities’ will let you build the
your offer after having blocked the coefficients resulting from simulation #2.
Tasks sharing
‘Organisation’ menu (Tasks manager only)
This function allows team based estimating or sharing of an estimate between several users. It
is based on the assignment of a user to each task of a B.o.Q. Its principle is of master / slave,
®
Quick Devis Enterprise Edition © IAES (1991-2001) © QUOTALYS (2001-2007)
Page 51/210
®
Quick Devis Enterprise Edition
User’s Manual
i.e. one of the files will be the master file and the slave files will be derived from it. The
consolidation will be always carried out in the master file and could be carried out constantly,
without waiting until the users (slave files) did finish. This allows the making of financial points
constantly along the estimating process. The master file can also be used directly for the
study.
To assign the users to the tasks, call the function from the ‘Tasks manager’ and check the box
at the top of the window. Close the window and type the names of the various users in the
appropriate column. You can use the standard Copy / Paste functions or assign a user to a
whole branch while typing its name on the heading of a chapter.
Let us suppose in our example that Bob is the Master, he will have to click on ‘Jack’, then
‘Create a file for Jack’ and on ‘John’ then ‘Create a file for John’. Bob will transmit the files
generated to Jack and John. These files have the name of the initial estimate followed by the
name of the user appearing between braces. The slave files are strictly identical to the master
file, exactly as if you had copied them using the ‘Record as’ function.
When Jack and John will open their respective files, they will see in the tasks manager and at
the bottom of the detailed view, the authorized user’s name of each task.
If Paul enters data in a task which is not his, that does not have any effect because, at the time
of the fusion to the master file, these data are ignored.
To consolidate the data in the master file, Bob will just have to call the function again and to
click on the buttons ‘Merge with the file of Jack’ and ‘Merge with the file of John’.
If the assignment of the tasks were to be modified during the study or if the B.o.Q were to be
restructured, it would then be necessary to modify the three files in an identical way. The
fastest and most effective solution would consist of a consolidation in Bob’s file followed by a
new generation of Jack’s file and John’s file.
®
Quick Devis Enterprise Edition © IAES (1991-2001) © QUOTALYS (2001-2007)
Page 52/210
®
Quick Devis Enterprise Edition
User’s Manual
Note: It is important when using this function to use the same kinds of materials and kinds of
workforce in each file so as to guarantee that the right headings of the overhead datasheet will
be properly filled. It is thus advised to establish these data in the master file before generating
the slaves’ files.
®
Quick Devis Enterprise Edition © IAES (1991-2001) © QUOTALYS (2001-2007)
Page 53/210
®
Quick Devis Enterprise Edition
User’s Manual
The detailed view
The detailed view lets you enter detail for each task of a bill of quantities. This view is similar to a
spreadsheet.
To reach the “detailed view”, you can click on the “Detailed view” tab at the bottom of the main
window, double click on a task in the B.o.Q. (yellow cells) or press the <F4> key. The last method is
the most convenient because the same key lets you enter the detail and return to the task within the
B.o.Q. (by pressing the F4 key again).
The detailed view displays as follows:
As in the B.o.Q. all the tasks appear in a tree structure placed at the left of the tables representing the
detail of each task.
The presentation of the detailed view can be easily modified in order to adapt it to your own needs.
To change the presentation of the detailed view, call the function “Setting of detailed view or
nomenclatures” described in the chapter Common functions.
To scroll the detailed view, you can use the arrow keys or use the right scroll bar which scrolls the
rows inside a task. To scroll within the entire estimate, directly click the task to be reached in the tree
structure located at the left side of the view or use the little arrows below the right scroll bar. You can
extend the detailed view by clearing the box below these arrows.
®
Quick Devis Enterprise Edition © IAES (1991-2001) © QUOTALYS (2001-2007)
Page 54/210
®
Quick Devis Enterprise Edition
User’s Manual
To enter a new row in the detailed view, you can manually type the field contents as you would do in
a spreadsheet. To edit the fields, double click on them or press the F2 key.
Other functions let you insert or modify data within the detailed view. They are described below.
To use these functions, you have to know how to select rows in the detailed view: the selections can
be made with the mouse by keeping the left button pressed while moving the mouse across the
selection or, more efficiently, by pressing the <SHIFT> key while the cursor is moved. To select a
single line, press the <SHIFT> key first and then, the <Right arrow > key or the <Left arrow> key.
If you wish to make an operation on all the rows of the detailed view, you can use the function:
Select all “Edit” menu
This function selects all the rows of the current task.
The selection methods are similar to that used in spreadsheets. The main difference is that most of
the functions relate to whole rows and not to cells.
Cut row
“Edit” menu (ctrl + X)
This function copies then removes whole lines which should be selected first. The copy is
placed in a temporary clipboard on the disc and is available for all future sessions of Quick
Devis® Enterprise Edtion.
Copy row
“Edit” menu (ctrl + C)
This function copies the selected rows. The copy is placed in a temporary clipboard on the disc
and is available for all future sessions of Quick Devis® Enterprise Edtion.
Paste row
“Edit” menu (ctrl + V)
This function inserts and pastes rows copied or cut using the “Cut row” or “Copy row”
functions.
Copy cell
“Edit” menu (ctrl + M)
This function copies the contents of the cell on which the cursor is. Only one cell must be
selected. The copy is preserved only during the current session.
Paste cell
“Edit” menu (ctrl + Q)
This function pastes the contents of a cell copied using the “Copy cell” function in the cell
where the cursor is. The column which receives the data must be compatible with that in which
the data was copied (text or value).
Insert line
“Edit” menu (ctrl + down)
This function inserts as many rows as selected before the call. It inserts one row below the row
on which the cursor is if no line is selected.
®
Quick Devis Enterprise Edition © IAES (1991-2001) © QUOTALYS (2001-2007)
Page 55/210
®
Quick Devis Enterprise Edition
Insert before
User’s Manual
“Edit” menu (ctrl + L)
If no line is selected when calling this function, a window will prompt you to enter the number
of rows to be inserted. The number of rows specified is then inserted before the cursor
position. If rows are selected when calling the function, a number of rows equivalent to the
number of selected rows is inserted before the cursor position.
Delete rows
“Edit” menu (ctrl + D)
If no row is selected when calling the function, a window will prompt you to enter the number of
rows to be deleted. The number of rows specified is then deleted starting with the row on
which the cursor is. If lines are selected when calling the function, these lines are deleted.
Glossary
“Edit” menu (F11)
The glossary is somewhat like a huge clipboard with multiple memories which will be
convenient if you have to copy / paste data repetitively and frequently.
The operation of the glossary is described in the chapter The glossary.
Replace by the article whose reference is mentioned
“Data” menu (Ctrl + W)
This function automatically inserts one or more articles coming from a database after typing
only the mnemonic code of the database followed by the reference or the description of the
article.
The code can be typed in the fields “Description”, “Reference”, “Family”, “Manufacturer” or
“User field”. The mnemonic code which identifies the database must comprise three characters
and can be defined using the menu “Set up searching prefixes”. For further information on
defining prefixes, read the chapter Setting prefixes in this manual.
To search for a reference, the syntax is as follows (example):
MGE20200 (inserts the article from the Merlin Gerin database having the reference “20200”)
If the reference does not exist in the database, the database will open and show the nearest
reference. If it does exist, the article is inserted without opening the database.
MGE C60N 2x4A (inserts the article from the Merlin Gerin database having the description
“C60N 2x4A”)
If the description does not exist in the database, the database will open and show the nearest
description. If it does exist, the article is inserted without opening the database.
The presence of a space between the mnemonic code and the data will determine if the
search should be done using the reference or the description. If there is no space, a reference
is searched, if there is one, a description is searched. This selection does not depend on the
field in which the code was typed but only on the presence of the space.
You can type several codes on several consecutive rows and replace them by articles in only
one operation. To do so, just select the lines codified before calling the function.
®
Quick Devis Enterprise Edition © IAES (1991-2001) © QUOTALYS (2001-2007)
Page 56/210
®
Quick Devis Enterprise Edition
User’s Manual
Copy down “Edit” menu (ctrl + B)
This function lets you copy the contents of the cell on which the cursor is the number of times
specified to the cells which are immediately below it. If you specify a number higher than the
number of lines remaining in the task, the copy will not be propagated beyond the last line of
the current task. All the editing columns can accept this function.
Copy first row of task
“Edit” menu (ctrl + Y)
This function lets you copy the first row of the current task in the B.o.Q. to the row on which the
cursor is. This is to avoid recopying manually data appearing in the B.o.Q. when the detailed
task contains only one line.
The function also copies the quantity and the unit appearing in the B.o.Q.
Display all rows from B.o.Q.
“Edit” menu
This function displays in the “detailed view” all the text lines appearing in the B.o.Q. including
those of the chapters. If the button is released, only the lines referring to the tasks are shown.
The “detailed view” also offers functions of data retrieval, in the estimates and in the databases:
Find current row in its original database
“Edit” menu (Ctrl + F3)
This function, when called with the cursor placed on an article which comes from a database,
automatically opens the database and points out the article in the database.
This will be particularly useful to quickly replace an article by another to change its dimensions
or its weight for example.
Search
“Edit” menu
This function lets you search a text in one of the five key fields of the detailed view
(“Description”, “Reference”, “Family”, “Manufacturer” and “User Field”).
Search is always made starting from the cursor position, from left to right then downwards. If
no occurrence is found, it goes automatically to the top of the estimate (or the task according
to the appropriate check box) and stops on the row where the cursor is.
You can specify if the required cell must contain only the specified text and if the case of the
characters must be respected.
®
Quick Devis Enterprise Edition © IAES (1991-2001) © QUOTALYS (2001-2007)
Page 57/210
®
Quick Devis Enterprise Edition
User’s Manual
If the first search gave a result, you just have to press the F3 key to find the next occurrence.
So you do not have to call the function again.
Some formatting functions are available in the detailed view:
Bold / Italic / Underlined
(ctrl + G, ctrl + I, ctrl + U)
These functions let you change the current cell’s typeface. You can select bold, italic or
underline as required for the texts appearing in the “Description” column. The other columns’
typeface cannot be changed. These functions only relate to whole cells.
Colour markers
This button displays the colour markers bar.
To use the markers in the detailed view, select the lines to be marked and click the desired
colour. To remove a mark, proceed in the same way and simply click on the white marker with
a red cross.
Show gridlines
“Window” menu
This function lets you display the grid lines in the detailed view.
The last operation ran in the detailed view can be cancelled, even if this operation relates to the
entire estimate.
Cancel
“Edit” menu (ctrl + Z)
Use this function to cancel the last operation ran in the detailed view. Any operation can be
cancelled. If you leave the detailed view to reach another view, the ability to cancel is
removed. Displaying a database is not considered as reaching another view; the insertion of
articles can thus be cancelled.
You can append data to the databases directly from the detailed view using the following functions:
Record article in database “Data” menu (ctrl + E)
This function records the selected articles in the specified database. To be recorded in an
existing private database, the articles must comprise at least one of the following key fields
(“Description”, “Reference”, “Family”, “Manufacturer” or “User field”). If you wish to record an
article in an “Internet” database, the field “Reference” must be specified because this kind of
database identifies its articles using the “Reference” field only.
If an article already exists in the database, you will be prompted to state if you wish to replace
it by the selected article.
In a private database, an article is regarded as identical to another if and only if the five key
fields (“Description”, “Reference”, “Family”, “Manufacturer” or “User field”) match. The case of
characters is not considered; the uppercase letters are thus equivalent to the lowercase ones.
®
Quick Devis Enterprise Edition © IAES (1991-2001) © QUOTALYS (2001-2007)
Page 58/210
®
Quick Devis Enterprise Edition
User’s Manual
In an Internet database, an article is regarded as identical to another if its “Reference”
matches. The other fields are ignored in the comparison.
Note: It is not recommended that you record articles in the Internet databases because, when
they are updated, the added articles will be removed. You can, on the other hand, add, for
example; work times or kinds of workforce to Internet databases. These data will be correctly
preserved when updating the database from the Web.
Update article in database “Data” menu (ctrl + T)
This function lets you update an article in a database with the data that are on the selected
lines. The lines must come from databases.
This function will be useful to enrich the databases by adding additional data, e.g. workforce
times or kinds of workforce.
If you modify, in the detailed view, the field “Reference” of an article which come from an
Internet database, you will not be able to update it again if the reference specified does not
exist in the original database because Internet databases only identifies their articles according
to the “Reference” field.
For the private databases (the ones you have created), if you make changes in any key field
(“Description”, “Reference”, “Family”, “Manufacturer” or “User field”) in the detailed view, the
article will not be recognized when trying to update and an error will be generated. In order to
allow updates in a private database, the five key fields must be identical.
The actualization of the detailed rows from the databases is also possible using the function:
Update rows “Data” menu (ctrl + J)
This function lets you update the selected rows in the “detailed view” starting from their original
databases. If the databases were updated, the data present in the detailed view will be
immediately updated when calling the function.
By default, the function updates the “price per unit” and the “rebate” but you can also update
the “time per unit” and the “kind of workforce” by checking the appropriate boxes.
In order to update the selected rows, the articles must be recognized by their databases. For
this purpose, Quick Devis® Enterprise Edtion uses the “Database source” field of the detailed
view which contains the path and the database file name of each article.
®
Quick Devis Enterprise Edition © IAES (1991-2001) © QUOTALYS (2001-2007)
Page 59/210
®
Quick Devis Enterprise Edition
User’s Manual
If an article comes from an Internet database, Quick Devis® Enterprise Edtion seeks for the
reference of the article in the database; if it finds it, the row is updated. The other key fields
(“Description”, “Manufacturer”, “Family”, “User field”) are then ignored and are replaced by
these appearing in the database.
If the article comes from a private database, the five key fields must be identical in the
“detailed view” and in the “database” for the articles to be recognized. These fields are:
“Description”, “Reference”, “Manufacturer”, “Family” and “User field”. The case of the
characters is ignored for the comparison.
If you have made changes to a field (the “description” field in the database for example), you
can specify that this field should not be taken into account in the comparison by checking the
appropriate box. Another box then lets you specify if the field thus ignored in the comparison
must be reported on the selected rows.
Simply click on the “Update” button to start actualizing the selected rows. The status of the
check boxes is automatically preserved for the next call until you leave Quick Devis®
Enterprise Edtion.
You can insert in the detailed view some data coming from external tools (CAD software, etc.)
For this purpose, you can call the function:
Insert a frame of articles from Excel
“Data” menu
This function lets you import data in Microsoft Excel™ format or CSV format (delimited text
files) directly in the detailed view. You can, for example, import a frame containing only
references and quantities and transform these data into fully developed articles using the
“Update rows” function described above.
When calling the function, you’ll have to select a Microsoft Excel™ file (.XLS) or a delimited
text file (.CSV)
If an error message appears while opening a Microsoft Excel™ file, it is probable that elements
like macros or charts appear in the file. These elements are not supported by the function. In
such a case, carry out a “copy/paste values” under Microsoft Excel™ in a new workbook and
try again.
Quick Devis® Enterprise Edtion supports three different separators (vertical separator,
semicolon or tabulation). It detects automatically the separator used.
®
Quick Devis Enterprise Edition © IAES (1991-2001) © QUOTALYS (2001-2007)
Page 60/210
®
Quick Devis Enterprise Edition
User’s Manual
When the content of the file is displayed, you must provide the columns’ names. Locate the
cursor on the header of each column to be defined (line 1) and click on the button “Change the
column’s name” or double click on the cell. Then, select then the name of the corresponding
field and click the ‘Ok’ button.
To remove a column’s name so that it is not imported in the detailed view, locate the cursor on
the header and simply press the <DEL> key.
When the columns’ headers are set, select the lines to be imported and click on the button
“Import in current detailed view”.
Note: the positions of the columns are preserved so that you do not have to redefine them
before each new importation.
To speed up insertion of articles from databases, without having to open the bases, you can use the
function:
Set up searching prefixes
“Data” menu
This function lets you associate prefixes composed of 3 letters to your databases to allow
insertion directly in the detailed view without having to open the databases. Then, you will just
have to type the prefix followed by the reference or the prefix followed by a space and the
description to automatically insert the article in the detailed view. This can be done using the
function “Replace by the article whose reference is mentioned” (“Data” menu).
To set up searching prefixes, read the chapter Setting prefixes in this manual.
®
Quick Devis Enterprise Edition © IAES (1991-2001) © QUOTALYS (2001-2007)
Page 61/210
®
Quick Devis Enterprise Edition
User’s Manual
The Nomenclatures
You can use the nomenclatures view to reclassify the estimate according to various criteria in order
to prepare order lists or to display the important amounts of material and workforce to compare them
with various ratios in order to “weigh” the estimate.
To reach the nomenclatures view, you can click on the “Nomenclatures” tab located at the bottom of
the main window, or use the contextual menu by pressing the right mouse button.
The nomenclatures view displays as follows:
The displayed data can be printed or exported to Microsoft Excel by clicking the appropriate buttons.
Quick Devis® Enterprise Edtion does not allow changes in the nomenclatures view. Consider using
Quick Devis® Enterprise Edition if you wish to make such changes.
Various functions, specific to the nomenclatures, are available in the menu bar:
®
Quick Devis Enterprise Edition © IAES (1991-2001) © QUOTALYS (2001-2007)
Page 62/210
®
Quick Devis Enterprise Edition
User’s Manual
Select sorting key
Click the drop-down list in the menu bar from which you can select any of the following for your
sort criteria:
•
•
•
•
•
•
Manufacturer
Families
Reference
Description
User field
Kinds of workforce
These various keys let you group articles which have identical fields and provide sub-totals on
them.
Display only significant rows
“Edit” menu
When this function is set, only the rows having a quantity in the detailed view, a quantity in the
B.o.Q. and an amount of material or workforce are displayed. If not set, all the rows are
displayed in the nomenclatures, including the comment rows.
If the button is pressed and you do not see, in the nomenclatures some significant rows, it is
probably because the task which “carries” the rows in the B.o.Q. has no quantity or because
the branch to which this task belongs has no quantity.
Find current row in its original database
“Data” menu (Ctrl + F3)
When you call this function with the cursor located on an article which comes from a database,
it automatically opens the original database and points out the article.
Search
“Edition” menu
This function lets you search for a text in all the visible rows in the nomenclatures.
You can select the search order by initially scanning the rows or initially the columns. You can
also specify if the searched cell must contain only the specified text. Lastly, you can specify if
the case of the characters must be respected.
If you wish to modify the appearance of the nomenclature view, call the “Settings of detailed view or
nomenclatures” function in the “Options” menu. Its operation is described in the chapter Common
functions.
®
Quick Devis Enterprise Edition © IAES (1991-2001) © QUOTALYS (2001-2007)
Page 63/210
®
Quick Devis Enterprise Edition
User’s Manual
The overhead expenses workbook
The overhead expenses workbook is intended to synthesize in documents defined by the user, with
the Microsoft Excel format™, the data which come from the estimate. It lets you build sheets of sale
which can determine automatically the coefficients to apply according to the overhead expenses and
the expected margins. Quick Devis® Enterprise allows up to 198 different coefficients (calculated or
not) in the same estimate. These coefficients are distributed as follows:
•
•
99 on workforce kinds (one on each kind of workforce). The kinds of workforce can also
express hours machines, months of use, etc any data you wish to express as a temporal value
in the estimate rather than by an amount.
99 on kinds of materials (one on each kind of material). Remind that subcontracting
corresponds simply to particular kinds of material.
The expenses, as they result from the estimate are the sum of the different kinds of material in the
referenced currency added to the sum of the kinds of workforce in the referenced currency.
To display data in conformity with the estimate, the overhead expenses workbook may need to be
refreshed. In such a case, the words ‘Requesed calc’ blink in top left of the sheet. Just click on these
words or launch a refresh in order to get data which match your estimate.
The overhead sheet proposes different tabs which are automatically filled from the estimate. You can
choose to display them or not. However, two of these tabs cannot be hidden because they both
constitute the global amount of the estimate; these tabs are the kinds of workforce and the kinds of
materials.
To set the tabs which you want to display, call the function ‘Environment settings’ of the ‘Options’
menu `Options'. In order to optimize the computing times, only the visible tabs are refreshed.
To display a tab, just notch the appropriate box. At the right of the windows are 18 free sheets which
can be used for any purpose. To rename a tab, click on its name and make you changes in the text
area ‘Tab name’ at the bottom of the windows, then click on the button ‘Set new name’.
Certain tabs cannot be named. They are ‘Workforce’, ‘Materials’, ‘Manufacturers’, ‘Families’,
‘Currencies’ and ‘User defined fields’.
The two first tabs, named ‘Overhead costs’ and ‘Calcul1’ in our example are free sheets which you
can use to enter your sheets of sale for example. The tab named ‘Calcul1’ contains obligatorily an
area appearing in its seven first lines which let you visualize the expenses and indicate the targeted
selling price. For this reason, it is more judicious to use the first tab to store your sheet of sale. The
‘Calcul1’ tab can be hidden when you finish the setting of it.
®
Quick Devis Enterprise Edition © IAES (1991-2001) © QUOTALYS (2001-2007)
Page 64/210
®
Quick Devis Enterprise Edition
User’s Manual
The tab names ‘Internal code’ in our example is in fact the tab ‘User fields’ which was renamed. You
can use it to enter your own articles coding for example. This tab, like the tab ‘Families’ also
centralizes the times per kind of workforce so you get the information ‘Kind of workforce by internal
code’.
The tab ‘User fields’ displays the total of the various free fields which you set up in the detailed view.
The tab ‘Free worksheet’ can receive any data like sheets of sale, summaries or charts. They can
also receive lists of classification which will be available in the detailed view. Read the chapter User
defined drop down lists to get further information about those lists.
The check box ‘Display selling prices in sheets’ displays selling prices columns in most of the tabs
filled by Quick Devis® Enterprise Edition. It should be noted that these data are available only after a
recalculation of the selling prices. Checking this box generates computing times appreciably longer.
The check box ‘Sort in alphabetical order’ lets you sort the fields ‘Manufacturer’, ‘Families’ and ‘User
fields’ alphabetically rather than by their order of appearance in the estimate. Checking this box
generates computing times slightly longer.
The check box ‘Display data for optional tasks’ displays, in the tabs filled by Quick Devis® Enterprise
Edition, columns mentioning the amounts and times of the sum of the tasks being in option. These
data appear with the right-hand side of the tabs, in grey coloured areas. Checking this box generates
computing times appreciably longer.
The check boxes ‘Display 2 decimals for amounts’ and ‘Display 2 decimals for times’ lets you adjust
the displayed precision to 2 decimals or zero decimal. The calculated data are always computed with
the maximum precision. These boxes do not affect the computing times.
®
Quick Devis Enterprise Edition © IAES (1991-2001) © QUOTALYS (2001-2007)
Page 65/210
®
Quick Devis Enterprise Edition
User’s Manual
The check box ‘Display MT and HR in the lists’ can be used when you use a customized drop-down
list in the detailed view which data are centralized in a free worksheet (see the chapter User defined
drop down lists). The check box associates to each list item, a breakdown by kind of workforce and
by kind of material. You can for example place in a free list the different phases of a planning to
automatically recover the amounts of material and the times you should engage for each phase.
Additionally, you could append a Gantt chart bound to these data. Checking this box generates
computing times appreciably longer.
The ‘Workforce’ tab
The ‘Workforce’ tab lets you define the labour resources which could be exploited in the detailed
view. You can set up to 99 resources of this type which you can express in the unit of your choice at
the rate of your choice. What we call ‘Workforce’ here could also correspond to hours of machine or
any other data which you wish to enter by the expression of a time.
If you express your resources in a unit different from the hour, the minute or the second, you will have
to specify how many hours correspond to your unit bus Quick Devis® Enterprise Edition carries out
all its calculations on the basis of an hour.
If you do not specify the currency in which the resource must be expressed, Quick Devis® Enterprise
Edition will retain the referenced currency automatically.
Advice: When you deploy Quick Devis® Enterprise Edition, you should set kinds of workforce and
kinds of materials which will not change or move in the future. You can, if the need arise leave some
blank kinds for specific needs but avoid changing the assignments because it would be difficult to
carry out coherent copy / paste operations between an old and a new estimate.
To enter data this tab, you cannot carry out copy / paste operations because you work directly on the
database of the estimate. If you want to copy the contents of a cell into another, edit the cell content
by pressing the <F2> key, copy its contents and edit the target cell to paste the contents to it.
The buttons window appearing in bottom, on the right of the screen lets you select the lines and
columns to display in order to see on the screen only the significant rows and columns.
The ‘Material’ tab
®
Quick Devis Enterprise Edition © IAES (1991-2001) © QUOTALYS (2001-2007)
Page 66/210
®
Quick Devis Enterprise Edition
User’s Manual
The ‘Material’ lets you define the material supplies which could be exploited in the ‘Detailed view’.
You can set to 99 resources of this type. What we call ‘Material’ could also correspond to
subcontracting or any value which you wish to express in the shape of an amount.
Before choosing your kinds of materials, you must know that a kind of material can support a specific
coefficient. For example, it is useless to create a named kind of material named ‘Copper cables’ and
another one name ‘Aluminium cables’ if you never have different coefficients of sale on these two
types. In such a case, you will create a kind of material ‘Cables’ and you will discriminate copper and
aluminium by a family or a user field.
Advice: When you deploy Quick Devis® Enterprise Edition, you should set kinds of workforce and
kinds of materials which will not change or move in the future. You can, if the need arise leave some
blank kinds for specific needs but avoid changing the assignments because it would be difficult to
carry out coherent copy / paste operations between an old and a new estimate.
To enter data this tab, you cannot carry out copy / paste operations because you work directly on the
database of the estimate. If you want to copy the contents of a cell into another, edit the cell content
by pressing the <F2> key, copy its contents and edit the target cell to paste the contents to it.
The ‘Material’ tab can reveal light values in its column ‘Expected negotiation’, even if no coefficient
were entered the detailed view. This is due to the B.o.Q. rounded selling prices which can generate
light differences between the calculated amounts and the really displayed amounts.
If you enter directly a negotiation coefficient in the appropriate column of the ‘Material’ tab, Quick
Devis® Enterprise Edition will automatically defer on the estimate the coefficient thus typed and will
affect all the lines of the kind of material considered. It will then overwrite the possible negotiation
coefficients present on these lines.
The buttons window appearing in bottom, on the right of the screen lets you select the lines and
columns to display in order to see on the screen only the significant rows and columns.
®
Quick Devis Enterprise Edition © IAES (1991-2001) © QUOTALYS (2001-2007)
Page 67/210
®
Quick Devis Enterprise Edition
User’s Manual
The ‘Manufacturers’ tab
The ‘Manufacturer’ tab reclassifies the whole of the articles according to the field ‘Manufacturer’ used
in the detailed view and provides for each manufacturer a total amount. The rebate values and
negotiation values are also displayed for each manufacturer.
The number of manufacturers in an estimate is not limited but Quick Devis® Enterprise Edition
centralizes in the ‘Manufacturer’ tab only the first 250 manufacturers appearing in the estimate. The
other possible manufacturers will appear at the bottom of the document on the line ‘Manufacturers
not qualified’.
The ‘Manufacturers’ tab can reveal light values in its column ‘Expected negotiation’, even if no
coefficient were entered the detailed view. This is due to the B.o.Q. rounded selling prices which can
generate light differences between the calculated amounts and the really displayed amounts.
If you enter directly a negotiation coefficient in the appropriate column of the ‘Manufacturers’ tab,
Quick Devis® Enterprise Edition will automatically defer on the estimate the coefficient thus typed
and will affect all the lines of the manufacturers considered. It will then overwrite the possible
negotiation coefficients present on these lines.
The ‘Families’ tab
The ‘Families’ tab reclassifies the whole of the articles according to the field ‘Families’ used in the
detailed view and provides for each family an amount for the estimate. The cost of workforce and the
workforce times per family are also available.
®
Quick Devis Enterprise Edition © IAES (1991-2001) © QUOTALYS (2001-2007)
Page 68/210
®
Quick Devis Enterprise Edition
User’s Manual
You can use this tab to categorize your supplies or your workforce resources since you do not need
to apply a specific coefficient of sale per family. The number of families in an estimate is not limited
but Quick Devis® Enterprise Edition centralizes in the ‘Families’ tab only the first 250 families
appearing in the estimate. The other possible families will appear at the bottom of the document on
the line ‘Families not qualified’.
The ‘User fields’ tab
The ‘User fields’ tab reclassifies the whole of the articles according to the field ‘User field’ used in the
detailed view and provides for each user field an amount for the estimate. The cost of workforce and
the workforce times per user field are also available.
This tab can be named to handle a coding specific to your company for example. The corresponding
field can also be named in the detailed view and in the nomenclatures.
®
Quick Devis Enterprise Edition © IAES (1991-2001) © QUOTALYS (2001-2007)
Page 69/210
®
Quick Devis Enterprise Edition
User’s Manual
You can use this tab to categorize your supplies or your workforce resources since you do not need
to apply a specific coefficient of sale per user field. The number of user fields in an estimate is not
limited but Quick Devis® Enterprise Edition centralizes in the ‘User fields’ tab only the first 250 user
fields appearing in the estimate. The other possible use fields will appear at the bottom of the
document on the line ‘User fields not qualified’.
The ‘Currency tab’
Quick Devis® Enterprise Edition lets you define up to 99 currencies by indicating their parity with the
currency chosen as the currency of reference. If you display the ‘Currency’ column in the detailed
view, you will be able to specify on each line the currency used. For lack of specification, the currency
of reference will be taken into account.
®
Quick Devis Enterprise Edition © IAES (1991-2001) © QUOTALYS (2001-2007)
Page 70/210
®
Quick Devis Enterprise Edition
User’s Manual
To enter a new currency, type its 3 letters code and, at the choice, its rate expressed in the currency
of reference or the rate of the currency of reference expressed in the new currency.
If you wish to give your estimate in a currency different from the currency of reference, change the
currency of reference by selecting the new one in the list being in top left of the ‘Currency’ tab, at the
right side of the word ‘Reference’.
To enter data this tab, you cannot carry out copy / paste operations because you work directly on the
database of the estimate. If you want to copy the contents of a cell into another, edit the cell content
by pressing the <F2> key, copy its contents and edit the target cell to paste the contents to it.
Important : When you change the currency of reference of an estimate, ensure that all the lines which
handle material in the estimate comprise a currency without what Quick Devis® Enterprise Edition
will assign to the lines without currency, the new currency of reference thus causing a difference in
price between the initial estimate and the estimate expressed in the new currency.
The buttons windows appearing in bottom, on the right of the screen lets you select the lines and
columns to display in order to see on the screen only the significant rows and columns.
The ‘Owner fields’ tab
The ‘Owner fields’ tab centralizes the totals of each free field used in the detailed view. It centralizes
all the fields, even those which do not contain relevant data to add such as for example, the unit
weights.
The values appearing in this tab result from arithmetic sums of the values present in the various
fields. They correspond to the sums of values for the complete estimate.
The free tabs
The free tabs can be employed as traditional sheets but also let you centralize data according to lists.
®
Quick Devis Enterprise Edition © IAES (1991-2001) © QUOTALYS (2001-2007)
Page 71/210
®
Quick Devis Enterprise Edition
By default, the typing areas of the free tabs are locked. Use the button
order to enter data there.
User’s Manual
to unlock these areas in
Read the chapter User defined drop down lists to get further information about drop down lists in the
detailed view.
The sheet ‘Calcul1’
This sheet which constitutes the second tab of the environment workbook has an important function
because it must receive the selling price expected. At the time of the design of sheets of sale, place
the selling price in the C7 cell of this sheet, using a formula which refers to a calculated cell.
The C7 cell is accessible only in mode ‘Overhead sheet only’ and ‘Overhead sheet + coefficients’. In
mode ‘Coefficients only’ or ‘Calculated coefficients’, it automatically adds up the amounts in selling
price of the tabs ‘Workforce’ and ‘Material’. In this case, the C7 cell is white and its access is
prohibited.
The H7 cell adds up automatically the tabs ‘Workforce’ and ‘Material’ expressed in terms of
expenses, as they result from the estimate.
The C10 cell contains the coefficient between the expenses and the selling price and the H10 cell
contains this same value expressed as a percentage of the selling price.
The C8 cell contains a text if several different currencies are used in the estimate. It does not contain
anything in the contrary case.
®
Quick Devis Enterprise Edition © IAES (1991-2001) © QUOTALYS (2001-2007)
Page 72/210
®
Quick Devis Enterprise Edition
User’s Manual
The G9 cell can be used to test the mode of environment in progress and to thus modify the behavior
of the sheet of sale. Value 1 (one) indicates that the estimate is evaluated in mode ‘Overhead sheet
only’, value 2 (two) in mode ‘Overhead sheet + coefficients’ and value 3 (three) in mode ‘Coefficients
only’ or ‘Calculated coefficients’.
For this last value, it is common to calculate the margin according to the selling price given by the
tabs ‘Workforce’ and ‘Material’ whereas for values 1 and 2, the user enters generally the expected
margin.
The lines appearing after line 11 of the sheet can be used freely for your calculations. Only the 11
first lines are inaccessible.
Designing a sheet of sale
The sheet of sale is the most important element of an estimate, it should be designed to centralize
the data resulting from the estimate in a way which is appropriate to the user and it will let him
calculate the overhead costs and the coefficients according to criteria like the general expenses, the
distance to the building site, the custom taxes, the transport charges, etc. It finally will let the user
appreciate the risk taken and thus decide margin.
The sheet of sale reads its data from the various tabs above described by simply creating links using
Excel type™ formulation.
As any free sheet of the workbook, the sheets of sale use the Microsoft Excel™ format which means
that you can transpose any type of calculation, whatever complex.
The sheet of sale will preferably take place in the first tab which is envisaged for this purpose. It can
also be placed in any free sheet among the 18 available ones.
The design of a sheet of sale passes by the query of data in the tabs refreshed automatically by
Quick Devis® Enterprise Edition so that any modification of the expenses at the detail level will
automatically generate a new evaluation of the selling price.
This principle should be adopted to build standard sheets able to adapt with little or even no
modification to all the types of project.
It is advised, to save time, to design sheets comprising a minimum of data to enter and thus,
expressing a maximum of cells by formulas or references to the automatically refreshed tabs. So, you
will avoid having to rethink your calculations with each new estimate.
We will not develop here the operation of a spreadsheet. You can refer to the Microsoft Excel™
documentation to approach the realization of sheets of sales under Quick Devis® Enterprise Edition.
The only imposition which is made to you is to place the expected selling price in the C7 cell of the
sheet ‘Calcul1’. Tou can do that by placing for example the formula = Overhead Sheet!C24 if your
calculated selling price appears in the C24 cell of a tab named ‘Overhead sheet’.
You could, in extreme cases, to be unaware of all the data refreshed in the various tabs and to force
the selling price by directly typing its value in the C7 cell of the sheet ‘Calcul1’.
®
Quick Devis Enterprise Edition © IAES (1991-2001) © QUOTALYS (2001-2007)
Page 73/210
®
Quick Devis Enterprise Edition
User’s Manual
To carry out truly universal sheets of sale which let appear on the screen only the developed items o
the ‘Workforce’ and ‘Material’ tabs, it can be necessary to automatically hide lines using formulas.
Ideally, your sheet of sale will show all the kinds of workforce and all the kinds of material and will
automatically hide the kinds not used in the estimate.
For that, you must enter the text {SCANROWS} in one of the masked columns of the #1 line of your
sheet of sale. Quick Devis® Enterprise Edition will consequently, each time you refresh the sheet,
scan the column thus marked. For all the lines of this column where the text {HIDEROW} will appear,
Quick Devis® Enterprise Edition will hide the corresponding line automatically. By opposition, for all
the lines of the column where the text {SHOWROW} will appear, it will show the corresponding line
automatically (with its default height).
If you want to mask automatically the lines which comprise the kinds of material reported in the sheet
of sale for example, just place a formula such as:
IF(C40=0,’’{HIDEROW}’’,’’ {SHOWROW}’'
)
If the line 40 (which contains then the data of the ‘Material’ tab for example) contains a zero value, it
will be hidden automatically. In the contrary case, it will be displayed automatically.
Note : if you place more than once the text {SCANROWS} on the #1 line, only the first column with
this text will be taken into account.
The operation is the same if you wish to hide columns instead of rows. In this case, you will place the
text {SCANCOLUMNS} on a line of sequence number lower than 250 in the #1 column and you will
use the texts {SHOWCOLUMN} and {HIDECOLUMN} to show or hide the columns.
Advice: At the time of the design of a sheet of sale, you can sum in a masked column the whole of
the lines resulting from the ‘Workforce’ and ‘Material’ tabs. Then ensure using a formula that the sum
of these lines is quite equal to the amount present in the H7 cell of the ‘Calcul1’ tab. You can post an
error message in red in the event of discordance between these two amounts. If that happens, that
means your sheet of sale is badly designed or that you did not envisage the case where a user adds
a kind of workforce or a kind of material.
®
Quick Devis Enterprise Edition © IAES (1991-2001) © QUOTALYS (2001-2007)
Page 74/210
®
Quick Devis Enterprise Edition
User’s Manual
Choosing the environment mode
The mode of environment lets you define the manner that Quick Devis® Enterprise Edition will use to
break down the coefficients on the various tasks of the B.o.Q. This choice makes sense only if you
give a broken B.o.Q to your customer (comprising at least two tasks).
Quick Devis® Enterprise Edition offers four different modes of calculation of the environment:
•
•
•
•
Overhead sheet only
Overhead sheet + coefficients
Coefficients only
Calculated coefficients
A drop-down list located in the menu bar of menu lets you select the mode.
Overhead sheet only
The default breakdown mode is 'Overhead sheet alone'. In this mode, your sheet of sale defines the
selling price starting from the data of your choice (those of the other tabs). The resulting price will be
placed in the C7 cell of the ‘Calcul1’ sheet and will be used to determine the single coefficient of
environment.
This coefficient is calculated in a simple way by dividing the selling price calculated by the expenses
resulting from the estimate (located in the H7 cell of the ‘Calcul1’ sheet or expressed by
Material!C106+Workforce!C106 formula. It appears in the C10 cell of the ‘Calcul1’ sheet.
The coefficient, in this mode is simply applied to the costs of each task in the B.o.Q so that the price
appearing at the bottom of the B.o.Q reflects this amount (it may slightly differ because of the roundoffs).
In this mode, the ventilation of the environment is linear. Your workforce resources receive the same
coefficient as your materials. In the case of contractual markets, this mode can be acceptable
because the potential low environment of certain tasks is exactly compensated by the high
environment of other tasks.
Overhead sheet and coefficients
You can, on the other hand, for certain projects need a more advanced repartition of your coefficients
while wishing to preserve the complex calculation of your selling price. It is particularly interesting for
call-off contracts, maintenance markets, or markets in which the payment terms are important.
Indeed, for these kinds of markets, you may not know in advance the exact quantities of each item of
the B.o.Q and you may find it beneficial to make so that your selling prices match, as precisely as
possible, the real costs of each task.
To approach this type of environment, which is quite most complex, Quick Devis® Enterprise Edition
proposes the ‘Overhead sheet + coefficients’ mode. Use this mode, you can balance the repartition of
the environment for each kid of material and each kind of workforce.
When you pass to ‘Overhead sheet + coefficients’ mode the only apparent difference is the new
columns ‘Repartition of overhead expenses’ and ‘Coeff SP/Gross cost’ which now appear in the
'Material' and 'Workforce' tabs. By default, the values of the columns ‘Repartition of overhead
®
Quick Devis Enterprise Edition © IAES (1991-2001) © QUOTALYS (2001-2007)
Page 75/210
®
Quick Devis Enterprise Edition
User’s Manual
expenses’ are set to 100 so that the environment is broken down linearly. The ‘Coeff SP/Gross cost’
resulting is then the same one as that which had been given in the ‘Overhead sheet only’ mode.
If you wish to under coefficient a task of materials or workforce, you can type the value 50 for
example in the column ‘Repartition of overhead expenses’ on the line of the resource so as to assign
only 50% of the environment which would have being assigned on this resource. Quick Devis®
Enterprise Edition then recomputes in real time the coefficients ‘Coeff SP/Gross cost’ which increase
on all the other tasks and drop on the task considered. The selling price calculated in your sheet of
sale is then kept.
Likewise, you can upper coefficient a particular resource by typing the value 200 for example in the
suitable cell or not coefficient at all a resource by placing a zero value there (the amount
corresponding to the B.o.Q will then be identical to the costs typed in the detailed view).
You understood that the percentage ‘Repartition of overhead expenses’ is not a coefficient but simply
a value which let you balance each kind of material or workforce onto the non forced resources.
Thus, placing the value 50 or the value 200 on all the lines has exactly the same effect; A linear
repartition of the environment.
This ‘balanced’ approach of the environment lets you build 'portables' datasheets which you can load
from an estimate into another one. Indeed, only the ‘repartition’ is transposed when you import such a
sheet of another estimate, the prices adapt then automatically to the new estimate.
You can also directly force a coefficient on a particular line. Quick Devis® Enterprise Edition will
recompute in real time the amounts for the other lines so as to keep the selling price calculated.
You also can, to still refine your calculations make so that these coefficients depend on a formula
which refers to a specific calculation rather than typing them. Let us imagine for example that we wish
to break down the environment of engineering on the ‘engineering’ tasks. Rather than forcing a
coefficient, we could isolate in a cell the total engineering expenses, isolate in another cell the
environment amount we wish to repartee on this resource and calculate the ratio between these two
cells in a third cell. This last cell being taken as a reference in the column ‘Coeff SP/Gross cost’ vis-àvis to the resources considered.
Coefficients only
The two modes of environment above developed comprise a sheet of sale which is 'Master’. Meaning
that, whatever the repartition mode of the various coefficients, this sheet fixes the selling price of the
project.
If these modes of environment offer a great flexibility at the time of the selling price determination,
they may induce nevertheless a ‘problem’ which can subsequently surprise the customer in the event
of modification of some quantities on the B.o.Q. Indeed, in these modes, the simple fact of modifying
a quantity in the B.o.Q or modifying the costs of any task can generate a change of the selling prices
of all the tasks because the environment is broken down according to the calculation of your sheet of
sale. If your sheet of sale contains fixed overheads costs, this will cause the change of all selling
prices.
To avoid presenting a B.o.Q with all of the prices modified when your customer asks you to make
changes in only one of them, Quick Devis® Enterprise Edition proposes a third mode of environment:
the mode ‘Coefficients only’.
®
Quick Devis Enterprise Edition © IAES (1991-2001) © QUOTALYS (2001-2007)
Page 76/210
®
Quick Devis Enterprise Edition
User’s Manual
In this mode, the sheet of sale does not define any more your selling price selling which is then
defined only by the array of coefficients. When you pass from the mode 'Overhead sheet only’' to the
mode 'Coefficients only', the coefficients columns of the ‘Material’ and ‘Workforce’ tabs receive
automatically the average coefficient appearing in the C10 cell of the ‘Calcul1” sheet. The selling
price is thus unchanged although it is defined only by these tabs.
In the same way, when you pass from the mode 'Overhead sheet + coefficients' to the 'Coefficients
alone' mode, the coefficients columns of the ‘Material’ and ‘Workforce’ tabs receive the coefficients
resulting from the columns ‘Coeff SP/Gross cost’. The selling price is thus unchanged also.
In the mode 'Coefficients only', it is not any more the repartition of the environment that you can
modify but directly the coefficients which link the expenses to the selling prices. The corresponding
selling prices appear then, in real time on the modified lines.
In this mode, your sheet of sale always informs you about the price to which you would have to sell
the project to preserve the expected margin. It is thus easy to modify the calculation of margin so that
it displays the resulting margin by taking into account the cost price calculated by the sheet of sale
and the real selling price appearing in the C7 cell of the ‘Calcul1’ sheet.
Note : In the mode 'Coefficients only', each time you modify a coefficient, the selling price of your
complete project is modified because the C7 cell of the ‘Calcul1’ sheet (That which contains the
selling price) contains then the formula 'Material!C106+Workforce!C108’ which corresponds to the
sum of the selling prices defined by the ‘Material’ and ‘Workforce’ tabs.
Calculations in mode 'Coefficients only' are fast if the coefficients placed in the columns of ‘Material’
and ‘Workforce’ tabs do not contain formulas but values (general case). Indeed, if these values are
typed by the user, Quick Devis® Enterprise Edition does not need to recompute the workbook with
each selling price recalculation because the values of the coefficients are known and cannot be
changed by the calculation. Under these conditions, Quick Devis® Enterprise Edition displays only
one button
instead of the two usual ones
. The selling prices are evaluated at the same time
as the expenses.
Calculated coefficients
If you enter formulas in the columns ‘Coeff SP/Gross cost’ of the ‘Material’ and ‘Workforce’ tabs
whereas the environment mode is set to ‘Coefficients only', Quick Devis® Enterprise Edition
automatically passes to the ‘Calculated coefficients' mode. In this mode, there is no automatic
calculation to reach a selling price fixed by your sheet of sale, thus you have to use formulas to
calculate all the coefficients. You should place appropriate formulas in all cells of the columns ‘Coeff
SP/Gross cost’ in booth sheets.
Conclusion
In short, it is advised to build your estimates in the mode 'Overhead sheet only' or 'Calculated
coefficients‘ because they are fastest, to build your first offer in the mode 'Overhead sheet +
coefficients' if necessary and to adjust your offers if the need arise in the mode 'Coefficients only'.
Nevertheless, if you took the practice to work only with coefficients, you can use the mode
'Coefficients only' for the first offer but you will deprive yourself of the powerful computational tool of
environment which constitute the free worksheets, unless you do not use the mode ‘Calculated
coefficients' which offers the advantages of booth modes but is more delicate to program because it
imposes the determination of all the coefficients by calculation.
®
Quick Devis Enterprise Edition © IAES (1991-2001) © QUOTALYS (2001-2007)
Page 77/210
®
Quick Devis Enterprise Edition
User’s Manual
Calculate workforce rates
If you wish to calculate the costs of your labour rates rather than to enter them manually, you can
place formulas in the column ‘Cost of unit rate’ of the ‘Workforce’ sheet. These formulas will refer to
free sheets in which you will have set up your calculations.
When you use this type of rate determination, it is imperative to make sure that no data from the
estimate comes to modify these rates (a number of hours, etc.) without what you would get circular
references which it would be impossible to solve and the selling prices of your estimate would change
with each recalculation.
Building you sheets of sale using Microsoft Excel™
If you already have sheets of sale built under Microsoft Excel™, it is quite easy to import them under
Quick Devis® Enterprise Edition.
With this intention, start by exporting a virgin workbook from Quick Devis® Enterprise Edition to
Microsoft Excel™ using the function ‘Export Ms Excel' of the ‘File’ menu. Modify this sheet under
Excel™ by pasting the data of your original document and reimport the workbook under Quick
Devis® Enterpise Edition using the function 'Import from Ms Excel' of the ‘File’ menu.
Note: This function does not support graphics. If you wish to use graphics in your sheets, use the
copy function of Excel™ and the paste function of Quick Devis® Enterprise Edition. Take care in all
the cases to alter the formulas located in the various tabs of the workbook exported by Quick Devis®
Enterprise Edition.
Modify under Excel™ only the authorized tabs and do not alter the cells being in the lines lower than
12 of the ‘Calcul1’ sheet.
So that Quick Devis® Enterprise Edition can read your modified Excel™ workbook, it is necessary
that this last does not comprise any link to an external workbook. If any, you can break the links using
the appropriate function of Excel™ or better, run ‘copy / paste values only’ operation in your Excel™
sheets rather than a traditional to copy / paste operation.
Advice: it is not recommended to use merged cells under Quick Devis® Enterprise Edition,
particularly if they contain computed values because the calculation algorithms could not find the
expected values when they scan a column or a line. Thus, always prefer the function ‘Center across
cells’ to the function ‘Merge cells’.
Setting up iterations
Quick Devis® Enterprise Edition supports the iterations in its free sheets. Avoid however the using of
several levels of iteration. It is often easy to avoid them by computing the funding within a cell rather
than reading the resulting value in another cell which depends on the first cell.
If however you cannot avoid the usage of iteration, you should know that they can slow down your
calculations appreciably if several levels are used. Thus, take care to limit them by specifying their
maximum number and the level of accuracy which stop them. These parameters can be defined
of the ‘Calculations’ menu.
through menu ‘Calculations, iterations’
®
Quick Devis Enterprise Edition © IAES (1991-2001) © QUOTALYS (2001-2007)
Page 78/210
®
Quick Devis Enterprise Edition
User’s Manual
Prohibit any iteration which could interact with the detailed view because they could not be solved.
For example, avoid determining a labour rate from the number of hours in your estimate. Use a fixed
labour rate and vary its coefficient according to a calculation if you have such a mechanism to
implement.
®
Quick Devis Enterprise Edition © IAES (1991-2001) © QUOTALYS (2001-2007)
Page 79/210
®
Quick Devis Enterprise Edition
User’s Manual
The arrange view
Quick Devis® Enterprise Edtion can display the estimate in “Arrange” mode which lets you easily
move tasks within an estimate in order to add chapters or to change the general organization of a bill
of quantities.
To reach the “Arrange” mode, click on the appropriate tab at the bottom of the main window or use
the contextual menu clicking the right mouse button.
With this mode, you can move entire tasks (with their contents) or even chapters by keeping pressed
the left mouse button while you move items across the tree view. To terminate the move, just release
the button.
When you release the button after having placed the cursor on the host task, Quick Devis®
Enterprise Edtion will prompt you to specify if the task or the branch to be moved must come
immediately under the selected task (same level) or if the moved data constitute a child task (or
branch) of the selected task (next level). In the last case, the contents (detailed view) of the host task
will be definitely deleted because the task will become a branch. A branch cannot contain detailed
rows.
If you make a mistake while reorganizing, just do not validate your changes. You will be prompted to
do so you when you will leave the “Arrange” view going to another view. If you answer “Yes” to the
validation request, Quick Devis® Enterprise Edtion will automatically reorganize the estimate
according to your new classification.
®
Quick Devis Enterprise Edition © IAES (1991-2001) © QUOTALYS (2001-2007)
Page 80/210
®
Quick Devis Enterprise Edition
User’s Manual
The options
Various options let you determine the behaviour of Quick Devis® Enterprise Edtion or the behaviour
of a particular estimate. The “Calculations”, “Display settings”, “Rounding” and “Tree view” tabs apply
to the estimate from which the options were called. Changes made in the “Settings” tab are stored in
the user’s profile. So, they stay operative for any future sessions of Quick Devis® Enterprise Edtion.
Calculations “Options” menu
This tab lets you specify if the “Value Added Taxes” and the “All Taxes Included” amounts
must appear at the bottom of the B.o.Q. so check the appropriate box. The applicable V.A.T.
rate must also be provided.
These options apply only to the estimate from which they were called. If you want them to be
applied to all of your new estimates, set them in a model estimate.
Display Settings “Options” menu
This tab lets you define the colours used in the B.o.Q. view. You can set the colour of the cells
which match tasks (those which handle detailed rows in the detailed view) and the background
colour of the B.o.Q. header.
®
Quick Devis Enterprise Edition © IAES (1991-2001) © QUOTALYS (2001-2007)
Page 81/210
®
Quick Devis Enterprise Edition
User’s Manual
You can restore the default colours by clicking the appropriate button. Then, your system’s
colours will apply.
These options apply only to the estimate they were called from. With the report generator, you
can define other headings with other colours.
If you want the “Display settings” to be applied to all your new estimates, set them in a model
estimate.
Rounding settings “Options” menu
This tab lets you define the rounding level which will be used for the selling prices in the
detailed view and in the B.o.Q. You can also define the rounding level of the quantities in the
B.o.Q.
It is recommended to use the lowest available level as shown in the example below. Indeed,
the use of a high rounding level can have important effect on the final price because it causes
the rounding of the selling prices of each row in the detailed view. It is then, the sum of each
rounded row which is reported in the bill of quantities (and not the rounding of the total of the
non rounded rows).
®
Quick Devis Enterprise Edition © IAES (1991-2001) © QUOTALYS (2001-2007)
Page 82/210
®
Quick Devis Enterprise Edition
User’s Manual
You can choose a specific number of decimals to display selling prices in the B.o.Q. However,
only some values will be proposed according to the rounding level selected for the quantities
and the selling prices of the detailed view.
These restrictions are forced in order to guarantee that a breakdown presented with the rows
of the detailed view in the reports generator will always post correct calculations. Meaning the
posted quantities multiplied by the posted unit prices will give exactly the total prices shown on
the rows. In the same way, the sum of the total amounts rounded displayed on each row will
give exactly the total amounts appearing at the bottom of the chapters.
Important: If you modify the rounding level of the quantities of an existing estimate going to a
higher level, Quick Devis® Enterprise Edtion may change some quantities appearing in the
detailed view and you will not be able to retrieve them. In such a case, it is recommended that
you save your estimate first to keep track of the original quantities.
The rounding options apply only to the estimate from which they are called. If you want them to
be applied to all your new estimates, set them in a model estimate.
Display tree view “Options” menu
This tab lets you define the appearance of the tree structure located at the left of the main
window and to define the numbering model which will be used as default in your B.o.Q. when
you will create tasks and sub-tasks.
®
Quick Devis Enterprise Edition © IAES (1991-2001) © QUOTALYS (2001-2007)
Page 83/210
®
Quick Devis Enterprise Edition
User’s Manual
Quick Devis® Enterprise Edtion lets you enter any quantity in the branches of an estimate
(chapters) in order to multiply entire branches. This capability can however generate typing
errors for people accustomed to regard branches as simple chapters without quantity.
If you wish to prohibit the use of quantities in the branches, check the suitable box and Quick
Devis® Enterprise Edtion will replace the unspecified or wrong quantities by the value 1 in all
the branches of the estimate.
If you wish your estimate to be numbered according to logic; 1 for the chapters, 1.1 for subchapters, 1.1.1 for sub-sub-chapters, etc enter 1 as item of a sub task and .1 as sub item.
If you would rather have an alphanumeric classification for example, enter A as item of a sub
task and A.1 or A.A as sub item.
These changes in the logic of classification will affect only the tasks created subsequently to
the changes. If you wish to renumber a whole estimate according to your new logic, call the
“Renumber all task” in the “Organization” menu.
The “display tree view” options apply to the estimate from which they were called. If you want
them to be applied to all your new estimates, set them in a model.
Settings “Options” menu
This tab lets you define the proposed default directories for access to the estimates and to the
models of automated frames. It also lets you define the directory in which the databases will be
stored.
To set directories, click the “Set up” buttons and select the new paths. You can also delete the
contents of the fields so the last directory used will be proposed.
®
Quick Devis Enterprise Edition © IAES (1991-2001) © QUOTALYS (2001-2007)
Page 84/210
®
Quick Devis Enterprise Edition
User’s Manual
You must indicate a directory for the databases. If you do not do it, it will be impossible to use
them. This directory can also be specified using the “Path” button of the articles’ window.
®
Quick Devis Enterprise Edition © IAES (1991-2001) © QUOTALYS (2001-2007)
Page 85/210
®
Quick Devis Enterprise Edition
User’s Manual
Setting detailed view and nomenclatures
This function makes it possible to define the order, the format, the colors and the behavior of the
columns of the minutes and the nomenclatures.
The definition is specific to the minutes or the nomenclatures according to the posting from which you
call the function. The presentation of the minutes can be different from that of the nomenclatures.
Fitting of the columns
In the window of definition, you see on the left the columns masked but available to be posted and on
the right, the columns posted in the order where they are posted.
To add a column, select it in the list of right-hand side and click on the button “To post the column”.
To remove a column, select it in the list of right-hand side and click on the button “To mask the
column”.
To change the order of the columns, click on the column to move in the list of right-hand side,
maintain the button left of the mouse inserted and move the column with the site of your choice.
To restore posting by defect, simply click on the button “To restore L” posting by défaut'.
You can modify the format of certain columns by unrolling the list “Format numbers” after having
placed the cursor in the list of right-hand side on the column to be formatted. You can operate in the
same way for alignment and to specify the column width (this last value can also be allotted while
making slip the separators of columns directly into the minutes or the nomenclatures)
®
Quick Devis Enterprise Edition © IAES (1991-2001) © QUOTALYS (2001-2007)
Page 86/210
®
Quick Devis Enterprise Edition
User’s Manual
To assign a color specific to a column, click on the column in the list of right-hand side and click on
the zone “prime coat”. Specify the new color and validate.
You can also change the color of the stringcourses being into top and bottom of each “minute” by
clicking on the zone “Prime coat zone form”. In the same way, the zone “Attributes general” enables
you to specify the names and sizes of police forces for the posting of the minutes or the
nomenclatures.
The box “To mask the column” enables you to set up columns with formulas whose result can enter
the calculation of posted columns without the user not seeing these intermediate columns. The
function is applicable only to the free fields.
The box “To prohibit the seizure” enables you to prevent the user from modifying the contents of the
cells of the column. You will use it if you wish for example whom a column can receive only from the
data coming from data bases. This function is not applicable to all the columns.
Among the basic columns, it is one whose name can be redefined. It is about the “Field user”. To reelect it use the zone text “Name of the column”. For all the other columns (except free fields), the
names are imposed.
Definition of free fields
Quick Devis® Enterprise Edition proposes 60 free numerical fields whose operation can be defined
by the user. To add a free field, click on its name in the list of left and click on the button “To post the
column”. Give a name to the field by using the zone text “Name of the column”.
If you wish that the field receive a calculation, click in the zone “Formulates” and enter a formula
relating to the other columns. You can use the near total of the formulation Microsoft Excel™.
®
Quick Devis Enterprise Edition © IAES (1991-2001) © QUOTALYS (2001-2007)
Page 87/210
®
Quick Devis Enterprise Edition
User’s Manual
Your formulas must refer line 2. You can use successive clicks on the columns to create the formulas
as you would do it under Microsoft Excel™. After having entered the formula, validate while clicking
on the key <ENTREE> and specify if you wish to see appearing a total with the bottom of each
minute in the column comprising the formula. With this intention, you have boxes of options with the
bottom of the window. The box “Summons arithmetic” will place in foot of minute a formula making
the sum of the values of the column whereas the box “Result of the formula” transposes simply the
formula on the line of total making it possible for example to post a percentage.
Caution: If you shift a posteriori, the columns by operating operations to slip/to move in the list of
right-hand side, the formulas which referred there will not be modified and you will have to thus take
them again to give them in agreement with the new positions of your columns.
In addition to the free fields, certain basic fields can also receive formulas. It is about:
•
•
•
•
Quantity
Unit price
Unit time
Forced unit price
You will be able for example to place a formula in the column “quantity” to make so that its value
depends on two other columns, to carry out a calculation of rate or any other calculation requiring of
the multiple values.
Implementation of drop-down lists
Although the free fields are of numerical type, it is possible to place drop-down lists there posting
choices in text. Let us imagine that you have to cross information of the type “Weight” with
information of the type “Material” to go up in the sheets of environment or the nomenclatures the
weights for each material used in the estimate.
For that, you will use three free fields: a field “unit Weight” which the user will enter the weight of each
article, the “total Weight” which will be calculated by the formula “unit Weight” X “Quantity”. Lastly, a
field named “Material” will contain a drop-down list posting all possible materials.
®
Quick Devis Enterprise Edition © IAES (1991-2001) © QUOTALYS (2001-2007)
Page 88/210
®
Quick Devis Enterprise Edition
User’s Manual
To parameterize this last field, notch the box “Drop-down list” and to specify in the drop-down lists
“To recapitulate”, information which you wish to cross according to the criteria present in the list. You
can centralize two types of information of your choice.
It then remains you to specify in which free sheet of the environment you wish to centralize these
data and to post then to fill out this free sheet via the function “Options D” environnement' of small
“the Options”. Do not forget to unbolt the cells of the sheet before entering there your materials.
After having carried out this parameter setting, you will have a drop-down list in the minutes which will
function exactly like the native lists “Standard of supply” and “Types of hand D” œuvre' and which will
be able to contain up to 500 items.
Names of columns reserved
Certain names of columns induce special behaviors. These names are always between hooks [].
They are the following names:
•
•
[Qté per unit] This column makes it possible to store in the minute the quantity of article per
unit of group. When you import a group in the presence of this column, the unit quantities of
the group are placed in this column. Thanks to that, when you change the quantity of the
group, Quick Devis® Enterprise Edition automatically recomputes the quantities of the articles
which composes it. This operation is also possible without this column but, in this case, if the
group with a quantity of zero, it will not be possible any more to find the quantities of the
articles which make it up. It is thus advised to use this column systematically as soon as you
use groups. The column is not visible when the groups are presented in mode “grouped”
(button ).
[Qté estimate] This column which is visible only in mode “Situation of work” makes it possible
automatically to receive the quantities of the estimate at the time of its transformation into
situation of work. Like the passage in situation of work causes to put at zero the column
quantity, the presence of this column makes it possible to preserve the initial quantities to
make calculations of “remainder be made” for example.
®
Quick Devis Enterprise Edition © IAES (1991-2001) © QUOTALYS (2001-2007)
Page 89/210
®
Quick Devis Enterprise Edition
•
•
User’s Manual
[Qté the preceding one] This column which is visible only in the situations of work makes it
possible to preserve the quantities at the time of the passage of a situation NR at a N+1
situation so as to post states mentioning the current situation, the preceding situation and the
progression.
[% Advance] This column which is visible only in the situations of work makes it possible to
replace the column “Quantity” for the data acquisition. It automatically places in the column
“Quantity” a formula which determines the value according to the percentage of seized
advance and the initial quantity envisaged (in the column [Qté estimate]).
Posting of lines in the form of columns
In certain cases, it can be more convivial to present the various types of supply or types of labor in
the form of columns rather than to specify them in drop-down lists. This mode is much less flexible
than the presentation on line because it does not give access which has certain types of supplies and
certain standard of labor but it can be desirable when users are accustomed to screens of seizure
under Excel™ and that one wishes to pass them under Quick Devis® Enterprise Edition without
upsetting their practices.
Let us imagine that the Excel™ screen to be reproduced only had 5 columns (Made out, Quantité,
Petites supplies, Grosses supplies and Exposure time). In a traditional configuration, one would have
placed a column “Price unit” and the user would have specified the type of supply with the drop-down
list suitable. However, in our configuration which must reproduce the Excel™ screen, it is necessary
that the two types of supply appear in the form of columns in place and place of the drop-down list
proposing the types of supplies.
To post the types of supply in columns in our example, click on each one of them in the list of left
appearing in the bottom of the window and click on the button “Posting in column”. The types of
supplies will appear then in blue in the list of right-hand side. Make slip these sets of columns into the
desired position and notch the box “To mask” for the columns which you do not wish to see
(Currency, Remise and Coefficient of negotiation) in our example.
®
Quick Devis Enterprise Edition © IAES (1991-2001) © QUOTALYS (2001-2007)
Page 90/210
®
Quick Devis Enterprise Edition
User’s Manual
When you validate, you will obtain the desired screen.
In this screen, if the user between data in the column “Small supplies” and also in the colonne' “Large
supplies”, Quick Devis® Enterprise Edition will create two lines automatically because it cannot
support two types of supplies on the same line. However, the second line will be automatically
masked so that the user sees well his two types of supply on the same line.
This presentation of lines in column is thus only one simple artifice of presentation. The data storage
in the estimate is well always in conformity with the standard mode of Quick Devis® Enterprise
Edition.
This type of posting imposes certain restrictions by prohibiting the access to all the functions which
must operate on a line and only one such as for example “Recopying downwards” or “Deferring on all
the estimate”. To also note that, in this mode, the recording of a line connects in the minutes can
create several lines in a data base articles, the various articles which make a line are identified by
their field user which contains RECORD 001, RECORD 002…
For all these reasons which lead to an unflexibility, it is disadvised employing lines posted in columns.
Thus employ this function only if you make a point of reproducing with exactitude a screen Microsoft
Excel™ with multiple columns. The experiment shows that the majority of the users having employed
this type of presentation finally came from there to a presentation on line as soon as they
included/understood the interest of it. These functions can thus be used to facilitate one transitional
period between Excel™ and Quick Devis® Enterprise Edition.
Outline and management of profile
When you conceive a presentation of minutes or nomenclatures, you can the pre one visualize before
validation while clicking on the button “Seen/Profils”. This function also enables you to store the
various profiles of presentation in files so as to be able to read again it later on.
You can use to this end the buttons “To charge a profile” and “To record the profile”.
Columns of the nomenclatures
®
Quick Devis Enterprise Edition © IAES (1991-2001) © QUOTALYS (2001-2007)
Page 91/210
®
Quick Devis Enterprise Edition
User’s Manual
The posting of the columns in the nomenclatures can be different from that of the minutes. However,
the free fields defined in the minutes imperatively include/understand the values entered the minutes
because they are the same physical fields. It is not possible to give them different names in the two
visions. Nothing prevents however from adding free fields specific to the nomenclatures and
comprising their own formulas.
The nomenclatures offer possibilities restricted compared to the minutes. It is not for example not
possible to post lines in columns there.
The free fields which appear in the nomenclatures also appear in the list of the primary education and
secondary keys of classification. It is thus possible to carry out all types of sorting on these fields. The
cooling of the list of sorting is carried out at the time of the access to the nomenclatures, it can thus
be necessary to click on the miter “Minutes” then on the miter “Nomenclatures” to see appearing new
sort criteria in the lists after having defined new columns in the nomenclatures.
®
Quick Devis Enterprise Edition © IAES (1991-2001) © QUOTALYS (2001-2007)
Page 92/210
®
Quick Devis Enterprise Edition
User’s Manual
Working with public databases
In some countries, you can profit from on line manufacturers’ tariff by subscribing to this service from
a provider. To get the list of available providers and their conditions of subscription, click the “Web
U.R.Ls” function in the “Data” menu.
Web addresses
“Data” menu
This function lets you select a database provider and subscribe to a contract which will let you
download and keep up to date your tariff databases. You must be connected to the Internet
before calling this function.
The providers appearing in the list are approved by our services and guarantee compatibility
with the software. To select a provider, simply call the function and make your choice visiting
the listed Web sites or contacting directly the providers.
When you subscribe, the provider will authorize your Quick Devis® Enterprise Edtion identifier
on his web site and you will be able to download the databases calling “Update databases
from the web” function. The databases thus downloaded will work only on the computer used
to subscribe.
Important: Each provider can propose different panels of databases whose references can be
coded differently; consequently, if you plan to change your provider after having used the
databases, it is recommended that you create a new directory to store the new provider’s
databases or to backup your previous databases.
Indeed, if you try to update databases resulting from a provider with those of another, some
articles may be destroyed if their references do not exist in the new provider’s database. If you
added workforce times or workforce kinds in these articles their data will then be lost.
If you wish to test the databases of a provider without having to subscribe, you can select the
provider in the list and directly call the “Update databases from the web” function. You will then
be allowed to import incomplete databases comprising only one article out of ten.
Update databases from the Web
“Data” menu
This function lets you download or update databases from a public Web site. Before calling
this function, you must select a provider using the "Web addresses” function.
Connection to the remote site is done automatically and, after a short period of time, the list of
the available databases appears in the left side list. The right side list displays all Internet
databases that already are in your local databases directory.
Note: the communication uses HTTP protocol and your Microsoft Internet Explorer settings. If
you encounter communication problems, select another databases provider or make sure you
can navigate on the selected provider’s site using Microsoft Internet Explorer.
Your provider may, if required propose several databases directories. Click the drop-down list
located under the left side list to display these directories and their contents.
®
Quick Devis Enterprise Edition © IAES (1991-2001) © QUOTALYS (2001-2007)
Page 93/210
®
Quick Devis Enterprise Edition
User’s Manual
Just for the first time, you may have to set a path for the data storage (except if you already did
it using the function “Configure an estimate”). To set a path, simply click the button “set up the
local path for databases” (or the “Path” button from the databases list).
Then, select the provider’s databases you are interested in on the left side list (you can keep
the SHIFT key pressed to select several databases at once) and click “Append selection”
button. The selected databases are then moved to the right side list, being available for
downloading.
You can also add all the available databases at once clicking the “Append all” button.
You can do similar operations from the right side list using the “Remove selection” or “Remove
all” buttons.
If you already made a first remote loading, the list of the downloaded databases which are on
your computer appears in the right side list. In this case, if you simply wish to update these
databases, click the “Add all databases which may be updated” button. Quick Devis®
Enterprise Edtion will only download the databases which require an update among the
databases which are on your computer.
The databases requiring an update are tagged in the right side list with an orange triangle.
Database which are on the remote web site but does not exist on your computer are tagged
with a “New” symbol in the left side list.
After moving databases to be downloaded from the left side list to the right side list using the
functions described above, you will just have to click the “Download databases” button “ to
launch the following operations:
•
•
•
Downloading of the selected databases
Conversion to Quick Devis® Enterprise Edtion format
Data mixing with your databases (databases which were on your computer) if they do
exist in order to keep your additional data (work times, kinds of workforce…)
When the process terminates, Quick Devis® Enterprise Edtion displays a download report. If a
database was not correctly downloaded, it appears in the report and you just have to download
it again.
®
Quick Devis Enterprise Edition © IAES (1991-2001) © QUOTALYS (2001-2007)
Page 94/210
®
Quick Devis Enterprise Edition
User’s Manual
When all databases are downloaded, you must download the empty rebates tables (which are
tables containing rebates codes of the various manufacturers). To download these tables, click
the “Download rebates” button. This operation can be done before or after the downloading of
the databases.
Downloading the rebates tables allows the rebate figures already entered on your computer to
be preserved. However, in order to avoid preserving the rebates of a previous tariff and to
apply them to a new tariff, this renewal of the rebates requires a voluntary action: You will have
to call the “Rebates editor” function and to click on the “Transfer” button.
Finally close the application clicking the “Close the session” button in order to return to Quick
Devis® Enterprise Edtion.
Under Quick Devis® Enterprise Edtion, you then have access to all of the tariffs downloaded
calling the “Access databases” function. If no database appears after the downloading, check
the path clicking the “Path” button of the “Access databases” function and make sure it
matches the path used while downloading.
Later, when you wish to update your databases, just call the function “Update databases from
the web” and click the “Add all databases which may be updated” button. Proceeding this way,
Quick Devis® Enterprise Edtion will download only the databases which really require an
update and will ensure a mixing with your own data so as to preserve the data you might have
added such as work times or kinds of workforce. At the end of the update, you will have to
download the rebates tables again clicking the “Download rebates” button; your rebates rates
will then be preserved and mixed with the new data.
®
Quick Devis Enterprise Edition © IAES (1991-2001) © QUOTALYS (2001-2007)
Page 95/210
®
Quick Devis Enterprise Edition
User’s Manual
Quick Devis® Enterprise Edtion will preserve the old databases in the same directory as the
new ones. To remove the old databases, click the “Delete” button of the “Access databases”
function. You will be prompted to specify if you want to delete only the selected database or all
the obsolete databases remaining in the directory.
Answer the above question by clicking “Yes”. Quick Devis® Enterprise Edtion will select all the
obsolete databases and will prompt you to confirm the destruction by clicking again the
“Delete” button.
Note: The providers usually update their databases on a monthly basis. It is thus suggested
that you call the “Update databases from the web” once a month.
If the update of a database fails while returning a message such as “Damaged database”, it
might be because the database on your disc is damaged and its updating from the remote
database is not possible. In such a case, before contacting the database provider, try to repair
the database using the “Repair an estimate or a database” function in the “Tools” menu. If the
problem is not solved, remove the database from your disc before downloading the new
database.
Rebates editor
“Data” menu
The databases supplied by the public providers do not comtain rebates but only tariffs. In order
to specify your own rebates, the providers supply empty rebate tables which are coded to
match the articles and manufacturers they provide.
These rebate tables can be downloaded clicking the “Download rebates” button of the “Update
databases from the Web” function.
To specify the rebates you wish to use for each manufacturer and each family of articles, call
the “Rebates editor” function and enter the rebates values in the “Current rebate” column for
each manufacturer you will use.
The list of the manufacturers, located on top left of the window, displays 3 different symbols
according to the databases’ status: an “earth” indicates that the database which is on your disc
conforms to its corresponding rebates table (in terms of date). A question mark (?) indicates
that the database, or its rebates’ table do not conform and thus require an update. Lastly, a red
cross on the “earth” indicates that the database exists on the remote web site but not on your
computer.
®
Quick Devis Enterprise Edition © IAES (1991-2001) © QUOTALYS (2001-2007)
Page 96/210
®
Quick Devis Enterprise Edition
User’s Manual
To enter the rebates, click on each manufacturer you may need on the top list and type the
rebates in the bottom list. When you will click on another manufacturer, you will be prompted to
record or cancel your changes.
On the top list, symbols indicate if the rebates table matches with the database located on the
disc. Indeed, in order to avoid rebates/price association errors, Quick Devis® Enterprise Edtion
checks that the rebates table matches its tariff. If not, a warning message is posted when you
open the database.
If you see error symbols in the list, click on them to know more about the error. These errors
are displayed within the top frame at the right of the window.
When you update your rebates tables through the “Download rebates” function, the data of the
“Current rebate” column are automatically copied to the “Previous rebate” column for all the
manufacturers whose tariffs were updated. This requires you to renew the old rebates or to
enter new ones so as to avoid the use of rebates which would not correspond anymore to the
new tariff of the manufacturer.
If you want to renew all your rebates, for all the manufacturers at once, click the “Transfer”
button.
If you want to renew the rebates for one or more specific manufacturer, display them by
clicking them in the top list, make the appropriate selections and use the “Copy” and “Paste”
buttons to copy data from the “Previous rebate” column to the “Current column”.
®
Quick Devis Enterprise Edition © IAES (1991-2001) © QUOTALYS (2001-2007)
Page 97/210
®
Quick Devis Enterprise Edition
User’s Manual
Warning: If, between 2 database upgrades you do not take care of your rebates by transferring
them, you will definitely loose you rebates because, for each effective tariffs upgrade, Quick
Devis® Enterprise Edtion moves data from the “Current rebate” column to the “Previous
rebate” column. Note that you can always recover your rebates by renaming the “Remises.old”
file (see below).
Most of the manufacturers list a line of products behind each rebate code. To display these
products, click the “See products” button. To display only the rebate codes, click the button
again.
You can print the rebates table of the displayed manufacturer by clicking the “Print” button.
Technical tips: the rebate tables are stored in a Microsoft Access format in a file located in the
database directory to which they apply. This file is named “Remises.rem”. It is backuped in a
file named “Remises.old” when an update is made using the “Download rebates” function.
Thus, use these files if you wish to recover past rebates or backup your rebate tables.
®
Quick Devis Enterprise Edition © IAES (1991-2001) © QUOTALYS (2001-2007)
Page 98/210
®
Quick Devis Enterprise Edition
User’s Manual
The data model
Quick Devis® Enterprise Edition proposes a data model arranged hierarchically based on 3
different types of databases:
•
•
•
Physical bases of articles
Bases of groups
Virtual bases of articles
The physical bases of articles are placed on the lowest level of the hierarchy. The
maintenance of the model’s data is made at this level only. They contain generally only prices,
times and technical data but they can also contain embedded methods of calculation intended
to evaluate prices, times or quantities according to the context in which the articles are
imported (the estimates’ context in fact).
The bases of groups allow quick import of articles which are located physical bases of articles.
The groups can be seen as technical sets of articles which comprise quantities. The bases of
groups also support Excel™ like workbooks which allow establishing complex logics of
importation if the need arise (selection of articles according to calculations of power, volumes,
size, etc.). The groups can also call whole groups instead of articles.
The virtual bases are like ‘ghost’ bases of articles which refer to articles appearing in the bases
of physical articles. They enables, for example to gather in only one base some of the articles
coming from several physical bases. When an article is imported from a virtual base, Quick
Devis® Enterprise Edition picks it, in fact in a physical base. The virtual bases allow moreover,
handle data which may overwrite data issued from the physical bases (making change in their
description, times, etc.)
The hierarchy proposed by the data model of Quick Devis® Enterprise Edition was designed to
reduce maintenance to a minimum: the prices, times and technical data are updated only at
the level of the physical bases of articles.
The other types of bases (groups and virtual) comprise only links to the physical bases of
articles and thus do not require any upgrade. The groups act as a technical set which
comprise only links to multiple articles and the virtual bases act as simple one by one links (a
virtual article = a physical article).
The data model is based on the Microsoft Access™ format. The bases can be directly open
using Microsoft Access™. They are in fact traditional MDB (Microsoft Data Base) files. The
suffixes used for these files under Quick Devis® Enterprise Edition are :
•
•
•
QDB for the physical bases of articles
GRP for the bases of groups
VDB for the virtual bases of articles
®
Quick Devis Enterprise Edition © IAES (1991-2001) © QUOTALYS (2001-2007)
Page 99/210
®
Quick Devis Enterprise Edition
User’s Manual
$% & $ '(& )*+
,*-. & /*01 +$
*0
&*$*(+
"
#
"
#
!
®
Quick Devis Enterprise Edition © IAES (1991-2001) © QUOTALYS (2001-2007)
Page 100/210
®
Quick Devis Enterprise Edition
User’s Manual
The various types of databases
To reach the databases or to create new ones, just click on the button
bases appears.
. The list of the available
Before even creating data bases, you must set the directories in which they will be stored.
Setting directories
Quick Devis® Enteprise Edition uses virtual paths to store the data bases. You can set up to 10
different paths (numbered 1 to 10) on each user computer. This concept of virtual paths is important
and must be well understood to effectively authorize the estimates updating process.
Each virtual path corresponds to a physical path (local or network). Each path can contain a set of
data bases which can be shared between several users if it is located on a network disk.
Quick Devis® Enterprise Edition stores in its detailed rows only the number of the path. It never
stores the physical path.
If two users do not see a same network disk path with the same physical path as it is often the case,
it is thus enough to indicate the same path number on each computer with the specific physical path
to each computer. Quick Devis® Enterprise Edition will then be able to upgrade an estimate on any
computer, even if the physical paths are seen differently.
®
Quick Devis Enterprise Edition © IAES (1991-2001) © QUOTALYS (2001-2007)
Page 101/210
®
Quick Devis Enterprise Edition
User’s Manual
It should be noted that all bases with external discounts (and also Internet bases) must be
imperatively in the #9 path. All the Intranet bases must be in the #10 path.
To assign a virtual number to a physical path, click on the button ‘Path’ in the list of the bases.
Place the cursor on the path to be defined and click on the button ‘Set up the path’. Then select a
local path or a network path and accept.
Note: it is recommended to remove the paths which are not used so that Quick Devis® Enterprise
Edition does not propose them. To remove a path, click on it and click on the button ‘Delete the path’.
When the configuration is finished, click on the button ‘Ok’. In the list of the bases, you will just have
to click on the symbol displayed at the bottom right of the window to pass quickly from a valid path to
another one. These symbols are:
You also can use the arrows shown at the bottom left of the window to do that.
Types of supported databases
Quick Devis® Enterprise Edition supports two different types of physical bases of articles: the public
bases which are illustrated by the icon and which comprises a date and the private bases which
are illustrated by the icon .
It also supports virtual bases of articles, illustrated by the icon
appear boldfaces in the list and are illustrated by the icon .
and of the bases of groups which
The list can also call configuration tools. These tools are external but recognised by Quick Devis®
Enterprise Edition. They will be illustrated by the icon
and of the bases associated with these tools
are illustrated by the icon .
The window can be increased or reduced vertically in order to display more bases; to do that, select
the bottom border of the window and stretch it. The position and the size of the window are
in the
memorized during all the session so that a new call to the window (by clicking on the icon
bar of menu) will display the window at the place where you left it and with its former size.
®
Quick Devis Enterprise Edition © IAES (1991-2001) © QUOTALYS (2001-2007)
Page 102/210
®
Quick Devis Enterprise Edition
User’s Manual
You can create new bases by clicking on the ‘New’ button. You will then be prompted to select the
type to be created:
The following choices are proposed:
Groups data base
The bases of groups are intended to store technical sets which are made of quantities associated
with links to articles appearing in physical data bases.
Standard articles data base
They are physical bases comprising the standard data which are:
•
•
•
•
•
•
•
•
•
•
•
•
•
•
Description
Reference
Manufacturer
Family
User field
Unit
Public price
Currency
Kind of material
Rebate
Time per unit
Kind of workforce
Spreadsheet Excel™ like field (for the calculated articles)
Microsoft Word™ field (for comments, photos, etc...)
Articles data base with forced prices
These bases are standard bases which comprise moreover a ‘Forced selling price’ field.
The forced selling prices are of an interest for the call-off contracts. In this type of contracts, the
selling prices are negotiated for a given period of time.
The use of these fields in the data bases allows generating editions with forced prices for the
customer while carrying out your estimate in calculated statement in order to control the margins at
the time of the study.
Virtual data base
®
Quick Devis Enterprise Edition © IAES (1991-2001) © QUOTALYS (2001-2007)
Page 103/210
®
Quick Devis Enterprise Edition
User’s Manual
A virtual base refers to articles which are stored in physical bases. That allows creating bases which
comprise the articles most usually used.
Let us imagine that you have 100 physical bases which comprise 1’000’000 articles but, you employ
usually only 1’000 articles coming from various bases. If you create a virtual base, you will be able to
place your 1’000 articles there and to reach it easily without having to worry about the data
maintenance.
Indeed, each time you use an article coming from the virtual base, Quick Devis® Enterprise Edition
will seek the data of the article in the corresponding physical base.
The virtual bases can store data which can derogate from those present in the referred physical
bases. Let us imagine that you share data bases containing prices and times with various users and
that you wish, for certain articles, to have your own times without having to worry about the
maintenance of a specific base. You will use in this case a virtual base in which you would specify
that you wish to use times coming from the virtual base rather than those coming from the physical
base. The other data (price, rebate, etc.) will be taken from the physical base.
The virtual bases enable this type of filter on various criteria: times, forced prices, description, etc.
Articles data base with external rebates and forced selling prices
These bases support the same fields as the bases with forced selling price but their rebate values are
stored in an external file in order to facilitate their maintenance.
You will make this choice when you wish to maintain rebates tables comprising much less items than
articles in the base. Quick Devis® Enterprise Edition will use the family field which will contain codes
identifying the rebates in the external file.
Articles database with extended fields dans forced selling prices
These bases support the same fields as the bases with forced selling price with moreover, the
following additional fields:
•
•
•
•
•
Comment
60 user definable numerical fields
5 user definable language fields
Coefficient on material
Coefficient on workforce time
With the extended fields, you can for example name a field ‘unit weight’ and another ‘unit volume’,
store these data in your bases with extended fields and evaluate for each project the total weights
and volumes. If the need arise, you will be able to sort these values according to various criteria
(families, references, descriptions, etc.) and to exploit them in your overhead sheets.
Articles database with extended fields, external rebates and forced selling prices
These bases support the same fields as the bases with extended fields and forced selling prices but
their rebate values are stored in an external file in order to facilitate their maintenance.
®
Quick Devis Enterprise Edition © IAES (1991-2001) © QUOTALYS (2001-2007)
Page 104/210
®
Quick Devis Enterprise Edition
User’s Manual
You will make this choice when you wish to maintain rebates tables comprising much less items than
articles in the base. Quick Devis® Enterprise Edition will use the family field which will contain codes
identifying the rebates in the external file.
Other kinds of database which cannot be created by the user
Quick Devis® Enterprise Edition supports two other types of physical bases of articles which cannot
be created by the user. They are:
Internet bases these bases are physical bases of articles which are synchronized upon request with
bases being reproduced on the discs of the users. They enable public on line tariffs with associated
private rebate tables. They can be stored on the users’ computers or on the central site of the
company. These bases can be published using the tool Tariff Publisher® edited by IAES.
Bases Intranet these bases are physical bases of articles which are synchronized upon request with
bases being reproduced on the discs of the users. They enable private on line tariffs which comprise
their own rebates. These bases can be published using the tool Tariff Publisher® edited by IAES.
Description
Unit
Price per unit (material)
Currency
Kind of material
Coefficient on material
Rebate on material
Timer per unit
Kind of workforce
Coefficient on time
Manufacturer
Reference
Family
User field
Forced selling price per unit
Comment
60 free numerical fields
‘Language’ fields
Word™ document
Excel™ like workbook
®
X
X
X
X
X
X
X
X
X
X
X
X
X
X
X
X
X
X
X
X
X
X
X
X
X
X
X
X
X
X
X
X
X
X
X
X
X
X
X
X
X
X
X
X
X
X
X
X
X
X
X
Quick Devis Enterprise Edition © IAES (1991-2001) © QUOTALYS (2001-2007)
X
X
X
X
X
X
X
X
X
X
X
X
X
X
X
X
X
X
X
X
X
X
X
X
X
X
X
X
X
X
X
X
X
X
X
X
X
X
X
X
X
X
X
X
X
X
X
X
Virtual
Extended fields +
external rebates
Private with external
rebates
Extended fields
Intranet
Internet
With forced selling
prices
Fields in detailed view
Standard
Summary of the features of the different data bases
X
X
X
X
X
X
X
X
X
X
X
X
Page 105/210
®
Quick Devis Enterprise Edition
Directories (Path #)
Compatibility Tariff
Publisher
Export to Excel™
Encrypted data
Articles recognized by 5
fields
Articles recognized by their
reference field only
Date of the tariff
User’s Manual
1-10
1-10
X
X
Choice Choice
Choice Choice
9
X
10
X
X
1-10
9
9
X
X
X
X
X
X
X
1-10
Choice
X
X
X
X
Choice
The family field is used to seek the reference in the database. It cannot be used for any other purpose.
Mode of identification of the articles
According to the selected type (see above table), the articles are identified in two different ways:
•
•
Only with their field ‘Reference’
With their fields ‘Description’, ‘Reference’, ‘Family’, ‘Manufacturer’ and ‘User field’
When the field reference is used alone, you can modify the description of the articles in the base for
example, the article remains always the same for Quick Devis® Enterprise Edition. In this case, if you
make an update of the article from the estimate, the new description will come to replace the old one
in the detailed view.
This type of bases implies the specification of references for all the articles. The references must all
be different in the base without what, you risk to import an article having a reference and, at the time
of an update, to replace it by another article having the same reference.
You will choose this type of identification if you have a rigorous management of the data or simply if
you plan to share data on your networks.
If on the other hand you wish to store your own articles without having to worry about the field
‘Reference’, you will use bases which identify their articles on all the fields. In this case, a simple
modification of one of the key fields in the data base will prevent Quick Devis® Enterprise Edition
from finding the article in the base when updating and estimate. You will be able with this type, to
store articles even if they have no reference since they will comprise one of the key fields
(Description, Reference, Manufacturer, Family, User Field).
In the bases which support the multiple identification and also the identification by reference alone,
(when the button is inserted,
you can pass from one mode to the other by clicking on the button
the references alone are employed, when it is released, the 5 fields are employed). To reach this
button, you must set the edition mode of the database first using the button .
Bases with external rebates
Public Internet bases cannot rebates because the editors cannot plan to transmit the same rebates
values to all their customers.
®
Quick Devis Enterprise Edition © IAES (1991-2001) © QUOTALYS (2001-2007)
Page 106/210
®
Quick Devis Enterprise Edition
User’s Manual
With Internet bases, you thus subscribe to a provider’s service and you enter you rebates in an
external file, accessible by the function ‘Rebates editor’ of ‘Data’. You can also manage you rebates
on a private remote site through your Intranet (by a purchasing team for example). This subject is
covered in the Chapter ‘Web addresses’.
You may also wish to have external rebates, even if you build your own databases. It can be of
interest when you compile data coming from manufacturers.
In this case, you will use a private database with external rebates (with or without extended fields).
You will be able to create your own codes using the function ‘Rebates editor’ of the ‘Data’ menu.
The file which contains the rebates is common to all the bases in the same directory and is always
located in the #9 path.
The databases with dates
Certain types of bases are imperatively dated. They are bases Internet, Intranet and of all the types
of bases with external handing-over.
Only two ways support the dated bases: the N°9 way which support the bases dated with external
handing-over and the N°10 way which supports the bases dated without external handing-over.
The N°9 way supports all the basic types, including those with external handing-over. The N°10 way
supports all the types of bases except those with external handing-over. The other ways support
neither the dated bases, nor the bases with external handing-over (you can place bases dated in all
the ways but their date will be posted only in the ways N°9 and N°10 and you will profit from the
treatment by date only in these ways)
.
A base is regarded as dated since its name, before its suffix .QDB ends in [MMAA] where MM
indicates the month and AA the year. Example my base [0605] .qdb. If several bases bear the same
name but have different dates in the same repertory, Quick Devis® Enterprise Edition will always use
the last dates some at the time of the updates and actualizations of estimate.
The utility of the coefficients under material and workforce
In the majority of the cases, these coefficients are managed on the level of the estimate because it
correspond respectively to “anticipated negotiation” and “difficulty or facility” of implementation. They
can thus be regarded as “adjustments” of the data present in the bases. For this reason, they do not
have anything to make in the bases.
However, in certain trades like the Civil Engineering, the coefficient on labor is connected with an
output which it can be desirable to store. In the same way in the field of piping, the coefficient on
supply is often connected with a coefficient of “fall” or “loss”. For this reason, it can also be interesting
to store it in the bases.
So that these coefficients do not come “to pollute” estimates which would not need any, it was
which make it possible to determine so
envisaged in the wide bases with field of the buttons
®
Quick Devis Enterprise Edition © IAES (1991-2001) © QUOTALYS (2001-2007)
Page 107/210
®
Quick Devis Enterprise Edition
User’s Manual
yes gold not the coefficients must be taken into account during the use of the bases. These buttons
are accessible only in mode “Edition” .
If the buttons are inserted, not only the coefficients are imported but they are also recordable and
updatable exactly as if they were traditional fields. In the contrary case (not inserted buttons), the
coefficients are completely ignored, with the importation, the recording and the update.
Using Ms Word documents in articles
The storage of Word documents on the level of the bases of articles makes it possible to carry out
technical documents of specifications in an automated way.
Quick Devis makes it possible to dynamically create summaries which show the whole of the Word
documents imported in your estimate.
By using these functions, you will not have to specify each component any more with each time you
carry out a new estimate.
Using Excel like workbooks in articles
The tables in the articles make it possible to calculate the unit price, the handing-over or the
exposure time of an article according to various and varied criteria (table of the Excel type). You can
enter these tables of the variables of the INDEX type or MATTER PRICE.
Consequently, the simple fact of modifying these variables on the level of an estimate will
automatically recompute all the articles of the estimate.
In order to avoid storing sheets of spreadsheves in all the articles of an estimate, it was envisaged
two solutions which are given at the time of the importation:
1. Only the result of calculation is imported and the table remains in the base of articles. In this
case, calculation in the event of change of variable will be carried out only with the
actualization of the estimate.
2. The table is copied base of articles about the minutes at the time of the importation of article.
In this case, calculation in the event of change of variable is dynamic and the user can
possibly modify calculation without affecting the data base.
Créating databases
After having selected the basic type to create, validate while clicking on the button “Ok”. If you chose
a base with external handing-over, you will be invited to specify a name and a date because these
bases are imperatively dated.
®
Quick Devis Enterprise Edition © IAES (1991-2001) © QUOTALYS (2001-2007)
Page 108/210
®
Quick Devis Enterprise Edition
User’s Manual
If on the other hand, you use another basic type, Quick Devis® Enterprise Edition will create a named
base automatically “New base” and will add it to the list. It will not remain you whereas has to re-elect
it while clicking delicately on the name of the base thus created and to enter the new name. You will
validate your seizure while clicking some on a white zone of the window, as you would do it in the
Windows explorer.
Note: Bases Internet or Intranet cannot be created directly. To obtain bases Internet, it is enough for
you to select a supplier of access and to download the bases. Consult the chapter ‘Les fonctions de
gestion des bases publiques this handbook more on bases Internet.
Removing databases
To remove the old bases of a repertory, click on the button “To destroy” starting from the list of the
bases and specify that you wish to destroy all the obsolete bases while answering the put question in
the affirmative.
Quick Devis® Enterprise Edition will select all the obsolete bases then so that you can see them
before it are not destroyed. If you agree with the selection, again click on the button “To destroy” to
carry out obliteration.
The bases are regarded as obsolete since more recent dated bases and bearing the same name
appear in the same repertory or when the bases bear a name which starts with “Old version of”. This
last mention indicating a safeguard carried out by the system at the time of an operation of repair or
compaction.
If you do not wish to destroy that only one data base, select it in the list, click on the button “To
destroy” and answer the put question negatively.
Managing access rights
The data bases being able to be used in network, it can be useful to restrict the rights of access of
certain users. The rights of access to the data bases on Quick Devis® Enterprise Edition are
independent of rights given by your administrator network.
For a correct operation, it is imperative that the whole of the users has a total access in reading and
writing on the repertory of the data bases. It is then Quick Devis® Enterprise Edition which will make
it possible to restrict these rights.
The rights apply to a whole repertory and thus to the whole of the data bases which are there,
whatever their type. They do not affect to in no case the other repertories; thus, a user will be able to
have rights restricted on a complete way network shared and rights on the bases which reside on its
own disc.
®
Quick Devis Enterprise Edition © IAES (1991-2001) © QUOTALYS (2001-2007)
Page 109/210
®
Quick Devis Enterprise Edition
User’s Manual
To affect rights specific to a repertory, post the list of the bases which appear in it while clicking on
the button and by selecting the suitable way. Then click on the button “Rights” to post the list of the
authorized users:
Your login will appear in first position in the list and you will have all rights (RW) in all the columns.
You can add the names of login other users of the repertory on your network. The users who will not
appear in the list will have only rights of reading on all (RO). It is thus not inevitably necessary to list
all the potential users but only those which will have specific rights.
To modify the rights of a user, it is enough double to click on its authorization with the intersection of
the selected column and the line comprising its login. One rocks thus of RO (reading alone) with RW
(read/write). It should be noted that for the bases of articles one also has RWEP (read/write safe for
the prices) which makes it possible the user to add technical times and data without deteriorating the
prices of the base.
If you want to restore the rights in read/write for all the users, to remove all the users of the list except
you and validate.
Note: The rights of the users are stored in a file named QDRights.rgt and placed in the repertory to
which it applies. The removal of this file also makes it possible to recover the complete rights for all
the users.
®
Quick Devis Enterprise Edition © IAES (1991-2001) © QUOTALYS (2001-2007)
Page 110/210
®
Quick Devis Enterprise Edition
User’s Manual
The articles manager
The manager of articles is intended to post the bases of physical articles or the virtual bases of
articles, to allow of it the edition and insertion in the estimates.
To open a base of articles in the manager, you can double click on his name or click on the button
“To open” after having positioned the cursor on the name of the base.
It is complete posting, in mode “reading”.
Functions of research
To carry out a research, enter simply the first characters of the article to seek in the box text which is
next to the “Made out” button. Consequently, at each entry of a new character the cursor of the
manager of articles comes to position on the article nearest to the entered criterion.
If you need to make research on other fields (like the reference for example), it will be enough for you
to click on the heading of the column of the new classification to cause an immediate reclassification
of the data base. You can also change the classification into clicking on the “Made out” button.
Another method of research consists in employing the tree structure being with the left of the bases
of articles. In the bases Internet, this structure relates to the key of classification appearing in the
“Field User”. For the private bases, you can decide field of classification at the time of the creation of
the tree structure (see low in this chapter).
When you click with the left button of the mouse on item of the tree structure, Quick Devis®
Enterprise Edition automatically reclassifies the base according to the “Field User” (or another field if
®
Quick Devis Enterprise Edition © IAES (1991-2001) © QUOTALYS (2001-2007)
Page 111/210
®
Quick Devis Enterprise Edition
User’s Manual
it is about a private base) and points on the first article corresponding to item on which you clicked.
The whole base is available, even the articles which does not answer the criteria of item.
If, on the other hand, you use the right button to click on the tree structure, the key of classification is
not modified (you remain in “Made out” mode if this last were active) and a filter is applied so as to
return only the articles corresponding to item on which you clicked. The other articles do not appear
any more in the screen. If you had selected articles as a preliminary, the selection will be lost.
To find one or more particular articles according to a key word which is not necessarily the beginning
of the article, classify the base according to the criterion of your choice and enter a filter the box text
to this end envisaged. Validate by pressing the key <entrée> at the end of the seizure.
Quick Devis® Enterprise Edition then posts with the screen only the articles which correspond to the
entered criterion. If you had selected articles as a preliminary, the selection will be lost.
The syntax of the filters allows the use of the following characters:
•
•
•
•
•
•
•
* any character or quantifies or continuation of characters or continuation of figures
? any character or quantifies single
# any single figure
[X there] any figure ranging between X and y (X and included there)
[A-Z] any character or quantifies included/understood between A and Z (A and Z included)
[! X there] any figure except those ranging between X and y (X and included there)
[! A-Z] any character except those ranging between A and Z (A and Z included)
Here some applicable examples when the base is classified by “the Wording”:
•
•
*XM* (any article containing returns “XM” in its wording)
Relay 2## V* (returns any article starting with “Relay 2”, followed by two digits, follow-up of V
and any data)
The valid filters (those which return articles) are stored in the list of the last filters called (in the same
box text). If you wish to purge the list of the recorded filters, click on the button “Filters” and press the
button “To purge the list of the filters”.
Only the last 25 filters used appear in it. If you enter from there 26th, 1st list is automatically
unobtrusive.
Cut windows
It is possible to as many open with the screen managers of articles than the memory of your
computer can support some. This function is particularly practical when you use several data bases
regularly simultaneously.
To open one second data base, click again on the button of the bar of menu of the principal
window and select another data base. You can, if you wish it, also open this manner several
authorities of the same data base.
If, instead of clicking on button of the bar of menu of the principal window, you click on the button
of the manager of articles opened, the new base opens in the manager of articles and not in the
shape of a new window.
®
Quick Devis Enterprise Edition © IAES (1991-2001) © QUOTALYS (2001-2007)
Page 112/210
®
Quick Devis Enterprise Edition
User’s Manual
This possibility of opening a significant number of data bases often forces to reduce the size of it so
that they do not occupy all the screen. With this intention, you have several buttons:
•
•
•
•
•
who allows to post or mask the tree structure placed at the left of the manager
who allows to reduce the window to a size letting appear only the column of classification
selected (in this mode, one passes from one classification to the other with the keys <Flèche
gauche> and <Flèche droite>.
who allows to reduce the window to a simple bar of menu, not offering any visibility of the
articles (put in base day before)
who allows to return to standard posting
who allows to post the base in full screen, at ends of edition
When you close the manager of articles, Quick Devis® Enterprise Edition memorizes these
parameters as well as the position of the window, the key of classification, etc… so that, with the next
opening, the base has the appearance in which had left it to you.
Insertion of articles in the minutes
The insertion of articles in the minutes is possible in the standard modes (
edition ( ).
), reduced (
) and
To insert an article, you can simply position the cursor above and slip the article on the line of minute
of your choice.
which will cause the insertion of the article to the top of the line of
You also can click on the button
minute on which the cursor in the minute is.
If you press the button , the article will then be inserted to replace the line on which the cursor in
the minute is or, to replace the selection of line carried out in the minutes if necessary.
If you wish to insert a multiple selection of articles, you will need, in the manager of articles, to select
the articles one by one entering the selection. With this intention, you can double click on the articles
or to press the key spaces. Use the same operation for désélectionner the articles.
You can also enter directly of the quantities the manager of articles to avoid having to do it in the
minute by positioning the cursor on the article and by maintaining the key <CTRL> inserted while you
seize the quantity. The fact of affecting a quantity causes the selection of the articles automatically.
The selections of articles can be inserted in the minutes with the same methods as the articles simple
(to slip, insert
and replace ).
Note: for désélectionner all the articles in only one operation, click on the button
.
Editing databases
To pass a data base in mode “Edition”, click on the button . In this mode, you cannot insert articles
in the minutes by using the function “to slip” but only by employing the buttons.
®
Quick Devis Enterprise Edition © IAES (1991-2001) © QUOTALYS (2001-2007)
Page 113/210
®
Quick Devis Enterprise Edition
User’s Manual
Let us recall that you can also modify or insert articles directly in the minutes of an estimate then to
record them or to update them in the bases of articles as from the minutes. This constitutes an
alternative generally more effective than the direct edition of the bases of articles.
After mode switch-over edition, the base appears in full screen with the following bar of menu.
You can then directly publish all the fields while entering there of the data. You can double click or
press the F2 key to publish a field.
Take care to respect the awaited formats. Here fields available in all the bases:
•
•
•
•
•
•
•
•
•
•
•
•
The wording ............................................. 250 characters maximum
Reference .................................................. 50 characters maximum
Family ........................................................ 20 characters maximum
Field User .................................................. 20 characters maximum
Manufacturer ............................................. 20 characters maximum
Unit ............................................................ 10 characters maximum
Public price ...................................................... 0 to 9999999999.99
Type of supply ...................................................................... 0 to 99
Currency ........................... 3 imperative characters in capital letters
Handing-over ........................................................................ 0 to 95
Unit time .......................................................... 0 to 9999999999.99
Type of personnel ................................................................. 0 to 99
The field “Given” is not accessible in the bases comprising from the external handing-over.
Indeed, in this type of bases, the handing-over lie in a file common to all the bases of the
repertory named “Remises.rem” and accessible by the function “Management from the handingover” of small “the Data”
The bases at forced selling prices comprise in more the following field:
•
Selling price forced .......................................... 0 to 9999999999.99
In this field, a zero value means selling price not forced. To force the value with zero, enter the
value -1.
The bases with wide fields lay out in addition to the following fields:
•
•
•
Coefficient on supply ........................................................... 0,1 to 5
Coefficient over time ............................................................ 0,1 to 5
Comment ................................................. 255 characters maximum
®
Quick Devis Enterprise Edition © IAES (1991-2001) © QUOTALYS (2001-2007)
Page 114/210
®
Quick Devis Enterprise Edition
•
•
User’s Manual
60 free fields .............................. -999999999.99 to 9999999999.99
5 linguistic fields ...................................... 255 characters maximum
The fields coefficients on supply and coefficients over time appear only if you pressed the buttons
. If these fields are not posted in the base (case by defect), the operations of recording and
reading of the base do not take into account the corresponding values. Press these buttons only if
you have to store these coefficients in base.
The 60 free fields are numerical fields in which you can store very given coming from the free
columns of the minutes. The correspondence is not carried out by the position of the column but
by its name. Thus, if a field is named “unit Weight” in the base and also “unit Weight” in the
minutes, the correspondence will be established with the reading as with the recording whatever
the respective positions of these fields in the minutes or the base. To determine the name of a
free field, place the cursor on its heading and click on the button
.
The 5 linguistic fields enable you to store the translation of the wording of your bases in several
languages. To define a language, click on the heading of a field and click on the button
. You
will have to then choose the language in a list.
When several languages are used in a base, a drop-down list allowing for choice of the language
appears in the bar of menu of the manager of articles in standard view.
To update an estimate in a language different from that used for the importation of the articles.
Select the language of the estimate via small “the Options of data” of small “the Options” and
bring up to date then the estimate starting from the multilingual bases via the function “To bring up
to date all the estimate” or via the function “To update line” according to whether you wish to
operate total or partial translations.
If you wish to create a new article, to click on the button
created.
, and modify it characteristic of the article
To destroy an article or a selection of article, select the articles to be destroyed while placing the
cursor in the left edge of the window by pressing some the left button, then click on the button . For
désélectionnez the articles, use the same procedure.
The edition mode also makes it possible to optimize the base, i.e. as well as possible to reduce its
size and manner to guarantee optimal access times. To optimize a base, click on the button . This
operation can also be carried out starting from small “the Tools” without having to open the base as a
preliminary.
Creation or edition of a tree structure
To create or publish the tree structure of a deprived base, it is enough to place the base in standard
view ( ), to press the set knob of the tree structure ( ) and to then press the button of edition of the
structure ( ). The editor of structure presents himself as follows.
®
Quick Devis Enterprise Edition © IAES (1991-2001) © QUOTALYS (2001-2007)
Page 115/210
®
Quick Devis Enterprise Edition
User’s Manual
In the example above, we used the “Field User” of the data base to build the tree structure. The
“fields users” will thus have, in this base, form X 00 000 follow-ups of a sequence number or a
succession of characters.
Thus, code A 01 002 001 will belong to “Heating water gas” and the code B 01 003 will belong to the
“Electrical equipment boxes”. Here the form of the tree structure thus created.
If you wish it, you can use Microsoft Excel to create or modify your tree structures by using the
suitable buttons of the editor of structures. However, in such a case, we advise you to export as a
preliminary an Excel document rather starting from Quick Devis® Enterprise Edition than of to create
one of them completely. This method guarantees that there will be no error of format in the document
to import.
®
Quick Devis Enterprise Edition © IAES (1991-2001) © QUOTALYS (2001-2007)
Page 116/210
®
Quick Devis Enterprise Edition
User’s Manual
You can also employ the function “Conversion into base D” articles' of small “the Data” which makes
it possible to create bases of articles while automatically generating their tree structure starting from
Microsoft Excel™.
Note: The tree structure of bases Internet being imposed by the manufacturers, it is not allowed to
publish the tree structure of this basic type.
Assumption of responsibility of documents Microsoft Word™
The manager of articles allows to store documents Microsoft Word™ associated with the articles.
This with an aim of carrying out technical specifications for example.
You can reveal the Word™ document of an article while clicking on the button . To record the
document, it is enough for you to click on the list of the articles or to leave the manager of articles.
The Word™ document can be transferred in the minutes to the moment from the importation from the
article. For that, notch the box “To import MS Word document” appearing with the bottom of the
manager of articles in standard view. The statute of this box is stored in the user profile so that you
do not have to notch it with each opening of the manager.
Assumption of responsibility of tables of calculations
The manager of articles supports tables of calculations which can for example be used to calculate
the prices, times, the handing-over or the quantities of the articles. This function will be particularly
useful if you need to vary the price of an article according to economic constraints stored in the
aggregate variables of an estimate or if you need to calculate the quantity of an article according to
technical criteria.
To reveal the table of calculation, click on the button . The operation of the spreadsheet is
described in the chapter the tables of calculations of the minutes.
Export of a base of articles towards Microsoft Excel
To export the contents of a data base towards Microsoft Excel, click on the button
, starting from
standard posting ( ) or of posting for edition ( ). Quick Devis® Enterprise Edition then proposes to
you to specify what you wish to export.
®
Quick Devis Enterprise Edition © IAES (1991-2001) © QUOTALYS (2001-2007)
Page 117/210
®
Quick Devis Enterprise Edition
User’s Manual
You can export the whole of the articles of the base, only those which correspond to the filter that you
set up (*XM* example) or only the articles that you selected. The function launches Microsoft Excel
automatically and posts a standardized screen which can then be modified under Microsoft Excel and
be reconverted in base Quick Devis® Enterprise Edition through the function “Conversion into base
D” articles' of small “the Data”.
Note: for reasons of data protection against the copy, bases Internet cannot be completely exported.
This function is thus reserved at the private bases.
Functions of the manager of articles
The functions accessible by the menus are here detailed:
To open base
This function makes it possible to open a base of articles in the posted manager.
To insert the selection
This function makes it possible to insert the current selection in the lines which precede the line on
which the cursor in the minutes is. The function as many inserts lines as of selected articles.
To replace the selection
This function makes it possible to insert the current selection in the minutes by replacing the selected
lines or, if there is no selection in the minute, the function then replaces the line on which the cursor
is.
If no article is selected in the base with the call of the function, it is the article on which the cursor is
which will be taken into account.
Die to select the articles
This button makes it possible to remove any selection of articles in progress.
Selection of posting
®
Quick Devis Enterprise Edition © IAES (1991-2001) © QUOTALYS (2001-2007)
Page 118/210
®
Quick Devis Enterprise Edition
User’s Manual
These buttons respectively make it possible to post the base in mode take care, reduce, standard
and edition.
Posting and edition of the tree structure
These buttons respectively make it possible to post the tree structure on the left of the base of
articles and to publish this tree structure. The method to be used to create a tree structure is
described in the Création chapter or edition of a tree structure. The tree structure can be published
only in “Standard” view because it does not appear in mode “Edition”.
To export basevers ms Excel™
This function makes it possible to export the totality of the base of articles towards a file Microsoft
Excel™. The function exports in the format used as footbridge i.e. you can use this format to recreate
a base of articles via the module of conversion into data bases.
You can, by notching the adapted boxes, to export the articles which answer the filter in place (all
articles by defect) or only one selection of articles which you will have carried out as a preliminary.
Requests of modification
This function makes it possible to carry out modifications on the various fields of a base of articles by
formulating requests. Its operation is described in the chapter the query language.
To create a new article
This function created a virgin new article carrying the wording “new article”.
To delete an article
This function deletes the selected articles of the base. To select articles, use the side selectors being
with the left of the manager of articles.
To optimize the base of articles
A base of articles can often be optimized in terms of size and access time because the free sites left
by the destroyed data occupy unnecessarily of the place on the disc.
®
Quick Devis Enterprise Edition © IAES (1991-2001) © QUOTALYS (2001-2007)
Page 119/210
®
Quick Devis Enterprise Edition
User’s Manual
To optimize the opened base, it is enough to invite you this function.
By safety, this function always carries out a copy safeguards named Sauvegarde <nom of the base>
of the <date and heure>.
It is imperative that the base is completely accessible to carry out an optimization. If a user is
connected, an error message will appear.
To lock the articles with the importation
If this button is inserted and that articles of the base are imported in an estimate whose statute of the
articles/groups is locked, the user will be able to modify only the columns authorized in the minutes.
Defer to the chapter “Options of safety” of small “the Options” more.
To recognize the articles by their reference
By defect, in the bases without external handing-over, the articles are recognized by using their 5 key
fields. If you insert this button, the articles will be recognized by their reference only. More defer to
the chapter the data model on the modes of recognition of the articles.
Editer the table of calculations of the article
This button gives access the table of calculation of the article. More defer to the chapter the tables of
calculations of the minutes.
To destroy the table of calculations of the article
This button makes it possible to remove the table of calculation of the article on which the cursor is.
Editer the document Microsoft Word™ of the article
This function makes it possible to post a document Microsoft Word™ which will take seat in the
article.
The document Microsoft Word™ is recorded automatically when you click on the table of the articles
or when you close the manager of articles. A check box appearing in the low zone of the window in
standard mode makes it possible to import this document parameterized in the minutes.
To remove a Word™ document
This function removes of an article a document Microsoft Word™.
To mask the fields languages not used
This function makes it possible to mask the columns of the fields languages not named.
To mask the extended fields not used
This function makes it possible to mask the columns having not named extended fields.
®
Quick Devis Enterprise Edition © IAES (1991-2001) © QUOTALYS (2001-2007)
Page 120/210
®
Quick Devis Enterprise Edition
User’s Manual
To name a wide field or a linguistic field
This button makes it possible to give a name to a wide field or to assign a language to a linguistic
field.
To remove the name wide field or a linguistic field
This button makes it possible to remove the name with a wide field of a linguistic field.
To take into account the coefficients
These two buttons respectively make it possible to indicate that the base must take into account
coefficients on supply and the coefficients over time. If these buttons are in a hurry, the operations of
recording and reading of the base will take into account the corresponding values.
Press these buttons only if you have to store these coefficients in base.
®
Quick Devis Enterprise Edition © IAES (1991-2001) © QUOTALYS (2001-2007)
Page 121/210
®
Quick Devis Enterprise Edition
User’s Manual
Le gestionnaire de groupes
To open a base of groups in the manager, you can double click on his name or click on the button
“To open” after having positioned the cursor on the name of the base. The bases of groups appear in
fat in the list.
The manager of groups is intended to post the bases of groups and to allow of it the edition and
insertion in the estimates.
A group is, by definition, a whole of articles. The articles referred by a group must imperatively
appear in physical bases. These articles can contain prices, times or any type of technical data.
A group contains only references towards the articles which make it up and it associates each one as
of the its articles a quantity which can possibly be the result of a calculation. The groups thus do not
contain a price. It is about purely technical sets which are developed only at the time of the
importation in the estimates.
A group can contain to the maximum 5.000 lines and a base of groups up to 65 536 groups.
However, for reasons of performances of posting to the loading, it is disadvised using bases
containing more than 2 500 groups. Cut out your groups in several bases if you have more data to
manage.
It is complete posting, in mode “reading alone”. The groups can be posted in arborescent mode like
above one in mode lists like below.
®
Quick Devis Enterprise Edition © IAES (1991-2001) © QUOTALYS (2001-2007)
Page 122/210
®
Quick Devis Enterprise Edition
To pass from a view to the other, click on the button
User’s Manual
.
Searching functions
To carry out a research, enter simply the first characters of the article to seek in the box text which is
next to the “Made out” button. Consequently, at each entry of a new character the cursor of the
manager of groups comes to position on the group nearest to the entered criterion.
If you need to rather make research on the reference than on the wording, it will be enough for you to
click on the heading of the column of the new classification to cause an immediate reclassification of
the data base. You can also change the classification into clicking on the “Made out” text which
becomes successively “Reference then” then “(Tree) Reference”. This last mode classifies the base
according to the tree structure.
In mode “Posting arborescent”, you can employ the tree structure. This structure always carries on
the key of classification “Reference”. You can create yourself your own tree structure (see low in this
chapter).
To find one or more particular articles according to a key word which is not necessarily the beginning
of the wording or the reference of a group, classify the base according to the criterion of your choice
and enter a filter the box text to this end envisaged. Validate by pressing the key <enter> at the end
of the seizure.
Quick Devis® Enterprise Edition then posts with the screen only the groups which correspond to the
entered criterion. If you had selected articles as a preliminary, the selection will be lost.
The syntax of the filters allows the use of the following characters:
•
any character or quantifies or continuation of characters or continuation of figures
®
Quick Devis Enterprise Edition © IAES (1991-2001) © QUOTALYS (2001-2007)
Page 123/210
®
Quick Devis Enterprise Edition
•
•
•
•
•
•
User’s Manual
? any character or quantifies single
# any single figure
[X there] any figure ranging between X and y (X and included there)
[A-Z] any character or quantifies included/understood between A and Z (A and Z included)
[! X there] any figure except those ranging between X and y (X and included there)
[! A-Z] any character except those ranging between A and Z (A and Z included)
Here some applicable examples when the base is classified by “the Wording”:
•
•
*XM* (renvoie tout groupe contenant ‘XM’ dans son libellé)
Relais 2## V* (renvoie tout groupe commençant par ‘Relais 2’, suivi de deux chiffres, suivi de
V et de n’importe quelles données)
The valid filters (those which return groups) are stored in the list of the last filters called (in the same
box text).
Only the last 25 filters used appear in it in the box text. If you enter from there 26th, 1st list is
automatically unobtrusive.
Window’s sizes
It is possible to as many open with the screen managers of groups than the memory of your
computer can support some. This function is particularly practical when you use several bases of
groups regularly simultaneously.
To open one second base of groups, click again on the button of the bar of menu of the principal
window and select another base. You can, if you wish it, also open this manner several authorities of
the same data base to insert a group within an other for example.
If, instead of clicking on button of the bar of menu of the principal window, you click on the button
of the manager of groups opened, the new base opens in the manager of groups and either in the
shape of a new window.
This possibility of opening a significant number of data bases often forces to reduce the size of it so
that they do not occupy all the screen. With this intention, you have several buttons:
•
•
•
•
who allows to reduce the window to a size letting appear only the column of classification
selected (in this mode, one passes from one classification to the other with the keys <Flèche
gauche> and <Flèche droite>.
who allows to reduce the window to a simple bar of menu, not offering any visibility of the
groups (put in base day before)
who allows to return to standard posting. In this mode, you can redimensionner the window
by stretching it and to move the bar which separates the list from the groups of those of the
articles which make the group.
who allows to post the base in full screen, at ends of edition
When you close the manager of groups, Quick Devis® Enterprise Edition memorizes these
parameters as well as the position of the window, its size, the key of classification, etc… so that, with
the next opening, the base has the appearance in which had left it to you.
®
Quick Devis Enterprise Edition © IAES (1991-2001) © QUOTALYS (2001-2007)
Page 124/210
®
Quick Devis Enterprise Edition
User’s Manual
Inserting groups in detailed view
The insertion of groups in the minutes is possible in the modes standard (
) and reduced (
) only.
To insert a group, you can simply position the cursor above and slip the article on the line of minute
of your choice.
You also can click on the button
which will cause the insertion of the group to the top of the line of
minute on which the cursor in the minute is.
If you press the button , the group will then be inserted to replace the line on which the cursor in
the minute is or, to replace the selection of line carried out in the minutes if necessary.
If you wish to insert a multiple selection of groups, you will need, in the manager of groups, to select
the groups one by one entering the selection. With this intention, you can double click on the groups
or to press the key spaces. Use the same operation for désélectionner the groups. This operation of
multiple selections is not available for the groups comprising of the worksheets.
You can also enter directly of the quantities the manager of groups to avoid having to do it in the
minute by positioning the cursor on the group and by maintaining the key <CTRL> inserted while you
seize the quantity. The fact of affecting a quantity causes the selection of the groups automatically.
The selections of groups can be inserted in the minutes with the same methods as the groups simple
and replace ).
(to slip, insert
Note: to deselect all the groups in only one operation, click on the button
.
When a group was imported in the minutes, it is not recognized any more as a group but simply like a
whole of articles. If you wish that a group behave like such after being imported in the minutes, it will
be necessary for you to select the lines which make it up in the minutes and to group them using the
function “To group with L” impression' small “Edition”. You can make so that this statute is automatic
by notching the suitable boxes of the function “Options of data” of small “the Options”. When a group
appears grouped in the minutes, the modification of the quantity of group involves the modification of
the quantities of the articles which make it up.
A group can appear “grouped” only if it were imported with its line of title. This option is also available
in the function “Options of data” of small “the Options”.
In the minutes, a group is regarded as being the child of the group which precedes it since the two
groups appear grouped and are followed without white line of separation. In this case, the
modification of the quantity of the relative group can involve the modification of the quantities of the
child group (according to the choice made by the operator at the time of the seizure of quantity)
When you put at zero the quantity of a group appearing grouped in the minutes, the quantities of all
its articles also pass to zero and you thus cannot any more, to later on affect correct quantities by
changing the quantity of the group simply because it is not then possible any more to make a
calculation of ratio which would make it possible to determine the new quantities.
For this reason, it is advised to place in your estimate a named reserved free field [Qté per unit]
(with its hooks). In the presence of such a field, Quick Devis® Enterprise Edition will automatically
place the valid quantities of articles for a unit of group in this column. It will be thus always possible to
®
Quick Devis Enterprise Edition © IAES (1991-2001) © QUOTALYS (2001-2007)
Page 125/210
®
Quick Devis Enterprise Edition
User’s Manual
calculate the resulting quantities of articles when you modify the quantity of a group. This column is
never visible when the groups are posted in “Grouped” mode (button
of the minutes).
Editing databases
To pass a base of groups in mode “Edition”, click on the button
groups.
. In this mode, you cannot insert
Let us recall that you can also create, modify or insert articles directly in the minutes of an estimate
then to record them in a group by inviting the function simply “To record a group” of small “the Data”.
This constitutes an alternative generally more effective than the direct edition of the bases of groups.
After mode switch-over edition, the base appears in full screen with the following bar of menu.
You can then directly publish all the fields while entering there of the data. You can double click or
press the F2 key to publish a field. However, this method is not recommended because you are likely
badly to set up the references allowing to find the articles.
The best method consists in opening in reading mode the base of articles which contains the articles
to be referred and operating a simple operation to slip/to deposit towards the list of articles of the
group in the course of edition. You also can in the same manner of inserting groups coming from the
same base of groups or another in the list. In this case, the groups appearing in the list will be the
children groups of the published group and their contents will thus be imported with each importation
of the relative group.
Note: Take care when you create slip of the children groups into a relative group so that one of the
child groups does not call itself the relative group. You would have a recursive procedure then that
Quick Devis® Enterprise Edition could detect only by one overflow of capacity. It generates an error
message when one tries to import more than 5 000 articles in only one operation.
If you choose to publish the fields manually, take care to respect the awaited formats:
•
•
•
•
•
Quantity ................. -999999999.9999999 to 9999999999.9999999
The wording ............................................. 250 characters maximum
Reference .................................................. 50 characters maximum
Family ........................................................ 20 characters maximum
Field User .................................................. 20 characters maximum
®
Quick Devis Enterprise Edition © IAES (1991-2001) © QUOTALYS (2001-2007)
Page 126/210
®
Quick Devis Enterprise Edition
•
•
•
User’s Manual
Way ...................................................................................... 1 to 10
Base source ............................................... 35 characters maximum
To import MO or not ................................................................... 0ui
If you wish to create a new group, to click on the button , and modify it characteristic of the group
thus created in the list of left. You can also create a new group by copying the contents of an existing
group, to carry out a similar group for example. With this intention, place your cursor on the group to
be copied and click on the button .
To destroy a group, place your cursor on its name in the list of left and click on the button
.
The column “To import MO” makes it possible to determine if when one imports an article starting
from a group, one also imports his times and types of labor. This functionality is very practical if you
rather estimate the exposure times of the groups at the total level than on the level of the articles
which composes it. In this case, you will register “NOT” like value on the lines of the articles and you
will add an article of installation to the group which will contain a total time then.
When the articles are inserted via the group, they will come without individual time but with a total
time whereas when they are inserted unitairement (starting from a base of articles), they come with
their individual time.
The edition mode also makes it possible to optimize the base, i.e. as well as possible to reduce its
size and manner to guarantee optimal access times. To optimize a base, click on the button . This
operation can also be carried out starting from small “the Tools” without having to open the base as a
preliminary.
Creating or editing a tree view structure
To create or publish the tree structure of a base of groups, it is enough to place the base in edition
mode ( ), to press the set knob of the tree structure ( ) and to then press the button of edition of
the structure ( ). The editor of structure presents himself as follows.
®
Quick Devis Enterprise Edition © IAES (1991-2001) © QUOTALYS (2001-2007)
Page 127/210
®
Quick Devis Enterprise Edition
User’s Manual
The tree structure is always based on the reference of the groups. In the example above, the groups
whose reference starts with 20060303 will be placed in the referred branch 200603 itself placed in
the branch 2006. In this example the wording are in the order of the tree structure but it is by no
means about an obligation.
You can use the buttons “Export ms Excel” and “Importation ms Excel” to recover lists starting from
Microsoft Excel™. Take care in this case to respect the screen awaited by the function, the best
solution consists to export a screen, to fill it under Microsoft Excel™ and to reimport it.
Embeded spreadsheets (groups with their own calculations)
The group being a whole of articles bound by quantities, it is by linear defect i.e. if you do not multiply
two the quantity of the group to be essential, Quick Devis® Enterprise Edition will multiply by two the
quantities of each article which makes the group.
However, in certain cases, a linear logic of this type is insufficient to model a calculation. One could
for example have to calculate volumes of sand and ground according to a width and a height of
trench.
For that, Quick Devis® Enterprise Edition enables you to place a sheet of spreadsheet in a group. To
insert such a sheet, click on the button
after having passed the group in edition mode. You will
then have a sorter of the Excel™ type comprising two miters: a miter “Quantities” in which you will be
able to create the user interface and to carry out your calculations and a miter “Articles” which
contains the list of the articles and which functions exactly like a group without worksheet.
After having carried out your calculations, it will be enough for you to defer of them the results in the
column “Quantity” of the miter “Articles” by simple formulas. You can for example import an article
rather than another according to selection criteria by using conditional formulas.
®
Quick Devis Enterprise Edition © IAES (1991-2001) © QUOTALYS (2001-2007)
Page 128/210
®
Quick Devis Enterprise Edition
User’s Manual
The formulation is of type Excel™ and the majority of the functions are supported.
When you import in the minutes a parameterized group, only the lines having a quantity are imported.
So you can there place for example all the articles of a range and automatically select one of these
articles according to criteria of calculations.
In our example, the drop-down list appearing in C17 returns in B25 the text which appears there. The
formulas placed in C27, C28 and C29 place the quantity calculated in the correct cell according to
this type.
The various computed values appearing in lines 18 to 29 of the column C, are deferred in the miter
“Articles” on the column “Quantity”.
®
Quick Devis Enterprise Edition © IAES (1991-2001) © QUOTALYS (2001-2007)
Page 129/210
®
Quick Devis Enterprise Edition
User’s Manual
You do not need to record your modifications, the simple fact of closing the base or to click on
another group records the document. You can use the functions of importation and export towards
Microsoft Excel™ to recover existing data.
Passing paramteers from a parent group to a child group
When you use groups with worksheet, it can be interesting to transmit to a child group as data input,
certain cells of the relative group which calls it. All alone the child group called having to expose its
traditional interface of parameter setting.
To carry out this operation, insert the child group in the list of articles of the relative group by
operating an operation to slip/to deposit starting from one second base or of a new authority of the
same base.
Specify then in the columns of right-hand side, on the line of the child group, which is the column
which contains the data sources in the relative group and which is the column which will contain the
target data in the group child (AD and AE in our example).
Parameterize then your relative group so that the data devrant to have passed to the child group
appear in column AD.
This zone of communication which contains 499 cells will be automatically copied at the time of the
importation in column AE of the child group. It is enough for you then to conceive the child group so
that it takes his data sources in his column AE.
If the child group is called only, column AE will be empty and no data will thus appear in the boxes to
fill on the interface of parameter setting. The user will then be invited to seize the data input. If, on the
other hand, the group is called starting from the relative group, these boxes to interface it will be
automatically filled via column AE.
Functions of the group manager
®
Quick Devis Enterprise Edition © IAES (1991-2001) © QUOTALYS (2001-2007)
Page 130/210
®
Quick Devis Enterprise Edition
User’s Manual
The functions accessible by the menus are here detailed:
To open base
This function makes it possible to open a base of groups in the posted manager.
To insert the selection
This function makes it possible to insert the current selection in the lines which precede the line on
which the cursor in the minutes is. The function inserts lines as many as necessary to accept all the
selected groups.
To replace the selection
This function makes it possible to insert the current selection in the minutes by replacing the selected
lines or, if there is no selection in the minute, the function then replaces the line on which the cursor
is.
If no group is selected in the base with the call of the function, it is the group on which the cursor is
which will be taken into account.
Die to select the groups
This button makes it possible to remove any selection of groups in progress.
Selection of posting
These buttons respectively make it possible to post the base in mode take care, reduce, standard
and edition.
Posting and edition of the tree structure
These buttons respectively make it possible to post the tree structure of the base in the place of the
list of the groups and to publish this tree structure. The method to be used to create a tree structure is
described in the Création chapter or edition of a tree structure.
To import a list of groups to format ms Excel
This function makes it possible automatically to import a list of groups in the minutes starting from a
file Microsoft Excel™ containing the references, the quantities and possibly the wording of the groups
to be imported.
It will be particularly useful to create footbridges with software of CAD which generate lists of “macro
elements” which must be broken up to be evaluated under Quick Devis® Enterprise Edition.
With the opening of the file, you will have to indicate to Quick Devis® Enterprise Edition where are
each column to take into account in the file.
®
Quick Devis Enterprise Edition © IAES (1991-2001) © QUOTALYS (2001-2007)
Page 131/210
®
Quick Devis Enterprise Edition
User’s Manual
If the opening of a file Microsoft Excel™ is refused to you by the function, it is probable that elements
like macros or graphs appear in the file. These elements are not supported by the function. In such a
case, carry out one to copy/to stick values under Microsoft Excel™ in a new sorter and start again the
operation.
When the file is posted with the screen, you should specify the site of the columns. Place the cursor
on the heading of column to be defined (in line 1) and click on the button “To change the name of the
column” or double click on the cell. Select then the name of the corresponding field and validate.
To remove the definition of a field and to make so that it is not taken any more into account, place the
cursor on the heading and press the key <SUPPR>.
After having defined the columns, select the lines to be imported and click on the button “To import
the selected groups”.
Note: the positions of the columns are preserved so that you do not have to redefine them with each
importation.
.
Editing the group’s Microsoft Word™ document
This function makes it possible to post a document Microsoft Word™ which will take seat in the
group. This document can contain data which allow its automation at ends of information of technical
specification for example.
All the texts specified between accodances {} are regarded as being fields to be informed. Here some
examples of the formulation:
•
•
•
•
{RQV-12} returns the quantity of the article coming in 12th position in the group in figures
(Row Quantity Value)
{RQW-7EN} returns the quantity of the article coming in 7th position in the group in letters
(Row Quantity in Words) in English language (IN)
{CET-G19} returns the text present in the G19 cell of the miter “Quantities” (Cell Text G19)
{CEW-AX22FF} returns the value present in cell AX22 of the miter “Quantities” in letters (Cell
in Words AX22) in French language France (FF)
®
Quick Devis Enterprise Edition © IAES (1991-2001) © QUOTALYS (2001-2007)
Page 132/210
®
Quick Devis Enterprise Edition
User’s Manual
The languages available for the sums in letters are FF (French France), FS (French Switzerland),
BFR (French Belgium), IN (English), OF (German) and IT (Italian)
Evitez in your documents to employ styles (titer1, titer2…) if not they will appear in the synopsis of
your summary. The overlap of your text will be automatically specified according to the station to
which it belongs in the summary. It is thus useless to change the setting into page in the document
appearing in the group.
The document Microsoft Word™ is recorded automatically when you click on the table of the group or
when you close the manager of groups. A check box appearing in the low zone of the window in
standard mode makes it possible to import this document parameterized in the minutes.
Removing a Word™ document
This function removes of a group a document Microsoft Word™.
Export whole database to Ms Excel™
This function makes it possible to export the totality of the base of groups towards a file Microsoft
Excel™. By defect the function exports in the format used as footbridge i.e. you can use this format to
recreate a base of groups via the module of conversion into data bases. In this screen, the data
relating to the articles (located at the right-hand side of the sheet) are optional and are not used to
create a base.
You can, by notching the adapted boxes, to export the groups which answer the filter in place (all
groups by defect) or only one selection of groups which you will have carried out as a preliminary.
The function also makes it possible to generate a screen Microsoft Excel™ mentioning the prices and
times and carrying out totals of these values for each group. With this intention, it will read with one
these values in the bases of articles called by each group.
This function does not export the table of calculations which can be present in each group but only
one summary table.
Export current group to Ms Excel™
This function makes it possible to export towards Microsoft Excel™ the sorter of calculation which
appears in a parameterized group. The function exports the miter “Quantities” as well as the list of the
articles.
®
Quick Devis Enterprise Edition © IAES (1991-2001) © QUOTALYS (2001-2007)
Page 133/210
®
Quick Devis Enterprise Edition
User’s Manual
The check boxs and drop-down lists being animated by Quick Devis® Enterprise Edition, they are not
supported under Microsoft Excel™ and are thus not exported by the function. Yew you have such
objects to use, build under Quick Devis® Enterprise Edition after having imported your Excel™
documents.
Import a groupe from Ms Excel™
This function makes it possible to import starting from Microsoft Excel™ a group made up of a miter
“Quantities” and a miter “Articles”. It is highly disadvised building this type of documents starting from
Excel™. The best solution consists in exporting a document starting from Quick Devis® Enterprise
Edition, modifying it under Excel™ and reimporting the unit modified by using the function.
The document to be imported should contain neither graphic object, nor reference to external sorters
without what Quick Devis® Enterprise Edition will refuse to import it or will not matter that the
worksheets, without graphic elements.
Create a new empty group
This function created a new virgin group carrying New wording the “groups” and the poster.
Create a new derivated group
This function created a new group by duplicating the group on which the cursor is. It names this New
group “groups” and posts.
Remove a group
This function removes the posted group of the base. It also withdraws all the references which it
contains in articles or groups.
Remove an article
This function deletes the article on which the cursor is. No message of confirmation is required.
Seek article in it’s original database
This function makes it possible to open the base containing the article or the group on which is
placed the cursor in the list of right-hand side and to select there the article or the group thus pointed.
This makes it possible for example to replace an article by another quickly.
To optimize the base of groups
A base of groups can often be optimized in terms of size and access time because the free sites left
by the destroyed data occupy unnecessarily of the place on the disc.
To optimize the opened base, it is enough to invite you this function.
By safety, this function always carries out a copy safeguards named Sauvegarde <nom of the base>
of the <date and heure>.
®
Quick Devis Enterprise Edition © IAES (1991-2001) © QUOTALYS (2001-2007)
Page 134/210
®
Quick Devis Enterprise Edition
User’s Manual
It is imperative that the base is completely accessible to carry out an optimization. If a user is
connected, an error message will appear.
To check the integrity of the base
This function makes it possible to check the integrity of the current group or the whole of the groups
of the complete base. This checking consists of a control of the presence of the bases of articles and
groups referred as well as presence of the articles and groups in these bases. A precise anomaly
report appears after execution of the function.
To post or mask the details
This drop-down list makes it possible to post with the bottom of the manager of groups the zone
where the characteristics of the group in progress are registered.
This zone allows, in addition to the visualization of the data of the group, to specify the criteria of
recognition of the articles coming from bases which are identified by the whole of their fields (and not
of the bases which identify their articles by their reference such, the Web bases). This can make it
possible for example to find articles whose wording changed while being based only on the other
criteria. In such a case, not the box would not notch “Made out”. The boxes all are notched by defect.
The zone also makes it possible to specify if the tables or the documents Microsoft Word™ present in
the articles or the groups must be imported in the minutes. These four check boxs are memorized in
the user profile in fact that they are always in the position in which the user left with the reopening of
the base.
A specific zone text makes it possible to indicate a price forced for the group. In such a case, this
value is imported in the columns “forced unit Price” of the minutes, on the line of title groups since
you notched the suitable box of the miter “Options of data” of small “the Options”.
Print area
This function defines the print area per defect selected as a preliminary in the miters of the worksheet
or in the list of articles of a group without worksheet.
Print preview
This function makes it possible pre to visualize the impression according to the zone in progress.
To print
This function prints according to the print area in progress and makes it possible to select the printer.
Page-setting
®
Quick Devis Enterprise Edition © IAES (1991-2001) © QUOTALYS (2001-2007)
Page 135/210
®
Quick Devis Enterprise Edition
User’s Manual
This function makes it possible to define the parameters of page-setting. These data are stored in the
worksheet of the group.
To cancel
This function cancels the last operation carried out in the worksheet of a group. It does not make it
possible to cancel an insertion or a destruction of articles.
To cut/To copy/To stick/To erase
These functions respectively make it possible to cut, copy, stick and erase the contents of the cells
selected in a worksheet.
Name and size of police force
These drop-down lists make it possible to determine the name and the size of the police force of the
cells selected in a worksheet.
Fat//Italic Underlined
These buttons respectively make it possible to boldface, to put in italic and to underline the data
contained in the selected cells of a worksheet.
Colors of the cells
These buttons respectively make it possible to define the color of make and the color of police force
of the selected cells of a worksheet.
Alignment
These buttons respectively make it possible to align on the left, center and align on the right the
contents of the cells selected in a worksheet.
To center on several columns
This button makes it possible to center the cells selected on several columns. Always prefer this
solution with a fusion of cells because it guarantees that the referencing of a cell corresponds well to
its visible position.
Options of alignment
This function makes it possible to define the options of horizontal and vertical alignment of the
selected cells of the worksheet.
Options of edge
This function makes it possible to define the edges of the selected cells. It is disadvised for reasons
of compatibility with the forms of colors using thick types of edge unless using only one white zone,
without specific working.
®
Quick Devis Enterprise Edition © IAES (1991-2001) © QUOTALYS (2001-2007)
Page 136/210
®
Quick Devis Enterprise Edition
User’s Manual
Working of the numbers
This function makes it possible to format the numbers of the selected cells. The options of formatting
are similar to those of Microsoft Excel™.
Management of the lines and columns
These buttons respectively make it possible to insert lines, to insert columns, to destroy lines and to
destroy columns. They apply to the selected lines or columns.
Adjustment height and width
These buttons respectively make it possible to adjust the height of the selected lines and to adjust the
width of the selected columns. Place the values at zero to mask lines or columns.
Protection of the cells
This function makes it possible to define the statute of locking of the cells selected in a worksheet.
The cells are actually locked only in standard view, never in posting for edition.
Limits of the table
This function makes it possible to define the last column and the last visible line by the user in a
worksheet. The function has a visible effect only in standard view, never in posting for edition.
To seek/To replace
This button makes it possible to seek and replace data in a worksheet.
To stick a variable
This function posts the list of the aggregate variables available in the active estimate. It makes it
possible to stick these variables in cells so as to define a specific behavior of the groups according to
the estimate in which the data must be inserted.
To register a variable
This function makes it possible to register an aggregate variable starting from a group. The aggregate
variables thus registered are those of the estimate in which the group is imported and the inscription
is carried out at the time of the importation.
Unit, Quantity, Made out
This function reveals cells in AA1, AA2 and AA3 which enable you to set up the apparent units,
quantities and wording. This makes it possible for example automatically to determine the wording
according to the results of a calculation.
If cells AA1, AA2 or AA3 contain data, it is they which will be substituted for the units, quantities and
made out group at the time of the importation. In the contrary case the source data will be used.
Check box
®
Quick Devis Enterprise Edition © IAES (1991-2001) © QUOTALYS (2001-2007)
Page 137/210
®
Quick Devis Enterprise Edition
User’s Manual
This function makes it possible to insert an object “check box” in a worksheet. To insert a check box,
click on the button and click on a point of the sheet, then, while maintaining the button left of the
mouse inserted, move the cursor towards another zone and slacken the button.
To activate the parameter setting of a check box, maintain the key <CTRL> inserted and click on the
object. Click then on the right button of the mouse to reveal the table below:
In the miter “Name” it is not useful to name your object. In the miter “Options”, specify the cell in
which you wish to place the result of the check box. A6 example.
You will then recover in the cell the value “TRUTH” when the box is notched and “FALSE” in the
contrary case.
To decontaminate the parameter setting of a check box and making it operational for the user, click
simply on the table of calculations, apart from the zone where the object is.
Drop-down list
This function makes it possible to insert an object “drop-down list” in a worksheet. To insert a dropdown list, click on the button and click on a point of the sheet, then, while maintaining the button left
of the mouse inserted, move the cursor towards another zone and slacken the button.
To activate the parameter setting of a drop-down list, maintain the key <CTRL> inserted and click on
the object. Click then on the right button of the mouse to reveal the table below:
In the miter “Name” it is not useful to name your object. In the miter “Options”, specify the cell in
which you wish to place the result of the drop-down list. P6 example.
®
Quick Devis Enterprise Edition © IAES (1991-2001) © QUOTALYS (2001-2007)
Page 138/210
®
Quick Devis Enterprise Edition
User’s Manual
You will then recover in the cell an ordinal value function of the element selected (0, 1, 2, 3…) or a
value text if you notch the box “To assign like text”.
The list of the various elements appearing in the drop-down list must appear with a separator of the
type not comma in the zone “Elements”. It is not possible to define this list of elements starting from
the worksheet.
To decontaminate the parameter setting of a drop-down list and to make it operational for the user,
click simply on the table of calculations, apart from the zone where the object is.
Zoom
This drop-down list makes it possible to define the value of zoom of the worksheet. This value is
stored in the group.
®
Quick Devis Enterprise Edition © IAES (1991-2001) © QUOTALYS (2001-2007)
Page 139/210
®
Quick Devis Enterprise Edition
User’s Manual
The glossary
Quick Devis® Enterprise Edtion proposes a glossary which behaves like a giant clipboard with 1’000
memories. It should not be regarded as a database. Each memory can store up to 10’000 rows.
To write data in the glossary, select the rows to be recorded in the detailed view and call the
glossary. When rows are selected, the glossary opens in “writing” mode so you just have to select the
memory number in which you wish to store your selection and click the “Write in glossary” button.
Only the first line of each selection copied appears in the glossary. The glossary contains all the
columns appearing in the detailed view, including the masked columns.
To insert data from the glossary in the detailed view, call the glossary without selecting any row first,
indicating that the glossary must be open in “reading” mode. Select the memory which contains the
data to be inserted and click the “Insert in estimate” button .This will insert all the lines appearing in
the selected memory.
The data of the glossary are preserved on the disc and are stored in the user profile. Thus several
users of the same computer can have different glossaries.
You can create as many glossaries as you wish clicking the “Save glossary” button and providing a
name. This name will then appear in the glossaries list and you will be able to switch from one
glossary to another by simply clicking the list.
To remove a glossary, click the “Remove a glossary” button and select the glossary to be deleted.
To clear a memory in a glossary, select the desired memory number and click the “Remove from
glossary” button.
®
Quick Devis Enterprise Edition © IAES (1991-2001) © QUOTALYS (2001-2007)
Page 140/210
®
Quick Devis Enterprise Edition
User’s Manual
The glossary being simply an advanced clipboard, it does not include data updating functions instead
of the Internet databases. So if you paste data from a glossary memory after one year, you will get in
your detailed view the data at the date where insertion in the glossary was made. If these data come
from articles databases, you may want to update them using the “Update rows” function.
If you need to read or write the glossaries from external programs, you must know that the glossaries
are stored in files having a .GLO suffix and use the Microsoft Access format.
®
Quick Devis Enterprise Edition © IAES (1991-2001) © QUOTALYS (2001-2007)
Page 141/210
®
Quick Devis Enterprise Edition
®
Quick Devis Enterprise Edition © IAES (1991-2001) © QUOTALYS (2001-2007)
User’s Manual
Page 142/210
®
Quick Devis Enterprise Edition
User’s Manual
Setting prefixes
Defining prefixes lets you quickly import data coming from the databases in the detailed view without
having to open the databases first. The method used is described in the function “Replace by the
article whose reference is mentioned”.
To define prefixes, call the function:
Set up searching prefixes
“Data” menu
The prefixes can be entered clicking delicately on the text to edit the “Prefix” column. Then,
Type 3 capital letters or 3 digit code prefix. You can assign prefixes to your own databases.
For public databases, prefixes are generally suggested.
When prefixes are set, click the “Ok” button to record them. You can restore the default
prefixes clicking the “Reset” button.
Note that the path number is always #9, which corresponds to the only definable path in Quick
Devis® Enterprise Edtion. If you need more paths for you databases, consider using Quick
Devis® Enterprise Edition.
®
Quick Devis Enterprise Edition © IAES (1991-2001) © QUOTALYS (2001-2007)
Page 143/210
®
Quick Devis Enterprise Edition
User’s Manual
The workbooks of the detailed view
®
Quick Devis Enterprise Edition © IAES (1991-2001) © QUOTALYS (2001-2007)
Page 144/210
®
Quick Devis Enterprise Edition
User’s Manual
The request language
Quick Devis® Enterprise Edition has a tool able to make modifications of scale in an estimate or a
base of articles. It makes it possible to specify the range of the modifications and to operate all types
of modifications thanks to requests in open language.
When you call the function, a mask of request appears. If the function is called without preliminary
selection in the minutes or if it is called starting from a sight different from the minutes, the request by
defect is: IF; and remains to supplement. If the function is called as from the minutes and that lines of
minute are selected, the request pre is written so that only are taken into account the selected lines.
To create, your requests, you have of the fields, the conditions and the following operators:
Champs
[Numéro_de_ligne]
[Description]
[Unité]
[Quantité]
[Prix_unitaire]
[N°_de_monnaie]
[N°_type_de_FO]
[Remise]
[K_négociation]
[Montant_total_FO]
[Temps_unitaire]
[Unité_temps]
[N°_type_de_MO]
[Coeff_sur_temps]
[Temps_total]
[Montant_total_MO]
[PR_total_ligne]
[Fournisseur]
[Référence]
[Famille]
[Champ_utilisateur]
®
Quick Devis Enterprise Edition © IAES (1991-2001) © QUOTALYS (2001-2007)
Page 145/210
®
Quick Devis Enterprise Edition
User’s Manual
[Date_MAJ_article]
[Date_MAJ_ligne]
[Base_d'articles_source]
[Prix_Unit_Forcé]
Which all the possibly definite free fields are added.
Conditions
• > Vrai if the value which precedes is higher than the value which follows
• < Vrai if the value which precedes is lower than the value which follows
• = Vrai if the value or the character string which precedes is equal to the value or the character
string which follows
• <> Vrai if the value or the character string which precedes is different from the value or the
character string which follows
• AND And logic, makes it possible to connect the conditions (maximum 4)
• OR Or logic, makes it possible to connect the conditions (maximum 4)
• THEN key Word of end of condition
• Vrai CONTAINS if the chain which precedes contains the character string which follows
• COMMENCE_PAR
Truth if the chain which precedes starts with the character string
which follows
• SE_TERMINE_PAR Vrai if the chain which precedes finishes by the character string which
follows
Operators
+ Operator of addition of numbers or concatenation of chains
- Operator of subtraction of numbers
X Operator of multiplication of numbers
/Operator of division of numbers
= Operator of equality of chains or numbers. This operator is identical to that placed in the list of the
conditions
; Symbol of end of request; Indicate that the request is finished
Verbs
EFFACER_LIGNE Erases all the fields of the line for which the condition is true
TO BRING UP TO DATE Lance a complete actualization of the estimate
The listed fields correspond to the whole of the fields of the minutes. You can make tests on all these
fields. Syntax must be respected perfectly (not of space, respect of the/capital letters tiny and put
between hooks) without what you will be informed by it by a message during the launching of the
request. To avoid any error of seizure, it is advised to employ the button “fields” envisaged to this end
and to take care to separate each term by at least a space.
The query language is not “sensitive Box” i.e. that it does not differentiate the capital letters from tiny
in the contents of the fields or the chains specified between quotation marks, for example “RtYU”
starts with “RT” or “RtYU” starts with “rt” are both truths.
On the other hand, the breakage of the operators, field names and conditions must be respected.
®
Quick Devis Enterprise Edition © IAES (1991-2001) © QUOTALYS (2001-2007)
Page 146/210
®
Quick Devis Enterprise Edition
User’s Manual
You can seize in the same window up to 21 requests one after the other by simply separating them
by CR (carriage return) and by finishing them by a point comma.
To avoid having to often seize the same requests, you can record them and give the responsability
them thanks to the suitable buttons “To record the requests” and “To give the responsability of the
requests”). The files of requests can be placed on any local disk drive or network. They carry all suffix
.REQ.
Rather than to precisely develop all the aspects of the query language, here a concrete example; Let
us imagine that we wish to multiply by 27 the quantity of the articles being between line 12 and line
71 of the minute corresponding to item 1.9. The request can be formulated as follows:
IF [Numéro_de_ligne] > 11 AND [Numéro_de_ligne] < 72 THEN [Quantity] = [Quantity] * 27;
It is necessary to have at least a space between each fields, operator or condition without what an
error message is transmitted with launching. Quick Devis® Enterprise Edition generates messages
clear and localized on the errors of syntaxes of its query language; you can thus without risk register
errors.
To launch a request, it is necessary to specify its range if that given by defect is not that desired. For
that click on the button “Carried”. If the request is launched starting from a base of articles and not
starting from an estimate, the range is obligatorily the whole of the base.
To specify the range, double click on the station or connects on which you wish to see applied the
requests. If you doubles click on the first station, in fact the whole estimate will be taken into account.
The range of the request is also stored in file .REQ so that you do not have to specify it
systematically.
Click the button “To carry out” to launch the sweeping of the estimate and the test of the requests.
Quick Devis® Enterprise Edition will then affect directly the lines answering the conditions specified,
according to your wishes.
®
Quick Devis Enterprise Edition © IAES (1991-2001) © QUOTALYS (2001-2007)
Page 147/210
®
Quick Devis Enterprise Edition
User’s Manual
Note: Verb EFFACER_LIGNE puts at white or with the zero all fields of the specified lines but does
not destroy these lines physically.
The verb TO BRING UP TO DATE must imperatively be alone on its line (TO BRING UP TO DATE;)
and the first line of request or the last line of request occupies. In the first case, the total actualization
of the estimate is launched before the execution of the requests. In the second, it is launched
afterwards.
This verb is particularly intended for the automation of markets with order or the form. Indeed, it will
be easy for you to build requests which modify the field [base_source] of an estimate so as to “point”
sometimes on a set of bases, sometimes on another. The verb TO BRING UP TO DATE will give the
up to date estimate then consequently.
Before launching a request, it is desirable to carry out a backup copy of your estimate by the order
“To record under” or more simply “To record”. However, if the requests are called as from the
minutes, their effect can be cancelled because the last operation carried out in the minutes can be
cancelled.
®
Quick Devis Enterprise Edition © IAES (1991-2001) © QUOTALYS (2001-2007)
Page 148/210
®
Quick Devis Enterprise Edition
User’s Manual
Managing the estimates
Quick Devis® Enterprise Edition proposes a mechanism intended for the follow-up of the estimates
on one or more computers. One understands by follow-up the recapitulation of the amounts, of the
dates and data technical and financial intended to carry out assessments according to various criteria
to be defined.
Explanations about the mechanism
Management is carried out thanks to a dialog between the computers equipped with Quick Devis
Enterprise Edition and a data base being on a central waiter. This data base can be consulted and
configured using the module of management.
If you do not have this type of communication to implement because you carry out little estimate or
simply because this management is entrusted to another application within the framework of your
company, you can then satisfy you to use the simplified management of the estimates. The latter
does not offer the capacities of follow-up of the estimates but makes it possible all the same to share
a base of customers. It thus makes it possible to quickly inform the principal fields which will be
exploited in the states or the mails of accompaniment. More, defer to the chapter simplified
management, low in this chapter.
The mechanism implemented by Quick Estimate Enterprise Edition for the exchange with the data
base centralized figure below:
®
Quick Devis Enterprise Edition © IAES (1991-2001) © QUOTALYS (2001-2007)
Page 149/210
®
Quick Devis Enterprise Edition
User’s Manual
- 2
$3
4 5
2
& 22
/
& 6
- 27
2
826 22 9 2
0
/ ,
- 27
-)* +$
2
,*-. & /*0
'(&,)
&
0$*(+
The bonds between the computers are ensured through a local area network (LAN) and so require
the division between the various users of a unit being on the waiter.
If this operating mode does not satisfy you and that you have need for bonds using the Internet or
that you wish to take into account a hierarchy of the personnel users, contact your retailer who will be
able to propose Projects Monitor® to you, a tool network especially conceived to supervise projects,
invitation to tender with obtaining the market at the national level or international. Consult
http://www.iaes-software.com more on Projects Monitor®.
Within the framework of the dialog with the module of management for local area network, when the
customer (the user of Quick Devis® Enterprise Edition) connects himself to the base, this one
transmits the awaited configuration to him. The customer fills these data in a manual or automatic
way then. The data which it transmits can be native elements (assembling estimate, number of
customer, price of the options…) or of the elements defined by the user which forward by the
aggregate variables of the estimate and which come from the sheets from environment or the form
(estimated margins, times, elements of planning, price of a chapter, textual elements of specification,
technical merits…)
After having filled the cells indicated by the configuration, the customer transmits the data relating to
his estimate, within the framework imposed, towards the list of the estimates in the base of
management.
The customer can draw, during the data acquisition, in the lists of customers, estimate, of types of
projects, quantity surveyors or the chargé d' affaires being reproduced on the waiter. He can also
inform these data manually. They will then be added to the lists automatically at the time of the
inscription in base so that the other users customers can profit from it.
®
Quick Devis Enterprise Edition © IAES (1991-2001) © QUOTALYS (2001-2007)
Page 150/210
®
Quick Devis Enterprise Edition
User’s Manual
It should be noted that the three last evoked lists (standard of projects, quantity surveyors or chargé
d' affaires) can be re-elected in the base of management to correspond to your own sort criteria. You
can for example name them “Business”, “Order of service” and “Material” in order to operate sorting
and under totals according to these criteria in the module of management. The modifications of this
type operated in the base of management are propagated automatically with all the customers who
connect themselves to it.
The customer automatically stores, within the estimate, an image of the configuration awaited by the
last base of management to which it was connected so as to allow the consultation of the data except
connection. It is thus possible to consider the seizure of the elements without has connection to the
base. These data will then be published at the time of next connection.
Example of application
In order to quickly learn how to configure a base of management, we propose to you hereafter to
build an example intended to carry out invoicing with advance. The schedule of conditions is
described below.
It is a question of filling automatically of the tables which will have to comprise:
•
•
•
•
•
•
•
•
•
•
The creation date of the estimate
The agency in load of the estimate
The number of the customer
The business to which the estimate belongs
The number of the estimate
The wording of the estimate
The amount of the estimate
The currency
The revision number
A possible comment
The user will seize a percentage of advance under Quick Devis® Enterprise Edition and the module
will post a column then “Going up to invoice” expressed by amount X the percentage of advance.
The invoicees amounts will be seized each month, directly starting from the estimates and the
remaining amount to invoice will be posted. This seizure of the amounts indeed invoicees makes it
possible subsequently to consider a modification of the amount of the estimate to the first invoicing.
It will be envisaged 10 months of possible invoicing on the basis of monthly invoicing. Lastly, it will
have to be possible to generate assessments by business and agency.
Creation of the base of management
Launch the module of management by clicking on Démarrer/All the programs/Quick Devis
V6/Gestion of the estimates, then click on small Fichier/Nouvelle bases management .
Choissez a site on the waiter, divided in reading as in writing for all the potential users and give the
name to your base: My First Database for example and validate.
®
Quick Devis Enterprise Edition © IAES (1991-2001) © QUOTALYS (2001-2007)
Page 151/210
®
Quick Devis Enterprise Edition
User’s Manual
A base configured by defect appears immediately with the screen.
Configuration of the miters
As described in our schedule of conditions, we will need to make assessments by business and
agency. These data will have to appear in lists in order to avoid with the user having to manually
enter them for each estimate.
By defect the module proposes lists by “Types of project”, “Quantity surveyors” and “Charged D to
us” affaires'. The lists of quantity surveyors are associated each potential revision of an estimate
because the quantity surveyors can change from one revision to another. The two other lists are
directly associated the estimates what will be also the case for our “Business” and “Agencies”. We
will thus re-elect the two Standard lists “of project” and “Charged D” affaires'.
With this intention, click on small Configuration/Noms of the miters.
Let us enter the plural and singular names of our lists for the miters N°2 and N°3 as indicated above.
Let us validate by pressing Ok. The miters, with the bottom of the module of management were
famous.
Now let us supplement the miters “Businesses” while entering there our first numbers of businesses.
For that, click on the miters, and to click on the button . A new box appears then with the word
“New” followed by the name of the miter. Place there the cursor and publish the text while clicking on
the button or in double clicking on the cell. Proceed in the same manner to fill the following boxes.
®
Quick Devis Enterprise Edition © IAES (1991-2001) © QUOTALYS (2001-2007)
Page 152/210
®
Quick Devis Enterprise Edition
User’s Manual
Proceed in an identical way for the miter of the agencies.
The miter “Calculators” will not be used in our application. There we could have made appear any list,
then associated with each revision of the estimate. On the other hand, we will use the miter
“Customer” who will allow us to make assessments by customer. We will enter a customer to start
while proceeding as for the other lists.
The calculators will be able to supplement these lists later on directly starting from Quick Devis®
Enterprise Edition according to the needs.
Configuration of the columns
We should now post the columns in accordance with the list of the schedule of conditions. Let us click
on the Devis miter and call the Configurer function the columns of small Configuration.
To mask the useless columns, select the one with one in the list of right-hand side and press the
Masquer button the column. The column appearing in red in the list cannot be masked by this
operation because it is it which contains the identifier of the estimate (the estimates are identified on
their creation date).
You can also move the columns of the list of right-hand side simply by slipping them with the desired
sites.
®
Quick Devis Enterprise Edition © IAES (1991-2001) © QUOTALYS (2001-2007)
Page 153/210
®
Quick Devis Enterprise Edition
User’s Manual
Now let us add the fields intended to receive the percentage of advance, the amount to be invoiced,
the 10 periods of invoicing, the invoiced total and the remaining amount to invoice. For that, we will
use the first 14 numerical fields. For the comment, we will use the first field text of 255 characters.
Should we now name each one of these fields while clicking successively on each one of them in the
list of left and clicking on the zone Nom text of the column. Let us register the following names, in the
order of the columns posted above.
•
•
•
•
•
•
% advance
Corresponding amount
Invoice Mois 1
Invoice Mois 2
Invoice Mois 3
Invoice Mois 4
®
Quick Devis Enterprise Edition © IAES (1991-2001) © QUOTALYS (2001-2007)
Page 154/210
®
Quick Devis Enterprise Edition
•
•
•
•
•
•
•
•
•
User’s Manual
Invoice Mois 5
Invoice Mois 6
Invoice Mois 7
Invoice Mois 8
Invoice Mois 9
Invoice Mois 10
Invoiced total
Remain to invoice
Comment
Implementing formulation
Let us define the formulas now. The “amount corresponding” is expressed by the “amount” X “%
advance”/100. That is to say the column G X the column J/100. The “invoiced Total” will be the sum
of the columns L with U. the “Remainder to be invoiced” will be the difference between the “Amount”
and the “invoiced Total” is the column G minus the column V.
To enter these formulas, it is enough to place the cursor on the columns concerned in the list of righthand side and to click on the Série zone or formula. Consequently, one enters simply the formula as
one would do it under Microsoft Excel and one validates by pressing the Enter key.
®
Quick Devis Enterprise Edition © IAES (1991-2001) © QUOTALYS (2001-2007)
Page 155/210
®
Quick Devis Enterprise Edition
User’s Manual
The formulas having entered, it remains us to format the numbers in the columns. We will post
advance with 0 decimals followed by the symbol % and the amounts with 2 decimals without any
symbol (default setting).
For that, let us click successively on the columns and define the format in the zone text to this end
envisaged.
Note the backslash (\) in front of the symbol % which, as under Microsoft Excel, will avoid us having
to enter the value in a decimal form (0,15 per 15%).
Test of operation
In order to check our formats and our calculations, we now will create an estimate of test, directly
starting from the module of management. With this intention, let us operate as for the other lists; let
us click on the button , then double let us click on the line thus created.
Replissons the various fields while clicking in the drop-down lists and automatically let us inform the
customer by selecting it in the list using the button “To import”.
Manually let us give a number to the estimate for the moment. We will further see how to allot
automatic numbers.
®
Quick Devis Enterprise Edition © IAES (1991-2001) © QUOTALYS (2001-2007)
Page 156/210
®
Quick Devis Enterprise Edition
User’s Manual
To register the values, in the data base, let us click simply on the Déclarer button. The well informed
line appears then in the base.
We will assign an amount to this estimate in double clicking again on the line. The miter of the first
revision (A) appears. We can then enter an amount basic the Solution box and declare this amount
while clicking on the Déclarer button. When the amount is declared, let us click on the Variables miter
to fill the fields which we added. Let us enter then manually of the values the columns for the
moment.
Let us ensure that the computed values in the lines “Going up corresponding” and “Remains to be
invoiced” are quite in conformity with our waitings and press up to date the Mettre button in central
base to register the data in the line of the estimate.
Coupling with Quick Devis® Enterprise Edition
®
Quick Devis Enterprise Edition © IAES (1991-2001) © QUOTALYS (2001-2007)
Page 157/210
®
Quick Devis Enterprise Edition
User’s Manual
In order to automate the declarations, it is necessary for us now to specify, on the stations Quick
Devis® Enterprise Edition, the base to be used as well as the various parameters defining the
behavior.
Launch Quick Devis® Enterprise Edition and click on small Outils/Paramètres of the new estimates.
Click on the zone text corresponding to the base of management and select the base on the waiter.
The repertory must be accessible in reading as in writing by all the users.
Simplified management should not be activated so that management supplements is taken into
account. Lastly, you can select an automatic recording mode of the data in base of management
what will avoid with the user having to carry out a declaration with each modification of its estimate.
If the data transmitted to the base of management are based on the selling prices (general case), it is
recommended to choose option A each recalculation of the selling prices. In this manner you are
certain to have valid selling prices in the base. However, one can imagine that a user recalculation
the selling prices and does not safeguard his estimate in which case the data appearing in the base
will not be in conformity with those of the file estimate not safeguarded. To avoid that, you can select
option A the recording of the estimate.
Design of an estimate master
We now will carry out an estimate master which will be used as a basis for all the estimates intended
to be centralized in the base of management. Click for that on small Fichier/Nouveau Estimate. Place
this estimate master on a repertory of the waiter where all the users will have an access at least in
reading.
The window of declaration of estimate appears. Let us declare the estimate to observe the operation
of the connection with the base. Use the drop-down lists and the Importer button for that.
®
Quick Devis Enterprise Edition © IAES (1991-2001) © QUOTALYS (2001-2007)
Page 158/210
®
Quick Devis Enterprise Edition
User’s Manual
Click on the Verrouiller button and to declare in central base. Consequently, the estimate is
registered in the base as if you had created it starting from the module of management. Click on the
Variables miter, you find the structure and the formulation of the columns awaited by the module of
management.
You could possibly ask the user to enter the data these boxes to each declaration but, the majority of
these data coming from the estimate, it are more judicious to register automatic connections with the
cells of the sheets of environment. For that, we will declare aggregate variables which will be used as
footbridge between the environment and the base of management.
Click on small Outils/Aggregate variables and register the following variables:
After having entered these data, validate while clicking on Ok. If you réaffichez the window of the
aggregate variables, you will observe that they all are preceded by ENV_, indicating that they are
®
Quick Devis Enterprise Edition © IAES (1991-2001) © QUOTALYS (2001-2007)
Page 159/210
®
Quick Devis Enterprise Edition
User’s Manual
variables of environment and not of variables management as those which are by defect in the base
of management (name of the estimate, number of customer, etc…)
Go now in the Environnement miter of the estimate and build a sheet which will be the interface of
acquisition data. You can for that use a free sheet while clicking on small Options/Environnement.
We will name this sheet “Advance”.
Click on the miter “Advance” of the environment and create an interface for the user in conformity
with the example below.
In our example, we envisage boxes to carry out the seizure but it would have been possible to set up
formulas dependant at the need for the data appearing in the other miters in order to automate the
process of declaration as well as possible.
®
Quick Devis Enterprise Edition © IAES (1991-2001) © QUOTALYS (2001-2007)
Page 160/210
®
Quick Devis Enterprise Edition
User’s Manual
We marked here in blue the cells which the user will have to enter. The other cells are calculated
automatically. In order to to bring back in cell C5 price selling of form (and not that of the environment
which can be slightly different because of the round-offs), we used the Coller function a name of
small Edition to use the BOR_PVBordereau variable who brings back the amount in selling price
appearing in the price schedule.
A line was added in the minute of our estimate in order to have an amount of example (100 :) for our
calculations. The billable amount in C9 was expressed by formula C5*C7/100.
To bind the cells of the sheet with the aggregate variables, it is enough to place the cursor on the
cells to be registered and to invite the Inscrire function a variable of small Edition.
®
Quick Devis Enterprise Edition © IAES (1991-2001) © QUOTALYS (2001-2007)
Page 161/210
®
Quick Devis Enterprise Edition
User’s Manual
Proceed in the same way for the unit of the variables. Let us recall that, if the variables present in the
base of management do not have correspondence in the variables of environment of the estimates, it
is always possible with the user to manually seize them via the interface of management of Quick
Devis® Enterprise Edition.
Our estimate master is now finished, it is necessary for us to destroy its data of management
because it will be used as a basis for all the new estimates. If we leave management in the master,
the declaration would not be required during the creation of new estimates.
To destroy management, invite small Outils/Réinitialiser management and confirm. Do not forget to
remove the line of example that we had placed in the minute for the needs for our example and
safeguard your estimate master.
We now will indicate to Quick Devis® Enterprise Edition which the estimate master which we have
just created must be used as a basis for all the future estimates. Click on Outils/Paramètres of the
new estimates then on Ajouter a file. Then select the estimate master which you have just created in
order to add it to the list.
®
Quick Devis Enterprise Edition © IAES (1991-2001) © QUOTALYS (2001-2007)
Page 162/210
®
Quick Devis Enterprise Edition
User’s Manual
You can now leave Quick Devis® Enterprise Edition. And to start again the module of management in
which we will declare the variables of environment which will ensure the correspondence with the
master.
In the module of management, open the base and click on Configuration/Configurer the columns.
Click then on each column corresponding to the variables of management and register the variables
as indicated below.
Vous pouvez ignorer la casse des lettres, les différenciations majuscules et minuscules ne sont pas
prises en compte dans les noms de variables. Bien sûr, il n’y a pas de noms de variable à placer
dans les colonnes comportant des formules.
®
Quick Devis Enterprise Edition © IAES (1991-2001) © QUOTALYS (2001-2007)
Page 163/210
®
Quick Devis Enterprise Edition
User’s Manual
If double click now on an estimate present in the base, the Variables miter disappeared bus plus no
variable can be seized by the user; they all are assigned with variables of environment of the
estimate or with formulas.
Test of operation
Let us close the module of management now and create an estimate starting from Quick Devis®
Enterprise Edition. With creation, we are invited to declare the estimate while drawing from the base
thanks to the Importer buttons or while entering manually the data.
After having pressed the button To lock and declare in central base, let us enter some figures the
minutes in order to build a selling price then, go in the sheet “Advance” of the environment to register
some values there.
When we recompute the selling prices by pressing the button
automatically registers the data in base of management.
, Quick Devis® Enterprise Edition
We can check by opening the module of management that the estimate was indeed recorded with the
values appearing in the environment.
Automatic classification of the estimates
It can be interesting automatically to number the estimates in base of management. This
classification can be total or specific to each user. If it is total, it will be defined starting from the
module of management, in the contrary case, it will be defined on each user station.
For our example, we will define it overall while clicking on small Configuration/Numéros of estimate of
the module of management.
®
Quick Devis Enterprise Edition © IAES (1991-2001) © QUOTALYS (2001-2007)
Page 164/210
®
Quick Devis Enterprise Edition
User’s Manual
You can then give a prefix made up of letters or figures followed by an ordinal number and to specify
if the users can or cannot modify the number suggested.
Fonctionnalités du module de gestion
This chapter describes with functions appearing in the menus of the module of management. To
learn with the utilis
ludic er of manner, defer to the chapter Exemple d’application front Ci.
New base of management small “File”
This function makes it possible to create a virgin base. It is accessible only when there is not
basic with the screen. The creation of a base causes its opening automatically.
To open base of management
small “File”
This function opens a base of management which the user must specify. The last open base is
memorized in order to open automatically with the next launching of the module of
management.
This parameter is stored in the QDLastGestFile.INI file appearing in the user profile (generally
C:\Documents and Settings \ <nom of the utilisateur> \ Application Dated \ Quick Devis \).
To close the base small “File”
Firm the base presents at the screen by recording the modifications so necessary.
To open the small
estimate “File”
This function launches Quick Devis® Enterprise Edition and opens the estimate on which the
cursor is.
The way stored in the base is used for that. This principle functions only if the estimates are
placed on the waiter and that the whole of the users “see” the resource network under the
same name.
In the contrary case, you will obtain a warning message indicating that the module of
management cannot find the estimate.
Small export
®
Microsoft Excel “file”
Quick Devis Enterprise Edition © IAES (1991-2001) © QUOTALYS (2001-2007)
Page 165/210
®
Quick Devis Enterprise Edition
User’s Manual
This function makes it possible to export the screen present at the screen towards Microsoft
Excel. The screen is exported with the possible formulas present in the columns. A print area
is established by defect.
This function requires Microsoft Excel 97 or superior. If Microsoft Excel is not detected
automatically with the first launching, the application will require of you to specify the site of the
Excel.exe file which is generally in C:\Program Files \ Microsoft Office \ Officexx \.
Small importation
Microsoft Excel “file”
This function is usable only when the Clients miter is posted. It makes it possible to import a
list of customers directly in the base.
Being a question of a particular format, it is highly advised to export a virgin screen starting
from the module of management, to fill it under Microsoft Excel and to reimport it by using this
function.
To leave
“file finely”
Firm the module of management by recording the modifications in the base presents at the
screen so necessary.
To remove
“edition finely”
Destroyed the recording on which the cursor is, functions in all the lists.
Small Editer “edition”
Allows to publish the recording on which the cursor is. In the lists of estimate, the function
posts interface of management similar to that used to declare the estimates under Quick
Devis® Enterprise Edition. In the other lists, in fact simple zones of seizure are posted.
More on the interface of seizure of the interface of management, defer to the chapter Edition
d’un devis low, in this chapter.
New
finely “edition”
This function adds a recording to the posted list. The recording is called by defect “New”. If a
recording of this type already exists, a message announces it and the cursor is automatically
placed on the recording in question.
To refresh the data
small “edition”
This function makes it possible to post up to date lists by taking of account the possible
modifications carried out by the users customers since the opening of the base. It can be
called starting from all the lists.
To change the small password
®
“configuration”
Quick Devis Enterprise Edition © IAES (1991-2001) © QUOTALYS (2001-2007)
Page 166/210
®
Quick Devis Enterprise Edition
User’s Manual
Allows to assign a password to the base of management. This password will be then
necessary to open it but will not be necessary for the users customers who address the base
starting from Quick Devis® Enterprise Edition.
Numbers of the small
estimate “configuration”
This function is intended to define an automatic classification of the estimates at the total level,
i.e. for all the estimates carried out with a connection to the base of management. If your
classification must be different according to the user (change of prefix for example), define the
rules of classification on each station via the Paramètres function of the new estimates of small
Outils of Quick Devis® Enterprise Edition.
You can indicate a prefix made up of letters, key figures or words which will be employed
systematically in the composition of the number. It will be followed by a number of figures
which you will indicate. It is not necessary to begin classification with number 1, you can
specify another value.
If you want to insert a date in the prefix, it is enough to place it between backslashs, example \
DDMMYYYY \ indicates a date with format 01012006, \ MMYY \, a date with format 0506. You
can also insert the login of the user in the limit of 10 characters by using syntax \ LLLLL \.
Code FD \ LLLLL \ \ DDMMYY \ - with a user having for login “Jonhatan” will give like number
of DVJonh010206-000001 estimate.
The sequence number placed behind the suffix relates always to the suffix. Take into account
during the attribution length. If for example your estimates are coded \ MMYYYY \ - followed
sequence number, ensure that this last is sufficiently long to support the estimates which you
carry out in one month.
Determine whether the users are authorized to modify the number suggested. If such is the
case, they will not be able to in no case to take the number of an estimate which already exists
in the base.
If an estimate is destroyed in the base, you can re-use his number for a new estimate by
specifying “the first number available” in the suitable list. In the contrary case, the number
selected will be always that which follows the last number appearing in the base.
®
Quick Devis Enterprise Edition © IAES (1991-2001) © QUOTALYS (2001-2007)
Page 167/210
®
Quick Devis Enterprise Edition
User’s Manual
If you do not wish that the users be able to modify the options of classification starting from
their station, specify it in the suitable box.
Authorizations
small “configuration”
This function makes it possible to define the authorizations which the users starting from their
stations Quick Devis® Enterprise Edition will have.
By defect, the users can destroy customers in the central base starting from their station. They
can also import lists of customers to the format Microsoft Excel who will go then directly in the
central base. You can prohibit these operations to them by notching the suitable box.
Whatever your choice, the users will be able to always add customers starting from their
station.
The other choice makes it possible to specify if the users can modify their data of declaration a
posteriori. If you prohibit to them, the users will not be able to change the customer, nor
information relating to the estimate after having carried out their first declaration. They will be
able however to constantly seize a date of carryforward of the response without however being
able to deteriorate the date of answer initially envisaged.
To configure the columns
small “configuration”
This function makes it possible to define the site and the contents of the various columns of
the list of the estimates.
®
Quick Devis Enterprise Edition © IAES (1991-2001) © QUOTALYS (2001-2007)
Page 168/210
®
Quick Devis Enterprise Edition
User’s Manual
The list of right-hand side posts the columns in the order of posting. To add a column, select it
in the list of right-hand side and click on Afficher the column. To remove a column, select it in
the list of left and click on Masquer the column.
The column appearing in red cannot be removed but you can mask it by notching the suitable
box.
To configure a column, click on its heading in the list of right-hand side and specify its format,
its name and its alignment by using the suitable boxes. The formats answer the standard
Microsoft Excel.
For the columns receiving of the text, you can specify if a reference with the line must be
operated if the text does not enter the cell by notching the suitable box.
Totals are automatically carried out on the mains Rising and estimated Budget. For the other
numerical columns, you can post totals with the bottom of columns by specifying it in the
suitable list. You can also place a formula as a total, in this case, it to take into account its data
sources on the line of total.
You can enter a variable the Nom box of variable to couple the column with a variable of
environment appearing in a model Quick Devis® Enterprise Edition.
To enter a formula, click in the zone Série text or formula and enter the formula as you would
do it under Microsoft Excel. Validate by pressing the key <enter> when the seizure is finished.
You can, in the place of the formulas, to enter a list of choice so that the user is invited to
select a value or a text in a list. The lists cannot exceed 255 characters and the items must
imperatively separated by points commas.
To enter a list, click on the Séries button starting from the editor of formulas.
®
Quick Devis Enterprise Edition © IAES (1991-2001) © QUOTALYS (2001-2007)
Page 169/210
®
Quick Devis Enterprise Edition
User’s Manual
Click on “Ok” when you finished to register the formula or the series in the selected column.
The tool of configuration of the columns will also enable you to record or read profiles which
will be useful to transpose a configuration of a data base for another for example. These
profiles store all the configuration of the columns, with all evoked parameters Ci front.
Click on the button Aperçu/Profils to post the management of profiles.
The buttons To charge profile and Enregistrer profile can then be used to manage your files of
profiles.
To restore posting by defect, without any personalized column, click on the Rétablir button
posting by defect.
Names of the miters
small “configuration”
The lists by defect are called:
•
•
•
•
Customers
Calculators
Chargé d' affaires
Types of project
The named list “Customers” cannot have another name. On the other hand, the three other
lists can be famous if you want for example to carry out lists by “Agency” and by “Business”.
®
Quick Devis Enterprise Edition © IAES (1991-2001) © QUOTALYS (2001-2007)
Page 170/210
®
Quick Devis Enterprise Edition
User’s Manual
It is important to note that the list of the calculators is associated the revisions of the estimate.
There can thus be several calculators by estimate. If you re-elect this list, its operation will
remain associated with the revisions.
The two other lists are associated the estimate, and entered at the time of the first declaration
of the estimate.
It is important to specify the texts in the plural and in the singular because they are used to
post complete lists or individual items. The names specified here are propagated automatically
with all the estimates connected to the base.
To carry out a backup copy small “tools”
This function makes it possible to carry out a copy of the open base. By defect, this copy is
realized in the same repertory that the base is door the name Sauvegarde <nom base> <date
and heure>. However, you can specify another repertory using the Paramètres function of
safeguard.
It is imperative that the base is completely accessible to carry out a safeguard. If a user is
connected, an error message will appear.
Parameters of safeguard
small “tools”
This function makes it possible to define the frequency and the site of autosavings. It is highly
advised to implement it.
By defect, it is not envisaged any autosaving.
You can define the repertory of safeguard while clicking on the Définir button and the
frequency of safeguard by selecting the suitable value in the list.
The safeguards are carried out automatically during the closing of the base. It is thus
imperative of launching the module of management to carry out the safeguard. If for example
you specify a daily safeguard but which you launch the module only once per week, the
safeguard will be carried out only once per week.
To purge in accordance with the small filter “tools”
This function makes it possible to remove base all the estimates which do not correspond to
the criteria of the filter. It can be used for example each year to set out again with a base
removed from the estimates of the previous year.
With this intention, it is enough for you to apply the criteria of date to the filter so as to post
only the estimates to preserve and call the function.
®
Quick Devis Enterprise Edition © IAES (1991-2001) © QUOTALYS (2001-2007)
Page 171/210
®
Quick Devis Enterprise Edition
User’s Manual
By safety, this function always carries out a copy safeguards named Sauvegarde <nom of the
base> of the <date and heure>.
To optimize the base
small “tools”
A data base can often be optimized in terms of size and access time because the free sites left
by the destroyed data occupy unnecessarily of the place on the disc.
To optimize the opened base, it is enough to invite you this function.
By safety, this function always carries out a copy safeguards named Sauvegarde <nom of the
base> of the <date and heure>.
It is imperative that the base is completely accessible to carry out an optimization. If a user is
connected, an error message will appear.
Edition of an estimate
To publish an estimate in the module of management, double click on its line in the list of the
estimates or click on the button .
The majority of the operations described here can be carried out starting from the module of
management but also, with certain restrictions, starting from Quick Devis® Enterprise Edition.
An estimate, in terms of management comprises several phases materialized by various miters:
•
•
•
•
The declaration
Revisions
The result
Variables
The declaration makes it possible to specify the customer, the number of estimate, the wording like
various generic data. Use the drop-down lists or the Importer button to fill the fields quickly.
If a new customer is seized here, it will automatically come to be added to the list of the customers.
®
Quick Devis Enterprise Edition © IAES (1991-2001) © QUOTALYS (2001-2007)
Page 172/210
®
Quick Devis Enterprise Edition
User’s Manual
In the same way, you can add Types of project or the Chargé d' affaires while clicking on the
Nouveau buttons.
To register the data in the base, click on up to date the Mettre button in central base.
To have an amount, an estimate must have at least a revision. While clicking on the miter Revision,
you reach all the revisions of the estimate. You can post with revisions by using the buttons << and
>>. The revisions of an estimate can go from A to ZZ.
Only the revision in progress can be seized, the preceding revisions being grayed. If you want to
return to a former revision, post the last revision validates and click on the button Détruire revision.
For each revision, you can specify a calculator by unrolling the suitable list or add one of them while
clicking on the Nouveau button. The elements thus added come to supplement the lists of the module
of management.
®
Quick Devis Enterprise Edition © IAES (1991-2001) © QUOTALYS (2001-2007)
Page 173/210
®
Quick Devis Enterprise Edition
User’s Manual
The prices of the alternatives and options appearing here correspond to recoverable fields in the
various states and standard mails under Quick Devis® Enterprise Edition.
To validate a revision, click on the Déclarer button. The amount of the estimate registered in the
corresponding line in base of management will be always the rising one of the last validated revision.
The Résultat miter makes it possible to specify if an estimate is gained or lost.
If the estimate is gained, you can enter the amount of attribution. Click on the Déclarer button to
validate the recording. It is the rising one specified here which will go in the line of the estimate under
the base of management.
If your base of management comprises free fields intended for the seizure (not comprising neither
formula, nor variable of environment), the interface of management posts a Variables miter.
®
Quick Devis Enterprise Edition © IAES (1991-2001) © QUOTALYS (2001-2007)
Page 174/210
®
Quick Devis Enterprise Edition
User’s Manual
This miter, you can enter of the data the cells appearing in white (authorized with the seizure). If lines
are associated variables of environment, they do not appear here because they are prohibited with
the seizure (filled directly by Quick Devis® Enterprise Edition).
You can all the same reveal these lines while clicking on the right button of the mouse after having
placed the cursor on the table.
To register the variables seized in the base, click simply on up to date the Mettre button in central
base.
You can constantly print the data of management specific to an estimate while clicking on the
Imprimer button. You will be able to then choose what you want to print.
All the modifications operated in the interface of management are propagated automatically with the
corresponding estimates under Quick Devis® Enterprise Edition. Thus, you can starting from the
module management modify a customer, destroy a revision, etc… even if the user of the estimate is
not authorized to do it starting from his station.
The filters
The module of management proposes a system of filters which makes it possible to post the
estimates according to all criteria's available in the columns. The filters can be parameterized in limp
texts and the lists being with the bottom of the list of the estimates.
To restore the parameters of the filter by defect, you can click on the button All the Estimates. To
restore the broadest fork of dates simply, click on the button being between the boxes of dates.
When your filter is parameterized, apply while clicking to the Appliquer button in order to post only the
estimates which answer the filter. You can record your filter by providing a file name in the base
being under the list and click on the Enregistrer button. The new filter appears then in the list.
To apply a preregistered filter, it is enough for you to click on his name in the list.
®
Quick Devis Enterprise Edition © IAES (1991-2001) © QUOTALYS (2001-2007)
Page 175/210
®
Quick Devis Enterprise Edition
User’s Manual
The filters also comprise the key of classification in progress. To establish a key of classification, you
can use the Classer list by which is under the totals. You can also click on the headings of columns;
the first click produces an ascending classification, a second click on the same column produces a
downward classification.
To post intermediate totals relating to the keys of classification, choose a key of classification with
totals in the drop-down list. Totals will appear automatically with each change of the sort criterion.
The files of filters have a suffix .qdf and are placed in the user profile (generally C:\Documents and
Settings \ <nom of the utilisateur> \ Application Dated \ Quick Devis \). They are thus specific to the
user and not at the base of management. Parameters of the columns on the other hand (formats,
alignment, formulas…) are specific to the base of management.
The simplified management tools
You can manually create the database clicking the “New customers’ database” button and providing
a name in the management window.
To call the management tool, click the button
. The following window will appear.
You can enter the fields manually or import them from the customers’ database clicking the “Import a
customer” button and selecting the customer in the list.
The new customers are automatically recorded in the database when you click the “Ok” button.
You can click the headings of the customers’ lists to change their sorting order. You can sort
customers by customers’ numbers, customers’ companies, customers’ addresses or contacts’
names.
A customer is identified in the database by its number. This field is thus requested and you cannot
record a customer who has exactly the same properties as another even if he has a different number.
You can change customers’ database at any time by clicking the “Set customers’ database” and
selecting a new customers’ file (.QDC)
®
Quick Devis Enterprise Edition © IAES (1991-2001) © QUOTALYS (2001-2007)
Page 176/210
®
Quick Devis Enterprise Edition
User’s Manual
Customers’ database files (.QDC) are Microsoft Access files. You can create them or modify them
using this program. However, in such a case, avoid usage of “Null” values in the fields.
If you wish to manage your customers’ database, click the ‘Import a customer’ button to display the
window as shown below:
Within this window, you can append customers, remove them or change their data by clicking the
appropriate buttons.
You also can export the whole database to an Excel file and import a customers’ file matching this
format in a Quick Devis customers’ database. If you use this feature, make sure the input format will
match the one expected by Quick Devis. The best solution consists in exporting an empty Excel
frame from Quick Devis first, and then, completing it under Excel.
If requested, you can re import an Excel file in an existing Quick Devis customers’ database. In such
a case, customers’ data will be simply updated if the customers’ numbers match in the Excel file and
in the Quick Devis database.
Technique tips
The data bases of management are bases with the format Microsoft Access (Jet 3.51) You can use
Microsoft Access to publish them with the proviso of avoiding converting them with the opening.
The principal table with for name Quotation, it is related to a named table VersionTable by its QUOVirtualNumber field which is not other than the creation date of the estimates.
The table containing the lists of customers has as a name Client, that of the types of
ProjectKindTable projects, that of the WhoQuoteTable calculators and that of chargé d' affaires
WhoManageTable.
®
Quick Devis Enterprise Edition © IAES (1991-2001) © QUOTALYS (2001-2007)
Page 177/210
®
Quick Devis Enterprise Edition
User’s Manual
A named table ColNames contains all the characteristics of the columns (formats, alignment,
formulas…). The NamingTable table contains when with it the names of the lists nommables.
®
Quick Devis Enterprise Edition © IAES (1991-2001) © QUOTALYS (2001-2007)
Page 178/210
®
Quick Devis Enterprise Edition
User’s Manual
The Reports Generator
The reports generator lets you print and export your estimates as you wish by using different
presentations (profiles) of your estimates.
A profile is a template which defines the appearance; it sets the displayed columns, the page
headings, the detail level, etc. When a profile has been defined, it can be recorded and loaded from
any estimate in order to produce a specific appearance.
You do not need, when using Quick Devis® Enterprise Edtion to build your estimate in the manner
you wish to present it: You will just have to load a specific profile into the reports generator so that the
estimate will automatically take the profile’s appearance.
The reports generator is a program integrated into Quick Devis® Enterprise Edtion which can be
called using the function:
Reports generator
®
“File” menu
Quick Devis Enterprise Edition © IAES (1991-2001) © QUOTALYS (2001-2007)
Page 179/210
®
Quick Devis Enterprise Edition
User’s Manual
The reports generator offers several buttons which allow definition of the report to be produced.
Load profile
This function displays a menu containing up to 25 profiles. They match the last profiles loaded
or recorded. Simply click on the profile name to load it. The profiles appear in their order of
use; most recent being on top of the list.
If you load more than 25 profiles, the oldest will be pushed out of the list and the new one will
take the top place.
You can load a profile from the disc clicking the “Load report profile” button and selecting the
desired file.
You can also use the standard profiles delivered with Quick Devis® Enterprise Edtion clicking
the “Show basic profiles” button. It is recommended that you use these profiles to create your
own documents in order to avoid having to define all the settings.
If you want to clear the list, click the “Clear profiles list” button. Then, the list will be
automatically rebuilt progressively.
Click the “Cancel” button to close the window and return to the reports generator.
Reset profile
This function lets you display a profile which will strictly conform to the Bill of Quantities
entered under Quick Devis® Enterprise Edtion. The profile will have no heading. Use it to start
defining a new profile.
If you encounter a problem while loading a profile, use this function and retry in order to
determine if the problem is in the estimate or the profile you are trying to load (if the report
generator works with an empty profile, the problem is certainly in your profile). It will then be
necessary to rebuild it.
Kind of profile
You can display 3 different kinds of profiles using the reports generator:
•
•
®
The Bill of Quantities without detailed rows which comes with the same appearance as
the B.o.Q. entered under Quick Devis® Enterprise Edtion
The Bill of Quantities with detailed rows which displays the B.o.Q. and the detailed rows
of each task (the lines of the detailed view)
Quick Devis Enterprise Edition © IAES (1991-2001) © QUOTALYS (2001-2007)
Page 180/210
®
Quick Devis Enterprise Edition
•
User’s Manual
The detailed rows only which let you print the expenses as you want to see them and
not necessarily as you entered them
To select a kind of profile, click simply in the appropriate drop-down list.
Zoom
This function lets you increase or decrease the size of the displayed profile on the screen. It
does not affect the printed or the exported size.
Show descriptions or task items on sub-totals
This function, applicable to B.o.Q. based profiles only lets you include in the wording of the
sub-totals the reference mark of the chapters (example: sub-total task: 1) or the first line
constituting the description of the chapters (example: sub-total: Electric Components)
The last solution implies that the description used in the first line of the chapter is not too long
so that it can be displayed on one line.
Rounding levels
This function displays the rounding definition window (“Options” menu). When the roundings
are defined, the report generator is displayed again with the new rounding settings. To set the
round-offs, read the Rounding settings function in this manual.
Amounts in words
This function lets you display amounts in words under the amounts which appear in the report.
It is applicable only to B.o.Q. style reports. You can display the amounts in several languages
and place them under the amounts in figures.
If you do not wish to use the default currency suggested, enter the usual names of your
currency for its singular and plural forms. The hundredth of the currency should also be
mentioned.
Select the gender of the currency and the gender of its hundredth if applicable to the selected
language.
Specify the column which contains the values to be converted into words (I if the words relate
to total prices and H if they relate to unit prices).
®
Quick Devis Enterprise Edition © IAES (1991-2001) © QUOTALYS (2001-2007)
Page 181/210
®
Quick Devis Enterprise Edition
User’s Manual
Check the appropriate box if you wish the amounts in words to be preceded by the text
appearing in the “unit” column. Example “The set: Twelve thousand euros”.
The two drop-down lists appearing at the bottom of the window let you specify the range of the
wording conversion and the language to be used.
Adjust line spacing
This function lets you adjust the height of the blank rows. The displays are differents according
to the profile from which it is called (B.o.Q. without or with detailed rows).
In the first case, the function lets you specify the height of the lines between each task. In the
second case, it lets you specify the row height in the detailed view.
First page header
This button lets you build personalized profiles by defining the heading of the first page and the
structure of the profile.
®
Quick Devis Enterprise Edition © IAES (1991-2001) © QUOTALYS (2001-2007)
Page 182/210
®
Quick Devis Enterprise Edition
User’s Manual
To define a specific profile, preferably get an empty profile (clicking on the button ) or a
preset profile and click the button
.
. Select the rows below the lines you wish
You can insert up to 50 rows clicking the button
to insert before clicking this button.
You can then enter texts and values and format them using the button . You can also insert
data resulting from the estimate to customize you profile according to the estimate from which
.
it is called. To do so, click on the button
If you wish to set up borders in the heading, select the cells and click the button .
n
To display your logo, use the function
to import a .WMF file or more easily, copy and paste
an image from Microsoft Excel or Microsoft Word.
To display all available columns, click the button
the button .
. To hide columns, select them and click
To return to the report view after definition of the heading, simply click again on the button
Record your profile under the name of your choice using the button .
.
Next pages headers
This button lets you define the heading of the pages starting from the second page to the last
page of the document. Its operation is identical to that described for the heading of the first
page.
You can insert up to 10 lines in the heading of the next pages.
Bottom pages
Use this button to append some pages to your document. Its operation is identical to that
described for the heading of the first page. You can place formulas and paste names in the
bottom pages as you would do in the heading pages.
Note: If you want to use a formula to be applied to the whole resulting document, make sure
your formula includes the line 1. Example: SUM(I1:I10000) will return the total of the rows 1 to
10’000 in the final document but the formula SUM(I2:I20) would apply to the bottom pages
area only and will return the total of the rows 1’002 to 1’020 if the first row of the bottom pages
is the row 1’000 of the final document.
You can insert up to 500 lines in the bottom pages.
Insert / Delete rows
(accessible in edit mode only)
These buttons let you insert rows before the selected rows or to remove the selected rows. If
no selection is active when these functions are called they relate to the last line of the heading.
Cell format
®
(accessible in edit mode only)
Quick Devis Enterprise Edition © IAES (1991-2001) © QUOTALYS (2001-2007)
Page 183/210
®
Quick Devis Enterprise Edition
User’s Manual
This button lets you define the format of the selected cells. You can set alignments, colours,
borders, formats, etc.
(accessible in edit mode only)
Paste a name
This button lets you paste a variable which comes from the estimate in the heading of the
profile in order to adapt the profile automatically regarding the estimate from which it was
called.
The data relating to the customer coming from management declaration in the estimate are
available in this function (names, addresses, companies, etc)
Set borders
(accessible in edit mode only)
This button lets you define the borders of the selected cells.
Insert an image
(accessible in edit mode only)
This button lets you import a .WMF image (Windows Metafile) directly to the heading of a
profile.
If your image does not have a .WMF format, import it under Microsoft Excel or Microsoft Word,
and select “Paste data from the Windows
select it and copy it. Then, call the function
clipboard”.
Important: Avoid using large images size to save printing time. A large image imported and
reduced in the heading using the mouse is still a large image in memory. Thus take care in
such a case to reduce it before importing it to the heading.
Display all columns
(accessible in edit mode only)
This button lets you display all available columns in a profile, including the costs columns.
Hide columns
(accessible in edit mode only)
This button lets you hide the selected columns.
(Ctrl X - accessible in edit mode only)
Cut
This button lets you copy and clear the selected cells.
Copy
(Ctrl C - accessible in edit mode only)
This button lets you copy the selected cells.
Paste
(Ctrl X - accessible in edit mode only)
This button lets you paste the cells previously copied in the selected cells.
Font names
®
(accessible in edit mode only)
Quick Devis Enterprise Edition © IAES (1991-2001) © QUOTALYS (2001-2007)
Page 184/210
®
Quick Devis Enterprise Edition
User’s Manual
This function lets you select a font name in a list. The font name applies to the selected cells.
You can also type the name in the drop-down list.
Font size
(accessible in edit mode only)
This function lets you select a font size in a list. The font size applies to the selected cells. You
can also type the size in the drop-down list.
Bold / Italic / underlined
(accessible in edit mode only)
This function lets you change the typeface of the selected cells. You can use bold, italic or
underline.
Alignment
(accessible in edit mode only)
These buttons respectively let you align left, center, right or center on several columns the
texts appearing in the selected cells. Prefer this function which lets you center a text on
several columns to the merging of cells because the latter cannot be exported to Microsoft
Excel.
Colours
(accessible in edit mode only)
These buttons respectively let you modify the background colour and the font colour of the
selected cells. You can also change the pattern of the cells.
Tree view to be printed
This function lets you select the branches to be hidden in the edition. This is useful when you
wish to print chapters only.
®
Quick Devis Enterprise Edition © IAES (1991-2001) © QUOTALYS (2001-2007)
Page 185/210
®
Quick Devis Enterprise Edition
User’s Manual
When branches are collapsed, a button “Expand all” lets you display the tree structure in
conformity with that in the B.o.Q.
Managing Page breaks
These buttons respectively let you insert a page break at the place where the cursor is and to
remove the page break on which the cursor is.
To move a page break, place the cursor on it and click the left mouse button. Keep the button
pressed while moving the mouse to the desired location and release the button.
You cannot move a page break outside a page. In such a case, Quick Devis® Enterprise
Edtion automatically generates a page break to fit the calculated size.
Important: The page breaks are valid only for the current session of the report generator. They
cannot be stored in the profiles because those must adapt to any estimate. If you need specific
functionalities which allow preserving page break positions, consider using Quick Devis®
Enterprise Edition which lets you store the images of the reports in the estimates.
Setting columns
(accessible in “Detailed rows only” mode)
This function lets you define how the detailed rows should be displayed. Its operation is strictly
identical to the function “Settings of detailed view or nomenclatures” described in the chapter
Common functions in this manual.
It is thus possible to arrange columns of detailed view in a completely different way from the
one in which the estimates were built. These presentations are then stored in profiles you can
use with any estimate.
Display B.o.Q. rows or all the rows
(accessible in “Detailed rows only” mode)
This function lets you include in the “detailed view” type profiles the text lines appearing in the
Bill of Quantities, including those of the chapters. If the button is released, only the lines that
refer to the displayed tasks are shown.
When you display all the lines, you automatically get totals and sub-totals on each chapter and
a grand total at the bottom of the estimate.
Show gridlines
This function lets you display the grid lines in a report. If the grid is visible on the screen, it will
be also printed.
Save profile
This function lets you record the profile appearing on the screen with all its parameters. You
can store your profiles wherever you wish. Quick Devis® Enterprise Edtion automatically
.
appends recorded profiles to the list accessible using the button
Print
®
Quick Devis Enterprise Edition © IAES (1991-2001) © QUOTALYS (2001-2007)
Page 186/210
®
Quick Devis Enterprise Edition
User’s Manual
This button prints the displayed profile. You can print in two different ways: directly or via
Microsoft Excel.
The second method sends the document to Microsoft Excel and prints it using the Excel
printing engine. This method can be interesting if you have to print huge documents because
the Microsoft Excel printing engine is faster than the one of Quick Devis® Enterprise Edtion.
The documents are printed according to the page settings defined using the button
can specify the range of pages to be printed by using the appropriate check boxes.
. You
Page settings
This function lets you select the printing device and the paper to be used. It also lets you
define the text you want to print in the headers and footers of the documents.
The “Print black & White” check box is particularly useful for printing clear black & white copies
of coloured documents.
All these settings are recorded in the profile except the name of the printer. For this reason,
the loading of the profile automatically configures the page.
®
Quick Devis Enterprise Edition © IAES (1991-2001) © QUOTALYS (2001-2007)
Page 187/210
®
Quick Devis Enterprise Edition
User’s Manual
The following codes can be used in the headers and footers:
•
•
•
&F (prints the name of the estimate file)
&D (prints the date of printing)
&P (prints the page number)
Note: You cannot print the total number of pages because in order to display rapidly the data
(without requiring a complete pagination of the document) Quick Devis® Enterprise Edtion
calculates progressively the position of page breaks while viewing or printing. If you wish to
print the number of pages in the document, export it to Microsoft Excel first and place the code
&N in its header or in its footer.
Print preview
This function lets you preview the document. You can move within the pages using the
“Previous page” and “Next page” buttons or directly reach a page clicking the “Reach” button
and providing the page number to be reached.
The printing and page settings functions are available from the preview window.
Quit
This button closes the reports generator. While closing, the displayed report is memorized so
as to be displayed automatically next time the reports generator is launched.
®
Quick Devis Enterprise Edition © IAES (1991-2001) © QUOTALYS (2001-2007)
Page 188/210
®
Quick Devis Enterprise Edition
User’s Manual
Export to Microsoft Excel
This function exports the displayed profile to Microsoft Excel with all its data and images.
In order to send the document to a customer for example, you can remove the hidden
columns. If you wish to use the document to carry out calculations, you may consider removing
the headings; check the “Remove page headers” box to do so.
The “Transfer print settings” box lets you export to Microsoft Excel the entire data (colours,
page settings, printing area, etc.) so as to get under Excel a document strictly in conformity
with the displayed document.
If you do not check the “Launch Microsoft Excel” box, Quick Devis® Enterprise Edtion will
prompt you to provide a file name.
The two bottom check boxes require Microsoft Excel version 97 or greater installed on your
computer.
Export to Microsoft Word
This function lets you export the selected contents to Microsoft Word.
The “Convert array to texts” lets you get text under Microsoft Word which can be directly used.
If it is not checked, a table is transmitted to Microsoft Word.
The second box lets you remove the “Total” and “Sub-total” figures which are generally not
needed in a Word document.
You can automatically launch Microsoft Word by checking the third box.
This function requires Microsoft Word 97 or greater installed on your computer.
To launch an Excel file with Macro
®
Quick Devis Enterprise Edition © IAES (1991-2001) © QUOTALYS (2001-2007)
Page 189/210
®
Quick Devis Enterprise Edition
User’s Manual
This function makes it possible to launch macro written in VBA (Visual BASIC for Applications)
under Microsoft Excel starting from the generator of states while passing to him the result of a
profile like input datum. The call the macro one generates the following stages:
1.
2.
3.
4.
Loading of the specified profile
Export of the profile towards a temporary Excel file
Copy file containing the macro one towards a temporary file
Load-and-go of the file containing the copy of macro Excel
In this last stage, the macro one then created a resulting file with the Excel format or in another
format after having carried out page-settings necessary. Such macro can also be used for the
interfacing with systems of management.
To specify macro, click on the button
so as to post the table of the macros below:
Select macro among the 10 possible ones and publish by clicking on the button “Parameters”
and inform the various fields as follows:
Name the macro one
An unspecified name which will enable you to identify the macro one by its button of
call.
Name of the file to be created while exporting
The name of the file Excel (.XLS) which will be exported at the time of the call and will
be read by the macro one. This file will thus comprise the data input and will be the
image of the selected profile. This file name can be seized, it is not necessary that there
exists because it will be recreated with each launching of macro. The repertory chosen
for this file must be accessible in writing as in reading.
Name of the file master containing the macros
The name of an existing file containing the macro one to carry out in its Auto_Open
program ().
The repertory chosen for this file can be accessible only in reading, Quick Devis never
written there.
®
Quick Devis Enterprise Edition © IAES (1991-2001) © QUOTALYS (2001-2007)
Page 190/210
®
Quick Devis Enterprise Edition
User’s Manual
Name of file ms resulting Excel to open
It is in this file that the file containing will be duplicated the macro one. It is him which
will be carried out. The repertory chosen for this file must be accessible in writing as in
reading.
Name of the file profile to be used
It is about the file profile which will be charged before export towards the file specified
like “Name with the file to create while exporting”. It is thus him which will impose the
format of the data transmitted to macro Excel. The repertory chosen for this file can be
accessible only in reading, Quick Devis never written there.
The behavior the macro one can be specified thanks to the various check boxs being with the
right-hand side of the window.
To remove the masked columns
If this box is notched, the columns masked possibly present in the profile will be
removed before export, thus shifting the columns being on their line towards the left.
The macro one will have to hold account of it if it employs data appearing in the shifted
columns.
To remove the heading of first page
This box makes it possible to preserve only the useful data at the time of the call the
macro one. The lines composing the heading of first page are removed if this box is
notched.
To remove the heading of the following pages
This box makes it possible to avoid having to take account of the possible page breaks
in the programming of the macro one. The lines composing the heading of pages 2 and
higher are removed if this box is notched, presenting a document then a uniform and
without heading.
To remove the heading of the options
This box acts like the preceding one but, for the zone of options.
To launch ms Excel
®
Quick Devis Enterprise Edition © IAES (1991-2001) © QUOTALYS (2001-2007)
Page 191/210
®
Quick Devis Enterprise Edition
User’s Manual
This function makes it possible to launch Microsoft Excel from the macro one directly
and to post thus possibly the result of macro after execution.
Press simply the button “To validate” after having parameterized your macro then notch the
casz “To post the button” if you wish that the macro one be able to be launched starting from
the generator of state by a simple button.
If you do not wish that the macro one be materialized by a button, do not notch the box. You
will be able to then launch the macro one while clicking on and by then clicking on the button
“Throw” corresponding to macro.
Administrators: The parameters of the macros are stored in the user profile (generally
C:\Documents and Settings \ <nom of the utilisateur> \ Application Dated \ Quick Devis \), in a
file named QDXLMacr.INI. It is not advised to modify this file manually.
If you need to parameterize macros in an identical way on several stations, it will be enough
for you to copy the file after parameter setting towards the profiles of the various users.
To program macro under Microsoft Excel, it is important to know some “easy ways”:
1. Use a routine called Auto_Open () to store your macro. In this manner, it will start
immediately after the call.
2. Test the name of the file as of the first lines of the routine so as to carry out it that if it is
about the file copied by Quick Devis and not if it is about the file master containing the
macro one.
3. Specify in one of the cells of the file master containing the macro one, the way and the
name of the file comprising the data input (exported.xls in B2 cell in our example). This
will make it possible to easily move the file master from one repertory to another without
having to modify the code of macro.
4. Decontaminate automatic calculation at the beginning of macro so as to accelerating
the treatment and reactivate at the end of macro.
5. Activate the sheet containing the result at the end of macro so that the user
automatically has under the eyes the resulting document. If it is simply a question of
generating a file, records it and leaves Excel directly from the macro one.
6. If you do not know how one writes a specific code in VBA under Excel, use the function
“To record macro” small “Tool” then manually carry out what you wish that the macro
one makes. Read then code VBA generated under the editor Visual BASIC and use this
code in your macro.
Here a common language in VBA which could be the base of all macro Microsoft Excel called
starting from Quick Devis® Enterprise Edition.
®
Quick Devis Enterprise Edition © IAES (1991-2001) © QUOTALYS (2001-2007)
Page 192/210
®
Quick Devis Enterprise Edition
User’s Manual
The first three lines make it possible to avoid launching the macro one automatically when you
open the file master directly under Microsoft Excel. Only the copies the macro one will be
carried out (result.xls in our example)
The two following lines make it possible to decontaminate automatic calculation to increase the
speed of treatment.
Then, one tests if the B2 cell of the file includes/understands a bond well towards the source
file waited (exported.xls in our example)
Your code will be placed then and will have as data source SourceWBK and SourceWSH, the
target data could be registered in the sorter containing the copy of macro, that is to say
MacroWBK.
®
Quick Devis Enterprise Edition © IAES (1991-2001) © QUOTALYS (2001-2007)
Page 193/210
®
Quick Devis Enterprise Edition
User’s Manual
Automated mails
The automated mails under Quick Devis® Enterprise Edtion are carried out by transmitting
parameters to Microsoft Word. You need Microsoft Word 97 and Microsoft Excel 97 or greater to use
this function. (Excel being used as a bridge for the communication with Word)
To create your own automated mail without risk of error, the best solution consists in modifying the
sample mail provided with Quick Devis® Enterprise Edtion. Do not try to launch the mail document in
any other way than through Quick Devis® Enterprise Edtion because you might break the links.
First of all, ensure that the macros are well activated under Microsoft Word by launching it and calling
the “Tools / Macro / Security” function. Then select a level allowing the macro operations (low or
average). Then, close Microsoft Word.
Launch Quick Devis® Enterprise Edtion, open an estimate and enter some data in the management
form (customer’s name, project’s name, etc.) calling the “Declaring estimate” function from the
“Tools” menu. Then, call the function “Ms Word mail” from the “File” menu.
Open the file named “Sample mail” which is located in the directory you chose for the standard mails.
This directory was defined using the “Configure an estimate” procedure described at the beginning of
this manual. If you did not carry out this procedure, you can directly open the sample mail from the
Quick Devis® Enterprise Edtion installation directory (\Program Files\Quick Devis V6)
Important: You must keep the <SHIFT> key pressed during all the opening process so that Microsoft
Word will not merge the fields and thus, preserve the field codes. If a question concerning the
execution of a request is posted, answer in the affirmative.
The document appearing on the screen should be in conformity with the above model. Make changes
to match your needs but never enter the field codes manually. To insert a field code, use the function
“Insert merging field” located in the “Merging functions” toolbar of Microsoft Word.
®
Quick Devis Enterprise Edition © IAES (1991-2001) © QUOTALYS (2001-2007)
Page 194/210
®
Quick Devis Enterprise Edition
User’s Manual
If the toolbar does not appear in the menu, click “Tools > Merging functions > Display toolbar”
You can also use the usual copy and paste functions to insert the merging fields by copying these
fields from those which are proposed at the bottom of the standard mail document.
When you have finished, it is imperative you record the resulting document under a Word model
format (.DOT) and not as a document (.DOC). Preferably save this document in the directory defined
to receive standard mails (“Options > Default settings”) under Quick Devis® Enterprise Edtion.
To use your new mail template, simply call the “Ms Word Mail” function in the “File” menu and select
your model without pressing the <SHIFT> key. Answer in the affirmative if Word ask you to launch a
SQL request. You should then obtain a document as follows:
If the merging function has not worked and you get a document with the fields instead of their
button under Word and ensure that you strictly followed the procedure
contents, press the
described above for the creation of the document and check that the .DOT model created matches
the data located in the file named QDWORDFS.XLS (in the same directory as the model). Also make
sure that the macros of Microsoft Word are activated.
To check the links to QDWORDFS.XLS file, open the .DOT file from Quick Devis® Enterprise Edtion
keeping the <SHIFT> key pressed according to the procedure described above and click the “Open
data source” in the “Merging tools” bar. Then, select the file QDWORDFS.XLS which is in the same
directory as the model and specify that you want to use the first sheet of the Excel workbook as a
data source. Accept and record your model in a .DOT format.
®
Quick Devis Enterprise Edition © IAES (1991-2001) © QUOTALYS (2001-2007)
Page 195/210
®
Quick Devis Enterprise Edition
User’s Manual
Important advice: Use as a model for all your standards letters the sample file provided with Quick
Devis® Enterprise Edtion which is located in the installation directory \Program Files\Quick Devis
V6\). Using this model, you should not meet any problem while merging, even if you move the
resulting file. Indeed, this sample file contains VBA macros which automatically detect the installation
directory of the file and will locate the data source.
®
Quick Devis Enterprise Edition © IAES (1991-2001) © QUOTALYS (2001-2007)
Page 196/210
®
Quick Devis Enterprise Edition
User’s Manual
The safety of the estimates
In order to offer an optimal safety, the changes you operate in your estimates are recorded “in line” in
the file. However, this file is a temporary file which resides on your local hard disk in order to offer
good performances.
The principle used while opening an estimate is as follows:
1. Quick Devis® Enterprise Edtion checks that a copy of the file requested (which might have
been closed in an incorrect way) does not already exist in the “cache” directory. In such a
case, it would directly open the file form the “cache” with a message announcing that the file
was recovered.
2. If not, the .DVZ file selected is expanded into the local “cache” directory (making a simple copy
if it is a .DEV file)
3. It opens the expanded file located in the “cache” directory
4. It writes a flag indicating that the file was closed in a wrong way in anticipation of a possible
problem.
The principle used while closing an estimate is as follows:
1. Quick Devis® Enterprise Edtion compresses the estimate (which is located in the “cache”
directory) to a temporary file which will be placed in the “Last Save QDV” directory.
2. If the process of compression worked correctly (checking of the integrity), Quick Devis®
Enterprise Edtion will copy the resulting file to its initial location with a temporary suffix.
3. If the process of copying worked correctly, Quick Devis® Enterprise Edtion will delete the
original file and will assign the name of the original to the file copied.
4. Lastly, it will mark the .DVZ file recorded with a flag meaning that it does not contain any errors
in order to avoid opening it from the “cache” directory at the next opening.
The principles described above prevent you from any risk of loss of data. If however you wish to
restore a former version, call the “Recover an estimate” function in the “Tools” menu which enables
you to retrieve tracks of all your recordings.
These safety tracks are stored in stacks whose size is defined using the “Performances and Safety”
functions in the “Tools” menu. They are necessarily placed on a local disc in order to offer good
performances. The files are placed in the user’s profile directory (generally C:\Documents and
Settings\<user’s name>\Application Data\Quick Devis\)
The safety directories are:
•
•
•
CacheQDV (work directory)
LastSaveQDV (stack for last saved files)
RecoverQDV (original files which have been recovered or repaired)
®
Quick Devis Enterprise Edition © IAES (1991-2001) © QUOTALYS (2001-2007)
Page 197/210
®
Quick Devis Enterprise Edition
User’s Manual
The formats of estimates files
Quick Devis® Enterprise Edtion manages two different formats for the estimates, .DVZ files and .DÉV
files.
The first are compressed estimates in ZIP format, the second are expanded estimates (with Microsoft
Access format) and they can be read directly under Microsoft Access.
When you create a new empty estimate, an expanded file (.DEV) is automatically created; it is then
transformed into a compressed file (.DVZ) with the first recording. The original .DEV file is removed if
the compression process ended successfully).
If you wish to open a .DVZ file under Microsoft Access, you will have to expand it first. To do so, use
the “Compression tools” function in the “Tools” menu.
®
Quick Devis Enterprise Edition © IAES (1991-2001) © QUOTALYS (2001-2007)
Page 198/210
®
Quick Devis Enterprise Edition
User’s Manual
Converting an Excel file to a database
Quick Devis® Enterprise Edtion lets you export an article database to Microsoft Excel and convert an
Excel workbook to an articles database so as to use for example tariffs you have obtained in an Excel
format.
To carry out such a conversion, you must create an empty frame which you will have to fill using copy
and paste functions under Excel. To create an empty frame, call the function:
Create an empty frame
“Data” menu
Save the frame generated with a new name and open the file which contains your data.
Using successive copy / paste operations fill each column. Do not forget to fill the “Currency” field
with a 3 character code.
If you wish, you can associate a tree structure to your database by filling the “Tree View” sheet of the
Excel workbook.
To create a coherent tree structure, read the Creating or editing a tree structure function in the
chapter The Articles Manager.
Specify to which field your tree structure must be linked by typing the character X in the appropriate
cell.
®
Quick Devis Enterprise Edition © IAES (1991-2001) © QUOTALYS (2001-2007)
Page 199/210
®
Quick Devis Enterprise Edition
User’s Manual
When your Excel workbook if filled, save it and call the function:
Convert a frame
“Data” menu
Select the Excel file you recorded, click the “Convert” button and provide a name for the new
database. Place it in the directory you indicated to receive the databases.
If the conversion process is successful, you will simply get the message “conversion terminated”. If it
failed, an error message will be posted and the column N will contain a specific error message for
each row containing an error. Correct these errors and launch the operation again.
If the database specified already exists, Quick Devis® Enterprise Edtion will prompt you to replace it
or add the new articles to the database. In this last case, the articles will be added only if they did not
exist already in the original database. About this, remember that articles are regarded as identical in
a private database since their 5 key fields are identical (“Description”, “Reference”, “Family”,
“Manufacturer” and “User field”).
You can carry out the opposite operation at any time by opening the database under Quick Devis®
Enterprise Edtion and exporting it to Microsoft Excel.
®
Quick Devis Enterprise Edition © IAES (1991-2001) © QUOTALYS (2001-2007)
Page 200/210
®
Quick Devis Enterprise Edition
User’s Manual
Converting an Excel file to an estimate
Quick Devis® Enterprise Edtion lets you quickly convert a Microsoft Excel file to an operating
estimate.
You must prepare the Excel file as follows:
The description must appear in the column C and must never exceed 255 characters. The unit will
appear in the column D without exceeding 10 characters. The quantity will be in the column E in a
numerical format with or without decimals. The item of the task will be placed in the column B using a
text format and will not exceed 15 characters.
Column A will be necessarily codified according to the “depth” of the tree structure of the estimate.
The values can range from 0 to 7 and match their overlapping level in the structure. Thus, in our
example, line 1 will be the title of the estimate (you cannot have a level zero), lines 2 and 22 will
match chapters and lines 3, 10 and 16 match sub-chapters.
Lines 5 to 9, 11 to 15, 17 to 21 and 24 to 28 are terminations of branches and thus correspond to
tasks to de detailed in the detailed view.
®
Quick Devis Enterprise Edition © IAES (1991-2001) © QUOTALYS (2001-2007)
Page 201/210
®
Quick Devis Enterprise Edition
User’s Manual
You can insert between two tasks or chapters as many lines as you wish as in the example above in
lines 4 and 23. The data of these lines will belong to the tasks which “carry them” (the tasks
appearing in lines 3 and 22 in our example).
After coding, you can convert the file to an estimate using the following function:
Convert an Excel file to an estimate
“File” menu
Simply select the Excel file to be converted and you will get an estimate file immediately. When the
file will be converted, you will have to import you usual environment settings using the function “Get
settings from another estimate” in the “Tools” menu.
During the conversion process, Quick Devis® Enterprise Edtion preserves most of the attributes
appearing in the column C: italic, bold, underline, font sizes, font names and font colours. The
possible backgrounds or patterns of cells are not reproduced. The attributes of the other columns are
not considered.
Important: Quick Devis® Enterprise Edtion does not support all features of Excel files and in
particular the macros, the pictures and the charts. In order to ensure a perfect conversion, it is
recommended that you start from a new Excel workbook and paste data in it using the function
“special paste / values only”, then “special paste / formats only” without copying the entire page but
only the necessary cells. These operations ensure that the resulting Excel file will be free from any
object which could not be supported by Quick Devis® Enterprise Edtion.
®
Quick Devis Enterprise Edition © IAES (1991-2001) © QUOTALYS (2001-2007)
Page 202/210
®
Quick Devis Enterprise Edition
User’s Manual
Installing a license server
To get a network protection with floating licenses, you must have a server which exposes a shared
directory with read and write access from all of the Quick Devis® Enterprise Edition users
The host of the license server can be any computer on the network on which you will share a
directory. It is not necessarily a dedicated server.
To implement a license server, download first the server program which is available on the following
web page: http://www.iaes-software.com/downloads.htm
Then, install the server program, in any directory (C:\ServQD\ as default). This is that directory which
should be shared with read and write access.
The server will operate without dongle an dis made of two components :
•
•
A NT service named QDKEYSRV.EXE and which works without requiring any open session
on the server.
An exe files named QD6KNET.EXE which was designed to set up the licenses.
The generated key codes are dependant on the computer (the server) on which the program is
installed. The encoding is based on fixed IP address of the main LAN card or on a unique identifier
(UUID).
In order to install the license server program, you must first make sure you have administrator rights.
The server can run only on the following operation systems:
•
•
•
Windows 2000
Windows XP
Windows Vista
After installation, you will see the following links in the ‘Start / Licenses server Quick Devis V6’:
•
•
•
License manager QD V6
User’s manual
Uninstall the license server
To start the server, just launch ‘License manager QD V6’
The license manager program will then suggest to create directly a logical identifier to handle the new
codes. The logical key created contains up to 100 keys which can be used only after you have
requested the corresponding license codes. Ask your dealer to get these codes.
Getting license codes
The license server of Quick Devis® Enterprise Edition associates to each key code (12 hexadecimal
character codes beginning by the letter B), a 28 characters license code which contains your license
information and which can be operational only with its associated code.
®
Quick Devis Enterprise Edition © IAES (1991-2001) © QUOTALYS (2001-2007)
Page 203/210
®
Quick Devis Enterprise Edition
User’s Manual
To ask for a license code, click the ‘
To ask a code license, click on the button “To increase the window” and place the cursor on the
desired key code (take them in the order preferably).
Then click on the button “To ask a code license for the selected key code”
®
Quick Devis Enterprise Edition © IAES (1991-2001) © QUOTALYS (2001-2007)
Page 204/210
®
Quick Devis Enterprise Edition
User’s Manual
Enter your co-ordinates (you will not have to enter them any more for the other codes licenses). Then
click on one of the two buttons according to whether you wish to fax the request for code or to
formulate it directly on line.
The codes will be transmitted to you as soon as possible. Generally, you will receive them by e-mail
except contrary stipulation.
Seizure of the codes licenses
When you receive your codes, it will be necessary for you to register them on the waiter. With this
intention, click on the button “To register a code license for the key code selected” after having
selected the suitable key code beforehand.
Saisissez le code à 28 caractères et cliquez sur le bouton ‘Enregistrer’. Vérifiez la saisie SVP car
vous ne pouvez entrer que 4 codes invalides après quoi, votre clé sera automatiquement neutralisée
et vous seriez alors contraint de contacteur votre revendeur pour la débloquer à distance.
Démarrage et arrêt du service
The waiter of licenses functions in the form of a service, i.e. which it can turn without nobody being
logué on the waiter.
When you start again the machine, the service (which is the waiter of license itself) QDKEYSRV.EXE
starts automatically but, if an anomaly is met or simply if the waiter were never initialized, or if you do
not wish to start again the machine, you will have to start the service manually.
With this intention, call the “Control panel”. Select “Tools D” administration':
Among the tools of administration, select “Services”:
®
Quick Devis Enterprise Edition © IAES (1991-2001) © QUOTALYS (2001-2007)
Page 205/210
®
Quick Devis Enterprise Edition
User’s Manual
In the services, identify the service named QDKeySRV:
And launch while clicking on the bond “To start”.
If the service is correctly launched, you will be able later on to then stop it while clicking on the bond
“To stop”.
To know if your service is correctly launched, again launch “Management of the licenses network QD
V6” of the menu “To start/Serveur of licenses”. With the bottom of the increased window, you must
have a message of the service indicating “Not D” erreur'. For any other message, or in the event of
absence of message, your waiter is not launched.
Of course, even if you close the business application of the keys network, the service will continue to
function and the users will be able to continue to use Quick Devis® Enterprise Edition. The
management tool is only used to manage the licenses and it also has a function of monitoring.
With each time you start again the computer, the service will start again automatically.
Monitoring licenses on server
The management tool of the keys functions independently of the service, it can be launched whatever
the statute (started/stopped) of the service.
®
Quick Devis Enterprise Edition © IAES (1991-2001) © QUOTALYS (2001-2007)
Page 206/210
®
Quick Devis Enterprise Edition
User’s Manual
It interacts automatically with the service every minute. This means that code license entered on the
module of management will be usable, at most, one minute after its seizure (if the service is launched
of course). In the same way an error message received by the service will be posted in the module of
management only one minute after its effective reception.
To visualize the as-used condition of the licenses, notch the box “To post the window D” use of the
licenses'
Vous pourrez alors visualiser les droits pour chacune des licences inscrites, leur statut, le login de
l’utilisateur en cours ainsi que l’heure à laquelle ce dernier s’est logué.
Setting up clients’ computers
On each station customers, launch the module “Management of the licenses” in the menu “To
start”/“Quick Devis”. And click on the button “To redefine” in order to indicate to the customer the
shared repertory containing the waiter of licenses on the waiter.
By defect, Quick Devis seeks a local physical key systematically, then a local logical key and finally a
key network. This default option to locally use a dongle while leaving available a token on the waiter.
®
Quick Devis Enterprise Edition © IAES (1991-2001) © QUOTALYS (2001-2007)
Page 207/210
®
Quick Devis Enterprise Edition
User’s Manual
If you wish to change this option, to be unaware of the keys network or simply to reach more quickly
your licenses with launching, it is enough for you, to notch the suitable box in the module of
“Management of the licenses”
There are other solutions making it possible to indicate to the customers where the waiter of licenses
is. These solutions can be used if the administrator wants to avoid passing on each station
customers.
The first solution, consists of the installation of a file named QDSERVPATH.INI in the repertory
system of the machine customer (generally \ Windows \ System32 \)
This textual file must contain on its first line the way of the waiter.
One second solution employs variables of environment. On all the stations customers, you can place
a variable of environment named QDDIRNET which points on the repertory of the waiter. Example:
QDDIRNET= \ \ Machine001 \ ServQD
Note: If no variable QDDIRNET is found, Quick Devis seeks a variable DIRNET.
The third solution consists in directly placing the way of the waiter in the base of register of the
stations customers \ HKEY_CLASSES_ROOT \ Quick Devis \. This operation is identical to a manual
specification on the stations customers via the module “Management of the licenses”
The key of HighLogin register indicates here the order of research of the licenses. It accepts values
ROOM, NETWORK and LOGICAL corresponding to the three priorities of research.
Certain solutions have priority on others. The priorities are as follows:
1.
2.
3.
4.
®
File QDSERVPATH.INI
Specification in the module of management of the licenses or via the base of register
Variable of environment QDDIRNET
Variable of environment DIRNET
Quick Devis Enterprise Edition © IAES (1991-2001) © QUOTALYS (2001-2007)
Page 208/210
®
Quick Devis Enterprise Edition
User’s Manual
Troubleshooting
No amount appears in the overhead sheet when data was entered in the detailed view
Check that you entered a quantity on each task in the B.o.Q. and that each branch (chapter) also has
a quantity in the B.o.Q.
To make sure quantity will be equal to 1 in all the branches without having to type them, you can
check the appropriate box in the “Options > Display tree view” menu.
Quick Devis® Enterprise Edtion is not stable and stops frequently without apparent reason
If frequent instabilities are noted, it is probably because a program was installed subsequent to the
installation of Quick Devis® Enterprise Edtion and altered some of its components. In this case, the
best solution consists of completely removing the program using the “Uninstall Quick Devis®
Enterprise Edtion” function in the “Start” menu. Specify “Uninstall manually” click then “Select all”,
then “Next” until the procedure comes to an end. This manual method ensures that all of the
components of Quick Devis® Enterprise Edtion are removed. Then, reinstall the program normally.
Quick Devis® Enterprise Edtion seems to be extremely slow during the creation of an
estimate
Quick Devis® Enterprise Edtion uses the Microsoft Jet data engine which is also the engine of
Microsoft Access. Access to this engine can be controlled in real time by certain antivirus programs
or by remote programs being on your networks. These tools can considerably slow down the access.
First of all, disconnect your computer from the network, close the session, open a new one and start
Quick Devis® Enterprise Edtion again. If the problem seems to be solved, contact your network
administrator who will be able to solve the problem by changing the safety settings. If the
disconnection from the network does not solve the problem, change your local antivirus settings so
that it does not filter the exchanges between the programs and the local disc but only the exchanges
with the outside.
The article databases cannot be opened
If you cannot open an article database, try to repair it using the function “repair an estimate or a
database” from the “Tools” menu. You can also compact it using the function “Compact an estimate
or a database” from the “Tools” menu.
If it is an Internet database, its access may be refused to you because you are trying to use a
database on a different computer from which it was ordered. Contact your database provider to get
rights for your computer.
During the conversion of an Excel form, the file cannot be read
It is recommended to start a conversion from a new Excel workbook and to paste the data to be
converted using the “Special paste / Values only” and “Special paste / Format only” functions. Never
copy the entire sheet from your original document. Only copy the necessary cells. These operations
ensure that the resulting Excel file will be free from any object which could not be supported by Quick
Devis® Enterprise Edtion.
During the conversion of an article database, the Excel file cannot be read
®
Quick Devis Enterprise Edition © IAES (1991-2001) © QUOTALYS (2001-2007)
Page 209/210
®
Quick Devis Enterprise Edition
User’s Manual
In order to ensure a correct conversion, it is essential to export an empty workbook first using the
appropriate function of the “Data” menu and to paste the data to be converted using the “Special
paste / Values only” function. Avoid creating an empty Excel workbook; always use one which was
exported by Quick Devis® Enterprise Edtion.
The loading of a profile in the reports generator causes the error “Cannot read the clipboard”
The problem probably comes from the profile you loaded which has an anomaly or which cannot be
completely loaded into the memory. To check it, reset an empty profile clicking the appropriate button
of the reports generator. Close the report generator with this new profile. If the problem seems to be
solved, recreate the report starting from the empty profile, record it and delete the profile which does
not work. In order to load profiles quickly, even on systems equipped with large memory, avoid
employing large images which you would have to reduce in the reports generator. Reduce the
images using a graphic program before importing them in Quick Devis® Enterprise Edtion.
The selling prices are not calculated
If the selling prices are not calculated and the “#N/A” is displayed in the B.o.Q. your estimate is
probably damaged. In such case, try to repair it using the “Repair an estimate or a database” function
of the “Tools” menu. Then reindex your estimate and compute it. If the problem is not solved, return
to a previous version of your estimate using the function “Recover an estimate” from the “Tools”
menu.
I cannot load an estimate previously saved
Your estimate is probably damaged. In such case, try to repair it using the “Repair an estimate or a
database” function of the “Tools” menu. Then reindex your estimate and compute it. If the problem is
not solved, return to a previous version of your estimate using the function “Recover an estimate”
from the “Tools” menu.
When trying to update public databases, some cannot be downloaded
This is probably caused by damaged databases on your computer and Quick Devis® Enterprise
Edtion cannot mix them with the remote databases. Start repairing the databases using the “Repair a
database or an estimate” and “Compact a database or an estimate” functions from the “Tools” menu.
Then, retry to update you databases.
If it fails again, backup them if they contain personal information such as work times or kinds of
workforce and delete the databases which caused the problem.
When calling the ‘Save as’ function, the file dialog does not appear
It is certainely due to a default in a component named COMCTL32.OCX which is located in the
\Windows\System32 directory of your system. To reinstall it properly, remove the program using the
“Uninstall Quick Devis® Enterprise Edtion” function in the “Start” menu. Specify “Uninstall manually”
click then “Select all”, then “Next” until the procedure comes to an end. This manual method ensures
that all of the components of Quick Devis® Enterprise Edtion are removed. You also can delete
manually the component to ensure it will be reinstalled.
Then, reinstall the program normally.
®
Quick Devis Enterprise Edition © IAES (1991-2001) © QUOTALYS (2001-2007)
Page 210/210