1
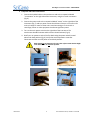
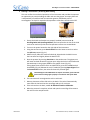
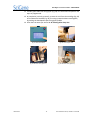
www.scigene.com
Little Dipper® Processor for FISH
USER MANUAL
CAT. #1080-70-1 (115V); 1080-70-2 (230V)
FOR RESEARCH USE ONLY
Not for Use in Diagnostic Procedures
SciGene • 470 Lakeside Dr, Ste F, Sunnyvale, CA 94085 USA • 408-733-7337 • [email protected]
Little Dipper® Processor for FISH— USER MANUAL
Serial Number
The following serial number identifies the specific instrument you have purchased and must be
referenced when requesting service. A copy is affixed to the instrument.
Warranty
4B
The Little Dipper® Processor described in this manual is warranted to be free of defects in materials
and workmanship for a period of 12 months from date of delivery. This warranty does not cover
removable parts or accessories, including removable baths. In the event of a defect during the
warranty period, liability is limited to factory repair service at no charge. All original packaging
should be retained by the customer in the event that the instrument is returned to the factory for
service or repair. The foregoing warranty is void in the event the unit was abused or modified or
used in a manner inconsistent with its intended purpose. No other warranty is expressed or implied
including warranties of merchantability and fitness for a particular purpose. In no event shall
SciGene or its representatives be liable for any direct, indirect, special, incidental or consequential
damages or for any damages resulting from loss arising out of or in connection with the sale, use or
performance of the product.
Copyright
Copyright ©2005-2013 SciGene Corporation. All rights reserved. SciGene and Little Dipper are
trademarks of SciGene Corporation, Sunnyvale, California, USA. All other trademarks used in this
manual are the property of their respective owners.
Intended Use
The intended use of this instrument is for washing and drying of fluorescent in situ hybridization
(FISH) slides or microarrays. This instrument should only be used according to instructions provided
in this User Manual and other SciGene technical documents. If the equipment is used in a manner
not specified by the manufacturer, the protection provided by the equipment may be impaired.
March 2013
1
LD for FISH manual 2.0; software 1.4 for FISH
Little Dipper® Processor for FISH— USER MANUAL
Table of Contents
I.
SAFETY NOTICES .................................................................................................................................. 3
A. Instrument Safety ...................................................................................................................................3
B. Conventions and Labels ..........................................................................................................................3
C.
Spills and Reagent Disposal ....................................................................................................................4
II. SITE PREPARATION .............................................................................................................................. 5
III. UNPACKING AND SETUP ...................................................................................................................... 6
A. Unpacking and Verifying Items ...............................................................................................................6
B. Identifying System Components .............................................................................................................8
C.
Computer and Power Connections .........................................................................................................9
IV. SYSTEM OPERATION ...........................................................................................................................10
A. Installing Baths and Centrifuge Buckets ...............................................................................................10
B. Using the Touch Screen ........................................................................................................................11
C.
Using the Pause Button ........................................................................................................................11
D. Using the Emergency Stop ....................................................................................................................11
E.
Running a Test Protocol / Practicing Rack Loading ...............................................................................12
F.
Running a Pre-Installed Protocol ..........................................................................................................13
G. Using the Temperature Controllers ......................................................................................................15
V. CUSTOM PROTOCOLS .........................................................................................................................16
A. Adding a Protocol .................................................................................................................................16
B. Deleting a Protocol ...............................................................................................................................17
VI. PERIODIC MAINTENANCE ...................................................................................................................18
A. Cleaning Before Every Use ....................................................................................................................18
B. Cleaning After Every Use ......................................................................................................................18
C.
Monthly Cleaning and Calibration ........................................................................................................18
VII. SYSTEM CALIBRATION ........................................................................................................................19
A. Temperature Controller Calibration .....................................................................................................19
B. Slide Rack Position Calibration .............................................................................................................20
C.
Centrifuge Loading Calibration .............................................................................................................21
D. Touch Screen Calibration ......................................................................................................................21
VIII. SPECIFICATIONS .................................................................................................................................22
IX. ORDERING INFORMATION ..................................................................................................................22
X. TROUBLESHOOTING ...........................................................................................................................23
XI. SERVICE..............................................................................................................................................24
A. Lockout Procedure ................................................................................................................................24
B. Fuse Replacement.................................................................................................................................24
XII. DECLARATION OF CONFORMITY .........................................................................................................25
March 2013
2
LD for FISH manual 2.0; software 1.4 for FISH
Little Dipper® Processor for FISH— USER MANUAL
I.
SAFETY NOTICES
A. Instrument Safety
Before operating the instrument, read the information in this section concerning
hazards and potential hazards. Ensure that everyone involved with the instrument’s
operation is instructed in both general safety practices for laboratories and specific
safety practices for the instrument.
B. Conventions and Labels
The following is a glossary of the safety conventions and symbols that are used on the Little
Dipper® Processor. Whenever such symbols appear on instruments, please observe
appropriate safety measures.
1. Warnings
Failure to comply with the following warnings that are affixed to the product
can lead to possible personal injury or death.
This symbol indicates the potential for a Pinch Point. Do not place
fingers in the slot in the Z-axis tower.
This symbol indicates the potential presence of a Hot Surface. Turn off
the temperature controller and leave sufficient time for cooling or use
heat protection prior to handling a bath.
Biological hazards can be associated with the materials used on this
instrument. Potentially infectious waste and other hazardous waste
must be treated in accordance with good laboratory practice
guidelines.
March 2013
3
LD for FISH manual 2.0; software 1.4 for FISH
Little Dipper® Processor for FISH— USER MANUAL
2. Cautions
Failure to comply with the following cautionary statement affixed to the
product may lead to possible personal injury.
Do not touch the bottom metal surface of the bath during operation. Insert
the bath liner and fill with buffer before turning on power to each bath.
The Little Dipper System weighs approximately 59 lbs (26.5 kg). Use
caution when lifting the unit to avoid personal injury.
Do not under any circumstances lift the unit by the cylindrical tower or its
extended gripper arm!! This will damage the instrument!
Do not under any circumstances run a protocol while a bath cover is in
place.
To achieve temperatures above 70˚C, a bath cover must be used to obtain
and maintain temperatures. When the robot is in use, baths running at
high temperatures may need to be topped off due to evaporation.
C. Spills and Reagent Disposal
Observe all national, regional, and local regulations for waste disposal
and management.
Biological and other hazards can be associated with the materials used on this
instrument. Potentially infectious and other hazardous waste materials must
be treated in accordance with good laboratory practices.
This symbol indicates the potential presence of a Hot Surface. Use care
when cleaning a spill in this area to avoid being burned.
1. Cleaning Spills
a. Turn off the instrument.
b. Wipe the spill using an absorbent material. Always pull the liquid to the
front of the instrument, away from the control panel and around the bath
positions.
c. Clean the deck with a cloth or paper towel and an appropriate disinfectant
solution (e.g. 70% ethanol) for the type of spill present.
d. Wipe the deck dry.
e. Dispose of the material in a manner that is in accordance with good
laboratory practices.
2. Disposing of Reagents
Some chemicals used on this instrument can be hazardous. Please adhere to
good laboratory practices when disposing of hazardous chemicals.
March 2013
4
LD for FISH manual 2.0; software 1.4 for FISH
Little Dipper® Processor for FISH— USER MANUAL
II. SITE PREPARATION
The Little Dipper Processor for FISH requires a level surface area of at least 30 x 22 inches
(76 x 56 cm) with a vertical clearance of 30 inches (76 cm) (Fig. 1). Locate the unit within 3
feet (1 meter) of a single power outlet that delivers at least 1700 Watts/20 Amps of
constant power.
Clear the benchtop before unpacking any cartons. Allow unimpeded access to the
Emergency Off (EMO) and main power switches on the right side of the instrument.
Figure 1. Allow proper clearance for the instrument.
March 2013
5
LD for FISH manual 2.0; software 1.4 for FISH
Little Dipper® Processor for FISH— USER MANUAL
III.
UNPACKING AND SETUP
A. Unpacking and Verifying Items
The Little Dipper Processor instrument weighs about 59 lbs (26.5 kg) and is
generally shipped in a large carton with an additional small carton for accessories.
Do not lift the unit by the robot arm. Always grip the instrument from
underneath the base when lifting!!
Never attempt to lift or move the instrument alone. Use caution when lifting
the unit to protect yourself and others from personal injury.
1. Open the large carton and remove the interior box and foam.
2. With the aid of another person, carefully lift the instrument by its base only,
and place it directly on the benchtop (Fig. 2). Ensure clearance around the
instrument making sure not to block the cooling fan in the back.
3. Use scissors to cut the white tie wrap that prevents the gripper arm from
rotating during shipping (Fig. 3).
4. Unpack the interior box that contains the touchscreen, power cord and user
documentation.
5. Open the smaller carton to remove the accessories and additional components.
6. Verify all packing list items are received in good condition.
Figure 2. Lift by the base.
Figure 3. Cut tie wrap.
Table 1. Items Provided in Shipment
INSTRUMENT Carton
Little Dipper Processor
User Manual
Power Cord
Touch Screen with Cable
ACCESSORIES Carton*
Baths, Slide Racks
Bath Covers
Digital Thermometer
Centrifuge Buckets, Pads and Spacers
*Varies by configuration.
March 2013
6
LD for FISH manual 2.0; software 1.4 for FISH
Little Dipper® Processor for FISH— USER MANUAL
Fig. 4. Little Dipper Processor System Components
Fig. 5 Internal View of Centrifuge
March 2013
7
LD for FISH manual 2.0; software 1.4 for FISH
Little Dipper® Processor for FISH— USER MANUAL
B. Identifying System Components (Figs. 4 and 5)
1. Main power switch – Turns on power to the unit
2. Bath power switch – Turns on power to each bath, for heating liquid
3. Temperature controller – Used to set and observe bath temperature
4. Temperature sensor – Transmits bath temperature to controller.
5. Standard bath – Removable insert, compatible with most liquids/solvents
6. Low volume bath - Removable stainless steel insert
7. Gripper arm – Rotates and moves slide racks up and down in baths
8. Gripper – Opens, closes and secures the slide rack assembly
9. Fan – Draws air through the instrument cabinet for cooling
10. Emergency switch – Cuts power for safety
11. Slide rack(s) – Holds slides during processing.
12. Centrifuge access panel – Automatically opens for the gripper to insert a slide rack
13. Centrifuge latch – Keeps lid closed
14. Centrifuge lock – Internal lock for safety
15. Touchscreen cable connection – Receptacle for attaching control cable
16. Touchscreen – Used to create, store and run protocols and for calibration
17. Pause button – Toggle switch that stops and restarts a running protocol
18. Centrifuge swinging buckets – Green (sample) and red (balance) rack buckets
19. Temperature calibration jack - Receptacle for cable to thermometer
20. Power cord connection - Receptacle for power cord
21. Stir bar speed control – Rotating switch to adjust stir bar speed
22. Stir bar – Creates a gentle vortex in the bath
23. Bath covers – Lids help achieve and maintain temperatures above 70°C
24. Slide rack spacer – Raises rack above absorbent pad
25. Absorbent pad – Soaks up excess water in centrifuge
March 2013
8
LD for FISH manual 2.0; software 1.4 for FISH
Little Dipper® Processor for FISH— USER MANUAL
C. Computer and Power Connections
1. Connect the braided cable to the touchscreen and to the receptacle labeled
“TOUCHSCREEN” on the right side of the instrument, using the circular connectors
(Fig. 6).
2. Connect the power cord to the receptacle labeled “POWER” on the right side of the
instrument (Fig. 7) and to a power source that delivers 15 Amps or more for 115V
units or 8 Amps or more for 230V units. Avoid connecting to a circuit with a
centrifuge, freezer or other equipment that draws significant power.
3. Turn on the main power switch on the right side of the instrument. The
touchscreen should illuminate and the motors should activate (Fig. 8).
4. Briefly turn on power to each of the five baths using the power switch located
above each bath position (Fig. 9). Verify that each temperature controller
illuminates and then turn off power to each bath position.
Baths should not be powered on for more than a few seconds without buffer
in the bath inserts. Do not heat dry baths.
March 2013
Fig. 6. Connect touchscreen.
Fig. 7. Connect power cord.
Fig. 8. Turn on main power.
Fig. 9. Briefly turn on baths.
9
LD for FISH manual 2.0; software 1.4 for FISH
Little Dipper® Processor for FISH— USER MANUAL
IV.
SYSTEM OPERATION
A. Installing Baths and Centrifuge Buckets
1. Clean baths, racks and stir bars by rinsing in running tap water, followed by 100
ml of DI water and then 100 ml of ethanol (Fig. 10). Dry with a lint-free towel.
2. Clean sensors with DI water and a lint-free towel (Fig. 11).
3. Install standard or heatable low volume baths by rotating temperature sensors
up, placing baths and then lowering sensors (Fig. 12). For low volume baths
without temperature control, leave sensors down while placing baths.
4. Place a stir bar in all baths (Fig. 13). Low volume baths use low profile stir bars
(SciGene cat. #1080-11-1).
Fig. 10. Clean baths and racks.
Fig. 11. Clean sensors.
Fig. 13. Add stir bars.
Fig. 14. Unlock centrifuge.
Fig. 15. Insert buckets.
Fig. 16. Insert pads and spacers.
5. Unlock and open the centrifuge (Fig. 14).
6. Hang a red bucket on the rotator arms tabs marked “BALANCE RACK”. Repeat
using a green bucket on the rotator arms marked “SAMPLE RACK” (Fig. 15).
7. Place an absorbent pad in each bucket with a black frame spacer on top (Fig. 16).
8. Balance the centrifuge by inserting a rack with the same number of slides as
the sample rack into the red bucket.
9. Close and lock the centrifuge.
March 2013
10
LD for FISH manual 2.0; software 1.4 for FISH
Little Dipper® Processor for FISH— USER MANUAL
B. Using the Touch Screen
Use the handheld touchscreen to navigate between screens, select and run protocols,
create new protocols and control instrument movement (Fig. 17). If the touchscreen
fails to respond, it may require calibration. See Section VI C. for details.
Fig. 17. Use touchscreen controls.
Fig. 18. Pause protocols as needed.
C. Using the Pause Button
The action of the instrument can be immediately stopped and restarted using the
illuminated red “PAUSE/RESUME” button at top right on the touchscreen. When pressed,
the instrument will stop and the button light will flash. To resume the protocol, press
the button again (Fig. 18).
D. Using the Emergency Stop
To immediately stop movement of the gripper arm and stir bars, press the red
Emergency Stop (EMO) button on the right side of the instrument (Fig. 19). Bath
heaters will continue to receive power. To restore power to the gripper arm and stir
bars, release the EMO button by rotating it a quarter turn clockwise (Fig. 20). To move
the arm, press Control Panel on the Home Page and use the up | down | left | right
buttons. To remove the slide rack, hold the rack and press the Open Gripper button on
the Control Panel screen. The protocol will not resume upon releasing the EMO switch
and must be restarted from the beginning.
If the touch screen does not illuminate when the unit is turned on, rotate the red
EMO button on the side of the instrument to release the emergency stop.
Fig. 19. Press EMO to stop.
March 2013
Fig. 20. Rotate to restore power.
11
LD for FISH manual 2.0; software 1.4 for FISH
Little Dipper® Processor for FISH— USER MANUAL
E. Running a Test Protocol / Practicing Rack Loading
This test verifies the mechanical operation of the instrument and provides the operator
an opportunity to practice loading the slide rack onto the gripper. An empty slide rack
is automatically moved from bath to bath with agitation, followed by a brief
centrifugation. No liquid is required and temperature controllers should remain OFF.
Fig. 21. Quik-tst protocol.
Fig. 22. Load slide rack.
1. Ensure that baths and buckets are properly installed (see section IV. A.
Installing Baths and Centrifuge Buckets) and correspond to the size of the slide
racks to be used. Verify that the all temperature sensors are rotated down.
2. Turn on main power located on the right side of the instrument.
3. Using the touchscreen, press Run Protocol from the home screen then select
the Quik-tst protocol (Fig. 21).
4. Hold an empty slide rack centered in Bath #1, aligned with the black lines on
the instrument and slightly below the bath fill line.
5. Start the protocol by pressing Start Now on the touchscreen. The gripper arm
will lower into Bath #1 with the gripper open. Align the holes in the handle with
the two bumps in the gripper paddle as the gripper closes (Fig. 22).
If the gripper closes and the rack is not held securely, press the red EMO switch
immediately (Fig. 19). Release the rack, if needed, by pressing Open Gripper from
the Control Panel screen, then select and start the protocol again.
Immediately press the EMO switch to stop the instrument, if the slide rack
fails to mount on the gripper properly or touches the sides of the bath.
6. The instrument will now agitate the rack in each bath.
7. Observe placement of the slide rack in the baths. The rack will automatically
move from the last bath into the centrifuge and spin for a minute.
8. If the rack touches the bath, see VII. B. Slide Rack Position Calibration.
9. When the protocol is complete, unlock and open the centrifuge lid to remove
the rack from the sample bucket.
March 2013
12
LD for FISH manual 2.0; software 1.4 for FISH
Little Dipper® Processor for FISH— USER MANUAL
F. Running a Pre-Installed Protocol
The instrument comes configured with validated protocols installed. Refer to the Little
Dipper Processor Method corresponding to your protocol for details on how to set up
the instrument. Method sheets can be found online at www.scigene.com.
Do not under any circumstances run a protocol while a bath cover is in place.
To achieve and maintain temperatures above 70˚C, a bath cover must be used,
while the machine is NOT in motion. Baths at high temperatures may need buffer(s)
added to offset evaporation.
The following are general guidelines on how to set up and run a pre-installed protocol.
1. Ensure baths, racks and stir bars are free of buffer residue and dust. See section
VI. A. Cleaning Before Every Use.
2. Insert baths and stir bars as specified for the protocol (Fig. 23).
3. Rotate all temperature sensors down (Fig. 24).
Fig. 23. Place baths and stir bars.
Fig. 24. Rotate sensors down.
Fig. 25. Turn on main power.
Fig. 26. Set temperature(s).
4. Add recommended buffer(s) to the fill line.
5. Turn on main power to the instrument (Fig. 25).
6. Turn on power to bath(s) to be heated and set temperature(s) (Fig. 26). Cover
any baths set above 70°C. Allow time for baths to reach set temperature(s).
7. Place a balance rack into the centrifuge with same number of slides as the
sample rack.
8. Add sample slides to rack.
9. Remove any bath covers.
10. Submerge the slide rack in Bath #1 between the two black lines.
11. On the touchscreen home page, press Run Protocol, then select the desired
protocol and press Start Now (Fig. 27).
March 2013
13
LD for FISH manual 2.0; software 1.4 for FISH
Little Dipper® Processor for FISH— USER MANUAL
12. Carefully place slide rack onto gripper (Fig. 28). The instrument will perform the
steps as programmed.
13. At completion (varies by protocol), remove the rack from the centrifuge (Fig. 29)
or from above the last bath (Fig. 30), if running a protocol without centrifugation,
by pushing the thumbpad to open the gripper paddle.
14. Clean the instrument per section VI. B. Cleaning After Every Use.
March 2013
Fig. 27. Press Start Now.
Fig. 28. Load sample rack.
Fig. 29. Remove rack (option 1).
Fig. 30. Remove rack (option 2).
14
LD for FISH manual 2.0; software 1.4 for FISH
Little Dipper® Processor for FISH— USER MANUAL
G. Using the Temperature Controllers
Temperature controllers are used to regulate heating of the five bath positions. Each
controller is calibrated at the factory to provide an accurate bath temperature when
operated between 35 to 95°C. The following instructions are general guidelines for
setting temperature(s).
1. Select a bath position (according to your protocol) and turn ON the switch above
the bath to provide power to the temperature controller. The controller will display
both the current (red) and set (green) temperature.
Baths should not be powered on for more than a few seconds without buffer in
the bath inserts. Do not heat dry baths.
Do not touch the bottom metal surface of the bath during operation. Insert the
bath liner and fill with buffer before turning on power to each bath.
This symbol indicates the potential presence of a Hot Surface. Turn off
the temperature controller and leave sufficient time for cooling or use
heat protection prior to handling a bath.
2. To change the set temperature, press the up or down arrow buttons until the
desired temperature is shown. Allow time for the bath to reach the set
temperature and stabilize.
Refer to section VII. A. Temperature Controller Calibration for information on
calibrating the controllers.
Fig. 31. Temperature controllers.
March 2013
15
Fig. 32. Set temperature.
LD for FISH manual 2.0; software 1.4 for FISH
Little Dipper® Processor for FISH— USER MANUAL
V.
CUSTOM PROTOCOLS
A. Adding a Protocol
Custom protocols can be created using the touchscreen. The touchscreen can store up
to 14 protocols with 1 to 9 steps each.
1. From the touchscreen Home page, press New/Edit Protocol. On the
Create/Edit Protocol screen (Fig. 33), use the up/down buttons to move the
cursor “»” to “NEW”. Press Select to go to the Name Protocol screen (Fig. 34).
2. Within the Name Protocol screen, use the shift key to move the “^” (up arrow)
within the numeric 10 key pad until the desired letter is indicated. Press to
select the indicated letter displayed above the key pad. Continue for up to
eight characters.
3. When finished, press Enter to go to the Step Input screen (Fig. 35) and then
press Step 1.
4. When the Parameters screen displays, press the Bath # button, enter “1”, and
then press Enter.
All protocols start from Bath #1.
Fig. 33. Create/Edit Protocol screen.
Fig. 34. Name Protocol screen.
Fig. 35. Step Input screen.
5. Select the remaining parameters for Step 1 of the protocol and then enter the
desired values within the ranges indicated.
Table 2. Parameter Settings for Custom Protocols
Parameter
Range
Agitation Rate
0-600
Agitation Time
0-32,000 seconds
Drip Time
0-32,000 seconds
Pause Time
1
0-32,000 seconds
1 Time the instrument pauses at the end of the step with rack remaining submerged.
2 After agitation, time that the rack is suspended above bath, before moving
March 2013
16
LD for FISH manual 2.0; software 1.4 for FISH
Little Dipper® Processor for FISH— USER MANUAL
6. To add a pause within the protocol, do one of the following:
•
Enter time for rack to remain submerged at end of step
•
Enter 9999 for User Control. Rack will stay submerged until the operator
presses the touchscreen to resume the protocol.
This is beneficial for protocols that require more than 5 baths.
7. When all values for Step 1 are entered, press Save and Exit to return to the
Step Input screen.
8. Continue to enter values for additional steps (max. 9) (Fig. 36). Remember to
program “C” for the centrifuge, if ending in a drying step.
9. When finished creating the protocol, press Save & Exit to return to the Select
Protocol screen. Up to 3 steps are displayed at one time on the touch screen.
Each screen of the protocol must be saved separately before saving the entire
protocol.
B. Deleting a Protocol
1. To delete a protocol, press Control Panel from the home screen then Advanced
Settings.
2. Press the Delete Protocol button to open the screen.
3. Choose a protocol to delete using the up and down arrows and then press
Select. A confirmation screen appears saying “Delete Protocol?” Choose YES to
confirm.
4. Press the BACK button on each of the previous screens to return to the home
screen.
March 2013
Fig. 36. Advanced Settings screen.
Fig. 37. Delete Protocol button.
Fig. 38. Delete Protocol screen.
Fig. 39. Delete Protocol confirmation.
17
LD for FISH manual 2.0; software 1.4 for FISH
Little Dipper® Processor for FISH— USER MANUAL
VI.
PERIODIC MAINTENANCE
A. Cleaning Before Every Use
Baths, racks and stir bars must be free of buffer residue and dust before processing
slides. If they were not cleaned and stored properly after the last use, wash and dry
them as follows:
1.
2.
3.
4.
5.
6.
Fill baths containing the rack(s) and stir bars with tap water.
Wipe racks, stir bars and baths with a lint-free towel.
Rinse in running tap water.
Rinse with approximately 100-200 ml of DI water.
Rinse with 100 ml of ethanol and dry with a lint-free towel.
Clean temperature sensors with DI water and a lint-free towel (Fig. 40).
B. Cleaning After Every Use
1. Wash baths, stir bars and racks with running tap water then rinse in DI water and
ethanol and dry with a lint-free towel. Store in clean plastic bags to protect from
dust (Fig. 41).
2. Clean temperature sensors with DI water and lint-free towel.
3. Wipe exterior of instrument cabinet with a damp paper towel.
Fig. 40. Clean temperature sensors.
Fig. 41. Place clean baths in bags.
C. Monthly Cleaning and Calibration
1. Calibrate bath temperatures using a NIST-certified thermometer. See section VI. A.
Temperature Controller Calibration.
2. Remove and wash the centrifuge buckets and spacers using warm water and lintfree towels.
3. Replace the absorbent pad in each centrifuge bucket.
4. Clean all exterior surfaces of the cabinet, gripper paddles and gripper arm housing
with damp, lint-free towels.
5. Remove the centrifuge buckets. Clean the inside surfaces of the centrifuge and
rotor with damp, lint-free towels.
6. Inspect the centrifuge buckets for signs of wear or deformation where they hang
from the rotor. Replace if worn or bent.
March 2013
18
LD for FISH manual 2.0; software 1.4 for FISH
Little Dipper® Processor for FISH— USER MANUAL
VII.
SYSTEM CALIBRATION
The instrument is calibrated and tested at the factory and should not require adjustment
under most circumstances.
A. Temperature Controller Calibration
The EZ-Zone controllers are calibrated at the factory to
provide accurate bath temperatures from ambient +5 to
95°C (Fig. 42). Re-calibration is recommended only if the
display varies by more than one degree (1°C) to the
temperature shown on an externally connected NIST
certified digital thermometer (Cat. #1051-52-0).
Fig. 42. EZ Zone Controller
To adjust a controller to achieve accurate temperatures:
1. Add water to bath fill line in a standard bath and ensure temperature sensor is
down in contact with liquid in the bath.
2. Turn ON the instrument.
3. Turn on the temperature controller and set the temperature on the controller to
65°C. Allow 30 minutes to stabilize.
4. Using the cable provided with the digital thermometer, plug one end into the blue
receptacle found above the controller.
5. Turn on the thermometer. Allow 1 minute for thermometer to stabilize. The actual
temperature of the bath will be displayed.
6. Calculate the difference between the temperature shown on the controller and on
the digital thermometer. For example, if the controller displays 65.0°C and the
thermometer displays 66.5°C, the difference (offset) is 1.5°C.
7. On the controller, press the up and down arrows simultaneously for 3 seconds. The
left display shows “A1” and the right display shows “open”.
8. Press the Advance Button (green circle) 3 times until the right display shows “i.CA”.
The left display shows the offset value between the controller and thermometer
when the unit was last calibrated.
9. Use the up or down arrow to adjust the offset value to the temperature difference
calculated in Step 4. For example, if the controller shows a temperature 1.5°C lower
than the thermometer, adjust the offset by adding 1.5 to the value shown.
10. Press the Infinity Key (∞) twice to exit calibration and return to the operation
display. Verify that the temperature on the thermometer matches the display. The
controller is now calibrated to provide accurate temperatures from 35 to 95°C.
March 2013
19
LD for FISH manual 2.0; software 1.4 for FISH
Little Dipper® Processor for FISH— USER MANUAL
B. Slide Rack Position Calibration
The instrument is calibrated and tested at the factory for proper rack positioning and
should not require adjustment unless a new touchscreen is installed. The following
tests check proper alignment. Baths should remain OFF with no liquid needed.
1. Bath #1 Loading
a. Insert standard baths into Baths #1 and #2.
b. Insert and activate stir bars.
c. Hold a 12-position rack in Bath #1, aligned with the black lines on the instrument
and slightly below the fill line.
d. Using the touchscreen, press Control Panel | Advanced Settings | Bath 1 Loading
(Fig. 43). The gripper arm will move over Bath #1, open and lower. Align the slide
rack handle onto the paddle bumps on the open gripper. The gripper will not close.
e. While continuing to hold the rack on the open gripper, use the left/right and
up/down arrows on the touchscreen to position the rack in the center of the bath,
above the rotating stir bar such that it does not touch the rotating stir bar.
f.
When finished, remove the rack from the gripper and click Save/Exit to save
settings.
Fig. 43. Calibrate Bath 1 Loading screen.
Fig. 44. Center slide rack in Bath 2 screen.
2. Bath #2 Center Calibration
a. Insert standard baths into Baths #1 and #2 with stir bars.
b. Activate stir bars.
c. Hold a 12-position rack in Bath #1, aligned with the black lines on the instrument
and slightly below the fill line.
d. Using the touchscreen, press Control Panel | Advanced Settings | Bath 2 Center
(Fig. 44). The gripper arm will move over Bath #1, open and lower. Load the slide
rack handle onto the paddle bumps on the gripper as it closes. Let go of the rack.
e. The gripper arm will move the rack to Bath #2 and stop. Verify that the rack is
centered in Bath #2. Use the left/right arrows to adjust the position if necessary.
f. Press Save/Exit when finished.
March 2013
20
LD for FISH manual 2.0; software 1.4 for FISH
Little Dipper® Processor for FISH— USER MANUAL
C. Centrifuge Loading Calibration
This test ensures the rack is automatically inserted into the sample bucket of the
centrifuge.
1. Hold a 12-position rack in Bath #1. In the Advanced Settings screen, press C’fuge
Loading (Fig. 45). Load the rack onto the gripper. The gripper will close and then move
the rack to the centrifuge (Fig. 46). The centrifuge access panel opens automatically
and the gripper arm lowers the rack inside, stopping at a set position in the green
bucket.
2. Look down through the access panel to verify that the rack is centered from side to
side in the bucket. Use the arrow buttons to adjust the position of the arm and
centrifuge rotor if needed.
3. Press Save/Exit. The arm will move up and down in the centrifuge and then release
the rack. Make sure the rack gently falls into place into the green bucket.
Fig. 45. Calibrate Centrifuge Loading screen.
Fig. 46. Rack loading into centrifuge.
D. Touch Screen Calibration
If the touchscreen fails to respond to touch, it may need calibration.
1. To access the Touchscreen Calibration screen, press the touchscreen while the
instrument is powering up.
2. Touch point 1 (Fig. 47).
3. On the Point 2 screen, touch point 2.
4. On the Point 3 screen, touch point 3 (Fig. 48).
5. After the Home screen displays, check that the screen now responds to touch. If it does
not respond, contact your SciGene representative.
Fig. 47.Touchscreen calibration point 1.
March 2013
21
Fig. 48.Touchscreen calibration point 3.
LD for FISH manual 2.0; software 1.4 for FISH
Little Dipper® Processor for FISH— USER MANUAL
VIII. SPECIFICATIONS
Electrical
Power supply
115V AC, 50/60 Hz; 1700W; 20 Amps (cat. #1080-70-1)
230V AC; 50/60 Hz; 1700W; 10 Amps (cat. #1080-70-2)
Processing
Control
Slide capacity
Centrifuge speed
Temperature Control
Software-controlled by external touchscreen
Holds up to 24 slides per batch
690 RPM ± 15 RPM
Range: Ambient: +5 to 95°C (41 to 194°F)
Regulation: ± 0.5°C from set point
Bath volumes
Standard: 670 ml
Environmental
Ambient temperature
Relative humidity
Overvoltage category
Physical
Dimensions
Weight (net)
Low volume
heatable: 270 ml
Low volume: 210 ml
Operation: +15 to +32°C (58 to 90°F)
Storage: -20 to +60°C (-4 to 140°F)
Operation: 20 to 80% RH non-condensing
Storage: 10 to 90% RH non-condensing
II
51 x 71 x 56 cm (20 x 28 x 22 inches) (H x W x D)
26.5 kg (59 lbs)
IX. ORDERING INFORMATION
SciGene Cat. #
1080-10-1
1080-10-2
1080-10-5
1080-11-0
1080-11-1
1080-12-0
1080-12-1
1080-12-2
1080-12-4
1080-20-1
1080-20-0
1080-20-5
1080-24-0
1080-25-0
1080-21-0
1080-21-1
1080-23-1
1080-23-2
1080-23-3
1080-22-1
1080-22-2
1080-22-3
1080-41-0
March 2013
Product Description
Standard Bath, 670 ml.
Low Volume Bath, 210 ml. Includes a glass insert and stir bar.
Low Volume Heatable Bath, 275 ml. Includes a glass insert and stir bar.
Stir bars for Little Dipper standard baths, 10/pk.
Stir bars for Little Dipper low volume baths, 10/pk.
Bath cover.
Bath cover, 5/pk.
Bath cover, slotted, for Little Dipper 12-position slide rack.
Bath cover, slotted, for Little Dipper 24-position slide rack.
Slide Rack, 12-Position for standard 3 inch slides. Includes handle.
Slide Rack, 24-Position for standard 3 inch slides, without handle.
Slide Rack, 24-Position for standard 3 inch slides. Includes handle
Handle for Hybex or 24-position racks.
24 Slide Rack Kit. Includes two 24-slide racks, buckets (red/green), spacers and pads.
Absorbent Pads for Slide Rack Buckets, Hybex and 24-position, 25/pk.
Absorbent Pads for Slide Rack Buckets, 12-Position, 25/pk.
Slide Rack Bucket for Samples, green, 12-position racks.
Slide Rack Bucket for Balance, red, 12-position racks.
Spacer for Rack Bucket, 2/pk, 12-position racks.
Slide Rack Bucket for Samples, green, Hybex and 24-position racks.
Slide Rack Bucket for Balance, red, Hybex and 24-position racks.
Spacer for Rack Bucket, 2/pk, Hybex and 24-position racks.
Little Dipper Upgrade Kit for Agilent Arrays.
22
UOM
Each
Each
Each
10/PK
10/PK
Each
5/PK
Each
Each
Each
Each
Each
Each
Each
25/PK
25/PK
Each
Each
PK
Each
Each
2/PK
Each
LD for FISH manual 2.0; software 1.4 for FISH
Little Dipper® Processor for FISH— USER MANUAL
X. TROUBLESHOOTING
Indication
Probable Cause
Corrective Action
Instrument does not
power ON.
Power disconnected
Main power switch is OFF.
Fuse has blown.
Check power connections.
Turn main power switch ON.
Replace fuse with same type.
Instrument is receiving
power but robot will not
respond.
Emergency stop button has
been activated.
Twist the red EMO button on the side of the
instrument to release the emergency stop.
Protocol does not run.
Pause button has been
activated.
Press the red pause button on the top of the touch
screen.
Bath temperature varies by
several degrees from NISTcertified thermometer.
Temperature controller needs
to be re-calibrated.
Follow the instructions in section VII. A. Temperature
Controller Calibration.
Touchscreen does not
respond.
Touchscreen needs calibration
Follow the instructions in section VII. A. Touchscreen
Calibration.
Question
Answer
How do I clean the
instrument?
Refer to section VI. C. Periodic Maintenance and/or request a “Little Dipper Periodic
Cleaning and Maintenance” document from your SciGene representative (Fig. 49).
How do I safely move the
instrument?
Request a “Packing the Little Dipper Processor for Shipment” document (Fig. X-2) from
your SciGene representative (Fig. 50).
Fig. 49. Maintenance instructions.
March 2013
Fig. 50. Repackaging instructions
23
LD for FISH manual 2.0; software 1.4 for FISH
Little Dipper® Processor for FISH— USER MANUAL
XI. SERVICE
A. Lockout Procedure
If a malfunction or need for service occurs, comply with the following lockout
procedure for restricting use of the instrument. All users, upon observing that the
instrument is locked out for servicing or maintenance shall not attempt to start,
energize, or use the equipment.
1. Notify all affected users that servicing or maintenance is required and that the
instrument must be shut down and locked out to perform the servicing or
maintenance.
2. If the machine is operating, shut it down by the normal stopping procedure (turn
off baths and main power or press the EMO switch).
3. Disconnect the power cord from the wall socket and from the instrument so
that the machine is isolated from energy sources (Fig. 51).
4. Twist and remove the fuse (Fig. 52). Place in a locked safe.
5. Contact your SciGene representative to arrange for service.
Fig. 51. Disconnect power cord.
Fig. 52. Remove fuse.
B. Fuse Replacement
The fuse may be replaced by turning off and unplugging the unit, then gently twisting
and removing the old fuse. Replace with a new fuse (slow blow) with the same
electrical rating (250V, 20A for 115V or 250V, 10A for 230V).
March 2013
24
LD for FISH manual 2.0; software 1.4 for FISH
Little Dipper® Processor for FISH— USER MANUAL
XII. DECLARATION OF CONFORMITY
Little Dipper Processor, Model 650c
SciGene
470 Lakeside Dr, Ste F
Sunnyvale, CA 94085-4720 USA
Declares that the above referenced product(s) meets the essential requirements of the following
European Union Directives by using the relevant standards shown below to indicate compliance.
EMC Directive 2004/108/EC
EN 61326-1
2006
EN 61000-4-2
EN 61000-4-3
EN 61000-4-4
EN 61000-4-6
1995
2006
2004
2007
LVD Directive 2006/95/EC
EN 60204-1
2006
EN 61010-1
2004
nd
2 Edition
Electrical equipment for measurement, control and laboratory
use to include:
+A1: 1998 +A2: 2001
Electrical equipment of machines
Safety requirements for measurement, control and laboratory
use
Part 1: General requirements
Terry Gill
Sunnyvale, California, USA
Name of Authorized Representative
Place of Issue
Director of Product Manufacturing
June 17, 2010
Title of Authorized Representative
Date of Issue
Signature of Authorized Representative
March 2013
25
LD for FISH manual 2.0; software 1.4 for FISH