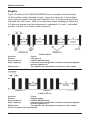
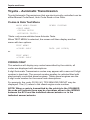
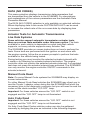
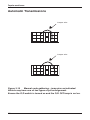
1
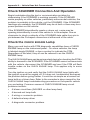
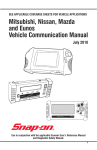
SEE APPLICABLE COVERAGE SHEETS FOR VEHICLE APPLICATIONS
Toyota, Lexus, Honda
and Proton
Vehicle Communication Manual
July 2010
Use in conjunction with the applicable Scanner User’s Reference Manual
and Diagnostic Safety Manual.
Vehicle Identification
Before operating this unit, please read this manual
and any applicable Scanner User’s Manual.
Safety Notices..................................... Refer Diagnostic Safety Manual
Quick Reference Contents Listing .... page 5
Using the Scanner Module ................ Refer to relevant
User's Manual for
more information
Vehicle Identification
Toyota, Lexus, Honda
and Proton
Vehicle Communication Manual
July 2010
BEFORE OPERATING THIS UNIT,
PLEASE READ THIS MANUAL CAREFULLY,
ALSO PAY PARTICULAR ATTENTION TO THE SAFETY
PRECAUTIONS IN THIS MANUAL AND THE
DIAGNOSTIC SAFETY MANUAL.
Vehicle Identification
The information, specifications, and illustrations
in this manual are based on the latest information
available at the time of publication. The SCANNER
manufacturer and the vehicle manufacturers
reserve the right to make equipment changes at
any time without notice.
Copyright © 2010 Snap-on Technologies Inc.
Vehicle Identification
Quick Reference Contents
Detailed Contents are at the beginning of each part
Part 1 — Vehicle Identification..............................................................6
Gives you general information on vehicle identification. Information on
SCANNER startup troubleshooting also is included.
Part 2 — Vehicle Connection and Diagnostics...................................10
Honda........................................................................................................... 12
Proton........................................................................................................... 26
Toyota/Lexus................................................................................................ 32
Appendix B – Vehicle Does Not Communicate With SCANNER........54
General Note For All Vehicles
All SCANNER and Reference Manual directions
are as if the operator is
standing at the back of the vehicle facing forward.
Vehicle Identification
Part 1 - Vehicle Identification
Contents
Vehicle Identification..............................................................................6
Entering the Vehicle Identification........................................................7
System Selection....................................................................................8
SCANNER Connection Message.............................................................8
Vehicle Identification
After you select the software, the SCANNER then requires you to
enter the vehicle ID into the SCANNER, this done by selecting the
manufacturer, the year of the vehicle, model and engine displacement.
Pressing N at any point in the first few steps lets you back up to the
previous step to correct a choice. Pressing N at the final step will return
to the start of the identification process.
‘AUSTRALIA’ is for vehicles that are manufactured for the Australian
market and ‘USED IMPORTS’ refers to vehicles that were originally
sold new in Japan and have since been exported to other countries,
including Australia and New Zealand. The SCANNER does not list every
model that is available but does cover the more popular vehicles that are
available.
CAUTION: Although every effort has been made to provide accurate
information, due to the many models available and the lack of
information available for these vehicles the information that is
contained in the SCANNER for these Used Import vehicles may not
always be accurate for the particular model being tested.
Vehicle Identification
Entering The Vehicle Identification
After you select the vehicle manufacturer, the screen displays the following
message (example):
SELECT MODEL YEAR
MODEL:
VEHICLE: 1983
ENGINE:
Move the thumbpad or thumbwheel up or down until the correct year for
the vehicle you are testing is displayed. Then press Y to enter the model
year. The display now shows the model year that you selected in the
previous step and asks you to select the model name:
SELECT MODEL TYPE
MODEL: CAMRY
VEHICLE: 1995
ENGINE:
Move the thumbpad or thumbwheel up or down and press Y to
select the model name. The display now shows the model name that
you selected in the previous step and asks you to select the engine
displacement by pressing the thumbpad up and down to the correct
engine, some vehicles may only have one choice:
SELECT ENGINE DISPLACEMENT
MODEL: CAMRY
VEHICLE: 1995
ENGINE: SCROLL TO SELECT ENGINE
Move the thumbpad or thumbwheel up or down and press Y to select
the engine displacement. The display now shows the engine that you
selected in the previous step.
Transmission and Air Conditioning Information
At the end of vehicle identification, the screen may display the complete
model and engine identification, similar to this:
SELECT VEHICLE OPTIONS:
> A/T WITH A/C
A/T WITHOUT A/C
M/T WITH A/C
M/T WITHOUT A/C
Vehicle Identification
Scroll arrow to select correct option of vehicle being tested and press Y.
NOTE: A/T = Automatic Transmission
M/T = Manual Transmission
A/C = Air Conditioning
If the identification is correct, press Y to store the identification in
memory. If the identification is not completely correct, press N to return
to the start of the identification steps.
System Selection
For some vehicles, the SCANNER provides engine and transmission
test capabilities. After you press Y to store the identification for these
vehicles, the screen will display this message:
SELECT SYSTEM
ENGINE
AUTO TRANS
ANTI-LOCK BRAKES
AIRBAG (SRS)
Move the thumbpad or thumbwheel up or down to move the cursor to
the desired system and press Y. The above display does not appear for
vehicles without transmission tests.
SCANNER Connection Message
After you press Y to store the vehicle identification or after you select the
engine or transmission system for testing, the SCANNER display tells
you how to connect the SCANNER to the vehicle. For example:
CONNECT DL-17 ADAPTER WITH S-9 KEY TO
17-PIN CONNECTOR UNDER RH DASH OR ON
LOWER RH DASH FACIA.
PRESS Y TO CONTINUE. OK TO RELEASE BUTTON.
After the SCANNER is connected to the vehicle, press Y to proceed to
the MAIN MENU.
Vehicle Identification
PAGE INTENTIONALLY
LEFT BLANK
Vehicle Connection & Diagnostics
Part 2 — Vehicle Connection and Diagnostics
Contents
Connecting the SCANNER to the vehicle ........................................ 11
Special Notes on Graph Mode ......................................................... 11
Note on Functional Tests .................................................................. 11
Honda – . ............................................................................................ 12
Connector Types . ............................................................................. 14
Engine ............................................................................................... 16
Automatic Transmission ................................................................... 20
ABS ................................................................................................... 22
SRS – Airbag . ................................................................................... 24
Proton –............................................................................................... 26
Connector Types . ............................................................................. 27
Engine ............................................................................................... 28
Automatic Transmission ................................................................... 30
Toyota and Lexus – . .......................................................................... 32
Special Notes . .................................................................................. 34
Connector Types................................................................................ 37
Engine................................................................................................ 39
Automatic Transmission.................................................................... 46
ABS ................................................................................................... 50
SRS – Airbag . ................................................................................... 52
Used Imports Airbag only . .......................................................... 53
10
Vehicle Connection & Diagnostics
Connecting the SCANNER to the Vehicle
This section of the manual gives you drawings of the vehicle diagnostic
connectors and tells you which SCANNER adapter to use. The
carmakers are listed alphabetically for quick-reference.
After you identify the vehicle the SCANNER display then tells you where
to find the diagnostic connector and which vehicle adapter to use.
CAUTION: Ensure vehicle identification as entered on the screen is
same as the vehicle connected to the SCANNER. Ensure SCANNER
adaptor is connected to correct vehicle pins as failure to observe above
can damage the diagnostic equipment and the cost of repairs is not
covered by warranty.
Note on Functional Tests
Functional tests are not applicable to Ethos software.
Special Notes on Graph Mode
Note that not all vehicle systems will be able to be displayed in the
Graph Mode due to the communication type. It may also take several
attempts to establish communication in Graph Mode. This is not a fault
of the scan tool or the vehicle.
11
Honda
Honda
CAUTION FOR ABS AND SRS SYSTEMS
Before attempting any repairs on vehicles fitted with ABS or SRS Airbag,
systems observe all precautions the manufacturer specifies for these
systems.
Honda Australia Vehicles
Honda Australia vehicles are vehicles that are produced to be sold
as new on the Australian market. When selecting a vehicle ID on the
SCANNER ensure the correct initial selection is made:
HONDA – AUSTRALIA.
Used Import Vehicles
Used Import vehicles are vehicles that were sold new in Japan and have
since been exported to other countries including Australia and New
Zealand. The SCANNER does not list every model that is available but
does cover the more popular vehicles that are available. When selecting
a vehicle ID on the SCANNER ensure the correct initial selection is
made:
HONDA – USED IMPORTS.
CAUTION: Although every effort has been made, due to the many
models available and the lack of information available for these vehicles
the information that is contained in the SCANNER for these Used Import
vehicles may not always be accurate for the particular model being
tested.
Entering initial vehicle ID
When entering the initial vehicle identification ensure you have first
selected the correct data base for the vehicle being tested, that is
whether it is a Honda Australia vehicle or a Honda Used Import vehicle.
If you are unsure about a vehicle’s origin check the compliance plates
on the vehicle.
Note that Honda Australia vehicles are not manufactured in Australia
but were sold as new vehicles in Australia and comply with Australian
vehicle design rules.
12
Honda
SCANNER Communication Types
The SCANNER supports live Codes and Data for Engine only on most
4 cylinder models that support live data. Live data has been available
on most Honda engines since 1992. All other Engines are Manual Code
Read.
Automatic Transmission’s, ABS and SRS systems are Manual Code
Read only. The SCANNER provides on screen instructions on how to
retrieve the codes for these systems.
Refer to the applicable coverage sheets for specific Honda vehicle
coverage.
13
Honda
Connector Types
Honda vehicles use two types of diagnostic connectors for live data.
3-pin connector
Use power
lead as
necessary
16-pin connector
Use DL-16 adaptor with specified key.
Figure 3:1 Hon-1 adapter and DL-16 adapter
For Manual Code Read vehicles the SCANNER does not require to
be connected to the vehicle. The SCANNER may display on-screen
instructions.
14
Honda
Honda Code Types
Used on:
Pattern:
Read codes on:
Start codes by:
When done:
Used on:
Pattern:
Read engine codes on:
Read Trans. codes on:
Start codes by:
When done:
CODE TYPE 02
Honda
Straight count
Engine — Red LED on ECU; Trans — Red LED on TCM
Turn ignition on
Turn ignition off, clear codes
CODE TYPE 03
Honda
Long and short
Red LED on ECM; except some 1990 and later vehicles
flash codes on CHECK engine lamp on dash
Red LED on TCM or gear indicator lamp on dash or ABS
or SRS lamps
Turn ignition on; except for vehicles with bridge check
connector, then ignition on
Turn ignition off, clear codes
15
Honda
Honda – Engine
Codes & Data
The SCANNER allows for Codes & Data on most Honda four cylinder
vehicles made after 1992. The SCANNER will display engine data and
any engine codes, with descriptions, transmitted by the vehicle to the
SCANNER.
Codes and Data Test Menu
An example of the Engine Main Menu for live data vehicles.
MAIN MENU—ENGINE
>TEST MENU
CUSTOM SETUP
OTHER SYSTEMS
When TEST MENU is selected, the screen will then display another
menu with three options.
TEST MENU
>CODES ONLY
DATA (NO CODES)
FREEZE FRAME
CODES ONLY
This selection will display any codes transmitted by the vehicle, all
codes are displayed with descriptions.
NOTE: When a code is transmitted by the vehicle to the SCANNER the
code will indicate there may be a problem either in the indicated sensor/
actuator or in the WIRING for that sensor/actuator.
DATA (NO CODES)
This selection displays engine data that is transmitted by the vehicle
to the SCANNER. For descriptions and explanations of the various
parameters see the Australian Data Parameter Manual.
FREEZE FRAME
This selection displays what is known as FREEZE FRAME data. When
the first engine diagnostic trouble code is set the engine computer sets
the freeze frame data. When selected this will display the code along
with certain engine parameters that were captured when the code was
set. If no codes are set there is no freeze frame data stored and nothing
can be displayed.
(Freeze Frame data can also be known as DTC History.)
16
Honda
Used Imports engine live data systems
On some Used Import Honda vehicles not all codes that are present
may be displayed by the SCANNER. If the check engine light is on and
the SCANNER is not displaying any codes then perform a manual code
retrieval to check for more codes.
To clear the codes use the SCANNER “Clear Codes” option on the
CODES ONLY exit menu.
17
Honda
Manual Code Read – Engines
Honda uses two types of code patterns. The SCANNER refers to these
as code types 02 and 03. Neither of these code types can be read by
the SCANNER because these cars do not have a diagnostic connector
for SCANNER hookup.
Code types 02 and 03 are read by observing a red flashing LED on the
ECU with the key on and engine off. Illustration shows typical Honda
ECU locations.
Some 1990-later vehicles flash code type 03 on the CHECK engine
lamp when a jumper is installed in the 2-pin service check connector.
If no codes are present, the lamp will stay on solid. The service check
connector may have either male or female terminals.
Code type 02 flashes the LED a number of times equal to the trouble
code (straight count), with a 2-second pause a the end of the code.
For example, you would see a trouble code 5 as five blinks on the LED,
followed by a 2-second pause before the code repeats.
Code type 03 flashes a series of long and short blinks on the LED (long/
short). The LED flashes each 10’s place digit as long pulses, and each
1’s place digit as short pulses. For example, two long pulses followed by
two short pulses means code 22.
Figure 3:3
18
Typical Honda ECU locations.
Honda
Engines
Figure 3:4
Bridging check connector.
Clear Codes for all types
Clear codes is available for Live Data Honda engines, it is accessed
from the CODES ONLY exit menu.
For Manual Code Read vehicles the SCANNER provides information on
how to erase the codes, this Clear Codes information is available on the
CODE FUNCTIONS menu.
19
Honda
Honda – Automatic Transmission
Some Honda Automatic Transmissions that are electronically controlled
provide Manual Code Read for diagnosis and some provide Codes Only.
Codes Only
The SCANNER allows for Codes Only on selected Honda vehicles. The
SCANNER will display auto trans codes, with descriptions, transmitted
by the vehicle to the SCANNER.
Codes Only Test Menu
An example of the Auto Trans Main Menu.
MAIN MENU – TRANS
>TEST MENU
CUSTOM SETUP
OTHER SYSTEMS
When TEST MENU is selected, the SCANNER will then display another
menu with three options.
TEST MENU
>CODES ONLY
CODES ONLY
This selection will display any codes transmitted by the vehicle, all
codes are displayed with descriptions.
NOTE: When a code is transmitted by the vehicle to the SCANNER
the code will indicate there may be a problem either in the indicated
sensor/actuator or in the WIRING for that sensor/actuator.
20
Honda
Manual Code Read
During Manual Code Read the SCANNER is not connected to the
vehicle but the SCANNER may display on-screen instructions.
The procedures for accessing the codes are contained in the SCANNER
under the Code Functions menu.
The SCANNER provides a list of the code numbers and their
descriptions on screen, located also under the CODE FUNCTIONS
selection.
NOTE: The code indicated may be a problem either in the WIRING
between the ECU and the indicated sensor/actuator or in the
indicated sensor/actuator.
Figure 3:5
Jumping check connector.
Clear Codes – Automatic Transmission
For Manual Code Read vehicles the SCANNER provides information on
how to erase the codes, this Clear Codes information is available on the
CODE FUNCTIONS menu.
21
Honda
Honda ABS
CAUTION: Before attempting any repairs on vehicles fitted with ABS
systems observe all precautions the manufacturer specifies for
these systems.
Manual Code Read
During Manual Code Read the SCANNER is not connected to the
vehicle but the SCANNER may display on-screen instructions.
The procedures for accessing the ABS codes are contained on the
SCANNER under the Code Functions menu.
The SCANNER provides a list of the code numbers and their
descriptions on screen, located also under the CODE FUNCTIONS
selection.
NOTE: The code indicated may be a problem either in the WIRING
between the ECU and the indicated sensor/actuator or in the
indicated sensor/actuator.
Figure 3:7
22
Bridging check connector
Honda
Clear Codes – ABS
Procedures for code clearing are provided in the SCANNER under the
CODE FUNCTIONS menu.
23
Honda
HONDA SRS Airbag
CAUTION: Before attempting any repairs on vehicles fitted with SRS
Airbag systems observe all precautions the manufacturer specifies for
these systems.
On some early Honda vehicles the SRS Airbag system is electronically
controlled but does not have any diagnostic ability. The procedures
for repair of these systems are lengthy and not supported by the
SCANNER.
Manual Code Read
During Manual Code Read the SCANNER is not connected to the
vehicle but the SCANNER may display on-screen instructions.
The procedures for accessing the SRS Airbag codes are contained on
the SCANNER under the Code Functions menu.
The SCANNER provides a list of the code numbers and their
descriptions on screen, located also under the CODE FUNCTIONS
selection.
NOTE: The code indicated may be a problem either in the WIRING
between the ECU and the indicated sensor/actuator or in the
indicated sensor/actuator.
Figure 3:9
24
Bridging check connector
Honda
Clear Codes – Airbag
To clear DTCs from the SRS unit use the following procedure for all
models.
The Memory Erase Signal (MES) connector is located either near the
fuse box or under either side of the dash.
1.
Switch the ignition off.
2.
Connect jumper wire to the MES connector.
3.
Switch the ignition on.
4.
The SRS indicator lamp lights for about six seconds, then goes
off. Remove the jumper wire from the MES connector within four
seconds of the lamp switching off.
5.
When the SRS indicator lamp lights again, connect the jumper
wire to the MES connector within four seconds of the lamp
switching on.
6.
When the SRS indicator lamp shuts off, remove the jumper wire
from the MES connector within four seconds.
7.
The SRS lamp flashes twice to indicate memory has been erased.
8.
Switch the ignition off and wait ten seconds.
Figure 3:10
Clearing Airbag codes
25
Proton
SCANNER Communication Types
The SCANNER supports live Codes and Data for Engine and Automatic
Transmission.
Refer to the applicable coverage sheets for specific Proton vehicle
coverage.
26
Proton
Connector Types
12-pin connector
Use Hyundai-2 and side power in adapter as necessary.
16-pin connector
DL-16
(Use with specified
personality key)
Use DL-16 with specified key.
27
Proton
Proton – Engine
The SCANNER supports Live Codes & Data and Auto Code Read for
Proton engines.
Codes and Data
**ATTENTION: IMPORTANT INFORMATION**
When proceeding from the SCANNER connector screen message the
SCANNER will “pause” while it initiates communication with the vehicle.
It is important that the vehicle ignition is in the ON position at this time.
Once the below screen is displayed you must press Y for CODES &
DATA within 4 seconds to maintain communication with the vehicle. If
communication is lost with the vehicle the SCANNER will display a “NO
COMMUNICATION” message on the screen, press N and re-enter the
vehicle identification.
MAIN MENU—ENGINE
>CODES & DATA
CUSTOM SETUP
FUNCTIONAL TESTS
The SCANNER will display engine data together with any engine codes
transmitted by the vehicle on the screen. Any codes that are present are
displayed, along with its description, at the top of the on-screen data
list. If there are no codes present the screen will display (NO CODES
PRESENT). For descriptions and explanations of the various parameters
see the Australian Data Parameter Manual.
NOTE: When a code is transmitted by the vehicle to the SCANNER
the code will indicate there may be a problem either in the indicated
sensor/actuator or in the WIRING for that sensor/actuator.
28
Proton
A sample of a screen display with no codes present.
RPM____825 O2 (mV)___898 TPS(V)_____1.12
**
CODES & DATA.
OK TO DRIVE.
**
(NO CODES PRESENT)
LOAD(%)____ 27
COOLANT(º)________56
Sample of a screen display with codes present.
RPM____825 O2 (mV)___898 INTEGRATR__102
**
CODES & DATA.
OK TO DRIVE.
**
13 AIR TEMP SENSOR
14 THROTTLE POSITION SENSOR
LOAD(%)_______ 27
COOLANT(º)________56
Actuator Tests – Engine
The SCANNER supports actuator tests for some live data vehicles; there
are various tests available under this menu option. The tests available
for each vehicle is dependent on what tests that vehicle supports,
not every vehicle supports every Functional Test
The SCANNER provides on screen instructions on how to perform the
tests. Some tests are performed with the ignition on and some with
the engine running, follow the on screen prompts to perform the tests
available for the vehicle being tested.
During testing you must monitor the selected actuator with a meter or by
listening for actuator activation. The engine controller does not monitor
the selected actuator. A completed test does not mean the actuator was
activated. The SCANNER can only monitor the engine controller ON/
OFF commands to the actuator.
Clear Codes
Clear codes is available for Proton engines, it is accessed from the
CODES & DATA exit menu.
29
Proton
Proton – Automatic Transmission
Codes and Data
MAIN MENU—TRANS
>CODES & DATA
CUSTOM SETUP
FUNCTIONAL TESTS
Note:- Not all vehicles will have Functional Tests.
The SCANNER will display automatic transmission data together
with any automatic transmission codes transmitted by the vehicle
on the screen. Any codes that are present are displayed, along with
its description, at the top of the on-screen data list. If there are no
codes present the SCANNER will display (NO CODES PRESENT).
For descriptions and explanations of the various parameters see the
Australian Data Parameter Manual.
NOTE: When a code is transmitted by the vehicle to the SCANNER
the code will indicate there may be a problem either in the indicated
sensor/actuator or in the WIRING for that sensor/actuator.
A sample of a screen display with no codes present.
RPM_________825
TPS(V)____________1.12
**
CODES & DATA.
OK TO DRIVE.
**
(NO CODES PRESENT)
PULSE GEN A__820 PULSE GEN B_____0
Sample of a screen display with codes present.
30
RPM_________825
TPS(V)____________1.12
**
CODES & DATA.
OK TO DRIVE.
**
31 PULSE GEN A OPEN
41 SHIFT SOL A OPEN
PULSE GEN A__820 PULSE GEN B_____0
Proton
Functional Tests – Automatic Transmission
The SCANNER supports a functional test for some live data vehicles.
The SCANNER provides on screen instructions on how to perform the
test. Follow the on screen prompts to perform the test.
During testing you must monitor the selected actuator/solenoid with a
meter or by listening for actuator/solenoid activation. The transmission
controller does not monitor the selected actuator/solenoid. A completed
test does not mean the actuator/solenoid was activated. The SCANNER
can only monitor the engine controller ON/OFF commands to the
actuator/solenoid.
Clear Codes – Automatic Transmission
Clear codes is available on Proton automatic transmissions with Live
Data, it is accessed from the CODES & DATA exit menu.
31
Toyota and Lexus
Toyota and Lexus
CAUTION FOR ABS AND SRS SYSTEMS
Before attempting any repairs on vehicles fitted with ABS or SRS
Airbag, systems observe all precautions the manufacturer specifies
for these systems.
Toyota Australia Vehicles
Toyota Australia vehicles are vehicles that are produced to be sold as
new on the Australian market. They may or may not be manufactured
in Australia but comply with Australian design laws. When selecting a
vehicle ID on the SCANNER ensure the correct initial selection is made:
TOYOTA – AUSTRALIA.
Toyota Used Import Vehicles
Used Import vehicles are vehicles that were sold new in Japan and have
since been exported to other countries including Australia and New
Zealand. The SCANNER does not list every model that is available but
does cover the more popular vehicles that are available. When selecting
a vehicle ID on the SCANNER ensure the correct initial selection is
made:
TOYOTA – USED IMPORTS.
32
Toyota and Lexus
Caution - Important note for Used Imports
Although every effort has been made to ensure the correct information
has been supplied for each vehicle there may be differences between
what appear to be the same models.
If no there is no response to the SCANNER for live data and auto code
read systems check for codes manually by following the procedures
listed in this Reference Manual for Engine and Automatic Transmission.
Entering initial vehicle ID
When entering the initial vehicle identification ensure you have first
selected the correct data base for the vehicle being tested. Refer to
the Scanner Vehicle Coverage listings for specific details of systems
covered in each software section.
Note that not all Toyota Australia vehicles are manufactured in Australia
but were sold as new vehicles in Australia and comply with Australian
vehicle design rules. If you are unsure about a vehicle's origin, check the
compliance plates on the vehicle.
33
Toyota and Lexus
Special notes
No Communication with Engine Running
Note: Toyota and Lexus models that use either the Toyota-1 or Toyota-2
adaptors require the side power to be used on these adaptors. Live data
will only be displayed if side power is used on the adaptor with engine
running.
Additional information for Toyota Camry models 1993 to
1997 and Lexus ES300 1993 to 1996
(Relevant model designations: SXV10 & VDV10)
When attempting to locate the round 17-pin diagnostic connector under
the right hand dash of the vehicle be aware the connector is located
right under the dash directly above the accelerator pedal. It is grey in
colour and also has a cap with the word DIAGNOSTIC on it. It has come
to our attention that some connectors have been moved from where
they were originally during the life of the vehicle and cannot be easily
located. If the connector cannot be located there will be a round hole in
the panel where it should be, search above this hole for the connector
which will be on the end of a wiring loom.
s
If the connector cannot be located at all an alternative for the engine
system only an be used. Under the bonnet of the vehicle on the left
hand side of the engine bay is a 23-pin diagnostic connector also with
a cap labelled DIAGNOSTIC. Use the TOYOTA-1 adaptor to connect the
SCANNER to the vehicle using the correct ID for the vehicle.
Auto Code Read for Automatic Transmission codes and ABS codes
cannot be accessed through this diagnostic connector.
(Please Note: For any make or model of vehicle always follow the on
screen instructions for connector locations and if directed refer to the
relevant Reference Manual for further information.)
34
Toyota and Lexus
Special notes cont.
Slow to communicate
When the SCANNER is initiating communication with some vehicles it
may take up to 10 seconds before codes or data is displayed on the
screen. This is dependant on the vehicle being tested and not controlled
by the SCANNER.
Actuator tests
When performing Actuator Tests make sure all of the on-screen
instructions are followed precisely so that the test is performed
correctly. Not following the procedures may produce faulty test results.
Entering initial vehicle ID
When entering the initial vehicle identification ensure you have first
selected the correct data base for the vehicle being tested. Refer to
the Scanner Vehicle Coverage listings for specific details of systems
covered in each software section.
Note that not all Toyota Australia vehicles are manufactured in Australia
but were sold as new vehicles in Australia and comply with Australian
vehicle design rules. If you are unsure about a vehicle's origin, check the
compliance plates on the vehicle.
Reading Codes
When reading codes on the SCANNER – whether it is Live Data, Auto
Code Read or Manual Code Read – and you are unsure about the code,
try pulling a known sensor then running the code check again. Then see
if the code has registered with the vehicle and been transmitted to the
SCANNER correctly.
General note on clearing codes from any system
If the code clearing method described on the SCANNER is not be
effective for the vehicle, then remove a battery terminal for at least one
minute and recheck the system.
35
Toyota and Lexus
SCANNER Communication Types
The SCANNER will present the relevant communication type for the
vehicle system being tested, whether it is Codes & Data, Auto Code
Read or Manual Code Read.
The SCANNER supports live Codes and Data for Engine and Automatic
Transmission and some ABS on vehicles that use the 16-pin diagnostic
connector.
Vehicles with the under-dash 17-pin diagnostic connector are live data
for engine only, while the automatic transmission, ABS and SRS are
Auto Code Read.
Most vehicles 1993 and later with the under-bonnet diagnostic
connector are live data for engine and Manual Code Read for automatic
transmission & ABS and Auto Code Read for most SRS Airbag.
Earlier vehicles, pre 1992, are mostly Manual Code Read only.
Lexcen vehicles using the Holden 6-pin diagnostic connector are Live
Data for Engine only. For Lexcen vehicles, VR & VS/T4, with the 16-pin
diagnostic connector refer to the latest Holden section.
SRS Airbag systems that are supported by the SCANNER are either
Auto Code Read or Manual Code Read.
Refer to the applicable coverage sheets for specific Toyota vehicle
coverage.
36
Toyota and Lexus
Connector Types
Toyota vehicles use four types of diagnostic connectors as detailed
below. Refer to Scanner connector message on screen for location.
Bracket
could be
on either
side.
23-pin connector
SIDE POWER
MUST BE USED
17-pin connector
17-pin or 23-pin connector is located underbonnet with a cap that is labelled “DIAGNOSTIC” on it.
Figure 3:11
Use Toyota-1 for both connectors, use battery power
lead or cigarette power lead to side of adaptor.
Side
power
6-pin connector located
under left side dash.
Figure 3:13
Holden-1A Adapter
Use Holden-1A.
37
Toyota and Lexus
Connector Types
17-pin connector
17-pin round connector located under right side dash, with a cap that is labelled
“DIAGNOSTIC” on it.
Figure 3:12
Use Toyota-2 and use battery power lead or cigarette
power lead to side of adaptor.
s
Note: Picture shows location
of diagnostic connector for the
1993-1997 Camry and 1993-1996
Lexus ES300 models. These
vehicles also have a diagnostic
connector under the bonnet
but the underdash connector
should be used as not all systems
are covered by underbonnet
connector.
16-pin connector
Figure 3:14
38
Use DL-16 with specified key.
Toyota and Lexus
Always follow on-screen instructions regarding adapters and keys used
when connecting to a vehicle.
Toyota - Engine
The SCANNER supports Live Codes & Data, Auto code Read and
Manual Code Read for Toyota engines.
Live Codes and Data
For live Codes & Data vehicles there are three different SCANNER
Engine test menus’ available. The SCANNER will automatically display
the correct one for the vehicle being tested. An example of each
follows:
Type 1: (Lexcen VN/VP only)
MAIN MENU—ENGINE
>CODES & DATA
CUSTOM SETUP
Type 2:
MAIN MENU—ENGINE
>CODE FUNCTIONS
CUSTOM SETUP
OTHER SYSTEMS
DATA (NO CODES)
Type 3:
MAIN MENU—ENGINE
>TEST MENU
CUSTOM SETUP
ACTUATOR TESTS*
OTHER SYSTEMS
*Some vehicles do not have ACTUATOR TESTS.
39
Toyota and Lexus
Type 1: Codes & Data (Lexcen VN/VP only)
The SCANNER will display engine data together with any engine codes
transmitted by the vehicle on the screen. Any codes that are present are
displayed, along with its description, at the top of the on-screen data
list, if there are no codes present the SCANNER will display (NO CODES
PRESENT). For descriptions and explanations of the various parameters
see the Australian Data Parameter Manual.
NOTE: When a code is transmitted by the vehicle to the SCANNER
the code will indicate there may be a problem either in the WIRING
between the ECU and the indicated sensor/actuator or in the
indicated sensor/actuator.
A sample of a screen display with no codes present.
RPM____825 O2 (mV)___898 INTEGRATR__102
**
CODES & DATA.
OK TO DRIVE.
**
(NO CODES PRESENT)
OPEN/CLSD LOOP__CLSD O2 STATUS__RICH
Sample of a screen display with codes present.
RPM____825 O2 (mV)___898 INTEGRATR__102
**
CODES & DATA.
OK TO DRIVE.
**
22 THROTTLE POSITION (TP) SENSOR
33 MAP SENSOR HIGH
OPEN/CLSD LOOP__CLSD O2 STATUS__RICH
Type 2:
Vehicles with this type of menu selection will have Auto Code Read in
the CODE FUNCTION selection and DATA (NO CODES) will display
engine data only with no codes.
MAIN MENU—ENGINE
>CODE FUNCTIONS
CUSTOM SETUP
OTHER SYSTEMS
DATA (NO CODES)
For the CODE FUNCTIONS selection see Scanner Plug-in User’s Manual
for specific details. For descriptions and explanations of the various
parameters see Part 3 of this manual.
The DATA (NO CODES) selection will display engine data that is
transmitted to the SCANNER by the vehicle.
40
Toyota and Lexus
Type 3: Test Menu
Vehicles that support this type of Codes & Data use the 16-pin
diagnostic connector. This type was first used in 1997 and has been
introduced over the model range in the following years.
MAIN MENU—ENGINE
>TEST MENU
CUSTOM SETUP
ACTUATOR TESTS
OTHER SYSTEMS
ACTUATOR TESTS are only available on some vehicles.
When type 3 TEST MENU is selected, the SCANNER will then display
another menu with two options.
TEST MENU
>CODES ONLY
DATA (NO CODES)
CODES ONLY
This selection will display any codes transmitted by the vehicle. All
codes are displayed with the codes number and description.
5-digit Engine codes may appear with a second 2-digit number
in brackets. The second number applies to vehicles fitted with
electronically controlled diesel engines. These diesel engines use the
2-digit code number for the same code descriptions.
For example, the code: P0120 (41) TPS SENSOR CIRCUIT may be
displayed. The (41) refers to the diesel engine code number.
NOTE: When a code is transmitted by the vehicle to the SCANNER
the code will indicate there may be a problem either in the WIRING
between the ECU and the indicated sensor/actuator or in the
indicated sensor/actuator.
DATA (NO CODES)
This selection displays engine data that is transmitted to the SCANNER
by the vehicle. For descriptions and explanations of the various
parameters see the Australian Data Parameter Manual.
When displaying data in this mode CUSTOM DATA LIST can be used
to increase the refresh rate of the on screen data by displaying less
parameters.
41
Toyota and Lexus
Actuator Tests for Type 3 only
The SCANNER supports actuator tests for some live data vehicles, there
are various tests available under this menu option. The tests available
for each vehicle is dependent on what tests that vehicle supports,
not every vehicle supports every Functional Test.
The SCANNER provides on-screen instructions on how to perform the
tests. Some tests are performed with the ignition on and some with
the engine running, follow the on screen prompts to perform the tests
available for the vehicle being tested.
During testing you must monitor the selected actuator/solenoid with
a meter or by listening for actuator/solenoid activation. The engine
controller does not monitor the selected actuator/solenoid. A completed
test does not mean the actuator/solenoid was activated. The SCANNER
can only monitor the engine controller ON/OFF commands to the
actuator/solenoid.
Auto Code Read
See Scanner Plug-in User’s Manual for further Auto Code Read
information. The SCANNER will read and display any fault present codes
on the screen. Toyota vehicles transmit a constant flash as a pass code.
42
Toyota and Lexus
Manual Code Read Toyota and Code Types – Engine
Code Types 09 & 10 – Toyota and Lexus
Early Toyotas use either one of two types of code patterns. The
SCANNER refers to these as code types 09 and 10.
In most cases, Toyota codes 09 and 10 can only be read visually. This
is because Toyota does not have a diagnostic connector available on
these vehicles for SCANNER hookup. To manually gather codes from
these vehicles, you short two wires of a check connector together and
observe a flashing lamp on the dash. Late-model Toyotas and Lexus
models can auto code read. These vehicles transmit Toyota code type
09 and can be read automatically by the SCANNER or visually.
Type 09 flashes a 2-digit (tens/ones) CHECK ENGINE lamp code. The
lamp flashes each digit as 0.5-second pulses, with 1.5 seconds between
digits. If more than one code is present, the light will remain off for 2.5
seconds and then indicate the next code. After all codes have been
displayed, there is a 4.5-second pause and the sequence is repeated.
Continuous flashing indicates that the system is normal and no trouble
codes are present.
Toyota Supra and Cressida (1983-84) connections.
Figure 3:15
Manual code gathering
43
Toyota and Lexus
Engine
Type 10 flashes the CHECK ENGINE lamp a number of times equal
to the trouble code (straight count), every 4.5 seconds. If more than
one code is present, the light will remain off for 2.5 seconds and then
indicate the next code. After all codes have been displayed, there is a
4.5-second pause and the sequence is repeated. A code 1 indicates
system normal, no trouble codes present.
CODE TYPE 9
Used on:
Toyota
Pattern:10’s and 1’s
Read codes on:
CHECK ENGINE lamp
Start codes by:
Connect vehicle diagnostic connector terminals together
and turn ignition on
When done:
Turn ignition off, disconnect connectors, clear codes
CODE TYPE 10
Used on:
Pattern:
Read codes on:
Start codes by:
Toyota
Straight count
CHECK ENGINE lamp
Connect vehicle diagnostic connector terminals together
and turn ignition on
When done:
Turn ignition off, disconnect connectors, clear codes
Code 1 is pass code (system OK).
44
Toyota and Lexus
Clear Codes for all types – Engine
Clear codes is available only for type 3 TEST MENU Live Data Toyota
engines that use the 16-pin connector, it is accessed from the CODES
ONLY exit menu.
For Auto Code Read and Manual Code Read vehicles clear code
instructions are detailed in the CODE FUNCTIONS menu.
45
Toyota and Lexus
Toyota – Automatic Transmission
Toyota Automatic Transmissions that are electronically controlled can be
either Manual Code Read, Auto Code Read or Live Data.
Codes & Data Test Menu
MAIN MENU—TRANS
>TEST MENU
CUSTOM SETUP
ACTUATOR TESTS*
OTHER SYSTEMS
*Note: only some vehicles have Actuator Tests.
When TEST MENU is selected, the screen will then display another
menu with two options.
TEST MENU
>CODES ONLY
DATA (NO CODES)
or
TEST MENU
>CODES ONLY
CODES ONLY
This selection will display any codes transmitted by the vehicle, all
codes are displayed with descriptions.
5-digit Automatic Transmission codes may appear with a second 2-digit
number in brackets. The second number applies to vehicles fitted with
electronically controlled diesel engines. These diesel engines use the
2-digit code number for the same code descriptions.
For example, the code: P0120 (41) TPS SENSOR CIRCUIT may be
displayed. The (41) refers to the diesel engine code number.
NOTE: When a code is transmitted by the vehicle to the SCANNER
the code will indicate there may be a problem either in the WIRING
between the ECU and the indicated sensor/actuator or in the
indicated sensor/actuator.
46
Toyota and Lexus
DATA (NO CODES)
This menu selection displays transmission data parameters that
are transmitted from the vehicle to the SCANNER. For descriptions
and explanations of the various parameters see the Australian Data
Parameter Manual.
The DATA (NO CODES) selection is only available on selected vehicles.
When displaying data in this mode CUSTOM DATA LIST can be used
to increase the refresh rate of the on screen data by displaying less
parameters.
Actuator Tests for Automatic Transmissions
Live Data Systems
Some vehicles support automatic transmission actuator tests,
there are various tests available under this menu option. The tests
available for each vehicle is dependent on what tests that vehicle
supports, not every vehicle supports every Actuator Test
The SCANNER provides on screen instructions on how to perform the
tests. Some tests are performed with the ignition on and some with
the engine running, follow the on screen prompts to perform the tests
available for the vehicle being tested.
During testing you must monitor the selected actuator/solenoid with
a meter or by listening for actuator/solenoid activation. The engine
controller does not monitor the selected actuator/solenoid. A completed
test does not mean the actuator/solenoid was activated. The SCANNER
can only monitor the engine controller ON/OFF commands to the
actuator/solenoid.
Manual Code Read
Note: On some Manual Code systems the SCANNER may display onscreen instructions.
For other Manual Code Read vehicles the SCANNER may direct you to
use the Toyota-1 adaptor, when doing this the SCANNER will short the
necessary pins in the diagnostic connector but you will need to read the
codes on the dash mounted “O/D OFF” lamp.
Important: For these vehicles ensure the “O/D OFF” switch is not
engaged and the “O/D OFF” lamp is not illuminated.
Auto Code Read
Important: For these vehicles ensure the “O/D OFF” switch is not
engaged and the “O/D OFF” lamp is not illuminated.
On Auto Code Read Codes vehicles codes can also be gathered
manually by bridging the pins as indicated in the following diagram.
47
Toyota and Lexus
Automatic Transmissions
s
Jumper wire
s
Jumper wire
Figure 3:16
Manual code gathering – jump pins as indicated.
Vehicle may have one of two types of pin arrangement.
Ensure the O/D switch is turned on and the O/D OFF lamp is not on.
48
Toyota and Lexus
Functional Tests for Auto Code Read and
Manual Code Read for Automatic Transmissions
Functional Tests are supported for all Auto Code Read and most Manual
Code Read systems. There are three tests supported:
TPS TEST
BRAKE SWITCH TEST
SHIFT TEST
When performing these tests follow the on-screen instructions to ensure
the tests are performed correctly. Some tests may not be supported by
the vehicle.
Clear Codes
Clear codes is available on Toyota automatic transmissions with Live
Data, it is accessed from the CODES ONLY exit menu.
For Auto Code Read and Manual Code Read refer to clear codes in the
CODE FUNCTION menu for clear codes procedures.
49
Toyota and Lexus
Toyota ABS
CAUTION: Before attempting any repairs on vehicles fitted with ABS
systems observe all precautions the manufacturer specifies for
these systems.
The SCANNER supports Live Codes & Data, Auto code Read and
Manual Code Read for Toyota ABS systems.
NOTE: Toyota live data ABS system may use a different adapter
key from the engine and auto trans. Always follow on-screen
instructions when changing systems.
Codes and Data Test Menu
MAIN MENU—ABS
>TEST MENU
CUSTOM SETUP
OTHER SYSTEMS
When TEST MENU is selected, the SCANNER will then display another
menu with two options.
TEST MENU
>CODES ONLY
DATA (NO CODES)
or
TEST MENU
>CODES ONLY
CODES ONLY
This selection will display any codes transmitted by the vehicle, all
codes are displayed with descriptions.
NOTE: When a code is transmitted by the vehicle to the SCANNER
the code will indicate there may be a problem either in the WIRING
between the ECU and the indicated sensor/actuator or in the
indicated sensor/actuator.
DATA (NO CODES)
This selection displays ABS data that is transmitted to the SCANNER by
the vehicle. For descriptions and explanations of the various parameters
see the Australian Data Parameter Manual.
50
Toyota and Lexus
Auto Code Read – ABS
For Auto Code Read vehicles refer to Scanner Plug-in User’s Manual
for details. Important: For these vehicles ensure that all SCANNER
instructions are followed.
The SCANNER will read and display any fault present codes on the
SCANNER screen.
Manual Code Read
Note: On some Manual Code systems the SCANNER may display onscreen instructions.
For other Manual Code Read vehicles the SCANNER may direct you to
use the Toyota-1 adaptor, when doing this the SCANNER will short the
necessary pins in the diagnostic connector but you will need to read the
codes on the dash mounted “ABS” lamp.
Important: For these vehicles ensure that all instructions are followed.
The following pins can also be bridged to enable ABS manual code
read. Note:- this not applicable to vehicles that only have the 16-pin
connector.
ABS Manual Code Read – bridge pins as shown with ignition key on,
read codes on ABS lamp.
Figure 3:17
Manual code gathering – jump pins as indicated.
Vehicle may have one of two types of pin arrangement.
51
Toyota and Lexus
Toyota SRS Airbag
CAUTION: Before attempting any repairs on vehicles fitted with SRS
Airbag systems observe all precautions the manufacturer specifies for
these systems.
The SCANNER supports Codes & Data, Codes Only, Manual Code Read
and Auto Code Read for Toyota SRS Airbag systems.
NOTE: Some Toyota SRS Airbag systems are not electronically
controlled and therefore do not have any diagnostic capability.
Codes Only
There is two options in the Codes Only systems, CURRENT and
HISTORY Codes. Current Codes are DTC’s that are currently in the
system and History are DTC’s that have occurred since the last time
DTC’s were cleared. Always check both options when testing.
Auto Code Read
For Auto Code Read vehicles follow all on-screen instructions and refer
to relevant manuals for further Auto Code Read details.
The SCANNER will read and display any SRS fault codes present in the
SRS system on the screen.
The SCANNER provides a list of the code numbers and their
descriptions on screen, located also under the CODE FUNCTIONS
selection.
NOTE: When a code is transmitted by the vehicle to the SCANNER
the code will indicate there may be a problem either in the WIRING
between the ECU and the indicated sensor/actuator or in the
indicated sensor/actuator.
Manual Code Read
Note: On some Manual Code systems the SCANNER may display onscreen instructions.
For Manual Code Read vehicles the codes must be read on the dash
mounted “SRS” lamp.
The SCANNER provides a list of the code numbers and their
descriptions on screen, located also under the CODE FUNCTIONS
selection.
NOTE: When a code is transmitted by the vehicle to the SCANNER
the code will indicate there may be a problem either in the WIRING
between the ECU and the indicated sensor/actuator or in the
indicated sensor/actuator.
52
Toyota and Lexus
SRS Clear Codes
Auto Code Read vehicles support clear codes from the SCANNER.
Important: ensure on-screen instructions are followed.
Manual Code Read vehicle codes are cleared once the fault is repaired
and the ignition is cycled off and on.
Used Imports SRS Airbag Only
There are 3 different SRS Airbag types used on Toyota motor vehicles.
Some Airbag systems are a mechanical type with no diagnostic ability,
some are a Manual Code Read type and some are an Auto code Read
type.
The 3 different types are used interchangeably on some models. You
will need to determine whether a system is mechanical or electronic.
1)
Mechanical system check: Simply turn on the ignition and check
to see if there is an AIRBAG warning lamp or symbol that lights
up for a short time then extinguishes. There will also not be
any wiring normally associated with the an Airbag , eg steering
column connectors, fuses etc. These are normally drivers side
only Airbag set-up.
2)
The Manual Code Read versions will not transmit any codes to the
SCANNER although the SCANNER will trigger code reading with
the codes being read on the dash mounted SRS lamp.
These codes will clear when the fault is rectified and the ignition
cycled off for 10 seconds and then on again.
3)
The Auto Code read type will transmit codes to the SCANNER, a
NO CODES PRESENT message is displayed when no fault codes
have been recorded. These codes can be cleared electronically
by the SCANNER.
The SCANNER is set to Auto Code Read as default for all Airbag
systems although the system being tested on the vehicle may be a
Mechanical or Manual Code Read type. If it is a Manual Code Read then
the SCANNER will not read any codes from the vehicle they can only be
read on the dash mounted SRS lamp.
Note: If the dash mounted lamp does not light at all then diagnose
why the lamp does not light up.
53
Appendix A — Vehicle Does Not Communicate
Appendix B — Vehicle Does Not
Communicate With SCANNER
Contents
General Checks.................................................................55
No Codes are Displayed....................................................................56
Engine Will Not Start and ECU Will Not
Communicate with Ignition On...........................................................57
Engine Runs but Will Not Communicate...........................................57
Check SCANNER Connection and Operation.................58
Check the CHECK ENGINE Lamp....................................58
Special Cases — Specific Vehicles..................................59
Toyota and Lexus vehicles no communication
with engine running . .........................................................................59
If a control system fails to communicate with the SCANNER, a problem
may exist with the wiring or other circuit parts on the car; or the vehicle
identification to the SCANNER may be incorrect. The vehicle’s failure to
communicate can be an important symptom for diagnosing a driveability
problem.
NOTE: Also check vehicle specific
information in Part 2.
54
Appendix B — Vehicle Does Not Communicate
General Checks
Check the following points first:
1. Vehicle identification — Check the vehicle identification entered.
The control modules do not all transmit the same amount of data
at the same speed. Nor do they all transmit the same information
in the same order. Additionally, the SCANNER must address, or
“question,” some modules to establish communication. All of these
points mean that the SCANNER must know exactly what year
and model module it is connected to. If the SCANNER thinks it is
receiving data from one car and it is connected to another (through
incorrect identificaton), it will either not communicate at all or
display some data readings that are clearly incorrect. Always enter
a new vehicle identification when testing a new vehicle, even if two
vehicles are exactly the same model with the same engine.
2. SCANNER connections — See "Check SCANNER Connection and
Operation" for information on SCANNER cables and connections.
3. Loss of power to a control module — The modules receive
battery voltage through one or more fuses or fusible links in the
wiring harness. Use a wiring diagram to check module connections
for battery voltage and ground. If a module fuse or fusible link is
open, the module cannot communicate with the SCANNER.
4. Ignition off when connecting SCANNER — Be sure the ignition
is off when connecting and disconnecting the SCANNER. If the
ignition is on when the SCANNER is connected or disconnected,
SCANNER memory may be disrupted. Erase and reenter vehicle
identification if this occurs.
5. Always follow the SCANNER on screen instructions.
6. Ensure you are using the correct adaptor and correct key if
applicable.
7. Check the SCANNER reference manuals for any applicable details.
8. Ensure you are connected to the correct vehicle connector.
9. Check the SCANNER cable for broken wires and adaptors for
misaligned pins.
10. Check the vehicle connector for broken wires and for misaligned
pins.
55
Appendix B — Vehicle Does Not Communicate
11. Vehicles with Mazda Electronic Control Systems (MECS), including
Ford Laser etc, as well as certain Kia vehicles do not transmit any
codes when no faults are detected. (The SCANNER screen will not
change when checking for codes.)
12. Low vehicle battery voltage may cause incorrect SCANNER test
results.
13. The vehicle ECU may be faulty, check
by disconnecting a
known sensor and running a test.
No Codes are Displayed
Most data stream vehicles transmit trouble codes along with their data.
Therefore, if the data is displayed, an absence of trouble codes does
not indicate a communication problem. Some vehicles transmit trouble
codes separately from the data stream.
Some vehicles with AUTO CODE READ capability transmit a "pass
code," others do not. Therefore, the absence of trouble codes may or
may not indicate that there is a communication problem. However, if the
car you are testing will not start, or has a driveability symptom, and no
codes are present, there probably is a communication problem.
You can diagnose a communication problem on some AUTO CODE
READ cars by attempting to manually gather codes. However, many
AUTO CODE READ cars do not provide manual code gathering as an
option.
You can also try inducing a trouble code. Unfortunately, there is no
common way to do this. The method will vary, depending on the
vehicle make and model year. Generally, you can induce a code
by disconnecting a resistive-type sensor, such as a TPS or coolant
temperature sensor. However, the best method is to use your experience
based on what you have seen on similar cars in the past.
IF NO CODES DISPLAYED AND YOU WISH TO VERIFY THAT
THE VEHICLE IS OK PULL A KNOWN SENSOR, RUN TEST AND
KNOWN CODE SHOULD APPEAR – REPLACE SENSOR AND
CLEAR CODES.
56
Appendix B — Vehicle Does Not Communicate
Engine Will Not Start and ECU Will Not Communicate
With Ignition On
If the engine does not start and the PCM will not communicate with the
ignition on, follow the instructions in the section titled "Check the CHECK
ENGINE Lamp" to see if the vehicle will display codes on the instrument
panel lamp. Also make these basic tests:
• Battery — Check the battery state of charge and cranking capacity.
The MODIS is self-powered. Therefore, the SCANNER may appear
to operate normally even if the battery does not have enough power
to crank the engine or operate the vehicle computer.
• ECU supply voltage — Check a wiring diagram for the location of
the ECU fuses or fusible links and test for an open circuit.
• ECU ground — Use a wiring diagram to identify the location of the
ground connection. An open ground can keep a fuel-injected engine
from starting. A high-resistance, or “dirty,” ground can cause overall
poor operation.
An open ground or battery voltage (B+) circuit on a fuel-injected engine
will remove power from the PCM and keep the engine from starting.
A carbureted engine may start and run even if the power circuit to the
PCM is open. It probably will run very poorly, however, because it will be
running without feedback fuel control or spark advance control.
Engine Runs But Will Not Communicate
The way in which the engine runs can be a clue to the cause of a test
problem. If the engine seems to run normally but the PCM will not
communicate with the SCANNER, the cause may be a wiring problem
to the diagnostic connector that does not affect the rest of the system.
If the engine runs poorly, the cause may be a poor system ground or a
voltage problem that affects the PCM or the entire system.
Refer to the sections, "Check the CHECK ENGINE Lamp" and “Check
the diagnostic Connector” for troubleshooting instructions.
57
Appendix B — Vehicle Does Not Communicate
Check SCANNER Connection And Operation
Begin troubleshooting the test or communication problem by
determining if the SCANNER is working normally. If the SCANNER
works properly on other vehicles, particularly same-model vehicles, the
problem is probably in the vehicle, not the SCANNER. If the SCANNER
readings are unsteady, the SCANNER may be at fault or there may be a
power problem on the vehicle.
If the SCANNER intermittently resets or drops out, a wire may be
opening intermittently in one of the cables or in the adapter. Use an
ohmmeter to check continuity of the SCANNER data cable from pin to
pin between the D-shaped connectors at either end of the cable.
Check the CHECK ENGINE Lamp
Many cars and trucks with PCM diagnostic capabilities have a CHECK
ENGINE lamp on the instrument panel. On some vehicles, the lamp
is labeled simply ENGINE, or has a symbol to indicate the PCM.
Regardless of the label, they all can be referred to as the CHECK
ENGINE lamp.
The CHECK ENGINE lamp can be an important device for checking the PCM’s
ability to transmit to the SCANNER. If the SCANNER cannot communicate
with the vehicle, disconnect the SCANNER and see if the PCM will flash
trouble codes on the CHECK ENGINE lamp. This applies only to some
vehicles.
Turn the ignition on and verify that the CHECK ENGINE lamp lights with
the ignition on and the engine off. If it does not, troubleshoot and repair
the problem before going farther. It could be as simple as a burned out
lamp bulb or a blown fuse. Refer to the carmaker's shop manual for the
CHECK ENGINE lamp troubleshooting procedure on the specific vehicle
you are testing. Common causes of CHECK ENGINE lamp circuit
problems include:
• A blown circuit fuse (GAUGES or other lamp fuse)
• A burned-out lamp bulb
• A wiring or connector problem
• A defective lamp driver
• A diagnostic connector problem
58
Appendix B — Vehicle Does Not Communicate
Special Cases
Some vehicle systems transmit data at a slow baud rate. These vehicles
can appear to have communication problems when actually, they simply
tranmsit data at a very slow speed.
The baud rate determines how fast the SCANNER responds to the PCM
and how fast the data readings change on the screen. It also affects
the time that it takes to record a movie. Readings from these vehicles
can take up to seven seconds to change. This display speed, or “data
update rate” depends on the ECU; it is not controlled by the SCANNER.
Toyota and Lexus Vehicles with no communication with
engine running using MODIS
Note: Toyota and Lexus vehicles that use the Toyota-1 or Toyota-2
adaptors require side power in adaptor to communicate with engine
running. Ensure 12V is being fed into the side of the adaptor.
NOTE: Also check vehicle specific
information in Part 2.
59
®SNAP-ON TOOLS (AUSTRALIA) PTY LTD
ABN 55 010 793 683
60
Form ZEEMAUTOY102
E.&O.E.
07/10