1
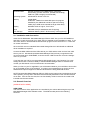
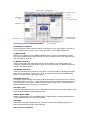
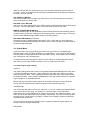
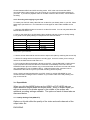
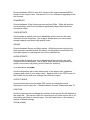
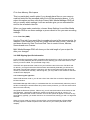
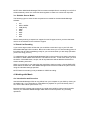
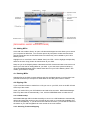
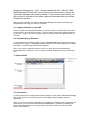
User Manual
Max Media Manager PRO for SONY™ PSP™
1. General Introduction
2. Getting Started
a. Product Contents
b. System Requirements
c. Installation and Connection
d. General Overview
3. Working with Video
a. Introduction and Overview
b. Simple Mode
i. Choosing the right settings
ii. Encoding and copying to your PSP
c. Expert Mode
i. Quality Settings Tab
ii. Dimensions Tab
iii. File size Tab
iv. Time Tab
d. DVD Ripping Specific Information
i. Choosing the right files
e. Suitable Source Media
f. Batch List Encoding
4. Working with Music
a. Introduction and Overview
b. Adding MP3s
c. Deleting MP3s
d. Ripping CDs
i. CDDB Lookup
ii. Selecting Tracks and Ripping
5. Working with Images
a. Introduction and Overview
b. Transferring your Images
i. Copy Options
ii. Transferring Images
c. Deleting Images
6. Receiving Podcasts
a. Introduction and Overview
b. Subscribing to Podcasts
c. Copying Podcasts to your PSP
d. Unsubscribing to Podcasts
7. Saves Online
a. Introduction
b. Powersaves
i. What are Powersaves?
ii. Overview
iii. Downloading and Using a Powersave
c. Community
i. What are Community Saves?
ii. Overview
iii. Downloading and Using a Community Save
iv. Uploading a Save to the Community
d. My Uploads
i. What is My Uploads?
ii. Overview
iii. Deleting an Upload
8. Saves in your PC Database
a. Overview
b. Saves in your PC Database
c. Editing Saves in your PC Database
d. Deleting Saves from your PC Database
e. Transferring Saves to your PSP
f. Uploading a Save to the Community
i. Getting Started
ii. Options Screen
iii. Upload Your Gamesave
9. Saves on your PSP
a. Introduction and Overview
b. Copying Saves to your PC Database
c. Deleting Saves
10. Options Screen
11. Technical Support
1. General Introduction
Congratulations on your purchase of Max Media Manager PRO for SONY’s PSP handheld
console. Max Media Manager PRO is the most fully featured media management solution for
PSP on the market.
Using Max Media Manager PRO you can create PSP friendly audio and video directly from
CDs and DVDs*, control every detail of video, audio and image transcoding and even enjoy
all the PSP gamesave management features of Datel’s market leading Action Replay MAX for
PSP product.
2. Getting Started
2.a. Product Contents
Your Max Media Manager PRO for PSP product should include the following; check the box
to make sure everything is there:
•
•
•
1 x High Speed USB 2.0 lead (MINI USB to USB)
1 x “Max Media Manager PRO for PSP” PC software disc
1 x User manual
2.b. General Introduction
To get maximum functionality out of your Max Media Manager PRO pack you need a set-up
that meets the following minimum requirements:
MINIMUM SYSTEM REQUIREMENTS
Computer /
Processor
1GHz+ processor
Communication
Internet connection (for CDDB lookup, gamesave
downloading, product activation, podcast downloading)
USB Port (USB 2.0 highly recommended)
Operating System
Windows® XP Home or XP Pro.
Memory
512Mb RAM
Install size: 10MB of free hard-disk space for program
installation plus additional hard drive space for storing
media (Up to 2GB recommended for larger video files)
Display
800X600 SVGA or higher, True Colour
Drive
CD-ROM drive (for installation and CD ripping)
PSP Storage
Additional Memory Stick™ DUO memory cards (optional)
2.c. Installation and Connection
Insert the CD-ROM titled “Max Media Manager PRO for PSP” into your PC CD-ROM drive
and wait a couple of seconds (if you have auto-run enabled) for the installation to start. If you
don’t have auto-run enabled find the SETUP.EXE program on the CD and run it. Follow the
on-screen instructions.
Since the PSP acts as a standard Removable Storage Device in Windows® no additional
driver installation is required.
Connect the MINI USB end of the USB cable to your PSP and the other end to a free USB
slot on your PC. Windows® (and Max Media Manager PRO) will only recognise the PSP
once it has been put in USB MODE, to do this choose ‘USB Connection’ from the ‘Settings’
menu on your PSP.
If you find that your PSP is not recognised by Windows® (look in ‘My Computer’ for a new
storage device with a new drive letter) or the Max Media Manager PRO PC software then
consult your Windows®’ or PC manufacturer’s documentation.
When you first run your PC application you will be asked whether you would like to look online
for an upgraded version of the software. It is highly recommended that you do this as new
features and improved support for different file formats are being added all the time.
NOTE: Because Max Media Manager PRO for PSP can be improved and revised through this
online update, you may find in the future that functionality described in this manual becomes
out of date. If this is ever the case, the new functionality will be covered in the ‘readme’ file
included with the new release.
2.d. General Overview
[OVERVIEW.EPS HERE]
VIEW TABS
The main functions of the application are controlled by the various tabs along the top of the
Max Media Manager PRO software screen. The different tabs perform the following
functions:
RIP DVD
IMAGES
Create PSP friendly video directly from
an unprotected DVD
Transfer images to your PSP for viewing on
the move.
VIDEO
SAVES PC
Encode and transfer video to and from your
PSP.
List the gamesaves stored on your PC’s
hard-drive.
RIP CD
SAVES – PSP
Create PSP friendly MP3 directly from
an audio CD.
List the gamesaves stored on your PSP’s
Memory Stick.
AUDIO
SAVES - WEB
Transfer MP3s to your PSP for listening on
the move.
Connect to the Codejunkies.com server to
download new gamesaves or view
gamesaves you have uploaded.
SUB TABS
When on the video encoding tab, use the sub tabs to determine whether you are copying
directly to the PSP or to a ‘Batch List’ for automatic multiple encoding.
MAIN WINDOW
Depending upon which main view tab you are on you will see different content displayed in
the main window.
PC MEDIA CONTROLS
These buttons vary depending upon which view tab you are currently on. Use the media
controls for such functions as EDIT, DELETE, DOWNLOAD etc.
APPLICATION CONTROLS
Use the application controls to CLOSE, MINIMISE and MAXIMISE the Max Media Manager
PRO software, including accessing the program’s many options.
3. Working with Video
a. Introduction and Overview
The PSP will only allow playback of video files correctly named, filed and encoded to the PSP
specification, MAX Media Manager PRO takes care of this process for you.
MAX Media Manager PRO has two ways for you to create perfect PSP ready video, either
from a file already on your system (use the VIDEO tab) or directly from an unprotected DVD
(use the DVD VIDEO tab).
Since the video encoding options for creating a PSP video from a file or DVD are the same,
we will use the VIDEO tab as an example in this section. To create a video from a DVD, use
the information in the section along with the additional information specific to DVD ripping
discussed in section 3.d.
[DESIGNERS: INSERT VIDEO.EPS HERE]
ADD MEDIA TO LIBRARY
Click to browse for video content to prepare for playback on your PSP. (Note: if you wish to
use a DVD disc as the source for your video conversion, use the DVD VIDEO tab).
PC MEDIA VIEW
Adding a file or files to your PC MEDIA LIBRARY does not move or duplicate the original
file(s), the PC Media Library simply lists links to files you add so that you can easily encode
and copy them to your PSP.
PC MEDIA CONTROLS
These controls affect the media items that have been added to your ‘Media Library’ list.
Choosing to delete an item will remove it from your list only, the file you added to the list will
remain in its original location.
PSP MEDIA CONTROLS
These controls affect the video files on your PSP. Choosing to delete a file will permanently
delete it from your PSP’s memory card. When on the Batch List tab, use the EXCECUTE
button to encode all jobs in the batch queue.
ENCODING OPTIONS
Changing the quality setting of the video encoder will affect the size and look of your videos
when played back on the PSP. Lower quality settings result in smaller file sizes (allowing you
to fit more video on your memory sticks) but lower visual / audio clarity. Experiment with
different settings to see which suit your needs best.
ENCODE / COPY
Press this button after selecting a source video file and choosing your encoding settings using
either the Expert Mode or Simple Mode options.
EXPERT MODE TABS
When in ‘Expert Mode’ (click the MODE button to toggle between modes) use these tabs to
control different aspects of your video encoding.
SUB TABS
Select PSP to encode immediately onto your PSP or select Batch Mode to add jobs to a
batch queue pending execution of the batch list.
PSP (or Batch) CONTENTS
When on the PSP tab, this window shows you the contents of the Video specific folder on
your PSP. When on the Batch tab, this window will display the list of encoding job waiting to
run when you click ‘Execute’.
PSP CAPACITY METER
This bar shows the amount of space you have left on your PSP’s storage device (memory
card or hard drive) for storing video.
ENCODE / COPY BUTTON
Use to convert video (using quality set in VIDEO QUALITY SETTINGS) without transferring to
your PSP. The encoded video is output to the same folder as the source video.
SIMPLE / EXPERT MODE SWITCH
Press the MODE button to switch between simple mode and expert mode encoding options.
In simple mode you will see a reduced set of encoding options, in expert mode you will have
access to MAX Media Manager PRO’s full set of encoding options.
ENCODING PROGRESS (not shown)
Encoding progress is displayed along the bottom of the screen after you have selected a
source file and clicked the CONVERT or COPY buttons. Video encoding could take several
minutes on large video files.
3.b. Simple Mode
A quick and easy way to get perfectly good video onto your PSP is to use MAX Media
Manager PRO’s video encoding capabilities in ‘Simple Mode’. In this mode you will still have
access to basic encoding options such as compression quality, screen aspect and encoding
type, sufficient for many encoding jobs.
To understand the encoding options, see the section below on choosing the right settings,
then, when you are ready, follow the steps in 3.b.ii. to create your PSP video.
3.b.i.Choosing the right settings
QUALITY
The quality settings affect the amount of compression MAX Media Manager PRO uses when
it encodes the selected video files. Higher settings (to the right) mean sharper, smoother
video but larger file sizes. Lower settings (to the left) mean less sharp, lower quality videos
but smaller file sizes. Using a setting of MEDIUM or HIGH will usually produce an output file
of good quality for a reasonable file size.
Results will vary from video to video based on the amount and type of movement in the
source video so experiment with different settings to find ones that work best.
SCREEN SIZE
This control sets the aspect ratio of your output file. Try to use a setting that suits the aspect
of the source file you are using. For instance, if you know that the source file was a
widescreen DVD, choose widescreen to create an output file in the widescreen aspect. The
PSP’s screen is particularly suited to this setting. Alternatively, if you are converting a video
recorded from a normal aspect TV program, choose the TV setting to produce a video that
maintains these dimensions.
For more control over how the original movie is cropped to create the output aspect you
choose, switch to the Expert Mode tab.
ENCODING
Choose between MPG4 and AVC encoding mode. AVC is the new format that SONY
recommend but it does require you to be running v2.0 or higher of its browser software on
your PSP. If you want to playback video on an older version of the browser, choose MPG4
encoding.
3.b.ii. Encoding and copying to your PSP
To create your first PSP ready video file from a video file you already have on your PC, follow
these steps (see section 3.e. for information on what types of video make suitable source
files):
1. Click the ADD MEDIA button to browse for a video file to add. You can only add videos file
formats listed in section 3.e.
2. Click on the video file in the PC Media Library window and then choose a Quality Setting.
For a guide to how quality settings correspond to File sizes see below:
Q Setting
1
2
3
4
5
MB/min
0.77
1.07
1.76
3.32
3.85
30min video
23.1Mb
32.1Mb
52.8Mb
99.6Mb
115.5Mb
Sample video: Typical action film.
3. Use the Screen Size selector and choose an aspect ratio (start by matching the source file)
4. Use the Encoding selector and pick an encoding type. Use AVC unless you are using a
version of the PSP browser older than v2.0.
5. To encode the video and transfer it directly to the PSP, click the ENCODE / COPY button.
If you would like to encode the video but not transfer it immediately to the PSP click the
CONVERT button (this will create a copy in the same folder as the source movie and list the
new outputted file in your PC Media Library). Videos that have been converted can be
transferred to the PSP at any time (no further encoding will be required).
Once a video has been transferred to your PSP, view it by exiting USB MODE on your
console and then scrolling across to ‘VIDEO’ on your PSP’s main menu and pressing X to
play on the new file.
3.c. Expert Mode
When you click the MODE button on the VIDEO or DVD VIDEO tab you
switch between Simple Mode and Expert Mode. When in Expert Mode you
will see a new set of sub-tabs appear in the middle of the screen with
additional encoding settings available. The options of each of these tabs are
discussed below.
3.c.i. Quality Settings Tab (QUALITY)
Options on this tab affect the quality of the video and audio channels of the
output video file.
ENCODING
Choose between SONY’s new AVC format or the original standard MPG4
format for the output video. See section 3.b.i. for information regarding these
two formats.
FRAMERATE
Choose between 15fps (frames per second) and 30fps. 30fps will produce
much smoother video but will produce significantly larger files than those
encoded at 15fps.
VIDEO BITRATE
Use the slider to specify how much bandwidth will be used for the video
channel in the file outputted. Use a higher bitrate when you have ample
storage capacity and desire high quality video
SOUND
Choose between Stereo and Mono sound. Where the sound coming from
both channels is predominantly the same, choosing Mono over Stereo will
have little impact on reducing the size of the outputted file.
AUDIO BITRATE
Use the slider to specify how much bandwidth will be used for the audio
channel in the file outputted. Use a higher audio bitrate setting where the
quality of the audio is a priority (music videos for instance).
3.c.ii. Dimensions Tab (DIMS)
Use the dimensions tab to take total control of the aspect ratio, alignment,
cropping and zoom of your output video. Keep an eye on the PSP screen on
the control too see how your changes will affect the output.
OUTPUT MODE
Use the button above the example PSP screen to change the actual
dimensions of the output file. Choose between Cinema, Widescreen and TV.
POSITION
Use the control arrows to change the position of the source file with relation to
the output file. This can be useful for correcting an off centre source file or for
eliminating sub-titles or channel logos. Use the reset button in the centre to
restore to default settings.
ZOOM (middle)
Use the zoom in and zoom out controls to magnify or shrink the source file
with relation to the output file whilst maintaining the aspect ratio. Use the
reset button in the centre to restore to default settings.
STRETCH / SHRINK
Use the stretch and shrink controls to manually change the dimensions of the
outputted file without linking those dimensions to the aspect ration of the
source file. This can be useful for correcting files that have been encoded to
a different video size (widescreen, cinema screen etc) and have had their
aspect ratio distorted.
3.c.iii. File size Tab (FILESIZE)
MAX Media Manager PRO features two ingenious ways to help you determine
settings based on a desired size for your output file.
ESTIMATE VIDEO SIZE
Once you have selected a source movie (in the Media Library window), use
the Estimate Video Size button to have MAX Media Manager PRO calculate
an estimated file size for your output video based on the settings you have
made in the other tabs. This eliminates the need for you to keep changing
your settings and then re-encoding until you produce a file of the desired size.
When you click the button, Max Media Manager PRO will use a real sample of
the source file you have selected and perform a sample encode. Once this is
complete, it will report back with an estimate for the entire file given your
current settings.
FIT TO MEMORY SETTINGS
As an alternative to the method above, if you know the total file size that you
would like the output file to be (for example if you want the movie to fit on your
512MB Memory Stick™) then use the Fit to Memory Settings button.
When you click the button, you will see a dialogue with various Fit to Memory
options.
Fit to a Memory Stick™ Size
To fill a memory stick completely with your chosen source file, choose ‘Fit to a
Memory Stick™ Size” and then use the up and down arrows to find the setting
that matches the capacity of your Memory Stick™.
Fit to a set size
If you would like to specify the total size of the output move yourself, choose
this option and then use the up and down arrows to set the actual size of the
encoded file.
Fit to free Memory Stick space
This is a particularly useful option if you already have files on your memory
card but would like the encoded video file to fill the remaining space. If you
select this option and then click Auto Detect, MAX Media Manager PRO will
tell you exactly which settings it will use and also give you an estimated file
size for the encoded video file.
When you have made a selection, choose ‘Keep Settings’ to set Max Media
Manager PRO to use these settings or press cancel to use your own encoding
settings.
3.c.iv. Time Tab (TIME)
Use the Time tab if you would like to encode only part of the source movie, for
instance if you would like to crop the credits from the start or end. Use the up
and down arrows for Start Time and End Time to control Hours, Minutes,
Seconds and even Frames.
MAX Media Manager PRO will show you the total length of your output file
after your changes.
3.d. DVD Ripping Specific Information
If you would like to generate a PSP compatible video directly from a DVD, first ensure that the
DVD is not CSS protected (the law prevents us from allowing you to RIP DVD video to a file,
even if you own the DVD, if it is protected using CSS).
If the DVD isn’t protected then insert it into your DVD drive and click on the ‘RIP DVD’ tab.
On the tab, you might find that the DVD has been automatically detected (you will see the
files listed in the left hand window), otherwise, click the browse button above the window to
choose your DVD drive manually. After doing this, you may need to click refresh for the DVD
contents to be displayed.
3.d.i. Choosing the right files
When DVD has been read in, you will see a list of the video files on the disc displayed in the
left hand window.
MAX Media Manager PRO will try to understand the disc and automatically select the parts of
the disc containing the actual feature film (not the menus) however, you can also select which
files to encode manually.
Alongside the filenames (Video1, Video 2 etc) you will see the durations of the videos on the
disc displayed. Use these to identify the sections of the DVD you wish to convert. For
example, most DVDs will include a number of menu files (which will appear in the list as very
short videos), typically, you would choose to not convert those, leaving you with 1-4 large files
selected.
When you have made you section of source files, use the Simple Mode or Expert Mode
encoding options to create the perfect PSP video file for your needs (see earlier in this
chapter).
NOTE: When MAX Media Manager PRO encounters multiple files for encoding from a DVD it
will automatically ‘stitch’ the movie files back together to create one continuous output file.
3.e. Suitable Source Media
The following types of video file are accepted source media for the Max Media Manager
software:
•
•
•
•
•
•
•
•
AVI
MPG / MPEG
VOB (DVD)
WMV
MOV
MPE
3GP
MP4
We are always looking to expand our support for new file types, ensure you have the latest
version of the software for the maximum support.
3.f. Batch List Encoding
If you have a large number of files that you would like encode and copy to your PSP then
MAX Media Manage PRO includes a ‘Batch List’ mode where you can add encoding jobs to a
list (rather than encode immediately) ready for you to execute when you are ready (like when
you are not using your PC).
To create batch jobs, use MAX Media Manager PRO in the normal way but set the sub tab on
the VIDEO or DVD VIDEO tab to BATCH LIST rather than PSP. In this mode, when you click
the COPY / ENCODE button, the job, with all its parameters will be added to the batch list
window awaiting execution.
When you have built up your batch list and would like to begin encoding, click the EXECUTE
button below the batch list. MAX Media Manager PRO will now encode all the jobs in the list,
using the individual settings specified.
NOTE: Batch list encoding is only available for VIDEO encoding.
4. Working with Music
4.a. Introduction and Overview
Use MAX Media Manager PRO to copy MP3s from your computer to your PSP by clicking on
the AUDIO tab. If you would like to create MP3s for playback on your PSP directly from a
CD, use the RIP CD tab (see section 4.d.)
Because the PSP includes native support for a wide range of MP3s, when used to transfer
music to your PSP MAX Media Manager PRO does not need to perform any encoding
operations.
[DESIGNERS: INSERT AUDIO.EPS HERE]
4.b. Adding MP3s
Click ‘Add new media to library’ to open a file browse dialogue box with allows you to search
your computer for MP3 files. You can also open a ‘My Computer’ window and use that to
drag-and-drop files into the PC Media View from where they can be added to your PSP’s
Memory Stick™.
Highlight one or more files in the PC Media View (use CTRL+ click to highlight multiple files)
and then click the ‘Copy’ button to transfer them to your PSP.
Keep an eye on the Capacity Meter underneath the PSP Contents window to see how much
space you have free for adding MP3s to your PSP. If you want more space for MP3s try
using Max Media Manager PRO to delete other files from your PSP’s Memory Stick™ like
videos, game-saves or images.
4.c. Deleting MP3s
Highlight files in the PSP Contents window and click the Delete button to remove them from
your PSP and free up more space for other MP3s or files like game-saves or videos.
4.d. Ripping CDs
If you would like to listen to tracks from a CD you own on your PSP, click on the RIP CD tab
at the top of the screen.
Insert your audio CD in your CD ROM drive and wait a few seconds. MAX Media Manager
PRO may detect the CD automatically, if not, click the REFRESH button to index the CD.
4.d.i. CDDB Lookup
MAX Media Manager PRO includes the ability to connect to a CD Database to automatically
retrieve and name the tracks on your CD (this will only work on commercially available CDs,
not home compilations). If you have an active Internet connection, you will see the names of
the tracks on your CD alongside their track number in the main window.
4.d.ii. Selecting Tracks and Ripping
Use the check boxes alongside each track to specify whether you would like to convert and
copy them to your PSP. When you are ready, choose either TO PC (to copy the track to the
location on your PC specified in the FOLDERS tab of the OPTIONS menu) or TO PSP to put
the MP3s directly onto your PSP.
Use the capacity meter to ensure you have sufficient space on your PSP for the tracks you
wish to rip.
5. Working with Images
5.a. Introduction and Overview
Your PSP’s fantastic screen and Memory Stick™ DUO storage makes it the perfect machine
for showing off your digital pictures on the move so why not use your Max Media Manager
PRO to copy your pictures from your PC to your PSP?
The PSP requires your images to be in JPG format (native format for most digital cameras). It
is also worth remembering that the PSP’s screen is 480 x 272 so if you want to maximise the
number of pictures you fit on your PSP (without distortion) use MAX Media Manager PRO’s
image re-sampling options when copying the images to your PSP.
5.b. Copy Options
Before you click the COPY button, choose which (if any) of MAX Media Manager PRO’s resampling options you would like to apply to your images. These options will automatically
resize your images to get the best picture quality in the smallest file size (which also makes
them quicker to load on the PSP).
STRAIGHT COPY
This will leave your original image as it is. Using this option, if the image you copy is larger
than the PSP’s screen, you will be able to use the PSP to zoom in on the image to see
additional detail. File sizes may be large using this setting, and loading times slow.
RESCALE TO PSP, STRETCH AND DISTORT, RESIZE TO FILL
Use one of these settings to automatically resample your images to more closely match the
resolution of the PSP. Choose the setting that matches how you want to view the image on
your PSP. File sizes will be smaller and loading times quicker using one of these settings.
5.c. Transferring your Images
Click ‘Add new media to library’ to open a file browse dialogue box which allows you to
browse your computer for JPG files. You can also open a ‘My Computer’ window and use
that to drag-and-drop files into the PC Media View from where they can be added to your
PSP’s Memory Stick™.
Highlight one or more files in the PC Media View (use CTRL+ click to highlight multiple files)
and then click the ‘Copy’ button to transfer them to your PSP.
Keep an eye on the Capacity Meter underneath the PSP Contents window to see how much
space you have free for adding images to your PSP. If you want more space for images try
deleting other files from your PSP’s Memory Stick™ like videos, game-saves or MP3s.
c. Deleting Images
Highlight files in the PSP Contents window and click the Delete button to remove them from
your PSP and free up more space for other images or files like game-saves or videos.
6. Receiving Podcasts
6.a. Introduction and Overview
MAX Media Manager PRO includes a fully featured Podcast subscription management
system which allows you to subscribe to any number of Podcasts, browse recommended
Podcasts and even have selected shows (audio and video) downloaded automatically and
encoded ready for playback on your PSP.
To get started, click on the PODCASTS tab in the top bar.
[DESIGNERS: INSERT PODCAST.EPS HERE]
IDEA:
If you’re not already a part of the Podcast revolution, read a few primers on the Internet to get
you up to speed on what Podcasts are and who’s making them to get the most out of this
great feature.
6.b. Subscribing to Podcasts
MAX Media Manager PRO uses the highly flexible and standardised RSS
method for managing Podcast subscriptions. This means that anywhere you
see a Podcast linked to with the RSS symbol, you should be able to copy that
link and use it to subscribe to that Podcast using MAX Media Manager PRO.
Subscribing to a Podcast means that MAX Media Manager PRO keeps a
record of the location of the Podcast and gives you the option of having it
automatically downloaded when new episodes become available (click on the
OPTIONS button next to a subscribed Podcast and Choose ‘Automatically
download the latest episode’).
Click on the SUBSCRIPTIONS tab to view any Podcasts you are already
subscribed to or use the ADD RSS button at the bottom of the screen to open
a dialogue where you can enter the URL for the Podcast (which will often,
though not always end in “.xml”). Having entered the URL, click OK. MAX
Media Manager PRO will now try to connect to that document to receive the
information relating to the chosen Podcast. If the process is successful, you
will see lots of information (and often a picture) associated with your chosen
Podcast Info window.
When you first subscribe to a Podcast, MAX Media Manager PRO will automatically start
downloading it and notify you when it is complete.
6.c. Copying Podcasts to your PSP
Once a Podcast has finished downloading, you will see a COPY TO PSP button shown with
its information in the Podcast Info window. Click this button to have the Podcast transferred
to your PSP. Keep an eye on the capacity meter to ensure you have enough free space on
your PSP.
6.d. Unsubscribing to Podcasts
To unsubscribe from a Podcast, simply click the UNSUBSCRIBE button alongside its entry in
the Podcast Info window. MAX Media Manager PRO will now no longer display the Podcasts
information or automatically download new episodes.
Note: If you have any episodes stored on your PC or PSP, they will not be deleted by
unsubscribing from a Podcast. If you no longer want them, delete them in the conventional
way.
7. Saves Online
[DESIGNERS: INSERT SAVES_WEB.EPS HERE]
7.a. Introduction
As well as being the most fully featured media managers on the market, MAX Media Manager
PRO is also your key to the exciting world of downloading and exchanging awesome
gamesaves.
When you click on the SAVES - WEB tab you are instantly connected to the Codejunkies.com
server where you can browse and download POWERSAVES - gamesaves created by fulltime professional gamers to put you right where you want to be in all your favourite PSP
games. See section 7.b.
You can also check out gamesaves that have been uploaded to the Codejunkies.com
community server by gamers like you. Hit the COMMUNITY sub-tab to pick up where other
gamers left off or check out customised players/stats/vehicles etc. See section 7.c.
After seeing what others can do by downloading saves from the Codejunkies.com community,
you’re going to want to join in the fun yourself, and you can! – Once you’ve registered with
Codejunkies.com (which is free and quick) you can upload and share as many gamesaves
you’ve created as you like. See section 7.c.iv. and 7.d.
7.b. Powersaves
7.b.i. What Are Powersaves?
Powersaves are created exclusively by Datel’s team of professional gamers to give you the
freedom to pick up your gaming just where and how you want in your games. Unlike saves in
the Community (which are uploaded by fellow gamers) you know that the titles and
descriptions of Powersaves are accurate; you can download them and play with confidence.
7.b.ii. Overview
[DESIGNERS: INSERT POWERSAVES.EPS HERE]
SUB TABS
When you are on the ONLINE tab (See section 7.b.ii) you have 3 sub-tab views. Click the
POWERSAVES button for this view.
SAVE TITLE
This is the name that has been given to the specific gamesave by the user who created it.
DESCRIPTION
This is the description given to the specific gamesave by the user who created it.
DOWNLOAD
Click the download button to download the currently highlight gamesave to your download
target(s), see below.
DOWNLOAD TARGETS
Alongside the download button are two checkboxes representing the two places that the
highlighted gamesave can be downloaded to. To download the gamesave directly to your
PSP tick the PSP box. To download the gamesave to your PC database tick PC. You can
download to either or both locations however you must specify at least one target location.
RATING
See what others thought of a gamesave before you download it. 1 Star means they didn’t like
it, 5 stars means they loved it!
RATE IT
Once you have downloaded and used a save you can go back into Max Media Manager PRO
and let others know what you thought of the save by ‘rating it’. Click the RATE IT button and
then choose you rating from 1 star (you didn’t like it at all) to 5 stars (you loved it).
7.b.iii. Downloading and Using a Powersave
When using Max Media Manager PRO, ensure you have an active Internet connection on
your PC and that your PSP is connected to your PC via the supplied mini USB to USB lead (if
you wish to download directly to your PSP). See section 2.c for connection info.
Downloading a Powersave and using it on your PSP couldn’t be simpler. Having made sure
you’re on the POWERSAVES sub-tab on the ONLINE tab click on the first letter of the name
of the game you would like to download a gamesave for to begin searching.
When the results come back scroll down the list to find the game you are looking for. You
should see its icon shown on the folder image. Click anywhere on the game’s entry to
retrieve a list of gamesaves for that game.
When the list appears, click on the Powersave you would like to download to highlight it (often
there will be more than one per game).
Now look to the bottom of the screen and select your download target. To put the gamesave
directly onto your PSP as well as save a copy in your PC’s database tick both targets and
press the download button.
Use the BACK button at the bottom of the screen to go back to the previous browse screen.
7.c. Community
7.c.i. What Are Community Saves?
Clicking on the COMMUNITY server tab sets MAX Media Manager PRO to display
gamesaves that have been uploaded by either fellow MAX Media Manager PRO users, or
users of Datel’s market leading Action Replay MAX for PSP. If you upload a gamesave using
MAX Media Manager PRO, this is where it will appear!
7.c.ii. Overview
Much of the functionality for the COMMUNITY server screen is the same as the
POWERSAVES tab (see earlier in this section), however, particular to this tab is:
CREATED BY
Because saves in the COMMUNITY have been uploaded by gamers just like yourself, when
they are listed they always include a credit to the person who uploaded them.
RATINGS
To help reward people who upload the best saves to the community and help users decide
which saves to download a ratings system is in place for all user-uploaded saves.
You can rate every save on Codejunkies.com to help other Max Media Manager PRO users
decide which saves to download but remember: ONLY RATE SAVES YOU HAVE
DOWNLOADED AND TRIED. There is no point in rating a save that you have not tried.
To rate a save (after you have downloaded and tested it) find it listed in the community and
click to highlight it before clicking on the RATE IT button at the bottom of the screen. You can
only rate each save once.
7.c.iii. Downloading and Using a Community Save
You download and use a gamesave from the community in much the same way as you would
a POWERSAVE (see section 7.b.iii) but clicking on the COMMUNITY sub-tab instead of the
POWERSAVES tab before searching.
When you have searched and found a gamesave you would like to download highlight it and
then choose where you would like to download it to by ticking the appropriate download
targets at the bottom of the page before clicking the download button.
7.c.iv. Uploading a Save to the Community
To upload a gamesave to the community server you need to be registered with
Codejunkies.com. Follow the link from the options dialogue to sign up (it’s quick and free).
To upload a gamesave you have created you first need the gamesave to be in your PC
Database. To do this follow the instructions in section 9.b, Copying Saves to your PC
Database.
Once the gamesave is stored in your PC Database, correctly named and described, click on
PC DATABASE tab and find the gamesave. To upload the gamesave follow the instructions
in section 8.f, Uploading a Save to the Community).
7.d. My Uploads
7.d.i. What is My Uploads?
My Uploads is your way to view, edit, delete and download gamesaves that you have
uploaded to the server.
You will only see any content if you have uploaded saves to the community (see section 8.f,
Uploading a Save to the Community).
If you have uploaded one or more gamesaves you can use this sub-tab to keep your
gamesaves up-to-date (for instance if you keep improving a gamesave) or to edit the save
name or description to make them more helpful to other users.
You should also try to delete gamesaves that you have replaced or that you no longer wish to
list in the community. This helps to keep the content fresh for other users and ensure that
only the best saves are shared online.
7.d.ii. Overview
Much of the functionality for the COMMUNITY server screen is the same as the
POWERSAVES tab (see earlier in this section), however, particular to this tab is:
DATE ADDED
Look at the date added to identify different versions of saves you have uploaded.
DELETE
Because the gamesaves shown on this tub-tab were uploaded by you, you will see a delete
button at the bottom of the screen.
RATINGS
Use the ratings on your gamesaves to see how popular your gamesaves have been. This
can help you make your gamesaves even more popular in future by enabling you to see
which types of gamesaves people like the most!
7.d.iii. Deleting an Upload
To delete a gamesave you have uploaded to the community, highlight the gamesave you
would like to remove by clicking on it then press the delete button at the bottom of the screen.
You will be asked to confirm this action before the save is actually removed.
8. Saves in your PC Database
8.a. Overview
8.b. Saves in your PC Database
When you first install Max Media Manager PRO you will find your PC Database empty. This
will soon change as you download gamesaves from the online server (click the ONLINE tab)
and use Max Media Manager PRO to copy gamesaves from your PSP’s memory stick.
Think of your PC Database as being your central store for all your gamesaves. When you
download community gamesaves (see section 7.c.iii) or Powersaves (see section 7.b.iii) save
a copy to your PC Database so you can access them another time without even going online.
Also, use your PC Database as a back-up for all your important PSP gamesaves. Memory
Sticks can be expensive; you can keep space free for other files by storing your lesser-used
saves on your PC. See section 9.b, Copying Saves to your PC Database for instructions on
how to do this.
8.c. Editing Saves in your PC Database
It is important that you keep gamesaves in your PC Database accurately named and
described. This will help you identify them in the future and also make the saves a lot more
useful to other users if you choose to upload them to the Community.
After highlighting the gamesave you would like to edit and clicking EDIT you will see the save
details dialogue. Make any modifications you would like and click UPDATE to commit your
changes.
Note: You cannot make any changes to the game details or the credit.
8.d. Deleting Saves from your PC Database
Remember that there is probably plenty of space to store as many gamesaves on your PC as
you want but if you are sure you would like to delete one click to highlight it and then press
the DELETE button at the bottom of the screen.
8.e. Transferring Saves to your PSP
When you want to transfer a gamesave from your PC Database to your PSP console simply
highlight the gamesave by clicking on it and then press the TO PSP button at the bottom of
the screen.
CAUTION! – Transferring a gamesave from your PC Database to your PSP may overwrite a
gamesave for the same game already on your PSP. Back up your existing gamesaves to
your PC before hand for peace of mind.
8.f. Adding Saves To Your PC Database From Your PSP
To add gamesaves to your database from your PSP you need first to be on the PSP view tab,
see section 9.b for full instructions.
8.g. Uploading A Save To The Community
8.g.i. Getting Started
When you’ve made a gamesave that you’d like to share with the community the first step is to
make sure it’s in your PC Database. Follow the steps described in 9.b to do this.
The next step is to find the save in your PC Database (click onto the PC DATABASE tab on
the view tabs). Make sure that you have filled out all the relevant details for your gamesave
so that other users will know exactly what your gamesave includes, where it puts them etc. If
you want to modify the details do so now (see section 8.c for instructions).
Next, make sure you have entered your Codejunkies.com username and password into Max
Media Manager PRO on the options screen. If you have not already got a Codejunkies.com
username and password go to the options screen and follow the link to the Codejunkies.com
registration page. Registration is quick and free and just allows us to prevent spamming of
the server.
8.g.iii. Upload Your Gamesave
Once you have completed the steps described simply highlight the save and click the
UPLOAD button.
You will see a progress bar (at the bottom of the screen) display the status of the upload.
Once complete, switch to the MY UPLOADS (section 7.d) to see your gamesave live on the
server. You can even look on the community (section 7.c) to see your gamesave as others
would.
9. Saves on your PSP
9.a. Introduction and Overview
When you click on the PSP tab-view you are looking at the gamesaves you currently have on
your PSP. The information about the gamesaves is limited to the icon image, the region, the
game ID and the date and size.
Additional information such as save titles and description (as seen on the Online and PC
Database tabs) are not compatible with the PSP and as such are no longer visible.
9.b. Copying Saves to your PC Database
To transfer gamesaves from your PSP to your PC Database first highlight the save or saves
you would like to copy. You can select multiple files by using your keyboards ‘CTRL’ key
when you click your mouse or by clicking the SELECT ALL button on the Max Media Manager
PRO interface.
Once you have made your selection click the TO PC button on the interface.
For each game-save you selected you will then be asked to complete the FILE DETAILS
dialogue. This is so that you will be able to identify exactly what the save does amidst your
growing collection. Once you have completed the save details dialogue for each save you
can switch to your PC Database view where the saves will be visible.
9.c. Deleting Saves
To delete a save or saves on your PSP simply highlight them (use CTRL and click or
SELECT ALL for multiple saves) and then press the DELETE button underneath the PSP
contents window.
WARNING: Deleting a game save is permanent and cannot be undone.
10. Options Screen
Click the OPTIONS button on the top bar to access the options screen.
You will see 4 tabs relating to settings for different aspects of the MAX Media Manager PRO
product.
10.a. GENERAL
Use this tab to specify the drive letter for your PSP (if it cannot be automatically detected) and
check for online updates.
CURRENT VERSION
The current version of your Max Media Manager PRO software is shown here. You may
need this when speaking to Datel technical support.
UPDATE NOW
You should keep your Max Media Manager PRO software up-to-date by downloading new
versions when they become available. Max Media Manager PRO should automatically notify
you when new updates are available but if not you can manually check for and download
updates by clicking the UPDATE NOW button.
FIND PSP & DRIVE LETTER
On certain PC configurations it may be necessary to tell your Max Media Manager PRO
software which drive letter the PSP is on (for instance if you have another USB storage
device present). If this is the case, tick the box that says ‘DO NOT SEARCH FOR THE PSP’
and then choose the drive letter for the PSP in the drive letter selector.
If you are not sure which drive letter your PSP is, connect your PSP to your PC (using the
supplied USB lead) and enter USB Mode on the PSP. Open ‘My Computer’ on your PC and
look at the drives listed under ‘Devices with Removable Storage’. You should see something
like “Removable Drive (F)”. There may be more than one removable drive so exit USB Mode
on your PSP and then go back in. Your PSP’s drive letter will be the one that disappears and
reappears when you do this.
10.b. GAMESAVES
Use this tab to enter your Codejunkies registration details (required for uploading), check your
product license number and filter your gamesave content.
USERNAME
The username you chose when you registered on Codejunkies.com
PASSWORD
The password you chose when you registered on Codejunkies.com
DEFAULT REGION
This is where you set the default region of your Max Media Manager PRO software. Max
Media Manager PRO can connect to one of 3 databases, USA, EUROPE and JAPAN.
Whenever you browse Powersaves, Community saves or upload your own gamesaves you
will be connected to the database you specify on this tab.
If you own games from all one region, i.e. USA then you need only to set the region once.
You will subsequently always be connected your chosen server. However, if you own games
from different regions (for instance Japanese import games) then you should change the
region setting accordingly depending upon which gamesaves you are looking for (or
uploading).
Choosing ALL will show you gamesaves from all the regions. If you select this option, pay
attention to the region of gamesaves you intend to download to ensure they are for the same
region as the game you own.
10.c. RSS CASTS
AUDIO
Specify the folder where you would like audio Podcasts saved to on your PS
VIDEO
Specify the folder where you would like video Podcasts saved to on your PS
Also, specify whether you would like Podcasts displayed on the relevant audio or video tabs
and choose the encoding type to use when Podcasts are automatically prepared for PSP
playback.
10.d. FOLDERS
Choose where you would like to store MP3s generated by CD ripping on your PC.
11. Technical Support
If you are experiencing difficulties any aspect of your Max Media Manager PRO product
please ensure that you have read and understood the contents of this user manual before
contacting Datel’s technical support department.
When you contact Datel customer services or technical support department, please have
ready the version number of the software you are using (normally found on the inner ring on
the underside of the software disc) along with when and where you purchased the product. If
you are having difficulties with the PS2™ software please have ready the PS2™ revision
number (SCPH#) found on a sticker on the reverse of your PS2 console.
DATEL CUSTOMER SERVICES EUROPE:
Customers Services,
Datel Ltd,
Stafford Road,
Stone,
STAFFS
ST15 0DG
UNITED KINGDOM
Email: [email protected]
Web: www.codejunkies.com
DATEL CUSTOMER SERVICES USA:
ATTN: Customer Services,
Datel Design & Development Inc,
33 North Garden Avenue,
Suite 900, Clearwater, FL 33755
Email: [email protected]
Customer service knowledgebase: www.datelcustomerservice.com
Main website: www.codejunkies.com
© 2005 Datel Design & Development Ltd. Action Replay is a trademark of Datel Design &
Development Ltd. Action Replay Codes ©1996-2005 Datel Design & Development Ltd
and/or its suppliers.
PlayStation 2/PS2 is a registered trademark of Sony Computer Entertainment Inc.
Max Media Manager PRO is a 100% unofficial product and is NOT sponsored, endorsed or
approved by Sony Computer Entertainment Inc, nor any games developer or publisher.