1
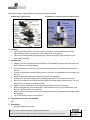
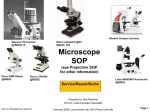
STANDARD OPERATING PROCEDURE: Use and care of the compound light microscope Note: To be undertaken only by trained personnel in conjunction with a current site-specific risk assessment. __________________ 1. Introduction The microscope is a tool that enables us to view things that are too small to be seen with the naked eye. The most common type of microscope used in school science laboratories is the compound light microscope. It uses a system of two or more lenses to collect and focus transmitted visible light through a specimen to the eye. It is the principle tool for the study of biology and is often referred to as bright field microscopy. Animal cells, plant cells, protozoa and bacteria can be easily seen with a compound light microscope. The typical compound light microscope is able to magnify from 40x to 1000x, increasing our ability to see detail so that objects as small as 0.2 micrometres (µm) or 200 nanometres (nm) can be seen. Compound light microscopes may be monocular (for viewing using only one eye) or binocular (for viewing using both eyes). Compound light microscopes from various manufacturers may appear different but operate on similar principles. A microscope is a delicate precision instrument and care must always be used when using, transporting and maintaining it. A typical school microscope has three magnifications: Scanning, Low and High. Each objective and eyepiece (ocular lens) will have the magnification written on it. Some microscopes will also have an oil immersion objective. The total magnification is the ocular magnification multiplied by the objective magnification. Objective Magnification Ocular lens Total magnification Scanning 4x 10x 40x Low power 10x 10x 100x High power 40x 10x 400x Oil immersion 100x 10x 1000x Version 1.0 SOP: Use and care of the compound light microscope Written by: Science ASSIST Disclaimer: ASTA excludes all liability to any person arising directly or indirectly from using this resource. Date: May 2015 Page 1 of 8 Below are images of typical light microscopes with parts labelled: a) With built in light source b) With mirror to direct an external light source 2. Context These instructions are for the use of science teachers, technicians and secondary school students who are under the direct supervision of a teacher. This SOP contains general guidelines only. Please consult the user manual for your particular microscope. 3. Safety notes Always carry the microscope with two hands. It is advisable to place one hand under the base of the box for extra support. If the microscope is stored in a box, always ensure the door is locked before picking up the box. If using sunlight as the external light source, never face the adjustable mirror directly into the sun. Never disassemble the microscope as doing so may damage it. Unplug from the power supply before replacing the bulb or moving the microscope. Never use coarse focus except with the scanning and low power objective lens. It is very easy to drive an objective through a slide. Make sure your workstation is set up ergonomically to use the microscope. Avoid prolonged use of the microscope. Take breaks to rest your eyes and make sure that the light intensity is not excessive. Make sure the microscope and any external light sources are regularly electrically tested and tagged. For all chemicals consult current SDS’s. 4. Regulations, licences and permits NA 5. Equipment Compound light microscope Version 1.0 SOP: Use and care of the compound light microscope Written by: Science ASSIST Disclaimer: ASTA excludes all liability to any person arising directly or indirectly from using this resource. Date: May 2015 Page 2 of 8 User manual for your microscope PPE: laboratory coat, enclosed shoes, hair tied back Microscope cover Prepared slides with coverslips Immersion oil (if using 100x objective) Light source (if required) Lens tissue and blower brush Lens cleaning fluid or Windex®. Do not use any other solvents on microscope lenses as they can loosen the glue used to hold the lens elements in place and ruin the lens. 6. Operating procedure Set up and use of a compound light microscope 1. Read and be familiar with the user manual for your model of microscope. 2. Carry the microscope with two hands, one under the base and the other gripping the arm or frame. 3. Gently place the microscope on a flat, level surface and plug into a power source. Some microscopes have a built in light source but others have a mirror to focus natural light or an external light source. 4. With a built-in light source, turn on the light source and adjust the light setting so that it is not too bright by turning or sliding the brightness adjustment knob on the base. 5. ‘If using an external light source direct the light via the mirror. Rotate the low power objective into position. Remove the eyepiece, look down the body tube and adjust the mirror and diaphragm setting so light is reflected up the tube and a circle of evenly illuminated light is visible in the field of view. Replace the eyepiece. Use the concave mirror side if the microscope has a fixed condenser lens or the flat mirror side if the microscope has an adjustable condenser’1. 6. The iris diaphragm is located just above the light source on the bottom side of the stage. Using the lever attached, you can increase or decrease the amount of light reaching the specimen. Look through the eyepiece and adjust the sub-stage iris diaphragm to allow sufficient comfortable light through. 7. Between the stage and the iris diaphragm is the condenser. The condenser further aids in the focusing of the light onto the specimen. In some microscopes it can be moved up and down. To begin with, position it close to the stage. If you have a problem focusing your specimen then adjust the position of the condenser. 8. Adjust the stage down as low as possible with the coarse focus knob. 9. Begin by viewing the specimen with the lowest power objective lens in place and then increase to the higher power objective lenses. 10. Select the 4x scanning objective by rotating the nosepiece, ensuring it clicks into place. (Operating procedure cont….) Version 1.0 SOP: Use and care of the compound light microscope Written by: Science ASSIST Disclaimer: ASTA excludes all liability to any person arising directly or indirectly from using this resource. Date: May 2015 Page 3 of 8 11. Place a prepared slide onto the stage and hold it in place with the metal clips. Centre it so that the specimen is under the objective lens. Move it with the stage control knobs either left to right or backwards and forwards. 12. After placing the slide on the stage look at the objective lens and the stage from the side and use the coarse focussing knob to bring the slide as close to the objective as possible without touching it. 13. Look in the eyepiece/s and slowly move the stage away from the objective lens with the coarse focusing knob. Stop when the image comes into view. 14. If using a binocular microscope adjust the distance between the eyepieces to suit your eyes by sliding the eyepieces in and out until you see one image. This is called the interocular distance. 15. Use the fine focus to sharpen the image. Scan the slide, select the part of the specimen you are interested in and center it in your field of view. 16. Adjust the sub-stage iris diaphragm to optimise the lighting. 17. Rotate in the low power 10x objective and refocus with the fine focus. You may need to open the iris diaphragm to let more light in. In general, the higher the power, the more light you require. 18. Repeat with the high power 40x objective, adjusting the iris diaphragm if required. Use only the fine adjustment knob to focus the microscope when using the higher power objective lenses. 19. If you have a 100x oil immersion objective, you will need to first focus on the specimen with the 40x objective. Next rotate the nosepiece so that a midway position is obtained between the 40x objective and the 100x objective. Place a small drop of immersion oil onto the slide coverslip then continue to rotate the nosepiece so that the 100x objective is rotated into the oil. The immersion oil should be used sparingly. Never use immersion oil with any of the other objectives. (N.B. It is possible to place the oil directly on a specimen that has been fixed or heat fixed and stained without a coverslip, e.g. bacterial slides. However, it is difficult to remove the oil from the slide without damaging the smear.) Any attempt to re-look at the slide with a low or high power objective may result in contamination of these objectives with the immersion oil. Do not use immersion oil on a wet mount unless you can secure the coverslip well. 20. Sharpen the image with the fine focus only and adjust the light with the iris diaphragm if required. 21. When finished, lower the stage, rotate the low power objective (4x) into position and remove the slide. 22. Clean the oil off the slide and the objective when finished with lens tissue and lens cleaning fluid. In order to return to work at the lower magnifications, the slide must be completely cleaned of any residual oil. Wipe the stage clean with a paper towel. 23. Turn off the light and at the main switch. 24. Report any problems to your teacher. 25. Cover the microscope with its dust cover. (Operating procedure cont….) Version 1.0 SOP: Use and care of the compound light microscope Written by: Science ASSIST Disclaimer: ASTA excludes all liability to any person arising directly or indirectly from using this resource. Date: May 2015 Page 4 of 8 Microscope handling and storage 1. When work is completed, lower the stage, remove the slide, rotate in the lowest power objective, wrap the cord loosely around the base and cover with a dust cover. Take care not to wrap the cord around a hot (built in) light source. 2. Always keep your microscope covered when not in use. Optics and mechanical parts must be protected from dust. 3. Always move the microscope with one hand under the base and the other hand gripping the arm or frame. 4. Keep microscopes away from vibration, moisture, high temperatures and direct sunlight. 5. Never store microscopes in chemical storage areas as corrosive fumes may damage metal and lenses. Microscope maintenance 1. Treat lenses with great care as they can be easily scratched. Never use anything abrasive. 2. When cleaning lenses, first blow away any dust with a blower brush then use lens tissue and lens cleaning fluid such as Windex® to clean the objectives and eyepieces. Do not use paper towel or regular tissues, as they will scratch the lens. Do not use other solvents. 3. Do not remove eyepieces or objectives from their location but clean only their external surfaces. 4. Remove immersion oil from the 100x objective immediately after use with lens tissue and lens cleaning fluid. 5. Wipe dust off the body of the microscope with a damp cloth. 6. Never attempt to take a microscope apart. This could impair operation, efficiency and accuracy. 7. Have the microscope serviced regularly by a professional, as most microscopes require periodic lubricating and minor adjustment of their mechanical parts. 8. Follow your user’s manual for instruction in replacing the bulb. Always allow a bulb to cool before replacing it. When replacing bulbs avoid touching the glass with your hands, use a tissue. Fingerprints can reduce bulb quality and reduce its life. Version 1.0 SOP: Use and care of the compound light microscope Written by: Science ASSIST Disclaimer: ASTA excludes all liability to any person arising directly or indirectly from using this resource. Date: May 2015 Page 5 of 8 7. Trouble shooting/emergencies First Aid: If using immersion oil or lens cleaning fluid, please check the latest SDS for current first aid information prior to using. COMMON FAULTS POSSIBLE CAUSES No light Image is too dark Image is too light Spot in the field of view that doesn’t move when the slide is moved Poor image quality, poor resolution, image not sharp (100x oil objective) Power cord is not connected, power switch is off Wrong bulb is installed The bulb has burnt out Light intensity control is turned down too low Objective is not properly in position If using the 100x objective immersion oil has not been applied Increase light intensity Sub-stage iris diaphragm is not open enough Condenser is too low Decrease light intensity Sub-stage iris diaphragm is open too much Lens is dirty. Clean both the objective and eyepiece. Clean objective, eyepiece and condenser Check if immersion oil is contaminated or cloudy or air bubbles are present Slide is wrong way up Poor image quality, poor resolution, image not sharp (40x objective) There is dirt or oil on the lens Uneven illumination Adjust condenser Make sure objective has clicked into place Flickering light Bulb needs replacement Loose connection at the outlet Bulb not properly inserted Check voltage supply Half the viewing field is illuminated Make sure the objective is clicked into place. Coverslip is too thick Slide is the wrong way up The stage is slowly dropping, adjust tension of course focus knob Clean the slide, objective and eyepiece Unable to focus the slide Version 1.0 SOP: Use and care of the compound light microscope Written by: Science ASSIST Disclaimer: ASTA excludes all liability to any person arising directly or indirectly from using this resource. Date: May 2015 Page 6 of 8 8. Waste disposal Dispose of used lens cleaning tissue into the regular waste. Place used coverslips into a sharps container. Commercially prepared slides should be returned to the slide box. Used microscope slides from wet mounts can be washed and reused OR should be disposed of with broken glass. Slides with heat fixed smears are difficult to clean so are not reused and are disposed of with broken glass: refer to Science ASSIST AIS: Lab glass and porcelain disposal. (http://assist.asta.edu.au/resource/2395/ais-lab-glass-andporcelain-disposal) 9. Related material Microscope User Manual specific to your microscope Risk assessment for use of the light microscope SDS for immersion oil SDS for lens cleaning fluid/Windex Glossary: Coarse focus – moves the mechanical stage to give approximate focus of the specimen. Condenser – focuses light from the light source onto the specimen. Condenser focus – adjusts the height of the condenser so that it focuses light from the light source onto the specimen. Eyepieces or oculars – lenses that further magnify the image of the specimen produced by the objective lens (secondary magnification). Field of view – the circular area of the specimen that you can see through the eyepiece. Fine focus – moves the mechanical stage to give sharp focus of the specimen. Immersion oil – an oil medium that has a high refractive index and is used with the 100x oil immersion objective to increase the resolution. Use immersion oil only for the purpose of microscopy. Interocular adjustment – controls the distance between the two oculars to match the distance between the eyes of the user. Magnification – is the degree of enlargement of the specimen. Numerical aperture – a number written on the objectives that expresses the ability of a lens to resolve fine detail. Objectives – lenses that produce primary magnification of the specimen. Parfocal – allows the rotation from one objective to another with only fine focus adjustment required to focus the image. Resolution – ability of a lens to distinguish and separate fine detail. Stage – platform on which slides are supported for viewing. Version 1.0 SOP: Use and care of the compound light microscope Written by: Science ASSIST Disclaimer: ASTA excludes all liability to any person arising directly or indirectly from using this resource. Date: May 2015 Page 7 of 8 Stage controls – allows movement left to right and backwards and forwards. Sub-stage iris diaphragm – controls the amount of light entering the specimen. Total magnification – magnification of the objective x magnification of the eyepiece. Turret or nosepiece – holds the objectives. Working distance – is the distance between the front lens of the objective and the specimen when it is focused. As magnification increases the working distance decreases. References: 1 WA Department of Education, 2010 Science Laboratory Manual: Biology Techniques, p 49. ©Department of Education (WA) (with permission) ‘Basic Concepts in Microscopy’, ZEISS Microscopy Online website http://zeisscampus.magnet.fsu.edu/articles/basics/ (Accessed November 2014) ‘Basic Concepts in Optical Microscopy’, Olympus Microscopy Resource Center website http://www.olympusmicro.com/primer/anatomy/anatomy.html (Accessed November 2014) Chemwatch Gold FFX. 2015. Long Safety Data Sheet: Immersion Oil for Microscopy http://www.chemwatch.net (Subscription required. Accessed May 2015) Chemwatch Gold FFX. 2015. Long Safety Data Sheet: Windex Spray http://www.chemwatch.net (Subscription required. Accessed May 2015) NSW Department of Education and Training (2010) Working in Science Manual. Professional Learning and Leadership Development Directorate 2010. Sydney: NSW Version 1.0 SOP: Use and care of the compound light microscope Written by: Science ASSIST Disclaimer: ASTA excludes all liability to any person arising directly or indirectly from using this resource. Date: May 2015 Page 8 of 8