1
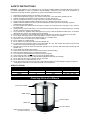
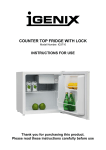
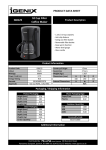
CATERING URN
Model Number: IG4008 / IG4015 / IG4020 / IG4030
INSTRUCTIONS FOR USE
Thank you for purchasing this product.
Please read these instructions carefully before use
Having trouble with your Urn? …
Try our troubleshooting guide on page 4.
If that does not solve the issue contact us …
Guarantee Information
This product is guaranteed for a period of 12 months from the date of purchase against mechanical
and electrical defects.
The guarantee does not cover accidental damage, misuse, neglect, tampering or attempted
disassembly. To qualify for the guarantee the product must be used in accordance with the
instructions in the user manual. Failure to do so will result in the warranty being void.
If your product becomes faulty within the agreed guarantee period please contact our customer
service department on 01473 271 272 or write to us at the address detailed below.
Please quote the model number which begins IG, the ‘Batch Number’ beginning ‘5’ and give details of
the exact fault.
We will then decide whether to repair or replace the item.
You will be required to return a copy of your proof of purchase. Please retain your original.
If an item is replaced within the agreed guarantee period, the guarantee for the replacement item will
be calculated from the purchase date of the original.
Tel: 01473 271 272
Email: [email protected]
Fax: 01473 270 733
Website: www.igenix.co.uk
Postal Address:
Customer Service Department
Pik-a-Pak Electrical Distributors
38 Bluestem Road,
Ransomes Europark,
Ipswich, IP3 9RR
When writing or emailing us to report a fault please ensure you attach a copy of your proof of purchase.
Please retain your original
Disclaimer
Updates to hardware components are made regularly. Therefore some of the instructions,
specifications and pictures in this documentation may differ slightly from your particular situation. All
items described in this guide are for illustration purposes only and may not apply to your particular
situation. No legal right or entitlements may be obtained from the description made in this manual.
Disposal of Old Electrical Appliances
The European Directive 2002/96/EC on Waste Electrical and Electronic Equipment (WEEE), requires
that old household electrical appliances must not be disposed of in normal unsorted municipal waste.
Old appliances must be collected separately in order to optimise the recovery and
recycling of the materials they contain and reduce the impact on human health and the
environment. The crossed out “wheeled bin” symbol on the product reminds you of your
obligation, that when you dispose of the appliance it must be separately collected.
Consumers should contact their local authority or retailer for information concerning the
correct disposal of their old appliance.
2
SAFETY INSTRUCTIONS
Important: This appliance is not intended for use by persons including children with reduced physical, sensory
or mental capabilities, or lack of experience and knowledge, unless they have been given supervision or
instruction concerning use of the appliances by a person responsible for their safety.
1.
2.
3.
4.
5.
6.
7.
8.
9.
10.
11.
12.
13.
14.
15.
16.
17.
18.
19.
20.
21.
22.
23.
24.
25.
26.
Read these instructions before use and keep in a safe place.
Ensure that the electricity supply in your home is rated at 220 - 240 volts before operating the urn.
Children should be supervised to ensure that they do not play with the urn.
This urn is designed for indoor use only and must not be used or stored outside.
Always unplug the appliance before attempting to move it. NEVER move the urn if it is full.
Repairs to electrical appliances are only to be undertaken by trained personnel. Repairs by untrained
professionals can be dangerous.
To protect against fire, electric shock and injury to persons do not immerse the cord, plug or urn in water or
any other liquid.
Unplug from the power socket when not in use and before cleaning. Allow to cool before putting on or taking
off parts, and before cleaning the appliance.
Do not operate any appliance with a damaged cord or plug or after the appliance malfunctions, or has been
damaged in any manner. This appliance must be earthed.
The use of accessories not recommended by the manufacturer may result in fire, electric shock or injury.
Do not let the cord hang over the edge of the table or counter, or touch a hot surface.
Do not place on or near a hot gas or electric burner, or in a heated oven.
Operate on a firm, flat surface out of reach of children.
Do not operate on a metal surface.
Do not use the urn for anything other than its intended use.
To disconnect from the power supply, ensure that switch is in the “Off” position and remove plug from the
power socket. Always hold the plug, never pull the cord.
The metal body of the urn will become hot when operated, so do not touch with bare hands. Use the tap and
handles only.
Do not let the urn operate without water.
Avoid contact with steam when removing the lid from the urn after boiling.
Take care when dispensing the hot water from the tap.
Do not fill the urn past the MAX level, boiling water may spill out.
Ensure the lid is firmly closed and do not open the lid whilst boiling.
Never modify the urn in anyway. Unauthorised modifications will void your warranty.
Do not switch on the urn if it is upside down or on its side.
Do not leave the urn unattended when in use.
Do not leave water in the urn for more than 2 days without boiling as it could stagnate. Empty the water out
completely and refill if the urn has been stood idle over the weekend.
SPECIFICATIONS
Product
IG4008
IG4015
IG4020
IG4030
Capacity (Litres)
8.8
15
20
30
Wattage
950
1650
1650
2500
Voltage
220 – 240V ~ 50Hz
220 – 240V ~ 50Hz
220 – 240V ~ 50Hz
220 – 240V ~ 50Hz
Catering Urns at a Glance
Cool Touch Handles
Water Gauge
Indicator Lights
Water Tap
ON / OFF Switch
Safety Cut-out reset button
(on base of the urn)
3
Operating Instructions
Before First Use
Before using the urn for the first time, fill with water to the MAX level, boil and pour away.
Using your Urn
1. Place the catering urn on a stable, flat heat resistant surface, out of the reach of children.
2. Plug into a suitable power outlet, ensuring that the power cord is not stretched or could be
accidently caught.
3. Remove the lid by turning it in a clockwise direction and lifting.
4. Fill the urn with the required amount of water ensuring that the level is between the MAX and MIN
marks. Do not overfill the catering urn. Replace the lid, ensuring it is locked into position.
5. Press the ON / OFF switch to boil and the red light will illuminate to indicate that the catering urn
is operating.
6. Once the urn has boiled the water, the orange light will illuminate to indicate that the water has
reached 97˚C. The main element in the catering urn will switch off and the secondary element will
come on automatically to keep the water at 90˚C. The hot water can now be dispensed via the tap
at the front of the catering urn.
7. The urn can be refilled at any time with cold water, but it is recommended that it is turned off and
unplugged before you do. Use caution when removing the lid as there is a risk of scalding from
the steam.
8. When the urn is not in use it is recommended to empty all water and switch the urn off using the
ON / OFF switch and removing the plug from the socket.
Thermal Cutout
Your Igenix catering urn is fitted with a thermal safety device which will switch off the urn in case of
accidental overheating or the urn boiling dry. To reset, disconnect from the power for approximately 30
minutes to allow the urn to cool down. Plug the urn back in again and press the reset button on the
base of the urn.
Descaling
If allowed to build-up, limescale can cause the element to overheat and can cause the tap to stop
working correctly. Regular checks need to be made of the inside of the urn for signs of limescale. It is
important that limescale deposits are removed by using descaling tablets, powders or liquids. If you
are in a hard water area, the urn may need to descaled every week. If you are in a soft water area
then descaling the urn will not need to be carried out so often.
Cleaning and Care
• Before cleaning the urn, ensure it is disconnected from the power supply and has cooled down
completely.
• Do not use abrasives or harsh cleaning solutions.
• Do not immerse the urn in any liquid. To clean the exterior and interior, use a slightly damp lint
free cloth.
• It is advisable to remove limescale deposits at regular intervals. A household limescale remover
can be used as long as the manufacturer’s guidelines are followed.
• Use a small brush to clean the inside of the tap by moving it up and down inside the tap. Also use
the brush to clean the tap connections inside the urn.
• Wash the tap handle in warm soapy water, rinse and replace.
• Do not use baking soda when cleaning as this can cause damage to the appliance.
Troubleshooting
Problem
Possible Cause
1.
3.
Not properly plugged into the
mains wall socket.
No electricity in the mains
wall socket.
On/Off switch not turned on.
4.
Safety cut-out activated.
1.
Large build up of scale in the
urn.
You live in a hard water area.
2.
The urn does not work.
The urn cuts out before it boils.
Urn scales up quickly.
1.
4
Solution
1.
Plug in firmly
2.
Check fuse or breaker.
3.
Push on/off switch to on.
4.
Empty the urn and allow to
cool for 30 minutes. Press the
reset button on the base of
the urn and refill with water.
Use a descaling agent to
clean the urn.
Regularly de-scale your urn.
1.
1.