1
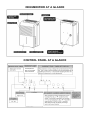
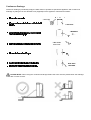
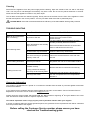
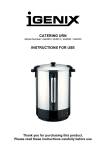
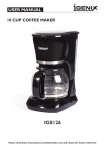
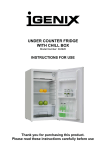
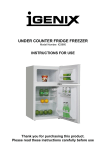
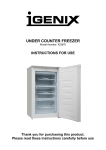
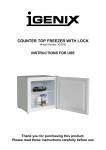
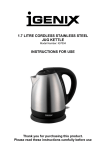
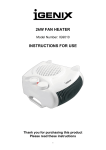
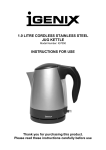
50L/D DEHUMIDIFIER
Model Number: IG9805
INSTRUCTIONS FOR USE
Thank you for purchasing this product.
Please read these instructions carefully before use.
SAFETY INSTRUCTIONS
IMPORTANT: This appliance is not intended for use by persons including children with reduced
physical, sensory or mental capabilities, or lack of experience and knowledge, unless they have been
given supervision or instruction concerning use of the appliances by a person responsible for their safety
•
•
•
•
•
•
•
•
•
•
•
•
•
•
•
•
•
•
•
•
•
•
•
This appliance is designed for domestic use in a house, small offices and other similar
applications.
Never use the product for anything other than its intended purpose.
Ensure that the electricity supply in your home is rated at 220 -240 volts before operating the
appliance.
If the supply cord is damaged it must be replaced by qualified electrician.
Do not fold the power cord.
Ensure that the plug is fitted securely into the power socket.
This appliance should not be located beneath any power sockets.
Do not use multiple socket adaptors.
Always keep the unit upright to avoid damage to the cooling system.
Do not place anything on top of the appliance.
Ensure that the inlets and the outlets are not blocked or covered.
Do not cover the appliance.
Children should be supervised to ensure they do not play with the appliance.
Do not allow the appliance or control panel to become wet.
Keep flammable materials away from the appliance.
Do not place the appliance near any type of heat source.
Do not unplug the appliance whilst in operation.
Do not put anything inside the vents.
Do not place the appliance on an un-even surface.
Place the dehumidifier a least 30cm from the wall to dissipate heat properly.
Never use the appliance in the immediate surroundings of a bath, shower, swimming pool or
greenhouse.
Always store the dehumidifier in the upright position.
After unpacking, place the unit in the upright position to allow the refrigerant to stabilise. Leave
for a minimum of 3 hour before use.
IMPORTANT: There are no user serviceable parts inside and the casing should not be opened by
an unqualified person.
Any damage resulting from failure to comply with the instruction will render the warranty invalid.
About Humidity
Air always contains a certain amount of water in the form of water vapour. This is known as humidity.
The capacity of the air to hold water vapour increases with the temperature. This is why in our homes, as
soon as the temperature decreases, the vapour contained in the air condenses leaving moisture on the
colder surfaces in the room such as the windows and the walls etc.
The purpose of the dehumidifier is to remove the excess moisture from the air to control the
condensation in the home. The optimum environmental conditions for the home are between 40% and
60% Relative Humidity (RH). Below these levels the air can feel too dry and may cause skin complaints
and create static.
If temperatures in the home are below 10°C for prolonged periods, low level heating will be necessary to
allow the condensation to evaporate into the air before dehumidification can take place. The air will
however be slightly warmed by the dehumidifier as the dry air leaving the dehumidifier is about 1°C
higher than normal room temperature.
DEHUMIDIFIER AT A GLANCE
CONTROL PANEL AT A GLANCE
If the temperature is
below 12°C the defrost
function will activate.
Operating Instructions
Before operating ensure that the dehumidifier is situated upright on a stable, flat surface with the back of the
dehumidifier a minimum of 30 cm from the wall. Windows must be closed in order to achieve maximum efficiency.
1. Plug the appliance into a suitable power outlet.
2. Make sure that the water tank is in the correct position. If the ‘Tank Full’ indicator illuminates, remove the
tank and replace it in the correct position ensuring that the ‘float’ lever is able to move freely.
3. Set the desired humidity by pressing the up or down arrow buttons on the control panel until the desired
level is displayed on the LED screen. This process must be repeated each time the appliance is started.
If the humidity in the room is above the level set the dehumidifier will begin start operating. When the humidity in
the room reaches the level set the compressor will stop operating but the fan will continue to run.
If the humidity in the room rises above the level set the compressor will automatically start working again.
PLEASE NOTE: If when you switch on your dehumidifier and set your required level of humidity the unit does
not begin operating, it is likely that the current humidity in the room is already below this level. The dehumidifier will
begin operating once the humidity rises above the level set. The current room humidity will be displayed in the left
LED screen as indicated in the diagram on the previous page.
PLEASE NOTE: This dehumidifier operates using a compressor similar to that of your refrigerator and also a
motorised fan therefore the unit will make noise whilst it is working. This is rated at 55dB.
Using the Timer Function
On start up the appliance will run continuously. To set the run-time of the appliance repeatedly press the Timer
button until the desired number of hours is displayed on the LED screen. Release the Timer button.
When the appliance is in Standby-by repeatedly press the Timer button to set the number of hours until the
appliance will switch on.
The timer can be set from 1 – 24 hours.
To turn the time off set the timer to 0 hours.
Defrost
When operating in temperatures less than 12°C the surface of the evaporator may accumulate frost and effect the
efficiency of the dehumidifier. When this happens that machine will go into periodic defrost mode automatically and
the indicator will be displayed on the LED screen. Do not use the dehumidifier in temperatures less than 5°C.
Should the dehumidifier freeze-up switch off the appliance, allow the temperature to rise and then restart.
Water Tank Full
When the water tank is full the dehumidifier will stop operating. Remove the water tank careful with both hands and
discard the water. Replace the water tank in the correct position. The dehumidifier will automatically begin
operating again.
Continuous Drainage
Instead of needing to periodically empty the water tank it is possible to operate this appliance with ‘Continuous
Drainage’ by fitting an 18 mm diameter hose (supplied) into the appliance. Directions as follows:
PLEASE NOTE: When using the continuous drainage feature the hose must be placed below the drainage
outlet with no knots or kinks.
Cleaning
Disconnect the appliance from the power supply before cleaning. Wipe the outside of the unit with a soft damp
cloth. You may use a mild detergent if necessary. Dry with a cloth. Do not use any harsh abrasives or solvents.
Never immerse this appliance in water or any other liquid.
The air filters should also be cleaned regularly. Gently remove the air filter from the front of the appliance. Clean
the filter and replace in the correct position. You may use warm water if the filter is particularly dirty.
PLEASE NOTE: If the filter is blocked with dust the efficiency of the dehumidifier will be greatly reduced.
TROUBLE SHOOTING
Problem
Both fan and compressor
are not working.
Possible Cause
No power to the unit.
Possible Solution
Check the mains power supply.
Check the unit is not set to 'OFF'.
Check the fuse.
The dehumidifier will not operate if the room
humidity is already below the level set.
Room temperature and humidity
may be too low.
Ensure all windows and doors are closed and
there is sufficient heat in the room.
Not collecting water.
Unit is making loud noise.
Air intake filter may be blocked
Clean the filter of any obstructions.
The room is too big for operating
capacity of the unit.
This unit is recommended for room size 165 220 m3
Floor may be uneven
Re-position the unit on an even stable surface.
The water tank may not be
installed correctly.
Remove the tank or hose and re-fit correctly.
Leaking from the unit.
If using continuous drainage,
hose may not be correctly fitted.
Unit may have frozen.
Unplug the unit and allow the temperature to
rise. Do not operate the unit in temperatures
below 5°C
Guarantee Information
This product is guaranteed for a period of 12 months as standard from the date of purchase against mechanical
and electrical defects.
If you experience any problems with this product please do not return to the retailer. Call our Customer Service
department on 01473 271 272 or email us at [email protected] .
Please quote the model number which begins IG, the ‘Batch Number’ beginning ‘5’ and give details of the exact
fault. We will then decide whether to repair or replace the item.
You will be required to return a copy of your proof of purchase. Please retain your original.
If an item is replaced within the agreed guarantee period, the guarantee for the replacement item will be calculated
from the purchase date of the original.
Before calling the Customer Service number please ensure you have
checked the Troubleshooting guide.
Fuse and Mains Plug Replacement
This product is supplied with a moulded plug, which contains
a 3A fuse. If you are simply replacing the fuse, you must use
a 3A fuse which has been approved by ASTA to BS1362.
FUSE
COVER
FUSE
If the plug becomes damaged, a new plug must be fitted.
Replace the original plug with a 13A (BS1363) plug and make
sure that it is fitted with an ASTA approved 3A fuse.
Never use the moulded plug without the fuse cover fitted.
To replace the plug:
1. Cut off the existing fitted plug and dispose of it.
2. The wires in the mains lead supplied with this appliance
are coloured in accordance with the following code:
Green/Yellow
(Earth)
GREEN/YELLOW = EARTH (E)
BLUE = NEUTRAL (N)
BROWN = LIVE (L)
This product MUST be earthed.
Brown
(Live)
Blue
(Neutral)
CABLE
GRIP
As the colours of the wires in the mains lead may not correspond with the colour markings identifying the terminals
in your new plug, proceed as follows:
The wire which is coloured GREEN or YELLOW/GREEN must be connected to the terminal which is marked with
symbol or a coloured GREEN or YELLOW/GREEN.
the letter E or
The wire which is coloured BLUE must be connected to the terminal in the plug which is marked with the letter N or
coloured BLACK or BLUE.
The wire which is coloured BROWN must be connected to the terminal which is marked with the letter L or
coloured RED or BROWN.
Ensure that the connections are tight and that no loose strands are left out of the terminals.
IF IN DOUBT CONSULT A QUALIFIED ELECTRICIAN – DO NOT ATTEMPT TO CHANGE THE PLUG
YOURSELF
If the mains lead becomes damaged consult a qualified electrician.
SPECIFICATION
Model Number
IG9805
Voltage
220-240V ~ 50Hz
Moisture Removal
50 Litres per day (30°C 80% RH)
Power Input
740W
Operating Temperature
5°C - 32 °C
Noise Rating
55dB
Dimensions (H x W x D)
600 x 388 x 282 mm
Weight
20 kg
Disposal Information
Waste electrical products should not be disposed of with household waste. Please recycle where facilities exist. Check with your
local authority for recycling advice
Disclaimer
Updates to hardware components are made regularly. Therefore some of the instructions, specifications and
pictures in this documentation may differ slightly from your particular situation. All items described in this guide are
for illustration purposes only and may not apply to your particular situation. No legal right or entitlements may be
obtained from the description made in this manual.
View the range online at www.igenix.co.uk
Follow us on Twitter
@Igenix_Products
Tel: 01473 271 272
Email: [email protected]
Fax: 01473 270 733
Website: www.igenix.co.uk
Postal Address:
Customer Service Department
Pik-a-Pak Electrical Distributors
38 Bluestem Road,
Ransomes Europark,
Ipswich, IP3 9RR
When writing to or emailing us to report a fault please ensure you attach a copy of your proof of
purchase. Please retain your original