1
Operation Manual
USAGE AND SAFETY PRECAUTIONS
USAGE AND SAFETY PRECAUTIONS
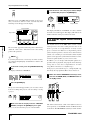
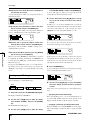
SAFETY PRECAUTIONS
• Alterations
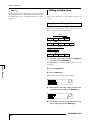
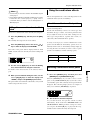
Caution
In this manual, symbols are used to highlight warnings and
cautions for you to read so that accidents can be prevented.
The meanings of these symbols are as follows:
This symbol indicates explanations
about extremely dangerous matters. If
users ignore this symbol and handle the
Warning device the wrong way, serious injury or
death could result.
This symbol indicates explanations
about dangerous matters. If users
Caution ignore this symbol and handle the
device the wrong way, bodily injury and
damage to the equipment could result.
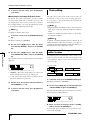
• Connecting cables and input and output jacks
Caution
You should always turn off the power to the MRS1044 and all other equipment before connecting or
disconnecting any cables. Also make sure to
disconnect all cables and the AC adapter before
moving the MRS-1044
Usage Precautions
• Electrical interference
The MRS-1044 is powered by the supplied AC
adapter. To prevent malfunction and safety hazards,
do not use any other kind of AC adapter.
For safety considerations, the MRS-1044 has been
designed to provide maximum protection against the
emission of electromagnetic radiation from inside the
device, and protection from external interference. However,
equipment that is very susceptible to interference or that
emits powerful electromagnetic waves should not be placed
near the MRS-1044, as the possibility of interference
cannot be ruled out entirely.
When using the MRS-1044 in an area with a
different line voltage, please consult your local
ZOOM distributor about acquiring a proper AC
adapter.
With any type of digital control device, the MRS-1044
included, electromagnetic interference can cause
malfunctioning and can corrupt or destroy data. Care
should be taken to minimize the risk of damage.
Please observe the following safety tips and precautions to
ensure hazard-free use of the MRS-1044
• Power requirements
Warning
Never open the case of the MRS-1044 or attempt to
modify the product in any way since this can result in
damage to the unit.
• Environment
Avoid using your MRS-1044 in environments where
Caution it will be exposed to:
• Extreme temperature
• High humidity or moisture
• Excessive dust or sand
• Excessive vibration or shock
• Cleaning
Use a soft, dry cloth to clean the MRS-1044. If necessary,
slightly moisten the cloth. Do not use abrasive cleanser,
wax, or solvents (such as paint thinner or cleaning alcohol),
since these may dull the finish or damage the surface.
Please keep this manual in a convenient place for
future reference.
• Handling
The MRS-1044 is a precision instrument. Do not
Caution exert undue pressure on the keys and other controls.
Also take care not to drop the unit, and do not subject
it to shock or excessive pressure.
2
ZOOM MRS-1044
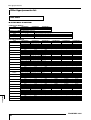
Contents
USAGE AND SAFETY PRECAUTIONS
2
2
Usage Precautions
•••••••••••••••••••••••••••••••••
2
Introduction
Overview
•••••••••••••••••••••••••••••••••••••••••••
5
•••••••••••••••••••••••••••••••••••••••••••••
5
Introducing the MRS-1044
•••••••••••••••••••••••••
6
Recorder section • • • • • • • • • • • • • • • • • • • • • • • • • • • • • • • • • • •
Rhythm section • • • • • • • • • • • • • • • • • • • • • • • • • • • • • • • • • • • • •
Mixer section • • • • • • • • • • • • • • • • • • • • • • • • • • • • • • • • • • • • • • •
Effect section • • • • • • • • • • • • • • • • • • • • • • • • • • • • • • • • • • • • • • •
6
7
7
7
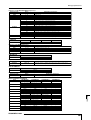
Reference [Recorder]
Assigning marks within the song
(Marker function) • • • • • • • • • • • • • • • • • • • • • • • • • • • • • • • • • • • • 29
Assigning a mark • • • • • • • • • • • • • • • • • • • • • • • • • • • • • • • • • • 29
Locating to a mark location • • • • • • • • • • • • • • • • • • • • • • • • • 30
Deleting a mark • • • • • • • • • • • • • • • • • • • • • • • • • • • • • • • • • • • • 30
Finding a desired location
(Scrub/Preview function) • • • • • • • • • • • • • • • • • • • • • • • • • • • • 31
Using the Scrub/Preview functions • • • • • • • • • • • • • • • • • • 31
Changing the settings of the Scrub function • • • • • • • • • • 31
Playing back repeatedly (A-B Repeat function)
Parts of the MRS-1044 and what they do
Front panel
•••
8
•••••••••••••••••••••••••••••••••••••••••••
8
Input section • • • • • • • • • • • • • • • • • • • • • • • • • • • • • • • • • • • • • • • 8
Effect section • • • • • • • • • • • • • • • • • • • • • • • • • • • • • • • • • • • • • • • 9
Rhythm section • • • • • • • • • • • • • • • • • • • • • • • • • • • • • • • • • • • • • 9
Display section • • • • • • • • • • • • • • • • • • • • • • • • • • • • • • • • • • • • 10
Fader section • • • • • • • • • • • • • • • • • • • • • • • • • • • • • • • • • • • • • • 10
TRACK PARAMETER section • • • • • • • • • • • • • • • • • • • 11
Control section • • • • • • • • • • • • • • • • • • • • • • • • • • • • • • • • • • • • 11
Transport section • • • • • • • • • • • • • • • • • • • • • • • • • • • • • • • • • • 12
Rear panel
Side panel
Connections
••••••••••••••••••••••••••••••••••••••••••
••••••••••••••••••••••••••••••••••••••••••
•••••••••••••••••••••••••••••••••••••••••
Listening to the demo songs
••••••••••••••••••
Turn on the power • • • • • • • • • • • • • • • • • • • • • • • • • • • • • • • • •
Select a demo song • • • • • • • • • • • • • • • • • • • • • • • • • • • • • • • •
Play back the demo song • • • • • • • • • • • • • • • • • • • • • • • • • •
Turn off the power • • • • • • • • • • • • • • • • • • • • • • • • • • • • • • • •
Introductory tour
•••••••••••••••••••••••••••••••••••
Step 1: Preparations before recording
••••••••••
12
13
14
15
15
15
15
16
Step 2: Record the first track
••••••••••••••••••••
•••••••••••••••••••••••••••••••••••••••••••••••••••
2-2: Set the insert effect • • • • • • • • • • • • • • • • • • • • • • • • • • •
2-3: Select a track and record • • • • • • • • • • • • • • • • • • • • •
Step 3: Overdubbing
••••••••••••••••••••••••••••••
20
Combining multiple tracks (Bounce function)
23
••••••••••••••••••••••••••••••••••
24
24
26
27
28
37
•••••••
Executing bounce recording • • • • • • • • • • • • • • • • • • • • • • • • 37
Making settings for the Bounce function • • • • • • • • • • • • • 37
Track editing
38
•••••••••••••••••••••••••••••••••••••••••
Copying a specified region of data to another location
• • • • • • • • • • • • • • • • • • • • • • • • • • • • • • • • • • • • • • • • • • • • • • • 38
Copying the data of an entire track • • • • • • • • • • • • • • • • • • 40
Moving a specified region of data to another location
• • • • • • • • • • • • • • • • • • • • • • • • • • • • • • • • • • • • • • • • • • • • • • • • 40
Erasing a specified region • • • • • • • • • • • • • • • • • • • • • • • • • • • 42
Erasing the data of an entire track • • • • • • • • • • • • • • • • • • • 43
Exchanging the data of entire tracks • • • • • • • • • • • • • • • • • 43
Capturing the recorded contents of a track
44
•••••••••
Capturing a track • • • • • • • • • • • • • • • • • • • • • • • • • • • • • • • • • • • 44
Swapping with the captured data • • • • • • • • • • • • • • • • • • • • 45
46
•••••••••••••••••••••••••••••••••••
46
•••••••••••••••••••••••••••••••••••••
Basic operation of the input mixer
47
••••••••••••••••••
Assigning input signals to recording tracks • • • • • • • • • • 47
Adjusting the depth of the send/return effects • • • • • • • • 48
Adjusting the pan/balance • • • • • • • • • • • • • • • • • • • • • • • • • • 48
Basic operation of the track mixer
20
21
21
35
•••••••••••••••••••••••••••••••••••••••
Switching V-takes • • • • • • • • • • • • • • • • • • • • • • • • • • • • • • • • • • 35
Editing the name of a V-take • • • • • • • • • • • • • • • • • • • • • • • • 36
About the mixer
4-1: Adjust the volume, pan, and EQ • • • • • • • • • • • • • •
4-2: Using the send/return effects • • • • • • • • • • • • • • • • •
4-3: Apply an insert effect to the entire song • • • • • •
4-4: Perform the mixdown • • • • • • • • • • • • • • • • • • • • • • • •
ZOOM MRS-1044
Using V-takes
17
3-1: Select an insert effect patch • • • • • • • • • • • • • • • • • • • 23
3-2: Select a track, and record • • • • • • • • • • • • • • • • • • • • • 23
Step 4: Mixdown
Using manual punch-in/out • • • • • • • • • • • • • • • • • • • • • • • • • 33
Using auto punch-in/out • • • • • • • • • • • • • • • • • • • • • • • • • • • • 33
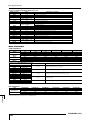
Reference [Mixer]
2-1: Adjust the input sensitivity and recording level
32
•••••
Re-recording only a specified region
(Punch-in/out function) • • • • • • • • • • • • • • • • • • • • • • • • • • • • • 33
17
1-1: Load a project • • • • • • • • • • • • • • • • • • • • • • • • • • • • • • • • 17
1-2: Play the rhythm section accom-paniment • • • • • 18
1-3: Save the project • • • • • • • • • • • • • • • • • • • • • • • • • • • • • • 19
29
••••••••••••••••••••••••••••••
Moving to a desired location in the song
(Locate function) • • • • • • • • • • • • • • • • • • • • • • • • • • • • • • • • • • • • 29
49
••••••••••••••••••
Adjusting the volume/pan/EQ • • • • • • • • • • • • • • • • • • • • • • • 49
Adjusting the effect depth • • • • • • • • • • • • • • • • • • • • • • • • • • • 50
Linking odd-numbered/even-numbered channels • • • • • 50
Saving/recalling mixer settings (Scene function)
••••
51
Saving a scene • • • • • • • • • • • • • • • • • • • • • • • • • • • • • • • • • • • • •
Recalling a saved scene • • • • • • • • • • • • • • • • • • • • • • • • • • • • •
Deleting a scene • • • • • • • • • • • • • • • • • • • • • • • • • • • • • • • • • • • •
Switching scenes automatically • • • • • • • • • • • • • • • • • • • • •
51
52
52
52
Switching the level meter display type
••••••••••••••
54
3
Contents
••••••••
•••••••••••••••••••••••••••
SAFETY PRECAUTIONS
Contents
Reference [Rhythm]
••••••••••••••••••••••••••••••••
About the rhythm section
Playing rhythm patterns
55
•••••••••••••••••••••••••••
55
About projects
•••••••••••••••••••••••••••••
56
Project operations
Contents
Selecting and playing a rhythm pattern • • • • • • • • • • • • • • 56
Changing the tempo of the rhythm pattern • • • • • • • • • • • 57
Changing the drum kit / bass program • • • • • • • • • • • • • • • 57
Creating a rhythm song
•••••••••••••••••••••••••••••
58
Inputting rhythm pattern data • • • • • • • • • • • • • • • • • • • • • • •
Inputting chord data • • • • • • • • • • • • • • • • • • • • • • • • • • • • • • • •
Inputting tempo data • • • • • • • • • • • • • • • • • • • • • • • • • • • • • • •
Inputting other data • • • • • • • • • • • • • • • • • • • • • • • • • • • • • • • •
Playing a rhythm song • • • • • • • • • • • • • • • • • • • • • • • • • • • • • •
58
60
62
62
63
Editing a rhythm song
•••••••••••••••••••••••••••••••
64
Copying a specific region of measures • • • • • • • • • • • • • • • 64
Transposing the entire rhythm song • • • • • • • • • • • • • • • • • 65
Erasing the rhythm song • • • • • • • • • • • • • • • • • • • • • • • • • • • • 65
Creating an original rhythm pattern
•••••••••••••••••
66
Selecting the track that you want to record • • • • • • • • • • • 66
Recording your pad performance in a rhythm pattern
• • • • • • • • • • • • • • • • • • • • • • • • • • • • • • • • • • • • • • • • • • • • • • • • 67
Specifying the chord of a rhythm pattern • • • • • • • • • • • • 69
Editing a rhythm pattern
Reference [Project]
••••••••••••••••••••••••••••
70
Adjusting the volume balance of the drum kit and
bass program • • • • • • • • • • • • • • • • • • • • • • • • • • • • • • • • • • • • •
Copying a rhythm pattern • • • • • • • • • • • • • • • • • • • • • • • • • • •
Editing the name of a rhythm pattern • • • • • • • • • • • • • • • •
Erase a rhythm pattern • • • • • • • • • • • • • • • • • • • • • • • • • • • • • •
70
71
71
71
Importing rhythm patterns and the rhythm song
from another project • • • • • • • • • • • • • • • • • • • • • • • • • • • • • • • 72
Editing various settings of the rhythm section
••••••
Basic procedure • • • • • • • • • • • • • • • • • • • • • • • • • • • • • • • • • • • •
Changing the length of the pre-count (COUNT) • • • • • •
Changing the metronome volume (CLICK) • • • • • • • • • •
Adjusting the sensitivity of the pads (PAD SENS) • • • •
Checking the remaining amount of memory
(MEMORY) • • • • • • • • • • • • • • • • • • • • • • • • • • • • • • • • • • • • • •
72
72
73
73
73
About the effects
•••••••••••••••••••••••••••••••••
••••••••••••••••••••••••••••••••••••
•••••••••••••••••••••••••••••••
About insert effect patches • • • • • • • • • • • • • • • • • • • • • • • • • •
Changing the insert location of the insert effect • • • • • •
Applying the insert effect only to the monitor
signal • • • • • • • • • • • • • • • • • • • • • • • • • • • • • • • • • • • • • • • • • • • •
Selecting the patch for the insert effect • • • • • • • • • • • • • •
Editing the insert effect patch • • • • • • • • • • • • • • • • • • • • • • •
Storing an insert effect patch • • • • • • • • • • • • • • • • • • • • • • • •
Editing the name of an insert effect patch • • • • • • • • • • • •
Using the send/return effects
Reference [MIDI]
About MIDI
86
87
87
87
87
88
89
What you can do using MIDI • • • • • • • • • • • • • • • • • • • • • • • 89
About the MIDI connectors • • • • • • • • • • • • • • • • • • • • • • • • • 89
Making MIDI-related settings
•••••••••••••••••••••••
90
Basic procedure • • • • • • • • • • • • • • • • • • • • • • • • • • • • • • • • • • • • 90
Setting the drum/bass MIDI channel
(DRUM CH / BASS CH) • • • • • • • • • • • • • • • • • • • • • • • • • • 90
Specifying transmission of Timing Clock messages
(CLOCK) • • • • • • • • • • • • • • • • • • • • • • • • • • • • • • • • • • • • • • • • • • 90
Specifying transmission of Song Position Pointer
messages (SPP) • • • • • • • • • • • • • • • • • • • • • • • • • • • • • • • • • • • • 91
Specifying transmission of Start/Stop/Continue messages
(COMMAND) • • • • • • • • • • • • • • • • • • • • • • • • • • • • • • • • • • • • • 91
Reference [Other]
Using the tuner
92
•••••••••••••••••••••••••••••••••••
Changing the function of the foot switch
•••••••••••
92
••••••••••••••••••••••••••••••••••••••
92
Preventing digital copying of your master tape
•••••
93
74
Troubleshooting
75
75
76
76
77
78
80
81
About the send/return effect patches • • • • • • • • • • • • • • • • •
Selecting a send/return effect patch • • • • • • • • • • • • • • • • • •
Editing a send/return effect patch • • • • • • • • • • • • • • • • • • • •
Storing a send/return effect patch • • • • • • • • • • • • • • • • • • • •
Editing the name of a send/return effect patch • • • • • • • •
81
81
82
83
83
84
95
••••••••••••••••••••••••••••••••••••••••••
Specifications of the MRS-1044
81
••••••••••••
85
86
86
89
••••••••••••••••••••••••••••••••••••
••••••••••••••••••••••••••••••••••••••••••
74
•••••••••••••••••••••••
Importing patches from another project
85
•••••••••••••••••••••••••••••••••••
73
Insert effect • • • • • • • • • • • • • • • • • • • • • • • • • • • • • • • • • • • • • • • • 74
Send/return effects • • • • • • • • • • • • • • • • • • • • • • • • • • • • • • • • • 74
Using the insert effect
85
•••••••••••••••••••••••••••••••••••••••
Basic procedure • • • • • • • • • • • • • • • • • • • • • • • • • • • • • • • • • • • •
Loading a project (PROJECT SELECT) • • • • • • • • • • • • •
Creating a new project (PROJECT NEW) • • • • • • • • • • •
Checking the project size / available hard disk capacity
(PROJECT SIZE) • • • • • • • • • • • • • • • • • • • • • • • • • • • • • • • • • •
Duplicating a project (PROJECT COPY) • • • • • • • • • • • •
Erasing a project (PROJECT ERASE) • • • • • • • • • • • • • • •
Editing the project name (PROJECT NAME) • • • • • • • •
Protecting a project (PROJECT PROTECT) • • • • • • • • •
Storing a project (PROJECT STORE) • • • • • • • • • • • • • • •
Appendices
Reference [Effects]
85
•••••••••••••••••••••••••••••••••
•••••••••••••••••
95
••••••••••••••••••••••••••••••••••••
96
Problems during playback • • • • • • • • • • • • • • • • • • • • • • • • •
Problems during recording • • • • • • • • • • • • • • • • • • • • • • • •
Problems with effects • • • • • • • • • • • • • • • • • • • • • • • • • • • • •
Problems with the rhythm section • • • • • • • • • • • • • • • • •
Problems with MIDI • • • • • • • • • • • • • • • • • • • • • • • • • • • • • •
Other problems • • • • • • • • • • • • • • • • • • • • • • • • • • • • • • • • • • •
96
96
96
97
97
97
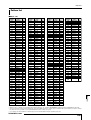
Effect type/parameter list
•••••••••••••••••••••••••
98
Insert effect • • • • • • • • • • • • • • • • • • • • • • • • • • • • • • • • • • • • • • • 98
Send Return effect • • • • • • • • • • • • • • • • • • • • • • • • • • • • • • • 105
Effect patch list
Pattern list
•••••••••••••••••••••••••••••••••••
106
•••••••••••••••••••••••••••••••••••••••••
109
Drum kit / bass program list
•••••••••••••••••••••
113
Pad-Instrument/Note# correspondence table
••••••••••••••••••••••••••••••••••••••••••••••••••
MIDI implementation
•••••••••••••••••••••••••••••
MIDI implementation chart
Index
114
116
••••••••••••••••••••••
117
•••••••••••••••••••••••••••••••••••••••••••••••
118
• MIDI is a registered trademark of the AMEI.
4
ZOOM MRS-1044
Introduction
Overview
■ Brings together all the functionality you need for complete music production
All the functionality you need for music production – hard disk recorder, drum/bass machine, mixer, effects,
and more – is provided by the MRS-1044. From creating the rhythm tracks to the processes of multitrack
recording and mixdown, the MRS-1044 lets you do it all.
■ 10-track x 10-take recorder
The recorder section provides six mono tracks and two stereo tracks, for a total of ten tracks. Two tracks can
be recorded simultaneously, and up to ten tracks can be played back at a time. Each track has ten virtual
tracks (V-takes). For important parts such as vocals or guitar solos, you can switch between virtual tracks to
record multiple takes. A full range of editing functions is also provided, allowing you to copy or move audio
data.
■ Bounce function that allows ping-pong recording of ten tracks simultaneously
The bounce function makes it easy to consolidate multiple tracks into one or two tracks with just a few
keystrokes. Even when there are no vacant tracks available, you can play back ten tracks simultaneously and
bounce them down to two tracks.
■ Rhythm section that can be used to provide guide rhythm or accompaniment
The rhythm section provides 255 types of accompaniment patterns that use the internal drum + bass sound
generator. This can run in synchronization with the recorder, or be used as an independent guide rhythm.
You can also program chords or pattern playback order to create the rhythm accompaniment for an entire
song without using up any of the audio tracks.
■ Full-featured mixer section
The internal digital mixer has thirteen channels: 2 drums, 1 bass, and 10 tracks. The level, pan, and EQ
settings of each channel can be savped as separate "scenes." A saved scene can be recalled manually at any
time, or can be switched automatically at a desired point in a song.
■ Versatile effects
In terms of internal effects, the MRS-1044 provides an "insert effect" that can be inserted into a specified
signal route, and a "send/return effect" that is used via the mixer send/return. The effects can be used in a
variety of ways, from modifying the tone while recording a track, to spatial processing or mastering during
mixdown.
■ Excellent expandability
An optional USB board and SCSI board are planned for release, allowing data to be transferred between the
MRS-1044 and a personal computer or external storage device. This will make it easy to backup/restore
data, to manage audio data and rhythm data, and to update the system.
In order to take full advantage of the MRS-1044's versatile functionality and to ensure troublefree enjoyment, please read this manual carefully. Keep this manual in a safe place together with
the warranty card.
ZOOM MRS-1044
5
Introduction
Thank you for purchasing the ZOOM MRS-1044 multitrack recording studio (subsequently referred to as "the MRS-1044").
The MRS-1044 is a digital audio workstation with the following features:
Introducing the MRS-1044
Now let's take a closer look at each section.
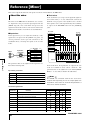
Introducing the MRS-1044
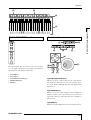
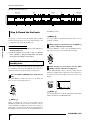
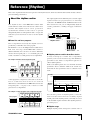
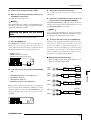
Recorder section
The MRS-1044 is internally divided into the following four
sections.
Introduction
● Recorder
section
This records and plays back audio.
● Rhythm
section
This uses the internal drum/bass sound generator to play
rhythms.
● Mixer
section
This mixes the signals from the recorder section and
rhythm section, and outputs them from the stereo output
jacks.
● Effect
section
This processes input signals or signals of the mixer section.
The MRS-1044 lets you use two effects: an insert effect
and a send/return effect.
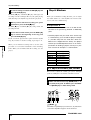
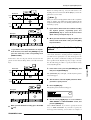
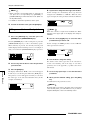
The following diagram shows the relationship and signal
flow between each section.
The recorder section of the MRS-1044 has ten tracks: six
mono tracks (tracks 1 – 6) and two stereo tracks (tracks 7/8
and 9/10). Up to ten tracks can be played back
simultaneously, and two tracks can be recorded
simultaneously.
Each track 1 – 10 has ten virtual tracks (referred to as "Vtakes"), and for each track, you can select one take for
recording/playback (Using V-takes → p.35). For example,
you can record guitar solos onto multiple V-takes, and then
compare them later to select the best take.
Tracks
1 2 3 4 5 6
7/8 9/10
1
2
3
4
V-takes 5
6
7
8
9
10
Recorder section
INPUT
Insert effect
Track 1
Track 2
Track 3
Track 4
Track 5
Track 6
OUTPUT
Track 7/8
Track 9/10
Bass sound
Drum sound
Rhythm section
DRUM BASS 1
2
3
4
5
6
7/8 9/10 MASTER
REVERB
CHORUS
DELAY
Send/return effect
Mixer section
6
ZOOM MRS-1044
Introducing the MRS-1044
Rhythm section
Effect section
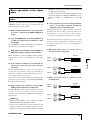
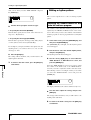
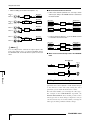
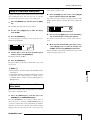
■ Insert effect
This effect is used by inserting it into a specific signal
route. You can choose one of the following three locations
in which to place the insert effect.
Recorder section
Track 1
Track 2
Track 3
(1) Immediately after the input jack (default setting)
(2) The desired channel of the mixer
(3) Immediately before the MASTER fader
Rhythm section
Bass sound
Rhythm
pattern
Rhythm
pattern
The MRS-1044 provides two types of effect: an "insert
effect" and a "send/return effect." These two can be used
simultaneously. These two effects have differing
characteristics, as described below.
Rhythm
pattern
to
the mixer
Drum sound
H INT
You can also create original patterns by using either the
eight pads located on the front panel or through the use of
MIDI.
You can arrange rhythm patterns in the desired order of
playback, and program chords and tempo to create the
rhythm accompaniment for an entire song. (This is called a
"rhythm song.") This lets you construct the rhythm
accompaniment for a song without using up any audio
tracks.
By default, the insert effect is inserted immediately after
the input jack (1) as shown in the diagram on p.6, allowing
it to directly modify the signal that will be recorded on the
track. By changing its location to (2) or (3), you can
process a specific track or the entire song during mixdown.
■ Send/return effect
This effect is internally connected to the send/return of the
mixer section. There are two types of effect, reverb and
chorus/delay, and they can be used simultaneously.
The depth of the send/return effect is adjusted by the send
level of each mixer channel. Raising the send level will
produce a deeper reverb or chorus/delay effect for that
channel.
Mixer section
The output of recorder tracks 1 – 6, 7/8 and 9/10, and the
drum + bass sound output of the rhythm section are
assigned to mixer section channels 1 – 6, channels 7/8,
channels 9/10, DRUM channel, and BASS channel
respectively. For each channel, the following parameters
can be controlled independently.
•
•
•
•
•
Volume
Pan
2-band EQ
Send level to the send/return effect
Mute on/off
ZOOM MRS-1044
7
Introduction
The rhythm section of the MRS-1044 has 255 accompaniment
patterns (several measures long) that use the internal
drum/bass sound generator. (These are called "rhythm
patterns.") Rhythm patterns can be played independently,
or in synchronization with the recorder.
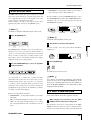
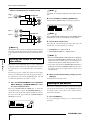
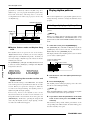
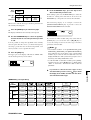
Parts of the MRS-1044 and what they do
Front panel
Effect section (➔ p.9)
Input section (➔ p.8)
TRACK PARAMETER section (➔ p.11)
Display section (➔ p.10)
Control section (➔ p.11)
Parts of the MRS-1044 and what they do
Rhythm section (➔ p.9)
Fader section (➔ p.10)
(2) [INPUT 1]/[INPUT 2] controls
These controls adjust the sensitivity of the input signal
from the [INPUT 1] and [INPUT 2] jacks.
Input section
(1)
(5)
(2)
(4)
(3)
(1) [PEAK] indicators
These show whether the input signal (input source) from
the [INPUT 1] and [INPUT 2] jacks is distorting. The
indicators will light -6 dB below the level at which the
sound begins to distort.
8
Transport section (➔ p.12)
(3) [ON/OFF] keys
These keys enable/disable [INPUT 1] and [INPUT 2].
When enabled (on), the key will light.
(4) [REC LEVEL] control
This control adjusts the volume of the input signal from the
[INPUT 1] and [INPUT 2] jacks.
(5) [CLIP] indicator
This indicator will light if the signal that has passed
through the [REC LEVEL] control is clipping.
ZOOM MRS-1044
Front panel
•
•
•
•
•
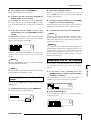
Effect section
(1)
(2)
(3)
(4)
(6)
(7)
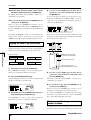
(1) [EFFECT] key
This key accesses a screen where you can select a patch
(stored effect settings) or view the patch that is already
selected for the internal effect.
(2) [BYPASS/TUNER] key
This key bypasses the insert effect or accesses the Tuner
function. The key will light when the insert effect is
bypassed. The key will blink when the Tuner function is
being used.
(3) [INPUT SOURCE] key
This key is used in conjunction with the [ON/OFF] key or
status keys to select the location at which the insert effect
will be placed.
(4) ALGORITHM keys
Use the following four keys to select the insert effect
algorithm (the combination of effect modules). The key of
the selected algorithm will light.
•
•
•
•
[GUITAR/BASS] key
[MIC] key
[LINE] key
[MASTERING] key
(5) MODULE keys
Use the following five keys to switch each effect module
within the algorithm on/off, or to select an effect module.
With the exception of the [TOTAL] key, the key of a
module that is in use will light.
ZOOM MRS-1044
(6) [CHORUS/DELAY] key
This is the chorus/delay of the send/return effect. Pressing
this key accesses a screen where you can select a patch or
view the current patch. This key will be dark if the
chorus/delay is off.
(7) [REVERB] key
This is the reverb of the send/return effect. Pressing this
key accesses a screen where you can select a patch or view
the current patch. This key will be dark if the reverb is off.
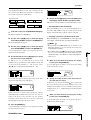
Rhythm section
(1)
(2)
(3)
(4)
(5)
(6)
(7)
(8)
(9)
(10)
(1) [RHYTHM] key
Use this to record a rhythm pattern or create a rhythm song.
When you press this key, the rhythm section will be
disconnected from the recorder section, allowing the
rhythm section to operate independently.
(2) [SONG] key
(3) [PATTERN] key
These keys switch the rhythm section between "Rhythm
Song mode" and "Rhythm Pattern mode." The [SONG] key
will light when Rhythm Song mode is selected, and the
[PATTERN] key will light when Rhythm Pattern mode is
selected.
9
Parts of the MRS-1044 and what they do
(5)
[COMPRESSOR] key
[PRE AMP/DRIVE] key
[EQUALIZER] key
[MODULATION/DELAY] key
[TOTAL] key
Front panel
(4) [DRUM/BASS] key
This key accesses a screen where you can select the tracks
(drum track / bass track) that will be assigned to pads 1 – 8.
(5) [BANK] key
This key accesses a screen where you can select the
combination of sounds (the "pad bank") that will be
assigned to pads 1 – 8 (10).
Parts of the MRS-1044 and what they do
(6) [INSERT/DELETE] key
(7) [ERASE] key
These keys are used to edit a rhythm song or rhythm
pattern.
(8) [KIT/PROG] key
This key accesses a screen where you can change the drum
sounds or bass sound used by the rhythm section.
(9) [TEMPO] key
This key accesses a screen where you can view or change
the tempo of the rhythm pattern or rhythm song.
(10)Pads 1 – 8
These pads play the drum sounds or bass sound used by the
rhythm section.
Display section
(3) [PROJECT/UTILITY] key
This key is used to access a variety of functions and
settings, such as loading or saving a project, or track
editing functions.
(4) [ACCESS] indicator
This indicator will light when the internal hard disk is
being read or written to.
(5) [V-TAKE] key
This key accesses a screen where you can switch the virtual
track (V-take) of each recorder track (1 – 10).
(6) [BOUNCE] key
This key is the on/off switch for the Bounce function used
to combine multiple tracks.
(7) [TIME BASE] key
This key switches the display counter between time display
and measure display.
(8) [SCENE] key
This key is used to save the current mixer settings as a
"scene," or to recall a previously saved scene (Scene
function).
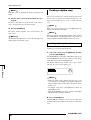
Fader section
(1)
(3)
(4)
(2)
(1) DRUM/BASS status keys
These keys are used mainly to switch muting on (key dark)
or off (key lit green) for the drum channel and bass
channel.
(2) Status keys 1 – 6, 7/8, 9/10
These keys are used mainly to switch muting on/off for
channels 1 – 6, 7/8, and 9/10, and to select the recording
track. Each time you press a status key, the key will cycle
between lit green (channel = mute off) → dark (channel =
mute on) → lit red (selected as recording track).
(5) (6) (7)
(8)
(1) Display
This shows the current location within the song, the signal
level of the various mixer channels, the values of internal
settings, and other data necessary for operation. The
contents of the display will change according to the
operating state.
(2) [LCD CONTRAST] control
This adjusts the contrast of the display.
10
(3) MASTER status key
This key is used to select the MASTER fader for internal
settings.
(4) Faders (DRUM, BASS, 1 – 6, 7/8, 9/10, MASTER)
The DRUM/BASS faders adjust the volume of the
drum/bass channels, and faders 1 – 6, 7/8, 9/10 adjust the
volume of channels 1 – 6, 7/8, 9/10. The MASTER fader
adjusts the overall volume that is sent from the [OUTPUT]
jacks.
ZOOM MRS-1044
Front panel
(1)
(2)
(3)
(4)
Control section
(1)
(3)
(2)
(4)
(5)
(6)
The following five keys are used to access screens where
you can adjust settings such as pan, EQ, and send/return
effect depth for each channel of the mixer.
(7)
(8)
(9)
(10)
•
•
•
•
•
[EQ HIGH] key
[EQ LOW] key
[CHORUS/DELAY SEND] key
[REVERB SEND] key
[PAN] key
(11)
(1) [AUTO PUNCH IN/OUT] key
This key is used to make settings for the "Auto Punchin/out function" which lets you re-record a specific region
of a track. The key will light when the Auto Punch-in/out
function is on.
(2) [A-B REPEAT] key
This key is used to make settings for the "A-B Repeat
function" which causes a specified region to play back
repeatedly. The key will light when the A-B Repeat
function is on.
(3) [CLEAR] key
This key erases the mark that is set for the current location.
ZOOM MRS-1044
11
Parts of the MRS-1044 and what they do
TRACK PARAMETER section
Front panel
(4) MARKER [U]/[I] keys
These keys move to the mark that precedes or follows the
current location.
Transport section
(1)
(2)
(3)
(4)
(5)
(6)
(5) [MARK] key
This key sets a mark at the current location. By pressing
the [MARK] key at a previously marked location, you can
access a screen that lets you assign a scene to that mark.
Parts of the MRS-1044 and what they do
(6) Cursor [Q]/[W]/[E]/[R] keys
These keys are used to switch between display screens, or
to move the blinking area within the display.
(7) Dial
This is used mainly to adjust the value of a setting.
(8) [EDIT] key
Use this key when you want to edit the settings of the
internal effects, or to edit a rhythm song / rhythm pattern.
(9) [UNDO/REDO] key
This key is used to capture recorded data from a track, or to
exchange (swap) the captured data with the contents of the
current track.
(10)[EXIT] key
This key is used to cancel execution of a function, or to
return to the previous setting screen.
(11)[ENTER] key
This key is used to confirm a selection or to execute a
function.
(9) (8)
(7)
(6)
(5) (4)
(1) [INPUT 1] jacks
These are the input jacks for INPUT 1. Select and use one
of the following three jacks.
12
(2) REW [T] key
This key moves the current location backward in steps of
one second (or in steps of one beat). Press and hold the key
to rewind quickly.
(3) FF [Y] key
This key moves the current location forward in steps of one
second (or in steps of one beat). Press and hold the key to
fast-forward quickly.
(4) STOP [P] key
This key stops the song. To turn the Scrub function on,
hold down this key and press the PLAY [R] key.
(5) PLAY [R] key
This key plays the song from the current location.
(6) REC [O] key
Use this key to record on the recorder, to record a rhythm
pattern, or to begin creating a rhythm song.
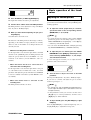
Rear panel
(10)
(1) ZERO [U] key
This key returns to the starting location of the song (the
zero position of the counter).
(3)
(2)
(1)
• BALANCE: This is an XLR balanced jack to which a mic
or line-level device can be connected.
• UNBALANCE: This is an unbalanced phone jack to
ZOOM MRS-1044
Rear panel
which a mic or line-level device can be connected.
• GUITAR/BASS: This is a phone jack to which a passivetype electric guitar or bass can be connected directly.
N OTE
These jacks are given priority in the order of GUITAR/BASS
→ UNBALANCE → BALANCE. For example, if all three are
connected, the GUITAR/BASS jack will be selected.
• BALANCE: This is an XLR balanced jack to which a mic
or line-level device can be connected.
• UNBALANCE: This is an unbalanced phone jack to
which a mic or line-level device can be connected.
N OTE
If both jacks are connected, the UNBALANCE jack will be
selected.
(3) [OUTPUT] jacks
These jacks output the signal that has passed through the
MASTER fader. The following three jacks can be used
simultaneously.
• MASTER: These are RCA phono analog output jacks.
• PHONES: A pair of stereo headphones can be connected
to this jack. Use the knob beside this jack to adjust the
headphone volume.
• DIGITAL: This is an optical-type digital output jack.
(5) [FOOT SW] jack
A separately sold foot switch (ZOOM FS01) can be
connected to this jack.
(6) [MIDI IN] connector
MIDI messages can be input from this connector.
(7) [MIDI OUT] connector
MIDI messages can be output from this connector.
(8) [PHANTOM ON/OFF] switch
When this switch is on, +48V phantom power will be
supplied to the two [INPUT 1/2] BALANCE jacks.
N OTE
If devices that do not require phantom power are
connected to the [INPUT 1/2] BALANCE jacks, you must
turn this switch off.
(9) [POWER] switch
This switch turns the power of the MRS-1044 on/off.
N OTE
When turning off the power of the MRS-1044, you must use
the [POWER] switch. If you turn the power off by simply
disconnecting the AC adaptor plug, the previously recorded
content or changes will be lost.
(10)[DC 12V] jack
Connect the included AC adaptor to this jack.
Side panel
This slot is for installation of a separately sold SCSI board or USB board (planned for release).
ZOOM MRS-1044
13
Parts of the MRS-1044 and what they do
(2) [INPUT 2] jacks
These are the input jacks for INPUT 2. When connecting a
stereo output device, use these jacks in conjunction with
the [INPUT 1] jacks. Select and use one of the following
two jacks.
(4) [EXP PEDAL] jack
A separately sold expression pedal (ZOOM FP01, FP02)
can be connected to this jack.
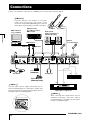
Connections
Connect your instruments, audio devices, and MIDI devices as shown in the following diagram.
N OTE
To prevent damage to the speakers of your audio
system, tur n off the power of the audio system
connected to the [OUTPUT] (MASTER) jacks (or turn the
volume all the way down) before you make connections.
MIDI sequencer
(e.g., computer)
Digital recorder
(e.g., DAT recorder or
MD recorder)
Bass
Guitar
Connections
Audio system
(audio components or
amplified speakers)
Dynamic
or condenser mics
MIDI interface
MIDI IN
MIDI OUT
Foot switch
(ZOOM FS01)
AC adaptor
Headphones
R
Expression pedal
(ZOOM FP01/FP02)
L
CD player, etc.
R
L
H INT
Loop the cable of the AC adaptor around the hook as
shown in the diagram before connecting it to the [DC 12V]
jack. This will prevent the plug from being pulled out if the
AC adaptor cable is accidentally pulled.
Synthesizer or sampler, etc.
H INT
When connecting stereo output devices such as a
synthesizer or CD player, connect the L output of
the external device to the [INPUT 1] jack, and the
R output to the [INPUT 2] jack.
14
ZOOM MRS-1044
Listening to the demo songs
When shipped from the factory, the internal hard disk of the MRS-1044 contains several demo songs. After you have finished
making connections, turn on the power and listen to the demo songs.
Turn on the power
Here's how to turn on the power of the MRS-1044 and your
other equipment.
3. Press the [ENTER] key once again.
1. Make sure that the AC adaptor, instruments, and
audio system (or stereo headphones) are connected
appropriately to the MRS-1044. (For details on
connections, refer to ➔ p.14.)
Now you can select from the projects that are saved on the
internal hard disk.
2. Press the rear panel [POWER] switch to turn on the
Project name
Project number
4. Turn the dial to select a demo song project.
N OTE
H INT
If electronic instruments are connected to the [INPUT 1]/
[INPUT 2] jacks, turn on the power in the order of the
electronic instruments → MRS-1044.
Project numbers 992 and following are not demo songs;
they are projects that contain material for use with the
"Introductory tour" that starts on page 17, or projects from
which you can import rhythm patterns.
5. Press the [ENTER] key.
3. Turn on the power of the audio system connected
The selected project will be loaded.
to the [MASTER] jacks.
Play back the demo song
Select a demo song
The internal hard disk of the MRS-1044 contains several
demo songs. Here's how to load a demo song from the hard
disk.
1. Press the [PROJECT/UTILITY] key.
The display will indicate "PROJECT."
After the demo song has finished loading, here's how to
play it back.
1. Turn down the volume of your audio system.
If you are listening through headphones connected to the
[OUTPUT] (PHONES) jack, turn down the knob located
beside the jack.
2. Press the transport section PLAY [R] key.
H INT
On the MRS-1044, data for a song (including the demo
songs) is managed in units called "projects." When you
load a project, the complete state in which that song was
saved will be reproduced.
2. Press the [ENTER] key.
The demo song will begin playing.
3. Raise the volume of your audio system (or the knob
for the [OUTPUT] (PHONES) jack) to a comfortable
volume.
The display will indicate "PROJECT SELECT."
ZOOM MRS-1044
15
Listening to the demo songs
power of the MRS-1044.
Listening to the demo songs
4. If you want to adjust the volume of the individual
tracks, use faders 1 – 6, 7/8, and 9/10. If you want
to adjust the volume of the entire song, use the
MASTER fader.
internal hard disk, and then the power will turn off. The
next time the power is turned on, the project that you were
last operating will be loaded automatically.
H INT
1
2
9/10
The demo songs have a protect setting that prevents the
data from being overwritten. For this reason, the project will
not be saved when you turn off the power after loading a
demo song.
Caution!
Listening to the demo songs
Immediately after the demo song (project) has been loaded,
the volume of each track and the overall volume of the
entire song will be set automatically, without regard to the
current physical positions of the faders. When you operate
a fader, the volume will immediately be set to the new
position of the fader.
H INT
• You must use this method to turn off the power of
the MRS-1044. If you tur n off the power by
disconnecting the AC adaptor plug from the [DC
12V] jack, or by unplugging the AC adaptor from
the AC power outlet, the project will not be saved,
and any previous recordings or changes will be
lost.
• In particular, you must never turn the power off by
unplugging the AC adaptor while the access
indicator of the display section is lit. Doing so may
damage the internal hard disk, causing all data to
be lost permanently.
For a project that uses the rhythm section, use the DRUM
fader to adjust the volume of the drum sound, and the
BASS fader to adjust the volume of the bass sound.
5. To stop the demo song, press the STOP [P]key.
H INT
While stopped, you can press the ZERO [U] key to move to
the beginning of the song. Or you can press the REW [T]
key / FF [Y] key to rewind/fast-forward in steps of one
second.
Turn off the power
When turning off the power of the MRS-1044 and your
peripheral equipment, do so in the opposite order from
which you turned the power on.
1. Turn off the power of your audio system (or turn
the volume all the way down).
2. Press the rear panel [POWER] switch.
Normally, the project will automatically be saved on the
16
ZOOM MRS-1044
Introductory tour
This section explains the process of recording instruments on tracks while monitoring the accompaniment produced by the
rhythm section. It also explains how to complete a two-channel mix.
This introductory tour is divided into the following steps
1 – 4. By following through these steps in order, you can
experience the entire process from recording the first tracks
to completing your song.
• Step 1: Preparations before recording
Make recording preparations for the introductory tour.
• Step 2: Recording the first track
Record the first track while listening to the accompaniment
of the rhythm section.
• Step 4: Mixdown
Mix the rhythm section and the tracks that you recorded on
the recorder down to a two-channel stereo mix, creating the
finished song.
In this step, we will load a project in which a rhythm
section accompaniment has already been programmed,
adjust the volume of the rhythm section, and make
preparations for recording.
◆ Preparations ◆
As described on page 14, connect your audio system
to the [OUTPUT] (MASTER) jacks. If you are using
headphones, connect them to the [OUTPUT]
(PHONES) jack.
1-1: Load a project
On the MRS-1044, all data needed to reproduce a song you
created (e.g., the recorded contents of the tracks and the settings
of the mixer section) is managed in terms of a "project."
Each project contains the following data.
•
•
•
•
•
All recorded data of the recorder section
Settings of the mixer section
Settings of the rhythm section
Settings of the internal effects
Other settings such as scenes, marks, and MIDI-related
settings
H INT
Multiple projects can be saved on the internal hard disk. By
loading a project that you created earlier, you can recall the
same state in which that project was last saved.
When you want to record on the MRS-1044, you must start
by either loading a previously-created project, or creating a
new project.
When the MRS-1044 is shipped from the factory, its hard
disk contains a sample project in which a rhythm section
accompaniment for this introductory tour has already been
programmed. Use the following procedure to load this
sample project.
1 Turn on the power in the order of first the MRS1044, and then your audio system.
ZOOM MRS-1044
17
Introductory tour
• Step 3: Overdubbing
Record (overdub) the second and subsequent tracks while
listening to the previously recorded tracks and the backing
of the rhythm section.
Step 1:
Preparations before recording
Step 1: Preparations before recording
5 Turn the dial to select the project named "Sample
1" (number 992), and press the [ENTER] key.
When the power of the MRS-1044 is turned on, the project
that you used last will be loaded automatically. The
following screen will appear in the display.
Project name
Project number
Project number
The display will indicate "LOADING" for a time, and then
the main screen will reappear. The display will indicate the
number and name of the project that was loaded.
Project name
1-2: Play the rhythm section accompaniment
Counter
Hours Minutes Seconds Milliseconds
Introductory tour
The screen that appears first when the power is turned on is
called the "main screen." The main screen is the starting
point for all operations.
H INT
If you have pressed one or more keys to switch screens,
you can press the [EXIT] key several times to return to the
main screen.
2 In the main screen, press the [PROJECT/UTILITY]
key.
The display will indicate "PROJECT."
The rhythm section of the MRS-1044 contains a drum
sound generator and a bass sound generator that can be
used to provide an accompaniment. A newly created
project contains 255 different accompaniment patterns
(called "rhythm patterns") that use these drum and bass
sounds, each consisting of several measures. These rhythm
patterns can be played in synchronization with the recorder,
and used as guide rhythms as you record on a track.
In addition, you can arrange desired rhythm patterns in a
specified order of playback, and program chord and tempo
change data to create the accompaniment for an entire
song. (This is referred to as a "rhythm song.")
In the project you loaded in step 1-1, a simple rhythm song
has already been programmed. Here's how to listen to it.
1 Make sure that the DRUM/BASS status keys are lit,
and raise the DRUM, BASS, and MASTER faders to
the 0 (dB) position.
3 Press the [ENTER] key.
The project menu will appear. Here you can select various
items for working with projects, such as loading or saving
a project.
4 Make sure that the display indicates "PROJECT
SELECT," and press the [ENTER] key once again.
Now you can select from the projects on the hard disk.
18
Lit
0dB
The drum sound and bass sound of the rhythm section are
sent respectively to the DRUM channel and BASS channel
of the mixer. The DRUM/BASS status keys switch channel-
ZOOM MRS-1044
Step 1: Preparations before recording
muting on/off, and the DRUM/BASS faders adjust the
volume of each channel.
If the DRUM/BASS status keys are dark, muting is turned
on. Press the keys to make them light (mute off).
2 Make sure that the [SONG] key is lit, and press the
PLAY[R] key.
1-3: Save the project
Before you begin recording tracks, let's save the project
you loaded in step 1 – 2 (Sample 1) on the hard disk in its
current state.
H INT
The current project will be saved automatically when you
load another project, create a new project, or press the
[POWER] switch to turn off the power.
Lit
When the [SONG] key is lit, "Rhythm Song mode" is
selected, allowing you to create or play a rhythm song.
When you press the PLAY [R] key, the rhythm song will
begin playing.
At this time, the recorder will also begin running. However,
since no tracks have been recorded yet, you will not hear
any sound.
If the AC adaptor is pulled out of the outlet and power to
the MRS-1044 is lost, all changes that occurred since the
last save will be lost. This is also true of any other
miscellaneous power failure. To prevent data loss from
such causes, we encourage you to execute the Save
operation periodically.
1 In the main screen, press the [PROJECT/UTILITY]
key.
The display will indicate "PROJECT."
2 Press the [ENTER] key.
3
If necessary, operate the DRUM/BASS faders to
adjust the volume balance.
This rhythm song will be used as the accompaniment for
the tracks that you will record in step 2. Adjust the volume
balance for comfortable listening.
The project menu will appear.
3 Use the cursor [E]/[R] keys to make the display
indicate "PROJECT STORE."
4 To stop the playback, press the STOP [P] key.
H INT
H INT
• For details on programming your own rhythm song to
create an original accompaniment, refer to p.58.
• Tempo data has been input at the beginning of the
rhythm song for this project. For details on how to
change this tempo data, refer to p.62.
The arrow(s) that appear in the upper right of the display
indicate which cursor keys are valid in the currentlydisplayed screen.
4 Press the [ENTER] key.
The "PRJ STR SURE?" screen will appear, asking you
whether you are sure that you want to store the project.
5 Press the [ENTER] key once again.
When saving has been completed, you will return to the
main screen.
ZOOM MRS-1044
19
Introductory tour
H INT
N OTE
Step 2: Record the first track
[Example staff: Rhythm guitar 1]
Step 2: Record the first track
both INPUT 1 and 2.
N OTE
In this step, you will record the rhythm guitar backing
shown in the staff (above) on track 1, while listening to the
accompaniment played by the rhythm song.
Introductory tour
◆ Preparations ◆
• Connect your electric guitar to the [INPUT 1]
(GUITAR/BASS) jack.
• Load the project you saved in step 1-3 (project
name "Sample 1," project number 992). For details
on how to load a project, refer to p.17.
It is not possible to simultaneously input three or more
channels of signals.
2 While playing your instrument, turn the [INPUT 1]
control to adjust the input sensitivity.
Adjust the [INPUT 1] control so that the [PEAK] indicator
lights when you play your instrument most strongly.
2-1: Adjust the input sensitivity and
recording level
Here's how to adjust the input sensitivity appropriately for
the instrument connected to the [INPUT] jack, and how to
adjust the volume of the input signal (recording level).
1 Press the INPUT 1 [ON/OFF] key to make the key
light.
3 While playing your instrument, turn the [REC
LEVEL] control to adjust the recording level.
Set the [REC LEVEL] control as high as possible without
making the [CLIP] indicator light. The current signal level
is shown by the level meter (IN) located in the center of the
display.
The [ON/OFF] key switches the jack on or off. When the
key is lit, the corresponding jack is on.
H INT
Lit
If a recording track has not been specified, the input signal
will be sent directly to the MASTER fader.
H INT
When recording from a mono source, make sure the
[ON/OFF] key lights only for the jack to which the source is
connected. When recording from a stereo source (such as a
synthesizer), connect the L/R outputs of the instrument to
the [INPUT 1/2] jacks, and turn on the [ON/OFF] keys of
20
ZOOM MRS-1044
Step 2: Record the first track
2-2: Set the insert effect
The MRS-1044 contains two types of effects: an "insert
effect" that can be inserted into a specific signal route, and
two "send/return effects" that can be applied to the entire
song by using the send/return of the mixer.
In this example, we will record with the insert effect
applied to the guitar connected to the [INPUT 1] jack.
• MASTERING : An algorithm suitable for processing a
stereo mix signal, such as during mixdown.
For this example, press the [GUITAR/BASS] key to select
the GUITAR/BASS algorithm. The [GUITAR/BASS] key
will light, and you can now select patches that use the
GUITAR/BASS algorithm.
H INT
For details on using the send/return effects, refer to p.26
1 Press the [EFFECT] key.
Patch name
Patch number
H INT
For details on the algorithms, refer to p.75.
3 Turn the dial to select the desired patch.
For this example, select the patch named "StrmBeat"
(number 34).
4 Press the [EXIT] key.
2 Use the ALGORITHM keys to select an algorithm
for the insert effect.
You will return to the main screen.
An "algorithm" is a combination of effect modules
(individual effects) that the insert effect lets you use
simultaneously. Insert effect patches are organized
according to their algorithm. This means that when
selecting an insert effect patch, you start by selecting the
algorithm that is appropriate for the instrument you will be
recording, or for the desired purpose.
There are four algorithms, as follows.
• GUITAR/BASS : An algorithm suitable for recording
guitar/bass.
• MIC : An algorithm suitable for vocals or mic recording.
• LINE : An algorithm suitable mainly for recording
stereo-output instruments such as synthesizer or electric
piano.
ZOOM MRS-1044
H INT
If you want to record without sending the sound through
the insert effect, press the [BYPASS/TUNER] key in the
main screen. This will bypass the insert effect. When you
press the [BYPASS/TUNER] key once again it will go dark,
and bypass will be disabled.
2-3: Select a track and record
Now we will set the recording level, and record the sound
of the guitar (with the insert effect applied) on track 1.
1 While playing your instrument, turn the [REC
LEVEL] control to adjust the recording level.
By default, the insert effect is inserted before the [REC
LEVEL] control. For this reason, the recording level may
change if you change the insert effect patch. Re-adjust the
21
Introductory tour
The [EFFECT] key will light, and a screen will appear,
allowing you to select a patch for the internal effects. A
"patch" is a set of previously saved settings for an internal
effect. A newly created project contains patches for the
insert effect, and you can instantly change effect settings
simply by selecting one of these patches.
Step 2: Record the first track
recording level after selecting the insert effect patch.
INSERT
EFFECT
2 With the recorder stopped, repeatedly press status
key 1 to make the key light red.
Status keys 1 – 6, 7/8, and 9/10 are used to switch channelmuting on/off and to select the recording track. Each time
you press a status key, the key will cycle through the
following states: lit green (channel= mute off) → dark
(channel= mute on) → lit red (selected as the recording
track).
When track 1 is selected as the recording track (the status
key 1 will change from green to red), the input signal
routing will change as follows.
Introductory tour
When a recording track has not been selected
4 Press the ZERO [U] key to return to the beginning
of the song.
5 To begin recording, hold down the REC [O] key
and press the PLAY [R] key.
MASTER
The REC [O] key and PLAY [R] key will light, and
recording on track 1 will begin. Record your guitar playing
while listening to the rhythm song.
Track 1
Track 2
Track 3
When a recording track (track 1) has been selected
Operating fader 1 simply changes the level at which the
recording source is being monitored, and will not affect the
recording level. If necessary, you can operate the
DRUM/BASS faders to adjust the volume balance with the
rhythm song. When you are finished adjusting the monitor
level, press the STOP [P] key to stop the rhythm song.
1
MASTER
6 When you have finished recording the guitar, press
the STOP [P] key.
The REC [O] key and PLAY [R] key will go dark, and
recording will stop.
Track 1
Track 2
Track 3
7 To listen to the recorded content, press the ZERO
[U] key to return to the beginning of the song, and
press the PLAY [R] key.
H INT
The number of tracks that can be recorded simultaneously
is limited to either two mono tracks or one stereo track. If
you want to record in stereo on tracks 1 – 6, select the
recording tracks by simultaneously pressing status keys in
a combination of 1/2, 3/4, or 5/6.
3 Press the PLAY [R] key, and while listening to the
rhythm song, operate fader 1 to adjust the monitor
level of the guitar.
1
Track 1 will be played back together with the rhythm song.
If you want to re-do the recording, repeat steps 2 – 6.
8 If you are satisfied with the recorded content, save
the current project.
For details on saving the project, refer to p.19.
H INT
• When the recorder is stopped, you can use the REW [T]
/ FF [Y] keys to move the current location backward or
forward in steps of one second (if the counter is
displaying the time) or in steps of one beat (if the counter
is displaying the measure). After moving in this way, you
can press the PLAY [R] key to begin playback from that
location.
• You can also use the REW [T] / FF [Y] keys to move the
current location, and then re-record from that location. If
22
ZOOM MRS-1044
Step 3: Overdubbing
you want to re-record repeatedly over the same region, it
is convenient to use the auto punch-in/out function (→
p.33).
• By using V-takes (→ p.35) you can record a new take
while preserving the current take.
[Example staff: Rhythm guitar 2]
Step 3: Overdubbing
Introductory tour
In this step you will record a rhythm guitar part (like the
example staff shown above) on track 2, while listening to
the rhythm guitar you recorded on track 1 in step 2 (as well
as the rhythm song). Recording additional parts in this way
is called "overdubbing."
3 Press the [EXIT] key.
You will return to the main screen.
3-2: Select a track, and record
◆ Preparations ◆
Load the project that you saved as the last operation
in Step 2-3. Alternatively, you can load the project
"Sample 2" (number 993), in which track 1 already
contains a rhythm guitar part recorded on track 1.
(For details on loading a project, refer to p.17.)
3-1: Select an insert effect patch
We will also apply an insert effect also to track 2 while
recording it.
1 Press the [EFFECT] key, and use the ALGORITHM
keys to select the desired insert effect algorithm.
As in step 2-2, press the [GUITAR/BASS] key to select the
GUITAR/BASS algorithm.
2
Turn the dial to select the desired patch.
For this example, select the patch named "Phaser" (number
7).
ZOOM MRS-1044
Next we will set the recording level, and record the rhythm
guitar on track 2.
1 While playing your instrument, turn the [REC
LEVEL] control to adjust the recording level.
2 With the recorder stopped, press status key 2
repeatedly to make the key light red.
Track 2 will be selected as the recording track.
3 Press the PLAY [R] key, and while listening to the
rhythm song, use fader 2 to adjust the monitor
level.
As necessary, use the DRUM/BASS faders and fader 1 to
adjust the volume balance of the rhythm song and track 1.
When you are finished adjusting the monitor levels, press
the STOP [P] key to stop the song.
4 Press the ZERO [U] key to return to the beginning
of the song.
23
Step 3: Overdubbing
5 To start recording, hold down the REC [O] key and
Step 4: Mixdown
press the PLAY [R] key.
The REC [O] key and PLAY [R] key will light, and
recording on track 2 will begin. Record your guitar playing
while listening to the rhythm song and track 1 play back.
When you are finished recording all tracks, you can adjust
the volume balance etc. of the rhythm section and recorder
section, and create a finished song.
6 When you have finished recording your guitar
performance, press the STOP [P] key.
The REC [O] key and PLAY [R] key will go dark, and
recording will end.
7 To hear the recorded content, press the ZERO [U]
key to return to the beginning of the song, and
press the PLAY [R] key.
Tracks 1/2 will be played back together with the rhythm
song. If you want to re-do the recording, repeat steps 2 – 6.
Introductory tour
When you are finished recording track 2, use the same
procedure to record other instruments on the remaining
tracks. When you are finished with all recording, save the
project.
◆ Preparations ◆
• Connect a master recorder such as an MD or DAT
recorder to the [OUTPUT] (DIGITAL or MASTER)
jacks.
• Load the project that you saved at the end of step
3-2. Alternatively, you can load the project "Sample
3" (number 994) from the hard disk. When the
MRS-1044 is shipped from the factory, this project
contains pre-recorded performances on all tracks.
(For details on loading a project, refer to p.17.) The
track structure of "Sample 3" is shown below.
Track 1
Track 2
Track 3
Track 4
Track 5
Track 6
Track 7/8
Track 9/10
Rhythm guitar 1
Rhythm guitar 2
Lead guitar
Electric piano
Organ
Synthesizer
Percussion (L/R)
Synth pad (L/R)
4-1: Adjust the volume, pan, and EQ
Here's how to adjust the volume, pan (stereo left/right
position), and EQ for each channel of the mixer section.
Adjust the volume
1 Make sure that all status keys (DRUM, BASS, 1 – 6,
7/8, 9/10) are lit green. In addition, press the INPUT
1/2 [ON/OFF] keys to make them go dark.
Lit
1
Dark
H INT
If the INPUT 1/2 [ON/OFF] keys are turned on, any instruments
connected to the [INPUT 1/2] jacks can also be mixed.
24
ZOOM MRS-1044
Step 4: Mixdown
2 Raise the MASTER fader to the 0 (dB) position.
Adjust the pan
4 In the main screen, press the [PAN] key of the
3 Press the PLAY [R] button to play back the song,
and use the faders of each channel (DRUM, BASS,
1 – 6, 7/8, 9/10) to adjust the volume balance.
The drum sound and bass sound of the rhythm section are
assigned to the DRUM and BASS channels respectively,
and recorder tracks 1 – 6, 7/8, 9/10 are assigned to mixer
channels 1 – 6, 7/8, and 9/10 respectively. Use the
DRUM/BASS faders to adjust the volume of the rhythm
section, and faders 1 – 6, 7/8, and 9/10 to adjust the volume
of each track of the recorder section.
TRACK PARAMETER section.
When you press one of the keys of the TRACK
PARAMETER section, the track parameter menu will
appear, allowing you to set parameters such as pan and EQ
for each channel. If you press the [PAN] key, a screen will
appear in which you can adjust the Pan setting.
Recorder section
Track 1
Track 2
Track 3
Track 4
Track 5
Track 6
5 Press the status key of the channel whose pan you
want to adjust.
2
Track 9/10
Pan value
Bass
sound
Drum
sound
When the track parameter menu is displayed, you can press
a status key (or the cursor [E]/[R] keys) to select the
channel whose parameter you want to adjust.
Rhythm section
DRUM BASS 1
2
3
4
5
6
7/8 9/10 MASTER
6 Turn the dial to adjust the pan value.
The level meter (DRUM, BASS, 1 – 6, 7/8, 9/10) located in
the center of the display indicates the post-fader signal
level of each channel. The L/R level meter indicates the
level of the signal that has passed through the MASTER
fader. Adjust the mix, being careful that the 0 (dB) dot of
each level meter does not light.
The pan value can be adjusted in a range of L100 (far left)
– 0 (center) – R100 (far right).
7 Repeat steps 5 – 6 to adjust the pan of other
channels.
N OTE
For the stereo channels (the DRUM channel, channels 7/8
and 9/10), the PAN parameter functions as a BALANCE
parameter that adjusts the volume balance between the
L/R channels.
H INT
If necessary, you can also make the level meters show the
pre-fader signal levels (→ p.54).
Adjust the EQ
8 Press the [EQ HIGH] key or [EQ LOW] key.
Press the [EQ HIGH] key to adjust the high-frequency
equalizer, or press the [EQ LOW] to adjust the lowfrequency equalizer. The following illustration shows the
ZOOM MRS-1044
25
Introductory tour
Track 7/8
Step 4: Mixdown
screen that will appear if you press the [EQ HIGH] key.
the signal flow of the send/return effects.
Send
CHORUS/
DELAY
SEND LEVEL
CHORUS/
DELAY
REVERB
SEND LEVEL
DRUM BASS 1
9
REVERB
2
7/8 9/10 MASTER
Return
Press the status key of the channel whose EQ you
want to adjust.
10 Use the cursor [W]/[Q] keys to select the EQ
parameter that you want to adjust, and turn the dial
to modify the setting.
The available parameters and their ranges are as follows.
●
Introductory tour
If you press the [EQ HIGH] key first
• EQ HI G: Adjust the amount of boost/cut -12 – 0 – 12
(dB) for the high-frequency range.
• EQ HI F: Adjust the frequency at which the highfrequency boost or cut will occur, in the range of
500 – 18000 (Hz).
●
If you press the [EQ LOW] key first
• EQ LO G: Adjust the amount of boost/cut -12 – 0 – 12
(dB) for the low-frequency range.
• EQ LO F: Adjust the frequency at which the lowfrequency boost or cut will occur, in the range of 40 –
1600 (Hz).
H INT
• When the EQ HI G / EQ HI F parameters are displayed in
the screen, you can press the [EQ HIGH] key to switch
the high-frequency EQ on/off. (The key will be dark when
this is turned off.)
The amount of signal sent to each effect (send level)
adjusts the depth of each send/return effect for each
channel. Raising the send level will increase the amount of
signal that is sent to the effect, producing a deeper effect
for that channel.
In this example, we will select a send/return effect patch,
and adjust the send level of each channel to adjust the
amount of reverb and chorus.
Change the send/return effect patch
Newly created projects contain patches for reverb and
chorus/delay. Here's how you can change the patch that is
currently selected for reverb or chorus/delay, and edit the
reverb or chorus effect as desired.
1 Press the [EFFECT] key.
A screen will appear in which you can select the patches
for the internal effects (insert effect or send/return effects).
• When the EQ LO G / EQ LO F parameters are displayed
in the screen, you can press the [EQ LOW] key to switch
the low-frequency EQ on/off. (The key will be dark when
this is turned off.)
11 Repeat steps 9 – 10 to create settings in the same
2
Press the [REVERB] key or [CHORUS/DELAY] key.
way for other EQ parameters or other channels.
12 When you have finished creating settings, press the
[EXIT] key.
You will return to the main screen.
Press the [REVERB] key to select a reverb patch, or the
[CHORUS/DELAY] key to select a chorus/delay patch.
The display will indicate the patch that is currently selected
for the effect you selected.
The screen shown in the next page is an example of when
the [REVERB] key is pressed.
4-2: Using the send/return effects
Two effects, reverb and chorus/delay, are internally
connected to the send/return of the mixer. These effects are
called "send/return effects." The following diagram shows
26
ZOOM MRS-1044
Step 4: Mixdown
9 When you have finished making settings, press the
[EXIT] key.
You will return to the main screen.
S/R-REV: Reverb
S/R-CHO: Chorus / Delay
4-3: Apply an insert effect to the
entire song
Patch name
You can place the insert effect immediately before the
MASTER fader, and use one of the MASTERING
algorithm patches to modify the dynamics or tone of the
entire song. Here's how you can use this method to apply
an insert effect to the entire song.
Patch number
3 Turn the dial to select a patch.
For this example, select the patch named "BrgtRoom"
(number 01).
4 When you have finished selecting the patch, press
the [EXIT] key.
Change the insert location of the insert effect
1 In the main screen, press the [INPUT SOURCE] key
(located in the effect section).
You will return to the main screen.
Adjust the send level
5 In the TRACK PARAMETER section, press the
[CHORUS/DELAY SEND] key or the [REVERB
SEND] key.
Press the [REVERB SEND] key if you want to adjust the
reverb send level, or the [CHORUS/DELAY SEND] key if
you want to adjust the chorus/delay send level. A screen
will appear in which you can adjust the send level of the
selected effect. The screen shown below is an example of
when the [REVERB SEND] key is pressed.
Send level value
2 Turn the dial to make the display read "TRACK
MASTER."
Now the insert effect is inserted immediately before the
MASTER fader, and can process the signal of the entire
song that is sent from the [OUTPUT] jack.
6 Press the status key of the channel (DRUM, BASS,
OUTPUT
1 – 6, 7/8, 9/10) whose send level you want to
adjust.
The send level value of the selected channel will be
displayed.
DRUM BASS 1
2
3
4
5
6
7/8 9/10
7 Press the PLAY [R] key, and while the song plays
back, turn the dial to adjust the send level value.
The send level can be adjusted in a range of 0 – 100. As the
value is increased, the effect will be applied more deeply to
the selected channel.
MASTER
INSERT
EFFECT
8 Adjust the send level of other channels in the same
way as in steps 6 – 7.
ZOOM MRS-1044
27
Introductory tour
The [INPUT SOURCE] key will blink, and the display will
indicate "TRACK INPUT." This means that the insert
effect is inserted into the input mixer (the mixer section
that processes the input signal).
Step 4: Mixdown
H INT
0dB
The insert effect can also be inserted into any desired
channel of the mixer, to process the signal of the rhythm
section. For details refer to p.76.
3 Press the [EXIT] key.
You will return to the main screen.
Select a patch for the insert effect
4 Press the [EFFECT] key, and then press the
[MASTERING] key.
The MASTERING algorithm will be selected for the insert
effect.
5 Turn the dial to select a patch.
Introductory tour
For this example, select patch number 07 "WarmMst"
2 When you have finished adjusting the MASTER
fader, press the STOP [P] key to stop, and then
press the ZERO [U] key to return to the beginning
of the song.
3 Start recording on the external recorder connected
to the [OUTPUT] jack(s), and then press the PLAY
[R] key of the MRS-1044.
4 When you have finished recording, stop the
external recorder. Press the MRS-1044's STOP [P]
key to stop the song.
This completes the mixdown. Don't forget to save the
current project on the hard disk.
6 Press the PLAY [R] key to play back the song.
The entire song will pass through the insert effect and be
sent from the [OUTPUT] jacks. If desired, you can edit the
currently selected patch to make detailed adjustments to the
way in which the effect is applied (→ p.78).
H INT
When shipped from the factory, the hard disk contains a
project with a completed mix of all recorded tracks. (Project
name "Sample 4," project number 995.) For details on how
to load a project, refer to p.17.
N OTE
7
When you have finished selecting the patch, press
the [EXIT] key.
You will return to the main screen.
4-4: Perform the mixdown
Finally, you will record (mix down) the completed song
onto an external master recorder.
On the MRS-1044, the current project will be saved
automatically when you turn off the power or load another
project. For this reason, if you modify the mix after having
saved the project with its "completed" mix, you will be
unable to return to the original "completed" mix. To make
sure that you have preserved the completed mix, we
recommend that you either Protect that project (→ p.85) or
save the current mixer settings as a "scene"
(→ p.51).
1 Press the PLAY [R] key to play back the song, and
while you watch the level meter, adjust the overall
volume of the song as desired.
Adjust the MASTER fader while making sure that the 0 dB
dot of the L/R level meter does not light
28
ZOOM MRS-1044
Reference [Recorder]
This section explains the functions and operations of the MRS-1044's recorder section.
Moving to a desired location in
the song (Locate function)
Assigning marks within the
song (Marker function)
You can specify a location within the song in time (minutes
/ seconds / 10 ms) units or in measure (measure / beat /
tick) units, and move to that location.
You can assign up to 100 marks in a song at any desired
location, and locate to a mark by pressing a key or by
specifying the desired mark number. This is convenient when
you want to play back repeatedly from a specific location.
1. In the main screen, press the [TIME BASE] key in
the display section.
The time display and measure display will alternate each
time you press the [TIME BASE] key.
Minutes
The marker function can also be used to recall mixer
settings (scenes) at a desired location in a song (→ p.51).
Assigning a mark
Seconds
Hours
H INT
Milliseconds
Here's how to assign a mark at the desired location in a
song.
1. Find to the point at which you want to assign a
Measures
Beats
Ticks (48 ticks = 1 beat)
N OTE
Locate operations can be performed even if the rhythm
section is disconnected from the recorder section (i.e.,
when the [RHYTHM] key is lit). In this case, however, the
measure display will always be used.
If necessary, you can use the Scrub function to make fine
adjustments to the current location in 10 millisecond steps
(→ p.31).
H INT
A mark can be assigned either during playback or when
stopped.
2. Press the [MARK] key.
2. Make sure that the recorder is stopped, and press
the cursor [R] key once in the main screen.
The "M" character will blink for time display, and the
"MEASURE" indicator will blink for measure display.
A mark will be assigned to the current location. When a
mark has been assigned, the new mark number (01 – 99)
will appear in the MARKER area in the upper right of the
display.
3. Use the cursor [E]/[R] keys to move the blinking
area to the left or right, and turn the dial to specify
the location to which you want to move.
The time display can be changed in minutes/seconds/10
millisecond units, and the measure display can be changed
in measure/beat/tick units. When you change the value, you
will immediately move to the specified location.
You can now press the PLAY [R] key to begin playing
from the point to which you located.
ZOOM MRS-1044
The mark number is assigned automatically in ascending
order from the beginning of the song. If you add a new
mark between two existing marks, the subsequent marks
will be renumbered.
29
Reference [Recorder]
mark.
Assigning marks within the song (Marker function)
Add a mark
Deleting a mark
Mark number
Here's how to delete a mark that you assigned.
Song
1. Locate to the mark that you want to delete.
Mark number
The mark number displayed in the MARKER area is the
mark that will be deleted. However, it is not possible to
delete a mark unless the mark location exactly matches the
current location. Make sure that the dot at the lower right
of the mark number is lit.
Song
H INT
• Mark number 00 is already set at the beginning of the
song (the counter zero location).
• In the main screen, the MARKER area in the upper right
of the display will show the number of the mark that you
passed last (i.e., the previous mark in the song). If a dot
is shown at the lower right of the mark number, this
means that the mark location matches the current
location.
2. Press the [CLEAR] key.
The selected mark will be deleted, and subsequent marks
will be renumbered.
N OTE
• A deleted mark cannot be recovered.
• It is not possible to delete mark number "00" located at
the beginning of the song.
Locating to a mark location
Reference [Recorder]
Here's how to move to the location of a mark. This can be
done in two ways: you can use key operations, or specify
the mark number directly.
■ Using keys to locate
1. Press either the MARKER [U] or [I] key.
Each time you press the key, you will locate to the next
mark before or after the current location.
Mark
Current location
Song
■ Specifying the mark number to locate
1. In the main screen, press the cursor [E] key once.
The word MARKER will blink in the upper right of the
display.
2. Turn the dial to select the desired mark number.
As soon as the number is changed, you will locate to that
number.
30
ZOOM MRS-1044
Finding a desired location (Scrub/Preview function)
Finding a desired location
(Scrub/Preview function)
time display, or "TICK" for measure display) blink.
4. Turn the dial to the left or right to find the desired
The MRS-1044 provides a "Scrub" function that lets you
search for a desired location while repeatedly playing a
short region before or after the current location. This is
convenient when you want to accurately find the point at
which a specific sound starts or stops. When the Scrub
function is on, you can use the "Preview function" that
plays 0.7 seconds of the preceding or following sound
when you press the REW [T] or FF [Y] key. By using the
Scrub and Preview functions together, you can find the
desired location quickly and accurately.
N OTE
When the Scrub/Preview functions are being used, only
one of the tracks 1 – 10 can be played back.
location.
While scrub playback continues, the current location will
move forward or backward in 10 millisecond steps (for
time display) or one-tick steps (for measure display).
5. If you want to use the Preview function to hear the
region before the current location, press the REW
[ T ] key. To hear the region after the current
location, press the FF [Y] key.
If you press the REW [T] key, a region of 0.7 seconds
prior to the current location will play (ending at the current
location). If you press the FF [Y] key, a region of 0.7
seconds following the current location will play (beginning
at the current location). This is called "preview playback."
When preview playback ends, scrub playback will resume.
Using the Scrub/Preview functions
1. In the main screen, hold down the STOP [P] key
Preview playback
Preview playback
This turns on the Scrub function, and a short region (40
milliseconds by default) following the current location will
play back repeatedly.
6. To cancel the Scrub function, press the STOP [P]
Current location
key.
You will return to the main screen.
Track
Scrub playback
When the Scrub function is on, the SCRUB indicator will
appear in the lower right of the display.
Changing the settings of the Scrub
function
When the Scrub function is on, you can change the
direction of the scrub playback (whether it will play the
region before or after the current location), and the length
of the scrub playback region.
The track being "scrubbed"
1. In the main screen, hvold down the STOP [P] key
and press the PLAY [R] key.
Scrub function
is on
2. Press one of the status keys 1 – 6, 7/8, or 9/10 to
select the track that will be scrubbed.
This turns the Scrub function on, and the following screen
will appear. The characters in the lower left (TO/FRM)
indicate the direction of scrub playback, and the number in
the lower right (40 – 200) is the length of scrub playback.
For the stereo tracks (7/8, 9/10), the selection will alternate
between odd-numbered and even-numbered tracks each
time you press the status key.
3. Use the cursor [ E ]/[ R ] keys to make the unit
displayed at the right edge of the counter ("MS" for
ZOOM MRS-1044
Direction of scrub playback
Length of scrub playback
2. If you want to change the length of scrub playback,
31
Reference [Recorder]
and press the PLAY [R] key.
Current location
Finding a desired location (Scrub/Preview function)
use the cursor [E]/[R] keys to make the scrub
playback length setting blink, and turn the dial.
You can select 40, 80, 120, 160, or 200 (ms) as the length
of scrub playback.
H INT
You can also use the cursor [Q]/[W] keys to change the
scrub playback length.
3. If you want to change the direction of scrub
playback, use the cursor [E]/[R] keys to make the
scrub playback direction setting blink, and turn the
dial.
If you select "TO," scrub playback will begin from an
earlier point and end at the current location. If you select
"FRM," scrub playback will begin from the current
location (this is the default setting).
(Default setting)
Current location
Scrub playback
Current location
Scrub playback
Playing back repeatedly (A-B
Repeat function)
A-B Repeat is a function that repeatedly plays back a
desired region of the song. This is useful when you want to
listen to the same region repeatedly.
1. Locate to the point at which you want to begin
repeat playback, and press the [A-B REPEAT] key.
The [A-B REPEAT] key will blink, and the repeat start
location (point A) will be specified.
2. Locate to the point at which you want to end
repeat playback, and press the [A-B REPEAT] key.
The [A-B REPEAT] key will change from blinking to
solidly lit, and the repeat end location (point B) will be
specified.
N OTE
If you specify a point B that is located earlier than point A,
the region from points B → A will be played repeatedly.
Reference [Recorder]
H INT
H INT
The scrub function playback will be affected immediately
by any change you make to the scrub settings.
• If you want to re-make the point A/B settings, press the
[A-B REPEAT] key several times to make it go dark, and
then repeat steps 1 – 2 once again.
• Point A/B settings can be made when the recorder is
either stopped or playing.
4. If you want to use the new scrub playback settings
to find a location, use the cursor [E]/[R] keys to
move the blinking area to the unit displayed at the
right of the counter ("MS" for time display, or
"TICK" for measure display).
Turn the dial to the left or right, and the current location
will move backward or forward. For details on operating
the Scrub/Preview functions, refer to the preceding item.
3. To begin repeat playback, press the PLAY [R] key.
Repeat playback will begin when you press the PLAY [R]
key while the [A-B REPEAT] key is lit. Even after pressing
the STOP [ P ] key to stop playback, you can perform
repeat playback again as many times as desired, as long as
the [A-B REPEAT] key is lit.
4. To turn off repeat playback, press the [A-B
5. To exit the Scrub function, press the STOP [P] key.
You will return to the main screen.
REPEAT] key.
The [A-B REPEAT] key will go dark, and repeat playback
will be turned off.
N OTE
When the [A-B REPEAT] key goes dark, the programmed
point A/B locations will be erased.
32
ZOOM MRS-1044
Re-recording only a specified region (Punch-in/out function)
Re-recording only a specified
region (Punch-in/out function)
Punch-in/out is a function that lets you re-record just a
specified region of a previously recorded track. The action
of switching a currently-playing track to record mode is
called "punch-in," and the action of switching back from
recording to playback is called "punch-out."
The MRS-1044 provides two ways to do this. You can use
the panel keys or a foot switch (sold separately) to punchin/out manually ("manual punch-in/out"), or cause punchin/out to occur automatically at previously specified points
("auto punch-in/out").
N OTE
When you use punch-in/out to re-record, the previously
recorded material will be overwritten (replaced) by the
newly recorded material. If you plan to compare the
previous state with the result of punching-in/out, you must
capture that track beforehand as Undo data (→ p.44).
Here's how to use manual punch-in/out to re-record a
region of a previously recorded track.
H INT
If you want to use a foot switch (ZOOM FS01/FS02) to
punch-in/out, connect the foot switch to the rear panel
[FOOT SW] jack.
where you want to punch-in, and press the PLAY
[R] key to begin playback.
5. When you come to the punch-in location, press the
REC [O] key (or press the foot switch).
The REC [O] key will light, and recording will begin from
that location.
6. When you come to the punch-out location, press
the REC [O] once again (or press the foot switch
once again).
The REC [ O ] key will go dark, and recording will be
defeated from that point.
7. To stop the transport, press the STOP [P] key.
8. To check the newly recorded content, locate to the
point of step 4, and press the PLAY [R] key.
Using auto punch-in/out
Auto punch-in/out is a function that lets you specify
beforehand the region to be re-recorded. Punch-in will
occur automatically when you reach the starting location
(in point), and punch-out will occur automatically when
you reach the ending location (out point).
In point
Out point
N OTE
Track Playback
With the default settings of the MRS-1044, a foot switch
connected to the [FOOT SW] jack is set to start/stop song
playback. If you want to use the foot switch to punchin/out, you must first change the internal setting (→ p.92).
1. Repeatedly press the status key of the track on
which you want to punch-in/out, making the key
light red.
Recording
Playback
In order to perform auto punch-in/out, use the [AUTO
PUNCH-IN/OUT] key to first specify the In point and Out
point, and then perform the recording operation. The
procedure is as follows.
1. On the channel for the track that you want to rerecord, raise the fader to the 0 dB position.
2. Raise the fader of the corresponding channel to the
0 dB position.
2. While playing your instrument, use the [REC
LEVEL] control to adjust the recording level.
3. While playing your instrument, use the [REC
LEVEL] control to adjust the recording level.
As necessary, play back the recorder and use the faders of
the mixer section to adjust the mix balance of your
instrument and the playback of the tracks.
ZOOM MRS-1044
3. Locate to the point at which you want to punch-in,
and press the [AUTO PUNCH-IN/OUT] key.
The [AUTO PUNCH-IN/OUT] key will blink. This sets the
"In point" at which recording will begin.
33
Reference [Recorder]
Using manual punch-in/out
4. Locate to a point several measures earlier than
Re-recording only a specified region (Punch-in/out function)
9. When you are finished recording, press the STOP
[P] key.
Blinking
10. To check the recorded content, press the status
4. Locate to the point at which you want to punchout, and press the [AUTO PUNCH-IN/OUT] button
once again.
This sets the "Out point" at which recording will end. The
[AUTO PUNCH-IN/OUT] button will change from
blinking to solidly lit. This indicates that the auto punchin/out function is now enabled.
key of the track on which you punched-in/out,
making the status key light green. Then locate to a
point earlier than the In-point, and press the PLAY
[R] key.
If you want to re-do the recording, repeat steps 5 – 8.
11. When you are satisfied with the recording, press
the [AUTO PUNCH-IN/OUT] key.
Lit
H INT
If you want to specify the in/out points precisely, it is
convenient to use the Scrub function (→ p.31) to find the
locations and assign a mark (→ p.29) beforehand at the
desired locations.
5. Locate the recorder to a spot earlier than the In
Reference [Recorder]
point.
The [AUTO PUNCH-IN/OUT] key will go dark, and the
Auto Punch-in/out function will be turned off. (The In
point and Out point settings will be discarded.)
H INT
By using Auto Punch-in/out in conjunction with the A-B
Repeat function (→ p.32), you can automatically return to
the punch-in point after punching-out, and listen to the
recorded content. To do this, set the In/Out points, and
then set point A and point B outside this region, and enable
A-B Repeat.
6. Repeatedly press the status key for the track on
which you want to punch-in/out, until the key
blinks red.
N OTE
A status key that is lit red means that the current location is
between the In point and Out point. In this case, operate
the transport once again to locate to a point that is earlier
than the In point.
7. If you want to rehearse the auto punch-in/out,
press the PLAY [R] key.
The recorder will begin playing. When you reach the In
point, the track on which you are punching-in/out will be
muted. When you reach the Out point, muting will be
defeated. (You will always be able to monitor the input
signal during this time.) Performing this action will not
record anything on the track.
When you are finished rehearsing, move once again to a
location earlier than the In point.
8. To actually perform auto punch-in/out, hold down
the REC [O] key and press the PLAY [R] key.
When you reach the In point, recording will begin
automatically (punch-in). When you reach the Out point,
recording will end automatically, and playback will resume
(punch-out).
34
ZOOM MRS-1044
Using V-takes
Using V-takes
Each track 1 – 10 of the recorder contains ten virtual
tracks, called "V-takes." For each track, you can select one
take, which will be used for recording and playback. For
example, you can switch V-takes as you record multiple
vocal or guitar solos on the same track, and later compare
them and select the best V-take.
V-take currently selected
for each track 1–10
V-takes 1
2
3
4
5
6
7
8
9
10
Track
1
2
3
4
V-takes 5
6
7
8
9
10
Lit: Already-recorded V-take
Blinking: Currently selected V-take
Dark: Unrecorded V-take
Lit when the currently selected
V-take is already recorded
2. Use the cursor [E]/[R] keys to make the track
number blink, and turn the dial to select a track
(1 – 10).
Tracks
Switching V-takes
Here's how to switch the V-take used by each track 1 – 10.
H INT
Even for the stereo tracks (tracks 7/8 and 9/10) you can
select different V-takes for odd-numbered/even-numbered
tracks.
1. In the main screen, press the display section [VTAKE] key.
The [V-TAKE] key will light, and a screen will appear in
which you can switch the V-take for each track. In the
"TRxx-yy" indication, xx is the track number (1 – 10), and
yy is the V-take number (1 – 10) currently selected for that
track. The name of the V-take is displayed below "TRxxyy."
The level meter display area will show dots as
lit/blinking/dark to indicate the V-take currently selected
for each track, and the V-takes that have already been
recorded.
ZOOM MRS-1044
H INT
You can also use the status keys (1 – 6, 7/8, 9/10) to select
a track. When using status keys 7/8 and 9/10, the oddnumbered/even-numbered tracks will be selected
alternately each time you press the key.
3. Use the cursor [E]/[R] keys to make the V-take
number indicator blink, and turn the dial to select a
V-take (1 – 10).
As necessary, repeat steps 2 – 3 to switch V-takes for other
tracks as well.
V-takes that have already been recorded will be assigned a
default name as follows. These names can be edited as
desired. (See the following section.)
• GTRxx-yy: A V-take recorded through an insert effect
(algorithm= GUITAR/BASS)
• MICxx-yy: A V-take recorded through an insert effect
(algorithm= MIC)
• LINxx-yy: A V-take recorded through an insert effect
(algorithm= LINE)
• MASxx-yy: A V-take recorded through an insert effect
(algorithm= MASTERING)
• BYPxx-yy: A V-take recorded with the insert effect
bypassed
35
Reference [Recorder]
1 2 3 4 5 6 7/8 9/10
Using V-takes
• BOUxx-yy: A V-take recorded using the Bounce
function
* xx will be the track number (1 – 10), and yy will be the Vtake number (1 – 10).
H INT
If an unrecorded V-take is selected, the V-take name area
will indicate "NO DATA."
5. When you have finished inputting the name, press
the [EXIT] key.
The name will be updated, and you will return to the screen
of step 2. If necessary, you can now edit the V-take name of
another track.
6. When you have finished editing, press the [EXIT]
key.
4. When you have finished switching V-takes, press
the [EXIT] key.
You will return to the main screen.
H INT
The [V-TAKE] key will go dark, and you will return to the
main screen.
If all recorded data is erased from a V-take, the name will
revert to "NO DATA."
Editing the name of a V-take
A V-take that has been recorded will be automatically
assigned a default name, but you can edit this V-take name
as follows.
1. In the main screen, press the [V-TAKE] key.
Reference [Recorder]
A screen will appear in which you can switch the V-take of
each track.
2. Use the cursor [E]/[R] keys and the dial (or the
status keys) to select the track (1 – 10) for which
you want to edit the name of a V-take.
For details on how to select a track, refer to p.35.
H INT
• It is not possible to edit the name of an unrecorded Vtake (NO DATA).
• The V-take name can be edited only for the V-take that is
currently selected for each track 1 – 10.
3. Press the [EDIT] key.
The first character of the V-take name will blink.
4. Use the cursor [E]/[R] keys to move the blinking
location, and turn the dial to change the character.
The following characters can be selected.
Numerals: 0 – 9
Letters: A – Z, a – z
Symbols: (space) ! ” # $ % & ’ ( )
+,-./:;<=
>?@[ \ ]^_ { } ˜
36
ZOOM MRS-1044
Combining multiple tracks (Bounce function)
Combining multiple tracks
(Bounce function)
"Bounce" is a function that mixes the performances of the
recorder section and rhythm section (drum kit + bass
program), and records them on one or two tracks. (This is
sometimes called "ping-pong recording.") As an example,
we will explain how recorder tracks 1 – 8 and the rhythm
section can be mixed in stereo, and recorded on tracks 9/10.
Executing bounce recording
1. Press the status key of the bounce-destination
track (9/10) to make the key light red.
A maximum of two mono tracks or one stereo track can be
selected as the bounce-destination.
2. Press the [BOUNCE] key.
destination, the signal mixed to mono will be recorded.
• If necessary, you can play back all ten tracks, and
bounce them to the desired one or two tracks. For details
refer to the section that follows.
4. Press the STOP [P] key.
5. Press the ZERO [U] key to return to the beginning
of the song, and then hold down the REC [O] key
and press the PLAY [R] key.
Recording on track 9/10 will begin.
6. When you have finished recording, press the STOP
[P] key.
The Bounce function will be turned off.
Making settings for the Bounce function
You can change the settings of the Bounce function if
necessary.
3. Press the PLAY [R] key to play back the song, and
■ Specifying playback/mute for the recording
track(s)
adjust the mix balance of each track.
While watching the L/R level meters, adjust the DRUM,
BASS, 1 – 6, and 7/8 channel faders and the MASTER
faders so that the L/R level meters do not clip.
When the Bounce function is on, the signal that passes
through the MASTER fader will be output from the
[OUTPUT] jacks, and at the same time will be sent to the
bounce-destination track(s). Even if you are using the
insert effect or a send/return effect, the sound with the
effect(s) applied will be recorded on the bounce-destination
track(s).
By default, the bounce-destination recording track(s) will be
muted. If you want to play back all ten tracks simultaneously
while you bounce-record, use the following procedure to
change the internal setting so that the recording track(s) will
also play back.
1. In the main screen, press the [PROJECT/UTILITY]
key.
The display will indicate "PROJECT."
2. Use the cursor [E]/[R] keys to make the display
read "UTILITY BOUNCE," and press the [ENTER] key.
3. Use the cursor [E]/[R] keys to make the display
read "BOUNCE REC TR," and press the [ENTER] key.
The current setting will be displayed.
H INT
• If you turn the INPUT 1/2 [ON/OFF] keys on, you can mix
the input signals from the [INPUT 1] and [INPUT 2] jacks
into the bounce recording.
• MUTE : The recording track(s) will be muted (default
setting).
• PLAY : The recording track(s) will play back.
4. Turn the dial to change the setting to "PLAY."
• If you select only one mono track as the bounce-
ZOOM MRS-1044
37
Reference [Recorder]
The [BOUNCE] key will light, and the Bounce function
will be turned on.
Combining multiple tracks (Bounce function)
5. To return to the main screen, press the [EXIT] key
Track editing
several times.
■ Selecting the recording-destination V-take
By default, the result of the Bounce operation will be
recorded on the V-take that is currently selected for the
recording track(s). If you want to preserve the contents of
the recording track(s), you can use the following procedure
to change the recording-destination V-take.
H INT
For details on V-takes, refer to p.35.
1. In the main screen, press the [PROJECT/UTILITY]
key.
The display will indicate "PROJECT."
2. Use the cursor [E]/[R] keys to make the display
read "UTILITY BOUNCE," and press the [ENTER]
key.
Reference [Recorder]
3. Use the cursor [E]/[R] keys to make the display
read "BOUNCE REC TAKE," and press the [ENTER]
key.
The currently selected recording-destination V-take will be
displayed.
The audio data recorded on the tracks of the recorder can
be edited in a variety of ways, such as erasing portions of
it or copying it to other tracks. This section explains the
track editing functions.
H INT
• When using the track editing functions, the two tracks of
each stereo track (7/8, 9/10) are handled as separate
tracks.
• V-takes not currently selected for tracks 1 – 10 can also
be selected for editing.
N OTE
In general, recorded track data that was rewritten by an
editing operation cannot be recovered. If you plan to
compare the state of the data before and after editing, you
must Capture the state of that track (→ p.44).
Copying a specified region of data to
another location
A specified region of recorded data can be copied to any
location in any track. The data that was previously at the
copy-destination will be erased, and overwritten by the
copy-source data.
Copy-source data
Copy
• CURRENT : The bounce result will be recorded on the
V-take currently selected for the recording track.
• 1 – 10 : The bounce result will be recorded on the Vtake of the number you specify here.
4. Turn the dial to specify the recording-destination V-
Copy-destination track
1. In the main screen, press the [PROJECT/UTILITY] key.
The display will indicate "PROJECT."
take (CURRENT or 1 – 10).
2. Use the cursor [E]/[R] keys to make the display read
5. To return to the main screen, press the [EXIT] key
several times.
"UTILITY TR EDIT," and press the [ENTER] key.
The track edit menu will appear, from which you can select
the desired type of editing function.
3. Make sure that the display indicates "TR EDIT
COPY," and press the [ENTER] key.
A screen will appear in which you can specify the copysource track and V-take.
38
ZOOM MRS-1044
Track editing
4. Use the dial and cursor [Q]/[W] keys to specify the
copy-source track and V-take.
In "TR xx-yy," "xx" is the copy-source track number, and
"yy" is the V-take number. Use the dial to select the track
number (1 – 10), and use the cursor [Q]/[W] keys to select
the V-take number (1 – 10).
key, you can scrub-play the track and V-take you
specified in step 4. For details on using scrub-playback,
refer to p.31.
• The starting location can be specified only between the
beginning of the song and the last-recorded location (i.e.,
within the recorded data).
7. When you have finished specifying the starting
location, press the [ENTER] key.
A screen will appear in which you can specify the ending
location of the copy-source.
If you turn the dial toward the right when track 10 is
selected, the following screen will appear.
8. Specify the ending location of the copy-source in
the same way as in step 6.
5. Press the [ENTER] key.
9. When you have finished specifying the ending
A screen will appear in which you can specify the
beginning of the copy-source.
6. Use the cursor [E]/[R] keys to move the blinking
area in the display, and turn the dial to specify the
location.
The location can be specified in one of the following two ways.
location, press the [ENTER] key.
A screen will appear in which you can specify the copydestination track (and V-take).
10. Specify the copy-destination track and V-take in
the same way as in step 4.
A screen will appear in which you can specify the copydestination location.
• Specifying the location numerically
Move the blinking area to one of the M (minutes) / S
(seconds) / MS (millisecond) areas in the bottom of the
display, and turn the dial to edit the value of each unit.
• Assigning a previously-specified mark location
Move the blinking area to the MARKER area in the upper right
of the display, and turn the dial to specify the mark number.
11. Specify the copy-destination location in the same
way as in step 6, and press the [ENTER] key.
A screen will appear in which you can specify the number
of times (1 – 100) that the data will be copied.
H INT
• By pressing the [TIME BASE] key to switch to the
Measure display, you can specify the location in
measure/beat/clock units.
• By holding down STOP[P] and pressing the PLAY[R]
ZOOM MRS-1044
39
Reference [Recorder]
In this screen you can use the dial to specify two adjacent
odd-numbered/even-numbered tracks (1/2, 3/4, 5/6, 7/8,
9/10) as the copy-source. In this case, the V-takes currently
selected for the two selected tracks will automatically be
selected as the copy-source.
At this time, you can press the PLAY[R] key to play back
the region between the specified starting location and
ending location. If there is no recorded data at the specified
ending location, an "*" symbol will appear in the lower line
of the screen.
Track editing
12. Turn the dial to specify the number of times that the
data will be copied, and then press the [ENTER] key.
The display will indicate "TrCopy SURE?," asking you to
confirm the Copy operation.
13. To execute the Copy, press the [ENTER] key. To
cancel, press the [EXIT] key.
4. Use the cursor [ E ]/[ R ] keys and the dial to
specify the copy-source track/V-take, and press
the [ENTER] key.
A screen will appear in which you can specify the copydestination track/V-take. In "COPY TO TRxx-yy," the xx
value is the copy-destination track number, and the yy
value is the V-take number.
When you press the [ENTER] key and the copy is
completed, the display will indicate "COMPLETE." If you
then press [EXIT], you will return to the Track Edit menu
of step 2.
If you press the [EXIT] key in step 13, you will return to the
setting screen of step 11. If necessary, you can press the
[EXIT] key repeatedly to step backward through each screen.
In this screen, the dots of the level meter will be lit or unlit
as follows to indicate whether the currently selected V-take
has already been recorded or not.
Copying the data of an entire track
The recorded data of an entire track can be copied to
another track. The recorded data at the copy-destination
will be erased, and overwritten by the copy-source data.
Reference [Recorder]
Copy-source data
Copy
V-takes
1
2
3
4
5
6
7
8
9
10
Copy-destination track
Track
Blinking: the specified V-take
Lit: an already-recorded V-take
Dark: an unrecorded V-take
Lit if the currently specified
V-take has already been recorded
1. In the main screen, press the [V-TAKE] key.
The [V-TAKE] key will light, and a screen will appear in
which you can switch the V-take for each track.
2. Press the [PROJECT/UTILITY] key.
A menu will appear in which you can select operations that
edit the recorded data of an entire track.
5. Use the cursor [ E ]/[ R ] keys and the dial to
specify the copy-destination track/V-take, and
press the [ENTER] key.
The display will ask "COPY SURE?," asking you to
confirm the copy operation.
6. To execute the copy, press the [ENTER] key. To
cancel, press the [EXIT] key.
3. Repeatedly press the [PROJECT/UTILITY] key to
make the display read "COPY TRxx-yy."
In "COPY TRxx-yy," the xx and yy values respectively
indicate the copy-source track number and V-take.
When you press the [ENTER] key and the copy is
completed, you will return to the screen from step 1.
If you press the [EXIT] key, you will return to the setting
screen from step 4. If necessary, you can press the [EXIT]
key to step backward through each screen.
Moving a specified region of data to
another location
A specified region of recorded data can be moved to the
desired location of a desired track. The previous data at the
40
ZOOM MRS-1044
Track editing
move-destination will be erased, and overwritten by the
move-source data. When this operation is completed, the
move-source region will contain silence.
Move-source track
6. Use the cursor [E]/[R] keys to move the blinking area
in the display, and turn the dial to specify the location.
Move
Move-destination track
1. In the main screen, press the [PROJECT/UTILITY] key.
The location can be specified in one of the following two ways.
• Specifying the location numerically
Move the blinking area to one of the M (minutes) / S
(seconds) / MS (millisecond) areas in the bottom of the
display, and turn the dial to edit the value of each unit.
The display will indicate "PROJECT."
2. Use the cursor [E]/[R] keys to make the display
read "UTILITY TR EDIT," and press the [ENTER] key.
The track edit menu will appear.
3. Use the cursor [E]/[R] keys to make the display
read "TR EDIT MOVE," and press the [ENTER] key.
4. Use the dial and the cursor [Q]/[W] keys to specify
H INT
• By pressing the [TIME BASE] key to switch to the
Measure display, you can specify the location in
measure/beat/clock units.
• By holding down STOP[P] and pressing the PLAY[R]
key, you can scrub-play the track and V-take you
specified in step 4. For details on using scrub-playback,
refer to p.31.
the move-source track and V-take.
In "TR xx-yy," "xx" specifies the move-source track
number, and "yy" specifies the V-take number. Use the dial
to select the track number (1 – 10), and use cursor
[Q]/[W] keys to select the V-take number (1 – 10).
7. When you have finished specifying the starting
If you turn the dial toward the right when track 10 is
selected, the following screen will appear.
8. Specify the ending location of the move-source in
location, press the [ENTER] key.
A screen will appear in which you can specify the ending
location of the move-source.
the same way as in step 6.
At this time, you can press the PLAY[R] key to play back
the region between the specified starting location and
ending location. If there is no recorded data at the specified
ending location, an "*" symbol will appear in the lower line
of the screen.
In this screen you can use the dial to specify two adjacent
odd-numbered/even-numbered tracks (1/2, 3/4, 5/6, 7/8,
9/10) as the move-source. In this case, the V-takes
currently selected for the two selected tracks will
automatically be selected as the move-source.
9. When you have finished specifying the ending
location, press the [ENTER] key.
A screen will appear in which you can specify the movedestination track (and V-take).
5. Press the [ENTER] key.
A screen will appear in which you can specify the starting
location of the move-source.
ZOOM MRS-1044
41
Reference [Recorder]
A screen will appear in which you can specify the movedestination track and V-take.
• Assigning a previously-specified mark location
Move the blinking area to the MARKER area in the upper right
of the display, and turn the dial to specify the mark number.
Track editing
10. Specify the move-destination track and V-take in
the same way as in step 4.
A screen will appear in which you can specify the movedestination location.
read "TR EDIT ERASE," and press the [ENTER] key.
A screen will appear in which you can specify the track
and V-take from which data will be erased.
4. Use the dial and the cursor [Q]/[W] keys to specify
the track and V-take from which data will be
erased.
11. Specify the move-destination location in the same
way as in step 6, and press the [ENTER] key.
A screen will appear in which you can specify the number of
times (1 – 100) that the move-source region will be copied.
12. Turn the dial to specify the number of times that
the data will be copied, and press the [ENTER] key.
In "TR xx-yy," "xx" is the track number and "yy" is the Vtake number from which data will be erased. Use the dial to
select the track number (1 – 10), and use the cursor
[Q]/[W] keys to select the V-take number (1 – 10).
If you turn the dial toward the right when track 10 is
selected, the following screen will appear.
The display will ask "TrMove SURE?," asking you to
confirm the Move operation.
Reference [Recorder]
13. To execute the Move operation, press the [ENTER]
key. To cancel, press the [EXIT] key.
When you press the [ENTER] key and the Move operation
is completed, the display will indicate "COMPLETE." If
you then press the [EXIT] key, you will return to the Track
Edit menu of step 2.
If you press the [EXIT] key in step 13, you will return to
the setting screen of step 11. If necessary, you can press the
[EXIT] key repeatedly to step back through each setting
screen.
In this screen you can use the dial to specify two adjacent
odd-numbered/even-numbered tracks (1/2, 3/4, 5/6, 7/8,
9/10). In this case, data will be erased from the V-takes
currently selected for the two selected tracks.
5. Press the [ENTER] key.
A screen will appear in which you can specify the starting
location of the region that will be erased.
Erasing a specified region
This operation erases the recorded data from the specified
region, returning it to a silent (blank) state.
6. Use the cursor [E]/[R] keys to move the blinking
Erase
area in the display, and turn the dial to specify the
location.
The location can be specified in one of the following two
ways.
1. In the main screen, press the [PROJECT/UTILITY] key.
The display will indicate "PROJECT."
2. Use the cursor [E]/[R] keys to make the display
read "UTILITY TR EDIT," and press the [ENTER]
key.
The Track Edit menu will appear.
3. Use the cursor [E]/[R] keys to make the display
42
• Specifying the location numerically
Move the blinking area to one of the M (minutes) / S
(seconds) / MS (millisecond) areas in the bottom of the
display, and turn the dial to edit the value of each unit.
• Assigning a previously-specified mark location
Move the blinking area to the MARKER area in the upper
right of the display, and turn the dial to specify the mark
number.
ZOOM MRS-1044
Track editing
which you can switch the V-take of each track.
H INT
• By pressing the [TIME BASE] key to switch to the
Measure display, you can specify the location in
measure/beat/clock units.
• By holding down STOP[P] and pressing the PLAY[R]
key, you can scrub-play the track and V-take you
specified in step 4. For details on using scrub-playback,
refer to p.31.
7. When you have finished specifying the starting
location, press the [ENTER] key.
2. Press the [PROJECT/UTILITY] key.
A menu will appear in which you can edit recorded data in
units of entire tracks.
3. Repeatedly press the [PROJECT/UTILITY] key to
make the display indicate "ERASE TRxx-yy."
In "ERASE TRxx-yy," the xx and yy values respectively
indicate the track number and V-take number that will be
erased.
A screen will appear in which you can specify the ending
location of the region to be erased.
H INT
8. Specify the ending location of the region to be
erased in the same way as in step 6.
9. When you have finished specifying the ending
location, press the [ENTER] key.
The display will ask "TrErase SURE?," asking you to
confirm the Erase operation.
10. To execute the Erase operation press the [ENTER]
key. To cancel, press the [EXIT] key.
When you press the [ENTER] key and the Erase operation has
been completed, the display will indicate "COMPLETE." If
you then press the [EXIT] key, you will return to the Track
Edit menu from step 2.
If you press the [EXIT] key in step 9, you will return to the
setting screen from step 7. If necessary, you can press the
[EXIT] key repeatedly to step back through each setting screen.
4. Use the cursor [ E ]/[ R ] keys and the dial to
specify the track/V-take that will be erased, and
press the [ENTER] key.
The display will indicate "ERASE SURE?," asking you to
confirm the Erase operation.
5. Press the [ENTER] key to execute the Erase
operation, or press the [EXIT] key to cancel.
When you press the [ENTER] key and the Erase operation
has been completed, you will return to the screen from step 1.
If you press the [EXIT] key, you will return to the screen
from step 3. If necessary, you can press the [EXIT] key to
step back through each screen.
Exchanging the data of entire tracks
You can exchange the recorded data of two specified
tracks/V-takes.
Exchange
Erasing the data of an entire track
You can erase all recorded data from a specified track. The
erased track will revert to an unrecorded state.
Erase
1. In the main screen, press the [V-TAKE] key.
1. In the main screen, press the [V-TAKE] key.
The [V-TAKE] key will light, and a screen will appear in
which you can switch the V-take of each track.
2. Press the [PROJECT/UTILITY] key.
The [V-TAKE] key will light, and a screen will appear in
ZOOM MRS-1044
43
Reference [Recorder]
At this time, you can press the PLAY[R] key to play back
the region between the specified starting location and
ending location. If there is no recorded data at the specified
ending location, an "*" symbol will appear in the lower line
of the screen.
In this screen, the lit/unlit state of the dots in the level meter
will indicate whether the currently specified V-take has
already been recorded. For details refer to p.40.
Track editing
A menu will appear in which you can edit recorded data in
units of entire tracks.
3. Repeatedly press the [PROJECT/UTILITY] key to
make the display indicate "EXCHG TRxx-yy."
In "EXCGH TRxx-yy," the xx and yy values respectively
indicate the track number and V-take number that will be
exchanged with another track/V-take.
4. Use the cursor [ E ]/[ R ] keys and the dial to
specify the track/V-take that you want to
exchange, and press the [ENTER] key.
A screen will appear in which you can specify the other
track/V-take with which the first will be exchanged. In
"ExchgTo TRxx-yy," the xx and yy values respectively
indicate the track number and V-take number.
Capturing the recorded contents
of a track
The MRS-1044 lets you capture the recorded data of a
desired track, and temporarily store it on the hard disk. The
captured data can be swapped (exchanged) with a current
track when needed.
For example if you capture a track before performing
punch-in/out recording on that track, you can repeat the
Swap operation to compare its original state with the
results of punch-in/out recording.
◆ Capture
Recorded data
Recorder
Track 1
Track 2
Track 3
Capture
track 1
◆ Swap
Data captured from track 1
Re-recorded region
Reference [Recorder]
Recorder
Track 1
Track 2
Track 3
H INT
In this screen, the lit/unlit state of the dots in the level meter
will indicate whether the currently specified V-take has
already been recorded. For details refer to p.40.
5. Use the cursor [ E ]/[ R ] keys and the dial to
specify the other track/V-take for the exchange,
and press the [ENTER] key.
The display will indicate "EXCHG SURE?", asking you to
confirm the Exchange operation.
6. Press the [ENTER] key to execute the Exchange
operation, or press the [EXIT] key to cancel.
When you press the [ENTER] key and the Exchange
operation has been completed, you will return to the screen
from step 1.
If you press the [EXIT] key, you will return to the screen
from step 4. If necessary, you can press the [EXIT] key to
step back through each screen.
44
Capture
track 1
Data captured from track 1
Recorder
Track 1
Track 2
Track 3
Capture
track 1
Capturing a track
Here's how to select and capture a desired track.
1. In the main screen, press the [UNDO/REDO] key.
A screen will appear in which you can select the track to be
captured.
ZOOM MRS-1044
Capturing the recorded contents of a track
2. Press one of the status keys (1 – 6, 7/8, 9/10) or use
the dial to select the track to be captured.
N OTE
It is not possible to capture a track that has not yet been
recorded.
3. Press the [ENTER] key.
The display will ask "CAPTURE SURE?"
4. To execute the Capture operation, press the
[ENTER] key once again.
When the capture is completed, the display will indicate
"SWAP," and you will be able to execute the Swap
operation for that track.
3. Press the [ENTER] key.
The display will ask "SWAP SURE?"
4. To execute the Swap operation, press the [ENTER]
key once again.
The recorded data of the selected track will be exchanged
with the previously captured recorded data. The recorded
data of the selected track will be saved as capture data on
the hard disk until the project is saved.
H INT
You can return to the previous state by immediately
executing Swap a second time.
5. Press the [EXIT] key.
You will return to the main screen.
5. Press the [EXIT] key.
You will return to the main screen.
H INT
If necessary, you can repeat steps 2 – 4 to capture multiple
tracks.
Reference [Recorder]
N OTE
The captured data will be erased from the hard disk when
the currently selected project is saved.
Swapping with the captured data
Here's how to swap (exchange) the captured data with the
current recorded data of a track.
1. In the main screen, press the [UNDO/REDO] key.
2. Press one of the status keys (1 – 6, 7/8, 9/10) or use
the dial to select a track that was previously
captured.
When a captured track is selected, the display will indicate
"SWAP."
H INT
If you select a track that has not been captured, the display
will indicate "CAPTURE."
ZOOM MRS-1044
45
Reference [Mixer]
This section explains the functions and operation of the two mixers built into the MRS-1044.
■ Track mixer
About the mixer
The mixer of the MRS-1044 is divided into two sections:
an "input mixer" that processes the input signals from the
[INPUT 1/2] jacks, and a "track mixer" that processes the
signals from the tracks of the recorder section and from the
rhythm section. Details of each mixer are described below.
In the track mixer you can process the playback signals of
the recorder tracks (1 – 6, 7/8, 9/10) and the sound of the
drum kit / bass program of the rhythm section, and mix
these signals to stereo. The signal mixed by the track mixer
is output via the MASTER fader from the [OUTPUT]
jacks.
Recorder
■ Input mixer
In the input mixer you can adjust the sensitivity of the
signals that are input from the [INPUT 1/2] jacks, set
various parameters such as pan and send levels to the
send/return effects, and assign the signals to the recorder
tracks.
OUTPUT
Track 1
Track 2
Track 3
Track 4
Track 5
Track 6
Track 7/8
Track 9/10
Rhythm section
Recorder
INPUT
Reference [Mixer]
Track 1
Track 2
Track 3
Track 4
Track 5
Track 6
Track 7/8
Track 9/10
Input mixer
The parameters that can be adjusted in the input mixer are
listed in the following table.
Input mixer parameters
Parameter
DRUM
BASS
Track mixer
Channel DRUM BASS 1
2
3
4
5
6
7/8 9/10
MASTER
In the track mixer, the signals that are output from each
track are handled in units called "channels." The
parameters that can be adjusted for each channel (DRUM,
BASS, 1 – 6, 7/8, 9/10) are listed in the table below.
Content
CHO SEND
Volume sent to chorus/delay (send/return effect)
REV SEND
Volume sent to reverb (send/return effect)
PAN
Left/right position (L/R channel balance)
REC LVL
Volume of the input signal (position of the [REC LEVEL] control)
H INT
The DRUM, 7/8, and 9/10 channels are each stereo
channels that respectively process the output signals from
the drum kit, stereo tracks 7/8, and 9/10. The parameters of
these stereo channels are linked.
Track mixer parameters
Parameter
Content
EQ HI G
Amount of boost/cut for high-range EQ
EQ HI F
Frequency at which high-range EQ will boost/cut
EQ LO G
Amount of boost/cut for low-range EQ
EQ LO F
Frequency at which low-range EQ will boost/cut
CHO SEND
Volume sent to chorus/delay (send/return effect)
REV SEND
Volume sent to reverb (send/return effect)
PAN
Left/right position (L/R channel balance)
FADER
Volume of each channel (fader position)
ST LINK
Link the parameters of the odd/even-numbered channels
46
DRUM/BASS
Channel
1–6
7/8, 9/10 MASTER
ZOOM MRS-1044
Basic operation of the input mixer
Basic operation of the input
mixer
Assigning input signals to recording
tracks
Here's how the signals that are input from the [INPUT
1]/[INPUT 2] jacks can be sent to a recording track, and
their recording levels can be adjusted.
1. Make sure that the instrument or mic that you want
to record is connected to the [INPUT 1]/[INPUT 2]
jack(s).
2. Press the [ON/OFF] key of the jack(s) (INPUT 1/2)
to which you connected your instrument, to make
the key light.
The [ON/OFF] key enables and disables the jack. When a
key is lit, the corresponding jack is enabled.
parameters, you should once again check whether the
recording level is appropriate.
• The precise setting of the REC LEVEL parameter can be
checked by pressing the TRACK PARAMETER section
[PAN] key → INPUT 1 or 2 [ON/OFF] key → cursor [W]
key.
6. Press the status key for the recording-destination
track (1 – 6, 7/8, 9/10) to make the key light red,
putting the track in record-ready mode.
The input signal from the input mixer will be sent to the
recording track. You can select record-ready mode for any
one mono track 1 – 6, any one stereo track (7/8, 9/10), or
any two mono tracks (only the track pairs 1/2, 3/4, or 5/6).
The signal flow from the input mixer to the track will
change as follows, depending on the number of selected
recording tracks and on the state of the INPUT 1/2
[ON/OFF] keys.
●
3. While playing your instrument, turn the [INPUT 1]/
When two mono tracks or a stereo track is
selected as the recording track
[INPUT 2] control(s) to adjust the input sensitivity.
Recorder
INPUT 1
or
INPUT 2
Track
Reference [Mixer]
Make adjustments so that the [PEAK] indicator flickers
slightly when you play your instrument at its loudest
volume.
Track
4. If you will be recording the sound through the
insert effect, select an insert effect patch as
necessary.
With the default settings of a project, the insert effect is
inserted into the input mixer, and a patch suitable for
guitar/bass recording is selected. (For details on how to
select a different patch, refer to p.77.)
If you want to record without sending the sound through the
insert effect, press the effect section [BYPASS/TUNER]
key to bypass the insert effect.
5. While playing your instrument, turn the [REC
LEVEL] control to adjust the recording level.
The [REC LEVEL] control adjusts the signal level before it
is sent to the recording track (i.e., after it has passed
through the insert effect). The [CLIP] indicator will light if
the signal clips.
Recorder
INPUT 1
Track
Track
INPUT 2
●
When one mono track is selected as the
recording track
INPUT 1
or
INPUT 2
INPUT 1
Recorder
Track
Recorder
Track
H INT
INPUT 2
• Adjust the [REC LEVEL] control as high as possible
without allowing the [CLIP] indicator to light.
• The level of the signal sent to the recording track will
change according to the settings of the insert effect
parameters. If you switch insert effect patches or edit the
ZOOM MRS-1044
47
Basic operation of the input mixer
●
When a recording track has not been selected
INPUT 1
or
INPUT 2
H INT
For details on selecting a send/return effect patch, refer to
p.81.
MASTER fader
OUTPUT
L
Track mixer
2. Press the INPUT 1 (or INPUT 2) [ON/OFF] key.
The input mixer (INPUT) will be selected for operations.
R
INPUT 1
H INT
MASTER fader
INPUT 2
OUTPUT
L
The CHORUS/DELAY SEND parameter and REVERB SEND
parameter are common to both INPUT 1/2 input signals.
Track mixer
R
3. Turn the dial to edit the value.
Increasing the value will deepen the effect. The range and
default value of each parameter are as follows.
N OTE
The diagrams above show the signal flow when the insert
effect has not been inserted into the input mixer. For details
on the signal flow when the insert effect is inserted, refer to
p.77.
Reference [Mixer]
Adjusting the depth of the send/
return effects
The depth of the send/return effects can be adjusted by
setting the volume (send level) of the signal that is sent from
the input mixer to each send/return effect (chorus/delay,
reverb).
In normal operation, sending the signal from the input
mixer to the send/return effect will only apply the effect to
the signal that is sent from the [OUTPUT] jacks, and will
not affect the signal that is recorded on a track.
1. Press the TRACK PARAMETER section [CHORUS/
DELAY SEND] key or [REVERB SEND] key to select
one of the send/return effects.
Press the [CHORUS/DELAY SEND] key to adjust the
chorus/delay depth, or press the [REVERB SEND] key to
adjust the reverb depth. The following illustration shows
the screen that will appear when the [CHORUS/DELAY
SEND] key is pressed.
• REVERB SEND : 0 – 100 (Default: 0)
• CHORUS/DELAY SEND : 0 – 100 (Default: 0)
H INT
• When the CHORUS/DELAY SEND parameter is displayed,
pressing the [CHORUS/DELAY SEND] key will cause the
signal sent from the input mixer to chorus/delay to be
switched on/off. (The key will be dark when this is off.)
• In the same way, when the REVERB SEND parameter is
displayed, pressing the [REVERB SEND] key will cause
the signal sent from the input mixer to reverb to be
switched on/off.
4. When you have finished making settings, press the
[EXIT] key.
You will return to the main screen.
Adjusting the pan/balance
Here's how to adjust the pan (stereo position) of the signal
sent from the input mixer to the [OUTPUT] jacks or
recording tracks, or the balance (the volume balance
between two channels).
1. Press the [PAN] key.
A screen will appear in which you can adjust the PAN
parameter.
Parameter
48
Value
ZOOM MRS-1044
Basic operation of the track mixer
Basic operation of the track
mixer
2. Press the INPUT 1 (or INPUT 2) [ON/OFF] key.
The input mixer will be selected for pan adjustments.
Adjusting the volume/pan/EQ
3. Turn the dial to edit the value of the PAN parameter.
For each channel, you can adjust the volume, pan (stereo
position between the L/R channels of the [OUTPUT] jack),
and EQ (equalizer).
The PAN parameter can be adjusted in a range of L100 (far
left) – 0 (center) – R100 (far right).
1. To adjust the volume (output level) of a channel,
4. When you have finished adjusting the pan, press
operate the fader of the corresponding channel
(DRUM, BASS, 1 – 6, 7/8, 9/10).
the [EXIT] key.
You will return to the main screen.
The function of the PAN parameter will change as follows,
depending on the number of input jacks that are currently
turned on, and on the number of recording tracks that are
currently selected.
• When two mono tracks or a stereo track is
selected as the recording track
For the signal that is sent from the input mixer to the pair
of odd-numbered/even-numbered tracks, the PAN
parameter will adjust the pan (if either but not both INPUT
1 and 2 are enabled) or the balance (if both INPUT 1 and 2
are enabled).
• When one mono track is selected as the
recording track
The PAN parameter will have no effect.
• To check the precise setting of the volume (FADER
parameter), press the following sequence of keys:
TRACK PARAMETER section [PAN] key → cursor [W] key
→ status key of the desired channel.
• You can check the MASTER fader setting by pressing
any TRACK PARAMETER key → MASTER status key.
2. To adjust the pan of a channel, press the TRACK
PARAMETER section [PAN] key, and then press one
of the status keys (DRUM, BASS, 1 – 6, 7/8, 9/10) to
select the desired channel.
A screen will appear in which you can adjust the PAN
parameter of the selected channel.
3. Turn the dial to adjust the value of the PAN
parameter.
The range is L100 (far left) – 0 (center) – R100 (far right).
If you want to continue and adjust the pan of another
channel, repeat steps 2 – 3.
H INT
• For channels 7/8, 9/10, and DRUM, the PAN parameter is
used to adjust the balance (the volume balance of the left
and right channels).
• In the parameter screen you can also use the cursor
[ Q ]/[ W ] keys to select parameters, and the cursor
[E]/[R] keys to switch channels.
4. To adjust the EQ, press the [EQ HIGH] key or [EQ
LOW] key.
Press the [EQ HIGH] key to adjust the high-range tone, or
the [EQ LOW] key to adjust the low-range tone.
ZOOM MRS-1044
49
Reference [Mixer]
• When no recording track is selected
For the signal that is sent from the input mixer to the L/R
channels of the [OUTPUT] jacks, the PAN parameter will
adjust the pan (if either but not both INPUT 1 or 2 are
enabled) or the balance (if both INPUT 1 and 2 are
enabled).
H INT
Basic operation of the track mixer
H INT
At this time, your editing will affect the channel that was
last selected in steps 2 – 3. As necessary, use the statue
keys or the cursor [E]/[R] keys to switch channels.
5. Use the cursor [ Q ]/[ W ] keys to select the EQ
parameter that you want to adjust, and turn the dial
to edit the value.
The parameters that can be selected and their ranges are as
follows.
Adjusting the effect depth
Here's how to adjust the effect depth by setting the volume
that is sent from each channel to the send/return effects
(chorus/delay, reverb).
1. Press the TRACK PARAMETER section [CHORUS/
DELAY SEND] key or [REVERB SEND] key to select
a send/return effect.
2. Press one of the status keys (DRUM, BASS, 1 – 6,
■
If you pressed the [EQ HIGH] key first
• EQ HI G : Adjust the amount of high-range boost/cut.
Range: -12 – 0 – 12 (dB), Default: 0
• EQ HI F : Adjust the frequency at which the high-range
boost/cut will occur.
Range: 500 – 18000 (Hz), Default: 8000
■
If you pressed the [EQ LOW] key first
• EQ LO G : Adjust the amount of low-range boost/cut.
Range: -12 – 0 – 12 (dB), Default: 0
• EQ LO F : Adjust the frequency at which the low-range
boost/cut will occur.
Range: 40 – 1600 (Hz), Default: 125
7/8, 9/10) to select the desired channel.
The corresponding channel will be selected for operations.
3. Turn the dial to edit the value.
The effect will apply more deeply as you increase the
value. The range and default setting of each parameter are
as follows.
Reference [Mixer]
• REV SEND : 0 – 100 (Default: 0)
• CHO SEND : 0 – 100 (Default: 0)
H INT
H INT
• When the EQ HI G / EQ HI F screens are displayed, you
can press the [EQ HIGH] key to switch the high-range EQ
on/off. (The key will be dark when off.)
• When the EQ LO G / EQ LO F screens are displayed, you
can press the [EQ LOW] key to switch the low-range EQ
on/off. (The key will be dark when off.)
6. Repeat steps 4 – 5 to adjust settings in the same
When the CHORUS/DELAY SEND or REVERB SEND
parameters are displayed, you can use the [CHORUS/
DELAY SEND] key or [REVERB SEND] key as an on/off
switch for the signal that is sent from that channel to the
reverb or chorus/delay. For details refer to p.48.
4. When you have finished adjusting settings, press
the [EXIT] key.
You will return to the main screen.
Linking odd-numbered/even-numbered
channels
way for another range or EQ parameter.
7. When you have finished adjusting settings, press
the [EXIT] key.
You will return to the main screen.
Adjacent odd-numbered → even-numbered mono channels
(1/2, 3/4, 5/6) can be linked. (This is referred to as "stereo
link.") The parameters of two stereo-linked channels will
operate in tandem in the same way as channels 7/8 or 9/10.
1. Press the TRACK PARAMETER section [PAN] key.
50
ZOOM MRS-1044
Saving/recalling mixer settings (Scene function)
2. Press the status key (1 – 6) for one of the two
channels that you want to stereo-link.
3. Press the cursor [W] key twice.
The ST LINK (stereo link) parameter screen will appear.
Saving/recalling mixer settings
(Scene function)
The current mixer and effect settings can be saved as a
"scene" in a special area of memory, and recalled either
manually or automatically when desired. This is convenient
when you want to compare various mixes, or when you
want to automate mix operations.
A scene contains the following data.
4. Turn the dial to switch the setting on.
Stereo linking will be enabled for the selected channel and
the adjacent odd-numbered/even-numbered channel. To
defeat stereo link, turn this parameter off (oFF).
5. Press the [EXIT] key.
You will return to the main screen.
H INT
N OTE
• To adjust the volume of stereo-linked channels, use the
odd-numbered fader. (The even-numbered fader will have
no effect.)
Up to 100 different scenes can be stored in memory. Scene
data stored in memory is saved on the internal hard disk as
part of the currently selected project.
Saving a scene
Here's how to save the current settings as a scene.
1. Press the [SCENE] key, and use the cursor
[E]/[R] keys to make the display read "SCENE
SAVE."
The right side of the display will indicate the scene number
(0 – 99) in which the data will be saved.
• The parameters as well as the status keys of 2 stereolinked channels will operate in tandem.
N OTE
When you save a scene for the first time, pressing the
[SCENE] key will automatically access the "SCENE SAVE"
screen.
2. Turn the dial to select the number (0 – 99) in which
the scene will be saved.
Numbers in which a scene is already saved are indicated by
an asterisk "*" at the left.
3. To save the scene, press the [ENTER] key.
The scene will be saved in the selected number. To return
to the main screen, press the [ENTER] key.
ZOOM MRS-1044
51
Reference [Mixer]
The PAN parameter of two stereo-linked channels will
function as a BALANCE parameter that adjusts the volume
balance between the odd-numbered / even-numbered
channels.
• Input mixer (except for the REC LEVEL parameter) and
track mixer settings
• MASTER fader setting
• The state of all status keys
• The patch number currently used by the insert effect
and the send/return effects
Saving/recalling mixer settings (Scene function)
N OTE
If you select a scene that has already been saved, and
execute this operation, the previously saved scene will be
overwritten.
N OTE
It is not possible to access the above screen if no scene
has been saved in memory.
2. Turn the dial to select the number (0 – 99) of the
Recalling a saved scene
Here's how to recall a scene that was saved to memory.
1. Press the [SCENE] key, and use the cursor
[E]/[R] keys to make the display read "SCENE
CALL."
The right side of the display will indicate the scene number
that will be recalled.
scene that you want to delete.
Only scene numbers for which data has been stored in
memory can be selected.
3. To delete the selected scene, press the [ENTER]
key.
The scene will be deleted, and you will return to the main
screen. If you press the [EXIT] key instead of the
[ENTER] key, you will return to the main screen without
deleting.
Switching scenes automatically
N OTE
It is not possible to access the above screen if no scene
has been saved in memory.
By assigning a scene to a mark that was placed at a desired
location in the song, you can cause scenes to switch
automatically. This is convenient when you want to change
the mix as the song progresses. Refer to p.29 for more
about marks.
2. Turn the dial to select the scene number (0 – 99)
Reference [Mixer]
that you want to recall.
Only scene numbers for which data has been stored in
memory can be selected.
1. While playing back the song from the beginning,
create the mix that will be the starting point, and
save it in a scene.
For details on scene operations, refer to p.51.
3. To recall the selected scene, press the [ENTER]
key.
The scene will be selected, and you will return to the main
screen. If you press the [EXIT] key instead of the
[ENTER] key, you will return to the main screen without
recalling.
Deleting a scene
Here's how to delete a scene that was stored in memory.
1. Press [SCENE], and use the cursor [E]/[R] keys
2. Make sure that the transport is stopped, and press
the ZERO [U] key to locate to the beginning of the
song.
The beginning of the song (counter zero location) already
contains mark number zero. First you will assign the
starting scene to this mark.
3. Press the [MARK] key.
When you press the [MARK] key at a location where a
mark has been assigned, a screen will appear in which you
can assign a scene to the corresponding mark.
to make the display indicate "SCENE DEL."
The right side of the display will indicate the scene number
for deletion.
52
ZOOM MRS-1044
Saving/recalling mixer settings (Scene function)
H INT
11. Using the procedure from steps 6 – 10, assign a
• If you press the [MARK] key at a location where a mark
has not yet been assigned, a new mark will be assigned
to that location.
mark to each point at which you want the mix to
change, and assign a scene to each of these
marks.
• If a dot is shown at the lower right of the mark number,
this means that the mark matches the current location.
12. When you have assigned the desired scenes to the
4. Turn the dial to select the number of the scene you
saved in step 1 (the scene that will be the starting
point of the mix).
The scene will be assigned to the mark, and at the same
time the selected scene will be recalled. The following
screen shows an example of when mark number 0 is
assigned to scene number 1.
marks, press the ZERO [U] key to locate to the
beginning of the song, and press the PLAY [R] key
to play back.
Each time the song reaches the location of a mark to which
a scene has been assigned, that scene will be recalled.
H INT
To cancel a scene assignment, turn the dial to make the
display indicate "--".
Reference [Mixer]
5. Press the [EXIT] key.
You will return to the main screen.
6. Locate the point at which you want the mix to
change, and assign a mark.
7. While playing back the song from that point, create
the new mix, and save it in a scene.
8. Use the MARKER [U]/[I] keys to locate to the
mark you assigned in step 6, and press the [MARK]
key.
A screen will appear, allowing you to assign a scene to the
mark you selected in step 6.
9. Turn the dial to select the number of the scene you
saved in step 7.
10. Press the [EXIT] key.
You will return to the main screen.
ZOOM MRS-1044
53
Switching the level meter display type
Switching the level meter
display type
With the MRS-1044's default settings, the level meters
displayed in the center of the screen will indicate the level
of the signals that have passed through the [REC LEVEL]
controls/faders (post-fader). If necessary, however, you can
switch the meters so that they indicate the level of the
signals before they pass through the [REC LEVEL]
controls/faders (pre-fader).
1. In the main screen, press the [PROJECT/UTILITY]
key.
The display will indicate "PROJECT."
2. Use the cursor [E]/[R] keys to make the display
read "UTILITY SYSTEM," and press the [ENTER]
key.
3. Use the cursor [E]/[R] keys to make the display
read "UTILITY LVL MET," and press the [ENTER]
key.
Reference [Mixer]
4. Turn the dial to change the setting to "PRE" (prefader).
To return the setting to post-fader, select "POST."
5. Press the [EXIT] key several times.
You will return to the main screen.
54
ZOOM MRS-1044
Reference [Rhythm]
This section explains the functions and operation of the rhythm section, which uses internal drum sounds and bass sounds to
generate backing performances.
About the rhythm section
The "rhythm section" of the MRS-1044 contains drum
sounds and bass sounds, and can be used as a drum + bass
machine. The rhythm section can be operated in
synchronization with the recorder section, or operated
independently. Here we will explain the basic concepts and
terms that you need to know in order to use the rhythm
section.
■ Drum kits and bass programs
The accompaniment created by the rhythm section is
produced by a "drum kit" and a "bass program."
The drum kit is a set of 24 drum/percussion sounds such as
kick, snare, and conga, and the MRS-1044 contains 31
different drum kits. You can select one of these drum kits,
and use the front panel pads 1 – 8 to manually play each
sound, or use them as a sound generator for accompaniment.
An example of drum sounds assigned to pads
Bass program
Drum kit
DRUM BASS 1
2
3
Rhythm section
Mixer section
■ Rhythm patterns and the drum/bass tracks
A newly created project contains 255 accompaniment
patterns (each several measures long) with drum/bass
performance data. These accompaniment patterns are
called "rhythm patterns."
Inside each rhythm pattern, the area that holds the drum
performance data is called the "drum track," and the area
that holds the bass performance data is called the "bass
track."
Recorder
Track
A bass program is a single bass sound, such as an electric
bass or acoustic bass. You can choose one of the 16
different bass sounds built into the MRS-1044, and use the
front panel pads 1 – 8 to play a scale, or use it as a sound
generator for accompaniment.
Rhythm
section
1
2
Rhythm
pattern
Drum track
Bass track
3
4
Rhythm
pattern
Drum track
Bass track
An example of a bass program scale assigned to the pads
Bass program
You can edit a portion of a rhythm pattern, or erase the
entire recorded content and create an entirely original
rhythm pattern. The rhythm patterns you modify are saved
on the hard disk together with the other rhythm patterns as
part of the project.
■ Rhythm songs
Multiple rhythm patterns arranged in a desired order of
ZOOM MRS-1044
55
Reference [Rhythm]
Drum kit
The output signal from the drum kit (stereo) and the output
signal from the bass program (mono) are internally
connected to the DRUM channel and BASS channel of the
mixer section. For each, you can independently adjust the
volume, pan/balance, and EQ, and apply send/return
effects.
About the rhythm section
playback are collectively called a "rhythm song." In a
rhythm song, you can program the rhythm pattern data,
bass track chord data, and tempo data to create the
accompaniment for an entire song. A project can use only
one rhythm song.
Playing rhythm patterns
This section explains how to play rhythm patterns, how to
change the tempo, and how to change the drum kit or bass
program.
Patterns in the project
Pattern A
Pattern B
Pattern C
Pattern D
Pattern E
Selecting and playing a rhythm pattern
Here's how to select and play one of the 255 rhythm
patterns.
Rhythm song
Measure
number
1
N OTE
2
Pattern A
Drum track
Bass track
Chords
Am
3
4
Pattern E
Drum track
Bass track
Dm7
G7
5
6
Pattern B
Drum track
Bass track
Before you continue with the following procedure, make
sure that the DRUM, BASS, and MASTER faders of the
panel are raised, and that the DRUM and BASS status keys
are lit.
C
1. In the main screen, press the [PATTERN] key.
■ Rhythm Pattern mode and Rhythm Song
mode
Reference [Rhythm]
The rhythm section can operate in one of two modes:
"Rhythm Pattern mode," in which you can create and play
rhythm patterns, and "Rhythm Song mode," in which you
can create and play a rhythm song. One of these two modes
will always be selected.
The [PATTERN] key will light when Rhythm Pattern mode
is selected, and the [SONG] key will light when Rhythm
Song mode is selected.
Rhythm Song mode
Lit
Rhythm Pattern mode
Lit
■ Synchronizing the recorder section and
rhythm section
With the default settings of the MRS-1044, the rhythm
section will operate in synchronization with the recorder
section. When you operate the transport to make the
recorder section begin running, the rhythm pattern or
rhythm song will also begin playing.
If necessary, however, the rhythm section can be
disconnected from the recorder section and used as an
independent drum + bass machine. To do this, press the
[RHYTHM] key. In this state, operating the transport will
cause only the rhythm section to begin playing, and the
recorder section will remain stopped.
56
The [RHYTHM] key will blink. If Rhythm Song mode
([SONG] key lit) has been selected, it will switch to
Rhythm Pattern mode ([PATTERN] key lit).
The display will show the "rhythm pattern screen" in which
you can select a rhythm pattern.
Length of the rhythm pattern
(number of measures)
Rhythm pattern number
Rhythm pattern name
2. Turn the dial to select the rhythm pattern that you
want to play.
3. Press the PLAY [R] key.
The rhythm pattern will begin playing, and at the same
time the recorder will begin running.
H INT
When the [RHYTHM] key is dark or blinking, the rhythm
section and recorder section are synchronized.
4. If you want to mute the performance of the drum
track or bass track, press the DRUM or BASS
status key.
The status key will go dark, and the performance of the
corresponding track will be muted. To defeat muting, press
the same status key once again.
ZOOM MRS-1044
Playing rhythm patterns
5. To stop playback, press the STOP [P] key.
2. Turn the dial to adjust the tempo.
The recorder and rhythm pattern will stop.
The tempo can be adjusted in steps of 0.1 over a range of
40 – 250 (BPM). The tempo can even be changed while the
rhythm pattern is playing.
6. To return to the main screen, press the [EXIT] key
while the rhythm section is stopped.
The [PATTERN] key will remain lit, and the [RHYTHM]
key will go dark. If you press the PLAY [R] key in this
state, the rhythm pattern that was used most recently will
play.
3. To change the tempo manually, press the [TEMPO]
7. If you want only the rhythm section to play
4. To return to the main screen, press the [EXIT] key.
independently, press the [RHYTHM] key while
stopped.
The [RHYTHM] key will light, and the rhythm section will
be disconnected from the recorder section. The rhythm
pattern screen will appear in the display.
key twice or more at the desired tempo.
The interval between the last two times you pressed the key
will be detected automatically, and set as the new tempo.
H INT
The tempo you specify here will apply to all rhythm patterns
played in Rhythm Pattern mode, and to a rhythm song in
which tempo data has not yet been input. (For details on
rhythm songs, refer to p.55.)
N OTE
In this state, pressing the PLAY [R] key will play only the
rhythm pattern, and the recorder section will remain
stopped.
N OTE
If you record on the recorder tracks while listening to the
rhythm patterns, and then later change the tempo of the
rhythm patterns, the two sets of performances will no
longer be synchronized. If you want to record on the
recorder while listening to rhythm patterns, you must
decide on the tempo first.
Changing the drum kit / bass program
You can change the sounds (drum kit / bass program) that
are assigned to the drum or bass tracks of the rhythm
pattern.
H INT
It is also possible to load rhythm pattern data from another
project existing on the hard disk (→ p.72).
1. In the main screen, repeatedly press the
Changing the tempo of the rhythm
pattern
Select "Pad Drum" if you want to switch the drum kit, or
"Pad Bass" if you want to switch the bass program.
[DRUM/BASS] key to make the display read either
"Pad Drum" or "Pad Bass."
You can use the [TEMPO] key to change the tempo of the
rhythm pattern.
1. In Rhythm Pattern mode, press the [TEMPO] key.
The current tempo value will be displayed.
2. Press the [KIT/PROG] key.
A screen will appear in which you can change the drum kit
or the bass program.
Tempo value
Name of drum kit / bass program
ZOOM MRS-1044
57
Reference [Rhythm]
When the [RHYTHM] key is lit, the counter in the display
will always indicate the measure.
Playing rhythm patterns
N OTE
Creating a rhythm song
While this screen is displayed, all transport operations are
invalid.
3. Turn the dial to select the desired drum kit / bass
program.
For a list of drum kits / bass programs that can be selected,
refer to the appendix at the end of this manual.
4. Press the [ENTER] key.
The change will be finalized, and you will return to the
main screen.
N OTE
The drum kit / bass program you select here will apply to all
rhythm patterns and rhythm songs.
This section explains how to arrange rhythm patterns in the
desired order of playback in an empty rhythm song, and
input chords and other data to create a complete rhythm
song.
H INT
When you create a new project on the MRS-1044, the
rhythm song will always be empty.
N OTE
Before you perform the following procedure, make sure that
the DRUM, BASS, and MASTER faders of the panel are
raised, and that the DRUM and BASS status keys are lit.
Inputting rhythm pattern data
Here's how to input rhythm pattern data into an empty
rhythm song in the desired playback order.
1. In the main screen, press the [SONG] key, and then
press the [RHYTHM] key.
Reference [Rhythm]
The [RHYTHM] key will light. If Rhythm Pattern mode
(the [PATTERN] key lit) has been selected, it will change
to Rhythm Song mode (the [SONG] key lit).
The display will show the "rhythm song screen," which
indicates the progress of the rhythm song.
N OTE
• While the rhythm song is playing, the lower line of the
screen will show the number of the rhythm pattern that
has been input at the current location, the type of chord,
and the root.
• The rhythm song can be created/edited only when the
[RHYTHM] key is lit.
• While the [RHYTHM] key is lit, the counter in the display
will always indicate measure numbers.
2. Press the REC [O] key.
The REC [O] key will light, and you can now input data
such as rhythm pattern numbers and chords into the rhythm
song.
58
ZOOM MRS-1044
Creating a rhythm song
7. To finalize the selected rhythm pattern, press the
[ENTER] key.
The rhythm pattern data will be input at the current
location.
3. Use the cursor [Q]/[W] keys to make the display
read " Ptn".
H INT
The number of the rhythm pattern that is input at the
current location is displayed below "Ptn" in this screen. For
an empty rhythm song, however, no rhythm pattern data
has been input. For this reason, the area that displays the
rhythm pattern number will indicate "EOS" (End Of Song)
to show the end of the rhythm song.
4. Press the [INSERT/DELETE] key to make the
display read "INSERT?"
Each time you press the [INSERT/DELETE] key, the
display will cycle between "INSERT?" → "DELETE?" →
original display. When "INSERT?" is displayed, new
rhythm pattern data can be input at the current location.
When rhythm pattern data is input, the time signature,
chord root, and drum track / bass track volume specified
for that rhythm pattern will be input at the same location.
8. Repeatedly press the cursor [R] key to move to
the location at which you will input the next rhythm
pattern.
Each time you press a cursor [E]/[R] key, the current
location will move one measure backward or forward.
When you advance to the end of the rhythm song, the
display will indicate "EOS."
H INT
• At a location where no rhythm pattern data has been
input, an " " symbol will be displayed to the left of the
"Ptn." This indicates that the immediately preceding
rhythm pattern will continue playing.
5. Turn the dial to select the rhythm pattern that you
want to input.
The number and length (in measures) of the currently
selected rhythm pattern will be displayed.
Rhythm pattern number
Rhythm pattern length (measures)
6. As necessary, use the cursor [ Q ]/[ W ] keys to
change the length of the rhythm pattern.
If you want to lengthen the rhythm pattern, play back the
same rhythm pattern repeatedly. If you want to shorten the
rhythm pattern, switch to the next rhythm pattern before it
has finished playing.
9. Repeat steps 3 – 8 to input rhythm patterns for the
entire song.
If you make a mistake during input, use the following
procedures to correct the mistake.
■ To re-select a pattern that you input
Use the cursor [ E ]/[ R ] keys to move to the desired
rhythm pattern data, and turn the dial to select a new
pattern.
■ To insert a new pattern
Use the cursor [E]/[R] keys to move to the location at
which you want to insert rhythm pattern data, and execute
steps 4 – 7. The rhythm pattern data will be inserted at the
current location, and subsequent rhythm pattern data will
be moved backward according to the length of that pattern.
H INT
This operation will not affect the original rhythm pattern.
ZOOM MRS-1044
59
Reference [Rhythm]
• It is also possible to insert other rhythm pattern data into
the middle of a rhythm pattern.
Creating a rhythm song
11. To return to the main screen, stop the rhythm
INSERT
section and press the [EXIT] key.
Pattern D
Pattern A
Pattern B
Pattern C
Pattern A
Pattern B
Pattern D
Inputting chord data
Pattern C
■ To erase rhythm pattern data
Use the cursor [E]/[R] keys to move to the location at
which you want to erase rhythm pattern data, and press the
[ERASE] key. The rhythm pattern data will be erased, and
the display will change to " Ptn," indicating that the
preceding pattern will continue playing.
Here's how to add chord data to the rhythm song that you
created by inputting rhythm pattern data.
H INT
• Chord data consists of a "ROOT" that specifies the root
(C, C#, D ...B) of the chord, and "CHORD" that specifies
the type of chord (major or minor, etc.).
• The bass phrase of the rhythm pattern will be transposed
according to the root that you input. Also, part of the
bass phrase will be converted according to the type of
chord you specify.
ERASE
Pattern A
Pattern B
Pattern A
Pattern B
Pattern C
Pattern D
Pattern D
1. In the main screen, make sure that the [SONG] key
is lit, and press the [RHYTHM] key.
The [RHYTHM] key will light, and the rhythm song screen
will appear.
2. Press the REC [O] key.
N OTE
If you erase the rhythm pattern data that is recorded at the
beginning of the rhythm song, there will be silence until the
next location at which rhythm pattern data is input.
Reference [Rhythm]
■ To delete a specific measure
Use the cursor [E]/[R] keys to move to the beginning of
the measure that you want to delete, and repeatedly press
the [INSERT/DELETE] key to make the display read
"DELETE?" When you press the [ENTER] key, the current
measure will be deleted, and subsequent rhythm pattern
data will be moved forward. If you delete the first measure
of a two-measure rhythm pattern, the second measure will
remain, and the display will change to " Ptn". If
necessary, repeat the step to delete this measure as well.
DELETE
Pattern A
Pattern B
Pattern A
Pattern B
Pattern C
Pattern D
Pattern D
3. Use the cursor [Q]/[W] keys to make the display
read "ROOT."
When inputting chord data into the rhythm song, you will
specify the chord root (C – B) and chord type (major or
minor, etc.) separately. When "ROOT" is displayed, you
can specify the root of the chord.
Chord root Chord type
Chord data is input at locations where a rhythm pattern has
been input, as in the illustration above. The default root and
type for chord data is as follows.
• Root: the root of the chord specified for the rhythm
pattern
• Type: "--" (no conversion)
H INT
10. When you have completed the entire rhythm song,
For details on rhythm pattern chords, refer to p.69.
press the STOP [P] key.
The REC [O] key will go dark, and you will return to the
rhythm song screen. If you want to check the content that
you input, press the PLAY [R] key.
60
4. Turn the dial to specify the note name (C – B) that
will be the root of the chord.
The following screen shows an example of when the chord
ZOOM MRS-1044
Creating a rhythm song
root has been changed to A.
(2) Specify the location in 4th note units
Use the REW [T]/FF [Y] keys to move to the beginning
of the preceding or following quarter note.
5. To specify the chord type, press the cursor [W] key
once to make the display read "CHORD."
6. Turn the dial to select the chord type.
You can choose from the following chord types.
Display
Content
Display
Content
(3) Specify the location in 16th note units
Repeatedly press the cursor [Q] key to make the display
read "EV→", and turn the dial to move forward or
backward in 12-tick (16th note) units.
When you use methods (1) or (2), a " " symbol will be
displayed to the left of "CHORD" or "ROOT" at locations
where no chord data has been input. This indicates that the
preceding chord data will remain in effect.
No conversion
The following screen shows an example of when the chord
type has been changed to minor (m). With these settings,
chord data of "A minor" has been input at the beginning of
the rhythm song.
When you use method (3), the symbol displayed at the
right of "EV→" will indicate the type of data that is input
at the current location. For example, "Pt" indicates rhythm
pattern data, and "TS" indicates time signature data. (For
details refer to the table on p.63.)
8. Input the remaining chord data in the same way.
Chord data that you input can be edited in the following
ways.
H INT
If you select "--" (no conversion) as the chord type, only the
bass will be transposed, and the phrase will not be
converted. Select this when you want the original phrase to
be played without change.
7. Move to the location at which you want to input the
next chord data, and input chord data in the same
way as described in steps 2 – 5.
Chord data does not necessarily have to be input at the
same location as the rhythm pattern data. You can also
change the chord in the middle of a rhythm pattern, or in
the middle of a measure. The input location can be changed
in the following ways.
To change the chord
Move to the location at which the chord data is input, use
the cursor [Q]/[W] keys to switch the display to "ROOT"
(chord root) or "CHORD" (chord type), and turn the dial to
change the chord.
●
To delete chord data
Move to the location at which the chord data is input, use
the cursor [Q]/[W] keys to switch the display to "ROOT"
or "CHORD," and press the [ERASE] key. The chord data
will be erased, and the display will change to " ROOT"
or " CHORD."
9. When you have finished, press the STOP [P] key.
You will return to the rhythm song screen. Then press the
[EXIT] key to return to the main screen.
(1) Moving in steps of a measure
Use the cursor [E]/[R] keys to move to the beginning of
the preceding or following measure.
ZOOM MRS-1044
61
Reference [Rhythm]
●
Creating a rhythm song
Inputting tempo data
If no tempo data has been input into a rhythm song, it will
play at the tempo that was specified in Rhythm Pattern
mode. In other words if you change the tempo in Rhythm
Pattern mode, the tempo of the rhythm song will also
change.
To prevent this, you can input tempo data at the beginning
of the rhythm song in which the rhythm pattern / chord
data was input, in order to fix a specific tempo for the
rhythm song.
1. In the main screen, make sure that the [SONG] key
is lit, and press the PLAY [R] key.
The rhythm song will begin playing.
2. Press the [TEMPO] key.
The current tempo setting will be displayed.
Now, each time you play the rhythm song from the
beginning, it will be re-set to the tempo setting that you
input here.
Tempo setting
H INT
Tempo data can also be input in the middle of the rhythm song
at 16th note intervals. For details refer to the section below.
8. Press the STOP [P] key.
You will return to the rhythm song screen. Then press the
[EXIT] key to return to the main screen.
N OTE
If you record on the recorder tracks while listening to the
rhythm song, and then change the tempo, the two
performances will no longer match. If you want to record
while listening to the rhythm song, you must finalize the
tempo first.
Tempo setting
3. While you listen to the rhythm song, turn the dial to
adjust the tempo setting (40.0 – 250.0).
When you decide on the tempo, make a note of the setting.
Reference [Rhythm]
H INT
If you press the [TEMPO] key two or more times in
succession, the interval will be detected automatically, and
specified as the new tempo.
Inputting other data
A variety of other data (referred to as "events") such as
tempo and drum/bass track volume can be added to the
rhythm song that you created by inputting rhythm pattern
data and chord data.
1. In the main screen, make sure that the [SONG] key
is lit, and press the [RHYTHM] key.
4. Press the STOP [P] key to stop the rhythm song,
and press the [RHYTHM] key.
The [RHYTHM] key will light, and the rhythm song screen
will appear.
The [RHYTHM] key will light, and the rhythm song screen
will appear.
2. Press the REC [O] key.
5. Press the REC [O] key.
3. Press the cursor [ Q ] key to make the display
indicate "EV➔".
6. Use the cursor [Q]/[W] keys to make the display
show " Tempo".
When this display is shown, you can turn the dial to move
the current location forward or backward in 16th note steps.
In this screen you can input new tempo data, or view/edit
previously input tempo data.
7. Turn the dial to input the tempo setting that you
decided on in step 3.
62
In this screen, symbols displayed following "EV→" such
as "Pt" or "TS" let you see what type of events are input at
the current location. The following table shows the types of
events that can be input, and the corresponding symbols.
ZOOM MRS-1044
Creating a rhythm song
Type of
event
Content
Symbol
Range
Ptn
Rhythm pattern
000 – 254
number
TimSig
Time signature
1 – 8(1/4 – 8/4)
ROOT
Chord root
C–B
CHORD
Chord type
--, Maj, m, 7, m7, M7,
aug, dim, 7sus4, sus4,
m7b5, m6, 6, m9, M9,
mM7
Tempo
Tempo
40.0 – 250.0
DrVOL
Drum track
volume
0 – 15
BsVOL
Bass track
volume
0 – 15
●
To edit the value of an event
Display the event that you want to edit, and turn the dial to
input the new value.
●
N OTE
If no tempo data has been input, the tempo specified in
Rhythm Pattern mode will be used. To specify a tempo for
the rhythm song itself, input tempo data at the beginning of
the rhythm song (→ p.62).
4. Move to the location at which you want to input a
To delete an event
Display the event that you want to delete, and press the
[ERASE] key.
8. When you have finished, press the STOP [P] key.
You will return to the rhythm song screen. Then press the
[EXIT] key to return to the main screen.
Playing a rhythm song
Here's how to play the rhythm song that you created by
inputting rhythm pattern data and chord data.
1. In the main screen, make sure that the rhythm
section [SONG] key is lit.
If it is dark, press the [SONG] key. (The rhythm section
will switch to Rhythm Song mode.)
new event.
For details on how to move the current location, refer to
page 61.
5. Use the cursor [Q]/[W] keys to select the type of
2. Press the PLAY [R] key.
The rhythm song will begin playing. If something has been
recorded on the recorder, those tracks will play back
simultaneously.
event that you want to input.
H INT
For all types of events, the minimum unit for input is a 16th
note.
3. To stop the rhythm song, press the STOP [P] key.
4. If you want the rhythm section to play
independently, press the [RHYTHM] key while
stopped.
The [RHYTHM] key will light, and the rhythm section will
be disconnected from the recorder section. The display will
show the rhythm song screen.
In this state, pressing the PLAY [R] key will cause only
the rhythm song to play, while the recorder section remains
stopped. At this time, the display will show the number of
the current pattern and chord.
6. Turn the dial to input the value.
Current chord
7. Input the remaining events in the same way.
The events you input can be edited in the following ways.
ZOOM MRS-1044
Rhythm pattern number
5. To return to the main screen, press the [EXIT] key.
The [RHYTHM] key will go dark, and you will return to
the main screen.
63
Reference [Rhythm]
If the event you select here has been input at the current
location, its value will be displayed. If there is no
corresponding event, the display will indicate " ". This
indicates that the previously input event will apply.
Creating a rhythm song
Editing a rhythm song
H INT
It is also possible to make the rhythm song play back using
different rhythm section sounds (drum kit / bass program).
For details refer to p.57 "Changing the drum kit / bass
program."
This section explains how to edit a rhythm song that you
created.
Copying a specific region of measures
Part of a rhythm song can be copied in measures and
inserted into another location. This is convenient when you
want to repeat a portion of a rhythm song.
Copy
1
2
3
Pattern A
1
2
4
5
Pattern A
3
Pattern A
4
6
7
Pattern A
5
6
7
Pattern A
Pattern B
8
Pattern B
8
9
Pattern A
10
Pattern B
Copy
1
2
3
Pattern A
1
2
Pattern A
4
Pattern B
3
4
Pattern B
5
6
7
Pattern A
8
Pattern B
1. In the main screen, make sure that the [SONG] key
is lit, and press the [RHYTHM] key.
Reference [Rhythm]
The [RHYTHM] key will light, and the rhythm song screen
will appear.
2. Press the REC [O] key.
3. Press the [EDIT] key.
The following screen will appear in the display.
4. Turn the dial to select the starting measure of the
copy-source region, and press the [ENTER] key.
5. Turn the dial to select the last measure of the copysource region, and press the [ENTER] key.
64
ZOOM MRS-1044
Editing a rhythm song
rhythm song will be converted according to the setting you
specified.
6. To return to the main screen, press the [EXIT] key
6. Select the starting measure of the copy-
several times.
destination, and press the [ENTER] key.
The copy will be executed, and you will return to the
screen of step 2.
H INT
If the copy-destination region extends beyond the end of
the rhythm song, the rhythm song will be lengthened
automatically.
7. Press the STOP [P] key.
H INT
By adjusting the reference pitch of the MRS-1044's built-in
tuner, you can make fine adjustments to the pitch of the
bass program. (For details on the tuner, refer to p.92.)
Erasing the rhythm song
Here's how to erase the entire rhythm song, resetting it to a
blank state.
You will return to the rhythm song screen.
1. In the main screen, make sure that the [SONG] key
Transposing the entire rhythm song
Here's how the bass track of the rhythm song can be
transposed in semitone units.
is lit, and press the [RHYTHM] key.
The [RHYTHM] key will light, and the rhythm song screen
will appear.
2. Press the [INSERT/DELETE] key.
1. In the main screen, make sure that the [SONG] key
The display will ask "DELETE?"
is lit, and press the [RHYTHM] key.
The [RHYTHM] key will light, and the rhythm song screen
will appear.
2. Press the [EDIT] key.
press the [EXIT] key to cancel.
If you press the [ENTER] key, the rhythm song will be
erased and you will return to the rhythm song screen. If
you then press the [EXIT] key, you will return to the main
screen.
N OTE
Once you erase the rhythm song, it cannot be recovered.
Use this operation with care.
3. Press the [ENTER] key.
The current transpose setting (-6 – 0 – +6) will be
displayed below "TRANSP".
4. Turn the dial to change the transpose setting, and
press the [ENTER] key.
The display will ask "SURE?"
5. Press the [ENTER] key to execute the Transpose
operation, or press the [EXIT] key to cancel.
If you press the [ENTER] key, the Transpose operation will
be executed, and the chord data (root) that was input in the
ZOOM MRS-1044
65
Reference [Rhythm]
The display will indicate "EDIT TRANSP."
3. Press the [ENTER] key to erase the rhythm song, or
Creating an original rhythm pattern
Creating an original rhythm
pattern
An example of drum sounds
assigned to pads
This section explains how you can create your own original
rhythm pattern by tapping the front panel pads 1 – 8.
Selecting the track that you want to
record
Here's how to select an empty rhythm pattern, and then
select the track (drum track or bass track) on which you
will record a performance.
■ Selecting an empty rhythm pattern
1. In the main screen, press the [PATTERN] key and
then press the [RHYTHM] key.
The [RHYTHM] key will light, and the rhythm pattern
screen will appear.
2. Turn the dial to select an empty rhythm pattern.
H INT
When the drum track is selected, "DRUM" will always be
shown in the PAD area in the right of the display.
2. As necessary, press the [BANK] key and turn the
dial to switch pad banks.
The group of sounds assigned to pads 1 – 8 is called the
"pad bank." When the drum track is selected, you can
switch pad banks to change the drum/percussion sounds
that are played by pads 1 – 8. You can select from pad
banks 1 – 3 (default: 1).
Empty rhythm patterns are displayed with a name of
"EMPTY".
Pad bank
Reference [Rhythm]
If there is no empty rhythm pattern, you can select an
unwanted rhythm pattern and erase it by pressing the
[INSERT/DELETE] key → [ENTER] key. (For details
refer to p.71.)
3. Press the [EXIT] key.
The subsequent procedure will differ depending on
whether you select the drum track or the bass track as the
recording destination.
■ Selecting the bass track
1. Repeatedly press the [DRUM/BASS] key to make
■ Selecting the drum track
1. Repeatedly press the [DRUM/BASS] key to make
You will return to the rhythm pattern screen. The pad bank
setting will remain valid even if you change screens or
modes.
the display indicate "Pad Bass."
The bass track will be selected. Now you can tap pads 1 – 8
to play the scale of the bass program selected for the bass
track.
the display indicate "Pad Drum."
The drum track will be selected. Now you can tap pads 1 –
8 to hear the sounds of the drum kit selected for the drum
track.
The drum kit contains 24 drum/percussion sounds, and
eight of these are assigned to the pads.
66
An example of the scale of the bass program
assigned to the pads
ZOOM MRS-1044
Creating an original rhythm pattern
screen will appear.
H INT
When the bass track is selected, "BASS" will always be
shown in the PAD area in the right of the display.
N OTE
A rhythm pattern can be recorded or edited only when the
[RHYTHM] key is lit.
2. As necessary, press the [BANK] key and turn the
dial to switch the pad bank.
When the bass track is selected, you can switch the pad
bank to change the scale or range of the bass program
played by pads 1 – 8. For the bass track, you can select pad
banks Maj-1 – Maj-3 and min-1 – min-3 (default: Maj-1).
"Maj" is a major scale, and "min" is a natural minor scale.
The number following Maj or min indicates the range in
units of an octave.
2. Press the [EDIT] key.
A screen will appear in which you can edit the rhythm
pattern settings. (This is called the "rhythm pattern edit
menu.")
3. Use the cursor [E]/[R] keys to make the display
read "EDIT QUANTIZ," and press the [ENTER] key.
Tonic of scale
Pad bank
The current quantization setting will be displayed. The
display has the following significance.
3. As necessary, use the cursor [ Q ]/[ W ] keys to
change the tonic (C – B) of the currently selected
scale (default: E).
4
Quantization setting
Press the [EXIT] key.
You will return to the rhythm pattern screen. The pad bank
and scale tonic settings will remain valid even if you
change screens or modes.
If necessary, you can also change the drum kit / bass
program sound that is assigned to the track (→ p.57).
Recording your pad performance in a
rhythm pattern
You can specify the shortest note value to be recorded, and
the length and time signature of the rhythm pattern, and
then record your performance on the pads.
■ Setting the minimum note value unit
(quantization)
With the initial settings, your performance on the pads will
be aligned to the closest 16th note when it is recorded in a
rhythm pattern. In a context like this, the minimum note
value that is recorded is called the "quantization." The
quantization can be changed as follows.
quarter note
8th note
8th note triplet
16th note (default setting)
16th note triplet
32nd note
one tick (no quantization)
Reference [Rhythm]
H INT
4:
8:
12:
16:
24:
32:
Hi:
H INT
• One tick is a length corresponding to 1/48th of a quarter
note.
• This setting is common to all rhythm patterns.
4. Turn the dial to change the setting, and press the
[EXIT] key.
The new setting will be finalized, and you will return to the
rhythm pattern edit menu.
5. Press the [EXIT] key.
You will return to the rhythm pattern screen.
1. Make sure that the [PATTERN] key is lit, and
press the [RHYTHM] key.
The [RHYTHM] key will light, and the rhythm pattern
ZOOM MRS-1044
67
Creating an original rhythm pattern
■ Setting the length and time signature of the
rhythm pattern
When creating a new rhythm pattern, you can use the
following procedure to specify the number of measures and
time signature in the pattern.
N OTE
It is not possible to change the length or time signature
after recording a rhythm pattern.
1. Make sure that an empty rhythm pattern is
selected in the rhythm pattern screen.
2. Press the REC [O] key, and then press the PLAY
[R] key.
You will hear a pre-count of "click, click, click, click."
When the pre-count ends, rhythm pattern recording will
begin.
H INT
1. Make sure that an empty rhythm pattern is
selected in the rhythm pattern screen, and press
the [EDIT] key.
• The recorder section will not operate during rhythm
pattern recording.
The rhythm pattern edit menu will appear.
• The number of pre-count measures and the metronome
volume can be changed as desired (→ p.72).
2. Use the cursor [E]/[R] keys to select the "EDIT
3. While listening to the metronome, tap pads 1 – 8.
BARLEN" or "EDIT TIMESIG" screen, and press the
[ENTER] key.
Select the "EDIT BARLEN" screen if you want to change
the length of the rhythm pattern, or select the "EDIT
TIMESIG" screen if you want to change the time signature.
The screen shown below is an example of the display that
appears when you select "EDIT TIMESIG" and press the
[ENTER] key.
Your performance on the pads will be recorded according
to the quantization setting (→ p.67). When you reach the
end of the pattern, you will automatically return to the
beginning.
Pad
Pre-count
Reference [Rhythm]
3. Turn the dial to change the setting.
●
To specify the length of the rhythm pattern
(BARLEN)
Turn the dial to specify the number of measures (1 – 99) in
the rhythm pattern.
●
To specify the time signature of the rhythm
pattern (TIMESIG)
Turn the dial to specify the time signature of the rhythm
pattern in a range of 1/4 – 8/4.
4. After making the change, press the [EXIT] key.
The new setting will be finalized, and you will return to the
rhythm pattern edit menu.
5. Press the [EXIT] key.
You will return to the rhythm pattern screen.
■ Recording your pad performance
Pad
Recorded repeatedly
H INT
• The strength with which you tap the pads will be
recorded in the pattern. If you are recording on the bass
track, the length of time for which you hold down a pad
will also be recorded.
• If you press the REC [ O ] key during recording, the
REC [O] key will change to blinking, and recording will be
temporarily suspended. In this state you can tap the
pads to check which sound is assigned to each pad.
Recording will resume when you press the REC [O] key
once again.
• You can also input a pattern using a MIDI controller
connected to the MRS-1044's [MIDI IN] connector,
instead of tapping the pads.
4. If you want to erase the performance of a specific
pad from the track, hold down the [ERASE] key and
press the corresponding pad.
Performance data for the corresponding pad will be erased
from the pattern for the interval during which you hold
down the [ERASE] key and the pad.
Here's how to record your pad performance into an empty
rhythm pattern.
68
ZOOM MRS-1044
Creating an original rhythm pattern
Drum track
Pattern recording will stop, and you will return to the
rhythm pattern screen. Press the PLAY [R] key to hear the
pattern that you recorded.
Snare
H INT
Kick
When you select an empty pattern and record it, a pattern
name of "Patxxx" (xxx will be the pattern number) will be
assigned automatically. You can edit this pattern name as
necessary (→ p.71).
Snare
Kick
7. If you want to switch tracks and continue recording
Bass track
the rhythm pattern, repeatedly press the
[DRUM/BASS] key to select the desired track
(drum or bass), and repeat steps 2 – 6.
8. When you have finished recording the pattern and
want to return to the main screen, press the [EXIT]
key several times.
5. If you want to erase the performance of all pads
from the track, hold down the [ERASE] key and
press the status key of the corresponding track
(DRUM or BASS).
Performance data for all pads will be erased from the
pattern for the interval during which you hold down both
keys.
When you have created a new rhythm pattern that includes
a bass track, and want to use this pattern in a rhythm song,
you will need to specify the root and chord type for the
pattern. If you fail to make these settings, the chords that
were specified in the rhythm song may not play correctly.
Use the following procedure to specify chords for newly
created rhythm patterns.
1. In the main screen, press the [PATTERN] key, and
then press the [RHYTHM] key.
Kick
The [RHYTHM] key will light, and the rhythm pattern
screen will appear.
Snare
2. Turn the dial to select the rhythm pattern for which
Kick
you want to specify a chord.
3. Press the [EDIT] key.
The rhythm pattern edit menu will appear.
Bass track
4. Use the cursor [E]/[R] keys to access either the
"EDIT OrROOT" or "EDIT OrCHORD" screen, and
press the [ENTER] key.
6. When you have finished recording, press the STOP
[P] key.
ZOOM MRS-1044
Select "EDIT OrROOT" if you want to specify the chord
root, or "EDIT OrCHORD" if you want to specify the
chord type. The following screen shows an example of
69
Reference [Rhythm]
Drum track
Snare
Specifying the chord of a rhythm
pattern
Creating an original rhythm pattern
what you see when you select "EDIT OrROOT" and press
the [ENTER] key.
Editing a rhythm pattern
This section explains how to edit an existing rhythm
pattern.
Setting
5. Turn the dial to specify the chord root / type.
●
To specify the chord root (OrROOT)
Turn the dial to specify the note name of the chord root in a
range of C – B (default: C).
Adjusting the volume balance of the
drum kit and bass program
The volume of the drum kit and bass program can be
adjusted by the DRUM and BASS faders of the mixer
section. If necessary, however, the volumes of the drum kit
and bass program can also be programmed for each rhythm
pattern.
●
To specify the chord type (OrCHORD)
Turn the dial to specify the chord type. Only "Maj" (major)
or "min" (minor) can be selected (default: Maj).
For example if you input an E minor bass phrase into the
rhythm pattern, you would set the root to "E," and the
chord type to "min."
1. In the main screen, press the [PATTERN] key, and
then press the [RHYTHM] key.
The [RHYTHM] key will light, and the rhythm pattern
screen will appear.
2. Turn the dial to select the desired rhythm pattern,
and press the [EDIT] key.
6. Press the [EXIT] key.
The setting will be finalized, and you will return to the
rhythm pattern edit menu.
7. To return to the main screen, press the [EXIT] key
Reference [Rhythm]
several times.
The rhythm pattern edit menu will appear.
3. Use the cursor [E]/[R] keys to select either the
"EDIT DrumLvl" or "EDIT BassLvl" screen, and
press the [ENTER] key.
Select the "EDIT DrumLvl" screen if you want to adjust
the volume of the drum track, or the "EDIT BassLvl"
screen if you want to adjust the volume of the bass track.
The following screen is an example of what you see when
you select the "EDIT DrumLvl" screen and press the
[ENTER] key.
The display will indicate the current volume level (0 – 15).
4. Turn the dial to adjust the setting, and press the
[EXIT] key.
The change will be finalized, and you will return to the
rhythm pattern edit menu.
5. To return to the main screen, press the [EXIT] key
several times.
70
ZOOM MRS-1044
Editing a rhythm pattern
Copying a rhythm pattern
Here's how a rhythm pattern can be copied to another
pattern number.
3. Use the cursor [E]/[R] keys to move the blinking
area, and turn the dial to change the character.
For details on the characters that can be used, refer to p.36.
H INT
1. In the rhythm pattern screen, select the copysource rhythm pattern, and press the [EDIT] key.
The rhythm pattern edit menu will appear.
2. Use the cursor [E]/[R] keys to make the display
read "EDIT COPY," and press the [ENTER] key.
When you select an empty rhythm pattern and record onto
it, the pattern will automatically be assigned a default name
of "Patxxx" (xxx will be the pattern number).
4. When you have finished editing the name, press the
[EXIT] key.
The rhythm pattern name will be updated, and you will
return to the rhythm pattern edit menu.
5. To return to the main screen, press the [EXIT] key
several times.
Copy-source rhythm
pattern number
Copy-destination
rhythm pattern number
Erase a rhythm pattern
3. Turn the dial to select the copy-destination rhythm
pattern, and press the [ENTER] key.
The display will ask "SURE?"
4. Press the [ENTER] key to execute the copy, or
press the [EXIT] key to cancel.
When the copy is completed, you will return to the rhythm
pattern edit menu.
Here's how you can erase all data from a specified rhythm
pattern, returning it to a blank state.
1. In the rhythm pattern screen, select the rhythm
pattern that you want to erase.
2. Press the [INSERT/DELETE] key.
The display will ask "SURE?"
several times.
3. Press the [ENTER] key to execute the erasure, or
press the [EXIT] key to cancel.
Editing the name of a rhythm pattern
Here's how you can edit the name of a rhythm pattern.
1. In the rhythm pattern screen, select the rhythm
When the pattern has been erased, you will return to the
rhythm pattern screen.
4. To return to the main screen, press the [EXIT] key
several times.
pattern whose name you want to edit, and press
the [EDIT] key.
The rhythm pattern edit menu will appear.
2. Use the cursor [E]/[R] keys to make the display
read "EDIT NAME," and press the [ENTER] key.
The rhythm pattern name will appear, and the first
character will be blinking.
ZOOM MRS-1044
71
Reference [Rhythm]
5. To return to the main screen, press the [EXIT] key
Importing rhythm patterns and the rhythm song from another project
Importing rhythm patterns and
the rhythm song from another
project
Editing various settings of the
rhythm section
Here's how you can import (load) the rhythm pattern data
(255 patterns) and rhythm song data from another project
that was saved on the hard disk.
Here's how you can edit various settings that affect the
entire rhythm section, such as adjusting the sensitivity of
pads 1 – 8 or adjusting the volume of the metronome.
1. In the main screen, press the [RHYTHM] key, and
then press the [PROJECT/UTILITY] key.
A screen will appear in which you can make various
settings for the rhythm section. (This screen is called the
"rhythm utility menu.") This operation can be performed
whether the rhythm section is in Rhythm Pattern mode or
in Rhythm Song mode.
2. Use the cursor [E]/[R] keys to make the display
read "UTILITY IMPORT," and press the [ENTER]
key.
A screen will appear in which you can select the project to
be imported.
Basic procedure
The basic procedure for editing the rhythm section settings
is the same for most items. Here's the basic procedure.
H INT
You can use the same procedure in either Rhythm pattern
mode or Rhythm Song mode.
1. In the main screen, press the [RHYTHM] key.
The [RHYTHM] key will light, and either the rhythm
pattern screen or the rhythm song screen will appear,
depending on the currently selected mode.
2. Press the [PROJECT/UTILITY] key.
The rhythm utility menu will appear, where you can make
various settings for the rhythm section.
Import-source project name
Project number
3. Use the cursor [E]/[R] keys to select one of the
Reference [Rhythm]
3. Turn the dial to select a project, and press the
following items to edit, and press the [ENTER] key.
[ENTER] key.
The display will ask "SURE?"
4. Press the [ENTER] key to import, or press the
[EXIT] key to cancel.
After the data has been imported, you will return to the
rhythm utility menu. To return to the main screen, press the
[EXIT] key several times.
N OTE
The rhythm patterns and rhythm song that are imported will
overwrite the rhythm patterns and rhythm song of the
project that you are currently operating.
• COUNT: Change the length of the pre-count.
• CLICK: Change the volume of the metronome.
• PAD SENS (sensitivity): Specify how the volume will be
affected by the force with which a pad is struck.
• MIDI: Make MIDI-related settings (→ p.90).
• IMPORT: Import rhythm patterns and the rhythm song
from a project saved on the hard disk.
• MEMORY (memory remaining): Check the remaining
amount of rhythm pattern and rhythm song memory.
4. Turn the dial to edit the setting.
The screen display and operation will be different for each
item. For details refer to the sections that follow.
H INT
For details on MIDI operations, refer to page 90. For details
on the Import procedure, refer to the preceding section.
72
ZOOM MRS-1044
Editing various settings of the rhythm section
5. When you have finished creating settings, press the
[EXIT] key several times.
You will return to the main screen.
Changing the length of the pre-count
(COUNT)
You can change the length of the pre-count that is sounded
when you record a rhythm pattern. When the following
screen is displayed, turn the dial to choose one of these
settings.
• OFF: The pre-count will be turned off.
• 1: A one-measure pre-count will be sounded (default
setting).
• 2: A two-measure pre-count will be sounded.
• PAD: The pre-count will be turned off, and recording
will begin the instant you tap a pad.
how strongly you tap.
• LOUD: The volume will be loud, regardless of how
strongly you tap.
• LITE: Maximum sensitivity. Even light taps will produce
a loud volume.
• NORMAL: Normal sensitivity (default setting).
• HARD: Low sensitivity.
• EX HARD: Lowest sensitivity. Loud volumes will not be
produced unless you tap quite strongly.
Checking the remaining amount of
memory (MEMORY)
The remaining amount of recording memory for rhythm
patterns and the rhythm song will be displayed as a
percentage (%). This screen is for display only, and has no
setting that can be edited.
Changing the metronome volume
(CLICK)
Reference [Rhythm]
You can change the volume of the metronome that sounds
while you record a rhythm pattern. When the following
screen is displayed, turn the dial to adjust the volume (0 –
15).
Adjusting the sensitivity of the pads
(PAD SENS)
You can specify how the volume will respond to the force
with which you tap the pads (pad sensitivity). When the
display indicates "PAD SENS," turn the dial to select one
of the following settings.
• SOFT: The volume will be soft, regardless of how
strongly you tap.
• MEDIUM: The volume will be medium, regardless of
ZOOM MRS-1044
73
Reference [Effects]
This section explains how to use the effects built into the MRS-1044.
For example if you insert the insert effect into the input
mixer, the effect can be applied to the signal that is input
from the [INPUT 1/2] jacks, and recorded on a track of the
recorder. Alternatively if you insert the insert effect into a
channel of the track mixer or immediately before the
MASTER fader, you can process a specific track or the
entire song during mixdown.
About the effects
The MRS-1044 has two types of effects, an "insert effect"
and two "send/return effects." The two types can be used
simultaneously. The two types of effect are described
below in detail.
Send/return effects
Insert effect
The send/return effects are internally connected to the
send/return of the mixer section. The MRS-1044 has two
send/return effects, reverb (REVERB) and chorus/delay
(CHORUS/DELAY), and these two can be used
simultaneously. The send levels of the input mixer or track
mixer adjust the effect depth of the send/return effects.
Raising the send level will send the corresponding signal to
the input of the effect, and the signal processed by the
effect will be returned immediately before the MASTER
fader, and mixed with the other signals. (See the
"Send/return effect" diagram below.)
The insert effect is used by inserting it into a specific signal
route. You can select one of the following locations at
which to insert the effect. (See the "Insert Effect" diagram
below.)
(1) Input mixer
(2) Any channel of the track mixer (1 – 6, 7/8, 9/10,
DRUM, BASS)
(3) Immediately before the MASTER fader
[Insert effect]
Insert effect
(2)
(1)
Recorder
section
INPUT
OUTPUT
Track 1
Track 2
Reference [Effects]
Track 7/8
Track 9/10
Input mixer
Rhythm
section
DRUM
BASS
Track mixer
(3)
MASTER
[Send/return effect]
Send/return effects
CHORUS/DELAY
CHORUS/DELAY SEND
REVERB
REVERB SEND
REC LEVEL
Input mixer
74
DRUM BASS
1
2
7/8
9/10
Track mixer
ZOOM MRS-1044
Using the insert effect
Using the insert effect
H INT
• Some algorithms are mono input / stereo output, and
others are stereo input / stereo output. This difference
will affect the signal flow when the insert effect is
inserted. For details refer to p.77.
This section explains how to insert the insert effect, how to
select a patch, and how to edit the patch.
• The MIC algorithms "MIC SINGLE" and "MIC DUAL" will
switch according to the effect type selected for the
COMP/LIM module. For details on the effect types, refer
to p.78.
About insert effect patches
The insert effect is a multi-effect unit that contains a chain
of separate effects such as compressor, distortion, and
delay. Each of these separate effects is called an "effect
module," and up to six effect modules can be used
simultaneously. A set of effect modules that can be used
simultaneously is called an "algorithm." You can use one of
the following four types of algorithms.
Each module has various parameters (corresponding to the
knobs of a compact effect unit) that can be edited to adjust
the character or depth of the effect. Settings for the
parameters of each effect module and an overall volume
setting (patch level) are collectively referred to as a
"patch."
• GUITAR/BASS: An algorithm suitable for recording
guitar/bass.
• MIC: An algorithm suitable for recording vocals etc.
through a mic. This algorithm has two variations, "MIC
SINGLE" for use with one mic, or "MIC DUAL" for
use with two mics.
• LINE: An algorithm used mainly when recording stereooutput line-level devices such as synthesizers or
electronic pianos.
• MASTERING: An algorithm suitable for processing a
stereo mix signal during mixdown, etc.
Patch
PRE AMP/
DRIVE
COMP
VOL PDL
EQ
ZNR
MODULATION/
DELAY
PAT LVL
A newly created project contains 220 patches designed by
ZOOM, and these patches are organized according to the
four algorithms. You can instantly switch insert effect
settings simply by selecting the appropriate algorithm, and
then selecting a patch. The following table shows how the
patches are organized for each algorithm.
The arrangement of the effect modules and the signal flow
for each algorithm is shown in the diagram below.
Patch number
GUITAR/BASS
00 – 99
100 types
MIC
00 – 49
50 types
LINE
00 – 49
50 types
MASTERING
00 – 19
20 types
Reference [Effects]
Algorithm
Types
[Module arrangement for each algorithm]
Algorithm
Effect modules
COMP
PRE AMP/
DRIVE
SINGLE
COMP/LIM
MIC PRE+
DE-ESSER
EQ
DUAL
COMP/LIM
CONM
MIC PRE
MIC PRE
LINE
COMP/LIM
MASTERING
3BAND COMP/
LO-FI
GUITAR/BASS
Input/output type
VOL PDL
MODULATION/
DELAY
ZNR
VOL PDL
MODULATION/
DELAY
EQ
EQ
ZNR
ZNR
VOL PDL
DOUBLING
DOUBLING
ISOLATOR
EQ
ZNR
VOL PDL
MODULATION/
NORMALIZE
EQ
ZNR
VOL PDL
DIMENSION/
RESONANCE
EQ
ZNR
Mono → stereo
MIC
ZOOM MRS-1044
Stereo → stereo
75
Using the insert effect
Changing the insert location of the
insert effect
Applying the insert effect only to the
monitor signal
When the project is in its initial state, the insert effect is
sent into the input mixer. However, you may change the
insert location as necessary. The procedure is as follows.
Normally when the insert effect is placed into the input
mixer, the signal processed by the effect will be recorded on
the track. If necessary, however, you can apply the insert
effect only to the monitor signal, and record the unprocessed
input signal on the track. For example when recording the
unprocessed sound of a vocal performance, the vocalist will
be more comfortable singing if an insert effect suitable for
mic recording is applied to the monitor signal.
1. In the main screen, press the effect section [INPUT
SOURCE] key.
The currently selected insert location will appear in the
display.
INPUT
Insert effect
Location at which the insert effect is inserted
Recorder
The display has the following significance.
1. Send the insert effect into the input mixer.
•
•
•
•
•
INPUT: Input mixer (default setting)
DRUM: DRUM channel of the track mixer
BASS: BASS channel of the track mixer
TR 1 – TR6: Channels 1 – 6 of the track mixer
TR1/2, TR3/4, TR5/6, TR7/8, TR9/10: Channels 1/2, 3/4,
5/6, 7/8, or 9/10 of the track mixer
• MASTER: Immediately before the MASTER fader
For the procedure, refer to the preceding section.
2. Press the [EFFECT] key, and then press one of the
ALGORITHM keys that is already lit.
A screen will appear in which you can select an insert
effect patch.
3. Press the [PROJECT/UTILITY] key, and use the
2. Turn the dial to select the insert location.
H INT
cursor [ E ]/[ R ] keys to make the display read
"UTILITY REC SRC."
Reference [Effects]
While the above screen is displayed, you can also select the
insert location by pressing an INPUT 1/2 [ON/OFF] key or a
status key (DRUM, BASS, 1 – 6, 7/8, 9/10, MASTER). When
using the status keys to select channels 1/2, 3/4, or 5/6 as a
pair, press status keys 1/2, 3/4, or 5/6 simultaneously.
4. Press the [ENTER] key.
3. Press the [EXIT] key.
You will return to the main screen.
A screen will appear in which you can select one of the
following two types of signal to be recorded on the track.
H INT
If the [INPUT SOURCE] key is lit when you are in the main
screen, this means that the insert effect is placed in a
location other than in the input mixer.
• WET: The input signal that has passed through the insert
effect will be recorded on the track (default setting).
• DRY: Only the unprocessed input signal will be recorded
on the track. Even in this case, however, the insert effect
will be applied to the monitor signal.
76
ZOOM MRS-1044
Using the insert effect
5. Turn the dial to change the setting to "DRY."
3. Turn the dial to select the desired patch.
6. When you have finished adjusting settings, press
As you turn the dial, new patches will be recalled
immediately.
the [EXIT] key several times.
You will return to the main screen.
4. If you want to temporarily turn the insert effect off,
press the effect section [BYPASS/TUNER] key.
N OTE
The "UTILITY REC SRC" setting is stored independently for
each project. Before you begin recording other parts,
change the setting back to "WET."
The [BYPASS/TUNER] key will light, and the insert effect
will be bypassed. Bypass will be disabled when you press
the [BYPASS/TUNER] key once again.
H INT
Selecting the patch for the insert
effect
If you press the [ENTER] key after pressing the
[BYPASS/TUNER] key, the Tuner function will be turned on.
(For details on the Tuner function, refer to p.92.)
Here's how to select the patch for the insert effect.
5. To return to the main screen, press the [EXIT] key.
1. Press the [EFFECT] key.
The [EFFECT] key will light, and a screen will appear in
which you can select a patch for the effect that you
operated last (either the insert effect or send/return effect).
The display will indicate the currently selected patch.
INSERT: insert effect
S/R-REV: Send/return effect (reverb)
S/R-CHO: Send/return effect (chorus/delay)
Patch name
The flow of the signal that passes through the insert effect
will change as shown below, depending on the insert
location, the number of input signal channels (1 or 2
channels), and the input/output type of the insert effect
(mono input / stereo output, or stereo input and output).
("M → S" indicates mono input / stereo output, and "S →
S" indicates stereo input/output algorithms.)
■ When inserted into the input mixer
• When recording on two mono tracks (tracks 1/2, 3/4,
5/6) or on a stereo track (7/8, 9/10)
Patch number
2. In the effect section, press the desired ALGORITHM
Recorder
INPUT 1
or
INPUT 2
EFFECT
(M→S)
•
•
•
•
GUITAR/BASS algorithm: [GUITAR/BASS] key
MIC algorithm: [MIC] key
LINE algorithm: [LINE] key
MASTERING algorithm: [MASTERING] key
Track
Recorder
INPUT 1
or
INPUT 2
EFFECT
(S→S)
Track
Track
Recorder
INPUT 1
EFFECT
(M→S)
Track
Track
INPUT 2
When selecting a patch for the insert effect, you will begin
by first selecting the algorithm (the combination of effect
modules). When you press the ALGORITHM key, the
display will show the insert effect patches of that
algorithm.
ZOOM MRS-1044
Recorder
INPUT 1
EFFECT
(S→S)
Track
Track
INPUT 2
77
Reference [Effects]
key.
Track
Using the insert effect
• When recording on one mono track (track 1 – 6)
Recorder
INPUT 1
or
INPUT 2
EFFECT
(M→S)
INPUT 1
or
INPUT 2
EFFECT
(S→S)
Track
■ When inserted into the track mixer
• If two mono channels (channels 1/2, 3/4, 5/6), a stereo
channel (7/8, 9/10), or the DRUM channel is selected as
the insert location
Recorder
Recorder
Track
Track
Track
EFFECT
(M→S)
Channel
EFFECT
(M→S)
Channel
Recorder
Recorder
INPUT 1
Track mixer
Track
Track
Track
Track mixer
Channel
EFFECT
(S→S)
Channel
INPUT 2
Recorder
INPUT 1
EFFECT
(S→S)
Track
• If a mono channel (channel 1 – 6) or the BASS channel
is selected as the insert location
INPUT 2
Recorder
Track
H INT
If no recording track is selected, the output signal of the
insert effect will be sent to a location immediately before
the MASTER fader, and mixed with the signals of the track
mixer.
Track mixer
EFFECT
(M→S)
Channel
Recorder
Track
Track mixer
EFFECT
(S→S)
Channel
■ When inserted immediately before the MASTER
fader
MASTER fade
OUTPUT
L
R
Reference [Effects]
L
R
L
EFFECT
(M→S)
R
EFFECT
(S→S)
R
L
Editing the insert effect patch
The effect modules of the insert effect have various "effect
parameters" that can be adjusted to make detailed changes
to the character of the effect. By editing the effect
parameters, you can obtain the desired tone or effect.
For some effect modules, you can change the "effect type."
For example in the GUITAR/BASS algorithm, the
MODULATION/DELAY effect module provides twelve
effect types such as chorus, flanger, and phaser, and you
can select and use any one of these. When you change the
effect type, the effect parameters will also change.
78
ZOOM MRS-1044
Using the insert effect
4. From the MODULE keys, press the key for the
Effect MODULATION/
module
DELAY
effect module that you want to edit.
Effect type
CHORUS
FLANGER
PHASER
Effect
parameters
DEPTH
RATE
MIX
DEPTH
RATE
FB
POSITION
RATE
COLOR
When editing a patch, use the MODULE keys to select the
module for editing. The table below shows how the
MODULE keys correspond to the various effect modules.
Here's how to edit the effect type and effect parameters for
the currently selected patch.
The following display is an example of when the
[MODULATION/DELAY] key is pressed to select the
MODULATION/DELAY effect module.
1. Press the [EFFECT] key to make the key light.
The display will indicate the currently selected patch.
2. Use the ALGORITHM keys to select an algorithm,
and turn the dial to select the patch that you want
to edit.
It is not possible to change the algorithm of the currently
selected patch. For this reason, you must first begin by
selecting a patch that uses the desired algorithm, even
when you want to create a patch from scratch.
3. Press the [EDIT] key.
The upper part of the display will indicate "EDIT." This
means that the patch may now be edited.
If you select an effect module using a key other than the
[TOTAL] key, you can use the cursor [Q]/[W] keys to
access the setting screens for the effect type and effect
parameters of that module.
H INT
• The lit/dark condition of the [COMPRESSOR], [PRE
AMP/DRIVE], [EQUALIZER], and [MODULATION/DELAY]
keys indicates the on/off status of the corresponding
module. (If you select an effect module that is off, the
display will indicate "-OFF-.") Each time you press one of
these keys, the setting will alternate on/off.
• To edit the ZNR or VOL PDL modules, press [TOTAL],
and then use the cursor [Q]/[W] keys to display either
"ZNR" or "VOL PDL." Then turn the dial to edit the
parameter.
selected module, press the cursor [Q] key to make
the display show "TYPE," and then turn the dial to
select the desired effect type.
[MODULE key correspondence]
Key
Algorithm
COMP
PRE AMP/
DRIVE
EQ
MODULATION/
DELAY
ZNR
VOL PDL
PAT LVL
SINGLE
COMP/LIM
MIC PRE+
DE-ESSER
EQ
MODULATION/
DELAY
ZNR
VOL PDL
PAT LVL
DUAL
COMP/LIM
MIC PRE
EQ
DOUBLING
ZNR
VOL PDL
PAT LVL
LINE
COMP/LIM
ISOLATOR
EQ
MODULATION/
ZNR
VOL PDL
PAT LVL
MASTERING
3BAND COMP/
LO-FI
NORMALIZE
EQ
DIMENSION/
RESONANCE
ZNR
VOL PDL
PAT LVL
GUITAR/BASS
MIC
ZOOM MRS-1044
79
Reference [Effects]
5. If you want to switch the effect type for the
Using the insert effect
The following diagram shows an example of when the
MODULATION/DELAY module effect is changed from
"CHORUS" to "FLANGER."
Patch level
H INT
Strictly speaking, the patch level is not an effect module,
but is one of the parameters included in the patch.
Effect type
10. When you have finished editing, press the [EXIT]
N OTE
key.
Some effect modules have only one effect type. For such
modules, there will be no screen for selecting the effect
type.
H INT
If the contents of a patch have been edited, the "EDIT"
indicator in the upper part of the display will change to
"EDITED."
6. Use the cursor [Q]/[W] keys to select the effect
parameter that you want to edit.
The following diagram shows an example of what you see
when you have selected the DEPTH parameter of the
"FLANGER" effect.
You will return to the patch select screen.
N OTE
Be aware that if you return to the patch select screen and
select another patch, the edited contents will be lost. If you
want to keep the results of your editing, refer to the
following section.
Storing an insert effect patch
A patch you edited can be stored in any location of the
same algorithm. You can also store an existing patch in
another location to create a copy of that patch.
1. Press the [EFFECT] key, and then press the [EDIT]
key.
The currently selected patch can now be edited.
Effect parameter
Setting
2. Press the [TOTAL] key, and use the cursor [Q]/[W]
keys to make the display read "STORE."
Reference [Effects]
7. Turn the dial to change the setting.
For details on the effect types that can be selected for each
effect module, and on the effect parameters of each type,
refer to the appendix (→ p.98) at the end of this manual.
3. Press the [ENTER] key.
8. Repeat steps 4 – 7 to make the desired edits for
4. Turn the dial to select the store-destination patch
other modules.
A screen will appear in which you can specify the storedestination patch number.
number, and press the [ENTER] key.
The display will ask "SURE?"
9. If you want to adjust the patch level (the final
volume of the patch), press the [TOTAL] key, use
the cursor [Q]/[W] keys to make the display read
"TOTAL PAT LVL," and turn the dial.
5. Press the [ENTER] key.
The patch will be stored, and you will return to the patch
select screen.
The patch level can be adjusted in a range of 1 – 30.
80
ZOOM MRS-1044
Using the send/return effects
H INT
Using the send/return effects
• Patches that you store are saved on the hard disk as part
of the project.
• Patch data included in an already existing project can be
loaded into the current project (→ p.84). This is
convenient when you want to use an edited patch in a
different project.
Editing the name of an insert effect
patch
Here's how to edit the name of the currently selected patch.
1. Press the [EFFECT] key, and then press the [EDIT]
key.
This section explains how to select and edit patches for the
send/return effects (reverb, chorus/delay)
About the send/return effect patches
The "reverb" and "chorus/delay" send/return effects are
separate and independent.
Reverb and chorus/delay each have an "effect type" that
determines the type of effect, and various parameters that
let you adjust the character of the effect. Settings for the
effect type and parameters, together with a name, are
collectively called send/return effect "patches."
The currently selected patch can now be edited.
2. Press the [TOTAL] key, and use the cursor [Q]/[W]
keys to make the display read "PAT NAM."
The name of the patch will be displayed below "PAT
NAM," and the character currently selected for editing will
blink.
A newly created project contains 20 different reverb
patches and 20 different chorus/delay patches. You can
instantly switch reverb or chorus/delay settings simply by
choosing the effect for which you want to select a patch
(reverb or chorus/delay), and then selecting a patch.
Algorithm
Patch number
Types
REVERB
00 – 19
20 types
CHORUS/DELAY
00 – 19
20 types
3. Use the cursor [E]/[R] keys to move the blinking
area, and turn the dial to change the character.
4. When you have finished editing the name, use the
cursor [ Q ]/[ W ] keys to make the display read
"STORE," and press the [ENTER] key three times.
The patch will be stored with the edited name, and you will
return to the patch select screen.
Selecting a send/return effect patch
Here's how to select a reverb or chorus/delay patch.
1. Press the [EFFECT] key, and then press the
[REVERB] key or [CHORUS/DELAY] key.
Press the [REVERB] key if you want to select a reverb
patch, or the [CHORUS/DELAY] key if you want to select
a chorus/delay patch. The currently selected patch will be
displayed. The following display shows an example of
what you see when the [REVERB] key is pressed.
2. Turn the dial to select the new patch.
As you turn the dial, new patches will be recalled
immediately. If the track mixer REVERB SEND and
CHORUS/DELAY SEND parameter settings are raised,
you can press the PLAY [R] key to play back the song,
and listen to the result of the newly selected patch.
ZOOM MRS-1044
81
Reference [Effects]
For details on the characters that can be selected, refer to
p.36.
Using the send/return effects
4. If you want to change the effect type, turn the dial.
H INT
• When a reverb or chorus/delay patch is selected, you
can press the corresponding key ([REVERB] or
[CHORUS/DELAY]) to switch that effect on/off. (When off,
the key will be dark.)
In this example, the chorus/delay effect type has been
changed from "CHORUS" to "DELAY." When the effect
type is changed, the effect parameters will also be different.
• For details on track mixer operations, refer to p.49.
3. To return to the main screen, press the [EXIT] key.
Editing a send/return effect patch
Here's how to edit a reverb or chorus/delay patch.
H INT
When the contents of a patch are modified, the "EDIT"
indicator in the upper part of the display will change to
"EDITED."
1. Press the [EFFECT] key, and then press the
[REVERB] key or [CHORUS/DELAY] key.
Press the [REVERB] key to edit a reverb patch, or press the
[CHORUS/DELAY] key to edit a chorus/delay patch.
When either key is pressed, the currently selected patch
will be displayed. The following screen is an example of
what you see when the [CHORUS/DELAY] key is pressed.
5. Use the cursor [Q]/[W] keys to select the effect
parameter that you want to edit.
In this example, the TIME parameter of the "DELAY"
effect type has been selected.
Effect parameter
Patch name
Patch number
2. If necessary, turn the dial to select the patch that
you want to edit.
Setting
6. Turn the dial to change the setting.
For details on the effect types that can be selected for
reverb or chorus/delay, and on the range of each effect
parameter, refer to the appendix (→ p.105) at the end of
this manual.
3. Press the [EDIT] key.
Reference [Effects]
The display will indicate "EDIT," and a screen will appear
in which you can edit the patch. When the [EDIT] key is
first pressed, a screen will appear in which you can select
the effect type of the selected send/return effect (in this
example, chorus/delay).
7. As necessary, repeat steps 5 – 6 to edit other effect
parameters.
8. When you have finished editing, press the [EXIT]
key.
You will return to the patch select screen.
N OTE
Effect type
82
Be aware that if you return to the patch select screen and
select another patch, your edits will be lost. If you want to
keep the edited patch, refer to the following section.
ZOOM MRS-1044
Using the send/return effects
Storing a send/return effect patch
A patch you edited can be stored in any location of the
same send/return effect. You can also store an existing
patch in another location to create a copy of that patch.
1. Press the [EFFECT] key, and then press the [EDIT]
whose name you want to edit.
2. Press the [EDIT] key, and use the cursor [Q]/[W]
keys to make the display read "PAT NAM."
The name of the patch will be displayed below "PAT
NAM," and the character currently selected for editing will
blink.
key.
The currently selected patch can now be edited.
2. Use the cursor [Q]/[W] keys to make the display
read "STORE."
3. Use the cursor [E]/[R] keys to move the blinking
3. Press the [ENTER] key.
A screen will appear in which you can specify the storedestination patch number.
area, and turn the dial to change the character.
For details on the characters that can be selected, refer to
p.36.
4. When you have finished editing the name, use the
cursor [ Q ]/[ W ] keys to make the display read
"STORE," and press the [ENTER] key three times.
4. Turn the dial to select the store-destination patch
number, and press the [ENTER] key.
The patch will be stored with the edited name, and you will
return to the patch select screen.
The display will ask "SURE?"
5. Press the [ENTER] key.
The patch will be stored, and you will return to the patch
select screen.
H INT
Reference [Effects]
• Patches that you store are saved on the hard disk as part
of the project.
• Patch data included in an already existing project can be
loaded into the current project (→ p.84). This is
convenient when you want to use an edited patch in a
different project.
Editing the name of a send/return
effect patch
Here's how to edit the name of the patch that is currently
selected for a send/return effect.
1. Press the [EFFECT] key, and then press the
[REVERB] key or [CHORUS/DELAY] key.
Press the [REVERB] key if you want to edit the name of
the reverb patch, or press the [CHORUS/DELAY] key if
you want to edit the name of the chorus/delay patch. When
either key is pressed, the currently selected patch will be
displayed. If necessary, turn the dial to select the patch
ZOOM MRS-1044
83
Importing patches from another project
Importing patches from another
project
Here's how to import (load) all patches for the internal
effects (insert effect and send/return effect) from another
project that is already saved on the hard disk.
1. Press the [EFFECT] key, and then press the
[PROJECT/UTILITY] key in the display section.
The display will indicate "UTILITY REC SRC."
2. Use the cursor [E]/[R] keys to make the display
read "UTILITY IMPORT," and press the [ENTER]
key.
A screen will appear, allowing you to select the project
from which the patch data will be imported.
3. Turn the dial to select the project from which the
patch data will be imported, and press the [ENTER]
key.
The display will ask "IMPORT SURE?"
4. Press the [ENTER] key to execute the Import
operation, or press the [EXIT] key to cancel.
When the data has been imported, you will return to the
"UTILITY IMPORT" screen. At this time, all effect
patches of the project you selected in step 3 will be
overwritten onto the current project.
Reference [Effects]
84
ZOOM MRS-1044
Reference [Project]
This section explains operations that affect an entire project.
About projects
On the MRS-1044, the data needed to reproduce a song
you create is managed in units called "projects." A project
contains the following data.
•
•
•
•
•
•
•
•
•
The data recorded on V-takes 1 – 10 of tracks 1 – 10
The current mixer settings
The settings saved in scene numbers 0 – 99
The numbers of the patches currently selected for the
insert effect / send return effects
Insert effect and send/return effect patches (260
patches)
The recorded contents of the rhythm patterns (255
patterns)
The recorded contents of the rhythm song
The number of the drum kit and bass program currently
selected by the drum and bass tracks
MIDI-related settings
Project operations
This section explains operations such as loading or saving
a project. The procedure is the same for most project
operations. The basic procedure is as follows.
Basic procedure
1. In the main screen, press the [PROJECT/UTILITY]
key.
The display will indicate "PROJECT."
2. Press the [ENTER] key.
The "project menu" will appear, allowing you to select the
desired project operation.
The internal hard disk can store a maximum of 1,000
projects, as long as space is available. A project can be
loaded at any time.
N OTE
On the MRS-1044, recording/playback operations can be
performed only for the currently loaded project. It is not
possible to operate multiple projects simultaneously.
Project menu item
3. Use the cursor [E]/[R] keys to select one of the
following operations, and press the [ENTER] key.
ZOOM MRS-1044
85
Reference [Project]
• PROJECT SELECT: Load a previously saved project
from the internal hard disk.
• PROJECT NEW: Create a new project.
• PROJECT SIZE: View the size of the currently loaded
project.
• PROJECT COPY: Duplicate a specified project on the
hard disk.
• PROJECT ERASE: Erase a specified project from the
hard disk.
• PROJECT NAME: Edit the name of the currently loaded
project.
• PROJECT PROTECT: Write-protect the currently loaded
project.
• PROJECT STORE: Store the currently loaded project.
Project operations
4. Execute the operation (or change the setting) that
H INT
you selected.
For details on the procedure, refer to the sections that
follow.
5. To return to the main screen, press the [EXIT] key
several times.
• A newly created project will be automatically assigned a
default name of "PRJxxx" (xxx will be a project number in
the range of 000 – 999). You can edit this name as
desired.
• When you press the [ENTER] key, the project that you
had been working on will be saved automatically before
the new project is created.
H INT
In the case of an operation that you execute, you will
automatically return to the main screen after execution.
Loading a project (PROJECT SELECT)
You can select a project that was saved on the hard disk,
and load it. When the following screen is displayed, use the
dial to select the project that you want to load.
Project name
Checking the project size / available
hard disk capacity (PROJECT SIZE)
This displays the size of the currently loaded project, the
available capacity of the internal hard disk, and the
remaining recording time. Use the cursor [Q]/[W] keys to
switch between the following display items.
●
REMAIN MB: This shows the remaining space on the
internal hard disk in MB (megabyte) units. (One
megabyte is 1,048,576 bytes.)
●
REMAIN h/m: The approximate recordable time
remaining for each track is shown in hours (h) / minutes
(m) / seconds.
●
PRJ SIZ MB: This shows the size of the currently
loaded project in MB (megabyte) units.
●
PRJ SIZ h/m: This shows the size of the currently
loaded project in terms of the recorded time per track, in
hours (h) and minutes (m).
Project number
Press the [ENTER] key to load the project, or press the
[EXIT] key to cancel. After the project has been loaded,
you will return to the main screen.
H INT
• When you press the [ENTER] key, the project that you
had been working on will be saved automatically before
the selected project is loaded.
• When the power of the MRS-1044 is turned on, the
project that you were last working on will be loaded
automatically.
Reference [Project]
Creating a new project (PROJECT
NEW)
This operation creates a new project. To execute, press the
[ENTER] key when the following screen is displayed. To
cancel, press the [EXIT] key.
Number of the project
that will be newly created
When you press the [ENTER] key, a new project will be
loaded, and you will return to the main screen.
86
ZOOM MRS-1044
Project operations
N OTE
• These screens are for display only, and contain no items
that can be edited.
To execute the erasure, press the [ENTER] key. To cancel,
press the [EXIT] key. When the erase operation has been
completed, you will return to the main screen.
• The remaining recordable time is an approximation.
H INT
Duplicating a project (PROJECT
COPY)
This operation copies a specified project that is saved on
the hard disk.
Project name
Project number
1. When the above screen is displayed, turn the dial
to select the copy-source project, and press the
[ENTER] key.
It is also possible to erase the currently loaded project. In
this case, the lowest-numbered project will automatically
be loaded after the erase operation has been completed.
N OTE
Once a project has been erased, it cannot be recovered.
Use this operation with care.
Editing the project name (PROJECT
NAME)
This lets you edit the name of the currently loaded project.
When the following screen is displayed, the character
selected for editing will blink.
A screen will appear in which you can specify the copydestination project number.
Copy-destination project number
Use the cursor [E]/[R] keys to move the blinking area,
and use the dial to change the character.
For details on the characters that can be used, refer to p.36.
H INT
2. Turn the dial to select the copy-destination project
number, and press the [ENTER] key.
The display will ask "SURE?"
3. To execute the copy, press the [ENTER] key. To
cancel, press the [EXIT] key.
Protecting a project (PROJECT
PROTECT)
This setting lets you write-protect the currently loaded
project. When the following screen is displayed, use the
dial to select one of the following two settings.
Erasing a project (PROJECT ERASE)
This operation erases the specified project from the hard
disk. When the following screen is displayed, use the dial
to select the project that you want to erase.
Project name
ZOOM MRS-1044
Project number
●
●
OFF: Protect is turned off.
ON: Protect is turned on. When protect is on, the
following operations will be impossible.
•
•
•
•
Editing or recording on the recorder
Changing the V-take
Editing a patch
Recording or editing a rhythm pattern or the rhythm
87
Reference [Project]
When the copy operation has been completed, you will
return to the main screen with the copy-destination project
selected.
The edited name of the project will be updated when the
project is saved.
Project operations
song
• Deleting or saving the project
• Saving/deleting scenes, making marker settings, etc.
A project for which the Protect setting is turned on is
indicated by a
symbol displayed at the left of the project
number in the main screen.
H INT
• If you save the project after completing the mix, it will be
impossible to return to that state if you continue making
changes. If you do not want a completed mix to be
changed further, we recommend that you turn Protect on.
• The Protect setting will be stored on the internal hard
disk as soon as you switch the setting on or off.
Storing a project (PROJECT STORE)
This operation stores the currently loaded project on the
hard disk. To store the project, press the [ENTER] key
when the following screen is displayed.
When the project has been stored, you will return to the
"PROJECT STORE" screen.
H INT
Reference [Project]
The currently loaded project will be stored automatically
when you load another project, when you create a new
project, or when you press the [POWER] switch to turn off
the power.
N OTE
If the AC adaptor is pulled out of the outlet and power to
the MRS-1044 is lost, all changes that occurred since the
project was last stored will be lost. This is also true of any
other miscellaneous power failure. As a precaution against
such occurrences, we recommend that you store the
project periodically.
88
ZOOM MRS-1044
Reference [MIDI]
This section explains the MIDI-related settings of the MRS-1044.
About MIDI
MIDI (Musical Instrument Digital Interface) is a standard
that allows messages such as performance data
(collectively called "MIDI messages") to be exchanged
between devices such as electronic musical instruments
and computers. The MRS-1044 supports MIDI, and can
transfer messages to and from another MIDI-compatible
device via the [MIDI IN/OUT] connectors located on its
rear panel.
receive Note messages from an external MIDI device in
order to play a drum kit or bass program.
●
[MIDI OUT] connector
This connector transmits MIDI messages from the MRS1044. Note messages that represent the content played by a
rhythm pattern or rhythm song are transmitted from this
connector, as well as MIDI Timing Clock messages when
the MRS-1044 is running.
What you can do using MIDI
On the MRS-1044, you can use MIDI for the following
things
●
Play a drum kit / bass program from an external
device
Performance data can be sent from a MIDI keyboard or
computer to the MRS-1044, to play a drum kit or bass
program. When creating a rhythm pattern, you can also
record a performance from an external MIDI device instead
of using the pads.
●
Operate the MRS-1044 and an external MIDI
device in synchronization
Synchronization messages called "(MIDI) Timing Clock"
can be transmitted from the MRS-1044 to an external
rhythm machine, sequencer, or similar MIDI device, so that
the two devices will operate in synchronization.
About the MIDI connectors
Reference [MIDI]
The MRS-1044 has the following connectors in order to
exchange MIDI messages with external MIDI devices.
●
[MIDI IN] connector
This connector receives MIDI messages that are sent from
an external MIDI device. This connector is used mainly to
ZOOM MRS-1044
89
Making MIDI-related settings
Making MIDI-related settings
This section explains the procedure for making MIDIrelated settings. The procedure is the same for most
settings. The basic procedure is as follows.
Setting the drum/bass MIDI channel
(DRUM CH / BASS CH)
You can specify the MIDI channels for the drum track and
bass track.
When the display shows "DRUM CH" or "BASS CH," turn
the dial to select one of the following settings.
Basic procedure
1. Press the [RHYTHM] key, and then press the
[PROJECT/UTILITY] key.
2. Use the cursor [E]/[R] keys to make the display
read "UTILITY MIDI."
3. Press the [ENTER] key.
Now you can select MIDI-related setting items.
Setting item
4. Use the cursor [E]/[R] keys to select one of the
following items that you want to set, and press the
[ENTER] key.
Reference [MIDI]
•
•
•
•
•
DRUM CH: Set the MIDI channel of the drum track.
BASS CH: Set the MIDI channel of the bass track.
CLOCK: Turn Timing Clock transmission on/off.
SPP: Turn Song Position Pointer transmission on/off.
COMMAND: Turn Start/Stop/Continue message
transmission on/off.
5. Use the dial to set the item.
For details on each item, refer to the explanations that
follow.
6. When you have finished creating settings, press the
• 1 – 16CH: MIDI channels 1 – 16 (default: DRUM
CH=10, BASS CH=9)
• OFF: Channel messages (Note messages) will not be
transmitted or received.
If you specify a MIDI channel (1 – 16) for the drum or bass
track, you can transmit Note messages from an external
MIDI device on that MIDI channel to play the sounds of
the MRS-1044's drum or bass track (i.e., to play the drum
kit or bass program). Also, when you play back a rhythm
pattern (or rhythm song) on the MRS-1044, the content of
the drum and/or bass track will be transmitted as Note
messages. If this setting is turned OFF, Note messages will
not be transmitted or received.
Specifying transmission of Timing
Clock messages (CLOCK)
This setting specifies whether the MIDI synchronization
message Timing Clock will be transmitted. When the
display shows "CLOCK," turn the dial to select one of the
following settings.
• ON (transmission on): MIDI Timing Clock will be
transmitted when the MRS-1044 is running (default
setting).
• OFF (transmission off): Timing Clock will not be
transmitted.
[EXIT] key several times.
You will return to the usual screen.
90
Timing clock will be output according to the tempo of the
rhythm pattern (or rhythm song) that is playing. In order
for the external MIDI device to play back in
synchronization at an appropriate tempo, you will need to
specify the tempo and time signature of the rhythm pattern
ZOOM MRS-1044
Making MIDI-related settings
(rhythm song) even if you are not using the rhythm track.
N OTE
Timing Clock will be transmitted even if the drum and/or
bass tracks are muted (DRUM/BASS status keys dark).
H INT
• When using MIDI Timing Clock messages transmitted
from the MRS-1044 to synchronize the operation of an
exter nal MIDI device, you should also tur n on
transmission for Song Position Pointer and
Start/Stop/Continue messages as well as Timing Clock.
Specifying transmission of Start/
Stop/Continue messages (COMMAND)
You can specify whether Start/Stop/Continue messages
will be transmitted. Start/Stop/Continue are MIDI
messages that control the transport of a device, causing it
to "run" or "stop." Normally these messages are used in
conjunction with Timing Clock. When the display indicates
"COMMAND," turn the dial to select one of the following
settings.
• When transmitting Timing Clock from the MRS-1044, we
recommend that you turn the drum/bass MIDI channels
OFF. Synchronization may become unstable if MIDI
messages other than timing clock are also being
transmitted.
Specifying transmission of Song
Position Pointer messages (SPP)
You can specify whether Song Position Pointer messages
will be transmitted. Song Position Pointer is a MIDI
message that indicates the current measure position.
Normally it is used in conjunction with Timing Clock.
When the display indicates "SPP," turn the dial to select
one of the following settings.
• ON (transmission on): The appropriate Start/
Stop/Continue message will be transmitted when the
MRS-1044 stops or begins running (default setting).
• OFF (transmission off): Start/Stop/Continue messages
will not be transmitted.
• ON (transmission on): MIDI Song Position Pointer
messages will be transmitted when a Locate operation is
performed on the MRS-1044 (default setting).
• OFF (transmission off): Song Position Pointer messages
will not be transmitted.
Reference [MIDI]
ZOOM MRS-1044
91
Reference [Other]
This section explains how to use functions such as the MRS-1044's built-in tuner, and how to change the function of the foot
switch.
Changing the function of the
foot switch
With the default settings of the MRS-1044, a separately
sold foot switch (ZOOM FS01) connected to the [FOOT
SW] jack can be used to play/stop the MRS-1044. If you
want to use the foot switch to perform manual punch-in/out
recording (→ p.33), use the following procedure to change
the internal setting.
1. In the main screen, press the [PROJECT/UTILITY]
Using the tuner
The MRS-1044 has a built-in chromatic tuner that can be
used when tuning an instrument (e.g., guitar or bass)
connected to the [INPUT 1/2] jacks. Here's how to use the
tuner.
1. Connect the instrument that you want to tune to
the [INPUT 1/2] jack, and turn on the [ON/OFF] key
for the jack to which you connected it.
key.
The display will indicate "PROJECT."
2. In the main screen, press the [EFFECT] key, and
then press one of the lit ALGORITHM keys.
2. Use the cursor [E]/[R] keys to make the display
read "UTILITY SYSTEM," and press the [ENTER]
key.
The patch currently selected for the insert effect will be
displayed.
N OTE
3. Use the cursor [E]/[R] keys to make the display
read "UTILITY FOOT SW," and press the [ENTER]
key.
The function currently assigned to the foot switch will be
displayed.
It is not possible to use the tuner from a screen that shows
a send/return effect patch.
3. Press the [BYPASS/TUNER] key.
The display will alternately show "INSERT BYPASS" and
"TUNER→ENTER." During this time, the insert effect
will be bypassed.
4. Press the [ENTER] key.
• PLY_STP: The MRS-1044 will alternate between
play/stop each time you press the foot switch (default
setting).
• PUNCH IO: The foot switch can be used to perform
manual punch-in/out.
The display will indicate "TUNER," and the tuner function
will be turned on. While the tuner function is on, the insert
effect will remain bypassed, and the send/return effects
(reverb and chorus/delay) will also be turned off.
4. Use the dial to select either "PLY_STP" or "PUNCH
Reference [Other]
IO."
5. Play the note that you want to tune, and tune your
5. To return to the main screen, press the [EXIT] key
several times.
instrument so that the desired note name (C, C#, D,
D#, E...) appears in the display.
Note name
92
ZOOM MRS-1044
Preventing digital copying of your master tape
6. When the desired note name appears, watch the
">" and "<" symbols in the display, and make fine
adjustments to the tuning.
Preventing digital copying of
your master tape
When mixing down to a DAT recorder etc. via the
[DIGITAL] jack, you can prevent digital copies from being
made from your completed master tape onto another digital
recorder. The procedure is as follows.
Pitch is flat
1. In the main screen, press the [PROJECT/UTILITY]
key.
The display will indicate "PROJECT."
Correct pitch
2. Use the cursor [E]/[R] keys to make the display
show "UTILITY SYSTEM," and press the [ENTER]
key.
3. Use the cursor [E]/[R] keys to make the display
Pitch is sharp
show "UTILITY D PRTCT," and press the [ENTER]
key.
7. If you want to change the reference pitch of the
The current digital copy setting will be displayed.
tuner, turn the dial.
The reference pitch of the tuner is set to middle A=440 Hz
by default. The reference pitch can be adjusted in a range
of 435 – 455 Hz.
Reference pitch of the tuner
H INT
If you change the reference pitch, the pitch of the bass
program will also change accordingly.
• OFF: Digital copying from your master tape to another
digital recorder will be permitted (default setting).
• ON: SCMS (Serial Copy Management System) data will
be added to the digital signal that is output from the
[DIGITAL] jack. It will not be possible to make digital
copies from a master tape that contains this data.
(D PRTCT=OFF)
(D PRTCT=ON)
8. When you have finished tuning, press the [EXIT]
MRS-1044
key.
You will return to the main screen. At the same time, the
insert effect will remain bypassed, but the send/return
effects will be switched back on.
[BYPASS/TUNER] key.
[OUTPUT] (DIGITAL) jack
Mixdown
Mixdown
MD/DAT recorder
Digital copying is
possible
MD/DAT recorder
ZOOM MRS-1044
MD/DAT recorder
Digital copying is
not possible
MD/DAT recorder
93
Reference [Other]
9. To disable bypass for the insert effect, press the
MRS-1044
[OUTPUT] (DIGITAL) jack
Preventing digital copying of your master tape
4. Turn the dial to switch the setting "ON."
5. When you have finished making settings, press the
[EXIT] key several times.
You will return to the main screen.
H INT
This setting must be made before you mixdown. If you turn
the setting ON after mixing down, it will have no effect.
Reference [Other]
94
ZOOM MRS-1044
Appendices
Specifications of the MRS-1044
●
Recorder
Physical tracks
10
Virtual tracks
100 (10 virtual tracks for each track)
Drum track
1 (stereo)
Bass track
1 (mono)
Simultaneously recordable tracks
2 tracks
Recorded data format
16 bit linear (uncompressed)
Maximum recording time More than 44 hours (calculated for
mono tracks)
Markers
100 mark points per project
Location display
Hour/Min/Sec/mSec display,
or Meas/Beat/Tick display
Track editing functions
Copy, Move, Paste, Erase, Exchange
Punch-in/out function
Manual, Auto
Other functions
Bounce, Scrub/Preview, A-B Repeat,
Undo/Redo
●
Mixer
Simultaneously playable tracks
13 (10 audio tracks + stereo drum
track + mono bass track)
Faders
11 (1 – 6 mono, 7/8 – 9/10 stereo,
drum, bass, stereo master)
Level meter display
Switchable post-fader/pre-fader, fader
value monitor function
Track parameters
Equalizer, effect send, pan (balance
for stereo-link)
Equalizer
HIGH (f: 500 Hz-18 kHz,
GAIN: +/-12 dB)
LOW (f: 40 Hz-1.6 kHz,
GAIN: +/-12 dB)
Effect send
Chorus/delay send, reverb send
Stereo link
Selectable for tracks 1/2, 3/4, 5/6;
fixed for tracks 7/8 and 9/10
Scene function
100 scenes for each project (can be
registered at markers)
●
Effects
Algorithms
●
Rhythm
Number of voices
Sound generator type
Drum kits
Number of drum sounds
Number of bass sounds
Hard disk
Number of projects
A/D converter
D/A converter
Sampling frequency
Signal processing
Frequency response
S/N
Dynamic range
THD+N
Display
Guitar/bass (Hi-Z) input
Unbalanced inputs
Balance inputs
Phantom power
Input level
Master out
Output impedance
Nominal output level
Headphone out
Digital out
MIDI
Control input
Optional board slot
Dimensions
Weight
Power supply
Power consumption
Included items
Optional accessory
8 drum voices, 1 bass voice
16 bit linear PCM
30 drum kits
24 for each drum kit (8 pads x 3
banks)
15 types (5 octaves for each sound)
Optional board
3.5 inch E-IDE type, 15 GB
Maximum of 1,000 projects
24 bit 64 times oversampling
24 bit 128 times oversampling
44.1 kHz
24 bit
20 Hz – 20 kHz +/-1 dB (for 10 k-ohm
load)
93 dB (IHF-A)
97 dB (IHF-A)
0.02% (400 Hz, at 10 k-ohm load)
60 x 42 mm original LCD (with
backlight)
1 x mono phone jack, input impedance
500 k-ohms
2 x mono phone jack, input impedance
greater than 50 k-ohms, unbalanced
2 x XLR-3-31 type, input impedance 1
k-ohm balanced, pin 2 hot
48 V (with on/off switch)
-50 dBm < continuously variable < +4
dBm
RCA phono jacks (L/R)
1 k-ohm
-10 dBm
Stereo phone jack, 50 mW (at 32 ohm
load)
S/P DIF optical (20 bit)
IN, OUT
FP02 input jack, FS01 input jack
1
430 (W) x 260 (D) x 77 (H)
3.4 Kg
DC 12V, 2A (requires included AD0009 AC adaptor)
20 W (12V 1A) typical
Universal AC adaptor (AD-0009), AC
cable
FS01 (foot switch), FP02 (expression
pedal)
UIB-01 (USB interface board), SIB01 (SCSI interface board)
0 dBm = 0.775 Vrms
Specifications and appearance are subject to change without notice for improvement.
ZOOM MRS-1044
95
Appendices
4 types (guitar/bass, mic, line,
mastering)
Modeling method
VAMS (Variable Architecture
Modeling System)
Number of patches
220 (100 guitar/bass + 50 mic + 50
line + 20 mastering)
Number of effect modules 4 (compressor, pre-amp/drive, equalizer, modulation/delay)
Number of send/return patches
40 (20 chorus/delay + 20 reverb)
Tuner type
Auto chromatic tuner
Tuner calibration
435 – 445 Hz, adjustable in 1 Hz steps
Number of pads
8 pads (velocity sensitive)
Resolution
48 PPQN
Time signatures
1/4 – 8/4 time signatures
Number of factory preset patterns
More than 400 (rewritable)
Maximum number of patterns
255 patterns for each song (rewritable)
Maximum number of measures
999 measures (for each Rhythm song),
255 measures (for each Rhythm
pattern)
Number of notes
Approximately 10,000 notes (for each
Rhythm song)
Tempo
40.0 – 250.0 (resolution 1/10)
Troubleshooting
Troubleshooting
If the MRS-1044 does not function as you expect, check the following points first.
Problems during playback
■ No sound, or sound is very weak
• Check the connections to your audio system, and the
volume of your audio system.
• Make sure that the status keys of each channel are lit
green. If a key is dark, press the key to make it light
green.
• Make sure that the fader of each channel and the
MASTER fader are raised. If they are already raised,
lower each fader and then raise it once again.
• If a scene with the volume lowered has been assigned to
a mark, the volume will automatically be lowered when
that mark is reached. Delete the scene that is assigned to
the mark (→ p.52).
• The recorder will not operate when the [RHYTHM] key
is lit. Press the [EXIT] key several times to make the
[RHYTHM] key go dark.
■ Operating the fader does not affect the
volume
• On channels for which stereo link is turned on, the fader
of the even-numbered channel will have no effect.
Either turn stereo link off (→ p.50), or operate the fader
of the odd-numbered channel.
■ The display indicates "Don't Play" and
playback is not possible
• The recorder will not operate in the current screen. Press
the [EXIT] key several times to switch to the main
screen.
hard disk (→ p.85).
• Recording is not possible if the project is writeprotected. Either turn protect off (→ p.85), or use a
different project.
■ The signal from the [INPUT 1/2] (BALANCE)
jack(s) is not input
• If plugs are inserted in the [INPUT 1] (GUITAR/BASS,
UNBALANCE) jacks or the [INPUT 2] (UNBALANCE)
jack, disconnect these plugs.
■ The recorded sound is distorted
• Check whether the input sensitivity setting ([INPUT
1/2] control) and recording level setting ([REC LEVEL]
control) were appropriate.
• Lower the fader so that the 0 (dB) dot of the level meter
does not light.
• If the EQ gain of the track mixer is set extremely high,
the sound may be audibly distorted even if the fader is
lowered. Set the EQ to an appropriate value.
Problems with effects
■ Insert effect does not apply
• Make sure that the [BYPASS/TUNER] key is dark.
• Make sure that the insert effect is sent to the desired
location (→p.76).
• Make sure that a MODULE key is lit. If all MODULE
keys are dark, either press one or more MODULE keys
to make them light, or select another patch.
■ Send/return effect does not apply
Problems during recording
■ The input signal cannot be heard, or is too
soft
Appendices
• Make sure that the INPUT 1/2 [ON/OFF] keys are lit.
• Make sure that the [INPUT 1]/[INPUT 2] controls are
raised.
• Make sure that the [REC LEVEL] control is raised. If it
is already raised, lower it and then raise it again.
• Make sure that the [CHORUS/DELAY] or [REVERB]
key is lit. If it is dark, press the key several times to
make it light.
• For each channel of the mixer, make sure that the
REVERB SEND or CHORUS/DELAY SEND parameter
is turned on. If it is on, make sure that the send level is
raised (→ p.50).
■ Can't record on a track
• Make sure that you have selected a recording track.
• Check whether you have run out of free space on the
96
ZOOM MRS-1044
Troubleshooting
Problems with the rhythm section
■ Can't hear the rhythm pattern play back
• Make sure that the DRUM/BASS status keys are lit
green.
• Make sure that the DRUM/BASS faders are raised. If
the faders are already raised, lower them and then raise
them once again.
• Make sure that you have not selected a blank rhythm
pattern (pattern name "EMPTY").
■ Can't hear the rhythm song play back
• In the case of a new project, the rhythm song has not yet
been created, so you will hear no sound. Either create
the rhythm song, or load a project for which a rhythm
song has been created.
■ No sound when you tap the pads
• If the pad sensitivity has been set to "SOFT," loud
sounds will not be produced even when you tap
strongly. Change the setting to "NORMAL," "LITE," or
"LOUD" (→ p.72).
■ Can't record or edit a rhythm pattern /
rhythm song
• When the [RHYTHM] key is dark or blinking, it is not
possible to record or edit a rhythm pattern or rhythm
song. Press the [RHYTHM] key to make the key light.
• If the display indicates "FULL," this means that you
have used up the rhythm section memory. Please delete
unneeded rhythm patterns.
■ Sounds recorded in the rhythm pattern do
not play
• Sounds that exceed the maximum polyphony (8 notes
for the drum track, and 1 note for the bass track) will
not be played. Either delete some of the other notes that
have already been recorded (→ p.68), or stay within the
maximum polyphony when you record.
Problems with MIDI
■ Can't synchronize with an external MIDI
device
• Make sure that a MIDI cable is correctly connected
from the [MIDI OUT] connector of the MRS-1044 to
the MIDI IN connector of the external device.
• On the MRS-1044, make sure that transmission is
enabled for the Timing Clock, Song Position Pointer,
and Start/Stop/Continue messages (→ p.90).
• On the external MIDI device, make sure that it is set to
receive Timing Clock and synchronize to it.
• Make sure that the external MIDI device is in playback
mode.
Other problems
■ Can't save the project
• The project cannot be saved if the Protect setting is on.
Turn protect off (→ p.85).
■ Can't use the tuner
• The tuner cannot be used if the insert effect is inserted
in a location other than the input mixer. Change the
insert location to the input mixer.
■ Can't record on an external recorder
connected to the [OUTPUT] (DIGITAL) jack.
• Make sure that the external recorder is set to a sampling
frequency of 44.1 kHz.
• Make sure that the audio format of the external recorder
supports S/P DIF.
■ Can't create a new project or copy a project
• If the display indicates "FULL," this means that 1,000
projects already exist, and no further projects can be
created. Please delete unwanted projects.
■ The display indicates "STOP RECORDER,"
and operation is not possible
• The currently-performed operation cannot be performed
while the recorder is running. Press the STOP[P] key to
stop the recorder, and then perform the operation.
• Make sure that a MIDI cable is correctly connected
from the MIDI OUT connector of the external device to
the MRS-1044's [MIDI IN] connector.
• Make sure that the MIDI channels for the drum track
and bass track are set appropriately (→ p.90).
• Make sure that the MIDI transmit channel(s) of the
ZOOM MRS-1044
97
Appendices
■ The MRS-1044's drum/bass sounds cannot
be played from an external MIDI device
external device matches the MIDI channel(s) of the
drum track and/or bass track.
Effect type/parameter list
Effect type/parameter list
Insert effect
■ GUITAR/BASS ALGORITHM
COMPRESSOR MODULE
TYPE
COMP
PARAMETER 1
PARAMETER 2
PARAMETER 3
SENS
ATTACK
LEVEL
A compressor that makes the dynamics more consistent.
Explanation of COMPRESSOR MODULE parameters
Parameter name
Range
SENS
ATTACK
LEVEL
0 – 10
0 – 10
1–8
Explanation of parameter
Set the input sensitivity of the compressor.
Adjust the speed at which compression is applied.
Adjust the output level of the module.
PRE AMP/DRIVE MODULE
TYPE
J-CLN
US-CLN
US-DRV
Tweed
Class A
UK-CRU
UK-DRV
CMB 335
MTL PNL
BLK BTM
MD LEAD
FZ-STK
Appendices
98
PARAMETER 1
PARAMETER 2
PARAMETER 3
PARAMETER 4
PARAMETER 5
PARAMETER 6
GAIN
TONE
LEVEL
--
--
--
LEVEL
--
--
--
LEVEL
--
--
--
LEVEL
--
--
--
--
--
--
--
--
--
--
--
--
--
--
--
--
--
--
--
--
--
LEVEL
--
--
--
LEVEL
--
--
--
--
--
--
LEVEL
--
--
--
TONE
LEVEL
CABINET
SPEAKER
DEPTH
TONE
LEVEL
CABINET
SPEAKER
DEPTH
LEVEL
CABINET
SPEAKER
DEPTH
LEVEL
CABINET
SPEAKER
DEPTH
LEVEL
CABINET
SPEAKER
DEPTH
LEVEL
CABINET
SPEAKER
DEPTH
CABINET
SPEAKER
DEPTH
Clean sound that models a transistor combo amp.
GAIN
TONE
Clean sound that models a built-in type vacuum tube amp.
GAIN
TONE
Drive sound that models a built-in type vacuum tube amp.
GAIN
TONE
Model of a small built-in vacuum tube combo amp, with characteristic distortion.
GAIN
TONE
LEVEL
Unique crunch sound that models a British-style combo amp.
GAIN
TONE
LEVEL
Crunch sound that models a British-style vacuum tube stack amp.
GAIN
TONE
LEVEL
Drive sound that models a British-style vacuum tube stack amp.
GAIN
TONE
LEVEL
Models a vacuum tube combo amp characterized by long sustain.
GAIN
TONE
LEVEL
High-gain drive sound that models a vacuum tube stack amp.
GAIN
TONE
LEVEL
Model of a vacuum tube stack amp, characterized by thick lows and delicate distortion.
GAIN
TONE
Drive sound that models a high-gain amp suitable for lead.
GAIN
TONE
60's sound typical of a Fuzz unit played through an amp stack.
GAIN
TONE
LEVEL
TE Bass
Model of a bass amp with a distinctively clean low-mid range.
FD Bass
Model of a bass amp with vintage-style drive.
SnsBass
Trebly drive sound for bass.
CR+CAB
Combination of crunch and cabinet simulator.
TS+CAB
Combination of vintage overdrive and cabinet simulator.
GV+CAB
Combination of vintage distortion and cabinet simulator.
MZ+CAB
Combination of metal-style distortion and cabinet simulator.
9002+CB
Combination of the Zoom 9002 distortion and cabinet simulator.
Aco.Sim
Transforms the sound of an electric guitar into an acoustic-guitar-like tone.
E-AcPRE
Pre-amp for electric-acoustic.
BassSim
Transforms the sound of an electric guitar into a bass-guitar-like tone.
CABINET
Simulation of the cabinet of a guitar/bass amp.
GAIN
GAIN
GAIN
GAIN
GAIN
GAIN
GAIN
TOP
COLOR
TONE
CABINET
TONE
TONE
TONE
TONE
TONE
BODY
LEVEL
TONE
LEVEL
CABINET
SPEAKER
DEPTH
LEVEL
--
--
--
--
--
--
--
SPEAKER
DEPTH
ZOOM MRS-1044
Effect type/parameter list
Explanation of PRE AMP/DRIVE MODULE parameters
Parameter name
Range
GAIN
TONE
LEVEL
TOP
BODY
CABINET
1 – 30
0 – 10
1–8
1 – 30
0 – 10
CM
br
Ft
St
bC
bS
C1
C2
C3
GS
GW
bC
bS
0 – 10
1–4
SPEAKER
DEPTH
COLOR
Explanation of parameter
Adjusts the amount of gain.
Adjusts the tone.
Adjusts the output level of the module.
Adjusts the resonance of the strings.
Adjusts the resonance of the body.
Combo: Simulation of a combo-type cabinet.
Bright Combo: Produces a brighter tone than Combo.
Flat: A cabinet with a flat response.
Stack: Produces the character of a stack-type cabinet.
BassCombo: The sound of a combo-type cabinet for bass.
BassStack: The sound of a stack-type cabinet for bass.
Combo 1: The sound of a combo-type guitar amp with one 12 inch speaker.
Combo 2: The sound of a combo-type guitar amp with two 12 inch speakers.
Combo 3: The sound of a combo-type guitar amp with one 10 inch speaker.
Gt Stack: The sound of a stack-type guitar amp with four 10 inch speakers.
Gt Wall: The sound of multiple stack-type amps placed together.
Bs Combo: The sound of a combo-type bass amp with one 15 inch speaker.
Bs Combo: The sound of a stack-type bass amp with four 6.5 inch speakers.
Adjusts the cabinet resonance of the speaker.
Adjusts the character of the electric-acoustic pre-amp.
EQ MODULE
TYPE
PARAMETER 1
PARAMETER 2
PARAMETER 3
PARAMETER 4
3BandEQ
HIGH
MID
LOW
LEVEL
Three-band equalizer.
Explanation of EQ MODULE parameters
Parameter name
Range
HIGH
MID
LOW
LEVEL
-12 – 12
-12 – 12
-12 – 12
1–8
Explanation of parameter
Boosts/cuts the high-frequency range.
Boosts/cuts the mid-frequency range.
Boosts/cuts the low-frequency range.
Sets the output level of the module.
ZNR MODULE
TYPE
ZNR
PARAMETER 1
THRSHOLD
Zoom's proprietary noise reduction that minimizes noise when you are not playing.
Explanation of ZNR MODULE parameters
Parameter name
Range
THRSHOLD
OFF,1 – 30
Explanation of parameter
Adjusts the sensitivity of ZNR. For best results, set this as high as possible without
allowing the attacks or decays to sound unnatural.
VOL PDL MODULE
TYPE
VOL PDL
PARAMETER 1
MIN VOL
You can use an expression pedal to control the volume.
Explanation of VOL PDL MODULE parameters
Parameter name
Range
MIN VOL
0 – 10
Explanation of parameter
When using an expression pedal as a volume pedal, this specifies the minimum volume.
MODULATION/DELAY MODULE
TYPE
CHORUS
FLANGER
PHASER
TREMOLO
PDL-WAH
AutoWah
RingMod
EXCITER
AIR
WIDE
DELAY
PARAMETER 2
PARAMETER 3
PARAMETER 4
DEPTH
RATE
MIX
--
FB
--
Stereo chorus with clear sound and great spaciousness.
DEPTH
RATE
An effect that adds a pronounced character and modulation to the sound.
POSITION
RATE
COLOR
--
CLIP
--
LEVEL
RTM
An effect that adds a swooshing modulation to the sound.
DEPTH
RATE
An effect that cyclically varies the volume.
POSITION
FREQ
An effect that lets you use an expression pedal to control wah manually.
FLT TYPE
POSITION
RESO
SENS
An effect in which wah is applied according to your playing dynamics.
SHIFT
TONE
BALANCE
--
BALANCE
--
LowBoost
--
Appendices
PITCH
PARAMETER 1
An effect that modifies the pitch of the original sound.
POSITION
RATE
An effect that produces a metallic resonance.
FREQ
DEPTH
An effect that gives the sound more focus and spatial definition.
SIZE
TONE
MIX
--
Simulates the effect of air on the room resonance, giving the sound spatial depth.
TIME
WET LVL
DRY LVL
--
An effect that produces the sound of a stereo recording made with two mics.
TIME
FB
MIX
--
A delay effect with a maximum of 500 mSec.
ZOOM MRS-1044
99
Effect type/parameter list
Explanation of MODULATION/DELAY MODULE parameters
Parameter name
Range
DEPTH
RATE
MIX
FB
0 – 10
1 – 30
0 – 30
TYPE = FLANGER : -10 – 10
TYPE = DELAY : 0 – 10
AF / bF
1–4
0 – 10
POSITION
COLOR
CLIP
FREQ
Explanation of parameter
Adjusts the depth of the effect.
Adjusts the speed of the effect.
Adjusts the mix amount of the effect.
Adjusts the amount of feedback.
Exchanges the effect locations of the DRIVE module and MOD module.
Changes the type of the phase tone.
Emphasizes the effect.
Specifies the center frequency of the wah.
Specifies the frequency.
Sets the output level of the module.
Specifies whether the expression pedal will be used as a wah pedal.
Specifies the type of filter.
Adds character to the sound.
Adjusts the sensitivity with which the effect is applied.
Sets the amount of shift produced by the pitch shifter.
Adjust the tone.
Adjusts the balance between the direct sound and effect sound.
Emphasizes the low-frequency range.
Specifies the spatial width.
Sets the delay time.
TYPE = PDL-WAH : 1 – 50
TYPE = EXCITER : 1 – 5
1–8
OFF / On
bPF / LPF
1 – 10
-10 – 10
-12.0 – 24.0
0 – 10
0 – 30
0 – 10
1 – 10
TYPE = WIDE : 1 – 64
TYPE = DELAY : 1 – 50
0 – 30
0 – 30
LEVEL
RTM
FLT TYPE
RESO
SENS
SHIFT
TONE
BALANCE
LowBoost
SIZE
TIME
WET LVL
DRY LVL
Adjusts the mix amount of the effect sound.
Adjusts the mix amount of the direct sound.
■ MIC ALGORITHM
COMP/LIM MODULE
TYPE
PARAMETER 1
PARAMETER 2
PARAMETER 3
PARAMETER 4
PARAMETER 5
PARAMETER 6
SINGLE
COMP x1
SINGLE
LIMIITx1
DUAL
COMP x2
DUAL
LIMIITx2
SENS
ATTACK
LEVEL
--
--
--
RELEASE
LEVEL
--
--
--
ATTACK_1
LEVEL_1
SENS_2
ATTACK_2
LEVEL_2
RELEASE2
LEVEL_2
A mono input/output compressor.
THRSHOLD
A mono input/output limiter.
SENS_1
A two-channel input/output compressor. Parameters for left and right can be set independently.
THRSH_1
RELEASE1
LEVEL_1
THRES_2
A two-channel input/output limiter. Parameters for left and right can be set independently.
Explanation of COMP/LIM MODULE parameters
Parameter name
SENS
SENS 1
SENS 2
ATTACK
ATTACK_1
ATTACK_2
THRSHLD
THRSH_1
THRES_2
RELEASE
RELEASE1
RELEASE2
LEVEL
LEVEL_1
LEVEL_2
Range
SINGLE
DUAL ( Lch )
DUAL ( Rch )
SINGLE
DUAL ( Lch )
DUAL ( Rch )
SINGLE
DUAL ( Lch )
DUAL ( Rch )
SINGLE
DUAL ( Lch )
DUAL ( Rch )
SINGLE
DUAL ( Lch )
DUAL ( Rch )
Explanation of parameter
0 – 15
Adjusts the input sensitivity of compression.
0 – 15
Adjusts the speed at which compression is applied.
0 – 15
Adjusts the sensitivity at which the limiter begins to apply.
0 – 15
Specifies the length from when the input signal level falls below the threshold until
compression ends.
1–8
Specifies the output level of the module.
MIC PRE MODULE
TYPE
PARAMETER 1
PARAMETER 2
PARAMETER 3
PARAMETER 4
PARAMETER 5
PARAMETER 6
COLOR
TONE
LEVEL
DE-ESSER
--
--
LEVEL 1
COLOR 2
TONE 2
LEVEL 2
MIC PRE (*1)
A pre-amp for use with an external mic.
MIC PRE (*2)
A pre-amp for use with an external mic.
COLOR 1
TONE 1
Appendices
*1: When a SINGLE type effect is selected for the COMP/LIM module
*2: When a DUAL type effect is selected for the COMP/LIM module
100
ZOOM MRS-1044
Effect type/parameter list
Explanation of MIC PRE MODULE parameters
Parameter name
Range
COLOR
COLOR 1
COLOR 2
TONE
TONE 1
TONE 2
LEVEL
LEVEL 1
LEVEL 2
DE-ESSER
SINGLE
DUAL ( Lch )
DUAL ( Rch )
SINGLE
DUAL ( Lch )
DUAL ( Rch )
SINGLE
DUAL ( Lch )
DUAL ( Rch )
SINGLE
1–6
Explanation of parameter
Specifies the response of the mic pre-amp.
1. Flat response
2. Low-cut response curve.
3. Response curve for acoustic guitar. 4. Low-cut response curve for acoustic guitar.
5. Response curve for vocal.
6. Low-cut response curve for vocal.
0 – 10
Adjusts the tone.
1–8
Sets the output level of the module.
0 – 10
Specifies the amount by which vocal sibilants will be cut.
EQ MODULE
TYPE
PARAMETER 1
PARAMETER 2
PARAMETER 3
PARAMETER 4
PARAMETER 5
PARAMETER 6
PARAMETER 7
PARAMETER 8
3BandEQ (*1)
HIGH
MID
LOW
LEVEL
--
--
--
--
MID 1
LOW 1
LEVEL 1
HIGH 2
MID 2
LOW 2
LEVEL 2
Three-band equalizer.
HIGH 1
3BandEQ (*2)
Three-band equalizer.
*1: When a SINGLE type effect is selected for the COMP/LIM module
*2: When a DUAL type effect is selected for the COMP/LIM module
Explanation of EQ MODULE parameters
Parameter name
Range
HIGH
HIGH 1
HIGH 2
MID
MID 1
MID 2
LOW
LOW 1
LOW 2
LEVEL
LEVEL 1
LEVEL 2
SINGLE
DUAL ( Lch )
DUAL ( Rch )
SINGLE
DUAL ( Lch )
DUAL ( Rch )
SINGLE
DUAL ( Lch )
DUAL ( Rch )
SINGLE
DUAL ( Lch )
DUAL ( Rch )
Explanation of parameter
-12 – 12
Boosts/cuts the high-frequency range.
-12 – 12
Boosts/cuts the mid-frequency range.
-12 – 12
Boosts/cuts the low-frequency range.
1–8
Sets the output level of the module.
ZNR MODULE
TYPE
PARAMETER 1
PARAMETER 2
ZNR (*1)
THRSHOLD
--
Zoom's proprietary noise reduction that minimizes noise when you are not playing.
THRSH 2
THRSH 1
ZNR (*2)
Zoom's proprietary noise reduction that minimizes noise when you are not playing.
*1: When a SINGLE type effect is selected for the COMP/LIM module
*2: When a DUAL type effect is selected for the COMP/LIM module
Explanation of ZNR MODULE parameters
Parameter name
Range
SINGLE
DUAL ( Lch )
DUAL ( Rch )
THRSHOLD
THRSH 1
THRSH 2
OFF,1 – 30
Explanation of parameter
Adjusts the sensitivity of ZNR. For best results, set this as high
as possible without allowing the attacks or decays to sound
unnatural.
VOL PDL MODULE
TYPE
PARAMETER 1
MIN VOL
VOL PDL
You can use an expression pedal to control the volume.
*For an explanation of the parameters, refer to the GUITAR/BASS algorithm.
Appendices
ZOOM MRS-1044
101
Effect type/parameter list
MODULATION/DELAY MODULE
TYPE
PARAMETER 1
PARAMETER 2
PARAMETER 3
PARAMETER 4
PARAMETER 5
PARAMETER 6
DEPTH
RATE
MIX
--
--
--
FB
--
--
--
--
--
--
--
CLIP
--
--
--
BALANCE
--
--
--
--
--
--
--
LowBoost
--
--
--
--
--
--
MIX
--
--
--
MIX
--
--
--
TIME 2
TONE 2
MIX 2
CHORUS
Stereo chorus with clear sound and great spaciousness.
FLANGER
An effect that adds a pronounced character and modulation to the sound.
RATE
DEPTH
COLOR
RATE
PHASER
An effect that adds a swooshing modulation to the sound.
RATE
DEPTH
TREMOLO
An effect that cyclically varies the volume.
TONE
SHIFT
PITCH
An effect that modifies the pitch of the original sound.
BALANCE
RATE
RingMod
An effect that produces a metallic resonance.
EXCITER
An effect that gives the sound more focus and spatial definition.
DEPTH
FREQ
Simulates the effect of air on the room resonance, giving the sound spatial depth.
FB
TIME
DELAY
MIX
TONE
SIZE
AIR
A delay effect with a maximum of 500 mSec.
TONE
TIME
DOUBLE (*1)
A doubling effect that allows the delay time to be set in 1 mSec steps up to 100 mSec.
DOUBLE (*2)
A doubling effect that allows the delay time to be set in 1 mSec steps up to 100 mSec.
MIX 1
TONE 1
TIME 1
*1: When a SINGLE type effect is selected for the COMP/LIM module
*2: When a DUAL type effect is selected for the COMP/LIM module (usable only with DOUBLE)
Explanation of MODULATION/DELAY MODULE parameters
Parameter name
Range
DEPTH
RATE
COLOR
CLIP
SHIFT
BALANCE
FREQ
LowBoost
SIZE
FB
SINGLE
SINGLE
SINGLE
SINGLE
SINGLE
SINGLE
SINGLE
SINGLE
SINGLE
SINGLE
TIME
SINGLE
TIME 1
TIME 2
TONE
TONE 1
TONE 2
MIX
MIX 1
MIX 2
DUAL ( Lch )
DUAL ( Rch )
SINGLE
DUAL ( Lch )
DUAL ( Rch )
SINGLE
DUAL ( Lch )
DUAL ( Rch )
Explanation of parameter
0 – 10
1 – 30
1–4
0 – 10
-12.0 – 24.0
0 – 30
1–5
0 – 10
1 – 10
TYPE = FLANGER : -10 – 10
TYPE = DELAY : 0 – 10
TYPE = DELAY : 1 – 50
TYPE = DOUBLE : 1 – 100
1 – 100
Specifies the depth of the effect.
Specifies the speed of the effect.
Modifies the type of phase tone.
Emphasizes the effect.
Specifies the amount of pitch shift produced by the pitch shifter.
Adjusts the balance between the direct sound and effect sound.
Specifies the frequency.
Emphasizes the low range.
Specifies the spatial width.
Adjusts the amount of feedback.
Sets the delay time. ( x 10 mSec )
Sets the delay time. ( x 1 mSec )
Sets the delay time. ( x 1 mSec )
0 – 10
Adjusts the tone.
0 – 30
Adjusts the mix amount of the effect.
■ LINE ALGORITHM
COMP/LIM MODULE
TYPE
COMP
PARAMETER 1
PARAMETER 2
PARAMETER 3
SENS
ATTACK
LEVEL
A stereo input/output compressor.
THRSHOLD
LIMITER
RELEASE
LEVEL
A stereo input/output limiter.
Explanation of COMP/LIM MODULE parameters
Parameter name
Range
SENS
ATTACK
LEVEL
THRSHOLD
RELEASE
0 – 15
0 – 15
1–8
0 – 15
0 – 15
Explanation of parameter
Specifies the input sensitivity of compression.
Adjusts the speed at which compression is applied.
Specifies the output level of the module.
Specifies the sensitivity at which the limiter will begin to apply.
Specifies the time from when the input signal falls below the threshold until compression ends.
Appendices
ISOLATOR MODULE
TYPE
ISOLATOR
PARAMETER 1
PARAMETER 2
PARAMETER 3
PARAMETER 4
PARAMETER 5
XOVER_Lo
XOVER_Hi
MIX_HIGH
MIX_MID
MIX_LOW
An effect that divides the signal into three frequency bands, and lets you specify the mix amount.
Explanation of ISOLATOR MODULE parameters
Parameter name
Range
XOVER_Lo
XOVER_Hi
MIX_HIGH
MIX_MID
MIX_LOW
102
50 – 16000
50 – 16000
OFF, -24 – 6
OFF, -24 – 6
OFF, -24 – 6
Explanation of parameter
Specifies the frequency at which the Lo/Mid bands will be divided.
Specifies the frequency at which the Mid/Hi bands will be divided.
Specifies the mix amount of the high range.
Specifies the mix amount of the mid range.
Specifies the mix amount of the low range.
ZOOM MRS-1044
Effect type/parameter list
EQ MODULE
TYPE
3BandEQ
PARAMETER 1
PARAMETER 2
PARAMETER 3
PARAMETER 4
HIGH
MID
LOW
LEVEL
Three-band equalizer.
*For an explanation of the parameters, refer to the GUITAR/BASS algorithm.
ZNR MODULE
TYPE
ZNR
PARAMETER 1
THRSHOLD
Zoom's proprietary noise reduction that minimizes noise when you are not playing.
*For an explanation of the parameters, refer to the GUITAR/BASS algorithm.
VOL PDL MODULE
TYPE
VOL PDL
PARAMETER 1
MIN VOL
You can use an expression pedal to control the volume.
*For an explanation of the parameters, refer to the GUITAR/BASS algorithm.
MODULATION/DELAY MODULE
TYPE
CHORUS
FLANGER
PHASER
TREMOLO
PITCH
RingMod
DOUBLE
PARAMETER 1
PARAMETER 2
PARAMETER 3
DEPTH
RATE
MIX
Stereo chorus with clear sound and great spaciousness.
DEPTH
RATE
FB
An effect that adds a pronounced character and modulation to the sound.
RATE
--
COLOR
An effect that adds a swooshing modulation to the sound.
DEPTH
CLIP
RATE
An effect that cyclically varies the volume.
SHIFT
TONE
BALANCE
An effect that modifies the pitch of the original sound.
RATE
BALANCE
--
An effect that produces a metallic resonance.
TIME
MIX
TONE
A doubling effect that allows the delay time to be set in 1 mSec steps up
to 100 mSec.
Explanation of MODULATION/DELAY MODULE parameters
Parameter name
Range
DEPTH
RATE
MIX
FB
COLOR
CLIP
SHIFT
TONE
BALANCE
TIME
0 – 10
1 – 30
0 – 30
TYPE = FLANGER : -10 – 10
1–4
0 – 10
-12.0 – 24.0
0 – 10
0 – 30
1 – 100
Explanation of parameter
Specifies the depth of the effect.
Specifies the speed of the effect.
Adjusts the mix amount of the effect.
Adjusts the amount of feedback.
Modifies the type of phase tone.
Emphasizes the effect.
Sets the amount of change produced by the pitch shifter.
Adjusts the tone.
Adjusts the volume balance between the direct sound and effect sound.
Specifies the delay time.
■ MASTERING ALGORITHM
3BAND COMP/Lo-Fi MODULE
TYPE
MLT CMP
PARAMETER 1
PARAMETER 2
PARAMETER 3
PARAMETER 4
PARAMETER 5
XOVER_Lo
XOVER_Hi
SNS_HIGH
SENS_MID
SENS_LOW
MIX_HIGH
MIX_MID
PARAMETER 8
MIX_LOW
An effect that divides the input signal into three frequency bands, and lets you specify a compressor and mix amount for each band.
CHARA
Lo-Fi
PARAMETER 6 PARAMETER 7
COLOR
DIST
TONE
EFX LVL
DRY LVL
--
--
An effect that intentionally degrades the audio quality of the sound.
Explanation of 3BAND COMP/Lo-Fi MODULE parameters
Parameter name
Range
ZOOM MRS-1044
50 – 16000
50 – 16000
0 – 15
0 – 15
0 – 15
OFF, -24 – 6
OFF, -24 – 6
OFF, -24 – 6
0 – 10
1 – 10
0 – 10
0 – 10
0 – 30
0 – 30
Explanation of parameter
Specifies the frequency at which the Lo/Mid bands will be divided.
Specifies the frequency at which the Mid/Hi bands will be divided.
Specifies the sensitivity of the compressor applied to the high range.
Specifies the sensitivity of the compressor applied to the mid range.
Specifies the sensitivity of the compressor applied to the low range.
Specifies the mix amount of the high range.
Specifies the mix amount of the mid range.
Specifies the mix amount of the low range.
Specifies the character of the filter.
Specifies the color.
Specifies the degree of distortion.
Adjusts the tone.
Adjusts the mix amount of the effect sound.
Adjusts the mix amount of the direct sound.
Appendices
XOVER_Lo
XOVER_Hi
SNS_HIGH
SENS_MID
SENS_LOW
MIX_HIGH
MIX_MID
MIX_LOW
CHARA
COLOR
DIST
TONE
EFX LVL
DRY LVL
103
Effect type/parameter list
NORMALIZE MODULE
TYPE
PARAMETER 1
GAIN
NORMLZR
A module that lets you set the input level of the comp module.
Explanation of NORMALIZE MODULE parameters
Parameter name
Range
GAIN
-12 – 12
Explanation of parameter
Specifies the gain.
EQ MODULE
TYPE
PARAMETER 1
PARAMETER 2
PARAMETER 3
PARAMETER 4
3BandEQ
HIGH
MID
LOW
LEVEL
Three-band equalizer.
*For an explanation of the parameters, refer to the GUITAR/BASS algorithm.
ZNR MODULE
TYPE
ZNR
PARAMETER 1
THRSHOLD
Zoom's proprietary noise reduction that minimizes noise when you are not playing.
*For an explanation of the parameters, refer to the GUITAR/BASS algorithm.
VOL PDL MODULE
TYPE
VOL PDL
PARAMETER 1
MIN VOL
You can use an expression pedal to control the volume.
*For an explanation of the parameters, refer to the GUITAR/BASS algorithm.
DIMENSION/RESONANCE MODULE
TYPE
PARAMETER 1
PARAMETER 2
PARAMETER 3
PARAMETER 4
PARAMETER 5
PARAMETER 6
PARAMETER 7
RISE_2
--
--
--
--
--
RATE
TYPE
RESO
EFX LVL
DRY LVL
RISE_1
DIMENSN
DIMENSN An effect that produces spatial width.
RESONNC
RESONNC A resonance filter with LFO.
DEPTH
FreqOFST
Explanation of DIMENSION/RESONANCE MODULE parameters
Parameter name
Range
RISE_1
RISE_2
DEPTH
FreqOFST
RATE
TYPE
RESO
EFX LVL
DRY LVL
0 – 30
0 – 30
0 – 10
1 – 30
1 – 30
HPF /LPF /bPF
1 – 30
0 – 30
0 – 30
Explanation of parameter
Specifies the degree to which the stereo component is emphasized.
Specifies the spaciousness that includes the mono component.
Specifies the depth of the effect.
Specifies the LFO offset.
Specifies the speed of the effect.
Specifies the type of filter.
Adds character to the effect.
Adjusts the mix amount of the effect sound.
Adjusts the mix amount of the direct sound.
Appendices
104
ZOOM MRS-1044
Effect type/parameter list
Send Return effect
CHORUS/DELAY MODULE
TYPE
CHORUS
PARAMETER 1
PARAMETER 2
PARAMETER 3
PARAMETER 4
PARAMETER 5
LFO TYPE
DEPTH
RATE
PRE DLY
EFX LVL
A stereo chorus that produces clear sound and a wonderfully spacious feeling.
TIME
DELAY
TIME
DOUBLE
FB
DAMP
EFX LVL
REV_SEND
TONE
EFX LVL
--
--
A delay effect of up to 1000 mSec.
A doubling effect of up to 100 mSec.
Explanation of CHORUS/DELAY MODULE parameters
Parameter name
Range
Explanation of parameter
LFO TYPE
Mn /St
Selects the LFO phrase; Mn (mono) or St (stereo).
DEPTH
0 – 10
Sets the depth of the effect.
RATE
1 – 30
Sets the speed of the effect.
PRE DLY
1 – 30
Sets the pre-delay time.
EFX LVL
0 – 30
Adjusts the mix amount of the effect sound.
TIME
TYPE=DELAY:1 – 1000
Sets the delay time. (TIME= setting value x 1msec)
FB
DAMP
REV_SEND
TONE
TYPE=DOUBLE:1 – 100
0 – 10
0 – 10
0 – 30
0 – 10
Adjusts the amount of feedback.
Sets the amount of high-frequency decay for the delay sound.
Sets the amount of delay sound that is sent to reverb.
Adjusts the tone.
REVERB MODULE
TYPE
HALL
PARAMETER 1
PARAMETER 2
PARAMETER 3
PARAMETER 4
PARAMETER 5
PARAMETER 6
PRE DLY
REV TIME
EQ_HIGH
EQ_LOW
E/R MIX
EFX LVL
EQ_LOW
E/R MIX
EFX LVL
A reverb effect that produces the reverberation characteristic of a concert hall.
PRE DLY
ROOM
REV TIME
EQ_HIGH
A reverb effect that simulates the reverberation of a room.
Explanation of REVERB MODULE parameters
Parameter name
Range
PRE DLY
1 – 100
REV TIME
1 – 30
EQ_HIGH
-12 – 6
EQ_LOW
-12 – 6
E/R MIX
0 – 30
EFX LVL
0 – 30
Explanation of parameter
Specifies the pre-delay time.
Specifies the reverb time.
Specifies the high-frequency volume of the reverb sound.
Specifies the low-frequency volume of the reverb sound.
Specifies the volume of early reflections.
Adjusts the mix amount of the effect sound.
Appendices
ZOOM MRS-1044
105
Effect patch list
Effect patch list
■ GUITAR/BASS ALGORITHM
Comment
No. PATCH NAME
Appendices
00
Standard
Clean sound touched up for recording
01
MRS-Drv
Full distortion + rich sound
02
RCT-BG
The high-gain amp sound of the American-made "Rectifier" series
03
CrnchCmp
Crunch sound subtly tuned with a touch of compression
04
9002Lead
The original 9002 sound
05
F-Tweed
The sound of a small, American-made vintage tube amp
06
J-Chorus
JC clean sound
07
Phaser
Clean sound that simulates a vintage phase effect
08
BlackPnl
The heavy metal sound of the "5100 series" of American-made stack amp
09
MatchCru
Crunch sound of a modern class-A amp
10
Arpeggio
Clean sound suitable for arpeggios
11
JetSound
Versatile jet sound
12
Combo-BG
Sound characterized by detailed overdrive and long sustain
13
FDR-Twin
Drive channel sound of an American-made vintage tube amp
14
Beatle
Class-A type Mersey Beat sound
15
CleanCH
Clean channel sound of an American-made vintage tube amp
16
WildFuzz
Vintage fuzzbox sound
17
JB.Style
Octaver simulation. An indispensable effect for Gt&Bs unison riffs
18
Pitch-5
Even single notes sound like power chords. Also great as a variation for solo sounds.
19
BRT-Drv
The great sound of the British "900 series" of stack amps
20
Soldan
High-gain amp sound ideal for single coil half-tone settings
21
MatchDrv
Drive sound of a modern class-A amp
22
Snake
Heavy metal sound with a solid bottom
23
Crunch
"800 series" crunch sound ensemble
24
Ballad
Warm lead sound
25
Metal-X
Good metal sound with subtle overtones produced by effect
26
DP-Drv
70's hard rock sound
27
WetDrive
Simple overdrive sound with a wet feel
28
Mellow
Lead sound with a sweet tone
29
MultiDst
Strong all-around sound for backing or melody
30
Bright
Crisp sound for a wide range of uses
31
Melody
Tastefully seasoned sound, ideal for melodies
32
V-Blues
Vintage blues sound
33
BlueFngr
Bluesy sound suitable for finger picking
34
StrmBeat
Basic sound suitable for strummed backing
35
CompCln
Natural comp sound
36
JazzTone
Clean sound suitable for jazz
37
Funky
Funky cutting sound
38
FDR-Cln
Clean sound of American-made vintage tube amp
39
Rockbily
Rockabilly sound with short delay
40
NYFusion
Clean sound suitable for direct-line recording
41
Wet-Rhy
Cutting sound suitable for ballades
42
LA-Std
LA studio-style big chorus sound
43
50sRNB
Tremolo sound suitable for rhythm & blues
44
DeepFLG
Clean flanged sound
45
HDR-Drv
Wet new hard rock sound
46
12-Clean
Clean sound suitable for arpeggios, with octave pitch
47
Cry-Lead
"Cry effect" -style sound
48
ZakWah
Lead sound with auto-wah
49
TheRing
Ring modulator also usable as a sound effect for recording
106
Application
Guitar
ZOOM MRS-1044
Effect patch list
Comment
No. PATCH NAME
50
BS-Pick
Tight sound for playing with a pick
51
BS-Od
Rock sound with retro-feeling distortion
52
BS-Drv
Bass sound with hard distortion
53
BS-Fingr
All-around sound for finger picking
54
BS-Slap
Crisp slap sound
55
BS-Comp
Nice-feeling sound with attack controlled by picking dynamics
56
BS-Edge
Tight sound with an edge
57
BS-Solo
Sound suitable for melody, with chorus
58
BS-Octve
Sound with an upper octave mixed in, useful in an ensemble
59
BS-Wah
Funky bass with auto-wah
60
AG-Fingr
Sound suitable for finger-style playing
61
AG-Cho
Chorus sound for electro-acoustic. Use with strumming, arpeggios, or solos.
62
AG-12
Simulation of 12 string sound
63
AG-Flang
Flanging sound tuned for acoustic guitar
64
AcoSIM 1
Simulation of unadorned acoustic guitar sound
65
AcoSIM 2
Acoustic simulation with beautiful chorus effect
66
AcoSIM 3
Shimmering detuned sound with no modulation
67
BsSIM1
Simulates a tight picked bass Bass simulations
68
BsSIM2
Chorus bass simulation, effective with melody lines
69
BsSIM3
Simulation of an auto-wah bass
Application
Bass
Electro-acoustic
Acoustic guitar
simulations
Bass simulations
70
99
EMPTY
■ MIC ALGORITHM
Comment
No. PATCH NAME
00 Vo-Stnd
Standard vocal effect
01
Vo-Rock
Rock vocal effect
02
Vo-Balld
Ballade vocal effect with depth created by detuned chorus
03
Vo-Echo
Vocal echo effect
04
Vo-PreC1
For condenser mics: smooth, listenable sound recommended during recording
05
Vo-PreC2
For condenser mics: doubling sound that adds depth to a voice, recommended during recording
06
Vo-PreD1
For dynamic mics: an effect that improves the definition of the sound, recommended during recording
07
Vo-PreD2
For dynamic mics: makes the sound fatter and wetter, recommended during recording
08
Vo-Robot
Robot voice as in SF movies
09
AG-Live
Sound for mic recording, with a live feel. Broadly usable, not only for guitar.
10
AG-Brght
Sound for mic recording; bright and crisp
11
AG-Solo
Gorgeous solo sound
12
AG-Edge
Patch for acoustic guitar, useable during recording (enhances the edge)
13
AG-Strum
Patch for acoustic guitar, usable during recording (suitable for strumming)
14
ForWind
Sound with good presence and distinctive mid-range
15
ForBrass
Overall crisp-sounding short delay
16
ForPiano
Sound with enhanced depth and definition Piano
17
Vo/Vo 1
Patch suitable for duets
18
Vo/Vo 2
Patch for chorus opposed to a main vocal
19
Vo/Vo 3
Patch suitable for harmony
20
AG/Vo 1
Patch that creates a street-like character
21
AG/Vo 2
Patch with differing vocal character than Street
22
AG/Vo 3
Patch that applies effects to aggressively modify the vocal character
23
AG-Mix 1
Enhanced sound effective for mixdown (strumming)
24
AG-Mix 2
Enhanced sound effective for mixdown (arpeggios)
Application
Vocal ( single )
Acoustic guitar
Wind instruments
Brass instruments
Piano
Vocal ( dual )
Sing-along
Acoustic guitar
25
Appendices
EMPTY
49
ZOOM MRS-1044
107
Effect patch list
■ LINE ALGORITHM
Comment
No. PATCH NAME
00 Syn-Lead
Effect for single-note synth leads
01
OrganPha
Phaser effect for synth/organ
02
OrgaRock
Sound for rock organ
03
EP-Chor
Beautiful resonance and chorus, effective for electric piano
04
ClavFlg
Sound for clavinet
05
Concert
Concert hall effect for piano
06
Honkey
Honky-tonk piano simulation
07
PowerBD
An effect that gives a bass drum more power
08
DrumFlng
Conventional flanger for drums
09
LiveDrum
Simulation of outdoor live doubling
10
JetDrum
Phaser sound effective on 16-beat hi-hat
11
AsianKit
Transforms a standard kit into an Asian kit
12
BassBost
Boost patch that emphasizes the low range
13
Mono->St
An effect that gives spaciousness to a mono source
14
AM Radio
Simulation of an AM radio
Application
Keyboard
Piano
Rhythm
Audio
15
49
EMPTY
■ MASTERING ALGORITHM
Comment
No. PATCH NAME
00
PlusAlfa
Mastering that enhances the overall power
01
All-Pops
Conventional mastering
02
StWide
Wide-range mastering
03
DiscoMst
Mastering for club sound
04
Boost
Mixdown effect for a hi-fi finish
05
Power
For mixes with a big and powerful low range
06
Live
Add a live feel to the overall mix
07
WarmMst
Mastering that adds an overall warm feeling
08
TightUp
Mastering with an overall hard feel
09
1930Mst
Mastering to a 1930's sound
10
LoFi Mst
For lo-fi mastering
11
BGM
Mastering for background music
Application
Mastering
12
19
EMPTY
■ CHORUS /DELAY
Comment
No. PATCH NAME
00
Vocal
Chorus effective for adding color to a vocal
01
GtChorus
Chorus effect useful for lackluster guitar sound
02
Doubling
Versatile doubling effect
03
Echo
Flamboyant analog-style delay for guitar or vocal
04
Delay375
Delay that matches the commonly-used tempo of 120
05
LongDLY
Long delay ideal for ballades, etc.
06
FastCho
Fast chorus (effective for adding depth to the sound)
07
DeepCho
Versatile deep chorus effect
08
ShortDLY
Versatile short delay
09
DeepDBL
Deep doubling effect
10
EMPTY
19
■ REVERB
Comment
No. PATCH NAME
Appendices
00
TightHal
Hall reverb with a hard tonal quality
01
BrgtRoom
Room reverb with a hard tonal quality
02
SoftHall
Hall reverb with a mild tonal quality
03
LargeHal
Simulates the reverberation of a large hall
04
SmallHal
Simulates the reverberation of a small hall
05
LiveHous
Simulates the reverb of a live house
06
TrStudio
Simulates the reverberation of a rehearsal studio (garage)
07
DarkRoom
Room reverb with a mild tonal quality
08
VcxRev
Reverb tuned to enhance the vocal
09
Tunnel
Simulates the reverberation of a tunnel
10
EMPTY
19
108
ZOOM MRS-1044
Pattern list
Pattern list
■ Basic set
Pattern
number
Pattern
name
Chord
Pattern
number
000
08Beat01
Em
052
001
08Beat02
Em
053
002
08Beat03
Em
003
08Beat04
004
Pattern
name
Chord
Pattern
number
HRK 03
Em
104
HRK 04
Em
105
054
HRK 05
Em
Em
055
HRK 06
08Beat05
Em
056
005
08Beat06
Em
006
08Beat07
007
Pattern
name
Chord
Pattern
number
Pattern
name
Chord
TECH01
Em
156
MidEs1VA
Em
TECH03
Em
157
Grv Drm1
Em
106
TECH05
Em
158
Grv Drm2
Em
Em
107
TECH07
Em
159
Grv Drm3
Em
HRK 07
Em
108
TECH09
Em
160
Grv Drm4
Em
057
MTL 01
Em
109
DnB 01
Em
161
GrvSnrFl
Em
Em
058
MTL 02
Em
110
DnB 03
Em
162
INTRO01
Em
08Beat08
Em
059
MTL 03
Em
111
DnB 05
Em
163
INTRO02
Em
008
08Beat09
Em
060
MTL 04
Em
112
DnB 06
Em
164
INTRO03
Em
009
08Beat10
Em
061
THRS01
Em
113
TRIP01
Em
165
INTRO04
Em
010
08Beat11
Em
062
THRS02
Em
114
TRIP02
Em
166
INTRO05
Em
011
08Beat12
Em
063
PUNK01
Em
115
TRIP04
Em
167
INTRO06
Em
012
16Beat01
Em
064
PUNK02
Em
116
AMB 01
Em
168
INTRO07
Em
013
16Beat02
Em
065
FUS 01
Em
117
AMB 02
Em
169
INTRO08
Em
014
16Beat03
Em
066
FUS 02
Em
118
AMB 04
Em
170
INTRO09
Em
015
16Beat04
EM
067
FUS 05
Em
119
BALD01
EM
171
INTRO10
EM
016
16Beat05
Em
068
FUS 06
Em
120
BALD03
Em
172
INTRO11
Em
017
16Beat06
Em
069
POP 01
Em
121
BALD05T
Em
173
INTRO12
Em
018
16Beat07
Em
070
POP 03
Em
122
BALD07
Em
174
INTRO13
Em
019
16Beat08
Em
071
POP 05
EM
123
BALD09
Em
175
INTRO14
Em
020
16FUS 01
Em
072
POP 07
Em
124
BALD11T
Em
176
INTRO15
Em
021
16FUS 02
Em
073
POP 09
EM
125
BLUS01
Em
177
INTRO16
Em
022
04JAZZ01
EM
074
POP 11
Em
126
BLUS02
EM
178
INTRO17
EM
023
04JAZZ02
EM
075
RnB 01
Em
127
BLUS04
EM
179
INTRO18
EM
024
04JAZZ03
EM
076
RnB 03
Em
128
CNTR01
EM
180
COUNT
EM
025
04JAZZ04
Em
077
RnB 05
Em
129
CNTR02
Em
181
ENDING01
Em
026
BOSSA
Em
078
RnB 07
EM
130
CNTR04
Em
182
ENDING02
Em
027
CNTRY
Em
079
RnB 09
EM
131
JAZZ01
Em
183
ENDING03
Em
028
68BLUS
Em
080
FUNK01
Em
132
JAZZ03
Em
184
ENDING04
Em
029
DANCE
Em
081
FUNK03
Em
133
JAZZ05
Em
185
ENDING05
Em
030
ROCK01
Em
082
FUNK05
Em
134
JAZZ07P
Em
186
ENDING06
Em
031
ROCK02
Em
083
FUNK07
Em
135
SHFL01
Em
187
ENDING07
Em
032
ROCK03
Em
084
FUNK09
Em
136
SHFL03
Em
188
METRO4/4
Em
033
ROCK04
Em
085
FUNK11
Em
137
SHFL05
Em
189
METRO3/4
Em
034
ROCK05
Em
086
HIP 01
Em
138
SKA 01
Em
190
All Mute
Em
035
ROCK06
Em
087
HIP 03
Em
139
SKA 02
Em
191
036
ROCK07
Em
088
HIP 05
Em
140
SKA 04
Em
037
ROCK08
Em
089
HIP 07
Em
141
REGG01
Em
038
ROCK09
Em
090
HIP 09
Em
142
REGG02
Em
039
ROCK10
Em
091
HIP 11
Em
143
REGG03
Em
040
ROCK11
Em
092
HIP 13
Em
144
AFRO01
Em
041
ROCK13
Em
093
HIP 15
Em
145
AFRO03
Em
042
ROCK15
Em
094
HIP 17
Em
146
AFRO05
Em
043
ROCK17
Em
095
HIP 19
Em
147
AFRO07
Em
044
ROCK19
Em
096
HIP 21
Em
148
LATN01
Em
045
ROCK21
Em
097
HIP 23
Em
149
LATN03
Em
046
ROCK23
Em
098
DANC01
Em
150
LATN05
Em
047
ROCK25
Em
099
DANC03
Em
151
LATN07
Em
048
ROCK27
Em
100
DANC05
Em
152
LATN09
Em
049
ROCK28T
Em
101
HOUS01
Em
153
LATN11
Em
050
HRK 01
Em
102
HOUS03
Em
154
MidE01
Em
051
HRK 02
Em
103
HOUS04
Em
155
MidE03
Em
EMPTY
254
Appendices
* When a new project is created, the Basic set will be placed in the rhythm patterns.
* With the factory settings, project number 999 contains the Basic set, and drum kit 08GENERL and bass program 10PICKED are selected.
* Select the drum kit / bass program and tempo as desired. (With the factory settings, project number 999 is protected. If you want to change
the drum kit or bass program, you must first defeat the Protect setting. See p.87.)
* If you want to use these patterns in another project, execute the Rhythm Import operation (see p.72).
ZOOM MRS-1044
109
Pattern list
■ Rock set
Pattern
number
Pattern
name
Chord
Pattern
number
Pattern
name
Chord
Pattern
number
Pattern
name
Chord
Pattern
number
Pattern
name
Chord
Appendices
000
ROCK01
Em
057
HRK s2FA
Em
114
POP s1VA
Em
171
08Beat08
Em
001
ROCK02
Em
058
HRK s2VB
Em
115
POP s1FA
Em
172
08Beat09
Em
002
ROCK03
Em
059
HRK s2FB
Em
116
POP s1VB
Em
173
08Beat10
Em
003
ROCK04
Em
060
MTL 01
Em
117
POP s1FB
EM
174
08Beat11
Em
004
ROCK05
Em
061
MTL 02
Em
118
POP s2VA
EM
175
08Beat12
Em
005
ROCK06
Em
062
MTL 03
Em
119
POP s2FA
EM
176
16Beat01
Em
006
ROCK07
Em
063
MTL 04
Em
120
POP s2VB
EM
177
16Beat02
Em
007
ROCK08
Em
064
MTL s1VA
Em
121
POP s2FB
EM
178
16Beat03
Em
008
ROCK09
Em
065
MTL s1FA
Em
122
POP s3VA
Em
179
16Beat04
Em
009
ROCK10
Em
066
MTL s1VB
Em
123
POP s3FA
Em
180
16Beat05
EM
010
ROCK11
Em
067
MTL s1FB
Em
124
POP s3VB
Em
181
16Beat06
Em
011
ROCK12
Em
068
THRS01
Em
125
POP s3FB
Em
182
16Beat07
Em
012
ROCK13
Em
069
THRS02
Em
126
RnB 01
Em
183
16Beat08
Em
013
ROCK14
Em
070
PUNK01
Em
127
RnB 02
Em
184
16FUS 01
Em
014
ROCK15
Em
071
PUNK02
Em
128
RnB 03
Em
185
16FUS 02
Em
015
ROCK16
Em
072
TP s1VA
Em
129
RnB 04
Em
186
04JAZZ01
Em
016
ROCK17
Em
073
TP s1FA
Em
130
RnB 05
Em
187
04JAZZ02
EM
017
ROCK18
Em
074
TP s1VB
Em
131
RnB 06
Em
188
04JAZZ03
EM
018
ROCK19
Em
075
TP s1FB
Em
132
RnB 07
EM
189
04JAZZ04
EM
019
ROCK20
EM
076
FUS 01
Em
133
RnB 08
EM
190
BOSSA
Em
020
ROCK21
Em
077
FUS 02
Em
134
RnB 09
EM
191
CNTRY
Em
021
ROCK22
Em
078
FUS 03
Em
135
RnB 10
EM
192
68BLUS
Em
022
ROCK23
Em
079
FUS 04
Em
136
RnB s1VA
Em
193
DANCE
Em
023
ROCK24
Em
080
FUS 05
Em
137
RnB s1FA
Em
194
INTRO01
Em
024
ROCK25
Em
081
FUS 06
Em
138
RnB s1VB
Em
195
INTRO02
Em
025
ROCK26
Em
082
FUS 07
EM
139
RnB s1FB
Em
196
INTRO03
Em
026
ROCK27
Em
083
FUS 08
Em
140
FUNK01
Em
197
INTRO04
Em
027
ROCK28T
Em
084
FUS s1VA
Em
141
FUNK02
Em
198
INTRO05
Em
028
ROCKs1VA
Em
085
FUS s1FA
Em
142
FUNK03
Em
199
INTRO06
Em
029
ROCKs1FA
Em
086
FUS s1VB
Em
143
FUNK04
Em
200
INTRO07
Em
030
ROCKs1VB
Em
087
FUS s1FB
Em
144
FUNK05
Em
201
INTRO08
Em
031
ROCKs1FB
Em
088
FUS s2VA
Em
145
FUNK06
Em
202
INTRO09
Em
032
ROCKs2VA
Em
089
FUS s2FA
Em
146
FUNK07
Em
203
INTRO10
Em
033
ROCKs2FA
Em
090
FUS s2VB
Em
147
FUNK08
EM
204
INTRO11
Em
034
ROCKs2VB
Em
091
FUS s2FB
Em
148
FUNK09
Em
205
INTRO12
Em
035
ROCKs2FB
Em
092
FUS s3VA
Em
149
FUNK10
Em
206
INTRO13
Em
036
ROCKs3VA
Em
093
FUS s3FA
Em
150
FUNK11
Em
207
INTRO14
Em
037
ROCKs3FA
Em
094
FUS s3VB
Em
151
FUNK12
Em
208
INTRO15
Em
038
ROCKs3VB
Em
095
FUS s3FB
Em
152
FUNKs1VA
Em
209
INTRO16
Em
039
ROCKs3FB
Em
096
16FUS 03
Em
153
FUNKs1FA
Em
210
INTRO17
Em
040
ROCKs4VA
Em
097
16FUS 04
Em
154
FUNKs1VB
Em
211
INTRO18
Em
041
ROCKs4FA
EM
098
INDTs1VA
Em
155
FUNKs1FB
EM
212
COUNT
Em
042
ROCKs4VB
EM
099
INDTs1FA
Em
156
FUNKs2VA
Em
213
ENDING01
Em
043
ROCKs4FB
EM
100
INDTs1VB
Em
157
FUNKs2FA
Em
214
ENDING02
Em
044
ROCKs4BR
Em
101
INDTs1VC
Em
158
FUNKs2VB
Em
215
ENDING03
Em
045
HRK 01
Em
102
POP 01
Em
159
FUNKs2FB
Em
216
ENDING04
Em
046
HRK 02
Em
103
POP 02
EM
160
16Beat09
Em
217
ENDING05
Em
047
HRK 03
Em
104
POP 03
Em
161
16Beat10
Em
218
ENDING06
Em
048
HRK 04
Em
105
POP 04
Em
162
16Beat11
Em
219
ENDING07
Em
049
HRK 05
Em
106
POP 05
EM
163
16Beat12
Em
220
METRO4/4
Em
050
HRK 06
Em
107
POP 06
Em
164
08Beat01
Em
221
METRO3/4
Em
051
HRK 07
Em
108
POP 07
Em
165
08Beat02
Em
222
All Mute
Em
052
HRK s1VA
Em
109
POP 08
Em
166
08Beat03
Em
223
053
HRK s1FA
Em
110
POP 09
EM
167
08Beat04
Em
254
054
HRK s1VB
Em
111
POP 10
EM
168
08Beat05
Em
055
HRK s1FB
Em
112
POP 11
Em
169
08Beat06
Em
056
HRK s2VA
Em
113
POP 12T
Em
170
08Beat07
Em
EMPTY
* With the factory settings, project number 996 contains the Rock set, and drum kit 00LIVE1 and bass program 00LIVEBS are selected.
* Select the drum kit / bass program and tempo as desired. (With the factory settings, project number 996 is protected. If you want to change
the drum kit or bass program, you must first defeat the Protect setting. See p.87.)
* If you want to use these patterns in another project, execute the Rhythm Import operation (see p.72).
110
ZOOM MRS-1044
Pattern list
■ HipHop/Techno set
Pattern
number
Pattern
name
Chord
Pattern
number
Pattern
name
Chord
Pattern
number
Pattern
name
Chord
Pattern
number
Pattern
name
Chord
000
HIP 01
Em
052
HOUS02
Em
104
Grv Bas3
Em
156
COUNT
Em
001
HIP 02
Em
053
HOUS03
Em
105
Grv Bas4
Em
157
ENDING01
Em
002
HIP 03
Em
054
HOUS04
Em
106
Grv Pad
Em
158
ENDING02
Em
003
HIP 04
Em
055
HOUSs1VA
Em
107
GrvSnrFl
Em
159
ENDING03
Em
004
HIP 05
Em
056
HOUSs1FA
Em
108
08Beat01
Em
160
ENDING04
Em
005
HIP 06
Em
057
HOUSs1VB
Em
109
08Beat02
Em
161
ENDING05
Em
006
HIP 07
Em
058
HOUSs1FB
Em
110
08Beat03
Em
162
ENDING06
Em
007
HIP 08
Em
059
TECH01
Em
111
08Beat04
Em
163
ENDING07
Em
008
HIP 09
Em
060
TECH02
Em
112
08Beat05
Em
164
METRO4/4
Em
009
HIP 10
Em
061
TECH03
Em
113
08Beat06
Em
165
METRO3/4
Em
010
HIP 11
Em
062
TECH04
Em
114
08Beat07
Em
166
All Mute
Em
011
HIP 12
EM
063
TECH05
Em
115
08Beat08
Em
167
012
HIP 13
Em
064
TECH06
Em
116
08Beat09
Em
254
013
HIP 14
Em
065
TECH07
Em
117
08Beat10
Em
014
HIP 15
Em
066
TECH08
Em
118
08Beat11
Em
015
HIP 16
Em
067
TECH09
Em
119
08Beat12
Em
016
HIP 17
Em
068
TECH10
Em
120
16Beat01
Em
017
HIP 18
Em
069
TECHs1VA
Em
121
16Beat02
Em
018
HIP 19
Em
070
TECHs1FA
Em
122
16Beat03
Em
019
HIP 20
Em
071
TECHs1VB
Em
123
16Beat04
EM
020
HIP 21
Em
072
TECHs1FB
Em
124
16Beat05
Em
021
HIP 22
Em
073
DnB 01
Em
125
16Beat06
Em
022
HIP 23
Em
074
DnB 02
Em
126
16Beat07
Em
023
HIP s1VA
Em
075
DnB 03
Em
127
16Beat08
Em
024
HIP s1FA
Em
076
DnB 04
Em
128
16FUS 01
Em
025
HIP s1VB
Em
077
DnB 05
Em
129
16FUS 02
Em
026
HIP s1FB
Em
078
DnB 06
Em
130
04JAZZ01
EM
027
HIP s1VC
Em
079
DnB s1VA
Em
131
04JAZZ02
EM
028
HIP s1VD
Em
080
DnB s1FA
Em
132
04JAZZ03
EM
029
HIP s2VA
Em
081
DnB s1VB
Em
133
04JAZZ04
Em
030
HIP s2VB
Em
082
DnB s1FB
Em
134
BOSSA
Em
031
HIP s2FB
Em
083
TRIP01
Em
135
CNTRY
Em
032
HIP s2VC
Em
084
TRIP02
Em
136
68BLUS
Em
033
HIP s2VD
Em
085
TRIP03
Em
137
DANCE
Em
034
HIP s3VA
Em
086
TRIP04
Em
138
INTRO01
Em
035
HIP s3VB
Em
087
AMB 01
Em
139
INTRO02
Em
036
Hip Funk
Em
088
AMB 02
Em
140
INTRO03
Em
037
DANC01
Em
089
AMB 03
Em
141
INTRO04
Em
038
DANC02
Em
090
AMB 04
Em
142
INTRO05
Em
039
DANC03
Em
091
AMB s1VA
Em
143
INTRO06
Em
040
DANC04
Em
092
AMB s1FA
Em
144
INTRO07
Em
041
DANC05
Em
093
AMB s1VB
Em
145
INTRO08
Em
042
DANC06
Em
094
AMB s1FB
Em
146
INTRO09
Em
043
DANCs1VA
Em
095
Grv Arp1
Em
147
INTRO10
Em
044
DANCs1FA
Em
096
Grv Arp2
Em
148
INTRO11
Em
045
DANCs1VB
Em
097
Grv Drm1
Em
149
INTRO12
Em
046
DANCs1FB
Em
098
Grv Drm2
Em
150
INTRO13
Em
047
DANCs2VA
Em
099
Grv Drm3
Em
151
INTRO14
Em
048
DANCs2FA
Em
100
Grv Drm4
Em
152
INTRO15
Em
049
DANCs2VB
Em
101
Grv Perc
Em
153
INTRO16
Em
050
DANCs2FB
EM
102
Grv Bas1
Em
154
INTRO17
Em
051
HOUS01
Em
103
Grv Bas2
Em
155
INTRO18
Em
EMPTY
ZOOM MRS-1044
111
Appendices
* With the factory settings, project number 997 contains the HipHop/Techno set, and drum kit 20HIPHP1 and bass program 07SYNTH are
selected.
* Select the drum kit / bass program and tempo as desired. (With the factory settings, project number 997 is protected. If you want to change
the drum kit or bass program, you must first defeat the Protect setting. See p.87.)
* If you want to use these patterns in another project, execute the Rhythm Import operation (see p.72).
Pattern list
■ Jazz/Latin set
Pattern
number
Pattern
name
Chord
Pattern
number
Pattern
name
Chord
Pattern
number
Pattern
name
Chord
Pattern
number
Pattern
name
Chord
000
BALD01
EM
052
SHFLs1VB
Em
104
MidEs1VB
Em
156
INTRO18
Em
001
BALD02
Em
053
SHFLs1FB
EM
105
MidEs1FB
Em
157
COUNT
Em
002
BALD03
EM
054
SKA 01
Em
106
BOSSA 01
Em
158
ENDING01
Em
003
BALD04
EM
055
SKA 02
Em
107
SAMBA 01
Em
159
ENDING02
Em
004
BALD05T
EM
056
SKA 03
Em
108
SAMBA 02
Em
160
ENDING03
Em
005
BALD06
Em
057
SKA 04
Em
109
08Beat01
Em
161
ENDING04
Em
006
BALD07
Em
058
REGG01
Em
110
08Beat02
Em
162
ENDING05
Em
007
BALD08
Em
059
REGG02
Em
111
08Beat03
Em
163
ENDING06
Em
008
BALD09
EM
060
REGG03
Em
112
08Beat04
Em
164
ENDING07
Em
009
BALD10
Em
061
REGG04
Em
113
08Beat05
Em
165
METRO4/4
Em
010
BALD11T
Em
062
REGGs1VA
Em
114
08Beat06
Em
166
METRO3/4
Em
011
BALDs1VA
Em
063
REGGs1FA
Em
115
08Beat07
Em
167
All Mute
Em
012
BALDs1FA
Em
064
REGGs1VB
Em
116
08Beat08
Em
168
013
BALDs1VB
Em
065
REGGs1FB
Em
117
08Beat09
Em
254
AFRO01
Em
118
08Beat10
Em
Appendices
014
BALDs1FB
Em
066
015
BLUS01
Em
067
AFRO02
Em
119
08Beat11
Em
016
BLUS02
EM
068
AFRO03
Em
120
08Beat12
Em
017
BLUS03
Em
069
AFRO04
Em
121
16Beat01
Em
018
BLUS04
Em
070
AFRO05
Em
122
16Beat02
Em
019
BLUS05
EM
071
AFRO06
Em
123
16Beat03
Em
020
BLUS06
EM
072
AFRO07
Em
124
16Beat04
EM
021
BLUSs1VA
EM
073
AFRO08
Em
125
16Beat05
Em
022
BLUSs1FA
EM
074
AFROs1VA
Em
126
16Beat06
Em
023
BLUSs1VB
EM
075
AFROs1FA
Em
127
16Beat07
Em
024
BLUSs1FB
EM
076
AFROs1VB
Em
128
16Beat08
Em
025
CNTR01
Em
077
AFROs1FB
Em
129
16FUS 01
Em
026
CNTR02
Em
078
LATN01
Em
130
16FUS 02
Em
027
CNTR03
Em
079
LATN02
EM
131
04JAZZ01
EM
028
CNTR04
Em
080
LATN03
Em
132
04JAZZ02
EM
029
CNTRs1VA
Em
081
LATN04
Em
133
04JAZZ03
EM
030
CNTRs1FA
Em
082
LATN05
Em
134
04JAZZ04
Em
031
CNTRs1VB
Em
083
LATN06
Em
135
BOSSA
Em
032
CNTRs1FB
EM
084
LATN07
Em
136
CNTRY
Em
033
JAZZ01
EM
085
LATN08
EM
137
68BLUS
Em
034
JAZZ02
Em
086
LATN09
Em
138
DANCE
Em
035
JAZZ03
Em
087
LATN10
Em
139
INTRO01
Em
036
JAZZ04
Em
088
LATN11
Em
140
INTRO02
Em
037
JAZZ05
Em
089
LATN12
Em
141
INTRO03
Em
038
JAZZ06
Em
090
LATNs1VA
Em
142
INTRO04
Em
039
JAZZ07P
Em
091
LATNs1FA
Em
143
INTRO05
Em
040
JAZZs1VA
EM
092
LATNs1VB
Em
144
INTRO06
Em
041
JAZZs1FA
Em
093
LATNs1FB
Em
145
INTRO07
Em
042
JAZZs1VB
Em
094
LATNs2VA
Em
146
INTRO08
Em
043
JAZZs1FB
Em
095
LATNs2FA
Em
147
INTRO09
Em
044
SHFL01
Em
096
LATNs2VB
Em
148
INTRO10
Em
045
SHFL02
Em
097
LATNs2FB
Em
149
INTRO11
Em
046
SHFL03
Em
098
MidE01
Em
150
INTRO12
Em
047
SHFL04
Em
099
MidE02
Em
151
INTRO13
Em
048
SHFL05
Em
100
MidE03
Em
152
INTRO14
Em
049
SHFLs1VA
Em
101
MidE04T
Em
153
INTRO15
Em
050
SHFLs1Va
Em
102
MidEs1VA
Em
154
INTRO16
Em
051
SHFLs1FA
Em
103
MidEs1FA
Em
155
INTRO17
Em
EMPTY
* With the factory settings, project 998 contains the Jazz/Latin set, and drum kit 12JAZZ and bass program 05ACOUBS are selected.
* Select the drum kit / bass program and tempo as desired. (With the factory settings, project number 998 is protected. If you want to change
the drum kit or bass program, you must first defeat the Protect setting. See p.87.)
* If you want to use these patterns in another project, execute the Rhythm Import operation (see p.72).
112
ZOOM MRS-1044
Drum kit / bass program list
Drum kit / bass program list
■ Drum Kit List
LIVE ROCK
STUDIO DRUMS
STANDARD KIT
VARIATION
GENERAL DRUMS
FUNK TRAP
JAZZ DRUMS
EPIC ROCK
BALLAD SET
DANCE KIT
RAP/HIPHOP
TECHNO BEAT
LO-FI KIT
PERCUSSION
ENSEMBLE PARTS
■ Bass Program List
No.
Display
No.
Display
0
00LIVE1
LiveRock1
Kit name
0
00LIVEBS
Program name
Live Bass
1
01LIVE2
LiveRock2
1
01STUDIO
Studio Bass
2
02STDIO1
Studio Drums1
2
02EPICBS
Epic Bass
3
03STDIO2
Studio Drums2
3
03FUNKBS
Funk Bass
4
04STNDR1
Standard KIT1
4
04BALLAD
Ballad Bass
5
05STNDR2
Standard KIT2
5
05ACOUBS
Acoustic Bass
6
06ELE_DR
Electric Drums
6
06ROCKBS
Rock Bass
7
07ENHPWR
Enhanced Power
7
07SYNTH
Synth Bass
8
08GENERL
General Kit
8
08TECHNO
Techno Bass
9
09DRUM9
Drum#9
9
09NOFRET
No Frets
10
10FUNK1
FunkTrap1
10
10PICKED
Picked Jazz
11
11FUNK2
FunkTrap2
11
11JAZZBS
Jazz Bass
12
12JAZZ
Jazz Kit
12
12DRIVE
Drive Bass
13
13BRUSH
Brush Kit
13
13FUZZ
Fuzz Bass
14
14EPIC1
Epic Rock1
14
14SAW
Saw Wave
15
15EPIC2
Epic Rock2
15
15SQUARE
Square Wave
16
16BALAD1
Ballad Set1
17
17BALAD2
Ballad Set2
18
18DANCE1
Dance Kit1
19
19DANCE2
Dance Kit2
20
20HIPHP1
Rap/Hiphop1
21
21HIPHP2
Rap/Hiphop2
22
22TECH1
Techno Beat1
23
23TECH2
Techno Beat2
24
24LO_FI
Lo-Fi Kit
25
25DIST
Distortion
26
26GNPERC
General Percussion
27
27DRSKIN
Drum Skins
28
28CLKSTK
Click and Sticks
29
29LOPERC
Lo Percussion
30
30HIPERC
Hi Percussion
Appendices
ZOOM MRS-1044
113
Pad-Instrument/Note# correspondence table
Pad-Instrument/Note# correspondence table
■ Drum pad instrument name / MIDI note# correspondence table
Common to all kits (except for kits 12, 13, 26, 27, 28, 29, 30)
PAD No.
PAD NAME
BANK2
BANK1
Instrument name
NOTE#
Instrument name
BANK3
NOTE#
Instrument name
NOTE#
PAD1
KICK
Kick
36
CowBell
56
Agogo
67
PAD2
SNARE
Snare
38
Mute High Conga
62
Tambourine
54
PAD3
CLOSED HAT
Closed HiHat
42
Open High Conga
63
Hand Claps
39
PAD4
OPEN HAT
Open HiHat
46
Low Conga
64
Short Guiro
73
PAD5
TOM 1
TOM 1
50
Stick
37
High Timbales
65
PAD6
TOM 2
TOM 2
47
High Bongo
60
Low Timbales
66
PAD7
TOM 3
TOM 3
43
Low Bongo
61
Shaker
70
PAD8
CYMBAL
Crash Cymbal
49
Ride Cymbal
51
Cup
53
KIT:12JAZZ
PAD No.
PAD NAME
BANK1
Instrument name
BANK2
NOTE#
Instrument name
BANK3
NOTE#
Instrument name
NOTE#
PAD1
KICK
Kick
36
Ride Cymbal 2
56
Agogo
67
PAD2
SNARE
Snare
38
Mute High Conga
62
Tambourine
54
PAD3
CLOSED HAT
Closed HiHat
42
Open High Conga
63
Pedal HiHat
39
PAD4
OPEN HAT
Open HiHat
46
Low Conga
64
Short Guiro
73
PAD5
TOM 1
TOM 1
50
Stick
37
High Timbales
65
PAD6
TOM 2
TOM 2
47
High Bongo
60
Low Timbales
66
PAD7
TOM 3
TOM 3
43
Low Bongo
61
Shaker
70
PAD8
CYMBAL
Crash Cymbal
49
Ride Cymbal 1
51
Cup
53
KIT:13BRUSH
PAD No.
PAD NAME
BANK2
BANK1
Instrument name
NOTE#
Instrument name
BANK3
NOTE#
Instrument name
NOTE#
PAD1
KICK
Kick 1
36
Snare 2
56
Agogo
67
PAD2
SNARE
Snare 1
38
Mute High Conga
62
Tambourine
54
PAD3
CLOSED HAT
Closed HiHat
42
Open High Conga
63
Pedal HiHat
39
PAD4
OPEN HAT
Open HiHat
46
Low Conga
64
Short Guiro
73
PAD5
TOM 1
TOM 1
50
Stick
37
High Timbales
65
PAD6
TOM 2
TOM 2
47
High Bongo
60
Low Timbales
66
PAD7
TOM 3
Kick 2
43
Low Bongo
61
Shaker
70
PAD8
CYMBAL
Crash Cymbal
49
Ride Cymbal
51
Cup
53
KIT:26GNPERC
PAD No.
PAD NAME
BANK1
Instrument name
BANK2
NOTE#
Instrument name
BANK3
NOTE#
Instrument name
NOTE#
PAD1
KICK
Metronome Click
36
Short Guiro 1
56
Wood Block High
67
PAD2
SNARE
Metroneme Bell
38
Long Guiro 1
62
Wood Block Low
54
PAD3
CLOSED HAT
Scratch 1
42
Agogo 1
63
Jingle Bell
39
PAD4
OPEN HAT
Scratch 2
46
Agogo 2
64
Castanet
73
PAD5
TOM 1
HighQ
50
Claves 1
37
Mute Surdo
65
PAD6
TOM 2
Square Click
47
Cabasa
60
Open Surdo
66
PAD7
TOM 3
Short Stick
43
Whistle 1
61
Muted Triangle
70
PAD8
CYMBAL
Vibraslap
49
Whistle 2
51
Open Triangle
53
KIT:27DRSKIN
Appendices
PAD No.
PAD NAME
BANK1
Instrument name
BANK2
NOTE#
Instrument name
BANK3
NOTE#
Instrument name
NOTE#
PAD1
KICK
Live Conga 1
36
Hand Tom
56
Wood Block High
67
PAD2
SNARE
Live Conga 2
38
Doumbek 1
62
Wood Block Low
54
PAD3
CLOSED HAT
Timbales 1
42
Doumbek 2
63
Jingle Bell
39
PAD4
OPEN HAT
Timbales 2
46
Doumbek 3
64
Castanet
73
PAD5
TOM 1
Bongo Reverb 1
50
Latin Sell 1
37
Mute Surdo
65
PAD6
TOM 2
Bongo Reverb 2
47
Cabasa
60
Open Surdo
66
PAD7
TOM 3
Tumba 1
43
Whistle 1
61
Muted Triangle
70
PAD8
CYMBAL
Tumba 2
49
Whistle 2
51
Open Triangle
53
114
ZOOM MRS-1044
Pad-Instrument/Note# correspondence table
KIT:28CLKSTK
BANK1
PAD No.
PAD NAME
Instrument name
BANK2
NOTE#
Instrument name
BANK3
NOTE#
Instrument name
NOTE#
PAD1
KICK
Stick Reverb
36
Latin Sell
56
Wood Block High
67
PAD2
SNARE
Studio Click
38
Castanet 1
62
Wood Block Low
54
PAD3
CLOSED HAT
Cross Stick
42
Castanet 2
63
Jingle Bell
39
PAD4
OPEN HAT
Short Guiro
46
Castanet 3
64
Castanet
73
PAD5
TOM 1
Claves
50
Brush Slap
37
Mute Surdo
65
PAD6
TOM 2
Wood Click 1
47
Cabasa
60
Open Surdo
66
PAD7
TOM 3
Wood Click 2
43
Whistle 1
61
Muted Triangle
70
PAD8
CYMBAL
Wood Click 3
49
Whistle 2
51
Open Triangle
53
KIT:29LOPERC
BANK1
PAD No.
PAD NAME
Instrument name
BANK2
NOTE#
Instrument name
BANK3
NOTE#
Instrument name
NOTE#
PAD1
KICK
Doumbek 1
36
Loose Conga 1
56
Wood Block High
67
PAD2
SNARE
Doumbek 2
38
Loose Conga 2
62
Wood Block Low
54
PAD3
CLOSED HAT
Doumbek 3
42
Tabla 1
63
Jingle Bell
39
PAD4
OPEN HAT
Timbales
46
Tabla 2
64
Castanet
73
PAD5
TOM 1
Tumba 1
50
Latin Sell
37
Mute Surdo
65
PAD6
TOM 2
Tumba 2
47
Cabasa
60
Open Surdo
66
PAD7
TOM 3
Tumba 3
43
Whistle 1
61
Muted Triangle
70
PAD8
CYMBAL
Hand Tom
49
Whistle 2
51
Open Triangle
53
KIT:30HIPERC
BANK1
PAD No.
PAD NAME
Instrument name
BANK2
NOTE#
Instrument name
BANK3
NOTE#
Instrument name
NOTE#
PAD1
KICK
Tambourine 1
36
Long Guiro 1
56
Wood Block High
67
PAD2
SNARE
Tambourine 2
38
Long Guiro 2
62
Wood Block Low
54
PAD3
CLOSED HAT
Tambourine 3
42
Agogo 1
63
Jingle Bell
39
PAD4
OPEN HAT
Claves
46
Agogo 2
64
Castanet
73
PAD5
TOM 1
Shaker 1
50
Short Guiro
37
Mute Surdo
65
PAD6
TOM 2
Shaker 2
47
Cabasa
60
Open Surdo
66
PAD7
TOM 3
Shaker 3
43
Whistle 1
61
Muted Triangle
70
PAD8
CYMBAL
Vibraslap
49
Whistle 2
51
Open Triangle
53
* On the MRS-1044, each drum kit is independent. This means that instruments with identical names may sound different.
■ Bass pad note# correspondence table
For E min
PAD No.
For E Maj
PAD NAME
min-1
min-2
min-3
NOTE#
NOTE#
NOTE#
PAD No.
PAD NAME
Maj-1
Maj-2
Maj-3
NOTE#
NOTE#
NOTE#
PAD1
KICK
28
40
52
PAD1
KICK
28
40
52
PAD2
SNARE
30
42
54
PAD2
SNARE
30
42
54
PAD3
CLOSED HAT
31
43
55
PAD3
CLOSED HAT
32
44
56
PAD4
OPEN HAT
33
45
57
PAD4
OPEN HAT
33
45
57
PAD5
TOM 1
35
47
59
PAD5
TOM 1
35
47
59
PAD6
TOM 2
36
48
60
PAD6
TOM 2
37
49
61
PAD7
TOM 3
38
50
62
PAD7
TOM 3
39
51
36
PAD8
CYMBAL
40
52
64
PAD8
CYMBAL
40
52
64
ZOOM MRS-1044
Appendices
* If the key is set to other than E, the NOTE# will change accordingly.
* The bass can be sounded in a range of note numbers 12 – 74.
* Note numbers 12 – 74 can be received from MIDI IN regardless of the Pad Bank setting.
115
MIDI implementation
MIDI implementation
MRS-1044
MIDI IMPLEMENTATION
1. Recognized Messages
Status 1st
2nd
Description
---------------------------------------------------------------------------8nH
kk
vv
Note Off kk: note number
vv: velocity will be ignored
9nH
kk
00H
Note Off
kk: note number
9nH
kk
vv
Note On
kk: note number
vv: velocity
BnH
BnH
BnH
07H
78H
7BH
vv
xx
xx
Channel Volume
All Sounds Off
All Notes Off
vv: volume value
2. Transmitted Messages
Status 1st
2nd
Description
---------------------------------------------------------------------------8nH
kk
40H
Note Off kk: note number
9nH
kk
vv
Note On
BnH
BnH
07H
7BH
vv
00H
Channel Volume
All Notes Off
F2H
sl
sh
Song Position Pointer
F8H
FAH
FBH
FCH
kk: note number
vv: velocity
vv: volume value
shsl: song position
Timing Clock
Start
Continue
Stop
Appendices
116
ZOOM MRS-1044
MIDI implementation chart
MIDI implementation chart
[HardDisk Recorder
]
Model MRS-1044
MIDI Implementation Chart
Date :
Transmitted
Recognized
20.August,2001
Version :1.01
Remarks
Function ...
Basic
Channel
Default
Changed
1-16,OFF
1-16,OFF
1-16,OFF
1-16,OFF
Mode
Default
Messages
Altered
3
x
******************
3
x
12-74
******************
12-74
True voice
Velocity Note ON
Note OFF
o
x
o
x
After
Touch
x
x
x
x
x
x
7
7
Volume
120
All Sounds Off
Note
Number
Key's
Ch's
Pitch Bend
Memorized
Control
Change
Prog
Change
x
******************
x
System Exclusive
x
x
System
o
x
x
x
x
x
o
o
x
x
x
o
x
x
x
o
x
x
True #
Song Pos
Song Sel
Tune
Common
System
Real Time
Aux
Messages
Clock
Commands
Local ON/OFF
All Notes OFF
Active Sense
Reset
Appendices
Notes
Mode 1 : OMNI ON, POLY
Mode 3 : OMNI OFF, POLY
ZOOM MRS-1044
Mode 2 : OMNI ON, MONO
Mode 4 : OMNI OFF, MONO
o : Yes
x : No
117
Index
Index
EQ
[EQ HIGH] key
[EQ LOW] key
[EQUALIZER] key
[ERASE] key
[EXIT] key
[EXP PEDAL] jack
A
A-B Repeat function
[A-B REPEAT] key
[ACCESS] indicator
Algorithm
ALGORITHM keys
[AUTO PUNCH IN/OUT] key
Auto punch-in/out
32
11, 32
10
21, 75
9, 77
11, 33
33
25, 49
11, 49
11, 49
9, 79
10, 60, 69
12
13
F
Fader section
Faders
FF[Y] key
[FOOT SW] jack
Foot switch
Front panel
B
Balance
[BANK] key
Bass track
Bass program, editing a
Bass programs
BASS status key
Bounce function
[BOUNCE] key
[BYPASS/TUNER] key
48
10, 66
55
57
55
10
37
10, 37
9, 21, 92
D
[DC 12V] jack
Demo songs
Dial
Display
Display section
Drum kit
Drum kit, changing the
DRUM status key
Drum track
[DRUM/BASS] key
13
15
12
10
10
55
57
10
55
10
Appendices
E
[EDIT] key
Effect modules
Effect parameters
Effect section
Effect types
[EFFECT] key
Effects
[ENTER] key
118
G
[GUITAR/BASS] key
9, 77
Hard disk free space, checking the
Capture
44
Channel
46
Chord type
61
[CHORUS/DELAY SEND] key 11, 48
[CHORUS/DELAY] key
9, 81
[CLEAR] key
11, 30
[CLIP] indicator
8, 20
[COMPRESSOR] key
9, 79
Control section
11
Counter
18
12
Cursor [Q]/[W]/[E]/[R] keys
12
75
78, 98
7, 9
78, 98
9, 21
74
12
86
I
[INPUT 1] / INPUT 2] controls
8, 20, 47
[INPUT 1] jacks
12
BALANCE
12
GUITAR/BASS
13
UNBALANCE
12
[INPUT 2] jacks
13
BALANCE
13
UNBALANCE
13
Input mixer
46
Adjusting the depth of the
send/return effects
48
Adjusting the pan/balance
48
Assigning the input signal to
recording tracks
47
Input section
8
Input sensitivity
20
[INPUT SOURCE] key
9, 76
Insert effect
7, 74
Applying an insert effect
only to the monitor signal
76
Changing the insert location
of the insert effect
76
Editing a patch
78
Editing the patch name
81
Selecting a patch
77
Storing a patch
80
[INSERT/DELETE] key
10
K
[KIT/PROG] key
[LCD CONTRAST] control
10
Level meter
25
Switching the level meter display
type
54
[LINE] key
9, 77
Locate / the Locate function
29
M
10
10
12
13
13, 14, 92
8
H
C
L
Main screen
18
Manual punch-in/out
33
[MARK] key
12, 29
Marker function
29
12, 30
MARKER[U] / [I] keys
Marks
29
Assigning a mark
29
Deleting a mark
30
Locating to a mark location
30
MASTER fader
10
MASTER status key
10
[MASTERING] key
9, 77
Measure display
29
Memory, checking the remaining
amount of
73
Metronome, changing the volume
of the
73
[MIC] key
9, 77
MIDI
89
MIDI channel, setting the
90
MIDI messages
89
Song Position Pointer
transmission
91
Start/Stop/Continue
transmission
91
Timing Clock transmission
90
[MIDI IN] / [MIDI OUT]
connectors
13, 89
Mixdown
24
Mixer
46
Mixer section
7
[MODULATION/DELAY] key 9, 79
MODULE keys
9, 79
N
Note messages
89
O
[ON/OFF] keys
[OUTPUT] jacks
DIGITAL
MASTER
PHONES
Overdubbing
8, 20, 47
13
13
13
13
23
10, 57
ZOOM MRS-1044
Index
P
Pad bank
66
Pad sensitivity, adjusting the
73
Pads
10, 55
Pan
25, 48
[PAN] key
11, 48, 49
Patch level
75, 80
Patches
21
Insert effect patches
75
Importing patches from another
project
84
Patch list
106
Send/return effect patches
81
[PATTERN] key
9, 56
[PEAK] indicators
8, 20
[PHANTOM ON/OFF] switch
13
Phantom power supply
13
Ping-pong recording
37
PLAY[R] key
12
Post-fader
54
Power, turning off the
16
Power, turning on the
15
[POWER] switch
13, 15, 16
[PRE AMP/DRIVE] key
9, 79
Pre-count, changing the length of the 73
Pre-fader
54
Preview function
31
Project
17, 85
Checking the size of a project 86
Copying a project
87
Creating a new project
86
Editing the project name
87
Erasing a project
87
Loading a project
86
Protecting a project
87
Storing a project
88
Project menu
18, 85
[PROJECT/UTILITY] key
10
Punch-in/out function
33
Selecting and playing a
rhythm pattern
56
Rhythm pattern Edit menu
67
Rhythm Pattern mode
56
Rhythm pattern screen
56
Rhythm pattern, creating a
66
Recording on a rhythm pattern 67
Selecting the track to record
66
Specifying a chord of a
rhythm pattern
69
Rhythm pattern, editing a
70
Adjusting the drum/bass
volume balance
70
Copying a rhythm pattern
71
Erasing a rhythm pattern
71
Editing the name of a rhythm
pattern
71
Loading a rhythm pattern
from another project
72
Rhythm section
7 ,9, 55
Rhythm song
18, 55
Rhythm Song mode
19, 56
Rhythm Song screen
58
Rhythm song, creating a
58
Inputting chord data
60
Inputting other data
62
Inputting rhythm pattern data 58
Inputting tempo data
62
Playing a rhythm song
63
Rhythm song, editing a
64
Copying a specific region
of measures
64
Erasing a rhythm song
65
Loading a rhythm song from
another project
72
Transposing the entire rhythm
song
65
Rhythm utility menu
72
S
Q
Quantization
67
R
ZOOM MRS-1044
44
T
Tempo
57
[TEMPO] key
10, 57
[TIME BASE] key
10, 29
Time display
29
Timing Clock
89, 90
[TOTAL] key
9, 79
Track edit menu
38
Track editing
38
Copying a specified region of
data to another location
38
Copying the data of an entire
track
40
Erasing a specified region
42
Erasing the data of an entire
track
43
Exchanging the data of entire
tracks
43
Moving a specified region of
data to another location
40
Track mixer
46
Adjusting the effect depth
50
Adjusting the volume/pan/EQ 49
Linking two channels
50
TRACK PARAMETER section
11
Transport section
12
Tuner
92
U
[UNDO/REDO] key
USB board
12, 44
5, 13
V
[V-TAKE] key
10, 35
V-takes
35
Editing the name of a V-take
36
Switching the V-takes
35
Z
ZERO[U] key
12
Appendices
Rear panel
12
[REC LEVEL] control
8, 20, 47
REC[O] key
12
Recorder
29
Recorder section
6, 29
Recording level
20
Remaining time for recording,
checking the
86
Repeat playback
32
[REVERB SEND] key
11, 48
[REVERB] key
9, 81
REW[T] key
12
[RHYTHM] key
9
Rhythm pattern
55
Changing the tempo of a
rhythm pattern
57
[SCENE] key
10, 51
Scenes / the Scene function
51
Deleting a scene
52
Recalling a saved scene
52
Saving a scene
51
Switching scenes automatically 52
SCMS
93
Scrub function
31
SCSI board
5, 13
Send level
48
Send/return effects
7, 26, 74
Editing a patch
82
Editing the patch name
83
Selecting a patch
81
Storing a patch
83
Side panel
13
Song Position Pointer
91
[SONG] key
9, 56
Status keys
10, 22
Stereo link
50
STOP[P] key
12
Swap
119
ZOOM CORPORATION
NOAH Bldg., 2-10-2, Miyanishi-cho, Fuchu-shi, Tokyo 183-0022, Japan
PHONE: +81-42-369-7116 FAX: +81-42-369-7115
Web Site: http://www.zoom.co.jp
Printed in Japan MRS-1044 - 5000-2