1
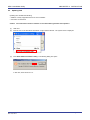
User’s Manual HEX Consolidation Utility Utility for Generating ROM Code for Ordering Renesas Electronics Preprogrammed Flash Memory Devices User’s Manual All information contained in these materials, including products and product specifications, represents information on the product at the time of publication and is subject to change by Renesas Electronics Corp. without notice. Please review the latest information published by Renesas Electronics Corp. through various means, including the Renesas Electronics Corp. website (http://www.renesas.com). www.renesas.com Rev. 1.00 Nov. 2011 Notice 1. 2. 3. 4. 5. 6. 7. All information included in this document is current as of the date this document is issued. Such information, however, is subject to change without any prior notice. Before purchasing or using any Renesas Electronics products listed herein, please confirm the latest product information with a Renesas Electronics sales office. Also, please pay regular and careful attention to additional and different information to be disclosed by Renesas Electronics such as that disclosed through our website. Renesas Electronics does not assume any liability for infringement of patents, copyrights, or other intellectual property rights of third parties by or arising from the use of Renesas Electronics products or technical information described in this document. No license, express, implied or otherwise, is granted hereby under any patents, copyrights or other intellectual property rights of Renesas Electronics or others. You should not alter, modify, copy, or otherwise misappropriate any Renesas Electronics product, whether in whole or in part. Descriptions of circuits, software and other related information in this document are provided only to illustrate the operation of semiconductor products and application examples. You are fully responsible for the incorporation of these circuits, software, and information in the design of your equipment. Renesas Electronics assumes no responsibility for any losses incurred by you or third parties arising from the use of these circuits, software, or information. When exporting the products or technology described in this document, you should comply with the applicable export control laws and regulations and follow the procedures required by such laws and regulations. You should not use Renesas Electronics products or the technology described in this document for any purpose relating to military applications or use by the military, including but not limited to the development of weapons of mass destruction. Renesas Electronics products and technology may not be used for or incorporated into any products or systems whose manufacture, use, or sale is prohibited under any applicable domestic or foreign laws or regulations. Renesas Electronics has used reasonable care in preparing the information included in this document, but Renesas Electronics does not warrant that such information is error free. Renesas Electronics assumes no liability whatsoever for any damages incurred by you resulting from errors in or omissions from the information included herein. Renesas Electronics products are classified according to the following three quality grades: “Standard”, “High Quality”, and “Specific”. The recommended applications for each Renesas Electronics product depends on the product’s quality grade, as indicated below. You must check the quality grade of each Renesas Electronics product before using it in a particular application. You may not use any Renesas Electronics product for any application categorized as “Specific” without the prior written consent of Renesas Electronics. Further, you may not use any Renesas Electronics product for any application for which it is not intended without the prior written consent of Renesas Electronics. Renesas Electronics shall not be in any way liable for any damages or losses incurred by you or third parties arising from the use of any Renesas Electronics product for an application categorized as “Specific” or for which the product is not intended where you have failed to obtain the prior written consent of Renesas Electronics. The quality grade of each Renesas Electronics product is “Standard” unless otherwise expressly specified in a Renesas Electronics data sheets or data books, etc. “Standard”: 8. 9. 10. 11. 12. Computers; office equipment; communications equipment; test and measurement equipment; audio and visual equipment; home electronic appliances; machine tools; personal electronic equipment; and industrial robots. “High Quality”: Transportation equipment (automobiles, trains, ships, etc.); traffic control systems; anti-disaster systems; anticrime systems; safety equipment; and medical equipment not specifically designed for life support. “Specific”: Aircraft; aerospace equipment; submersible repeaters; nuclear reactor control systems; medical equipment or systems for life support (e.g. artificial life support devices or systems), surgical implantations, or healthcare intervention (e.g. excision, etc.), and any other applications or purposes that pose a direct threat to human life. You should use the Renesas Electronics products described in this document within the range specified by Renesas Electronics, especially with respect to the maximum rating, operating supply voltage range, movement power voltage range, heat radiation characteristics, installation and other product characteristics. Renesas Electronics shall have no liability for malfunctions or damages arising out of the use of Renesas Electronics products beyond such specified ranges. Although Renesas Electronics endeavors to improve the quality and reliability of its products, semiconductor products have specific characteristics such as the occurrence of failure at a certain rate and malfunctions under certain use conditions. Further, Renesas Electronics products are not subject to radiation resistance design. Please be sure to implement safety measures to guard them against the possibility of physical injury, and injury or damage caused by fire in the event of the failure of a Renesas Electronics product, such as safety design for hardware and software including but not limited to redundancy, fire control and malfunction prevention, appropriate treatment for aging degradation or any other appropriate measures. Because the evaluation of microcomputer software alone is very difficult, please evaluate the safety of the final products or system manufactured by you. Please contact a Renesas Electronics sales office for details as to environmental matters such as the environmental compatibility of each Renesas Electronics product. Please use Renesas Electronics products in compliance with all applicable laws and regulations that regulate the inclusion or use of controlled substances, including without limitation, the EU RoHS Directive. Renesas Electronics assumes no liability for damages or losses occurring as a result of your noncompliance with applicable laws and regulations. This document may not be reproduced or duplicated, in any form, in whole or in part, without prior written consent of Renesas Electronics. Please contact a Renesas Electronics sales office if you have any questions regarding the information contained in this document or Renesas Electronics products, or if you have any other inquiries. (Note 1) “Renesas Electronics” as used in this document means Renesas Electronics Corporation and also includes its majorityowned subsidiaries. (Note 2) “Renesas Electronics product(s)” means any product developed or manufactured by or for Renesas Electronics. How to Use This Manual Target Readers This manual is intended for users who are going to place an order for a Renesas Electronics microcontroller that incorporates flash memory preprogrammed by Renesas Electronics. These microcontrollers are known as “flash memory device”. Purpose This manual is intended to give users an understanding of the features of the HEX Consolidation Utility. Organization This manual includes the following sections. Overview Installation Usage Messages How to Read This Manual It is assumed that the readers of this manual have general knowledge of electricity, logic circuits, and microcontrollers. In the descriptions of the applications, it is also ® assumed that the readers have sufficient knowledge of Windows . For Windows usage and terminology, refer to each Windows manual. To understand the overall operation: Read this manual according to the CONTENTS. To know the hardware specifications of the microcontroller: See the user’s manual for the target device. To know how to place orders for a flash memory device: Consult an Renesas Electronics sales representative or distributor. Conventions Note: Footnote for item marked with Note in the text. Caution: Information requiring particular attention Remark: Supplementary information Numeral representation: Binary ... xxxx or xxxxB Decimal ... xxxx Hexadecimal ... 0XXXXX or xxxxH Terminology The meanings of the terms used in this manual are as follows: Term HCU Meaning HEX Consolidation Utility, a utility for generating the ROM code required for placing orders for Renesas Electronics devices that incorporate flash memory preprogrammed by NEC Electronics FP5 Abbreviation of the flash memory programmer PG-FP5 E1/E20 Abbreviation of the E1 emulator / E20 emulator MINICUBE2 Nickname used for the main unit of QB-MINI2, the on-chip debug emulator with programming function RFP Abbreviation of the flash memory programming software, Renesas Flash Programmer PR5 file Abbreviation of the parameter file for PG-FP5 Parameter file contain parameter information required for writing programs to the flash memory in the target microcontroller. These files have the extension *.pr5. Do not change the data in the parameter file. If the data is changed, HCU might not operate properly. ESF file Abbreviation of the setting file for PG-FP5 Setting file store the data required to write programs. In FP5, a setting file stores the settings related to the programming environment, such as target microcontroller settings and command option specifications. In RFP, project files have the extension *.esf. If the data is changed, HCU might not operate properly. Option data General term for Security flag settings (Disable Chip Erase, Disable Block Erase, Disable Program, Disable Read), Brock protection settings (the flash shield window, Boot Block end), reset vector handling function settings, option byte settings, on-chip debug security ID settings, wide-voltage mode, and full-speed mode The functions that can be used differ depending on the target microcontroller. HEX file A file of Intel HEX format type or Motorola HEX format type without option data It corresponds to the following file format. - Intel HEX format - Intel HEX-32 format - Motorola S type HEX format HCUHEX file A file that integrates option data and HEX file is generated by using the HCU In the case of the HEX file of the Intel HEX format or Intel HEX-32 format, it generates to the Intel HEX-32 format. In the case of the HEX file of the Motorola S type HEX format, it generates to the Motorola S type HEX format (data record S3 and end record S7). Related Documents See the following documents when using this manual. The related documents indicated in this publication may include preliminary versions. However, preliminary versions are not marked as such. Document Name PG-FP5 Flash Memory Programmer User’s Manual Document No. R20UT0008E Caution The related documents listed above are subject to change without notice. Be sure to use the latest version of each document when designing. All trademarks and registered trademarks are the property of the respective owner. CONTENTS CHAPTER 1 OVERVIEW ...........................................................................................7 1.1 1.2 1.3 1.4 Features.....................................................................................................................................7 HCU System Organization .......................................................................................................7 Operating Environment............................................................................................................8 1.3.1 Hardware environment .................................................................................................8 1.3.2 Software environment...................................................................................................8 Supported Microcontrollers ....................................................................................................8 CHAPTER 2 INSTALLATION ....................................................................................9 2.1 2.2 2.3 2.4 Obtaining ...................................................................................................................................9 Installation.................................................................................................................................9 Uninstallation ............................................................................................................................9 Updating HCU .........................................................................................................................10 CHAPTER 3 USAGE................................................................................................11 3.1 3.2 3.3 3.4 3.5 Introduction.............................................................................................................................11 Overview of Basic HCU Operation........................................................................................11 Modes ......................................................................................................................................12 Edit Mode.................................................................................................................................12 3.4.1 Example of using the HCU in edit mode ................................................................12 Check Modes...........................................................................................................................18 3.5.1 Example of using the HCU in check mode ............................................................18 APPENDIX A MESSAGES.......................................................................................22 A.1 Message Format .....................................................................................................................22 A.2 Messages Displayed in Error Dialog Boxes ........................................................................23 A.3 Messages Displayed in Information Dialog Boxes .............................................................24 HEX Consolidation Utility Utility for Generating ROM Code for Ordering Renesas Electronics Preprogrammed Flash Memory Devices R20UT0912EJ0100 Rev. 1.00 Nov. 25, 2011 CHAPTER 1 OVERVIEW The ROM code generator HEX Consolidation Utility (HCU) is a software tool that includes functions for creating the ROM code required when placing an order for a Renesas Electronics microcontroller that incorporates flash memory preprogrammed by Renesas Electronics. 1.1 Features Merging of HEX files and option data Viewing and editing option data settings 1.2 HCU System Organization The following figure shows an example of how a system that uses the HCU is organized. Figure 1-1. HCU System Organization Note PR5 file HEX file Host ESF file PG-FP5 HCUHEX file HCU HCU operation overview The HCU can generate HCUHEX files and can be used to check option data settings. For details about using the HCU, see CHAPTER 3 USAGE. Note As for the ESF file generated by PG-FP5, the contents of a setting of option data are included. HCU can load option data from an ESF file. When you do not have PG-FP5, HCU can input directly the option data. R20UT0912EJ0100 Rev. 1.00 Nov. 25, 2011 Page 7 of 27 Renesas Flash Programmer 1.3 0BCHAPTER 1 OVERVIEW Operating Environment This section explains the following items with respect to the operating environment: Hardware environment Software environment 1.3.1 Hardware environment Host machine Computer that satisfies the system requirements of the OS used 1.3.2 Software environment Windows XP (32-bit only) Windows Vista (32-bit and 64-bit) Windows 7 (32-bit and 64-bit) 1.4 Supported Microcontrollers For the microcontrollers supported by the HCU, contact a Renesas Electronics sales representative or distributor. R20UT0912EJ0100 Rev. 1.00 Nov. 25, 2011 Page 8 of 27 HEX Consolidation Utility 0BCHAPTER 2 INSTALLATION CHAPTER 2 INSTALLATION This chapter describes the following items related to HCU: Obtaining Installation Uninstallation Updating HCU 2.1 Obtaining Download HCU and PR5 file from the following websites: Websites of HCU Japanese: http://japan.renesas.com/hcu English: https://www5.renesas.com/micro/tool_reg/OdsListTool.do?code=640&lang=en Websites of PR5 file Japanese: http://japan.renesas.com/pg_fp5 English: Caution 2.2 http://www.renesas.com/pg_fp5 Use of the latest version of software is recommended to guarantee HCU operation. Installation This section describes how to install HCU, PR5 file, and ESF file. Table 2-1. Installation Item Description Unzip the downloaded file (hcu_gui_vxxx.zip) into any folder and run HCU.exe included in the HCU folder. (xxxx shows HCU version.) PR5 file ESF file Unzip the downloaded file into any folder. The file *.pr5 is included in the folder. This file is created by using FP5. For details about how to create ESF files, see the PG-FP5 Flash Memory Programmer User’s Manual (R20UT0008E). 2.3 Uninstallation This section describes how to uninstall HCU, PR5 file, and ESF file. These items can be uninstalled in any order. Table 2-2. Uninstallation Item Description HCU Remove the HCU (HCU.exe). PR5 file Remove the PR5 file (*.pr5). ESF file Remove the ESF file (*.esf). R20UT0912EJ0100 Rev. 1.00 Nov. 25, 2011 Page 9 of 27 HEX Consolidation Utility 2.4 0BCHAPTER 2 INSTALLATION Updating HCU Updating HCU enables the following: Addition of newly supported functions or microcontrollers Correction of restrictions Caution Use of the latest version of software is recommended to guarantee HCU operation. (1) Start HCU. (2) Click the icon on the left side of the title bar or right-click the title bar. The system menu is displayed. (3) Click About HEX Consolidation Utility. The following dialog box opens. In this case, HCU version is 1.01. R20UT0912EJ0100 Rev. 1.00 Nov. 25, 2011 Page 10 of 27 HEX Consolidation Utility 0BCHAPTER 3 USAGE CHAPTER 3 USAGE This chapter describes the HCU dialog boxes. 3.1 Introduction Make sure that the HCU and the PR5 file for the microcontroller used are installed. For details about installation, see CHAPTER 2 INSTALLATION. 3.2 Overview of Basic HCU Operation The following figure shows an overview of the basic operation after the HCU starts. Caution After the HCUHEX file is created in edit mode, be sure to enter check mode to check whether the specified option data settings are correct. Use FP5, RFP or QB-Programmer to check whether the code works for the microcontroller before sending the HCUHEX file as the ROM code. In addition, a verification of operation is the next work. The HCUHEX file is programmed on a microcontroller. The microcontroller is verified by the HEX file and it is checked whether data is equal. Figure 3-1. Dialog Boxes Displayed in the Startup Wizard Edit mode Check mode Selection of PR5 file Selection of PR5 file Selection of HEX file Selection of HCUHEX file Load optional data from the ESF file? No Displaying the option data End of check mode Yes Selection of ESF file Merging the HEX files and option data Generation of HCUHEX file End of edit mode R20UT0912EJ0100 Rev. 1.00 Nov. 25, 2011 Inputting the option data Checking whether the code works for the microcontroller by using the FP5, RFP or the QB-Programmer Sending the HCUHEX file as the ROM code Page 11 of 27 HEX Consolidation Utility 3.3 0BCHAPTER 3 USAGE Modes The HCU can operate in the following two modes: Edit mode To create an HCUHEX file in this mode, select a PR5 file and a HEX file and then load option data from an ESF file or directly input option data. For details about this procedure, see 3.4 Edit Mode. Check mode In this mode, the settings specified by option data can be checked by selecting the PR5 and HCUHEX files. For details about this procedure, see 3.5 Check Mode. 3.4 Edit Mode In this mode, the HCUHEX file can be created by selecting a PR5 file and a HEX file and then loading option data from an ESF file or directly inputting option data. Caution After the HCUHEX file is created in edit mode, be sure to enter check mode to check whether the specified option data settings are correct. 3.4.1 Example of using the HCU in edit mode The following describes an example of using the HCU in edit mode. Use the HCU in the order described in this section. To return to a previous dialog box, click the Cancel button. (1) Run HCU.exe. When the HCU starts, the following dialog box is displayed. In the Mode Select area, select the Edit mode option and click the OK button. The dialog box shown in (2) opens. (2) Open the dialog box to select a PR5 file. Click the Select the Parameter file button. The dialog box shown in (3) opens. R20UT0912EJ0100 Rev. 1.00 Nov. 25, 2011 Page 12 of 27 HEX Consolidation Utility 0BCHAPTER 3 USAGE (3) Select a PR5 file. (Here, 70F3771_CSI0.pr5 is selected as an example.) Select the PR5 file and click the Open button. The dialog box shown in (4) opens. Remark If multiple PR5 files, such as 70F3771_CSI0.pr5 and 70F3771_CSI3.pr5, are provided for one microcontroller, both files can be selected. (4) Open the dialog box to select a HEX file. Click the Select the HEX file button. The dialog box shown in (5) opens. R20UT0912EJ0100 Rev. 1.00 Nov. 25, 2011 Page 13 of 27 HEX Consolidation Utility 0BCHAPTER 3 USAGE (5) Select a HEX file. (Here, input.hex is selected as an example.) Select the HEX file and click the Open button. The dialog box shown in (6) opens. (6) Open the dialog box to specify how to input option data. Click the Select the Option data button. The dialog box shown in (7) opens. (7) Specify how to input option data. Input option data by loading the data from an ESF file, or by inputting option data directly. To load the data from an ESF file, select the Select the ESF file option and click the OK button. The dialog box shown in (8) opens. To input option data directly, select the Set the Option data option and click the OK button. The dialog box shown in (9) opens. R20UT0912EJ0100 Rev. 1.00 Nov. 25, 2011 Page 14 of 27 HEX Consolidation Utility 0BCHAPTER 3 USAGE (8) Select an ESF file. (Here, 70F3771_CSI0.esf is selected as an example.) Select the ESF file and click the Open button. The dialog box shown in (9) opens. R20UT0912EJ0100 Rev. 1.00 Nov. 25, 2011 Page 15 of 27 HEX Consolidation Utility 0BCHAPTER 3 USAGE (9) Specify the option data settings. In the Set Security command options area, specify the security flag settings (Disable Chip Erase, Disable Block Erase, Disable Program, Disable Read), the block protection settings (the flash shield window, Boot Block end), and the reset vector. In the Device options area, specify whether to use the wide voltage mode. In the OCD security ID setting area, specify the onchip debug security ID. In the Option bytes setting area, specify the option bytes. For details about each feature, see the user’s manual for each microcontroller or the PG-FP5 Flash Memory Programmer User’s Manual (R02UT0008E) Specify each setting and click the OK button. The dialog box shown in (10) opens. Remarks 1. The setup items that appear dimmed are not available because they are not supported by the target microcontroller. 2. If the option bytes or the on-chip debug security ID is allocated to a specific address in the flash memory, setting these items is not necessary and therefore the Option bytes setting or OCD security ID setting area appears dimmed. (10) Prepare for HCUHEX file creation. Click the OK button. The dialog box shown in (11) opens. R20UT0912EJ0100 Rev. 1.00 Nov. 25, 2011 Page 16 of 27 HEX Consolidation Utility 0BCHAPTER 3 USAGE (11) Merge the HEX file and option data. Click the OK button. The dialog box shown in (12) opens. (12) Input the HCUHEX file name. The file is created. (Here, output.hex is input as an example.) In the File name box, input any name and click the Save button. The HCUHEX file is created and the dialog box shown in (13) opens. (13) This is the end of HCUHEX file creation. Click the OK button. The display returns to the dialog box shown in (1). Caution After the HCUHEX file is created in edit mode, be sure to enter check mode to check whether the specified option data settings are correct. R20UT0912EJ0100 Rev. 1.00 Nov. 25, 2011 Page 17 of 27 HEX Consolidation Utility 3.5 0BCHAPTER 3 USAGE Check Modes In this mode, the settings specified by option data can be checked by selecting the PR5 and HCUHEX files. 3.5.1 Example of using the HCU in check mode The following describes an example of using the HCU in check mode. Use the HCU in the order described in this section. To return to a previous dialog box, click the Cancel button. (1) Run HCU.exe. When the HCU starts, the following dialog box is displayed. In the Mode Select area, select the Check mode option and click the OK button. The dialog box shown in (2) opens. (2) Open the dialog box to select a PR5 file. Click the Select the Parameter file button. The dialog box shown in (3) opens. R20UT0912EJ0100 Rev. 1.00 Nov. 25, 2011 Page 18 of 27 HEX Consolidation Utility 0BCHAPTER 3 USAGE (3) Select a PR5 file. (Here, 70F3771_CSI0.pr5 is selected as an example.) Select the PR5 file and click the Open button. The dialog box shown in (4) opens. Remark If multiple PR5 files, such as 70F3771_CSI0.pr5 and 70F3771_CSI3.pr5, are provided for one microcontroller, both files can be selected. (4) Open the dialog box to select the HCUHEX file. Click the Select the HEX file button. The dialog box shown in (5) opens. R20UT0912EJ0100 Rev. 1.00 Nov. 25, 2011 Page 19 of 27 HEX Consolidation Utility 0BCHAPTER 3 USAGE (5) Select an HCUHEX file. (Here, output.hex is selected as an example.) Select the PR5 file and click the Open button. The dialog box shown in (6) opens. (6) Prepare to check the option data settings. Click the Select the Option data button. The dialog box shown in (7) opens. R20UT0912EJ0100 Rev. 1.00 Nov. 25, 2011 Page 20 of 27 HEX Consolidation Utility 0BCHAPTER 3 USAGE (7) Check the option data settings. In the Security command options area, the settings for the security flag settings (Disable Chip Erase, Disable Block Erase, Disable Program, Disable Read), the block protection settings (the flash shield window, Boot Block end), and the reset vector can be checked. In the Device options area, whether the wide voltage mode is used can be checked. In the OCD security ID setting area, the on-chip debug security ID can be checked. In the Option bytes setting area, the option bytes can be checked. The settings appear dimmed and cannot be edited. For details about each feature, see the user’s manual for each microcontroller or the PG-FP5 Flash Memory Programmer User’s Manual (R02UT0008E) Check each setting and click the OK button. This dialog box closes and the dialog box shown in (1) opens. Remark If the option bytes or the on-chip debug security ID is allocated to a specific address in the flash memory, setting these items is not necessary and therefore the Option bytes or OCD security ID setting area appears dimmed. R20UT0912EJ0100 Rev. 1.00 Nov. 25, 2011 Page 21 of 27 HEX Consolidation Utility 0BAPPENDIX A MESSAGES APPENDIX A MESSAGES A.1 Message Format Messages are output in error dialog boxes or in information dialog boxes. Figure A-1. Error Dialog Box Figure A-2. Information Dialog Box R20UT0912EJ0100 Rev. 1.00 Nov. 25, 2011 Page 22 of 27 HEX Consolidation Utility 0BAPPENDIX A MESSAGES A.2 Messages Displayed in Error Dialog Boxes No. E 2102 Message Read parameter file failed. Description The PR5 file cannot be read because the format is invalid. Obtain a valid PR5 file. E 2104 Open HEX file failed. The HEX file cannot be opened. Confirm that the file is accessible. E 2105 This is already a consolidated HEX file. An HCUHEX file was selected. Select a HEX file. E 2106 This is not a consolidated HEX file. The selected file is not an HCUHEX file. Select an HCUHEX file. E 2107 Option data is not correct! Invalid option data was input. Obtain a valid HCUHEX file. E 2108 Read HEX file failed. The HEX file cannot be read because the format is invalid. Obtain a valid HEX file. E 2110 Read Setting file failed. The ESF file cannot be read because the format is invalid. Obtain a valid ESF file. E 2111 Setting file is not match parameter file. The selected PR5 file does not match the PR5 file specified in the ESF file. Confirm that the combination of the ESF and PR5 files is correct. E 2112 Open output file failed. The HCUHEX file cannot be opened. Confirm that the file is accessible. E 2118 Out of range! The input option data value is out of the specifiable It is possible that the option data does not range. Input a correct value. match the parameter file. E 2220 OCD_ID input wrong! An invalid on-chip debug security ID value was input. Input a correct value. E 2221 Option byte input wrong! An invalid option byte value was input. Input a correct value. E 2503 HEX file address out of range against target The input HEX file address range is out of the flash device. memory address range in the target microcontroller. Obtain a valid HEX file. R20UT0912EJ0100 Rev. 1.00 Nov. 25, 2011 Page 23 of 27 HEX Consolidation Utility 0BAPPENDIX A MESSAGES A.3 Messages Displayed in Information Dialog Boxes No. Message Description I 2113 File generation success The HCUHEX file was successfully created. I 2119 Do you want merge the HEX file and the Option The HEX file and option data will be merged. data? Click the OK button to continue the operation, or the Cancel Please enter a new HEX file name. button to go back to the previous dialog box. Caution: When 'Chip Erase' is disabled, chip If the Disable Chip Erase option is selected, the flash cannot be erased and programmed any more! memory in the target device cannot be erased and I 2401 reprogrammed. Click the OK button to continue the operation, or the Cancel button to go back to the previous dialog box. I 2402 Caution: When 'Boot block cluster If the Boot block cluster reprogramming option is not reprogramming' is disabled, chip cannot be selected, the flash memory in the target device cannot be erased and programmed any more! erased and reprogrammed. Click the OK button to continue the operation, or the Cancel button to go back to the previous dialog box. I 2403 Caution: When 'Block Erase' is disabled, chip If the Disable Block Erase option is selected, the flash cannot be erased and programmed any more! memory in the target device cannot be erased and reprogrammed. Click the OK button to continue the operation, or the Cancel button to go back to the previous dialog box. I 2419 Caution: Boot Block swapping will not be possible Boot block swapping cannot be executed because the with this selection. specified block number is more than half the maximum Anyhow, boot block protection is possible. block number specified in the PR5 file. Boot block protection can be specified. Click the OK button to continue the operation, or the Cancel button to go back to the previous dialog box. R20UT0912EJ0100 Rev. 1.00 Nov. 25, 2011 Page 24 of 27 HEX Consolidation Utility User’s Manual: Publication Date: Rev. 1.00 Nov. 25, 2011 Published by: Renesas Electronics Corporation http://www.renesas.com SALES OFFICES Refer to "http://www.renesas.com/" for the latest and detailed information. Renesas Electronics America Inc. 2880 Scott Boulevard Santa Clara, CA 95050-2554, U.S.A. Tel: +1-408-588-6000, Fax: +1-408-588-6130 Renesas Electronics Canada Limited 1101 Nicholson Road, Newmarket, Ontario L3Y 9C3, Canada Tel: +1-905-898-5441, Fax: +1-905-898-3220 Renesas Electronics Europe Limited Dukes Meadow, Millboard Road, Bourne End, Buckinghamshire, SL8 5FH, U.K Tel: +44-1628-585-100, Fax: +44-1628-585-900 Renesas Electronics Europe GmbH Arcadiastrasse 10, 40472 Düsseldorf, Germany Tel: +49-211-65030, Fax: +49-211-6503-1327 Renesas Electronics (China) Co., Ltd. 7th Floor, Quantum Plaza, No.27 ZhiChunLu Haidian District, Beijing 100083, P.R.China Tel: +86-10-8235-1155, Fax: +86-10-8235-7679 Renesas Electronics (Shanghai) Co., Ltd. Unit 204, 205, AZIA Center, No.1233 Lujiazui Ring Rd., Pudong District, Shanghai 200120, China Tel: +86-21-5877-1818, Fax: +86-21-6887-7858 / -7898 Renesas Electronics Hong Kong Limited Unit 1601-1613, 16/F., Tower 2, Grand Century Place, 193 Prince Edward Road West, Mongkok, Kowloon, Hong Kong Tel: +852-2886-9318, Fax: +852 2886-9022/9044 Renesas Electronics Taiwan Co., Ltd. 13F, No. 363, Fu Shing North Road, Taipei, Taiwan Tel: +886-2-8175-9600, Fax: +886 2-8175-9670 Renesas Electronics Singapore Pte. Ltd. 1 harbourFront Avenue, #06-10, keppel Bay Tower, Singapore 098632 Tel: +65-6213-0200, Fax: +65-6278-8001 Renesas Electronics Malaysia Sdn.Bhd. Unit 906, Block B, Menara Amcorp, Amcorp Trade Centre, No. 18, Jln Persiaran Barat, 46050 Petaling Jaya, Selangor Darul Ehsan, Malaysia Tel: +60-3-7955-9390, Fax: +60-3-7955-9510 Renesas Electronics Korea Co., Ltd. 11F., Samik Lavied' or Bldg., 720-2 Yeoksam-Dong, Kangnam-Ku, Seoul 135-080, Korea Tel: +82-2-558-3737, Fax: +82-2-558-5141 © 2011 Renesas Electronics Corporation. All rights reserved. Colophon 1.1 HEX Consolidation Utility R20UT0912EJ0100