1
Alkacon
®
®
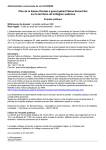
Beginner's guide to template creation with
OpenCms 8
Version:
1.0
Date:
Monday, March 5, 2012
Alkacon
®
Beginner's guide to template creation with OpenCms 8
®
Version: 1.0 Date: March 5, 2012
Table of Content
Table of Content ......................................................................................................................... 2
1 Abstract ............................................................................................................................... 3
2 Design ................................................................................................................................. 3
3 Create a module .................................................................................................................. 3
4 HTML Prototype ................................................................................................................... 5
4.1
Identify static parts ...................................................................................................... 5
4.2
Split image .................................................................................................................. 6
4.3
Create a simple HTML page ....................................................................................... 8
5 Template creation ................................................................................................................ 9
5.1
Create a simple template ............................................................................................ 9
5.2
Model page ................................................................................................................. 9
5.3
Sitemap configuration ............................................................................................... 11
5.4
First test .................................................................................................................... 12
5.5
Add Header / Footer configuration ............................................................................ 14
5.6
Styling ....................................................................................................................... 16
5.7
Headincludes ............................................................................................................ 19
5.8
Identify more template parts ...................................................................................... 20
5.9
The <cms:container> tag .......................................................................................... 23
5.9.1 Testing .................................................................................................................. 23
5.10 Add content to the model page ................................................................................. 25
5.10.1
Style .................................................................................................................. 26
5.10.2
Testing .............................................................................................................. 28
5.11 Navigation ................................................................................................................. 28
5.11.1
Main navigation ................................................................................................. 29
5.11.1.1
Build a simple list ....................................................................................... 29
5.11.1.2
Links .......................................................................................................... 30
5.11.1.3
Styling ....................................................................................................... 31
5.11.1.4
Testing ...................................................................................................... 32
5.11.2
Breadcrumb navigation ..................................................................................... 33
5.11.2.1
Style .......................................................................................................... 35
5.11.3
Side Navigation ................................................................................................. 36
5.11.3.1
Indention.................................................................................................... 38
5.11.3.2
Style .......................................................................................................... 40
5.11.3.3
Testing ...................................................................................................... 41
© Alkacon Software GmbH
Page 2 of 42
Alkacon
®
1
Beginner's guide to template creation with OpenCms 8
®
Version: 1.0 Date: March 5, 2012
Abstract
One of the most important aspects of website building is the creation of the required templates.
Sites generated by OpenCms are built by using one or more templates that define a uniform
layout of the presented content.
This beginner‟s guide describes some easy steps on how to create JSP based page templates
from scratch. As this is a core functionality required in almost all projects, you should study this
documentation carefully. Following the steps described here, you should be able to get your
JSP template up and running in a short time.
2
Design
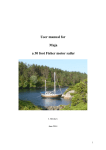
First step in developing a template is the design. It is assumed that you have a page design
present as an image file like *.jpg, *.tif or so. In larger projects this might have been outsourced
and created by graphic design experts or you might have built it yourself using some image
editing software.
3
Create a module
Create a module and give it a proper name (e.g. my.first.template)
In the OpenCms workplace, switch to the Administration view and select “Module
© Alkacon Software GmbH
Page 3 of 42
Alkacon
®
Beginner's guide to template creation with OpenCms 8
®
Version: 1.0 Date: March 5, 2012
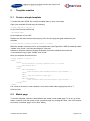
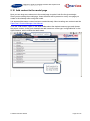
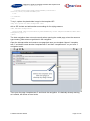
Management”. In the Module Management, click on “New Module”. As package name enter
“my.first.template” and as module name “My First Template”.
In the section Module folders check all the checkboxes (important: template JSPs must be
placed in the template folder)
Click OK to create the module with these settings.
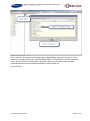
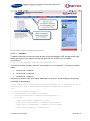
Switch back to the Explorer view and go to the folder
“/system/modules/my.first.template/templates/” and select “New” from the toolbar. In the
opening dialog select “JSP”.
© Alkacon Software GmbH
Page 4 of 42
Alkacon
®
Beginner's guide to template creation with OpenCms 8
®
Version: 1.0 Date: March 5, 2012
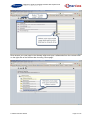
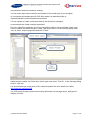
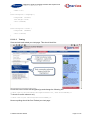
In the following window name the file “myFirstTemplate.jsp” and if you want to edit the
properties give it a proper title like “My First Template”.
4
HTML Prototype
Next step in developing a working template is to build a HTML Prototype. Again, in larger
projects this might have been outsourced and be done by some web design guys. This would
be a fully functional static HTML version of a model page that needs to be turned into a JSP
template. Here is just a short introduction since most of the HTML basic output is included in
chapter 5: Template creation.
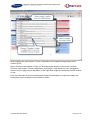
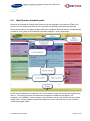
4.1
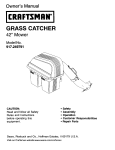
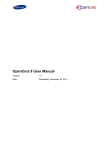
Identify static parts
Let‟s disassemble the template design step by step and find out what parts and layout concepts
will be reused on every single page.
© Alkacon Software GmbH
Page 5 of 42
Alkacon
®
Beginner's guide to template creation with OpenCms 8
®
Version: 1.0 Date: March 5, 2012
You could of course make a more detailed analysis of static parts and Identify more template
parts.
4.2
Split image
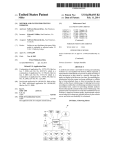
Chopping the image into 3 pieces would be a first approach. You can do this using a standard
image editing software. The parts would be named header, body and footer. You can try this
and upload them to your OpenCms installation. Go to the “resources” folder of your newly
created module “my.first.template” and click the “New” icon from the toolbar. Create a new
folder by select the option “Folder” and then click “Continue”.
© Alkacon Software GmbH
Page 6 of 42
Alkacon
®
Beginner's guide to template creation with OpenCms 8
®
Version: 1.0 Date: March 5, 2012
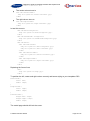
In the following dialog enter the folder name “images” and click “Finish”.
After you created the “images” folder click on the “Upload” icon from the toolbar and in the
opening multiple file upload dialog select the header, body and footer parts from your local
system. Click OK.
© Alkacon Software GmbH
Page 7 of 42
Alkacon
®
4.3
Beginner's guide to template creation with OpenCms 8
®
Version: 1.0 Date: March 5, 2012
Create a simple HTML page
A very simple HTML version would be something like:
<html>
<head>
<title>Wonderful World of Flowers
</title>
</head>
<body>
<div>
<img src=’<path-to>/header.jpg’>
</div>
<div>
<img src=’<path-to>/body.jpg’>
</div>
<div>
<img src=’<path-to>/footer.jpg’>
</div>
</body>
</html>
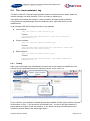
You can copy this to your template and try it out.
Switch to the folder were you created the template JSP and right click the file. From the context
menu select “Edit source code”. Copy the given HTML example into your JSP and replace the
placeholders <path-to> by the path to your image parts, which would in fact be something like
“/opencms/opencms/system/modules/my.first.template/images”.
Save and close the edited file and open it in your browser and should look like the given design.
© Alkacon Software GmbH
Page 8 of 42
Alkacon
®
Beginner's guide to template creation with OpenCms 8
®
Version: 1.0 Date: March 5, 2012
5
Template creation
5.1
Create a simple template
To make this static HTML file a simple template there is only a few steps:
Open your template file and copy the following
<%@page taglibs=”c,cms,fn” %>
to your first line and add the tag
<cms:enable-ade>
to the head part of your JSP.
Replace the title and read the title property of the current page that gets rendered by the
template.
<title><cms:info property="opencms.title" /></title>
Make the header and footer part of your template work with OpenCms 8 ADE and add ids called
“header” and „footer” to the surrounding divs. And add
Instead of using the extracted images as header and footer substitute them with the
<cms:container> tag of type “header” and “footer”.
Now your template should look like:
<%@page taglibs=”c,cms,fn” %>
<html>
<head>
<title><cms:info property="opencms.title" /></title>
<cms:enable-ade />
</head>
<body>
<div id=”header”>
<cms:container name=”headercontainer” type=”header” />
</div>
<div>
<img src=’<path-to>/body.jpg’>
</div>
<div id=”footer”>
<cms:container name=”footercontainer” type=”footer” />
</div>
</body>
</html>
It is a must to close the <cms:container> and <cms:enable-ade> tag properly with a “/”.
Save and exit.
5.2
Model page
To test the template, switch to /sites/default/ and create a new model page. To do so, go to the
folder /.content/.new/ and create a new “container page” by clicking the “New” icon in the toolbar
and select “Container page” in the “New” dialog.
© Alkacon Software GmbH
Page 9 of 42
Alkacon
®
Beginner's guide to template creation with OpenCms 8
®
Version: 1.0 Date: March 5, 2012
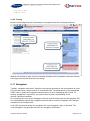
Click “Continue” and name the container page “myModelPage” and click “Continue”. In the
following Properties dialog enter “My First Model Page” as title and then click the “Advanced”
button and scroll down to the property “template”. Here enter the path to your template
/system/modules/my.first.template/templates/myFirstTemplate.jsp
and click finish.
© Alkacon Software GmbH
Page 10 of 42
Alkacon
®
5.3
Beginner's guide to template creation with OpenCms 8
®
Version: 1.0 Date: March 5, 2012
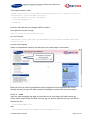
Sitemap configuration
Now edit the sitemap configuration by opening the file /.content/.config and go to the tab “Page
models”. Here add a new page model and choose your new model page from the widget
opening when the folder icon is clicked.
© Alkacon Software GmbH
Page 11 of 42
Alkacon
®
Beginner's guide to template creation with OpenCms 8
®
Version: 1.0 Date: March 5, 2012
Click Save and Exit.
5.4
First test
Now open the Sitemap Editor and click the “Create page” icon. The opening dialog offers all
model pages for creating a new page.
Select your newly created “My First Model Page” and move it to your sitemap structure by drag
& drop.
© Alkacon Software GmbH
Page 12 of 42
Alkacon
®
Beginner's guide to template creation with OpenCms 8
®
Version: 1.0 Date: March 5, 2012
Now rename your new page in the sitemap editor and open it afterwards from the context menu
on the right side of the element bar choosing “Show page”.
© Alkacon Software GmbH
Page 13 of 42
Alkacon
®
5.5
Beginner's guide to template creation with OpenCms 8
®
Version: 1.0 Date: March 5, 2012
Add Header / Footer configuration
The page appears in your browser and at first sight it contains just the image of the body part.
But now select the “Add” option from the ADE toolbar and add a “Header / Footer configuration”
to your page by drag & drop.
© Alkacon Software GmbH
Page 14 of 42
Alkacon
®
Beginner's guide to template creation with OpenCms 8
®
Version: 1.0 Date: March 5, 2012
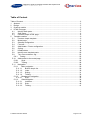
While dragging the new Header / Footer configuration to the page the target areas will be
outlined in red.
When creating a new Header / Footer you should drag the element to the footer container.
Since the new Header / Footer configuration is still empty, it will appear as a thin transparent
element on your page with an edit button to the right which might be masked by the ADE toolbar
on top.
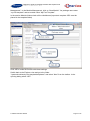
Click the edit button of the new element and choose the edit option to create the header and
footer parts of your template in the WYSIWYG editor.
© Alkacon Software GmbH
Page 15 of 42
Alkacon
®
Beginner's guide to template creation with OpenCms 8
®
Version: 1.0 Date: March 5, 2012
When adding images (logos, background) to the Header / Footer parts, please make sure that
the files reside within your template module, e.g.
/system/modules/my.first.template/resources/images/. Of course you can also edit the HTML
source code directly.
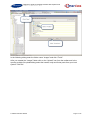
Click save and exit. On saving the model page the footer should appear the way you designed it
in the editor. From the “Add content” option of the ADE toolbar now double click the type
“Header / Footer configuration” and drag another instance of your configuration (e.g. “my first
header / footer configuration”) to the header area of the model page. It should appear the way it
was designed in the editor.
To ensure that you could only add a single header and footer to a page you should add the
maxElements attribute to the <cms:container> tag as follows:
…
<cms:container name=”headercontainer” type=”header” maxElements =”1” />
...
<cms:container name=”footercontainer” type=”footer” maxElements =”1” />
...
The background images used for header and footer should be extracted from the reference
design using your preferred image editor. In our example a gradient image is used. A tiny
portion of a width of a few pixels is enough to repeat the background image by using style
sheets.
Save the background images to your template module‟s /resources/images/ folder.
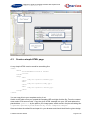
5.6
Styling
Since there is no styling defined yet, text and links in the header and footer part might appear
© Alkacon Software GmbH
Page 16 of 42
Alkacon
®
Beginner's guide to template creation with OpenCms 8
®
Version: 1.0 Date: March 5, 2012
using browser default font and size settings.
You can insert style sheets need for the template in the header part of your template.
In our example all template specific CSS files reside in a dedicated folder at
/system/modules/my.first.template/resources/css/
You can upload or create a new style sheet in the OpenCms workplace.
As an example we create a simple style sheet.
Go to the OpenCms workplace and in your template module‟s resources folder select “new”
from the toolbar and select the type “Folder” and click continue. In the following dialog enter
“css” as name, skip the properties and click “Finish”.
Inside the just created “css” folder click “New” again and select “Text file”. In the following dialog
name it “style.css”.
It is assumed that you know about CSS, otherwise please find more details on CSS at
http://www.w3.org/Style/CSS/
The CSS should at least contain some styling information for the page layout, background
images, font size.
© Alkacon Software GmbH
Page 17 of 42
Alkacon
®
Beginner's guide to template creation with OpenCms 8
®
Version: 1.0 Date: March 5, 2012
Example CSS:
html * { font-size: 12px }
textarea, pre, tt, code {
font-family:"Courier New", Courier, monospace;
}
body {
padding: 10px 0;
font-family: Verdana,Helvetica,Arial,sans-serif;
font-size: 75.00%;
height: 1%;
}
h1, h2, h3, h4, h5, h6 { font-weight:bold; margin: 0 0 2px 0; }
h1 { font-size: 24px }
h2 { font-size: 20px;
margin-top: 6px }
h3 { font-size: 18px;
margin-top: 5px }
h4 { font-size: 16px;
margin-top: 8px }
h5 { font-size: 14px;
margin-top: 8px }
h6 { font-size: 14px;
font-style: italic; margin-top: 8px }
p {
line-height: 16px;
margin-top: 3px;
margin-bottom: 3px;
}
ul, ol, dl { line-height: 15px; margin: 10px 0 10px 10px; }
li { margin-left: 15px; line-height: 15px; }
#window {
width: 960px;
margin: 0 auto;
text-align: left;
}
#header {
background-image: url(../images/bg_head_demo_png24.png);
position: relative;
padding-top: 0px;
}
#main {
padding: 10px 0;
}
#footer {
background-image: url(../images/bg_foot_demo_png24.png);
padding: 10px;
margin-top: 10px;
}
© Alkacon Software GmbH
Page 18 of 42
Alkacon
®
Beginner's guide to template creation with OpenCms 8
®
Version: 1.0 Date: March 5, 2012
To link this style sheet to the template, add the following line to the HTML head part of your
template:
<link href="
<cms:link>
%(link.weak:/system/modules/my.first.template/resources/css/style.css)
</cms:link>"
rel="stylesheet" type="text/css">
</link>
To complete the basic layout add two surrounding div containers to the HTML <body> part with
ids “window” and “page”.
5.7
Headincludes
To enable includes of css from other modules without reediting the template you can use the
<cms:headincludes> tag in the HTML head part of the template.
Add the line
<cms:headincludes type=”css” />
to include style sheets needed for other modules / resource types.
<cms:headincludes type=”javascript” />
will include additional JavaScript for modules /
resource types.
By now the source code of your template should look like:
<%@page buffer="none" session="false" taglibs="c,cms,fn" %>
<html>
<head>
<title><cms:info property="opencms.title" /></title>
<cms:enable-ade />
<link
href="<cms:link>%(link.weak:/system/modules/my.first.template/resources/css/style.css)
</cms:link>" rel="stylesheet" type="text/css"></link>
<cms:headincludes type="css" />
</head>
<body>
<div id="window">
<div id="page">
<div id="header">
<cms:container name="headercontainer" type="header" maxElements="1" />
</div>
<div>
<img src='<path-to>/body.jpg'>
</div>
<div id="footer">
<cms:container name="footercontainer" type="footer" maxElements="1" />
</div>
</div>
</div>
© Alkacon Software GmbH
Page 19 of 42
Alkacon
®
Beginner's guide to template creation with OpenCms 8
®
Version: 1.0 Date: March 5, 2012
</body>
</html>
5.8
Identify more template parts
Now that we finished the Header and Footer part of the template, let‟s check the HTML body
section for more building blocks that can be reused or potentially generated automatically.
Recurring elements in the page template will be the navigation elements as this will basically be
needed on every page of the website but will differ slightly on every single page.
Now that we identified more elements, let‟s cut the dummy image into pieces and replace them
later on. The body.jpg pieces are called main-navigation, breadcrumb-navigation, leftnavigation, left-container, center-container, right-container and you can do this with any simple
image editor. In the workplace upload the images from your local hard drive to your modules
/resources/images/ folder.
© Alkacon Software GmbH
Page 20 of 42
Alkacon
®
Beginner's guide to template creation with OpenCms 8
®
Version: 1.0 Date: March 5, 2012
In the template JSP the central
<div>
<img src='<path-to>/body.jpg'>
</div>
will be replaced by:
A <div> for the main navigation
<div id=”main-navigation”>
<img src='<path-to>/main-navigation.jpg'>
</div>
A div for the breadcrumb navigation
<div id=”breadcrumb-navigation”>
<img src='<path-to>/breadcrumb-navigation.jpg'>
</div>
A surrounding div for the three columns
<div id=”main”>
<div id=”leftcolumn”></div>
<div id=”centercolumn”></div>
<div id=”rightcolumn”></div>
</div>
The left column turns to
<div id=”leftcolumn”>
<img src='<path-to>/left-navigation.jpg'>
<img src='<path-to>/left-container.jpg'>
</div>
© Alkacon Software GmbH
Page 21 of 42
Alkacon
®
Beginner's guide to template creation with OpenCms 8
®
Version: 1.0 Date: March 5, 2012
The center column turns to
<div id=”centercolumn”>
<img src='<path-to>/center-container.jpg'>
</div>
The right column turns to
<div id=”rightcolumn”>
<img src='<path-to>/right-container.jpg'>
</div>
In total this turns to
<div id=”main-navigation”>
<img src='<path-to>/main-navigation.jpg'>
</div>
<div id=”breadcrumb -navigation”>
<img src='<path-to>/breadcrumb-navigation.jpg'>
</div>
<div id=”main”>
<div id=”leftcolumn”>
<img src='<path-to>/left-navigation.jpg'>
<img src='<path-to>/left-container.jpg'>
</div>
<div id=”centercolumn”>
<img src='<path-to>/center-container.jpg'>
</div>
<div id=”rightcolumn”>
<img src='<path-to>/right-container.jpg'>
</div>
</div>
Replacing the former lines
<div>
<img src='<path-to>/body.jpg'>
</div>
To position the left, center and right column correctly add some styling to your templates CSS
#leftcolumn {
float: left;
width: 240px;
}
#rightcolumn {
float: right;
width: 240px;
}
#centercolumn {
margin-left: 240px;
margin-right: 240px;
width: 470px;
}
The model page should still look the same.
© Alkacon Software GmbH
Page 22 of 42
Beginner's guide to template creation with OpenCms 8
Alkacon
®
5.9
®
Version: 1.0 Date: March 5, 2012
The <cms:container> tag
The parts of the left, center and right container should now be turned into areas, where the
content manager can drop elements. This is very easy in OpenCms 8.
Just replace the images left-container, center-container and right-container with the
<cms:container> tag and assign them the attributes name, type width and if you like
maxElements.
In the template JSP the following lines have to be replaced:
Left container
<img src='<path-to>/left-container.jpg'>
Turns to
<cms:container name="leftcontainer" type="left" width="230"
maxElements="8" />
Center container
<img src='<path-to>/center-container.jpg'>
Turns to
<cms:container name="centercontainer" type="center" width="450"
maxElements="8" detailview="true"/>
Right container
<img src='<path-to>/right-container.jpg'>
Turns to
<cms:container name="rightcontainer" type="right" width="230"
maxElements="8" />
5.9.1
Testing
Open your model page from /sites/default/.content/.new in the browser and add some new
content from the preinstalled resource types like article, event, news, etc.
As you can see, your template is already drag & drop enabled, but the right container is placed
at the bottom. In fact – if you would use a horizontal ruler – the top of the right container is
placed below the bottom of the left container. If you would now drop some elements to the
containers, this will destroy the whole page layout.
© Alkacon Software GmbH
Page 23 of 42
Alkacon
®
Beginner's guide to template creation with OpenCms 8
®
Version: 1.0 Date: March 5, 2012
What you have to do is to change the order of the “centercolumn” and “rightcolumn” <div> in the
template JSP.
Your template now should have the following source code:
<%@page buffer="none" session="false" taglibs="c,cms,fn" %>
<html>
<head>
<title><cms:info property="opencms.title" /></title>
<cms:enable-ade />
<link
href="<cms:link>%(link.weak:/system/modules/my.first.template/resources/css/style.css)
</cms:link>" rel="stylesheet" type="text/css"></link>
<cms:headincludes type="css" />
</head>
<body>
<div id="window">
<div id="page">
<div id="header">
<cms:container name="headercontainer" type="header" maxElements="1"
/>
</div>
<div id="main-navigation">
<img
src='/opencms_8042/opencms/system/modules/my.first.template/resources/images/mainnavigation.JPG'>
</div>
<div id="breadcrumb -navigation">
<img
src='/opencms_8042/opencms/system/modules/my.first.template/resources/images/breadcrum
b-navigation.JPG'>
</div>
<div id="main">
<div id="leftcolumn">
<img
src='/opencms_8042/opencms/system/modules/my.first.template/resources/images/leftnavigation.JPG'>
<cms:container name="leftcontainer" type="left" width="230" maxElements="8" />
</div>
<div id="rightcolumn">
<cms:container name="rightcontainer" type="right" width="230"
maxElements="8" />
</div>
<div id="centercolumn">
<cms:container name="centercontainer" type="center" width="450"
maxElements="8" detailview="true"/>
</div>
</div>
<div id="footer">
<cms:container name="footercontainer" type="footer" maxElements="1" />
</div>
</div>
</div>
</body>
</html>
© Alkacon Software GmbH
Page 24 of 42
Alkacon
®
Beginner's guide to template creation with OpenCms 8
®
Version: 1.0 Date: March 5, 2012
5.10 Add content to the model page
Now you can drop some elements to the model page to make it look like the given design.
Since you are editing the model page, these elements will be present on every new page you
create in the sitemap editor using this model.
It is assumed that some content has been created already. About creating new content read the
OpenCms 8 Content Manager User Manual.
From the “Add content” option in the ADE toolbar select the desired resource type and choose
the proper content. In the given example we add a resource of the type “configurable list” to the
right container, which collects the latest news.
© Alkacon Software GmbH
Page 25 of 42
Alkacon
®
Beginner's guide to template creation with OpenCms 8
®
Version: 1.0 Date: March 5, 2012
5.10.1 Style
When you look at our original design, the model page still lacks some styling, so edit the
style.css at /system/module/my.first.template/resources/css/ and add some styling for the box
elements
© Alkacon Software GmbH
Page 26 of 42
Alkacon
®
Beginner's guide to template creation with OpenCms 8
®
Version: 1.0 Date: March 5, 2012
.box_schema2 h4 {
background: url("../images/gradient.png") repeat-x scroll center top #B31B34;
color: #FFFFFF;
}
.box_schema2 {
background: none repeat scroll 0 0 #FFCCCC;
}
.box_schema1 h4 {
background: url("../images/gradient.png") repeat-x scroll center top #003082;
color: #FFFFFF;
}
.box_schema1 {
background: none repeat scroll 0 0 #AACCFF;
}
.box_schema3 h4 {
background: url("../images/gradient.png") repeat-x scroll center top #003082;
color: #FFFFFF;
}
.box_schema3 {
background: none repeat scroll 0 0 #FFFFFF;
}
.box {
margin-bottom: 15px;
border: 1px solid #7B7F7E;
}
.box h4{
margin-bottom: 15px;
border: 1px solid #7B7F7E;
font-size: 13px;
line-height: 16px;
margin: 0;
padding: 5px;
width: auto;
}
.boxbody {
© Alkacon Software GmbH
Page 27 of 42
Alkacon
®
Beginner's guide to template creation with OpenCms 8
®
Version: 1.0 Date: March 5, 2012
font-size: 11px;
padding: 10px;
}
5.10.2 Testing
Now the model page that gets rendered by our template looks like our design reference:
What is still missing to make it a fully functional template are the navigation elements, that are
still image dummies extracted from our design.
5.11 Navigation
Typically, navigation elements in OpenCms are special according to the requirements of a site.
So, they often need a larger amount of customized code. The development of the appropriate
HTML code to render the navigation elements also may be a challenging task in itself. To
develop navigations in OpenCms, you need to have a good understanding of the
java.util.Collection interfaces.
In our example the code for the navigation element could be directly put into the template JSP.
For maintainability aspects the navigation elements will be created in separate JSPs that get
included into the template JSP.
In the JSP that should render the navigation the <cms:navigation> tag is to be used. The
<cms:navigation> tag provides access to the navigation information.
© Alkacon Software GmbH
Page 28 of 42
Alkacon
®
Beginner's guide to template creation with OpenCms 8
®
Version: 1.0 Date: March 5, 2012
The following attributes are available:
var: name of the variable
type: the navigation type (breadCrumb, forFolder, treeForFolder)
startLevel: (optional) start level for navigation
endLevel: (optional) end level for navigation
resource: (optional) the description text of the user
param: (optional) parameter for navigation
With the <cms:navigation> tag the OpenCms VFS navigation information can be accessed with
Expression Language.
Example:
<c:set var="navStartLevel" ><cms:property name="NavStartLevel" file="search"
default="0" /></c:set>
<cms:navigation type="forFolder" startLevel="${navStartLevel}" var="nav"/>
<div id="main-navigation" class="gradient">
<c:if test="${!empty nav.items}">
…
</c:if>
5.11.1 Main navigation
Let‟s start with the main navigation. In the workplace, switch to the root site and go to your
module /system/modules/my.first.template. Inside the /elements folder create a new folder
called “menu”. Inside the folder /elements/menu create a JSP using the “New” option from the
toolbar and name it “main-navigation.jsp”. Afterwards right click the new JSP and select “Edit
sourcecode” from the context menu.
We‟ll start with a very easy example how to use the <cms:navigation> tag and then refine our
JSP until the navigation works properly.
5.11.1.1
Build a simple list
First add the page directive to include the basic taglibs
<%@page buffer="none" session="false" import="org.opencms.jsp.*" taglibs="c,cms,fn" %>
Next line will be the <cms:navigation> tag with the following attributes:
Type=”forFolder”, which will collect all resource of the type “folder” inside the root folder
“/”. (This is the default navigation level (0), if not declared otherwise by the attribute
“startLevel”.
var=”nav” the collection results are accessible through the variable “nav”
<cms:navigation type="forFolder" var="nav"/>
Next we generate some unformatted output by iterating over the collection stored in the variable
“nav” using EL. Each entry is passed to a variable “elem” and the navText property gets read
using EL.
To separate the navigation entries we just put it in a HTML list <li> element.
© Alkacon Software GmbH
Page 29 of 42
Alkacon
®
Beginner's guide to template creation with OpenCms 8
®
Version: 1.0 Date: March 5, 2012
This simple example reads:
<%@page buffer="none" session="false" import="org.opencms.jsp.*" taglibs="c,cms,fn" %>
<cms:navigation type="forFolder" var="nav"/>
<c:forEach items="${nav.items}" var="elem">
<li>${elem.navText}</li>
</c:forEach>
Save the JSP and edit your template JSP to include it.
Now replace the dummy image
<img src='<path-to>/main-navigation.JPG'>
by a cms:include
<cms:include file="%(link.weak:/system/modules/my.first.template/elements/menu/mainnavigation.jsp)" />
and save the template.
Switch to /sites/default/.content/.new and open your model page in the browser.
With just 5 lines of code we generated a simple navigation list that represents the correct
sitemap structure at top level. What remains is building the correct links and some styling.
5.11.1.2
Links
Open the main-navigation.jsp again a extend the line of code where the folder names get
written with a simple HTML link built of anchor tag <a> and the attribute href get‟s set with EL.
Replace the line
<li>${elem.navText}</li>
with
<li><a href="${elem.resourceName}">${elem.navText}</a></li>
© Alkacon Software GmbH
Page 30 of 42
Alkacon
®
Beginner's guide to template creation with OpenCms 8
®
Version: 1.0 Date: March 5, 2012
Even better is using the <cms:link> tag here because it will check and correct the links with
„absolute‟ URIs.
<li><a href="<cms:link>${elem.resourceName}</cms:link>">${elem.navText}</a></li>
Now save and exit. Switch to /sites/default/ and reload your model page.
5.11.1.3
Styling
Some refinement in the JSP will highlight the currently selected page (or tree).
Before iterating over the navigation elements store the current page in a variable “current”.
Now differentiate if the iteration returns a page that is based in the tree of the currently selected
top level navigation element or a different page using the <c:choose> tag. To do so, a simple
string comparison is made with fn:startsWith(String, String). Assign different classes “highlight”
and “default” depending on the result.
The source of your main-navigation.jsp now should look like:
<%@page buffer="none" session="false" import="org.opencms.jsp.*" taglibs="c,cms,fn" %>
<cms:navigation type="forFolder" startLevel="0" var="nav"/>
<c:forEach items="${nav.items}" var="elem">
<c:choose>
<c:when test="${fn:startsWith(cms.requestContext.uri, elem.resourceName)}">
<c:set var="class"> highlight</c:set>
</c:when>
<c:otherwise><c:set var="class">default</c:set></c:otherwise>
</c:choose>
<li>
<a href="<cms:link>${elem.resourceName}</cms:link>"
class="${class}">${elem.navText}</a>
</li>
</c:forEach>
Now style this class in your CSS. In the workplace go to your module and edit the
© Alkacon Software GmbH
Page 31 of 42
Alkacon
®
Beginner's guide to template creation with OpenCms 8
®
Version: 1.0 Date: March 5, 2012
/elements/css/style.css. Add some style information:
#main-navigation ul li {
display: block;
float: left;
margin: 0 1px 0 0;
}
#main-navigation {
background: url("../images/gradient.png") repeat-x scroll left top #003082;
font-weight: bold;
height: 24px;
}
#main-navigation a.highlight {
background: url("../images/gradient.png") repeat-x scroll left top #B31B34;
color: #FFFFFF;
}
#main-navigation a:hover {
background: url("../images/gradient.png") repeat-x scroll left top #B31B34;
}
#main-navigation ul li a {
display: block;
height: 20px;
padding: 4px 20px 0;
text-decoration: none;
color: #FFFFFF;
}
5.11.1.4
Testing
Now open the model page in your browser and check the main navigation.
© Alkacon Software GmbH
Page 32 of 42
Alkacon
®
Beginner's guide to template creation with OpenCms 8
®
Version: 1.0 Date: March 5, 2012
5.11.2 Breadcrumb navigation
In the workplace go to your module and open the folder /elements/menu/. From the workplace
toolbar select the “New” option and select the resource type “JSP”. Name the new file
“breadcrumb-navigation.jsp” and click finish.
Right-click the file “breadcrumb-navigation.jsp” and select edit. As you have seen in
construction of the main navigation a simple navigation JSP consist of the following:
Page directive with short taglibs
<cms:navigation> tag to collect the elements of the navigation
Iteration over the navigation elements
A properly formatted HTML output of the navigation elements.
This time in the <cms:navigation> tag set the attribute type to “breadCrumb”. Set startLevel to 1
to prevent the root getting listed and endLevel to -1 so the entire tree gets searched. A minimal
navigation to start with would be:
<%@page buffer="none" session="false" import="org.opencms.jsp.*" taglibs="c,cms,fn" %>
<cms:navigation type="breadCrumb" startLevel="1" endLevel="-1" var="nav"/>
<c:forEach items="${nav.items}" var="elem">
<a href="<cms:link>${elem.resourceName}</cms:link>">${elem.navText}</a>
</c:forEach>
This would already work, but looking at our reference design, the breadcrumb navigation has
delimiting >> signs, separating the navigation entries. This would just be adding some HTML
like
»
© Alkacon Software GmbH
Page 33 of 42
Alkacon
®
Beginner's guide to template creation with OpenCms 8
®
Version: 1.0 Date: March 5, 2012
Add this when writing a navigation element. After iterating over the navigation entries, the name
of the “Title” property of the currently selected page has to be written as plain text without link.
The source of this simple breadcrumb-navigation.jsp should now look like:
<%@page buffer="none" session="false" import="org.opencms.jsp.*" taglibs="c,cms,fn" %>
<cms:navigation type="breadCrumb" startLevel="1" endLevel="-1" var="nav" param="true"
/>
<c:forEach items="${nav.items}" var="elem">
<a href="<cms:link>${elem.resourceName}</cms:link>">${elem.navText}</a>
»
</c:forEach>
<cms:property name="Title" />
Save and exit and switch to /sites/default/ and reload your model page. It should look like:
Of course this is not perfect. If the navText property is not set, you could of course use the title
property and if the selected item is a folder and not a page, this will result in an redundant >>.
A fully functional breadcrumb navigation with some additional logic would look like:
<%@page buffer="none" session="false" taglibs="c,cms,fn" %>
<c:set var="navStartLevel" ><cms:property name="NavStartLevel" file="search"
default="0" /></c:set>
<cms:navigation type="breadCrumb" startLevel="${navStartLevel+1}" endLevel="-1"
var="nav" param="true" />
<c:set var="first" value="true" />
<c:forEach items="${nav.items}" var="elem">
<c:set var="navText">${elem.navText}</c:set>
<c:if test="${empty navText or fn:contains(navText, '??? NavText')}">
© Alkacon Software GmbH
Page 34 of 42
Beginner's guide to template creation with OpenCms 8
Alkacon
®
®
Version: 1.0 Date: March 5, 2012
<c:set var="navText">${elem.title}</c:set>
</c:if>
<c:if test="${!empty navText}">
<c:if test="${!first}"> » </c:if>
<a href="<cms:link>${elem.resourceName}</cms:link>">${navText}</a>
<c:set var="first" value="false" />
</c:if>
</c:forEach>
<c:set var="navTextOnFolder" value="${navText}" />
<c:set var="navText"><cms:property name="NavText" /></c:set>
<c:if test="${empty navText or fn:contains(navText, '??? NavText')}">
<c:set var="navText"><cms:property name="Title" /></c:set>
</c:if>
<c:if test="${!empty navText and (navText ne navTextOnFolder)}">
<c:if test="${!first}">
»
</c:if>
<c:out value="${navText}" />
</c:if>
Save the file and switch to the /template/ folder and edit your template JSP
Replace the line
<img src='<path-to>/breadcrumb-navigation.JPG'>
With an include of the breadcrumb-navigation:
<cms:include
file="%(link.weak:/system/modules/my.first.template/elements/menu/breadcrumbnavigation.jsp)" />
Save and exit.
5.11.2.1
Style
Now add some styling to the breadcrumb navigation in style.css
#breadcrumb-navigation a {
color: #444444;
}
#breadcrumb-navigation {
border-bottom: 1px solid #B31B34;
padding: 5px 0 5px 20px;
position: relative;
}
Now switch to your model page and reload it in your browser.
© Alkacon Software GmbH
Page 35 of 42
Alkacon
®
Beginner's guide to template creation with OpenCms 8
®
Version: 1.0 Date: March 5, 2012
The breadcrumb navigation looks like in our design reference.
5.11.3 Side Navigation
Now what‟s left is the side navigation, which typically is structured like an explorer view of a
folder tree. The side navigation should only show resource below the navigation entry selected
in the main navigation and only unfold the branch of the currently selected leaf.
Since the code of the main-navigation is a good starting point, in the workplace go to your
module and in the /elements/menu/ folder and copy the main-navigation.jsp to a new file sidenavigation.jsp.
Edit the side-navigation.jsp and change the attributes of the <cms:navigation> tags. Set type to
“treeForFolder” and startLevel to 1 and endLevel to a number that represents the navigation
levels in total.
<%@page buffer="none" session="false" import="org.opencms.jsp.*" taglibs="c,cms,fn" %>
<cms:navigation type="treeForFolder" startLevel="1" endLevel="5" var="nav"/>
<ul>
<c:forEach items="${nav.items}" var="elem">
<c:choose>
<c:when test="${fn:startsWith(cms.requestContext.uri, elem.resourceName)}">
<c:set var="class">highlight</c:set>
</c:when>
<c:otherwise><c:set var="class">default</c:set></c:otherwise>
</c:choose>
<li>
© Alkacon Software GmbH
Page 36 of 42
Alkacon
®
Beginner's guide to template creation with OpenCms 8
®
Version: 1.0 Date: March 5, 2012
<a href="<cms:link>${elem.resourceName}</cms:link>"
class="${class}">${elem.navText}</a>
</li>
</c:forEach>
</ul>
To try it, replace the placeholder image in the template JSP
<img src='<path-to>/left-navigation.JPG'>
with a JSP include and add another surrounding div for styling reasons:
<div id="left-navigation">
<cms:include file="%(link.weak:/system/modules/my.first.template/elements/menu/leftnavigation.jsp)" />
</div>
The side navigation does not work correctly when opening the model page, since the resource
type content_folder does not get listed in the navigation.
Open the sitemap editor and create a new page that uses your template. Name it “templatetest-1” and below create another “template-test-2” and then “template-test-3” so you have 3
navigation levels.
Then open the page “template-test-3” and check the navigation. It is basically already working
as it should, but shows no tree levels.
© Alkacon Software GmbH
Page 37 of 42
Alkacon
®
5.11.3.1
Beginner's guide to template creation with OpenCms 8
®
Version: 1.0 Date: March 5, 2012
Indention
To add the indention for the tree levels go back to the left-navigation JSP and add some logic.
Within the iteration, first read the current tree level with EL and store it in a variable
“currentLevel”.
<c:set var="currentLevel" value="${elem.navTreeLevel}" />
Then define another variable “oldLevel” and compare it to “currentLevel”. There are 3 possible
cases:
1. currentLevel > oldLevel
2. currentLevel == oldLevel
3. currentLevel < oldLevel
depending on that the JSP should write additional <ul> and <li> and accordingly closing tags.
A possible implementation
<%@page buffer="none" session="false" import="org.opencms.jsp.*" taglibs="c,cms,fn" %>
<cms:navigation type="treeForFolder" startLevel="1" endLevel="5" var="nav"/>
<ul>
<c:set var="oldLevel" value="" />
<c:forEach items="${nav.items}" var="elem">
<c:set var="currentLevel" value="${elem.navTreeLevel}" />
<c:choose>
<c:when test="${empty oldLevel}"></c:when>
<c:when test="${currentLevel > oldLevel}"><ul></c:when>
<c:when test="${currentLevel == oldLevel}"></li></c:when>
<c:when test="${oldLevel > currentLevel}">
© Alkacon Software GmbH
Page 38 of 42
Alkacon
®
Beginner's guide to template creation with OpenCms 8
®
Version: 1.0 Date: March 5, 2012
<c:forEach begin="${currentLevel+1}" end="${oldLevel}">
</li></ul>
</c:forEach>
</li>
</c:when>
</c:choose>
<c:choose>
<c:when test="${fn:startsWith(cms.requestContext.uri, elem.resourceName)}">
<c:set var="class">highlight</c:set>
</c:when>
<c:otherwise><c:set var="class">default</c:set></c:otherwise>
</c:choose>
<li>
<a href="<cms:link>${elem.resourceName}</cms:link>"
class="${class}">${elem.navText}</a>
</li>
<c:set var="oldLevel" value="${currentLevel}" />
</c:forEach>
</ul>
Reload your testpage and have a look at the outcome.
The left navigation works fine so far, but needs some styling so the template matches our
reference design.
© Alkacon Software GmbH
Page 39 of 42
Alkacon
®
5.11.3.2
Beginner's guide to template creation with OpenCms 8
®
Version: 1.0 Date: March 5, 2012
Style
In the workplace open the style.css of your template and add some styling information.
#left-navigation li a {
color: #444444;
}
#left-navigation a {
background-color: #FFFFFF;
border-bottom: 1px solid #EEEEEE;
display: block;
padding: 3px 0 3px 10%;
text-decoration: none;
width: 90%;
}
#left-navigation li {
margin: 0;
}
#left-navigation ul {
list-style-type: none;
margin: 0;
padding: 0;
}
#left-navigation ul ul a {
background-color: #F8F8F8;
padding-left: 15%;
width: 85%;
}
#left-navigation ul ul ul a {
background-color: #FCFCFC;
padding-left: 20%;
width: 80%;
}
#left-navigation ul ul ul ul a {
background-color: #FFFFFF;
padding-left: 25%;
width: 75%;
}
#left-navigation {
border-top: 1px solid #EEEEEE;
margin-bottom: 15px;
© Alkacon Software GmbH
Page 40 of 42
Alkacon
®
Beginner's guide to template creation with OpenCms 8
®
Version: 1.0 Date: March 5, 2012
width: 100%;
}
#left-navigation a.highlight {
background:
#003082;
font-weight: bold;
color: #FFFFFF;
}
#left-navigation a:hover {
background:
#DDDDDD;
color: #444444;
}
5.11.3.3
Testing
Save and exit and reload your test page. This should look like:
Check the source of the left-navigation.jsp and change the following line
<c:when test="${fn:startsWith(cms.requestContext.uri, elem.resourceName)}">
To check for active element only
<c:when test="${nav.isActive[elem.resourceName]}">
Now everything should be fine. Reload your test page.
© Alkacon Software GmbH
Page 41 of 42
Alkacon
®
Beginner's guide to template creation with OpenCms 8
®
Version: 1.0 Date: March 5, 2012
Congratulations! Your template is finished.
© Alkacon Software GmbH
Page 42 of 42