1
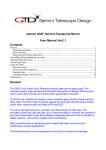
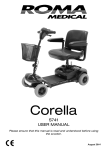
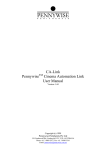
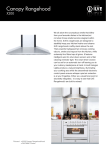
Introduction
Warranty conditions
Congratulations on your purchase of the Making Life Easy Euro X-Frame Rollator. The rollator is manufactured
from high quality materials and includes a sling type fabric seat & backrest; shopping bag and walking stick
holder. The handles are height adjustable and the rollator folds easily for transport or storage.
• This good has a 12 month warranty from date of purchase.
• Valid proof of purchase is required for all warranty claims.
• Warranty covers manufacturing faults.
• Warranty does not cover change of mind or damage, fault or failure due to external causes, including
accident, abuse, misuse, or normal wear and tear.
• Any unauthorised repairs, alterations or modifications or any attempt to open or dismantle the good will
render the warranty void.
• Defective goods together with valid proof of purchase should be returned to the place of purchase or your
nearest pharmacy that stocks the same goods, or shipped directly to the manufacturer. To locate your
nearest pharmacy that stocks the same goods visit www.makinglifeeasy.com.au. If shipped directly to the
manufacturer, you must prepay the shipping and transportation charges, and insure the shipment or
accept the risk of loss or damage during shipment and transportation. The manufacturer will determine
at no cost to you the cause of the fault (if any) within a reasonable time frame. Any repaired or replaced
goods, original goods determinednot faulty, or refund (if a major failure is determined) will be sent to
the pharmacy you returned the goods to for collection, or shipped to you freight prepaid if you shipped the
goods directly to the manufacturer.
• Our goods come with guarantees that cannot be excluded under the Australian Consumer Law. You are
entitled to a replacement or refund for a major failure and compensation for any other reasonably foreseeable
loss or damage. You are also entitled to have the goods repaired or replaced if goods fail to be o
f acceptable
quality and the failure does not amount to a major failure. Goods presented for repair may be r eplaced by
refurbished goods of the same type rather than being repaired.
Intended Use
The rollator is designed to assist the user to walk, rest and carry small items. It can be used indoors and
outdoors on flat surfaces by a single individual. The maximum user weight is 136kg.
The intended user should possess the necessary physical, visual and cognitive skills to operate the rollator
safely. If you have any doubt, please consult your place of purchase.
It is important that the user reads and understands the safety advice given within this manual before attempting
to operate the product to avoid possible injury to the user or bystanders and avoid damage to the rollator or
surrounding property.
Safety Advice
This rollator is designed to be used as a mobility aid, creating a natural gate as the user walks securely with
their primary weight between the handlebars with the unit in front of the user.
Walking
Aids
Rollator
Euro X-Frame
DO:
• Read this manual carefully before using the rollator
• Always ensure the brakes are in the locked position if the rollator is left unattended
• Check all castors and wheels are secure before use
• Check the brakes are functioning properly
• Check handle height adjustment hand knobs are secure before use
• Check the rollator is fully unfolded before use
• Take care when carrying the rollator when folded. Keep your hands away from the folding mechanism to
prevent any risk of pinching
DO NOT:
• Use the rollator as an aid to transport persons. It is not intended to be used as a wheelchair
• Sit on the rollator if the brakes are not locked. This could cause the rollator to move resulting in injury to the
user or other persons
• ‘Drop’ into the seat of the rollator. Always sit into the rollator in a smooth, controlled motion. Seek assistance
if necessary
• Hang objects on the brake levers or handgrips. This could affect brake operation and/or stability of the
rollator
Every care has been taken to ensure that the rollator will give you safe, reliable service provided you adhere to
the advice given above.
Imported by Aushang IE Co Ltd
For Making Life Easy
250 Camberwell Road
Camberwell VIC 3124
Ph: 1300 653 279
Made in China
www.makinglifeeasy.com.au
Product ID 642541 (07/14)
Please ensure this manual is read and understood
before using the product.
ASSEMBLY INSTRUCTIONS
Components / Parts
Step 1
Step 2
Step 3
Step 4
Step 5 - Figure A
Press down here to open rollator
1- Backrest
2- Adjustable parking / running brake
3- Seat area
4- Height adjustable handles
5- 20 cm swivel front castors (wheels)
6- Shopping bag
Remove all packaging. The rollator will be
folded as shown above.
Step 5 - Figure B
Step 5 - Figure C
Unfold the front castors and secure in place
using the handknobs as shown. Ensure the
thread of the handknob screws through the
hole in the castor assembly and that the thread
screws in the bolt on the inside of the frame.
Fold out the rear legs as shown above and
secure the legs in place with the handknobs.
Ensure the handknob screws through the hole
in the leg and into the nut on the frame.
Folding the Rollator
Brake Operation
Opening the Rollator
To open the rollator, push down on either side
of the cross bars as shown above. You should
feel both sides ‘click’ into position.
Brake Adjustment
Maintenance
2
1- Locking Nut
2- Adjustment Screw
Pull handle to fold rollator
It is important to fit the rollator correctly as
this will ensure your safety and comfort. If the
handles are too low this may cause you to lean
too far forward and can allow the rollator to
roll away from you. If the handles are too high,
this may cause unnecessary tension of the
shoulders (see fig. B).
3
The spring button should be located in the
same position either side of the rollator
(see fig. C).
To fold the rollator gently pull the strap in the
middle of the seat as shown above.
To adjust to the correct height, stand up
straight with your arms by our side. Adjust
the hand grip to be level with your wrist
(see fig. A).
Check both castor and rear leg handknob
screws are secure before use.
1
2
1
1- Pull up on brake handle lever to slow the rollator.
2- Push down on brake handle lever to lock the
rear wheels.
3- Pull up on brake lever handle to release the lock.
Brakes must be applied in the lock position
when the seat is going to be used. Pre check
the lock by pushing forward on the rollator.
Turn the adjuster screw anti-clockwise to
increase the tension then lock the adjustment
by turning the locking nut clockwise whilst
holding the adjuster screw still.
Reducing the brake pressure may effect
the brake in the locked position.
Before each use of the rollator
1 - Check that the castors, handles and hand
knobs are secure.
2 - Check that the brakes are operating correctly.
If any part of the rollator appears loose or
insecure, contact your place of purchase for
assistance.
The brake cables may stretch over time and
should be checked regularly. If you need to
replace the brake cables, ask for assistance at
your place of purchase.
Cleaning
The rollator can be cleaned with a damp cloth
or sponge and warm soapy water. Domestic
anti-bacterial surface cleaners may be used if
required.
Care should be taken not to leave any cleaning
residues on the handgrips or seat (where fitted)
this may leave them slippery when used.
Do not use scouring pads or scrapers as this may
damage surface coatings.