1
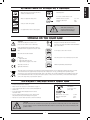
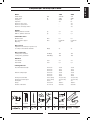
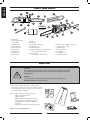
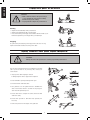
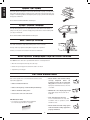
317 EL
321 EL
Always disconnect power before performing
E N GL I S H
SYMBOLS USED IN OPERATOR’S MANUAL:
Visual inspection.
cleaning or maintenance work.
Do not use a coiled extension cord.
Always use approved safety gloves.
Minimum wire cross-section:
1,5
Maximum cable length:
30 m
Voltage:
230 V
mm²
Clean your chain saw regularly.
CAUTION!
Chain saws are dangerous!
Careless or improper use can
Use approved face mask or safety goggles.
result in severe or fatal injury.
SYMBOLS ON THE CHAIN SAW:
CAUTION!
Noise emission to the environment according to the
Chain saws are dangerous! Careless or im-
European Community’s Directive. The machine’s
proper use can result in serious or fatal injury.
emission is specified in «TECHNICAL SPECIFICATIONS»
page 3 and on label.
Read operating instructions and make certain you
understand them thoroughly before using the chain
saw.
Do not expose saw to rain or moisture.
The chain saw is double-insulated.
Disconnect power in case of damage to power cable.
Always use:
•
Approved helmet
•
Approved hearing protection
•
Approved safety goggles or face mask
Maximum permissible guide bar length.
This product conforms to
applicable CE directives.
This product may not be treated as household waste. Instead it shall be handed over to the applicable collection point for the recycling
of electrical and electronic equipment. By ensuring this product is disposed of correctly, you will help prevent potential negative
consequences for the environment and human health, which could otherwise be caused by inappropriate waste handling of this product.
For more detailed information about recycling of this product, please contact your local council office, your household waste disposal
service or the shop where you purchased the product.
IMPORTANT! BEFORE USING CHAIN SAW
•
Read operating instructions carefully.
•
Always observe the «Safe Use» recommendations on page 4.
•
Check chain and guide bar for correct assembly and adjustment.
Do not use a coiled
•
Start the saw.
power cable!
•
Do not start sawing until an adequate amount of oil has
•
Incorrect chain tensioning increases wear on chain, sprocket
Minimum wire cross-section:
and guide bar, and may result in damage to these parts.
Maximum cable length:
Improper use of power cable may lead to serious motor damage.
Voltage:
IMPORTANT!
reached the chain.
•
1,5 mm²
30 m
230 V
CAUTION!
The chain saw must not be modified in any way under any circumstances without the permission of the manufacturer.
Use only original accessories. Unauthorized modifications and/or accessories may cause serious or fatal injury of the
operator or others.
1
E N GL I S H
CONTENTS
Symbols
1
Slip clutch 1700W
10
Important! Read before using chain saw
1
Electronic overload protection 2000W
10
Contents
2
Cutting equipment
10
EC declaration of conformity
2
Chain and guide bar lubrication
11
Technical specifications
3
- Chain oil
11
Chain saw parts
4
- Filling chain oil
11
Safe use
4
- Checking automatic
11
Starting and stopping
6
Daily inspection and maintenance
6
Kickback prevention
7
Chain brake with kickback guard
8
- Kickback guard inspection
8
- Manual chain brake function check
8
- Inertia chain brake function check
8
Mounting guide bar and adjusting chain
chain lubrication system
- Checking chain wear
9
Chain catcher
10
Right hand guard
10
11
Filing chain
12
Limbing
12
Crosscutting
13
Felling operations
13
- Danger zone
14
- Felling direction
14
- Clearing branches/Line of retreat
14
- Felling
14
EC DECLARATION OF CONFORMITY
Electrolux Motor AS, N-1708 Sarpsborg, Norway hereby declares that the following chain saws:
Husqvarna 317 EL and Husqvarna 321 EL, with serial numbers starting at 44900001 and onwards,
- are manufactured in compliance with EC Directive 98/37/EC (Machinery),
EC Directive 73/23/EEC including amendments (Low Voltage Directive), EC Directive 89/336/EEC including amendments
(Electromagnetic Compatibility Directive), and Directive 2000/14/EC (Noise Emission in the environment by equipment for
use outdoors)
- are manufactured in compliance with the following harmonized standards: EN 50144-1, EN 50144-2-13, IEC 60745-1
and IEC 60745-2-13.
Notified body: 0404, SMP Svensk Maskinprovning AB, Fyrisborgsgatan 3, SE-754 50 Uppsala, Sweden, has:
- carried out the EC type examination in accordance with the machinery Directive (98/37/EC) Article 8(2)(c)
- issued EC type examination certificates No. 404/04/1038 - Husqvarna 317 EL and 404/04/1037 - Husqvarna 321 EL
pursuant to machinery Directive 98/37/EC, Annex IV (4)
The chain saw submitted is identical to the samples submitted for EC type examination.
The measured and guaranteed sound power levels in accordance with Directive 2000/14/EC are set forth
under Technical Data in the User’s Manual.
Sarpsborg, 1th of November 2004
-------------------Jan Hansen, President
2
Motor
1700
2000
Rated voltage
VAC
220-240
230
Rated output
W
1700
2000
Frequency
Hz
50/60
50
Slip clutch
Yes
No
Electronic start control
-
Yes
Electronic speed control
-
Yes
Electronic overload protection
-
Yes
Weight
Without guide bar and chain
kg
4,4
4,4
With 14” guide bar and chain
kg
5,1
5,1
Oil tank volume
litres
0.1
0.1
Oil consumption approx.
litres
0.1/20 min.
0.1/20 min.
auto
auto
dB(A)
95
95
Sound power, measured
LW dB(A)
104
104
Sound power, guaranteed
LWA dB(A)
106
106
Chain lubrication
Oil pump
Noise levels
Equivalent noise intensity at operator’s ear,
according to international standards
Noise emissions
Vibration
Front handle
m/s2
4.4
4.4
Rear handle
m/s2
5,4
5,4
inches/cm
12/30
12/30
inches/cm
14/35
14/35
inches/cm
16/40
16/40
inches/cm
12/30
12/30
inches/cm
14/35
14/35
inches/cm
16/40
16/40
Chain speed, unloaded
m/sec. (drive)
14,5 (6 tooth)
15,2 (6 tooth)
Chain speed, rated output
m/sec. (drive)
12,5 (6 tooth)
12,2 (6 tooth)
Chain pitch
inches
3/8
3/8
Gauge
inches/mm
.050/1.3
.050/1.3
Number of drive links
12”/14”/16”
45/52/56
45/52/56
Chain/guide bar
Recommended bar length
Effective cutting length
inch
inch/mm
inch/mm
inch/mm
�
3
inch/cm/dl
E N GL I S H
TECHNICAL SPECIFICATIONS
E N GL I S H
CHAIN SAW PARTS
1. Rear handle
2. Power trigger lockout
11. Chain
3. Front handle
12. Guide bar
4. Serial No. plate
13. Chain brake release slot
5. Chain tensioner
14. Kickback guard
18. Chain catcher - deflects chain in case
chain breaks or derails
6. Chain oil reservoir
15. Chain drive cover
19. Guide bar nut
7. Chain oil level
16. Right hand guard - protects right hand
20. Nose sprocket
8. Ventilation slots
9. Power cable
in case chain breaks or derails
22. Combination tool
17. Drive sprocket
10. Power trigger
21. Scabbard
- concealed by chain drive cover
23. Operator’s manual
SAFE USE
CAUTION!
Never operate a chain saw with one hand only. Doing so may lead to i serious injury
to operator, helpers or bystanders. An electric chain saw is designed for operation
with both hands.
DANGER!
Use of accessories not conforming to the recommendations outlined in the
Operating Instructions could lead to injury.
• Dress safely. Avoid jewellery and loose-fitting clothing,
which may be caught in moving parts. Approved safety
mitts and sturdy footwear which gives a good footing are
recommended (also for helpers).
Wear: -
Approved face mask or safety goggles
Approved hearing protection
Approved helmet
Approved safety boots with protective reinforcement, steel toecap and non-slip soles
- Clothing which is snug without hampering
movement
- Approved gloves with protective reinforcement
Always keep a first-aid kit on hand!
4
• Keep work area clear and well-lighted. Do not operate chain
saw under wet or humid conditions, around water or in rain
or snow. Ingress of moisture into the motor can cause shortcircuiting.
• Do not bear down hard when cutting. With the chain
properly sharpened, light pressure is sufficient. Forcing the
saw at the end of a cut can make you lose control when you
break through.
• Show caution, care and common sense. Do not operate
the chain saw when you are tired or under the influence
of alcohol or drugs which may affect vision, judgement or
physical control. Keep all body parts well away from the
chain as long as the motor is running. Always ensure that
the chain is not touching anything before starting the chain
saw.
• Secure short logs before sawing.
• Show particular care when cutting small branches, and
avoid sawing bushes or many small branches at once.
Small branches can get caught in the chain with a violent
jerk and cause serious personal injury.
• Be on your guard against electric shock. Avoid touching
metal objects imbedded in or in electrical contact with the
ground.
• Do not abuse power cables. Never lift or carry the chain
saw by the power cable, and never disconnect the power
by jerking on the cable. Keep cable away from water, oil
and sharp objects. Avoid crushing cable in or against
doors, fences, or other metal objects which can conduct
electricity.
• We recommend limiting tree diameter to guide bar length so
that the NOTCH and FELLING CUT may be done with single
cuts. (See «Technical Specifications» for recommended
guide bar lengths for your chain saw model).
• Inspect the chain saw and power cable before use. Do not
use a chain saw with a damaged cable. Get it repaired by
qualified service personnel. Keep handles clean, dry and
free of grease and oil.
• See to it that all tools are removed from the chain saw
before connecting the power.
• Ensure that the extension cord is in good condition and
approved for outdoor use. It must be of sufficient dimension
for the chain saw’s rated power. See section «IMPORTANT!
READ BEFORE USING CHAIN SAW» on page 1.
• The chain will keep rotating a short while after releaseing
the power trigger (slowness).
• When carrying the chain saw, stop the motor, keep your
finger AWAY from the power trigger and turn the saw with
the guide bar to the rear and pointing away from your
body.
• Disconnect power supply before servicing chain saw.
• Your chain saw complies with all relevant safety standards.
Repairs should be performed only by qualified service
personnel using only original parts.
• Connect chain saw to a power supply equipped with a
current-operated earth-fault protection device.
• Examine saw closely for damaged parts before use to avoid
malfunctions and to ensure safe and efficient operation.
Verify that all moving parts are fitted and adjusted correctly.
Except for the maintenance described in this operator’s
manual, damaged parts must be replaced at an authorized
service centre. Defective power triggers are to be replaced
by authorized service personnel. Do not operate the saw if
the power trigger does not work properly.
• Double-insulated! Your electric chain saw is doubleinsulated for added protection against electric shock. A
double-insulated electric tool is designed with two separate
«layers» of electrical insulation or one layer of insulation
of double thickness between the operator and the tool’s
conducting parts. Double-insulated tools do not use earthed
mains connections and may therefore be connected to any
normal 220-240 VAC outlet. Observe the same precautions
required with all electric tools. Double insulation gives
added protection only against defective insulation.
• Store the chain saw in a safe, dry place out of the reach of
children, with the power disconnected and the guide bar
scabbard in place.
• Use chain saw only on wood. Do not attempt to cut metal, plastic,
masonry or any non-wood building materials. Do not use the
guide bar to push away branches, roots or other objects.
5
E N GL I S H
• Ensure that you can move and stand safely at all times.
Watch out for roots, stones, branches, holes, mounds
and so forth when moving around. Be particularly careful
when working on slopes. Work with the trunk to your right,
keeping the log between you and the guide bar. Always grip
your chain saw with both hands, holding it as close to your
body as possible for best control. Wherever possible, let
the log take the weight of the chain saw. Always keep the
log between you and the guide bar when moving forward.
• See to it that others keep their distance as long as the
chain is in motion. Keep onlookers, children and animals
away from the work area. Do not let inexperienced persons
handle the chainsaw or power cable.
E N GL I S H
STARTING AND STOPPING
CAUTION!
• Make certain at all times that your footing is
secure and that the chain touches nothing
but the wood you are cutting.
• Keep bystanders away from your work area.
Starting
• Grip the front handle firmly with your left hand.
• Grip the rear handle firmly with your right hand.
• Press and hold the power trigger lockout button with the inside of your
hand and squeeze the power trigger with your index finger.
Stopping
Stop the saw by releasing the power trigger. If the saw does not stop,
trip the chain brake and disconnect the power cable.
DAILY INSPECTION AND MAINTENANCE
CAUTION!
Always disconnect the power before cleaning or performing maintenance.
Here are a few general instructions for maintaining your handsaw. If you are in doubt on any of these points, contact your
service dealer.
1. Inspect power cable and plug for defects.
A damaged power cable or plug must be replaced.
2. Clean ventilation openings and keep them open.
3. Check automatic chain lubrication.
4. Turn guide bar over at regular intervals to distribute the
wear on both sides. Check to see that the oil passage is
clear. Clean the guide bar groove.
5. Check chain tension, sharpen the cutters and ensure that
chain turns easily.
6. Check drive sprocket for abnormal wear, replacing it if
necessary.
7. Remove any burrs from the edges of the guide bar
6
DANGER!
Kickbacks occur suddenly and without warning. A kickback may be violent enough to throw a
chainsaw back at the user. A running chain can inflict severe and even fatal injury. It is imperative
for users to be familiar with the causes of kickbacks in order to exercise the proper care and use
working techniques to prevent kickback.
CAUTION!
Improperly sharpened cutters or the wrong chain and guide bar combination will
increase the risk of kickback. See «Technical Specifications» on page 3.
CAUTION!
Do not let the chain come in contact with the ground or any objects. Chain link and wire fencing
materials present a particular kickback hazard.
Observe all safety rules in order to avoid kickbacks and other
accidents which may cause injury.
• A kickback is a sudden reaction in which a chain saw is
thrown back as a result from contact with the upper part of
the bar nose known as the kickback danger zone.
• The direction of a kickback is always in the same plane as
the guide bar. The most common reaction is that the guide
bar and saw are thrown up and back towards the operator.
The saw can be thrown in other directions, depending on
the position of the saw at the moment of kickback.
Basic rules
• Take extreme care when cutting with the top chain (on the
underside of a log). The force of the chain action pushes the
saw backwards, and if the operator does not maintain firm
control, the kickback danger zone may move far enough
back into the kerf to produce a kickback. Cutting with the
bottom chain (on the top side of the log) pulls the saw forward. This presses the power head firmly against the tree,
providing a steady support and giving the operator added
control over the saw and consequently over the kickback
danger zone.
• Knowing the cause and nature of a kickback helps reduce
or eliminate the element of surprise. Surprise increases the
danger of an accident. Most kickbacks are small, but some
are violent, and all are lightning-fast.
• Always grip the chain saw firmly with thumb and fingers
wrapped around the handles, right hand on the rear handle
and left hand on the front handle. All users, whether right or
left-handed, must use this grip, which will reduce the effect
of a kickback and help keep the saw under control.
Do not let go of the chain saw handles!
• Most accidents caused by kickbacks take place in connection with limbing. Make certain your footing is secure
and that there are no objects nearby which may trip you
or make you lose your balance. If you are not careful, the
kickback danger zone could make contact with a branch,
a nearby tree or some other object which could cause a
kickback.
• Follow the maintenance and sharpening instructions for the
chain and guide bar. When replacing chains and guide bars,
use only combinations recommended by us. See «Technical
Specifications».
• The smaller the bar nose radius, the smaller the kickback
danger zone and thus
the kickback tendency.
• Never use a chain saw to cut above shoulder height, and
do not cut with the guide bar nose. Never operate a chain
saw while holding it with only one hand!
• By using low-kickback
cutting equipment and
keeping the cutters
properly sharpened, the
strength of a kickback
can be greatly reduced.
• Maintain full speed while cutting.
7
E N GL I S H
KICKBACK PREVENTION
E N GL I S H
CHAIN BRAKE WITH KICKBACK GUARD
Your chain saw is equipped with a chain brake designed to
• The chain brake may be activated manually or by the force
stop the chain instantaneously in the event of a kickback.
of inertia depending on the strength of the kickback and
A chain brake can reduce the risk of accident, but only the
the position of the saw in relation to the object which made
operator can prevent accidents from happening. Be extremely
contact with the kickback danger zone.
careful when operating a chain saw and do not allow the kick- If the kickback is sufficiently violent and the left hand
back danger zone to make contact with anything.
is too far from the kickback guard, the chain brake is
• The chain brake (A) is activated either manually (with the left
hand) or by the force of inertia (the inertia of the kickback
guard resisting the motion of the saw from the force of the
kickback). However it is activated, the kickback protection
mechanism works in the opposite direction to the force of
the kickback. The saw incorporates a slip clutch which protects the saw against overload. If the chain stops while the
motor is running, the saw is overloaded. Ease up on the
cutting pressure until the chain starts running again. If the
saw jams in the tree, stop the saw immediately and free it.
activated by the INERTIA of the chain brake against the
force of the kickback.
- In the event of smaller kickbacks or when the left hand
is near the kickback guard, the chain brake is activated
manually with the left hand.
• When the chain saw is turned on its side and the operator
is holding the side of the front handle, the kickback guard
will not strike the left hand in the event of a kickback and
will thus not activate the chain brake. In a situation of this
type, inertia is the only thing that can activate the chain
brake, but like manual activation, it will not work in every
situation.
Kickback guard inspection
• The chain brake is also activated when the kickback guard
(B) is pushed forward. This releases a springloaded mecha-
• Inspect kickback guard for visible defects, such as cracks.
nism which jerks the brake band tightly around the brake
• Move kickback guard back and forth to ensure that it moves
drum.
freely without being loose.
Manual chain brake function check
• Check chain brake daily or every time the saw is used.
Holding the running saw firmly with the left hand on the
front handle and the right hand on the rear handle, twist
your left wrist, pushing the kickback guard to activate the
chain brake without letting go of the front handle. The chain
• The purpose of the kickback guard is not only to activate
should stop instantaneously. If the chain brake does not
the chain brake. Its other important function is to reduce
perform as required, have it serviced by authorized per-
the danger of contact with the chain in the event that the
sonnel.
operator loses his grip on the front handle.
Inertia chain brake function check
• Use the chain brake as a «parking brake» when carrying
the chain saw around or putting it down for short periods!
Besides automatic activation in the event of a kickback, the
• Hold the running saw level with the guide bar approximately
45 cm above a stump or other solid wooden object.
chain brake may also be activated manually and must be
activated in the event of any inadvertent contact with a ro-
Release the power trigger.
tating chain.
• Release the front handle, letting
• An activated chain brake is released by pulling the kickback
the chain saw pivot in your
guard back towards the front handle.
right hand as the guide bar falls
• As pointed out on page 7, a kickback can be extremely
down and strikes the stump.
violent and lightning-fast. Most kickbacks are small and do
The brake should activate when
not activate the chain brake. When this happens, it is im-
the bar nose hits the stump.
portant to maintain a firm grip on the saw and not let go.
8
CAUTION!
Always disconnect power before performing cleaning or maintenance work.
CAUTION!
A loose chain can jump out of its groove during operation and cause serious
or even fatal injury.
6. Replace the chain drive cover and screw
the mounting nut hand tight.
1. Pull kickback guard back against the front handle
to ensure that the chain brake is not applied.
7. Tension the chain by screwing the
tensioning screw clockwise using the
screwdriver tip on the combination
tool.
2. Screw out the guide bar nut and remove
the chain drive cover.
8. Tighten chain firmly but not so hard that it does not turn easily
by hand force. Place the combination tool into the Chain brake
release slot and push to release the chain brake. To avoid contact between your hands and the chain, use gloves to turn the
chain.
2
3. Fit the chain around guide bar nose with
the top cutters facing forwards.
9. Tighten the mounting nut with the combination tool while hold4. Holding the chain over the guide bar nose, position the
ing the tip of the guide bar up.
back end of the guide bar against the drive sprocket at a
45° angle to the power head. Pass the free end of the chain
around the drive sprocket, swing the guide bar into place
over the mounting bolt and against the power head, and
guide the chain into the guide bar groove.
The tension of a new chain must be checked frequently until it
is broken in. Continue to check the tension at regular intervals
to ensure good performance and a long service life.
• Wear causes a chain to become looser with use. Regular
tensioning is important to compensate for this wear.
5. Seat the guide bar tensioner pin in its hole in the guide bar.
• Check the chain tension at least every time you refill the chain
oil reservoir.
9
E N GL I S H
MOUNTING GUIDE BAR AND ADJUSTING CHAIN
E N GL I S H
CHAIN CATCHER
The chain catcher is designed to catch a chain which breaks or jumps out of its groove.
This problem will generally be avoided, however, if the chain is tensioned properly (see
chapter on «Mounting guide bar and adjusting chain» page 9) and the chain and guide
bar properly maintained.
Ensure that the CHAIN CATCHER is undamaged.
RIGHT HAND GUARD
The right hand guard protects the right hand in the event that the chain breaks or
jumps out of its groove, as well as keeping twigs and branches from interfering with
your grip on the handle.
Ensure that the RIGHT HAND GUARD is undamaged.
SLIP CLUTCH 1700W
Your chain saw features a slip clutch which protects it from overload.
The slip clutch may require cleaning after long periods of operation.
Contact your nearest service dealer in the event of malfunction.
ELECTRONIC OVERLOAD PROTECTION 2000W
The 2000W electric chain saw is provided with electronic overload protection.
• When the overload protection trips, the saw stops.
• Release the power trigger. Ensure that the chain is not stuck.
• Squeeze the power trigger.
CUTTING EQUIPMENT
• Ensure that the cutter teeth are always
This section explains how correct maintenance and use of the
correctly
right cutting equipment:
sharpened!
Follow
our
instructions and use the recommended
• Reduces kickback tendencies
filing guide. A chain which is damaged or
• Reduces the frequency of chain derailing and breakage
of accident.
improperly maintained increases the risk
• Maintain the correct depth-gauge height.
• Achieves maximum cutting effect
Worn depth gauges increase the risk of
• Increases the service life of the chain
kickback.
• Keep chain properly tensioned!
A loose chain derails more easily and
The five basic rules
accelerates wear on guide bar, chain
• Use only the recommended cutting equipment!
and drive socket.
See «Technical Specifications» on page 3.
• Ensure that the automatic oiling system
works and that the cutting equipment is
properly maintained.
10
CAUTION!
Inadequate lubrication can lead to cutting equipment failure and serious or fatal
personal injury.
Chain oil
• A full reservoir is sufficient for 20 minutes of steady use.
• The chain and bar are lubricated by an automatic oiling
• If the lubrication system does not seem to be working, and
system. We recommend using only chain saw oil, which is
the following steps do not help, take your saw to a service
formulated for good adhesion and flow characteristics in hot
dealer.
or cold weather. Nonetheless, it is important to use the viscosity appropriate to the season. Oil thickens in subfreezing
-
temperatures and can overload the oil pump and cause
Check the guide bar’s oil passage
and clean if necessary.
parts to fail.
• As a manufacturer of chain saws, we have developed an
ideal chain oil which, being based on vegetable oils, is
completely biodegradable. We recommend our oil for the
sake of your chain and guidebar and for the sake of the
-
environment.
Check guide bar groove and
clean if necessary.
• Where chain oil is not available, EP 90 gear oil may be used.
• If you need help choosing chain oil, contact your service dealer.
• Never use old motor oil! Used motor oil contains impurities
-
which may be harmful to oil pump, guide bar and chain.
Ensure that the nose sprocket
turns easily and is not clogged.
Clean and grease if necessary.
Filling chain oil
• All our chain saw models feature automatic chain lubrication.
Checking chain wear
• Inspect chain every day for:
Checking automatic chain lubrication system
-
Visible cracks in rivets or links
• Start the chain saw and point the guide bar towards a fixed,
-
Stiffness
light-coloured object at a distance of approximately 20 cm.
-
Abnormal wear in rivets or links
After running the saw for a minute, a streak of oil spatter
-
Min. 3 mm (1/8”) horizontal cutter length
should be clearly visible on the light surface.
-
Any deviation on any of these points indicates a worn
chain which must be discarded
11
E N GL I S H
CHAIN AND GUIDE BAR LUBRICATION
E N GL I S H
FILING CHAIN
General instructions regarding cutters
See «Technical Specifications» for the details which apply to
your chain. It is very difficult to file a chain saw correctly with-
• Never cut wood using a dull chain. Having to press hard is a
out the proper aids. We recommend the use of a file guide to
sure sign of a dull chain, as are very small chips. A very dull
ensure maximum cutting efficiency with the least tendency to
chain will produce sawdust rather than chips.
kickback.
Filing cutters
To file cutters correctly, a ROUND FILE
and a FILE GUIDE are required. Look
under «Technical Specifications» for
the correct file diameter and file guide
for your saw and chain.
• A sharp chain will produce large chips, and the saw will
feed itself through the wood.
• The part of the chain that saws is
• File
called the CUTTING LINK, which
only
with
the
chain
properly tensioned. A loose
consists of a CUTTER (A) and
chain
DEPTH GAUGE (B). The difference
wiggles,
making
it
difficult to file.
in height between them determines
the depth of the cut.
• Always file from the inside of each
• When filing a saw, pay close attention to:
cutter towards the outside. Lift
the file on the return stroke.
TOP-PLATE ANGLE
• File the cutters on one side first.
Then turn the saw around and file
CUTTING ANGLE
the cutters on the other side.
• Make certain that all cutters are of
HORIZONTAL FILE ANGLE
equal length. When the horizontal
length is down to 3 mm (1/8”), the
chain is worn out and must be dis-
FILE DIAMETER
carded.
CAUTION!
FILE DEPTH
Improperly filed cutters heighten
kickback tendencies!
LIMBING
CAUTION!
Most kickback accidents take place when limbing. Pay very close attention to the
kickback danger zone when cutting limbs under tension!
All the principles which apply to crosscutting also apply when cutting thick branches.
Cut complicated branches in several stages.
Ensure that your footing is secure at all times, whether moving about or
standing in one place. Always work with the log to your right. For best control,
hold the chain saw as close to your body as possible.
12
• Cutting a log supported at one end. The log is more than
CAUTION!
likely to splinter if cut straight through from the top down.
If the chain becomes stuck in the
kerf, STOP THE SAW!
Do not attempt to jerk the saw free.
You could be harmed by the chain
if the saw suddenly comes loose.
- Make an initial cut from below (approx. 1/3 of the
Lever the saw free instead.
diameter)
• Cutting a log on the ground. There is little danger of the
saw jamming or the log splintering, but it is difficult to avoid
running the saw into the ground when breaking through at
the end of the cut.
- Finish the cut from above.
Saw straight through the log. Be careful at the end of the
cut to avoid contact with the ground. Keep the saw running
at full speed, but be prepared for the breakthrough.
• Cutting a log supported at both ends. The saw is more than
likely to jam in the kerf if cut straight through from above.
- Make an initial cut from the top (approx. 1/3 of the
diameter).
- If it is possible to turn the log, stop cutting 2/3
of the way through the log.
- Finish the cut from below.
- Turn the log and cut the remaining section from above.
FELLING OPERATIONS
CAUTION!
Felling a tree is a job which calls for experience. Do not attempt to fell trees if you are
inexperienced. DO NOT CARRY OUT ANY OPERATIONS FOR WHICH YOU DO NOT
FEEL QUALIFIED!
CAUTION!
Beginning chain saw operators should gain experience cutting logs on a sawhorse or
similar arrangement.
CAUTION!
We advise operators without sufficient experience against felling trees with trunk
diameters exceeding their guide bar length.
13
E N GL I S H
CROSSCUTTING
E N GL I S H
Danger zone
A danger zone surrounds the tree to a distance of
Notch depth should be around 1/4 of the
2 1/2 times the height of the tree. See to it that no one is
diameter of the tree and the angle should
standing within this zone while you are felling the tree.
be around 45°.
Felling direction
The line defined by the inside angle of the
When felling a tree, one always aims to place it where neither
notch must be precisely horizontal and
objects nor difficult terrain will hamper limbing and cutting.
at a precise right angle to the direction
Unobstructed movement and secure footing are essential.
of fall.
It is also important to avoid lodging the tree against another
tree. A lodged tree is extremely dangerous.
Felling cut
The felling cut is done from the opposite
After determining where you want the tree to fall, you must
side of the tree and must also be
also consider the likely unaided direction of fall. This is
horizontal. Stand with the tree to your left
affected by the straightness and lean of the tree, wind direc-
and cut with the bottom of the guide bar
tion, concentration of branches and any snow that may weigh
(pulling chain).
the tree down.
After assessing all these factors, you may find you have no
Place the FELLING CUT approximately
choice but to fell the tree in its natural direction of fall because
3-5 cm (1 1/2 - 2”) above the BOTTOM
your preferred direction of fall is likely to fail.
NOTCH CUT.
Another important factor affecting your personal safety, though
it has no bearing on the direction of fall, is the presence of any
Cut at full motor speed, feeding the saw
dead branches which could fall while you are felling the tree.
slowly into the tree. Watch out for tree
movement opposite to the intended direc-
Clearing branches/Line of retreat
tion of fall. Insert a WEDGE or FELLING
Remove any branches from around
BAR in the FELLING CUT as soon as the
the base of the tree which may in- Planned Direction of fall
depth of the cut permits.
terfere with your work. It is safest to
Danger zone
work from the top down and to keep
the tree trunk between you and the
running chain. Never cut branches
Retreat
above shoulder height. Clear under-
When complete, the FELLING CUT must
Retreat
be parallel to the notch and leave a
Danger zone
strip of HINGE WOOD at least 1/10 the
diameter of the tree.
growth around the tree and identify
your line of retreat or escape, taking note of any obstructions
(stones, branches, holes, etc.).Your line of retreat should be at
The HINGE WOOD acts as a hinge,
an angle, around 135° behind the direction of fall.
steering the direction of the falling tree.
Felling
If the HINGE WOOD is too small or has
Three cuts are made to fell a tree. The «TOP NOTCH CUT»
been sawn through, or if the
and the «BOTTOM» or «HORIZONTAL NOTCH CUT» forms
notch and the felling cut are
the «NOTCH», which determines the direction in which the
mismatched, the tree is no
tree will fall. The final cut is the «FELLING CUT», which allows
longer under control.
the tree to topple over.
Notch
As the felling cut approaches the notch,
To form the NOTCH, start with the TOP
the tree should start falling, either by
NOTCH CUT. Using the bottom of the
itself or with the help of a WEDGE or
guide bar (pulling chain), make a 45°
FELLING BAR.
downward angled cut at right angles to
the intended direction of fall.
Next do the BOTTOM NOTCH CUT,
ensuring that it meets the bottom of the
TOP NOTCH CUT precisely.
14