1
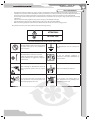
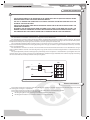
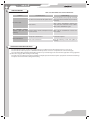
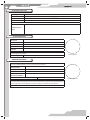
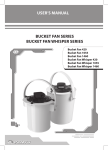
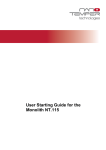
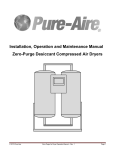
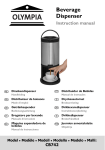
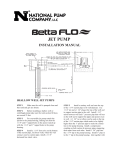
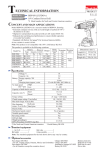
User’s Manual
DRF(I)-OV
DESTRATIFICATOR
ДРФ(И)-ОВ
2
CONTENTS
Safety requirements
Introduction
Use
Delivery set
Designation key
Technical specifications
Design and operating logic
Mounting and set-up
Connection to power mains
Technical maintenance
Troubleshooting
Storage and transportation rules
Manufacturer's warranty
Acceptance certificate
Seller information
Mounting certificate
Warranty card
3
5
5
5
5
6
7
7
9
9
10
10
11
12
12
12
13
www.ventilation-system.com
3
SAFETY REQUIREMENTS
•
•
•
•
•
•
Read this User’s Manual carefully prior to the operation and installation of the Destratificator (hereinafter «Destratificator»).
Installation and operation of the destratificator shall be performed in accordance with the present User’s Operation Manual as
well as the provisions of all the applicable local and national construction, electrical and technical codes and standards.
The warnings contained in the present User’s Manual must be considered most seriously since they contain vital personal safety
information.
Failure to follow the safety regulations may result in an injury or destratificator damage.
Upon familiarization keep the User’s Manual for the entire service life of the destratificator.
While transferring equipment control the User’s Manual must be turned over to the receiving operator.
The symbols used in the present User’s Manual have the following meaning:
ATTENTION!
RESTRICTED!
DESTRATIFICATOR INSTALLATION SAFETY PRECAUTIONS
The destratificator must be disconnected from
the power mains prior to every installation or
repair operation.
The destratificator must be connected to
earth!
The destratificator must not be operated
outside the temperature envelope stated in
the User's Manual or in aggressive or explosive
environments.
Do not use damaged equipment or
conductors to connect the destratificator to
the power mains.
While installing the destratificator follow the
safety regulations specific to the use of power
tools.
Unpack the destratificator with care.
Do not change the power cord length at your
own discretion. Do not bend the power cord.
Avoid damaging the power cord.
Do not position any heating devices or
other equipment in close proximity to the
destratificator power cord.
ДРФ(И)-ОВ
4
DESTRATIFICATOR OPERATION SAFETY PRECAUTIONS
Do not touch the regulator or the control panel
with wet hands. Do not carry out destratificator
maintenance with wet hands.
Do not wash the destratificator with water.
Avoid penetration of water onto the electric
parts of the destratificator.
ON
Use the destratificator only as intended by the
manufacturer!
OFF
Disconnect the destratificator from
the power mains prior to any technical
maintenance.
Do not let children operate the destratificator!
Keep the power cord intact while operating
the destratificator. Do not put any foreign
objects on top of the power cord.
Do not store any flammable gases or highly
flammable substances in close proximity to the
destratificator.
Do not direct the air flow generated by the
destratificator onto combustion equipment
or burning candles.
Should the destratificator generate any unusual
sounds, smells or smoke disconnect it from the
power mains and contact the service centre.
Check the destratificator for secure
installation from time to time in case of
prolonged operation.
Do not block the air passage while the destratificator is working.
www.ventilation-system.com
5
INTRODUCTION
The present User’s Manual contains the technical details, operating instructions and technical specification for DRF-OV and DRFI-OV
destratificator.
USE
A destratificator is a device intended to minimize the heat loss by cancelling the temperature differential on the premises. destratificators
are essential elements of energy-saving solutions for buildings and premises.
Such units are used to force the warm air accumulated under the ceiling toward the lower part of the space. By ensuring an even
temperature in the entire space a destratificator helps to reduce the heating costs. In the warm season destratificators are used to supply
fresh air into a specific zone thus creating a favorable microclimate in the ventilated area.
The destratificator is designed for continuous operation without disconnection from the power mains.
The air being handled must not contain any combustible or explosive mixtures, chemical fumes, sticky substances, fibrous materials,
coarse dust, soot, fat or any environment prolific for the formation of harmful substances (toxic substances, dust and pathogens).
THE DESTRATIFICATOR IS NOT INTENDED FOR OPERATION BY CHILDREN OR ANY PERSONS WITH LIMITED SENSORY
OR MENTAL CAPACITY AS WELL PERSONS LACKING THE REQUIRED TRAINING.
THE DESTRATIFICATOR MUST BE HANDLED ONLY BY PROPERLY QUALIFIED PERSONNEL AFTER THE APPROPRIATE
SAFETY BRIEFING.
THE CHOICE OF DESTRATIFICATOR INSTALLATION LOCATION MUST PREVENT UNAUTHORIZED ACCESS BY
UNATTENDED.
DELIVERY SET
destratificator — 1 piece;
Mounting kit — 1 piece:
• Cable with a threaded tip, 3 m;
• Fastenings;
Safety kit — 1 piece:
• Cable with a loop, 3 m;
• Fastenings;
User’s Manual - 1 piece;
Shipping Box - 1 piece;
Power cord (optional) — 1 piece.
DESIGNATION KEY
DRF(I)-OV ХХХ R
Power cord
_ - not included in the package
R - power cord
Fan Diameter [mm]
250, 300, 350
Casing Type
_ - standard
I - sound-insulated
Unit Designation
DRF - destratificator
ДРФ(И)-ОВ
6
TECHNICAL SPECIFICATIONS
The destratificator is designed for operation in an enclosed area at ambient temperatures from -0 ºС to + 45 ºС at relative humidity of
up to 80% (at +25 ºС).
The unit meets the requirements of IPX4 hazardous parts access and water ingress protection standard.
The unit is rated electric hazard protection Class I.
The main outside and connecting dimensions as well as the appearance and technical parameters of the unit are given on Figure 1
and in Tables 1 and 2.
The destratificator undergoes continuous improvement - therefore, some models may slightly differ from the ones described herein.
Table 1. Technical Specifications
DRF-OV 250
DRFI-OV 250
DRF-OV 300
DRFI-OV 300
230
DRF-OV 350
DRFI-OV 350
Power Consumption [W]
50
75
140
Current [А]
0,22
0,35
0,65
Maximum Air Flow [m ]
800
1340
2500
Rotation Speed [minˉ¹]
1380
1350
1380
Type
Voltage [V] / 50 Hz
3
Max. Handled Air Temperature [°C]
60
Protection Rating
IP X4
Table 2. Outside and Connecting Dimensions
Destratificator Type
Dimensions [mm]
DRF-OV 250
DRF-OV 300
A
390
442
Н
524
620
Н1
386
456
D
341
392
D1
260
316
DRF-OV 350
DRFI-OV 250
DRFI-OV 300
DRFI-OV 350
490
456
506
556
705
626
701
776
516
468
518
569
442
384
434
484
360
302
352
402
DRF-OV
Fig. 1. Outside and Connecting Dimensions
D2
Weight [kg]
6,0
7,2
9,1
DRFI-OV
9,7
11,0
14,5
17,0
www.ventilation-system.com
7
DESIGN AND OPERATING LOGIC
The destratificator (see Fig. 2) consists of an axial fan attached to the casing via the vibration mounts. The destratificator has a polymercoated steel casing.
The destratificator is equipped with a single-phase asynchronous motors with an external rotor and an axial impeller. The motor is
equipped with built-in thermal protection enabling its automatic restarting and utilizes rolling-element bearings. The motor protection
class is IP 44.
The DRFI-OV casing has special perforation and a sound-insulating layer of mineral wool to reduce the noise generated by the axial
fan. The DRFI-OV destratificator has a flow straightener at the dicharge which ensures direct air flow and maximum air throw distance.
The destratificator is mounted by means of the bow bracket (DRFI-OV can be fixed with 15° steps) as well as the mounting and the
safety cables with threaded joints each 3 m long.
Mounting Kit
Safety Kit
Fan with Terminal Box and Protective Grid
Bow Bracket
Vibration Mount
Bolts for Bow Bracket Mounting to Casing
Casing
Sound-Insulation Layer
DRFI-OV
Airflow Straightener
Fig. 2. Destratificator design
MOUNTING AND SET-UP
Having unpacked the destratificator and prior to installation:
Read the User's Operation Manual carefully;
Check for signs of transit damage;
Manually check the impeller for smooth rotation.
Check the load-bearing structures at the installation site for adequate strength.
Follow the safety regulations during the make-ready procedures and destratificator operation.
Installation:
The destratificator is designed for installation on premises protected against atmospheric phenomena. The unit is installed under the
ceiling of the premises with the airflow nozzle down.
The destratificator is intended to be rigidly mounted to the load-bearing structure or suspended by means of the mounting kit
(included in the delivery package). Mounting the destratificator on two two cables allows the additional benefit of unit angle correction
by adjusting the safety cable length.
Attach the destratificator by the bow bracket;
Secure the destratificator to the threaded bar with 2 nuts (see Fig. 3.1);
Avoid deformation of the destratificator elements during installation;
Attach one end of the safety cable to the building structures;
Attach the other end of the safety cable to the destratificator bracket (Fig. 3.2);
ДРФ(И)-ОВ
8
Loosen the fastening bolts between the destratificator and the bracket, turn the destratificator and direct its nozzle toward the
intended air supply area (see Fig. 3.3);
Tighten the bolts between the casing and the bracket.
1)
2)
3)
Fig. 3. destratificator Installation
www.ventilation-system.com
9
CONNECTION TO POWER MAINS
THE DESTRATIFICATOR MUST BE CONNECTED TO THE POWER MAINS ONLY BY QUALIFIED PERSONS HAVING
BEEN MADE FAMILIAR WITH THE PRESENT OPERATION MANUAL.
THE UNIT IS INTENDED FOR CONNECTION TO AC MAINS SUPPLYING THE VOLTAGE COMPLIANT WITH THE
TECHNICAL SPECIFICATION CHART.
CHECK THE ENTIRE POWER CORD LENGTH FOR CHOKING. DO NOT SWITCH ON THE DESTRATIFICATOR IF THE
POWER CORD IS DAMAGED.
DISCONNECT THE DESTRATIFICATOR FROM THE POWER SUPPLY PRIOR TO ANY WORK ON THE UNIT! THE
NOMINAL ELECTRICAL PARAMETERS OF THE DESTRATIFICATOR ARE GIVEN ON THE MANUFACTURER’S LABEL.
ANY TAMPERING WITH THE INTERNAL CONNECTIONS IS PROHIBITED AND WILL VOID THE WARRANTY.
The destratificator is intended for connection to a single-phase 230 V/50 Hz AC mains.
The destratificator connection must be made using durable, insulated and heat-resistant conductors (cables and wires). The external
lead-in (230V/50Hz) must be equipped with an automatic cutout switch built into the stationary wiring to disconnect all the mains phases.
The QF external switch position (see Fig. 4) must ensure free access for quick power-off of the unit.
The recommended automatic switch nominal current is 1.0 A. The wire section is 0.75 mm². However, the conductor selection shall be
based on the maximum permissible wire heating depending on the wire type, its insulation, length and installation method (i.e. overhead,
in pipes or inside the walls).
The destratificator connections are made on the X1 terminal block mounted inside the terminal box on the destratificator casing in
strict accordance with the electrical connection diagram (see Fig. 4). The electrical connections diagram sticker is located inside the terminal box.
The speed adjustment (continuous and stepped) is performed by means of a thyristor or autotransformer speed regulator. The same
regulator device can be used for connecting several destratificators simultaneously provided that their combined capacity and working
current remain within the nominal parameters of the speed regulator.
X1
QF
L
~230 V/
50 Hz
N
L
2
N
PE
1
3
4
Fig. 4. Electrical Connections Diagram
TECHNICAL MAINTENANCE
The technical maintenance and repair of the destratificator may commence only after its disconnection from the power mains and all
the rotating parts coming to a complete halt.
The technical maintenance includes periodic cleaning of the surfaces from accumulated dust and dirt.
The recommended annual maintenance should include:
Checking the tightness of the fastening bolts and their tightening, if necessary;
Checking the fan blades for contamination and their cleaning, if necessary.
ДРФ(И)-ОВ
10
TROUBLESHOOTING
Table 3. Possible Malfunctions and Their Elimination
Problem
Possible Reasons
Fault handling
Make sure that the unit is properly connected
The unit is not connected to the power mains. to the power mains and make any corrections,
if necessary.
Fan will not start
Motor seizure.
Switch off the destratificator. Eliminate the
reason that has caused the motor seizure.
Switch on the destratificator again.
The automatic breaker
Excessive electric current consumption caused Switch off the destratificator. Contact the
activates upon the unit
by a short circuit.
service centre.
power-up
Fan impeller contaminated.
Clean the fan impeller.
Loose screw connections.
Check the fastening screws and tighten, if
necessary.
Noise and vibration
STORAGE AND TRANSPORTATION RULES
The destratificator must be stored in the original packing in a ventilated area at the temperature from +5 °C to +40 °C.
The air must not contain any vapors or admixtures which may lead to corrosion or compromise the connection integrity.
Use only suitable lifting equipment for handling operations to prevent damage to the unit. Follow the applicable moving regulations
specific to the cargo type while loading and unloading.
The units can be carried by any transport provided their adequate protection from atmospheric precipitation and mechanical damage.
Avoid jolts and collisions while loading and unloading.
www.ventilation-system.com
11
MANUFACTURER’S WARRANTY
The manufacturer hereby warrants normal destratificator operation over the period of 24 months from the retail sale date provided the
user’s observance of the transportation, storage, installation and operation regulations.
Should any malfunctions occur in the course of the destratificator operation through the manufacturer’s fault during the warranty
period the user is entitled to elimination of faults by means of warranty repair performed by the manufacturer.
The warranty repair includes work specific to elimination of faults in the destratificator operation to ensure its intended use by the user
within the warranty period. The faults are eliminated by means of replacement or repair of the complete destratificator or the faulty part of
such a destratificator.
The warranty repair does not include:
•
Routine maintenance;
•
destratificator installation/dismounting;
•
destratificator setup.
To benefit from warranty repair the user must provide the destratificator, the User’s Manual with stamped sale date and the payment
document certifying the purchase.
The destratificator model must comply with the one stated in the User’s Manual.
The warranty repair or replacement must be done at Seller’s point.
The manufacturer’s warranty does not apply to the following cases:
•
User’s failure to provide the destratificator with the entire delivery package as stated in the User’s Manual or with missing component
parts previously dismounted by the user;
•
Mismatch of the destratificator model and manufacturer with the respective details stated on the destratificator packing and in the
User’s Manual;
•
User’s failure to ensure timely technical maintenance of the destratificator;
•
External damage to the casing (excluding external modifications of the destratificator as required for its installation) and the
internal components of the destratificator;
•
Alteration of the destratificator design or engineering changes of the unit;
•
Replacement and use of destratificator assemblies, parts and components not approved by the manufacturer;
•
Destratificator misuse;
•
User’s violation of the destratificator installation regulations;
•
User’s violation of the destratificator control regulations;
•
Destratificator connection to the power pains with a voltage different from the one stated in the User’s Manual;
•
Destratificator breakdown due to voltage surges in the power mains;
•
User’s discretionary repair of the destratificator;
•
Destratificator repair performed by any persons without the manufacturer’s authorization;
•
Elapsing of the destratificator warranty period;
•
User’s violation of the established regulations specific to the destratificator transportation;
•
User’s violation of the destratificator storage regulations;
•
Wrongful acts against the destratificator committed by third persons;
•
Destratificator breakdown due to circumstances of insuperable force (fire, flood, earthquake, war, hostilities of any kind, blockade);
•
Missing seals if provided by the User’s Manual;
•
Failure to provide the User’s Manual with the sale date stamp;
•
Missing payment document certifying the destratificator purchase.
FOLLOWING THE REGULATIONS STIPULATED HEREIN WILL ENSURE A LONG AND
TROUBLE-FREE OPERATION OF THE DESTRATIFICATOR.
USERS’ CLAIMS SHALL BE SUBJECT TO REVIEW ONLY UPON PRESENTATION OF THE
DESTRATIFICATOR, THE PAYMENT DOCUMENT AND THE USER’S MANUAL WITH THE
SALE DATE STAMP.
ДРФ(И)-ОВ
12
ACCEPTANCE CERTIFICATE
Product Type
Destratificator
Model
DRF(I)-OV ____________
Serial Number
Manufacturing Date
is compliant with the technical specifications and is hereby declared ready for service.
Quality Inspector's
Stamp
SELLER INFORMATION
Shop name
Address
Phone Number
E-mail
Sale date
This is to certify delivery of the complete destratificator with the User’s Manual. The warranty terms are
acknowledged and accepted.
Seller stamp here
Customer signature
MOUNTING CERTIFICATE
DRF(I)-OV ______________ destratificator has been installed and connected to the power mains in
accordance with the provisions stated in the present User’s Manual.
Company Name
Address
Phone Number
Installation
Technician's Full Name
Installation Date:
Signature:
Installer stamp here
This is to certify that the work specific to the destratificator installation has been performed in
accordance with all the applicable provisions of local and national construction, electrical and technical
codes and standards. The destratificator operates normally as intended by the manufacturer.
Signature:
www.ventilation-system.com
13
WARRANTY CARD
Product Type
Model
Destratificator
DRF(I)-OV___________
Serial Number
Manufacturing Date
Sale date
Warranty Period
Selling Company
Seller Stamp here
______________________________________________________________________________________________________
______________________________________________________________________________________________________
______________________________________________________________________________________________________
______________________________________________________________________________________________________
______________________________________________________________________________________________________
______________________________________________________________________________________________________
______________________________________________________________________________________________________
_________________________________________________________________________________________________
NOTES
____________________________________________________________________________________
____________________________________________________________________________________
____________________________________________________________________________________
____________________________________________________________________________________
____________________________________________________________________________________
____________________________________________________________________________________
____________________________________________________________________________________
____________________________________________________________________________________
____________________________________________________________________________________
____________________________________________________________________________________
____________________________________________________________________________________
____________________________________________________________________________________
____________________________________________________________________________________
____________________________________________________________________________________
____________________________________________________________________________________
____________________________________________________________________________________
____________________________________________________________________________________
____________________________________________________________________________________
____________________________________________________________________________________
____________________________________________________________________________________
____________________________________________________________________________________
____________________________________________________________________________________
____________________________________________________________________________________
2013
V96EN-03