1
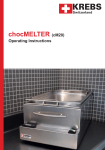
chocMELTER (cM6)
Operating Instructions
DESCRIPTION
The chocMELTER warming tank has been designed specifically to heat and maintain
chocolate at a temperature range of 20°C - 60°C / 68°F - 140°F.
The system works with direct and air based induction heating, applied from below as
well as each of the four sides. This innovative approach heats the chocolate much
faster and more efficiently than the industry standard 'below only' heating systems
- which take many hours longer to melt the chocolate. With the combination of a
quality control system and temperature sensor being located 'in the chocolate',
(rather than just the air void below), you can be sure of far more accurate readings.
The heating unit will click off after achieving the desired temperature. If the vat is left
within the chocMELTER with the lid on, retained heat is excellent. The efficient, low
energy design translates into significant running cost savings.
In addition to the energy saving, faster heating and accurate control, this SWISS
made product has been developed with a compact & lightweight footprint and comes
with ergonomic easy to carry handles & horizontal control panel. The unit is also
designed with maximum hygiene in mind - the electrical components are damp
washable with no indents and the body does not have the gaps or screw holes that
are present in most warming tanks.
The chocMELTER has been designed specifically for heating chocolate and cocoa
butter, however, dependent upon the required temperatures, it can potentially be
used for similar materials such as icing, glaze, butter and the like.
CHOCOLATE TEMPERING
Whilst most users of this product already possess specialist chocolate preparation
knowledge, below we have provided some basic comments relating to tempering.
For more specific information, please contact a training school such as the Barry
Callebaut Academy™ centre.
Pre-tempered chocolate
If you are working with pre-tempered chocolate, take care that the overall
temperature does not exceed much higher than 32°C / 90°F at any time. Otherwise
it risks destroying those preferred Beta V crystals and will need to be tempered again.
To minimise this risk we recommend melting the chocolate slowly with lower heat
settings.
Manual Tempering
If however, you want to melt a large volume in advance of manual tempering, then
you may want to set the target melt temperature up around 55°C / 131°F for dark
chocolate or 50°C / 122°F for milk and white chocolate. This will speed up the
melting process.
2
The more common approach when manually tempering chocolate is to use the
seeding method. Here, very small amounts of solid tempered chocolate, containing
the desired Beta V crystal structure, are slowly added in small buttons to the
untempered liquid chocolate pool at around 45°C / 113°F. In addition to promoting
the formation of type Beta V crystals, it also has the effect of accelerating the cool
down process.
Remember to stir occasionally & briefly during the tempering process - too much
stirring when using the seeding method can accelerate over-crystallisation!
Below are generally accepted approximate working temperatures by chocolate type:
Dark chocolate:
Milk chocolate:
White chocolate:
31 - 32°C / 88 - 90°F
29 - 30°C / 84 - 86°F
28 - 29°C / 82 - 84°F
The seeding process
According to experts such as the Barry Callebaut Academy™ center, the amount of
Beta V crystal within the seed chocolate should not exceed more than 0.4 to 0.6%
of the total pool. This can be achieved by adding a maximum of 10 - 15% of seed
buttons, as described below. These seed buttons contain small levels of Beta V
crystals, which multiply quite quickly and eventually will crystallise (solidify) the
complete liquid pool - at which time you would need to go through the tempering
process again.
1. Melt the chocolate until it is completely liquid in form. This should never be higher
than 60°C / 140°F. The ideal melting temperature is recommended as
45°C / 113°F.
2. Bring the chocolate to 45°C / 113°F and add about 10% of seed chocolate
compared to the total liquid pool. Stir continuously until the seed has melted.
3. Allow the temperature to fall to 35°C / 95°F. Once all the seed buttons have
completely dissolved, add another 5 - 10% of seed chocolate.
4. Once the remaining seed buttons have melted, bring the temperature down to
your working chocolate level and stir to ensure a uniform temperature distribution.
5. Important - confirm the tempering condition: If correctly tempered, the
chocolate fluidity can be tested on a palette knife. If it solidifies quickly, it is
tempered.
N.B. To slow down over-crystallisation, avoid excessive amounts of seed chocolate,
or too much stirring which will speed up the multiplication of Beta V crystals. To
reverse early signs of over-crystallisation, applying additional heat for a short period
may help retain a good tempered condition.
3
GETTING STARTED
NEVER USE the fixed internal bowl area to melt chocolate.
Chocolate should only be melted in the removable vat.
DO NOT FILL WITH WATER!.
Unlike cheap bain marie units, the chocMELTER uses induction heating via air &
direct contact, combined with digital control.
N.B. Before fully sliding the chocolate vat into the chocMELTER,
=> thread the temperature sensor through the hole in the back rim of the vat
so that the sensor is pointing downwards into the basin. It should stop just before
touching the bottom. This innovative and simple design provides a much more
precise reading than the industry standard approach of inaccurately measuring
the air void below the chocolate. When finished, simply wipe down the sensor
with a soapy cloth and fit into the handy storage clip.
•
Add the chocolate. If it has not been pre-melted, we recommend you break it up
into small pieces or use pellets in order to speed up the process and then cover
the chocolate with the lid. For guidance, some optional tempering processes are
detailed below.
•
A target temperature of up to 60°C / 140°F can be set, being the maximum
temperature recommended for melting chocolate before risking that it burns.
To set the desired temperature simply,
1. Press button P for 3 seconds.
2. Use the arrows to set the Target temperature.
3. Press button P to confirm.
The displayed value will then return to the actual temperature.
Once the target temperature is reached, the heating unit will power off with a click.
Due to our innovative heating design, if the lid is left in place the temperature loss is
minimal. Upon achieving the desired temperature, it is not uncommon for the heating
feature to be in off mode for the majority of the time.
4
Active in the temperature
setting menu
N/A
SET
N/A
ALM
Heating in Process
H/C
Cooling in Process
H/C
Quit – leave menu
OUT
Arrows to program the
Target temperature
P: Press for 3 seconds to
set the target temperature
•
Remember to stir the chocolate regularly, but briefly - this will aid the melting
process.
•
When you want to lower the temperature during tempering, to speed up this
“cooling down” phase, remove the inner chocolate vat from the chocMELTER and
put on a table. Apply air movement across the top via a fan if available.
TIPS & TRICKS
The ideal working environment? The best conditions for working with chocolate
are an air conditioned room at around 20°C / 68°F with a maximum humidity of 70%.
Do not allow water to mix with melted chocolate. Avoid storing chocolate in a
standard refrigerator as water condensation may form on the chocolate surface when
brought out at room temperature with the resulting white/grey effect (bloom). If
stored in a fridge, the maximum humidity recommended is 50%. Pay particular
attention to removing any excess moisture from the the lid of the vat. If dipping is
your thing, make sure fruit, biscuits and even the utensils being used are at room
temperature and thoroughly dry.
Need a thicker or thinner consistency? The viscosity (thickness / surface tension)
of your chocolate can be influenced by temperature or its cocoa butter content. If you
need a thinner layer, simply increase the temperature within the industry norms, or
mix with as much as 50% pre melted cocoa butter. When filling moulds or using
thicker layers, you can speed up the cooling process with a fan by applying air
movement across the top of the chocolate.
Can you use a microwave or saucepan as a melting aid? Yes, these will speed up
the process, however these methods come with risk of burning the chocolate due to
higher temperatures. If using a microwave, at the first sign of melting stir and heat for
no more than 15 second intervals. Continue to stir between intervals. The longer the
duration and lower the temperature used, the better the potential chocolate quality.
CLEANING
Important: Chocolate or other similar material should only be placed in the
removable vat and never in the chocMELTER interior. Never expose the
chocMELTER to liquids or immerse in water.
Always clean immediately after use. For external cleaning of the chocMELTER,
simply wipe down the surfaces and temperature sensor with a mild food grade
approved detergent.
The removable vat can be cleaned in the same way as other stainless steel
containers / pans - either in the sink or dishwasher. Avoid the use of steel wool or
similar abrasive materials. A small pipe brush can be used on any edges.
5
FOR YOUR SAFETY
The chocMELTER should only be operated safely when the safety & operating
instructions have been read and are strictly adhered to.
•
Warning: Do not touch the inside container of the chocMELTER as it can reach
temperatures above 60°C / 140°F. To avoid the risk of shock, never open the unit.
•
Warning: Ensure that children have no access to the chocMELTER or its cable or
packaging.
•
Warning: At no time should the electrical or the heating components be brought
into contact with liquids or flammable materials of any type. Never immerse the
system in water and avoid locating it close to water sources. Recommended
cleaning methods are detailed above.
•
Unplug the chocMELTER from its power source when not in use or before cleaning.
TECHNICAL SPECIFICATIONS
Nominal output
Melting Rate*
Temperature Range
Container Capacity
Efficient Heating
Temperature Sensor
Body and Vat Material
Unit Dimensions**
Boxed Dimensions
Dry Weight
Packed Weight
Country of Manufacture
50 W
6 kg / 13 lbs chocolate circa 3 hours
20°C - 60°C / 68°F - 140°F
5,5 l water or 6 kg/13 lbs chocolate
Air & Direct from all 5 sides
Inside the chocolate container for accuracy
High quality stainless steel
40 cm x 18 cm x 25 cm
42 cm x 24 cm x 30 cm
4.6 kg (without container/lid)
6.2 kg (boxed, incl. container/lid)
Switzerland
The above specifications are approximate.
*Varies with environment temperature, pre heating time and material type.
**Excluding Handles.
6
Guarantee
•
The chocMELTER is guaranteed for twelve months from sale date subject to the enclosed
terms and on condition that it is only used for processing products approved for the
food industry. The guarantee starts upon customer receipt. In the event of a fault, please
contact the reseller before returning the machine.
•
The chocMELTER is designed to work and rest intermittently and should not be used to
run continuously by removing or tricking the sensor.
•
Only original spare parts may be used in the event of repairs.
•
The chocMELTER must be serviced and cleaned as described in the operating
instructions.
•
The guarantee excludes any damage due to modifications, overloading or incorrect
handling.
REPAIRS & PRODUCT LIABILITY
The chocMELTER is produced with quality components. If you have questions we
recommend following the user video on our website: www.krebsswitzerland.com or
contacting your reseller for additional support. Please always include the article number
& product serial number in any correspondence.
General repairs are not covered by the guarantee and shall be performed by service
centers subject to the applicable price and delivery terms of the country in question.
No liability is accepted for damage caused directly or indirectly by the use of this product.
The user assumes full responsibility for the use of the product in accordance with the laws
of food hygiene and other legal regulations.
EN Declaration of Conformity CE
We declare that the product described above is in conformity with the relevant provisions of the
following directives and standards as set out in the following norms:
The Machinery Directive (98/37/EC)
The Construction Products (89/106/EEC)
The Low Voltage Directive 73/23/EEC
The EMC Directive 89/336/EEC as amended by 91/263/EEC, 92/31/EEC, 93/97/EEC.
All relevant components coming into contact with the liquid pool are certified as consisting of food
grade materials.
Dr. S. Kendrick
A. Hitschrich
7