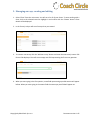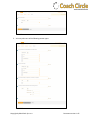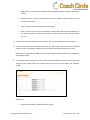
1
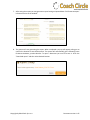
Coach Circle step by step manual For coaches use Rebel Duck Sp. z o.o. COPYRIGHT 2013-2014 by Rebel Duck Sp. z o.o. All rights reserved. This publication is protected by copyright and all rights are reserved by Rebel Duck. It may not, in whole or part, be copied, photocopied, reproduced, translated, or reduced to any electronic medium or machine-readable form without prior consent, in writing, from Rebel Duck. Send us your suggestions on [email protected] Copyright by Rebel Duck Sp. z o.o. Document version: 1.05 Table of Contents 1. Introduction .......................................................................................................................................... 3 2. Coach’s dashboard and streaming ........................................................................................................ 4 3. Creating new client ............................................................................................................................... 6 4. Creating and editing client’s contract ................................................................................................... 8 5. Planning sessions calendar ................................................................................................................. 10 6. Editing session details and generating report .................................................................................... 13 7. Session details and client’s involvement tracking .............................................................................. 16 8. Editing client’s session details ............................................................................................................. 18 9. Managing surveys, creating and editing ............................................................................................. 19 10. Settlements ..................................................................................................................................... 23 11. Change password ............................................................................................................................ 25 Copyright by Rebel Duck Sp. z o.o. Document version: 1.05 1. Introduction Dear CoachCircle users, it is our pleasure to present you the training materials for CoachCircle online system. We hope that you will find the information in your daily work and that it will enable you to use our tool in more efficient way. Copyright by Rebel Duck Sp. z o.o. Document version: 1.05 2. Coach’s dashboard and streaming 1. After logging into the system Coach dashboard is displayed. This view shows important informatios grouped in three sections: Upcoming events – (right hand panel) list of upcoming sessions within next 7 days. Recent events – (central panel) list of recent clients activities like setting session result, answering survey or filling homework. Communication stream – (left panel) on-going discussion with coaches. 2. Click on client name in recent or upcoming events section to start working with the selected coache. One click will redirect you to appropriate client’s details. 3. To start a new conversation in the communication stream start typing the client's name prefixed with a “@” symbol in the edit window (1). System will suggest and display a list of coaches with Copyright by Rebel Duck Sp. z o.o. Document version: 1.05 matching the first or last name (2). To choose a customer click on the selected name or select the given row using up and down arrow keys and press “Enter”. Continue with editing text and click ‘Send’ when finished. Your message will be instantly displayed in the Coache’s application. 4. To response to one of your client’s posts just click ‘Comment’ next to it, type the text and click ‘Send’ when finished. 5. User may delete topics/conversations or comments of which he is an author. To remove click on the small bin icon on the right hand of the discussion . Please remember that it is impossible to retrieve deleted posts/topics. Copyright by Rebel Duck Sp. z o.o. Document version: 1.05 3. Creating new client 1. Select the ‘Client’ from the main menu. You will see a list of all your clients. 2. Click the ‘New client’ button. Client’s details edit form will be displayed. 3. Click the ‘Edit’ button to enable edit mode and start entering the client’s data in the available fields. Copyright by Rebel Duck Sp. z o.o. Document version: 1.05 4. Fill in all required fields. Set if client is the ‘Independent’ or the ‘Sponsored’ 5. Checkbox "Can login" controls client access to the application. If you decide not to check it you do not have to fill in the "Login/e-mail" and "Confirm e-mail". When you decide to give Cache an access to the system then you must correctly complete the fields of his email (activation e-mail will be sent to this mailbox). If you decide to deprive the client of right to use the systems, then simply uncheck the box "Can login". 6. You can always modify the data entered by clicking the "Edit" button and repeat step 4. You can also modify client’s login information. Each time you change Cache’s login, he will need to activate his account based on new email address. 7. Select the ‘Client’ from the main menu. You will see the new client in the list. 8. To start working with a chosen client click to highlight the record and confirm by pressing the ‘Choose’ button. Client details will be displayed. Copyright by Rebel Duck Sp. z o.o. Document version: 1.05 4. Creating and editing client’s contract 1. Select the ‘Client’ from the main menu. You will see a list of all your clients. To start working with client click to highlight it and confirm with the ‘Choose’ button. Client details will be displayed. 2. Select the ‘Contract’ tab. Client’s contract edit form will be displayed. 3. Click the ‘Edit’ button to enable edit mode and start creating client’s contract. 4. Fill in all required fields and confirm by clicking the ‘Save’ button. 5. After saving additional fields will be displayed – Client and Sponsor’s (if client is set as sponsored) objectives. You may fill in these fields by clicking the ‘Edit’ button and the ‘Save’ once completed. Copyright by Rebel Duck Sp. z o.o. Document version: 1.05 6. You may modify entered data by clicking the ‘Edit’ button at the bottom and repeating manipulation from step 4 and 5 of this scenario. Please note that in case of modifying Client and/or Sponsor’s objectives, previous versions may be displayed (tracked) by selecting modification date from the drop-down field. Copyright by Rebel Duck Sp. z o.o. Document version: 1.05 5. Planning sessions calendar 1. Select the ‘Client’ from the main menu. You will see list of all your clients. To start working with a chosen client click to highlight the record and confirm with the ‘Choose’ button. Client details will be displayed. 2. Select the ‘Calendar’ tab. A calendar form will be displayed. You may switch the month-week-day view and navigate back and forward by using the buttons in right upper corner of the window. Entries in grey are already occupied by your different clients. 3. To add a new session click on the chosen day in the month view or on the chosen hour in the week view. The schedule session panel appears. Set session start time and session duration. Confirm by clicking the ‘Save’ button. A new session will be added and color-coded in orange. Copyright by Rebel Duck Sp. z o.o. Document version: 1.05 Please note that if it was the client’s first session then the ‘Session’ and the ‘Survey’ tabs appear. 4. To modify day of the session just drag the entry to another day and drop. 5. To modify hour switch to weekly view and drag the session entry to another time or day. 6. To modify session duration switch to weekly view and drag the upper or lower border of the chosen entry. 7. All sessions defined in the ‘Calendar’ tab are counted in the ‘Contract’ tab as: Past Sessions – session/s planed before current day (red); Active session – nearest planed session (green); Copyright by Rebel Duck Sp. z o.o. Document version: 1.05 Future sessions – next planned session/s (orange). 8. All sessions defined in the ‘Calendar’ tab are listed in the ‘Session’ tab as well and have the same color-codes for Past, Active and Future sessions. You may display details of any session by selecting it from the ‘Session’ drop-down field. Copyright by Rebel Duck Sp. z o.o. Document version: 1.05 6. Editing session details and generating report 1. Select ‘Client’ from the main menu. You will see a list of all your clients. To start working with a client click to highlight the chosen record and confirm with the ‘Choose’ button. Client details will be displayed. 2. You may start working with sessions in two ways: Go to the ‘Calendar’ tab, on the calendar find the session that you are interested in and click it. You will be presented with the chosen session details in the ‘Session’ tab. Go to the ‘Session’ tab, click on the Session drop-down field and select the one you are interested in. The screen will be reloaded with the selected session details. Please note: Coach may modify every session regardless of its status – past, active or future. 3. To start editing session details click the ‘Edit’ button. 4. Fill in enabled fields for current session: Objective; Level of objective achievement and progress bar; Conclusions; Copyright by Rebel Duck Sp. z o.o. Document version: 1.05 Effects; Tools and techniques; Observed changes; Notes. 5. To enable the homework section select the ‘Homework’ checkbox and fill in your comments in the fields that will appear. 6. You may save all modification by clicking the ‘Save’ button. You will be informed about successful saving on a notification bar at the bottom of the window. Copyright by Rebel Duck Sp. z o.o. Document version: 1.05 7. After saving the session you may generate a report basing on inputted data. Click ‘Generate report’ in bottom section of the window. 8. The system will start generating the report. When completed a pop up will appear asking you to confirm the location to save the document. The system will automatically give it following name FirstName.LastName_session-date.doc. To open a document you must first save it. Press the "Download report" and then select desired location. Copyright by Rebel Duck Sp. z o.o. Document version: 1.05 7. Session details and client’s involvement tracking 1. Select ‘Client’ from the main menu. You will see a list of all your clients. To start working with a client click the selected record to highlight it and confirm with the ‘Choose’ button. Client details will be displayed. Open the session you want to analyse in the 'Session' tab. You may see additional information: Date and time stamp when client filled in and / or modified his session details; Whether the client edited his / her homework. 2. To see coache's session detail click the ‘Client’s session’ button. Right-hand panel will be replaced with the session details filled by the coache. Fields are aligned so you may compare your insights with coache’s comments. Copyright by Rebel Duck Sp. z o.o. Document version: 1.05 3. You may start editing your session details by clicking the ‘Edit’ button at the bottom of the window when having those of your client on the right side. 4. To close coache’s details click the ‘Client’s session’ button again. Copyright by Rebel Duck Sp. z o.o. Document version: 1.05 8. Editing client’s session details 1. Select ‘Client’ from the main menu. You will see a list of all your clients. To start working with a client click the selected record to highlight it and confirm with the ‘Choose’ button. Client details will be displayed. In the 'Session' tab open the session you want to analyse and edit. 2. To start editing client’s session activate it by clicking the ‘Client’s session’. The system displays the details on the right hand panel. 3. Press the ‘Edit’ button and then select the text field you want to edit. To accurately show which text is to be modified point the cursor to the appropriate place and then press the ‘Pencil’ icon at the bottom of the screen. This will set a date stamp and user modifying the client entry. It is allowed to edit or delete entire client’s entry. 4. To save your changes, confirm by clicking ‘Save’". Since that time, also your client will see the revised text. Copyright by Rebel Duck Sp. z o.o. Document version: 1.05 9. Managing surveys, creating and editing 1. Select ‘Client’ from the main menu. You will see a list of all your clients. To start working with a client click to the selected record to highlight it and confirm with the ‘Choose’ button. Client details will be displayed. 2. In the ‘Survey’ tab you will see all surveys that you created. 3. To create a new survey click the ‘Add new survey’ button and enter the new survey’s name. Edit form will be displayed. You will see an empty text field representing the first survey question. 4. When you start typing in the first question, a new field representing a possible answer will appear bellow. When you start typing in the answer field the next empty text field will appear etc. Copyright by Rebel Duck Sp. z o.o. Document version: 1.05 5. You may select one of the following answer types: Copyright by Rebel Duck Sp. z o.o. Document version: 1.05 Single choice – enter as many possible answer as needed, only one may be chosen by the coache; Multiple choice – enter as many possible answer as needed, multiple answers may be chosen by the coache; Text – coache is asked to enter a text as an answer; Scale – enter numeric minimum and maximum values and a value of the step. Example: if you enter minimum: 0, maximum 10, step size: 5 then only three values will be possible: 0, 5, 10. 6. Confirm your survey by clicking the ‘Save’ button. The new survey appears on the survey list. 7. To see survey details click ‘Preview’, to edit click the ‘Edit’ button. You may save the modified survey as a new one (without modifying the initial version) by clicking ‘Save survey as new’. Please note: If you decide to modify a survey, it will change for all the coaches it was assigned to. Save as new instead. 8. To assign one of the existing surveys to an active coache (for which the session is active) click the ‘Assign to client’ button next to the chosen survey. You will see a check mark in the ‘Assigned’ column. Please note: Only one survey form is available for each session. Copyright by Rebel Duck Sp. z o.o. Document version: 1.05 Clients may modify the answers many times before the next session starts. Only the last answers are saved. Client may have only one survey assigned. When switching to another one you won’t see the response history of the previous one. 9. To see client’s responses click the ‘Display results’ button. You will see a history of his answers (one survey answer per session). Copyright by Rebel Duck Sp. z o.o. Document version: 1.05 10. Settlements 1. Select ‘Settlements’ from the main menu. You will see a list of all your clients’ sessions organized in an interactive tree graph. 2. All sessions are grouped in the following hierarchies: Independent or sponsored (for sponsor clients); Client name; Contract creation date; Single sessions. 3. To show or hide (filter) elements on the graph just click on the tree selected nodes – this will cause folding / unfolding of the selected groups. 4. At the top right corner you will find a date filter – only sessions from checked periods will be displayed. The graph will change dynamically when marking the checkboxes adjusting the list of sessions. 5. To create a settlement just mark the required sessions. The system will calculate the sum of selected sessions and their total cost based on the values stored in the contract tab. Copyright by Rebel Duck Sp. z o.o. Document version: 1.05 6. Click the ‘New settlement’ button. You may modify the calculated total cost and set settlement as ‘bill’ or ‘clearing’ and add name/number. Click ‘Save’ to confirm or ‘Cancel’ to stop edition. 7. Settlements saved as ‘bill’ are color coded in yellow (sessions and settlements) and ‘cleared’ are highlighted in green. 8. You may edit the list of sessions assigned to a settlement by clicking on the selected settlement node – all active connections are marked in orange. Check or uncheck sessions to be assigned or unassigned and confirm by ‘Save’ . 9. To change settlement type just click on it and select the chosen type from the combo-box and save. 10. All the connections of a given settlement can be view quickly by hovering the mouse cursor over the chosen settlement node. Copyright by Rebel Duck Sp. z o.o. Document version: 1.05 11. Change password 1. Select ‘Settings’ from the main menu. You will see a form to change the password. 2. Fill in the current password and twice the new one. Remember about required form of the new password: it should be at least 8 characters long and no more then 16, contain at least one digit, one special character (e.g. ! or @ or # or $ etc.) and one capital letter. Confirm by clicking “Save” button. 3. System will validate new password and inform you about the result. 4. It is also possible to recover the password. For this purpose, before logging, click the link "I forgot my password" on the main login page. You will be redirected to the recovery form. 5. Enter the email address used as a login to the system and confirm by pressing "Send" button. Activation message will be re-sent to this email box (as in the case of creating a new account). Copyright by Rebel Duck Sp. z o.o. Document version: 1.05