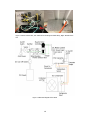
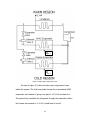
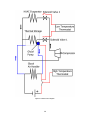
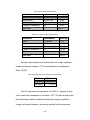
1
Experimental Demonstration of Photovoltaic Powered Solar Cooling With
Ice Storage
by
Tobin Peyton-Levine
A Thesis Presented in Partial Fulfillment
of the Requirements for the Degree
Master of Science
Approved June 2012 by the
Graduate Supervisory Committee:
Dr. Patrick Phelan, Chair
Dr. Steven Trimble
Dr. Robert Wang
ARIZONA STATE UNIVERSITY
August 2012
ABSTRACT
The ability to shift the photovoltaic (PV) power curve and make the
energy accessible during peak hours can be accomplished through pairing
solar PV with energy storage technologies. A prototype hybrid air
conditioning system (HACS), built under supervision of project head
Patrick Phelan, consists of PV modules running a DC compressor that
operates a conventional HVAC system paired with a second evaporator
submerged within a thermal storage tank. The thermal storage is a
0.284m3 or 75 gallon freezer filled with Cryogel balls, submerged in a
weak glycol solution. It is paired with its own separate air handler,
circulating the glycol solution. The refrigerant flow is controlled by
solenoid valves that are electrically connected to a high and low
temperature thermostat. During daylight hours, the PV modules run the
DC compressor. The refrigerant flow is directed to the conventional HVAC
air handler when cooling is needed. Once the desired room temperature is
met, refrigerant flow is diverted to the thermal storage, storing excess PV
power. During peak energy demand hours, the system uses only small
amounts of grid power to pump the glycol solution through the air handler
(note the compressor is off), allowing for money and energy savings. The
conventional HVAC unit can be scaled down, since during times of large
cooling demands the glycol air handler can be operated in parallel with
the conventional HVAC unit.
i
Four major test scenarios were drawn up in order to fully
comprehend the performance characteristics of the HACS. Upon initial
running of the system, ice was produced and the thermal storage was
charged. A simple test run consisting of discharging the thermal storage,
initially ~¼ frozen, was performed. The glycol air handler ran for 6 hours
and the initial cooling power was 4.5 kW. This initial test was significant,
since greater than 3.5 kW of cooling power was produced for 3 hours,
thus demonstrating the concept of energy storage and recovery.
ii
DEDICATION
This thesis is dedicated to my parents, Bettina Peyton and Matthew
Levine. They are the ones who have supported my decisions throughout
my entire life and academic career. Thank you, Mom and Dad.
iii
ACKNOWLEDGMENTS
This research was carried out with support from many members of
the University community. Grateful acknowledgment is directed toward my
primary advisor, Dr. Patrick Phelan, for noticing my talents and inviting me
to be a part of his research team. Generous thanks to Jonathan Sherbeck
for the amazing amount of help, insight, and knowledge that he provided
throughout this whole process. Also to Dr. Steven Trimble and Dr. Robert
Wang for being part of my review committee and providing thoughtful
instruction. Finally, much thanks to mechanical and aerospace engineering
lab manager, Bruce Steele, for his aid in troubleshooting data collection.
iv
TABLE OF CONTENTS
Page
LIST OF TABLES ................................................................................ vii
LIST OF FIGURES ................................................................................ ix
NOMENCLATURE.................................................................................. xi
PREFACE ............................................................................................ xii
CHAPTER
1
2
3
INTRODUCTION ......................................................................... 1
1.1
Motivation ........................................................................ 3
1.2
Objectives ........................................................................ 4
1.3
Description ....................................................................... 6
BACKGROUND .......................................................................... 12
2.1
Vapor-Compression Refrigeration Cycle ............................ 12
2.2
Operational Modes .......................................................... 19
2.3
Ice Bear ......................................................................... 23
2.4
Comparison Between the HACS and the Ice Bear .............. 25
EXPERIMENTAL METHODOLOGY ................................................ 29
3.1
Design of Experiments .................................................... 29
3.2
Testing ........................................................................... 30
3.3
System Setup ................................................................. 33
3.4
Sought Observations and Calculations .............................. 38
3.5
Explanation of Calculations .............................................. 38
3.6
Experimental Uncertainty................................................. 44
v
CHAPTER
4
5
Page
RESULTS AND DISCUSSION ...................................................... 52
4.1
Technical Difficulties........................................................ 52
4.2
Experimental Results and Discussion ................................ 52
4.3
Charging The Thermal Storage ........................................ 68
4.4
Validity of Data ............................................................... 70
DC vs. AC Powered System........................................................ 72
5.1
Cost Comparison ............................................................. 72
5.2
Performance Comparisons ............................................... 76
5.3
Coefficient of Performance Comparisons ........................... 78
5.4
Power Savings ................................................................ 82
6
CONCLUSIONS AND RECOMMENDATIONS.................................. 85
7
FUTURE WORK ......................................................................... 87
REFERENCES ...................................................................................... 88
APPENDIX .......................................................................................... 92
A: TEST PROCEDURES ............................................................. 92
vi
LIST OF TABLES
Table
Page
1.1 Objectives....................................................................................... 5
2.1 Operational modes ........................................................................ 19
2.2 HACS vs. Ice Bear cost analysis ...................................................... 26
2.3 Markup costs ................................................................................ 27
2.4 HACS vs. Ice Bear capacities .......................................................... 28
3.1 List of variables ............................................................................. 29
3.2 HACS parts and corresponding test equipment ................................ 33
3.3 Solar module part numbers ............................................................ 34
3.4 Sensor manufacturer information ................................................... 34
3.5 Total test equipment ..................................................................... 34
3.6 R1 and R2 resistor compilation ........................................................ 48
3.7 Uncertainties within calculations ..................................................... 51
4.1 Recorded ambient temperatures .................................................... 54
4.2 Positional Acronyms ...................................................................... 59
4.3 Recorded voltages ......................................................................... 66
4.4 Calculated power output of the solar modules ................................. 66
4.5 Solar elevation angle ..................................................................... 67
4.6 Pure water thermal storage............................................................ 69
4.7 5% glycol solution thermal storage................................................. 69
4.8 Energy required to charge the thermal storage ............................... 69
vii
Table
Page
4.9 Charge times ................................................................................ 70
5.1 DC system prices........................................................................... 73
5.2 AC system one prices .................................................................... 73
5.3 AC system with variable speed compressor ..................................... 74
5.4 Excess PV power options for DC powered system ............................ 75
5.5 Pros and cons of AC and DC powered systems ................................ 78
5.6 Researched assumptions for DC powered system ............................ 79
5.7 Researched assumptions for AC powered system ............................ 79
5.8 Calculated coefficients of performance ............................................ 81
5.9 Breakdown of COP for the DC powered HACS ................................. 81
5.10 Breakdown of COP for the AC powered HACS ................................ 82
5.11 APS super peak energy plan ......................................................... 83
5.12 Projected savings ........................................................................ 84
viii
LIST OF FIGURES
Figure
Page
1.1 Project timeline ............................................................................... 2
1.2 HACS prototype............................................................................... 6
1.3 Prototype schematic ........................................................................ 7
1.4 Power selector box ........................................................................ 10
1.5 Electrical diagram of HACS ............................................................. 10
2.1 A vapor – compression refrigeration system .................................... 14
2.2 Vapor compression cycle, temperature vs. entropy diagram ............. 14
2.3 HACS vapor compression cycle ....................................................... 15
2.4 HACS control diagram .................................................................... 20
2.5 Ice Bear........................................................................................ 24
2.6 Ice Bear condensing unit ............................................................... 24
3.1 Test equipment ............................................................................. 35
3.2 LabVIEW front panel 1................................................................... 36
3.3 LabVIEW front panel 2................................................................... 37
3.4 Thermocouple calibration curve ...................................................... 46
3.5 SCB-100 ....................................................................................... 49
4.1 Room temperature over time ......................................................... 54
4.2 First set of cooling power data ....................................................... 55
4.3 Second set of cooling power data ................................................... 56
4.4 Temperature of thermal storage vs. cooling power .......................... 58
ix
Figure
Page
4.5 Thermal storage: center ................................................................ 60
4.6 Thermal storage: front, right, top ................................................... 60
4.7 Thermal storage: front, right, bottom ............................................. 61
4.8 Thermal storage: front, left, top ..................................................... 61
4.9 Thermal storage: front, left, bottom ............................................... 62
4.10 Thermal storage: back, left, top ................................................... 62
4.11 Thermal storage: back, left, bottom .............................................. 63
4.12 Thermal storage: back, right, top ................................................. 63
4.13 Thermal storage: back, right bottom............................................. 64
4.14 Temperature across glycol air handler .......................................... 65
x
NOMENCLATURE
A
Ampere
Bx
Bias uncertainty
C
Coulomb
Cp
Specific heat at constant pressure [J kg-1 K-1]
COP
Coefficient of performance cooling
d
Diameter of a pipe [m]
DOE
Design of experiments
GPM
Gallons per minute
Q
Heating or Cooling load [kWth]
HACS Hybrid air conditioning system
HVAC Heating ventilation and air conditioning
Mass flow rate [kg s-1]
n
Sample size
Px
Precision uncertainty
QC
Heat removed from cold reservoir [W]
Qin
Heat transfer rate [W]
RPM
Revolutions per minute
t
t-statistic
ΔT
Finite increment in temperature [K, oC]
Ux
Total uncertainty
Volumetric flow rate [m3 s-1]
ρ
Density [kg m-3]
Ω
Ohm [m2 kg s-1 C-1]
xi
PREFACE
The research presented in this paper is a culmination of the work of
multiple students and professionals. The construction of the prototype
system had been nearly completed by Jon Sherbeck and Nate Sanford
before I joined the research team in August 2011. At that time, the
prototype system consisted of the direct current “DC” compressor installed
and in line with the two evaporators (conventional HVAC air handler and
evaporator within the freezer for thermal storage). Installations to
complete the prototype system included filling the thermal storage with
Cryogel balls and a weak glycol solution, connecting the glycol pump and
air handler, installing the PV modules, and creating the electrical device
that differentiated between which source (Grid or PV) powered the
system [1]. My role within the project consisted of finishing construction
of the prototype system, installing all data acquisition devices, creating a
program to log the data collected, creating an experimental design in
order to test the abilities of the prototype system, and formulating a
general coefficient of performance (COP) equation that can be used to
compare the COP of the prototype to conventional HVAC units.
xii
Chapter 1: INTRODUCTION
Extensive research on heating ventilating and air conditioning
(HVAC) systems has been performed, aiming towards decreasing the
energy needs and requirements of these systems. Theoretical models and
numerical ratings, such as the coefficient of performance (COP) and
cooling power have been developed in order to rate the efficiency of HVAC
systems. The COP is the measure of the efficiency with which a heat
pump operates. It directly correlates to the ability of the heat pump to
either add heat to the hot reservoir (for heating) or remove heat from the
interior (for cooling) [2]. The cooling power is a measure of the cooling
load that the HVAC system can produce [3].
The Department of Defense sent out a proposal asking researchers
to find ways to improve energy efficiency in buildings [4]. Dr. Patrick
Phelan and John Sherbeck proposed a novel system, titled the Hybrid Air
Conditioning System or HACS, in which a HVAC unit is powered by
photovoltaic (PV) modules paired with ice thermal storage. This system is
unique because it combines a direct current (DC) compressor with the PV
modules in order to avoid electrical losses through an inverter. Along with
the innovative idea of having a DC compressor, a second evaporator
placed inside the ice thermal storage allows for the excess PV power to be
stored and discharged for cooling during later hours. A complete
prototype system was constructed along with an economic model
1
performed by a former student Sadiq Jubran [5]. Figure(1.1) shows the
general timeline of the project until May 2012.
Figure 1.1 Project timeline
Looking at the timeline outlined in Fig(1.1), it is clear that the
project has been in progress for almost two years. It is important to note
the incident of compressor failure in May 2012. Due to the compressor
failure, the abilities of the original HACS prototype could not be fully
observed. Only one test, consisting of discharging the thermal storage,
2
could be performed. It should be noted that from this point forward, the
discussion outlines the work performed by myself which includes
comparisons between competing models, design of experiments for the
original prototype system, an error analysis, data analysis and description,
followed by the research and concurrent move towards building an AC
powered system. Ultimately, despite the minimal amount of run time and
data collected, the prototype system fully demonstrated that energy can
be stored and accessed during later hours to provide cooling.
1:1 MOTIVATION
This prototype hybrid air conditioning system (HACS) was originally
built for use in forward operating bases (FOB’s) in order to help decrease
their energy requirements. Reducing a FOB’s energy needs leads to a
decrease in the size of the resupply transports, and most importantly,
fewer lives need be put at risk. For this reason, the prototype system was
designed to be easily transported and installed.
Recently it has been noted that the HACS can be used for
residential and commercial purposes also. In the residential case, the
system’s design allows owners to better cope with peak energy rates,
occurring typically during the times from 5pm to 8pm. Due to the ice
thermal storage, PV energy collected during times of peak solar radiation
can be stored through thermal storage “ice”, and thus can be accessed
during peak energy rate hours. In the commercial sector, the system can
3
easily be scaled up. The difference is that PV modules will run the
conventional HVAC system fully during work hours, and the ice thermal
storage will be charged overnight, when energy rates are inexpensive. In
both the residential and commercial cases, when the ice thermal storage
is fully charged and there is no demand for cooling during daylight hours,
excess PV power can be put back into the grid and sold to the energy
provider.
Energy providers can also benefit from this system. The system
was designed to use minimal grid energy during hours of peak energy
demand, thus the peak power curve for power plants can be smoothed.
Peak power generators are inefficient and not as cost-effective as base
load systems. Creating a smooth, consistent energy profile enables power
plants to become more efficient at providing energy. Thus by decreasing
the need for peak power generators to be turned on, power plants can
increase both their efficiencies and profit margins.
1:2 OBJECTIVES
Construction on the prototype HACS system started in 2011 as
shown in Figure 1.1, at the Arizona State University Tempe campus, and
was completed in early 2012. Prior to my involvement, Jonathan Sherbeck
and Nate Sanford assembled the major parts for the prototype system
during the summer of 2011. Taking Nate’s place in the fall of 2011, I
4
assisted Jonathan in completing assembly of the system and installing the
data acquisition instrumentation.
An economic model was constructed by Sadiq Jubran, which
demonstrated the system’s electrical and economic benefits in specific
situations [5]. In order to show that this hybrid air conditioning system is
not just a theoretical solution, a full prototype needed to be built. After
completion of the construction of the prototype system, the main
objectives of this project were outlined and are listed in table 1.1.
Table 1.1 Objectives
Install data collection devices on the system
Design of experiments
Error analysis
Coefficient of performance analysis
Thermodynamic modeling
System optimization
Numerous data acquisition devices needed to be installed in order
to perform a proper analysis. Temperature, mass-flow, pressure and
electrical measurements devices were installed. Design of experiments is a
major subject for understanding how the data can best be collected from
the system. Test scenarios were outlined and organized to make each test
run provide the most valuable data. An error analysis on the
instrumentation was required in order to make sure the data collected
5
were valid. From the experiments and data collected described below, a
hypothetical analysis of the system’s coefficient of performance (COP),
cooling loads, and electrical power consumptions was performed. From
further data collection, a full-study thermodynamic model could be
constructed along with system optimization. Lastly, it is important to note
that even though the system could not be subjected to rigorous testing,
the hypothetical experimental analysis and outlined calculations
nonetheless provide a model of how to compare such prototype systems
to conventional HVAC units.
1:3 DESCRIPTION
The prototype hybrid air conditioning system (HACS), as shown in
Figures 1.2-1.3, is a photovoltaic (PV) powered heating, ventilation and air
conditioning HVAC unit combined with glycol thermal storage (ice).
Figure1.2 Top left: HACS prototype. Top right: Solar modules. Bottom left: Thermal storage.
Bottom right: DC compressor and condenser
6
Figure 1.3 Prototype schematic
The prototype system consists of PV modules, a DC compressor,
glycol thermal storage (0.284m3 (75-gal) freezer filled with Cryogel balls,
9*10-4m3 or 1 quart oil containers, 3.54*10-4m3 or 12oz water bottles,
immersed in 0.15m3 of 40-gal of a weak glycol solution), two air handlers
(a conventional 1 ton HVAC air handler and a glycol air handler) and a
power selector box [1]. The glycol air handler was a custom design of
combining a truck evaporator inserted into a custom hand-made air
handler that allows for the air to pass three times over the evaporative
coils upon exiting the air handler. The built system combines PV modules,
paired with a direct current “DC” compressor cycling refrigerant (R134a)
7
through to separate evaporators. It is important to note that the use of a
DC compressor allows for minimal energy loss from the energy harnessed
from the PV modules. The two refrigerant loops connected to the
compressor are as follows: the first loop is cycled through the
conventional HVAC unit, and the second loop is cycled through the ice
thermal storage, “the freezer.” The flow of R134a is controlled by two
separate solenoid valves, one valve at the inlet to the ice thermal storage,
and the second one at the inlet to the conventional HVAC unit. The valve
at the inlet to the thermal storage is programmed to be normally open
while the second valve at the conventional HVAC air handler inlet is
programmed to be normally closed. The solenoid valve states are
controlled by two thermostats: one high-temperature thermostat and one
low-temperature thermostat. The low-temperature thermostat controls the
conventional HVAC side while the high-temperature thermostat controls
the glycol thermal storage. When the room temperature is not within the
programmed range of the low-temperature thermostat, the conventional
HVAC loop is activated (solenoid valve 1 closes and solenoid valve 2
opens) and refrigerant is cycled through the conventional HVAC air
handler. When the desired room temperature has been achieved, the
solenoid valves return to their normal states, and refrigerant is cycled
through the evaporator storing excess PV power within the freezer. During
the peak energy rate hours (12-8pm), the PV modules run the entire
8
system until there is insufficient solar radiation. When there is not enough
solar radiation to power the system, the DC compressor, and conventional
HVAC unit are shut down. The high-temperature thermostat then controls
the glycol air handler, cycling the glycol through the glycol air handler
which in turn provides cooling power during the peak rate hours. The only
systems that require electrical power during the peak rate hours are the
glycol air handler and the glycol pump. The glycol air handler requires 200
W and the glycol pump requires 35W for a total of only 235W. In a final
scenario, when temperature demands provide too great a load for one of
the two air handlers, the HVAC air handler loop can be run with the glycol
thermal storage air handler discharging the thermal storage at the same
time, increasing the overall cooling power of the system.
As stated earlier, power is supplied either from the grid or PV
modules. A power selector box was constructed as a device that
differentiates which power source runs the HACS. Jonathan Sherbeck
created an electrical box that is based on his own “two-diode theory.” The
two-diode theory consists of a simple setup of two diodes, one connected
to the grid power, the other to the PV modules. The diodes differentiate
between which power source runs the HACS. Thus, whichever power
source is supplying the higher voltage runs the system. The inside of the
box is shown in Figure 1.4, along with the full electrical diagram of the
prototype system in Figure 1.5.
9
Figure 1.4 Power selector box, Left: Inside of box showing two diode theory, Right: Outside of the
box
Figure 1.5 Electrical diagram of the HACS
10
The electrical diagram shown in Figure 1.5 illustrates that the grid
power is first sent through a variac set at a specified voltage (120V). The
alternating current (AC) is then sent through a rectifier and converted to
DC. Then the power is directed into the power selector box. As shown in
Figure 1.4, the grid power travels through its specified Zener diode, then
to the plug that connects the power box to the DC motor controller.
On the PV side, the PV modules power is fed through a DC cut-off
switch, which is then connected to the power selector box. Within the box
the PV power is fed through its specified Zener diode and then to the plug
outgoing to the DC motor controller. Note that the two shunt resistors
within the box which take current measurements on the system have a
claimed accuracy of ±0.25%.
Due to the PV modules supplying DC current to a DC compressor,
power losses through an inverter do not occur. The only electrical power
losses seen within the HACS system are when the grid AC power goes
through the rectifier and is converted to DC, and that due to resistive
power losses throughout the system. This system was designed to be
highly energy efficient.
11
Chapter 2: BACKGROUND
2:1 VAPOR-COMPRESSION REFRIGERATION CYCLE
The proposed system includes a conventional air conditioning unit.
This unit is operated using either the grid or the solar PV power,
concurrently cycling refrigerant to cool either the indoor space or the
thermal storage. As outlined earlier, the flow of the refrigerant is
determined by the thermostat controls, and is based on the specific room
temperature conditions.
This air conditioner uses a vapor-compression cycle to cool the
space that is acting as the cold sink. In this case, the cold sink is the
space that requires cooling and provides a cooling load to the air
conditioner. It is necessary that it be colder than a separate space, the
hot sink, for the vapor compression cycle to cool it. In this case, the hot
sink is the outdoor, ambient air temperature.
The air conditioner works as a cycle, circulating a working fluid
through its components in order to absorb and release heat as desired.
This system is using R134a as the working fluid since that is the
appropriate refrigerant to use for the compressor that was selected. The
compressor uses DC power so that it can accept energy directly from the
PV modules.
For this system, the compressor is located outdoors in the hot sink
along with a condenser. The R134a is circulated through the compressor
12
and is compressed to a superheated vapor. The refrigerant is then
condensed using a fan that blows ambient air across coils filled with the
flowing refrigerant. This allows the refrigerant to release energy to the hot
sink, the ambient air.
The refrigerant flows to an expansion valve inside the enclosed
space which requires cooling, inside the building in this case. The
temperature of the refrigerant drops as it goes through the expansion
valve. The cooled refrigerant then flows through an evaporator, which
consists of thin coil piping and is placed within the cold sink. This allows
the refrigerant to absorb energy from the cold sink, which leaves the
surrounding space colder. For air conditioning purposes, an air handler is
used. The air handler blows air across the coils of the evaporator,
dispersing the chilled air around the enclosed space and providing a
continual supply of room-temperature air to be cooled by the evaporator.
The evaporated vapor is cycled back outdoors to the compressor to
release the stored heat from the enclosed space to the hot sink and
continue the process [6]. Figures 2.1-2.2 portray the described vapor
compression cycle.
13
Figure 2.1 A vapor – compression refrigeration system [2]
Figure 2.2 Vapor compression cycle, temperature vs. entropy diagram [7]
The described vapor compression cycles gives a good explanation
for conventional HVAC systems. On the other hand, the HACS contains
two evaporators and thus has two separate vapor compression cycles.
Figure 2.3 displays the vapor compression cycle for the HACS.
14
Qin 1
Qin 2
Figure 2.3 HACS vapor compression cycle
As seen in Figure 2.3, there are two vapor compression loops
within the system. The first loop cycles through the conventional HVAC
evaporator and consists of going from point 1→2→3→4 and back to 1.
The second loop circulates the refrigerant through the evaporator within
the freezer and consists of 1→2→3→5 and back to point 1.
15
Solar cooling can use two different methods. One method, a
thermal-driven system, uses the heat provided by the sun to drive an
absorption refrigeration cycle. Another method, used by our system,
requires electrical or mechanical work input [8]. Our system, rather than
using the thermal energy of the sun directly, uses the photovoltaic
modules to convert sunlight to electricity, which is then used to power a
refrigeration cycle, such as the vapor-compression cycle contained within
the HACS [9].
While solar cooling can be provided without any storage capacity,
our design is intended to make use of the high levels of sunlight during
the peak irradiation time during the day in order to provide cooling during
the subsequent period of peak cooling demand. Therefore, our design
utilizes a method for storing energy for cooling as needed.
The conventional vapor-compression cycle is used to run R134a
through a parallel section of the system into a separate expansion valve
and evaporator. This evaporator is located in a thermal storage tank. A
0.284 m3 (75 gallon) freezer chest functions as the thermal storage tank
in our prototype. The refrigerant is run through four sets of identical
expanding copper coils throughout the freezer, as shown in Figure 1.3.
The start diameter of the coils is 0.0127m, and the ending diameter is
0.01905m. Each set of copper coils has an approximate surface area of
0.2662 m2. The sum of the four copper coils is 1.066 m2, the total surface
16
area onto which energy transfer can occur from the refrigerant to the
glycol solution.
In order to store the energy of the refrigerant, the evaporator is
used to absorb heat from the contents of the thermal storage tank. A
phase change in a substance is ideal for storing thermal energy, so water
has been chosen due to its ready availability and lack of health hazards.
However, to utilize the thermal energy, some of the chilled
contents of the tank must be extracted and used to absorb heat from the
space that requires conditioning. As a result, containers of water are
placed in the tank surrounding the evaporator coils. These containers are
known as Cryogel Ice Balls, which are designed specifically for such
applications [1]. They are sealed plastic balls containing water, and have
dimples to allow them to easily expand when the water freezes. The
Cryogel balls remain in the freezer, while a surrounding liquid absorbs the
stored thermal energy from the balls as it passes over them, using the
energy to cool the conditioned space by running through an air handler.
Since it must remain in liquid phase at the freezing point of water, a weak
propylene glycol-water solution has been chosen as a surrounding liquid;
in addition to having a lower freezing point than water, it is less toxic than
alternative substances. The solution within the freezer is a 5% glycol
solution, which lowers the freezing point to approximately -1oC or 30oF
and raises the boiling point to 101oC or 214oF.
17
The thermal storage tank is considered fully charged when the
Cryogel balls are all completely frozen and the glycol solution is at its
freezing point, frozen near the evaporator, but still in liquid state so that it
can flow between the inlet and outlet of the thermal storage tank, cycling
through the glycol air handler.
Alternate containers for holding water in the thermal storage tank
were also explored. Recycled water bottles or 9.4*104 m3 (1 qt) oil
containers also effectively isolate water from the surrounding glycol
solution while allowing a sufficient heat transfer. Water bottles, although
much more cost effective and more readily available, are less durable and
tend to leak. The used oil containers need to be thoroughly washed in
order to remove any oil residue that could contaminate the thermal
storage solution. Cryogel balls were specifically designed to operate under
the temperatures and pressures of the storage tank, and were specially
made to allow for expansion when liquid water turns to ice. Depending on
the dimensions of the thermal storage container and the evaporator coils,
either the Cryogel balls or the water bottles may be preferable for
optimum packing, due to their different geometries.
18
2.2 OPERATIONAL MODES
Programmable thermostats control the states of the solenoid
valves, which in turn control the path of the refrigerant through the two
refrigerant loops as shown in Figure 1.3. When the temperature of the
conditioned space is higher than the programmed set point, solenoid valve
2 (normally closed) opens and solenoid valve 1 (normally open) closes,
directing the refrigerant into the conventional air handler to cool the
room. The two main operational settings of the HACS are as follows: offpeak energy rate hours and on-peak energy rate hours. Between these
two settings there are three subdivision modes, equaling a total of six
separate modes. These modes of operation can be viewed in table 2.1.
and Figure 2.4, which display the feedback loops for the 6 different
operational modes that the HACS offers.
Table 2.1 Operational modes
Modes Powered Equipment
Cooling modes
1 Compressor cycling refrigerant to
HVAC air handler
2 Compressor cycling refrigerant to
HVAC air hander, thermal storage
discharging through its respective
air handler
3 Thermal storage discharging
through its respective air handler
charging modes
1 Compressor cycling refrigerant to
the thermal storage evaporator
19
On-Peak
Energy
Hours
Off-Peak
Energy
Hours
N/A
Available
N/A
Available
Available
Available
N/A
Available
Figure 2.4 HACS control diagram
20
The two thermostats in Figure 2.4 control the operation of the
HACS. Figure 2.4 illustrates how the low-temperature thermostat controls
the refrigerant flow to either the thermal storage or the conventional
HVAC air handler. Solenoid valve 1 is normally open and solenoid valve 2
is normally closed; thus the normal refrigerant loop cycles through the
thermals storage. When the room temperature is above the input setting
of the low-temperature thermostat, the two solenoid valve states are
switched, diverting refrigerant flow to the HVAC air handler, providing
cooling. The high-temperature thermostat controls the power to the glycol
pump and air handler. The normal state of the switch is open, thus the
pump and air handler are off. When the high-temperature thermostat
reads a higher temperature than what the user has selected, the switch
closes and the glycol pump and air handler are powered on. It is
important to note that using thermal storage allows the size of the
conventional air conditioning unit to be smaller, because the glycol air
handler can be turned on and run using the stored cooling if the
conventional air handler does not cool the room to the programmed
temperature. Thus, the second air handler can supplement the cooling
power of the first.
Other technologies are sometimes utilized to store or use energy
during low-cost off-peak times. Batteries can be charged during this
period, or other technologies can be used for storing thermal energy. For
21
example, water heaters and chillers are sometimes run during the night to
store the heated or chilled water until it is needed during the day, rather
than using the electricity needed during the day at higher costs [10]. A
good example of this type of system is the Ice Bear by Ice Energy. This
system uses off-peak low-cost nighttime grid energy to freeze ice around
refrigerant condensing coils. During daytime hours, the refrigerant can be
cooled within the coils contained in the ice and run back through an
evaporator to provide cooling [11].
Energy generated through photovoltaic power is commonly used
directly, without being stored. Our system uses the photovoltaic power
directly, with as few losses as possible, by converting it directly to its end
state of thermal energy without doing conversions in between, and storing
it when it does not need to be used immediately as well as storing offpeak grid power. This avoids using on-peak grid power, and problems
associated with storing power in a battery in the form of electricity. It also
avoids the problem that sunlight is not consistent and not always available
during on-peak times and periods of high cooling demand, such as during
early evening.
The Ice Bear is a somewhat comparable technology currently on
the market; it is designed for freezing water during off-peak times. The
Ice Bear uses a conventional air conditioner as necessary, except during
on-peak times, when it circulates refrigerant through the ice and into an
22
air handler to cool the conditioned space. This competing system is
described in the next sub-section.
2:3 ICE BEAR
Ice Energy, a Colorado-based company developed another thermal
storage system known as the “Ice Bear.” The company describes the Ice
Bear system as,
“An
intelligent
solution
that
commercial
conditioning
distributed
works
in
energy
conjunction
direct-expansion
systems,
storage
with
(DX)
air-
specifically
the
refrigerant-based, 4-20-ton packaged rooftop
systems common to most small to mid-sized
commercial buildings [11].”
The Ice Bear system, as shown in Figures 2.5 and 2.6, consists of a
450-gallon container filled with water and copper piping, with an external
compressor, condensing unit, and air handler [11],[12]. The system is
designed to use low-cost nighttime (6pm-6am) grid power to charge the
ice thermal storage. During morning hours (6am-12pm) the conventional
air conditioning unit is driven. Through peak energy rate hours (12pm6pm) the compressor and condensing unit are turned off and the
refrigerant is cooled by being pumped through the ice storage and
circulated back to the air handler to provide cooling until the ice has
23
melted. The cycle repeats itself every day. Ice Energy claims that the
system can “deliver an average reduction of 7.2kW of source equivalent
peak demand for a minimum of 6 hours daily, shifting 32 kWth-hours of
on-peak energy to off-peak hours.” [11]
Figure 2.5 Ice Bear [11]
Figure 2.6 Ice Bear thermal storage [13]
24
2:4 COMPARISON BETWEEN THE HACS AND THE ICE BEAR
The prototype hybrid air conditioning system (HACS) and the Ice
Bear have both been constructed with the intent of reducing net energy
consumption. Similarly, both systems at full scale deployment also possess
the ability to improve electric system load factors, thus reducing electric
system costs and increasing global efficiency. While both systems are built
to combat similar complications, each system goes about this in a unique
manner. The Ice Bear system helps reduce peak energy demand through
taking advantage of low-cost nighttime energy to charge the ice storage
for daytime use. Similarly, the HACS takes advantage of off-peak energy
to power the system, but it does this during the day as well as at night,
and has the ability to be completely driven off of PV modules, with excess
PV power being stored in the form of ice energy.
Comparing the similarities and differences between the HACS and
Ice Bear system illustrates the advantages of the HACS prototype. Table
2.2 is a cost comparison of the major mechanical parts for both the HACS
and Ice Bear.
25
Table 2.2 HACS vs. Ice Bear cost analysis. *Individual part costs were unattainable due to system
being sold as a complete package [12]
HACS
Price
Ice Bear 5 ton unit
Price
$
-
$
-
1 ton DC Compressor
and Condensing Unit
Motor Controller
$ 675.00
$ 819.00
4.3 ton Copland Scroll
Compressor
CoolData® SmartGrid Controller
Thermal Storage
Temperature Controller
2 Solenoid Valves
$ 200.00
Refrigerant Management System
$
-
$ 250.00
420 gal ice storage
$
-
HVAC air handler
$ 440.00
HVAC air handler
$
-
Glycol Air handler
$ 440.00
Thermostat
$
-
Variac
$ 222.00
$
-
2 Thermostats
$ 100.00
$
-
75 gallon freezer
$ -
$
-
PV modules
$2,930.00
$
-
Total Unit Price
$6,076.00
Total Unit Price*
$12,000.00
As shown in Table 2.2, the prices of the Ice Bea can be hard to
compare to the HACS cost. The smallest system of Ice Bear available is a
5-ton unit. With extrapolation, the 5-ton unit comes out to cost
approximately $2,400/ton; a 2-ton unit would cost approximately $4,800.
The HACS is a 1-ton unit that has a 2-ton cooling capability when both air
handlers are running. The HACS system costs a total of $6,076.00, which
is $1,276.00 more than the equivalently-rated Ice Bear system. It is
important to note that even though the initial price of the HACS may be
higher, the energy the system saves will likely have greater value in the
long term. Additionally, in order to get a true understanding of the cost
comparison, it is important to compare the retail price of the two systems.
With an estimated retail markup of 50%, table 2.3 shows the new cost
comparisons.
26
Table 2.3 Markup costs
HACS
System Size
Cost prior to markup
Markup cost
1-2 ton
$6,076.00
$9,114.00
Ice Bear
5 ton
$ 8,000.00
$12,000.00
Looking at table 2.3, one could recalculate the cost per ton of the
HACS system to obtain $4,557 per ton. At the present time, it is clear that
the HACS system is more expensive per ton than the Ice Bear. However, it
is important to consider the fact that the Ice Bear system has already
undergone thorough prototyping and analysis. The system is sold as a
complete package; discounts on parts may be offered. After going
through its own rigorous packaging analysis and subsequent high volume
production scale, the price of the HACS system would presumably
decrease to a comparable level.
When considering the overall size of the two systems, the HACS
system can be smaller due to its ability to use the thermal storage along
with the conventional HVAC air handler at the same time. The Ice Bear,
which only consists of refrigerant lines, has to be larger because it can
only use one source of cooling at a time, i.e., the conventional HVAC side
or the ice storage. It is important to note that there would be a slight
increase in price if the HACS system were scaled up by increasing the
compressor capacity and ice thermal storage size to match the 4 ton
capacity of the Ice Bear. The price increase, however, would only be on
27
the order of approximately $200. Thus, it is important to realize that since
the HACS system can achieve the same cooling power as the Ice Bear
while running a smaller compressor, it can run at a higher efficiency and
consume even less electricity. Table 2.2 compares the characteristics of
the HACS vs. the Ice Bear.
Table 2.4 HACS vs. Ice Bear capacities [11]
HACS
Cooling load (tons)
1 to 2
Unit Price ($)
$ 6,076.00
Price / ton ($)
$ 3,038.00
Predicted thermal storage ability 1 ton for 12
(ton-hours)
hours
Ability to provide heat
Yes
Ability to run off PV power
Yes
Ability to feed power back to grid Yes
Ready for off grid use
Yes
28
Ice Bear
5
$ 12,000.00
$ 2,400.00
5 ton for 6
hours
No
No
No
No
Chapter 3: EXPERIMENTAL METHODOLOGY
3:1 DESIGN OF EXPERIMENTS
In order to study the efficiency of the HACS prototype, a complete
design of experiments (DOE) had to be performed. The HACS was
designed in order to decrease the energy consumption and increase the
operating efficiency of cooling units in forward operating bases and
commercial and residential buildings. An experiment designed to show the
operating efficiencies and benefits of the HACS was constructed.
Following the basic procedural steps of DOE, independent,
dependent, and constant variables were assigned [14]. Table 3.1 displays
the list of variables that were derived.
Table 3.1 List of Variables *Constant variables are dependent on which independent variables are
held constant for a specific experiment
Independent
Variables
Compressor RPM
Glycol Flow Rate
Room
temperature /
Load
Glycol air
handler fan
speed
Time of day
Dependent
Variables
Energy used to
charge the
thermal storage
Energy required
to run the
system
How long TS
lasts before
complete
discharge
Max cooling
power
Non-Manipulated
Variables
Calculations
Outside
temperature
Cooling power of
HVAC air handler
Solar radiation
Cooling power of
glycol air handler
Cost of grid power
/ Energy savings
COP of system
Room temp
over time
Load on HACS vs.
Room temperature
PV power
consumed vs.
supplied
29
The list of variables in Table 3.1 is the basis upon which the
experimental procedure was constructed. It is important to note that the
constant variables will change from experiment to experiment as different
independent variables are held constant. The four independent variables,
compressor RPM, glycol flow rate, room temperature/load, and the glycol
air handler speed allow for four general test procedures to be assembled.
The four test tables, along with test 1 procedure are provided in appendix
A. By changing the four independent variables described above, a clear
and concise understanding of how the HACS system operates may be
gained.
3:2 TESTING
As discussed previously and in better detail in appendix A, test 1
was to be performed on the hybrid air conditioning system first until the
compressor failure. The independent variable selected was room
temperature/load. This test allowed for the greatest and most general
observations to be made with clear precision and accuracy. Test 1, as
described in appendix A, consists of running a four-day test cycle with the
high and low thermostats set to specific temperatures (the high
temperature thermostat set to 296K or 73oF and the low temperature
thermostat set to 295K or 72oF). The first run of the test was performed
with the thermostats set at common household temperatures for
summertime [15], [16]. The test was then planned to be repeated until a
30
range of 66-80oF had been covered. Through running this first test
procedure, calculations and observations could be performed on the
following: coefficient of performance (COP) of the HACS, cooling power of
both the glycol and conventional AC air handler, load on the HACS vs.
temperature, PV power consumed vs. supplied from the grid and the cost
of grid power and or energy savings for the HACS. Other observations
that could be made consisted of how long the glycol thermal storage took
to become fully charged and discharged. The cooling power of the thermal
storage could be observed over time, with day four of the test being
specifically designed to show the glycol thermal storage’s effectiveness.
This last test, along with the other three tests, would allow a clear
observation of how long the PV modules can run the HACS during daylight
hours.
The second test set to be performed on the HACS system was to
vary the glycol thermal storage flow rate through its air handler.
Regulating the glycol flow rate is as simple as varying the diameter of the
glycol inlet tube. The second test spans a two-day period. Day one is used
to run the HACS system until the glycol thermal storage is fully charged.
On day two, the glycol thermal storage is fully discharged. This test allows
for observations to be made on how to optimize the discharge of the
glycol thermal storage while maintaining an optimal cooling power across
the glycol air handler.
31
Test 3 is designed to show the heat transfer properties of the
overall HACS system, but most importantly within the glycol thermal
storage. By varying the compressor revolutions per minute (RPM) rate,
observations could be made on how quickly and efficiently the thermal
storage could be charged. Another aspect to varying the compressor RPM,
observations on power required to run the system versus compressor RPM
could be made, allowing for further optimization of the HACS.
The final test consists of varying the fan speed of the glycol
thermal storage air handler. Through varying the speed of the glycol air
handler fan, the cooling power can be observed with respect to fan speed.
Through running this test and observing the previous results from test 2,
one could observe and calculate the most efficient way to discharge the
thermal storage, while at the same time maintaining a level of cooling
power that would meet the temperature needs of the operator. Through
running tests 1-4, a clear understanding of the HACS prototype could be
garnered, and system optimization could be completed. Ultimately, the
HACS system could be re-built or manufactured and scaled to specific user
requirements. Finally, it is important to note that these tests were
designed specifically for the first HACS prototype (the DC powered
system). Due to the event of the compressor failure, a new prototype
system is under construction that will be an AC-powered system. Thus,
32
the tests outlined above provide a solid foundation for future testing of a
second HACS prototype.
3:3 SYSTEM SETUP
To gain a complete understanding of our hybrid air conditioning
system, and run the previously discussed test procedures, extensive test
equipment had to be installed. Tables 3.2 through 3.5 list the equipment
used in the construction of the prototype system, including the total
installed instrumentation and what it was paired with for data collection.
Table 3.2 HACS parts and corresponding test equipment
Parts
Manufacturer / Part No.
10 PV modules
Solar Cemiconductor Put Ltd
DC cutoff switch
SQUARE D
Variac
Power selector box
STACO Energy Producs
Custom Built
High temp thermostat
LUX TX500E
Low temp thermostat
LUX TX500E
2 voltage / 2 current sensors
1 thermocouple taped on
DC compressor
Masterflux SIERRA05-0982Y3
Outdoor condenser
Masterflux
DC motor controller
Masterflux 025F0062-01
Refrigerant inlet line
OD = 1.3cm
Refrigerant outlet line
HVAC air handler
2 solenoid valves
Inserted Test Equipment
Pressure transducer / Rotameter /
Thermocouple
OD = 1.9cm
Pressure transducer / Thermocouple
Air Con ACN1318HPCCOEV
Parker 6B05
Freezer for thermal storage
Recycled
Thermal Storage
Evaporator
Custom Built 1.3cm ODouter to 1.9cm
OD
Cryogel balls
Cryogel
12 Oz water bottles
Recycled
1 quart oil containers
Recycled
Weak glycol solution
Sierra Antifreeze
Glycol pump
Via Aqua VA-306
9 Dispersed thermocouples
Glycol inlet line
1.9cm ID
Thermocouple
Glycol outlet line
2.5 cm ID
Rotameter / Thermocouple
Glycol air handler
Custom Built
33
Table 3.3 10 Solar module part numbers
Solar Cemiconductor Put Ltd
S2-6M313909-0357747
S2-6M313909-0357743
S2-6M354109-0357732
S2-6M354109-0357741
S2-6M313909-0357748
S2-6M313909-0357745
S2-6M354109-0357734
S2-4M154109-0357726
S2-4M154109-0357719
S2-4M154109-0357718
Table 3.4 Sensor manufacturer information
Sensor
Manufacturer / Part No.
Glycol rotameter
King Instruments K72-7/1
Refrigerant rotameter
King Instruments 2-32-G-042
Thermocouples
OMEGA engineering K-type
Shunt resistors
MLA-15-50 0-15A
Pressure Transducers
Setra 209
Sensor data acquisition device National Instruments SCB-100
Table 3.5 Total test equipment
Total Test Equipment
No. of Sensors
Rotameters
2
Thermocouples
14
Voltage
2
Current
2
Pressure Transducers
2
34
In order to be able to perform analysis on the cooling power,
coefficient of performance, electrical power consumed, and load on our
system, many measurement devices were considered. To execute these
calculations, measurements of the refrigerant and glycol flow rate,
pressures within the refrigerant lines and many temperatures needed to
be collected. Also current and voltage sensors needed to be placed on
both the PV and grid side in order to observe the overall power
distribution and consumption of our system. Figure 3.1 shows the
locations within the HACS system in which testing equipment was
installed.
Figure 3.1 Test equipment
35
As shown in Figure 3.1, there are two rotameters, one to measure
the refrigerant flow rate, and one for the glycol flow rate. Pressure
transducers have been placed on the inlet and outlet refrigerant lines
across the compressor. Thermocouples were placed at the inlet and outlet
of both the AC and glycol air handler along with nine thermocouples
within the glycol thermal storage. Also current and voltage probes were
installed on the PV and grid side of the system.
All of the experimentation equipment except both rotameters
output an analog signal that could be wired to a sensor data acquisition
device. A LabVIEW program was written to compile all the data and
compute some of the calculations. Figures 3.2 and 3.3 show the front
panels of the LabVIEW program.
Figure 3.2 LabVIEW front panel 1
36
Figure 3.3 LabVIEW front panel 2
The LabVIEW front panels were designed to give a simple overview
of how the hybrid air conditioning system presently functions. The
program compiles the data with respect to time and saves it as an Excel
file where further calculations could be completed.
As described earlier, the HACS prototype has four different modes
of operation; 1) compressor running refrigerant to the AC air handler, 2)
compressor running refrigerant to the glycol thermal storage, 3) glycol
thermal storage cycling through the glycol air handler (compressor, and
AC air handler are off), 4) compressor cycling refrigerant to the AC air
handler, with the glycol thermal storage cycling through its respective air
handler. It is clear to see that the HACS has many modes of operation and
can constantly change which mode it is running in.
37
The ability of the HACS to constantly change state made it
important to collect data continuously with respect to time. The LabVIEW
program was created to sample data at a rate of once per 10 seconds.
This 10 second interval was specifically selected because it allows
observation of constant changes in system function, while avoiding
collection of redundant data.
3:4 SOUGHT OBSERVATIONS AND CALCULATIONS
As described earlier, if the four outlined tests were carried out, they
should provide data that can be used to calculate the following: energy
used to charge the thermal storage, energy required to run the system,
how long the PV modules can run the system daily, how long the thermal
storage effectively lasts, performance of system with different room
temperature loads, cooling power of both air handlers and the max
cooling power of the system. From the data collected, each discussed
observation and calculation could be performed.
3:5 EXPLANATIONS OF CALCULATIONS
In order to calculate the energy used to charge the thermal storage
timed data on the average temperature throughout the thermal storage,
inlet and outlet temperature of the refrigerant lines, mass flow rate of the
refrigerant, and electrical power consumed by the HACS system need to
be collected. The collected data can be inserted into equation 1 to
calculate the total heat removed by the evaporator within the
38
conventional HVAC air handler and the glycol thermal storage evaporator
[17]:
(1)
where Q is the total heat load (kWth),
is the mass flow rate of the
refrigerant (kg s-1), and Δhref is the enthalpy change of the refrigerant (J).
With the previous calculations, the power used to charge the thermal
storage and efficiency of charging the thermal storage can be studied.
The energy required to run the system can be analyzed through
collecting the current and voltage data supplied by the solar modules and
grid over time. These data can be compared to the faceplate data on each
electrical device within the HACS system, in order to compare the actual
power requirements of the HACS versus the additive nameplate power
requirements. With this comparison the overall electrical efficiency of the
system may be calculated through dividing the measured power Wmeasured
over the theoretical nameplate power Wtheoretical, where Wmeasured is the
supplied power from the solar modules and grid, and Wtheoretical is the
summed faceplate power requirements of each electrical part of the
HACS. The data collected on the total power supplied by the grid and PV
modules (kWh) can be used to calculate the cost to run the HACS and the
savings that it generates ($/kWh).
At the present time, the two-diode selector box as described in
previous sections only allows our PV modules to run our system when
39
their output voltage is greater than the grid voltage. However, the DC
compressor can run on a minimum voltage of 90V. Therefore, it is obvious
that our PV modules may at times be supplying enough power to run the
system, but may not be in use. By attaching an external load to the PV
modules, the current and voltage can be measured during the times when
the PV modules are not powering the HACS. Through collecting the power
measurements of the PV modules over the course of time, it will become
clear how many hours a day the PV modules can actually run our system
during different times the year, along with how much power it can feed
back into the grid.
Since the hybrid air conditioning system is basically a heat pump,
the performance of the system can be directly calculated using an
equation for coefficient of performance (COP). The COP of a conventional
HVAC unit can be calculated using equation 2 [2]:
(2)
where Qin is the heat transfer rate or refrigeration capacity (W), Qc is heat
removed from the cold reservoir (J s-1), Pc is the input power as
mechanical power at the shaft of the compressor (W),
is the mass flow
rate (kg/s), and h1-4 is the specific enthalpy per unit mass (J/kg) at the
specified point in Figure 2.1, and W is the work consumed by the heat
pump (J). Because the HACS prototype contains two evaporators, the
40
conventional COP equation does not apply to the system. In order to
calculate the COP of the HACS both evaporative loops need to be taken
into account. The COP of the two separate evaporative loops can be
explained by Equation 3:
(3)
In Equation 3, h1-5 represents the specific enthalpy per unit mass (J/kg)
at the specified points in Figure 2.3. Equation 3 is only useful for
explaining the COP of the HACS when it is functioning in either of the two
modes. In order to obtain a COP that represents the system as whole, it
would be important to compute the two COP calculations in Equation 3
with respect to time (24 hr cycle). Using the last expression of Equation 2
and adding index notation to represent the different cycles of the HACS,
the COP as a whole may be represented as Equation 4:
(4)
where Q is the heat removed from the room (W), Wgrid and WPV is the
power provided by the grid or PV modules (W), time is the hours of
operation (h) and i represents the three modes of operation (1-3) defined
as: 1) compressor running refrigerant to the HVAC air handler, 2)
compressor charging the thermal storage, 3) thermal storage discharging.
The sum of the three separate COP’s calculated from the three modes of
41
operation is divided by the power input to the system. This whole term is
then integrated with respect to time in order to get an average COP for
the HACS. It is also important to note that the integral boundaries can be
adjusted to fit different time periods such as months, days or even years.
The freezer that the glycol thermal storage is contained in is an
excellent insulator, thus allowing for the thermal storage to stay at
freezing temperatures for long periods of time. When the thermal storage
is being used for cooling purposes, circulating the glycol solution through
its perspective air handler, the cooling power can be calculated using
Equation 5 [3]:
(5)
where Q is the total heat load (kWth),
is the volumetric flow rate of the
glycol (m3 s-1), ρ is the density of the weak glycol solution (kg m-3), cp is
the specific heat (J kg-1 oC-1), and ΔT is the temperature difference across
the inlet and outlet refrigerant lines (oC) [13].
In order to observe and calculate the effective period of time that
the thermal storage lasts, it is important to observe the cooling power of
the glycol air handler with respect to time. The glycol thermal storage will
be deemed effective as long as the cooling power across the glycol air
handler is ≥0.
Taking temperature measurements at the inlet and outlet
refrigerant lines, the mass flow of the refrigerant with corresponding
42
R134a specific heat and density properties will be enough information to
calculate the conventional HVAC air handler cooling power. To obtain the
cooling power of the glycol air handler, temperature measurements across
the air handler, the mass flow of the glycol through the air handler and
the specific heat and density of our ice thermal storage solution will
provide ample numerical data.
The maximum cooling power of the system is represented as the
sum of the two air handlers’ cooling power, as shown by Equation 6:
(6)
Qmax is the additive cooling power (kWth), Qconventional is the cooling power
of the conventional HVAC air handler (kWth), and Qglycol is the cooling
power of the glycol air handler (kWth). Note that the maximum cooling
power can be taken with respect to time as the glycol thermal storage is
discharged.
With the collection of abundant measurements, the overall
functionality, performance, and advantages of the HACS can be observed
and calculated. The economic modeling performed by Sidiq Jubran can be
compared and confirmed with the test data and calculations [5]. A
working thermodynamic model has not been completed; when it is done,
the data collected from the HACS will be more than sufficient to compare
theoretical best-case scenarios. Lastly, comparisons between conventional
43
HVAC system performances and costs can be carried out, further
illustrating the advantages of the HACS system.
3:6 EXPERIMENTAL UNCERTAINTY
Running the tests described above on the prototype HACS is an
excellent way to demonstrate the system’s advantages. The data collected
from running the tests can provide numerical proof of the potential
abilities of the prototype system. On the other hand, in order to assess
whether the data collected are a valid demonstration of the HACS
capabilities, an uncertainty assessment on the experimental data is
required.
First, it is important to point out that the error cannot be calculated
exactly unless the true value of the quantity being measured is known.
Within our prototype system there are bias “Bx” and precision “Px”
uncertainties [18]. The total uncertainty “Ux” is defined as [18]:
(7)
The total uncertainty is the square root of the sum of the squared bias
and precision uncertainties. The precision uncertainties are defined as
[18]:
(8)
Where t is the t-statistic, Sx is the sample standard deviation, and n is the
sample size [18]. In most cases the bias uncertainties are user-estimated
[18].
44
All the instrumentation for collecting data from the HACS has been
calibrated for its specific use. Thermocouples were calibrated within a
range of temperatures using a precise hot water bath paired with an ice
bath. The hot water bath allowed for the user to digitally set the device to
heat the water to a specific temperature within the range from 20 oC to
100 oC. The error presented with this calibration derives from the error
within the temperature sensor for the hot water bath. The hot water bath
had a name plate error of ±0.1 oC. Thermocouple calibration was
performed starting with the thermocouples placed in the ice bath,
representing 0oC. The temperature output of the thermocouples was
recorded at this point. Next, the thermocouples were transferred to the
hot water bath. The hot water bath was set initially at 20 oC and was
increased in increments of 5 oC until 100 oC was achieved. The voltage
readouts from the thermocouples were recorded during each 5oC step.
The resulting calibration curve had an accuracy of ± 0.1 oC for the
temperatures ranging from 20 oC to 99 oC, and the 0 oC and 100 oC points
are exact known temperatures, thus accompanied with no error. The
calibration curve that was attained can be viewed in Figure 3.4.
45
Measuerd Values (oC)
110
100
90
80
70
60
50
40
30
20
10
0
0
10
20
30
40
50
60
Reference Values
70
(oC)
80
90
100
Figure 3.4 Thermocouple calibration curve
The calibration curve that was produced from this test was then
uploaded into a LabVIEW file and used as a reference for the
thermocouple readings. Looking at the calibration curve in figure (3.4) it is
important to note the linear in continuity from just above 95 oC to 100oC.
This could be a result of the inaccuracy of the hot water bath temperature
sensor. The produced calibration curve allowed for accurate thermocouple
readings, with the main source of error coming from the ± 0.1 oC
accuracy of the hot water bath.
The pressure transducers that were installed within the refrigerant
inlet and outlet lines from the compressor have a readout range of 0-300
psig. The listed specifications from the manual on the product showed an
accuracy of ±0.25%[19]. Thus, any pressure measurements taken from
our system were within an uncertainty range of ±0.25%.
46
There were two rotameters installed, one inserted within the
refrigerant liquid line from the compressor, and the other inserted on the
outlet side of the glycol air handler. The rotameter for the refrigerant line
was professionally calibrated by King Instruments for use with refrigerant.
The rotameter was shipped with a known accuracy of ±2.0% of full scale
flow. On the glycol side, the rotameter purchased was a King Instruments
72 series rotameter specifically made for water. The glycol rotameter was
meant for water and is being used in a water/glycol solution with the ratio
of 35:1.5 water to glycol. Thus, it is safe to assume that the fluid going
through the glycol rotameter is 95.89% water. The claimed accuracy of
the rotameter was between ±3% of full scale [20]. The major error
introduced with the rotameters is the analog output that they display. The
biggest source of error is in the visual reading of the rotameter.
In order to read the voltage supplied either from the grid or PV
modules, a voltage divider circuit was installed across the outlet that the
DC controller board plugs into. The voltage divider circuit uses a pair of
resistors (R1 and R2) to divide an input voltage V1 into a smaller output
voltage V2 [18]. The output voltage measured across R2 is then [18]:
(9)
In the HACS system, the minimum voltage supplied is 130V coming from
the grid. The maximum voltage supply is 165V, supplied from the PV
modules. Thus the voltage divider was designed to output a volt reading
47
for a range of 0-200 V. The chosen R1 and R2 values were 195 kΩ and 5
kΩ, based on a 200 V1 input. This would supply a voltage output reading
range of 0-5 V with 0 equaling true 0 V and 5 V equaling 200 V.
There is one major source or error within reading the voltage
sensors. The resistors used to construct the voltage divider are not 100%
accurate. They are color-coded by the manufacturer for both size and
accuracy. The resistors used in the HACS all had a gold band,
representing an accuracy of ±5% [19]. R1 and R2 were constructed using
multiple resistors, and table 3.6 represents their makeup.
Table 3.6 R1 and R2 resistor compilation
R1 = 195KΩ
9x10kΩ
2x2.2kΩ
2x300Ω
1x100kΩ
R2 = 5kΩ
2x2.2kΩ
2x300Ω
When measuring the resistance with a digital meter, the actual
resistance of R1 and R2 was 186 kΩ and 491 Ω respectively. Both of the
actual recorded resistances of R1 and R2 were taken with a digital
multimeter that was accurate up to ±0.5 Ω [21]. R1 was within 95.38% of
the marked resistor value and R2 was within 98.2%. After acquiring the
actual resistance of R1 and R2, the curve to calculate the correct output
voltage was formed, which was accurate up to a half-digit.
In order to measure the current supplied from either the grid or PV
modules, shunt resistors were installed in series with each power source
48
within the power selector box, as displayed in Figure 1.4. The two shunt
resistors relate a specific millivolt output to a corresponding current. The
shunt resistor for the PV modules had a 0-50 mV output that
corresponded to 0-16 A current. The grid power shunt resistor consisted
of a 0-50 mV output which was directly related to a 0-20 A current. Both
of the shunt resistors have a claimed accuracy of ±0.25%.
The final source of error in data collection stems from the data
acquisition device that interfaces with the LabVIEW computer program.
The data acquisition device is a SCB-100. The device was specifically built
to read sensors with a voltage output [22]. Figure 3.5 displays the SCB100.
Figure 3.5 SCB-100
49
As shown in Figure 3.5, it is clear that there are many sensors
plugged into one single device. In order to keep the electrical noise to a
minimum, all the floating signal sources such as the thermocouples were
tied to analog ground with a 200 Ω resistor. This provided a return path
for the instrumentation bias currents. The specific error limitations of the
SCB-100 are minimal. For thermocouple use, the device has an error of
±0.5 oC, which was avoided due to the thermocouple calibration. Using
the SCB-100 for measuring the pressures, currents, and voltages the
specified source of error is due to gain, and results in a ±0.08%
uncertainty [22]. The added error from the sensor data acquisition device
is very minimal, but does create cumulative error on top of the initial
installed instrumentation error.
The major calculations performed from the data collected from the
system include cooling power of both air handlers, coefficient of
performance (COP), and the overall electrical efficiency of the system.
For the calculations discussed, the equations involved are (1) through (6).
After sample data on the HACS has been collected, the uncertainty
variables that have been discussed can be inserted into Equations 7 and
8, and the total uncertainty may be calculated. Table 3.7 lists the
estimated uncertainties of the calculations.
50
Table 3.7 Uncertainties within calculations
Calculation
Instrumentation
Estimated
Uncertainty
COPrefrigerant loop
current, voltage, thermocouple,
DAQ, rotameter
current, voltage, thermocouple,
DAQ, rotameter
current, voltage, thermocouple,
DAQ, rotameters
thermocouple, DAQ, rotameter
±2.0%
thermocouple, DAQ, rotameter
±2.0%
COPthermal storage loop
COPHACS
Cooling power of
glycol air handler
Cooling power of
refrigerant air handler
±3.0%
±3.6%
±3.0%
Looking at table 3.7, the expected uncertainties do not add up to
very much. However, it is important to note that these calculations can be
misleading. Each calculation involves the uncertainty of a rotameter. Even
though the stated uncertainties of the rotameter are very small, human
error can be introduced during the reading process. Even though this
added human error is not accounted for in the calculations, it should not
go unnoticed. A way of minimizing the human error would be to have the
same person always read the rotameters, always following the same
method of documentation.
51
Chapter 4: RESULTS AND DISCUSSION
4:1 TECHNICAL DIFFICULTIES
At the present time, the prototype HACS system is out of
commission. Due to the fact that everyone working on this project was
fairly new to heating ventilation and air conditioning systems, there were
many obstacles that came into play. Since this is the first time that this
type of system has been built, many unforeseen roadblocks are to be
expected. For example, the DC compressor purchased for the project had
never been run on such a big system involving two evaporators. This
turned out to be a major problem, because the oil contained within the
compressor upon installation was not enough for such a large system.
With two evaporators, the oil was unable to cycle through the refrigerant
lines and smoothly return to the compressor. Without oil cycling back to
the compressor to keep the bearings greased, the compressor lifetime
was severely shortened. Due to the compressor’s short lifetime, only
minimal data on the system could be collected.
4:2 EXPERIMENTAL RESULTS AND DISCUSSION
None of the outlined tests discussed in chapter 3 could be
performed fully. On March 8 2012, the system was successfully turned on
in order to see if ice could be produced. We were able to leave the system
on for about a 5-hour time period. The system was turned off in order to
avoid complete freezing and damaging the evaporative coils, due to glycol
52
not being added to the thermal storage yet. During this charge up time,
no data could be collected due to faults in the LabVIEW program. After
the program was fixed, on the following day a simple test was performed
to view the cooling power of the thermal storage, along with its longevity.
The thermal storage was pumped through its corresponding air handler,
while the rest of the prototype system was turned off. The only
components requiring electrical power were the glycol thermal storage
pump (35 W), and air handler (200 W). The ice thermal storage was
deemed ¼ of the way frozen from the top down when the test was
started. The system was allowed to run overnight and turned off in the
morning after the ice had completely melted. The glycol flow rate was
constant and read 1.51*10-4 m3 s-1 or 2.4 gallons per minute. It is
important to note that the air handler turned off for a 15-minute period
due to the temperature setting on the thermostat being met. In order to
prevent this from happening again, and sustain continuous cooling with
the glycol air handler running, the thermostat was turned down to its
lowest temperature setting of 8.3 oC or 47 oF. Figure 4.1 shows the room
temperature during the time the test was performed.
53
22
Temperature (oC)
20
18
16
14
12
10
0
1
2
3
4
Time (h)
5
6
7
Figure 4.1 Room temperature over time
In order to acquire a good understanding of the cooling power
supplied during this test, comparisons needed to be made between the
temperatures within the lab versus the outdoor ambient temperature. The
test was run starting at 5pm on March 8, 2012. Table 4.1 shows the
outdoor ambient temperatures during the 6-hour time period of the test
run [23].
Table 4.1 Recorded ambient temperatures on 3/8/2012 [23]
Time
4:51pm
5:51pm
6:51pm
7:51pm
8:51pm
9:51pm
Recorded Temperature oC
21.7
21.7
21.1
20.0
18.2
19.4
It is important to note that the lab with which the HACS is located
is a poorly insulated space on the roof of a building. Taking that into
54
consideration while comparing the temperatures in table 4.1 with Figure
4.1, it is clear that the thermal storage was able to provide a considerable
cooling load.
Figures 4.2 and 4.3 show the cooling power over time of the glycol
air handler.
6
Cooling Power (kWth)
5
4
3
2
1
0
0
0.5
1
1.5
2
2.5
Time (h)
Figure 4.2 First section of the cooling power over time of the thermal storage
55
Cooling Power (kWth)
5
4
3
2
1
0
2.7
3
3.3
3.6
3.9
4.2
4.5
4.8
5.1
5.4
5.7
6
6.3
Time (h)
Figure 4.3 Cooling power after 15 minute shut off
The cooling power in Figures 4.2 and 4.3 was calculated using
Equation 5 from Chapter 3 along with the density and specific heat of
water. From Figure 4.1 it is clear that the glycol air handler started out
producing just over 4.5 kWth of cooling power. This was above our
requirement of producing 3.5 kWth, or 1 ton of cooling power with the
glycol air handler.
Figure 4.2 shows that above 3.5 kWth of cooling was able to be
sustained for 2 hours and 38 minutes, which is when the glycol air handler
shut down. The 15-minute time period when the glycol air handler shut
off is very interesting to analyze. The start of the plot in Figure 4.3 shows
the cooling power of the thermal storage to recharge back to almost 4
kWth. This recharge may be explained by the returning water from the
glycol air handler having a greater period of time to cool back down
56
before it entered the pump to return to the glycol air handler. The cooling
power of the glycol air handler in Figure 4.3 stayed above or equal to 3.5
kWth or 1 ton until the 3 hour 18 minute mark of the test. It is also
important to note the exponential decay in Figure 4.3. The observation of
the exponential decay of the cooling power is a great example of the
thermal temperature time constant.
Subtracting 15 minutes from the time of 3.2 hours, it can be
estimated that the ice thermal storage supplied ≥3.5 kWth of cooling for
almost 3 full hours. The cooling power of the glycol air handler became
negligible after a total run time of 6 hours and 22 minutes. This initial test
is very significant in that it proves the ability of the system to store PV
power for later efficient use. Correspondingly, if one were to say that a ¼
frozen freezer equaled approximately 3 hours of effective cooling, one
could extrapolate the numbers and assume that if the freezer was ¾
frozen from the top, the cooling power of the glycol air handler could be
≥3.5 kWth for approximately 9 hours.
It is also important to note the temperatures within the thermal
storage and understand their relevance with respect to the cooling power
of the glycol air handler. The average temperature of the thermal storage
and the cooling power throughout the testing period is shown in Figure
4.4.
57
5
16
4
14
3
12
2
10
1
8
Thermal Storage Temperature
0
0
1
2
3
Temperature (oC)
Cooling Power (kWth)
Cooling Power
6
4
5
6
7
Time (h)
Figure 4.4 Temperature of thermal storage vs. cooling power
Figure 4.4 demonstrates that when the average temperature of the
thermal storage rises above 11oC, there is not enough energy within the
thermal storage to provide the temperature gradients across the glycol air
handler so that the cooling power can be at 3.5 kWth. Therefore, it is safe
to conclude that the average temperature within the thermal storage has
to be ≤11oC.
Another interesting observation concerning the temperatures within
the thermal storage concerns the gradients of temperatures within the
thermal storage. Placed within the thermal storage were 9 thermocouples.
There were two in each corner, (one at the top and one at the bottom)
and one in the center of the thermal storage. Table 4.2 shows the
acronyms that describe the placement of the thermocouples.
58
Table 4.2 Positional acronyms
Position
Acronym
Thermal Storage
TS
Center
C
Front Right Top
FRT
Front Right Bottom
FRB
Front Left Top
FLT
Front Let Bottom
FLB
Back Left Top
BLT
Back Left Bottom
BLB
Back Right Top
BRT
Back Right Bottom
BRB
Figures 4.5-4.13 display the different temperatures that each
thermocouple within the thermal storage displayed during the testing
period.
59
20
Temperature (oC)
18
16
14
12
10
8
6
4
2
0
0
1
2
3
4
5
6
7
Time (h)
Figure 4.5 Thermal storage: center
20
18
Temperature (oC)
16
14
12
10
8
6
4
2
0
0
1
2
3
4
Time (h)
5
Figure 4.6 Thermal storage: front, right, top
60
6
7
20
18
Temperature (oC)
16
14
12
10
8
6
4
2
0
0
1
2
3
4
5
6
7
Time (h)
Figure 4.7 Thermal storage: front, right, bottom
20
18
Temperature (oC)
16
14
12
10
8
6
4
2
0
0
1
2
3
4
Time (h)
5
Figure 4.8 Thermal storage: front, left, top
61
6
7
20
18
Temperature (oC)
16
14
12
10
8
6
4
2
0
0
1
2
3
4
5
6
Time (h)
Figure 4.9 Thermal storage: front, left, bottom
20
18
Temperature (oC)
16
14
12
10
8
6
4
2
0
0
1
2
3
4
5
Time (h)
Figure 4.10 Thermal storage: back, left, top
62
6
7
20
18
Temperature (oC)
16
14
12
10
8
6
4
2
0
0
1
2
3
4
Time (h)
5
6
7
6
7
Figure 4.11 Thermal storage: back, left, bottom
20
18
Temperature (oC)
16
14
12
10
8
6
4
2
0
0
1
2
3
4
5
Time (h)
Figure 4.12 Thermal storage: back, right, top
63
20
18
Temperature (oC)
16
14
12
10
8
6
4
2
0
0
1
2
3
4
5
6
7
Time (h)
Figure 4.13 Thermal storage: back, right, bottom
Looking at Figures 4.5-4.13, it is interesting to see that the thermal
storage holds its temperatures fairly well until the 3 hour mark. It is also
important to note the 15 minute gap that occurs in the test, easily
noticeable in each figure.
The final analysis on this test can be done by looking at the
temperature difference across the glycol air handler. Figure 4.14 shows
the temperatures across the glycol air handler.
64
18
16
Temperature (oC)
14
12
10
8
Inlet
Exit
6
4
2
0
1
2
3
Time (h)
4
5
6
7
Figure 4.14 Temperature across glycol air handler
As seen in Figure 4.14, the temperature gradient across the inlet
and exit to the glycol air handler needs to be a minimum of 5 oC in order
to obtain 3.5 kWth of cooling. With this required temperature gradient in
mind, the design of future thermal storage and air handler design
prototypes can be optimized.
The time period from which the thermal storage would most likely
have to be used is from 12pm-8pm daily, when the electricity rates are
the highest. It is important to note that the PV modules can run the whole
system until there is insufficient solar radiation. The DC compressor that is
installed in the HACS system can run off of a minimum voltage and power
of 90V and 855W. The PV modules were measured at 10am, 12pm and
5pm on May 21 2012. It is important to note the maximum working
65
voltage that the PV modules can supply is 165V. Table 4.3 shows the
recorded voltages at the specified times.
Table 4.3 Recorded voltages
Time of Day
Voltage (V)
10am
150
12pm
162
5pm
156
The voltages in table 4.3 were taken using a heating element as a
resistive load across the PV modules. The measured resistance of the
heating element was 18.5Ω. Using this information the power output of
the PV modules was calculated and is shown in table 4.4.
Table 4.4 Calculated power output of the solar modules
Time of day
Voltage (V)
Power (W)
10am
150
1248
12pm
162
1441
5pm
156
1315
The calculated power outputs of the solar modules in table 4.4, is
almost 1000W less than their nameplate ability solar modules (2300W).
This may be due to the solar panels being dirty and thorough cleaning
would solve this problem. As stated previously, the minimum power to
needed run the DC compressor is 855W. The listed voltage measurements
66
and power calculations are well above the minimums required to run the
DC compressor, showing that the PV modules could run the DC
compressor for approximately 7 hours per day.
It is also necessary to calculate the angle of the sun with respect to
the horizon during the previously specified times. Table 4.5 shows the
calculated solar elevation angle of the sun corresponding to the times that
the voltage measurements were taken [24].
Table 4.5 Solar elevation angle
Time
Solar Elevation Angle (o)
10am
40.89
12pm
65.20
5pm
42.85
Analyzing Table 4.5, it can be shown that the sun needs to be at a
minimum elevation angle of 40.89 degrees in order for there to be enough
solar radiation striking the solar modules to power the HACS. Therefore,
the solar panels could power the HACS from 10am till 5:30pm (7.5 total
hours) on the date of May 21 2012. With this assumption, and looking at
data of the solar elevation angle with respect to time and day of the year,
the HACS could be powered by the solar panels on an average of 10am –
5pm during the months of May through August [23], [24]. If the solar
modules can power the system until 5pm daily, the thermal storage may
67
only be needed for the peak energy rate hours of 5pm-8pm. Another
important point is that cooling may be needed prior and beyond the dates
of May through August. Looking at the monthly average temperatures of
April (22.7 oC) and September (31.1 oC), it could be noted that cooling
may be needed at those times, but not at such a high demand as the time
from May through August [23]. Lastly, it must be noted that as the solar
radiation decreases, during the month of September for example, the
thermal storage will be needed to run for longer periods of time. Thus it is
important to ensure adequate auxiliary thermal storage for days when
there is minimal solar radiation.
4:3 CHARGING THE THERMAL STORAGE
Understanding the amount of time it takes to charge the thermal
storage is a very relevant topic when discussing the abilities of the HACS.
In order to know the time required to charge the thermal storage, the
amount of energy required needs to be calculated. The amount of energy
required to charge the thermal storage was calculated for two specific
situations: pure water, and a 5% glycol solution. In order to calculate the
energy required to charge the thermal storage, the mass of liquid, Cryogel
balls, water bottles and oil containers needed to be calculated. Tables 4.6
and 4.7 show the distributed calculated masses for water and the 5%
glycol solutions.
68
Table 4.6 Pure water thermal storage
Substance
Amount
Mass (kg)
Water
Cryogel balls
12 oz water bottles
1 quart oil containers
40 gallons
8 cubic feet
30
25
151.00
79.46
10.65
23.66
total mass
264.77
Table 4.7 5% glycol solution thermal storage
Substance
information
mass kg
Water
Cryogel balls
12 oz water bottles
1 quart oil containers
glycol
38 gallons
8 cubic feet
30
25
2 gallons
143.8
79.46
10.65
23.66
18.44
total mass
276.01
Using the basic equations of heat transfer, the energy required to
charge the thermal storage to -1oC was calculated and is displayed in
Table 4.8 [25].
Table 4.8 Energy required to charge the thermal storage
Solution
Q (kJ)
Water
5% Glycol
110337
114313
The DC compressor can operate at a 3.5 kWth h-1 capacity as long
as the evaporator temperature is not below -12oC. The time to charge the
thermal storage could be modeled by dividing the energy required to
charge the thermal storage by the energy supplied by the compressor.
69
Table 4.9 shows the estimated times to charge the water and 5% glycol
solution thermal storage.
Table 4.9 Charge times
Charge
Time (h)
Solution
Water
5% Glycol
8.75
9.07
Table 4.8 shows that the estimated charge times for both solutions
are only differentiated by 18 minutes. This difference in time may be
explained by the small differences in specific heats of the two solutions.
Charging the thermal storage could be done overnight when the cost of
power is least expensive. It is important to note that these charge times
are only an estimate, and require verification by experiment.
4:4 VALIDITY OF RESULTS
With the initial data collected, it is clear from looking at Figures 4.2
and 4.3 that there is a lot of noise within the data. After much
troubleshooting, it was concluded that the numerous thermocouples all
plugged into one data acquisition device were the source of the noise. The
problem was that due to having so many thermocouples entering one
data acquisition device, the small currents within each thermocouple wire
were inducing noise into neighboring thermocouples. Through extensive
reconfiguring and problem solving, each thermocouple was tied to analog
ground through an 200 Ω resistor. This helped with the noise issues, and
70
allowed the only error within the temperature data to be a direct result of
the limits of the data acquisition device. The rotameter that was inserted
into the glycol thermal storage lines was meant for water, thus it is
already calibrated to have an accuracy of ±3.0%. The main error from the
rotameter then is the visual reading of it. Even though there is little to no
data yet on the system, the error that may be introduced when taking
measurements come from the refrigerant rotameter and the pressure
transducers inserted within the vapor and liquid refrigerant lines. The
refrigerant rotameter was calibrated upon purchase for refrigerant, and
thus is stated to be accurate between ±2.0% at full length. The pressure
transducers are very simple devices that introduce minimal error. Even
though they are not calibrated for R134a, they still read the line pressures
and those can be compared to an R134a conversion chart for accuracy.
The data collected is significant, and further testing should be able to
demonstrate the abilities of the HACS very well.
71
Chapter 5: DC VS. AC POWERED SYSTEM
5:1 COST COMPARISON
The original direct current “DC” powered system posed many
different advantages and disadvantages. The DC system was proposed in
order to accommodate the need for forward operating bases to achieve a
smaller power requirement, thus decreasing the size of the resupply
chains that travel to the forward operating bases, and to thus minimize
risk to soldiers. The initial system was conceived for locations with
minimal or no grid connectivity. A DC system was optimal for these types
of applications, because there would be minimal power losses from the PV
modules to the DC compressor due to the fact that no inverter was
needed.
As of late May 2012, planning and construction of a new second
stage prototype has been underway. The new system will be an
alternating current system (AC), with an AC compressor. As the research
on hybrid air conditioning systems has progressed, other uses for the
HACS have surfaced. From the perspective current issues such as global
climate change, the residential and commercial market for a HACS system
has become very intriguing. In order to understand which system best fits
the residential and commercial industry, analysis of the comparative costs
and advantages/disadvantages between DC and AC powered system was
performed. Regarding the cost analysis, it was discovered that the PV
72
modules cost was $293/module, or $2,093.00 for a total of 10 modules
[28]. The cost analysis between DC and two different AC systems is
shown in Tables 5.1-5.3.
Table 5.1 DC system prices [28], [29]
DC System Parts
Manufacturer / Part No.
Price
DC Compressor 1 ton
(R134a)
Motor Controller
Masterflux SIERRA050982Y3
Masterflux 025F0062-01
$
675.00
$
819.00
2 Thermostats
LUX TX500E
$
100.00
Thermal Storage
Temperature Controller
HVAC air handler
Omron E5AX
$
200.00
Air Con ACN1318HPCCOEV
$ -
Glycol Air handler
LG LSN122HE
$
440.00
Variac
STACO Energy Products
$
222.00
2 Solenoid Valves
Parker 6B05
$
250.00
Unit Price (Excludes PV
modules)
$2,706.00
Total Unit Price
$5,636.00
Table 5.2 AC system one [30], [31] *Included with compressor purchase
AC System Parts
Manufacturer / Part No. Price
AC Compressor 1 ton
(R410a)
Inverter
2 Thermostats
Thermal Storage
Temperature Controller
HVAC air handler*
Glycol Air handler
Ramsond R37GW2
$ 830.00
SMA Sunny Boy 700-US
LUX TX500E
Omron E5AX
$1,038.00
$ 100.00
$ 200.00
Ramsond
Ramsond replacement coil
195
Parker 6B05
$
$
2 Solenoid Valves
Unit Price (Excludes PV
modules)
Total Unit Price
195.00
$ 250.00
$ 2,613.00
$5,543.00
73
Figure 5.3 AC system with variable speed compressor [28], [31], [32]
AC System With Variable
Speed Compressor
Manufacturer / Part No.
Price
Variable AC Compressor 1 ton Mitsubishi
(R410a)
MSZ/MUZFE09NA
2 Thermostats
LUX TX500E
Thermal Storage
Omron E5AX
Temperature Controller
HVAC air handler*
Omron E5AX
Glycol Air handler
LG LSN122HE
2 Solenoid Valves
Parker 6B05
Inverter
SMA Sunny Boy 700-US
Unit Price (Excludes PV
modules)
$ 1,516.00
Total Unit Price
$6,474.00
$
$
100.00
200.00
$
$ 440.00
$ 250.00
$ 1,038.00
$3,544.00
It is clear that the price of the AC system in table 5.2 is a little less
than that of a DC system. The original HACS system was built as a DC
system in order to make it usable in forward operating basis with no grid
connection. On the other hand, if one were to install the original DC HACS
for residential and commercial use, and wanted to feed the excess PV
power back into the grid, an inverter would need to be purchased. The
added cost of an inverter, such as the one in table 5.2, for a DC system
would increase the capital cost by another $1,038.00, making the DC
system even less cost-effective.
In order to avoid the cost of an inverter in the DC powered system,
alternative uses for the excess PV power were discussed. A DC specific
power outlet could be installed within the residency and used to power
multiple contraptions, such as those listed in table 5.4.
74
Table 5.4 Excess PV power options for DC powered system
Electric car charging station
Hot water heater
Electronic accessory charging port
Electric stove – oven heating element
Lighting
The ideas presented in table 5.4 could offer great advantages. In
order to implement any of these excess PV power options, a DC specific
outlet would need to be installed within the house, further increasing the
parts list and capital cost of the DC powered system.
The comparison in price of an AC powered HVAC system being less
expensive versus a HVAC system with a DC compressor is also due to the
ubiquity of the AC powered system. Because AC powered HVAC systems
are highly mass-produced, their costs are much lower, even to the degree
that adding an inverter to the initial cost of the system still keeps it more
cost effective than a DC powered system.
Installing an AC powered system may also be simpler due to the
fact the HVAC manufacturers are more familiar with AC powered systems
than with DC powered systems. The ease at which the excess PV power
can be used is also very intriguing. Through an inverter, the excess PV
power can be fed directly back into the grid, allowing users to further
increase their cost savings on electricity. Alternatively, the excess PV
75
power can be supplied to any power outlet within the residency without
any specific added installations being performed.
5:2 PERFORMANCE COMPARISONS
From a thermal standpoint, both the DC and AC powered systems
should perform similarly. The thermal storage should charge and
discharge in comparable intervals of time. The conventional air handlers
will have similar cooling powers and will draw analogous electrical power.
Addressing the electrical performance of each system, however, allows
the main differences between the systems to become evident.
The DC powered system will have minimal power losses from the
PV modules to the DC compressor. This will allow for maximum use of the
power produced from the PV modules to run the system. Over long
periods of time, the small amount of extra solar radiation able to be used
for powering the system may have a cumulative effect on electricity
savings. The only problem with the DC powered system is that difficulties
are encountered when one wants to figure out what to do with excess PV
power. As of now, the original HACS does not supply excess PV power to
the grid, thus missing its potential to vastly decrease the meter reading.
Lastly, this DC powered system can easily be implemented for off-grid use
because of its relative simplicity; everything is DC powered and fewer
components are required to build the system.
76
The AC powered system’s main fault is the electrical losses through
the inverter. The inverter that is being installed has a maximum efficiency
of 93.3% and a California Energy Commission (CEC) efficiency of 91.5%
[31]. This 6.7-8.5% loss can add up quantitatively over long periods of
time, and could result in not only electrical losses but long term economic
losses. Because of this power loss through the inverter, the PV modules
will not be able to run the system for equal amounts of time during each
day, when compared to the DC powered system. On the other hand, the
ease of installation along with the ability to casually feed power back into
the grid will allow for large cost savings. All in all, the electrical
advantages and disadvantages between the two systems are very clear.
In order to make the DC system have the ability to perform similarly to
the AC powered system, i.e., to feed excess power back to the grid, the
capital cost will increase. Even with the AC powered system’s initial
electrical losses, it is clear the system is the more economical option, and
therefore represents a better model for residential and commercial use.
The pros and cons of the AC and DC powered systems can be observed in
Table 5.5.
77
Table 5.5 Pros and cons of AC and DC powered systems
AC Powered System
Pros
Ability to feed
excess PV
power back to
the grid
Price
DC Powered System
Cons
Electrical losses
through the
inverter
Pros
Minimal
electrical losses
Not easily ready
for off grid use
Ready for off
Needs added
grid applications inverter for grid
tied applications
What to do with
excess DC
power
Ease of
installation
Cons
Price
5:3 COEFFICIENT OF PERFORMANCE COMPARISONS
Coefficient of performance (COP) is the best indicator of the
operating efficiency of a heat pump. As of now, there is not enough
information to get the exact COP of the HACS using the equations
discussed in Chapter 3. An estimated COP of the HACS can be obtained by
performing operational research on the compressor performance, and
making some basic operating assumptions. Since data on the HACS was
collected for only a few days, the estimated COP will then correspond to
the day the PV modules were tested (May 21 2012). The factors that were
researched and assumed in order to estimate the COP of the HACS are
outlined in Tables 5.6 and 5.7 [27].
78
Table 5.6 Researched assumptions for DC powered system
Researched Assumptions for DC system
Power Input
cooling power of HVAC air handler
Thermal storage evaporator cooling power
Cooling power of glycol air handler
PV power supplied
Grid Power supplied
Mass flow of the refrigerant
glycol pump power
glycol air handler power
HVAC air handler power
condenser fan power
3.5 kW
3.5 kW
3.5 kW
1.150 kW
1.150 kW
62.79 kg/hour
35 W
200 W
150 W
150 W
Table 5.7 Researched assumptions for AC powered system *powered from the compressor [30]
Researched Assumptions for AC system
Power Input
cooling power of HVAC air handler
Thermal storage evaporator cooling power
Cooling power of glycol air handler
PV power supplied
Grid Power supplied
Mass flow of the refrigerant
glycol pump power
glycol air handler power
HVAC air handler power
condenser fan power
3.5 kW
3.5 kW
3.5 kW
1.092 kW
1.092 kW
62.79 kg/hour
35 W
200 W
0 W*
0 W*
Along with the outlined conventions in Tables 5.6 and 5.7, it was
assumed that the PV modules would power the system for 7 hours out of
the day, and the thermal storage would be discharging for 4 hours of the
day (5-9pm).
As discussed in chapter 3, there are three modes of operation; 1)
compressor cycling refrigerant to the conventional air handler, 2)
compressor cycling refrigerant to the thermal storage, 3) thermal storage
79
discharging through the glycol air handler. Along with these three modes
of operation, the HACS can be either powered from the grid or the PV
modules. When the system is powered from the grid and the compressor
is cycling refrigerant to either the conventional air handler or the thermal
storage, the coefficient of performance can be represented by equation 2.
Equation 2 can also be used to calculate the COP of the system when the
thermal storage is discharging and being run from the grid. When the
system is being powered by the PV modules, the power input to the
system is essentially free. It is important to note that equation 2 does not
take this into account. In order to calculate the COP when the PV modules
are running the system, the nameplate power consumption of each
running device is added up in order to figure out the power supplied. In
order to find the COP of the HACS system as a whole, equation 2 is
plugged into equation 3, which integrates over time allowing for a time
averaged COP to be calculated.
With the previously discussed assumptions, the COP of the original
prototype can be calculated and compared to the COP of conventional
HVAC units. Also the COP of the second prototype AC powered system can
be estimated to get a good understanding of its projected operating
efficiencies. For calculating the COP of the AC powered system, the
inverters efficiency (91.5%) was included in the calculation [31]. The
80
calculated COP’s for both the original HACS prototype and the AC powered
system are shown in Table 5.8.
Table 5.8 Calculated coefficients of performance
System
COP
HACS DC Powered
5.01
HACS AC Powered
5.03
MASTERFLUX SIERRA05-0982Y3
3.31
Ramsond AC Compressor
3.20
Table 5.8 illustrates that the AC powered system has the highest
COP. This may be due to the fact that the system requires slightly less
energy compared to the DC powered system. Also it is important to note
that the original COP of the MASTERFLUX DC compressor that was used
for the first prototype system was 3.31. It is also important to compare
the separate time independent COP’s of when the HACS is running in its
different modes of operation. Table 5.9 through 5.10 shows the calculated
COP’s during the different modes of operation for both the DC and AC
powered systems.
Table 5.9 Breakdown of COP for the DC powered HACS
Power
Supply
Conventional
HVAC Loop
Charging the
Thermal Storage
Discharging Thermal
Storage
Grid Power
3.043
3.043
14.89
PV Power
3.043
3.043
14.89
81
Table 5.10 Breakdown of COP for AC powered HACS
Power
Supply
Conventional
HVAC Loop
Charging the
Thermal Storage
Discharging Thermal
Storage
Grid Power
3.205
3.205
14.89
PV Power
2.954
2.954
13.72
Looking at table 5.9, the COP of the DC powered system when the
HACS is being powered by the grid or PV modules is identical. This can be
explained by the previous assumptions listed for calculating the COP. Lack
of data collected with the system running plays a major role in the
assumptions used to calculate the COP. When further testing is done, the
COP differences between running the system from the grid or PV modules
can be further differentiated. For the AC powered system, there is a
greater difference between the COP of the grid powering the system and
the PV modules powering the system. This can be explained due to the
losses through the inverter when the PV modules are powering the
system. It is also important to note the extremely high COP when the
thermal storage is discharging. This is due to the fact that the glycol pump
and air handler require minute amounts of power compared to running
the compressor while providing similar cooling loads. Lastly, the higher
COP’s as displayed in table 5.8 of both the DC and AC powered systems
strongly suggests that the HACS design could outperform conventional
HVAC units.
82
5:4 POWER SAVINGS
The main reason for the creation of the HACS is to save energy. In
order to fully understand the capabilities of the HACS, it is necessary to
perform an analysis of the projected energy savings. As discussed in the
previous sections, the PV panels could be assumed to run the system from
10am to 5pm daily for the months of May through August. The costs per
kWh of electricity Arizona Power Supply’s (APS) super peak energy is
outlined in Table 5.11 [5].
Table 5.11 APS super peak energy plan [5]
Rate
$/kWh
Time
Off Peak
$
0.05252
12am-12pm, 7pm-12am
Peak
$
0.24445
12pm-3pm, 6-7pm
Super Peak
$
0.49445
3pm-6pm
Using the outlined energy plan in Table 5.11, one can calculate the
comparative costs to run the HACS system vs. a conventional HVAC unit
with no PV modules. Table 5.12 shows the projected cost to run the DC
and AC powered HACS system, compared with their respective systems
with no thermal storage or PV modules during the months of May through
August.
83
Table 5.12 Projected savings
System
Daily Cost $
Cost from May-August ($)
HACS DC Powered
$ 0.87
$
106.72
Conventional DC
Powered
$ 3.35
$
411.96
HACS AC Powered
$ 0.83
$
101.84
Conventional AC
Powered
$ 3.18
$
391.18
As is evident in Table 5.12, adding thermal storage and PV modules
greatly reduces the operating costs of the system. Even though the initial
costs for systems with thermal storage and PV modules are greater, the
added performance benefits and cost savings in the long run are
substantial.
84
Chapter 6: CONCLUSIONS AND RECOMMENDATIONS
This research has the potential to contribute to numerous fields of
study. When the prototype system was first a plan on paper, its purpose
was to lower energy usage in forward operating bases, and reduce electric
costs in residential homes. Not only does the conceived prototype
successfully show the potential of addressing both needs, but it also gives
an indication of the potential to resolve many more problems. The
installed data collection devices and constructed data compiling programs
provide an excellent method of data collection and analysis. The
coefficient of performance equation that has been conceived provides a
solid basis with which hybrid air conditioning systems can be compared to
conventional HVAC units. It is also important to note that the HACS
successfully showed the ability to store energy for later use.
Both the DC or AC current systems contain multiple advantages.
The DC system allows for off-grid applications; the excess PV power can
be used to heat water for showers or to charge batteries for vehicles. An
AC current system offers the ease of grid connection, and greater
economic viability. This system as a whole has the ability to move the
whole energy sector to operate at higher efficiencies, through the
methods of smoothing out power generation and expenditure.
When the second prototype HACS system is completed, further
data can be collected to confirm it capabilities. The second HACS will be
85
an updated system that will include improvements on the structural and
electrical aspects. A complete analysis of the systems performance,
efficiency, and benefits can be performed.
86
Chapter 7: FUTURE WORK
In order to fully appreciate the proposed system, testing needs to
be completed for the duration of one calendar year. More temperature
sensors should be installed within the thermal storage in order to gain an
even better understanding of the thermal properties within the freezer.
Also, temperature sensors should be placed at the fan inlet and exit of
each air handler in order to collect data on the air temperatures being
across the air handlers. The HACS is a heat pump, thus it can run in
forward (cooling) and reverse (heating). A comprehensive thermodynamic
model and analysis, along with data collection would allow for a complete
understanding of the advantages of the system. From the knowledge
gathered from constructing the original DC HACS system and building the
second AC powered prototype, a panel should be convened to further
analyze how to package the system more efficiently. After testing and
data analysis, the projected costs of running the system should be
compared to actual runtime costs for further insight to the economic
advantages of the system. Finally, a team should be created to form a
company in order optimize the packaging of the system and start
production on a large-scale basis.
87
REFERENCES
[1] Cryogel, “Ice Ball Thermal Storage.” San Diego California, June 2012,
Web. <cryogel.com>
[2] Petrecca Giovanni, Industrial Energy Management “Principles and
Applications.” Norwell, MA: Kluwer Academic Publishers, 1993.
[3] “The Engineering Toolbox,” May, 2012 Web.
<http://www.engineeringtoolbox.com/heat-condenser-evaporatord_881.html>.
[4] “Program announcement for FY 2013 Environmental Security
Technology Certification Program (ESTCP) Installation Energy” BAA
February 2, 2012, U.S. Army Corps of Engineers, Humphreys
Engineer Center Support Activity.
[5] Jubran, Sadiq. Modeling and Optimization of Hybrid Solar PV-Powered
Air Conditioning System with Ice Storage, Arizona State University,
December 2011.
[6] Balmer, T. Robert, Modern Thermodynamics, Burlington, MA: Elsevier
Inc. 2011.
[7] "Vapor-compression refrigeration." Wikipedia. 13 May, 2012 Web.
<http://en.wikipedia.org/wiki/Vapor-compression_refrigeration>.
[8] D.S. Kim, C.A. Ferreira Infante, Solar refrigeration options – a state-ofthe-art review, Burlington, MA. Elsevier Inc. August 6, 2007.
[9] Otanicar, Todd. "Prospects for Solar Cooling - an Economic and
Environmental Assessment." Solar Energy86.5 (2012): 1287. Print.
[10] Global Institute of Sustainability [GIOS]. Sustainability Initiatives
Tour: Self-Guided Tour of the Tempe Campus.2011. Arizona State
University.
[11] Ice Energy, “Ice Bear Energy Storage.” May, 2012 Web.
<http://www.ice-energy.com/ice-bear-energy-storage-system>.
88
[12] Ice Bear “Product Sheet.” May, 2012 Web.
<http://www.iceenergy.com/stuff/contentmgr/files/1/b5fef8f4e945
bef09e48aca6714b5c51/download/ice_bear_product_sheet.pdf>.
[13] Denis Du Bois. “Ice Energy’s Ice Bear Keeps Off-Peak Kilowatts in
Cold Storage to Reduce HVAC’s Peak Power Costs.” Energy
Priorities Magazine, January, 16 2007
<http://energypriorities.com/entries/2007/01/ice_energy_peak_po
wer.php>.
[14] Luftig T. Jeffrey, Jordan S. Victoria, Design of Experiments in Quality
Engineering, New York. McGraw-Hill, 1998.
[15] H.E. Burroughs, Shirley J. Hansen, Managing Indoor Air Quality,
Lilburn, GA: The Fairmont Press, Inc. Sep 1, 2004.
[16] “Citi-Data,” May, 2012 Web. <http://www.citydata.com/forum/phoenix-area/1092335-what-do-you-set-your-c4.html>.
[17] EVAPCO Total Heat Versus Sensible Heat Evaporator Selection
Methods and Applications, Taneytown Maryland, EVAPCO, Inc.
2009.
[18] Beckwith Thomas G., Marangoni Roy D., Lienhard John H.,
Mechanical Measurements, 5th edition. Massachusetts: AddisonWesley Publishing Company, 1995.
[19] Setra Sensing Solutions, “Model 209 Pressure Transducer
Specifications” May, 2012 Web,
<http://www.setra.com/ProductDetails/209_HVAC.htm>.
[20] Instrumart.com “King 7200 Series Specifications” May 2012 Web,
<http://www.instrumart.com/products/18082/king-instrument7200-series-rotameter>.
[21] Cen-Tech “Seven function digital multimeter; Set up and operating
instructions,” May, 2012 Web,
<http://www.imarksweb.net/aws/view.php?u=aHR0cDovL3d3dy5o
89
YXJib3JmcmVpZ2h0LmNvbS9tYW51YWxzLzk4MDAwLTk4OTk5Lzk4
MDI1LnBkZg==>.
[22] National Instruments SCB-100 user Manual. National Instruments
Corporation April, 2007
<http://www.ni.com/pdf/manuals/371224b.pdf>.
[23] wunderground.com June, 2012 Web,
<http://www.wunderground.com/
history/airport/KPHX/2012/3/15/DailyHistory.html?req_city=Tempe
&req_state=AZ&req_statename=Arizona>
[24] Duffie A. John, Beckman A. William, Solar Engineering of Thermal
Processes. 3rd ed. Hoboken New Jersey, Jonh Wiley & Songs, Inc.
2006.
[25] Giancoli G. Douglas, Physics: Principles with Applications, Sixth
Edition. Saddle River New Jersey, Prentice Hall. 2005.
[26] Masterflux, “SIERRA05-0982Y3, Brushless DC Variable Speed
Compressor Technical Data Sheet,” June 2012, Web,
<masterflux.com>
[27] Google.com “100 Watt PV Module,” May 2012, Web,
<http://www.google.com/search?sugexp=chrome,mod=5&sourceid
=chrome&ie=UTF8&q=solar+module#hl=en&tbm=shop&sclient=psyab&q=solar+module+100+watt&oq=solar+module+100+watt&gs_
l=serp.3...14565.14702.4.15437.2.2.0.0.0.0.110.210.0j2.2.0...0.0.U
GNRBWaXiGo&pbx=1&bav=on.2,or.r_gc.r_pw.r_qf.,cf.osb&fp=5dc
b926e972a056d&biw=1280&bih=685>
[28] Google Products, “LG HVAC System.” May, 2012 Web.
<http://www.google.com/products/catalog?q=1+ton+HVAC+air+h
andler&hl=en&bav=on.2,or.r_gc.r_pw.r_qf.,cf.osb&biw=1280&bih
=685&um=1&ie=UTF8&tbm=shop&cid=1821693898546912482&sa=X&ei=peSNT47YLc
He2QWr1PmODA&ved=0CFAQ8gIwAA>.
90
[29] Vetco Electronics, “Cables Connectors and More.” May, 2012 Web.
<http://shop.vetcosurplus.com/catalog/product_info.php?products_
id=7787>.
[30] Ramsond Sensible Solutions June, 2012 Web,<http://ramsond.com/>
[31] SMA Solar Technology. May, 2012 Web. <http://www.smaamerica.com/en_US.html>.
[32] Comfort.com, May, 2012 Web.
<http://ecomfort.com/products/mitsubishi-mszfe09namuzfe09namr-slim-wall-mounted-single-zone-heat-pump-9000btu/3363>.
[33] Bell, Arthur A. HVAC equations, data, and rules of thumb. 2nd ed. The
Mcgraw-Hill Companies, 2008.
91
APPENDIX A
TEST PROCEDURES
92
Experiment 1: List of Variables
Independent
Variables
Dependent
Variables
Constant
Variables
Room
Temperature
/ load
Energy used
to charge the
thermal
storage
DC
compressor
RPM
Outside
temperature
Cooling power of
HVAC air handler
Energy
required to
run the
system
Glycol flow
rate
Solar radiation
Cooling power of
glycol air handler
How long TS
lasts before
complete
discharge
Fan speed of
glycol air
handler
Max cooling
power
Non-Manipulated
Variables
Calculations
Cost of grid
power / Energy
savings
COP of system
Load on HACS vs.
Room
temperature
PV power
consumed vs.
supplied
Experiment 1 procedure
A. Day 1
1. Turn on system
i. Turn on system at 7pm
2. Set thermostats
i. Low thermostat (HVAC air handler)
a. Set to 72 degrees
ii. High thermostat (Glycol air handler)
a. Set to 73 degrees
3. Running schedule
i. 7pm-7am
a. Let system run off the grid, meeting the room
temperature requirements and charging the
thermal storage when HVAC unit is not
running.
93
ii. 7am-12pm
a. Observe amount of ice storage accumulated at
7am (record this)
b. Let the system run off combined grid/PV power
c. Observe amount of ice storage accumulated by
12pm (record this)
iii. 12pm-7pm
a. Let system run off of PV power as long as
possible.
b. Once there is insufficient PV power, turn off
HVAC air handler side, and run only the glycol
thermal storage system
Take note of how much ice had built up
at this point
c. Set the high thermostat to 73 degrees
Note – if not enough ice has built up let
conventional HVAC side stay on for
these hours and be powered by PV/grid
B. Day 2
1. Running schedule
i. 7pm-7am
a. Set low thermostat to 72 degrees
b. Set high thermostat to 73 degrees
c. Let system run off of grid power over night to
meet room temp demands and charge the
thermal storage
Note ice storage volume at 7pm
ii. 7am-12pm
a. Let system run off of PV/grid power
b. Keep both thermostats at the same setting
Note ice storage volume at 7am and
12pm
94
iii. 12pm-7pm
a. Run system off the PV power only until
insufficient PV power is supplied
b. Once there is not enough PV power, turn off
the HVAC side and compressor. Only use the
glycol thermal storage
Note ice storage at moment when
HVAC/compressor is turned off.
Record the ice storage volume at 7pm
C. Day 3
1. Run schedule
i. 7pm-7am
a. Set low thermostat to 72 degrees
b. Set high thermostat to 73 degrees
c. Let system run off of grid power over night to
meet room temp demands and charge the
thermal storage
Record the ice storage volume 7am
ii. 7am-12pm
a. Let system run off of PV/grid power
b. Keep both thermostats at the same setting
Record the ice storage volume at 12pm
iii. 12pm-7pm
a. Run system off the PV power only until
insufficient PV power is supplied
b. Once there is not enough PV power, turn off
the HVAC side and compressor. Only use the
glycol thermal storage
Record the ice storage volume
D. Day 4
1. Run schedule
i. 7pm-unknown
a. Discharge the thermal storage fully
Observe how long the TS lasts (time)
Note when cooling power gets below 1
ton
E. Repeat (A-D) with setting the two thermostats within a range of
(66-80oF) in 2o increments.
95
Experiment 2: Variables
Independent
Variables
Glycol flow
rate
Dependent
Variables
Constant
Variables
Energy used
to charge the
thermal
storage
DC
compressor
RPM
Outside
temperature
Cooling power of
HVAC air handler
Energy
required to
run the
system
Room
temperature
/ load
Solar radiation
Cooling power of
glycol air handler
How long TS
lasts before
complete
discharge
Fan speed of
glycol air
handler
Max cooling
power
Non-Manipulated
Variables
Calculations
Cost of grid
power / Energy
savings
COP of system
Load on HACS vs.
Room
temperature
PV power
consumed vs.
supplied
96
Experiment 3: Variables
Independent
Variables
DC
compressor
RPM
Dependent
Variables
Constant
Variables
Energy used
to charge the
thermal
storage
Glycol flow
rate
Outside
temperature
Cooling power of
HVAC air handler
Energy
required to
run the
system
Room
temperature
/ load
Solar radiation
Cooling power of
glycol air handler
How long TS
lasts before
complete
discharge
Fan speed of
glycol air
handler
Max cooling
power
Non-Manipulated
Variables
Calculations
Cost of grid
power / Energy
savings
COP of system
Load on HACS vs.
Room
temperature
PV power
consumed vs.
supplied
97
Experiment 4: Variables
Independent
Variables
Dependent
Variables
Constant
Variables
Fan speed of
glycol air
handler
Energy used
to charge the
thermal
storage
DC
compressor
RPM
Outside
temperature
Cooling power of
HVAC air handler
Energy
required to
run the
system
Room
temperature
/ load
Solar radiation
Cooling power of
glycol air handler
How long TS
lasts before
complete
discharge
Glycol flow
rate
Max cooling
power
Non-Manipulated
Variables
Calculations
Cost of grid
power / Energy
savings
COP of system
Load on HACS vs.
Room
temperature
PV power
consumed vs.
supplied
98