1
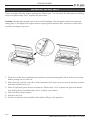
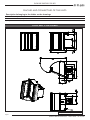
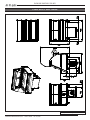
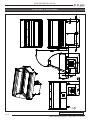
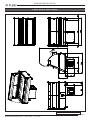
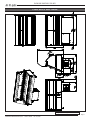
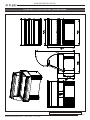
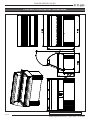
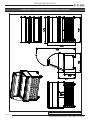
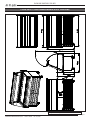
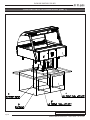
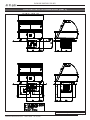
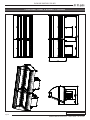
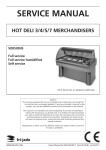
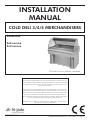
INSTALLATION
MANUAL
COLD DELI 3/4/5 MERCHANDISERS
VERSIONS
Self service
Full service
CD 3 self service on pedestal underframe
- NOTICE This manual is prepared for the use of trained Service Technicians and
should not be used by those not properly qualified. If you have attended
a trianing for this product, you may be qualified to perform all the procedures in this manual.
This manual is not intended to be all encompassing. If you have not
attended a training for this product, you should read, in its entirety, the
repair procedure you wish to performto determine if you have the necessary tools, instruments and skills required to perform the procedure.
Procedures for which you do not have the necessary tools, instruments
and skills should be performed by a trained technician.
Reproduction or other use of this Manual, without the express written
consent of Fri-Jado, is prohibited.
WWW.FRIJADO.COM
Installation Manual Cold Deli 3/4/5 form 9123584 rev. 09/2007
EMPTY PAGE
Page 2
Installation Manual Cold Deli 3/4/5 form 9123584 rev. 09/2007
Index
Index................................................................................................................................ 3
General technical data..................................................................................................... 4
Technical data ..................................................................................................................................4
Installation procedures..................................................................................................... 5
Unpacking and removing the unit from the pallet................................................................................5
Location............................................................................................................................................5
Separately packed parts.....................................................................................................................6
Electrical supply.................................................................................................................................7
Legs/castors......................................................................................................................................7
Test run.............................................................................................................................................7
Instructions for operators....................................................................................................................7
Placing and connecting of the units.................................................................................. 8
Cold Deli 3 full serve.........................................................................................................................8
Cold Deli 3 self serve.........................................................................................................................9
Cold Deli 4 full serve.......................................................................................................................10
Cold Deli 4 self serve.......................................................................................................................11
Cold Deli 5 full serve.......................................................................................................................12
Cold Deli 5 self serve.......................................................................................................................13
Cold Deli 3 on pedestal underframe.................................................................................................14
Cold Deli 4 on pedestal underframe.................................................................................................15
Cold Deli 5 on pedestal underframe.................................................................................................16
Cold Deli 3 on underframe with castors............................................................................................17
Cold Deli 4 on underframe with castors............................................................................................18
Cold Deli 5 on underframe with castors............................................................................................19
Cold Deli drop-in dimensions (part 1)...............................................................................................20
Cold Deli drop-in dimensions (part 2)...............................................................................................21
Cold Deli 3 and 4 models coupled...................................................................................................22
Page 3
Installation Manual Cold Deli 3/4/5 form9123584 rev. 09/2007
GENERAL TECHNICAL DATA
General technical data
This manual covers the Cold Deli Merchandisers. The Merchandisers are available in 3 sizes which
can be built into existing counters. Merchandisers can also be delivered on an under frame.
The Merchandisers are available in 2 versions:
• Self Service
• Full Service
All of the information, illustrations and specifications contained in this manual are based on the
latest product information availble at the time of printing.
Technical data
Type
Power
Fuses needed with power connection
230V, 1N ~ 50Hz (1 phase with zero)
Standard plug from factory single pole
CD 3
866 W
1x 10 A
CD 4
1068 W
1x 10 A
CD 5
1198 W
1x 10 A
Two-pole
earthed plug
16 A
< 70 dB(A)
2M2
3M1
195 kg
200 kg
250 kg
255 kg
1307 mm
1086 mm
1058 mm
1420 mm
100 mm
R134A
0.625 kg
Two-pole
earthed plug
16 A
< 70 dB(A)
2M2
3M1
225 kg
230 kg
290 kg
295 kg
1307 mm
1419 mm
1058 mm
1420 mm
100 mm
R134A
0.75 kg
Two-pole
earthed plug
16 A
< 70 dB(A)
2M2
3M1
265 kg
275 kg
340 kg
345 kg
1307 mm
1752 mm
1058 mm
1420 mm
100 mm
R404A
0.85 kg
sound pressure
Temperature class Self Service*
Temperature class Full Service*
Net Weight Self Service
Net Weight Full Service
Gross Weight Self Service
Gross Weight Full Service
Heigth
Width
Depth
Heigth with basis
Maximum Loading height
Refrigirant**
Amount of refrigirant
* Product temperature class according to NEN-EN 441-6
** The refrigerant complies with the environmental requirements applicable at the time of manufacturing of the unit.
Tools
• Standard set of tools.
• Metric wrenches, sockets and hex socket key wrenches.
• Multi meter and AC current clamp meter.
• Temperature tester.
• Insulation value tester (Megger).
Page 4
Installation Manual Cold Deli CD3/4/5 form 9123584 rev.9/2007
INSTALLATION PROCEDURES
Installation procedures
•
•
•
•
•
•
•
•
•
Unpacking of the unit.
Remove the pallet under the unit with the help of a fork lift.
Put the unit on his location.
Unpack and install all separately packed parts.
Remove all vinyl protection.
Check if there is enough free space around the unit (50 mm.).
Check the electrical supply.
Check all settings and make a test run with all functions switched on.
Give instructions to the operator.
Unpacking and removing the unit from the pallet
Immediately after unpacking the Merchandiser, check for possible shipping damage. If the Merchandiser is found to be damaged, save the packaging material and contact the carrier within 15
days of delivery. Remove the pallet under the unit with the help of a fork lift.
Location
The Merchandiser must be installed on a level surface. Level the unit with the adjustable legs. The
installation location must allow adequate clearances for servicing and for proper operation.
Installation Manual Cold Deli 3/4/5 form 9123584 rev. 09/2007
Page 5
INSTALLATION PROCEDURES
Separately packed parts
Clean and place all parts and/or accessories. Follow steps 1 to 3 to place the side glass and sliding
doors and follow steps 5 to 7 to place the pan frame .
Caution: Handle glass panels with care to avoid breakage. The side glass panels are tempered
safety glass. If the edges of the glass panels scrape against stainless steel, concrete or other hard
surfaces, breakage may occur.
1. Clean the inside, the removable parts and the accessories thoroughly with a cleanser and water
before putting the unit into use.
2.After cleaning, wipe the unit with a cloth moistened with clean water to remove cleanser residues
and then dry the entire unit.
3.Place all (optional) parts and/or accessories. Follow steps 1 to 3 to place the glass side panels
and sliding doors and follow steps 4 to 7 to place a pan frame.
4. Insert the plug into the socket
5. Switch on the unit.
6. Let the unit cool for at least half an hour before filling it with products.
Page 6
Installation Manual Cold Deli 3/4/5 form 9123584 rev. 09/2007
INSTALLATION PROCEDURES
Electrical supply
Prior to installation, test the electrical service to assure that it agrees with the specifications on the
machine data plate located on the middle backside panel near the controls. The connecting cable
for the unit must be equipped with an approved plug connection. If use is to be made of a permanent connection, the connecting cable must be connected to a manual on/off switch that is installed
near the unit in a clear visible way.
Legs/castors
Each Merchandiser is furnished on 120 mm adjustable legs. Units placed on a pedestal have no
adjustable legs. The pedestal must be installed on a level surface. Units placed on a underframe
are furnished with 2 swivel and 2 locking swivel castors.
Test run
Operate the cold deli merchandiser at a minimum temperature setting of 0°C, for 30 minutes. Within these 30 minutes the merchandiser should reach the adjusted temperature.
Instructions for operators
After installation of the Merchandiser, the operator of the unit has to be instructed.
The instruction has to cover the following subjects:
•
•
•
•
•
Programming and options.
Working of the unit.
Free space of unit for servicing and for proper operation.
Run through the user manual.
Cleaning of the unit.
•
How to react for obtaining information or making service calls.
Installation Manual Cold Deli 3/4/5 form 9123584 rev. 09/2007
Page 7
PLACING AND CONNECTING OF THE UNITS
Placing and connecting of the units
Description belonging to the lables on the drawings
Label
Description
1
Power cable, length 2,5 meters *
*) length is measured from the point where the cables comes out of the unit
1
Cold Deli 3 full serve
Placing and connecting the CD 3 full service
Page 8
Installation Manual Cold Deli 3/4/5 form 9123584 rev. 09/2007
PLACING AND CONNECTING OF THE UNITS
Cold Deli 3 self serve
Placing and connecting the CD 3 self service
Installation Manual Hot Deli 3/4/5 form 9123584 rev. 09/2007
Page 9
PLACING AND CONNECTING OF THE UNITS
1
Cold Deli 4 full serve
Placing and connecting the CD 4 full service
Page 10
Installation Manual Cold Deli 3/4/5 form 9123584 rev. 09/2007
PLACING AND CONNECTING OF THE UNITS
Cold Deli 4 self serve
Placing and connecting the CD 4 self service
Installation Manual Hot Deli 3/4/5 form 9123584 rev. 09/2007
Page 11
PLACING AND CONNECTING OF THE UNITS
1
Cold Deli 5 full serve
Placing and connecting the CD 5 full service
Page 12
Installation Manual Cold Deli 3/4/5 form 9123584 rev. 09/2007
PLACING AND CONNECTING OF THE UNITS
Cold Deli 5 self serve
Placing and connecting the CD 5 self service
Installation Manual Hot Deli 3/4/5 form 9123584 rev. 09/2007
Page 13
PLACING AND CONNECTING OF THE UNITS
Cold Deli 3 on pedestal underframe
Placing and connecting the CD 3 on pedestal underframe
Page 14
Installation Manual Cold Deli 3/4/5 form 9123584 rev. 09/2007
PLACING AND CONNECTING OF THE UNITS
Cold Deli 4 on pedestal underframe
Placing and connecting the CD 4 on pedestal underframe
Installation Manual Hot Deli 3/4/5 form 9123584 rev. 09/2007
Page 15
PLACING AND CONNECTING OF THE UNITS
Cold Deli 5 on pedestal underframe
Placing and connecting the CD 5 on pedestal underframe
Page 16
Installation Manual Cold Deli 3/4/5 form 9123584 rev. 09/2007
PLACING AND CONNECTING OF THE UNITS
Cold Deli 3 on underframe with castors
Placing and connecting the CD 3 on underframe with castors
Installation Manual Hot Deli 3/4/5 form 9123584 rev. 09/2007
Page 17
PLACING AND CONNECTING OF THE UNITS
Cold Deli 4 on underframe with castors
Placing and connecting the CD 4 on underframe with castors
Page 18
Installation Manual Cold Deli 3/4/5 form 9123584 rev. 09/2007
PLACING AND CONNECTING OF THE UNITS
Cold Deli 5 on underframe with castors
Placing and connecting the CD 5 on underframe with castors
Installation Manual Hot Deli 3/4/5 form 9123584 rev. 09/2007
Page 19
PLACING AND CONNECTING OF THE UNITS
Cold Deli drop-in dimensions (part 1)
Placing and connecting a CD built-in situation (part 1)
Page 20
Installation Manual Cold Deli 3/4/5 form 9123584 rev. 09/2007
PLACING AND CONNECTING OF THE UNITS
Cold Deli drop-in dimensions (part 2)
Placing and connecting a CD built-in situation (part 2)
Installation Manual Hot Deli 3/4/5 form 9123584 rev. 09/2007
Page 21
PLACING AND CONNECTING OF THE UNITS
Cold Deli 3 and 4 models coupled
Cold Deli 3 and 4 models coupled
Page 22
Installation Manual Cold Deli 3/4/5 form 9123584 rev. 09/2007
Fri-Jado B.V. • P.O. Box 560 • 4870 AN • Etten-Leur • The Netherlands • tel +31 76 50 85 400 • fax +31 76 50 85 444 • [email protected] • www.frijado.com