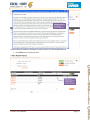
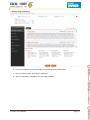
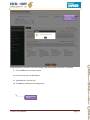
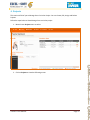
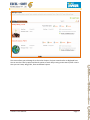
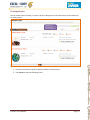
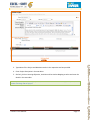
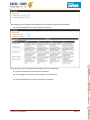
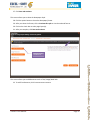
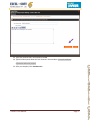
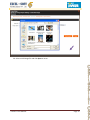
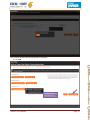
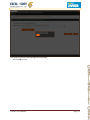
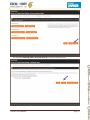
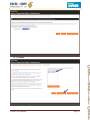
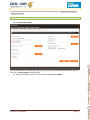
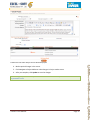
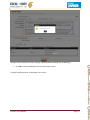
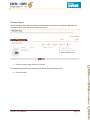
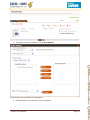
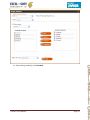
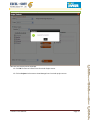
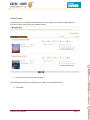
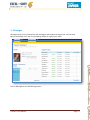
1
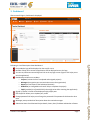
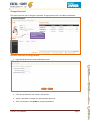
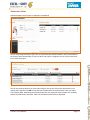
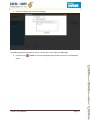
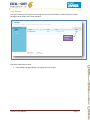
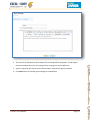
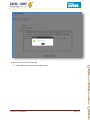
Project
Maker
Teacher’s User Manual
Version 1.1
Prepared by: Jessudass l Reviewed by: Joies
Excelsoft Technologies, Mysore
Contents
1.
Preface .............................................................................................................................................................. 3
2.
Sign In ............................................................................................................................................................... 4
3.
Dashboard ....................................................................................................................................................... 5
Edit Profile ............................................................................................................................................................................. 6
Change Password................................................................................................................................................................ 8
Submission Status ............................................................................................................................................................ 10
Marking Students’ Projects ................................................................................................................. 11
4.
Projects .......................................................................................................................................................... 16
Creating Project ................................................................................................................................................................. 18
Importing a Project ............................................................................................. Error! Bookmark not defined.
Edit Project .......................................................................................................................................................................... 41
Preview Project ................................................................................................................................................................. 44
Share Project.......................................................................................................... Error! Bookmark not defined.
Delete Project ..................................................................................................................................................................... 51
5.
Messages ....................................................................................................................................................... 53
View Message ..................................................................................................................................... 55
Reply Message .................................................................................................................................... 57
Compose Message .............................................................................................................................. 60
Move Message .................................................................................................................................... 65
Delete Message ................................................................................................................................... 67
Manage Folder ................................................................................................................................................................... 68
Add Folder ........................................................................................................................................... 68
Rename Folder .................................................................................................................................... 70
Delete Folder ....................................................................................................................................... 72
6.
Reports .......................................................................................................................................................... 73
My Projects .......................................................................................................................................................................... 74
Monitoring Project Report ............................................................................................................................................ 79
7.
Sign out .......................................................................................................................................................... 81
Teacher’s User Manual
Page 2
1. Preface
Abstract
The purpose of this User Manual is to help you access the functionalities provided in Project Maker
application. This User Manual provides step-by-step guidelines to make working with the application
easier and more effective, helping you to complete the activity successfully.
Audience Profile
Project Maker Application is intended for teachers to Create Creative and Curriculum based school
projects related to any subject. Teachers can Manage Projects, Mark the Projects, View students Report
and Manage Messages.
Typographic Conventions
Before starting, it is important to understand the Typographic Conventions used in this User Guide.
This
Represents
Italics
Input fields/ Links/ Messages displayed on
the screen
Bold
Menu/ Buttons/ Tabs displayed on the
screen
Note:
Teacher’s User Manual
A Note, providing additional information
about a certain topic
Page 3
2. Sign In
Sign In is the gateway to access the Project Maker. Enter the Project Maker URL in your web browser
and click, GO to view the Sign In screen.
Enter the following details to login:
1. Enter User name, Password and School code in the respective text box.
2. Click Sign In/ Press Enter in your keyboard to view Dashboard.
Note: Enter User Name, Password and School code as given to you. Please note that Password can be
case sensitive. Forgot password link helps you to retrieve the password if you forget.
Teacher’s User Manual
Page 4
3. Dashboard
After successful Sign In, Dashboard is displayed.
Following is a brief description about Dashboard:
Project Maker logo will be displayed on the top left corner
Number of days left to access the application will be displayed next to the logo
You can see, Welcome note and Sign out link on the top right corner (Sign out link helps you to
exit the application)
Dashboard provides access to Menu
o Projects (to view the list of completed and assigned projects)
o Messages (to organize your communication across the organization)
o Report (to view report of the Submitted Activities)
o Guidelines (to view guidelines that will help to complete the project)
o FAQ’s (provides list of possible FAQ’s that might arise while accessing the application)
Signed In Teacher’s Profile will be displayed in My profile pane
Edit Profile link allows you to Update your profile
Change password link helps you to Change the password if the password is disclosed to other
users
Messages pane provides brief description about the received messages
Submission Status lists Submitted Project details, Status, Start/ End date and Number of teams
Teacher’s User Manual
Page 5
Edit Profile
This section will brief you to update your profile. You can edit your Name, E-mail id, Phone number,
Address and change the image. Edit Profile link is in the Dashboard.
Click here to update
your profile
Follow the steps below to edit profile:
1. Click Edit Profile to view the following screen.
2. Edit the required data and click Update to save the changes.
Note: Click on Browse button to change the Photo.
Teacher’s User Manual
Page 6
Changes will be updated and a Success message ‘Profile updated successfully’ will be displayed.
3. Click OK to view the updated profile in Dashboard.
Teacher’s User Manual
Page 7
Change Password
This section will brief you to change the password. Change password link is provided in Dashboard.
Click here to Change
password
Follow the steps below to change password:
1. Click Change password to view the following screen.
2. Type Current password in the text box provided.
3. Enter New password of your choice in the text box.
4. Type the password once again in Confirm password text box.
5. After you complete, click Update to change the password.
Teacher’s User Manual
Page 8
A success message ‘Password changed successfully’ will be displayed.
6. Click OK to view Dashboard.
Note: You can exit the application and Sign In with New password
Teacher’s User Manual
Page 9
Submission Status
Submitted Status of the Projects is displayed in Dashboard.
You can view Assigned Projects status such as Submitted/ Not Submitted details, Start and End date of
the Project, Status and Number of Teams to which the project is assigned. You can click on View more
link to mark the project.
You can use the drop down list to select Class-Subject. You can also click on the date picker icon to
choose date range and click GO to view Activities scheduled for the selected dates. Once you select
Class-Subject/ Date, Submitted/ Not submitted Activities are displayed. Activity details such as Name,
Number of Submissions, Start date, Start time, End date and End time are displayed.
Teacher’s User Manual
Page 10
Marking Students’ Projects
This section will brief you to mark submitted projects. Click on View more link in Assigned projects pane
(Dashboard) to view this screen.
Click here to
Mark Project
Follow the steps below to mark submitted projects:
1. Click on Submitted Project name to view the following screen.
Click here to Add
Teacher’s Note
Click here to
view Editor
Detail
You can view Project Name, Group name, Submitted date and Editor’s name. Project submitted details
are marked with legends. This screen allows you to Mark Student Project, View Editor detail and
Teacher’s note.
2. Click Teacher’s Note to view list of Activity details provided by teacher at the time of creating
the project. (Teacher Notes will help you to evaluate the Project)
Teacher’s User Manual
Page 11
Click here to exit
this window
Teachers Notes to students is displayed. Use the scroll bar to view completed details.
3. Click Close icon to exit the window.
Click here to
Assign Grades
4. Click Observation icon
Teacher’s User Manual
to Assign Grades to the Project.
Page 12
5. Click the drop down list to select Type and Category name.
6. Click the drop down list to select Grades corresponding to each Rubric name.
7. Once you select Grades, Description is displayed.
8. After you complete, click Save to save the assigned grades.
Teacher’s User Manual
Page 13
Click here to exit
this window
Assigned grades are saved and a success message ‘Observations made successfully’ is displayed.
9. Click on Close icon to exit this window.
10. Click on Group name to add Remarks.
11. Type Remarks in the text area.
12. Click Save to complete the marking process.
Click here to add
remarks
Teacher’s User Manual
Page 14
A success message ‘Activity marked successfully’ is displayed.
Teacher’s User Manual
Page 15
4. Projects
This section will brief you to Manage Cross Curricular Project. You can Create, Edit, Assign and Delete
Projects.
Follow the steps below to View Manage Cross curricular project
1. Mouse-hover Projects menu to select.
2. Click on Projects to view the following screen.
Teacher’s User Manual
Page 16
This screen allows you to Manage Cross Curricular Projects. Projects created earlier are displayed here.
You can user the Filter by option and Search option to search Project using various search/ filter criteria.
Here you can Create, Assign, Edit, Share and Delete Projects.
Teacher’s User Manual
Page 17
Creating Project
You can create project manually, or export a project. Manage Cross Curricular Project screen allows you
to create project.
Click here to
Create Project
Follow the steps below to Create Project:
1. Click on a Curriculum to select, to which you wish to create project.
2. Click Create to view the following screen.
Teacher’s User Manual
Page 18
3. Type Name of the Project and Maximum marks in the respective text box provided.
4. Enter Project Description in the text editor.
5. Similarly, click on Learning Objectives, Activities and Curriculum Mapping to select and enter the
details in the text editor.
Note: Projects Description, Learning Objectives, Activities and Curriculum will be displayed as pdf file, while
student is working with the project.
Teacher’s User Manual
Page 19
Click here to
Select Teacher(s)
6. After you complete (Project Description, Learning objectives, Activities and Curriculum Mapping),
click on check box to Select Level(s), or click drop down list to Select Class.
7. Now, you will need to Add Teachers(s) to monitor this project. To add teacher(s) click Add
Monitoring Teacher(s).
Teacher’s User Manual
Page 20
Enrolled teacher(s) list will be displayed. You can view Teacher name, First name and Last name.
8. Click on the check box to Select teacher(s) and click OK.
Click here to
Add Rubrics
The selected Teacher(s) name will populate in Selected Teacher(s) pane.
9. Click View Rubrics to view the following pop up window.
Teacher’s User Manual
Page 21
Select Rubric(s) pop up window will be displayed. Type should Scholastic and Co-Scholastic.
10. Click the drop down list to select Type to be Scholastic.
Once you select Type, Class Subject and Category name will be displayed.
11. Click the drop down list to select Class and Subject.
12. Click Category name expand/ collapse button to view Rubric(s)
13. Click the drop down list to select Type to be Co-Scholastic.
Teacher’s User Manual
Page 22
If Type is selected as Co-Scholastic, then Category name will have Effective Communication, Empathy,
Group Project Rubric, Interpersonal relations and Time Management.
14. Click expand collapse button to view each of the Rubrics.
15. View the Rubric(s) and click Close icon to return to Create Cross Curricular Project screen.
16. Click Navigate to Project Maker.
Teacher’s User Manual
Page 23
Click here to Create
Project manually
This screen allows you to create project manually, or Import project.
17. To create a project manually, click Create a new project.
This screen will display Instructions to get started with the Project Maker. You can use the links on top/
Next button to proceed to the next screen.
18. Click About your project/ Next to view the following screen.
You can provide your Project details here.
19. Enter Project Title in the text box. (Unique name to identify the project)
20. Type a brief Project Description in the text area.
21. Click the date picker icon to select Start date and End date of the project.
22. Click Browse to change the image. (By default, Project maker image will be displayed). You can
also delete the Image if you do not require any image for your project.
23. Click the scroll bar down to view Save and continue.
Teacher’s User Manual
Page 24
24. Click Save and continue.
Here you can provide more details about your project.
25. Type Student-brief details in the text editor. (More brief details about the project)
26. Click the option button to choose Additional features.
Teacher’s User Manual
Page 25
27. Click Save and continue.
This screen allows you to select the Newspaper Style.
28. Click the option button to chose the Newspaper format.
29. After you select the format, click on Preview this style to view the selected format.
30. Click on the check box to select page layout(s).
31. After you complete, click Save and continue.
Click here to add
Text Resource
This screen allows you to add Resources such as Text/ Image/ Web links.
32. To add Text Resources, click Create new text resource.
Teacher’s User Manual
Page 26
33. Type Text resource title in the text box provided.
34. Type brief description about the Text resource in the text editor. (Provides additional
information about the project)
35. After you complete, Click Save Resource.
Teacher’s User Manual
Page 27
This resource has been saved message will be displayed.
36. Click OK.
Click here to add
Image Resource
Teacher’s User Manual
Page 28
37. To add Image Resources, click Create new mage resource.
38. Type Image Title and Image Caption in the respective text box and click Browse.
Note: Add Images that are relevant to the Project
Teacher’s User Manual
Page 29
39. Select a Valid image file and click Open to return.
Teacher’s User Manual
Page 30
Note: Image that you select can be as jpg, png, gif and tif file format.
The selected image will be replaced with the Project Maker image.
40. Click Save Resource.
Teacher’s User Manual
Page 31
This resource has been saved message will be displayed.
41. Click OK.
Click here to add
Web link Resource
Teacher’s User Manual
Page 32
42. To add Web link Resources, click Create new weblink resource. (Students will refer the web link to
acquire additional information about the project)
Note: Add Web links that are relevant to the Project
43. Type valid Website address in the text box provided. (You can click on Preview weblink to view
the added Website)
Note: Do not leave space while you enter the Web site address
44. Enter Website description in the text area.
45. Click Save Resource.
Teacher’s User Manual
Page 33
This resource has been saved message will be displayed.
46. Click OK to return.
Teacher’s User Manual
Page 34
47. Now click Publishing teams/ Save and continue to view the following screen.
48. Click the drop down list to select Number of teams you wish to include for the project.
Teacher’s User Manual
Page 35
49. Click Submit.
Teacher’s User Manual
Page 36
An automated reference number will be created for each publishing team. (env9a90 will be reference
number for Team-1)
Note: You can also print the reference numbers by clicking ‘Print reference numbers’ button.
50. Click Save and continue.
This is the last process of creating the project. You can view the overall Project Summary here. You can
also click on View/ Change to add/ edit data.
51. After you complete, move the scroll bar down to view Save and Finish.
Teacher’s User Manual
Page 37
52. Click Save and Finish to complete the project creation.
Here you can view created projects. Project details such as Title, Duration, deadline and description will
be displayed. This screen allows you to Export the project and Review or change project settings.
53. To export the created project, click on Export.
Teacher’s User Manual
Page 38
54. Click Save to save the project file in a desired location in your system.
55. Select a location and click Save.
The saved project will be in a zip file format. Later, you can Import the project if required. After you save
the project, you will return to Create Cross Curricular Project screen.
56. Now, click Save.
Teacher’s User Manual
Page 39
A success message Project created successfully will be displayed.
57. Click OK to view Manage Cross Curricular Project screen.
Created Projects are displayed here.
Teacher’s User Manual
Page 40
Edit Project
You can edit the project in order to add/ edit project details, resources, etc. Manage Cross Curricular
Project screen allows you to edit project.
Click here
Select Project
Follow the steps below to edit project:
1. Click on a Project you wish to edit.
2. Click on the expandable arrow to view details.
You can view project details such as Name, Type and Maximum marks. You can either click on the Close
icon, or collapsible arrow to close.
3. Click Edit to update the selected project.
Click here
to expand
Click here
to collapse
Click here to
edit project
Teacher’s User Manual
Page 41
Create Cross Curricular Project screen will be displayed.
4. Make required changes in the screen.
5. Click Navigate to Project Maker to make changes in Project maker screen.
6. After you complete, click Update to save the changes.
Note: We suggest you to edit the Project Name in Create Cross Curricular Project screen and also in the
Project Maker screen.
Teacher’s User Manual
Page 42
Changes will be saved and a success message Project updated successfully will be displayed.
7. Click OK to return to Manage Cross Curricular Project screen.
Created/ Updated projects are displayed in this screen.
Teacher’s User Manual
Page 43
Preview Project
This functionality allows you to preview the created project and send mail to students. Manage Cross
Curricular Project screen allows you to Preview projects.
Follow the steps below to preview project and assign to students:
1. Click on a project name you wish to Preview.
The selected project will pop up displaying Edit, Delete, Share and Preview links.
2. Click on Preview.
Teacher’s User Manual
Page 44
You can view the complete Project details here.
Teacher’s User Manual
Page 45
3. To assign this project to students, click on Select Students.
Select Students pop up window will be displayed.
4. Click drop down list to select Class, Team and Section.
Teacher’s User Manual
Page 46
List of students of the selected Class, Team and Section will populate in Available students pane. Now
you will need to select student(s) to assign the project.
5. Click on a student name to select.
Teacher’s User Manual
Page 47
6. To add student by name, click on a student name to select and click Add.
7. The selected student’s name will populate in Selected students pane.
8. To remove student from the selected list, click on a student name to select in Selected students
pane and click Remove.
9. To remove all the student(s) form the Selected list, click Remove All.
10. To add all the available students, click Add All.
Teacher’s User Manual
Page 48
11. After selecting student(s), click Send Mail.
Teacher’s User Manual
Page 49
Note: An auto-generated mail about the Project schedule will be sent to selected students
Mail Sent Successfully will be displayed.
12. Click OK to return to Preview Cross Curricular Project screen.
13. Click on Projects in the menu to view Manage Cross Curricular project screen.
Teacher’s User Manual
Page 50
Delete Project
Project(s) that are not required can be deleted in order to organize your project list. Manage Cross
Curricular Project screen allows you to delete projects.
Follow the steps below to delete project:
1. Click on a Project name you wish to delete.
The selected project will pop up displaying Edit, Delete, Share and Preview links.
2. Click Delete.
Teacher’s User Manual
Page 51
A confirmation message ‘Are you sure you want to delete? Will be displayed.
3. Click Yes to delete the selected project.
Teacher’s User Manual
Page 52
5. Messages
Messages allows you to communicate with Colleagues and Students through E-mail. You can Send,
Receive and Delete mails. You can also Manage folders to organize your mails.
Click on Messages to view the following screen.
Teacher’s User Manual
Page 53
Messages screen displays two panes. The left pane displays created folders. You can select a folder to
view list of related messages on the right pane with details such as senders name, subject and sent date.
You can click on the View link to view the complete message. In case if you need to reply for the
message, click on the reply link corresponding to the message that you wish to reply.
The table below provides brief description of icons displayed in Messages screen:
Icon
Allows
Add folder
Rename folder
Delete folder
Description
Click to add folder
Select a folder and click this icon to
rename folder
Select a folder and click this icon to
delete folder
Message screen allows you to:
a) View message
b) Reply to received message
c) Compose New Message
d) Move message from one folder to another
e) Delete message
f)
Manage folder
g) Add folder
h) Rename folder
i)
Delete folder
Teacher’s User Manual
Page 54
View Message
View message option allows you to view full message that you wish to read. Messages screen allows you
to view messages.
Click here to
view message
Follow the steps below to view message:
1. Select a folder to view messages.
2. Once you select a folder, you can view a list of messages of the selected folder in the right pane
with details such as senders name, subject and sent date.
Teacher’s User Manual
Page 55
3. Click on the Subject title to view the message.
Selected Message will be displayed. You can view Sender’s name, Subject and Message.
4. Click close icon
screen.
Teacher’s User Manual
/ Cancel to close the displayed pop up window and return to the Messages
Page 56
Reply Message
This section allows you to reply to any message that you have received from Parent/ teachers/ friends.
Messages screen allows you to view messages.
Click here
to reply
Follow the steps below to reply:
1. Click on Reply corresponding to the subject you wish to reply.
Teacher’s User Manual
Page 57
2. The name of the addressee and the subject of the message will be displayed in To and Subject
text boxes respectively as you are replying for the message sent by the addressee.
3. Type the reply that you wish to send in the text editor using various options provided.
4. Click Send button to send the typed message to the addressee.
Teacher’s User Manual
Page 58
‘Mail sent successfully’ will be displayed.
5. Click on OK button to return to Messages screen.
Teacher’s User Manual
Page 59
Compose Message
This option allows you to compose and send messages to selected users. Message screen allows you to
compose messages.
Click here
to compose
Follow the steps below to Compose Message:
1. Click Compose to view the following screen.
Teacher’s User Manual
Page 60
2. Click the option button to choose the C-mail/ E-mail.
3. Click Select Users.
Teacher’s User Manual
Page 61
Select Users pop up window will be displayed.
4. Click on Teacher(s)/Student(s)/ Class to view Users on the right pane.
5. Select user(s) using the check box and click Add. Once you select User(s), the name of selected
user(s) will be displayed in To text box.
Teacher’s User Manual
Page 62
6. Type a subject for the message in Subject text box.
7. Type the message in the text editor using various options provided.
8. Once you complete typing the message, click Send to send the typed message to selected
User(s).
Teacher’s User Manual
Page 63
A success message ‘Message sent successfully’ will be displayed.
9. Click OK to return to Messages screen.
Teacher’s User Manual
Page 64
Move Message
This section allows you to move messages to selected folders in order to organize your messages.
Messages screen allows you to move messages to selected folders.
Click here to
move message
Follow the steps below to move messages:
1. Select message(s) to be moved using the check box.
2. Click the drop down list to select the folder. The added folder names will be displayed.
3. Click on the folder name to select.
4. Click Move.
Teacher’s User Manual
Page 65
A success message ‘Message(s) moved successfully’ will be displayed.
5. Click OK to return to Messages screen.
Teacher’s User Manual
Page 66
Delete Message
This section briefs you about deleting messages. You can delete one or more messages from Messages
screen.
Click here to
delete message
Follow the steps below to delete message(s):
1. Select a folder in the left pane to view list of messages of the related selection in the right pane.
2. Select message(s) to be deleted using checkbox as displayed in the above screen.
3. Click Delete. A confirmation message ‘Are you sure you want to delete the selected message(s)?’
4. Click Yes to delete the selected message(s).
Teacher’s User Manual
Page 67
Manage Folder
You can add folder(s) to organize your mails/ messages.
You can view the folders section in the Message screen as displayed below:
Add folder
Delete folder
Rename folder
Add Folder
You can add folder(s) in order to organize your mails.
Following are steps to add a folder:
1. Click on a root folder to select.
2. Click Add folder icon
to view the following pop up window.
3. Type a name for the folder in the text box provided.
Teacher’s User Manual
Page 68
4. Click Save button to add the folder to the folders list.
Folder added successfully will be displayed.
5. Click OK to view the added folder in Messages screen.
Added New
folder
Teacher’s User Manual
Page 69
Rename Folder
This section allows you to change the name of the added folder.
Follow the steps below to rename folder:
1. Select a folder to be renamed from the folder list.
2. Click Rename folder icon
to view a pop up window displaying the name of the folder.
3. Enter a name for the folder in the text box.
4. Click Save.
Teacher’s User Manual
Page 70
The selected folder will be renamed and a success message ‘Folder renamed successfully’ will be
displayed.
5. Click OK to return to Messages screen.
Teacher’s User Manual
Page 71
Delete Folder
This section allows you to delete folder.
Following are steps to delete folder:
1. Select a folder that you wish to delete and click Delete folder icon
A confirmation message ‘Are you sure you want to delete the folder?’ will be displayed.
Note: If you choose a folder to select, then the main folder and the sub folders will also be deleted.
2. Click Yes to delete the selected folder.
Teacher’s User Manual
Page 72
6. Reports
Reports functionality allows you to view Scholastic and Co-scholastic reports of Submitted projects.
Click Reports in the menu to view the following screen.
Click here to view
detailed report
Teacher’s User Manual
Page 73
My Projects
My Projects will be selected by default. My Projects will display reports of teacher’s assigned projects.
You can view Project Name, Level, Class, Number of teams submitted the project, Number of Monitoring
teacher and Submitted Status.
Follow the steps below to view Reports:
1. Click on a Project Name to view the report.
Click here to view
individual report
The report will include; Group name, Editor copy, Scholastic percentage, Co-Scholastic percentage and
Project Submitted date. You can view the Team’s Report here.
2. To view individual student’s report, click on the expand/ collapse button of team you wish to
view.
You can view Student Name, Role, and Scholastic/ Co-Scholastic percentage.
Teacher’s User Manual
Page 74
3. Click Editor Copy.
You can Open/ Save the pdf file format of the editor copy.
4. Click Cancel to return.
Click here to view
Scholastic report
5. Click on the Scholastic numerical value to view detailed Scholastic report.
Teacher’s User Manual
Page 75
Scholastic report will include Category, Observation, Teacher Name, Rating and Score in percentage.
6. Click on Close icon to return.
7. Click on the Co-Scholastic numerical value to view detailed Co-Scholastic report.
Teacher’s User Manual
Page 76
Co-Scholastic report will include Category, Observation, Teacher Name, Rating and Score in percentage.
8. Click on Close icon to return.
Teacher’s User Manual
Page 77
9. Click Back to return to Reports screen.
Teacher’s User Manual
Page 78
Monitoring Project Report
If you are Monitoring Teacher, then the monitored project reports will be displayed in Monitoring
section.
Follow the steps below to view monitoring report:
1. Click Reports in menu to view the following screen.
My Projects will be selected by default.
2. Click Monitoring.
Click here to view
detailed report
You can view Project Name, Level, Class, Number of teams submitted the project, Number of Monitoring
teacher and Submitted Status.
3. Click on Project name to view detailed report.
Teacher’s User Manual
Page 79
Click here to view
individual report
The report will include; Group name, Editor copy, Scholastic percentage, Co-Scholastic percentage and
Project Submitted date. You can view the Team’s Report here.
4. To view individual student’s report, click on the expand/ collapse button of team you wish to
view.
You can view Student Name, Role, and Scholastic/ Co-Scholastic percentage.
Please refer the previous section to view Editor’s copy, Scholastic and Co-Scholastic reports
Teacher’s User Manual
Page 80
7. Sign out
Sign out link is provided in the Welcome banner and is available throughout the application.
Click here to Exit
the application
Click on Sign out link to exit the application.
Note: You can exit the application whenever required, but we advise you to Save any updates that you have
made.
Teacher’s User Manual
Page 81