1
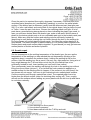
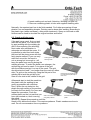
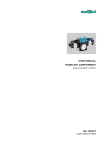
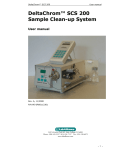
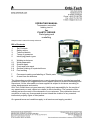
OPERATING MANUAL
Temperature controlled
welding iron kit
for
PLASTIC REPAIR
Prototyping and
modelling
Keep this user’s manual for handy reference.
Bill of Contents
1.
2.
3.
4.
5.
Set Contents
Safety advice
Technical details
Terms of guarantee
Identifying plastic types
6.
6.1
6.2
6.3
6.4
6.5
Welding techniques
Weld preparation
Scratch repair
Crack and hole repair
Surface finishing of unpainted items
Post welding
7.
8.
Permanent marking and labelling of Plastic parts
A word from the directors
The information provided represents our current expertise and is provided as practical
guidelines; however our suggestions cannot replace hands-on practical knowledge and
experience. All the information we have supplied is subject to revisions according to
newer developments and results.
Orbi-Tech GmbH does not grant warranty, liability and responsibility for the results of
any experiments or work carried out related to this information. The contents of this
welding set are the result of the demands of our customers. This publication does not
constitute or imply any licenses and does not intend the violation of any eventual
intellectual property rights of third parties.
Our general terms and conditions apply to all services and supply provided.
Congratulations...
... on purchasing your new plastic repair system. The new welding procedure
introduces new possibilities in repair techniques; Especially for PE and PP parts that
are hard or even impossible to fix using adhesives. In a lot of cases, there is no need
to dismantle the part for repair. This reduces your expenditures and helps you offer
your client attractive prices. Our technique uses plastic fillers of the same type as the
item to be repaired.
Naturally, only thermoplastics can be welded.
Please read the following operating instructions carefully before starting your work.
1. Set Contents
Description
Quantity
Carryingcase
Welding iron 230 V
Welding tip
Welding rod
1
1
1
1
1
1
1
1
1
1
1
1
1
1
Reinforcement grid
Cleaning rod
Brass brush
Heat transfer powder
ABS
ABS/PC
PC
PE
PP
PP-flex
PS
(Acrylnitril Butadien Styrol)
(Mischpolymer ABS und PC)
(Polycarbonat)
(Polyethylen)
(Polypropylen)
(Polypropylen weich)
(Polystyrol)
piece
piece
piece
package
package
package
package
package
package
package
piece
piece
piece
piece
2. Safety advice
Keep this operating manual with the appliance at all times for reference. With its
accurate temperature control, one can apply heat only where necessary. Thereby
reducing collateral damage to the parts; Hence it is possible to obtain professional
results with this kit, however it is advised to allow only experienced and trained
workers to use it. Do not repair parts from which danger could occur! Keep away from
children.
Attention: Fire and burns hazard
The area between the handle and the welding tip heats up to high temperature! The
welding tip may exceed 500°C which is dangerous for your skin and all body parts.
High temperatures can also cause fires.
Before connecting the mains plug make sure that:
The appliance rests on the accompanying welding stand on an un-inflammable
surface.
The welding tip is inserted as far in as possible in the appliance. The voltage
rating of the appliance and the power source have to be equal.
Always disconnect the mains plug:
When leaving the appliance unattended
When the welding tip loosens
When changing the welding tip (Wait until tip has cooled down)
When cleaning appliance and tip. Only dry-clean the appliance. Clean hot
welding tip with cotton cloth or dense tissue. Remove obstinate coating from hot
tip with the brass wire brush.
Allow the iron to cool down before storage.
Attention: Danger of electric shock
Store and use in a dry place. Keep away from humidity. Preferably use a socket outlet
within easy reach for your safety and convenience. Do not use when taken apart or
partly assembled. Leave the iron to cool off naturally on its stand. The appliance
should only be dismantled by authorised dealers.
Unplug and stop using and take back to your dealer immediately in case of:
T-80 not functioning properly
Missing or damaged parts, especially exposed wires
Blown fuse or main fuse
Do not attempt to repair the welding iron yourself!
Danger: health hazards
Do not breathe fumes while working. Only work in well ventilated places. Do not work
in a flammable or explosive atmosphere. Always wear gloves and safety glasses.
Follow the accident prevention regulations. Do not weld parts that may contain
dangerous compounds. Use only original spare parts and accessories.
Safety regulations for use and maintenance of electric appliances have to be adhered
to. Always wear safety glasses when welding plastics. Never leave the hot welding iron
unattended (Fire and Burns hazard). Only use the welding iron if the welding tip is
fitted properly, otherwise the heating unit might be damaged. Unplug from mains after
finishing work. Keep the hot welding iron has on its stand.
Heating plastics might create fumes that cause adverse health effects: Many plastics
decompose when heated beyond their melting point. Long molecular chains break
down to smaller molecules that can be harmful to your health. Thus make sure your
workplace is well ventilated. Do not breathe the resulting fumes. In case of distinct
increase of fumes, interrupt your workflow and try to continue using less heat. For this
very reason, PVC (Polyvinylchloride) must not be overheated at all.
Parts that may contain dangerous materials or unknown materials are not to be
welded. Always refer to the user’s manual provided by the manufacturer.
3. Technical details
The T-80 is equipped with a temperature regulator, keeping the temperature of the
welding tip constant.
For technical details please refer to the enclosed spec sheets.
Safety advice has to be observed at all times. Do not use your T-80 in explosive or
corrosive places and keep away from humidity.
4. Terms of Guarantee
All T-80’s are sold guaranteed free from defects in material and manufacture,
according to legal obligations. This guarantee is limited to replacement and exchange
of defective parts only. Damage of fragile parts is excluded from the guarantee. Claims
arising from damages to material other than the T-80 are excluded.
Improper handling, misuse and application of excess force, as well as modifications
caused by non-authorised dealers and personnel lead to termination of guarantee.
Guarantee does not cover consumer goods. The heating element and the welding tip
are expendable parts.
In the case of a guarantee claim, the appliance has to be sent, (carriage cost carried
by the sender), in the original packing to an authorized dealer or the manufacturer
(copy of invoice) and it has to be picked up after it has been repaired.
Use original parts and accessories only !
5. Identifying plastic types
Successful welds can only be obtained if welding sticks and parts are matched
chemically.
It is difficult to distinguish plastics by sight alone. Plastics can be dyed any colour and
textures vary. Identifying plastics is essential and requires some experience. Look for
the ISO-Code on the inner side of the parts (e.g. PC for Polycarbonate) or make a test
weld as described below.
Some plastic types are commonly used for particular applications, for instance, (for
your information only and without responsibility):
Modelling: airplanes, cars, buildings
PS
Trucks and tractors, fender, air ventilation duct
Trailer-fender
PE
PE
Boats, if not GFK: Canadian canoes, Kayaks, paddling boats
ABS, PE, PP
Water tanks
PE, PP
Vacuum cleaner bodies
PE
Lawn mowers
PP
Mobile phones
ABS/PC
Ski running surface
Automobiles:
Bumpers of European and Japanese make
Ford bumpers
Bumpers of US American makes
Body parts, Dashboards
PE
PP
PC
PUR
PUR or PP
(Car Body Smart
PA)
Fender, Grate, Grill
Water tank
Door gasket
neue oft ABS
PE
TPE
Motorcycles:
Fuel tanks, mud-guards on trail bikes
Fairings on road bikes
Cowlings and instrument facia
PE
PA6, ABS
ASA, ABS
Testing of plastic type:
Since plastics can only be heat bonded with similar materials, make a quick test weld
when in doubt about the type.
Procedure:
Hold the tip of the welding iron to the plastic part to be
welded and melt the plastic (do not use too much pressure
to avoid deforming the melted plastic).
Simultaneously melt the end of the welding rod on the
upper part of the welding tip. Using only little pressure is
important: Do not squeeze out molten plastic because
molten plastic is needed for the bound.
Fusing the welding rod and plastic part
together with heat and gentle pressure
Hold the melted welding stick on to the melted part of the
plastic part (again use very little pressure to avoid
squeezing the molten mass) and leave to cool down. Do
not move or shake!
Test the strength of the bond after it has completely
cooled down. Only same types of plastic give bound with
each other.
Start with the lowest temperature (250°C) and the most
common types of plastic, being PE and PP. In time and
with practical experience you´ll identify the types with ease.
Hold plastic rod until joint is cool and test
for proper adhesion.
Use the following table as reference to help you identifying most common plastics used
in automobiles and motorbikes ( for your casual information only):
Grill
Alfa Romeo
Audi
BMW
Cadillac
Chevrolet
Chrysler
Citroen
Daihatsu
Fiat
Ford
Honda
Hyundai
Jeep
Lancia
Landrover
Lexus
Mazda
Mercedes
Mitsubishi
Nissan
Opel
Peugeot
Pontiac
Renault
Rover
Seat
Skoda
Subaru
Toyota
Volvo
VW
Motorcycles
Bumper
PP, PUR
PP
PP
PC
ABS
ABS
ABS
ABS
ABS
ABS
ABS
PP
PP
PP
PP, PC
PP, PC
PP, PC
PP
PC
PP
PP
PP, PC
PP
PP
PP, PC
PP
Outter parts
Inner parts
PC
PA, PC
ABS, PC
ABS
ABS, PC
ABS, PC
ABS
ABS
ABS, PA
ABS
PC
ABS
ASA
PP
PP, PC
PP
PP
PP
PP, PUR
PP
PP
PC, ABS
PP
ABS, PC
ABS
PP
ABS
You might also consider if it is possible to cut off a small piece of the part you intend to
repair, from where it does not show, and use this as a welding rod:
However, beware of unknown plastics: Potential Fire and Intoxication hazards!
6. Welding techniques
Always check if the T-80 is in good working condition before connecting it to the mains.
Observe safety instructions. Then choose the desired temperature and plug in the
mains plug.
Overview of some plastic types and their maximum working temperature
Short description
Material
max. Working temperature
ABS
ABS/PC
PC
PE
PP
PP-flex
PS
TPE
Acronitryl Butadien Styren
(Mixpolymer ABS + PC)
Polycarbonate
Polyethylen
Polypropylen
Polypropylen flexible
Polystyrene
thermoplastic Elastomer
265°C
280 °C
290 °C
275 °C
275 °C
270 °C
265 °C
270 °C
Other materials on request.
Health hazard at too high temperatures: If a lot of fumes are created, interrupt your
work flow and use lower temperatures. Only work in well ventilated areas. Do not
breathe fumes!
Working with plastics requires patience. Parts have to be heated slowly, not using
temperatures that are too high. High temperatures destroy the molecules of the
plastics causing discoloration and decrease of durability. Unlike thermosetting plastics,
(like two-part epoxy and polyester priming and filling kits) when working with
thermoplastic welding, you are not limited by a specific setting or hardening time. As a
general rule thermoplastic materials can be melted repeatedly many times with ease.
Always use a scrap piece or a not so visible area to try out the welding technique
before starting to work on the piece you actually want to weld.
6.1. Weld preparation
The part that has to be repaired does not have to be necessarily dismantled, the whole
repair technique can be done from the outside. The start of cracks does not have to be
drilled.
Clean the part to be repaired thoroughly, degrease if necessary. Remove paint from
varnished parts (bumpers etc.) mechanically (sanding) to uncover the actual plastic
surface. If the broken part is deformed, gently heat the deformed part (heat gun mac
280 °C or infra- red heater) and mould back to its original shape using a piece of wood
or Teflon. Leave the part cool down. Choose the matching plastic rod type. A lot of
parts have a manufacturing stamp placed on them indicating the plastic type used. In
case you still have doubts about the plastic type, make a test weld: Weld a piece of
plastic to the broken plastic part on a non-noticeable part next to the broken patch (see
above). Make sure that the surface and welding rod are sufficiently heated up
(beginning to melt) before pushing the rod further through the hole in the welding tip.
Do not squeeze out molten plastic of booth parts. You need the molten plastic for a
good bound. The basic principle of plastic welding is: Put molten plastic together with
molten plastic and press molten plastics together. A good bound you only get between
molten plastics of molten surfaces of plastics.
6.2. Scratch repair
Set the temperature to the melting temperature of the plastic type. As soon as the
temperature of the welding iron has reached the set temperature (blinking of the
regulation lamp), smoothen the surface slowly, holding the welding tip flat on the
surface. Hold the welding iron like a pencil. Use only very light pressure. Using a lot of
force might damage the T-80 and does not do the job: the material has to be
sufficiently heated to melt. Insert welding rod, wait until it has melted.
Then continuously insert the welding rod through the hole in the welding iron without
lifting from the surface (picture 1). It is vital that the fresh material is applied on a
melted surface for the welding effect to happen. If the surface is too cold (hard), the
two pieces will not merge. You have to join melted rod onto melted plastic surface.
Continue working until enough material has mixed. The repaired patch has to be
higher than the actual surface (allow for shrinking after cooling off). Then, roughly
smooth out the surface without adding any more plastic with the hot iron tip and leave
to cool down naturally.
Picture 1:
1. Hold welding iron like a pencil
2. Use minimum pressure
3. Heat base material with the T-80 tip and melt
4. Insert welding rod and melt. Attention: Welding rod gets hot
5. Remove remaining plastic in hole with supplied cleaning stick
Naturally, the repaired part has to be finish sanded. For further processing of bare
plastics: see corresponding chapter. Painting can be done after welding (according to
the plastic type (where necessary, after primer treatment). Spray-on textured or matt
finishes can be used to simulate the original surface and colour.
6.3. Crack and hole repair
If the part has a crack, first you tack
weld the two parts. You can do this
by spot welding with the welding tip
with 2-5mm spacing (like stitching),
Next make sure penetration is
adequate and smooth the seam. If it
is possible to weld from both sides
the bond will be strong even with this
fairly simple method. If you can only
Tacking plasitc parts with
weld from one side, the bond is
stitching action
not as strong but is enough to will
keep the parts from moving during the
welding process. To make the bond even stronger, the
reinforcing grid can be used. Cut a piece of the grid
with the scissors and put it on top of the crack. The grid
should extend at least 7 mm longer than the crack on either
side. Fix grid on the surface by using the flat part of the
welding tip to tack the grid bit by bit.
Start on one side in the middle of the grid.
Alternating „stitching“ and smoothing
Reinforcing grid should overlap
the crack to be repaired by at
least 7mm
Afterwards start to sink the mesh into
the plastic with the welding tip as
gently as possible with minimum
force. When the net sinks into the
plastic through melting of the surface,
pull back the foot about 2 to 3mm and
repeat the procedure. Push the
molten plastic on the hot part that you
Sink in the metal mesh with heat
Cover the mesh with melted
have just worked on, thus covering
and gentle pressure
plastic
the mesh.
(picture 2). Repeat this procedure until the
mesh is fully below the surface. This requires patience. Plastic needs some time to
melt. Do not use excessive force or pressure.
Pictures:
1. Hold the welding iron like a pen
2. Only light pressure, Do not struggle!
3. Melting the net into the plastic
For a strong bond, try to position the mesh as near to the middle thickness of the
material as possible. You may also use several layers of net. The mesh should not be
visible after the repair. Make sure that the edges are sunk in properly in the plastic and
not visible.
You can then use the welding filler rods to complete the repair (pictures aboce).
When repairing holes, the net has to be attached on top of the hole as described
previously and covered with plastic material from both sides.
6.4 Surface finishing of unpainted items
With the tip of the T-80 you can finish slight scratches and repaired surfaces and left
unpainted. Make sure you use a clean, smooth welding tip without scratches (see
paragraph: Ending the repair session)
The procedures are:
1. Sand surface.
2. Set temperature that is just about enough to melt the surface within 20
seconds.
3. Apply a thin piece of plastic (same material as item under repair) of about
1mm thickness (if you do not have any, you can take some off a part of the
broken part that does not show)
4. Slightly press the welding tip on the thin piece until both item and plastic part
surfaces melt.
5. If necessary smooth out the surface.
6. Leave to fully cool off.
7. After cooling, scrape the surface smooth carefully with a scraper and fine
sandpaper.
To obtain a shiny surface (Attention: Burns hazard!) shortly blow hot air from a hot air
gun or gas flame on the surface so that any welding marks will blend. After cooling off
the surface will be shiny, if necessary use some polish or silicon spray.
A textured surface can be obtained by pressing the rough side of sanding paper on a
plastic surface that has been previously heated and softened by a hot air gun.
Doing this kind of work, patience and careful experimentation will give good results.
There are plastic welding virtuosos who obtain such brilliant results that it is very
difficult to tell the difference between the repaired and the original parts.
6.5 Post welding
Unplug the mains lead. Clean hot welding iron with paper or cotton tissue. Clean tough
dirt with wire brush. Remove remains of welding rod from the hole with the cleaning
rod. Tidy up the cleaning rod.
Attention: Cleaning rod might get hot as well!
Leave the T-80 to cool off naturally on the supplied stand. Do not cool off with water!!!
Put the appliance back in the case once it is cooled off completely.
Scratches on the bottom of the welding tip can be sanded with very fine sanding paper
(e.g. 1000 Grit). Put the sandpaper on a flat surface and sand the welding tip (once
cool) by moving the bottom backwards and forward on the sandpaper.
7. Permanent marking and labelling of plastic parts
Plastic parts can be marked permanently with the welding iron.
To do this, hold the welding tip – which is to be heated up according to the type of
plastic – on the area where you want to mark using very slight pressure. A thin melted
layer will rise since the heat flows from the welding tip into the plastic surface.
After you remove the welding tip you can mark the plastic permanently by slight
pressure with letter or number punches.
For embossing special logos or signs directly on plastic, please contact us for a
nonbinding quote.
8. A word from the directors
Dear Customers,
we wish you the best of luck and results with your plastic welding experiments and
works with the T-80. We believe that this appliance opens up nearly unlimited new
opportunities in processing and repairing plastic materials and products.
If you want to share your experience with other users, please send us your reports or
pictures (by post, fax or e-mail) so that we can inform them. We would be glad to
maintain an exchange of ideas and techniques. Ideas for improvement and innovation
are particularly welcome for up to date development and improvements.
Thermoplastic regards
Dr.-Ing. Joachim T. Pape
Managing director
Orbi-Tech GmbH