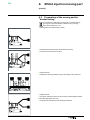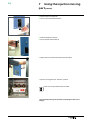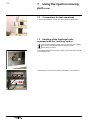
1
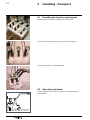
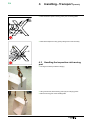
Medium Voltage Distribution
PIX
12-17.5 - 24kV Special Moving Parts
Injection & Visit
Instructions
www.schneider-electric.com
PIX
Contents
1
Schneider Electric at your service����������������������������������������������� 3
1.1 Your contacts������������������������������������������������������������������������������������ 3
2
2.1
2.2
2.3
2.4
2.5
2.6
With regards to this User Manual������������������������������������������������� 4
Responsibilities�������������������������������������������������������������������������������� 4
Reminder concerning normal operating conditions (in accordance with .
IEC 60694)���������������������������������������������������������������������������������������� 4
*Temperature ambient admissible ���������������������������������������������� 4
*Installation altitude���������������������������������������������������������������������� 4
*Atmospheric pollution����������������������������������������������������������������� 4
*Permissible atmospheric humidity level������������������������������������� 4
Eco-design concept and revalorisation of the materials used��������� 5
Particular instructions for operation and intervention with energized .
equipment����������������������������������������������������������������������������������������� 5
Conventional symbols���������������������������������������������������������������������� 5
Tightening torques for standard assemblies (bolt + nut)������������������ 6
3
3.1
3.2
3.3
Moving part for injection��������������������������������������������������������������� 7
Use��������������������������������������������������������������������������������������������������� 7
Sizes and approximate weights of the injection moving parts to be .
fitted in place of a ”SF6 outgoing feeder”����������������������������������������� 7
Sizes and approximate weights of the injection moving parts to be fit..
ted in place of a ”Vacuum outgoing feeder”�������������������������������������� 8
4
4.1
4.2
4.3
4.4
Handling - Transport�������������������������������������������������������������������� 10
Handling the injection moving part������������������������������������������������� 10
Special precautions������������������������������������������������������������������������ 10
Handling the inspection visit moving part����������������������������������������11
Special precautions������������������������������������������������������������������������ 12
5
1250 A injection moving part������������������������������������������������������ 13
5.1 Preparation of the moving part for ”cable tests”����������������������������� 13
5.2 Preparation of the moving part for ”busbar testing”����������������������� 15
6
3150 A injection moving part������������������������������������������������������ 17
6.1 Preparation of the moving part for ”cable testing”�������������������������� 17
6.2 Preparation of the moving part for ”busbar testing”����������������������� 19
7
7.1
7.2
7.3
Using the injection moving part������������������������������������������������� 21
Fitting the moving part into its functional unit��������������������������������� 21
Connections for test operations����������������������������������������������������� 24
Earthing of the functional units equipped with the ”earthing” option�� 24
8
Use of the inspection visit moving part������������������������������������ 25
8.1 Fitting the moving part into the functional unit������������������������������� 25
8.2 Possibility of earthing using an earthing block������������������������������� 26
9
Storage of a moving part������������������������������������������������������������� 27
9.1 Specific instructions for storage����������������������������������������������������� 27
9.2 Storage������������������������������������������������������������������������������������������� 27
2
AMTNoT083-02
PIX
1 Schneider Electric at your
service
Electrical equipment necessitates a particular attention and scrupulous
respect of the recommendations explained in this user manual. Operation
and maintenance may only be carried out by qualified person nel who have
received suitable authorisation for the operations and manoeuvres they are
responsible for performing.
Schneider Electric’s After-Sales Service, which is the nearest to you, is at
your disposal for any type of aid or advice.
Reminder : All locking-out operations must be performed according to the
”General Safety Instructions booklet for Electrical Applications” and the
particular regulations for the network concerned.
1.1 Your contacts
France:
Schneider Electric
Equipo de interrupción Tensión Media Bd de la
Résistance BP 84019 F-71040 Mâcon Cedex 9
Tel. : 33 (0) 3 85 29 35 00 Fax : 33 (0) 3 85 29 36 30 Freefone N° : 0 800 40 27 62 24hrs/day 7days/week
Germany:
Schneider Electric
D-01099 Dresden Tel. :
Fax :
Sachsenwerk Königsbrücker Strasse 124,
+ 49 (0) 351 8200
+ 49 (0) 351 820 2342
Belgium: Schneider Electric
Belgium S.A. Route Zénobe Gramme, 33 Zoning
des Plénesses B-4821 Dison
Tel. : + 32 (0) 87 320 350
Fax :
+ 32 (0) 87 320 405
United Kingdom:
Schneider Electric
Tel. :
Fax :
Switzerland:
Schneider Electric
Oberentfelden
Tel. : Fax : AMTNoT083-02
Frederick Road, Salford, M6 6QH, Inglaterra
+ 44 (0) 161 745 9090
+ 44 (0) 161 745 4482
Carl-Sprecher-Strasse 3 CH-5036
+ 41 (0) 6 27 37 33 33
+ 41 (0) 6 27 37 36 77
3
PIX
2 With regards to this User
Manual
© - Schneider Electric- 2011. Schneider Electric, the Schneider Electric
logo and their figurative forms are Schneider Electric registered trade
marks. The other trademarks men tioned in this document, registered or
not, belong to their respective holders. The other brand names mentioned
within this document, whether they be copyright or not, belong to their
respective holders.
2.1 Responsibilities
Our devices are quality controlled and tested at the factory in accor dance
with the standards and the regulations currently in force.
Apparatus efficiency and apparatus life depend on the compliance with the
installation, commissioning and operation instructions described in this
user manual. Non respect of these instructions is likely to invali date any
guarantee.
The texts in this user manual make reference to French regulations.
Local requirements especially about safety which are in accordance with
the indications given in this document, must be observed.
Schneider Electric declines any responsibility for the consequences:
■■ Due to the non respect of the recommendations in this manual which
make reference to the international regulations in force.
■■ Due to the non respect of the instructions by the suppliers of cables and
connection accessories during installation and fitting operations,
■■ any possible aggressive climatic conditions (humidity, pollution, etc.)
acting in the immediate environment of the materials that are neither
suitably adapted nor protected for these effects.
This user manual does not detail the lockout procedures that must be
applied. The interventions described are carried out on de-energised
equipment (in the course of being installed) or locked out (non operational).
2.2 Reminder concerning normal
operating conditions (in accordance with
IEC 60694)
Temperature ambient admissible
The ambient air temperature should be comprised between - 15°C and +
40° C.
The average measured value for a 24 hour period must not exceed 35°C.
Installation altitude
HV equipment can be used up to an altitude of 1,000 m.
Beyond this, account must be taken of the decrease in dielectric withstand.
It will therefore be necessary to use appropriately insulated substations.
Atmospheric pollution
There must be no dust particles, fumes and smoke, corrosive or flammable
gases, vapours or salts.
Permissible atmospheric humidity level
The average value of atmospheric humidity in a 24 hour period must not
exceed 95 %.
The average value of water vapour pressure over a period of 24 hours must
not exceed 22 mbar.
The average atmospheric relative humidity value measured over a period
of one month must not exceed 90 %.
The average water vapour pressure over a period of one month must not
exceed 18 mbar.
4
AMTNoT083-02
PIX
2 With regards to this User
Manual (contd.)
Condensation may appear in case of any sharp variation in tempera ture,
due to excessive ventilation, a high atmospheric humidity level or the
presence of hot air. This condensation can be avoided by an appropriate
layout of the room or of the building (suitably adapted ventilation, air driers,
heating etc.).
Whenever the humidity level is higher than 75%, we recommend that you
take appropriate corrective measures for which Schneider Electric can
offer you the necessary assistance. Please do not hesitate to contact us.
2.3 Eco-design concept and revalorisation
of the materials used
The design and manufacture of our packaging are both in conformity with
the French government decree N° 98-638 of 20 July 1998, concerning the
account that is taken of environmental requirements.
2.4 Particular instructions for operation
and intervention with energized equipment
When commissioning and opera ting the equipment under normal
conditions, the General safety instructions for electrical applications must
be respected, (protective glo ves, insulating stool, etc.), as well as the
operating instructions. All operations must be completed once started.
2.5 Conventional symbols
Code for a product recommended and marketed by Schneider
Electric
Value of the tightening torque
Example: 1.6 daN.m
Mark corresponding to a legend
CAUTION! Remain vigilant!
Precautions to be taken in order to avoid any accident or injury
FORBIDDEN! Do not do it!
The compliance with this indication is compulsory, non
compliance with this stipulation may damage the equipment.
INFORMATION - ADVICE
Your attention is drawn to a specific point or operation.
AMTNoT083-02
5
PIX
2 With regards to this User
Manual (contd.)
2.6 Tightening torques for standard
assemblies (bolt + nut)
Threaded fasteners without grease:assembly with ungreased washers.
Threaded fasteners with grease:assembly with greased washers.
Use grease referenced:
Dimensions
6
Zinc plated steel
fasteners without
grease (daN.m)
Stainless steel
fasteners with
grease (daN m)
grease (daN.m)
Class 6.8
Class 8.8
A2-70
M4
0.2
0.3
0.2
M5
0.4
0.5
0.4
M6
0.7
0.9
0.7
M8
1.6
2.1
1.6
M 10
3.2
4.3
3.2
M 12
5
6.6
5
M 14
8.7
11.6
8.7
M 16
13.4
17.9
13.4
M 20
26.2
35
26.2
AMTNoT083-02
PIX
3
Moving part for injection
3.1 Use
The moving part for injection purposes has several utilities
■■ Busbar measurement and tests,
■■ Cable measurement and tests,
■■ Unlocking the shutters.
Special use for earthing a busbar or cables.
Only use this injection moving part after proper and regular
locking out of the switchboard.
3.2 Sizes and approximate weights of the injection moving parts to be
fitted in place of a ”SF6 outgoing feeder”
12 kV - SF6
Marked
630/800 A
-
650
Width of trolley (mm)
L
535
Depth of trolley (mm)
P
686.5
Height in position "busbar tests"
(mm)
H1±1
547.5
Height in position "cable tests" (mm)
H2±1
207.5
1250/1600 A
800
650
1000
2500 A 3150 A
1000
1000
535
Racking-in contacts
C
Clamps
Clamps
Distance between phases (mm)
E
180
210
180
Approximate Weight (kg)
-
?
17.5 kV - SF6
2000 A
800
NOT AVAILABLE,
DEVELOPED TO
ORDER
Width of functional unit
686.5
NOT AVAILABLE,
DEVELOPED TO ORDER
547.5
207.5
60 Tulips
210
254±1
254±1
80 Tulips
254±1
?
Marked
630/800 A
1250/1600 A
2000 A
2500 A
Width of functional unit
-
800
800
1000
1000
Width of trolley (mm)
L
625
625
Depth of trolley (mm)
P
786.5
725
H1±1
547.5
547.5
H2±1
207.5
207.5
Height in position "busbar tests" (mm)
Height in position "cable tests" (mm)
Racking-in contacts
C
Distance between phases (mm)
E
Approximate Weight (kg)
-
Clamps
NOT AVAILABLE,
DEVELOPED TO ORDER
60 Tulips
210
Marked
630/800 A
1250/1600 A
2000 A
2500 A
Width of functional unit
-
800
800
1000
1000
Width of trolley (mm)
L
Depth of trolley (mm)
P
24 kV - SF6
Height in position "busbar tests" (mm)
H1±1
Height in position "cable tests" (mm)
H2±1
Racking-in contacts
C
Distance between phases (mm)
E
Approximate Weight (kg)
-
AMTNoT083-02
254
80 Tulips
210
±1
254±1
NOT AVAILABLE,
DEVELOPED TO ORDER
Clamps
210
210
60 Tulips
80 Tulips
254±1
254±1
7
PIX
3
Moving part for injection
(contd.)
3.3 Sizes and approximate weights of the injection moving parts to be
fitted in place of a ”Vacuum outgoing feeder”
Width of functional unit
-
650
Width of trolley (mm)
L
535
Depth of trolley (mm)
P
686.5
Height in position "busbar tests" (mm)
H1
±1
547.5
Height in position "cable tests" (mm)
H2
±1
207.5
800
650
535
1600 A 2000 A 2500 A
800
800
800
1000
1000
625
625
810
810
686.5
686.5
683.5
683.5
547.5
547.5
547.5
552.5
207.5
207.5
Clamps
210
180
210
210
686.5
547.5
207.5
212.5
80 Tulips
210
254±1
254±1
Marked 630/800 A 1,250 A 1600 A 2000 A
2500 A
3150 A
750
1000
1000
810
810
683.5
755
547.5
571.5
C
Distance between phases (mm)
E
Approximate Weight (kg)
-
-
750
750
750
Width of trolley (mm)
L
625
625
Depth of trolley (mm)
P
786.5
786.5
Height in position "busbar tests" (mm)
H1
±1
547.5
547.5
Height in position "cable tests" (mm)
H2
±1
207.5
Clamps
NOT AVAILABLE,
DEVELOPED TO
ORDER
180
207.5
Width of functional unit (mm)
210
210
207.5
Racking-in contacts
C
Distance between phases (mm)
E
210
210
Approximate Weight (kg)
-
?
?
24 kV - Vacuum
3150 A
60 Tulips
Racking-in contacts
17.5 kV - Vacuum
1250 A
NOT AVAILABLE,
Marked 630/800 A
NOT AVAILABLE,
12 kV - Vacuum
207.5
231.5
60 Tulips
80 Tulips
254±1
254±1
?
Marked
630/800 A
1,250 A
1600 A
2000 A
2500 A
Width of functional unit
-
800
800
800
1000
1000
Width of trolley (mm)
L
Depth of trolley (mm)
P
Height in position "busbar tests" (mm)
H1±1
Height in position "cable tests" (mm)
H2±1
Racking-in contacts
C
Distance between phases (mm)
E
Approximate Weight (kg)
-
8
NOT AVAILABLE,
DEVELOPED TO ORDER
Clamps
210
210
60 Tulips
210
254
±1
254±1
AMTNoT083-02
PIX
3
Moving part for injection
(contd.)
Example:
1250 A Moving Part
AMTNoT083-02
9
PIX
4
Handling - Transport
4.1 Handling the injection moving part
■■ Moving part fixed to a pallet, for transport by a forklift truck.
■■ Using a chain hoist, lift the moving part up by its 4 slinging points.
■■ Place the moving part on the handling table.
4.2 Special precautions
■■ This moving part does not roll. On the ground, it must be placed on 2
wooden battens.
10
AMTNoT083-02
PIX
4
Handling - Transport (contd.)
■■ Never handle the injection moving part by the connecting plates.
■■ Never lift the injection moving part by taking it from under its trolley.
4.3 Handling the inspection visit moving
part
■■ Two lugs have been provided for slinging.
■■ Using a chain hoist, lift the moving part up by its 2 slinging points.
■■ Place the moving part on the handling table.
AMTNoT083-02
11
PIX
4
Handling - Transport (contd.)
■■ Lower the 2 lugs when the moving part has been placed on the table.
4.4 Special precautions
■■ This moving part does not roll.
On the ground, it must be placed on 2 wooden battens.
12
AMTNoT083-02
PIX
5
1250 A injection moving part
3
1
2
7
8
5
6
4
Legend
1 Removable test bars
2 Fixed insulator supports
3 ARCUS test contact balls
4 ARCUS earthing ball
5 Handling handle
6 Ramp for lifting the shutters
7 Lifting bracket
8 Other lifting points
5.1 Preparation of the moving part for
”cable tests”
The moving part is delivered in the position requested by the
customer
To transform a ”busbar testing” moving part to a ”cable testing”
moving part, follow the following indications precisely. Also refer to
tables § 3.2 or 3.3.
■■ moving part in the ”busbar testing” position.
■■ Dismantle the busbar from the central phase (4 screws).
■■ Turn the bar round and set it in place.
AMTNoT083-02
13
PIX
5
1250 A injection moving part
(contd.)
■■ Position the bar.
■■ Respect the squaring positions using a rule resting on the outer bars.
■■ Tighten the bar.
■■ Proceed in exactly the same way for the 2 other phases (always tighten
the bar before removing the following one).
■■ Dismantle and turn round the ARCUS test balls.
■■ Dismantle the lifting ramp from the shutters and remount it on the
left-hand side of the moving part (2 H M8x20 bolts).
■■ ”Cable testing” moving part now ready for use
14
AMTNoT083-02
PIX
5
1250 A injection moving part
(contd.)
5.2 Preparation of the moving part for
”busbar testing”
To transform a ”cable testing” moving part to a ”busbar testing”
moving part, follow the following indications very precisely.
Also refer to tables § 3.2 or 3.3.
■■ Moving part in the ”cable testing” position.
■■ Dismantle the busbar from the central phase (4 screws).
■■ Turn the bar round and set it in place.
■■ Position the bar.
■■ Respect the squaring positions using a rule resting on the outer bars.
AMTNoT083-02
15
PIX
5
1250 A injection moving part
(contd.)
■■ Tighten the bar.
■■ Proceed in exactly the same way for the 2 other phases (always tighten
the bar before dismantling the following one).
■■ Dismantle and turn round the ARCUS test balls.
■■ Dismantle the lifting ramp from the shutters and remount it on the
right-hand side of the moving part (2 H M8x30 bolts).
■■ Moving part in the ”busbar testing” position now ready for use.
16
AMTNoT083-02
PIX
6
3150 A injection moving part
Legend
1 Removable test bars
2 Fixed insulator supports
3 ARCUS test contact balls
4 ARCUS earthing ball.
5 Handling handle
6 Location of the shutter lifting system
7 Lifting bracket
8 Other lifting points
6.1 Preparation of the moving part for
”cable testing”
The moving part is delivered in the position requested by the
customer.
To transform a ”busbar testing” moving part to a ”cable testing”
moving part, follow the following indications pre cisely. Also refer to
tables 3.2 or 3.3.
■■ Moving part in the ”busbar testing” position.
■■ Dismantle the busbar from the central phase (4 screws).
■■ Turn the bar round and set it in place.
AMTNoT083-02
17
PIX
6
3150 A injection moving part
(contd.)
■■ Position the bar.
■■ Respect the squaring positions using a rule resting on the outer bars.
■■ Tighten the bar.
■■ Proceed in an identical way for the other 2 phases (tighten the bar before
removing the next one).
■■ Inspect the E±1 dimension at the extremity of the busbars.
■■ Dismantle and turn round the ARCUS test balls.
■■ Dismantle the lifting shaft from the shutters and remount it on the
right-hand side of the moving part
■■ ”Cable testing” moving part now ready for use
18
AMTNoT083-02
PIX
6
3150 A injection moving part
(contd.)
6.2 Preparation of the moving part for
”busbar testing”
To transform a ”cable testing” moving part to a ”busbar testing”
moving part, follow the following indications very precisely.
Also refer to tables 3.2 or 3.3.
■■ Moving part in the ”cable testing” position.
■■ Dismantle the busbar from the central phase (4 screws).
■■ Turn the bar round and set it in place.
■■ Position the bar.
■■ Respect the squaring positions using a rule resting on the outer bars.
■■ Tighten the bar.
■■ Proceed in exactly the same way for the other 2 phases (tighten the bar
before dismantling the next one).
■■ Inspect the E±1 dimension at the extremity of the bars.
AMTNoT083-02
19
PIX
6
3150 A injection moving part
(contd.)
■■ Dismantle and turn round the ARCUS test balls.
■■ Dismantle the lifting shaft from the shutters and remount it on the
left-hand side of the moving part.
■■ Moving part in the ”busbar testing” position now ready for use.
20
AMTNoT083-02
PIX
7 Using the injection moving
part
7.1 Fitting the moving part into its
functional unit
Tests can only be carried out if all of the operational and locking out
operations have been respected.
The functional unit compartment (cables or busbar) being the
subject of the test, must be De- Energized.
■■ Warning plate fixed to the moving part (elementary safety instructions).
■■ Lift up the moving part and place it on the handling table (see § 4.1).
■■ Fitting the moving part into its compartment (follow the instructions in
User Manuals NoT056 & NoT060):
□□ Open the door,
□□ If necessary, extract the moving part already in place,
□□ Fit in place the injection moving part,
□□ Pull out the handling table.
■■ Injection moving part in the ”tests” position.
■■ Close the door
AMTNoT083-02
21
PIX
7 Using the injection moving
part (contd.)
■■ Turn the handle downwards: the door descends and immobilises itself.
■■ Take the handle out.
■■ Turn the key in a clockwise direction: the door is locked.
■■ Take the key out.
Disengageable racking-in and drawing-out crank handle for the moving
part.
Marking
Moving part with clamps:
-->
end-piece
Moving part with clamps:
-->
end-piece
■■ Engage the crank handle through the door.
■■ Turn it in the direction of the arrow.
■■ The CLACK of the disengagement of the crank handle indicates that the
moving part is “racked-in”.
■■ Remove the crank handle.
22
AMTNoT083-02
PIX
7 Using the injection moving
part (contd.)
■■ Insert the key into its keyhole.
■■ Turn it in an anti-clockwise direction.
■■ Insert the handle into its hole.
■■ Turn it upwards: the door lifts up.
■■ Open the door: the handle and the key remain captive.
■■ Injection moving part in the ”racked-in” position.
In this case, only the lower shutter is raised.
■■ Proceed with locking-out operations (checking for absence of
voltage).
AMTNoT083-02
23
PIX
7 Using the injection moving
part (contd.)
7.2 Connections for test operations
■■ Use the ARCUS balls to connect the cables necessary for the tests.
7.3 Earthing of the functional units
equipped with the ”earthing” option
The use of the earthing system on the moving part is only possible
for functional units equipped with the ”earthing” option
on the racking-in travel.
■■ The ARCUS ball fixed to the trolley is directly connected to the functional
unit’s earthing circuit.
■■ Example of the connection for earthing the cables on a functional unit.
24
AMTNoT083-02
PIX
8 Use of the inspection visit
moving part
8.1 Fitting the moving part into the
functional unit
Checks can only be carried out if all of the operational and locking
out operations have been respected.
The functional unit compartment (cables or busbar) being the
subject of the test, must be De-Energized.
■■ Lift the moving part and place it on handling table (See § 4.1).
■■ Lift up the moving part and place it on the handling table (see NoT056 &
NoT060) :
□□ Open the door,
□□ If necessary, extract the moving part already in place,
□□ Fit in place the inspection visit moving part,
□□ Pull out the handling table.
■■ Moving part in the ” tests” position.
■■ Rack-in the moving part.
■■ Remove the crank handle.
■■ Unlock the shutter using a key.
■■ Lift up and mechanically latch the shutter (see next photo).
AMTNoT083-02
25
PIX
8 Use of the inspection visit
moving part (contd.)
■■ Detail of the mechanical latching system:
□□ lift the shutter,
□□ Pivot the lug so that it is made to support the edge of the shutter.
■■ Proceed with locking-out operations (checking for absence of
voltage).
8.2 Possibility of earthing using an
earthing block
■■ Check there is an absence of voltage.
■■ Connect the longest extremity of the earthing block to the switchboard’s
general ground.
■■ Fix one of the three other extremities of the earthing block to each phase.
26
AMTNoT083-02
PIX
9
Storage of a moving part
9.1 Specific instructions for storage
Cover the moving part with a translucent plastic cover. This in order to
avoid handling an injection moving part by its racking-in arms.
Avoid leaving the material where it is likely to be subjected to large, sudden
temperature changes.
Ensure that there are absolutely no corrosive vapours present, for example
sulphur dioxide (SO2).
9.2 Storage
The site chosen for storage must be capable of protecting the equipment
against possible damage due to:
■■ Water
■■ Water vapour
■■ Saline atmosphere
■■ All types of pollution
■■ Micro-organisms.
Contact Schneider Electric for any derogations to these criteria
AMTNoT083-02
27
© 2011 Schneider Electric - All rights reserved
Schneider Electric
35, rue Joseph Monier
CS 30323
92506 Rueil-Malmaison Cedex, France
As standards, specifications and designs change from time to time, please ask for
confirmation of the information given in this publication.
RCS Nanterre 954 503 439
Capital social 896 313 776 €
www.schneider-electric.com
Publishing: Schneider Electric
Design: Schneider Electric
Printing:
AMTNoT083-02
This document has been printed
on ecological paper
02-2011