1
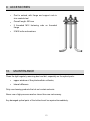
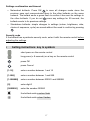
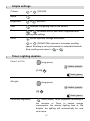
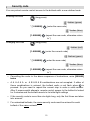
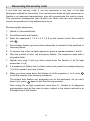
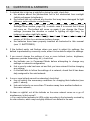
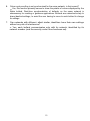
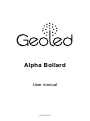
Alpha Bollard User manual V2014-06-30 2 Contents 2. 3. 4. 5. 6. 7. 8. SAFETY ...............................................................................................................................................................................................6 WARRANTY .........................................................................................................................................................................................7 FEATURES...........................................................................................................................................................................................8 ALPHA BOLLARD ................................................................................................................................................................................9 REMOTE CONTROL ..........................................................................................................................................................................10 INSTALLATION AND ACTIVATION .....................................................................................................................................................11 PRECAUTIONS ................................................................................................................................................................................11 § GENERAL INSTRUCTIONS .................................................................................................................................................................11 § FIXING ON A BLOCK .........................................................................................................................................................................12 § 9. ACCESSORIES ..................................................................................................................................................................................13 10. MAINTENANCE .................................................................................................................................................................................13 11. BATTERIES (INSERTING/CHANGING) ...............................................................................................................................................14 12. OPERATING PRINCIPLES .................................................................................................................................................................15 13. SETTINGS .........................................................................................................................................................................................16 SETTING INSTRUCTIONS: KEY TO SYMBOLS .......................................................................................................................................17 § SIMPLE SETTINGS ...........................................................................................................................................................................18 § TIMER: LIGHTING DURATION .............................................................................................................................................................18 § NETWORKING .................................................................................................................................................................................19 § SECURITY CODE .............................................................................................................................................................................20 § RECOVERING THE SECURITY CODE ...................................................................................................................................................21 § 14. QUESTIONS & ANSWERS .................................................................................................................................................................22 1. PRODUCT ...........................................................................................................................................................................................5 DECLARATION OF CONFORMITY .......................................................................................................................................................6 3 4 1. PRODUCT Product name: Alpha. Usage: Marking and signage LED lights with built-in solar collector. Geoled bollards are designed and made for outdoor use in areas where a high degree of resistance is required. This process of recovering solar power with a built-in photovoltaic collector offers extended operating time. The light turns on and off automatically according to ambient luminosity. Each bollard features a radio communications system enabling it to communicate with other identical bollards, thereby forming a wireless network in which all the bollards have the same settings. The Alpha bollard is controlled by an infrared remove control. Remote access to the bollard can be protected by a user-defined code. 5 2. DECLARATION OF CONFORMITY Geoled declares that the product named Alpha bollard complies with the regulatory provisions set forth in the following essential European health and safety directives: • • • • • • Directive 2002/96/EC on waste electrical and electronic equipment (WEEE); Directive 1999/5/EC on Radio Equipment and Telecommunications Terminal Equipment (R&TTE); Directive 2006/66/EC on batteries and accumulators and waste batteries and accumulators; Directive 2008/12/EC amending Directive 2006/66/EC on batteries and accumulators and waste batteries and accumulators; Directive 2008/103/EC amending Directive 2006/66/EC on batteries and accumulators and waste batteries and accumulators; Directive 2011/65/EU on the restriction of the use of certain hazardous substances in electrical and electronic equipment (RoHS). The product has been tested according to the following standards: • • • • • • • • ETSI EN 301 489-3: 2002 V1.4.1 in reference to ETSI EN 301 489-1: 2011 V1.9.2; ETSI EN 300 220-2 V2.4.1 in reference to ETSI EN 300 220-1 V2.4.1; ETSI EN 60950-1: 04/2006 / A11: 2009 / A1: 2010 : A12: 2011 ; ETSI EN 62031: 2008 ; EN 60529/A1: 2000 ; EN 60598: 2009 ; EN 60068-2-75: 1998 ; EN 62262: 2004. 3. SAFETY Observe national safety standards when installing and using this light. Geoled accepts no liability for inappropriate implementation or installation of the product. Any alterations to the bollard are made solely under the responsibility of the person making them. The bollard should never operate if not fully assembled. The base of the bollard should not be lower than the top of the ground finishing coat. Storage conditions (excluding outdoor installation): - Maximum storage period: one year - Temperature: 20 to 25°C - Humidity: 45 to 75% 6 4. WARRANTY Products supplied by Geoled come with a three-year warranty starting on the date of delivery, covering all hidden defects originating from a defect in materials, design flaw or manufacturing defect affecting the supplied products, in particular their electronic and electrical components, rendering them unfit for purpose. The warranty is limited to replacing parts recognized as defective by our technical service. The warranty is void in case of misuse, failure to observe directions for use, negligence or lack of maintenance by the customer. Nor does it cover normal wear or cases of force majeure. The warranty is also void: - if the material or faulty design originates from the customer. Assembly sketches and suggestions in Geoled's promotional catalogues are provided solely as a rough guide; in other words products are installed and embedded under the sole responsibility of the customer; - if batteries other than those supplied or specifically recommended by Geoled are used in the products; - if the defect results from any unauthorized work on the products sold or if it results from an installation carried out by an unauthorized third party; - if the defect results from a cause unrelated to the equipment, for instance a knock, an act of vandalism or installation outdoors in a particularly inhospitable environment for such equipment. The warranty is void if the equipment has been exposed to fire or flooding, lightning or electrical damage. In order to exercise their rights, and on pain of forfeiture of any relevant action, customers should inform Geoled in writing of the existence of defects within no more than 5 days of discovering them. Under the warranty, Geoled will replace electrical or electronic components recognized as defective by the technical service at no charge. The warranty does not cover labour costs or any costs incurred in the following operations: dismantling, reassembly, transport on site, etc. The replacement of parts does not extend the above period of warranty. Furthermore, if shipment of the item is delayed for any reason beyond Geoled's control, the warranty period is extended accordingly, such extension being limited to 3 months. 7 5. FEATURES 1. Materials • Extruded aluminium housing thermo-lacquered with polyester powder • Diffuser in transparent UV-absorbing polycarbonate (PC) • Other plastic parts in PP (polypropylene) • Fixing base in injected aluminium for mounting on a foundation block or buried base (accessory) 2. Features • Dimensions 376 mm (H) x 157 mm (∅) • Weight 3.7 kg • Protection rating: IP 66 • Protection rating: IK 10 • Appliance Class III, extra-low voltage power source 3. Built-in light sources • 4 red/green/blue LEDs • 4 white LEDs (6200°K) 4. Built-in batteries • LiFePO4 technology (Lithium-metal) • 2 per bollard • Capacity (per unit): 3,000 mAh typical • Dimensions 64.5 mm (H) x 26 mm (∅), weight 90 gr • IFR26650 model Caution: there is a risk of explosion if the battery is replaced with an incorrect type of battery. Dispose of used batteries as instructed. 3.2 V 8 6. ALPHA BOLLARD Upper window (built-in solar cell) Lateral diffuser (Built-in LED sources) Housing Base Lateral fixing screws 9 , 7. REMOTE CONTROL • Powered by a 3V CR2025 battery • Minimum range 5 metres Label Keys Functions COLOR Variation of colours BRIGHT Increase/decrease brightness White colour shortcut key Scrolls through the colours DURATION Colour scrolling speed Selects lighting side S1 S2 Selects Sequence 1 or Sequence 2 Timer and Timer-controlled brightness functions Security code SET Network configuration Special functions OK Confirmation CANCEL Cancellation PERIOD A B Unused Unused 10 8. INSTALLATION AND ACTIVATION The bollard should be installed on a hard flat surface: paving stones, concrete block, decking, etc. Fix the base to a foundation block or a buried accessory you can order separately (see section 9. Accessories). § Precautions If you plan to network a number of bollards: • check that each bollard is no more than 70 metres away from another bollard on the same network • it is advisable to test networking before final installation to make sure the bollards communicate with one another • for bollards installed along a path, make sure the bases of each bollard face in the same direction, as indicated by an arrow on the base, so that you can then select the lighting side uniformly for all the bollards (see section 13. ADJUSTMENTS, Simple adjustments, Side) § General instructions • Unscrew the screws fixing the base to the housing • The bollard comes packed with two batteries: Insert the batteries into the bollard (see section 11. BATTERIES) • Install the base using your chosen fixing method: fix to the ground with 3 M12 bolts or onto a block with the embedding accessory • When the base is firmly secured to its bearing element and the batteries are inserted into the bollard, place the bollard on its base • Screw in the lateral screw retaining the housing to its base 11 § Fixing on a block 1. Cast the embedding accessory in the concrete, the fastening flange should be level with the concrete surface 2. Fit the base flush with the ground, over the threaded rods. Fix the base with a washer and bolt screwed onto each rod. 3. Fix the bollard housing onto the base and fix with the lateral screws. 12 9. ACCESSORIES • Part to embed, with flange and support rods in zinc-coated steel • Overall length: 250 mm • 3 threaded M12 fastening rods on threaded flange • 3 M12 bolts and washers 10. MAINTENANCE Clean the light regularly removing dust and dirt, especially on the optical parts: • upper window of the photovoltaic collector; • lateral diffusers. Only use cleaning products that do not contain solvents. Never use a high-pressure washer closer than one metre away. Any damaged optical parts of the bollard must be repaired immediately. 13 11. BATTERIES (INSERTING/CHANGING) 1. Remove the lateral screws 2. Remove the bollard from its base 3. Place the bollard upside down, taking care not to damage the solar collector 4. Loosen the 4 screws on the battery covers and remove the covers 5. To remove the batteries: place the bollard the right way up and tap it gently on the ground so that the batteries drop out 6. Check the polarities marked on the bottom of each battery compartment when inserting the new batteries. Insert each contact at the same time (avoid inserting them at an angle) 7. Replace the battery covers. Screw in the battery covers 8. Put the bollard back on its base and screw in the lateral screw 9. Let the bollard charge for at least two or three days in bright sunlight Caution: there is a risk of explosion if the battery is replaced with an incorrect type of battery. Dispose of used batteries as instructed. 14 12. OPERATING PRINCIPLES The Alpha bollard is a self-powered outdoor light. Its power is supplied by a photovoltaic collector (solar cell) located in the upper section of the bollard. The energy is stored in built-in batteries. The bollard turns on and off automatically according to ambient luminosity In order to accumulate enough energy in the daytime to be able to come on at night, it should be placed out of any shade in such a way that it receives unobstructed sunlight directly on its top all day long. Users can adjust night-time lighting to limit energy consumption and provide effective markings at night for the necessary time. In winter, we therefore recommend setting the number of hours during which the bollard is lit based on sunset times (see section 13. Settings, Timer). A bollard must be installed in accordance with the installation instructions. Once fixed to the ground, it takes two or three days for the bollard to charge up direct sunlight (in clear weather, Southern European conditions) in order to have enough energy to proceed with the configuration and settings. 15 13. SETTINGS You control and adjust the Alpha bollard's settings with an infrared remote control, supplied separately. Settings should be made in sufficiently dark conditions to enable the bollard to come on automatically. While adjusting settings, users should pay close attention to the light signals emitted by the bollards. When first brought into service, bollards are standalone and thus not networked (network code 0). At nightfall the bollard comes on and you can adjust the settings, which will be memorized until you next adjust them. Command Mode To adjust settings you first need to switch the bollard to Command Mode. • Press and hold down any key for 6 seconds, pointing the remote control at the bollard, which should be no more than 5 metres away. • The bollard will emit a short flash, indicating it is now in Command Mode and ready to receive orders. • If the remote control is not used for 90 seconds, the bollard emits another flash, indicating it is no longer in Command Mode. Sequences The bollard features two independent sequences (S1 and S2), which are sets of brightness, colour, and other user-definable parameters. Networking The bollards can work in standalone mode or be networked. If several bollards are networked, you can control any of them with the remote control for the entire network. The bollard receiving orders from the remote control transmits them to the other bollards on the same network when you press the confirm key on the remote control. The network should only be controlled from one bollard at a time. 16 Settings confirmation and timeout to save all changes made since the • Networked bollards: Press OK previous save and communicates them to the other bollards on the same network. The bollard emits a green flash to confirm it has sent its settings to the other bollards. If you do not press any settings for 30 second, the bollard reverts to its previous settings. • Standalone bollards: simple changes in settings (colour, brightness, side, choice of sequence, cycle) are saved without the need to confirm by pressing Security code If the bollard has a particular security code, enter it with the remote control before adjusting the settings. § Setting instructions: key to symbols short press on the remote control long press (> 6 seconds) on a key on the remote control press OK press Cancel [1-15] enter a number between 1 and 15 [1-999] enter a number between 1 and 999 [1-999999] enter a number between 000001 and 999999 [0] enter digit 0 [0000000] enter the number 000000 the bollard emits a colour flash the bollard emits colour flashes 17 § Simple settings Colours or (COLOR) Brightness or (BRIGHT) Side selected the lighting side on the bollard White Sequences S1 or S2 to choose one of two colour, brightness and lighting side settings Scroll scrolls cyclically through the colours or (DURATION) reduces or increases scrolling speed. Scrolling is not synchronized for networked bollards. Stop scrolling and return to S1 or S2 § Timer: Lighting duration From 1 to 15 h (long press) flashes (purple) [1-15] flash (green) All night (long press) flashes (purple) [0] flash (green) Automatic brightness (short press) limits brightness according to the duration of Timer to reduce energy consumption: the shorter lighting time is, the brighter the lighting will automatically be, and vice-versa. 18 § Networking Alpha bollards can be networked, which allows you to adjust all their settings without needing to move from one bollard to the next. Each bollard should be between 1.5 m and 70 m from another bollard on the same network. A network is a set of bollards that communicate by radio link and that share the following identifiers: a security code and a network number. For bollards to be part of the same network, they therefore need to be assigned the same network number and the same security code. Assigning different network numbers lets one user group bollards into separate networks according to location, while retaining for instance the same security for all the bollards. A network can have no security code, in which case settings can be accessed directly. For a bollard you have just added to a network to have the same settings as this network, just go to another bollard on the same network, switch to Command Mode then press OK . This bollard's settings will be applied to all the bollards on the same network, including those newly added to the network. To assign a network number to a bollard: Add to a network (long press) flashes (yellow) [1-999] Remove from the network (enter the network number) (long press) flashes (yellow) [0] (the bollard reverts to standalone mode) If the security code is more than three digits long, only the first three are taken into account. 19 § Security code You can protect remote control access to the bollards with a user-defined code. Entering the code (long press) flashes (green) * [1-999999] (enter the new code) flashes (blue) [1-999999] (repeat the new code, otherwise return to *) Changing the code (long press) flashes (red) [1-999999] (enter the current code) flashes (green) * [1-999999] enter the new code) flashes (blue) [1-999999] (repeat the new code, otherwise return to *) • Cancelling the code: in the above sequence of instructions, enter [000000] twice • A A A A A A or A B A B A B combinations are not accepted. If either of these combinations is entered, the bollard emits a red flash when is pressed. So you need to repeat the current step to enter a valid number. After 3 unsuccessful attempts, remote control access to the bollard is locked for 2 minutes and the bollard reverts to its initial light settings • If the security code is more than six digits long, only the first three are taken into account. • For networked bollards, the same security code must be entered for each bollard of the same network. 20 § Recovering the security code If you lose the security code, it can be recovered in the form of six light sequences emitted by the bollard. You communicate these six light sequences to Geoled or an approved representative, who will communicate the code in return. This procedure presupposes than Geoled can check that the user wishing to recover the password is duly authorized to do so. Recovering light sequences: 1. Switch to Command Mode; 2. The bollard emits red flashes; 3. Enter the sequence 0 1 2 3 4 5 6 7 8 9 on the remote control then confirm with ; 4. The bollards flashes red and yellow alternately to indicate it has switched to Recovery Mode; 5. To recover one of the six light sequences, press a number between 1 and 6; 6. Note the number of blue, red and green flashes. The sequence ends with a long white flash; 7. Repeat from step 5 until you have noted down the flashes of all the light sequences 1 to 6; 8. If a sequence of flashes has not been noted, just press the corresponding key (1 to 6) to repeat it and note it down; 9. When you have noted down the flashes of all the sequence 1 to 6, enter to exit the security code recovery procedure; The bollard then flashes red, prompting you for the password. As you don't know it yet, press again to quit the recovery process. After noting the six light sequences, send them to Geoled or its approved representative and get the code in return, subject to the checks referred to at the beginning of this section. 21 14. QUESTIONS & ANSWERS 1. If a bollard fails to light up at nightfall or during the night, check that: a. the window above the photovoltaic cell is not obstructed from sunlight (which recharges its batteries); b. the bollard has not suffered any knocks that may have damaged its light diffusers, solar collector or electronics; c. the lighting duration after sunset has not already been exceeded (see Settings/Timer section, page 18), in which case it is normal that it does not come on. The bollard will come on again if you change the Timer settings (increase the duration or switch to lighting all night long, for instance) or when night falls again; d. the bollard has been in direct sunlight for at least 12 hours in luminosity in excess of 30 Klux for a minimum battery charge; e. the batteries have been properly inserted as instructed in this manual (see 11. BATTERIES). 2. If the bollard emits red flashes when you want to adjust its settings: the bollard is protected by a security code, enter it to be able to adjust its settings. 3. If you cannot change the settings of one or more bollards (colour, brightness, sequences, periods, networking, etc.), check that: a. the bollards are in Command Mode before attempting to change any settings or network configuration; b. that a security code has been set and that you have entered it before changing any settings; c. if a bollard fails to follow the settings of a network, check that it has been duly assigned to the said network. 4. If one or more bollards cannot be networked, check that: a. they all satisfy the necessary conditions for charging their batteries (see point 1 above); b. that each bollard is no more than 70 metres away from another bollard on the same network; 5. At dawn or nightfall, not all the bollards on the same network come on or go off simultaneous, is that normal? ➟ Yes, each bollard activates its LEDs solely according to the luminosity received by its solar collector, which may be slightly different from bollard to the next. 22 6. Colour cycle scrolling is not synchronized for the same network, is that normal? ➟ Yes, this function primarily serves to show the palette of colours displayed by the Alpha bollard. Real-time synchronization of bollards on the same network is unnecessary for marking or guidance applications. Bollards are networked solely to share identical settings, to avoid the user having to move to each bollard to change its settings. 7. Can networks with different, albeit similar, identifiers have their own settings without any risk of interference? ➟ Yes, each bollard communicates only with its network, identified by its network number (and the security code if one has been set). 23 www.geoled.com 24