1
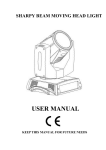
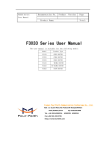
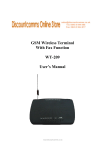
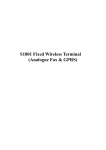
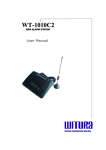
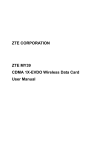
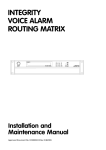
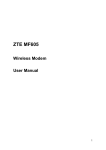
User Manual
Edition: 1st edition, Nov., 2006
Copyright © 2006 by ZTE Corporation
All rights reserved.
No part of this publication may be excerpted, reproduced, translated or
utilized in any form or by any means, electronic or mechanical, including
photocopying and microfilm, without the prior written authorization of ZTE
Corporation.
Telstra Turbo CardTM and the Next G logo are registered trade marks of the
Telstra Corporation and cannot be reproduced without permission.
Contents
1 Wireless Data Card Introduction.............................................................. 1
1.1 Introduction ................................................................................. 1
1.2 Safety Warning and Notices........................................................... 2
1.3 Systems Supported ....................................................................... 3
1.4 PC System Requirements ............................................................... 3
1.5 Data Card Technical Specification .................................................. 4
2 Installation ........................................................................................... 5
2.1 Unpacking ................................................................................... 5
2.2 Appearance and Parts ................................................................... 5
2.3 Software Installation .................................................................... 6
2.4 Running the Application ................................................................ 9
2.5 Safe Removal from your system ..................................................... 9
2.6 Software Uninstallation Process ................................................... 10
2.7 Hardware Set Up..........................................................................11
3 Using the Software Application ............................................................ 12
3.1 Software Introduction ................................................................. 12
3.2 Connecting to the Internet........................................................... 16
3.3 Making a Call ............................................................................. 17
3.4 Answering an Incoming Call......................................................... 18
3.5 Other Call Functions.................................................................... 18
3.6 SMS Messages ............................................................................ 19
3.7 Create a New Message................................................................. 20
3.8 Phone Book ................................................................................ 22
3.9 Settings ..................................................................................... 24
3.10 Call Records .............................................................................. 29
3.11 Help......................................................................................... 29
4 FAQ & Answers ..................................................................................... 30
5 Environmental Statement.................................................................... 33
1 Wireless Data Card Introduction
1.1 Introduction
Thank you for choosing the Telstra Turbo CardTM. To help you use your card
please read the manual carefully and keep it for future reference.
The pictures, symbols and contents in this manual are for reference only. They
might not be completely identical to your card. Please refer to the model you
purchased. The manufacturer operates a policy of continuous development. We
reserve the right to update and modify technical specifications in this
document at any time without prior notice.
The Telstra Turbo CardTM is a multi-mode 3G wireless data card compatible with
HSDPA, WCDMA, EDGE, GPRS, and GSM networks. With PCMCIA II interface to
connect to portable PC’s, it integrates the functionality of a modem and a
mobile phone and combines mobile communication with the internet perfectly.
It supports data, voice and SMS services through the mobile phone networks
helping you break away from limitations of fixed line connections, location
and network connectivity to communicate wirelessly anytime and anywhere.
The Telstra Turbo CardTM has been programmed to operate only on Telstra's
Next GTM and GSM networks. If you wish to use a non Telstra SIM/USIM in the
Telstra Turbo CardTM, a network unlocking fee will apply as set out in our
Customer Terms.
1
1.2 Safety Warning and Notices
To the owner
z The use of electronic transmitting devices is forbidden in aircraft, at petrol
stations and in hospitals. Please observe and obey all warning signs and
switch off your PC in these conditions.
z Operating a portable PC and data card may interfere with medical devices
such as hearing aides and pacemakers.
z Be aware of warning signs in places such as oil refineries or chemical
factories where there are explosive gases or explosive products being
processed.
z Store the data card out of the reach of children. The data card may cause
injury if used as a toy or may be damaged by rough play or moisture.
Using your Data card
z Only use original accessories supplied by the manufacturer. Using
unauthorized accessories may invalidate your warranty.
z Avoid using the data card near or inside metallic structures or
establishments that can transmit electromagnetic waves.
z The data card is not waterproof, please keep it dry and store it in a cool place
out of direct sunlight.
z Handle the data card with care. Don’t drop, bend, knock or treat it harshly to
avoid damage to the unit
z There are no user serviceable parts. Dismantling the unit will invalidate the
warranty.
z Operating temperature range of 0°C~55°C and humidity 5%~95% are
recommended.
Declaration of Conformity
We declare under our sole responsibility that the product(s) detailed in this
manual, and in combination with our accessories, conform with the essential
2
requirements of The Radio Communications Standard (Electro-magnetic
Radiation Human Exposure) 2003 and the Australian Communications and
Media Authority Section 376 of the Telecommunications Act 1997. The Product
is compliant with IMEI intergrity requirements as defined in GSM
standards:2.07/02.09/02.16/02.30/03.0304.08, 3GPP standard:22.016/23.003
Copyright Notice
The video/audio recordings you transfer or download may be protected by
copyright laws. They are for personal use only and must not be otherwise used
without the permission of the copyright owner.
Limitation of Liability
ZTE shall not be liable for any loss of profits or indirect, special, incidental or
consequential damages resulting from or arising out of or in connection with
using this product, whether or not ZTE had been advised, knew or should have
known the possibility of such damages.
The user should refer to the enclosed warranty card for full warranty and
service information.
1.3 Systems Supported
The Telstra Turbo CardTM uses the PCMCIA II form factor and supports most
portable PC models such as HP, Compaq, IBM, Toshiba, LG, Dell, etc.
1.4 PC System Requirements
The data card and software application supports Windows 2000 and XP only
with recommended specification:
CPU
Pentium III or above
Hard Disk
20G or above
RAM
128M or above
3
1.5 Data Card Technical Specification
Network
Standards
Frequency Bands
HSDPA/ WCDMA/ EDGE/ GPRS/ GSM
Dimensions
HSDPA 850MHz
HSDPA 2100MHz: 1920-1980 MHz
2110-2170 MHz
GSM 900MHz: 880-915 MHz / 925-960 MHz
GSM1800MHz: 1710-1785 MHz
1805-1880 MHz
GSM 1900MHz: 1850 -1910 MHz
1930 -1990 MHz
118×54×12 mm
Weight
About 55g
Data Rates
HSDPA mode max speed 3.6Mbps
WCDMA mode max speed 384 kbps
EDGE mode max speed 236.8kbps
3.3V
Working Voltage
Current
consumption
Stand by: 80mA
4
Max: 850mA
2 Installation
2.1 Unpacking
Please check that the following items are included in the package: Telstra Turbo
Card TM, Headset, Software CD, Quick Start Guide and Warranty Card.
2.2 Appearance and Parts
1. PCMCIA Interface 2. SIM/USIM Card Slot
4. Headset Jack
3. LED Indicator
5. External Antenna Port
LED Indicator Status:
LED
Status
Green On
Normal.
Red On
Abnormal / No network signal
Green flashing
Incoming Call
Green blinks four times
New SMS Message
5
2.3 Software Installation
Install the software before inserting your card into your PC.
Insert the CD into your CD-ROM drive. The installation should start
automatically. If the PC doesn’t launch the installation automatically please
run Setup.exe on the CD.
Click Next to continue.
6
Select “I accept…” and click Next to continue.
7
Installation is in progress…
8
2.4 Running the Application
When the software installation is finished make sure your SIM/USIM card is
inserted correctly into the Telstra Turbo CardTM .Insert the data card into the PC
slot and allow Windows to complete the New Hardware Installation. Launch
the application software by double-clicking on the desktop icon or select Start,
Programs, Telstra Turbo Card Manager.
2.5 Safe Removal from your system
In order to safely remove the data card from your system, please follow these
steps:
1.
Right click the Next GTM logo on the task bar.
2.
Select “Power Off Data Card”.
3.
4.
(Prompt “Power Off DATA CARD Successful” will appear) Click OK.
Close the software application.
5.
left click on the icon in the taskbar as shown:
Click the item in the above dialog box to get the following message:
Now, you can pull out the data card safely.
9
2.6 Software Uninstallation Process
If you need to uninstall the software first close the application program then
click Start, Programs, Telstra Turbo Card Manager, Uninstall.
Follow the prompts on screen:
Click Yes to confirm the uninstall process.
Click Finish and complete the application software removal.
10
2.7 Hardware Set Up
First install the CD Software See 2.3 above.
1. Inserting SIM/USIM card into the data card
Before inserting the data card into your PC you need to insert the SIM/USIM
card. Insert the SIM/USIM card with the gold contacts facing downwards into
the slot on the side of the data card.
2. Inserting data card into your PC
Insert the data card into the PCMCIA slot and push firmly home. The LED
indicates when the data card is properly inserted.
3. Earphone Connection
In order to send or receive voice calls please plug the earphone supplied into
the socket on the data card.
4. External Antenna (Optional extra)
If you have purchased an additional external antenna you can carefully insert
it into the side port on the data card.
11
3 Using the Software Application
3.1 Software Introduction
Launch the software by double clicking on the desktop icon. The connect
interface is displayed:
Functions Area
System Information Area
User Area
Press Connect to connect to the default service.
The screen is divided into three sections. The top section displays the function
buttons for quick connection, messages and set up. The next bar displays
network and card status and is called the System Information Area. The
remaining space is the user area and varies depending on application.
12
1. Functions Area:
The function buttons are straight forward and intuitive providing quick access
to the most common features of the data card.
Connect to the Internet
Dial or receive a call.
Send or view SMS Messages
Save and view your contacts list
Configure the data card settings
View your call records
System help
13
2. System Information Area
The system information area reports the status of the data card, signal
strength, missed calls, messages etc.
Network signal strength indicator.
You have incoming call or missed calls
There are new SMS messages
Data card is disconnected from the Internet
Data card is connected to the Internet
SIM/USIM card is roaming
P indicates packet-switch service. C indicates circuit switch service
Data card has been inserted into the computer
Data card has not been inserted into the computer
Data card is offline
SIM/USIM card is present and active
SIM/USIM card has not been inserted or the SIM/USIM card is not
correct
Current network service type, i.e. WCDMA or GPRS/GSM
Name of current service provider
14
System Information - Minimized Icons on task bar
When the window is minimized, the system icons display on the taskbar.
Double click the icon to re-size the display.
1. Taskbar Icons' Description
Data card has been inserted into the computer.
Data card has not been inserted into the computer.
Data card is offline.
SIM/USIM card has not been inserted or the SIM/USIM card is not
correct.
Data card is working normally, idle status.
No network signal.
New Message.
New incoming call or missed calls.
Green indicates successful connection to the internet.
2. Taskbar Right Click Options:
Power off Data Card: The card is switched off. To restart the card you need to
remove and re-insert it into the PC slot.
Data Card Offline: Take the data card offline. You cannot receive calls in this
state. You can re-start the card by right clicking on the task bar and selecting
Datacard On-Line.
Restore Factory Settings: Restore factory defaults (Note that this will not erase
15
your contacts, SMS, call records or data connection records).
Help: View system help.
About: View application software and hardware versions.
Exit: Close the application interface and stop using the data card.
3.2 Connecting to the Internet
Click the Data Connection icon
and press Connect to confirm.
Notes
•
When connecting to the internet for the first time, you should select the
right profile file. See 3.9 section 1.
•
Once you are connected, run Internet Explorer or other applications in the
usual way.
•
You can still receive and make calls while you are connected to the net,
subject to network support.
16
•
The connected icon appears on the taskbar:
•
Press Disconnect to terminate the connection.
3.3 Making a Call
Connect your headset and click the Calls icon
to make a call. Enter the
phone number using the keypad on the screen or by typing on the keyboard.
You can also select numbers from the calls list or from your contacts.
Notes
•
If you make a mistake press
•
Press
•
For international calls, press
to clear.
to make a call and press
to end a call.
twice for the international prefix
“+”.
17
3.4 Answering an Incoming Call
When you receive an incoming voice call, “Incoming Call” appears on the
screen and an alert will ring on the PC. The incoming number (if available) will
appear on the left and the green light on the data card will flash continually.
Press
to answer or press
to reject the call. You can also press
the button on the headset to answer the call.
3.5 Other Call Functions
1. Volume Adjustment:
You can adjust the headphone volume by using the slider
.
2. Redialing:
In standby status press
to bring up the dialed calls list, select the
required number and press the Dial button.
3. Making an Emergency call:
Even without a SIM/USIM card you can still make emergency calls. Enter the
number using the laptop keyboard or by clicking on the number keypad on the
screen. Also, you can make an emergency call when prompted to enter PIN or
PUK code.
4. Dialing when surfing on the Internet:
When surfing on the Internet you can also make voice calls (subject to network
support). Click
to enter the calls interface.
5. Viewing missed calls:
If there is a missed call press the icon
to view the details.
18
3.6 SMS Messages
Click the SMS icon
to use the SMS interface.
Then click on the respective button to view:
Inbox: Contains received SMS messages.
Outbox: Contains sent SMS messages.
Draft: Contains draft messages and messages that failed to send.
After clicking on the respective box use the buttons at the bottom of the
window to Read, Reply, Forward, Move, Delete, Save or Cancel message(s).
19
3.7 Create a New Message
Click New Message. Enter the recipient’s number or select a number from your
contacts by pressing
. Type your message then click Send and follow the
prompts. After sending the SMS will be saved in the Outbox. If it fails to send the
message will be saved in the Draft.
Notes
•
SMS messages are limited to 765 characters including spaces etc.
•
You can send messages while using the internet. Just click on the SMS
icon and create a new message as above.
•
You can add multiple recipients using ";" between each number.
20
New Message - Contacts List
After pressing the
search button you can enter single or multiple
contacts by selecting the check box on the left hand side then press the arrow
button
to move it to the right box. When you press OK the contacts will
show in the new message window.
21
3.8 Phone Book
Click the Phone Book icon
to use the phone book interface. The Folder
window indicates if the contacts are stored on the PC or the SIM/USIM card.
1. To Add a New Contact
Click New, New Contact. Enter the required information then select OK to
finish.
2. New Groups
Contacts can be stored in different groups. You can create and name your own
groups using the New Group button.
22
3. Searching and Editing Records
Type any part of the record into the entry bar and click Search. When a record
is selected you can View, Delete, SMS, Save as, Edit or Dial the selected record
using the corresponding buttons.
4. Copying contacts from SIM/USIM card to PC
Use the check boxes to select your required contact on the SIM/USIM card then
drag them up to the folder section and drop them on PC.
The highlighted contacts will be copied from the card to the PC.
23
3.9 Settings
Click the Settings icon
to use the settings interface.
1. Connection Settings
There are three default profiles provided by Telstra in the settings configuration.
You can view the details and set one of profiles as the default. Contact Telstra
Customer Care for more details, If the selected profile does not work try
selecting another profile or contact Telstra for more information.
For other profile, you can Add, Delete, Edit, and Set default.
24
2. Security Settings
• PIN Enable, Change PIN - Enable PIN protection and change your PIN
Number.
• Backup Phone Book, Call records, Internet connection records and SMS Store and restore back-ups on your PC.
Notes
The PIN number for the card is provided by Telstra. If you change or lock up
your PIN number you will need to contact Telstra Customer Care to obtain a
PUK code.
25
3. Network Settings
Network selection can be set to Automatic or Manual.
When you select Manual the card will search and display available networks.
26
Notes
•
•
It is recommended that you leave the default settings on automatic. The
software will negotiate the best available connection depending on your
network coverage.
Select International Roaming to enable use on overseas networks.
4. Messages Settings
You can set the Message Centre number (preset, no need to change) and
change the Validity Period, SMS Save Location and Delivery Report.
Note:
When delivery report is turned on you get a message back from the message
centre confirming when your SMS is delivered, (subject to network support).
27
5. Alert settings
You can set different sounds or mute each alert for Connect alert, Disconnect
alert, Incoming SMS alert and Incoming call alert on the PC.
Use Browse to select alternative sounds.
6. Factory settings
If you change any of your settings and manage to disable your connection
please select the Restore Factory Settings on the task bar. Move your mouse
over the icon on the task bar and right click to select the Restore Factory
Settings option. Restoring the factory settings does not erase your phone book,
saved messages, call records or data connection records.
This menu is only available when the card is inserted into the PC slot.
28
3.10 Call Records
Click the Call Records icon
to use the call records interface.
When a record is selected you can Dial, send SMS, Save, and Delete.
Use the Clear button to clear all records.
Note
When more than 50 records are exceeded every new record will automatically
delete the oldest record.
3.11 Help
Click Help icon
to switch to the help interface. Under Help you can get an
introduction to the data card functions, installation and usage guide.
29
4 FAQ & Answers
If you experience any problems with your data card please check the FAQ
section below. If the problems still exists consult your service provider or call
the customer service number on the warranty card.
If the card or the software are not responding please follow these steps:
1. Switch the card off line (right click the Next GTM logo on the task bar).
2. Remove and re-insert your card.
3. Close and restart the software application.
If problem still exists reboot the PC.
Description
After
restarting the
PC, there is still
no signal.
During
installation
the PC does
not find the
data card
Message send
fails
Possible reasons
You are in an area where
there is no network coverage.
The data card isn’t inserted
properly.
The SIM/USIM card isn’t
inserted correctly, eg
upside-down or reversed.
The installation program did
not install properly.
The data card isn’t inserted
correctly.
The SMS centre number isn’t
correct.
The network is busy or is
down for other reasons.
30
Solution
Move location until you
get better reception.
Pull out and insert the data
card again.
Insert the SIM/USIM card
correctly.
Run the installation
program first, then insert
the data card. Run Setup
from the CD and choose
‘Repair’ then re-insert the
data card.
Restart the computer, and
insert the data card again.
Check with your service
provider and re-enter the
number or restore factory
defaults, see 3.9 section 6.
Try again later.
Description
Data
connection
fails
Possible reasons
You are in an area where
there is no or poor network
coverage such as deep in a
building or underground in a
car park etc
The network is busy
The dialed number or the APN
in the user config files is
incorrect
The HSDPA/EDGE data fails
The manual configurations
are set wrong.
After connection, there is no
data transfer.
Internet Explorer is outdated.
Connected to
the Internet,
but cannot
open any web
pages
Cannot use the
data card
after deleting
some
hardware.
It is possible you have a virus
infecting your PC .
Solution
Move location until you
get better reception.
Try again later.
Check the number. Check
the APN, restore defaults
(See 3.9 part 6)
Network or service
problem. Please contact
your service provider.
Change your network
settings to automatic.
Restore defaults.
Check your APN settings.
You should upgrade your
Internet Explorer to be
version 6.0 or higher.
Use anti-virus software to
check and restore your
system.
You have connected to
another APN which cannot
connect to the Internet.
Check your APN settings.
Restore defaults.
The wrong hardware has been
deleted affecting the data
card.
Pull out and insert the data
card again to restart the
installation software.
Run Setup from the CD.
31
Description
Possible reasons
Solution
The window
disappears
when you
minimize it.
This is normal. The
application is still running in
the background and can be
accessed through the task
bar.
Double click the icon on
the task bar to re-size the
window.
Incoming call
does not show
phone
number.
The incoming call has blocked
their number, or the network
does not support this.
Problem is with the other
party or the network.
No warning
tones.
Sound card is not installed,
the volume is too low or the
sound is muted.
Check the sound card
settings and adjust the
volume. Check Settings,
Alert Settings (3.9 section
5).
Cannot receive
calls when
connected to
Internet.
Network problem.
Please check with your
service provider
The
installation
did not
complete
successfully
Card was inserted before
installation was complete.
Drivers are corrupted, other
Windows problems.
Remove and replace the
card. Check ‘Device
Manager’ in Windows and
re-install the drivers.
Run Setup from the CD and
choose ‘Repair’
32
5 Environmental Statement
ZTE is committed to saving and protecting the natural environment and asks
you to continue this commitment when you dispose of your equipment. Your
Telstra Turbo CardTM is made using the latest manufacturing techniques and
environmental standards to reduce waste and hazards to the environment.
However at the end of life of the equipment the manufacturer recommends
that you return the data card and accessories to your nearest re-cycling depot
or send it to our recycling agent below. Valuable materials such as gold, silver,
and copper can be recovered from the unit. Any toxic materials will be
prevented from entering the environment and the waste materials will be
recycled.
At the end of life of the equipment you can send your data card to:
MRI (Australia) Pty Ltd
20-24 Dennis St
Cambellfield
VIC 3061
www.mri.com.au
MRI Australia recycles every part of the equipment and diverts over 90% of the
materials from landfill for re-use.
33