1
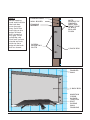
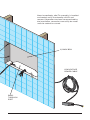
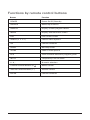
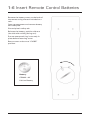
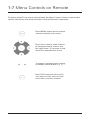
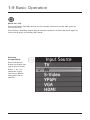
User
Manual
19” TFT-LCD Television
Model: S-1913-19.1-HY.1
Waterproof 19" High-Definition
Liquid Crystal Television
IMPORTANT: Please read this operation manual before operating the equipment.
™
by sÉur a®
Thank you for purchasing Hydra™ waterproof 19" TFT-LCD television.
Please take the time to read this manual for the best performance of your new
television. To enjoy the features of this unit and ensure years of trouble-free
operation, please make sure to carefully follow instructions.
Please keep this manual for future reference.
Information in this manual is subject to change without prior notice.
Caution
A. Any changes or modifications in construction of this device which are not
expressly approved void the manufacturers warranty.
B. Do not attempt your own maintenance. If a problem occurs, please turn
the TV off and consult your TV Dealer or Supplier. Opening or altering the
appliance by unauthorized persons results in void of warranty.
C. Do not expose the TV to extreme environmental conditions such as high
humidity, direct sunlight, dust, steam, smoke or excessive hot or cold
temperatures.
2
Safety Instructions
To reduce the risk of fire, electrical shock and other
injuries, keep these safety precautions in mind when
installing, using, and maintaining your TV. The socketoutlet should be installed near the equipment and
be easily accessible. The TV should be connected to a
grounded main socket outlet.
Warning: If you manipulate against the
recommended usage, serious injury or death to user
may result.
Safety Tips
For added safety during a lighting storm, or when this product is left unattended and
unused for long periods of time, unplug it from the wall outlet and disconnect the
antenna.
Do not touch the power cord with wet hands.
If any electric pin is wet or dusty, remove the moisture or dust before use.
Do not use a damaged power cord or plug.
Do not use the product close to any heat sources such as radiators, heat registers,
stoves, or other products that produce heat.
Do not place heavy articles or step on the product.
Placing the product on an unstable base can cause the product to fall, resulting in
serious personal injuries as well as damage to the product.
If you notice any smoke or scorched smell near the product, unplug power cord and
refer to qualified personnel for service and/or repair.
Do not use or place any combustible or flammable substances near
the product.
An outside antenna system should not be located in the vicinity of overhead power
lines or other electric light or power circuits, or where it can fall into such power lines
or circuits.
Turn off the main power and unplug the AC cord from the wall outlet before handling.
Do not operate in direct sunlight.
3
Contents
CHAPTER 1
Set Up
1-1 In The Box................................................... 7
1-2 Parts............................................................ 8
1-3 Terminals.................................................... 9
1-4 Installation............................................... 10
1-5 Remote Control........................................ 15
1-6 Insert Remote Control Batteries............. 17
1-7 Menu Controls on Remote...................... 18
1-8 Menu Configuration................................ 19
1-9 Basic Operation ...................................... 20
CHAPTER 2
Connection
2-1 Preparation.............................................. 22
2-2 Connecting Power................................... 22
2-3 Connecting TV Antenna........................... 23
2-4 Connecting VIDEO / S-VIDEO................. 24
2-5 Connecting HDMI.................................... 25
2-6 Connecting PC......................................... 26
2-7 Connecting RS-232C PC Control............ 28
2-8 Connecting Audio Lineout...................... 28
4
CHAPTER 3
Menu
3-1 The Menu System..................................... 30
3-2 Video Menu.............................................. 31
3-3 Audio Menu.............................................. 39
3-4 TV Menu.................................................... 41
3-5 Setup Menu.............................................. 46
3-6 Parental Menu.......................................... 55
CHAPTER 4
Specifications
4-1 Specifications........................................... 63
CHAPTER 5
Troubleshooting
5-1 Troubleshooting........................................ 66
5
1
Set Up
1-1 In The Box
1-2 Parts
1-3 Terminals
1-4 Installation
1-5 Remote Control
1-6 Insert Remote Control Batteries
1-7 Menu Controls on Remote
1-8 Menu Configuration
1-9 Basic Operation
6
1-1 In The Box
Please make sure the following items are included:
Hydra™ waterproof LCD product:
1) Back Box
2) TV Assembly
Waterproof Sealant
20 ft Low-Voltage Power Cord, CL2R
Power Supply Brick: 110-240V
Standard USA-A type plug
Waterproof Remote Control with battery
Mounting Hardware
User Manual
7
1-2 Parts
1) BACK BOX
Framing member
screw-mounting
slots (4)
gravity lock mounts
top
bottom
Framing
member
screwmounting
slots (4,
2 per side)
input/output/low voltage
pass-through port
2) TV ASSEMBLY
low voltage
power location
top
bottom
gravity
lock
guide
slots (4)
inputs/outputs
8
on-unit
control
buttons
glass face
1.3 Terminals
Note: this view shows
back box and tv assembly
installed together
1) back box
glass
face
2) tv assembly
5’ IR Lead with 3.5 mm
Male Connector
2 Channel Amplified
Speaker Out
bottom
on-unit control buttons
RS 232 Input
DTV/Antenna
PC Audio In (blue)
PC Audio Out (green)
Composite
S-Video
Component Input RGB
15 Pin VGA Input
HDMI Input
DC Power Input
Volume
Channel
Source
Menu
Power
9
1-4 Installation
NOTE: Read all installation instructions before beginning installation.
Step 1
Install back box in unfinished wall to framing members using the provided four
screws and washers through screw-mounting slots in back box. Ensure that the
front of the box will be flush with finished wall when installed. Feed power and
other desired cords through pass-through port.
vertical framing members
1) back box
Screw
into
framing
members
using
screwmounting
slots (4)
PASSTHROUGH
PORT
LOWVOLTAGE
POWER
audio
videO
Note: Do not overtighten mounting hardware. Back box should fit snuggly between
framing members. If the fit is poor, and overtightening occurs, the back box may
deform, resulting in a poorly sealed installation. If the back box doesn’t fit well
between framing members, shim the framing members for a square and stable fit.
10
Step 2
While keeping
cord ends outside
the back box
pass-through
port, finish the
wall tight to the
edges of back
box, removing
any gap. Once
complete, the
final wall surface
should be flush
with the front
edge of the back
box as shown.
finished wall
wall board
framing
member
screw
mounting
slots
note:
surface of
finished
wall and
front edge
of back
box are
flush
1) back box
finished
wall
1) back box
maintain
cords
in passthrough
port
during
wall
finishing
11
Step 3
Install TV Assembly:
A) Place TV assembly face down on a clean, dry surface near the installed
back box. Make all necessary connections and ensure LCD operation is
successful. Tip: Use a small table or stool as near to the installed back
box as possible to reduce wire slack.
B) Before applying adhesive, “dry fit” the TV assembly in back box. Notice
that the gravity lock mounts engage and ensure remote and LCD
functionality in installed position.
C) Remove TV assembly from back box and place face down near back box.
Do not disconnect any wires. Clean any residue from glass and remove
debris.
D) Apply supplied waterproof sealant liberally to glass face edge as shown.
Affix to wall surface, ensuring gravity lock mounts are fully engaged.
Sealant should seep out the front on all edges to provide the best seal.
back box is screw
mounted into
framing members
1/8” bead
(excess
sealant
should seep
out on all
edges when
fully engaged)
1) TV ASSEMBLY
glass face
recessed input/output/
low voltage location
12
Note: Immediately after TV assembly is installed
and sealed, verify functionality of LCD and
remote. If operation has been compromised by
the installation, corrections can easily be made
until the sealant has cured.
2) BACK BOX
low voltage
power cable
passthrough
port
13
Step 4
Allow waterproof
sealant 24 hours to
cure at 72 degrees
Fahrenheit before
exposing to moisture.
(or recommended
time designated by
sealant instructions)
Once fully cured,
use a razor blade or
utility knife to remove
excess sealant.
finished wall
wall board
framing
member
completely
installed
back box and
tv assembly
14
sealant
creates
watertight
seal
Note:
glass
faceplate
seals
directly
to
finished
wall
surface
1-5 Remote Control
2
3
1
1
Power On/Off, Standby
2
TV & Input Source
Selection Button
3
Display Button
4
Menu Control Center
5
Sleep Timer Button
6
Zoom Button
6
7
7
Electronic Program
Guide Button
5
8
8
Mute Button
9
Number Selection
Buttons
10 Channel Control
Buttons
11
4
10
9
11
Volume Control
Buttons
12 Enter Button
12
Remote performs best within
20 ft (6 m) of the LCD and
within 30º to the left or right
of the display.
15
Functions by remote control buttons
Button
Function
POWER
Power On/Off, Standby
SOURCE
Select Input Source
DISPLAY
Display current program details
MENU
Display and edit menu screen
EXIT
Exit current screen
Arrows (3456)
Control menu options
OK
Confirm selection
SLEEP
Set sleep timer
ZOOM
Zoom current picture
EPG
View available electronic program guide
MUTE
Temporarily turn off audio
0 - 9, .
Numeric selection
Channel Control Buttons (V )
Select control
Volume Control Buttons (+ -)
Volume control
ENTER
Confirm selection
16
1-6 Insert Remote Control Batteries
Remove the battery cover on the back of
the remote using the tool included or a
coin.
Open compartment and remove battery
and safety tab.
Discard plastic safety tab.
Reinsert the battery, positive side out
(the side with writing facing out).
Ensure waterproof ring is securely in
place before returning cover.
Return cover and turn to “CLOSE”
position.
Battery:
CR2032 + 3V
Lithium Battery
17
1-7 Menu Controls on Remote
Functions of the TV set can be controlled by the Menu Control Center on the remote
control. Familiarity with these functions will provide ease of operation.
Press MENU button on the remote
control to display main menu.
Press menu control arrow buttons
to navigate through menus. Use
the right arrow (4) to move to sub
menu of a selected main menu.
To change a selected menu setting,
use Menu control buttons (34).
Press EXIT button to return from
sub menu to main menu or from
main menu to menu removal.
18
1-8 Menu Configuration
Press MENU to open the menu window. Navigate using 5 or 6 to select the desired
menu. Press 4 or OK to enter the menu. Use 5 or 6 within the selected menu to
navigate to a submenu or setting to adjust. Press 4 or OK to enter the submenu or
use 3 or 4 to adjust selected setting. Press EXIT at any time, or wait 10 seconds to
exit the menu.
OR
19
1-9 Basic Operation
Power On / Off
Press the Power / Standby button on the remote control or on the side panel to
turn on the unit.
Press Power / Standby button on the remote control or on the side panel again to
return the display to standby (off) mode.
Selection
of Input Mode
Press the Source
button to display the
signal source menu.
Press 5 or 6 to
select the signal
source you desire,
then press OK to
confirm.
20
2
Connection
2-1 Preparation
2-2 Connecting Power
2-3 Connecting TV Antenna
2-4 Connecting VIDEO / S-VIDEO
2-5 Connecting HDMI
2-6 Connecting PC
2-7 Connecting RS-232C PC control
2-8 Connecting Lineout (External Speaker)
21
You can connect many types of external equipment to your TV.
To view external source options, select the input source by
pressing the SOURCE button on the remote control.
2-1 Preparation
Before connecting your TV to external equipment, please read to following
instructions.
Before Connection
Please read the relevant external equipment operation manual (DVD player, etc.)
carefully before making connections.
Whenever you connect an external audio or video system to your TV, ensure that all
elements are switched off.
2-2 Connecting Power
The TV automatically adjusts voltage.
Before connecting power, please check your power adapter for compatibility
with wall outlet.
Power cable should be firmly connected to the power source.
Power cable is USA A-Type 3-conductor, shielded, detatchable.
AC Receptacles: 110~240v, x 1, 50/60, GFI circuit.
22
2-3 Connecting TV Antenna
Connect RF cable to TV <ANTENNA> & <CABLE> input connector with an outdoor or
wall outlet antenna output.
• For watching analog TV, connect wall outlet with [Cable] input.
• For watching digital TV, connect wall outlet with [Antenna] input.
Turn on the TV after all connections.
Watching Analog TV & Digital TV
• Analog TV signal has a channel number structure of 1, 2, 3, 4, 5, etc., but Digital TV
signal has a channel number structure of 1-1, 2-1, 3-1, 4-1, 5-1, etc.
• If you press TV button on the remote control, its input source changes from Analog
to Digital or Digital to Analog.
23
2-4 Connecting VIDEO / S-VIDEO
Connect Video/Audio cable and S-Video cable to video port of the TV and camcorder,
gaming consoles, VCR, DVD player or Set-Top box.
Video & S-Video use same audio line, so if two types of external equipment are
connected with Video & S-Video, audio will only be available for one type of the
connected equipment.
Press SOURCE on the remote control and select Video or S-Video.
Note: Video, S-Video and audio cables are not included.
24
2-5 Connecting HDMI
Connect HDMI cable to HDMI port of TV and DVD player, VCR, Set-Top
box or camcorder.
2-6 Connecting PC Monitor
Connect 15-pin cable to 15-pin port on the TV and PC.
Connect audio cable to audio output of a PC (stereo jack) and PC audio input port of
the TV.
Note: D-Sub & stereo cables are not included.
Note: Optimal Resolution is 1280 X 1024 @ 60Hz.
For watching digital (DVD, Camcorder, etc) signal
• Press SOURCE on the remote control to select VGA.
25
2-7 Connecting RS-232C PC Control
Attach RS-232C cable cross-type to the supplied Din/D-Sub RS-232C.
et the RS-232C communication settings on the PC to match the
S
communication conditions listed.
Send the control commands from the PC via the RS-232C connector.
1. The LCD operates according to the received command and sends a response
message to the PC. Do not send multiple commands at the same time.
2.Wait until the PC receives the confirmation response before sending
the next command.
COMMAND TABLE
COMMANDS NOT INDICATED HERE ARE NOT GUARANTEED TO OPERATE
CONTROL ITEM
COMMAND
POWER ON COMMAND SETTING
R
0
_
_
_
OFF
1
_
_
_
ON
POWER SETTING
0
_
_
_
POWER OFF
1
_
_
_
POWER ON
(TOGGLE)
P
S
O
P
PARAMETER
W
W
R
INPUT SELECTION TOGGLE
I
TG
DX
_
_
_
TV
I
T
V
D
_
_
_
INPUT 1-5
0
I
A
V
D
*
_
_
_
INPUT TERMINAL NUMBER VOLUME
V
O
L
M
*
*
_
_
VOLUME 0-99
VIEW MODE
W
I
D
E
*
_
_
_
1: S.STRETCH [AV]
2: SIDE BAR [AV],
3: ZOOM [AV], 4: STRETCH [AV]
5: NORMAL [PC]
6: ZOOM[PC]
7: STRETCH[PC]
8: DOT BY DOT[PC][AV]
9: FULL SCREEN [AV]
MUTE
M
U
T
E
*
_
_
_
1: ON, 2: OFF
SLEEP TIMER
O
F
T
M
*
_
_
_
0: OFF, 1: OFF TIMER-30 MIN., 2: OFF TIMER-60 MIN.,
3: OFF TIMER-90 MIN.,
4: OFF TIMER-120 MIN.
CHANNEL
DIRECT
D
A
2
P
*
*
*
*
(0100-9999)
(EX: 50.2=50 02)
D
C
2
U
*
*
*
_
(1-999)
(EX: 50.2=050 002)
CHANNEL UP
C
H
U
PX
_
_
_
THE CHANNEL NUMBER OF TV +(X)
CHANNEL DOWN
C
H
D
WX
_
_
_
THE CHANNEL NUMBER OF TV -(X)
NOTES:
UNDERSCORES (_) WITHIN THE PARAMETER COLUMN REPRESENT A SINGLE SPACE
ASTERISKS(*) WITHIN THE PARAMETER COLUMN REPRESENT A VALUE WITHIN THE RANGE
INDICATED IN THE CONTROL CONTENTS
X WITHIN THE PARAMETER COLUMN REPRESENTS A VALUE WITHIN THE RANGE INDICATED
IN THE CONTROL CONTENTS
26
Communication conditions
Baud rate:
Data length:
Parity bit:
Stop bit:
Flow control
9600 bps
8 bits
None
1 bit
None
CONTROL CONTENTS
THE POWER ON COMMAND REJECTED
THE POWER ON COMMAND ACCEPTED
IT SHIFTS TO STANDBY
POWER ON
IT INPUT- SWITCHES BY THE TOGGLE. (IT IS THE SAME AS AN INPUT CHANGE KEY)
IT INPUT- SWITCHES TO TV. (A CHANNEL REMAINS AS IT IS. (LAST MEMORY))
IT INPUT- SWITCHES TO INPUT 1-INPUT 5. (1 AV) (2 S-V) (3 COMP) (4 VGA) (5 HDMI)
ALTHOUGH IT CAN CHOOSE NOW, IT IS TOGGLE OPERATION IN INSIDE.
ONLY AVAILABLE WHEN 4:3 SIGNAL IS BEING INPUT.
ONLY AVAILABLE WHEN 4:3 SIGNAL IS BEING INPUT.
ONLY AVAILABLE WHEN 4:3 SIGNAL IS BEING INPUT. [AV] ONLY AVAILABLE WHEN 1080i/p IS BEING INPUT.
DIGITAL AIR (TWO-PART NUMBERS, 3-DIGIT PLUS 2-DIGIT)
DIGITAL CABLE (TWO -PART NUMBERS, 3-DIGIT PLUS 3 DIGIT)
IF IT IS NOT TV DISPLAY, IT WILL INPUT-SWITCH TO TV. (SAME FUNCTION AS CH5)
IF IT IS NOT TV DISPLAY, IT WILL INPUT-SWITCH TO TV. (SAME FUNCTION AS CH6)
27
2-8 Connecting DVD
Connect component cable to component ports of TV and DVD player, VCR, Set-Top
box or camcorder.
Note: Component and audio cables are not included.
2-9 Connecting Audio Lineout
DETAIL VIEW
Eurotype Degson
Speaker Connector
2-Channel:
• Left channel
• Right channel
Wire Input
28
Sound via the audio output
terminal can be adjusted
with the volume buttons
on the remote control.
When selected, the Variable
option mutes the internal
audio system.
3
Menu
3-1 The Menu System
3-2 Video Menu
3-3 Audio Menu
3-4 TV Menu
3-5 Setup Menu
3-6 Parental Menu
29
3-1 The Menu System
After you have installed the battery in the remote control, you may want to set some
preferences on the LCD using the menu system.
• The buttons for On-Screen Display (OSD) option adjustment include MENU, 3, 4,
5, 6, OK or ENTER and EXIT buttons.
• Press MENU to open the OSD Menu then press 5 or 6 button to select the pages.
The pages are displayed in the following sequence (circular display)
Video
Audio
TV
Setup
Parental
Note: TV menu page is only for TV mode.
• Press the Menu button on the remote control or on the side panel, it will change in
the following sequence
Main Menu
Exit
Sub Menu
Main Menu Exit
1) Press MENU to display the menu system.
2) Press 5 or 6 to select the menu pages.
3) Press OK or 4 to enter.
4) Press 5 or 6 to select an item.
5) Press 3, 4, 5, 6 to select or adjust a setting.
N
ote: If you do not make a selection within 10 seconds,
the menu screen closes automatically.
7) Press MENU or EXIT to return or exit OSD menu.
30
3-2 Video Menu
Whether adjusting for the first time, or editing current picture settings, it is
recommended to start with the following settings:
Brightness: + 51
Contrast: +68
Hue: -19
Color Temperature: Cool
These settings maximize LCD picture for optimal performance through the mirror
glass. To achieve maximum performance, customize these settings according to the
lighting in your environment.
31
Adjustment of “Brightness” or “Contrast”
1) Press MENU for the “Video” menu to appear
2) Press 4 or OK to select the “Video” menu
3) Press 5 or 6 to highlight your selection
4) Press 3 or 4 to adjust
5) Press MENU or EXIT to return or exit menu mode
Adjustment of “Saturation”
(inactive for VGA)
1) Press MENU for the “Video” menu to appear
2) Press 4 or OK to select the “Video” menu
3) Press 5 or 6 to highlight your selection
4) Press 3 or 4 to adjust
5) Press MENU or EXIT to return or exit menu mode
32
Adjustment of “Hue” (only for NTSC)
1) Press MENU for the “Video” menu to appear
2) Press 4 or OK to select the “Video” menu
3) Press 5 or 6 to highlight your selection
4) Press 3 or 4 to adjust
5) Press MENU or EXIT to return or exit menu mode
Adjustment of “Sharpness” (inactive for VGA)
1) Press MENU for the “Video” menu to appear
2) Press 4 or OK to select the “Video” menu
3) Press 5 or 6 to highlight your selection
4) Press 3 or 4 to adjust
5) Press MENU or EXIT to return or exit menu mode
33
Selection of “Color Temperature”
1) Press MENU for the “Video” menu to appear
2) Press 4 or OK to select the “Video” menu
3) Press 5 or 6 to highlight your selection
4) Press 4 or OK to enter the sub-menu
5) Press 3 or 4 button to select one of “Cool”, “Standard”, “Warm” or “User” for
balance of whitening
Cool
Standard
Warm
User
6) Press MENU or EXIT to return or exit menu mode
If you adjust one item of “R Gain”, “G Gain”, or “B Gain”, the color temperature will
change to “User” automatically.
34
Selection of “Advanced Video”
(Inactive for VGA )
1) Press MENU for the “Video” menu to appear
2) Press 4 or OK to select the “Video” menu
3) Press 5 or 6 to highlight your selection
4) Press 4 or OK to enter the sub-menu
5) Press 5 or 6 to highlight your selection
4) Press 3 or 4 to select
5) Press MENU or EXIT to return or exit menu mode
35
Table of Video Adjustment Settings
Item Status Description
DNR Off, Low, Medium, Selecting to control the
Strong
sharpness and noise reduction
Black Level
On, Off
Extender
Darkens soft blacks, may darken other
dark colors, creating a “crush” effect
White Peak
On, Off
Limiter
Volume boost without distortion
due to over run on the speakers
CTI Select dynamic color
improve level
Off, Low, Medium,
Strong
Flesh Tone On, Off Select “On” to color correct
flesh tones automatically
Adaptive Luma On, Off
Control Select to control the luminance. This
feature will set the brightness and
contrast levels for optimum performance
36
Selection of “VGA” (only for VGA)
1) Press MENU for the “Video” menu to appear.
2) Press 4 or OK to select the “Video” menu.
3) Press 5 or 6 to highlight your selection.
4) Press 4 or OK to enter the sub-menu.
Selection of “Auto Adjust”
After entering the “VGA” menu
1) Press 5 or 6 to highlight your selection.
2) Press 4 or OK button to confirm.
3) Press the MENU button to return or exit.
Note: This item will auto-adjust the picture display.
37
Selection of “H.Position”, “V.Position”, “Phase”, “Clock”
After entering the “VGA” menu
1) P
ress 5 or 6 to highlight your selection.
2) Press 4 or OK button to confirm.
3) P
ress the MENU button to return or exit.
Table of Display Adjustment Settings
Item Description
H. Position
Use 5 or 6 to select “H. Position”
Use 3 or 4 to move the image left or right
V. Position
Use 5 or 6 to select “V. Position”
Use 3 or 4 to move the image up or down
Phase
Use 5 or 6 to select “Phase”
Use 3 or 4 to adjust
Clock
Use 5 or 6 to select “Clock”
Use 3 or 4 to adjust
38
3-3 Audio Menu
Adjustment of “Balance”, “Bass” or “Treble”
1) Press MENU, then press 6 for the “Audio” menu to appear.
2) Press 4 or OK to select the “Audio” menu.
3) Press 5 or 6 to highlight your selection.
4) Press 3 or 4 to adjust.
5) Press MENU or EXIT to return or exit menu mode
39
40
3-4 TV Menu
Specifying “Tuner Mode”
1) Press MENU, then press 6 until the “TV” menu appears
2) Press 4 or OK to select the “TV” menu
3) Press 5 or 6 to highlight your selection
4) Press 3 or 4 to select “Cable” or “Antenna”
5) Press MENU or EXIT to return or exit menu mode
41
Using the “Channel Scan”
1) Press MENU, then press 6 until the “TV” menu appears
2) Press 4 or OK to enter the “TV” menu
3) Press 5 or 6 to highlight your selection
4) Press 4 or OK to start searching
The channels that are found will save automatically
5) If you want to stop searching, press MENU or EXIT to return or exit menu mode
Note:
• Locked channels will be skipped during the search.
• Selection of Tuner Modes Cable or Antenna will affect the channel search.
When in Cable mode, the searched channels are “1 - 135”.
When in Antenna mode, it will search “2 - 69”.
42
Using the “Channel Skip”
1) Press MENU, then press 6 until the “TV” menu appears
2) Press 4 or OK to enter the “TV” menu
3) Press 5 or 6 to highlight your selection
4) Press 4 or OK to enter the sub-menu
5) Press 5 or 6 to choose an item, then press OK to confirm or cancel your selection
6) When you select “ “, the TV will automatically skip the channel
7) Press MENU or EXIT to return or exit menu mode
43
Selecting Channel
1) Press the channel control buttons (V ) button to search the channels — the
channel number will increase or decrease, excluding skipped channels.
2) Press numbered buttons 0~9 to select the channel you want. If the channel number
is bigger than 9, press the two number buttons successively. If the channel number
is bigger than 100, press the three number buttons successively. You have two
seconds to select your channel, after this the TV will go back to your last channel
displayed. When in DTV mode, the operation is shown as below
13 . 1
Number
Buttons
Dot
Button
Number
Button
Note: If you select a channel higher than those already in memory, the TV will display
the last channel selected.
Channel Detail
Channel List
13.1 TV # 1
13.2 TV #2
2.2 PATTERN
4.2 TV # 8
2
6
City TV is a
contemporary TV
station in Toronto
• Press 5 or 6 to select the channel number, and then press the Enter button
to play that channel content. (Press V buttons to select the Channel.)
• Press the Enter button again to display the Channel detail and then again to
exit channel detail.
44
Using the Guide (Electronic Program Guide)
Your TV has an “Electronic Program Guide” to help you navigate through all the
television shows. The Guide menu supplies information, such as program lists, and
the start and end times of available channels. In addition, detailed information about
the program is often available in the Guide. (The availability and the amount of
program details will vary depending on the broadcaster.)
1) Press the EPG button to display the Guide menu.
2) Press 4 or 3 to select the channel number.
3) Press 5 or 6 to select the channel program.
4) Press MENU or EXIT to return or exit menu mode
45
3-5 Setup Menu
Selection of “OSD Language”
1) Press MENU, then press 6 until the “Setup” menu appears.
2) Press 4 or OK to select the “Setup” menu.
3) Press 5 or 6 to highlight your selection.
4) Press 3 or 4 to select “English”, “Español” or “Français”.
English
Español
Français
5) Press MENU or EXIT to return or exit menu mode
46
Using the “Time Setup” menu
1) Press MENU, then press 6 until the “Setup” menu appears.
2) Press 4 or OK to select the “Setup” menu.
3) Press 5 or 6 to highlight your selection.
4) Press 4 or OK to enter the sub-menu.
5) Press 3 or 4 to choose “Time Zone”, “Time” or “Sleep Timer”.
Time Zone
Time
Sleep Timer
6) Press MENU or EXIT to return or exit menu mode
47
Selection of “Time Zone”
After entering the “Time Setup” menu
1) Press 5 or 6 to highlight your selection.
2) Press 3 or 4 to select “Hawaii”, “Eastern Time”, “Indiana”, “Central Time”,
“Mountain Time”, “Arizona”, “Pacific Time” or “Alaska”.
Hawaii
Eastern Time
Indiana
Central Time
Alaska
Pacific Time
Arizona
Mountain Time
3) Press MENU or EXIT to return or exit menu mode
Selection of “Time”
After entering the “Time Setup” menu
1) Press 5 or 6 to highlight your selection.
2) Press 4 or OK to enter the sub-menu.
3) Press MENU or EXIT to return or exit menu mode
48
After entering the “Time” menu
1) Press 5 or 6 to highlight your selection.
2) Press 3 or 4 button to select.
3) Press numbered buttons to set the “Date”, “Time”, “Power On Timer”
or “Power Off Timer”.
Date
Time
Power On Timer
Power Off Timer
4) Press MENU or EXIT to return or exit menu mode
Note:
• Pressing the Standby button to turn off the LCD, the setup time will be retained.
• If the unit is unplugged, or main power is otherwise disrupted, the memory for time
will be lost.
• The following items are active only when you select “Off” of “Auto Synchronization”
and select “On” of “Timer”.
49
Selection of “Sleep Timer”
After entering the “Time Setup” menu
1) Press 5 or 6 to highlight your selection.
2) Press 3 or 4 to select “10”, “20”, “30”, “40”, “50”, “60”, “90”, “120”, “180”, “240”,
Minutes or Off”.
3) Press MENU or EXIT to return or exit menu mode
10
20
30
40
50
60
90 120
50
180
240
Off
To use Closed Caption
(only for TV, AV, S-Video)
1) Press MENU, then press 6 until the “Setup” menu appears.
2) Press 4 or OK to select the “Setup” menu.
3) Press 5 or 6 to highlight your selection.
4) Press 4 or OK to enter the sub-menu.
5) Press MENU or EXIT to return or exit menu mode
Selection of “Analog Closed Caption”
After entering the “Caption” menu
1) Press 5 or 6 to highlight your selection.
2) Press 3 or 4 to select “CC1”, “CC2”, “CC3”, “CC4”, “TEXT 1”, “TEXT 2”, “TEXT 3”,
“TEXT 4” or “Off”.
CC1 CC2 CC3 CC4 TEXT 1
TEXT 2
TEXT 3
TEXT 4 Off
3) Press MENU or EXIT to return or exit menu mode
51
The analog closed caption features have two options
• Captions An on-screen display of the dialogue, narration, and sound effects of the TV
programs and videos that are closed captioned (usually marked as “C/C”
in TV listings.
• Text A
n on-screen display of information not related to the current program, such as
weather or stock data (when provided by individual stations).
• To view captions, highlight CC1, CC2, CC3, or CC4 (CC1 displays translation of the
primary language in your area).
Note: If the program or video
you selected is not closed
captioned, no captions will
display on-screen.
• To view text, highlight Text 1, Text 2, Text 3, or Text 4.
Note: If text is not available in your area, a black rectangle may appear on-screen. If
this happens, turn off the Closed Caption feature.
Note: A closed caption signal may not display in the following situations
• when a videotape has been dubbed
• when the signal reception is weak
• when the signal reception is nonstandard
52
Selection of “Digital Closed Caption”
After entering the “Caption” menu
1) Press 5 or 6 to highlight your selection.
2) Press 3 or 4 to select “Service 1”, “Service 2”, “Service 3”, “Service 4”, “Service 5”,
“Service 6” or “Off”.
Service 1
Service 2
Service 3
Service 4
Service 5
Service 6
Off
3) Press MENU or EXIT to return or exit menu mode
Selection of “Digital Caption Style”
After entering the “Caption” menu
1) Press 5 or 6 to highlight your selection.
2) Press 4 or OK to enter the sub-menu.
3) Press 3 or 4 to select “As Broadcaster” or “Custom”. When you select “Custom”,
you can use 5 / 6 or 3 / 4 buttons to highlight and select the option.
4) Press MENU or EXIT to return or exit menu mode
53
Font Size To set the Font Size value from Large, Small and Medium.
Font Color To set the Font Color value from White, Green, Blue, Red,
Cyan, Yellow, Magenta and Black.
Font Opacity To set the Font Opacity value from Solid, Translucent and
Transparent.
Background Color To set the Background Color value from White, Green,
Blue, Red, Cyan, Yellow, Magenta and Black.
Background Opacity To set the Background Opacity value from Solid,
Translucent and Transparent.
Window Color To set the Window Color value from White, Green, Blue,
Red, Cyan, Yellow, Magenta and Black.
Window Opacity To set the Window Opacity value from Solid, Translucent
and Transparent.
To “Reset Default” to the factory settings
1) Press MENU, then press 6 until the “Setup” menu appears.
2) Press 4 or OK to select the “Setup” menu.
3) Press 5 or 6 to highlight your selection.
4) Press 4 or OK to open the pop-up menu
5) Press 3 or 4 to select “OK” or “Cancel”. OK To reset default.
Cancel To return last menu.
6) Press MENU or EXIT to return or exit menu mode
Note: This will only reset the items in the setup menu and does not include the
password-protected items.
54
3-6 Parental Menu
Some programs and movies include signals that classify the content of the program
(dialog, language, sex, violence). The “Parental” control feature in this detects these
signals and blocks the programs according to your selections. To use this feature,
perform the following.
Parental control only available for
TV, AV, S-VIDEO sources.
1) Press the Menu button, and then press 5 or 6 until the “Parental” menu appears.
2) Press 4 or OK to enter
3) Use 0~9 buttons input the password, and the Parental Control menu will appear.
The “Parental” menu includes “Program Block”, “Change Password” and “Clear
All” functions. You can use these functions after entering the correct password.
Entering the password
When the password is already stored
Press the Number buttons (0~9) to enter the 4-digit password used to change channel
blocking settings. As you enter your password, each number will appear as a (*).
Note: The initial password for the system is “0000”.
If you have forgotten the password, please contact your local service center.
55
If the password you entered is invalid, a message will pop up as shown.
56
Using the “Change Password” item
1) After entering the “Parental” menu, press 5 or 6 to highlight the “Change
Password” item.
2) Press 4 or OK to confirm.
3) Use 0~9 buttons input your new password in the “New Password” blank.
4) Use 0~9 buttons input your new password again in the “Confirm Password” blank.
5) When this is complete the previous menu will be displayed.
Note: Please operate “Change Password” at the first time use this function.
57
Using the “Program Block” item
1) After entering the “Parental” menu, press 5 or 6 to highlight the “Program
Block” item.
2) P
ress 4 or OK to enter
3) P
ress MENU or EXIT to return or exit menu mode
Using the “Rating Enable” item
1) After entering the “Program Block” menu, press 5 or 6 to highlight the “Rating
Enable” item
2) P
ress 3 or 4 to select “On” or “Off”
On The rating settings are active
Off The rating settings are not active
58
Using the Ratings items
1) After entering the “Program Block” menu, press 5 or 6 to highlight a ratings item
(category options are listed on the following page)
2) Press 4 or OK to enter
3) Press 5, 6, 3, or 4 to select an item, then press OK to lock (display “ ”) or
unlock (display “ ”).
59
U.S. TV Ratings (including made-for-TV movies)
Children TV Ratings
TV-Y youth (individual content categories do not apply)
TV-Y7 youth, 7 years and older
General TV Ratings
TV-G general audience (individual categories do not apply)
TV-PG
parental guidance suggested
TV-14 14 years and older
TV-MA mature audience
Content Categories
Dialog sexual dialogue (applies to TV-PG and Above, TV-14)
Language
adult language (applies to TV-PG and Above, TV-14 and Above, TV-MA)
Sex scenes
sexual situations (applies to TV-PG and Above, TV-14 and Above, TV-MA)
Violence
(applies to TV-PG and Above, TV-14 and Above, TV-MA)
F Violence fantasy violence (applies only to TV-Y7)
U.S. Movie Ratings (movies previously shown in theaters)
G
general audience
PG parental guidance suggested
PG-13 13 years and older
R
Restricted
NC-17 18 years and older
X
Adult
Note: If you set a block to PG-13, G and PG movies will be available while
PG-13, R, NC-17, and X will be blocked.
60
Unlocking programs temporarily
If you try to watch a program that exceeds
the restrictions you specified, the system
enters program lock mode. You can either
unlock the program temporarily by entering
your password, or select a non-locked
program to watch.
V-Chip BLOCK
TV-PG
DLSV
Enter Password
----
To temporarily unlock the program, press
the Number buttons (0 - 9) to enter your
4-digit password.
If the correct code is entered, the program lock mode is released and the normal
picture appears.
Using the “Clean All” item
1) After entering the “Parental” menu, press 5 or 6 to highlight the “Clean All” item
2) Press 4 or OK to enter
3) Press MENU or EXIT to return or exit menu mode
Precautions
When changing the audio from internal to external speakers, power-off the unit
completely. The LCD unit has a built-in 5-Watt power amplifier. Damage may occur
during power-on if a complete power-off has not preceded the change.
61
4
Specifications
4-1 Specifications
62
4-1 Specifications
Display Features
Display technology
TFT-LCD
Screen Size
19"
Format
16:9
Brightness 450 cd/m2
Viewing Angle 160°(H/V)
Contrast 700:1
Response Time 6ms
Support resolution 1440 X 900
Maximum Colors 16.2M
Dot Pitch 0.285mm(H) X 0.285mm(V)
Panel Life 50000Hrs
OSD Language English, French, Spanish
Tuner & Color System
ATV
NTSC M
Digital
ATSC
Main Dimension
Monitor
Height 337mm
Width 483mm
Depth 80mm
Audio system
Fixed line audio output for external speakers, External Speaker Power Output ﹕
10-25w x 2 stereo amplifier for external speakers.
Variable line audio using PC output.
63
Input and output Terminals
RF 75ohms coaxial Antenna x 1
AV (Composite) RCA 75ohms composite video x 1
& Audio L, Audio R (RCA plugs)
Component Y, PB, and PR (RCA plugs) x 1
S-Video 4-pin DIN x 1
VGA 15-pin D-sub female x1
HDMI 480i, 480p, 576i, 576p, 720p and 1080i
RS232 9-pin DB9 Female x 1
Audio Line Output 3.5mm Line out L/R Jack for external
AC Receptacles 110~240 VAC Receptacle x 1 50/60
Audio Lineout
Degson Audio
Optimal Temperature & Humidity (Internal Wall Cavity Only)
Operating Temperature Storage Temperature Operating Humidity Storage Humidity -20 - 60˚C
-10 - 50˚C
10 - 80% RH
10 - 90% RH
Accessories
20 ft Low-Voltage Power Cord, CL2R
Standard USA-A type plug
Power Supply Brick: 110-240V, 50/60 Hz, 0.5A Max
Waterproof Sealant
Waterproof Remote Control with battery
Operation Manual
Installation Instructions
64
5
Troubleshooting
5-1 Troubleshooting
65
5-1 Troubleshooting
Before contacting service personnel, please read the following information. If you still
experience problems, contact your local dealer or qualified service personnel.
TV-related Problems
Unclear display or noisy sound
Check whether TV antenna is correctly connected.
Broadcasting may not be good in an area with bad reception or far away from a
station/network.
No image
Check whether the power cord is properly connected. And press the power
button.
Black background only
Check whether the mode is set as PC monitor or Video/S-Video input, not TV
mode.
Strips and shaking display
It may be interrupted by neighboring radio waves (please check any wireless
phone, hair drier, electric drilling machine and etc).
Execute fine tuning for manual adjustment.
Can’t receive a specific channel
Check whether channel setting is normally set.
Try to rotate an antenna’s direction.
66
PC Monitor-related problems
No image on the monitor
Check whether the D-Sub cable is firmly connected to the TV and a PC.
Check whether a graphic card is correctly inserted into the slot.
Check whether the power of a PC and the TV is on.
Check whether a graphic card or mode is set appropriately on a PC.
Referring to the Standard Signal Mode for PC monitor in the previous chapter,
change graphic mode.
Check whether the D-Sub cable pins are not inserted or bent.
No power
Check whether the power cord is normally inserted and reconnect it.
Pull out the power cord from wall outlet and reconnect it in 10~20 minutes.
LED lamp turns off in red and it shows no image
Check whether the graphic cable is connected to theTV and a PC.
Check whether a computer is in power-saving mode and attempt to operate
keyboard and mouse.
Unstable or unfocused image or trembling
Check whether the D-Sub cable is connected to the TV and a PC.
If a PC display mode is changed, the screen needs readjusting, so you need to
use Auto Adjustment.
Check whether the TV and your graphic card are compatible with each other and
whether it is set at an appropriate refresh rate. If letters look distorted, change
the refresh rate to 60Hz.
Abnormal image scale
By using vertical/horizontal position in Picture Adjustment Menus, adjust the
position.
Try to execute Auto Adjustment function.
67
SÉURA INCORPORATED
www.seura.com
© SÉURA® 2009
All Rights Reserved
SÉURA, Inc.
1230 Ontario Road
Green Bay, WI 54311
800.95.SEURA
t: 920.857.9069
f: 920.857.9490
12/1/09