1
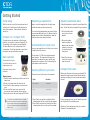
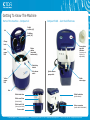
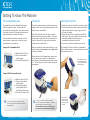
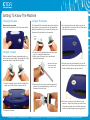
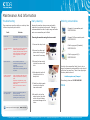
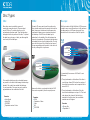
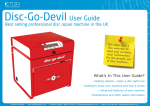
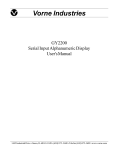
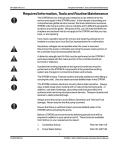
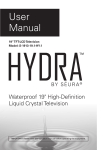
What’s In This User Guide?
Getting started - repair a disc right now
Getting to know your machine and how it works
Advanced features of your machine
Maintenance and other useful information
©Total Disc Repair Ltd | www.totaldiscrepair.co.uk | Technical Support: 0800 412 5424 - [email protected] | Sales: 01202 489 500 - [email protected]
Getting Started
Initial setup
Inspecting a repaired disc
Repairing GameCube discs
With the machine you will find a setup sheet which
includes a list of contents and briefly explains the
setup of the machine. Please refer to this before
moving on.
Have a look at the repaired side; the light repair
should have made a visible improvement.
A GameCube adapter is required to repair GameCube
discs. This will have been included with your machine.
If a more heavily damaged disc was chosen the disc
may need an additional repair. Try different levels of
damage to get a better understanding of what the
machine can do and in what timeframe.
1. Fit the GameCube disc,
shiny side up into the
adapter.
Compact v2 / Compact PLUS
This guide covers two variations of the Compact
machine: the Compact v2 and the Compact PLUS.
The operation of the machine is almost identical.
The main difference is the configuration of the
consumables. This will be explained in more detail
throughout the user guide where required.
Basic operation
Choose a disc for repair.
For this first disc we will run
a light repair cycle.
Place shiny side up on the
turntable.
Understanding the repair cycle
Now you have repaired your first disc, here is a more
in-depth look at the process.
The Compact v2 / PLUS uses a single-stage disc
repair process. This means that the longer the
repair time, the deeper the repair, and the more
polycarbonate is removed. This is achieved by the
liquid abrasive within the polish.
Selecting different cycle times
There are two set cycle times for the machines:
Repair process:
1. Position the disc centrally around the screw for the
clamp knob.
2. Screw in the clamp knob then close the lid.
3. Press ‘Start’ to begin repairing on a five minute
cycle.
4. At the end of the repair cycle, open the lid,
unscrew the clamp knob and remove the disc.
5. Spray and wipe the disc with spray and TDR cloth.
This machine is recommended for up to 15 repairs
per day and benefit from a period of rest after every
couple of repairs. Adhering to these guidelines will
ensure your machine continues to perform well for
years to come.
Cycle
Duration
Light - Medium
5:00 Minutes
Heavy
10:00 Minutes
1. Press ‘Start’ once and the red light will flash,
indicating that the five minute cycle has started.
2. Press ‘Start’ twice and the yellow light will flash,
indicating that the ten minute cycle has started.
2. Remove the platen
rubber and place the
adapter onto the platen,
clamping it into place
as normal using the
clamp knob.
3. Now follow the same
process for running a
repair as normal.
Compact PLUS users
Rotating the left power drive cap (pre-installed) 180
degrees will angle the pad into the GameCube disc,
resulting in a better grip from the pads and a faster
cut rate.
If using a power drive cap, you will need to purchase
the Compact PLUS consumables pack.
Otherwise, if both pad caps are clear, you need the
Compact v2 consumables pack.
©Total Disc Repair Ltd | www.totaldiscrepair.co.uk | Technical Support: 0800 412 5424 - [email protected] | Sales: 01202 489 500 - [email protected]
Getting To Know The Machine
Parts of the machine - Compact v2
Compact PLUS - Just the differences
Polish
outlets (x2)
Lid
Polishing
pads (x2)
Clamp
knob
Power drive
cap with
indicator
(improves cut
rate and is
adjustable)
Platen
rubber
(turntable
underneath)
Red
power
LED
Start/stop
button
Lid release
catch
Yellow
power
LED
Quick-release
pump cable
Polish
return pipe
Feet
Polish feed-tube
Polish over-flow
(behind tube)
Polish tank & lid
(return pipe inside)
Polish feed-tube
(quick-release)
Velcro connector
(makes tank detatchable)
Power cable
©Total Disc Repair Ltd | www.totaldiscrepair.co.uk | Technical Support: 0800 412 5424 - [email protected] | Sales: 01202 489 500 - [email protected]
Getting To Know The Machine
The consumables pack
The polish
Changing the polish
Consumables for both the Compact and Compact
PLUS are supplied in packs. These include the
correct ratio of pads and polish. Each pack contains
four bottles of polish (200ml each) and two pairs of
pads with enough for around 160 repairs.
The polish is water based and includes tiny abrasive
particles. Over time, these particles wear and so the
polish becomes less effective.
Each 200ml bottle of polish will repair around 40
discs before the repair quality reduces. At the end
of each repair session pour the polish back into the
bottle. At the end of 40 repair cycles, discard the
polish and start a fresh bottle.
1. Discard the old polish (it’s safe to pour down a sink).
2. Fill the tank with warm water, remove the polishing
pads and press ‘Start’ to begin a light cycle. This
will clean the tubing.
3. Empty the water from the polish tank and fill with
clean polish – first ensure that the polish has been
thoroughly shaken and that the pump is
submerged in polish within the tank.
4. You can now continue to repair discs as normal.
Each pair of pads will repair around 80 discs, so you
need to change the pads once for every two bottles
of polish you discard.
The Compact PLUS has a tank which is attached by
Velcro, making it easier to remove and easier for polish
to be poured in and out.
There is a difference between the packs: use the
picture below to make sure you order the correct
consumables for your machine.
Compact v2 Consumables Pack
4 x Bottles of polish (200ml)
2 x Pair of pre-assembled
polishing pads
1 x Cloth and CD spray (50ml)
Neither version of the Compact has a counter, and
so for optimum repair quality, it is advisable to
make a note of how many repairs have been carried
out. This will help you monitor when to change the
consumables.
* Pour polish into a jug so
it can be discarded in a
sink or transferred back
into bottle easily.
Compact PLUS Consumables Pack
4 x Bottles of polish (200ml)
1 x Pair of pre-assembled
polishing pads
1 x Pair of pre-assembled
polishing pads (for use
with the PowerDrive cap)
1 x Cloth and CD spray (50ml)
If you use a power drive cap with the machine,
you will need to purchase the PLUS version of the
consumable pack.
Over time, in a warm environment, the water
element of the polish can evaporate. This thickens
the polish and puts a strain on the pump.
When the machine is not in use, always pour
the polish from the tank back into the bottle.
* Use a pourer to
put water in the
tank for cleaning,
this is safest way
to do this.
©Total Disc Repair Ltd | www.totaldiscrepair.co.uk | Technical Support: 0800 412 5424 - [email protected] | Sales: 01202 489 500 - [email protected]
Getting To Know The Machine
Changing the pads
Compact PLUS pads
Removing the used pads
Gently push the pads out of the lid as shown below:
The Compact PLUS consumables pack comes with two
pairs of pads. A pair consists of one fully assembled
pad and one pad which just includes the bearing, but
first remove the old pads from the machine.
4. Push the pad with the clear plastic cap into the
right hand hole in the lid until the top of the cap is
flush with the top of the lid.
* Power
drive
cap
Compact v2 pads
With the standard Compact consumables pack you
will receive two pairs of pads. These pads will be fully
assembled ready to install into the machine.
1. On one of the old used pads there will be a white
cap. This is called the power drive.
2. Gently prise off this cap, put to one side and
discard the used pads.
* DO NOT USE ANYTHING
SHARP LIKE A KNIFE!
- USE A BLUNT TOOL.
1. Push the new pads into the lid until the top of the
plastic cap is flush with the surface of the lid.
5. Push the power drive pad assembly into the left
hand hole in the lid from underneath making sure
the two red dots align on the top of the lid.
3. Taking hold of the new pair, select the pad which
consists of just pad and bearing. Push this into
the power drive until tight.
6. With a disc in place, close the lid and run the
machine. Using a blunt object, tap both the top
of the cap and power drive until both pads touch
the disc and the bearings are spinning properly.
2. Discard the old pads.
©Total Disc Repair Ltd | www.totaldiscrepair.co.uk | Technical Support: 0800 412 5424 - [email protected] | Sales: 01202 489 500 - [email protected]
Maintenance And Information
Troubleshooting
Daily cleaning
If you experience a problem with your machine, there
is often a simple and quick solution.
Keeping the machine clean ensures good quality
repairs and a consistent performance. Cleaning is
recommended at the end of a day’s usage and before
each new consumables pack is fitted.
Compact v2 consumables pack:
5055378113864
Cleaning the machine using the clean assist:
Compact PLUS consumables pack:
5055378100512
Fault
Polish leaks
Solution
Lift the platen off the motor shaft
and clean any dried polish from the
polish well.
Ordering consumables
1. Unscrew the clamp knob.
The polish feed does
not work
Repairs are slow
Quality of repairs is
lower than usual
There are circles on
the repaired disc
Ensure the pump is fully submerged
Clean the pump and tubing by
replacing the tank’s polish with warm
water, removing the polishing pads
and pressing Start to run a light
cycle.
Stir or shake the polish so it
recombines (the polish may settle
over time).
Replace polish in the tank.
Replace both the polishing pads and
the polish.
Clean the polishing pads with water
Replace the polish and/or polishing
pads.
Wipe down the polish tank, pump,
tube and inside the machine with a
damp cloth.
Use a new TDR cloth to clean the
discs.
Make sure the polishing pads are
spinning correctly.
Check that the bearing in each
polishing pad is spinning freely.
Cloth & spray pack (Standard):
5055378101656
2. Remove the platen and
platen rubber using the
clean assist if necessary.
3. Reverse the clean assist
to block the motor shaft
hole.
4. Wipe down the inside of
the polish well with a
damp cloth.
Cloth & spray pack (XL):
5055378101663
As well as the consumables listed, there is also a
range of replacement parts available to order should
you find out you need any. There’s free shipping for
all orders placed online at:
totaldiscrepair.com/Compact
Alternatively, please call: 01202 489 500
5. Check the polishing pads
to make sure they are
clean and smooth.
Notes
6. Be careful not to allow
water to enter the polish
well as this could cause
permanent damage to the
motor.
Need help? Call Technical Support: 0800 412 5424
©Total Disc Repair Ltd | www.totaldiscrepair.co.uk | Technical Support: 0800 412 5424 - [email protected] | Sales: 01202 489 500 - [email protected]
Disc Types
CDs:
DVDs:
Blu-rays:
When discs were invented the process of
construction was quite simple. These are what
we call CD discs. To produce the disc, a solid
polycarbonate disc was made. Then the data layer
was applied to the top surface of the disc. To protect
this data layer, a lacquer, or label, was then applied
over the top of the data layer.
The early CDs were mainly used for audio and so
often a small scratch was not enough to disrupt the
data. However as the data on discs became more
complicated it became more important to protect
the data layer. On DVD discs the data layer is
sandwiched in the middle of the disc between two
pieces of polycarbonate. This protects the data layer
and makes the disc virtually indestructible. The only
issue with this type of disc is that the two layers of
disc can separate around the whole in the centre of
the disc, although this is quite rare.
With the invention of High Definition (HD) there was
a need to carry more information on a disc and soon
the data space on a DVD was not enough. Sony
solved this with the invention of the Blu-ray disc.
Hard coat
Polycarbonate
Data
Polycarbonate
Label
Polycarbonate
Data
Label
Polycarbonate
Data
Polycarbonate
Label
It is essentially the same as a DVD with 2 main
differences:
This made the data layer quite vulnerable because
any scratch to the label could damage the data layer
beneath. If a scratch has reached the data layer
it is not repairable. Disc repair can only repair the
polycarbonate on the underside of the disc.
Formats:
Audio Books
Audio CDs
CD-ROMS
Playstation version 1 discs
Because the data is so protected virtually all DVD
discs can be repaired by the disc repair process.
Formats:
DVDs
Playstation 2 discs
Xbox
Wii
DVD ROM
1. The polycarbonate on the bottom of the discs is
much thinner than a DVD and so the number of
times that the same disc can be repaired falls to
around 10-15.
2. The polycarbonate on the bottom of the disc
has a hard coated lacquer on top of it. This hard
coat reduces the chance of the disc being
scratched in the first place, but nonetheless
scratches can still happen.
Formats:
Blu-ray film
Playstation 3
©Total Disc Repair Ltd | www.totaldiscrepair.co.uk | Technical Support: 0800 412 5424 - [email protected] | Sales: 01202 489 500 - [email protected]
©Total Disc Repair Ltd | www.totaldiscrepair.co.uk | Technical Support: 0800 412 5424 - [email protected] | Sales: 01202 489 500 - [email protected]