1
™
OverDrive
Vehicle Scale
Software
User’s Manual
Software Version 2.2.0
B16398200A
(5/07)
© Mettler-Toledo, Inc. 2002, 2005, 2007
No part of this manual may be reproduced or transmitted in any form
or by any means, electronic or mechanical, including photocopying
and recording, for any purpose without the express written permission
of Mettler-Toledo, Inc.
U.S. Government Restricted Rights: This documentation is furnished
with Restricted Rights.
METTLER TOLEDO® and OverDrive™ are trademarks of MetttlerToledo, Inc. All other names and trademarks are the property of their
respective owners.
INTRODUCTION
Information about METTLER TOLEDO Technical Training for North
America can be obtained by writing, calling, or faxing:
METTLER TOLEDO
1900 Polaris Parkway
Columbus, Ohio 43240 USA
Phone: (614) 438-4511
Fax: (614) 438-4958
www.mt.com
Outside of North America, contact your local supplier.
METTLER TOLEDO RESERVES THE RIGHT TO MAKE
REFINEMENTS OR CHANGES WITHOUT NOTICE.
Mettler-Toledo, Inc.
(hereinafter Mettler-Toledo)
END-USER LICENSE AGREEMENT FOR
METTLER TOLEDO OverDrive™ SOFTWARE
IMPORTANT–READ CAREFULLY: Mettler-Toledo's End-User License Agreement ("EULA") is
a legal agreement between you (either an individual or a legal entity) and Mettler-Toledo
for the proprietary OverDrive™ Software identified above, which includes computer
software and may include associated media, printed materials, and "online" or electronic
documentation ("OverDrive™ Software"). This OverDrive™ Software is made available to
you only on the terms and conditions of this EULA. By installing, copying, or otherwise
using the OverDrive™ Software (whichever occurs first), you agree to be bound by the
terms of this EULA. If you do not agree with the terms of this EULA, you are not authorized
to use the OverDrive™ Software.
OverDrive™ SOFTWARE LICENSE
The OverDrive™ Software is protected by copyright laws and international copyright
treaties, as well as other intellectual property laws and treaties. The OverDrive™ Software
is licensed, not sold.
1. GRANT OF LICENSE
Installation and Use. This EULA grants to you the non-exclusive and non-transferable
right to use the OverDrive™ Software for your own internal purposes only. You may install
and use one copy of the OverDrive™ Software on a single terminal connected to a single
computer (i.e., with one CPU). You may either make copies of the OverDrive™ Software
solely for archival purposes in support of your use of the OverDrive™ Software on a single
computer or transfer the OverDrive™ Software to a single hard disk provided that you
keep the original only for backup or archival purposes. You may not reproduce or
distribute the software in any other way, including rental or leasing.
2. DESCRIPTION OF OTHER RIGHTS AND LIMITATIONS
Limitations on Reverse Engineering, Decompilation, and Disassembly. You may not
reverse engineer, decompile, or disassemble the OverDrive™ Software, except and only to
the extent that such activity is expressly permitted by applicable law notwithstanding this
limitation.
Separation of Components. The OverDrive™ Software is licensed as a single product. Its
component parts may not be separated for use on more than one computer.
Support Services. Mettler-Toledo may provide you with support services related to the
OverDrive™ Software ("Support Services"). Use of Support Services is governed by
Mettler-Toledo's policies and programs described in the user manual, in "online"
documentation, and/or in other Mettler-Toledo-provided materials. Any supplemental
software code provided to you as part of the Support Services shall be considered part of
the OverDrive™ Software and subject to the terms and conditions of this EULA. With
respect to technical information you provide to Mettler-Toledo as part of the Support
Services, Mettler-Toledo may use such information for its business purposes, including for
product support and development. Mettler-Toledo will not divulge such technical
information to third parties allowing personal identification.
Software Transfer. You may not transfer any of your rights under this EULA.
Termination. Without prejudice to any other rights, Mettler-Toledo may terminate this EULA
if you fail to comply with the terms and conditions of this EULA. In such event, you may
not use the OverDrive™ Software any longer and you must destroy all copies of the
OverDrive™ Software and all of its component parts.
3. COPYRIGHT
All title and copyrights in and to the OverDrive™ Software (including but not limited to any
images, photographs, animations, video, audio, music, text, and "applets" incorporated
into the OverDrive™ Software), the accompanying printed materials, and any copies of
the OverDrive™ Software are owned by Mettler-Toledo or its suppliers. The OverDrive™
Software is protected by copyright laws and international treaty provisions. Therefore, you
must treat the OverDrive™ Software like any other copyright protected material.
4. WARRANTIES
The OverDrive™ Software and any related documentation is provided to you "as is".
Limited Warranty. Mettler-Toledo undertakes at your written request within 90 days at the
sole discretion of Mettler-Toledo to repair or replace any part of the OverDrive™ Software
which is defective or unusable as a result of poor materials, faulty design or incorrect
manufacture.
No other warranties. Mettler-Toledo expressly disclaims any further warranty for the
OverDrive™ Software including warranty of any kind, whether express or implied,
including, without limitation, the implied warranties of merchantability, fitness for a
particular purpose, or non-infringement. The entire risk arising out of use or performance
of the OverDrive™ Software remains with you.
No liability for damages. In no event shall Mettler-Toledo or its suppliers be liable for any
damages whatsoever (including, without limitation, damages for loss of business profits,
business interruption, loss of business information, or any other pecuniary loss) arising
out of the use of or inability to use this OverDrive™ Software, even if Mettler-Toledo has
been advised of the possibility of such damages. Because, however, some
states/jurisdictions do not allow the exclusion or limitation of liability for consequential or
incidental damages by compulsory law, the above limitation may not apply to you.
5. MISCELLANEOUS
This EULA is governed by the laws of the State of Ohio. Any dispute arising out of or in
connection with this EULA shall be subject to the exclusive jurisdiction of the courts of the
State of Ohio. Notwithstanding the foregoing, Mettler-Toledo retains the right to bring legal
action against you before any other competent court.
Should you have any questions concerning this EULA, or if you desire to contact MettlerToledo for any reason, please contact: Mettler-Toledo, Inc., 1900 Polaris Parkway,
Columbus, Ohio, USA 43240.
CONTENTS
1
Installing the Program
1-1
Introduction......................................................................................... 1-1
Capabilities ........................................................................................ 1-1
Basic Package.....................................................................................1-1
Optional Add-On Modules .....................................................................1-2
Overview............................................................................................. 1-3
Installation.......................................................................................... 1-4
SQL Server ........................................................................................1-12
Configure Database ............................................................................1-14
Modification...................................................................................... 1-17
Modify/Repair ....................................................................................1-17
Remove ............................................................................................1-20
2
License Registration
2-1
Registering ......................................................................................... 2-1
License Registration Screen ...................................................................2-2
3
Startup
3-1
How to Start the Program ..................................................................... 3-1
Side Tree ............................................................................................ 3-3
Tool Bar .............................................................................................. 3-4
Menu Bar ............................................................................................ 3-5
Keyboard Shortcuts.............................................................................. 3-7
How to Close the Program.................................................................... 3-9
4
Creating Database Records
4-1
Data Setup Tables ............................................................................... 4-1
Forms .................................................................................................4-2
Tables.................................................................................................4-3
Tool Bar .............................................................................................. 4-4
Query Procedure ..................................................................................4-5
Modifying Tables ................................................................................. 4-5
Editing Table Entries ............................................................................ 4-6
Creating a New Record .........................................................................4-6
Deleting an Existing Record ...................................................................4-6
Editing an Existing Record.....................................................................4-7
Account............................................................................................... 4-8
Shipping Address ...............................................................................4-11
Badge ............................................................................................... 4-12
Serial Data Configuration ....................................................................4-13
AWID26 Badges ................................................................................4-14
Carrier.............................................................................................. 4-15
Company .......................................................................................... 4-16
Load Numbers ...................................................................................4-17
Container.......................................................................................... 4-18
Contract............................................................................................ 4-20
Contract Product ................................................................................4-22
Destination ....................................................................................... 4-25
Driver ............................................................................................... 4-26
Formula ............................................................................................ 4-27
Generator.......................................................................................... 4-28
Group Presets ................................................................................... 4-29
Groups.............................................................................................. 4-30
Origin ............................................................................................... 4-31
Origin Price Type ............................................................................... 4-32
Permit .............................................................................................. 4-33
Presets Basis .................................................................................... 4-34
Product ............................................................................................. 4-35
Profile .............................................................................................. 4-38
Remark 1 .......................................................................................... 4-40
Remark 2 .......................................................................................... 4-41
Short Code........................................................................................ 4-42
Surcharge ......................................................................................... 4-43
Tax ................................................................................................... 4-44
Trailer............................................................................................... 4-45
Vehicle ............................................................................................. 4-48
Extended Tables ................................................................................ 4-53
5
Processing Transactions
5-1
Transaction Screen .............................................................................. 5-1
Additional Data Fields.......................................................................... 5-7
Types of Transactions........................................................................... 5-8
One-Pass Weighing ............................................................................. 5-9
Two-Pass Weighing ........................................................................... 5-10
Multi-Pass Weighing.......................................................................... 5-12
Split Weighing .................................................................................. 5-14
Multi-Axle Weighing .......................................................................... 5-15
Net Weighing .................................................................................... 5-16
Zero Weighing................................................................................... 5-16
Virtual Scale Indicator ....................................................................... 5-17
Transaction Browser .......................................................................... 5-18
Capturing a Tare Weight .................................................................... 5-19
Transient Vehicles ............................................................................. 5-20
Transient Accounts ............................................................................. 5-20
Switching Scales ............................................................................... 5-21
Payment Method ............................................................................... 5-22
Search Function................................................................................. 5-23
Traffic Lights ..................................................................................... 5-24
Locating the Panel ............................................................................. 5-25
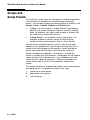
6
Presets and Groups
6-1
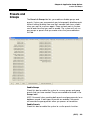
Presets ............................................................................................... 6-1
Using Presets...................................................................................... 6-3
Groups and Group Presets.................................................................... 6-4
Creating a Group ................................................................................. 6-5
Linking Groups .................................................................................... 6-7
Using Group Presets ............................................................................ 6-8
7
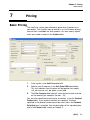
Pricing
7-1
Basic Pricing....................................................................................... 7-1
Advanced Pricing................................................................................. 7-2
Step Pricing.........................................................................................7-4
Formula Pricing ...................................................................................7-5
Formula Table ..................................................................................... 7-7
Override Rates .................................................................................... 7-9
Using Override Rates...........................................................................7-10
8
Application Setup Options
8-1
Options Screen.................................................................................... 8-1
Transaction ......................................................................................... 8-2
Enable Extended Tables ....................................................................... 8-8
Presets and Groups.............................................................................. 8-9
Combo Box Display ........................................................................... 8-11
Unattended ....................................................................................... 8-12
Preset Template ................................................................................ 8-15
Load Numbers and Key Table ............................................................. 8-16
Load Numbers ...................................................................................8-16
Key Table..........................................................................................8-17
9
Sampling
9-1
Sampling Setup................................................................................... 9-1
Sampling ............................................................................................ 9-4
Sampling Modification ......................................................................... 9-5
10 Setting Up Users
10-1
Security Setup................................................................................... 10-1
User Setup.........................................................................................10-1
Group Setup ......................................................................................10-5
Changing Passwords.......................................................................... 10-6
11 Managing Transaction Records
11-1
Transaction Maintenance ................................................................... 11-1
Query View........................................................................................11-2
Modify View.......................................................................................11-4
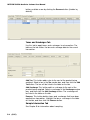
Weights and Measures....................................................................... 11-7
Form View.........................................................................................11-7
Table View ........................................................................................11-9
12 Reports and Tickets
12-1
Introduction....................................................................................... 12-1
Printing Tickets ................................................................................. 12-1
Report Screen ................................................................................... 12-2
Destinations.......................................................................................12-4
Parameters........................................................................................12-6
Permissions.......................................................................................12-7
Groups..............................................................................................12-8
Printing............................................................................................. 12-9
Standard Reports ............................................................................. 12-10
Standard Tickets .............................................................................. 12-13
13 Using the GUI Editor
13-1
Introduction....................................................................................... 13-1
Opening the GUI Editor........................................................................13-2
Editing Screens ..................................................................................13-3
Saving Changes ................................................................................ 13-3
Editing Text....................................................................................... 13-4
Hiding Objects................................................................................... 13-4
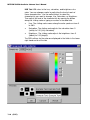
Changing Appearance ........................................................................ 13-4
Moving Objects ................................................................................. 13-8
Resizing Objects................................................................................ 13-9
Setting Tab Order ............................................................................ 13-10
Setting Required Fields .................................................................... 13-11
Adding Text and Graphics................................................................. 13-12
14 Advanced Pricing Wizard
14-1
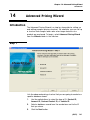
Introduction....................................................................................... 14-1
Step 1 .............................................................................................. 14-1
Step 2 .............................................................................................. 14-2
Step 3 .............................................................................................. 14-3
Step 4 .............................................................................................. 14-4
Push Buttons ..................................................................................... 14-6
15 Database Import/Export Wizard
15-1
Introduction....................................................................................... 15-1
Export............................................................................................... 15-1
Step 1 .............................................................................................. 15-1
Step 2 .............................................................................................. 15-2
Step 3 .............................................................................................. 15-3
Step 4 .............................................................................................. 15-4
Step 5 .............................................................................................. 15-5
Step 6 .............................................................................................. 15-6
Import............................................................................................... 15-7
Step 1 .............................................................................................. 15-7
Step 2 .............................................................................................. 15-8
Global Export .................................................................................... 15-9
Step 1 .............................................................................................. 15-9
Step 2 ............................................................................................ 15-10
Database Archive ............................................................................ 15-11
Step 1 ............................................................................................ 15-11
Step 2 ............................................................................................ 15-12
Step 3 ............................................................................................ 15-13
Step 4 ............................................................................................ 15-14
Step 5 ............................................................................................ 15-15
Push Buttons ................................................................................... 15-15
16 Transaction Type Wizard
16-1
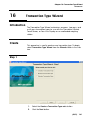
Introduction....................................................................................... 16-1
Create .............................................................................................. 16-1
Step 1 .............................................................................................. 16-1
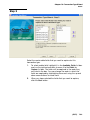
Step 2 .............................................................................................. 16-2
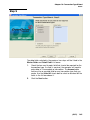
Step 3 .............................................................................................. 16-3
Step 4 .............................................................................................. 16-4
Step 5 .............................................................................................. 16-5
Step 5a ............................................................................................ 16-6
Step 6 .............................................................................................. 16-7
Step 7 .............................................................................................. 16-8
Modify .............................................................................................. 16-9
Step 1 .............................................................................................. 16-9
Step 2 ............................................................................................ 16-10
Step 2a...........................................................................................16-11
Step 3.............................................................................................16-12
Step 4.............................................................................................16-13
Step 5.............................................................................................16-14
Step 5a...........................................................................................16-15
Step 6.............................................................................................16-16
Step 7.............................................................................................16-17
Delete............................................................................................. 16-18
Step 1.............................................................................................16-18
Step 2.............................................................................................16-19
Step 3.............................................................................................16-20
Push Buttons ................................................................................... 16-20
17 Using Transaction Types
17-1
Introduction....................................................................................... 17-1
Transaction Wizard ............................................................................ 17-1
Touch Screen .................................................................................... 17-6
Four-Line Display ............................................................................ 17-12
18 Back Office Management
18-1
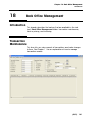
Introduction....................................................................................... 18-1
Transaction Maintenance ................................................................... 18-1
Ticket Re-pricing ............................................................................... 18-2
Invoice Cycle .................................................................................... 18-4
Invoicing........................................................................................... 18-5
Invoice Maintenance.......................................................................... 18-8
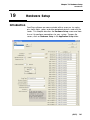
19 Hardware Setup
19-1
Introduction....................................................................................... 19-1
Adding a Scale .................................................................................. 19-2
Enable the Scale ................................................................................19-3
Customize the Scale Tab .....................................................................19-3
Connecting a Scale............................................................................ 19-4
Serial Configuration ............................................................................19-5
Custom Formats.................................................................................19-6
ASCII Characters...............................................................................19-16
Ethernet Configuration.......................................................................19-17
Scale Settings ................................................................................. 19-18
Connecting to Peripherals ................................................................ 19-19
Serial Ports......................................................................................19-20
Parallel Ports ...................................................................................19-21
Chapter 1: Installing the Program
Introduction
1
Installing the Program
Introduction
OverDrive™ vehicle scale software is designed to control
transactions in which material is bought, sold, or processed on a
scale. It enables you to store a detailed record of each transaction,
to print tickets and reports, and to export data for use with other
software packages.
OverDrive software can connect to as many as six scale indicators
and to peripheral devices such as traffic lights, gates, card readers,
and unattended weighing stations.
Capabilities
In addition to the basic OverDrive software package, we offer a
selection of add-on modules. The modules provide special
capabilities that are not included in the basic package. Note that
some of the features described in this manual are available only if
one of the add-on modules is installed. The following lists provide a
summary of which features are included in the basic software
package and the add-on modules.
Basic Package
OverDrive Module
•
Control of up to six scales plus manual weight entry
•
SQL Server 2005 database (or MSDE 2000 database)
•
Transaction screen
•
Database tables for Account, Carrier, Company, Container,
Contract, Destination, Driver, Generator, Origin, Origin Price
Type, Permit, Product, Profile, Remark 1, Remark 2,
Surcharge, Tax, Trailer, Vehicle, and 25 additional tables
•
Advanced pricing
•
Credit limits for individual customers
•
Multi-axle and split weighing
•
Product sampling
•
Presets and groups
•
Security setup for assigning access rights to users
(5/07) 1-1
METTLER TOLEDO OverDrive Software User’s Manual
•
Transaction maintenance
•
Weights and Measures log
•
Standard reports and tickets (can be customized with Crystal
Reports® software)
•
GUI editor
•
Wizards for database import/export, pricing, creating
transaction types, and running transactions
•
Languages: English, French, Spanish, Swedish, Norwegian,
Dutch
Optional Add-On
Modules
Unattended Module
•
Enables unattended weighing with transaction wizard, touch
screen, or four-line display
Invoicing Module
•
1-2 (5/07)
Tools for creating and working with invoices
Chapter 1: Installing the Program
Overview
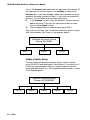
Overview
The following list outlines the basic steps involved in setting up
and operating your OverDrive system:
1.
Have your supplier install and configure the OverDrive
software. Discuss your processing needs with the supplier
ahead of time to make sure the installation is configured to
meet them. An installation can include the following tasks:
•
Install the software on a single PC or network
•
Register the software
•
Connect to scales and peripheral devices
•
Change the appearance of screens
•
Enable/disable individual functions
•
Enable supervisors and operators
•
Set up tickets and reports for printing
2.
Create database records. Before you can process
transactions, you will need to enter information about
products, accounts, contracts, vehicles, etc., in your
database.
3.
Process transactions. Once you have had your OverDrive
system configured and have entered information in the
database, you can begin processing transactions. You can
speed up transactions by creating groups and presets.
4.
Print tickets and reports. OverDrive software can print a ticket
automatically for each transaction. It also provides a selection
of standard reports that you can print. If Crystal Reports®
software is installed, you can design your own tickets and
reports.
5.
Manage records of transactions. OverDrive software stores a
complete record of each transaction. It gives you the ability to
void, modify, and export transactions.
6.
Manage the database. OverDrive software enables you to
import information into the database and export information
from the database for use with other software packages.
7.
Change default settings. You can change a wide range of
default settings to modify the way your OverDrive system
operates.
(5/07) 1-3
METTLER TOLEDO OverDrive Software User’s Manual
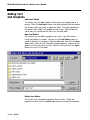
Installation
The following instructions explain how to install the OverDrive
program. Once you have installed the program, you will need to
complete the license registration procedure. If the program is not
registered, you will be able to use it in demonstration mode for 14
days, after which it will shut down.
1-4 (5/07)
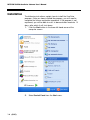
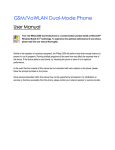
1.
Click the Start button in the lower left-hand corner of the
computer screen.
2.
Select Control Panel from the Start menu.
Chapter 1: Installing the Program
Installation
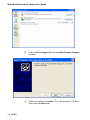
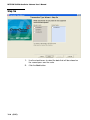
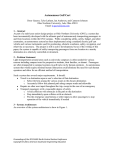
3.
Double-click the Add or Remove Programs icon in the control
panel.
4.
Click the Add New Programs icon on the Add or Remove
Programs window.
(5/07) 1-5
METTLER TOLEDO OverDrive Software User’s Manual
1-6 (5/07)
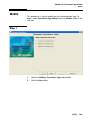
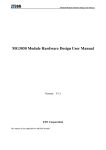
5.
Click the CD or Floppy button on the Add or Remove Programs
window.
6.
Place the OverDrive installation CD in the computer’s CD drive.
Then click the Next button.
Chapter 1: Installing the Program
Installation
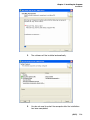
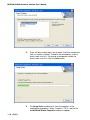
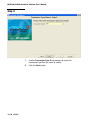
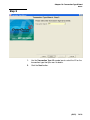
7.
Once Windows has located the Setup.exe installation file, click
the Finish button. You can use the browse button to locate the
Setup.exe file manually.
8.
When the InstallShield Wizard window appears, click the Next
button.
(5/07) 1-7
METTLER TOLEDO OverDrive Software User’s Manual
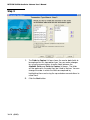
9.
Read the end-user license agreement, use the radio button to
accept the terms, and click the Next button. If you do not
accept the terms, you will not be able to install the program.
10. Select the location where the OverDrive files will be installed.
The default is C:\Program Files\Mettler Toledo\OverDrive. If you
want to install the files at a different location, use the Browse
button to select the location. Then click the Next button.
1-8 (5/07)
Chapter 1: Installing the Program
Installation
11. Select the setup type, and then click the Next button.
•
Typical installs all components. If you select the typical
setup, continue to Step 13.
•
Compact installs the minimum required components. If
you select the compact setup, continue to Step 13.
•
Custom allows you to select the components that you
want to install. If you select the custom setup, continue to
Step 12.
(5/07) 1-9
METTLER TOLEDO OverDrive Software User’s Manual
12. Enter a check mark next to the OverDrive features that you want
to install.
13. This window lists the components that you selected. Click the
Next button to start copying the files to your computer.
1-10 (5/07)
Chapter 1: Installing the Program
Installation
14. The Setup Status window shows the progress of the copying
process. When the copying process reaches 100%, wait for
the InstallShield Wizard Complete window to appear.
15. The installation has been completed. You will need to restart
your computer to be able to open the program. Select Yes and
then click the Finish button.
(5/07) 1-11
METTLER TOLEDO OverDrive Software User’s Manual
SQL Server
After installing the OverDrive program, you will need to install the
SQL Server 2005 database. Microsoft .NET Framework 2.0 must be
installed on the computer before you can install the SQL Server
2005 database. The Microsoft .NET Framework 2.0 installation file
is provided in the SQL Server 2005 Install directory in case you
need to run it.
With the OverDrive installation CD in the computer’s CD drive, use
Windows Explorer to locate the installation file:
Z:\SQLServer\SQLServer2005Install.
1.
1-12 (5/07)
Run the InstallSQLServer2005.vbs file.
Chapter 1: Installing the Program
Installation
2.
The software will be installed automatically.
3.
You do not need to restart the computer after the installation
has been completed.
(5/07) 1-13
METTLER TOLEDO OverDrive Software User’s Manual
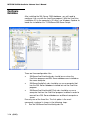
Configure
Database
After installing the SQL Server 2005 database, you will need to
configure it for use with the OverDrive program. With the OverDrive
installation CD in the computer’s CD drive, use Windows Explorer to
locate the installation file: Z:\SQLServer\SQLServer Scripts.
There are three configuration files:
•
SQLServerOverDriveConfig.vbs should be run when the
OverDrive program and SQL Server database are installed on
the same computer.
•
SQLServerConfigOnly.vbs should be run on a computer that
has the SQL Server database installed but not the OverDrive
program.
•
SQLServerOverDriveConfigPCOnly.vbs should be run on a
computer that has the OverDrive program installed in order to
connect to a SQL Server database on a different computer or
server.
Run only one of the three files. The first option is the most
commonly used and is shown in the following steps:
1.
1-14 (5/07)
Run the SQLServerOverDriveConfig.vbs file.
Chapter 1: Installing the Program
Installation
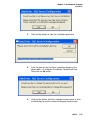
2.
Click the Yes button to start the installation procedure.
3.
Enter the path for the OverDrive installation directory (the
default path is C:\Program Files\Mettler Toledo\OverDrive).
Then click the OK button.
4.
Click the Yes button (and then change the password) or click
the No button to continue without changing the password.
(5/07) 1-15
METTLER TOLEDO OverDrive Software User’s Manual
5.
1-16 (5/07)
Click the OK button. You do not need to restart the computer
after the installation has been completed.
Chapter 1: Installing the Program
Modification
Modification
Once the program has been installed, you can use the InstallShield
Wizard to add, repair, or remove system components.
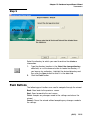
Modify/Repair
You will need the OverDrive installation CD to modify or repair the
system. Place the CD in the computer’s CD drive, and the window
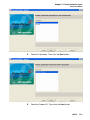
shown below will be displayed.
1.
Select a modification option, and then click the Next button.
•
Modify lets you add new components to your system or
remove components that are currently installed. Continue
to Step 2.
•
Repair lets you repair your system by replacing the
components that were selected during the previous
installation. Continue to Step 3.
•
Remove lets you remove all components that are
currently installed. Refer to the Remove procedure
described on Page 1-20.
(5/07) 1-17
METTLER TOLEDO OverDrive Software User’s Manual
1-18 (5/07)
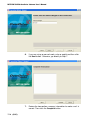
2.
There will be a check mark next to each OverDrive component
that is currently installed. To add a new component, enter a
check mark next to it. To remove a component, delete the
check mark next to it. Click the Next button.
3.
The Setup Status window will show the progress of the
modification procedure. When it reaches 100%, wait for the
InstallShield Wizard Complete window to appear.
Chapter 1: Installing the Program
Modification
4.
The procedure has been completed. You will need to restart
your computer to be able to open the program. Click the
Finish button to close the InstallShield Wizard.
(5/07) 1-19
METTLER TOLEDO OverDrive Software User’s Manual
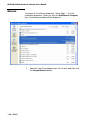
Remove
To remove all OverDrive components, follow Steps 1-3 of the
installation procedure. When you click the Add/Remove Programs
icon, the following window will be displayed.
1.
1-20 (5/07)
Select the OverDrive program from the list box, and then click
the Change/Remove button.
Chapter 1: Installing the Program
Modification
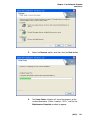
2.
Select the Remove option, and then click the Next button.
3.
The Setup Status window will show the progress of the
removal procedure. When it reaches 100%, wait for the
Maintenance Complete window to appear.
(5/07) 1-21
METTLER TOLEDO OverDrive Software User’s Manual
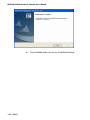
4.
1-22 (5/07)
Click the Finish button to close the InstallShield Wizard.
Chapter 2: License Registration
Registering
2
License Registration
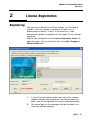
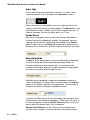
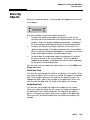
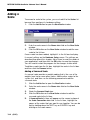
Registering
After you have installed the OverDrive software, you will need to
register it. Until the software is registered, you can use it in
demonstration mode for 14 days. At the end of the 14-day
demonstration period, the program will shut down if it has not been
registered.
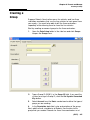
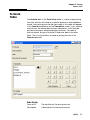
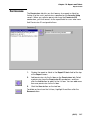
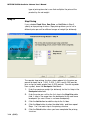
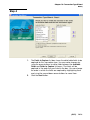
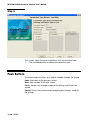
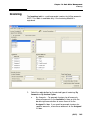
Register your installation from the License Registration Screen. To
open the screen, click the OverDrive icon in the Start / Programs /
Mettler Toledo menu.
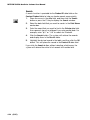
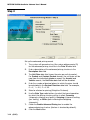
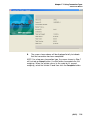
1.
In the first list box, place a check mark next to the software
modules that you have purchased. If you do not check any
boxes, you will be registered for the basic software package.
2.
The second box lists the languages that are included in the
OverDrive software package.
(5/07) 2-1
METTLER TOLEDO OverDrive Software User’s Manual
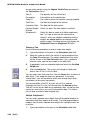
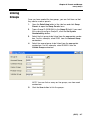
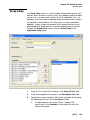
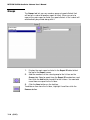
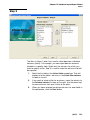
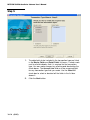
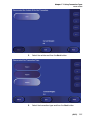
3.
Click the Save As button to create an electronic copy of your
registration form.
•
When the Select File window opens, select a storage
location in the Save In combo box.
•
Enter a file name (in *.txt format) in the File Name data
field.
•
Click the Save button on the window.
4.
Provide the registration form information to your local Mettler
Toledo customer service representative.
5.
Mettler Toledo will send you license keys for your system. Enter
those keys in the appropriate License Keys data fields on the
License Registration Screen (enter key #1 in the first field and
key #2 in the second field).
6.
Click the Register button. You will then be prompted to restart
the application in order to complete the registration process.
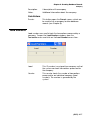
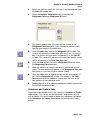
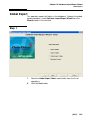
After you have registered your software, the License Registration
Screen will no longer open automatically when you log in to the
system. If you install an add-on module later, you will need to
register the software again. To display the License Registration
Screen, start the program and select Register in the Help menu.
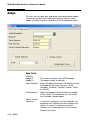
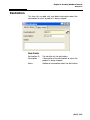
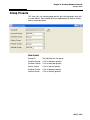
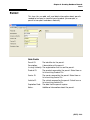
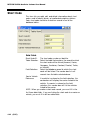
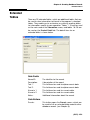
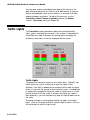
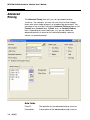
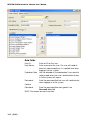
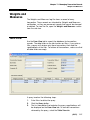
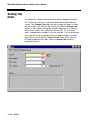
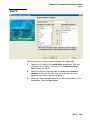
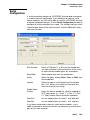
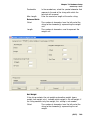
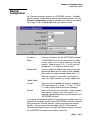
License
Registration
Screen
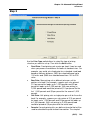
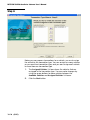
Add-On Modules
The first list box on the screen is used to select the add-on modules
that you have purchased:
•
OverDrive Module
•
Unattended Module
•
Invoicing Module
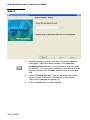
Product Codes
The product codes listed in the two data fields on the License
Registration Screen are for the computer on which the software is
installed. The license keys that you receive will be linked to those
product codes. To register a system, you must enter the license keys
that are linked to the product codes shown on the screen.
License Keys
There are two License Keys data fields. When you receive your
license keys, enter them in the data fields in order to register your
system.
2-2 (5/07)
Chapter 2: License Registration
Registering
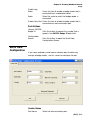
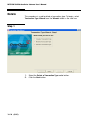
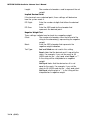
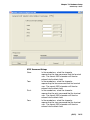
Push Buttons
Demo: Click the Demo button to start the OverDrive program in
demonstration mode. Demo mode allows you to try out the
software, giving you access to all functions and all available
languages. At the end of the 14-day demonstration period, the
program will shut down if it has not been registered.
Help: Click the Help button to open the program’s help files to the
page that describes the License Registration Screen.
Print: Click the Print button to print a text file of your registration
form. The form will list your product code numbers and will indicate
which modules you have selected.
Save As: Click the Save As button to save your registration form as
an electronic file. A window will appear, in which you will need to
enter a file name and specify a directory location for storing the file.
Save the registration form as a text file (*.txt). In other words, enter
a name such as register.txt in the File Name data field. After
entering a file name and specifying a directory location, click the
Save button to complete the procedure and close the window.
Register: Click the Register button to register your system. You will
need to obtain license keys and enter them in order to register.
When you have entered license keys and clicked the button, you will
be prompted to restart the application in order to complete the
registration process.
Cancel: Click the Cancel button to delete any changes and close the
License Registration Screen.
(5/07) 2-3
Chapter 3: Startup
How to Start the Program
3
Startup
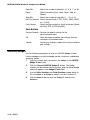
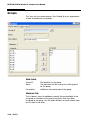
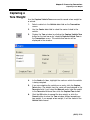
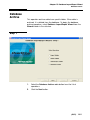
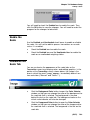
How to Start
the Program
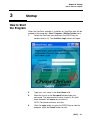
When the OverDrive software is installed, an OverDrive icon will be
created in the computer’s Start / Programs / Mettler Toledo menu.
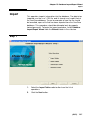
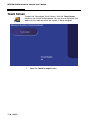
1.
Select the OverDrive icon and press the ENTER key (or
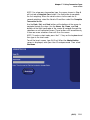
double-click on it). The OverDrive Login screen will open.
2.
Type your user name in the User Name field.
3.
Move the cursor to the Password field and type your
password. The password will not be shown in the field;
each character will appear as an asterisk.
4.
Click the Login button or press the ENTER key to start the
program (click the Cancel button to exit).
NOTE: Passwords are case sensitive.
(5/07) 3-1
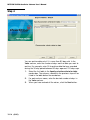
METTLER TOLEDO OverDrive Software User’s Manual
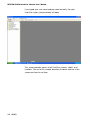
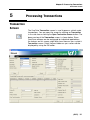
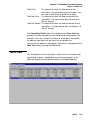
If you typed your user name and password correctly, the main
OverDrive screen (shown below) will open.
This screen provides access to all OverDrive screens, tables, and
functions. The rest of this chapter describes the basic features of the
screen and how to use them.
3-2 (5/07)
Chapter 3: Startup
Side Tree
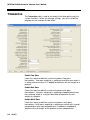
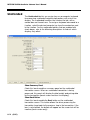
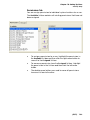
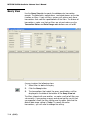
Side Tree
A data structure tree is located at the left-hand side of the screen. It
organizes the OverDrive screens in a system of folders, making it
easy to locate and open any screen. The contents of the side tree
depend on the permissions assigned to the person who is logged in
to the program. If a person does not have permission to use a
screen, the screen will not be listed in the side tree.
To open a folder, click on the plus sign to the left of it. When a folder
is open, the plus sign changes to a minus sign. You can also
double-click on the folder icon or folder name.
To close a folder, click on the minus sign to the left of it. You can
also double-click on the folder icon or folder name.
To open a screen, click on the name of the screen.
To close a screen, click the Close button in the upper right-hand
corner of the screen. Or click the control menu icon in the upper lefthand corner of the screen, and then click Close in the control menu.
There are left and right arrows in the border along the right edge of
the side tree. Clicking on the left arrow closes the side tree. Clicking
on the right arrow opens the side tree.
You can resize the area in which the tree is displayed. Position the
cursor on the border until a double-headed arrow appears. Then
hold down the mouse button and drag the border to the left or right.
(5/07) 3-3
METTLER TOLEDO OverDrive Software User’s Manual
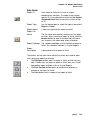
Tool Bar
The tool bar at the top of the screen provides easy access to several
commonly used functions.
Exit
This button closes the program.
Help
This button opens the program’s help files.
Open Transaction Screen
This button opens the Transaction screen.
Open Virtual Scale
This button opens the virtual scale indicator or brings it to the front if
it is behind the main screen.
Capture Vehicle Tare
This button opens a window that is used to record tare weights. A
vehicle must be selected on the Transaction screen before you can
capture a tare. The tare weight will be stored in the Vehicle table.
Enable Traffic Lights
This button displays the panel used to control traffic lights manually.
Locale
This combo box can be used to switch between the languages that
you have installed. To display text correctly, it might be necessary to
change a computer’s regional settings to match the language
selected (Start / Settings / Control Panel / Regional Settings). You
can also use the GUI Editor to adjust the amount of space allowed
for text.
3-4 (5/07)
Chapter 3: Startup
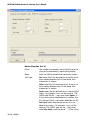
Menu Bar
Menu Bar
The menu bar at the top of the screen provides six pull-down
menus. Those menus and the items in them are explained below.
The keyboard shortcut for opening a menu is Alt + the letter that is
underlined in the menu name.
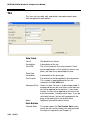
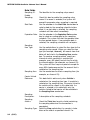
File Menu
•
Exit: This item closes the program.
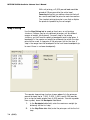
Record Menu
The Record menu is used for working with database records and is
active only when a data setup table is open.
•
Query: This item searches a database table for one or more
records. If all data fields on a table’s Form View tab are empty,
clicking Query will retrieve all records in the table. If you enter
information in a data field, clicking Query will retrieve only
those records that match the information. For example, entering
a Carrier ID on the Vehicle form will limit a search to the
vehicles that are operated by that carrier.
•
New: This item clears all records that are displayed on a form
or table so you can begin a new query or create a new record.
•
Save: This item saves a new database record or saves
changes made to an existing database record.
•
Delete: This item deletes a record from the database. To delete
a record, display it on the table’s Form View tab or highlight it
on the Table View tab and then click the Delete button.
•
First: Click this item to return to the first record in a query.
•
Previous: Click this item to return to the previous record.
•
Next: Click this item to go forward to the next record.
•
Last: Click this item to go forward to the last record in a query.
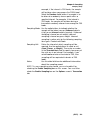
Tools Menu
•
GUI Editor: This item opens the Graphical User Interface (GUI)
editor, which is used to change the way your system’s screens
and windows look.
(5/07) 3-5
METTLER TOLEDO OverDrive Software User’s Manual
Window Menu
The Window menu is active only when a window is open.
•
Cascade: This item arranges all open windows one in front of
another so that only the top and left edges of the windows in
back are visible.
•
Tile Horizontal: This item arranges all open windows one
above another.
•
Tile Vertical: This item arranges all open windows side by side.
•
Minimize All Windows: This item minimizes all open windows.
The minimized windows will be located at the bottom of the
area where the windows are normally displayed, so you might
have to scroll down to locate them.
•
Windows: All open windows are listed at the bottom of the
menu. If more than one window is open, clicking on the name
of a window will bring it to the front of the other windows.
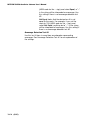
Transactions Menu
3-6 (5/07)
•
Load Numbers: This item opens the Load Numbers window,
which shows the load number and load counter for any
transaction currently being run. A load number is assigned to
an individual company and stored in the Company table
record. The load counter tracks how many transactions have
been processed for a load number.
•
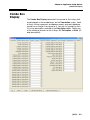
Transaction Browser: This item opens the Transaction Browser
window so that you can view a table that lists all open
transactions. Open transactions are two-pass and multi-pass
transactions that have not been completed. When a vehicle
returns for its second (or next) pass over the scale, the
operator can open the transaction browser to find the record for
the open transaction. Clicking on the record in the browser’s
table will display the transaction information on the Transaction
screen.
•
Print Last Ticket: This item reprints a new copy of the ticket for
the most recent transaction processed on a scale.
•
Zero Scale: This item adjusts the weight reading for an empty
scale to zero. This command is used to compensate for minor
changes in the weight reading caused when material such as
snow or ice builds up on a scale. The command affects only
the scale tab that is currently displayed on the Transaction
screen. The scale must be empty when you zero it.
•
Refresh Combo Data: This item refreshes the data in the
combo boxes on the Transaction screen. This command is
used to update the options listed in the combo boxes to reflect
any recent changes to the database records. For example, you
might have to create a record for a new account to complete a
Chapter 3: Startup
Keyboard Shortcuts
transaction. After creating the account record, refresh the
combo data so that the new Account ID will appear in the
Account combo box.
•
Capture Vehicle Tare: This item opens a window that is used
to record tare weights. A vehicle must be selected on the
Transaction screen before you can capture a tare. The tare
weight will be stored in the Vehicle table.
•
Enable Traffic Lights: This item displays the panel used to
control traffic lights manually.
Help Menu
•
Help Topics: This item opens the program’s help files.
•
Register: This item opens the License Registration screen.
•
About: This item displays information about the version of
OverDrive software you are using.
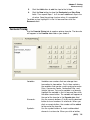
Keyboard
Shortcuts
F1 (Help): Opens the program’s help files. Place the cursor in a
data field and press the F1 key to open the help file for that data
field.
F2 (Refresh Combo Data): Refreshes the data in the combo boxes
on the Transaction screen to reflect recent changes in the database.
F3 (Search): Searches specific ID data fields to help locate database
records.
F4 (Scale Tab): Switches to the next scale tab on the Transaction
screen.
F5 (Product Detail Tab): Switches to the Product Detail tab on the
Transaction screen.
F6 (Product List Tab): Switches to the Product List tab on the
Transaction screen.
F7 (Tax Tab): Switches to the Taxes and Surcharges tab on the
Transaction screen.
F8 (Get Weight): Reads the weight from a scale or opens the
Manual Weight window so that you can enter a weight manually.
F9 (Accept): Records partial transaction data, such as the first
weighing of a two-pass transaction or all except the final weighing
of a multi-pass transaction.
F10 (File): Selects the File menu so that you can exit the program.
Use the down arrow key to open the menu.
(5/07) 3-7
METTLER TOLEDO OverDrive Software User’s Manual
F11 (Complete): Completes a transaction by recording a one-pass
transaction or recording the final weighing of a two-pass or multipass transaction.
F11 (Short Code Toggle): When the Unattended Touch Screen is in
use, this command enables/disables the data field where you can
enter a short code.
F12 (Transaction Browser): Opens the transaction browser.
Ctrl-End (Unattended Administration Toggle): When the Unattended
Touch Screen is in use, this command displays the Shutdown
button for closing the Touch Screen.
Ctrl-F (Query): Searches for records in a database table.
Ctrl-E (Notes): Opens the Transaction Notes window to allow you
to enter notes.
Ctrl-N (New): Clears all records that are displayed on a form or
table so that you can begin a new query or create a new record.
Ctrl-S (Save): Saves a new database record or saves changes
made to an existing database record.
Ctrl-Delete (Delete): Deletes the database record that is currently
displayed on a form.
Ctrl-Up Arrow (First): Returns to the first record in a table.
Ctrl-Left Arrow (Previous): Returns to the previous record.
Ctrl-Right Arrow (Next): Goes forward to the next record.
Ctrl-Down Arrow (Last): Goes forward to the last record in a table.
Ctrl-A (Add Detail Record): Adds a row to the table on the
Transaction screen’s Product List tab or Product Detail tab.
Ctrl-D (Delete Detail Record): Deletes a row from the table on the
Transaction screen’s Product List tab or Product Detail tab.
Ctrl-C (Cancel Transaction): Clears the data fields on the
Transaction screen.
Ctrl-L (Clear Last Detail Record): Clears the most recent entry on
the Transaction screen’s Product List tab or Product Detail tab.
Ctrl-P (Print Last Ticket): Prints the ticket for the most recent
transaction.
Alt-F4 (Close): Closes the program.
3-8 (5/07)
Chapter 3: Startup
How to Close the Program
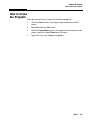
How to Close
the Program
There are several ways to close the OverDrive program:
•
Click the Close button in the upper right-hand corner of the
screen.
•
Select Exit from the File menu.
•
Click the Control Menu icon in the upper left-hand corner of the
screen, and then select Close from the menu.
•
Type Alt+F4 on your computer keyboard.
(5/07) 3-9
Chapter 4: Creating Database Records
Data Setup Tables
4
Creating Database Records
Data Setup
Tables
Before you can use the OverDrive system to process transactions,
you must create database records. For example, you should create
a record for each of the products that you handle and for each
vehicle that transports those products. That information will be
stored in the tables described in this chapter. The only limit to the
number of records that you can store in your database is the
amount of hard disk space available on the computer.
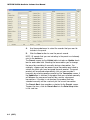
To view a table, open the Data Setup folder in the side tree and
click on one of the tables listed below:
(5/07) 4-1
METTLER TOLEDO OverDrive Software User Manual
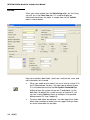
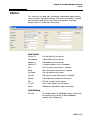
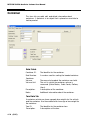
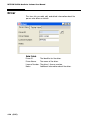
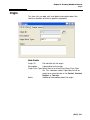
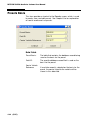
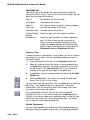
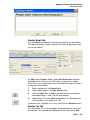
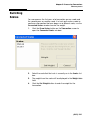
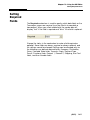
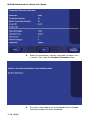
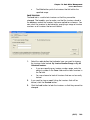
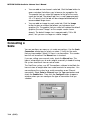
Forms
When you select a table from the Data Setup folder, the first thing
you will see is the Form View tab. It is used to display an
individual record from the table. A sample form for the Vehicle
table is shown below.
Each form contains data fields, which are used to enter, view, and
edit information for a record.
4-2 (5/07)
•
When you create a new record, you must enter a unique ID in
the ID data field on the form. You can type an alphanumeric
ID in the data field or click the Get System Generated Key
button to have the system assign an ID and place it in the
data field. By default the system assigns a numeric ID, but
you can use the Options screen to configure it to generate
alphanumeric IDs (see Chapter 8).
•
The other data fields are optional. You can leave these fields
blank when creating a record, but we suggest that you enter
as much information as possible.
Chapter 4: Creating Database Records
Data Setup Tables
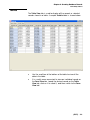
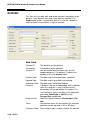
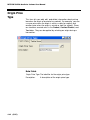
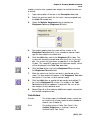
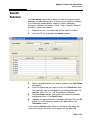
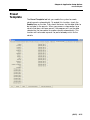
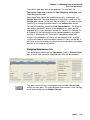
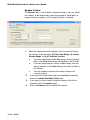
Tables
The Table View tab is used to display all the records or selected
records stored in a table. A sample Vehicle table is shown below.
•
Use the scroll bar at the bottom of the table to view all the
data in the table.
•
It is usually more convenient to view an individual record on
the Form View tab. Locate the desired record on the Table
View tab, click on it to select it, and then switch to the Form
View tab.
(5/07) 4-3
METTLER TOLEDO OverDrive Software User Manual
Tool Bar
When you open a database table, a tool bar will appear on screen.
The default location is below the menu bar in the upper left-hand
corner of the screen, but you can move the tool bar to whatever
location is most convenient. The push buttons on the tool bar are
used to view or edit records in the database tables. You can use
the buttons from both the Form View and Table View tabs.
Query: Searches for records in a database table. The keyboard
shortcut for this command is Ctrl-F.
New: Clears all records that are displayed on a form or table. This
lets you begin a new query or begin entering data to create a new
record. The keyboard shortcut for this command is Ctrl-N.
Save: Saves a new database record or saves changes made to an
existing database record. The keyboard shortcut for this command
is Ctrl-S.
Delete: Deletes the database record that is currently displayed on a
form. The keyboard shortcut for this command is Ctrl-Delete.
First: Returns to the first record in a table. The keyboard shortcut for
this command is Ctrl-Up Arrow.
Previous: Returns to the previous record. The keyboard shortcut for
this command is Ctrl-Left Arrow.
Next: Goes forward to the next record. The keyboard shortcut for
this command is Ctrl-Right Arrow.
Last: Goes forward to the last record in a table. The keyboard
shortcut for this command is Ctrl-Down Arrow.
4-4 (5/07)
Chapter 4: Creating Database Records
Modifying Tables
Query Procedure
You can use the Query button (or Ctrl-F key) to search for records
in a database table.
•
To retrieve all records in a table, clear all data fields on the
form and click the Query button.
•
To retrieve an individual record, enter its ID in the ID data field
on the form and click the Query button.
•
To retrieve a set of records, enter data as a filter in one or
more data fields and then click the Query button.
A filter is data used to limit a search. For example, entering a
Carrier ID on the Vehicle form will limit the search to those vehicles
operated by the carrier. You can enter partial data as a filter by
using a percent sign as a wildcard. For example, you can enter v%
or %6 to search for Vehicle6.
You can query for all records from either the Form View tab or the
Table View tab. If your query includes filters, perform it from the
Form View tab. The arrow buttons on the tool bar allow you to
scroll through the records that you retrieve.
Modifying
Tables
You can modify a table by sorting rows and columns and by
changing column widths.
To sort rows, click on one of the column headings. The rows will
be sorted so that the items under the heading that you clicked on
are in alphanumerical order.
To rearrange columns, position the cursor on the heading of the
column you want to move. Then hold down the mouse button and
drag the column to a new location.
To change the width of a column, position the cursor on the righthand border of a column heading until a double-headed arrow
appears. Then hold down the mouse button and drag the column
border to the desired width.
(5/07) 4-5
METTLER TOLEDO OverDrive Software User Manual
Editing Table
Entries
You can create new records in a table, delete existing records, and
edit existing records.
Creating a New
Record
Open the Data Setup folder in the side tree and select the table to
which you want to add a record. The form for that table will
appear.
1.
Fill in as many data fields as possible. The ID data field is
yellow, indicating that it must be filled in when you create a
database record. You can type in an ID or have the system
assign an ID by clicking the Get System Generated Key
button to the right of the ID data field.
If you do not enter an ID or if you enter an ID that is currently
used for another record, an error message will appear when
you try to save the new record.
2.
When you have entered all the information, click the Save
button. This will enter the new record in the table.
Deleting an
Existing Record
Open the Data Setup folder in the side tree and select the table
from which you want to delete a record. The form for that table will
appear.
1.
Display the record you want to delete by entering its ID in the
ID data field and then clicking the Query button.
If you do not know the ID, click the Query button to retrieve all
records in the table. Then select the record you want to delete.
You can use the arrow buttons to scroll through the records or
switch to the Table View tab to locate a record.
2.
4-6 (5/07)
Click the Delete button to delete the record displayed on the
form (or selected on the Table View tab). You will then be
prompted to confirm the deletion.
Chapter 4: Creating Database Records
Editing Table Entries
Editing an
Existing Record
Open the Data Setup folder in the side tree and select the table you
want to edit. The form for that table will appear.
1.
Display the record you want to edit by entering its ID in the ID
data field and then clicking the Query button.
If you do not know the ID, click the Query button to retrieve all
records in the table. Then select the record you want to edit.
You can use the arrow buttons to scroll through the records or
switch to the Table View tab to locate a record. Click on the
desired record in the table, and then return to the Form View
tab. The record that you selected will be displayed on the
form.
2.
Type your changes in the data fields on the form. If a data
field (such as the ID field) is gray, it cannot be edited.
3.
When you have finished editing the record, click the Save
button to update the existing record.
(5/07) 4-7
METTLER TOLEDO OverDrive Software User Manual
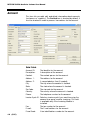
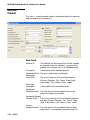
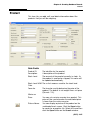
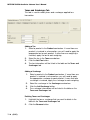
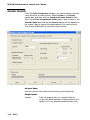
Account
This form lets you add, edit, and delete information about accounts
(customers or suppliers). The Enabled box is checked by default; it
must be checked in order to process transactions for the account.
Data Fields
Account ID:
The identifier for the account.
Description:
A description of the account.
Contact:
The contact person for the account.
Address 1:
The address for the account.
Address 2:
A second address line (if needed).
City:
The city where the account is located.
State:
The state where the account is located.
Zip Code:
The zip code for the account.
Country:
The country where the account is located.
Phone:
The telephone number for the account.
Invoice Cycle ID: Select an invoice cycle if you want to assign the
account to a group used for invoicing. This field
is available only if the Invoicing Module is
installed.
Fax:
4-8 (5/07)
The fax number for the account.
E-mail:
The E-mail address for the account.
Fiscal Code:
A tax identification number for the account.
Chapter 4: Creating Database Records
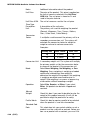
Account
Discount:
A discount (flat fee or percentage) allowed for the
account. The price of the transaction will be
reduced by this amount. To use a discount, you
must enter a number in this data field and select
Flat or Percent in the Type combo box.
Maximum Credit: The maximum amount of credit for the account.
NOTE: There is also a Maximum Credit field in
the Contract table. When you create contracts for
an account, the sum of the maximum credit
limits for those contracts cannot exceed the
maximum credit specified for the account.
Actual Credit:
The amount of credit used for the account. This
field updates automatically as credit is used.
Late Fee:
A fee charged for late payment.
Payment Method: Select Purchase Order, Credit Account, Check,
Cash, Credit Card, Debit Card, or Pre Pay.
Payment
Number:
A number assigned for payment (for example, a
purchase order number or a credit card number).
Ticket In:
Choose from a selection of predefined tickets to
print when a vehicle enters your facility. If no
inbound ticket will be printed, select (none).
Ticket Out:
Choose from a selection of predefined tickets to
print when a vehicle exits your facility. If no
outbound ticket will be printed, select (none).
Enabled:
Check this box to enable the account. If the box
is not checked, you will not be able to process
transactions for the account.
Type:
Select the type of discount (Flat or Percent).
Operation:
Select Ship, Receive, or Either. If you select
Either, then both shipping and receiving
transactions will be allowed for the account.
Notes:
Additional information about the account.
Payment
Expiration Date: The date when the payment method expires.
Account
Expiration Date: The date when the account expires.
Suspend Credit: Check this box to prevent the account from using
credit for transactions. When the box is checked,
the account must use another payment method.
Credit Suspension
Message:
Enter a message to be displayed when an
account with suspended credit tries to use credit
for a transaction. If nothing is entered here, the
system will use a default message.
(5/07) 4-9
METTLER TOLEDO OverDrive Software User Manual
Push Buttons
Advanced
Pricing:
4-10 (5/07)
This button opens the Advanced Pricing screen,
which can be used to create complex pricing
structures for an account (see Chapter 7).
Presets:
This button opens the Presets screen, which can
be used to link an account to other database
records (see Chapter 6).
Shipping:
This button opens the Shipping Address form.
Chapter 4: Creating Database Records
Account
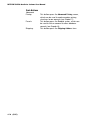
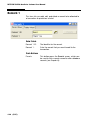
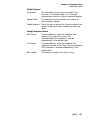
Shipping
Address
This form is used to enter additional addresses for an account.
Data Fields
Account ID:
The identifier for the account.
Shipping ID:
The identifier for the Shipping Address record.
Contact Name:
The name of the contact person at the facility.
Shipping Name: The facility located at the shipping address.
Address 1:
The address of the facility.
Address 2:
A second address line (if needed).
City:
The city where the facility is located.
State:
The state where the facility is located.
Zip Code:
The zip code for the facility.
Country:
The country where the facility is located.
Phone:
The telephone number for the facility.
Fax:
The fax number for the facility.
Notes:
Additional information about the address.
Push Buttons
Presets:
This button opens the Presets screen, which is
used to link a shipping address to other database
records (see Chapter 6).
(5/07) 4-11
METTLER TOLEDO OverDrive Software User Manual
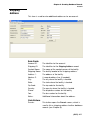
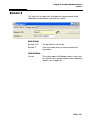
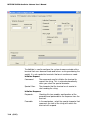
Badge
This form lets you add, edit, and delete information about badges
used to identify drivers at unattended weighing stations. Each
badge should be linked to a record in one of the database tables.
Data Fields
AWID26
Badge ID:
The number printed on an AWID26 badge.
Badge ID:
The badge number or identifier.
Table Selection: Select the table that contains the record to which
the badge will be linked (Account, Carrier,
Company, Container, Contract, Product, Trailer,
or Vehicle).
Field Selection:
Carrier Vehicle
Reference:
4-12 (5/07)
Select the database record to which the badge
will be linked. The combo box lists all records
from the table selected above.
If a vehicle is entered as the field selection, this
combo box will display the carrier linked to the
vehicle. If a carrier is entered as the field
selection, this combo box will list the vehicles
linked to the carrier.
Chapter 4: Creating Database Records
Badge
Enable Jag
Scale:
Scale:
Check this box to enable a badge reader that is
connected to an unattended station.
Select the scale to which the badge reader is
connected.
Enable Com Port: Check this box to enable a badge reader that is
connected to a communication port.
Push Buttons
Convert AWID26
Badge ID:
Click this button to convert the number that is
typed in the AWID26 Badge ID data field.
Configuration
Screen:
Click this button to open the Serial Data
Configuration Screen.
Serial Data
Configuration
If you have enabled a serial communication port for data entry
through a badge reader, use this screen to configure the port.
Combo Boxes
Port Name:
Select the communication port.
(5/07) 4-13
METTLER TOLEDO OverDrive Software User Manual
Data Bits:
Select the number of data bits (4, 5, 6, 7, or 8).
Parity:
Select the parity (Even, Mark, None, Odd, or
Space).
Stop Bits:
Select the number of stop bits (1, 1.5, or 2).
Bits Per Second: Select the baud rate (1200, 2400, 4800, 9600,
or 14,400).
Flow Control:
Select the flow control for input to the port (None,
Xon/Xoff, RTS, or RTSXon/Xoff).
Push Buttons
Restore Defaults: Restore the default settings for the
communication port.
OK:
Save the communication port settings that are
selected in the combo boxes.
Cancel:
Cancel any changes made to the communication
port settings.
AWID26 Badges
Use the following procedure to enter an AWID26 badge number
into the database so that the badge can be used at an unattended
weighing station:
4-14 (5/07)
1.
Type the number that is printed on the badge in the AWID26
Badge ID data field.
2.
Click the Convert AWID26 Badge ID button. The badge
number will be entered into the system, and the actual badge
code will appear in the Badge ID data field.
3.
Use the Table Selection and Field Selection combo boxes to
link the badge to a database record, such as a Vehicle ID.
4.
Click the Save button to save the Badge ID record in the
database.
Chapter 4: Creating Database Records
Carrier
Carrier
This form lets you add, edit, and delete information about carriers
whose vehicles transport products to or from your facility. A carrier
can transport products for more than one account, and each
account can use more than one carrier.
Data Fields
Carrier ID:
The identifier for the carrier.
Description:
A description of the carrier.
Address 1:
The address for the carrier.
Address 2:
A second address line (if needed).
City:
The city where the carrier is located.
State:
The state where the carrier is located.
Zip Code:
The zip code for the carrier.
Country:
The country where the carrier is located.
Phone:
The telephone number for the carrier.
Fax:
The fax number for the carrier.
E-mail:
The E-mail address for the carrier.
Notes:
Additional information about the carrier.
Push Buttons
Presets:
This button opens the Presets screen, which can
be used to link a carrier to other database
records (see Chapter 6).
(5/07) 4-15
METTLER TOLEDO OverDrive Software User Manual
Company
This form lets you add, edit, and delete information about the
company that operates the scale(s) connected to the OverDrive
system. If several companies share a scale, create a company
record for each.
NOTE: Records for suppliers and customers of these companies
are entered in the Account table.
Data Fields
4-16 (5/07)
Company ID:
The identifier for the company.
Name:
The name of the company.
Address 1:
The address of the company.
Address 2:
A second address line (if needed).
City:
The city where the company is located.
State:
The state where the company is located.
Zip Code:
The zip code for the company.
Country:
The country where the company is located.
Phone:
The telephone number for the company.
Fax:
The fax number for the company.
E-mail:
The E-mail address for the company.
Fiscal Code:
A tax identification number for the company.
Load Number:
If several companies use the scale(s), you can
assign a load number for each company to track
the transactions processed for each. The number
of transactions processed for a company will be
shown by the Load Counter.
Chapter 4: Creating Database Records
Company
Description:
A description of the company.
Notes:
Additional information about the company.
Push Buttons
Presets:
This button opens the Presets screen, which can
be used to link a company to other database
records (see Chapter 6).
Load Numbers
Load numbers are used to track the transactions processed by a
company. To open the Load Numbers window, open the
Transaction menu and click on the Load Numbers menu item.
Load:
This ID number is assigned to a company so that
the system can track transactions processed for
the company.
Counter:
This counter tracks the number of transactions
processed for an individual company (load
number). The number is generated by the
system.
(5/07) 4-17
METTLER TOLEDO OverDrive Software User Manual
Container
This form lets you add, edit, and delete information about
containers. A container is an object that is placed on a vehicle to
hold a product.
Data Fields
Container ID:
The identifier for the container.
Seal Number:
A number used for sealing the loaded container.
Container
Volume:
The amount of product the container can hold.
Volume Unit:
The unit in which the container volume is
measured (Cubic Meters, Cubic Yards, Gallons,
Liters).
Description:
A description of the container.
Notes:
Additional information about the container.
Tare Data Tab
A container vehicle can have separate tare weights for the vehicle
and the container. Use these data fields to assign a tare weight for
the container.
4-18 (5/07)
Tare ID:
The identifier for the container tare.
Description:
A description of the tare.
Chapter 4: Creating Database Records
Container
Scale ID:
The scale on which the container is being
weighed.
Total Tare:
The tare weight of the container.
Expiration Date: The date that the tare expires.
Certified Weight: Check this box if the tare weight is certified.
Entering a Tare
In order to process a transaction using a container, you must
assign a tare weight for the container. Use the following procedure
to enter a single tare weight.
1.
Type a description of the tare in the Description data field.
2.
Select the scale on which the vehicle is being weighed from
the Scale ID combo box. The weight reading from the scale
will be shown in the Total Tare data field. If you selected a
manual scale, type the tare weight in the data field.
3.
If applicable, enter an expiration date and check the Certified
Weight box.
4.
Click the Add button. The system will record this data and
enter a Tare ID for it in the list box.
You can enter more than one tare. Click the New button to clear the
data fields. Then repeat the tare entry procedure. If you enter
several tares, you will be able to select from among them when
you process a one-pass transaction.
You cannot delete a Tare ID, but you can set it as expired.
Highlight the Tare ID in the list box and click the Remove button.
That will set the current date as an expiration date, so that the tare
cannot be used unless you reset the expiration date. This allows
you to keep a record of each expired tare.
Push Buttons
Presets:
This button opens the Presets screen, which can
be used to link a container to other database
records (see Chapter 6).
Print:
This button prints a Container Tare Ticket. If the
Certified Weight box is checked, it prints a
Certified Container Tare Ticket.
(5/07) 4-19
METTLER TOLEDO OverDrive Software User Manual
Contract
This form lets you add, edit, and delete contract information for an
account. Each account can have more than one contract. The
Enable radio button is selected by default; it must be selected in
order to process transactions using the contract.
Data Fields
Contract ID:
The identifier for the contract.
Description:
A description of the contract.
Account ID:
Use the combo box to choose from a list of
enabled accounts. The account’s record must
already exist in the Account table.
Effective Date:
The date when the contract goes into effect.
Opened Date:
The date when the contract was entered.
Expiration Date: The date when the contract expires.
Discount:
A discount (flat fee or percentage) that is applied
when this contract is used. The price of the
transaction will be reduced by this amount. To
use a discount, enter a number in this data field
and select Percentage or Flat Fee in the
Discount Unit combo box.
Discount Unit:
Select the type of discount (Percentage or Flat
Fee).
Terms:
The payment terms for the contract (for example,
payment can be required in 30 or 60 days).
Purchase Order: The purchase order number used for the contract.
4-20 (5/07)
Chapter 4: Creating Database Records
Contract
PO Date:
The date on which the purchase order was
issued.
Maximum Credit: The maximum amount of credit for the account.
NOTE: There is also a Maximum Credit field in
the Account table. When you create contracts for
an account, the sum of the maximum credit
limits for those contracts cannot exceed the
maximum credit specified for the account.
Actual Credit:
The amount of credit that has been used for the
account. As the account uses credit, this field will
update automatically. When the account makes
a payment, this field must be edited manually.
Notes:
Additional information about the contract.
Contract:
Select Enable to activate the contract. If the
contract is disabled, it cannot be used for
transactions.
Operation:
Select Ship, Receive, or Either. If you select
Either, then both shipping and receiving
transactions will be allowed for the contract.
Push Buttons
Presets:
This button opens the Presets screen, which can
be used to link a contract to other database
records (see Chapter 6).
Contract Product: This button opens the Contract Product table,
which is described on the next page.
Search
A search function is provided for the Account ID data field on the
Contract table to help you locate records more quickly.
1.
Place the cursor in the data field, and then click the Search
button or press the F3 key to display the Search window.
2.
Select the data field that you want to search in the Field Name
combo box.
3.
Enter the record that you want to find in the Criteria data field.
Use a percent sign as a wildcard if you enter partial data. For
example, enter “a%” or “%6” to search for Account6.
4.
Click the Search button. The system will retrieve the records
and display them in the Results table.
5.
Highlight the desired record in the table, and then click the OK
button. This will place the record in the Account ID data field.
If you click the Search button without selecting a field name, the
system will retrieve the entire list of records for the data field.
(5/07) 4-21
METTLER TOLEDO OverDrive Software User Manual
Contract
Product
This form is used to provide specific information about the contract
and the product(s) covered by it.
Data Fields
Product ID:
The identifier for the product that will be shipped
or received under this contract. A record for the
product must already exist in the Product table.
Description:
A description of the contract product.
Contracted Price: The price used under this contract.
Contracted
Price UOM:
Price Type
Description:
The unit of measure for the contracted price
(Pound, Kilogram, Ton, Tonne, Cubic Yard,
Cubic Meter, Liter, Gallon, Piece, Load).
A description of the contracted price.
Contracted
Weight/Quantity: The total amount of the product that can be
processed under this contract.
Contracted Weight/
Quantity UOM: The unit of measure for the contracted weight or
quantity (Pound, Kilogram, Ton, Tonne, Cubic
Yard, Cubic Meter, Liter, Gallon, Piece, Load).
Current
Weight/Quantity: The total amount of the product that has been
processed. As transactions are processed, this
4-22 (5/07)
Chapter 4: Creating Database Records
Contract
amount will update automatically. If the current
weight/quantity exceeds the contracted weight/
quantity, an error message will be displayed.
Contract ID:
The identifier for this contract.
Maximum Order: The maximum amount of the product that can be
processed for a load.
Minimum Order: The minimum amount of the product that can be
processed for a load.
Delivery Price:
The price of the delivered product (includes
delivery costs).
Price Formula:
The formula used to determine the price of the
product. The default is net weight times unit price
(Pounds * Pr).
Purchase Order: The purchase order number used for the contract
product. If a purchase order is entered here, it will
override the purchase order entered in the
contract record. Both can be overridden manually
during a transaction.
Profile ID:
An ID assigned by the US EPA for certain waste
materials.
Taxes and Surcharges
The Taxes and Surcharges list box displays the taxes and
surcharges that will be applied to the price of the product.
•
To add a surcharge, select it in the Surcharges combo box
and then click the Add button.
•
To add a tax, select it in the Taxes combo box and then click
the Add button.
•
To delete a tax or surcharge, highlight it in the list box and
then click the Remove button.
•
To change the position of an item in the list box, highlight it
and use the up and down arrow buttons.
Push Buttons
Override Rate:
Advanced
Pricing:
This button opens the Contract Product Override
Rate screen, which can be used to create pricing
based on the origin of a product (see Chapter 7).
This button opens the Advanced Pricing screen,
which can be used to create complex pricing
structures for a contract product (see Chapter 7).
(5/07) 4-23
METTLER TOLEDO OverDrive Software User Manual
Search
A search function is provided for the Product ID data field on the
Contract Product table to help you locate records more quickly.
1.
Place the cursor in the data field, and then click the Search
button or press the F3 key to display the Search window.
2.
Select the data field that you want to search in the Field Name
combo box.
3.
Enter the record that you want to find in the Criteria data field.
Use a percent sign as a wildcard if you enter partial data. For
example, enter “p%” or “%6” to search for Product6.
4.
Click the Search button. The system will retrieve the records
and display them in the Results table.
5.
Highlight the desired record in the table, and then click the OK
button. This will place the record in the Product ID data field.
If you click the Search button without selecting a field name, the
system will retrieve the entire list of records for the data field.
4-24 (5/07)
Chapter 4: Creating Database Records
Destination
Destination
This form lets you add, edit, and delete information about the
destination to which a product is being shipped.
Data Fields
Destination ID:
The identifier for the destination.
Description:
A description of the destination to which the
product is being shipped.
Notes:
Additional information about the destination.
(5/07) 4-25
METTLER TOLEDO OverDrive Software User Manual
Driver
This form lets you add, edit, and delete information about the
person who drives a vehicle.
Data Fields
Driver ID:
The identifier for the driver.
Driver Name:
The name of the driver.
License Number: The driver’s license number.
Notes:
4-26 (5/07)
Additional information about the driver.
Chapter 4: Creating Database Records
Formula
Formula
This form lets you add, edit, and delete pricing formulas. See
Chapter 7 for an explanation of how to use pricing formulas.
Data Fields
Formula ID:
The identifier for the pricing formula.
Description:
A description of the pricing formula.
Unit:
Use the combo box to select the unit of weight or
volume that will be used for pricing.
Decimal
Precision:
Enter the number of decimal places to which the
price should be calculated. For example, 0 = X,
1 = X.X, 2 = X.XX.
(5/07) 4-27
METTLER TOLEDO OverDrive Software User Manual
Generator
This form lets you add, edit, and delete information about facilities
or localities that generate waste material.
Data Fields
4-28 (5/07)
Generator ID:
The identifier for the generator.
Description:
A description of the generator.
Address 1:
The address for the generator.
Address 2:
A second address line (if needed).
City:
The city where the generator is located.
State:
The state where the generator is located.
Zip Code:
The zip code for the generator.
Country:
The country where the generator is located.
Phone:
The telephone number for the generator.
Fax:
The fax number for the generator.
EPA Number:
The EPA number assigned to the generator.
Generator
State ID:
The State ID assigned to the generator.
Chapter 4: Creating Database Records
Group Presets
Group Presets
This form lets you create group presets by linking groups from two
or more tables. See Chapter 6 for an explanation of how to create
and use group presets.
Data Fields
Group ID:
The identifier for the group.
Account Group: A list of account groups.
Contract Group: A list of contract groups.
Carrier Group:
A list of carrier groups.
Product Group:
A list of product groups.
Vehicle Group:
A list of vehicle groups.
(5/07) 4-29
METTLER TOLEDO OverDrive Software User Manual
Groups
This form lets you create groups. See Chapter 6 for an explanation
of how to create and use groups.
Data Fields
Group ID:
The identifier for the group.
Basis:
The table that will be used as the starting point
for the group.
Description:
Additional information about the group.
Members Tab
The list boxes show the database records that are available to be
assigned as members of the group and those that have been
assigned to the group. Use the arrow buttons to move records from
one list box to the other.
4-30 (5/07)
Chapter 4: Creating Database Records
Origin
Origin
This form lets you add, edit, and delete information about the
facility or location at which a product originated.
Data Fields
Origin ID:
The identifier for the origin.
Description:
A description of the origin.
Origin Price Type: Select from a list of existing Origin Price Type
IDs. This selection makes it possible to link an
origin to an override rate in the Product, Contract
Product, or Tax table.
Notes:
Additional information about the origin.
(5/07) 4-31
METTLER TOLEDO OverDrive Software User Manual
Origin Price
Type
This form lets you add, edit, and delete information about pricing
based on the origin of a product or material. For example, you can
use one price when the origin is within a state (or region) and
another price when the origin is outside a state (or region). Prices
are stored as override rates in the Product, Contract Product, and
Tax tables. They can be applied by selecting an origin during a
transaction.
Data Fields
Origin Price Type: The identifier for the origin price type.
Description:
4-32 (5/07)
A description of the origin price type.
Chapter 4: Creating Database Records
Permit
Permit
This form lets you add, edit, and delete information about permits
needed to transport a specific type of product (for example, a
permit to transport hazardous material).
Data Fields
Permit ID:
The identifier for the permit.
Description:
A description of the permit.
Issuing Authority: The organization that issued the permit.
Product ID:
The product covered by the permit. Select from a
list of existing Product IDs.
Carrier ID:
The carrier covered by the permit. Select from a
list of existing Carrier IDs.
Vehicle ID:
The vehicle covered by the permit. Select from a
list of existing Vehicle IDs.
Expiration Date: The date that the permit expires.
Notes:
Additional information about the permit.
(5/07) 4-33
METTLER TOLEDO OverDrive Software User Manual
Presets Basis
This form provides a shortcut to the Presets screen, which is used
to create, view, and edit presets. See Chapter 6 for an explanation
of how to create and use presets.
Data Fields
Preset Basis:
The table that contains the database record being
used as the basis for the preset.
Field ID:
The specific database record that is used as the
basis for the preset.
Carrier Vehicle
Reference:
4-34 (5/07)
If a vehicle record is selected as the basis for the
preset, the carrier linked to the vehicle will be
shown in this data field.
Chapter 4: Creating Database Records
Product
Product
This form lets you add, edit, and delete information about the
products that you will be weighing.
Data Fields
Product ID:
The identifier for the product.
Description:
A description of the product.
Stock Level:
The amount of the product currently in stock. As
the product is received or shipped, this value will
be updated automatically.
Stock Level UOM: The unit of measure used for the stock level.
Price
Formula:
Minimum
Price:
Picture Name:
The formula used to determine the price of the
product. The default is net weight times unit price
(Pounds * Pr).
You can set a minimum price for a product. This
price will be used whenever the calculated price
is lower than the minimum price.
You can display a picture of the product on the
unattended touch screen. Click the Open button
to search for a graphics file. Select a file and then
click the Open button on the Search window.
(5/07) 4-35
METTLER TOLEDO OverDrive Software User Manual
Notes:
Additional information about the product.
Unit Price:
The price of the product. This price is applied per
the unit of measure selected in the Unit Price
UOM field. The unit price is stored as Pr and
used in the price formula.
Unit Price UOM: The unit of measure used for the unit price.
Price Type
Description:
Unit:
Conversion
Factor:
A description of the unit price.
The primary unit used for weighing the product
(Pounds, Kilograms, Tons, Tonnes, Gallons,
Liters, Cubic Yards, Cubic Meters).
A multiplier used to convert the primary unit to a
secondary or conversion unit. The system will
calculate the conversion factor for weight-toweight or volume-to-volume conversions.
Examples:
Primary Unit
Conv. Factor
Conv. Unit
kg
2.2046
lb
lb
0.4536
kg
Conversion Unit: A secondary weight unit. The system will multiply
the primary weight unit by the conversion factor
to measure the product in the conversion unit.
Mode:
Select Gross Weighing, Net Weighing, or Zero
Weighing. Gross weighing is weighing a loaded
vehicle and subtracting a tare weight to
determine the weight of the product. Net weighing
is weighing an object once to determine its
weight. Zero weighing is a means of processing
a transaction without recording a weight.
Operation:
Select Ship, Receive, or Either. If you select
Either, the product can be both shipped and
received.
Manual
Weight:
Profile Waste:
Standard Gate
Rate:
4-36 (5/07)
Check this box if you want to be able to enter the
weight of this product manually (it will still be
possible to weigh the product on a scale).
Check this box to require a profile to be selected
when the product is used for a transaction.
This check box lets you control whether or not a
product must be used with a contract. Before you
can use a product with a contract, you must link
Chapter 4: Creating Database Records
Product
the product to the contract in the Contract
Product table. When you select a contract for a
transaction, the Product combo box will list only
those products that are linked to the contract.
•
If the box is checked, the product can be
used with or without a contract. When no
contract is selected for a transaction, the
system will use the standard gate rate (the
price assigned in the product record). When
a contract is selected, the system will use the
price assigned in the contract product record.
•
If the box is not checked, the product can be
used only if a contract is selected for the
transaction. The system will use the price
assigned in the contract product record.
Permit Required: Check this box to require a permit to be selected
when processing a transaction for the product.
Taxes and Surcharges
The Taxes and Surcharges list box displays the taxes and
surcharges that will be applied to the price of the product.
•
To add a surcharge, select it in the Surcharges combo box
and then click the Add button.
•
To add a tax, select it in the Taxes combo box and then click
the Add button.
•
To delete a tax or surcharge, highlight it in the list box and
then click the Remove button.
•
To change the position of an item in the list box, highlight it
and use the up and down arrow buttons.
Push Buttons
Override Rate:
Advanced
Pricing:
Presets:
This button opens the Product Override Rate
screen, which can be used to create pricing
based on the origin of a product (see Chapter 7).
This button opens the Advanced Pricing screen,
which can be used to create complex pricing
structures for a product (see Chapter 7).
This button opens the Presets screen, which can
be used to link a product record to other
database records (see Chapter 6).
(5/07) 4-37
METTLER TOLEDO OverDrive Software User Manual
Profile
This form lets you add, edit, and delete information about waste
profiles. A waste profile is a comprehensive description of a waste
stream. It is provided by a waste generator to the facility receiving
the waste material.
Data Fields
Profile ID:
The identifier for the waste profile.
Generator ID:
The identifier for the waste generator.
Approval
Number:
An approval number for the waste profile.
Description:
A description of the waste profile.
Permitted
Quantity:
Accumulated
Quantity:
Accumulated
Quantity UOM:
The amount of the profiled waste that the facility
is permitted to receive.
The amount of the profiled waste that has been
received.
The unit of measure for the permitted quantity
and accumulated quantity.
Special Handling
Instructions:
Enter any special instructions for handling the
profiled waste.
4-38 (5/07)
Chapter 4: Creating Database Records
Profile
Effective Begin
Date:
Effective End
Date:
Status:
The date when the waste profile becomes active.
Transactions cannot be processed before this
date.
The date when the waste profile expires.
Transactions cannot be processed after this date.
Select Approved, Inactive, or Unapproved.
Transactions can be processed for a profiled
waste only if Approved is selected.
In order to use a profile when processing a transaction for a waste
product, you must (1) check the Profile Waste box in the product
record and (2) select the profile in the contract product record.
(5/07) 4-39
METTLER TOLEDO OverDrive Software User Manual
Remark 1
This form lets you add, edit, and delete a remark to be attached to
a transaction or printed on a ticket.
Data Fields
Remark 1 ID:
The identifier for the remark.
Remark 1:
Enter the remark that you want to add to the
transaction.
Push Buttons
Presets:
4-40 (5/07)
This button opens the Presets screen, which can
be used to link a remark record to other database
records (see Chapter 6).
Chapter 4: Creating Database Records
Remark 2
Remark 2
This form lets you add, edit, and delete a second remark to be
attached to a transaction or printed on a ticket.
Data Fields
Remark 2 ID:
The identifier for the remark.
Remark 2:
Enter the remark that you want to add to the
transaction.
Push Buttons
Presets:
This button opens the Presets screen, which can
be used to link a remark record to other database
records (see Chapter 6).
(5/07) 4-41
METTLER TOLEDO OverDrive Software User Manual
Short Code
This form lets you add, edit, and delete information about short
codes used to identify drivers at unattended weighing stations.
Each short code should be linked to a record in one of the
database tables.
Data Fields
Short Code ID:
The short code number or identifier.
Table Selection: Select the table that contains the record to which
the short code will be linked (Account, Carrier,
Company, Container, Contract, Product, Trailer,
or Vehicle).
Field Selection:
Carrier Vehicle
Reference:
Select the database record to which the short
code will be linked. The combo box lists all
records from the table selected above.
If a vehicle is entered as the field selection, this
combo box will display the carrier linked to the
vehicle. If a carrier is entered as the field
selection, this combo box will list the vehicles
linked to the carrier.
NOTE: When you create a short code record, you must fill in the
first three data fields. If you are linking the short code to a carrier or
vehicle, you must fill in all four data fields.
4-42 (5/07)
Chapter 4: Creating Database Records
Surcharge
Surcharge
This form lets you add, edit, and delete information about
surcharges that are applied to transactions. A surcharge is an
additional fee added to the price of a product.
Data Fields
Surcharge ID:
The identifier for the surcharge.
Description:
A description of the surcharge.
Surcharge UOM: The unit of measure for the surcharge amount.
Surcharges can be applied per unit of weight or
volume, per piece, per load, or by percentage of
price.
Amount:
The amount of the surcharge applied to the
transaction. This number is applied based on the
unit selected in the Surcharge UOM field.
Pre-Tax:
Select this radio button to apply the surcharge
before taxes. If the surcharge is applied before
taxes, it will be taxed at the same rate as the
product.
Post-Tax:
Select this radio button to apply the surcharge
after taxes. If the surcharge is applied after taxes,
it will not be taxed.
Notes:
Additional information about the surcharge.
(5/07) 4-43
METTLER TOLEDO OverDrive Software User Manual
Tax
This form lets you add, edit, and delete information about taxes
that are applied to transactions.
Data Fields
Tax ID:
The identifier for the tax.
Description:
A description of the tax.
Tax UOM:
The unit of measure for the tax amount. Taxes
can be applied per unit of weight or volume, per
piece, per load, or by percentage of price.
Price Type
Description:
Tax Amount:
A description of the price type.
The amount of the tax applied to the transaction.
This number is applied based on the unit
selected in the Tax UOM field.
Compound Tax: Check this box if the tax is to be compounded. A
compound tax can be used when more than one
tax will be applied to transactions. If you check
the box, the tax will be applied to the cost of the
entire transaction, including other taxes. If you do
not check the box, the tax will be applied to the
price of the product but not to other taxes.
Notes:
Additional information about the tax.
Push Buttons
Override Rate:
4-44 (5/07)
This button opens the Tax Override Rate screen,
which can be used to create a tax rate based on
the origin of a product (see Chapter 7).
Chapter 4: Creating Database Records
Trailer
Trailer
This form lets you add, edit, and delete information about trailers
that are attached to vehicles.
Data Fields
Trailer ID:
The identifier for the trailer.
Trailer Volume:
The amount of product the trailer can hold.
Volume Unit:
The unit in which the trailer volume is measured
(Cubic Meters, Cubic Yards, Gallons, Liters).
Compartments:
The number of compartments in the trailer.
Number of Axles: The number of axles on the trailer.
Seal Number:
A number used for sealing the loaded trailer.
Description:
A description of the trailer.
Vehicle ID
Number:
A vehicle identification number for the trailer.
Tag Number:
The license plate number of the trailer.
Tag Expiration
Date:
The date that the tag expires.
Notes:
Additional information about the trailer.
(5/07) 4-45
METTLER TOLEDO OverDrive Software User Manual
Tare Data Tab
You can assign a tare weight for a trailer and a tare weight for
each of the trailer’s axles. The sum of the axle tare weights should
equal the tare weight of the trailer.
Tare ID:
The identifier for the trailer tare.
Description:
A description of the tare.
Scale ID:
The scale on which the trailer is being weighed.
Total Tare:
The total tare weight of the trailer.
Expiration Date: The date that the tare expires.
Certified Weight: Check this box if the tare weight is certified.
Multiple
Weighments:
Check this box to create a multiple-weighment
tare. This type of tare can be used when a
trailer’s axles are weighed separately and the
weights are added together to calculate a total
trailer weight. Checking the box will display the
Weighment Tare and Weighment ID fields.
Entering a Tare
In order to process a transaction using a trailer, you must assign a
tare weight for the trailer. Use the following procedure to enter a
single tare weight.
1.
Type a description of the tare in the Description data field.
2.
Select the scale on which the vehicle is being weighed from
the Scale ID combo box. The weight reading from the scale
will be shown in the Total Tare data field. If you selected a
manual scale, type the tare weight in the data field.
3.
If applicable, enter an expiration date and check the Certified
Weight box.
4.
Click the Add button. The system will record this data and
enter a Tare ID for it in the list box.
You can enter more than one tare. Click the New button to clear the
data fields. Then repeat the tare entry procedure. If you enter
several tares, you will be able to select from among them when
you process a one-pass transaction.
You cannot delete a Tare ID, but you can set it as expired.
Highlight the Tare ID in the list box and click the Remove button.
That will set the current date as an expiration date, so that the tare
cannot be used unless you reset the expiration date. This allows
you to keep a record of each expired tare.
Multiple Weighments
You can enter separate tare weights that will be added together to
calculate a total tare weight for a vehicle. The following procedure
4-46 (5/07)
Chapter 4: Creating Database Records
Trailer
explains how to enter separate tare weights for individual axles on
a vehicle.
1.
Type a description of the tare in the Description data field.
2.
Select the scale on which the first axle is being weighed from
the Scale ID combo box.
3.
Check the Multiple Weighments box to display the
Weighment Tare and Weighment ID fields.
4.
The weight reading from the scale will be shown in the
Weighment Tare data field. If you selected a manual scale,
type the tare weight in the data field.
5.
Click the Add button next to the Weighment ID list box. The
system will record the weight and enter an ID for it in the list
box. The system will also enter a separate ID in the Tare ID
list box. This second ID represents the total tare weight, which
will be displayed in the Total Tare data field.
6.
Click the New button next to the Weighment ID box to clear
the Weighment Tare data field.
7.
Move the vehicle so that the next axle is positioned on the
scale. The tare weight will appear in the Weighment Tare data
field (enter it if you are using a manual scale).
8.
Click the Add button to record the tare weight and add an ID
for it to the Weighment ID list box. The weight in the Total
Tare data field will be updated. It represents the sum of the
tare weights of the individual axles.
9.
Repeat Steps 6 to 8 to add any additional weights required for
the multiple-weighment tare.
Push Buttons
Presets:
This button opens the Presets screen, which can
be used to link a trailer record to other database
records (see Chapter 6).
Print:
This button prints a Trailer Tare Ticket. If the
Certified Weight box is checked, it prints a
Certified Trailer Tare Ticket.
(5/07) 4-47
METTLER TOLEDO OverDrive Software User Manual
Vehicle
This form lets you add, edit, and delete information about vehicles
that are weighed on your scales.
Data Fields
Vehicle ID:
The identifier for the vehicle. Each vehicle must
be assigned to a carrier, and each vehicle/carrier
combination is a unique record. You can
duplicate Vehicle IDs if they are assigned to
different carriers (for example, Veh1/CarrierA and
Veh1/CarrierB).
Carrier ID:
The identifier for the carrier that owns the vehicle.
This ID must already exist in the Carrier table.
Vehicle Volume: The amount of product the vehicle can hold. The
volume is measured in the unit selected in the
Volume Unit data field. The vehicle volume can
be changed manually during a transaction. A
vehicle volume will override a product volume
(created by conversion factor) but will be
overridden by a container or trailer volume).
4-48 (5/07)
Chapter 4: Creating Database Records
Vehicle
Volume Unit:
The unit in which the volume is measured (Cubic
Meters, Cubic Yards, Gallons, Liters).
Minimum Legal
Weight:
The minimum legal weight of an empty vehicle.
Maximum Legal
Weight:
The maximum legal weight of a full vehicle.
Driver:
The name of the vehicle’s driver.
Seal Number:
A number used for sealing the loaded vehicle.
Description:
A description of the vehicle.
Transaction Type: If you select a transaction type (One Pass, Two
Pass, Multi Pass, Net Weighing, or Zero
Weighing), it will be used as the default
transaction type for the vehicle. This transaction
type will be selected automatically when you
select the vehicle for a transaction; however, you
can override the transaction type manually.
Vehicle ID
Number:
A vehicle identification number. This is not the ID
used by the system to identify the record.
Tag Number:
The license plate number for the vehicle.
Tag Expiration
Date:
The date that the tag expires.
Date Created:
The date that the vehicle record was created.
Notes:
Additional information about the vehicle.
Type of Vehicle: Select Tractor or Trailer.
Zero Weighing:
Check this box to enable the vehicle for zero
weighing. Zero weighing processes a transaction
without recording a weight. It is used primarily to
control access to a facility.
Operation:
Select Ship, Receive, or Either. If you select
Either, the vehicle can be used for both shipping
and receiving.
Attachments:
Select Trailer, Container, or Neither. If you select
Trailer, the Trailer tab will be enabled and the
system will expect the vehicle to be weighed with
a trailer attached. If you select Container, the
Container tab will be enabled and the system
will expect the vehicle to be weighed with a
container attached. If you select Neither, you will
not be able to use a vehicle attachment.
Tare Data Tab
This tab lets you assign a tare weight for a vehicle so that the
vehicle can be used for one-pass transactions. You can also
(5/07) 4-49
METTLER TOLEDO OverDrive Software User Manual
assign a tare weight using the Capture Vehicle Tare command in
the Transactions menu.
Tare ID:
The identifier for the vehicle tare.
Description:
A description of the vehicle tare.
Scale ID:
The scale on which the vehicle is being weighed.
Total Tare:
The total tare weight of the vehicle.
Expiration Date: The date that the tare expires.
Certified Weight: Check this box if the tare weight is certified.
Multiple
Weighments:
Check this box to create a multiple-weighment
tare. This type of tare can be used when a
vehicle’s axles are weighed separately and the
weights are added together to calculate a total
vehicle weight. Checking the box will display the
Weighment Tare and Weighment ID fields.
Entering a Tare
Use the following procedure to enter a single tare weight.
1.
Type a description of the tare in the Description data field.
2.
Select the scale on which the vehicle is being weighed from
the Scale ID combo box. The weight reading from the scale
will be shown in the Total Tare data field. If you selected a
manual scale, type the tare weight in the data field.
3.
If applicable, enter an expiration date and check the Certified
Weight box.
4.
Click the Add button. The system will record this data and
enter a Tare ID for it in the list box.
You can enter more than one tare. Click the New button to clear the
data fields. Then repeat the tare entry procedure. If you enter
several tares, you will be able to select from among them when
you process a one-pass transaction.
You cannot delete a Tare ID, but you can set it as expired.
Highlight the Tare ID in the list box and click the Remove button.
That will set the current date as an expiration date, so that the tare
cannot be used unless you reset the expiration date. This allows
you to keep a record of each expired tare.
Multiple Weighments
You can enter separate tare weights that will be added together to
calculate a total tare weight for a vehicle. The following procedure
explains how to enter separate tare weights for individual axles on
a vehicle.
1.
4-50 (5/07)
Type a description of the tare in the Description data field.
Chapter 4: Creating Database Records
Vehicle
2.
Select the scale on which the first axle is being weighed from
the Scale ID combo box.
3.
Check the Multiple Weighments box to display the
Weighment Tare and Weighment ID fields.
4.
The weight reading from the scale will be shown in the
Weighment Tare data field. If you selected a manual scale,
type the tare weight in the data field.
5.
Click the Add button next to the Weighment ID list box. The
system will record the weight and enter an ID for it in the list
box. The system will also enter a separate ID in the Tare ID
list box. This second ID represents the total tare weight, which
will be displayed in the Total Tare data field.
6.
Click the New button next to the Weighment ID box to clear
the Weighment Tare data field.
7.
Move the vehicle so that the next axle is positioned on the
scale. The tare weight will appear in the Weighment Tare data
field (enter it if you are using a manual scale).
8.
Click the Add button to record the tare weight and add an ID
for it to the Weighment ID list box. The weight in the Total
Tare data field will be updated. It represents the sum of the
tare weights of the individual axles.
9.
Repeat Steps 6 to 8 to add any additional weights required for
the multiple-weighment tare.
Containers and Trailers Tabs
These tabs are available only if you select the Container or Trailer
radio button. They let you assign containers and trailers for use
with a vehicle. You must create a record for a container (or trailer)
in the Container (or Trailer) table before you can assign it to a
vehicle.
(5/07) 4-51
METTLER TOLEDO OverDrive Software User Manual
1.
Select the Container or Trailer radio button to activate the
appropriate tab.
2.
Select a container (or trailer) from the Container to Add (or
Trailer to Add) combo box on the tab.
3.
Click the Add button on the tab. The Container ID (or Trailer
ID) will appear in the Assigned Containers (or Assigned
Trailers) list box. You can assign more than one container (or
trailer) to a vehicle.
When you process a transaction for a container (or trailer) vehicle,
you will need to select a Container ID (or Trailer ID) or check the
Truck Only box on the Transaction screen. If you have assigned
containers (or trailers) to a vehicle, you will be limited to selecting
from the assigned containers (or trailers). Otherwise, you will be
able to select from a list of all existing containers (or Trailers).
To delete an assigned container (or trailer), highlight it in the list
box and click the Remove button.
Push Buttons
Advanced
Pricing:
4-52 (5/07)
This button opens the Advanced Pricing screen,
which can be used to create complex pricing
structures for a vehicle (see Chapter 7).
Presets:
This button opens the Presets screen, which can
be used to link a vehicle record to other database
records (see Chapter 6).
Print:
This button prints a Vehicle Tare Ticket. If the
Certified Weight box is checked, it prints a
Certified Vehicle Tare Ticket.
Chapter 4: Creating Database Records
Extended Tables
Extended
Tables
There are 25 extended tables, which are additional tables that can
be used to store information not found in the program’s standard
tables. They enable you to customize a system by creating tables
for information specific to your operation. Tables 1-15 can be used
on the main area of the Transaction screen, and tables 16-25 can
be used on the Product Detail tab. The default form for an
extended table is shown below.
Data Fields
Name/ID:
The identifier for the record.
Description:
A description of the record.
Text 1:
This field can be used for alphanumeric data.
Text 2:
This field can be used for alphanumeric data.
Numeric 1:
This field can be used for numeric data.
Numeric 2:
This field can be used for numeric data.
Notes:
Additional information about the record.
Push Buttons
Presets:
This button opens the Presets screen, which can
be used to link an extended table record to other
database records (see Chapter 6).
(5/07) 4-53
Chapter 5: Processing Transactions
Transaction Screen
5
Processing Transactions
Transaction
Screen
The OverDrive Transaction screen is used to process vehicle scale
transactions. You can open the screen by clicking on Transaction
in the side tree or clicking the Open Transaction Screen button. The
demo version of the Transaction screen is shown below. Since
OverDrive software can be configured for individual applications,
the features on this screen might differ from those on your system’s
Transaction screen. Fields that are hidden on your screen can be
displayed by using the GUI editor.
(5/07) 5-1
METTLER TOLEDO OverDrive Software User Manual
Scale Tabs
The system can be connected to as many as six scales. Each
scale corresponds to a scale tab on the Transaction screen.
When you process a transaction, you must select the tab for the
scale on which the vehicle is being weighed. The Manual tab is not
connected to a scale; it allows you to enter a weight manually. To
select a scale tab, click on the tab or press the F4 key.
Combo Boxes
Most of the information that you will enter during a transaction is
retrieved from existing database records. For example, you can
select a vehicle from the records that you created in the Vehicle
table. Simply click on the Vehicle ID combo box’s down arrow to
display a list of Vehicle IDs, and then click on the ID that you want.
Other Data Fields
In addition to the combo boxes, there are data fields for data that
must be entered manually or data that cannot be edited. An
example of data to be entered manually is a purchase order
number that would be different for each transaction. Simply place
the cursor in the data field and type the entry.
Data that cannot be edited is read from a database record or a
scale. For example, the vehicle tare is retrieved from the database
record for the vehicle selected in the combo box. The only way to
change it would be to change the database record.
A vehicle can have more than one tare weight (for example, when
individual axles are weighed separately). When that is the case, a
list box will appear next to the Vehicle Tare data field. Use the list
box to select the desired Tare ID for a weighing.
Manual Ticket Number: Use this field to enter a manual ticket
number when a weight is entered manually during a transaction.
5-2 (5/07)
Chapter 5: Processing Transactions
Transaction Screen
The field is visible only when the Manual scale is selected. The
system will require you to enter a number for each manual
transaction if the Manual Ticket Number Required feature is
enabled on the Options screen’s Transaction tab.
Ticket Date: Use the calendar in this combo box to backdate a
ticket for a manual weighing transaction. The date that is selected
cannot be later than the current date and cannot be earlier than 60
days before the current date. It must also agree with other system
requirements. For example, if a profiled waste is selected for a
transaction, the ticket date must fall within the period when the
profile is in effect. The Ticket Date field is visible only when the
Manual scale is selected.
Manifest: The manifest is a document that identifies the type of
waste being shipped. You will be required to enter a Manifest ID
when processing a transaction for a profiled waste.
Check Boxes
Truck Only: Check this box when weighing a container (or trailer)
vehicle that does not have a container (or trailer) attached to it.
Split Weighing: Check this box when taking several weight
readings that will be added together to determine the weight of a
vehicle. Split weighing is used for vehicles that are too large to fit
on a scale.
Multi Axle: Check this box when weighing individual axles of a
vehicle separately.
Transaction Data Group
This group of data fields tracks basic information about the current
transaction.
(5/07) 5-3
METTLER TOLEDO OverDrive Software User Manual
Transaction Number: This system-generated number keeps track of
the total number of transactions processed by the system.
Gross Weight: This field shows the gross weight of the loaded
vehicle that is being weighed on the scale.
Tare Weight: This field shows the tare weight of the loaded vehicle
that is being weighed on the scale.
Net Weight: This field shows the net weight of the product that is
being weighed on the scale.
Total Ticket Volume: This field shows the total volume of the
vehicle that is being weighed on the scale.
Total Taxes & Surcharges: This field shows the total amount of
taxes and surcharges applied to the current transaction.
Total: This field shows the total cost of the current transaction.
Push Buttons
Complete: This button completes a transaction. Use the Complete
button to record a one-pass transaction or to record the final
weighing of a two-pass or multi-pass transaction. The keyboard
shortcut for this command is F11.
Cancel: This button clears the data fields on the Transaction screen
so that you can start a new transaction. The keyboard shortcut for
this command is Ctrl-C.
Clear: This button clears the data fields on the tab that is currently
displayed.
Accept: This button accepts partial transaction data. Use the
Accept button to record the first weighing of a two-pass transaction
or all weighings except the final weighing of a multi-pass
transaction. To record the final weighing of a two-pass or multipass transaction, use the Complete button. The keyboard shortcut
for this command is F9.
Get Weight: This button reads the weight from a scale. The system
will read the weight from the scale that corresponds to the scale
tab that is selected. If the Manual scale tab is selected, you will be
prompted to enter a weight manually. The keyboard shortcut for
this command is F8.
Show Scales: This button opens a window that lets you select a
scale to continue a transaction. It is used if a truck makes its first
pass on one scale and makes a subsequent pass on a different
scale. The button is active only when you are continuing or
completing an open transaction.
Notes: This button opens a window that can be used to enter notes
about the current transaction. The keyboard shortcut for this
command is Ctrl-E.
5-4 (5/07)
Chapter 5: Processing Transactions
Transaction Screen
Product Detail Tab
Use the Product combo box to select a product for the transaction.
The tab also displays weight data for any trailer or container used
for the transaction.
An Add button, Remove button, and Load Percent data field are
available for this tab (use the GUI Editor to make them visible).
They allow you to select more than one product during a one-pass
or two-pass transaction.
1.
Select a product in the Product field.
2.
Type a percentage in the Load Percent field.
3.
Click the Add button to add a new line to the list of products,
and repeat Steps 1 and 2 for the next product.
4.
Repeat Step 3 for each additional product. The load percents
of the products must add up to 100.
To delete a line, highlight it in the list and click the Remove button.
Product List Tab
This tab shows a list of the products being weighed for the current
transaction. You can add an additional row by clicking the Add
(5/07) 5-5
METTLER TOLEDO OverDrive Software User Manual
button or delete a row by clicking the Remove button (hidden by
default).
Taxes and Surcharges Tab
Use this tab to apply taxes and surcharges to a transaction. The
table on the tab shows the tax and surcharge data for the current
transaction.
Add Tax: This button adds a tax to the cost of the product being
weighed. Select a tax in the Tax combo box, and then click the Add
Tax button. The tax will be listed in the table on the tab.
Add Surcharge: This button adds a surcharge to the cost of the
product being weighed. Select a surcharge in the Surcharge combo
box, and then click the Add Surcharge button. The surcharge will
be listed in the table on the tab.
Remove: This button deletes taxes and surcharges that have been
applied to a transaction. Highlight the tax or surcharge in the table
on the tab, and then click the Remove button.
Sample Information Tab
See Chapter 9 for information about sampling.
5-6 (5/07)
Chapter 5: Processing Transactions
Additional Data Fields
Additional
Data Fields
The Transaction screen has 12 user-defined data fields for storing
transaction information that is specific to an application. Three user
text fields are available for the main area of the screen and three for
the Product Detail tab (they accept alphanumeric data). Three user
number fields are available for the main area of the screen and
three for the Product Detail tab (they accept numeric data). The
data fields and labels are hidden by default. Use the GUI Editor to
make them visible, reposition them, and change the text for the
label.
(5/07) 5-7
METTLER TOLEDO OverDrive Software User Manual
Types of
Transactions
The OverDrive system can process transactions for one-pass, twopass, and multi-pass weighing. It also provides options for net
weighing and zero weighing. Choose the desired method from the
Transaction Type data field on the Transaction screen.
5-8 (5/07)
•
One-pass weighing: Weigh a loaded vehicle and use a stored
tare or manually entered tare to determine the net weight of
the product being shipped or received.
•
Two-pass weighing: Weigh a vehicle once when it is empty
and once when it is loaded to determine the net weight of the
product being shipped or received.
•
Multi-pass weighing: This method is used to weigh a vehicle
that has several compartments or containers. It allows you to
record a separate weight for each compartment. The vehicle
would be weighed after each compartment is loaded or
unloaded.
•
Net weighing: Weigh an object once to determine its net
weight. This method is used to weigh a vehicle in order to
obtain a certified tare weight for the vehicle.
•
Zero weighing: This option processes a transaction without
recording a weight. Zero weighing is typically used to control
access to a facility. To use zero weighing, create a product
record with Zero Weighing as the mode. When you process a
transaction, select the zero-weighing product. That will enable
you to complete the transaction without entering a weight.
Chapter 5: Processing Transactions
One-Pass Weighing
One-Pass
Weighing
1.
When a vehicle drives onto the scale, the virtual indicator will
display the weight reading from the scale.
2.
Open the Transaction screen and select the tab for the scale
on which the vehicle is being weighed. If you will be entering
the weight manually, select the Manual tab.
3.
Select One Pass from the combo box in the Transaction Type
data field.
4.
Use the Carrier combo box to select the carrier linked to the
vehicle that is being weighed.
5.
Use the Vehicle combo box to select the vehicle that is being
weighed.
6.
Use the other combo boxes to select an account and any
other data that you need to record for the transaction. If
presets exist, some of the data will be entered automatically.
7.
Select the Product Detail tab, and use the Product combo box
to select a product.
8.
Click the Get Weight button. The gross weight will be read
from the scale and displayed in the Gross Weight data field. If
the vehicle record includes a tare weight, it will be shown in
the Tare Weight data field. If the vehicle record does not
include a tare weight, you will be prompted to enter one
manually.
9.
If taxes or surcharges are required, select the Taxes and
Surcharges tab. Use the combo boxes to enter the correct
product, tax, and surcharge. Click the Add Tax button to apply
the tax. Then click the Add Surcharge button to apply the
surcharge. The tax and surcharge information will be
displayed in the table on the tab.
10. If the information for the transaction is correct, click the
Complete button. A record of the transaction will be saved to
the database, and a ticket will be printed or stored.
(5/07) 5-9
METTLER TOLEDO OverDrive Software User Manual
Two-Pass
Weighing
For a two-pass transaction, you must enter the Vehicle ID during
the first pass over the scale. You can enter other data during either
pass. Entering data during the second pass is often preferable for
outbound transactions, since the product is not loaded onto the
vehicle until after the first pass. To enter account or contract data
during the second pass, you must enable those options in
Application Setup (see Chapter 8).
1.
When a vehicle drives onto the scale, the virtual indicator will
display the weight reading from the scale.
2.
Open the Transaction screen and select the tab for the scale
on which the vehicle is being weighed. If you will be entering
the weight manually, select the Manual tab.
3.
Select Two Pass from the combo box in the Transaction Type
data field.
4.
Use the Carrier combo box to select the carrier linked to the
vehicle that is being weighed.
5.
Use the Vehicle combo box to select the vehicle that is being
weighed.
6.
Use the other combo boxes to select an account and any
other data that you need to record for the transaction. In some
cases, this data can be entered during the second pass. If
presets exist, some of the data will be entered automatically.
7.
Select the Product Detail tab and use the Product combo box
to select a product. This data can also be entered during the
second pass.
8.
Click the Get Weight button. The weight will be read from the
scale and displayed in the Gross Weight data field. If you are
using a manual scale, you will be prompted to enter a weight.
9.
Click the Accept button to record the first part of the
transaction and store it as an open transaction. If the program
is set up to print inbound tickets, a ticket for the first pass over
the scale will be printed now.
10. The vehicle can now leave the scale. If this is a receive
transaction, the driver will now have the vehicle unloaded. If
this is a ship transaction, the driver will now have the vehicle
loaded.
11. When the vehicle returns to the scale for the second pass,
retrieve the record for the open transaction. To do that, select
the carrier from the Carrier combo box and the vehicle from
the Vehicle combo box. You can also retrieve the record by
opening the Transactions menu and clicking on Transaction
5-10 (5/07)
Chapter 5: Processing Transactions
Two-Pass Weighing
Browser. This will display a Transaction Browser table that
lists all open transactions. Locate the transaction you want,
and click on it to display the data from the first pass on the
Transaction screen.
12. Make sure the weight information displayed on the screen is
correct.
13. If product, account, or other data need to be entered during
the second pass, enter it now.
14. Click the Get Weight button. The weight will be read from the
scale and displayed in the Gross Weight data field for a ship
transaction or in the Tare Weight data field for a receive
transaction. If you are using a manual scale, you will be
prompted to enter a weight.
15. If taxes or surcharges are required, select the Taxes and
Surcharges tab. Use the combo boxes to enter the correct
product, tax, and surcharge. Click the Add Tax button to apply
the tax. Then click the Add Surcharge button to apply the
surcharge. The tax and surcharge information will be
displayed in the table on the tab.
16. If the information for the transaction is correct, click the
Complete button. A record of the transaction will be saved to
the database, and a ticket will be printed or stored.
(5/07) 5-11
METTLER TOLEDO OverDrive Software User Manual
Multi-Pass
Weighing
For a multi-pass transaction, you must enter the Vehicle ID during
the first pass over the scale. The Product ID cannot be entered
during the first pass. It must be entered during each subsequent
pass, allowing you to weigh a separate product for each pass. To
enter account or contract data during a later pass, you must enable
those options in Application Setup (see Chapter 8).
1.
When a vehicle drives onto the scale, the virtual indicator will
display the weight reading from the scale.
2.
Open the Transaction screen and select the tab for the scale
on which the vehicle is being weighed. If you will be entering
the weight manually, select the Manual tab.
3.
Select Multi Pass from the combo box in the Transaction Type
data field.
4.
Use the Carrier combo box to select the carrier linked to the
vehicle that is being weighed.
5.
Use the Vehicle combo box to select the vehicle that is being
weighed.
6.
Use the other combo boxes to select an account and any
other data that you need to record for the transaction. In some
cases, you can enter this data during a later pass. If presets
exist, some of the data will be entered automatically.
7.
Click the Get Weight button. The weight will be read from the
scale and displayed in the Gross Weight data field. If you are
using a manual scale, you will be prompted to enter a weight.
8.
Click the Accept button to record the first part of the
transaction and store it as an open transaction. If the program
is set up to print inbound tickets, a ticket for the first pass over
the scale will be printed now.
9.
The vehicle can now leave the scale. If this is a receive
transaction, the driver will now have the first part of the load
removed from the vehicle. If this is a ship transaction, the
driver will now have the first part of the load placed on the
vehicle.
10. When the vehicle returns to the scale for the next pass,
retrieve the record for the open transaction. To do that, select
the carrier from the Carrier combo box and the vehicle from
the Vehicle combo box. You can also retrieve the record by
opening the Transactions menu and clicking on Transaction
Browser. This will display a Transaction Browser table that
lists all open transactions. Locate the transaction you want,
5-12 (5/07)
Chapter 5: Processing Transactions
Multi-Pass Weighing
and click on it to display the data from the first pass on the
Transaction screen.
11. Make sure the weight information displayed on the screen is
correct.
12. Select the product and any other data that needs to be entered
during this pass.
13. Click the Get Weight button. The weight will be read from the
scale and displayed in the Gross Weight data field for a ship
transaction or in the Tare Weight data field for a receive
transaction. If you are using a manual scale, you will be
prompted to enter a weight.
14. Click the Accept button to add this weighing to the open
transaction.
15. Repeat steps 10 to 14 for each weighing except the final one.
Follow steps 16 to 21 for the final weighing.
16. When the vehicle returns to the scale for the final pass,
retrieve the record for the open transaction.
17. Make sure the weight information displayed on the screen is
correct.
18. Select the product and any other data that needs to be entered
during this pass.
19. Click the Get Weight button. The weight will be read from the
scale and displayed in the Gross Weight data field for a ship
transaction or in the Tare Weight data field for a receive
transaction. If you are using a manual scale, you will be
prompted to enter a weight.
20. If taxes or surcharges are required, select the Taxes and
Surcharges tab. Use the combo boxes to enter the correct
product, tax, and surcharge. Click the Add Tax button to apply
the tax. Then click the Add Surcharge button to apply the
surcharge. The tax and surcharge information will be
displayed in the table on the tab.
NOTE: If more than one product is being weighed, you will
need to add the appropriate taxes/surcharges for each
product. You can do that during the final pass or add
taxes/surcharges for the product being weighed during each
individual pass.
21. If the information for the transaction is correct, click the
Complete button. A record of the transaction will be saved to
the database, and a ticket will be printed or stored.
(5/07) 5-13
METTLER TOLEDO OverDrive Software User Manual
Split
Weighing
Split weighing involves weighing individual sections of a vehicle
separately and summing the weights to determine a total vehicle
weight. It can be used to process transactions for vehicles that are
too large to weigh on a scale. The procedure for a one-pass
transaction is described below.
1.
Position the first section of the vehicle on the scale.
2.
Enter the required data on the Transaction screen, and place a
check mark in the Split Weighing box.
3.
Click the Get Weight button to record the weight of the first
section of the vehicle. The Split Weighing window will open.
4.
Move the vehicle to position the second section of it on the
scale.
5.
Click the Get Weight button on the Split Weighing window to
record the weight of the second section of the vehicle.
6.
Click the Complete button on the Transaction screen to
complete the transaction.
You can also use split weighing for two-pass transactions. Follow
the procedure described above for both passes, using the Accept
button at the end of the first pass and the Complete button at the
end of the second pass.
NOTE: You cannot use the manual scale to process a split
weighing transaction.
5-14 (5/07)
Chapter 5: Processing Transactions
Multi-Axle Weighing
Multi-Axle
Weighing
Multi-axle weighing involves weighing individual axles separately
and summing the weights to determine a total vehicle weight. The
procedure for a one-pass transaction is described below.
1.
Position the first axle on the scale.
2.
Enter the required data on the Transaction screen, and place a
check mark in the Multi Axle box.
3.
Click the Get Weight button to display the Multi Axle window.
4.
Click the Get Weight button on the window. The first weight
will appear in the window’s list box.
5.
Move the vehicle to position the next axle on the scale.
6.
Click the Get Weight button on the window. The next weight
will be added to the window’s list box.
7.
Repeat Steps 5 and 6 for each additional axle that needs to
be weighed.
8.
Click the Done button on the Multi Axle window.
9.
Click the Complete button on the Transaction screen to
complete the transaction.
If the vehicle does not have a multiple-weighment tare, the system
will prompt you to enter one when you process the transaction.
You can also use multi-axle weighing for two-pass transactions.
Follow the procedure described above for both passes, using the
Accept button at the end of the first pass and the Complete button
at the end of the second pass.
NOTE: You cannot use the manual scale to process a transaction
with multi-axle weighing.
(5/07) 5-15
METTLER TOLEDO OverDrive Software User Manual
Net Weighing
Before you can process a net-weighing transaction, you must
create a product record that is enabled for net weighing.
1.
When a vehicle drives onto the scale, open the Transaction
screen and select the tab for that scale.
2.
Select Net Weighing from the combo box in the Transaction
Type data field.
3.
Use the Carrier combo box to select the carrier linked to the
vehicle that is being weighed.
4.
Use the Vehicle combo box to select the vehicle that is being
weighed.
5.
Use the Product combo box to select a product that is enabled
for net weighing.
6.
Use the Account combo box to select an account.
7.
Click the Get Weight button. The weight will be read from the
scale and displayed in the Gross Weight data field.
8.
Click the Complete button. A record of the transaction will be
saved to the database, and a ticket will be printed or stored.
Zero Weighing
Before you can process a zero-weighing transaction, you must
create a product record that is enabled for zero weighing and
enable the vehicle for zero weighing.
5-16 (5/07)
1.
When a vehicle drives onto the scale, open the Transaction
screen and select the tab for that scale.
2.
Select Zero Weighing from the combo box in the Transaction
Type data field.
3.
Use the Carrier combo box to select the carrier linked to the
vehicle that is being weighed.
4.
Use the Vehicle combo box to select the vehicle that is being
weighed.
5.
Use the Product combo box to select a product that is enabled
for zero weighing.
6.
Use the Account combo box to select an account.
7.
Click the Complete button. A record of the transaction will be
saved to the database, and a ticket will be printed or stored.
Chapter 5: Processing Transactions
Virtual Scale Indicator
Virtual Scale
Indicator
The virtual scale indicator displays current information from each
of the scales connected to the system. It allows the system
operator to view the activity on all scales simultaneously while
processing transactions. When you log in to the system, the virtual
scale indicator opens automatically. You can resize the indicator,
reposition it, and check the Always on Top box so that it will be
displayed over top of other screens that are open.
Data Fields
Scale ID:
This identifies the scale from which the weight
and transaction information is being read. If you
are using a JAGXTREME terminal, you can click
on the Scale ID hyperlink to open a JAGXTREME
web page that provides scale calibration and
diagnostics procedures.
Weight:
This data field shows the current weight reading
from the scale. The weight will be the same as
that displayed on the actual scale indicator.
Transaction
Number:
If a transaction is in progress, this data field will
show the transaction number.
(5/07) 5-17
METTLER TOLEDO OverDrive Software User Manual
Push Buttons
Transaction
Wizard:
Click this button to open the transaction wizard.
Touch Screen:
Click this button to open the touch screen
display.
UADT:
Click this button to view the unattended data
terminal (UADT).
Transaction
Browser
Two-pass and multi-pass transactions require weighing a vehicle
more than once. Usually the vehicle will leave the scale to be
loaded or unloaded between weighings. When the vehicle returns
to the scale to continue a transaction, the quickest way to retrieve
the open transaction record is to use the transaction browser. To
open the transaction browser, open the Transactions menu and
click on the Transaction Browser menu item.
The transaction browser is a table that lists all open transactions.
When a vehicle returns to a scale, double click on its record in the
transaction browser to display the record on the Transaction
screen. The transaction browser can be set to close automatically
when you double click on a record. It is often convenient to leave
the transaction browser open so that it is always visible when you
are processing transactions. You can resize the browser, reposition
it, and check the Always on Top box so that it will be displayed
over top of other screens that are open. The transaction browser
includes a Refresh button that is used to update the data listed in
the browser. You will need to use this button if you leave the
transaction browser open. It also includes a Void button that can
be used to void an open transaction and remove it from the
transaction browser.
5-18 (5/07)
Chapter 5: Processing Transactions
Capturing a Tare Weight
Capturing a
Tare Weight
Use the Capture Vehicle Tare command to record a tare weight for
a vehicle.
1.
Select a vehicle in the Vehicle data field on the Transaction
screen.
2.
Use the Carrier data field to select the carrier linked to the
vehicle.
3.
Display the Tare window by clicking the Capture Vehicle Tare
button on the tool bar or by selecting Capture Vehicle Tare in
the Transactions menu. The vehicle and carrier will be
displayed in the window.
4.
In the Scales list box, highlight the scale on which the vehicle
is being weighed.
5.
If you are weighing the vehicle on a scale, click the Capture
Tare button. The weight from the scale will be displayed in the
Tare data field. If you select the Manual scale, type the weight
in the Tare data field and then click the Capture Tare button.
6.
Click the OK button to accept the tare weight, or click the
Cancel button to close the Tare window without accepting a
tare weight. If you accept a tare weight, it will be stored in the
Vehicle table record.
(5/07) 5-19
METTLER TOLEDO OverDrive Software User Manual
Transient
Vehicles
You can process transactions for transient vehicles. These are
vehicles for which there is no database record in the Vehicle table.
When you begin the transaction, you will have the option of
creating a vehicle record or completing the transaction without
adding the vehicle to the database.
1.
When the vehicle arrives at the scale, highlight (none) in the
Vehicle combo box on the Transaction screen. Type an ID or
description of the vehicle so that it overwrites (none).
2.
If the carrier requirement is enabled, you will need to select a
carrier.
3.
When you move the cursor to the next data field, the
Transient Vehicle window will open, displaying the following
prompt: “This is a transient vehicle. Would you like to add it
to database?” Respond by clicking one of the following
buttons on the window:
•
Yes—This opens the Vehicle table. Enter information
about the vehicle and save the new vehicle record. Then
continue with the transaction.
•
No—This allows you to continue with the transaction.
•
Cancel—This cancels the transaction.
If you are processing a one-pass transaction for a transient vehicle,
you will be prompted to enter a manual tare weight after the system
has read the vehicle weight from the scale.
NOTE: To process transactions for transient vehicles, you must first
check the Disable Controls on Vehicle box on the Options screen’s
Transaction tab (see Chapter 8). That tab also includes an option
to disable the transient vehicle dialog box (the prompt described in
Step 3).
Transient
Accounts
You can also process transactions for accounts that do not exist in
the database. Highlight (none) in the Account combo box on the
Transaction screen. Type an ID or description of the account so
that it overwrites (none). You will not be prompted to add the
account to the database.
NOTE: To do this, you must first check the Disable Controls on
Account box on the Options screen’s Transaction tab (see Chapter
8).
5-20 (5/07)
Chapter 5: Processing Transactions
Switching Scales
Switching
Scales
You can process the first pass of a transaction on one scale and
the second pass on another scale. If a truck pulls onto a scale to
continue a transaction that was begun on a different scale, use the
Connected Scales window to enter the weight.
1.
Click the Show Scales button on the Transaction screen to
open the Connected Scales window.
2.
Select the scale that the truck is currently on in the Scales List
box.
3.
The weight from the scale will be displayed in the Weight data
field.
4.
Click the Get Weight button to enter the weight for the
transaction.
(5/07) 5-21
METTLER TOLEDO OverDrive Software User Manual
Payment
Method
The program can prompt you to enter payment information for a
transaction. To enable this function, check the Show Capture
Payment Method Details box on the Options screen’s Transaction
tab (see Chapter 8). If the function is enabled, the Payment
Method Details window will open when you complete a
transaction for which check, credit card, or debit card is selected
as the payment type. Enter the appropriate payment details in the
window, and then click the OK button to complete the transaction.
5-22 (5/07)
Chapter 5: Processing Transactions
Search Function
Search
Function
The Transaction screen has a search function to help you locate
database records more quickly. It allows you to search for records
in the following combo boxes: Account, Carrier, Company,
Container, Contract, Destination, Driver, Origin, Product, Remark1,
Remark2, Trailer, and Vehicle.
1.
Place the cursor in the data field that you want to search.
2.
Press the F3 key to display the Search window.
3.
Select the data field that you want to search in the Field Name
combo box.
4.
Enter the record that you want to find in the Criteria data field.
Use a percent sign as a wildcard if you enter partial data. For
example, enter “a%” or “%6” to search for Account6.
5.
Click the Search button. The system will retrieve the records
and display them in the Results table.
6.
Highlight the desired record in the table, and then click the OK
button. This will place the record in the data field on the
Transaction screen.
If you click the Search button without selecting a field name, the
system will retrieve the entire list of records for the data field.
(5/07) 5-23
METTLER TOLEDO OverDrive Software User Manual
You can also search a combo box by placing the cursor in the
data field and typing the first letter(s) of a data record. A time-out
feature automatically starts a new search if a set amount of time
elapses between keystrokes. To adjust the time-out, use the
Combo Box Search Timeout (seconds) field on the Options
screen’s Transaction tab (see Chapter 8).
Traffic Lights
The Transaction screen provides a panel for controlling traffic
lights, gates, and lighting manually. If the system is connected to
more than one scale, the panel will control lights and gates for
whichever scale tab is currently displayed on the screen.
Traffic Lights
The panel can control as many as four traffic lights. Typically, two
traffic lights are used if vehicles drive over the scale in one
direction. One light is located at the entrance to the scale to signal
when it is time for the vehicle to drive onto the scale. A second light
is located at the opposite end of the scale to signal when it is time
for the vehicle to exit the scale. If vehicles drive over the scale in
both directions, you will need an entry and exit light at each end of
the scale.
The panel includes a red and green button for each set of traffic
lights. Click on the green button to switch a light to green. Click on
the red button to switch a light to red.
5-24 (5/07)
Chapter 5: Processing Transactions
Traffic Lights
Barriers
The panel can control two barriers (or gates). Typically, you would
install an entry barrier at one end of the scale and an exit barrier at
the other end. If vehicles drive over the scale in two directions, the
entry barrier for one direction can serve as the exit barrier for the
other direction.
The panel includes an Open and Close button for each barrier.
Click on the desired button to open or close a barrier.
Illumination
The panel includes On and Off buttons to control lights used to
illuminate the scale and surrounding area. Click the desired button
to turn the lights on or off.
Locating the
Panel
The panel will not be visible when the OverDrive software is first
installed. As a default, it is hidden at the far right of the Transaction
screen. To locate the panel, extend the right-hand border of the
Transaction screen.
1.
Position the cursor on the blue title bar at the top of the
Transaction screen. Then hold down the mouse button and
drag the screen to the left.
2.
Position the cursor on the right-hand border of the Transaction
screen. Then hold down the mouse button and drag the
border to the right to enlarge the width of the screen. You will
need to enlarge the screen to several times its standard width.
3.
Click the Enable Traffic Lights button on the tool bar to make
the panel visible. The panel is visible when the button appears
to be pushed in.
You might need to use the GUI Editor to make the panel visible in
order to locate it. You can use the GUI Editor to reposition the panel
to a location that is convenient for your operators.
(5/07) 5-25
Chapter 6: Presets and Groups
Presets
6
Presets and Groups
Presets
Presets are used to speed up transactions by reducing repetitive,
manual data entry. Suppose a vehicle always carries the same
product for the same account. You can create a preset that links
the vehicle to the account and product. Then when you select the
vehicle for a transaction, the system will automatically enter the
account and product information.
To create a preset, choose a database record as the starting point.
A Vehicle table record is usually the best choice. But you can use
a record from any of the following tables: Account, Carrier,
Company, Container, Contract, Product, Remark 1, Remark 2,
Shipping Address, Trailer, Vehicle, and Extended tables.
1.
Decide which record you want to use as a starting point, and
open the table where the record is stored. For example, if you
want to use a vehicle record as the starting point, open the
Vehicle table.
2.
Display the desired record on the table’s Form View tab.
3.
Click the Presets button to open the Presets screen.
•
The ID for the record that you chose as a starting point
will appear in the appropriate data field.
•
The name of the table where the record is stored will
appear in the Basis data field.
(5/07) 6-1
METTLER TOLEDO OverDrive Software User Manual
4.
Use the combo boxes to select the records that you want to
include in the preset.
5.
Click the Save button to save the presets record.
NOTE: All records that you are including in the preset must already
exist in the database.
The Presets screen for the Vehicle table includes an Update check
box for each data field. Checking the box enables you to change
the preset by overriding it manually during a transaction. For
example, suppose you are processing a transaction and select a
vehicle for which you have assigned a preset product. The preset
product will be entered automatically, but you can override it
manually by selecting another product on the Transaction screen. If
the Update box is checked, the product that was selected manually
will become the new preset and will be used for subsequent
transactions. If the box is not checked, the product that was
selected manually will be used only for the current transaction.
The Presets Basis form provides a shortcut to the Presets screen.
To open the form, click on Presets Basis in the Data Setup folder
in the side tree.
6-2 (5/07)
Chapter 6: Presets and Groups
Using Presets
1.
Use the Presets Basis combo box to select the database table
that contains the record being used as the basis for the preset.
2.
Use the Field ID combo box to select the specific record being
used as the basis for the preset. If a vehicle record is selected,
the carrier linked to it will be shown in the Carrier Vehicle
Reference field.
3.
Click the Continue button to open the Presets screen.
Using Presets
Before you can use a preset, you must enable it on the Presets &
Groups tab of the Options screen. For example, if you used a
vehicle record as the starting point for a preset, you must check the
Enable Presets box and the Enable Vehicle Preset box on the tab.
Both boxes must be checked in order to enable the preset.
1.
Open the Transaction screen to begin processing a
transaction.
2.
In the appropriate combo box, select the record that was used
as the starting point for the preset.
3.
The preset information will be entered automatically in the
data fields on the Transaction screen. You can override the
presets manually.
If a vehicle record is the basis for the preset, you will need to select
the vehicle and carrier before the presets will be entered.
(5/07) 6-3
METTLER TOLEDO OverDrive Software User Manual
Groups and
Group Presets
The OverDrive system helps you manage your weighing operations
more efficiently by enabling you to create groups and group
presets. You can define groups and group presets for records in the
Account, Carrier, Contract, Product, and Vehicle tables.
•
A Group is a set of records in a table that are linked together
because they are all related to a record or records in another
table. For example, you might create a group of vehicles that
are used only by a particular account.
•
A Group Preset is a link between two or more groups. For
example, a group of vehicles can be linked to a group
containing one or more accounts that use those vehicles.
How are groups and group presets useful? If you have a large
database, your operators will need to search through long lists of
records when entering data for transactions. Groups and group
presets can speed up transactions by limiting the number of
choices available to an operator. For example, if a particular
vehicle is used by only three accounts, the operator will not need to
search through a list of all accounts in your database when that
vehicle arrives to begin a transaction. Instead, the operator can
simply choose from a list of the three accounts linked to the
vehicle.
This chapter contains an example that shows how to create groups
and group presets. The procedure involves three steps:
1.
6-4 (5/07)
Create two or more groups.
2.
Add records to the groups.
3.
Link the groups.
Chapter 6: Presets and Groups
Creating a Group
Creating a
Group
Suppose Roberts Construction owns five vehicles and has three
subsidiary contractors that use the five vehicles to haul gravel from
your quarry. You want to be able to bill the three contractors
separately while allowing them to share the five vehicles.
Start by creating an account group for the three contractors.
1.
Open the Data Setup folder in the side tree and click Groups
to open the Groups form.
2.
Type a Group ID (ROB1) in the Group ID field. If you want the
system to assign a Group ID, click the Get System Generated
Key button.
3.
Select Account from the Basis combo box to define the type of
group you are creating.
4.
In the Description data field, enter a description of the group.
Next, add the three subsidiaries of Roberts Construction to the
group that you created. Records for these three contractors must
(5/07) 6-5
METTLER TOLEDO OverDrive Software User Manual
exist in the Account table before you can add them to the group. All
existing accounts will be shown in the Available list box on the
Members tab. If you have already created the three accounts to be
added to the group, proceed to Step 5. If you have not created the
accounts, you will need to do so before continuing.
5.
In the Available list box, select the accounts that you want to
add to the group. Then click the right arrow button to move
them to the Assigned list box.
6.
Click the Save button to create account group ROB1.
When you are finished, you should have created an account group
with three members (as shown in the diagram below).
Roberts Account Group
Group ID: ROB1
ANT1
BAR1
COS1
Create a Vehicle Group
Once you have completed the account group, create a vehicle
group (ROBVEH) and add Roberts Construction’s five vehicles to it.
Follow the same procedure that you used to create the account
group and add records to it. The completed vehicle group is shown
in the diagram below.
Roberts Vehicle Group
Group ID: ROBVEH
VEH1
6-6 (5/07)
VEH2
VEH3
VEH4
VEH5
Chapter 6: Presets and Groups
Linking Groups
Linking
Groups
Once you have created the two groups, you can link them so that
they can be used as presets.
1.
Open the Data Setup folder in the side tree and click Group
Presets to open the Group Presets form.
2.
Type a Group ID (ROBLINK) in the Group ID field. If you want
the system to assign a Group ID, click the Get System
Generated Key button.
3.
Select the first group to be linked from the appropriate combo
box. For this example, select ROB1 from the Account Group
combo box.
4.
Select the second group to be linked from the appropriate
combo box. For this example, select ROBVEH from the
Vehicle Group combo box.
NOTE: You can link as many as five groups, one from each
combo box.
5.
Click the Save button to link the groups.
(5/07) 6-7
METTLER TOLEDO OverDrive Software User Manual
Using Group
Presets
Before you can use the group presets that you created, you must
enable them. To do that, check the Enable Groups box on the
Options screen’s Presets & Groups tab (see Chapter 8). Checking
this box will enable all group presets that you create.
NOTE: Be careful when creating both presets and group presets for
a database record. If both types of presets are enabled, the presets
will override the group presets when you process a transaction.
6-8 (5/07)
1.
To begin a transaction for one of the Roberts Construction
vehicles, select its ID from the Vehicle combo box on the
Transaction screen.
2.
Select the carrier linked to the vehicle in the Carrier combo
box.
3.
When you open the Account combo box to select an account,
you will notice that the three Roberts Construction subsidiaries
are the only accounts listed. Normally, you would have to
scroll through a list of all the accounts in the database to find
the correct one. Group presets speed up transactions by
limiting your choices to the records that you have linked
together.
Chapter 7: Pricing
Basic Pricing
7
Pricing
Basic Pricing
The OverDrive system can calculate a price when it processes a
transaction. The simplest way to do that is to use the basic pricing
formula that is available for each product. You can specify a price
when you create a record in the Product table.
1.
Enter a price in the Unit Price data field.
2.
Select a unit of measure in the Unit Price UOM combo box.
This unit indicates how the price will be applied: per weight
unit, per volume unit, per piece, or per load.
3.
The Price Formula data field will show the basic price formula
for the product (for example, Pounds * Pr).
You can also specify basic pricing for a contract, using the Contract
Product table. If you create a contract for a product, the price
specified in the product record cannot be used unless the Standard
Gate Rate box is checked. See the description of the standard gate
rate in the Product table section of Chapter 4.
(5/07) 7-1
METTLER TOLEDO OverDrive Software User’s Manual
Advanced
Pricing
The Advanced Pricing form lets you set up complex pricing
structures. For example, you can set up a structure that charges
lower rates when larger amounts of a product are purchased. You
can access this form by clicking the Advanced Pricing button on the
Product form, Account form, Vehicle form, or Contract Product
form. Depending on which table you use, you can define an
advanced pricing structure for an individual product, account,
vehicle, or contract product.
Data Fields
7-2 (5/07)
Price ID:
The identifier for the advanced pricing structure.
Description:
A description of the advanced pricing structure.
Chapter 7: Pricing
Advanced Pricing
Unit Price:
Decimal
Precision:
Price Using:
Price per unit of product. If you reached Advanced
Pricing from the Product or Contract Product
table, the unit price will be read from the Product
or Contract Product record. If you reached
Advanced Pricing from the Account or Vehicle
table, the unit price will be listed as zero.
Enter the number of decimal places to which the
price should be calculated. For example, 0 = X, 1
= X.X, 2 = X.XX.
Use the combo box to select the type of unit that
will be used for pricing. Pricing structures can be
set up according to weight or distance.
Enable Advanced
Pricing:
Check this box to enable the advanced pricing
structure. If the box is checked, the advanced
pricing structure will override the basic pricing for
the product.
Rate Type:
Use the radio buttons to select the operation for
which the pricing structure will be in effect:
Incoming (shipments entering the facility)
Outgoing (shipments exiting the facility)
Either (both incoming and outgoing shipments)
Price Type:
Use the radio buttons to select the type of pricing
structure you want to set up:
Fixed pricing sets a price per load. It can be used
when you process transactions for loads of
standard sizes. For example, you could set a fixed
price for a standard-sized load based on delivery
distance: $500 for a load delivered up to 100
miles and $550 for a load delivered from 100 to
200 miles.
Raw pricing sets a different price per unit for
portions of a load. For example, suppose you set
a price of $10 per pound for loads up to 1,000
pounds and $9 per pound for loads up to 2,000
pounds. With raw pricing, a 2,000-pound load
would be priced at $10 per pound for the first
1,000 pounds and $9 per pound for the second
1,000 pounds.
Unit pricing sets a single price per unit for the
entire load. For example, suppose you set a price
of $10 per pound for loads up to 1,000 pounds
and $9 per pound for loads up to 2,000 pounds.
(5/07) 7-3
METTLER TOLEDO OverDrive Software User’s Manual
With unit pricing, a 2,000-pound load would be
priced at $9 per pound for the entire load.
Formula pricing lets you define a formula that will
be used to calculate the price for each transaction.
The simplest pricing formula is one that multiplies
the price of a product by the net weight.
Step Pricing
Use the Step Pricing tab to create a fixed, raw, or unit pricing
structure. It allows you to set a different price per unit for different
ranges of weight (or distance). For each step in the pricing
structure, you will need to specify a breakpoint and a step price. A
breakpoint is the maximum weight (or distance) for which the step
price will be used. A step price is the price per unit for the step. A
step is the range from the breakpoint to the next lower breakpoint (or
to zero if there is no lower breakpoint).
The sample step pricing structure shown above lists the price per
pound for loads up to 1,000, 2,000, 3,000, and 4,000 pounds,
plus a step for loads greater than 4,000 pounds. To enter a greater
than symbol, leave the Breakpoint field blank.
7-4 (5/07)
1.
In the Breakpoint data field, enter the maximum weight (or
distance) for the first step.
2.
In the Step Price data field, enter the price per unit for the first
step.
Chapter 7: Pricing
Advanced Pricing
3.
Click the Add button to add the step to the list box.
4.
Click the New button to clear the Breakpoint and Step Price
fields. Then repeat Steps 1 to 3 for each additional step in the
structure. Save the pricing structure when it is completed.
To delete a step, highlight it in the list box and then click the
Remove button.
Formula Pricing
Use the Formula Pricing tab to create a pricing formula. The formula
will appear in the Formula data field as you create it.
Variables:
Variables are numbers that can change from
transaction to transaction. The list box contains
the variables that can be used in pricing formulas:
Price, Conversion Factor, Contracted Price, and
Vehicle Volume. To insert a variable in a formula,
highlight the variable in the list box and then click
the down arrow button. The variable will appear at
the end of the formula in the Formula data field.
Numerals:
Use the numeric buttons (0 to 9) and the decimal
button to insert numbers in a formula. When you
click a numeric button, the number will be added
to the end of the formula.
Symbols:
Use the symbol buttons to insert mathematical
elements in a formula. When you click a button,
(5/07) 7-5
METTLER TOLEDO OverDrive Software User’s Manual
the symbol will be added to the end of the
formula.
/ = division
* = multiplication
- = subtraction
+ = addition
( = left parenthesis
) = right parenthesis
^ = exponent (x^2 = x squared)
√ = square root (x√2 = square root of x)
7-6 (5/07)
Backspace:
Click the Backspace button to delete the last
character in the Formula data field.
Clear:
Click the Clear button to delete the entire formula.
Chapter 7: Pricing
Formula Table
Formula
Table
The Formula table in the Data Setup folder is used to create pricing
formulas that are not linked to a specific product or other database
record. Each pricing formula that you create in this table will appear
in the Formula combo box on the Transaction screen. If you select a
formula from the combo box during a transaction, it will override
any basic pricing or advanced pricing structures. To create a
formula record, assign a Formula ID and enter data in the other
fields. Then use the buttons to create a pricing formula in the
Formula data field.
Data Fields
Formula ID:
The identifier for the pricing formula.
Description:
A description of the pricing formula.
(5/07) 7-7
METTLER TOLEDO OverDrive Software User’s Manual
Unit:
Decimal
Precision:
Use the combo box to select a weight unit or
volume unit.
Enter the number of decimal places to which the
price should be calculated. For example, 0 = X, 1
= X.X, 2 = X.XX.
Variables:
Variables are numbers that can change from
transaction to transaction. The list box contains
the variables that can be used in pricing formulas:
Price, Weight, Conversion Factor, and Distance.
To insert a variable in a formula, highlight the
variable in the list box and then click the down
arrow button. The variable will appear at the end
of the formula in the Formula data field.
Numerals:
Use the numeric buttons (0 to 9) and the decimal
button to insert numbers in a formula. When you
click a numeric button, the number will be added
to the end of the formula.
Symbols:
Use the symbol buttons to insert mathematical
elements in a formula. When you click a button,
the symbol will be added to the end of the
formula.
/ = division
* = multiplication
- = subtraction
+ = addition
( = left parenthesis
) = right parenthesis
^ = exponent (x^2 = x squared)
√ = square root (x√2 = square root of x)
7-8 (5/07)
Backspace:
Click the Backspace button to delete the last
character in the Formula data field.
Clear:
Click the Clear button to delete the entire formula.
Chapter 7: Pricing
Override Rates
Override
Rates
Override rates are used to create pricing or tax rates based on the
origin of a product. You can open the Override Rate form by clicking
the Override Rate button on the Product, Contract Product, or Tax
form.
Data Fields
Product Override
Rate ID:
The identifier for the override rate.
Description:
A description of the override rate.
Product ID:
The product for which the rate is used.
Rate:
The amount charged per unit. The product override
rate will override the unit price specified in the
product record. The contract product override rate
will override the unit price specified in the contract
product record. The tax override rate will override
the unit price specified in the tax record.
Origin Price Type: Select from a list of origin price types.
On the Contract Product Override Rate form, there is an additional
data field for the Contract ID. On the Tax Override Rate form, the
Product ID data field is replaced by a Tax ID data field.
(5/07) 7-9
METTLER TOLEDO OverDrive Software User’s Manual
Using Override
Rates
Before you can use an override rate, you must create records in the
Origin table and Origin Price Type table. For example, you can
create two origin price types, one for shipments of waste that
originate within the state where your facility is located and one for
shipments that originate outside the state. Then you can create an
origin record for each state from which shipments will originate.
When you create an override rate record, link it to the appropriate
origin price type.
To use an override rate, select an origin when you process a
transaction. If an override rate and an origin price type exist for the
origin, the system will use the override price or tax rate instead of
the basic rate.
7-10 (5/07)
•
A product override rate will override basic product pricing. It will
not override advanced product pricing or pricing formulas
created with the Formula table.
•
A contract product override rate will override basic contract
product pricing. It will not override advanced contract product
pricing or formulas created with the Formula table.
•
A tax override rate will override a basic tax rate.
Chapter 8: Application Setup Options
Options Screen
8
Application Setup Options
Options
Screen
The Options screen in the Application Setup folder contains tabs that
are used to set system defaults. When you change any settings on
these tabs, you must restart the program for the changes to take
effect. The following buttons are available at the bottom of each tab
(except the Load Numbers / Key Table tab, which uses only the OK,
Cancel, and Apply buttons).
OK
Accepts all changes made to the default settings and closes the
Options screen. You must restart the program for the changes to
take effect.
Cancel
Cancels all changes made to the default settings.
Apply
Applies all changes made to the default settings. You will be able to
view the changes, but they will not take effect unless you click the
OK button.
Set Tab Check Boxes
Enters check marks in all boxes on the tab that is currently shown.
Clear Tab Check Boxes
Clears check marks from all boxes on the tab that is currently
shown.
(5/07) 8-1
METTLER TOLEDO OverDrive Software User’s Manual
Transaction
The Transaction tab is used to set defaults that change the way the
system functions. When you change settings, you must restart the
program for the changes to take effect.
Enable Two Pass
Check this box to enable the system to process two-pass
transactions. Two-pass weighing is weighing a vehicle once when it
is empty and once when it is loaded to determine the net weight of a
product.
Enable One Pass
Check this box to enable the system to process one-pass
transactions. One-pass weighing is weighing a loaded vehicle and
then entering a tare or using a stored tare to determine the net
weight of a product.
Enable Multi Pass
Check this box to enable the system to process multi-pass
transactions. Multi-pass weighing is weighing a vehicle with several
compartments after each compartment is loaded or unloaded to
determine the net weight of the product in each compartment.
8-2 (5/07)
Chapter 8: Application Setup Options
Transaction
Enable Net Weighing
Check this box to enable the system to process net-weighing
transactions. Net weighing is weighing an object once (without a
tare) to determine its net weight.
Enable Zero Weighing
Check this box to enable the system to process zero-weighing
transactions. Zero weighing is a type of transaction that is processed
without recording a weight. It is typically used to control access to a
facility.
Block Credit Transaction
Check this box to prevent the system from processing a transaction
for an account that does not have enough credit to pay for the
transaction. The transaction will be blocked when the actual credit
exceeds the maximum credit in the Account table record.
Check Vehicle Weight
Check this box to enable the system to check the maximum and
minimum vehicle weights stored in the Vehicle table. If the vehicle
being weighed is over or under weight, a message will appear on
the computer screen to alert the operator.
Block Overweight
Check this box to prevent the system from processing a transaction
when the vehicle is over weight. The maximum vehicle weight is
stored in the Vehicle table.
Use Contract
Check this box to require a contract to be used for every transaction.
If this feature is enabled, the system will not complete a transaction
unless a Contract ID is selected.
Contracted Weight/Quantity
Check this box to enable the system to verify that the load is within
the size range specified by the contract. A message will appear on
the computer screen to alert the operator if the net weight for the
transaction does not match the range specified by the Minimum
Order and Maximum Order data fields in the Contract Product table.
Show Pricing
Check this box to enable the system to show price data on the
Transaction screen.
Enable Load Counters
Check this box to enable the system to track the number of
transactions processed for each company to which you have
assigned a load number. Load numbers are assigned in the
Company table, and the load counter (number of transactions) is
shown on the Load Numbers window.
(5/07) 8-3
METTLER TOLEDO OverDrive Software User’s Manual
Enable Shipping Address
Check this box to enable the use of shipping addresses for
accounts. The addresses are stored in the Shipping Address table,
which can be opened from the Account table.
Account in 2nd Weighing
By default, the Account ID for a two-pass or multi-pass transaction
must be entered when the vehicle makes its first pass over the
scale. Check this box to allow the Account ID to be entered during
the second pass.
Contract in 2nd Weighing
By default, if a Contract ID is required for a two-pass or multi-pass
transaction, it must be entered when the vehicle makes its first pass
over the scale. Check this box to allow the Contract ID to be entered
during the second pass.
Disable Controls on Account
Check this box to disable database validation for the Account ID.
This allows you to enter account data manually during a
transaction. You must check this box to be able to process
transactions for transient accounts.
Disable Controls on Vehicle
Check this box to disable database validation for the Vehicle ID. This
allows you to enter vehicle data manually during a transaction. You
must check this box to be able to process transactions for transient
vehicles.
Enable Loss of Data Alarm
Check this box to enable the alarm that signals a loss of data from
the scale terminal.
Display Sampling Alert
Check this box to enable the system to display a message that
alerts the operator when a product sample is required.
Enable Sampling
This check box provides a global command for enabling/disabling
all active product sampling schedules. Individual sampling
schedules are set up and enabled from the Sampling Setup screen.
To enable a sampling schedule, you must check the Enable
Sampling box on this screen and check the Enable Sampling box for
the individual sampling record on the Sampling Setup screen.
Default Operation
Use the combo box to select a default operation: Ship, Receive, or
Either. If you select Either, you will be able to set the operation
manually for each transaction.
8-4 (5/07)
Chapter 8: Application Setup Options
Transaction
Weighing Unit
Use the combo box to select the unit of measure that will be used for
weighing: Pounds, Kilograms, Metric Tons, or Tons. This must
match the weighing unit of the scale terminal.
Expiration Notice
If you want the system to alert you a certain number of days before
a permit is due to expire, enter the number of days in this data field.
On the day specified, the system will automatically print a ticket
warning that the permit will expire in X days.
Enable Pass Zero
Check this box to require the scale to return to zero before the next
vehicle can be weighed. If the box is not checked, the scale will be
required to return to the weight entered in the Scale Minimum
Weight data field.
Disable Manual Tare
Check this box to prevent the operator from entering a tare weight
manually. If the box is checked, tare weights must be read from a
scale.
Tare/Weight Increment Size
Enter the increment size for all weights that are entered manually.
The number that you enter will correspond to the unit selected in the
Weighing Unit field on this tab. For example, if you enter 20 and the
weighing unit is pounds, then all weights that are entered manually
must be in increments of 20 pounds (20, 40, 60, etc.). You must
enter an increment size to be able to enter weights manually.
Scale Minimum Weight
Enter a minimum weight. If the Enable Pass Zero box is not
checked, the weight on the scale will need to go below this
minimum weight before the next vehicle can be weighed. This
setting is used only in attended weighing mode when no hardware
connection has been configured on the Hardware Setup screen.
Log Printer Port
Use the combo box to select the parallel port that you want to use
for log printing (if applicable).
Enable Log Printing
Check this box to enable log printing. When log printing is enabled,
the weight captured by the scale will be sent to the printer connected
to the log printer port every time the Accept or Complete button is
clicked.
Enable Ticket Printing
Check this box to enable the system to print tickets. In order to print
tickets, you must also select a Ticket In and/or Ticket Out format in
the Account table.
(5/07) 8-5
METTLER TOLEDO OverDrive Software User’s Manual
Kill Scale Server
Check this box to shut down the scale server (MT-Connections)
every time you close the OverDrive program.
Default Printer
Check this box to use the Windows default printer for printing reports
or tickets when a destination is not assigned. If the box is not
checked, the print preview will be used when a destination is not
assigned.
Print Delay (seconds)
Enter the length of time (in seconds) that the program will pause
between print requests when more than one copy of a report or ticket
is being printed.
Combo Box Search Timeout (seconds)
Enter the length of time (in seconds) that must elapse between
keystrokes for the program to start a new search. This option affects
searches in the combo boxes on the Transaction screen. For
example, suppose you type the letters “ve” to search for a record in
the Vehicle combo box. If the time between keystrokes is less than
the time-out, the program will search for records beginning with the
letters “ve”. If the time between keystrokes is greater than the timeout, the program will search for records beginning with “v” and then
start a new search for records beginning with the letter “e”.
Allow Manual Weights
Check this box to enable the operator to enter weights manually. If
the box is not checked, all weights must be read from a scale.
Enforce Carrier
Check this box to require a carrier to be selected for every
transaction. You will also need to assign a carrier every time you
create a record in the Vehicle table.
Default Carrier
This combo box allows you to select a default carrier that will be
used for all transactions. To activate the combo box, remove the
check mark from the Enforce Carrier box on this tab. You must
create a default carrier record in the Carrier table before you can
select it here. This option is designed for operations that use only
one carrier or do not use carriers.
Show Capture Payment Method Details
Check this box to prompt the operator to enter payment information
for a transaction. It causes the Payment Method Details window to
open at the completion of transactions for which one of the following
payment methods is selected: Check, Credit Card, and Debit Card.
8-6 (5/07)
Chapter 8: Application Setup Options
Transaction
Close Transaction Browser
Check this box if you want the transaction browser to close
automatically each time you select an open transaction from the
browser.
Filter Contract Products
Check this box to enable the system to filter contract products. When
you select a contract for a transaction, the filter will limit the list of
available products to those linked to the contract. If the box is not
checked, all products will be listed as available.
Default Unit of Measure
Use the combo box to select a default unit of measure. When you
create a new record in the product table, this unit will be selected
automatically for pricing and stock level. The default can be
overridden manually.
Manual Ticket Number Required
Check this box to require the operator to enter a number in the
Manual Ticket No. data field when a weight is entered manually
during a transaction.
Override Tons/Tonnes Weighing Unit
Check this box to enable the system to use “T” for metric tonnes.
When the box is not checked, “T” is used for tons.
Show Transient Vehicle Dialog
Check this box to display a dialog box when the operator enters a
transient vehicle during a transaction. A transient vehicle is a vehicle
for which there is no database record in the Vehicle table. The
dialog box prompts the operator to do one of the following: create a
database record for the transient vehicle and continue with the
transaction, continue with the transaction without creating a record,
or cancel the transaction.
Default Transient Vehicle Action
This combo box is activated when the Show Transient Vehicle
Dialog box is not checked. If you select “Yes” in the combo box,
then the Vehicle table will open during a transaction involving a
transient vehicle to allow the operator to create a record for the
vehicle. If you select “No”, then the Vehicle table will not open
automatically.
(5/07) 8-7
METTLER TOLEDO OverDrive Software User’s Manual
Enable
Extended
Tables
The program provides 25 extended tables, which can be used to
store information not found in the standard database tables. With
the extended tables, you can customize a system by creating tables
for information specific to your operation. To use an extended table,
you must enable it by checking the box for it on the Enable
Extended Tables tab.
NOTE: You will need to use the GUI Editor to make an extended
table’s data field and label visible and to position them on the
Transaction screen.
8-8 (5/07)
Chapter 8: Application Setup Options
Presets and Groups
Presets and
Groups
The Presets & Groups tab lets you enable or disable groups and
presets. It gives you a convenient way to temporarily disable presets
without having to delete them and then recreate them from scratch
when you want to use them again. Place a check mark in the box
next to each item that you want to enable. The system will not use
any groups or presets that you create unless they are enabled on
this tab.
Enable Groups
Check this box to enable the system to use any groups and group
presets that you have created. Groups are created and stored in the
Groups table.
NOTE: Be careful when creating both presets and group presets for a
database record. If both types of presets are enabled, the presets
will override the group presets when you process a transaction.
Enable Presets
Check this box to enable the system to use the presets function.
(5/07) 8-9
METTLER TOLEDO OverDrive Software User’s Manual
NOTE: In order to use presets, you must check both this box and the
box that enables presets for an individual table. The purpose of this
box is to allow you to enable/disable all presets with a single check
box. If you enable presets for individual tables and you want to
temporarily disable them, remove the check mark from this box.
When you want to enable the presets again, simply check this box.
Enable Presets for Individual Tables
To create a preset, you must use an individual database record
(such as a vehicle record) as the basis or starting point for the
preset. Use the check boxes on this tab to enable or disable presets.
For example, checking the Enable Vehicle Preset box enables all
presets for which a Vehicle table record is the basis.
NOTE: In order to use presets, you must also check the Enable
Presets box.
8-10 (5/07)
Chapter 8: Application Setup Options
Combo Box Display
Combo Box
Display
The Combo Box Display tab controls the format of the listings that
are displayed in the combo boxes on the Transaction screen. Each
of those listings represents a database record, and each database
record has a unique ID assigned to it. You can list records by their
IDs or by descriptions entered in the Data Setup tables. Select one
of the following formats for the listings: ID, Description, or Both (ID
and description).
(5/07) 8-11
METTLER TOLEDO OverDrive Software User’s Manual
Unattended
The Unattended tab lets you assign keys on a computer keyboard
for processing unattended weighing transactions with a four-line
display. The unattended functions are listed on the tab, with a
combo box next to each one. To assign a keyboard command to a
function, select the desired computer key from the combo box next
to the function. For the unattended options that are enabled with
check boxes, refer to the following descriptions to find out which
displays they affect.
Show Summary Panel
Check this box to enable a summary panel on the unattended
transaction screen. When an unattended transaction is being
processed, this panel will display the total weight and pricing data
for the transaction (touch screen and four-line display).
Show Back Button
Check this box to enable the Back button on the unattended
transaction screen. This button allows the driver processing the
transaction to go back to the previous step in the transaction. If the
box is not checked, the button will appear on the screen but will be
inactive (touch screen only).
8-12 (5/07)
Chapter 8: Application Setup Options
Unattended
Show Accept Key
Check this box to enable the Accept key on the unattended
transaction screen. This key allows the driver to accept a weight for
all but the final pass of a transaction (four-line display only).
Show Complete Key
Check this box to enable the Complete key on the unattended
transaction screen. This key allows the driver to accept a weight for
the final pass of a transaction (four-line display only).
Badge Only
Check this box to require drivers to use a badge to start an
unattended transaction (touch screen and four-line display).
Scroll Up Key
This key is used to scroll up through a list of selections (four-line
display only).
Scroll Down Key
This key is used to scroll down through a list of selections (four-line
display only).
Go to First Item Key
This key is used to go to the first item in a list of selections (four-line
display only).
Go to Last Item Key
This key is used to go to the last item in a list of selections (four-line
display only).
Accept Key
This key is used to accept data displayed on an unattended screen.
When the system prompts you to select an item (such as a Vehicle
ID), display the item on the screen and then use this key to accept
it. You will also use this key to complete a one-pass transaction,
complete both passes of a two-pass transaction, and complete all
but the final pass of a multi-pass transaction.
Use Default Accept Key for Transaction Pass
This check box gives you the option of using the Accept key to
complete a pass over the scale or assigning an Accept Pass key to
perform that function. If you check the box, then the Accept key will
be used. If you do not check the box, then the Accept Pass key will
be enabled. This feature allows you to use the Accept key only to
accept data (such as a Vehicle ID) and to use the Accept Pass key
to complete a pass over the scale. If the Accept Pass key is not
enabled, then the Accept key will be used for both functions.
Assigning an Accept Pass key will prevent a driver from
unintentionally completing a pass by holding down the Accept key
when accepting data.
(5/07) 8-13
METTLER TOLEDO OverDrive Software User’s Manual
Accept Pass Key
This combo box is activated when the Use Default Accept Key for
Transaction Pass box is not checked. It is used to assign a key for
completing any pass over a scale except the final pass of a multipass transaction.
Back Key
This key is used to go back to the previous step in an unattended
transaction.
Cancel Key
This key is used to cancel an unattended transaction.
Complete Multi Pass Key
This key is used to complete the final pass of a multi-pass
transaction.
Search Key
This key is used to search for a data record during an unattended
transaction. For example, if the system displays a long list of
available products, you can search for the desired product by typing
the Product ID or the first character(s) of the ID and then pressing
the search key (touch screen and four-line display).
Short Code Key
This key is used to enter a short code. Type the short code, and then
press the short code key to enter it (touch screen and four-line
display).
Exit Key
This key is used to cancel an unattended transaction and allow the
vehicle to exit the scale. It affects the transaction displayed on the
unattended weighing station (four-line display only), plus any lights
and gates controlled by the program.
Display Type
Use the combo box to select the type of display (four-line display
only) that will be used to process unattended transactions.
Jag Delay
Enter the maximum number of times (default is 50) that the system
will try to send a command to the JAGXTREME terminal. This option
is used to compensate for the communication speeds of different
systems. The terminal will not accept a new command until it has
finished processing the previous command. A slow system might
cycle through all 50 attempts before the terminal is ready to accept
a new command. To solve the problem, you can increase the
number of communication attempts by entering a larger number in
the Jag Delay data field (touch screen and four-line display).
8-14 (5/07)
Chapter 8: Application Setup Options
Preset Template
Preset
Template
The Preset Template tab lets you enable the system to create
vehicle presets automatically. To enable this function, check the
Enabled box on the tab. Then check the boxes for the data fields to
be included in the presets. When you process a transaction for a
vehicle that does not have presets, the program will use the data
selected for the transaction to create a preset automatically. This
function will not create a preset if a preset already exists for the
vehicle.
(5/07) 8-15
METTLER TOLEDO OverDrive Software User’s Manual
Load Numbers
and Key Table
The Load Numbers / Key Table tab is used to reset the load number
counter and to customize the system-generated keys that are
assigned as transaction numbers and as IDs for database records.
Load Numbers
This list box displays all load numbers that are currently enabled. A
load number is assigned to an individual company and stored in the
Company table record. The load counter tracks the number of
transactions processed for each load number. You can use this tab
to reset the load counters to zero.
1.
8-16 (5/07)
Select (highlight) the load numbers that you want to reset:
•
Click an individual load number to select it.
•
Click the Set All button to select all load numbers in the
list box.
•
Click the Clear All button to deselect the load numbers so
that they will not be reset.
Chapter 8: Application Setup Options
Load Numbers and Key Table
2.
Then click the OK button to reset the load counters that are
selected to zero.
Key Table
The Key Table lets you customize the formats of system-generated
keys. A key is a number assigned to each transaction or an ID
assigned to each database record. Transaction numbers are
generated by the system, but IDs for database records can be
entered manually or generated by the system. When the system
generates a key, it uses a simple numbering scheme (1, 2, 3…).
You can customize the key by adding an alphanumeric prefix or
suffix to the number.
All of the tables that use keys are displayed in the list box. When
you highlight a table in the list box, the formatting for the key will be
shown in the data fields to the right of the box. Edit the information
in the data fields to customize the formatting. Each table is
numbered and formatted independently.
Table Prefix
Enter up to three alphanumeric characters to be used as a prefix for
the key. For example, if you enter TRX as a prefix, the systemgenerated keys will be TRX1, TRX2, TRX3, etc. You can include both
a prefix and suffix in a key format.
Table Suffix
Enter up to three alphanumeric characters to be used as a suffix for
the key. For example, if you enter SSC as a suffix, the systemgenerated keys will be 1SSC, 2SSC, 3SSC, etc. You can include both
a prefix and suffix in a key format.
Next Key
This data field shows the number that will be assigned as a key for
the next transaction or database record.
Key Status
Select one of the options in the combo box: Supported or
Unsupported. This will determine what happens when you try to
save a new database record without assigning an ID for it. If
Supported is selected, the system will automatically generate a key
for the record. If Unsupported is selected, the system will prompt the
operator to enter a key.
Description
Enter a description for the key format.
Computer ID
If the system is running on more than one computer, you can use
the same set of keys for all computers or generate keys
independently on each computer. To set up a computer
(5/07) 8-17
METTLER TOLEDO OverDrive Software User’s Manual
independently, assign a Computer ID for it and enter the ID in this
data field.
Append Computer ID
Check this box to include the Computer ID at the beginning of the
system-generated key.
8-18 (5/07)
Chapter 9: Sampling
Sampling Setup
9
Sampling
Sampling
Setup
Sampling is used to monitor product quality. With the OverDrive
program, you can set up sampling schedules, receive a prompt
when a sample is required, and record sampling results. To create a
sampling schedule, open the Sampling Setup screen in the
Sampling Setup folder. Use the same procedure that you would use
to create a record in a data setup table. When you create a
sampling setup record, you are defining when a product sample
should be taken. Based on the settings that you select, the system
will prompt the operator when it is time to sample a product.
(5/07) 9-1
METTLER TOLEDO OverDrive Software User’s Manual
Data Fields
Sampling ID:
Enable
Sampling:
Start Date:
The identifier for the sampling setup record.
Check this box to enable the sampling setup
record. If a record is enabled, the system will
prompt the operator when sampling is required.
Use the calendar in the Start Date combo box to
select a date for the sampling schedule to take
effect. If no start date is selected, the sampling
schedule will take effect immediately.
Expiration Date: Use the calendar in the Expiration Date combo
box to select an ending date for the sampling
schedule. The system will alert the operator when
the time period expires. If no expiration date is
selected, the sampling schedule will not expire.
Sampling
Item Type:
Sampling Item:
Carrier Vehicle
Reference:
Sampling
Description:
Sampling
Actions:
Use the radio buttons to select the item type for the
sampling setup record. When you select an item
type (for example, Account), all records from that
table will be listed in the Sampling Item combo
box. To create a sampling record, specify an
interval at which sampling is required (for
example, every 50 loads) and an item to which
the interval applies (for example, an Account ID).
The system will then require a product sample for
every 50th load processed for the account that is
selected as the sampling item.
Use the combo box to select a sampling item (for
example, an Account ID).
This data field is active only when Vehicle is
selected as the sampling item type. If a vehicle is
selected as the sampling item, the carrier linked to
the vehicle will be shown in this data field. If a
carrier is selected in this data field, only the
vehicles linked to that carrier will be available in
the Sampling Item combo box.
A description of the sampling schedule.
Check the Ticket box to print a ticket containing
the sampling data when the transaction is
completed.
Sampling Type: Select the Step radio button if a sample is to be
taken at the end of a specified interval. For
9-2 (5/07)
Chapter 9: Sampling
Sampling Setup
example, if the interval is 200 loads, the sample
will be taken when you process the 200th load.
Select the Random radio button if a sample is to
be taken at a randomly chosen point within a
specified interval. For example, if the interval is
200 loads, the sample will be taken during a
transaction randomly chosen from among the 200
loads.
Sampling Mode: Use the radio buttons to indicate whether the
sample will be taken from an Outbound vehicle
(ship) or an Inbound vehicle (receive). Outbound
sampling is based on net weight; inbound
sampling is based on gross weight. Inbound
sampling is active only for the following sampling
item types: Product and Scale.
Sampling Unit:
Define the interval at which sampling will be
required. Use the radio buttons to select a unit
(Load, Pieces, or Weight). Then enter a number
in the Threshold data field to specify how many of
the units are in an interval. For example, if you
select Load and enter a threshold of 200, then
sampling will be required at intervals of 200
loads.
Notes:
Use this data field to enter additional information
about the sampling record.
NOTE: To use a sampling setup record, you must enable it by
checking the Enable Sampling box on this screen. You must also
check the Enable Sampling box on the Options screen’s Transaction
tab.
(5/07) 9-3
METTLER TOLEDO OverDrive Software User’s Manual
Sampling
Once a sampling schedule has been created and enabled, the
system will prompt you when a product sample is required. If a
sample is required for a transaction, the prompt will appear when
you click the Accept button (for inbound sampling) or the Complete
button (for outbound sampling).
It is possible for more than one sample to be required during a
transaction. That can happen if you set up sampling schedules
based on different item types. For example, you could set up a
schedule to sample a product at regular intervals and set up another
schedule to sample shipments to a specific account at regular
intervals.
9-4 (5/07)
1.
When a sample is required, the system will alert the operator
by displaying a message window. Acknowledge the message
by clicking the OK button on the message window.
2.
The Sampling Information tab will be displayed on the
Transaction screen. The sample(s) that must be taken will be
shown in the Required Samples list box.
3.
Highlight the first sample in the list box. The Sample Item Type
data field will show the database table used to set up the
sampling schedule, and the Sample Item data field will show
the individual record from that table.
4.
Test a sample of the product and enter the results in the
Sample Results data field.
5.
If more than one sample is required, highlight each additional
sample in the Required Samples list box and enter the results.
6.
When you have completed entering results for all required
samples, click the Continue button to record the sampling
information and continue with the transaction.
Chapter 9: Sampling
Sampling Modification
Sampling
Modification
The Sampling Modification screen is used to view records of
sampling results and make changes to them. To retrieve records,
use the standard query procedure:
•
To retrieve all sampling records, make sure all data fields are
empty and then click the Query button.
•
To retrieve specific sampling records, enter data as a filter and
then click the Query button. The Sampling ID, Sampling Date,
and Transaction Number data fields can be used as filters.
•
If you retrieve more than one record, use the arrow buttons on
the tool bar to scroll through the records.
Data Fields
Sampling ID:
This data field shows the ID for the sampling setup
record, which defines a sampling schedule. It
cannot be modified. Sampling setup records are
created with the Sampling Setup screen.
Sampling Date: This data field shows the date when the sample
was taken. It cannot be modified. You can search
for samples taken on a specific date by using the
calendar in the combo box to select a date when
you perform a query.
Transaction
Number:
This data field shows the transaction number for
which the sample was required. It cannot be
modified.
(5/07) 9-5
METTLER TOLEDO OverDrive Software User’s Manual
Sampling
Results:
This data field shows the results entered for a
specific sample. It can be modified.
Additional data fields are provided for specific sampling results:
moisture content, test weight, foreign material, grain damage, multicolor, and bean split.
9-6 (5/07)
Chapter 10: Setting Up Users
Security Setup
10
Setting Up Users
Security
Setup
Each person who uses the OverDrive system will need to enter a
user name and password to log in. To provide additional security,
you can assign various levels of access for users. For example, one
person can be set up as a system administrator with complete
access to all system functions. Others can be set up as operators
and given the limited access needed for the day-to-day job of
processing transactions. There is a screen for setting up users and a
screen for creating user groups.
User Setup
From the User Setup screen, you can set up users, assign
passwords for them, and specify which functions they will be
authorized to use. To open the User Setup screen, click on User
Setup in the Application Setup folder. To set up a user, fill in the
data fields, specify permissions and/or groups, and then click the
Save button.
(5/07) 10-1
METTLER TOLEDO OverDrive Software User’s Manual
Data Fields
User ID:
Enter an ID for the user.
User Name:
Enter a name for the user. The user will need to
enter this name exactly as it is spelled here when
logging in to the system.
Expiration Date: Use the calendar in the combo box if you want to
select a date when the user’s authorization to log
in to the system will expire.
Password:
Confirm
Password:
Enter the password that the user will need to enter
when logging in to the system.
Enter the password that was typed in the
Password data field.
NOTE: Passwords are case sensitive.
10-2 (5/07)
Chapter 10: Setting Up Users
Security Setup
Permissions Tab
You can assign permission to individual system functions for a user.
The Available list box contains all existing permissions that have not
been assigned.
•
To assign a permission to a user, highlight the permission in
the Available list box and then click the right arrow button to
move it to the Assigned list box.
•
To remove a permission from the Assigned list box, highlight
the permission in the list box and then click the left arrow
button.
•
The double arrow buttons are used to move all permissions
from one list box to the other.
(5/07) 10-3
METTLER TOLEDO OverDrive Software User’s Manual
Groups Tab
You can assign a user to one or more groups for which access to
system functions has been predefined. The Available list box
contains all existing user’s groups (user’s groups are created on the
Group Setup screen) that have not been assigned.
•
To assign a user to a group, highlight the group in the
Available list box and then click the right arrow button to move
the group to the Assigned list box.
•
To remove a group from the Assigned list box, highlight the
group in the list box and then click the left arrow button.
•
The double arrow buttons are used to move all groups from
one list box to the other.
•
When you select the “Standard User” group, you limit a user’s
access to security setup functions. A standard user can create
other standard users but cannot perform security functions
such as assigning permissions and groups, performing
queries, and deleting user records.
NOTE: You can assign any combination of groups and permissions
for a user. For example, you can assign a user to a group and then
assign additional permissions that are not available to the group.
10-4 (5/07)
Chapter 10: Setting Up Users
Security Setup
Group Setup
The Group Setup screen is used to create authorization groups with
different levels of access to the system. By creating a group for each
type of user, you can make it easier to set up individual users. For
example, you can create an operator group and define the functions
an operator is authorized to use. When you set up an individual
operator, simply assign the operator to this group and he/she will
automatically be authorized to use all the operator group functions.
To open the Group Setup screen, click on Group Setup in the
Application Setup folder.
1.
Enter an ID or name for the group in the Group ID data field.
2.
Enter a description of the group in the Description data field.
3.
Specify the system functions that will be available to the group
by adding permissions to the Assigned list box:
•
To add a permission to the list box, highlight the
permission in the Available list box and then click the
right arrow button.
(5/07) 10-5
METTLER TOLEDO OverDrive Software User’s Manual
•
4.
To remove a permission from the Assigned list box,
highlight the permission in the list box and then click the
left arrow button.
When you have finished creating or editing a group record,
save the record. The Group ID will be listed in the Available list
box on the User Setup screen’s Groups tab.
Changing
Passwords
Once a password has been assigned for a user, the user can
change it at any time from the Password Change screen. To open
the Password Change screen, click on Password Change in the
Application Setup folder.
10-6 (5/07)
1.
Enter the current password in the Current Password data field.
2.
Enter the new password in the New Password data field.
3.
Enter the new password in the Confirm New Password data
field.
4.
Click the Change Password button to change the password,
or click the Cancel button to cancel the password change.
Chapter 11: Managing Transaction Records
Transaction Maintenance
11
Managing Transaction Records
Transaction
Maintenance
The OverDrive system automatically creates a record of each
transaction that you process. Using the Transaction Maintenance
screen, you can search the database for transaction records to view
them or to modify the information stored in them. To open the
Transaction Maintenance screen, click on Transaction Maintenance
in the Back Office Management folder.
The current status of each transaction is indicated by the following
status codes:
C
Completed transactions
I
Incomplete transactions: Two-pass or multi-pass
transactions for which the final pass has not been
completed.
M
Modified transactions
V
Voided transactions
X
Exported transactions
To view the status code for a transaction, display the transaction
record on the Query View tab. The table where the records are
displayed includes a Status column.
(5/07) 11-1
METTLER TOLEDO OverDrive Software User’s Manual
Query View
Use the Query View tab to search the database for transaction
records. The data fields, radio buttons, and check boxes on the tab
function as filters. If you set filters, a query will retrieve only those
transactions that meet the specifications of the filters. To retrieve all
transactions, make sure that no filters are set and make sure the
Transaction Status and Date Range radio buttons are set to All.
A query involves the following steps:
1.
Select filters to define the query.
2.
Click the Query button.
3.
The transactions that match the query specifications will be
displayed in the table at the bottom of the Query View tab.
The filters interact with one another, so make sure that all filters are
set correctly. If you perform a query and do not get the results that
you expected, check the filter settings and try again. Note that the
default date range setting is Today. To search for earlier
transactions, you will need to change the setting.
11-2 (5/07)
Chapter 11: Managing Transaction Records
Transaction Maintenance
Transaction Number
To search for a specific transaction number, enter it in the
Transaction Number data field. Make sure that none of the other
filter settings exclude the transaction number, and then click the
Query button to retrieve the record.
ID Combo Boxes
You can search for transactions processed for a specific vehicle,
carrier, company, account, contract, or product. Select the desired
ID from one of the five combo boxes. You can specify more than
one type of ID. For example, you can select an Account ID and a
Product ID to search for transactions in which a specific account
bought/sold a specific product.
Transaction Status
Use the Transaction Status radio buttons to search for transactions
that belong to one of the following status groups:
•
All – All transactions.
•
Completed – Completed transactions only.
•
Incomplete – Incomplete transactions only.
•
Modified – Modified transactions only.
•
Exported – Exported transactions only.
Date Range
Use the Date Range radio buttons to search for transactions
processed during a specific time period:
•
Today – Transactions processed today (this is the default
selection).
•
Yesterday – Transactions processed yesterday.
•
Specify – Transactions processed during a specified time
period. Use the calendar in the Start Date combo box to select
the starting date for the period. Use the calendar in the End
Date combo box to select the ending date for the period.
•
All – All transactions.
Ticket Layout
You can print or view ticket layouts. Select a layout in the Ticket
Layout combo box, and then click the Print button to print a copy of
the layout or click the Print Preview button to view the layout.
(5/07) 11-3
METTLER TOLEDO OverDrive Software User’s Manual
Modify View
The Modify View tab is used to view an existing transaction record
and make changes to it. You will need to perform a query to locate
the record before you can modify it.
11-4 (5/07)
1.
Use the Query View tab to locate a transaction record.
2.
Highlight the transaction record in the table on the Query View
tab.
3.
Click the Modify View tab. The transaction data will be
displayed on the tab.
4.
Modify the transaction record by changing selections in the
combo boxes and entering new data in the data fields. You can
also modify data on the tabs at the bottom of the screen.
5.
Enter a reason for the changes in the Modification Reason data
field. You will not be able to save the changes unless you enter
a modification reason. The system will automatically record the
name of the operator who was logged in when the record was
modified.
6.
Click the Save button to save the modified transaction to the
database.
Chapter 11: Managing Transaction Records
Transaction Maintenance
Transaction type data cannot be modified. This includes the
Transaction Type data field and the Split Weighing, Multi Axle, and
Truck Only check boxes.
Some data fields cannot be modified manually, for example, the
Vehicle Tare field. The data displayed in that field is read from the
Vehicle table record, so the only way to modify it is to select a new
Vehicle ID or change the data stored in the Vehicle table record.
To void a transaction, check the Void Transaction box. The original
transaction record will remain in the database (its status will be
changed to V). If you change a Vehicle ID, Account ID, Contract ID,
or Product ID, the transaction will be voided regardless of whether
this box is checked or not. The original transaction record will
remain in the database (its status will be changed to V), and the
system will create a new transaction record (its status will be M). It
will have a new transaction number but the same master transaction
number as the original transaction.
Weighing Maintenance Tab
This tab displays data from the Transaction screen’s Product Detail
tab. All fields that cannot be modified manually will be disabled.
Two-pass and multi-pass transactions can include separate data
entries for each pass. To switch between those entries, click the right
or left arrow button on the Modify View tab.
(5/07) 11-5
METTLER TOLEDO OverDrive Software User’s Manual
Taxes and Surcharges Tab
This tab is used to modify taxes and surcharges applied to a
transaction.
Adding a Tax
1.
Select a product in the Product combo box. If more than one
product is involved in a transaction, you will need to apply the
appropriate tax to each product. If more than one weighing is
involved, apply the tax to each weighing.
2.
Select the tax in the Taxes combo box.
3.
Click the Add Tax button.
4.
The tax information will be listed in the table on the Taxes and
Surcharges tab.
Adding a Surcharge
1.
Select a product in the Product combo box. If more than one
product is involved in a transaction, you will need to apply
the appropriate surcharge to each product. If more than one
surcharge is involved, apply the surcharge to each weighing.
2.
Select the surcharge in the Surcharges combo box.
3.
Click the Add Surcharge button.
4.
The surcharge information will be listed in the table on the
Taxes and Surcharges tab.
Deleting Taxes and Surcharges
11-6 (5/07)
1.
Highlight the tax or surcharge that you want to delete in the
table on the Taxes and Surcharges tab
2.
Click the Remove button.
Chapter 11: Managing Transaction Records
Weights and Measures
Weights and
Measures
The Weights and Measures log file stores a record of every
transaction. These records are intended for Weights and Measures
certification, so they are permanent records that cannot be changed
or deleted. To view the file, open the Weights and Measures screen
from the side tree.
Form View
Use the Form View tab to search the database for transaction
records. The data fields on the tab function as filters. If you enter a
filter, a query will retrieve only those transactions that meet the
specifications of the filter. To retrieve all transactions, make sure that
all data fields are empty.
A query involves the following steps:
1.
Enter filters to define the query.
2.
Click the Query button.
3.
The first transaction that matches the query specifications will
be displayed on the Form View tab. To view all transactions
retrieved by the query, select the Table View tab.
(5/07) 11-7
METTLER TOLEDO OverDrive Software User’s Manual
The filters interact with one another, so make sure that all filters are
set correctly. If you perform a query and do not get the results that
you expected, check the filter settings and try again. Note that the
filters are case sensitive.
Data Fields
Transaction
Number:
Start Date and
Finish Date:
When a transaction record is displayed, the Start
Date data field shows the date on which the
transaction was started and the Finish Date data
field shows the date on which the transaction was
completed. You can also use the calendars in the
combo boxes to select a start date and a finish
date as filters for a query:
•
When you select a start date only, the query
will retrieve transactions that were started on
that date.
•
When you select a finish date only, the query
will retrieve transactions that were completed
on that date.
•
When you select both a start date and a
finish date, the query will retrieve all
transactions processed between the two
dates.
Computer ID:
This data field shows the ID for the computer on
which the transaction was processed. The
Computer ID is stored in the Key Table tab on the
Options screen. You can enter a Computer ID as a
filter for a query.
User ID:
This data field shows the ID for the user who
processed the transaction. The User ID is stored in
the Security Setup screen. You can enter a User ID
as a filter for a query.
Transaction
Status:
11-8 (5/07)
This data field shows the transaction number that
is assigned when a transaction is processed.
When you perform a query, you can retrieve a
specific transaction record by entering the
transaction number as a filter.
This data field shows the status of the transaction.
You can enter a transaction status as a filter for a
query.
Chapter 11: Managing Transaction Records
Weights and Measures
Total Price:
This data field shows the total price for the
transaction, including taxes and surcharges. You
can enter a total price as a filter for a query.
Total Net Price:
This data field shows the total net price for the
transaction. You can enter a total net price as a
filter for a query.
Total Net Weight: This data field shows the total net weight for the
transaction. You can enter a total net weight as a
filter for a query.
The Transaction Details table at the bottom of the Form View tab
displays the data recorded for each weighing of a transaction. For
example, when you retrieve the record for a two-pass transaction,
the data for each pass will be shown on a separate line.
You can print a copy of a transaction record that is displayed on the
Form View tab by clicking the Print button.
Table View
This tab displays all the transaction records that are retrieved when
you perform a query. Highlighting one of the transactions in the
table will display the transaction record on the Form View tab.
(5/07) 11-9
Chapter 12: Reports and Tickets
Introduction
12
Reports and Tickets
Introduction
The system includes a selection of standard report and ticket
formats. A report compiles information from the database. A ticket
prints information about an individual transaction. If you want to
customize reports and tickets within the OverDrive program, you will
need to install compatible report software such as Crystal Reports.
Printing
Tickets
The system can print a ticket automatically for each transaction. In
order to do that, you will need to select a ticket format and enable
ticket printing:
•
To select a ticket format, open the Account table. On the Form
View tab, you will see a Ticket In combo box for selecting an
inbound ticket format and a Ticket Out combo box for selecting
an outbound ticket format. You can select formats for either or
both combo boxes. If you do not wish to print a ticket, select
(none). When you specify a ticket format for an account, you
are instructing the system to print tickets for that account. If you
want to print tickets for all accounts, you will need to specify a
ticket format for each account record.
•
To enable ticket printing, open the Options screen. On the
Transaction tab, check the Enable Ticket Printing box.
(5/07) 12-1
METTLER TOLEDO OverDrive Software User’s Manual
Report
Screen
The Report screen is used to view an existing report/ticket or to
create a new report/ticket format.
12-2 (5/07)
•
To retrieve existing reports and tickets, select Report or Ticket
in the Report Type combo box and then click the Query button.
Data entered in any of the fields will act as a filter. All records
that are retrieved will be listed on the Table View tab.
•
To create a new report or ticket format, you must install
compatible report software such as Crystal Reports. Enter
information about the report or ticket in the data fields and then
click the Save button. Click the Edit/Open button to open the
format in Crystal Reports.
Chapter 12: Reports and Tickets
Report Screen
Data Fields
Report ID:
Each report or ticket must have a unique
alphanumeric identifier. To create a new record,
type an ID in the data field or click the Get System
Generated Key button to have the system assign
an ID.
Report Type:
Use the combo box to select the type of document:
Report or Ticket.
Report Name:
A name assigned to the report or ticket.
Report File
Name:
The file name and directory location for the report
or ticket. When creating a report or ticket, click the
Browse button to open a window that will allow
you to enter a file name and select a location.
Report Package: The software package used to create the report or
ticket. The standard software is Crystal Reports.
Report
Description:
A description of the report or ticket.
The buttons on the right-hand side of the screen are used to open,
view, and print reports and tickets:
•
The Edit/Open button opens a report or ticket so that you can
edit it. Before you can open a report or ticket, you must install
compatible report software such as Crystal Reports.
•
The Print Preview button opens a window that displays a
preview of the report or ticket.
•
The Print button prints a copy of the report or ticket.
(5/07) 12-3
METTLER TOLEDO OverDrive Software User’s Manual
Destinations
The Destinations tab lets you specify destinations for printing a
report/ticket or for creating a file.
1.
Display the report or ticket in the Report ID data field at the top
of the Report screen.
2.
Fill in the data fields to specify a destination, and then click the
Add button to add the destination to the list box. You can add
more than one destination. Simply click the Clear button to
clear the data fields and then specify another destination.
3.
Click the Save button on the tool bar.
To delete an item from the list box, highlight it and then click the
Remove button.
Data Fields
Destination Type: Use the radio buttons to select how you want to
output the report/ticket: Print Preview, Printer, or
File. Print Preview displays the report/ticket on the
computer screen, Printer sends a print command
to a Windows-compatible printer, and File creates
an electronic file.
Copies:
12-4 (5/07)
Enter the number of copies that you want to print.
This field is used only if Printer is selected as the
destination type.
Chapter 12: Reports and Tickets
Report Screen
Destination
Name:
Enter a name for the destination record that you
are creating.
Printer Name:
If the destination type is Printer, select the printer
to which you want to send the document. You can
select a local or network printer.
File Name:
If the destination type is File, click the Browse
button to select a directory location for the file that
will be created.
File Export Type: If the destination type is File, select the type of file
that you want to create.
Unattended
Condition:
When this box is checked, the system will verify
that the destination matches the Computer ID and
Scale Name listed on the tab. If they match, a
ticket will be printed. If they do not match, a ticket
will not be printed. This function is useful when a
system includes more than one scale or when a
printer is located at each end of a scale.
Computer ID:
This data field shows the ID of the computer that is
processing the transaction for which the ticket will
be printed.
Scale Name:
This data field shows the name of the scale that is
weighing the vehicle for which the ticket will be
printed. If a computer controls more than one
scale, a ticket will be printed for each scale. By
specifying an individual scale, you can have the
system print only one ticket.
After you have defined a destination for a report/ticket, you can use
the Print button to send the report/ticket to the destination. Highlight
the destination name in the list box, use the radio buttons to select a
destination type, and then click the Print button. If a destination is
not selected, clicking the button will display a print preview.
(5/07) 12-5
METTLER TOLEDO OverDrive Software User’s Manual
Parameters
The Parameters tab lets you specify the parameters to be included
in the report or ticket. Parameters correspond to the data fields on
the Transaction screen and Data Setup tables (for example,
Transaction Number and Product ID).
CAUTION: Do not change the parameters unless you are familiar
with Crystal Reports and how to use it to set parameters.
1.
Display the report or ticket in the Report ID data field at the top
of the Report screen.
2.
Enter the name of the parameter (for example, Transaction
Number or Product ID) in the Parameter Key data field.
3.
Enter a description of the parameter in the Parameter
Description data field.
4.
Click the Add button to add the parameter to the list box. You
can add more than one parameter. Simply click the Clear
button to clear the data fields and then specify another
parameter.
5.
Click the Save button on the tool bar.
To delete an item from the list box, highlight it and then click the
Remove button.
12-6 (5/07)
Chapter 12: Reports and Tickets
Report Screen
Permissions
The Permissions tab lets you limit access to a report or ticket by
linking it to the user’s permissions specified on the Security Setup
screen. When you select a permission from the Permission ID
combo box, you limit access to the report/ticket to users who have
that Permission ID assigned to them.
1.
Display the report or ticket in the Report ID data field at the top
of the Report screen.
2.
Add permissions to the list box on the Permissions tab. Select
a permission from the Permission ID combo box, and then
click the Add button to add it to the list box. You can add more
than one permission to the list box.
3.
Click the Save button on the tool bar.
To delete an item from the list box, highlight it and then click the
Remove button.
(5/07) 12-7
METTLER TOLEDO OverDrive Software User’s Manual
Groups
The Groups tab lets you can create a group of reports/tickets that
will act as a subset of another report or ticket. When you print a
copy of the main report or ticket, the reports/tickets in the subset will
automatically be printed along with it.
1.
Display the main report or ticket in the Report ID data field at
the top of the Report screen.
2.
Add the members of the subset group to the list box on the
Groups tab. Select a report from the Report ID combo box, and
then click the Add button to add it to the list box. You can add
more than one report to the list box.
3.
Click the Save button on the tool bar.
To delete an item from the list box, highlight it and then click the
Remove button.
12-8 (5/07)
Chapter 12: Reports and Tickets
Printing
Printing
You can print reports and tickets from the Report screen.
1.
Select Report or Ticket in the Report Type data field.
2.
Click the Query button to retrieve a list of reports or tickets.
3.
Select the report or ticket that you want to print. You can use
the arrow buttons on the tool bar to scroll through a list or
switch to the Table View tab and highlight the desired item.
4.
Click the Print button (or click the Print Preview button to view
the report/ticket on the computer screen).
5.
If a parameter is required, the Enter Parameter Values window
will open. Enter a parameter in the Discrete Value data field (or
enter a date range), and then click the OK button.
•
Reports: Some reports do not require parameters. You
must enter a transaction number for the Weights and
Measures report. You must enter a date for the other
reports that require parameters.
•
Tickets: You must enter a transaction number for
transaction tickets. You must enter a Sampling ID for
sampling tickets. You must enter a Tare Detail ID or Tare
Master ID for tare tickets.
(5/07) 12-9
METTLER TOLEDO OverDrive Software User’s Manual
Standard
Reports
Report Name
Fields Included
Account List
Account, Description, Contact, Phone, Credit Limit, Credit
Balance
Account Summary
Account, Description, Load #, Load %, Wt., Wt. %, Volume,
Volume %, Cost, Cost %
Account Summary by
Product
Account, Product, Loads, Wt., Units, Total Cost
Account Transaction
Complete Date
Account, Date, Total Net Wt., Total Net Price
Badge List
Badge, Description
Carrier List
Carrier, Description, Address, City, State, Zip
Cash Report
Transaction #, Account, Product, Payment Method, Date,
Payment Amount
Company List
Company, Description, Address, City, State, Zip
Completed
Transactions
Transaction #, Vehicle, Status, Account, Product, Start Date, End
Date
Container List
Container, Description, Volume, Volume Unit, Tare Wt.
Contract Information
Contract, Description, Discount, Product, Price, Contract Wt.,
Current Wt., Account
Contract Product
Pricing
Contract, Product, Unit Price
Credit Report by
Account
Account, Enabled, Expiration Date, Actual Credit, Maximum
Credit, Discount, Discount Unit
Customer Product
Product, Account, Transaction #, Date, Wt., Fees, Taxes, Total
Price
Daily Ticket Report
Date, Ticket #, Account, Carrier, Vehicle, Product, Time In, Time
Out, Wt., Units, UOM, Revenue
Detailed Transactions
Transaction #, Vehicle, Account, Contract, Start Date, End Date,
Net Wt., Net Price, Surcharges, Taxes, Total Price, Product, Unit,
Status
Driver List
Driver ID, Name, License #
Formula List
Formula ID, Description, Unit, Formula
Group Members List
Group, Member, Basis
12-10 (5/07)
Chapter 12: Reports and Tickets
Standard Reports
Invoice by Date
Ticket #, Date, Carrier, Vehicle, Company, Net Wt., Unit Price,
Net Price, Tax/Fees, Total Price, Product, Subtotal, Invoice Total
Invoice by Number
Ticket #, Date, Carrier, Vehicle, Company, Net Wt., Unit Price,
Net Price, Tax/Fees, Total Price, Product, Subtotal, Invoice Total
Invoice by Unlocked
Ticket #, Date, Carrier, Vehicle, Company, Net Wt., Unit Price,
Net Price, Tax/Fees, Total Price, Product, Subtotal, Invoice Total
Invoice Summary by
Date Locked
Invoice #, Date Invoiced, Account, Tickets, Net Wt., Net Price,
Taxes, Surcharges, Total Price, Subtotals, Grand Totals
Invoice Summary by
Unlocked
Invoice #, Date Invoiced, Account, Tickets, Net Wt., Net Price,
Taxes, Surcharges, Total Price, Subtotals, Grand Totals
Invoice Summary by
Date
Invoice #, Date Invoiced, Account, Tickets, Net Wt., Net Price,
Taxes, Surcharges, Total Price, Subtotals, Grand Totals
Invoice Summary by
Number
Invoice #, Date Invoiced, Account, Tickets, Net Wt., Net Price,
Taxes, Surcharges, Total Price, Subtotals, Grand Totals
Invoice Summary
Report
Invoice #, Date Invoiced, Account, Tickets, Net Wt., Net Price,
Taxes, Surcharges, Total Price, Subtotals, Grand Totals
Open Transactions
Transaction #, Status, Vehicle, Vehicle Description, Account,
Account Description, Start Date
Peak Graph Report
Hourly traffic by loads and weight
Permit List
Permit, Description, Issuing Authority, Product, Expiration Date
Price Report
Account, Product, Product Net Price, Total Net Price,
Surcharges, Taxes, Total Price
Product Customer
Product, Account, Transaction #, Date, Wt., Unit Price, Net Price
Product List
Product, Description, Stock Level, Unit Price, Minimum Price
Product Summary
Product, Description, Load #, Load %, Wt., Wt. %, Volume,
Volume %, Cost, Cost %
Product Taxes/
Surcharges
Product, Description, Tax, Tax Amount, Surcharge, Surcharge
Amount
Product/ Transaction
Detail Date
Product, Net Wt., Net Price, Unit Price
Short Code List
Short Code, Description
Surcharge List
Surcharge, Description, Type, Amount, Level Type
Tare Expiration Report
Carrier, Vehicle, Tare Date, Expiration Date, Tare Wt., Scale ID
Tax List
Tax, Description, Type, Amount, Compound Tax
Trailer List
Trailer, Description, Volume, VIN, Tag #, Expiration Date
Transaction Accounts
Date, Account, Transaction #, Product, Product Description, Net
Wt., Total Price, Surcharges, Taxes, Net Price
Transaction Products
Date, Product, Transaction #, Account, Account Description, Net
(5/07) 12-11
METTLER TOLEDO OverDrive Software User’s Manual
Wt., Total Price, Surcharges, Taxes, Net Price
Transaction –
Tax/Surcharge
Transaction #, Product, Levy ID, Levy Type, Pre/Post, Rate,
Amount, Taxes, Surcharges
Transaction Type
Wizard Settings
Transaction Type ID, Transaction Type, Normal Weighing, MultiAxle Weighing, Split Weighing, Prompt Order, Field Name,
Required, Transaction Pass
Transaction Vehicles
Vehicle, Transaction #, Account, Gross Wt., Net Wt., Tare Wt.,
Product, Total Wt.
Transaction Weights
Transaction #, Vehicle, Gross Wt., Net Wt., Tare Wt., Status,
Start Date, End Date
Vehicle Detail Report
Vehicle, Tare, Container, Trailer, Expiration Date, Maximum Wt.,
Tare Wt., Tractor/Trailer
Vehicle List
Vehicle, Description, Carrier, Volume, Minimum Wt., Maximum
Wt., Tag #, Tag Expiration Date
Vehicle Tare
Carrier, Vehicle, Tare Date, Expiration Date, Tare Wt., Scale ID
Vehicle Transaction
Vehicle, Transaction Complete Date, Net Wt., Net Price
Void Ticket Report
Transaction #, Date/Time Out, Wt., Cost, Reason/User
Voided Transaction
List
Transaction #, Vehicle, Status, Account, Product, Start Date, End
Date, Reason/User
Weights and
Measures
Transaction #, Start Date, Complete Date, Computer ID, User ID,
Status, Net Price, Net Wt., Total Price
12-12 (5/07)
Chapter 12: Reports and Tickets
Standard Tickets
Standard
Tickets
Ticket Name
Certified Container
Fields Included
Container, Tare ID, Tare Wt., Expiration Date, Scale, (Signature)
Certified Trailer
Trailer, Tare ID, Tare Wt., Scale, Expiration Date, (Signature)
Certified Vehicle
Vehicle, Description, Carrier, VIN, Tag Number, Tare ID, Tare
Wt., Expiration Date, Scale, (Signature)
Container Tare Ticket
Container, Tare ID, Tare Wt., Expiration Date, Scale
Multi-weigh Ticket
Transaction #, Date, Scale, Vehicle, Account, Discount, Pieces,
Container, Product, Weight Unit, Sample, Operation, Wt., Net
Price, Taxes, Total Price
Sampling Ticket
Transaction #, Date, Vehicle, Account, Product, Sampling ID,
Sampling Date, Sample Data Results
Standard Ticket
Transaction #, Scale ID, Date, Time In, Time Out, Gross Wt.,
Tare Wt., Net Wt., Account, Carrier, Trailer, Container, PO#,
Product, Quantity, Measure, Rate, Amount, Taxes, Fees
Trailer Tare Ticket
Trailer, Tare ID, Tare Wt., Scale, Expiration Date
Tsample
Transaction #, Account, Vehicle, Product, Date, In Wt.
Tsample2
Transaction #, Start Date, End Date, Payment Type, Vehicle,
Account, Carrier, Company, Remark1, Remark2, Pass, Scale,
Product, Container, Wt., Net Wt., Tax/Surcharge, Net Price
Tsample3
Transaction #, Start Date, End Date, Payment Type, Vehicle,
Account, Carrier, Contract, Remark1, Remark2, Pass, Scale,
Product, Container, Wt., Net Wt., Tax/Surcharge, Net Price
Unattended Ticket
Transaction #, Vehicle, Account, Total Net Wt., Total Net Price,
Total Price
Vehicle Tare Ticket
Vehicle, Description, Carrier, VIN, Tag #, Tare ID, Tare Wt.,
Expiration Date, Scale
(5/07) 12-13
Chapter 13: Using the GUI Editor
Introduction
13
Using the GUI Editor
Introduction
The Graphical User Interface (GUI) Editor is used to change the
appearance of OverDrive screens. It enables you to customize
screens to meet the specific needs of your application.
With the GUI Editor, you can do the following:
•
Edit text on a screen
(5/07) 13-1
METTLER TOLEDO OverDrive Software User’s Manual
•
Hide objects that are not needed
•
Change the size and appearance of objects
•
Reposition objects on a screen
•
Set the tab order for data fields
•
Add text and graphics to a screen
Opening the
GUI Editor
To open the GUI Editor, click the GUI Editor menu item in the Tools
menu.
The GUI Editor is available only when an editable screen is open.
13-2 (5/07)
Chapter 13: Using the GUI Editor
Introduction
Editing Screens
When you open the GUI Editor, the screen that you are editing will
change slightly. A dotted grid will appear on the screen. If the snapto-grid feature is enabled, you can use this grid to align objects
horizontally and vertically. A red dotted line will appear around
objects that are hidden.
To edit an object, click on the object to select it. Sizing handles will
appear at the corners of the object. The name of the object will be
displayed as the Field ID on the GUI Editor window.
Saving Changes
To save changes that you have made with the GUI Editor, open the
Tools menu and click the GUI Editor menu item. If you close the GUI
Editor without clicking the GUI Editor menu item, your changes will
not be saved.
(5/07) 13-3
METTLER TOLEDO OverDrive Software User’s Manual
Editing Text
Each item of text that appears on a screen is contained in an object
called a label. When you click on a label to select it, the text will
appear in the GUI Editor’s Text data field.
Edit the text in the data field, not on the screen. Then click outside
the data field to display the new text on the screen.
Hiding
Objects
Use the Visible combo box to make an object visible or invisible.
You cannot delete data fields or labels from a screen, but you can
hide them so that they are not visible to the operators. When you are
using the GUI Editor, both visible and invisible objects will appear
on the screen. Invisible objects are outlined with a red dotted line.
When you select an object on the screen, the combo box will
display “true” if the object is visible and “false” if the object is
invisible. Change the status in the combo box to hide an object or
make it visible.
Changing
Appearance
Foreground Color Button
This tool lets you change the color of an object or text on a screen.
Select an object and then click the button to open the Color Selector
window. Select a color and then click the window’s OK button.
Background Color Button
This tool lets you change the color of the background behind an
object on a screen. Select an object and then click the button to
open the Color Selector window. Select a color and then click the
window’s OK button.
13-4 (5/07)
Chapter 13: Using the GUI Editor
Changing Appearance
Color Selector
When you click either of the color buttons, the Color Selector
window will open. Use one of the color selector tabs to change the
foreground or background color for an item. The bottom part of the
window will display a preview of the color. Click the OK button to
select the color. If you have previewed a new color but have not yet
clicked the OK button, you can use the Reset button to restore the
last color that was selected.
Swatches Tab: This tab contains a palette full of color swatches.
Click on one of the color swatches to preview the color. When you
position the cursor over a color swatch, the color’s RGB settings will
be displayed briefly. To restore the default gray color, select one of
the gray swatches in the Recent palette.
(5/07) 13-5
METTLER TOLEDO OverDrive Software User’s Manual
HSB Tab: HSB refers to the hue, saturation, and brightness of a
color. You can change a color by adjusting the level of each of
those characteristics. Use the radio buttons to select the
characteristic you want to change: Hue, Saturation, or Brightness.
Then adjust the level of the characteristic by moving the button
along the sliding scale or typing a number in the data field.
•
Hue: The sliding scale moves along the color spectrum from 0
to 360.
•
Saturation: The sliding scale adjusts the saturation from 0
(white) to 100 (fully saturated).
•
Brightness: The sliding scale adjusts the brightness from 0
(black) to 100 (bright).
The RGB settings for the color are displayed in the fields in the lower
right-hand corner of the tab.
13-6 (5/07)
Chapter 13: Using the GUI Editor
Changing Appearance
RGB Tab: RGB refers to the three primary colors used to create a full
range of colors: red, green, and blue. You can change a color by
adjusting the amount of each primary color it contains. Move the
pointers along the Red, Green, and Blue sliding scales or type a
number in the data field to the right of each scale.
Font Family Combo Box
This tool lets you change the font of text on a screen. When you
select a label that contains text, the font will appear in this data field.
Use the combo box to select a new font.
Font Size Data Field
This tool lets you change the size of text on a screen. When you
select a label that contains text, the font size will appear in this data
field. Type a new font size in the data field. When you click outside
the data field, the size of the text on the screen will change.
(5/07) 13-7
METTLER TOLEDO OverDrive Software User’s Manual
Font Style Combo Box
This tool lets you change the style of text on a screen. When you
select a label that contains text, the font style will appear in this data
field. Use the combo box to select a new style: Normal, Bold, Italics,
or Bold+Italics.
Moving
Objects
The drag-and-drop method is the easiest way to move objects. Click
on an object to select it. Then hold down the mouse button and drag
the object to reposition it. You can also enter X and Y coordinates to
move an object to a precise location on the screen.
NOTE: If the Snap to Grid box is checked, you will not be able to
position objects between the dotted lines of the grid.
X-Coordinate Data Field
This tool lets you reposition an object along the screen’s horizontal
axis. When you select an object on the screen, a number will
appear in the data field. That number represents the position of the
left side of the object. The numbering system begins at the left edge
of the screen (0). Each dot on the screen’s grid equals 10 pixels.
For example, when you enter 35 in the data field, you are
positioning the left side of the object midway between the third and
fourth dots from the left edge of the screen.
Y-Coordinate Data Field
This tool lets you reposition an object along the screen’s vertical
axis. When you select an object on the screen, a number will
appear in the data field. That number represents the position of the
top side of the object. The numbering system begins at the top edge
of the screen (0). Each dot on the screen’s grid equals 10 pixels.
For example, when you enter 35 in the data field, you are
positioning the top side of the object midway between the third and
fourth dots from the top edge of the screen.
Snap to Grid Check Box
The snap-to-grid feature can help you align objects on a screen.
Place a check mark in the box to enable this feature. When it is
enabled, any object that you reposition will automatically be aligned
with the nearest horizontal and vertical grid lines. Those lines
appear as a series of dots on the screen. Objects that are already
positioned will not be affected. If you want greater freedom in
positioning objects, disable the snap-to-grid feature.
13-8 (5/07)
Chapter 13: Using the GUI Editor
Resizing Objects
Resizing
Objects
When you select an object, sizing handles will appear at the corners
of the object.
Use these handles to resize the object manually:
•
To adjust the width of an object, position the cursor on the
right-hand or left-hand border of the object between the sizing
handles. When the double-headed arrow appears, hold down
the mouse button and drag the border to the desired position.
•
To adjust the height of an object, position the cursor on the
upper or lower border of the object between the sizing handles.
When the double-headed arrow appears, hold down the mouse
button and drag the border to the desired position.
•
To adjust both the width and height simultaneously, position
the cursor on one of the sizing handles. When the doubleheaded arrow appears, hold down the mouse button and drag
the handle to the desired position.
You can also resize an object by specifying a size in the Width and
Height data fields.
Width Data Field
This tool lets you change the width of an object on the screen. When
you select an object on the screen, a number will appear in the data
field. That number represents the width of the object in pixels. To
change the width, type a new number in the data field. When you
click outside the data field, the width of the object will change.
Height Data Field
This tool lets you change the height of an object on the screen.
When you select an object on the screen, a number will appear in
the data field. That number represents the height of the object in
pixels. To change the height, type a new number in the data field.
When you click outside the data field, the height of the object will
change.
(5/07) 13-9
METTLER TOLEDO OverDrive Software User’s Manual
Setting Tab
Order
The data entry screens are designed so that an operator can press
the TAB key to move the cursor from data field to data field on a
screen. The Change Tab button lets you change the order in which
the tab moves from field to field. When you click the Change Tab
button, a red number will appear on each data field. If no tab has
been set for a field, the number will be zero (0). To set the tab
order, change these numbers. Enter the number 1 in the field where
you want the cursor to appear when you open a screen. Number
each field in succession to indicate the tab order. When you are
finished numbering the fields, click the Change Tab button to
complete the task.
13-10 (5/07)
Chapter 13: Using the GUI Editor
Setting Required Fields
Setting
Required
Fields
The Required combo box is used to specify which data fields on the
Transaction screen are required (must be filled in to complete a
transaction). When you select a data field, the combo box will
display “true” if the field is required and “false” if the field is optional.
Change the status in the combo box to make a field required or
optional. Some fields are always required or always optional, and
the settings cannot be changed. Settings can be changed only for
the following user-defined required fields: Company, Destination,
Driver, Extended Table fields, Formula, Origin, Payment Type,
Permit, Purchase Order, Remark 1, Remark 2, Shipping, User Text
fields, and User Number fields.
(5/07) 13-11
METTLER TOLEDO OverDrive Software User’s Manual
Adding Text
and Graphics
Add Label Button
This button lets you add a label in which you can display text or a
picture. Click the Add Label button, and then double-click the area of
the screen where you want to place the label. A text box containing
the words “New Label” will appear on the screen. Edit the text the
same way you would edit the text in an existing label.
New Icon Button
This button lets you add a graphic to a screen. You will need to
insert the graphic in a label. You can use the Add Label button to
create a label for this purpose. Select a label and then click the New
Icon button. When the file selection window appears, browse for the
graphic file that you want to insert. Select the file and click the Open
button to insert it in the label.
Delete Icon Button
This button lets you delete a graphic from a screen. Select the
graphic and then click the Delete Icon button to remove the graphic.
13-12 (5/07)
Chapter 14: Advanced Pricing Wizard
Introduction
14
Advanced Pricing Wizard
Introduction
The Advanced Pricing Wizard is a step-by-step guide for setting up
and editing complex pricing structures. For example, you can set up
a structure that charges lower rates when larger amounts of a
product are purchased. To begin, select Advanced Pricing Wizard
from the Wizards folder in the side tree.
Step 1
Link the advanced pricing structure that you are going to create to a
specific database record.
1.
Use the radio buttons to select the type of ID: Product ID,
Account ID, Contract Product ID, or Vehicle ID.
2.
Select a database record from the combo box next to the ID
that you chose.
3.
Click the Next button.
(5/07) 14-1
METTLER TOLEDO OverDrive Software User’s Manual
Step 2
Set up the advanced pricing record.
14-2 (5/07)
1.
The system will generate a key (the unique alphanumeric ID)
for the advanced pricing structure in the Price ID data field.
2.
Enter a description of the advanced pricing structure in the
Description data field.
3.
The Unit Price data field shows the price per unit of product.
For Product and Contract Product records, the unit price will be
read from the individual database record. For Account and
Vehicle records, the Unit Price data field will be disabled.
4.
Enter the number of decimal places to which the price should
be calculated in the Decimal Precision data field. For example,
0 = X, 1 = X.X, 2 = X.XX.
5.
Select a criterion for pricing (Weight or Distance).
6.
Use the Rate Type radio buttons to select the type of operation
for which the pricing structure will be in effect: Incoming
(shipments entering your facility), Outgoing (shipments exiting
your facility), or Either (both incoming and outgoing
shipments).
7.
Check the Enable Advanced Pricing box to enable the
advanced pricing structure (the box is checked by default).
8.
Click the Next button.
Chapter 14: Advanced Pricing Wizard
Introduction
Step 3
Use the Price Type radio buttons to select the type of pricing
structure you want to set up. Then click the Next button.
•
Fixed Price: Fixed pricing sets a price per load. It can be used
when you process transactions for loads of standard sizes. For
example, you could set a fixed price for a standard-sized load
based on delivery distance: $500 for a load delivered up to
100 miles and $550 for a load delivered from 100 to 200
miles.
•
Raw Price: Raw pricing sets a different price per unit for
portions of a load. For example, suppose you set a price of
$10 per pound for loads up to 1,000 pounds and $9 per
pound for loads up to 2,000 pounds. With raw pricing, a
2,000-pound load would be priced at $10 per pound for the
first 1,000 pounds and $9 per pound for the second 1,000
pounds.
•
Unit Price: Unit pricing sets a single price per unit for the entire
load. For example, suppose you set a price of $10 per pound
for loads up to 1,000 pounds and $9 per pound for loads up
to 2,000 pounds. With unit pricing, a 2,000-pound load
would be priced at $9 per pound for the entire load.
•
Formula: Formula pricing lets you define a formula that will be
used to calculate the price for each transaction. The simplest
(5/07) 14-3
METTLER TOLEDO OverDrive Software User’s Manual
type of pricing formula is one that multiplies the price of the
product by the net weight.
Step 4
Step Pricing
If you selected Fixed Price, Raw Price, or Unit Price in Step 3,
specify a step-pricing structure. Step pricing allows you to set a
different price per unit for different ranges of weight (or distance).
The sample step-pricing structure shown above lists the price per
pound for loads up to 1,000, 2,000, 3,000, and 4,000 pounds,
plus a step for loads greater than 4,000 pounds. To enter a greater
than symbol, leave the Breakpoint field blank.
14-4 (5/07)
1.
Enter the maximum weight (or distance) for the first step in the
Breakpoint data field.
2.
Enter the price per unit for the first step in the Step Price data
field. A step is the range from the breakpoint to the next lower
breakpoint (or zero if there is no lower breakpoint).
3.
Click the Add button to add the step to the list box.
4.
Click the New button to clear the data fields, and then repeat
Steps 1 to 3 for each step in the pricing structure.
5.
Click the Finish button when you have completed the pricing
structure.
Chapter 14: Advanced Pricing Wizard
Introduction
To delete a step, highlight it in the list box and then click the
Remove button.
Formula Pricing
If you selected Formula Pricing in Step 3, use the variables and
push buttons to create or edit a pricing formula. The elements of the
formula will appear in the Formula data field. When you have
completed the pricing formula, click the Finish button.
Variables:
Variables are numbers that can change from
transaction to transaction. The list box contains
the variables that can be used in pricing formulas:
Price, Conversion Factor, Contracted Price,
Weight, and Volume. To insert a variable in a
formula, highlight the variable in the list box and
then click the down arrow button. The variable will
appear at the end of the formula in the Formula
data field.
Numerals:
Use the numeric buttons (0 to 9) and the decimal
button to insert numbers in a formula. When you
click a numeric button, the number will be added
to the end of the formula.
Symbols:
Use the symbol buttons to insert mathematical
elements in a formula. When you click a button,
(5/07) 14-5
METTLER TOLEDO OverDrive Software User’s Manual
the symbol will be added to the end of the
formula.
/ = division
* = multiplication
- = subtraction
+ = addition
( = left parenthesis
) = right parenthesis
^ = exponent (x^2 = x squared)
√ = square root (x√2 = square root of x)
Backspace:
Click the Backspace button to delete the last
character in the Formula data field.
Clear:
Click the Clear button to delete the entire formula.
Push Buttons
The following push buttons are used to navigate through the wizard:
Back: Goes back to the previous screen.
Next: Goes forward to the next screen.
Finish: Accepts any changes made to the settings and closes the
wizard.
Cancel: Closes the wizard without accepting any changes made to
the settings.
14-6 (5/07)
Chapter 15: Database Import/Export Wizard
Introduction
15
Database Import/Export Wizard
Introduction
The Database Import/Export Wizard is used to import information to
or export information from the system’s database. You can limit the
data to be exported to specific tables, specific columns from each
table, and specific data entries (for example, a specific Product ID).
Export
This operation exports individual tables or portions of tables from the
database (the data is copied, not removed from the database). To
begin the export procedure, select Database Import/Export Wizard
from the Wizards folder in the side tree.
Step 1
(5/07) 15-1
METTLER TOLEDO OverDrive Software User’s Manual
1.
Select the Export Tables radio button from the list of
operations.
2.
Click the Next button.
Step 2
Select the tables that you want to export. All of the tables contained
in the database are listed in the Tables to select from list box on the
left.
15-2 (5/07)
1.
Move the tables that you want to export to the Selected tables
list box on the right. Use the arrow keys to move tables from
one list box to the other.
2.
When the tables that you want to export are displayed in the
Selected tables list box, click the Next button.
Chapter 15: Database Import/Export Wizard
Export
Step 3
The filters in Steps 3 and 4 are used to select data from individual
columns (fields). For example, you can export data for accounts
located in a specific state. Select only the columns for which you
want to specify a filter. Step 5 is used to select the columns that will
be exported.
1.
Select the first table in the Select table combo box. That will
display all of the table’s columns in the Select filter columns
list box on the left.
2.
If you want to select a filter for a column, move the column to
the Selected columns list box on the right. Use the arrow keys
to move columns from one list box to the other.
3.
When you have selected the desired columns for each table in
the combo box, click the Next button.
(5/07) 15-3
METTLER TOLEDO OverDrive Software User’s Manual
Step 4
This step allows you to specify a filter for each of the columns
selected in the previous step.
1.
Select the first table in the Specify selection criteria for table
combo box. The columns selected in the previous step will be
listed in the table below the combo box.
2.
For each column name, enter the appropriate data in the Value
column. For example, if you have selected the Product ID
column from the Product table, enter a specific Product ID as
the value.
3.
When you have entered all the values, click the Next button.
NOTE: Use the following format for date fields: YYYY-MM-DD. To
select all records processed before a given date, use a less-than
sign (<YYYY-MM-DD). To select all records processed after a given
date, use a greater-than sign (>YYYY-MM-DD).
15-4 (5/07)
Chapter 15: Database Import/Export Wizard
Export
Step 5
Select the columns that you want to export from each table.
1.
Select the first table in the Select table combo box. That will
display all of the table’s columns in the Columns to select
from list box on the left.
2.
Move the columns that you want to export to the Selected
columns list box on the right. Use the arrow keys to move
columns from one list box to the other.
3.
When you have selected columns for each of the tables in the
combo box, click the Next button.
(5/07) 15-5
METTLER TOLEDO OverDrive Software User’s Manual
Step 6
15-6 (5/07)
1.
Select the directory to which you want to export the database
information. Type the directory location in the Select the
storage directory data field, or use the browse button to
locate the directory. If you browse for a directory, highlight the
desired directory and then click the Open button to enter it in
the data field.
2.
Check the Backup Only box if you are exporting data to back
up your system. If the box is not checked, the transaction
status will be changed to exported (X).
3.
Click the Finish button to export the data.
Chapter 15: Database Import/Export Wizard
Import
Import
This operation imports information into the database. The data to be
imported must be in a *.CSV file, and its format must match that of
the OverDrive database. To see an example of how the file should
be formatted, open a file that has been exported from the OverDrive
database. This procedure should be attempted only by properly
trained personnel. To begin the import procedure, select Database
Import/Export Wizard from the Wizards folder in the side tree.
Step 1
1.
Select the Import Tables radio button from the list of
operations.
2.
Click the Next button.
(5/07) 15-7
METTLER TOLEDO OverDrive Software User’s Manual
Step 2
15-8 (5/07)
1.
Select the directory from which you want to import database
information. Type the directory location in the Select directory
data field, or use the browse button to locate the directory. If
you browse for a directory, highlight the desired directory and
then click the Open button to enter it in the data field.
2.
After selecting a storage directory, click the Finish button to
import the data.
Chapter 15: Database Import/Export Wizard
Global Export
Global Export
This operation exports all tables in the database. To begin the global
export procedure, select Database Import/Export Wizard from the
Wizards folder in the side tree.
Step 1
1.
Select the Global Export Tables radio button from the list of
operations.
2.
Click the Next button.
(5/07) 15-9
METTLER TOLEDO OverDrive Software User’s Manual
Step 2
15-10 (5/07)
1.
Select the directory to which you want to export the database
information. Type the directory location in the Select the
storage directory data field, or use the browse button to locate
the directory. If you browse for a directory, highlight the desired
directory and then click the Open button to enter it in the data
field.
2.
Check the Backup Only box if you are exporting data to back
up your system. If the box is not checked, the transaction
status will be changed to exported (X).
3.
Click the Finish button to export the data.
Chapter 15: Database Import/Export Wizard
Database Archive
Database
Archive
This operation archives data from specific tables. When data is
archived, it is deleted from the database. To begin the database
archive procedure, select Database Import/Export Wizard from the
Wizards folder in the side tree.
Step 1
1.
Select the Database Archive radio button from the list of
operations.
2.
Click the Next button.
(5/07) 15-11
METTLER TOLEDO OverDrive Software User’s Manual
Step 2
Select the tables that you want to archive. You can select the
Transaction and Weights and Measures tables (detail tables are
selected automatically). The tables that can be selected are listed in
the Tables to select from list box on the left.
15-12 (5/07)
1.
Move the tables that you want to archive to the Selected tables
list box on the right. Use the arrow keys to move tables from
one list box to the other.
2.
When the tables that you want to archive are displayed in the
Selected tables list box, click the Next button.
Chapter 15: Database Import/Export Wizard
Database Archive
Step 3
After you have selected the tables to be archived, select each table’s
completion date column as a filter.
1.
Select the first table in the Select table combo box. That will
display the table’s completion date column in the Select filter
columns list box on the left.
2.
Move the column to the Selected columns list box on the right.
Use the arrow keys to move columns from one list box to the
other.
3.
When you have selected a filter column for each table in the
combo box, click the Next button.
(5/07) 15-13
METTLER TOLEDO OverDrive Software User’s Manual
Step 4
You can archive data only if it is more than 90 days old. In the
Value column, enter the number of days worth of data you want to
archive. For example, enter 30 to archive data that was recorded
during the 30-day period between 90 days ago and 120 days ago.
15-14 (5/07)
1.
Select the first table in the Specify selection criteria for table
combo box. The columns selected in the previous step will be
listed in the table below the combo box.
2.
For each column name, enter the desired number of days in
the Value column.
3.
When you have entered all the values, click the Next button.
Chapter 15: Database Import/Export Wizard
Push Buttons
Step 5
Select the directory to which you want to archive the database
information.
1.
Type the directory location in the Select the storage directory
data field, or use the browse button to locate the directory. If
you browse for a directory, highlight the desired directory and
then click the Open button to enter it in the data field.
2.
Click the Finish button.
Push Buttons
The following push buttons are used to navigate through the wizard:
Back: Goes back to the previous screen.
Next: Goes forward to the next screen.
Finish: Accepts any changes made to the settings and closes the
wizard.
Cancel: Closes the wizard without accepting any changes made to
the settings.
(5/07) 15-15
Chapter 16: Transaction Type Wizard
Introduction
16
Transaction Type Wizard
Introduction
The Transaction Type Wizard customizes one-pass, two-pass, and
multi-pass transaction types for use with the Transaction Wizard,
Touch Screen, or Four-Line Display on an unattended weighing
station.
Create
This procedure is used to create a new transaction type. To begin,
select Transaction Type Wizard from the Wizards folder in the side
tree.
Step 1
1.
Select the Create a Transaction Type radio button.
2.
Click the Next button.
(5/07) 16-1
METTLER TOLEDO OverDrive Software User’s Manual
Step 2
16-2 (5/07)
1.
You must assign a unique alphanumeric ID for each
transaction type that you create. Type an ID in the Transaction
Type ID data field or click the Get System Generated Key
button to have the system assign an ID.
2.
Select a transaction type from the Transaction Type combo
box: One Pass, Two Pass, or Multi Pass.
3.
Use the radio buttons to select a weighing type: Normal
Weighing, Multi Axle Weighing, or Split Weighing.
4.
Click the Next button.
Chapter 16: Transaction Type Wizard
Create
Step 3
Select the master data fields that you want to capture for this
transaction type.
1.
To select a data field, highlight it in the Available Fields list box
and use the right arrow button to move it to the Fields to
Capture list box. The fields will be captured in the order they
are listed in the box. You can change the order in which the
fields are captured by highlighting them and using the up and
down arrow buttons to move them.
2.
When you have selected the fields that you want to capture,
click the Next button.
(5/07) 16-3
METTLER TOLEDO OverDrive Software User’s Manual
Step 4
Select the detail data fields that you want to capture for this
transaction type. Detail fields are fields on a Transaction screen tab.
16-4 (5/07)
1.
To select a data field, highlight it in the Available Fields list box
and use the right arrow button to move it to the Fields to
Capture list box. The fields will be captured in the order they
are listed in the box. You can change the order in which the
fields are captured by highlighting them and using the up and
down arrow buttons to move them.
2.
When you have selected the fields that you want to capture,
click the Next button.
Chapter 16: Transaction Type Wizard
Create
Step 5
The data fields selected in the previous two steps will be listed in the
Master Fields and Detail Fields list boxes.
1.
Check the box next to each field that should be required for the
transaction type. If a field is required, the operator will need to
enter data in it to complete a transaction. The Account data
field must be a required field for any transaction type that you
create. Use the Select All check box to select or deselect all the
fields in the list box above it.
2.
Click the Next button.
(5/07) 16-5
METTLER TOLEDO OverDrive Software User’s Manual
Step 5a
16-6 (5/07)
1.
Use the check boxes to select the data that will be entered on
the second pass over the scale.
2.
Click the Next button.
Chapter 16: Transaction Type Wizard
Create
Step 6
Select the vehicles that you want to assign to the transaction type.
The Available Vehicles list box shows all vehicles in the database.
1.
To assign a vehicle, highlight it and use the right arrow button
to move it to the Assigned Vehicles list box. Before you can
process transactions for a vehicle, you must assign the vehicle
to the transaction type. You can assign as many vehicles as
you want to a transaction type, and you can assign each
vehicle to more than one transaction type.
2.
Click the Next button.
(5/07) 16-7
METTLER TOLEDO OverDrive Software User’s Manual
Step 7
This screen shows the selections that you have made for the
transaction type. Make sure that the selections are correct.
1.
16-8 (5/07)
Click the Finish button to create the new transaction type.
Chapter 16: Transaction Type Wizard
Modify
Modify
This procedure is used to modify an existing transaction type. To
begin, select Transaction Type Wizard from the Wizards folder in the
side tree.
Step 1
1.
Select the Modify a Transaction Type radio button.
2.
Click the Next button.
(5/07) 16-9
METTLER TOLEDO OverDrive Software User’s Manual
Step 2
16-10 (5/07)
1.
Use the Transaction Type ID combo box to select the
transaction type that you want to modify.
2.
Click the Next button.
Chapter 16: Transaction Type Wizard
Modify
Step 2a
1.
The current transaction type is displayed in the Transaction
Type combo box. You can change it by selecting one of the
options in the box: One Pass, Two Pass, or Multi Pass.
2.
The radio button that is selected indicates the current weighing
type. You can change it by selecting another radio button:
Normal Weighing, Multi Axle Weighing, or Split Weighing.
3.
Click the Next button.
(5/07) 16-11
METTLER TOLEDO OverDrive Software User’s Manual
Step 3
16-12 (5/07)
1.
The Fields to Capture list box shows the master data fields to
be captured for this transaction type. You can make changes
by using the arrow buttons to move fields between the
Available Fields and Fields to Capture list boxes. The fields
will be captured in the order they are listed in the box. You can
change the order in which the fields are captured by
highlighting them and using the up and down arrow buttons to
move them.
2.
Click the Next button.
Chapter 16: Transaction Type Wizard
Modify
Step 4
1.
The Fields to Capture list box shows the detail data fields to be
captured for this transaction type. You can make changes by
using the arrow buttons to move fields between the Available
Fields and Fields to Capture list boxes. The fields will be
captured in the order they are listed in the box. You can change
the order in which the fields are captured by highlighting them
and using the up and down arrow buttons to move them.
2.
Click the Next button.
(5/07) 16-13
METTLER TOLEDO OverDrive Software User’s Manual
Step 5
16-14 (5/07)
1.
The data fields to be included in the transaction type are listed
in the Master Fields and Detail Fields list boxes. A check mark
next to a field indicates that it is required for the transaction
type. You can make changes by selecting and deselecting the
check boxes. The Account data field must be a required field
for any transaction type that you create. Use the Select All
check box to select or deselect all the fields in the list box
above it.
2.
Click the Next button.
Chapter 16: Transaction Type Wizard
Modify
Step 5a
1.
A check mark indicates which data is to be entered on the
second pass over the scale. You can make changes by
selecting and deselecting the check boxes.
2.
Click the Next button.
(5/07) 16-15
METTLER TOLEDO OverDrive Software User’s Manual
Step 6
Before you can process transactions for a vehicle, you must assign
the vehicle to the transaction type. You can assign as many vehicles
as you want to a transaction type, and you can assign each vehicle
to more than one transaction type.
16-16 (5/07)
1.
The Assigned Vehicles list box shows the vehicles that are
assigned to the transaction type. You can make changes by
using the arrow buttons to move vehicles between the
Available Vehicles and Assigned Vehicles list boxes.
2.
Click the Next button.
Chapter 16: Transaction Type Wizard
Modify
Step 7
This screen shows the selections that you have made for the
transaction type. Make sure that the selections are correct.
1.
Click the Finish button to modify the transaction type.
(5/07) 16-17
METTLER TOLEDO OverDrive Software User’s Manual
Delete
This procedure is used to delete a transaction type. To begin, select
Transaction Type Wizard from the Wizards folder in the side tree.
Step 1
16-18 (5/07)
1.
Select the Delete a Transaction Type radio button.
2.
Click the Next button.
Chapter 16: Transaction Type Wizard
Delete
Step 2
1.
Use the Transaction Type ID combo box to select the ID for the
transaction type that you want to delete.
2.
Click the Next button.
(5/07) 16-19
METTLER TOLEDO OverDrive Software User’s Manual
Step 3
This screen shows the current selections for the transaction type.
1.
Click the Finish button to delete the transaction type.
Push Buttons
The following push buttons are used to navigate through the wizard:
Back: Goes back to the previous screen.
Next: Goes forward to the next screen.
Finish: Accepts any changes made to the settings and closes the
wizard.
Cancel: Closes the wizard without accepting any changes made to
the settings.
16-20 (5/07)
Chapter 17: Using Transaction Types
Introduction
17
Using Transaction Types
Introduction
Once you have created a transaction type, you can use it with the
Transaction Wizard, Touch Screen, Four-Line Display on an
unattended weighing station. The amount of data that must be
entered and the order in which it is entered will be determined by
how the transaction type was set up. The sample procedures
described in this chapter are for a one-pass transaction that requires
you to enter only vehicle, account, operation, and product data.
Transaction
Wizard
To open the Transaction Wizard, click the Transaction Wizard button
on the Virtual Scale Indicator. Be sure to use the button that applies
to the scale on which the vehicle is being weighed.
1.
Select the Vehicle ID. Then click the Next button.
(5/07) 17-1
METTLER TOLEDO OverDrive Software User’s Manual
17-2 (5/07)
2.
Select the transaction type. Then click the Next button.
3.
Select the Account ID. Then click the Next button.
Chapter 17: Using Transaction Types
Transaction Wizard
4.
Select the Operation. Then click the Next button.
5.
Select the Product ID. Then click the Next button.
(5/07) 17-3
METTLER TOLEDO OverDrive Software User’s Manual
17-4 (5/07)
6.
If you are using a manual scale, enter a weight and then click
the Next button. Otherwise, go directly to Step 7.
7.
Review the transaction summary information to make sure it is
correct. Then click the Complete button.
Chapter 17: Using Transaction Types
Transaction Wizard
8.
The screen shown above will be displayed briefly to indicate
that the transaction has been completed.
NOTE: For a two-pass transaction type, the screen shown in Step 7
will include an Accept button. Use that button to complete the first
weighing. When the vehicle returns to the scale for its second
weighing, select the Vehicle ID and then click the Complete button.
(5/07) 17-5
METTLER TOLEDO OverDrive Software User’s Manual
Touch Screen
To open the Transaction Touch Screen, click the Touch Screen
button on the Virtual Scale Indicator. Be sure to use the button that
applies to the scale on which the vehicle is being weighed.
1.
17-6 (5/07)
Select the Touch to begin! button.
Chapter 17: Using Transaction Types
Touch Screen
2.
Select the vehicle and then the Next button.
3.
Select the transaction type and then the Next button.
(5/07) 17-7
METTLER TOLEDO OverDrive Software User’s Manual
17-8 (5/07)
4.
Select the account and then the Next button.
5.
Select the operation and then the Next button.
Chapter 17: Using Transaction Types
Touch Screen
6.
Select the product and then the Next button.
7.
If you are using a manual scale, enter a weight and then
select the Next button. Otherwise, go directly to Step 8.
(5/07) 17-9
METTLER TOLEDO OverDrive Software User’s Manual
17-10 (5/07)
8.
Review the transaction summary information to make sure it
is correct. Then select the Complete Transaction button.
9.
The screen shown above will be displayed briefly to indicate
that the transaction has been completed.
Chapter 17: Using Transaction Types
Touch Screen
NOTE: For a two-pass transaction type, the screen shown in Step 8
will include a Complete Pass button. Use that button to complete
the first weighing. When the vehicle returns to the scale for its
second weighing, select the Vehicle ID and then select the Complete
Transaction button.
Use the Back, Exit, and Next buttons at the bottom of the screen to
navigate through the steps. Use the Home, Up, Down, and End
buttons at the right-hand edge of the screen to navigate through the
selections on an individual screen. These buttons will be active only
if there are more selections than will fit on the screen.
NOTE: To enter a short code, press the F11 key on the keyboard and
then type in the short code.
To exit the touch screen, type Ctrl-End. When the Administration
screen is displayed, enter your User ID and password. Then select
Shutdown.
(5/07) 17-11
METTLER TOLEDO OverDrive Software User’s Manual
Four-Line
Display
The four-line display includes prompts in the first two lines and
options in the final two lines. Scroll through the options to find the
correct one, and then press the Accept key to select it.
1.
When the system is ready to process a transaction, it will
display the following message: Welcome to OverDrive. Press
the Accept key to start the transaction.
2.
At the Select Vehicle: prompt, scroll down to display the
desired vehicle and then press the Accept key.
3.
At the Select Transaction Type: prompt, scroll down to display
the desired transaction type and then press the Accept key.
4.
At the Select Account: prompt, scroll down to display the
desired account and then press the Accept key.
5.
At the Select Operation: prompt, scroll down to display the
desired operation and then press the Accept key.
6.
At the Select Product: prompt, scroll down to display the
desired product and then press the Accept key.
7.
At the Complete Transaction prompt, press the Accept key.
8.
A “Thank You” message will be displayed briefly, and then the
system should be ready to process another transaction.
The system accepts commands to scroll through options, select
options, and cancel a transaction. To assign these commands to
computer keys, use the Options screen’s Unattended tab in
Application Setup.
NOTE: For a two-pass transaction, Step 7 will display a Complete
Pass prompt. Press the Accept key to complete the first weighing.
When the vehicle returns to the scale for its second weighing, select
the Vehicle ID and accept it. Then press the Accept key at the
Complete Transaction prompt.
17-12 (5/07)
Chapter 18: Back Office Management
Introduction
18
Back Office Management
Introduction
This chapter describes the features that are available in the side
tree’s Back Office Management folder: transaction maintenance,
ticket re-pricing, and invoicing.
Transaction
Maintenance
This form lets you view records of transactions and make changes
to them. See Chapter 11 for an explanation of how to manage
transaction records.
(5/07) 18-1
METTLER TOLEDO OverDrive Software User’s Manual
Ticket Repricing
The Ticket Re-Pricing table is used to change the pricing on
transactions that are stored in the database. The data fields, list
boxes, and check boxes on the table function as filters to help you
find the tickets that you want to re-price. When you set filters, a
query will retrieve only those tickets that meet the specifications of
the filters.
18-2 (5/07)
1.
The Available list box will display a list of accounts. Highlight
the accounts for which you want to re-price tickets, and then
click the right arrow button to move them to the Assigned list
box.
2.
In the Companies list box, check the companies for which you
want to re-price tickets. You can select individual companies or
check the Select All box to select all companies.
3.
If you are specifying a ticket date range, use the calendar in the
From field to select a starting date and use the calendar in the
To field to select an ending date. To include all tickets, check
the All Dates box.
Chapter 18: Back Office Management
Ticket Re-pricing
4.
Click the Preview button to compile a list of tickets that match
the selection criteria.
Available Tickets
The tickets that match the selection criteria will be listed in the
Available Tickets table. You can limit the tickets in the list to
transactions for which the pricing differs from the pricing that is
currently in the database. To do that, check the Show only Tickets
with a different Adjusted Total Cost box.
The data fields at the bottom of the table indicate how many of the
tickets listed in the table fit into each of the following three
categories:
•
Total Tickets – The total number of tickets displayed in the list.
•
Total Tickets with a different Adjusted Total Cost – The total
number of tickets for which the pricing on the ticket differs
from the current pricing.
•
Total Tickets Re-Priced – The total number of tickets that have
been re-priced.
Use the following procedure to re-price tickets:
1.
In the Available Tickets table, highlight the ticket that you want
to re-price (you can highlight more than one ticket). If you want
to re-price all tickets that are listed in the Available Tickets
table, there is no need to highlight the tickets.
2.
If you are re-pricing one or more highlighted tickets, click the
Re-Price button. If you are re-pricing all of the available tickets,
click the Re-Price All button.
When you re-price a ticket, the number in the Total Tickets RePriced field will increase by one. The number in the Total Tickets
with a different Adjusted Total Cost field will decrease by one
because the re-priced ticket should match the pricing currently in the
database.
The Clear button is provided to allow you to clear the records listed
in the Available Tickets table so that you can compile a new list of
tickets to re-price.
Log File
The database compiles daily log files containing information about
all re-priced transactions. To view the files, click the Log File button
at the bottom of the table.
(5/07) 18-3
METTLER TOLEDO OverDrive Software User’s Manual
Invoice Cycle
The Invoice Cycle table is used to create invoice cycles, which
function like groups. For example, you can create two invoice
cycles, one for weekly billing and one for monthly billing. Then you
can assign the accounts that you want to bill once a week to the
weekly billing cycle and assign the accounts that you want to bill
once a month to the monthly billing cycle. NOTE: This table is
available only if the Invoicing Module is registered.
1.
Enter an Invoice Cycle ID in the Invoice Cycle ID field. If you
want the system to assign an Invoice Cycle ID, click the Get
System Generated Key button.
2.
Enter a description of the invoice cycle in the Description field.
3.
The Last Invoice Date field shows the date of the last time that
invoices were generated for this invoice cycle.
4.
Enter any additional information about the invoice cycle in the
Notes field.
5.
Save the changes.
After you have created an invoice cycle, you will need to assign
accounts to the cycle. To assign an account to an invoice cycle,
open the Account table, select the account record, and then select
the invoice cycle from the Invoice Cycle ID combo box.
18-4 (5/07)
Chapter 18: Back Office Management
Invoicing
Invoicing
The Invoicing table is used to generate invoices for billing accounts.
NOTE: This table is available only if the Invoicing Module is
registered.
1.
Select the radio button for the desired type of invoicing: By
Accounts or By Invoice Cycles.
•
By Accounts – To generate Invoices for all accounts,
leave all accounts in the Available list box or click the
double right arrow button to move them all to the
Assigned list box. If you want to generate invoices for
specific accounts, move those accounts to the Assigned
list box.
(5/07) 18-5
METTLER TOLEDO OverDrive Software User’s Manual
•
By Invoice Cycles – To generate Invoices for all invoice
cycles, select all of the check boxes or none of the check
boxes in the Invoice Cycle list box. If you want to
generate invoices for specific invoice cycles, check only
the boxes for those invoice cycles.
2.
You can filter the transactions by company to exclude some
companies when you generate invoices. In the Companies list
box, check the companies that you want to include in the
template. You can select individual companies or check the
Select All box to select all companies. If you do not check any
boxes, the system will not filter out any companies.
3.
You can filter the transactions by payment method to exclude
some payment methods when you generate invoices. In the
Payment Methods list box, check the payment methods that
you want to include in the template. You can select individual
payment methods or check the Select All box to select all
payment methods. If you do not check any boxes, the system
will not filter out any payment methods.
4.
The next available invoice number will be entered automatically
in the Next Invoice Number field. The system assigns a
number to each invoice, numbering the invoices consecutively
starting with the number 1. You can enter a higher invoice
number manually, but you cannot duplicate an invoice number
or enter a number that is lower than the last number that was
used.
5.
In the Terms In Days field, enter the maximum number of days
that you are allowing the customer to pay the invoice. This
information will be printed at the bottom of the invoices.
6.
In the Penalty as % field, enter the penalty (percentage of the
invoice amount) that will be charged to customers who pay
after the term has expired. This information will be printed at
the bottom of the invoices.
7.
In the Invoice Comments field, enter any additional text that
should appear on the invoices.
8.
Specify a ticket date range (tickets with dates that fall within the
range will be included when you generate invoices). Use the
calendar in the From field to select the date of the earliest ticket.
Use the calendar in the To field to select the date of the latest
ticket.
9.
If you want the invoices to include tickets that were backdated
manually, check the Include Backdated Tickets box.
10. Check the Auto-Preview after Generate box if you want to view
the invoices when you generate them.
11. Click the Generate button to generate the invoices.
18-6 (5/07)
Chapter 18: Back Office Management
Invoicing
12. A message will appear on screen to tell you if the invoices were
generated successfully. An invoice will be generated for each
account, and the invoice number will be added to the database
record for each transaction that is included on the invoice.
Invoice Templates
You can also use the Invoicing table to create invoice templates for
generating invoices. A template enables you to save settings for
generating invoices so that you can use them repeatedly without
having to recreate the settings each time.
1.
Enter an Invoice Template ID in the Invoice Template ID field. If
you want the system to assign an Invoice Template ID, click
the Get System Generated Key button.
2.
Enter a description of the invoice template in the Invoice
Description field.
3.
Select the radio button for the desired type of invoicing: By
Accounts or By Invoice Cycles. Make the desired selections in
the Accounts or Invoice Cycle list boxes (see Step 1 in the
procedure for generating invoices).
4.
Set any filters that are desired in the Companies and Payment
Methods list boxes (see Steps 2 and 3 in the procedure for
generating invoices).
5.
When you have completed the invoice template, save the
changes. Invoices that are generated using a template will
include only transactions that match the accounts (or invoice
cycles), payment methods, and companies that are selected.
NOTE: The Select All check boxes affect only the records that exist at
the time the invoice template is saved. For example, if you use the
Select All check box to select all companies for a template, a new
company that you create later would not automatically be included
in the template. You would need to revise the template and save it
again.
After you have created an invoice template, you can use it to
generate invoices. Select the Invoice Template ID, and then follow
Steps 4 to 12 in the procedure for generating invoices.
(5/07) 18-7
METTLER TOLEDO OverDrive Software User’s Manual
Invoice
Maintenance
The Invoice Maintenance table is used to print, lock, remove, and
purge invoices. NOTE: This table is available only if the Invoicing
Module is registered.
Print Invoices
The Print tab is used to print invoices that have been generated. You
can select the invoices to be printed by specifying a range of dates,
a range of invoice numbers, or all unlocked invoices.
1.
18-8 (5/07)
Select the radio button for the desired type of range: By Ticket
Date Range, By Invoice Number Range, or By All Unlocked
Invoices.
•
If you are printing by ticket date range, select a starting
date in the From field and an ending date in the To field.
•
If you are printing by invoice number range, enter the
earliest number in the From field and the latest number in
the To field.
•
Printing all unlocked invoices will print all invoices that
have not been finalized using the Lock tab.
2.
If you want to include tickets that were backdated manually,
check the Include Backdated Tickets box.
3.
Click one of the buttons to print or view the invoices.
•
The Summary button creates a report that includes the
invoices that fall within the specified range.
•
The Preview button opens a window that enables you to
view the invoices that fall within the specified range.
Chapter 18: Back Office Management
Invoice Maintenance
•
The Print button prints the invoices that fall within the
specified range.
Lock Invoices
The Lock tab is used to lock invoices so that they cannot be
changed. That enables you to make sure that the invoices stored in
the database match the invoices that were mailed to customers. You
can select the invoices to be locked by specifying a range of invoice
numbers or all invoices that are not locked.
1.
Select the radio button that indicates how you want to choose
the invoices to be locked: By Invoice Number Range or By All
Unlocked Invoices.
•
If you are specifying an invoice number range, enter the
earliest number in the From field and the latest number in
the To field.
•
You can choose to lock all invoices that are not currently
locked.
2.
If you want to view a report listing the invoices that will be
locked, click the Preview button.
3.
Click the Lock button to lock the invoices so that they cannot be
changed.
(5/07) 18-9
METTLER TOLEDO OverDrive Software User’s Manual
Remove Invoices
The Remove tab is used to delete unlocked invoices. You can select
the invoices to be removed by specifying a range of ticket dates, a
range of invoice numbers, or all invoices that are not locked.
1.
18-10 (5/07)
Select the radio button that indicates how you want to choose
the invoices to be removed: By Ticket Date Range, By Invoice
Number Range, or By All Unlocked Invoices.
•
If you are specifying a ticket date range, select a starting
date in the From field and an ending date in the To field.
•
If you are specifying an invoice number range, enter the
earliest number in the From field and the latest number in
the To field.
•
You can choose to remove all invoices that are not
currently locked.
2.
If you want to include tickets that were backdated manually,
check the Include Backdated Tickets box.
3.
If you want to view a report listing the invoices that will be
removed, click the Preview button.
4.
Click the Remove button to delete the invoices.
Chapter 18: Back Office Management
Invoice Maintenance
Purge Invoices
The Purge tab is used to delete invoices from the database. You can
select the invoices to be purged by specifying a range of dates or a
range of invoice numbers.
1.
Select the radio button for the desired type of range: By Ticket
Date Range or By Invoice Number Range.
•
If you are specifying a ticket date range, select a starting
date in the From field and an ending date in the To field.
•
If you are specifying an invoice number range, enter the
earliest number in the From field and the latest number in
the To field.
2.
If you want to include tickets that were backdated manually,
check the Include Backdated Tickets box.
3.
If you want to view a report listing the invoices that will be
purged, click the Preview button.
4.
Click the Purge button to delete the specified invoices from the
database.
(5/07) 18-11
Chapter 19: Hardware Setup
Introduction
19
Hardware Setup
Introduction
OverDrive software can communicate with as many as six scales,
plus traffic lights, gates, and other peripheral devices used with the
scales. This chapter describes the Hardware Setup screen and how
to use it to configure connections for your system. To open the
screen, click on Hardware Setup in the Application Setup folder.
(5/07) 19-1
METTLER TOLEDO OverDrive Software User’s Manual
Adding a
Scale
To connect a scale to the system, you must add it to the Scales list
box and then configure its hardware settings.
1.
Click the Add button to open the New Scale window.
2.
Enter the scale name in the Name data field on the New Scale
window.
3.
Click the OK button on the New Scale window to add the new
scale to the list box.
Once a scale has been added, highlight it in the list box to display
its current settings on the Hardware Setup screen. The settings are
described throughout this chapter. Adjust them to meet the needs of
your application, and then click the OK button to save the changes.
You will need to restart the program for the changes to take effect.
To delete a scale from the list box, highlight the scale in the list box
and then click the Remove button.
Adding a Summed Scale
A summed scale provides a weight reading that is the sum of the
weights from two or more other scales. Add the other scales to the
system first, and then use the following procedure to add the
summed scale.
19-2 (5/07)
1.
Click the Add button to open the New Scale window.
2.
Enter the scale name in the Name data field on the New Scale
window.
3.
Check the Summed Scale box.
4.
Click the OK button on the New Scale window to add the
summed scale to the list box.
5.
A Summed Scale list box will appear on the screen in place of
the Scale Connection data field. In the list box, highlight the
names of the scales that you want to sum together. You can do
that by holding down the SHIFT key or CONTROL key and
clicking on the scale names.
Chapter 19: Hardware Setup
Adding a Scale
You will need to check the Enabled box to enable the scale. Then
click the OK button to save the changes. You will need to restart the
program for the changes to take effect.
Enable the
Scale
Use the Enabled and Unattended check boxes to enable or disable
the scale. You will not be able to process transactions on a scale
unless it is enabled.
•
Check the Enabled box to enable the scale.
•
Check the Enabled box and the Unattended box to enable the
scale as an unattended weighing station.
Customize the
Scale Tab
You can customize the appearance of the scale tabs on the
Transaction screen by changing colors and adding graphics. In the
portion of the Transaction screen shown below, the image is the
area in which the word “Image” appears. Immediately below it are
two scale tabs (“Manual” and “Scale 1”).
•
Click the Background Color button to open the Color Selector
window so that you can change the color of the background for
the scale tab that is selected. The background is the area
behind the text on the scale tab. The background color on the
virtual scale indicator will also be changed.
•
Click the Foreground Color button to open the Color Selector
window so that you can change the color of the foreground for
the scale tab that is selected. The foreground is the text on the
scale tab.
(5/07) 19-3
METTLER TOLEDO OverDrive Software User’s Manual
•
You can add an icon to each scale tab. Click the Icon button to
open a window that allows you to browse for a graphics file.
The graphic that you select will appear to the left of the scale
name on the tab. The default tab size is small (approximately
40 x 15 pixels), but the tab will be enlarged automatically to
accommodate larger icons.
•
You can add an image for each scale tab. Click the Image
button to open a window that allows you to browse for a
graphics file. The graphic that you select will replace the default
graphic (the word “Image” on the sample screen shown
above). The default image size is approximately 106 x 58
pixels, but you can use larger or smaller images.
Connecting a
Scale
You can configure as many as six scale connections. Use the Scale
Connection combo box to select a number (1 to 6) for the scale
that you have added. Select 0 if there is no connection. This combo
box will not be active if the Manual box is checked.
If you are setting up a manual scale, check the Manual box. This
type of setup allows you to enter weights manually instead of having
the system read them from an actual scale.
The OverDrive system uses MT Connections software to facilitate the
transmission of weight data from scale terminals to computers. You
can configure the system for a serial connection or an Ethernet
connection. Select Serial or Ethernet from the Type combo box and
check the Enabled box. Then click the Configure button to open a
window where you can configure the type of connection that you
selected.
19-4 (5/07)
Chapter 19: Hardware Setup
Connecting a Scale
Serial
Configuration
A serial connection between a JAGXTREME terminal and a computer
is used to transmit weight data. If you configure a scale for serial
communication, you will not be able to use the JAGXTREME terminal
to control peripheral devices. Use the Serial Configuration window to
configure a serial connection for a scale. The settings that you select
should match those of the scale terminal. Click the OK button when
you have finished.
Port Number:
Select a COM port (1 to 8) from the combo box.
You can configure serial connections for as many
as eight communication ports on a computer.
Baud Rate:
Select a baud rate from the combo box.
Parity:
Select the parity setting (None, Even, or Odd) from
the combo box.
Format:
Select the type of serial format from the combo
box. This setting must match the format of the
scale terminal you are using.
Enable Scale
Control:
Check this box to enable the scale to respond to
CTPZ commands (C = Clear, T = Tare, P = Print,
Z = Zero) entered from a computer keyboard.
Data Bits:
Use the radio buttons to select 7 or 8 data bits.
Stop Bits:
Use the radio buttons to select 1 or 2 stop bits.
If you have configured a scale for serial communication, use a
cable to connect a serial com port on the computer to a serial com
port on the scale terminal.
(5/07) 19-5
METTLER TOLEDO OverDrive Software User’s Manual
Custom Formats
From the Serial Configuration window, you can configure a custom
serial format for a scale terminal. Select Custom in the Format
combo box, and then click the Configure Selected Format button.
When the Custom Configuration Screen opens, enter a name in the
Indicator Name data field on the General tab and set the options on
the screen’s tabs to match the configuration of the scale terminal.
Then click the OK button to save the custom format.
Indicator Name
Enter the name of the scale terminal that you are configuring.
Weight Update
Timeout:
19-6 (5/07)
Enter the length of time (in seconds) that the
system will pause between sending requests for a
weight. This is for demand-mode terminals only.
Chapter 19: Hardware Setup
Connecting a Scale
Weight Request
Command:
The command used to request a weight if the
terminal is in demand mode. This is entered
automatically when you select a special character.
Special Chars:
The character that the terminal must receive to
start sending a weight.
Enable Request: Check this box to require the system to request the
weight. Checking this box enables the other two
fields.
Weight Response Format
Start String:
In the combo box, select the character that
represents the start of the string. The
corresponding ASCII character is entered
automatically in the parallel field.
Terminator:
In the combo box, select the character that
represents the end of the string. The corresponding
ASCII character is entered automatically in the
parallel field.
Max Length:
The maximum length of the entire string.
(5/07) 19-7
METTLER TOLEDO OverDrive Software User’s Manual
The Init tab is used to configure the system to communicate with a
terminal that uses demand mode and returns a string containing the
weight. It is not needed for terminals that are in continuous mode.
Initialize Request
Command:
The command used to initialize the terminal to
request the string. This is entered automatically
when you select the special character.
Special Char:
The character that the terminal must receive to
start sending the string.
Initialize Response
19-8 (5/07)
Responds:
Checking this box enables configuration of the
preamble and postamble to the response from the
terminal.
Preamble:
In the combo box, select the special character that
represents the start of the string with which the
terminal will respond.
Chapter 19: Hardware Setup
Connecting a Scale
Postamble:
In the combo box, select the special character that
represents the end of the string with which the
terminal will respond.
Max Length:
Enter the maximum length of the entire string.
Returned Units
Offset:
The number of characters from the left end of the
string to the character(s) representing the weight
unit.
Length:
The number of characters used to represent the
weight unit.
Net Weight
If the string contains the net weight and another weight (gross
weight, tare weight, etc.), indicate which weight is the net weight. If
the string contains only one weight, this setting is not needed.
Offset:
The number of characters from the left end of the
string to the character(s) representing the net
weight.
(5/07) 19-9
METTLER TOLEDO OverDrive Software User’s Manual
Length:
The number of characters used to represent the net
weight.
Implied Decimal Point
If the terminal uses a decimal point, these settings will determine
how the system reads it.
DP Digits:
Enter the number of digits that follow the decimal
point.
DP Char:
Enter the ASCII code for the character that
represents the decimal point.
Negative Weight Test
These settings indicate how to check for a negative weight.
Offset:
The number of characters from the left end of the
string to the character(s) representing the negative
weight.
Mask:
Enter the ASCII character that represents the
negative weight indication.
Test Type:
And and NAnd are not used in this setting.
Equal states that the desired result is equal to the
mask. For example, if you set the mask to 45
(ASCII code for the – sign) and select Equal, a “-“
in the string will be interpreted as a negative
weight.
Not Equal states that the desired result is not
equal to the mask. For example, if you set the
mask to 45 (ASCII code for the – sign) and select
Not Equal, anything but a “-“ in the string will be
interpreted as a negative weight.
19-10 (5/07)
Chapter 19: Hardware Setup
Connecting a Scale
Weight Units
Offset:
The number of characters from the left end of the
string to the character(s) representing the
weighing unit.
Length:
The number of characters used to represent the
weighing unit.
Default Weight Units
Default:
Enter a default unit if you do not wish to receive
the unit from the terminal or if the unit does not
exist or is not accessible. The system will use this
unit when processing transactions.
(5/07) 19-11
METTLER TOLEDO OverDrive Software User’s Manual
Motion Detection Test #1
Offset:
The number of characters from the left end of the
string to the character(s) representing motion.
Mask:
Enter the ASCII character that represents motion.
Test Type:
And states that if the desired result and the result
from motion detection test #2 are found, then
interpret as in motion.
NAnd states that if the desired result or the result
from motion detection test #2 are found, then
interpret as in motion.
Equal states that the desired result is equal to the
mask. For example, if you set the mask to 126
(ASCII code for the ~ sign) and select Equal, a “~“
in the string will be interpreted as in motion. Use
this setting if there is no motion detection test #2.
Not Equal states that the desired result is not
equal to the mask. For example, if you set the
mask to 126 (ASCII code for the ~ sign) and
select Not Equal, anything but a “~“ in the string
19-12 (5/07)
Chapter 19: Hardware Setup
Connecting a Scale
will be interpreted as in motion. Use this setting if
there is no motion detection test #2.
Motion Detection Test #2
Use this test if there is more than one character representing motion.
See Motion Detection Test #1 for an explanation of the settings.
Overrange Detection Test #1
Offset:
The number of characters from the left end of the
string to the character(s) representing overrange.
Mask:
Enter the ASCII character that represents
overrange.
Test Type:
And states that if the desired result and the result
from overrange detection test #2 are found, then
interpret as overrange.
NAnd states that if the desired result or the result
from overrange detection test #2 are found, then
interpret as overrange.
Equal states that the desired result is equal to the
mask. For example, if you set the mask to 126
(5/07) 19-13
METTLER TOLEDO OverDrive Software User’s Manual
(ASCII code for the ~ sign) and select Equal, a “~“
in the string will be interpreted as overrange. Use
this setting if there is no overrange detection test
#2.
Not Equal states that the desired result is not
equal to the mask. For example, if you set the
mask to 126 (ASCII code for the ~ sign) and
select Not Equal, anything but a “~“ in the string
will be interpreted as overrange. Use this setting if
there is no overrange detection test #2.
Overrange Detection Test #2
Use this test if there is more than one character representing
overrange. See Overrange Detection Test #1 for an explanation of
the settings.
19-14 (5/07)
Chapter 19: Hardware Setup
Connecting a Scale
CTPZ Command Strings
Clear:
In the combo box, select the character
representing the clear command that the terminal
uses. The correct ASCII character will then be
entered into the blank field.
Tare:
In the combo box, select the character
representing the tare command that the terminal
uses. The correct ASCII character will then be
entered into the blank field.
Print:
In the combo box, select the character
representing the print command that the terminal
uses. The correct ASCII character will then be
entered into the blank field.
Zero:
In the combo box, select the character
representing the zero command that the terminal
uses. The correct ASCII character will then be
entered into the blank field.
(5/07) 19-15
METTLER TOLEDO OverDrive Software User’s Manual
ASCII Characters
ASCII
CHR
ASCII
CHR
ASCII
CHR
ASCII
CHR
0
NUL
32
SP
64
@
96
‘
1
SOH
33
!
65
A
97
a
2
STX
34
"
66
B
98
b
3
ETX
35
#
67
C
99
c
4
EOT
36
$
68
D
100
d
5
ENQ
37
%
69
E
101
e
6
ACK
38
&
70
F
102
f
7
BEL
39
'
71
G
103
g
8
BS
40
(
72
H
104
h
9
HT
41
)
73
I
105
i
10
LF
42
*
74
J
106
j
11
VT
43
+
75
K
107
k
12
FF
44
,
76
L
108
l
m
13
CR
45
-
77
M
109
14
SO
46
.
78
N
110
n
15
SI
47
/
79
O
111
o
16
DLE
48
0
80
P
112
p
17
DC1
49
1
81
Q
113
q
18
DC2
50
2
82
R
114
r
19
DC3
51
3
83
S
115
s
20
DC4
52
4
84
T
116
t
21
NAK
53
5
85
U
117
u
22
SYN
54
6
86
V
118
v
w
23
ETB
55
7
87
W
119
24
CAN
56
8
88
X
120
x
25
EM
57
9
89
Y
121
y
26
SUB
58
:
90
Z
122
z
27
ESC
59
;
91
[
123
{
28
FS
60
<
92
\
124
|
29
GS
61
=
93
]
125
}
30
RS
62
>
94
^
126
~
31
US
63
?
95
_
127
DEL
19-16 (5/07)
Chapter 19: Hardware Setup
Connecting a Scale
Ethernet
Configuration
An Ethernet connection requires a JAGXTREME terminal. It enables
you to transmit weight data and control peripheral devices. Use the
Ethernet Configuration window to configure an Ethernet connection
for a scale. Click the OK button when you have finished.
IP Address:
Enter the IP address for the JAGXTREME terminal.
Scale:
A JAGXTREME terminal can connect to as many
as four scales, plus a virtual scale for summing
weights. Select a scale (A, B, C, or D) from the
combo box. E is used for a virtual scale.
Update Rate:
Enter a number to indicate how many times per
second the data from the scale will be updated.
The maximum recommended update rate is 10
times per second. If more than one terminal is
used, you might need to set a lower update rate.
Enable Scale
Control:
Format:
Check this box to enable the scale to respond to
CTPZ commands (C = Clear, T = Tare, P = Print,
Z = Zero) entered from a computer keyboard.
Select a format for the connection. Jaguar Shared
Data can be used for most scale setups. It is
required if peripheral devices are connected to the
JAGXTREME terminal.
If you have configured a scale for Ethernet communication, you can
connect the computer directly to the JAGXTREME terminal or connect
them through an Ethernet network. When connecting the devices
directly, use a crossover Ethernet cable with RJ-45 connectors.
When connecting the devices through an Ethernet network, connect
the JAGXTREME terminal to the network via a hub.
(5/07) 19-17
METTLER TOLEDO OverDrive Software User’s Manual
Scale
Settings
Configure the following data fields to match your application.
Scale Type
Use the Scale Type combo box to select a scale type (Full-Length
Scale, Axle Scale, or Split-Weigh Scale). Axle scales and splitweigh scales are used to weigh portions of a vehicle separately and
then sum the weights together. With an axle scale, for example, a
driver positions one axle on the scale so that its weight can be
captured. Then the driver moves the vehicle to position a second
axle on the scale. This interval is called an excursion.
Excursion Time(s)
Enter the minimum time (in seconds) that the system will signal to
the driver that a weight has been captured. This signal is usually
given by a green traffic light that lets the driver know it is okay to
move the vehicle. The traffic light will remain green for at least the
number of seconds entered in the data field.
Excursion Weight
Enter an excursion weight. When the weight reading changes by at
least this amount (either up or down), it signals to the system that
the vehicle has moved.
End Cycle Time(s)
Enter an end cycle time (5 to 10 seconds is typical). When a scale
has been empty for this length of time, the system assumes that the
final weight has been captured and the vehicle has left the scale.
Unattended Type
If the scale will be used as an unattended weighing station, select
the type of unattended interface from the combo box: Touch Screen,
JagHMI, or Four-Line Display. If the scale is not being used as an
unattended weighing station, select None.
Threshold Value
Enter a threshold weight. This weight should be higher than the
excursion weight. When the weight reading reaches this level, it
signals to the system that a vehicle is on the scale.
Jag Scale
You can use a JAGXTREME terminal to control peripheral devices
and another terminal to read weight from a scale. If a JAGXTREME
terminal is connected to the scale, check this box. If another type of
terminal is connected to the scale, do not check this box. Any
changes to the hardware settings should be saved to the
JAGXTREME terminal automatically when the OverDrive program is
19-18 (5/07)
Chapter 19: Hardware Setup
Connecting to Peripherals
restarted. If new hardware settings are not saved automatically, you
can save them to the JAGXTREME terminal manually by clicking the
button next to the Jag Scale check box.
Ignore Threshold
Check this box to enable the system to ignore the threshold value.
This function cannot be used in legal-for-trade applications.
Connecting to
Peripherals
The system can communicate with peripheral devices via a
JAGXTREME terminal. You can configure as many as six hardware
connections for those devices. Use the HW Connection combo box
to select a number (7-12) for the hardware connection between the
JAGXTREME terminal and peripheral devices. Select 0 if there is no
connection. Selecting a connection will activate the Configure
button, which opens the Hardware Connection window.
1.
Select a number (7-12) from the HW Connection combo box.
2.
Click the Configure button.
3.
Configure the connection in the Hardware Connection window.
4.
•
Enter the IP address for the JAGXTREME terminal in the IP
Address data field.
•
Enter a number in the Update Rate data field to indicate
how many times per second the data from the scale will
be updated. The maximum recommended is 10 times per
second.
•
Check the Enabled box to enable the hardware
connection.
When you have configured the settings, click the OK button on
the Hardware Connection window.
(5/07) 19-19
METTLER TOLEDO OverDrive Software User’s Manual
Serial Ports
A JAGXTREME terminal provides two serial ports, plus an additional
two serial ports when the optional multi-function card is installed.
These ports are used for connecting to displays, printers, and card
readers. Use the serial port combo boxes to select the hardware that
will be connected to each port.
Serial Port Options
0 – Nothing connected to the port
1 – Four-Line Display
3 – Scoreboard
20 – Thermal Ticket Printer
21 – Dot Matrix Display
40 – LF – Don't remove any characters
41 – LF – Remove last character
42 – LF – Remove last two characters
43 – LF – Remove first & last character
44 – LF – Remove first & last two characters
45 – LF – Remove first & last three characters
46 – AAR Encoded Rail Tags
47 – Smart Pass 5110 Tags
50 – CR – Don't remove any characters
51 – CR – Remove last character
52 – CR – Remove last two characters
53 – CR – Remove first & last character
54 – CR – Remove first & last two characters
55 – CR – Remove first & last three characters
60 – ETX – Don't remove any characters
61 – ETX – Remove last character
62 – ETX – Remove last two characters
63 – ETX – Remove first & last character
64 – ETX – Remove first & last two characters
65 – ETX – Remove first & last three characters
70 to 75 – Serial Keyboard
80 to 85 – Future Use
90 to 95 – Future Use
Wire the peripheral devices to the serial ports on the JAGXTREME
terminal according to the selections made here.
19-20 (5/07)
Chapter 19: Hardware Setup
Connecting to Peripherals
Parallel Ports
A JAGXTREME terminal provides two parallel ports, one with four
inputs and one with four outputs. When the optional multi-function
card is installed, it provides two more parallel ports with eight more
inputs and eight more outputs. These ports are used for connecting
to traffic lights, gates, and other peripheral devices. Use the PAR
combo boxes to select the hardware to be connected to each port.
Parallel Port Input/Output Options
0 – Nothing connected
1 – Entrance Green Traffic Signal Direction 1
2 – Entrance Red Traffic Signal Direction 1
3 – Exit Green Traffic Signal Direction 1
4 – Exit Red Traffic Signal Direction 1
5 – Entrance Barrier (Gate)
6 – Exit Barrier (Gate)
7 – Illumination
8 – Entrance Green Traffic Signal Direction 2
9 – Entrance Red Traffic Signal Direction 2
10 – Exit Green Traffic Signal Direction 2
11 – Exit Red Traffic Signal Direction 2
51 – Entrance Loop or Photoeye
52 – Exit Loop or Photoeye
53 – Entrance Barrier Limit Switch
54 – Exit Barrier Limit Switch
55 – Photocell
56 – Split Weighing Push Button
Wire the peripheral devices to the parallel ports on the JAGXTREME
terminal according to the selections made here.
(5/07) 19-21
Chapter 20: Index
20
Index
A
Accept, 5-4, 8-13
Account, 4-8, 5-20, 8-4
Advanced Pricing, 7-2
Advanced Pricing Wizard, 14-1
Archive Data, 15-11
ASCII Characters, 19-16
Axles, 4-45, 4-46, 4-50, 5-15
B
Backup, 15-6, 15-10
Badge, 4-12, 8-13
C
Cancel, 5-4
Carrier, 4-15, 8-6
Clear, 5-4
Color, 13-4, 13-5, 13-6, 13-7, 19-3
Combo Box, 5-2, 8-11
Company, 4-16
Complete, 5-4, 8-13
Container, 4-18, 4-49, 4-51
Contract, 4-20, 8-3, 8-4
Contract Product, 4-21, 4-22
Conversion Factor, 4-36, 4-48, 14-5
Credit, 4-9, 4-21, 8-3
Custom Formats, 19-6
D
Data Fields, 4-2, 5-2
Database, 1-12
Demo Mode, 2-1, 2-3
Destination, 4-25
Discount, 4-9, 4-20
Driver, 4-26
E
Ethernet Connection, 19-4, 19-17
Excursion, 19-18
Exit, 3-4, 3-5, 3-9, 17-11
Export, 11-1
Export Data, 15-1, 15-9
Extended Tables, 4-53, 8-8
F
Filter, 4-5, 8-7, 11-2, 11-8, 15-4
Fixed Price, 7-3, 14-3
Font, 13-7
Form View, 4-2, 11-7
Formula, 4-27, 7-4, 7-5, 7-7, 7-10,
14-3, 14-5
Four-Line Display, 8-14, 16-1, 17-12,
19-18
G
Generator, 4-28, 4-38
Get Weight, 5-4
Global Export, 15-9
Graphics, 13-12, 19-3
Gross Weighing, 4-36
Group Presets, 4-29, 6-4, 6-7, 6-8
Groups, 4-30, 6-4, 6-5, 6-6, 6-7, 6-8,
8-9
GUI Editor, 3-5, 13-1, 13-2, 13-3
H
Hardware Setup, 19-1, 19-19
Help, 2-3, 3-4, 3-7
I
Icon, 13-12, 19-4
Image, 19-4
(5/07) 20-1
METTLER TOLEDO OverDrive Software User’s Manual
Import Data, 15-7
Import/Export Wizard, 15-1
Installation, 1-4
Invoice Cycle, 4-8, 18-4
Invoice Maintenance, 18-8
Invoicing, 18-5
J
JagHMI, 19-18
K
Keyboard Shortcuts, 3-7
L
Languages, 2-1, 3-4
License Key, 2-2
Load Counter, 4-16, 4-17, 8-3, 8-16
Load Number, 3-6, 4-16, 4-17, 8-3,
8-16
Load Percent, 5-5
Login, 3-1
M
Manifest, 5-3
Manual Weighing, 4-36, 5-2, 8-6
Menu Bar, 3-5
Modify Software, 1-17
Modules, 1-1, 2-2
Motion Detection, 19-12
Moving Objects, 13-8
Multi-Axle Weighing, 5-3, 5-15
Multi-Pass Weighing, 5-8, 5-12, 5-13,
8-2
Multiple Weighment Tare, 4-46, 4-47,
4-50, 5-15
N
Net Weighing, 4-36, 5-8, 5-16, 8-3
Notes, 5-4
20-2 (5/07)
O
One-Pass Weighing, 5-8, 5-9, 8-2
Operation, 4-9, 4-21, 4-36, 4-49, 7-3,
8-4
Options, 8-1
Origin, 4-31
Origin Price Type, 4-31, 4-32, 7-9
Overrange Detection, 19-13
Override Rate, 7-9, 7-10
P
Parallel Port, 19-21
Password, 3-1, 10-1, 10-2, 10-6
Payment Method, 5-22, 8-6
Permissions, 10-3
Permit, 4-33, 4-37
Presets, 4-34, 6-1, 6-3, 8-9, 8-15
Pricing, 4-22, 4-23, 4-27, 4-36, 7-1,
7-3, 7-4, 7-5, 7-7, 7-10, 8-3, 14-1
Printers, 8-6, 19-20
Printing, 2-3, 3-6, 8-5, 12-1, 12-3,
12-4, 12-5, 12-9
Printing Destinations, 12-4
Printing Groups, 12-8
Printing Parameters, 12-6
Printing Permissions, 12-7
Product, 4-35, 5-5
Product Code, 2-2
Profile, 4-23, 4-36, 4-38
Q
Query, 3-5, 4-4, 4-5, 9-5, 11-2
R
Raw Price, 7-3, 14-3
Record, 3-5
Refresh, 3-6, 5-18
Registration, 1-4, 2-1, 2-2, 2-3, 3-7
Remark, 4-40, 4-41
Remove Software, 1-20
Repair Software, 1-17
Reports, 12-1, 12-2, 12-3, 12-9, 1210
Chapter 20: Index
Re-Pricing, 18-2
Required Fields, 13-11
S
Sampling, 8-4, 9-1, 9-2, 9-3, 9-4, 9-5
Save, 3-5, 4-4
Scale Server, 8-6
Scale Terminal, 19-5, 19-17, 19-18
Scales, 5-2, 19-2, 19-3, 19-4, 19-18
Search, 4-21, 4-24, 5-23
Serial Communication, 4-13
Serial Connection, 19-4, 19-5
Serial Port, 19-20
Shipping Address, 4-10, 4-11, 8-4
Short Code, 4-42, 8-14, 17-11
Show Scales, 5-4, 5-21
Side Tree, 3-3, 4-1
Sizing Objects, 13-9
Split Weighing, 5-3, 5-14, 19-21
Standard Gate Rate, 4-36
Startup, 3-1
Step Pricing, 7-4, 14-4
Summed Scales, 19-2
Surcharges, 4-23, 4-37, 4-43, 5-6,
11-6
System-Generated Key, 4-2, 8-17
T
Tab Key, 13-10
Table View, 4-3, 11-9
Tables, 4-1, 4-3, 4-5, 4-6, 4-7
Tare, 3-4, 3-7, 4-18, 4-19, 4-46, 447, 4-49, 4-50, 5-2, 5-19, 8-5
Taxes, 4-23, 4-37, 4-43, 4-44, 5-6,
7-9, 11-6
Threshold Value, 19-18
Tickets, 3-6, 4-9, 5-2, 5-3, 8-5, 8-7,
9-2, 12-1, 12-2, 12-3, 12-9, 1213, 18-2
Time-Out, 5-24, 8-6
Tool Bar, 3-4, 4-4
Touch Screen, 5-18, 16-1, 17-6, 1918
Traffic Lights, 3-4, 3-7, 5-24, 19-21
Trailer, 4-45, 4-49, 4-51
Transaction Browser, 3-6, 5-18, 8-7
Transaction Maintenance, 11-1, 11-4,
18-1
Transaction Number, 5-17, 11-3, 11-8
Transaction Screen, 3-4, 5-1
Transaction Status, 11-1, 11-3
Transaction Type, 5-8, 16-1, 16-9,
16-18, 17-1
Transaction Type Wizard, 16-1
Transaction Wizard, 5-18, 16-1, 17-1
Transient Vehicle, 5-20, 8-4
Truck Only, 4-52, 5-3
Two-Pass Weighing, 5-8, 5-10, 5-11,
8-2
U
UADT, 5-18
Unattended, 8-12, 12-5, 16-1, 17-1,
19-18
Unit Price, 7-3, 14-3
Update Presets, 6-2
User Name, 3-1, 10-1, 10-2
User Number, 5-7
User Text, 5-7
Users, 10-1
User's Groups, 10-4, 10-5
V
Vehicle, 4-48, 5-20, 8-4
Virtual Scale Indicator, 3-4, 5-17
Void Transaction, 11-1, 11-5
W
Weights and Measures, 11-7
Z
Zero, 8-5
Zero Scale, 3-6
Zero Weighing, 4-36, 4-49, 5-8, 5-16,
8-3
(5/07) 20-3