1
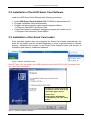
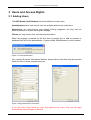
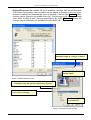
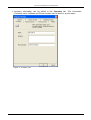
Hur Smart Card Software V2.6 User Manual
01102005
2
Hur Smart Card Software V2.6 User Manual
Table of Contents
TABLE OF CONTENTS ..........................................................................................................................................3
1
OVERVIEW.....................................................................................................................................................5
1.1
2
INSTALLATION..............................................................................................................................................5
2.1
2.2
2.3
3
FEATURES ................................................................................................................................................5
SYSTEM-REQUIREMENTS ..........................................................................................................................5
INSTALLATION OF THE HUR SMART CARD SOFTWARE ................................................................................6
INSTALLATION OF THE SMART CARD READER .............................................................................................6
USERS AND ACCESS RIGHTS ....................................................................................................................7
3.1
3.2
ADDING USERS.........................................................................................................................................7
LOGIN TO SYSTEM ....................................................................................................................................8
4
PROGRAM SETTINGS ..................................................................................................................................9
5
MANAGING DATABASE .............................................................................................................................16
5.1
STRUCTURE OF THE DATABASE ...............................................................................................................16
5.2
BROWSING GROUP / PERSON DATABASE .................................................................................................16
5.2.1 Searching Persons from the Database............................................................................................17
5.2.2 Adding, Removing and Editing Groups............................................................................................18
5.2.3 Adding, Removing and Editing Persons ..........................................................................................19
6
RUNNING EXERCISES................................................................................................................................20
6.1
CHOOSING THE GROUP AND A PERSON ....................................................................................................20
6.2
CREATING A NEW TRAINING PROGRAM .....................................................................................................21
6.2.1 Training Specification tab.................................................................................................................21
6.3
COPY OF A TRAINING PROGRAM ...............................................................................................................22
6.3.1 Member Card tab .............................................................................................................................23
6.4
SET SERIES TOOL ..................................................................................................................................24
6.5
USING LAST VISIT DATA ...........................................................................................................................25
6.6
UPLOADING A TRAINING PROGRAM TO CARD.............................................................................................26
6.7
SMART CARD CONTROLLER DISPLAY .......................................................................................................27
6.7.1 Exercise without card (Display) .......................................................................................................27
6.7.2 Exercise With Smart Card (Display) ................................................................................................28
6.8
TRAINING REPORT ..................................................................................................................................29
6.8.1 Comments........................................................................................................................................29
6.8.2 Current Visit Information ..................................................................................................................30
6.8.3 Training History................................................................................................................................31
7
PRINTING .....................................................................................................................................................34
7.1
7.2
8
OTHER FEATURES .....................................................................................................................................34
8.1
8.2
8.3
8.4
8.5
8.6
8.7
9
PRINTING A TRAINING SPECIFICATION ......................................................................................................34
PRINTING A TRAINING HISTORY ...............................................................................................................34
EXPORTING THE DATA .............................................................................................................................34
TRAINING EQUIPMENT INFORMATION .......................................................................................................35
GENERAL DATABASE INFO ......................................................................................................................35
STATISTICS ............................................................................................................................................36
MESSAGING SYSTEM IN HUR SMART CARD SOFTWARE ............................................................................37
HELP .....................................................................................................................................................38
ABOUT ...................................................................................................................................................38
TROUBLE SHOOTING ................................................................................................................................39
9.1
USING THE SOFTWARE ............................................................................................................................39
9.1.1 Persons and Groups are missing ....................................................................................................39
9.1.2 Can’t delete a group, a person or a visit in gym ..............................................................................39
9.1.3 Help file is missing ...........................................................................................................................39
9.1.4 Reader connections .........................................................................................................................40
3
Hur Smart Card Software V2.6 User Manual
9.1.5 Reading error ...................................................................................................................................40
9.2
DISPLAY ERRORS....................................................................................................................................41
10
PICTURE APPENDIX (FIGURES) ...............................................................................................................42
4
Hur Smart Card Software V2.6 User Manual
1 Overview
Welcome to the HUR Smart Card Software. With HUR Smart Card Software you can
create new training program and load the program to Smart Card. System adjust the
target workload and instruct the user during the exercise. After exercise the performed
and stored exercises are moved to computer’s database to further analysis. The Hur
Smart Card Software store performed workload, sets, reps, average heart rate,
maximum heart rate, exercise time and time of total visit.
This User Manual describes HUR Smart Card Software's features and helps to use it
in an efficient and productive way.
1.1 Features
•
•
•
•
•
•
•
•
•
•
Database for persons and groups
Data protection (password) for databases
Equipment information
Training affects (muscular pictures)
Self created template exercises with copy property
Training results are stored for later analysis
Data export to clipboard
Printable stored and performed exercise reports
Statistic information of utilization degree
Up to date list of active visitors in the gym
2 Installation
2.1 System-Requirements
HUR Smart Card Software needs the following software and hardware.
•
•
•
•
•
•
•
•
Microsoft Windows 2000 or Microsoft Windows XP
Screen resolution of 800*600 or higher (1024*768 is recommended)
Pentium III 450 (faster is recommended)
128 Mb of RAM (256 Mb is recommended)
CD-ROM
One free USB-port or one Com-port AND one ps-2 port
Printer is recommended, but not necessary
Unzip program (e.g. WinZip)
5
Hur Smart Card Software V2.6 User Manual
2.2 Installation of the HUR Smart Card Software
Install the HUR Smart Card Software with following procedure:
•
•
•
•
Insert HUR Smart Card Software V2.6 CD-ROM to appropriate drive
Program installation starts automatically
Program will automatically create required program folders:
C:/Program Files/HUR Labs/Smart Card
If there isn’t folder for database, installation program will create one to:
C:/Program Files/Common Files/HurDB20
2.3 Installation of the Smart Card reader
If the operating system does not recognize the Smart Card reader automatically, the
driver for the reader must be installed separately in order to get the reader to operate
properly. Installation file located on the Smart Card software folder and shortcut is
created to start menu by installation software.
Figure 0 Reader Installation Chart
GemPCTwin is for the reader with USB connection and GemPC410 is for the reader with
com-/ps-2-port connection.
Program will guide you through
installation session. Pick up the
right reader type from list
GemPCTwin:
GemPCSerial/ GemPCUSB
or (GemPC410) and click “Next”
button.
Figure 1 Reader Installation Window
6
Hur Smart Card Software V2.6 User Manual
3 Users and Access Rights
3.1 Adding Users
The HUR Smart Card Software has three different access levels.
Administrators have total control over the software without any restrictions.
Supervisors can add persons and change training programs, but they can not
remove persons or access the program settings.
Clients can only access their own training information.
When the program is started for the first time it prompts you to add one person to
database that will be the administrator. A group called ‘Administrators’ is also created.
Figure 2 Prompt Administrator
You need to fill person information fields as shown below. Note that only the required
fields are filled in these example pictures!
Figure 3 Filling Administrator Information
If you set users Login Name as ‘root’ and password as ‘pass’, this user will login
automatically when program is started!
7
Hur Smart Card Software V2.6 User Manual
3.2 Login to System
To login to the system you need to type a user name and password. If login is
accepted, user information is shown as in figure 4. You can logout the user from ‘File |
Logout’ or login new user from ‘File | Login’. By login in a new user will automatically
logout the previous user. If you have new messages, ‘Personal Messages’ box will
appear after logon.
Figure 4 Login Information
8
Hur Smart Card Software V2.6 User Manual
4 Program Settings
The HUR Smart Card Software has settings that need to be set in order for the
program to work properly. Settings can be entered through the ‘Database Settings’window, which can be viewed by selecting 'File | Settings from the program's main
menu. To be able to update the settings and add new members and groups, user
must login as an administrator!
This window displays the Database Settings information. It can be selected from File
menu or from tool bar icons.
Figure 5 Open the Settings
9
Hur Smart Card Software V2.6 User Manual
• The General tab allows selection between S.I. and U.S. units and information about
reader status.
If ‘Prompt for login after writing to the card’ is checked, user is asked to login the
member to the gym after writing the training information to the card. Otherwise user
needs to insert card back to reader after writing the training information to card in order
to login the member to the gym.
Time for inactive Visit Window can be also set here. Inactive window will be closed
automatically after this time.
Figure 6 General tab
10
Hur Smart Card Software V2.6 User Manual
• The country that is used as a default country in the “Add Person” window can be
changed in the Persons & Card tab. Also default values for Valid Hours can be set
in this tab.
Figure 7 Person & Card tab
11
Hur Smart Card Software V2.6 User Manual
• Defined Exercises tab contains the list of available exercises that can be used with
HUR Smart Card system. New exercises can be added or inserted to the list. When
exercise is added it will automatically move to the end of the list. With Insert. button
exercise can be placed in the middle of the list. This list pops up as a default training
order when creating a new Training Specification. By using ..Remove button the
exercise can be removed from available Exercise Name list.
Exercise Name can be renamed.
Maximum length of a name is 17 letters.
Picture of equipment and
muscle affects.
Figure 8 Defined Exercises Tab
Machine Model number or Name can’t be renamed. This
information links the exercise and machine together
List of available exercises that
can be done in the gym.
List of supported
manufacturers.
Figure 9 Add New Exercise window
12
Hur Smart Card Software V2.6 User Manual
• Company information can be edited in the Company tab. This information
(Company name, Address and Phone number) can be seen on a print report.
Figure 10 Company Tab
13
Hur Smart Card Software V2.6 User Manual
• Training Program tab contains general options and settings related to creation and
modification of any training program. “Hur Exercise Set Auto Update conditions
defines” the rules when “Auto Update” option is invoked.
Figure 11 Training Program Tab
14
Hur Smart Card Software V2.6 User Manual
• Training Session tab contains options related to behaviour of the system when
person finishes his/her training session.
Figure 12 Training Session Tab
15
Hur Smart Card Software V2.6 User Manual
5 Managing Database
5.1 Structure of the Database
The database behind the HUR Smart Card Software consists of groups, persons,
equipment, training programs and training history. This structure helps to organize
persons and groups logically, just like the files are organized to sub-directories on the
hard drive.
5.2 Browsing Group / Person Database
The contents of group / person database can be viewed by selecting 'File | Browse
Database' from the program's main menu. A window showing the ‘Contents of the
Database’ will appear:
Double-click the name
of a person and
Training Information
window will open.
By clicking the right
mouse button a pop
up menu is invoked.
Right Panel
Remove button is inactive when a
person has visits in database.
Status Bar
Figure 13 Contents of the Database window
16
Hur Smart Card Software V2.6 User Manual
5.2.1 Searching Persons from the Database
Persons can be searched from the database by clicking Find button or Ctrl+F. A
search dialog will appear:
In this example, the database was
searched for any persons with
last name “Manderbacka”
Figure 14 Find Person window
Enter the known information about the person to be searched in edit boxes on the left
of the window and click Search button to start search. Fields that are left blank are
not included in the search criteria. The search results will be shown in the memo
labelled 'Results'. Clicking a person's name in the results memo selects the person in
the group / person tree view. This is the fast way to locate a certain person in the
database.
17
Hur Smart Card Software V2.6 User Manual
5.2.2 Adding, Removing and Editing Groups
A new group can be added to the database by clicking the Add New Group button
or Ctrl+Alt+A. A dialog, where information about the new group can be entered will
appear.
Information about a certain group can be viewed or edited by selecting the group from
the tree view and clicking the View / Edit Group button. A dialog with group's
information will appear. Group information can now be edited.
Group Information can be selected
also from tool bar menu icon if it has
been activated: 'View | Toolbars'
Figure 15 Group Information window
A group can be removed from the database by selecting the group from the tree view
and clicking the Remove Group button.
Please note that a group, which contains persons, cannot be removed. To remove the
group, remove first all the persons in it.
18
Hur Smart Card Software V2.6 User Manual
5.2.3 Adding, Removing and Editing Persons
A new person can be added to a certain group by selecting the group from the tree
view and clicking the Person / Add button or Ctrl+A. A dialog, where information
about the new person can be entered will appear.
Information about a certain person can be viewed or edited by selecting the person
from the tree view and clicking the Person / View Info button. A dialog with person's
information will appear. Person information can now be edited.
Person Information can be
selected also from tool bar menu
icon if it has been activated:
'View |Toolbars'
Figure 16 Person Information window
A person can be removed from the database by selecting the person from the tree
view and clicking the Person / Remove button.
Please note that a person who has exercises in the database can't be removed. In
order to remove a person from the database, all of his/her Training History
information need to be removed first.
Note that person might have tests also in other HUR software and can not be removed
before those have also deleted!
19
Hur Smart Card Software V2.6 User Manual
6 Running exercises
6.1 Choosing the group and a Person
From the main menu click the ’Browse database’ menu item and choose the group
and the person who is going to do the exercise. After choosing the group a ‘Select
Group or Person’ -list is displayed. Select the person from the tree view and click
TTraining Info to open the Training Information window.
Figure 17 Select Person
20
Hur Smart Card Software V2.6 User Manual
6.2 Creating a new training program
6.2.1 Training Specification tab
A new training program can be made under the Administrator or Supervisor mode.
On Client mode person can only browse his/her own training program. On the bottom
of the screen a current mode can be seen on the left side of the status bar.
After chosen a person Training Spec. button a training specification window is
opened. This window can be opened also by key bar combination Ctrl+S. You can
see a name of the group and person on the status bar you are dealing with.
By clicking right mouse button a
personal training program tab can be
added, renamed or removed here.
By clicking right mouse button a new exercise
scan be added from Defined Exercises list. You
can also remove exercises, delete, rename or
copy a training program.
Timetable for update information if
Update Training Program is selected.
Automatically update Hur machines’ load if exercise is
over performed.
General
comments
from
supervisor. This text can be seen
on exercise and training history
report.
If fast mode is selected, the rest time is set to zero.
Figure 18 Training Information window Training Specification
21
Hur Smart Card Software V2.6 User Manual
New training programs are made by using Training Specification tab. First the
number of set is selected – maximum number of sets is 15. Time between Sets can
be set from 6 seconds up to 120 seconds with 6 seconds intervals. Load can be
adjusted with 1 unit steps. Number of repetitions can be set from 1 to 120 reps.
Target Heart Rate field is like a note for the person who is doing the exercise. Please
note that some cardio machines are controlled by the heart rate. The target heart rate
field should be left empty if heart rate control is not wanted.
More exercises can be added
here. (Insert Exercise)
Exercise can be deleted also
here. (Delete (Del))
Figure 19 Insert and Delete Exercises
If a person likes to have more exercises in training program, exercises can be added
by clicking Insert Exercise icon or the right button on the exercise list. If there are no
more exercises to add this icon is grey (not active). Exercise can be also deleted from
Delete (Del) icon from tool bar or with the right mouse button.
TIP: if a person likes to do e.g. four different kinds of exercises with Twist machine
during one drill he can rename Twist exercise in settings e.g. Twist easy/ Twist hard/
Twist fast/ Twist slow. Otherwise it is not possible to add in training specification or do
more than one time each exercise for a certain machine. Smart Card doesn’t allow
doing same exercise twice during one drill!
6.3 Copy of a training program
It is possible to copy training specifications from one person to another. This helps
creating several different training programs to one person. In order to copy a training
program you need to open source and destination person training information
windows. Training program can be copied and pasted with right mouse button click
like in any other applications. After copying training program is ready to be edited and
saved to database.
Click the right mouse button and select your function.
Figure 20 Copy of an Exercise
22
Hur Smart Card Software V2.6 User Manual
6.3.1 Member Card tab
Smart Card type can be selected from Member Card tab. There are two possibilities
to save Smart Card: Public or Private. Difference between Public and Private Card is
the way that a card is read after performed exercises. If the card is public the system
reads information from the card and stores performed exercises to database but it also
erases all information from the card and it is again “blank”. If the card is private the
system erases exercises, but personal data and training program are left on the card
and it is ready for another training session for same person.
Valid hours can be set from list box. Here is the value that is set as default value for
valid hours in settings. Meaning for these time limits is that owner of the gym can
control when person is supposed to visit in gym. This feature allows a person to do his
exercise but “overtime” can be seen in training reports.
Other information can be written in Card Note memo. There is space for 15
characters in Welcome Name box. This name can be seen with “HELLO” text on the
screen when a person put his card into display reader’s slot.
ID number for a person is created automatically
after exercise is stored to database.
Car type Public / Private can be chosen here.
Valid hours can be adjusted from
Staring hour to Ending hour.
Supervisor can be selected from the list.
A Welcome Name can be seen on display
when person starts doing his exercise.
Figure 21 Training Information window Member Card tab
When training specification is complete the program can be stored first to database
(recommended) and then to Smart Card.
23
Hur Smart Card Software V2.6 User Manual
6.4 Set Series Tool
This tool eases the process of entering data to Sets grid from Training Information
Windows for Hur Exercises.
Click the right mouse button
and select ‘Set Series Tool’.
Window is divided into three parts: Load, Reps and Heart Rate. In each of these sections
you can insert First value and Step. When 'Fill In' button is clicked Sets grid will be filled
with set of values like:
1. First
2. First+Step
3. First+Step+Step...
Figure 22 Set Series Tool
24
Hur Smart Card Software V2.6 User Manual
6.5 Using last visit data
With 'Use Last Visit Data' function you can update you old training program, or even
create a new training program, based on your last visit.
Click the right mouse button and
select ‘Use Last Visit Data”.
When creating a new training program by using data from the last visit, there are two
options for setting the exercise parameters: training and performed. If “Training” is
selected, the software will use the values from the training program used. Selecting
“Performed” will use the values from the last performed exercises. In Target Heart
Rate section “Average” means the average heart rate in last performed exercise and
“Max” the maximum heart rate.
Select the option for those exercises
not performed during last visit.
Select to create the
new training program
Figure 23 Using last visit data
25
Hur Smart Card Software V2.6 User Manual
6.6 Uploading a Training program to card
Training Specification is saved first to database by clicking Save Training Spec. To
DB icon in tool bar. Next window will open and information is stored to database.
Training Specification is stored to
database (Save Training Spec To DB)
Figure 24 Saving a Training Specification
Selecting Write Training Spec To Smart Card icon from tool bar can also save training
Specification. This does both savings mentioned above at the same time.
Figure 25 Saving a Training Specification
Training Specification is stored to Smart
Card (Training Spec To Smart Card)
If the option “Prompt after writing to the card” is selected in Settings window log in to
the gym can be done right after the training specification has been written to the card
(see figure 11). Otherwise it is recommended log in to the gym by inserting the card back
to the reader. This way the owner of the gym can control visitors when they have
logged in or out. Time of the visit can be seen from Active Visits window and in
Training History.
Active Visits window can be opened and closed from View Active Visits icon in
toolbar or from menu 'View | View Items’
Figure 26 Active Visits Icon
Figure 27 Active Visits Icon
Card ID field shows what kind of card person is using and persons ID number in
database. “Key” symbol means Private card and “open book” Public card. Visit ID
number means the total number of the visits. Every time a card is inserted to reader it
makes a new visit ID number even if there are no exercises done in the card.
26
Hur Smart Card Software V2.6 User Manual
6.7 Smart Card Controller Display
6.7.1 Exercise without card (Display)
HUR Smart Card Machines can be used with or without chip card. When exercise is done
without card workload must be adjusted manually. To increase workload (+) button must
be pressed and to decrease the workload (-) button must be pressed. If it is necessary to
reduce workload fast, e.g. 89KG (or N/Nm/Lbs) to 0KG, (-) button must be pressed about
4-5 sec. Numbers of repetitions and workload can be seen on display.
Smart Card reader slot where
chip card is inserted.
Controller Display screen.
(+) and (-) buttons for manual
control and adjusting.
Figure 28 Controller Display
Display screen without card when equipment has one direction (here with KG units) :
Display screen without Card when equipment has two directions (with KG units):
1. Normal display screen. To adjust a workload press “LOAD” button (right)
2. … adjusting the workload with (+) and (-) buttons. There is about 5 seconds
time after the “LOAD” button is pressed to adjust the load and display goes
back to screen 1
3. “SWITCH” button (left) changes the workload direction and new name of the
exercise can be seen in top of the screen.
27
Hur Smart Card Software V2.6 User Manual
6.7.2 Exercise With Smart Card (Display)
From display it is easy to follow the instructions that were stored in training
specification. Display guides a person during the training and the system adjusts
automatically workload according stored exercise in the card. It is also possible to
change workload manually in the middle of the training. Repetitions are counted
separately from both sides (left and right) if there are two cylinders. Display shows the
higher mount of repetitions from left or right side. A “beep” sound signals when more
repetitions are made than planned. If person wants to do more repetitions than
planned he have to continue his exercise within 3 seconds after last repetition that has
planned – otherwise exercise goes on the next step. If person stop his exercise in the
middle of the set and he like to continue he have to wait about 20 seconds and
exercise goes on the next step. After the last set a list of the next three exercises can
be seen on display.
When using Smart Card control in exercise display looks like this:
Figure 29 Display layouts with Smart Card
1. Hello text pops up when Smart Card is put into the display’s reader slot. Name of
the person is set in Member Card tab in Welcome Name (Figure 21).
2. Name of the exercise is in top of the screen and the next line tells what is the
target workload for the first set
a. If there are more exercises (e.g. Twist fast, Twist slow) for the same
machine it can be selected with “NEXT” if there are no other exercises
display shows the same as in first place.
b. If “OK” is selected exercise goes on the next step as suggested
3. “CAUTION” text is shown while workload is adjusting
28
Hur Smart Card Software V2.6 User Manual
4. System is ready:
a. Name of the exercise is seen on the top of the screen
b. Workload on the left side. Workload can be manually adjusted during the
exercise from (+) and (-) buttons.
c. Performed repetitions are in the middle, on the right side (e.g. 5 repetitions
of 4 planned). Maximum mount of rep counting is 120.
d. Number of sets is displayed on the left side (e.g. 4 sets of 4 planned). It is
not possible to do more sets than planned.
e. Heart rate can be seen on the right side of the screen if person is using
heart rate transmitter. If transmitter is not used only symbol of heart is
visible.
5. Time between sets is shown next – if there are more sets than 1. This rest time
can be skipped from “SKIP” if time is too long.
6. When exercise is finished a list of next three exercises can be seen on the screen.
a. Card can be taken away and person can go to the next machine
b. If there are more exercises for the same machine and “LIST” is pressed the
screen looks like in stage 2.
c. When “LIST” is selected and there are no more exercises in that machine
screen looks like this:
7. This kind of message appears if there are no exercises at all inside the Smart Card
for the machine.
6.8 Training Report
6.8.1 Comments
After a person is finished with exercises he/she needs to insert the card back to reader
in order to store the test data. If “Prompt for Visit’s Comments...” is selected in
Database Settings / Training Session tab, a window for comments opens and user
or supervisor comments can be added here.
Figure 30 Add Visit\s Comments window
Window has to be closed with “OK” or “Cancel” button! Otherwise the information of
the exercise session will not be stored to database.
29
Hur Smart Card Software V2.6 User Manual
6.8.2 Current Visit Information
When exercises is finished and comment window is closed (if it was selected in
settings) a Visit window pops up if there are some performed exercises stored in the
Smart Card. Not active Visit windows will be closed after 20 seconds.
Visit ID and a name of the person
Valid Hours
ID number
“Overtime”
Comments
Login Info
Color codes
Exercise color code analyse
Sort by Performed index
Description of performed training
Detailed information about sets
Figure 31 Visit information window
30
Hur Smart Card Software V2.6 User Manual
6.8.3 Training History
Training History window can be opened from main menu 'Training | Training
History', Ctrl+H or from Contents of Database / Training History button.
NOTE: Training History or Training Specification windows are always active for
one person whose name and group can be seen in status bar of the main screen
Number of Set
(DB Selection, down left corner).
Name of Exercise
Scroll the Visits
Figure 32 Training History window
1. Statistics of the Visits tab include personal information:
a. Total Number of Visits
b. Unlogged Visits
c. Visits with Stored Exercises
d. Total Amount of Exercises
e. All Performed Exercises
f. Under Performed Exercises
g. Full Performed Exercises
h. Over Performed exercises
2. Visits’ Calendar tab shows all visits a person has done and there is a colour
indication if he has visited one or more visits a day.
31
Hur Smart Card Software V2.6 User Manual
3. - 5. In Exercises Done tab there are graphical columns to indicate how successful the
exercises have been done. “Exercise to Analyse” shows the name of the exercise
that is analysed at a time. On “Set” combo box shows, which set of the exercise, is
analysed.
6. Visits in the Gym tab consist of list of all exercises a person has done in the gym.
There is a mark (+) before a visit icon - it means that person has done some
exercises. Quick color code analyse of the visit can be seen when mark is clicked
once. It opens a list of exercises that was included in that visit. Double click the text
line opens detailed information about the visit.
7. Visits box explains a meaning of logging symbols.
8. Exercises box shows explanation for color codes.
9. Progress Report describes a progress of a single exercise between times that has
been selected
max reps, max loads
Work indicator
(sets x reps x load)
Figure 33 Progress Report tab
Figure 34 Progress Report window
32
Hur Smart Card Software V2.6 User Manual
10. With Two Visits Comparison option two exercises can be analysed according the load,
number of reps or work indicator (sets x reps x load)
Selection of items
to Comparison
Select two Visits that
are compared
Graphical comparison
of two selected visits
Figure 35 Two Visits Comparison tab
Numerical information
of comparison
Figure 36 Training History window
33
Hur Smart Card Software V2.6 User Manual
7 Printing
7.1 Printing a Training Specification
To be able to print visit information a Training Program for… window must be active
and all fields must be filled. Training program can be printed with Ctrl+P combination,
from file menu “Print”, from tool bar Print Report icon. Print preview can be seen from
tool bar Report Preview.
Print Report
Report Preview
Figure 37 Print and Preview Report
In Person Training Specification Report a current report can be stored to selected
file or stored print file as a Quick Report file (*.QRP). This file can also be opened and
printed later.
Zoom Report
Load Report
Brows Report
Save Report
Figure 38 Report Preview features
7.2 Printing a Training History
To be able to print performed exercises a Visit… information window must be active.
Training History can be printed with Ctrl+P combination, from file menu “Print”, from
tool bar Print Report icon. Print preview can be seen from tool bar Report Preview.
8 Other Features
8.1 Exporting the data
When data is exported to another software an export Data icon in tool bar menu can
be used. The information that is copied is “Tab separated text file” format and it can
be opened e.g. in MS Word or MS Excel program.
Export Data
Figure 39 Export Data
34
Hur Smart Card Software V2.6 User Manual
8.2 Training Equipment Information
To get information about training equipment and practice effect of the muscle groups a
Present Hur Equipment – Guide can be opened 'Tools | Equipment'.
Picture of Equipment
Muscle groups
Equipment
Equipment description
Figure 40 Present Hur Equipment window
8.3 General Database Info
This window shows the basic information about database program is using and where
it is situated. This information is useful when backup folders are made.
Figure 41 General Database Information window
35
Hur Smart Card Software V2.6 User Manual
8.4 Statistics
Statistic information is situated in 'Tools | Statistics'.
Figure 42 System Statistics window
This window consists of two tabs. Visit by Hour shows total amount of visits on a
certain time of a day. Number of Visits tab sheet shows the visits per day, week or
month.
36
Hur Smart Card Software V2.6 User Manual
8.5 Messaging System in Hur Smart Card Software
The aim to implement messages in Hur Smart Card Software is to allow administrator
to inform gym users about any relevant issues concerning i.e. training information or
gym general maintenance. Administrator or Supervisor can choose when the message
is activated and when it expiries. On the other hand, when user logs in the system, he
or she is prompted with active messages dialog.
Function of the messaging system:
To get the messages of the logged person, user should choose from menu: “Tools>Logged Person Messages”.
If you are logged as Administrator or Supervisor, you can check the messages of the
selected person by choosing from menu: “File->Base DB Operations->Messages” or
pressing envelope toolbar button.
Personal Messages Form contains three tabs on the canvas:
- My messages - shows list of all messages received by the person.
- Sent Messages - shows all messages sent by the person together with list of the
recipients. (this option is available only for Administrator)
- Create New Messages - allows creating new message for many recipients. You can
add person or many of the persons to recipients list from “Contents of the Database”
and “Find Person” windows. Additionally you can set up properties of the message in
the right side of the sheet. (This option is available only for Administrator and
Supervisor)
The other important thing, concerning Supervisors and Administrators, is how to send
a message to one or group of the clients. There are two places where user can
choose persons to send message to.
The first one is “Contents of the Database” window, where one can choose person
from the tree-like structure. After choosing person from the left tree view, one can right
click and choose from the popup menu item: “Add Person to Message Recipients”.
The other option is to invoke “Find Person” dialog. After choosing search criterion and
performing search, user can select “Add to Message Recipients” or “Add All to
Message Recipients”.
37
Hur Smart Card Software V2.6 User Manual
8.6 Help
More information can be find in Help window - 'Help | Contents'
Figure 43 Help Topics Contents tab window
8.7 About
Version information can be checked from “About” window: the number of the software
version, a date when program is created and a link to HUR Company’s homepage.
Figure 44 About window
38
Hur Smart Card Software V2.6 User Manual
9 Trouble shooting
9.1 Using the software
9.1.1 Persons and Groups are missing
Database can’t be opened.
Figure 45 Training History window
You need to login to the system.
9.1.2 Can’t delete a group, a person or a visit in gym
User Mode must be changed to Supervisor Mode (See chapter 4 Settings). A
Password is needed to be able to delete information from database - if password has
been set.
9.1.3 Help file is missing
When clicking Help file and Contents and Help Topics can’t be seen.
Figure 46 Missing Help file message
Answering “Yes” the program search the right file.
39
Hur Smart Card Software V2.6 User Manual
Figure 47 Finding a Help file
9.1.4 Reader connections
No lights in reader Æ Check the cables
Reader doesn’t response Æ R/W Device Status: Not Known Æ No Device Present
Æ Check that the reader drivers are installed (Windows Device Manager)
NOTE that if reader is disconnected while PC is on you have to switch the PC off
reconnect the reader and turn the PC on (if using serial port reader, not usb).
9.1.5 Reading error
While reading the card an error message appears.
Figure 48 Program Error messages
Reason for error message is that the card is
not available for this software (e.g. card is damaged, blank or Setup Card). If the card
is made for another database (software) system can’t recognize it. Card must over
write or change. To be able to over write corrupted information in the card Ctrl button
must be pressed at the same time while replacing a card back into the reader.
TIP: Upload a training program as a public card and put the card back into reader take
it off and put it back. Now the card is again “blank” - if not, card is damaged.
40
Hur Smart Card Software V2.6 User Manual
9.2 Display errors
Display is “blank” or don’t response
Explanation: Display don’t have power or no pressure in the system Æ Check Cable
Socket and Compressor
Explanation: Static discharge in display unit when someone has touch the panel
Æ Reset the display by pulling out and reconnecting the power socket
Rep counter goes back to zero after 120 reps
Explanation: There is a 120 reps limit and after that the system starts to count again
from zero
Æ Add a new set to the exercise if you like to do more than 120 reps / exercise
HR numbers are not seen on display
Explanation: You are not doing exercise with card or you are not wearing HR
transmitter or transmitter is not properly set.
Æ Put your HR transmitter around your chest and check that it is set according
instructions
Rep counter goes back to zero during the exercise
Explanation: Cable connection inside the frame is damaged
Æ Check Cable Socket Æ take contact your serviceman
41
Hur Smart Card Software V2.6 User Manual
10 Picture Appendix (Figures)
Figure 1 Reader Installation Window......................................................................................................................6
Figure 2 Prompt Administrator................................................................................................................................7
Figure 3 Filling Administrator Information................................................................................................................7
Figure 4 Login Information......................................................................................................................................8
Figure 5 Open the Settings.....................................................................................................................................9
Figure 6 General tab.............................................................................................................................................10
Figure 7 Person & Card tab..................................................................................................................................11
Figure 8 Defined Exercises Tab ...........................................................................................................................12
Figure 9 Add New Exercise window .....................................................................................................................12
Figure 10 Company Tab.......................................................................................................................................13
Figure 11 Training Program Tab ..........................................................................................................................14
Figure 12 Training Session Tab ...........................................................................................................................15
Figure 13 Contents of the Database window .......................................................................................................16
Figure 14 Find Person window .............................................................................................................................17
Figure 15 Group Information window ...................................................................................................................18
Figure 16 Person Information window ..................................................................................................................19
Figure 17 Select Person .......................................................................................................................................20
Figure 19 Insert and Delete Exercises .................................................................................................................22
Figure 20 Copy of an Exercise .............................................................................................................................22
Figure 21 Training Information window Member Card tab ...................................................................................23
Figure 22 Set Series Tool......................................................................................................................................24
Figure 23 Using last visit data ...............................................................................................................................25
Figure 24 Saving a Training Specification ............................................................................................................26
Figure 25 Saving a Training Specification ............................................................................................................26
Figure 28 Controller Display ..................................................................................................................................27
Figure 29 Display layouts with Smart Card ...........................................................................................................28
Figure 30 Add Visit\s Comments window .............................................................................................................29
Figure 31 Visit information window.......................................................................................................................30
Figure 32 Training History window .......................................................................................................................31
Figure 33 Progress Report tab .............................................................................................................................32
Figure 34 Progress Report window ......................................................................................................................32
Figure 35 Two Visits Comparison tab...................................................................................................................33
Figure 36 Training History window .......................................................................................................................33
Figure 37 Print and Preview Report .....................................................................................................................34
Figure 38 Report Preview features.......................................................................................................................34
Figure 39 Export Data...........................................................................................................................................34
Figure 40 Present Hur Equipment window ...........................................................................................................35
Figure 41 General Database Information window ................................................................................................35
Figure 42 System Statistics window .....................................................................................................................36
Figure 43 Help Topics Contents tab window........................................................................................................38
Figure 44 About window .......................................................................................................................................38
Figure 45 Training History window .......................................................................................................................39
Figure 46 Missing Help file message....................................................................................................................39
Figure 47 Finding a Help file.................................................................................................................................40
Figure 48 Program Error messages .....................................................................................................................40
42