1
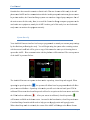
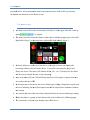
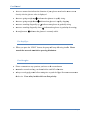
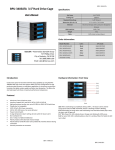
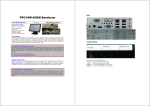
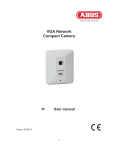
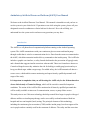
Ambulatory Artificial Pancreas Platform (AAPP) User Manual Welcome to the Artificial Pancreas User Manual. This manual is intended to teach you how to use the system in your clinical trial. If questions occur while using the system, please call your designated research coordinator or clinical advisor for the trial. He or she will help you understand how the system works and answer any questions you may have. Introduction The AAPP is a cell phone-based computational platform running on the Android operating system. The AAPP communicates with your continuous glucose sensor and insulin pump through a tablet that is wired to a communication device. Data from the sensor are transmitted to the AAPP, which then transmits insulin delivery commands to the insulin pump. The AAPP also includes a graphic user interface, a safety formula dedicated to the prevention of hypoglycemia, and a formula that suggests insulin corrections when needed. These two formulas are known as Control-to-Range because they minimize the risk for both hypo- and hyperglycemia and try to keep your blood sugar within a target range. For added safety, the AAPP transmits all data to a secure server, which enables remote monitoring and supervision by qualified personnel at all stages of the study. It is important to emphasize that you will be using the AAPP only for the 18-hour duration of one clinical study of Control-to-Range, which will be carried in controlled outpatient conditions. The action of the AAPP will be monitored at all times by qualified personnel that will be readily available to intervene if communication, sensor, or pump failure occurs. This study aims to see if this new technology that helps control blood sugar in people with type 1 diabetes mellitus on insulin pump therapy can be successfully used and monitored both in a hospital and in a non-hospital (hotel) setting. The principal elements of this technology, including the continuous glucose monitor (CGM) and the insulin pump, have been approved for use in people and are routinely used for the treatment of diabetes. The safety and the correction User Ma anual formulas have been tested t in exteensive cliniccal trials. Thee new elemeent of this stuudy is the ceell a its comm munication with w the insuulin pump annd continuouus glucose seensor. phone-baased AAPP and In previo ous studies, the t Control-tto-Range sysstem was tessted on a largger laptop coomputer. Onne of the main reasons for this study, th hen, is to seee if the Conttrol-to-Rangge computer programs caan be t new equiipment, nam mely the AAP PP. Another goal of this study is to ssee whether tthe used on the study teaam can monitor the equip pment remottely. System Sta art-Up Your Arttificial Pancrreas interface has been pre-programm p med to matcch your curreent pump setttings by the cliinicians perfforming the study. You will begin uusing the sysstem after a ttraining session with the research r stafff and will be given a co opy of this m manual to asssist you in learning how to operate th he AAPP. Your Y commu unication wiith the platfoorm will be m minimal. Thhe start-up sccreen of the AA APP is preseented below: The Artifficial Pancreeas can operaate in three modes: m openn loop, closedd loop and sstopped. When operating g in open loo op mode ( ), the systeem will delivver basal as programmedd and will alllow you to en nter meal bolluses. Open n loop is the mode m you w will use in thee trial until yyour CGM iss calibrated d. Please notte that closed d loop modee will not be an option onn the home sscreen until after the CGM M has been caalibrated ( ). After your y sensor iis calibrated,, closed loopp mode ( ) will beco ome availablle on the hom me screen. As A noted in tthe Introducttion, closed loop mode uuses Control-tto-Range forrmulas which h work to heelp prevent hhypoglycemiia and hyperrglycemia. When clo osed loop mo ode is activaated, the screeen of the AA APP will chhange to the H Home Screeen Page 2 User Ma anual presented d below. All communicaation with the principal interface of tthe AAPP is performed through the t touch buttons on the Home Screeen. The Home Screen: The T home scrreen reflects the current status of thee device in thhe upper leftt-hand corneer by sttating , , or stopped d. The T home scrreen has two o traffic lightts at either siide to indicaate hypoglycemia (left traffic liight labeled “hypo”) “ or hyperglycem h mia (right trafffic light labbeled “hyper”). A battery indicator is at th he top of thee device to thhe right of ceenter and dissplays the percentage off battery life left on the device. d Youu will be encoouraged to pplug in and ch harge the device if the battery life deeclines below w 25%. At 15% batteryy life, the devvice will w need to be b charged in n order to keeep operatingg. Next N to the baattery life arre CGM and Pump indic ators which appear in grreen when thhey arre connected d to the AAP PP. In n the upper area a of the sccreen, the cu urrent blood sugar readinng is displayyed in mg/dl with an n arrow indiicating the laatest blood su ugar trend annd the elapsed time in m minutes sincee the laast reading. The T amount and a time of the t last boluss is displayeed below the current bloood sugar readding. Below B that, th here is a grou up of touch buttons that are describeed in the folllowing pagees. The T current tiime is shown n at the botto om center off the device. Page 3 User Manual Traffic Lights: The system uses a pair of “traffic light” symbols to inform users of their risks for hypo- and hyperglycemia. In the Home Screen above, the hypoglycemia light is red, indicating high risk for hypoglycemia as described below. Under normal circumstances, however, both traffic lights would appear green indicating that blood glucose is currently stable. Hypoglycemia Traffic Light: If the hypoglycemia traffic light is green, this means that, according to the CGM readings, you are currently not at risk for hypoglycemia. It is important to emphasize, however, that a risk for hypoglycemia may still exist. For example, if the CGM readings are incorrect (i.e. sensor reading high), the system may underestimate the risk for hypoglycemia. Thus, you should always trust your experience and check your blood sugar independently if hypoglycemia is suspected. The yellow hypoglycemia light indicates that the system is detecting risk for hypoglycemia and is reducing insulin delivery to mitigate that risk. The red hypoglycemia light indicates that the system believes that hypoglycemia is imminent or already underway. An alarm will sound to notify you that you are either currently experiencing or predicted to experience hypoglycemia. When the red hypoglycemia light is illuminated or the alarm sounds, treat with your carbohydrate rescue choice immediately. After treating your hypo, please press the Hypo-Rx button on the Home Screen to indicate that you have taken action to treat your low blood glucose (BG) and press the “Stop Alarm” button to acknowledge your response to the alarm message. Page 4 User Ma anual Hyperglyceemia Trafficc Light: If I the hyperg glycemia trafffic light is green, g this m means that, acccording to tthe CGM readings, r you u are currenttly not at risk k for hypergglycemia. It iis importantt to emphasiize, however, h tha at a risk for hyperglycem mia may stilll exist. For eexample, if tthe CGM readings r are incorrect (i.ee. sensor reaading low), tthe system m may underesttimate the rissk for f hyperglyccemia. Thus, you should d always trusst your experrience and ccheck your blood sugar s independently if hy yperglycemiia is suspecteed. When W a yello ow light appears under th he hyperglyccemia stoplight, the systtem may sugggest a correction bolus b to avoid hyperglyccemia. A red hyperg glycemia ligh ht may be a sign of pum mp occlusion.. If you have been hyperglycem h mic for over three t hours with w no decreease in glucoose, a pump change migght be necessary. n Please P discusss this with th he research staff to deterrmine if thiss is necessaryy. Correction C Boluses: B The Conttrol-to-Rang ge may suggeest correctio on boluses too avoid hyperrglycemia. A Any correction bolus thaat the system m suggests wiill be announ nced via a diialog on the home screenn which requuests confirmaation. If the correction bolus is nott confirmed or cancelleed within 5 m minutes, thee system will w automattically deliv ver the insullin to preven nt hyperglyycemia. The Meal M Button n - Giving a meal m bolus: Tap T the meal icon when you y are ready y to eat. Yoou will need to enter the following vaalues when w having a meal: meaal size in graams of carbohhydrates; BG G; IOB; andd additional co orrection bolus to be dellivered. IO OB stands fo or “Insulin on o Board,” meaning m the aamount of innsulin still acctive in yourr sy ystem as deffined by the active insuliin time per yyour current pump param meters. Page 5 User Ma anual “IInclude IOB B” will be auttomatically checked c on tthe AAPP, bbut the box ccan be uncheecked by y touching th he green cheeckbox. The T total bolu us will be caalculated from m the inform mation that yyou entered. Press “INJE ECT” iff you wish to o deliver the bolus. The T system has h a bolus in nterceptor th hat will alert you to any bbolus that is considered un nsafe. If thiis occurs, thee system will tell you thee amount it rrecommendss that you takke in nstead. Thiss recommend dation can bee overriddenn by enteringg a different amount thatt you wish w the systeem to inject. If the bolus is interceptted you willl have 60 secconds to adjuust th he bolus amo ount and injeect. For add ded safety, iff you do not respond withhin 60 seconnds, th he bolus willl be cancelleed. Calib brating the System: S The T CGM seensor attacheed to the systtem will periiodically neeed to be caliibrated. Youur research r coorrdinator or clinical c advissor will inforrm you whenn it is time tto calibrate the sensor s as parrt of the triall. Press P the “Caalibrate” (blo ood drop) icon on the m main menu annd follow thee instructionns given g to enteer your BG reeading. Pleaase use the gglucometer thhe study teaam has givenn you to test your glucose. g If the system m requires mo ore than one BG readingg for calibrattion, you willl be prompteed to enter e a secon nd BG value.. Please P remem mber to wash h your handss before any fingerstickss to ensure accurate calibrations c for f the devicce. After A the inittial calibratio on you will need n to calibbrate the systtem approxiimately everyy tw welve hourss. You will only o need to enter one finngerstick vallue for each calibration aafter th he sensor haas been initiaalized. Page 6 User Ma anual Exercise When W you begin an exerccise session, please presss the red “NO OT EXERCIISING.” Thee bu utton will th hen turn greeen, and the sttatus will chhange to “EX XERCISING G.” When W you aree ready to sto op exercise, press the grreen “EXER RCISING” buutton to conffirm th hat you havee stopped exeercising. Thiis will changge the buttonn back to its red “NOT EXERCISING E G” state. Hypo oglycemia Trreatment - Hypo H Rx: When W you haave treated yo ourself for hypoglycemi h ia, press the pink Hypo-R Rx button onn the home screen. This will in ndicate to the system thaat you have ttreated your hypoglycem mia. Please P be surre to treat your y hypogly ycemia befoore pressingg the button n. Contiinuous Gluccose Monitorr (CGM) Grraph: Press the CGM M button on n the home sccreen to see your CGM and insulin ddelivery dataa. Once O you opeen the CGM graph, a dissplay showinng your BG w will appear. On the botttom of the screen,, delivered in nsulin is disp played. Basaal insulin in units/hour w will be displaayed in n blue; boluss insulin willl be displayeed in green: Page 7 User Ma anual There T are arro ows that indicate the direection of youur glucose trrend on the hhome screenn directly after the glucose value is disp played. An A arrow goiing straight up u An A arrow goiing straight down d An A arrow trav veling diagonally up An A arrow trav veling diagonally down A straight arrrow indicaates that gluccose is rapiddly rising. indicates that gglucose is rappidly droppinng. indicates thhat glucose iss gradually rrising. indicatess that glucose is graduallly decreasingg. indicaates that gluccose is curreently stable. The Stop Sign: S When W you prress the “STO OP” button, the pump w will stop deliivering insullin. Please consult c the research r tea am before pressing p thiss button. Final thoug ghts: Please communicate any questions yo ou have to thhe research tteam. Remember R to o wash and dry d your hand ds before eaach BG calibbration. Always A treat hypoglycem mia before tak king time to push the Hyypo-Rx treattment buttonn on th he device. Your Y safety in this trial is our first priority. Page 8