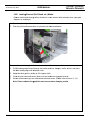
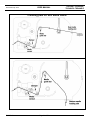
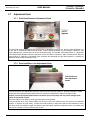
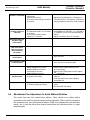
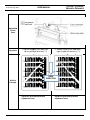
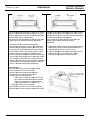
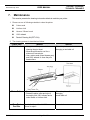
1
TD DP43HE, TDP43HE T E/E, TDP4 46HE and d TDP46H HE/E Therma al Transfe er Printerr © Pa anduit Corp. 2013 USER MANUA L B20730 Rev..: 01 8-2013 NOTE: In the interestt of higher q quality and d value, Panduit produc cts nually being g improved and update ed. Conseq quently, are contin pictures may m vary fro om the encllosed produ uct. www.pan nduit.com Region USA & Can nada Latin Amerrica Brasil Europe Asia Pacific Japan Australia Telephon ne 1-866-871-4571 +52-33-3 3777-6000 5511-361 13-2353 +31-546--580-452 65-6379-6700 81-3-6863-6060 613-9794 4-9020 e-mail GA-TecchSupport@ @panduit.co om TechSu upportLatAm [email protected] TechSu upportLatAm [email protected] emeatoolservicece enter@pand duit.com TechSu [email protected] m TechSu [email protected] m TechSu [email protected] m © Panduit Corp. 20 013 USER R MANUAL T TDP43HE, TDP43HE/E, TD DP46HE & T TDP46HE/E The inform mation contained in this manual is subject tto change without notice and do oes not represent a commitm ment on the part of Pa anduit corpo oration. No part of thiss manual m may be d or transmitted in any form f or by any means, fo for any purpo ose other than the purch haser’s reproduced personal use, u without the t expresse ed written pe ermission off Panduit Co orporation. Agency Co ompliance e and Appro ovals CE CLASS SA EN 55022:2 2006+A1:20 007 EN 55024:1998+A1:20 007+A2:200 03 EN 61000-4 4 SERIES REGULATIO R ONS FCC CFR Title 47 Part P 15 Sub bpartB:2010-Section 15.107 and d 15.109 004 Class A ICES-003 Issue 4:20 This devic ce complies with Part 1 15 of the FC CC Rules. Operation is subject to t the follow wing two co onditions. (1) This s device ma ay not caus se harmful interference e, and (2) This s device mu ust accept a any interferrence receiv ved, includiing inte erference th hat may cau use undesirred operatio on. GB-4953-2 2001 GB9254-20 008 (CLASS S A) GB17625.1 1-2003 此为 A 级产 产品,在生 生活环境中, 该产品可能 能会造成无线 线电干扰, 在这 种情况下, ,可能需要用 用户对干扰 扰采取切实可 可行的措施。 UL 60950-1 1 (2nd Editio on) CSA C22.2 2 No. 60950--1-07 (2nd E dition) A급 기기 (업 업무용 방송통 통신기자재) CClass A Equipm ment (Industtrial Broadcassting & Communicaation Equipme ent) 이 기기는 업 업무용(A급) 전 전자파적합기 기기로서 판 매 매자 또는 사용 용자는 이 점을 주의하시기 바라 며, 가정외의 의 지역에서 사 사용하는 것을 을 목적으로 합 합니다. This equip pment is Ind dustrial (Cla ass A) electtromagnetic c wave suita ability equipmentt and seller or user sho ould take notice of it, a and this equipmentt is to be us sed in the p places excep pt for home e. Specification ns are subje ect to change e without no otice. B20 0730-01 Pag ge 1 of 73 8 8-2013 © Panduit Corp. 20 013 USER R MANUAL T TDP43HE, TDP43HE/E, TD DP46HE & T TDP46HE/E Safety Instructtions WARN NING Read and understand all off the instructtions and sa afety informa ation in this manual befo ore operating g or servicing g this tool. CAUTION Danger of exp plosion if battery is incorrrectly replacced. Replace R only with the equ uivalent type e recommen nded by the m manufacture e. Dispose of us sed batteries s according tto the manufacturer’s instructions. CAUTION Electric Shock Haz zard: Before you co onnect the equipment to o the power o outlet, pleasse check the voltage off the power source. s Disconnect th he equipmen nt from the vvoltage of the e power source to preve ent po ossible trans sient over vo oltage dama ge. Don’t pour an ny liquid to th he equipmen nt to avoid electrical sho ock. CAUTION Keep K the equ uipment away from moistture and hum midity. CAUTION ONLY Y qualified service perso onnel for saffety reasons , should ope en equipmen nt. Don’tt repair or ad djust energiz zed equipme ent alone und der any circu umstances. Someone capable of pro oviding first aid a must alw ways be pres sent for yourr safety. Alway ys obtain firs st aid or med dical attentio on immediate ely after an injury. Neve er neglect an n injury, no ma atter how slight it seems s. B20 0730-01 Pag ge 2 of 73 8 8-2013 © Panduit Corp. 2013 USER MANUAL TDP43HE, TDP43HE/E, TDP46HE & TDP46HE/E Table of Contents Safety Instructions .............................................................. 2 1. Introduction ................................................................. 5 2. 3. 1.1 Product Introduction ................................................... 5 1.2 Product Features ......................................................... 5 1.3 General Specification .................................................. 6 1.4 Print Specifications ...................................................... 7 1.5 Ribbon Specifications .................................................. 7 1.6 Media Specifications .................................................... 8 Operations Overview .................................................. 9 2.1 Unpacking and Inspection ........................................... 9 2.2 Printer Overview ......................................................... 10 2.3 Operator Controls ...................................................... 13 2.4 Setting up the Printer ................................................ 14 2.5 Loading Ribbon .......................................................... 15 2.6 Loading the Media ..................................................... 19 2.7 Adjustment Knob ....................................................... 25 2.8 Using the Keyboard with PS/2 Interface .................. 26 Menu Function .......................................................... 27 Main Menu Overview ........................................................... 27 4. B20730-01 3.1 Setup Menu Overview ................................................ 28 3.2 File Manager ............................................................... 53 3.3 Diagnostics ................................................................. 55 3.4 Language .................................................................... 57 3.5 Service ........................................................................ 57 Diagnostic Tool ......................................................... 59 4.1 Start the Diagnostic Tool .......................................... 60 4.2 Printer Function (Calibrate sensor, Ethernet setup, RTC setup………) ....................................................... 61 Page 3 of 73 8-2013 © Panduit Corp. 2013 5. 6. USER MANUAL TDP43HE, TDP43HE/E, TDP46HE & TDP46HE/E Setting Ethernet by Diagnostic Utility .................... 61 5.1 Using USB interface to setup Ethernet interface ..... 62 5.2 Using RS-232 interface to setup Ethernet interface 63 5.3 Using Ethernet interface to setup Ethernet interface64 Troubleshooting ....................................................... 66 6.1 Common Problems .................................................... 66 6.2 Mechanism Fine Adjustment to Avoid Ribbon Wrinkles ............................................................................... 69 7. B20730-01 Maintenance .............................................................. 72 Page 4 of 73 8-2013 © Panduit Corp. 2013 1. TDP43HE, TDP43HE/E, TDP46HE & TDP46HE/E USER MANUAL Introduction 1.1 Product Introduction Thank you very much for purchasing a Panduit printer. The TDP43HE and TDP46HE Thermal Transfer Desktop Printers produce high-quality printed labels for a wide range of labeling applications for OEM, MRO, construction, data centers, enterprise, and industrial automation. The rugged, high-speed printers are designed for dependable use in industrial, construction, and harsh environments. Using the included Easy-Mark™ Labeling Software, the printers provide simple setup and operation with all Panduit thermal transfer label media to create wire and cable markers, terminal block labels, equipment labels, marker plates, panel labels, network labels, and safety and facility labels. We recommend the use of Easy-Mark, version 3.7.24, or higher. 1.2 Product Features The printer offers the following standard features. TDP43HE (300 dpi) TDP46HE (600 dpi) Thermal transfer printing ○ ○ Direct thermal printing ○ ○ High quality die-cast aluminum design ○ ○ Metal cover with large clear media view window ○ ○ Moveable gap sensor (position full web adjustable) ○ ○ Moveable black mark sensor (position full web adjustable) ○ ○ Ribbon end sensor ○ ○ Head open sensor ○ ○ LCD display (graphic type, 128x64 pixel) with back light ○ ○ Control panel with 6 operation buttons ○ ○ LED indicators ○ ○ Real time clock ○ ○ Internal Ethernet print server (10/100 Mbps) interface ○ ○ USB 2.0 (full speed) interface ○ ○ Serial RS-232C (2400-115200 bps) interface ○ ○ Parallel Centronics (SPP mode) interface ○ ○ Product standard feature B20730-01 Page 5 of 73 8-2013 © Panduit Corp. 2013 TDP43HE, TDP43HE/E, TDP46HE & TDP46HE/E USER MANUAL PS/2 keyboard interface for stand-alone or data entry at print site ○ ○ 32 MB SDRAM memory ○ ○ 8 MB FLASH memory ○ ○ SD FLASH card memory expands storage to 4 GB ○ ○ Powerful 32 bit 200 MHz RISC processor ○ ○ Standard industry emulations right out of the box including Eltron® and Zebra® language support ○ ○ 1.3 General Specification General Specifications Physical dimensions 270 mm (W) x 308 mm (H) x 505 mm (D) Weight 15 kg (33.1 lb.) Electrical Internal switching power supply Input: 100~240VAC, 50/60Hz Output: 24V, 8.33A, 200W Environmental condition Operation: 5 ~ 40˚C (41 ~ 104˚F), 25~85% non-condensing Storage: -40 ~ 60 ˚C (-40 ~ 140˚F), 5~90% non-condensing B20730-01 Page 6 of 73 8-2013 © Panduit Corp. 2013 1.4 TDP43HE, TDP43HE/E, TDP46HE & TDP46HE/E USER MANUAL Print Specifications Print Specifications Print head resolution TDP43HE (300 dpi) 300 dots/inch (12 dots/mm) Printing method Dot size (width x length) Print speed (inches per second) TDP46HE (600 dpi) 600 dots/inch (24 dots/mm) Thermal transfer and direct thermal 0.084 x 0.084 mm 0.042 x 0.042 mm (1 mm = 12 dots) (1 mm = 24 dots) 2, 3, 4, 5, 6, 7, 8 ips selectable Up to 8 ips 2, 3, 4 ips selectable up to 4 ips Max. print width 104 mm (4.09”) Max. print length Printout bias 1854.2 mm (73”) 1016 mm (40”) Vertical: 1 mm max. Horizontal: 1 mm max. 1.5 Ribbon Specifications Ribbon Specifications Ribbon outside diameter 90 mm max. Ribbon length 600 meter max. Ribbon core inside diameter 1 inch (25.4 mm) Max. 114.3 mm (4.5”) Ribbon width Ribbon wound type Min. 25.4 mm (1.0”) Ink coated inside wound Ribbon end type B20730-01 Transparency Page 7 of 73 8-2013 © Panduit Corp. 2013 1.6 TDP43HE, TDP43HE/E, TDP46HE & TDP46HE/E USER MANUAL Media Specifications 1.6.1 Industrial model Media Specifications TDP43HE (300 dpi) TDP46HE (600 dpi) Label roll capacity 208.3 mm (8.2”) Media alignment Edge alignment Media type Media wound type Continuous, die-cut, black mark, fan-fold, notch Printing face outside wound Max. 118 mm (4.6”) Media width (label + liner) Media thickness (label + liner) Min. 25.4 mm (1.0”) Max. 0.30 mm (11.8 mil) Min. 0.06 mm (2.36 mil) Max. 76.2 mm (3”) Media core diameter Label length Min. 25.4 mm (1”) Max. 1,854 mm (73”) Max. 1016 mm (40”) Min. 5 mm (0.20”) Min. 5 mm (0.20”) Max. 152.4 mm (6”) Label length (peeler mode) Min. 25.4 mm (1”) Gap height Min. 2 mm Black mark height Min. 2 mm Black mark width Min. 8 mm (0.31”) B20730-01 Page 8 of 73 8-2013 © Panduit Corp. 2013 2. USER MANUAL TDP43HE, TDP43HE/E, TDP46HE & TDP46HE/E Operations Overview 2.1 Unpacking and Inspection This printer has been specially packaged to withstand damage during shipping. Please carefully inspect the packaging and printer upon receiving the printer. Please retain the packaging materials in case you need to reship the printer. Unpacking the printer, the following items are included in the carton. One printer unit One Easy-Mark™ CD (Labeling Software) One quick installation guide Appropriate power cord(s) One USB interface cable One Windows driver disc, with user manuals One user manual (hard copy) One warranty card (not shown) One Ink Ribbon (Hybrid) One Utility Knife (CAUTION, SHARP!) If any parts are missing, please contact Panduit Customer Service. B20730-01 Page 9 of 73 8-2013 © Panduit Corp. 2013 2.2 USER MANUAL TDP43HE, TDP43HE/E, TDP46HE & TDP46HE/E Printer Overview 2.2.1 Front View 1. 2. 3. 4. 5. 6. B20730-01 LED indicators LCD display Front panel buttons Label exit chute Lower front cover Printer right side cover Page 10 of 73 8-2013 © Panduit Corp. 20 013 T TDP43HE, TDP43HE/E, TD DP46HE & T TDP46HE/E USER R MANUAL 2.2.2 2 Interior view 7 1 8 2 9 3 4 10 5 11 6 12 13 1. 2. 3. Ribb bon rewind spindle Ribb bon release button b Ribb bon guide pla ate 4. 5. 6. Printt head Plate en roller Printt head releas se lever 14 7. 8. 9. 10. Media guide barr Labe el roll guard Labe el supply spindle Ribb bon supply spindle 15 11. 12. 13. 14. 15. 16. 17. 18. Dam mper Media sensor loc ck lever Z ax xis mechanis sm adjustment knob Printt head press sure adjustm ment knob Anti--static brush Ribb bon sensor Media sensor Labe el guide B20 0730-01 16 17 18 Pag ge 11 of 73 8 8-2013 © Panduit Corp. 2013 USER MANUAL TDP43HE, TDP43HE/E, TDP46HE & TDP46HE/E 2.2.3 Rear View 1. Rear external label entrance chute 2. Parallel / Centronics interface 3. USB interface 4. Serial / RS-232C interface 5. Power cord socket 6. SD card slot 7. Ethernet interface 8. PS/2 interface 9. Power switch B20730-01 Page 12 of 73 8-2013 © Panduit Corp. 20 013 2.3 USER R MANUAL T TDP43HE, TDP43HE/E, TD DP46HE & T TDP46HE/E Operator Controls C 2.3.1 Front Panel Displa ay L LED in ndicators LCD display Front pane el button ns 2.3.2 2 Indicato ors LED Status S Indication n Off O The printe er power is turned off On O The printe er power is turned on On O Printer is ready r Blinking B ERRO OR B20 0730-01 Pause Download ding data intto printer. Off O Printer is ready r On O “CARRIAG GE OPEN” or “CUTTE ER ERROR R” Blinking B “NO PAPE ER”, “PAPE ER JAM”, “N NO RIBBON N” or “CLEA AN DATA” Pag ge 13 of 73 8 8-2013 © Panduit Corp. 20 013 USER R MANUAL T TDP43HE, TDP43HE/E, TD DP46HE & T TDP46HE/E 2.3.3 3 Front Panel Keys Keys Function Ente er the menu Exit from f a men nu or cance el a setting a and return tto the previious menu Paus se/Resume e the printing process Adva ance one la abel Scro oll up the menu list oll down the e menu list Scro Ente er/Select cu ursor located d option 2.4 1. 2. 3. 4. Se etting up the Printter Pla ace the printter on a flat, secure surfa ace. Ma ake sure the power switc ch is off. Co onnect the prrinter to the computer wiith the provid ded USB cable. Plu ug the power cord into th he AC power cord socke et at the rearr of the printe er, and then n plug the e power cord d into a prop perly grounde ed power ou utlet. Note: Ple ease switch h printer pow wer to OFF (O), before p plugging the e power cord d into the po ower co ord socket. B20 0730-01 Pag ge 14 of 73 8 8-2013 © Panduit Corp. 20 013 2.5 USER R MANUAL T TDP43HE, TDP43HE/E, TD DP46HE & T TDP46HE/E Lo oading Ribbon 2.5.1 Loading g Ribbon 1. Open thhe printer rig ght side cove er. 2 . Push the p print head release lever tto open the p print head mechanism. 3 . Install the rribbon onto tthe ribbon supply spindle. B20 0730-01 Pag ge 15 of 73 8 8-2013 © Panduit Corp. 20 013 T TDP43HE, TDP43HE/E, TD DP46HE & T TDP46HE/E USER R MANUAL 4. T Thread the riibbon throug gh the ribbon n sensor sslot and then n through the e open spacce in b between prin nt head and platen. (See e path d diagram on n next page.) Ribbon Riibbon senso or 5. T Tape the end d of the ribbo on to the Rib bbon R Rewind Spin ndle. Wind th he Ribbon R Rewind S Spindle, clocckwise, until the ribbon iss ssmooth and properly stre etched (about 3 to 5 rrotations). Note: Please DO O NOT push h the ribbon n se button w when you arre loading th he releas ribbon n. The ribbo on release b button is us sed to remov ve the used d ribbon. (Fo or ribbon re emoval, refer tto Section 2 2.5.2) 6. C Close the print head mecchanism. Ma ake sure th he latches a are engaged securely. B20 0730-01 Pag ge 16 of 73 8 8-2013 © Panduit Corp. 2013 TDP43HE, TDP43HE/E, TDP46HE & TDP46HE/E USER MANUAL Loading path for ribbon 2.5.2 Remove Used Ribbon 1. Break the ribbon between ribbon guide plate and the ribbon rewind spindle. B20730-01 Page 17 of 73 8-2013 © Panduit Corp. 20 013 T TDP43HE, TDP43HE/E, TD DP46HE & T TDP46HE/E USER R MANUAL 2. Push the e ribbon relea ase button to o release tthe ribbon on n the ribbon rewind spindle. 3. Then, slid de off the rib bbon from rib bbon rewind spindle. B20 0730-01 Pag ge 18 of 73 8 8-2013 © Panduit Corp. 20 013 2.6 USER R MANUAL T TDP43HE, TDP43HE/E, TD DP46HE & T TDP46HE/E Loa ading the e Media 2.6.1 Loading g the Media a 1 . Open the p printer right sside cover. 2.. Push the print head rele ease lever to o open ead mechan nism. the print he 3 . Move the la abel roll gua ard horizonta ally to the end of label spindle then flip down oll guard. the label ro B20 0730-01 Pag ge 19 of 73 8 8-2013 © Panduit Corp. 20 013 USER R MANUAL T TDP43HE, TDP43HE/E, TD DP46HE & T TDP46HE/E 4. Place the roll of media on the label supply y spindle. Fli p up the lab bel roll guard d. Move the label roll guard horizonttally to gently y fit the widtth of label ro oll. 3” La abel spindle 1” Label spind dle Note: Whe en using Panduit labels on 1” 1 cores, remo ove the label s supply spindle e cover, by rem moving the two o sc crews shown in i the image below. b Be sure e to store this cover for futu ure use, with la abels on 3” co ores. 5. Pull lab bel roll leading edge forw ward through h the media guide bar, d damper, med dia sensor a and place the label lea ading edge onto o the plate en roller. B20 0730-01 Pag ge 20 of 73 8 8-2013 © Panduit Corp. 20 013 USER R MANUAL T TDP43HE, TDP43HE/E, TD DP46HE & T TDP46HE/E 6. Unlock the media sensor s lock lever to adjust the media a sensor. Gap Labe el Sensor Black Mark Label Sensor * The se ensor location is marke ed by a trian ngle mark ▽ at the se ensor hous sing. edia sensorr position is s moveable,, please ma ke sure the e gap or blac ck mark is a at the * The me locatio on where me edia gap/bla ack mark wiill pass thro ough for sen nsing. 7. Adju ust the label guide to fit tthe width of the labe el. B20 0730-01 Pag ge 21 of 73 8 8-2013 © Panduit Corp. 2013 USER MANUAL TDP43HE, TDP43HE/E, TDP46HE & TDP46HE/E 8. Close the print head mechanism. Make sure the latches are engaged securely. 9. Using the front display panel, set the media sensor type and calibrate the selected sensor. (Please refer to section 3.1.2) Note: Please calibrate the gap/black mark sensor when changing media. B20730-01 Loading path for roll labels (printable surface facing up) Page 22 of 73 8-2013 © Panduit Corp. 20 013 USER R MANUAL T TDP43HE, TDP43HE/E, TD DP46HE & T TDP46HE/E 2.6.2 2 Loading g External (Roll Stand, etc.) Me edia Exte ernal media feeds f throug gh either the bottom or re ear external label entran nce chute. (S See path diagrams on nex xt page.) 1. 2. Open n the printer right side co over. Push the print head release le ever to open n the print he ead mechanism. 3. 4. Insertt the media through t the bottom or re ear external llabel entrancce chute. Pull th he leading edge e forward through the e media guid de bar, damp per, media ssensor, and place the la abel leading edge onto th he platen roller. 5. 6. 7. Adjus st the label guide g by slidiing to fit the paper width . Close e the print he ead mechanism. Make sure s the latch hes are enga aged secure ely. Set th he media sen nsor type and calibrate th he selected sensor. (Ple ease refer to section 3.1.3) Note: Please callibrate the gap/black g mark m sensorr when chan nging media a. B20 0730-01 Pag ge 23 of 73 8 8-2013 © Panduit Corp. 2013 USER MANUAL TDP43HE, TDP43HE/E, TDP46HE & TDP46HE/E • Loading path for Roll Stand labels B20730-01 Page 24 of 73 8-2013 © Panduit Corp. 2013 2.7 USER MANUAL TDP43HE, TDP43HE/E, TDP46HE & TDP46HE/E Adjustment Knob 2.7.1 Print Head Pressure Adjustment Knob The print head pressure adjustment knob has 5 levels of adjustment. Because the printer’s paper alignment is to the left side of mechanism, different media widths require different pressure to print correctly. Therefore it may require adjusting the pressure knob to get your best print quality. For example, if the label width is 4”, adjust both print head pressure adjustment knobs to the same level. If the label is less than 2” wide, increase the left side print head pressure by rotating the adjustment knob clockwise and decrease the right side pressure by rotating the adjustment knob counter-clockwise to level 1. 2.7.2 Print Head Burn Line Adjustment Knob Print head burn line adjustment knobs The print head burn line adjustment knobs are used to fine tune the print quality for different thickness of media. Turning the knobs adjusts the print head’s burn line forward or backward as it relates to the platen roller. Caution: Incorrectly adjusting these knobs can lead to poor print quality and may cause damage to the printer. Proceed with caution. The print head burn line default is set for general purpose printing media. Poor print quality when using thicker media may be due to the print head burn line not being at the optimized position. To improve the print quality, increase the head pressure or adjust the knobs counter-clockwise to move print head burn line toward the paper out direction then print again. Continue to adjust the burn line position and test print as necessary until the printout image is clear. B20730-01 Page 25 of 73 8-2013 © Panduit Corp. 2013 2.8 USER MANUAL TDP43HE, TDP43HE/E, TDP46HE & TDP46HE/E Using the Keyboard with PS/2 Interface 1. 2. Turn off the power of printer. Plug the keyboard with PS/2 interface cable into PS/2 connector on the rear of the printer. 3. Turn on the printer. 4. After pressing the F1 key of the keyboard, the LCD of printer will display as following. File List DRAM > FLASH CARD 2/4 5. Use up ↑or down ↓key of the keyboard to move “>” cursor and to select either DRAM, FLASH or CARD that you previously saved file in and press Enter key of the keyboard to list files. 6. Select the file and press Enter key to execute the .BAS file. FLASH File List 7. TEST1.BAS > TEST2.BAS TEST3.BAS Then, you can type the words or the number of the copy from keyboard by your .BAS file program. Press F1 key of the keyboard to start this function. Press up ↑ or down ↓ key of the keyboard to move cursor of printer LCD display to select the option. Press Esc key of the keyboard to return the previous menu. Press Enter key of the keyboard to enter/execute cursor located option. Press Ctrl + C keys of the keyboard to restart the printer and back to “Ready” state. B20730-01 Page 26 of 73 8-2013 © Panduit Corp. 2013 3. USER MANUAL TDP43HE, TDP43HE/E, TDP46HE & TDP46HE/E Menu Function Main Menu Overview B20730-01 Page 27 of 73 8-2013 © Panduit Corp. 20 013 3.1 B20 0730-01 USER R MANUAL T TDP43HE, TDP43HE/E, TD DP46HE & T TDP46HE/E Settup Menu u Overview w Pag ge 28 of 73 8 8-2013 © Panduit Corp. 20 013 USER R MANUAL T TDP43HE, TDP43HE/E, TD DP46HE & T TDP46HE/E 3.1.1 Printer Setup (TSP PL2) B20 0730-01 Pag ge 29 of 73 8 8-2013 © Panduit Corp. 2013 TDP43HE, TDP43HE/E, TDP46HE & TDP46HE/E USER MANUAL 3.1.1-1 Speed: Print Setup 1/12 > Speed Speed Density Direction 6 Use this option to setup print speed. The increment/decrement is 1 ips. Press key to raise the print speed, and press key to decrease print speed. Press key to set it into printer. Press to the previous menu. key to cancel the setting and return Note: If printing from enclosed software/driver, the software/driver will send out the SPEED command, which will overwrite the setting set from the front panel. 3.1.1-2 Density: Print Setup Speed Density > Density 8 2/12 Direction Use this option to setup printing darkness. The available setting is from 0 to 15, and the step is 1. Printer default density is 8.You may need to adjust your density based on selected media. Press and to increase/decrease the printing darkness. Press key to enable the setting. Press return to the previous menu. key to cancel the setting and Note: If printing from enclosed software/driver, the software/driver will send out the DENSITY command, which will overwrite the setting set from the front panel. 3.1.1-3 Direction: Print Setup Speed Density 3/12 Direction 0 > Direction The direction setting value is either 1 or 0. Use this option to setup the printout direction. Printer default printout direction is DIRECTION 0. Press key to set the direction as 1, and enable the setting. Press to set it as 0, and key to key to cancel the setting and return to the previous menu. B20730-01 Page 30 of 73 8-2013 © Panduit Corp. 2013 TDP43HE, TDP43HE/E, TDP46HE & TDP46HE/E USER MANUAL The following 2 figures are the printouts of DIRECTION 0 and 1 for your reference. DIRECTION 0 DIRECTION 1 Note: If printing from enclosed software/driver, the software/driver will send out the command, which will overwrite the setting set from the front panel. 3.1.1-4 Print Mode: (None/Batch Mode/Peeler Mode/Cutter Mode/Cutter Batch) Print Setup 4/12 Print Mode Density Direction Peeler Mode > Print Mode Cutter Mode 2/6 > Batch Mode This option is used to set the print mode. Printer default setting is Batch Mode. When entering this list, the print mode on the right side of “ >” icon is the current printer setting. Press and enable the setting. Press to select the different print mode and press button to key to cancel the setting and return to the previous menu. Printer Mode None Batch Mode Description Next label top of form is aligned to the print head burn line location. (Tear Off Mode) Once image is printed completely, label gap/black mark will be fed to the tear plate location for tear away. Peeler Mode Enable the label peel off mode. Cutter Mode Enable the label cutter mode. Cutter Batch Cut the label once at the end of the printing job. B20730-01 Page 31 of 73 8-2013 © Panduit Corp. 2013 TDP43HE, TDP43HE/E, TDP46HE & TDP46HE/E USER MANUAL Note: If printing from enclosed software/driver, the software/driver will send out the command, which will overwrite the setting set from the front panel. 3.1.1-5 Offset: Print Setup 5/12 Direction Offset Print Mode +000 > Offset This option is used to fine tune media stop location. Press the cursor from left digit to right digit, and press the “0” to “9”. Press the button to move the button to set the value from “+” to “-” or button to set the value into printer. Press key to cancel the setting and return to the previous menu. The default value is +000. Note: If printing from enclosed software/driver, the software/driver will send out the OFFSET command, which will overwrite the setting set from the front panel. 3.1.1-6 Shift X & Shift Y: Print Setup 7/12 Offset Shift Y Shift X +000 > Shif Y t This option is used to fine tune print position. Press the button to move the cursor from left digit to right digit, and press the button to set the value from “+” to “-” or “0” to “9”. Press the button to set the value into printer. Press key to cancel the setting and return to the previous menu. The default value is +000. Note: If printing from enclosed software/driver, the software/driver will send out the SHIFT command, which will overwrite the setting set from the front panel. 3.1.1-7 Reference X & Reference Y: Print Setup Shift Y Reference X > Referenc Y 9/12 Reference Y 000 This option is used to set the origin of printer coordinate system horizontally and vertically. Press the button to move the cursor from left digit to right digit, and press the button to set the value from “0” to “9”. Press the button to set the value into printer. Press key to cancel the setting and return to the previous menu. The default value is 000. B20730-01 Page 32 of 73 8-2013 © Panduit Corp. 2013 TDP43HE, TDP43HE/E, TDP46HE & TDP46HE/E USER MANUAL Note: If printing from enclosed software/driver, the software/driver will send out the REFERENCE command, which will overwrite the setting set from the front panel. 3.1.1-8 Code Page: Print Setup 10/12 Code Page Reference X > 850 Reference Y 852 > Code Page 860 11/41 Use this option to set the code page of international character set. When entering this list, the code page on the right side of “ >” icon is the current printer setting. Press the and to select the code page, and press the enable the setting. Press button to key to cancel the setting and return to the previous menu. Note: If printing from enclosed software/driver, the software/driver will send out the command, which will overwrite the setting set from the front 7-bit code page name USA BRI GER FRE DAN ITA SPA SWE SWI 8-bit International Character Set USA British German French Danish Italian Spanish Swedish Swiss Windows Code Page (SBCS) code page name B20730-01 International Character Set code page name 437 850 852 860 863 865 Character Set United States Multilingual Slavic Portuguese Canadian/French Nordic Windows Code Page (DBCS) code page name 1252 Latin 1 950 1250 Central Europe 936 1253 1254 1251 1255 1256 Greek Turkish Cyrillic Hebrew Arabic 932 949 Page 33 of 73 International International Character Set Traditional Chinese Big 5 Simplified Chinese GBK Japanese Shift-JIS Korean 8-2013 © Panduit Corp. 2013 TDP43HE, TDP43HE/E, TDP46HE & TDP46HE/E USER MANUAL 1257 1258 Baltic Vietnam ISO Code Page code page name 8859-1 8859-2 8859-3 8859-4 8859-5 ISO Code Page International code page name Character Set Latin 1 Latin 2 Latin 3 Baltic Cyrillic 8859-7 8859-9 8859-10 8859-15 International Character Set Greek Turkish Latin 6 Latin 9 3.1.1-9 Country: Print Setup 11/12 Country Reference Y Code Page 002 > Country 003 1/23 > 001 and to Use this option to set the country code for the LCD display. Press the select the country code, and press the button to set the value into printer. When entering this list, the country code on the right side of “ >” icon is the current printer setting.. Press key to cancel the setting and return to the previous menu. Code Country Code Country Code Country Code Country 001 USA 034 Spanish (Spain) 044 United Kingdom 055 Brazil 036 Hungarian 045 Danish 061 English (International) 038 Yugoslavian 046 Swedish 351 Portuguese 358 Finnish 002 003 CanadianFrench Spanish (Latin America) 031 Dutch 039 Italian 047 Norwegian 032 Belgian 041 Switzerland 048 Polish 033 French (France) 042 Slovak 049 German B20730-01 Page 34 of 73 8-2013 © Panduit Corp. 20 013 USER R MANUAL T TDP43HE, TDP43HE/E, TD DP46HE & T TDP46HE/E 3.1.2 2 Printer Setup S (ZPL2) 3.1.2 2-1 Darkne ess: Pri int Setup > Darkness Print Spe eed Tear off 1/17 Dankness 16 Use this option to o setup printting darknes ss. The availa able setting is from 0 to 3 30, and the step is 1 may need n to adju ust your denssity based o on selected media. 1. Prrinter defaultt density is 16.You Pres ss an nd to en nable the setting. Press to increase e/decrease th he printing d darkness. Pre ess key key to canccel the setting and return n to the prevvious menu. Note e: If printing g from enclo osed softwa are/driver, th the software e/driver willl send out tthe command d, which willl overwrite the setting g set from th he front pan nel. B20 0730-01 Pag ge 35 of 73 8 8-2013 © Panduit Corp. 2013 TDP43HE, TDP43HE/E, TDP46HE & TDP46HE/E USER MANUAL 3.1.2-2 Print Speed: Print Setup 2/17 Darkness > Print Speed Tear Off Print Speed 6 Use this option to setup print speed. The each increment/decrement is 1 ips. Press key to raise the print speed, and press key to decrease print speed. Press key to set it into printer. Press return to the previous menu. key to cancel the setting and Note: If printing from enclosed software/driver, the software/driver will send out the command, which will overwrite the setting set from the front panel. 3.1.2-3 Tear Off: Print Setup 3/17 Darkness Print Speed > Tear Off Tear Off +000 This option is used to fine tune media stop location. Press the move the cursor from left digit to right digit, and press the “+” to “-” or “0” to “9”. Press the button to button to set the value from button to set the value into printer. Press key to cancel the setting and return to the previous menu. The default value is +000. Note: If printing from enclosed software/driver, the software/driver will send out the command, which will overwrite the setting set from the front panel. 3.1.2-4 Print Mode: (Tear Off / Peel Off / Cutter) Print Setup 4/17 Print Mode Print Speed Tear Off Peel Off > Print Mode Cutter 1/4 > Tear Off This option is used to set the print mode. Printer default setting is Tear Off. When enter this list, the print mode in the right side of “ >” icon is the printer current setting. Press and setting. Press B20730-01 to select the different print mode and press button to enable the key to cancel the setting and return to the previous menu. Page 36 of 73 8-2013 © Panduit Corp. 2013 USER MANUAL Printer Mode TDP43HE, TDP43HE/E, TDP46HE & TDP46HE/E Description Next label top of form is aligned to the print head burn line Tear Off Peel Off Enable the label peel off mode. Cutter Enable the label cutter mode. Note: If printing from enclosed software/driver, the software/driver will send out the command, which will overwrite the setting set from the front panel. 3.1.2-5 Print Width: Print Setup Tear Off Print Mode > Print Width 5/17 Print Width 812 dot This option is used to set print width. Press the button to move the cursor from left digit to right digit, and press the button to set the value from “0” to“9” or “dot” to “mm”. Press the button to set the value into printer. Press key to cancel the setting and return to the previous menu. Note: If printing from enclosed software/driver, the software/driver will send out the command, which will overwrite the setting set from the front panel. 3.1.2-6 List Fonts: Print Setup 6/17 > List Fonts List Images List Formats Self Test … Printing … 1/1 This feature is used to print current printer available fonts list to the label. The fonts are stored in the printer’s DRAM, Flash or optional memory card. Press button to print the list. B20730-01 Page 37 of 73 8-2013 © Panduit Corp. 2013 TDP43HE, TDP43HE/E, TDP46HE & TDP46HE/E USER MANUAL 3.1.2-7 List Images: Print Setup 7/17 > List Images List Formats List Setup Self Test … Printing … 1/1 This feature is used to print current printer available images list to the label. The images are stored in the printer’s DRAM, Flash or optional memory card. Press button to print the list. 3.1.2-8 List Formats: Print Setup 8/17 > List Formats List Setup Control Prefix Self Test … Printing … 1/1 This feature is used to print current printer available formats list to the label. The formats are stored in the printer’s DRAM, Flash or optional memory card. Press button to print the list. 3.1.2-9 List Setup: Print Setup 9/17 > List Setup Control Prefix Format Prefix Self Test … Printing … 1/1 This feature is used to print current printer configuration to the label. Press button to print the list. 3.1.2-10 Control Prefix: Print Setup 10/17 List Formats List Setup > Control Prefix Control Prefix < ~ > 7EH This option is used to set control prefix character. Press the cursor from left digit to right digit, and press the button to move the button to set the value from “0” to “9” or “A” to “F”. Press the button to set the value into printer. Press cancel the setting and return to the previous menu. B20730-01 Page 38 of 73 key to 8-2013 © Panduit Corp. 2013 TDP43HE, TDP43HE/E, TDP46HE & TDP46HE/E USER MANUAL 3.1.2-11 Format Prefix: Print Setup 11/17 List Setup Control Prefix > Format Prefix Format Prefix < ⋏ > 5EH This option is used to set format prefix character. Press the cursor from left digit to right digit, and press the button to move the button to set the value from “0” to “9” or “A” to “F”. Press the button to set the value into printer. Press cancel the setting and return to the previous menu. key to 3.1.2-12 Delimiter Char: Print Setup 12/17 Control Prefix Delimiter Char Format Prefix < , > 2CH > Delimiter Char This option is used to set delimiter character. Press the from left digit to right digit, and press the “F”. Press the button to move the cursor button to set the value from “0” to “9” or “A” to button to set the value into printer. Press key to cancel the setting and return to the previous menu. 3.1.2-13 Media Power Up: Print Setup 13/17 Format Prefix Media Power U 4/5 Length Delimiter Char > No Motion > Media Power Up Exit This option is used to set the action of the media when you turn on the printer. Printer default setting is No Motion. When entering this list, the mode on the right side of “ >” icon is the current printer setting. Press press and to select the different print mode and button to enable the setting. Press key to cancel the setting and return to the previous menu. Selection Feed B20730-01 Description Calibration Printer will advance one label Printer will calibration the sensor levels, determine length Page 39 of 73 8-2013 © Panduit Corp. 2013 TDP43HE, TDP43HE/E, TDP46HE & TDP46HE/E USER MANUAL Length Printer determine length and feed label No Motion Printer will not move media 3.1.2-14 Head Close: Print Setup Head Close 14/17 Delimiter Char Media Power Up > Head Close 4/5 Length > No Motion Exit This option is used to set the action of the media when you close the printhead. Printer default setting is No Motion. When entering this list, the mode on the right side of “ >” icon is the current printer setting. Press and to select the different print mode and press button to enable the setting. Press and return to the previous menu. Selection Description Feed Printer will advance one label Printer will calibration the sensor levels, determine length Calibration Length key to cancel the setting Printer determine length and feed label No Motion Printer will not move media 3.1.2-15 Label Top: Print Setup 15/17 Media Power Up Head Close > Label Top Label Top +000 This option is used to adjust print position vertically on the label. Press the move the cursor from left digit to right digit, and press the “+” to “-” or “0” to “1/2”. Press the button to button to set the value from button to set the value into printer. Press key to cancel the setting and return to the previous menu. The default value is +000 and range is -120 to +120 dots. B20730-01 Page 40 of 73 8-2013 © Panduit Corp. 20 013 USER R MANUAL T TDP43HE, TDP43HE/E, TD DP46HE & T TDP46HE/E 3.1.2 2-16 Left Position: P Pri int Setup 16/17 Head Close e Le eft Positio on Label Top +0000 > Left Posit tion This option is us sed to adjustt print positio on horizontallly on the lab bel. Press th he to move the curs sor from left digit to right digit, and prress the from m “+” to “-” or “0” to “9”. Press the button button to o set the value butto on to set the e value into printer. Presss e setting and d return to th he previous menu. The default value e is key to cancel the +000 00 and range e is -9999 to o +9999 dots s. 3.1.3 3 Sensor 3.1.3 3-1 Status S This function is available a to check c the prrinter’s sens or status. W When entering g the [Statuss] optio on, you will see s following g message. Pap per Len. Gap p Size Int tensity Ref f. Level B20 0730-01 812 24 3 512 Pag ge 41 of 73 8 8-2013 © Panduit Corp. 20 013 T TDP43HE, TDP43HE/E, TD DP46HE & T TDP46HE/E USER R MANUAL 3.1.3 3-2 Calibration C This option is us sed to set the e media sensor type and d calibrate th he selected ssensor. We reco ommend to calibrate c the sensor before printing w when changin ng the media a. A. Gap G Mode Cali ibration 1/4 Gap Mode M > Gap Mode Bline Mode e Manu ual Cont. Mode e Pre-Printed 1/4 > Auto omatic and Pres ss the buttons s to scroll the e cursor to th he media typ pe and presss the button n to enter the e sensor caliibration mod de. Note e: If printiing from enclosed e software/dr s driver, the software/d driver will send out the GAP or BLINE B com mmand, wh hich will o overwrite tthe sensorr type setting set from th he front pa anel. A-1 Automa atic When en ntering the [A Automatic] option, you w will see follow wing messag ge, and printter will feed 2 to 3 gap la abels to calib brate the sen nsor sensitivvity automattically. When n on is completted, the LCD D screen willl return to th he previous m menu. calibratio Gap Mode M Auto omatic B20 0730-01 Pag ge 42 of 73 8 8-2013 © Panduit Corp. 20 013 A-2 USER R MANUAL T TDP43HE, TDP43HE/E, TD DP46HE & T TDP46HE/E Manual In case “Automatic” sensor s calibrration canno ot apply to th he media, ple ease use “Manual”” function to calibrate the e gap sensorr manually. Gap Mod de 2/4 2 Aut tomatic > Man nual Pre e-Printed When en ntering [Manual] option, you y will see following me essage. Plea ase comple ete these steps: 1. 1 Press the bu utton to move e the cursorr from left digit to rig ht digit, and d press the button to set the value ffrom “0” to “9” and the “d dot/ mm/ incch”. Press the b button to set the paper le ength into the prrinter. 2. 2 Press the bu utton to move e the cursorr from left digit to rig ht digit, and d press the button to set the value ffrom “0” to “9” and the “d dot/ mm/ incch”. Press the b button to set the gap size e into the printer. Paper Len. . 00812 dot t Gap Size 0024 dot Gap Mod de Scan Ba acking Intensi ity Ref. Le evel Gap Mod de Scan Pa aper Intensi ity Ref. Le evel B20 0730-01 x xxx 3. Open the e print head mechanism,, put the labe el backing ((liner) under the media ssensor. Presss the button to sset the value into the prin nter. x xxx 4. Then, Pu ut the label w with liner und der the media a sensor. P Press the button to set th he value into o the printer. Pag ge 43 of 73 8 8-2013 © Panduit Corp. 20 013 USER R MANUAL Gap Mod de Complet te Intensi ity Ref. Le evel A-3 x xxx T TDP43HE, TDP43HE/E, TD DP46HE & T TDP46HE/E 5. The gap sensor calib bration is com mplete. Presss the button the LCD screen n will return tto the previous menu. Pre-Prin nted Using thiis function, a user can se et the paper length and g gap size, be efore auto-ca alibrating the senso or sensitivity y. This can help h to get th e sensor sensitivity set, accurately. Gap Mod de 3/4 3 Manu ual > Pre-Printed Exit t When en ntering [Pre-P Printed] option, you will ssee following message. Please com mplete these ste eps : Paper Len. . 00812 dot t Gap Size 0024 dot Gap Mode Pre-Printe P ed B20 0730-01 1. 1 Press the utton to move e the cursorr from left bu digit to rig ht digit, and d press the button to set the value ffrom “0” to “9” and the “d dot/ mm/ incch”. Press the b button to set the paper le ength into the prrinter. 2. 2 Press the bu utton to move e the cursorr from left digit to rig ht digit, and d press the button to set the value ffrom “0” to “9” and the “d dot/ mm/ incch”. Press the b button to set the gap size e into the printer. 3. Then, pri nter will feed d labels to ccalibrate the ensitivity auttomatically. When calibrration sensor se is comple eted, the LC CD screen wiill return to th he previous menu. Pag ge 44 of 73 8 8-2013 © Panduit Corp. 2013 TDP43HE, TDP43HE/E, TDP46HE & TDP46HE/E USER MANUAL B. Bline (Black Line) Mode Calibration Bline Mode 2/4 1/4 Gap Mode > Bline Mode Manual Cont. Mode Pre-Printed Press the > Automatic and buttons to scroll the cursor to the sensor type. Press the button to enter the black-mark sensor calibration mode. B-1 Automatic When entering the [Automatic] option, you will see following message and printer will feed the black mark label to calibrate the sensor sensitivity automatically. When calibration process is completed, the LCD screen will return to the previous menu. Bline Mode Automatic B-2 Manual In case “Automatic” sensor calibration cannot apply to the media, please use “Manual” function to calibrate the bline sensor manually. Bline Mode Automatic > Manual Pre-Printed 2/4 When entering [Manual] option, you will see following message. Please complete these steps : Paper Len. 00151 dot B20730-01 1. Press the button to move the cursor from left digit to right digit, and press the button to set the value from “0” to “9” and the “dot/ mm/ inch”. Press the button to set the paper length into the printer. Page 45 of 73 8-2013 © Panduit Corp. 20 013 USER R MANUAL 2. Press P the butto on to move the cursor c from l eft digit to rig ght digit, and d press p the button to set the va alue from “0” to “9 9” and the “d dot/ mm/ inch h”. buttton to set the Press P the e bline b size into o the printerr. Bline B Size 0024 dot Bline Mode M Scan Ma ark Intensi ity Ref. Le evel x xxx Bline Mode M Scan Pa aper Intensi ity Ref. Le evel T TDP43HE, TDP43HE/E, TD DP46HE & T TDP46HE/E x xxx 3. Open the prrint head me echanism, pu ut the black mark under th he media sensor. Presss the button to set the va alue into the printer. 4. Then, put th he label witho out black ma ark under the m media sensorr. Press the b button to set the value intto the printer. Note: e of “Ref. Lev vel” for markk should be larger than Normally, the value 8. If the media sensor fails to do so, yyou have to paper for over 128 manua ally change the t Intensity by pressing g and d tto reach the t above va alue. Bline Mode M Complet te B20 0730-01 Intensi ity x Ref Lev vel xxx 5. The bline se ensor calibra ation is complete. P Press the on butto the LCD scrreen will retu urn to the previous me enu. Pag ge 46 of 73 8 8-2013 © Panduit Corp. 2013 B-3 TDP43HE, TDP43HE/E, TDP46HE & TDP46HE/E USER MANUAL Pre-Printed This function can set the paper length and gap size before auto-calibrate the sensor sensitivity. It can to get the sensor sensitivity accurately. Bline Mode 3/4 Manual > Pre-Printed Exit When entering [Pre-Printed] option, you will see following message. Please complete these steps : 1. Press the button to move the cursor from left digit to right digit, and press the button to set the value from “0” to “9” and the “dot/ mm/ inch”. Press the button to set the paper length into the printer. 2. Press the button to move the cursor from left digit to right digit, and press the button to set the value from “0” to “9” and the “dot/ mm/ inch”. Press the button to set the gap size into the printer. 3. Then, printer will feed labels to calibrate the sensor sensitivity automatically. When calibration is completed, the LCD screen will return to the previous menu. Paper Len. 00812 dot Bline Size 0024 dot Bline Mode Pre-Printed C. Cont. (Continuous media) Mode Calibration Cont. Mode Bline Mode > Automatic > Cont. Mode Manual Exit Exit Press the the B20730-01 3/4 1/3 and buttons to scroll the cursor to the sensor type. Press button to enter the continuous media sensor calibration mode. Page 47 of 73 8-2013 © Panduit Corp. 2013 C-1 USER MANUAL TDP43HE, TDP43HE/E, TDP46HE & TDP46HE/E Automatic When entering the [Automatic] option, you will see following message and printer will calibrate the sensor sensitivity automatically. When calibration process is completed, the LCD screen will return to the previous menu. Cont. Mode Automatic C-2 Manual In case “Automatic” sensor calibration cannot apply to the media, please use “Manual” function to calibrate the sensor manually. Cont. Mode Automatic > Manual Exit 2/3 When entering [Manual] option, you will see following message. Please complete these steps : Cont. Mode Remove Label Intensity Ref. Level x xxx Cont. Mode Scan Paper Intensity Ref. Level x xxx Cont. Mode Complete Intensity Ref. Level B20730-01 1. Remove the continuous label. Press the button to set the value into the printer. x xxx 2. Then, put the continuous label under the media sensor. Press the button to set the value into the printer. 3. The sensor calibration is complete. Press the button the LCD screen will return to the previous menu. Page 48 of 73 8-2013 © Panduit Corp. 20 013 3.1.4 T TDP43HE, TDP43HE/E, TD DP46HE & T TDP46HE/E USER R MANUAL Serial Comm. C 3.1.4.1 Baud Rate Seri ial Comm. 1/5 Baud Rate R 4/9 > 9600 bps > Baud Rate Parity 19200 bps Data Bits 38400 bps This option is us sed to set the e RS-232 ba aud rate. The e default settting is 9600 bps. Press buttton to and button ns to select the different baud rate an nd press set the value into o printer. Wh hen you ente er this list, th he baud rate value in the e right side o of “>” icon is the current setting in the printer. Press key tto cancel the P e setting and d return to the previous menu. m B20 0730-01 Pag ge 49 of 73 8 8-2013 © Panduit Corp. 2013 3.1.4-2 TDP43HE, TDP43HE/E, TDP46HE & TDP46HE/E USER MANUAL Parity Serial Comm. 2/5 Parity Baud Rate > Parity Odd Data Bits Even 1/4 > None This option is used to set the RS-232 parity. The default setting is “None”. Press and buttons to select the different parity and press button to set the value into printer. When you enter this list, the parity in the right side of “>” is the printer current setting. Press key to cancel the setting and return to the previous menu. 3.1.4-3 Data Bits Serial Comm. Baud Rate Parity > Data Bits 3/5 Data Bits 2/3 7 > 8 Exit This option is used to set the RS-232 Data Bits. The default setting is “8” data bits. Press and buttons to select the different Data Bits and press button to set the value into printer. When you enter this list, the Data Bits in the right side of “>” icon is the printer current setting. Press key to cancel the setting and return to the previous menu. 3.1.4-4 Stop Bit(s) Serial Comm. 4/5 Stop Bit(s) Parity Data Bits 2 > Stop Bit(s) Exit 1/3 > 1 This option is used to set the RS-232 Stop Bits. The default setting is “1” stop bit. Press and buttons to select the different Stop Bits and press button to set the value into printer. When you enter this list, the option in the right side of “>” icon is the printer current setting. Press key to cancel the setting and return to the previous menu. B20730-01 Page 50 of 73 8-2013 © Panduit Corp. 20 013 T TDP43HE, TDP43HE/E, TD DP46HE & T TDP46HE/E USER R MANUAL 3.1.5 5 Etherne et Use this menu to o configure internal Ethe ernet settingss, check the printer’s Eth hernet module statu and us, and resett the Etherne et module. Press P buttonss to select the key to different options and press bu utton to ente er the option.. Press cel the settin ng and return n to the prev vious menu. canc 3.1.5 5-1 Status: S (IP Address A / MAC) Use e this menu to check th he Ethernet setting sta atus. 3.1.5 5-2 IP P Address Ethernet E 1/3 IP Add dress Statu us 1/3 0.0.0.0 > Status > IP Address Subnet t Mask Configure e MAC C Exit Exi it 0.0.0.0 Gateway 0.0.0.0 The T IP addre ess informatiion will be sh hown on the e LCD displayy. Please prress or button to return r to the previous me enu. 3.1.5 5-3 MAC M Eth hernet > Status Configure Exit 1/3 Statu us IP Address 2/3 MAC Ad ddress 001B82 2-FF0918 > MAC C Exi it The MAC addres ss informatio on will be sh hown on the LCD displayy. Please pre ess or button b to retu urn to the pre evious menu u. B20 0730-01 Pag ge 51 of 73 8 8-2013 © Panduit Corp. 2013 TDP43HE, TDP43HE/E, TDP46HE & TDP46HE/E USER MANUAL 3.1.5-4 Configure: (DHCP / Static IP) Use this menu to set the printer’s DHCP and Static IP. 3.1.5-5 DHCP Ethernet 2/4 Configure Status > Configure Static IP Reset Exit 1/3 > DHCP Press the enter. Press and buttons to select the DHCP function and press key to cancel the setting and return to the previous menu. to DHCP SELECT: MENU: YES NO Press Press 3.1.5-6 button the printer will set DHCP and restart to reset the setting. button to return to the previous menu. Static IP Use this menu to set the printer’s IP address, subnet mask and gateway. Ethernet Status > Configure Exit 2/3 Configure 2/3 DHCP > Static IP Exit Press and buttons to select the different options and press button to enter the option. Press key to cancel the setting and return to the previous menu. IP Address Subnet Mask Gateway 000.000.000.000 000.000.000.000 000.000.000.000 Press button to move the cursor from left to right digits and press the button to scroll the value from “0” to “9”. Press button to next setting. B20730-01 Page 52 of 73 8-2013 © Panduit Corp. 20 013 T TDP43HE, TDP43HE/E, TD DP46HE & T TDP46HE/E USER R MANUAL Static IP I SELE ECT: YES MENU U: NO ss the Pres 3.2 button printer will re estart to rese et the Ethern net module ssetting. Presss key to cancel the e setting. File e Manage er This feature e is used to check c the priinter available memory a and file list. 3.2.1 File Listt Use this menu to o show, dele ete and run (.BAS) ( the filles saved in the printer DRAM/Flash h/Card mory. mem To show the files s: File e Manager > Fi ile List 1/4 File Lis st > FLASH Av vail. Memo ory CARD De el. All Files Exit 2/4 FLA ASH File L List > D DEMO.TTF D DEMO.BAS B20 0730-01 Pag ge 53 of 73 8 8-2013 © Panduit Corp. 2013 TDP43HE, TDP43HE/E, TDP46HE & TDP46HE/E USER MANUAL To delete the file:Please follow the order to press the button. FLASH File List DEMO.TTF 1.75 MB > DEMO.TTF DEMO.BAS DOWN: Delete To run the file (.BAS):Please follow the order to press the button. FLASH File List DEMO.BAS DEMO.TTF 406 Byte(S) > DEMO.BAS DOWN: SELECT: Delete Run 3.2.2 Avail. Memory Use this menu to show available memory space. File Manager 2/4 Avail. Memory File List DRAM: > Avail. Memory FALSH: Del. All Files CARD: 256 KB 6656 KB 0 KB 3.2.3 All Files Use this menu to delete all files. Press button to delete all files in the device. Press to cancel deleting files and go back to previous menu. File Manager File List Avail. Memory > Del. All File 3/4 File List 1/4 Del. All Files > DRAM FALSH SELECT: CARD MENU: YES NO B20730-01 Page 54 of 73 8-2013 © Panduit Corp. 20 013 3.3 T TDP43HE, TDP43HE/E, TD DP46HE & T TDP46HE/E USER R MANUAL Diiagnostic cs 3.3.1 Print Co onfig. This feature is used to print current c printter configura ation to the la abel. On the configuratio on d test pattern n, which is u useful for che ecking if the ere is any do ot printtout, there is a print head damage on the print p head he eater elemen nt. Diag gnostics 1/4 Self Test … > Pr rint Config g. Prin nting … 1/1 Du ump Mode Ro otate Cutte er B20 0730-01 Pag ge 55 of 73 8 8-2013 © Panduit Corp. 20 013 3.3.2 2 T TDP43HE, TDP43HE/E, TD DP46HE & T TDP46HE/E USER R MANUAL Dump Mode M Capttures the data from the communicat c ions port and d prints out tthe data received by priinter. In the dump d mode, all characte ers will be prrinted in 2 co olumns as fo ollowing. The e left side charracters are re eceived from m your system m and right sside data arre the corressponding hexa adecimal value of the characters. It allows a userss or engineerrs to verify a and debug th he prog gram. Diag gnostics Pr rint Config. 2/4 Printing … Dump p Mode 1/1 > Du ump Mode Ro otate cutt ter Note e: 1. Dump D mod de requires s 4” wide paper p width h. 2. Turn T off / on o the pow wer to resum me printerr for norma al printing. 3. Press P FEED D button to o go back to the prev vious men nu. B20 0730-01 Pag ge 56 of 73 8 8-2013 © Panduit Corp. 20 013 USER R MANUAL T TDP43HE, TDP43HE/E, TD DP46HE & T TDP46HE/E 3.3.3 3 Rotate Cutter C In ca ase paper is jammed in the t cutter, th his feature ca an rotate the e cutter blade e forward orr reverse direction n, which is he elpful to rem move the jam mmed paper e easily from tthe cutter. Diag gnostics Pr rint Config. 3/4 UP: Fwd d. DOWN: Re ev. Du ump Mode > Ro otate Cutt ter MENU: Exi it Note e: Panduitt does not currently offer a Cuttter modulle. 3.4 Lan nguage This option is use ed to setup the t language e on LCD dissplay. and a buttons to scroll th he curser to o desire lan nguage and press button n to select this option. Press P key to cancel the setting g and vious menu. The default language se etting is Eng glish. returrn to the prev Press 3.5 Serrvice sed to restorre printer setttings to defa aults and dissplay printerr mileage This feature is us mation. inform B20 0730-01 Pag ge 57 of 73 8 8-2013 © Panduit Corp. 2013 TDP43HE, TDP43HE/E, TDP46HE & TDP46HE/E USER MANUAL 3.5.1 Initialization Service 1/3 Initialization Initializing … > Initialization Mileage Info. SELECT Exit MENU YES NO The printer settings are restored to defaults as below once printer is initialized. Note : When printer initialization is done, please calibrate the gap or black mark sensor before printing. Parameter Speed Default setting TDP43HE / TDP43HE/E: 4 IPS (101.6 mm/sec) TDP46HE / TDP46HE/E: 3 IPS (76.2 mm/sec) Density 8 Label width 4.00”(101.6mm) Label height 4.00”(101.6mm) Sensor type Gap sensor Gap setting 0.12”(3.0mm) Print direction 0 Reference point 0,0(upper left corner) Offset 0 Print mode Batch mode Serial port settings 9600 bps, none parity, 8 data bits, 1 stop bit Code page 850 Country code 001 Clear flash memory No B20730-01 Shift X 0 Shift Y 0 Gap sensor sensitivity 3 (Will be reset. Need to re-calibrate the gap) Bline sensor sensitivity 2 (Will be reset. Need to re-calibrate the gap) Language English IP address DHCP Page 58 of 73 8-2013 © Panduit Corp. 2013 USER MANUAL TDP43HE, TDP43HE/E, TDP46HE & TDP46HE/E 3.5.2 Mileage Info. Use this option to check the printed mileage (displayed in meter). Service 1/3 Mileage: (m) Initialization > Mileage Info. 4016 Labels: (pcs.) Exit 4. 51698 Diagnostic Tool The Diagnostic Utility is a toolbox that allows users to explore the printer’s settings and status; change printer settings; download graphics, fonts, and firmware; create printer bitmap fonts; and to send additional commands to the printer. Using this convenient tool, you can explore the printer status and settings and troubleshoot the printer. The Diagnostic Utility is located on the provided driver disc, in the “Utility” folder. Note: This utility works with printer firmware V6.00 and later versions. B20730-01 Page 59 of 73 8-2013 © Panduit Corp. 2013 4.1 USER MANUAL TDP43HE, TDP43HE/E, TDP46HE & TDP46HE/E Start the Diagnostic Tool 1. Double click on the Diagnostic tool icon to start the software. 2. There are four features (Printer Configuration, File Manager, Bitmap Font Manager, Command Tool) included in the Diagnostic utility. Features tab Interface Printer functions Printer setup Printer Status B20730-01 Page 60 of 73 8-2013 © Panduit Corp. 2013 TDP43HE, TDP43HE/E, TDP46HE & TDP46HE/E USER MANUAL 4.2 Printer Function (Calibrate sensor, Ethernet setup, RTC setup………) 1. Select the PC interface connected with printer. 2. Click the “Function” button to setting. 3. The detail functions in the Printer Function Group are listed as below. Function Calibrate Sensor Ethernet Setup Description Calibrate the sensor specified in the Printer Setup group media sensor field Setup the IP address, subnet mask, gateway for the on board Ethernet (Please refer to next section) RTC Time Synchronize printer Real Time Clock with PC Print Test Page Print a test page Reset Printer Reboot printer Factory Default Initialize the printer and restore the settings to factory default. Dump Text To activate the printer dump mode. Ignore AUTO.BAS Ignore the downloaded AUTO.BAS program Configuration Page Print printer configuration Note: For more information about Diagnostic Tool, please refer to the diagnostic utility quick start guide in the CD disk \ Utilities directory. 5. Setting Ethernet by Diagnostic Utility The Diagnostic Utility is enclosed in the CD disk \Utilities directory. Users can use Diagnostic Tool to setup the Ethernet by RS-232, USB and Ethernet interfaces. The following contents will instruct users how to configure the Ethernet by these three interfaces. B20730-01 Page 61 of 73 8-2013 © Panduit Corp. 2013 5.1 USER MANUAL TDP43HE, TDP43HE/E, TDP46HE & TDP46HE/E Using USB interface to setup Ethernet interface 1. Connect the USB cable between the computer and the printer. 2. Turn on the printer power. 3. Start the Diagnostic Utility by double clicking on the icon. Note: This utility works with printer firmware V6.00 and later versions. 4. The Diagnostic Utility default interface setting is USB interface. If USB interface is connected with printer, no other settings need to be changed in the interface field. 5. Click on the “Ethernet Setup” button from “Printer Function” group in Printer Configuration tab to setup the IP address, subnet mask and gateway for the on board Ethernet. B20730-01 Page 62 of 73 8-2013 © Panduit Corp. 2013 5.2 USER MANUAL TDP43HE, TDP43HE/E, TDP46HE & TDP46HE/E Using RS-232 interface to setup Ethernet interface 5. Connect the computer and the printer with a RS-232 cable. 6. Turn on the printer power. 7. Start the Diagnostic Utility by double clicks on the icon. Note: This utility works with printer firmware V6.00 and later versions. 8. Select “COM” as interface then click on the “Setup” button to setup the serial port baud rate, parity check, data bits, stop bit and flow control parameters. 9. Click on the “Ethernet Setup” button from printer function of Printer Configuration tab to setup the IP address, subnet mask and the gateway for the on board Ethernet. B20730-01 Page 63 of 73 8-2013 © Panduit Corp. 2013 5.3 USER MANUAL TDP43HE, TDP43HE/E, TDP46HE & TDP46HE/E Using Ethernet interface to setup Ethernet interface 10. Connect the computer and the printer to the LAN. 11. Turn on the printer power. 12. Start the Diagnostic Utility by double clicks on the icon. Note: This utility works with printer firmware V6.00 and later versions. 13. Select “Ethernet” as the interface then click on the “Setup” button to setup the IP address, subnet mask and gateway for the on board Ethernet. 14. Click the “Discover Device” button to explore the printers that exist on the network. 15. Select the printer in the left side of listed printers, the correspondent IP address will be shown in the right side “IP address/Printer Name” field. 16. Click “Change IP Address” to configure the IP address obtained by DHCP or static. B20730-01 Page 64 of 73 8-2013 © Panduit Corp. 2013 USER MANUAL TDP43HE, TDP43HE/E, TDP46HE & TDP46HE/E The default IP address is obtained by DHCP. To change the setting to static IP address, click “Static IP” radio button then enter the IP address, subnet mask and gateway. Click “Set IP” to take effect the settings. Users can also change the “Printer Name” by another model name in this field, then click “Set Printer Name” to take effect this change. Note: After clicking the “Set Printer Name” or “Set IP” button, printer will reset to take effect the settings. 17. Click “Exit” button to exit the Ethernet interface setup and go back to Diagnostic Tool main screen. Factory Default button This function will reset the IP, subnet mask, gateway parameters obtained by DHCP and reset the printer name. Web setup button Except to use the Diagnostic Utility to setup the printer, you can also explore and configure the printer settings and status or update the firmware with the IE or Firefox web browser. This feature provides a user friendly setup interface and the capability to manage the printer remotely over a network. B20730-01 Page 65 of 73 8-2013 © Panduit Corp. 2013 6. USER MANUAL TDP43HE, TDP43HE/E, TDP46HE & TDP46HE/E Troubleshooting 6.1 Common Problems The following guide lists the most common problems that may be encountered when operating this printer. If the printer still does not function after all suggested solutions have been invoked, please contact the Customer Service Department of your purchased reseller or distributor for assistance. Problem Possible Cause Power indicator does The power cord is not not illuminate properly connected. Recovery Procedure Plug the power cord in printer and outlet. Switch the printer on. Carriage Open The printer carriage is open. Please close the print carriage. No Ribbon Running out of ribbon. The ribbon is installed incorrectly. Supply a new ribbon roll. Please refer to the steps in user’s manual to reinstall the ribbon. No Paper Running out of label. The label is installed incorrectly. Gap/black mark sensor is not calibrated. Supply a new label roll. Please refer to the steps in user’s manual to reinstall the label roll. Calibrate the gap/black mark sensor. Paper Jam Gap/black mark sensor is not set properly. Make sure label size is set properly. Labels may be stuck inside the printer mechanism. Calibrate the gap/black mark sensor. Set label size correctly. Take Label Peel function is enabled. Panduit does not offer a Peeler module, at this time. Change Print Mode to None or Batch Cutter function is enabled. Panduit does not offer a Cutter module, at this time. Change Print Mode to None or Batch UP : DOWN : MENU : B20730-01 Page 66 of 73 8-2013 © Panduit Corp. 2013 Not Printing TDP43HE, TDP43HE/E, TDP46HE & TDP46HE/E USER MANUAL Cable is not well connected to serial or USB interface or parallel port. The serial port cable pin configuration is not pin to pin connected. Re-connect cable to interface. If using serial cable, - Please replace the cable with pin to pin connected. - Check the baud rate setting. The default baud rate setting of printer is 9600,n,8,1. If using the Ethernet cable, - Check if the Ethernet RJ-45 connector green LED is lit on.. - Check if the Ethernet RJ-45 connector amber LED is blinking. - Check if the printer gets the IP address when using DHCP mode. - Check if the IP address is correct when using the static IP address. - Wait a few seconds let the printer get the communication with the server then check the IP address setting again. Chang a new cable. Ribbon and media are not compatible. Verify the ribbon-inked side. Reload the ribbon again. Clean the printhead. The print density setting is incorrect. Printhead’s harness connector is not well connected with printhead. Turn off the printer and plug the connector again. Check if the stepping motor is plugging in the right connector. Check your program if there is a command PRINT at the end of the file and there must have CRLF at the end of each command line. Memory full ( FLASH / DRAM ) The space of FLASH/DRAM is full. Delete unused files in the FLASH/DRAM. The max. numbers of file of DRAM is 256 files. - The max. user addressable memory space of DRAM is 2048KB. The max. numbers of file of FLASH is 256 files. - The max. user addressable memory space of FLASH is 6656 KB. SD card is unable to use SD card is damaged. SD card doesn’t insert correctly. Use the non-approved SD card manufacturer. Use the supported capacity SD card. Insert the SD card again. The supported SD card spec and the approved SD card manufacturers, please refer to section 2.2.3. PS/2 port does not work B20730-01 Did not turn off power prior to plug in the PS/2 keyboard. PS/2 keyboard is damaged. PS/2 keyboard doesn’t plugin correctly. There is no BAS file in the printer. Page 67 of 73 Turn off printer power prior to plug in the PS/2 keyboard. Plug the PS/2 keyboard again. Make sure the keyboard is fine. Make sure if there is any BAS file downloaded into printer. 8-2013 © Panduit Corp. 2013 USER MANUAL TDP43HE, TDP43HE/E, TDP46HE & TDP46HE/E Poor Print Quality Ribbon and media is loaded incorrectly Dust or adhesive accumulation on the print head. Print density is not set properly. Printhead element is damaged. Ribbon and media are incompatible. The printhead pressure is not set properly. Reload the supply. Clean the printhead. Clean the platen roller. Adjust the print density and print speed. Run printer self-test and check the print head test pattern if there is dot missing in the pattern. Change proper ribbon or proper label media. Adjust the printhead pressure adjustment knob. o If the left side printout is too light, please adjust the left side pressure adjustment knob to the higher index (higher pressure). If the pressure adjustment knob has been adjust to index “5” and the poor print quality is still at the left side of the printout, please adjust the pressure adjustment knob to index “1” and use the Z-axis adjustment knob to fine tune the pressure. o If the right side printout is too light, please adjust the right side pressure adjustment knob to the higher index (higher pressure) to improve the print quality. If the label thickness is more than 0.22 mm, the print quality might be not good enough, please adjust the heater line adjustment screw counter clockwise to get the best print quality. The release lever does not latch the printhead properly. LCD panel is dark but the LEDs are “ON” The printer initialization is unsuccessful. Turn the printer “OFF” and “ON” again. Initialize the printer. LCD panel is dark and the LEDs are “ON”, but the label is feeding forward The LCD panel harness connector is loose. The LCD panel harness connector is plugged upside down. Ribbon end sensor doesn’t work The ribbon sensor hole is covered with dust. Clear the dust in the sensor hole by the blower. Label feeding is not stable (skew) when printing The media guide does not touch the edge of the media. If the label is moving to the right side, please move the label guide to left. If the label is moving to the left side, please move the label guide to right. Skip labels when printing Label size is not specified properly. Sensor sensitivity is not set properly. The media sensor is covered with dust. Check if label size is setup correctly. Calibrate the sensor by Auto Gap or Manual Gap options. Clear the GAP/Black mark sensor by blower. B20730-01 Page 68 of 73 8-2013 © Panduit Corp. 2013 USER MANUAL The vertical printing Media sensor sensitivity is not position is incorrect set properly. Label size is incorrect. The vertical offset setting in the driver is incorrect. The horizontal printing position is incorrect Missing printing on the left or right side of label Real Time Clock time is incorrect when rebooting the printer Irregular printing 6.2 Adjust the Top Offset (Print Features) or Label Offset (Print Properties Advanced Setup) parameters, within the “Print” windows. Set the correct label size. Press [MENU] [SELECT] x 3 [DOWN] x 5 [SELECT] to fine tune the parameter of Shift X. Adjust “Left Offset” (Print Features). Set the correct label size. The battery has run down. Check if there is a battery on the main board. Power and Error LEDs Power switch OFF and ON too fast. are blinking fast Gray line on the blank label "Set the correct label size. Wrong label size setup. The parameter Shift X in LCD menu is incorrect. The Left Offset setting, within “Features”, in incorrect. Wrong label size setup. Multi interface board The installation is incorrect. doesn’t work Wrinkle Problem TDP43HE, TDP43HE/E, TDP46HE & TDP46HE/E Check if the board is plugged in the right connector. Turn off the printer and wait all LEDs are dark, and turn on the printer again. Printhead pressure is incorrect. Ribbon installation is incorrect. Media installation is incorrect. Print density is incorrect. Media feeding is incorrect. The printhead is dirty. The platen roller is dirty. Please refer to the next chapter. Please set the suitable density to have good print quality. Make sure the label guide touch the edge of the media guide. Clean the printhead when changing a new label roll Clean the platen roller when changing a new label roll The printer is in Hex Dump mode. The RS-232 setting is incorrect. Turn off and on the printer to skip the dump mode. Re-set the RS-232 setting. Mechanism Fine Adjustment to Avoid Ribbon Wrinkles This printer has been fully tested before delivery. There should be no ribbon wrinkle presented on the media for general-purpose printing application. Ribbon wrinkle is related to the media thickness, print head pressure balance, ribbon film characteristics, print darkness setting…etc. In case the ribbon does wrinkle, please follow the instructions below to adjust the printer parts. B20730-01 Page 69 of 73 8-2013 © Panduit Corp. 20 013 T TDP43HE, TDP43HE/E, TD DP46HE & T TDP46HE/E USER R MANUAL Adjustable e Printer Parts Symptom 4. Wrinkle W happ pens from lab bel lower 5. Wrrinkle happens from labe el lower le eft to upper right r directio on (“ˊ”) ht to upper left direction (“ˋ”) righ FE EED DIREC CTION Wrinkle Example Adjust the print head press sure adjus stment knob B20 0730-01 Pag ge 70 of 73 Adjus st the print head pressure adjus stment knob b 8 8-2013 © Panduit Corp. 20 013 USER R MANUAL The print hea ad pressure adjustment kno ob has 5 leve els of settings. Cloc ckwise direction adjustmen nt is to increase the print head d pressure. Counter C Clock kwise adjustm ment can decrease e the print head pressure. If the wrinkle on the label starts s from the e lower left sid de to upper right side, please e do following adjustment. 1. Decrease the right side print head prressure adjustmentt knob setting 1 level per ea ach adjustme ent then print th he label again n to check if wrinkle w is gone. 2. If the right side print hea ad adjustmen nt knob setting g has been set s to index 1 (the lowest pressure index x), please incrrease the left side s print hea ad pressure. 3. If the left side print head d adjustment knob setting has been set to o 5 (the highes st pressure in ndex) the wrin nkle can’t be av void, please ro otate the both h knobs back to t setting 1 th hen rotate the Z-axis mecha anism adjustm ment knob clockw wise for a few w degrees and d print again for f fine tune th he print head pressure distribution. T TDP43HE, TDP43HE/E, TD DP46HE & T TDP46HE/E print head pre essure adjustm ment knob ha as 5 levels of The p settin ngs. Clockwise e direction ad djustment is to o increase the prrint head presssure. Counte er Clockwise adjustment can d decrease the p print head pre essure. If the wrinkle on the label starts from the lowe er right side tto upper left sside, please do following adjusstment. 1. De ecrease the le eft side print head pressure e adjustment kno ob setting 1 le evel per each adjustment tthen print the e label again tto check if wrrinkle is gone.. 2. If tthe left side p print head adju ustment knob b level has bee en set to inde ex 1 (the lowe est index), ple ease inccrease the righ ht side print h head pressure e. Note for step 3: *Factory defa ault setting, th he Z-axis knob b is rotated counter cloc ckwise to the end of thread d. *Turn the Z-a axis mechanis sm adjustmen nt knob clockwise until you feel th he knob touch h the mechanism m for the first adjustment. a * If th he wrinkle is still s there, plea ase turn the ZZ axis mechanism m adjustment knob k clockwis se abo out 1/4 circle each time forr adjustment * If th he winkled dirrection is cha ange from “ˊ” to “ˋ” by adjus sting the Z-ax xis mechanism m adjustment knob, k please turn t the Z axis s mechanism adjustment knob k counter clockwise c to avoid a the wrin nkle. B20 0730-01 Pag ge 71 of 73 8 8-2013 © Panduit Corp. 2013 7. TDP43HE, TDP43HE/E, TDP46HE & TDP46HE/E USER MANUAL Maintenance This session presents the cleaning tools and methods to maintain your printer. 1. Please use one of following materials to clean the printer: Cotton swab Lint-free cloth Vacuum / Blower brush 100% ethanol Panduit Cleaning Kit (PRT-CLN) 2. The cleaning process is described as follows: Printer Part Print Head Method 1. Always turn off the printer before cleaning the print head. 2. Allow the print head to cool for a minimum of one minute. 3. Use a cotton swab (Head cleaner pen) and 100% ethanol to clean the print head surface. Interval Clean the print head when changing a new label roll Platen Roller 1. Turn the power off. 2. Rotate the platen roller and wipe it thoroughly with 100% ethanol and a cotton swab, or lint-free cloth. Tear Bar/ Peel Bar B20730-01 Use the lint-free cloth with 100% ethanol to wipe it. Page 72 of 73 Clean the platen roller when changing a new label roll As needed 8-2013 © Panduit Corp. 2013 TDP43HE, TDP43HE/E, TDP46HE & TDP46HE/E USER MANUAL Sensor Compressed air or vacuum Monthly Exterior Wipe it with water-dampened cloth As needed Interior Brush or vacuum As needed Note: Do not touch printer head by hand. If you accidentally touch it, please use ethanol to clean it. Please use 100% Ethanol. DO NOT use medical alcohol, which may damage the printer head. Regularly clean the print head and supply sensors once change a new ribbon to keep printer performance and extend printer life. B20730-01 Page 73 of 73 8-2013

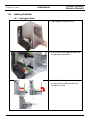
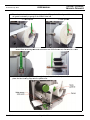
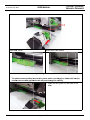


![MC40 Regulatory Guide [English] (P/N 72-166942](http://vs1.manualzilla.com/store/data/006355558_1-b53cce277e35f96f7b0742696fce8bd1-150x150.png)