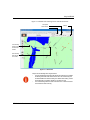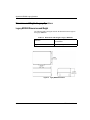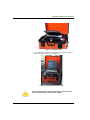
1
MRX920™ User’s Manual MRX920™ User’s Manual This manual is an unpublished work and contains the trade secrets and confidential information of Neptune Technology Group Inc., which are not to be divulged to third parties and may not be reproduced or transmitted in whole or part, in any form or by any means, electronic or mechanical for any purpose, without the express written permission of Neptune Technology Group Inc. All rights to designs or inventions disclosed herein, including the right to manufacture, are reserved to Neptune Technology Group Inc. The information contained in this document is subject to change without notice. Neptune reserves the right to change the product specifications at any time without incurring any obligations. Trademarks Used in this Manual MRX920TM is a trademark of Neptune Technology Group Inc. ARB is a registered trademark of Neptune Technology Group Inc. N_SIGHTTM R900® is a trademark of Neptune Technology Group Inc. Other brands or product names are the trademarks or registered trademarks of their respective holders. MRX920TM User’s Manual Literature No. UM MRX920 03.13 Part No. 12508-002 Copyright © 2005-2013 Neptune Technology Group Inc. All rights reserved. Neptune Technology Group Inc. 1600 Alabama Highway 229 Tallassee, AL 36078 Tel: (334) 283-6555 Fax: (334) 283-7293 Contents 1 Introduction System Operations . . . . . . . . . . . . . . . . . . . . . . . . . . . . . . . . . . . . . . . . . . . . . . . . . . . . . . . . 1-2 About This Manual . . . . . . . . . . . . . . . . . . . . . . . . . . . . . . . . . . . . . . . . . . . . . . . . . . . . . . . . 1-3 Conventions Used in this Manual . . . . . . . . . . . . . . . . . . . . . . . . . . . . . . . . . . . . . . . . . . . . . 1-4 Product Support within North America . . . . . . . . . . . . . . . . . . . . . . . . . . . . . . . . . . . . . . . . . 1-4 Contacting Customer Support . . . . . . . . . . . . . . . . . . . . . . . . . . . . . . . . . . . . . . . . . . . . . . . 1-5 2 Specifications Environmental Conditions . . . . . . . . . . . . . . . . . . . . . . . . . . . . . . . . . . . . . . . . . . . . . . . . . . . 2-1 Dimensions and Weight of the MRX920 . . . . . . . . . . . . . . . . . . . . . . . . . . . . . . . . . . . . . . . . 2-2 Hardware Requirements . . . . . . . . . . . . . . . . . . . . . . . . . . . . . . . . . . . . . . . . . . . . . . . . . . . . 2-3 3 Getting Started MRX920/MX900 Overview . . . . . . . . . . . . . . . . . . . . . . . . . . . . . . . . . . . . . . . . . . . . . . . . . . 3-1 MRX920 Features . . . . . . . . . . . . . . . . . . . . . . . . . . . . . . . . . . . . . . . . . . . . . . . . . . . . . . . . 3-2 WiFi/USB/Serial Support . . . . . . . . . . . . . . . . . . . . . . . . . . . . . . . . . . . . . . . . . . . . . . . . 3-3 WiFi Support . . . . . . . . . . . . . . . . . . . . . . . . . . . . . . . . . . . . . . . . . . . . . . . . . . . . . 3-3 USB Connection . . . . . . . . . . . . . . . . . . . . . . . . . . . . . . . . . . . . . . . . . . . . . . . . . . . 3-3 Serial Connection . . . . . . . . . . . . . . . . . . . . . . . . . . . . . . . . . . . . . . . . . . . . . . . . . . 3-3 The Laptop . . . . . . . . . . . . . . . . . . . . . . . . . . . . . . . . . . . . . . . . . . . . . . . . . . . . . . . . . . 3-4 MRX920 User’s Manual iii Contents Host Software Installation . . . . . . . . . . . . . . . . . . . . . . . . . . . . . . . . . . . . . . . . . . . . . . . . . . . 3-4 If the CD Does Not Start Automatically . . . . . . . . . . . . . . . . . . . . . . . . . . . . . . . . . . 3-5 Accepting the License Agreement . . . . . . . . . . . . . . . . . . . . . . . . . . . . . . . . . . . . . 3-5 Selecting the Setup Type . . . . . . . . . . . . . . . . . . . . . . . . . . . . . . . . . . . . . . . . . . . . 3-6 Preparing to Install . . . . . . . . . . . . . . . . . . . . . . . . . . . . . . . . . . . . . . . . . . . . . . . . . 3-7 For Windows Vista and Windows 7 Users . . . . . . . . . . . . . . . . . . . . . . . . . . . . . . . 3-7 Completing the Installation . . . . . . . . . . . . . . . . . . . . . . . . . . . . . . . . . . . . . . . . . . . 3-8 For Windows Vista Users Only . . . . . . . . . . . . . . . . . . . . . . . . . . . . . . . . . . . . . . . . . . . 3-8 Installing the USB Driver . . . . . . . . . . . . . . . . . . . . . . . . . . . . . . . . . . . . . . . . . . . . . . . . 3-9 If Windows 7 Does Not Recognize Driver . . . . . . . . . . . . . . . . . . . . . . . . . . . . . . . 3-10 Updating the Driver . . . . . . . . . . . . . . . . . . . . . . . . . . . . . . . . . . . . . . . . . . . . . . . . 3-13 Setting Up the MRX920 . . . . . . . . . . . . . . . . . . . . . . . . . . . . . . . . . . . . . . . . . . . . . . . . . . . . 3-15 Setting Up the Connection . . . . . . . . . . . . . . . . . . . . . . . . . . . . . . . . . . . . . . . . . . . . . . 3-15 Initial WiFi Connection . . . . . . . . . . . . . . . . . . . . . . . . . . . . . . . . . . . . . . . . . . . . . 3-17 Initial USB Connection . . . . . . . . . . . . . . . . . . . . . . . . . . . . . . . . . . . . . . . . . . . . . 3-19 Verify Connection Setting . . . . . . . . . . . . . . . . . . . . . . . . . . . . . . . . . . . . . . . . . . . 3-19 Installing the MRX920 in the Vehicle . . . . . . . . . . . . . . . . . . . . . . . . . . . . . . . . . . . . . . . . . . 3-20 Plugging in the Power Cable . . . . . . . . . . . . . . . . . . . . . . . . . . . . . . . . . . . . . . . . . . . . . . . . 3-22 Installing the Antenna . . . . . . . . . . . . . . . . . . . . . . . . . . . . . . . . . . . . . . . . . . . . . . . . . . . . . 3-23 Inserting the USB Flash Drive . . . . . . . . . . . . . . . . . . . . . . . . . . . . . . . . . . . . . . . . . . . . . . . 3-25 Starting the Software . . . . . . . . . . . . . . . . . . . . . . . . . . . . . . . . . . . . . . . . . . . . . . . . . . . . . . 3-26 Installing the Maps Component . . . . . . . . . . . . . . . . . . . . . . . . . . . . . . . . . . . . . . . . . . 3-27 Becoming Familiar with the MRX920 . . . . . . . . . . . . . . . . . . . . . . . . . . . . . . . . . . . . . . . . . 3-27 Navigation . . . . . . . . . . . . . . . . . . . . . . . . . . . . . . . . . . . . . . . . . . . . . . . . . . . . . . . 3-28 iv MRX920 User’s Manual Contents Host Software . . . . . . . . . . . . . . . . . . . . . . . . . . . . . . . . . . . . . . . . . . . . . . . . . . . . . . . 3-29 MX900 Function Buttons . . . . . . . . . . . . . . . . . . . . . . . . . . . . . . . . . . . . . . . . . . . 3-29 Reading Indicator . . . . . . . . . . . . . . . . . . . . . . . . . . . . . . . . . . . . . . . . . . . . . . . . . 3-31 Message Area and Progress Bar . . . . . . . . . . . . . . . . . . . . . . . . . . . . . . . . . . . . . 3-32 Information Area . . . . . . . . . . . . . . . . . . . . . . . . . . . . . . . . . . . . . . . . . . . . . . . . . . 3-32 Route Selection Window . . . . . . . . . . . . . . . . . . . . . . . . . . . . . . . . . . . . . . . . . . . 3-33 Route Display Windows . . . . . . . . . . . . . . . . . . . . . . . . . . . . . . . . . . . . . . . . . . . . 3-34 Viewing MIU Details . . . . . . . . . . . . . . . . . . . . . . . . . . . . . . . . . . . . . . . . . . . . . . . 3-35 Upgrading MX900 . . . . . . . . . . . . . . . . . . . . . . . . . . . . . . . . . . . . . . . . . . . . . . . . . . . . . . . . 3-36 4 Using the MRX920 Removable Storage . . . . . . . . . . . . . . . . . . . . . . . . . . . . . . . . . . . . . . . . . . . . . . . . . . . . 4-1 USB Flash Drive . . . . . . . . . . . . . . . . . . . . . . . . . . . . . . . . . . . . . . . . . . . . . . . . . . . 4-1 Import File . . . . . . . . . . . . . . . . . . . . . . . . . . . . . . . . . . . . . . . . . . . . . . . . . . . . . . . 4-2 Using Wireless Communications . . . . . . . . . . . . . . . . . . . . . . . . . . . . . . . . . . . . . . 4-2 Audible Tone Settings . . . . . . . . . . . . . . . . . . . . . . . . . . . . . . . . . . . . . . . . . . . . . . . . . . 4-2 Enabling the Audible Tone . . . . . . . . . . . . . . . . . . . . . . . . . . . . . . . . . . . . . . . . . . . 4-2 Setting Up the Connection . . . . . . . . . . . . . . . . . . . . . . . . . . . . . . . . . . . . . . . . . . . . . . 4-3 Selecting Routes . . . . . . . . . . . . . . . . . . . . . . . . . . . . . . . . . . . . . . . . . . . . . . . . . . . . . . 4-4 Detail Settings . . . . . . . . . . . . . . . . . . . . . . . . . . . . . . . . . . . . . . . . . . . . . . . . . . . . . . . . 4-8 Viewing Account Detail . . . . . . . . . . . . . . . . . . . . . . . . . . . . . . . . . . . . . . . . . . . . . 4-8 Reading Meters . . . . . . . . . . . . . . . . . . . . . . . . . . . . . . . . . . . . . . . . . . . . . . . . . . . . . . . . . 4-11 Collecting Readings . . . . . . . . . . . . . . . . . . . . . . . . . . . . . . . . . . . . . . . . . . . . . . . . . . 4-12 Starting the Meter Reading Process . . . . . . . . . . . . . . . . . . . . . . . . . . . . . . . . . . 4-12 Navigation on the Route Display Window . . . . . . . . . . . . . . . . . . . . . . . . . . . . . . . . . . . . . 4-15 Viewing Routes . . . . . . . . . . . . . . . . . . . . . . . . . . . . . . . . . . . . . . . . . . . . . . . . . . 4-15 MRX920 User’s Manual v Contents Identifying Missed Accounts . . . . . . . . . . . . . . . . . . . . . . . . . . . . . . . . . . . . . . . . . . . . . . . . 4-18 Viewing Account Details . . . . . . . . . . . . . . . . . . . . . . . . . . . . . . . . . . . . . . . . . . . . . . . . 4-18 Using Coded Notes or Skip Codes . . . . . . . . . . . . . . . . . . . . . . . . . . . . . . . . . . . . 4-18 Moving From One Account to the Next . . . . . . . . . . . . . . . . . . . . . . . . . . . . . . . . . 4-20 Displaying Account Detail . . . . . . . . . . . . . . . . . . . . . . . . . . . . . . . . . . . . . . . . . . . 4-20 Reading Missed Accounts . . . . . . . . . . . . . . . . . . . . . . . . . . . . . . . . . . . . . . . . . . . . . . 4-22 Pausing and Restarting Meter Reading . . . . . . . . . . . . . . . . . . . . . . . . . . . . . . . . . . . . . . . 4-22 Using the Data Logger . . . . . . . . . . . . . . . . . . . . . . . . . . . . . . . . . . . . . . . . . . . . . . . . . . . . 4-23 Special Considerations for the Data Logger . . . . . . . . . . . . . . . . . . . . . . . . . . . . . . . . 4-24 Using the Data Logger with a Route . . . . . . . . . . . . . . . . . . . . . . . . . . . . . . . . . . . . . . 4-24 Activating the Data Logger . . . . . . . . . . . . . . . . . . . . . . . . . . . . . . . . . . . . . . . . . . . . . . 4-25 Selecting Meter Combinations . . . . . . . . . . . . . . . . . . . . . . . . . . . . . . . . . . . . . . . . . . . 4-27 Viewing the Data Logger Information . . . . . . . . . . . . . . . . . . . . . . . . . . . . . . . . . . . . . . 4-28 Data Logger Graph . . . . . . . . . . . . . . . . . . . . . . . . . . . . . . . . . . . . . . . . . . . . . . . . 4-28 Data Logger Report . . . . . . . . . . . . . . . . . . . . . . . . . . . . . . . . . . . . . . . . . . . . . . . 4-33 Using Map View (Optional Feature) . . . . . . . . . . . . . . . . . . . . . . . . . . . . . . . . . . . . . . . . . . 4-36 GPS Feature . . . . . . . . . . . . . . . . . . . . . . . . . . . . . . . . . . . . . . . . . . . . . . . . . . . . . . . . 4-39 Configuring the GPS Device . . . . . . . . . . . . . . . . . . . . . . . . . . . . . . . . . . . . . . . . . 4-39 Using the GPS Modes . . . . . . . . . . . . . . . . . . . . . . . . . . . . . . . . . . . . . . . . . . . . . 4-40 Creating an Export File . . . . . . . . . . . . . . . . . . . . . . . . . . . . . . . . . . . . . . . . . . . . . . . . . . . . 4-42 Exiting the Software . . . . . . . . . . . . . . . . . . . . . . . . . . . . . . . . . . . . . . . . . . . . . . . . . . . . . . 4-43 From the Route Import and Route Export Windows . . . . . . . . . . . . . . . . . . . . . . . . . . 4-43 From the Route Selection Window . . . . . . . . . . . . . . . . . . . . . . . . . . . . . . . . . . . . . . . . 4-44 Turning off the Laptop . . . . . . . . . . . . . . . . . . . . . . . . . . . . . . . . . . . . . . . . . . . . . . . . . 4-44 Removing the USB Flash Drive While the Laptop is On . . . . . . . . . . . . . . . . . . . . . . . 4-45 vi MRX920 User’s Manual Contents 5 Troubleshooting Troubleshooting the MRX920 . . . . . . . . . . . . . . . . . . . . . . . . . . . . . . . . . . . . . . . . . . . . . . . . 5-1 Troubleshooting Hardware Issues . . . . . . . . . . . . . . . . . . . . . . . . . . . . . . . . . . . . . . . . . . . . 5-1 Troubleshooting Host Software Issues . . . . . . . . . . . . . . . . . . . . . . . . . . . . . . . . . . . . . . . . . 5-3 A MRX920 Legacy Operations Dimensions and Weight of Legacy Operations . . . . . . . . . . . . . . . . . . . . . . . . . . . . . . . . . . A-2 Legacy MRX920 Dimensions and Weight . . . . . . . . . . . . . . . . . . . . . . . . . . . . . . . . . . . A-2 Legacy MTX950 Dimensions and Weight . . . . . . . . . . . . . . . . . . . . . . . . . . . . . . . . . . . A-3 Laptop Specifications . . . . . . . . . . . . . . . . . . . . . . . . . . . . . . . . . . . . . . . . . . . . . . . . . . . . . . A-4 Power Supply . . . . . . . . . . . . . . . . . . . . . . . . . . . . . . . . . . . . . . . . . . . . . . . . . . . . . . . . . . . . A-4 Connecting the MRX920 Receiver to the Laptop . . . . . . . . . . . . . . . . . . . . . . . . . . . . . . . . . A-5 Placing the MRX920 in the Vehicle . . . . . . . . . . . . . . . . . . . . . . . . . . . . . . . . . . . . . . . . . . . A-5 Opening Carrying Case Cover . . . . . . . . . . . . . . . . . . . . . . . . . . . . . . . . . . . . . . . . . . . . . . . A-8 Plugging in the Power Cable . . . . . . . . . . . . . . . . . . . . . . . . . . . . . . . . . . . . . . . . . . . . . . . A-10 Turning the Unit On . . . . . . . . . . . . . . . . . . . . . . . . . . . . . . . . . . . . . . . . . . . . . . . . . . . . . . A-11 The Laptop . . . . . . . . . . . . . . . . . . . . . . . . . . . . . . . . . . . . . . . . . . . . . . . . . . . . . . . . . A-12 USB Port . . . . . . . . . . . . . . . . . . . . . . . . . . . . . . . . . . . . . . . . . . . . . . . . . . . . . . . A-13 Adjusting System Settings . . . . . . . . . . . . . . . . . . . . . . . . . . . . . . . . . . . . . . . . . . . . . . . . . A-14 Contrast . . . . . . . . . . . . . . . . . . . . . . . . . . . . . . . . . . . . . . . . . . . . . . . . . . . . . . . . . . . . A-14 Volume . . . . . . . . . . . . . . . . . . . . . . . . . . . . . . . . . . . . . . . . . . . . . . . . . . . . . . . . . . . . A-14 Using the MRX920 . . . . . . . . . . . . . . . . . . . . . . . . . . . . . . . . . . . . . . . . . . . . . . . . . . . . . . . A-15 Navigation . . . . . . . . . . . . . . . . . . . . . . . . . . . . . . . . . . . . . . . . . . . . . . . . . . . . . . A-15 MRX920 User’s Manual vii Contents Using the Keyboard . . . . . . . . . . . . . . . . . . . . . . . . . . . . . . . . . . . . . . . . . . . . . . . . . . . . . . . A-16 Numeric Keypad . . . . . . . . . . . . . . . . . . . . . . . . . . . . . . . . . . . . . . . . . . . . . . . . . . . . . . A-16 Using the Touchpad . . . . . . . . . . . . . . . . . . . . . . . . . . . . . . . . . . . . . . . . . . . . . . . . . . . A-17 Your Touchpad . . . . . . . . . . . . . . . . . . . . . . . . . . . . . . . . . . . . . . . . . . . . . . . . . . . A-18 Touchpad Precautions . . . . . . . . . . . . . . . . . . . . . . . . . . . . . . . . . . . . . . . . . . . . . A-19 Using the Transmitter (MTX950 Only) . . . . . . . . . . . . . . . . . . . . . . . . . . . . . . . . . . . . . . . . . A-19 Initiating the Transmitter . . . . . . . . . . . . . . . . . . . . . . . . . . . . . . . . . . . . . . . . . . . . . . . . A-20 Troubleshooting Legacy Units . . . . . . . . . . . . . . . . . . . . . . . . . . . . . . . . . . . . . . . . . . . . . . . A-22 Performing Diagnostics . . . . . . . . . . . . . . . . . . . . . . . . . . . . . . . . . . . . . . . . . . . . . . . . . . . . A-23 Displaying the Software Self Diagnostics . . . . . . . . . . . . . . . . . . . . . . . . . . . . . . . . . . . A-23 Importing Route Data . . . . . . . . . . . . . . . . . . . . . . . . . . . . . . . . . . . . . . . . . . . . . . . . . . . . . A-25 If Route Data File is Not Found . . . . . . . . . . . . . . . . . . . . . . . . . . . . . . . . . . . . . . . . . . A-25 Selecting the Import File . . . . . . . . . . . . . . . . . . . . . . . . . . . . . . . . . . . . . . . . . . . . A-26 If the USB Flash Drive is Not Recognized . . . . . . . . . . . . . . . . . . . . . . . . . . . . . . . . . . A-26 Glossary Index viii MRX920 User’s Manual Figures Figure 1.1 1.2 1.3 2.1 3.1 3.2 3.3 3.4 3.5 3.6 3.7 3.8 3.9 3.10 3.11 3.12 3.13 3.14 3.15 3.16 3.17 3.18 3.19 3.20 3.21 3.22 3.23 3.24 3.25 3.26 3.27 Title Page MRX920 Receiver . . . . . . . . . . . . . . . . . . . . . . . . . . . . . . . . . . . . . . . . . . . . . . . . . . . . . . . . . 1-1 MRX920 Meter Reading Operations . . . . . . . . . . . . . . . . . . . . . . . . . . . . . . . . . . . . . . . . 1-2 Support Options . . . . . . . . . . . . . . . . . . . . . . . . . . . . . . . . . . . . . . . . . . . . . . . . . . . . . . . . . . . 1-5 MRX920 Dimensions . . . . . . . . . . . . . . . . . . . . . . . . . . . . . . . . . . . . . . . . . . . . . . . . . . . . . . 2-2 MRX920 Receiving/Processing Unit . . . . . . . . . . . . . . . . . . . . . . . . . . . . . . . . . . . . . . . . 3-2 InstallShield Wizard Welcome Window . . . . . . . . . . . . . . . . . . . . . . . . . . . . . . . . . . . . . . 3-4 Neptune Software License Agreement . . . . . . . . . . . . . . . . . . . . . . . . . . . . . . . . . . . . . . 3-5 Setup Type Window . . . . . . . . . . . . . . . . . . . . . . . . . . . . . . . . . . . . . . . . . . . . . . . . . . . . . . . 3-6 Ready to Install Window . . . . . . . . . . . . . . . . . . . . . . . . . . . . . . . . . . . . . . . . . . . . . . . . . . . . 3-7 User Account Control Dialog . . . . . . . . . . . . . . . . . . . . . . . . . . . . . . . . . . . . . . . . . . . . . . . 3-7 InstallShield Wizard Complete . . . . . . . . . . . . . . . . . . . . . . . . . . . . . . . . . . . . . . . . . . . . . . 3-8 Windows Vista Compatibility . . . . . . . . . . . . . . . . . . . . . . . . . . . . . . . . . . . . . . . . . . . . . . . . 3-9 Selecting Neptune MRX920 Properties . . . . . . . . . . . . . . . . . . . . . . . . . . . . . . . . . . . . 3-10 Neptune MRX920 Properties . . . . . . . . . . . . . . . . . . . . . . . . . . . . . . . . . . . . . . . . . . . . . . 3-11 Neptune MRX920 Properties General Tab . . . . . . . . . . . . . . . . . . . . . . . . . . . . . . . . . 3-12 Update Driver Dialog . . . . . . . . . . . . . . . . . . . . . . . . . . . . . . . . . . . . . . . . . . . . . . . . . . . . . . 3-13 Update Driver Software . . . . . . . . . . . . . . . . . . . . . . . . . . . . . . . . . . . . . . . . . . . . . . . . . . . 3-13 Browse for Driver . . . . . . . . . . . . . . . . . . . . . . . . . . . . . . . . . . . . . . . . . . . . . . . . . . . . . . . . . 3-14 Windows Security Dialog . . . . . . . . . . . . . . . . . . . . . . . . . . . . . . . . . . . . . . . . . . . . . . . . . . 3-14 Update Driver Software Successful . . . . . . . . . . . . . . . . . . . . . . . . . . . . . . . . . . . . . . . . 3-15 Connection Settings Dialog . . . . . . . . . . . . . . . . . . . . . . . . . . . . . . . . . . . . . . . . . . . . . . . . 3-16 MAC Address . . . . . . . . . . . . . . . . . . . . . . . . . . . . . . . . . . . . . . . . . . . . . . . . . . . . . . . . . . . . . 3-18 MRX920 Placed in Vehicle . . . . . . . . . . . . . . . . . . . . . . . . . . . . . . . . . . . . . . . . . . . . . . . . 3-20 Optional Mobile Office . . . . . . . . . . . . . . . . . . . . . . . . . . . . . . . . . . . . . . . . . . . . . . . . . . . . . 3-21 Mobile Office in Use . . . . . . . . . . . . . . . . . . . . . . . . . . . . . . . . . . . . . . . . . . . . . . . . . . . . . . 3-21 Vehicle Power Supply Power Cable . . . . . . . . . . . . . . . . . . . . . . . . . . . . . . . . . . . . . . . . 3-23 Vehicle Power Supply Cable Inserted In Car . . . . . . . . . . . . . . . . . . . . . . . . . . . . . . . 3-23 Antenna Installation . . . . . . . . . . . . . . . . . . . . . . . . . . . . . . . . . . . . . . . . . . . . . . . . . . . . . . . 3-24 Antenna Cable Through Window . . . . . . . . . . . . . . . . . . . . . . . . . . . . . . . . . . . . . . . . . . 3-24 USB Port and Drive . . . . . . . . . . . . . . . . . . . . . . . . . . . . . . . . . . . . . . . . . . . . . . . . . . . . . . . 3-26 Navigating Within the Software . . . . . . . . . . . . . . . . . . . . . . . . . . . . . . . . . . . . . . . . . . . . 3-28 MRX920 User’s Manual ix Figures Figure 3.28 3.29 3.30 4.1 4.2 4.3 4.4 4.5 4.6 4.7 4.8 4.9 4.10 4.11 4.12 4.13 4.14 4.15 4.16 4.17 4.18 4.19 4.20 4.21 4.22 4.23 4.24 4.25 4.26 4.27 4.28 4.29 x Title Page Route Selection Window . . . . . . . . . . . . . . . . . . . . . . . . . . . . . . . . . . . . . . . . . . . . . . . . . . 3-33 Missed Reads and Captured Reads Windows . . . . . . . . . . . . . . . . . . . . . . . . . . . . . 3-34 MIU Details Dialog . . . . . . . . . . . . . . . . . . . . . . . . . . . . . . . . . . . . . . . . . . . . . . . . . . . . . . . . 3-36 Enable Tone Check Box Field . . . . . . . . . . . . . . . . . . . . . . . . . . . . . . . . . . . . . . . . . . . . . . 4-3 Connection Settings Dialog . . . . . . . . . . . . . . . . . . . . . . . . . . . . . . . . . . . . . . . . . . . . . . . . 4-4 Route Selection Window . . . . . . . . . . . . . . . . . . . . . . . . . . . . . . . . . . . . . . . . . . . . . . . . . . . 4-5 Missed Reads Window . . . . . . . . . . . . . . . . . . . . . . . . . . . . . . . . . . . . . . . . . . . . . . . . . . . . 4-6 MIU Details Window . . . . . . . . . . . . . . . . . . . . . . . . . . . . . . . . . . . . . . . . . . . . . . . . . . . . . . . 4-7 Route Selection Window with Route Highlighted . . . . . . . . . . . . . . . . . . . . . . . . . . . . 4-9 Captured Read Window with Account Highlighted . . . . . . . . . . . . . . . . . . . . . . . . . . 4-10 Route Selection Window . . . . . . . . . . . . . . . . . . . . . . . . . . . . . . . . . . . . . . . . . . . . . . . . . . 4-11 Reading a Route . . . . . . . . . . . . . . . . . . . . . . . . . . . . . . . . . . . . . . . . . . . . . . . . . . . . . . . . . 4-13 Route With All Reads Completed . . . . . . . . . . . . . . . . . . . . . . . . . . . . . . . . . . . . . . . . . . 4-14 Route Selection Window . . . . . . . . . . . . . . . . . . . . . . . . . . . . . . . . . . . . . . . . . . . . . . . . . . 4-16 Captured Reads Window Message Area . . . . . . . . . . . . . . . . . . . . . . . . . . . . . . . . . . . 4-17 MIU Details Window . . . . . . . . . . . . . . . . . . . . . . . . . . . . . . . . . . . . . . . . . . . . . . . . . . . . . . 4-21 Data Logger Tab . . . . . . . . . . . . . . . . . . . . . . . . . . . . . . . . . . . . . . . . . . . . . . . . . . . . . . . . . 4-24 Light Sensor for Data Logging Device . . . . . . . . . . . . . . . . . . . . . . . . . . . . . . . . . . . . . 4-25 Activating with a Flashlight . . . . . . . . . . . . . . . . . . . . . . . . . . . . . . . . . . . . . . . . . . . . . . . . 4-25 Data Logger Progress Bar . . . . . . . . . . . . . . . . . . . . . . . . . . . . . . . . . . . . . . . . . . . . . . . . 4-26 MIU Header Not Heard Message . . . . . . . . . . . . . . . . . . . . . . . . . . . . . . . . . . . . . . . . . . 4-26 Select Meter Combinations Dialog . . . . . . . . . . . . . . . . . . . . . . . . . . . . . . . . . . . . . . . . . 4-27 Meter Combination Defaults . . . . . . . . . . . . . . . . . . . . . . . . . . . . . . . . . . . . . . . . . . . . . . . 4-27 Sample Daily Data Logger Graph . . . . . . . . . . . . . . . . . . . . . . . . . . . . . . . . . . . . . . . . . 4-29 Show Menu Graph Options . . . . . . . . . . . . . . . . . . . . . . . . . . . . . . . . . . . . . . . . . . . . . . . 4-30 Graph Buttons . . . . . . . . . . . . . . . . . . . . . . . . . . . . . . . . . . . . . . . . . . . . . . . . . . . . . . . . . . . . 4-31 Sample Hourly Data Logger Graph . . . . . . . . . . . . . . . . . . . . . . . . . . . . . . . . . . . . . . . . 4-33 Sample Data Logger Report . . . . . . . . . . . . . . . . . . . . . . . . . . . . . . . . . . . . . . . . . . . . . . 4-34 Show Menu Report Options . . . . . . . . . . . . . . . . . . . . . . . . . . . . . . . . . . . . . . . . . . . . . . . 4-35 Report Buttons . . . . . . . . . . . . . . . . . . . . . . . . . . . . . . . . . . . . . . . . . . . . . . . . . . . . . . . . . . . 4-35 Map View Window . . . . . . . . . . . . . . . . . . . . . . . . . . . . . . . . . . . . . . . . . . . . . . . . . . . . . . . . 4-37 Invalid GPS Coordinates . . . . . . . . . . . . . . . . . . . . . . . . . . . . . . . . . . . . . . . . . . . . . . . . . . 4-38 MRX920 User’s Manual Figures Figure 4.30 4.31 4.32 4.33 A.1 A.2 A.3 A.4 A.5 A.6 A.7 A.8 A.9 A.10 A.11 A.12 A.13 A.14 A.15 A.16 A.17 A.18 A.19 A.20 A.21 Title Page GPS Settings Dialog . . . . . . . . . . . . . . . . . . . . . . . . . . . . . . . . . . . . . . . . . . . . . . . . . . . . . . 4-39 GPS Feature . . . . . . . . . . . . . . . . . . . . . . . . . . . . . . . . . . . . . . . . . . . . . . . . . . . . . . . . . . . . . 4-41 GPS Options . . . . . . . . . . . . . . . . . . . . . . . . . . . . . . . . . . . . . . . . . . . . . . . . . . . . . . . . . . . . . 4-42 No Available GPS Coordinates Message . . . . . . . . . . . . . . . . . . . . . . . . . . . . . . . . . . . 4-42 Legacy MRX920 Dimensions . . . . . . . . . . . . . . . . . . . . . . . . . . . . . . . . . . . . . . . . . . . . . . . A-2 Legacy MTX950 Dimensions . . . . . . . . . . . . . . . . . . . . . . . . . . . . . . . . . . . . . . . . . . . . . . . A-3 Removing the Safety Latch . . . . . . . . . . . . . . . . . . . . . . . . . . . . . . . . . . . . . . . . . . . . . . . . . A-6 Placing Seat Belt in Retention Loop . . . . . . . . . . . . . . . . . . . . . . . . . . . . . . . . . . . . . . . . . A-6 Replacing the Safety Pin . . . . . . . . . . . . . . . . . . . . . . . . . . . . . . . . . . . . . . . . . . . . . . . . . . . A-7 Latches on MRX920 Carrying Case . . . . . . . . . . . . . . . . . . . . . . . . . . . . . . . . . . . . . . . . . A-8 Opening the Cover . . . . . . . . . . . . . . . . . . . . . . . . . . . . . . . . . . . . . . . . . . . . . . . . . . . . . . . . . A-9 Placing Unit Against Back of Seat . . . . . . . . . . . . . . . . . . . . . . . . . . . . . . . . . . . . . . . . . . A-9 Vehicle Power Supply Power Cable . . . . . . . . . . . . . . . . . . . . . . . . . . . . . . . . . . . . . . . . A-10 Vehicle Power Supply Cable Inserted In Car . . . . . . . . . . . . . . . . . . . . . . . . . . . . . . . A-10 Laptop Keyboard . . . . . . . . . . . . . . . . . . . . . . . . . . . . . . . . . . . . . . . . . . . . . . . . . . . . . . . . . A-11 Laptop in Former MRX920 . . . . . . . . . . . . . . . . . . . . . . . . . . . . . . . . . . . . . . . . . . . . . . . . A-12 USB Port for USB Flash Drive . . . . . . . . . . . . . . . . . . . . . . . . . . . . . . . . . . . . . . . . . . . . . A-13 Navigating Within the Software . . . . . . . . . . . . . . . . . . . . . . . . . . . . . . . . . . . . . . . . . . . . A-16 Numeric Keyboard . . . . . . . . . . . . . . . . . . . . . . . . . . . . . . . . . . . . . . . . . . . . . . . . . . . . . . . . A-17 Touchpad . . . . . . . . . . . . . . . . . . . . . . . . . . . . . . . . . . . . . . . . . . . . . . . . . . . . . . . . . . . . . . . . A-17 Using the Transmitter . . . . . . . . . . . . . . . . . . . . . . . . . . . . . . . . . . . . . . . . . . . . . . . . . . . . . A-20 Specify Transmitter Settings . . . . . . . . . . . . . . . . . . . . . . . . . . . . . . . . . . . . . . . . . . . . . . . A-21 Route Import Screen . . . . . . . . . . . . . . . . . . . . . . . . . . . . . . . . . . . . . . . . . . . . . . . . . . . . . . A-23 MX900 System Check Screen . . . . . . . . . . . . . . . . . . . . . . . . . . . . . . . . . . . . . . . . . . . . . A-24 Import File Location Dialog . . . . . . . . . . . . . . . . . . . . . . . . . . . . . . . . . . . . . . . . . . . . . . . . A-25 MRX920 User’s Manual xi Figures Notes: xii MRX920 User’s Manual Tables Table 2.1 2.2 2.3 4.1 5.1 5.2 A.1 A.2 A.3 A.4 A.5 Title Page Environmental Conditions . . . . . . . . . . . . . . . . . . . . . . . . . . . . . . . . . . . . . . . 2-1 Dimensions and Weight of the MRX920 . . . . . . . . . . . . . . . . . . . . . . . . . . . . 2-2 Hardware Requirements . . . . . . . . . . . . . . . . . . . . . . . . . . . . . . . . . . . . . . . . 2-3 Data Logging Menu Options . . . . . . . . . . . . . . . . . . . . . . . . . . . . . . . . . . . . 4-30 Hardware Troubleshooting Table . . . . . . . . . . . . . . . . . . . . . . . . . . . . . . . . . 5-1 Host Software Troubleshooting Table . . . . . . . . . . . . . . . . . . . . . . . . . . . . . 5-3 Dimensions and Weight of Legacy MRX920 . . . . . . . . . . . . . . . . . . . . . . . . A-2 Dimensions and Weight of Legacy MTX950 . . . . . . . . . . . . . . . . . . . . . . . . A-3 PC Specifications . . . . . . . . . . . . . . . . . . . . . . . . . . . . . . . . . . . . . . . . . . . . . A-4 Operating Voltage and Current . . . . . . . . . . . . . . . . . . . . . . . . . . . . . . . . . . . A-4 Troubleshooting Table . . . . . . . . . . . . . . . . . . . . . . . . . . . . . . . . . . . . . . . . A-22 MRX920 User’s Manual xiii Tables Notes: xiv MRX920 User’s Manual Chapter 1 Introduction The MRX920 is a compact, portable, mobile data collection device used for meter reading of Neptune radio frequency (RF)-equipped water meters. It is used in conjunction with the MX900 host software to conduct automatic meter reading. The data collected is then communicated to the utility’s billing system. Figure 1.1 MRX920 Receiver The MRX920 provides the meter reading industry with many advantages over current meter reading methods: • Suitable for any size utility • Portable and easy to set up • Significantly reduced man-hours needed to collect readings • Maximized meter reading success rates • Improved meter reading accuracy • Access for meters that are “hard-to-read” or “dangerous-to-read” • Increased safety and minimized liability exposure The MRX920 is only to be used for in-vehicle purposes. MRX920 User’s Manual 1-1 Introduction System Operations Operators use the N_SIGHTTM R900® host software to make route assignments for meter readers. The routes to be read are obtained from the utility billing system and placed on a USB flash drive or accessed by use of a WiFi connection for the meter readers. Routes are loaded into the MX900 host software. Each meter reader drives through the assigned routes to collect data broadcast by R900® meter interface units (MIUs). When complete, the meter readings can be uploaded to the N_SIGHT R900 host software. The host software transfers the customer information to the billing computer to generate customer bills. See Figure 1.2. Figure 1.2 MRX920 Meter Reading Operations 1-2 MRX920 User’s Manual Introduction About This Manual The MRX920 User’s Manual describes the system and its features. This manual also provides procedures on how to set up the MRX920, use its MX900 host software, exit, and close the unit. This manual contains the following chapters: Chapter Description 2 Specifications Provides a section that includes all product specifications, including dimensions, weight, and environmental conditions. 3 Getting Started with the MRX920 Describes hardware setup instructions, power and antenna connection, and instructions on how to turn on the laptop computer. The chapter also includes information on how to adjust system settings including keyboard backlighting, display intensity, and the beeper settings. It also provides steps for installing and updating the software. 4 Using the MRX920 Explains how the product works, procedures for reading meters, reviewing account information, reading missed meters, using the data logger, using the mapping feature, and exiting the software. 5 Troubleshooting Provides diagnostics procedures for troubleshooting MRX920 problems. MRX920 Legacy Operations Provides steps for using the legacy MRX920 and laptop, plus a reference for the laptop keyboard and the LED activity and power indicators. Appendix A MRX920 User’s Manual Title 1-3 Introduction Conventions Used in this Manual This manual uses the following icons and typographical conventions to identify special information. The Warning icon identifies actions that can cause injury to the user or permanently damage the product. The Caution icon identifies important information that is critical to ensuring that data stored with the MRX920 is not lost. The Note icon identifies information that clarifies a point within the text. All small caps All bold initial caps + between keys Refers to keys. Examples: ENTER, ALT, TAB Refers to field names, menus, buttons, and menu options. Example: Device field or File menu. Refers to pressing the keys at the same time. Example: ALT+B Product Support within North America Neptune offers various methods to receive high-quality, responsive Customer Support. However, before contacting Neptune, it is important that you know the version number of the host software that your MRX920 uses. This information is useful to the Customer Support Specialist who addresses the call. To find the version number of MX900 host software, you must display the System Check window. For instructions on obtaining the version number of the MX900 host software, see “Performing Diagnostics,” on page A-23. 1-4 MRX920 User’s Manual Introduction Contacting Customer Support Within North America, Neptune Customer Support is available Monday through Friday, 8:00 AM to 7:00 PM Eastern Standard Time by telephone, email, or fax. To contact Customer Support by phone, call (800) 647-4832. You will be directed to the appropriate team of Customer Support Specialists. These specialists are dedicated to assisting you until the issue is resolved to your satisfaction. When placing a call, be prepared to give the following information: • The exact wording of any message that appears on the screen of the laptop • A description of what happened and what you were doing when the problem occurred • A description of how you tried to solve the problem • Your utility’s name You will be directed according to the options in Figure 1.3 Figure 1.3 Support Options MRX920 User’s Manual 1-5 Introduction To contact Customer Support by fax, send a description of your problem to (334) 283-7497. Please include on the fax cover sheet the best time of day for a Customer Support Specialist to contact you. To contact Customer Support by e-mail, send your letter to the following address: [email protected]. 1-6 MRX920 User’s Manual Chapter 2 Specifications This chapter provides product specifications, including dimensions, weight, and environmental conditions for the MRX920. Environmental Conditions Table 2.1 Environmental Conditions MRX920 User’s Manual Operating Temperature 32° to 122°F (0° to 50°C) Storage Temperature -40° to 185°F (-40° to 85°C) Operating Humidity 5% to 95% non-condensing relative humidity 2-1 Specifications Dimensions and Weight of the MRX920 The MRX920 is light in weight and compact in size. Refer to Table 2.2 and Figure 2.1 for the dimensions and weight of this unit. Table 2.2 Dimensions and Weight of the MRX920 Dimensions Refer to Figure 2.1, measurement in inches Weight Approximately 5.0 pounds (2.27 kg.) Figure 2.1 MRX920 Dimensions 2-2 MRX920 User’s Manual Specifications Hardware Requirements In order to adequately run the MX900 host software, the laptop you use must meet the following minimum specifications: Table 2.3 Hardware Requirements Processor Intel Pentium Processor 1.7 GHz Operating System One of the following operating systems is required: • Windows XP Professional (32 bit, service pack 3) • Windows Vista Business (32 bit, service pack 1) • Windows 7 Professional and Home Premium (64 bit) Memory 1GB expandable to 2GB The MRX920 is a mobile data collector designed to be used in a vehicle designated for meter reading. It has been constructed to be used occasionally on a bumpy terrain found in rural meter reading routes. This needs to be considered when choosing a laptop to use with the MRX920. Should your utility operate the MRX920 in bumpy conditions or should you require a display rated for outdoor visibility, Neptune recommends considering a ruggedized laptop such as a Panasonic Toughbook® or equivalent. Neptune recommends one of the following: • Cigarette lighter adapter, required for laptop. • Extended life battery Display 12.1" XGA (800 x 600) Keyboard 89-key Communication Internal 802.11b/g wireless LAN (if wireless loading/unloading is desired), WiFi 802.11, GPS Receiver (if GPS location tracking is desired). Interface USB 2.0, PS/2, RJ-11, RJ-45 (Ethernet LAN), VGA Durability Meets the recommended MIL-STD 810F Two important considerations: • The MRX920 does NOT supply power to the laptop. • However, for its own use, the MRX920 draws less than 1 amp of power. MRX920 User’s Manual 2-3 Specifications Notes 2-4 MRX920 User’s Manual Chapter 3 Getting Started This chapter provides an overview of the MRX920 along with software installation and hardware setup instructions including power and antenna connection. This chapter also includes information on how to adjust system settings including keyboard backlighting, display intensity, and the beeper settings. MRX920/MX900 Overview The MRX920 is a portable, mobile data collection device. It is used in conjunction with internal software, a laptop computer, and the MX900 host software to conduct automatic meter reading. The data collected is then communicated to the utility’s billing system. The MRX920 features the following: MRX920 User’s Manual • Durable construction in a compact design for everyday use in any vehicle • Optional Map view with GPS capability • Available WiFi connection to most laptops • Audible tone sounds to indicate successful readings • Wireless loading and unloading • Ability to read R900 radio transmitters • Captured reads stored to the hard drive of the laptop 3-1 Getting Started MRX920 Features The MRX920 consists of a data collection receiver/processing unit and the user’s laptop computer for use in meter reading. See Figure 3.1. The unit features meter reading software designed for simplified route collection. RF connection USB connection WiFi connection Status LEDs Power connection Figure 3.1 MRX920 Receiving/Processing Unit Attempting to repair or modify the unit on your own can result in personal injury or damage to the unit and will void the warranty. 3-2 MRX920 User’s Manual Getting Started WiFi/USB/Serial Support The MX900 host software supports WiFi and USB connection to the current receiver as well as a serial port connection for the legacy model receiver. WiFi Support The MX900 host software supports a TCP/IP connection. The MX900 host software bonds to one MRX920 through its Media Access Controller (MAC) address. Only one MRX920 at a time can be bonded to the MX900 host software/PC. USB Connection The MX900 host software supports a virtual serial port over USB. Neptune’s driver maps the USB device on the MRX920 to a virtual communications port. The MRX920 must be plugged into PC via USB cord in order to install USB driver. During the installation, prompts provide a warning indicating that the driver is not Windows certified. Serial Connection The MX900 software is able to connect to the legacy MRX920 through a serial port connection. To set up one of these connections, refer to “Setting Up the Connection,” on page 3-15. MRX920 User’s Manual 3-3 Getting Started The Laptop One of the available options when purchasing the MRX920 is to purchase the receiver by itself. This allows you to utilize an existing laptop hardware that may already be installed in the utility vehicle. This section guides you through setting up the MRX920 with a third-party laptop. The laptop will need a car charger or power inverter in order to be charged in the vehicle while reading. Neptune is not responsible for issues with any laptops not provided by Neptune and does not warranty, support, or repair laptops not provided by Neptune. Host Software Installation To install the MX900 host software, complete the following steps. 1 Close all programs before installing the MX900 host software. 2 Insert the MX900 host software installation CD into the CD-ROM drive of the laptop computer designated for use with the MRX920. The InstallShield Wizard Welcome window appears. Figure 3.2 InstallShield Wizard Welcome Window 3 3-4 Click Next to continue. MRX920 User’s Manual Getting Started If the CD Does Not Start Automatically 1 From the Windows Start menu, select Run. The Run dialog displays. 2 Click Browse and navigate to your CD drive. 3 Select and click Open. The Run dialog displays x:\setup.exe where x is the drive letter of the CD drive. 4 On the Run dialog, click OK. The InstallShield Wizard Welcome window appears. See Figure 3.2 on Page 3-4. 5 Click Next to continue. Accepting the License Agreement The Neptune Software License Agreement appears in the installation dialog. Figure 3.3 Neptune Software License Agreement MRX920 User’s Manual 1 Read the license agreement that appears in the dialog. 2 Click I accept the terms in the license agreement. 3 Click Next to continue. 3-5 Getting Started Selecting the Setup Type The following window appears. Figure 3.4 Setup Type Window 1 2 3-6 Do one of the following: • Select Complete installation to accept the default parameters. • Select Custom if you wish to change the installation directory. Press Next to continue. MRX920 User’s Manual Getting Started Preparing to Install The following window appears. Figure 3.5 Ready to Install Window Click Next to continue. For Windows Vista and Windows 7 Users If you are a Windows Vista or Windows 7 user, a dialog similar to the following may appear. Figure 3.6 User Account Control Dialog Click Yes to continue. MRX920 User’s Manual 3-7 Getting Started Completing the Installation The following window appears. Figure 3.7 InstallShield Wizard Complete Click Finish to close the InstallShield Wizard. For Windows Vista Users Only For Windows Vista only, complete these additional steps. 1 From the Start menu select Computer. 2 Browse the installation directory for the MX900 host software. Usually the installation directory is located in C:\Program Files\Neptune\MX900. 3 Right-click the MX900 application and select Properties. The following dialog appears. 3-8 MRX920 User’s Manual Getting Started Figure 3.8 Windows Vista Compatibility 4 Select the Compatibility tab. 5 Check Run this program as an administrator. 6 Click OK. Installing the USB Driver The following steps are for Windows 7 users only. To install the USB drive, complete the following steps. MRX920 User’s Manual 1 Be sure your MRX920 is powered from your automobile's cigarette lighter plug. 2 Connect the MRX920 to your laptop using a USB cable. 3-9 Getting Started If Windows 7 Does Not Recognize Driver If Windows 7 does not automatically prompt you for the device driver, complete the following steps. 1 Select Start. 2 Select Control Panel. 3 Select View devices and printers. 4 Scroll down to select Neptune MRX920. The following dialog appears. Figure 3.9 Selecting Neptune MRX920 Properties 5 3-10 Right-click and select Properties. MRX920 User’s Manual Getting Started The following dialog appears. Figure 3.10 Neptune MRX920 Properties 6 Select the Hardware tab. The following dialog appears. MRX920 User’s Manual 3-11 Getting Started Figure 3.11 Neptune MRX920 Properties General Tab 7 Click . The following dialog appears. 3-12 MRX920 User’s Manual Getting Started Updating the Driver Complete the following steps. Figure 3.12 Update Driver Dialog 1 Click . The following dialog appears. Figure 3.13 Update Driver Software MRX920 User’s Manual 3-13 Getting Started 2 Select Browse my computer for driver software. Figure 3.14 Browse for Driver 3 Click Browse to locate the mrxusbdriver folder on the installation CD. The following dialog appears. Figure 3.15 Windows Security Dialog 4 3-14 Select Install this driver software anyway. MRX920 User’s Manual Getting Started The following dialog appears. Figure 3.16 Update Driver Software Successful 5 Click Close. 6 Close all dialogs and go back to Devices and Printers. The driver installation is complete. Setting Up the MRX920 To set up the MRX920, please refer to Chapter 3 of this manual for the following instructions. • “Plugging in the Power Cable,” on page 3-22. • “Installing the Antenna,” on page 3-23 • “Inserting the USB Flash Drive,” on page 3-25 • “Starting the Software,” on page 3-26 (Software must first be installed.) Setting Up the Connection To establish a connection between the laptop and the MRX920 receiver, complete the following steps. 1 MRX920 User’s Manual Access the Route Selection window. 3-15 Getting Started 2 Click . The Connection Settings Dialog appears as illustrated in Figure 3.17. Figure 3.17 Connection Settings Dialog 3 3-16 Select one of the following three methods of connection between your laptop and the MRX920. Once you choose the initial connection, the connection options that are not compatible with your unit appear gray. • Serial Connection (for use with the legacy MRX920) • USB Connection • WiFi Connection MRX920 User’s Manual Getting Started Initial WiFi Connection In order to connect your MRX920 wirelessly to your PC, you must use the Windows Wireless Connection Manager. This section will look differently depending on the Operating System that is managing the network connection. To establish a WiFi connection to your MRX920 for the first time, complete the following steps. 1 Make sure you have an existing WiFi adapter. 2 Make sure the MX900 host software is installed on the laptop. 3 Turn on the MRX920. When you turn on MRX920, be sure that it is within 10 to15 feet of the laptop. 4 Select the Route Selection tab. 5 Click 6 Select WiFi Connection. 7 Select Switch Receivers. 8 Manually enter the MAC Address from the label on the MRX920 or click Scan to scan for the MAC address. . If you click Scan, the WiFi adapter connects to the MRX920 wirelessly. Wait approximately 90 seconds until WiFi connection is established. Then, click Scan again. See Figure 3.18 on Page 3-18. MRX920 User’s Manual 3-17 Getting Started Figure 3.18 MAC Address If you use Scan to select the correct MAC address from the dropdown selection list, click Select. 9 Click Save. 10 Click connection. 3-18 to begin reading the route using the WiFi MRX920 User’s Manual Getting Started Initial USB Connection To establish a USB connection for the first time, complete the following steps. 1 Turn on the MRX920. 2 Using a USB cable, attach the MRX920 to the laptop that is running the MX900 host software. 3 If a USB driver has not yet been installed, install the USB driver supplied on the installation CD. See “Installing the USB Driver,” on page 3-9. 4 Start the MX900 host software. 5 Select the Route Selection tab. 6 Click 7 Select USB Connection. 8 Click Save. 9 Click connection. . to begin reading the route using the USB For both WiFi and USB connections, the connection to the MRX920 is complete when you click Read Route — not when the MX900 host software first starts. Verify Connection Setting To verify the connection method, click the System Check tab. The connection shows as one of the following: MRX920 User’s Manual • Serial Connection • USB • WiFi 3-19 Getting Started Installing the MRX920 in the Vehicle With the MRX920, you have flexibility as to where to place the unit, for example, under the seat, in the back seat, and so forth. The most optimum way of using the unit is to place the unit in the passenger seat and fasten the seat belt through the straps on the carrying case, Part No. 13125-001. See Figure 3.19. Figure 3.19 MRX920 Placed in Vehicle Neptune offers an optional mobile office unit, Part No. 1310A-001, that can help you organize your equipment with a compartment for the MRX920 and a way to secure your laptop. See Figure 3.20 and Figure 3.21 on Page 3-21 for how you can use this unit. 3-20 MRX920 User’s Manual Getting Started The laptop must be installed securely in a vehicle mount. This protects the driver and equipment should the vehicle be required to come to an immediate stop. Figure 3.20 Optional Mobile Office The mobile office unit can keep your laptop and MRX920 secure while driving. Figure 3.21 Mobile Office in Use MRX920 User’s Manual 3-21 Getting Started Plugging in the Power Cable Complete the following steps to connect the vehicle power supply power cable to the MRX920, and plug it into the vehicle power supply receptacle. 1 Start the vehicle. It is very important to first start the vehicle before connecting the cable. 2 Grip the vehicle power supply cable by the black sleeve, not the metal casing. 3 Line up the red arrows and insert the power connector until the metal locking mechanism twists and locks into place. You might need to wiggle the power supply cable a little to get the connector to click. 4 3-22 After the power supply cable is connected, the red dot and red arrow should align, ensuring you that the cable is connected. MRX920 User’s Manual Getting Started 5 Insert the appropriate end of the vehicle power supply power cable into the connector on the MRX920, as illustrated in Figure 3.22. Vehicle power supply cable Figure 3.22 Vehicle Power Supply Power Cable 6 Plug the other end of the power cable into the vehicle power supply receptacle as illustrated in Figure 3.23. Vehicle power supply Figure 3.23 Vehicle Power Supply Cable Inserted In Car Installing the Antenna The proper installation of the antenna cable is critical for the optimal performance of the MRX920. If the cable is crimped, the performance of the unit will degrade significantly. There are several options for running the cable. Whichever method works best for you depends on the type of vehicle being used. The most important consideration when installing the antenna is for the cable to remain undamaged. MRX920 User’s Manual 3-23 Getting Started To ensure proper installation of the antenna, complete the following steps. 1 Referring to Figure 3.1 on Page 3-2, connect the RF antenna to the MRX920 and hand-tighten the connector by turning it clockwise until it is secured. 2 Place the magnetic base of the antenna in the center of the roof approximately one foot (30 cm) behind the leading edge of the roof. Antenna base Figure 3.24 Antenna Installation 3 Route the antenna wire through the passenger window or through the door. See Figure 3.25. To prevent the cable from crimping, use the cable protector as illustrated in the following figure. The cable runs through the window, which is the preferred method. Figure 3.25 Antenna Cable Through Window 3-24 MRX920 User’s Manual Getting Started 4 Use one of the cable protectors (Part No. 12729-001) that are included with the MRX920. Caution is necessary to ensure there is sufficient room for the cable and that it does not get crimped. In some vehicles, there is enough room to run the cable through the doorframe of the vehicle without crimping the cable. Other vehicles do not always have enough clearance (especially vehicles with rain gutters). Running the cable through a rear door can be an option. You can also run the cable through a window. 5 Gently close the window, positioning the antenna cable so there is no pressure on it. Pressure on the antenna cable can cause damage. Inserting the USB Flash Drive Neptune recommends that you insert the USB flash drive into the laptop after you place the laptop in the vehicle. Complete the following steps to insert the USB flash drive containing the routes you plan to read. MRX920 User’s Manual 1 If there is a cover over the USB flash drive, remove the cover. 2 Remove the dust cover from the USB port. 3-25 Getting Started USB port USB flash drive Figure 3.26 USB Port and Drive 3 Insert the USB flash drive into the port on the laptop. Be careful not to force the USB flash drive into the slot. Forcing can cause damage to the drive or to the data contained on the drive. If the drive does not insert easily, rotate it 180o, and try to insert it again. Starting the Software Complete the following steps to start the software on your laptop. 1 Double-click on the icon on your Windows desktop. The software automatically attempts to import a route file. When the import process is complete, the Route Selection window appears. If the route data file is not found, a message displays. See “If Route Data File is Not Found” on page A-25, for instructions. 2 3-26 Continue to “Using the MRX920” on page 4-1 to begin using your MRX920. MRX920 User’s Manual Getting Started Installing the Maps Component If you have purchased the additional Maps component, follow this procedure to install the Maps component. 1 Use Add/Remove in the Windows Control Panel to remove any old version of maps. 2 Place the USB drive into a USB port on the laptop. If Install Wizard does not start automatically, go to the directory where the USB drive is located. Double click Setup.exe. 3 Complete the Install Wizard with the following default values: • Install for anyone • Complete installation The maps are highly compressed and take several minutes to install. 4 Installation is complete when the InstallShield Wizard has finished all the necessary steps. Becoming Familiar with the MRX920 When the installation is complete, you are ready to begin using the MRX920 for meter reading. Please refer to Chapter 4 for instructions on operating the MRX920. When turned on, the unit only beeps when receiving an MIU signal in the selected route. Other readings are silently inserted into other routes. To protect the driver’s safety, use the beeper function on the MRX920 to monitor meter reading. MRX920 User’s Manual 3-27 Getting Started The laptop computer retrieves meter readings from the receiver in realtime and stores them in nonvolatile memory. It checks meter reading completeness against route files that are downloaded from the MX900 host software. About one second after a reading is received, the message area and progress bar update the reading status of the route. Navigation All MX900 functions are performed by using the cursor or using the tab key or the arrow to the appropriate section. keys to move the focus Figure 3.27 Navigating Within the Software For example, Figure 3.27 shows the Route Import window with a route highlighted. 3-28 MRX920 User’s Manual Getting Started Host Software The MX900 host software application runs on the laptop computer that works in conjunction with the MRX920. The purpose of the software is to log meter readings from routes where R900s are installed. Messages from MIUs outside of the route are identified as such and are discarded. The MX900 host software also provides a visual interface for the operator to monitor route progress. Although the MX900 host software can start and stop the reading of message data, it does not control the receive frequency or the decoding of message data. Instead, the MRX920 contains a receiving and processing unit that collects data only from R900s. The file transfer between the host software and the utility company billing system is in a file format specific to Neptune’s software application. MX900 Function Buttons Each MX900 host software window contains different function buttons pertaining to the specific information on that window. Use the following list to identify the different buttons and their specific functions. automatically launches the route import process closes the software program Route Import Window manually launches the import routes process stops the import routes process opens a dialog that allows the user to open a specific database closes the Route Import window MRX920 User’s Manual 3-29 Getting Started Route Selection Window initiates the route reading process changes the settings for the connection between the receiver and the laptop closes the Route Selection window and moves the user to the Route Export window Missed Reads Window opens a dialog that provides the user with various details for the missed read, including the selected account, the meter number, MIU, the collection method, the account name, coded notes, or skip codes returns you to the first account in the selected route Captured Reads Window opens a dialog that provides the user with various details for the captured read, including the selected account, the meter number, the type of MIU, the collection method, the account name, coded notes, or skip codes returns you to the first account in the selected route allows you to enter a value in Filter Text to narrow the selection of what displays on the this screen Data Logger Window allows you to connect to the E-Coder®)R900i™ data logger register to extract up to 96 days of hourly consumption data allows you to select options available while using this screen 3-30 MRX920 User’s Manual Getting Started Export Window launches the export of the loaded routes closes the Route Selection window Reading Indicator The Reading Indicator, located on the title bar of the software, shows the activity status of the MRX920. When the Route Selection window is first accessed, the Reading Indicator resembles the icon at the left with a red arrow, indicating that there is currently no reading activity. When the Reading Indicator displays a pulsing green arrow, it indicates that the MRX920 is reading and storing meter reading data. Select the button to initiate route readings. If for any reason the MRX920 is not receiving new data for a period longer than five seconds, the Reading arrow stops pulsing. The Read Route button changes to the button once you begin reading meters. Selecting this button temporarily stops the reading process, and the Reading Indicator no longer displays the pulsing arrow. When pressed again, the MRX920 resumes reading. MRX920 User’s Manual 3-31 Getting Started Message Area and Progress Bar The message area on the software window indicates the number and percentage of meters on the route that were read successfully. A progress bar also shows the percentage of the route that is complete. Before meter reading begins, no accounts are reported as read, and the progress bar is blank. While readings are captured, the Route Total progress bar shows the percentage complete of the route selected on the Route Selection window. The Route Selection window shows both the selected Route Total as well as the readings’ Grand Total. Information Area The information area of an MX900 window displays the route or addresses to be read. These following views are available: 3-32 • The route view includes the route number, number of MIUs to be read, first address on the route, and percentage of the route that was read. • The account view provides a listing of the addresses and MIU IDs to be read for a specific route. If you select account detail, the information area displays details for the selected account. • A meter reading and loading indicator area with a graphic progress bar and pulsing Reading Indicator. • A message and information display area. • An active function icon or Reading Indicator. MRX920 User’s Manual Getting Started Route Selection Window The Route Selection display window illustrated in Figure 3.28 shows loaded routes and the percentage of each route that has been read. The window includes the Reading Indicator, an information area with a list of routes, and a selection box that allows you to enable the audible tone. Reading indicator Enable tone Progress bars Message area Column headings Information area Figure 3.28 Route Selection Window You can sort your information by clicking one of the column headings. All the information then displays in the order of the selected column. MRX920 User’s Manual 3-33 Getting Started Route Display Windows There are two windows, the Missed Reads window and the Captured Reads window (Figure 3.29), that provide information for a selected route. Both of these windows have a message area for the selected route with the total number of meters on the route, the number that was read successfully, and the number that was missed. The Missed Reads window also has a progress bar that shows the percentage of the route that has been successfully read. Message areas Graphic progress bar Figure 3.29 Missed Reads and Captured Reads Windows 3-34 MRX920 User’s Manual Getting Started Viewing MIU Details It is possible to view the details of a specific MIU from either the Missed Reads or Captured Reads window. The software allows you to immediately identify the type of MIU by looking at the icons to the left of each MIU in the information field. — The blue MIU icon represents an R900 RF transmitter. If Hide inactive meters is selected on the host software, inactive meters are listed as unread meters on the Missed Reads window, represented by this icon. Once the inactive meters are read, they move to the Captured Reads window. Use the following procedure to access more detailed information on a specific MIU. 1 Select the specific MIU by touching the window with the stylus or by using the 2 MRX920 User’s Manual or the Press the MIU Details keys. button. 3-35 Getting Started The MIU Details dialog (Figure 3.30) appears. Figure 3.30 MIU Details Dialog Upgrading MX900 Complete the following steps to upgrade the MX900 host software: 1 Verify that all route processing has been completed and that data has been exported to the host system. 2 Verify that all data has been accepted by the host system and can be processed by your billing system. 3 Using the Windows Add/Remove Programs in Control Panel, remove the existing application software. Depending on the model, the application program may be either EZDrivePLUS or MX900. 3-36 MRX920 User’s Manual Getting Started 4 Using Windows Explorer, remove the following folder: • C:\Program Files\Neptune\EZDrivePLUS or • 5 C:Program Files\Neptune\MX900 Insert the upgrade CD. The Install Wizard starts automatically. If the Install Wizard does not start automatically, use Windows Explorer to select and double click Setup.exe on the CD. 6 MRX920 User’s Manual Follow the Install Wizard instructions to complete the setup. 3-37 Getting Started Notes: 3-38 MRX920 User’s Manual Chapter 4 Using the MRX920 Using the MRX920 to collect readings begins with the host software building a route file that is transferred to the MRX920. There are a number of defined ways to load an import file. You can use a wired network, WiFi network, local file system, storage device (SD) card, USB flash drive, and the like. Removable Storage This section discusses the use of a removable storage for the MRX920, which can be a thumb drive, compact flash (CF) card, SD card, or similar storage. If you use a removable source, the storage should be left in the PC until the route is exported, because the export information goes back onto the card from which the import file came. USB Flash Drive If you are using USB flash drive for removable storage, you must export the route after collecting the readings and before removing the USB drive. When using a USB flash drive, the meter reader inserts the USB flash drive into the laptop and begins automatic meter reading by driving the vehicle through the route and collecting readings. After the readings are complete, the meter reader exports the route. He then returns to the utility, shuts down the MRX920, and removes the USB flash drive to give to the host computer operator. The host computer operator transfers the data from the USB flash drive to the host computer software and transfers the data to the utility billing system computer. MRX920 User’s Manual 4-1 Using the MRX920 Import File If the import file is located on a network source and you do not plan to copy the import file locally, then you must import it while still connected to the network. Once you finish collecting reads you will need to reconnect to the network source before you export the readings. The source location of the import file must exist on the PC before you attempt to export the route. Using Wireless Communications Using a wireless connection, the meter reader downloads the route information onto the laptop and begins automatic meter reading by driving the vehicle through the route and collecting readings. After the readings are complete, the meter reader then transfers the data to the host computer using the wireless connection. Audible Tone Settings An audible tone or beeper is available in the MRX920 to emit a beep tone for every account that is read and stored in the MX900 host software. This allows the driver to safely monitor the reading progress without having to look at the laptop screen. The audible tone only sounds while the MRX920 is performing readings and stops when all readings are complete. You can turn the tone function on or off while the unit is performing readings. The default setting in the MRX920 is for the beep tone to be off. Enabling the Audible Tone Complete the following steps to enable the audible tone or beeper on the MRX920. 1 Access the Route Selection window. At the top of the window, there is a check box for Enable Tone, as shown in Figure 4.1 on page 4-3. Tones are only heard when readings are posted for MIUs in the selected route. Meters in other routes can be read without sounding a beep. 4-2 MRX920 User’s Manual Using the MRX920 Enable tone check box Figure 4.1 Enable Tone Check Box Field 2 Click the Enable Tone check box to select it. A check in the box indicates the audio tone is enabled and on. An empty box indicates the audio tone is off. Setting Up the Connection To set up the type of connection you will use, complete the following steps. MRX920 User’s Manual 1 Access the Route Selection window. 2 Click . 4-3 Using the MRX920 The Connection Settings Dialog appears as illustrated in Figure 4.2. Figure 4.2 Connection Settings Dialog 3 Select one of the three following methods to import and export routes, and complete the applicable information. • Serial Connection, see “Setting Up the Connection” on page 3-15. • USB, see “Initial USB Connection” on page 3-19. • WiFi, see “Initial WiFi Connection” on page 3-17. Selecting Routes This is an optional step if you want to review selected routes to determine a good starting point for reading. 1 4-4 Access the Route Selection window, shown in Figure 4.3 on page 4-5, by clicking the Route Selection tab. MRX920 User’s Manual Using the MRX920 Figure 4.3 Route Selection Window MRX920 User’s Manual 2 Highlight the route to be viewed. 3 Select the Missed Reads tab to display the Missed Reads window. 4-5 Using the MRX920 Only accounts in the selected route that are unread or missed during the reading process are displayed on the Missed Reads window as shown in Figure 4.4. Filter function Figure 4.4 Missed Reads Window The Missed Reads window appears showing the accounts in the route, with the first address in the route on the first line. You can narrow the list of missed reads or captured reads by using a filter which is applied as a substring on all fields on the MIU Details screen. Any substring match on any field results in the MIU being counted as part of the filter.To use a filter: 4 4-6 • On either the Missed Reads or Captured Reads window, type the text to use to filter your search in the Filter Text field. • Click . The list of missed reads or captured reads appears narrowed down to reflect your filter test. If necessary, select another address for your starting point. MRX920 User’s Manual Using the MRX920 5 To get detailed information on an account, select that account and click . The MIU Details window, shown in Figure 4.5, appears. Figure 4.5 MIU Details Window 6 MRX920 User’s Manual Go to the procedure “Starting the Meter Reading Process” on page 4-12 to begin reading the route. 4-7 Using the MRX920 Detail Settings When viewing route information in the software, you can view the details of a specific account. Account details consist of the following: • Parent Route • Account Number • Meter Number • Account Address • Account Name • Collection Method • MIU-ID • MIU Type • Channel • Wakeup Tone • Account Status • Tamper Code • Old_Tamper • Device Type Viewing Account Detail Complete the following steps to view account details for selected accounts. 1 4-8 From the Route Selection window, highlight the route containing the account you want to view, as shown in Figure 4.6 on page 4-9. MRX920 User’s Manual Using the MRX920 Highlighted route Figure 4.6 Route Selection Window with Route Highlighted MRX920 User’s Manual 4-9 Using the MRX920 2 Go to either the Missed Reads or Captured Reads window, depending on whether or not the account has already been read. See Figure 4.7. Figure 4.7 Captured Read Window with Account Highlighted 3 Highlight the specific account as illustrated in Figure 4.6 on page 4-9. 4 Press the MIU Details button. The MIU Details dialog appears with the details of the selected account. See Figure 4.5 on page 4-7. 5 4-10 To close the MIU Details dialog, select OK. MRX920 User’s Manual Using the MRX920 Reading Meters Because the MRX920 automatically reads meters, efficient use of the system depends on two factors: • Distance of the MRX920 from the MIU being read. • Vehicle’s driving speed. In a typical meter reading scenario, you drive your vehicle through the routes listed on the Route Selection window in any order. You can position your vehicle at any route or starting address as required by driving conditions and route distribution for the most efficient data collection. The MRX920 reads and stores readings regardless of the order of the routes displayed. Figure 4.8 Route Selection Window MRX920 User’s Manual 4-11 Using the MRX920 When the MRX920 starts collecting data, the Reading Indicator changes to display a pulsing green arrow. This icon continues to pulse as long as read data is received within a period of five seconds. In normal use, you focus on driving and listening for beeps on the selected route. You DO NOT need to look at the screen on the laptop while you are driving. The MRX920 automatically receives and stores any readings within range for any MIU IDs that are loaded on the laptop. Collecting Readings For the meter reader’s safety, the MRX920 is designed so that there is no requirement to use the laptop display and keyboard while driving. To verify that the unit is reading properly, use the beeper option to monitor readings. On occasion, it could be necessary for the driver to stop and view routes and display account detail. A meter reader can easily suspend meter reading and restart it before continuing on a route. See “Pausing and Restarting Meter Reading” on page 4-22. Starting the Meter Reading Process Complete the following steps to begin collecting meter readings after you have positioned your vehicle at the starting address and started up the MRX920 and laptop computer. To read meters, the plug-in power cord on the MRX920 must be connected to the vehicle power supply receptacle. Make sure the red LED is lit on the power cable. 4-12 1 From the welcome window, press the Start button, and the routes on the USB flash drive automatically load into the software. 2 Highlight the route where you begin reading. MRX920 User’s Manual Using the MRX920 The Route Selection window automatically appears. 3 Click the route you want to see on the Missed Reads and Captured Reads windows. 4 Press the Read Route button. Missed reads window Figure 4.9 Reading a Route The Reading Indicator turns on and pulses to indicate that reading is in progress. Addresses and routes that are successfully read are listed on the Captured Reads window; any remaining unread or missed routes are listed on the Missed Reads window. The Reading icon continues to pulse as long as read data is received within a period of five seconds. The icon represents inactive meters that are listed as unread meters on the Missed Read window, if Hide inactive meters is selected on the host software. Once the inactive meters are read, they move to the Captured Reads window. Refer to “Viewing MIU Details” on page 3-35. MRX920 User’s Manual 4-13 Using the MRX920 5 Start driving your vehicle by each address along the route at the posted speed limits. While the antenna is designed to stay in place at speeds of up to 70 mph, Neptune recommends operating the MRX920 at speeds not to exceed the legal limits. For optimal performance, the MRX920 should not be operated at speeds greater than 30 mph. Use the Audible Tone function on the MRX920 to monitor meter reading while driving. Use of the laptop display or keyboard can compromise driver safety. See “Enabling the Audible Tone” on page 4-2. 6 If the message area at the top of the Captured Reads window indicates that all accounts on the route have been read (as shown in Figure 4.10), select the next route to be read. Total read Figure 4.10 Route With All Reads Completed 4-14 MRX920 User’s Manual Using the MRX920 The Reading Indicator on the software window pulses as you continue driving each route until all of the routes have been read. When reading is completed, check the Missed Reads window to see if there are any missed accounts. 7 Choose from the following: • To pause the meter reading before all routes have been read, see “Pausing and Restarting Meter Reading” on page 4-22. • To reread missed meters, see “Using Coded Notes or Skip Codes” on page 4-18. • To end meter reading and upload the read data to the host software, see “Exiting the Software” on page 4-43. Navigation on the Route Display Window Before you complete readings with the MRX920, you can move between routes displayed on the window to select the information you want to view. This also gives you access to route details and individual account information. You can move between the routes whether or not the MRX920 is actively reading meters. 1 Select the desired route. 2 Press to move backward through the route or forward through the route. to move Viewing Routes Complete the following steps to select routes to display route reading progress and route detail. You can perform this procedure whether or not routes are actively being read. 1 MRX920 User’s Manual Press the Route Selection tab to access the Route Selection window, shown in Figure 4.11 on page 4-16. 4-15 Using the MRX920 Figure 4.11 Route Selection Window 2 Highlight the specific route you want to view. The top graphical progress bar displays the percentage of the route that is complete. 3 Select the Missed Reads or Captured Reads window. See Figure 4.12 on page 4-17. Both windows display the individual accounts within the selected route. The message area at the top of the window displays the route number, total MIUs, total MIUs read, and total MIUs missed. 4-16 MRX920 User’s Manual Using the MRX920 Message area Figure 4.12 Captured Reads Window Message Area You can narrow the list of missed reads or captured reads by using a filter. • On either the Missed Reads or Captured Reads window, type the text to use to filter your search in the Filter Text field. • MRX920 User’s Manual Click . The list of missed reads or captured reads appears narrowed down to reflect your filter test. 4-17 Using the MRX920 Identifying Missed Accounts Occasionally, because of driving speed, RF interference, or problems with the MIUs, it is possible to miss a meter reading. Usually, you can tell if meters are missed because the route does not progress to a read status of 100%. To view the missed accounts: 1 From the Route Selection window, highlight the route containing the missed reads. 2 Press the Missed Reads tab to display the Missed Reads window. All missed accounts are listed in the information area on the window. Refer to the following section, “Viewing Account Details” on page 4-18 for specific details of a missed account. Viewing Account Details Before reading begins, the Route Selection window displays zeros for all routes in the # of read MIUs field. Once reading is initiated, the captured reads for each route are recorded in this field. After meter reading is complete, only the missed or unread accounts remain on the Missed Reads window. The meter reader then knows which addresses to reread. If for any reason the MRX920 is not able to read missed MIUs on the second attempt, the meter reader can select specific accounts by using the MIU Details dialog to display more information for the account. Using Coded Notes or Skip Codes You can use the MIU Details window to record trouble that you are having with the reading. Or if you choose to skip the reading, you can record the reason. However, you cannot have an automatic reading with a skip code. The skip codes mean that you are skipping the reading. 4-18 MRX920 User’s Manual Using the MRX920 . When viewing details for an account, only two of the three notes fields can display. There is always the reading code and either a trouble code or a skip code. Entering a Trouble Code To enter a trouble code, complete the following steps. 1 On the MIU Details window, tab to the Coded Notes field. 2 Choose one of the following options: 3 • If you already know the trouble code, type it in the Coded Notes field. • If you do not know the code, tab to the TroubleCode Description field and select the reason code from the drop-down selection list. Press Save to record the reason for the trouble. Entering a Skip Code To enter a code for why you skipped a reading, complete the following steps. EZRouteMAPS customers should NOT use skip codes. 1 On the MIU Details window, tab to the SkipNotes field. 2 Choose one of the following options: 3 MRX920 User’s Manual • If you already know the skip code, type it in the SkipNotes field. • If you do not know the skip code, tab to the SkipCode Description field and select the reason code from the dropdown selection list. Press Save to record the reason for skipping the reading. 4-19 Using the MRX920 Moving From One Account to the Next Before completing readings for the addresses in a route, you can move between accounts to select the account to display. 1 Select the desired account. 2 Press to move backward through the route or forward through the route. to move Displaying Account Detail Complete the following steps to view route detail for selected routes. 4-20 1 From the Route Selection window, highlight the appropriate account. 2 Select either the Missed Reads window or the Captured Reads window depending on whether or not the account has been read. 3 Highlight a specific account. 4 Press the MIU Details button. MRX920 User’s Manual Using the MRX920 The MIU Details dialog (Figure 4.13) appears. Figure 4.13 MIU Details Window The collection method on the Account Detail window is unlicensed radio frequency (R900 MIUs). Usually route numbers are derived from the route numbers assigned at the time of previous meter reading routes, such as handheld meter reader routes. In addition, the fields for Coded Notes or Skip Codes allow you to record information about this account. See “Using Coded Notes or Skip Codes” on page 4-18. MRX920 User’s Manual 4-21 Using the MRX920 Reading Missed Accounts The procedure for reading missed accounts is similar to the procedure used on the initial reading. To assist in reading missed accounts, you need to view route and account details to locate the exact starting point for reading. It is also helpful to drive slower and get as close as possible to the missed meters to improve chances of receiving read data. To identify a missed meter, select a route from the Route Selection window that shows a read status of less than 100% in the progress bar at the top of the window. Once selected, missed accounts from that route are shown on the Missed Reads window. If necessary, use the MIU Detail button for the missed account and determine if there are any problems with the account that prevent a successful reading. Note the address of any accounts for subsequent reading and reporting. To read a missed meter, drive to the first unread account address on the route. Read the remaining accounts on the route. If you do not succeed in reading an account after a second attempt, the account remains with a status of “unread.” The utility can initiate follow-up action to investigate the source of the reading problem. Pausing and Restarting Meter Reading Complete the following steps to stop and then restart data collection using the MRX920. This is useful if you want to review the route reading status of a route or individual account or if you need to look up the starting address for a route to be read. 1 While the Reading Indicator is pulsing, press the Pause Route button. The Reading Indicator stops displaying the pulsing green arrow. When you press the Pause Route button, the red arrow displays. 2 4-22 To review account information before restarting, select either the Missed Reads or Captured Reads window depending on whether or not the account has already been read. MRX920 User’s Manual Using the MRX920 3 Select an account and press the MIU Details 4 To resume automatic reading, press the Read Route button. button. Reading continues and the Reading Indicator switches back to a status of “Reading”. Using the Data Logger The Data Logger feature provides the ability to extract up to 96 days of hourly consumption data within the R900® System environment. The data logging enhancements makes configuring, generating, and analyzing consumption information easier and more intuitive. Hourly and daily graphs can be generated to show leak and reverse flow events. The ultimate goal is to provide solutions that meet your needs and make the day-to-day tasks a little easier. Please contact your Neptune sales representative to confirm that your endpoint is compatible with data logging functionality. The data logger graph and report display the information captured from an E-Coder)R900i data logger register. The data logger is a feature that is configured and installed at the factory. You do not need to do anything to configure or begin logging data. Once the data is captured by the MRX920, it is then unloaded into the MX900 host software so graphs and reports can be run to analyze the data. The data logger graph is a visual representation of water usage over a defined period of time. Data logger information is useful for indicating leaks, reverse flow, and usage that have occurred over the past few months. The data logger report displays captured information in an alternative view, displaying actual interval captured readings and consumption values over a defined period of time. The data logger report also indicates any leaks and reverse flow that have taken place during the time frame. MRX920 User’s Manual 4-23 Using the MRX920 Special Considerations for the Data Logger Please consider the following when using the data logger. • Data logging is only available with MRX920 firmware version 7.04 or later. You can contact Customer Support to obtain an RMA to send your unit to be upgraded to this firmware version. See “Contacting Customer Support,” on page 1-5. • Data logger information is only exported if a version 5.0 route import file is received from the host or if no route import file is used. • Data log sessions are only kept in the MX900 host software for 30 days regardless of whether or not they are exported. • Data log sessions are only exported one time even if they still appear on the data log tab. Using the Data Logger To use the Data Logger, complete the following steps. 1 Click the Data Logger tab. Data Logger tab Figure 4.14 Data Logger Tab The following message appears if the you have not previously connected to the receiver for route reading or data logging. If you haven’t used the receiver prior to this time, click 4-24 . 2 Click . 3 Using the light sensor, activate LCD on the data logging device. See “Activating the Data Logger,” on page 4-25. MRX920 User’s Manual Using the MRX920 Activating the Data Logger The light sensor is recessed under the small round hole near the center of the dial face on the data logging device. The hole is marked with a flashlight graphic. See Figure 4.15. Light sensor Figure 4.15 Light Sensor for Data Logging Device The light sensor activates the LCD display for several minutes when the unit is exposed to a light source. For example, a unit mounted in an inside location would turn on the LCD for several minutes after the room light is turned on. A unit mounted in an outside pit would turn on the LCD for several minutes after the pit lid is opened exposing the unit to daylight. If the LCD is currently off, the LCD may be reactivated by covering the dial plate with your hand for about two seconds. In bright sunlight, it may be necessary to close the cover or the pit lid momentarily. If the LCD does not reactivate as expected, try shining a flashlight on the light sensor. Figure 4.16 Activating with a Flashlight MRX920 User’s Manual 4-25 Using the MRX920 A message appears at the bottom of the Data Logger screen informing you of the progress of the data logging. Figure 4.17 Data Logger Progress Bar If the data logging fails, the following message appears. Figure 4.18 MIU Header Not Heard Message When the data logging is complete, the Data Logger screen displays the number of packets received. While activating the data logging device, the route reading is suspended. Once the data logger has completed, the route reading is resumed. If you cancel the data logging, no data is saved, and the route reading is resumed. 4-26 MRX920 User’s Manual Using the MRX920 Selecting Meter Combinations During the data logging process, you are asked to select a meter combination. See Figure 4.19. Figure 4.19 Select Meter Combinations Dialog 1 On this screen, do one of the following: • From the drop-down selection list, click the meter combination you want. • Press Ctrl + M to display the Meter Combinations, as illustrated in Figure 4.20. Figure 4.20 Meter Combination Defaults MRX920 User’s Manual 4-27 Using the MRX920 Viewing the Data Logger Information The Data Logger Graph and Report display the information captured from an E-Coder)R900i data logger register. Once the data is captured by the data logging device, it is then unloaded into the MX900 host software so graphs and reports can be run to analyze the data. Data Logger Graph The Data Logger Graph is a visual representation of water usage over a defined period of time. Data logger information is useful for indicating leaks, reverse flow, and usage that have occurred over the past few months. You can generate hourly and daily graphs to show leak and reverse flow events. The ultimate goal is to provide solutions that meet your needs and make the day-to-day tasks a little easier. The following graphs are available for data logging. Bar graph Displays the bars in different colors to represent the following: Blue No flags, actual consumption. Yellow No flags, incomplete daily consumption calculation. Only the first or last bar can be yellow. Red Leak Gray Reverse flow These colors are in priority from lowest to highest. The bar is colored with the highest priority. Example: If a bar has a leak and a reverse flow, then the bar is painted gray. Line graph 4-28 Displays in blue only; it is drawn as a line from point to point instead of single bars for each point. MRX920 User’s Manual Using the MRX920 Daily Graphs The following is a sample of the daily data logger information in graph format. Figure 4.21 Sample Daily Data Logger Graph Displaying Different Graph Information Complete the following steps to show different graph information. 1 Do one of the following: • Right-click on the graph to display the menu of available options. • Select to display the menu of available options. See Figure 4.22 on page 4-30. MRX920 User’s Manual 4-29 Using the MRX920 Figure 4.22 Show Menu Graph Options 2 Select whatever available options you want to use. Table 4.1 Data Logging Menu Options Option Description Reset Refreshes the screen with the original data logging values Show report/graph Displays the data logging information in report or graph format, as applicable Hide reverse flow Hides the data logging reverse flow icons Print Sends the data logging information that appears to a printer Save as PDF Saves the information that appears in a PDF file Bar Displays the data logging information in a bar graph format • • 4-30 Selecting Hourly plus Bar can only display three days of data Selecting Back, which appears if your double-click a daily value, shows hourly data for the day. The Back button returns you from the hourly view to the daily view MRX920 User’s Manual Using the MRX920 Table 4.1 Data Logging Menu Options Option Description Line Displays the data logging information in a line graph format Daily Displays only daily data logging information in the graph or report format you select Hourly Displays only hourly data logging information in the graph or report format you select Selecting Hourly plus Bar can only display three days of data 3 Show all labels Displays all the data logging labels for the graph you select Remove all labels Hides all the data logging labels for the graph you select Use the available buttons at the bottom of the screen. See Figure 4.23. Figure 4.23 Graph Buttons 4 MRX920 User’s Manual In Start Date, select the starting date for the information you want to view by using the following: • Click the down arrow in • Use any of the arrow keys want. to select the date. to navigate to the date you 4-31 Using the MRX920 Theses arrows can help you navigate through the graph. – moves to first day – moves back seven days – moves back one day – moves forward one day – moves forward seven days – moves to last day 5 In End Date, select the ending date for the information you want to view by using the following: • Click the down arrow in • Use any of the arrow keys want. to select the date. to navigate to the date you The graph automatically updates anytime you change the date fields. 6 4-32 Do any of the following, if applicable. • Click a warning point on the graph to show or hide the label for the point. • Double-click a bar graph when in daily mode to display the hourly bar graph for the selected day. • Select Back, which appears if you double-click a daily value, to show hourly data for the day. The Back button returns you from the hourly view to the daily view. MRX920 User’s Manual Using the MRX920 Hourly Graphs The following is a sample of the hourly data logger information in graph format. Figure 4.24 Sample Hourly Data Logger Graph Data Logger Report The Data Logger Report displays captured information in an alternative view, displaying actual interval captured readings and consumption values over a defined period of time. The data logger report also indicates any leaks and reverse flow that have taken place during the time frame. There are two types of data logger reports: MRX920 User’s Manual • Daily consumption • Hourly consumption 4-33 Using the MRX920 Daily Report The following is a sample daily report for data logging information. Figure 4.25 Sample Data Logger Report Producing Different Report Information Complete the following steps to produce different report information. 1 4-34 Select to display a list of available options. See Figure 4.26 on page 4-35. MRX920 User’s Manual Using the MRX920 Figure 4.26 Show Menu Report Options 2 Select whatever available options you want to use. See Table 4.1 on Page 4-30 for a descriptions of these options. 3 Use the available buttons at the bottom of the screen. See Figure 4.27. Figure 4.27 Report Buttons 4 5 6 MRX920 User’s Manual In Start Date, select the starting date for the report information you want to view by using the following: • Click the down arrow in • Use any of the arrow keys want. to select the date. to navigate to the date you In End Date, select the ending date for the information you want to view by using the following: • Click the down arrow in • Use any of the arrow keys want. to select the date. to navigate to the date you Click Start to show the new information. 4-35 Using the MRX920 Hourly Report The following is a sample hourly report for data logging information. As with the daily reports, you can use the buttons at the bottom of the screen to view information for different dates. See “Producing Different Report Information” on page 4-34. Using Map View (Optional Feature) The Map View feature is an optional add-on feature that allows you to visually see the location of the meters on the route or routes you are reading. This is useful if you want to review the reading status of a route at a glance or just the read meters (green dots) and unread meters (red dots). Map View can also help you identify reads where problems have been indicated (yellow dots), such as, Hi/Low failures and E-CoderPLUS features. 4-36 MRX920 User’s Manual Using the MRX920 In addition to these features, the Map View option offers Global Positioning System (GPS) should you have a compatible GPS receiver. All these features are only valid with the N_SIGHT R900 host software and if you are using the N_SIGHT R900 file format. You must also have geocode information for all of the meters in order to use this feature. When you have the Map View add-on feature installed, the Map View tab appears in the tab bar as illustrated in Figure 4.28 on page 4-37. Complete the following steps to use this feature. 1 From the Route Selection window, highlight the appropriate route. 2 Click the Map View tab. The Map View window appears showing all the meters on your specific routes. Map View tab Settings Red indicating unread meters Green indicating read meters Yellow indicating problems with reads Figure 4.28 Map View Window MRX920 User’s Manual 4-37 Using the MRX920 If the GPS coordinates are not correct, the following message appears. Figure 4.29 Invalid GPS Coordinates A caution message appears if one or more of the GPS coordinates is not correct. The mapping feature is still fully functional. The message indicates that some or all GPS coordinates are invalid. Review and check for correct coordinates in the import file that comes from the CIS billing program. 3 4 4-38 Use any of the following map tools to enhance your map view. • – allows you to zoom in on a given area of the map. • – allows you to zoom out on a given area of the map. • – pan control allows you to move the map around. • – pointer allows you to select an area on the map. Used in conjunction with the View button. • – allows you to see a list of MIUs after you select an area on the map with the pointer tool. The MIUs have a captured reads status. Use the Points check boxes to see alternate views of the map. • – allows you to suppress the green dots on the map indicating the read meters. This way you view only those meters that are unread or have an unusual event audit indicator associated with the reading. • – allows you to suppress the yellow dots on the map indicating the read meters. This option also suppresses the green dots as well. MRX920 User’s Manual Using the MRX920 5 To exit this view and return to reading meters, click the Route Selection tab. GPS Feature This feature assumes you have a mobile data collector with GPS capabilities. The GPS device must be configured within the software. A dialog appears for you to modify the settings for the GPS device. Configuring the GPS Device To configure the GPS device, complete the following steps. 1 Open the MRX900 Software. 2 Click MapView. 3 Click GPS Settings. See Figure 4.28 on page 4-37. The following dialog appears. Figure 4.30 GPS Settings Dialog MRX920 User’s Manual 4-39 Using the MRX920 4 Complete the fields on this dialog to change the GPS settings. • Com Port — Set to the Com Port on the laptop that the GPS Device is installed in. • Baud Rate — GPS device manual should state the baud rate at which it operates. • Data Bits — set to 8. • Parity — set to None. • Stop Bits — set to one. Using the GPS Modes The GPS feature operates in three modes: Center View — This view positions the vehicle with the mobile data collector in the center of the window, and the map moves around the vehicle. Travel View — (Default view.) This view moves the vehicle with the mobile data collector around the map on the window, and the map remains stationary. The vehicle is represented by an orange icon on the window. When the vehicle goes off the edge of the map, the Map View shifts and repositions the vehicle in the center of the window. Track Feature — When activated, this feature allows you to track the path and view the trail for the meters that have been read for a route. 4-40 MRX920 User’s Manual Using the MRX920 Figure 4.31 illustrates the tracking feature with the GPS mode. GPS options Settings GPS mode box Track indicating the trail in which the vehicle has traveled Arrow indicating where the vehicle is located Figure 4.31 GPS Feature Keep in mind the following when using this feature. • The track indicating the trail in which the vehicle has traveled does not indicate the tracking trail for the meters that have been read. This is the tracking from the external GPS device that has nothing to do with the meter reading. It shows this tracking when it is activated, whether or not meters are read. • The arrow indicating where the vehicle is located moves or rotates in the direction in which the vehicle is moving. MRX920 User’s Manual 4-41 Using the MRX920 If your mobile data collector has GPS capabilities, you can activate the GPS feature on the Map View window by clicking the ON button. See Figure 4.32. Figure 4.32 GPS Options When the GPS option is activated, you can use the Map View in the following ways. If some coordinates or all coordinates within the file that are incorrect, the following warning message appears. The GPS functionality still works properly; however, the message lets you know that some or all GPS coordinates within the file are invalid. Figure 4.33 No Available GPS Coordinates Message Creating an Export File After you have completed reading all of your routes, you need to create an export file for your utility to upload the read data to the host software. MX900 keeps archives of the last seven export files. They are located in My Documents\Neptune\MX900\export. They are named with a timestamp like the following example: 20121207091423.exp (year, month, day, hour, minute, second) 4-42 MRX920 User’s Manual Using the MRX920 When all routes have been read, use the following procedure to create an export file. MX900 allows you to select routes to exclude from the export by leaving the Export column on the Route Selection window unchecked. 1 Press the Export tab to display the Export window. 2 Press the Export button for one of the following: • To store the routes on the USB flash drive • To transfer the routes to the host computer using the wireless connection You cannot be reading routes when creating the export file. If you are in the middle of reading, they must press Pause Route to suspend the reading. Exiting the Software To exit the software, you press the Exit Route Reading button on the Route Import, Route Selection, and Route Export windows. Pressing this button returns you to the Welcome window. From the Route Import and Route Export Windows Do one of the following: • Press the Exit Program button. If you are still reading meters, this button is gray. You can export but you cannot exit route reading unless you stop active reading. Press Pause, then you can exit the program. • Click the Windows Exit when you are not reading meters. The MX900 host software closes. It is now safe to turn off your computer. Proceed to “Turning off the Laptop” on page 4-44. MRX920 User’s Manual 4-43 Using the MRX920 From the Route Selection Window 1 Press the Exit Route Reading button. If you are still reading meters, this button is gray. Press Pause, then you can exit the program. The Route Export window displays. 2 On the Route Export window, press the Exit Route Reading button again. The Welcome window displays, and then the MX900 host software closes. It is now safe to turn off your computer. Proceed to "Turning off the Laptop". Turning off the Laptop 1 From the Start menu, click Shut Down. 2 From the Windows Shut Down window, select Shut Down. 3 Click OK. 4 You can now safely remove the USB flash drive. (Refer to "Removing the USB Flash Drive While the Laptop is On" in the section that follows.) Improperly removing the USB flash drive while the laptop is ON can cause data corruption on the USB flash drive. Refer to the following section for procedures to safely remove the USB flash drive while the PC is on. 4-44 5 Remove the power cable from the vehicle power supply receptacle. 6 Drive back to your utility to return the USB flash drive containing the read data, so it can be uploaded to the host software. MRX920 User’s Manual Using the MRX920 Removing the USB Flash Drive While the Laptop is On Complete the following steps to safely remove the USB flash drive from the laptop while it is operating. Improperly removing the USB flash drive while the laptop is ON can cause data corruption on the USB flash drive. 1 Click the USB flash drive icon located in the lower right corner of the Windows task bar. The USB flash drive properties dialog appears. 2 Select the Socket Status tab. 3 Select the USB flash drive from the list provided. The list provided shows one socket as being empty. (Refer to “USB Connection” on page 3-3.) 4 Click OK. A dialog displays telling you that you can now remove the USB flash drive. 5 MRX920 User’s Manual Remove the USB flash drive from the port on the laptop. 4-45 Using the MRX920 Notes 4-46 MRX920 User’s Manual Chapter 5 Troubleshooting Troubleshooting the MRX920 The troubleshooting section of this guide provides diagnostics procedures for troubleshooting MRX920 problems. It includes both a hardware section and a software section. It also includes recommendations on how to verify that the MRX920 is performing up to specification. Included are tables of possible symptoms, areas of focus, and actions that can be taken to try to resolve problems that could arise with either your MRX920 or MX900 host software. Troubleshooting Hardware Issues Use the following table to help identify possible solutions for hardware problems that could occur with the MRX920. Table 5.1 Hardware Troubleshooting Table Problem Probable Cause Loose connection at the vehicle plug. Loose connection at the MRX920. No power to the unit. MRX920 User’s Manual Things to Check Look for the LED on the power cable. Look for the LED on power cable, but not on the MRX920. Be sure the red arrow on the cable matches the red dot on the MRX920. Internal fuse blown on the power cable. Look for the LED on the power cable. Dead battery or fuse in the utility vehicle. Check the electrical status of the utility vehicle. 5-1 Troubleshooting Table 5.1 Hardware Troubleshooting Table Problem Probable Cause Cable is unplugged. Be sure the USB cable is secure on both the laptop end and the MRX920 end. Cable is damaged. Try any other USB cable. Check Connection Settings to ensure that you are connecting as you intended (WiFi vs USB). My USB connection isn't working. Connected through other method. 5-2 Look at front of the MRX920. The LEDs labeled WiFi and USB will flash slowly when not connected and will flash quickly on the chosen connection method (WiFi or USB) within the first few seconds of being connected. Flash will continue extremely fast. Unit is not connected correctly. As long as the Rx LED is changing from on to off, your MRX920 is receiving readings. RF antenna is damaged. Check the antenna for any crimps or damage. USB flash drive not inserted. Make sure the USB flash drive is properly inserted into an available USB port on your laptop. Incompatible data on USB flash drive. Select the Self-Diagnostics tab to verify that the data on the USB flash drive is compatible. Not getting readings. Power is applied, the MX900 host software executes but no route data is available. Things to Check MRX920 User’s Manual Troubleshooting Troubleshooting Host Software Issues Use the following table to help identify possible solutions for host software problems that could occur with the MX900 host software. Table 5.2 Host Software Troubleshooting Table Problem Cannot import route file. Cannot hear audible tone while meter reading. Probable Cause Things to Check Incorrect file type. Make sure the file you are importing is an .imp file. Corrupt file. Recreate the file in N_SIGHT R900. Verify that there is a check mark next to the Audible Tone option in the Audible tone check box is not selected. upper left corner of the route selection screen. Volume is not turned up on the laptop. Verify that the volume on the laptop is turned up and is not on mute. Unable to view all accounts in Missed and Captured Reads screens. Filter is turned on. Verify that the filter in the bottom right corner of the Missed and Captured Reads screen has been removed. Unable to export all routes. Export check box is not selected. In the Route Selection screen be sure to select the check mark next to all routes. Route file has been saved to an unknown location. In the route selection screen click Import Routes in the bottom left corner. Browse to the proper location where the route file has been saved and select it. Unable to locate route file. Cannot install the software. MRX920 User’s Manual Refer to “Host Software Installation” on Page 3-4 in this user's manual. 5-3 Troubleshooting Table 5.2 Host Software Troubleshooting Table Problem Probable Cause My MX900/RF Test software is connected to the wrong MRX920 My WiFi connection isn't working. Cannot press the right corner 5-4 in the top Things to Check Check the MAC address (available under Connection Settings) and compare it to the MAC address on the MRX920's label. Look at front of MRX920. LEDs labeled WiFi and USB will flash slowly when Connected through the other method not connected and will flash quickly on Check Connection Settings to ensure the chosen connection method (WiFi you are connecting as you intended or USB) within the first few seconds of (WiFi vs. USB) being connected. Flash will continue extremely fast. Must be in the paused mode to be able Verify that the software is in the to press the . paused mode. MRX920 User’s Manual Appendix A MRX920 Legacy Operations This appendix is only for users of the former MRX920 which included a laptop and carrying case. This appendix contains the following information. • “Dimensions and Weight of Legacy Operations” on page A-2 • “Laptop Specifications” on page A-4 • “Power Supply” on page A-4 • “Connecting the MRX920 Receiver to the Laptop” on page A-5 • “Placing the MRX920 in the Vehicle” on page A-5 • “Opening Carrying Case Cover” on page A-8 • “Plugging in the Power Cable” on page A-10 • “Turning the Unit On” on page A-11 • “Adjusting System Settings” on page A-14 • “Using the MRX920” on page A-15 • “Using the Keyboard” on page A-16 Please be aware that the pictures in this manual were taken using the laptop that Neptune supplied. Your specific laptop may be different. MRX920 User’s Manual A-1 Appendix A: MRX920 Legacy Operations Dimensions and Weight of Legacy Operations Legacy MRX920 Dimensions and Weight The following table and figure describe the dimensions and weight of the legacy MRX920. Table A.1 Dimensions and Weight of Legacy MRX920 Dimensions Refer to Figure A.1, measurement in inches and centimeters. Weight 48.0 lbs (21.77 kg.) Figure A.1 Legacy MRX920 Dimensions A-2 MRX920 User’s Manual Appendix A: MRX920 Legacy Operations Legacy MTX950 Dimensions and Weight The following table and figure describe the dimensions and weight of the legacy MTX950. Figure A.2 Table A.2 Dimensions and Weight of Legacy MTX950 Dimensions Refer to Figure A.2, measurement in inches. Weight 68.0 lbs Figure A.2 Legacy MTX950 Dimensions MRX920 User’s Manual A-3 Appendix A: MRX920 Legacy Operations Laptop Specifications Table A.3 PC Specifications Windows-Based System Type 1.83 GHz Intel® Pentium 1GB DDR SDRAM 12 Function keys Fully waterproofed design Keyboard Built-in, solid state mouse Embedded numeric keypad 7 programmable function keys 12.1” TFT XGA Outdoor transmissive DynaVue™ display with Touchscreen VGA Graphics Controller with 2MB VRAM Display User adjustable contrast and intensity Light sensor which adjusts screen intensity per ambient light Shock/scratch resistant anti-glare plate Windows XP, Service Pack 2 Operating System Windows Vista and Window 7 (32-bit and 64-bit) Power Supply Table A.4 Operating Voltage and Current Nominal Operating Voltage Nominal Operating Current Maximum Operating Current MRX920 - Laptop Computer turned ON 12V 4 to 7A 10A MTX950 - Laptop Computer and Transmitter turned ON 12V 8 to 12A 15A Component A-4 MRX920 User’s Manual Appendix A: MRX920 Legacy Operations Connecting the MRX920 Receiver to the Laptop Included with the receiver is a 10-foot DB9 serial cable. Once the software is installed, the cable needs to be connected to the serial port on the MRX920 and the other end connected to the laptop being used. (The laptop must have a DB9 serial connector.) The laptop must be installed securely in a vehicle mount. This protects the driver and equipment should the vehicle be required to come to an immediate stop. These mounts can be purchased from third-party manufacturers such as RAM Mounting Systems Inc. (www.ram-mount.com) and Gamber Johnson (www.gamberjohnson.com). This section provides basic instructions for setting up the MRX920 so it can be used to perform mobile meter reading and exchange information with the host computer. Neptune recommends that you insert the USB flash drive into the laptop after you place the unit in the vehicle. Placing the MRX920 in the Vehicle Complete the following steps to set up the MRX920 with your laptop in the vehicle passenger seat. Never set up the MRX920 during a lightning storm or under excessively wet conditions. 1 MRX920 User’s Manual Place the laptop and the MRX920 in the passenger seat securing them with the seat belt. A-5 Appendix A: MRX920 Legacy Operations 2 Position the retention loops facing the back of the seat. 3 Press the blue button on the safety pin and pull the pin out of the seat belt retention loop. See Figure A.3. Safety pin Blue button Seat belt Retention Loop Figure A.3 Removing the Safety Latch 4 Repeat Step 2 to remove the safety pin from the second seat belt retention loop. 5 Guide the seat belt through the seat belt retention loops as shown in Figure A.4. Figure A.4 Placing Seat Belt in Retention Loop A-6 MRX920 User’s Manual Appendix A: MRX920 Legacy Operations 6 Replace the safety pins in the seat belt retention loops, as shown in Figure A.5. Safety pin Figure A.5 Replacing the Safety Pin MRX920 User’s Manual 7 Adjust the seat belt so that the unit is secure in the passenger’s seat. 8 To further secure the unit, slide it against the back of the seat. A-7 Appendix A: MRX920 Legacy Operations Opening Carrying Case Cover To set up the MRX920 in a vehicle, you must open the top cover by opening the latches on the cover. See Figure A.6. Complete the following steps to open the latches on the MRX920, shown in the following figure, and open the carrying case top. 1 Lift the latch flap and turn it to the left. The latch releases from the catch on the carrying case top. Latches Figure A.6 Latches on MRX920 Carrying Case A-8 2 Repeat step 1 for the other latch. 3 Open the cover until it locks in place. See Figure A.7 on page A-9. MRX920 User’s Manual Appendix A: MRX920 Legacy Operations Figure A.7 Opening the Cover 4 If you have not already done so, slide the unit against the back of the seat to further secure it. See Figure A.8. Figure A.8 Placing Unit Against Back of Seat If the unit interferes with your vision for the passenger window, rest the cover on top of the laptop display to ensure maximum visibility. MRX920 User’s Manual A-9 Appendix A: MRX920 Legacy Operations Plugging in the Power Cable Complete the following steps to connect the vehicle power supply power cable to the MRX920 and plug it into the vehicle power supply receptacle. 1 Start the vehicle. 2 Insert the appropriate end of the vehicle power supply power cable into the connector on the MRX920, as illustrated in Figure A.9. Vehicle power supply cable Figure A.9 Vehicle Power Supply Power Cable 3 Plug the other end of the power cable into the vehicle power supply receptacle as illustrated in Figure A.10. Vehicle power supply Figure A.10 Vehicle Power Supply Cable Inserted In Car A-10 MRX920 User’s Manual Appendix A: MRX920 Legacy Operations Turning the Unit On Complete the following steps to turn on the MRX920 laptop and start the MX900 host software. 1 With the laptop computer facing you, open the display. 2 Raise the display to a comfortable viewing position with the keyboard accessible to you. 3 Press the power button of the laptop. located near the center of the back edge The power button is a soft raised button on the right side of the LED light indicators. See Figure A.11. LED activity indicators ON / OFF Tab Ctrl Alt Delete Arrow keys Figure A.11 Laptop Keyboard MRX920 User’s Manual A-11 Appendix A: MRX920 Legacy Operations If the laptop fails to respond to the keys or to the stylus, reboot by pressing and holding down Ctrl + Alt + Delete (Figure A.11) for at least 10 seconds. Release the buttons to restart the computer. For additional information on MRX920 self-diagnostics or keyboard, see the following: • “Performing Diagnostics,” on page A-23. • “Using the Keyboard” on page A-16. The Laptop The laptop computer for the MRX920, as shown in Figure A.12, is part of the overall data collector. It communicates with the receiver through a serial link using the software which decodes and records the collected readings by the receiver. Figure A.12 Laptop in Former MRX920 A-12 MRX920 User’s Manual Appendix A: MRX920 Legacy Operations To ensure the safety of the driver collecting readings, the laptop computer provides an audible indicator option that can be turned on or off as required. For more information, see “Audible Tone Settings,” on Page A 4-2. When turned on, the unit beeps when receiving an MIU signal in the selected route. Other readings are silently inserted into other routes. To ensure the driver’s safety, use the Beeper function on the MRX920 to monitor meter reading. The laptop computer retrieves meter readings from the receiver in realtime and stores them in nonvolatile memory. It checks meter reading completeness against route files that are downloaded from the host software. About one second after a reading is received, the message area and progress bar update the reading status of the route. USB Port The USB port, shown in Figure A.13, is located on the side of the MRX920 laptop unit. Another USB port is located on the rear of the laptop. You can use either slot for meter reading, but do not use both USB ports at the same time. The thumb drive only works with power from the vehicle. Figure A.13 USB Port for USB Flash Drive MRX920 User’s Manual A-13 Appendix A: MRX920 Legacy Operations The MRX920 requires that you use only one USB port for the USB flash drive. Adjusting System Settings This section describes several settings you can make to the MRX920 to make it easier and more comfortable to use. Contrast The laptop XGA display is a transmissive color display designed to minimize glare and maximize transmitted light from the backlight, so it has excellent readability in indirect light. The XGA display is easy to read in vehicles. However, to increase or decrease the brightness of the display, perform one of the following actions. • Press FN + F6 to decrease LCD brightness. • Press FN + F7 to increase LCD brightness. Volume The volume for the beeper setting can also be controlled: • Press FN + F8 — decreases the volume. • Press FN + F9 — increases the volume. • Press FN + F10 — toggles the volume mute on or off. You can also adjust the volume with the Windows volume control feature which is located on the taskbar and looks like this . Adjusting the volume using the function keys produces only a slight change with each press. It may take several presses to increase or decrease the volume to the desired level. A-14 MRX920 User’s Manual Appendix A: MRX920 Legacy Operations Using the MRX920 When the installation is complete, you are ready to begin using the MRX920 for meter reading. Please refer to Chapter 4 for instructions on operating the MRX920. Navigation All MRX920 functions are performed in one of two ways: • Using the TAB key or the arrow to move the focus to the appropriate section. keys • Using the provided stylus to touch the selections available on the laptop screen. Always use the stylus provided with the laptop to touch the screen. Substituting a hard or sharp item can damage the display. MRX920 User’s Manual A-15 Appendix A: MRX920 Legacy Operations Figure A.14 Navigating Within the Software For example, Figure A.14 shows the Route Import screen with a route highlighted. Using the Keyboard The previous MRX920 included a laptop with a US 89-key international keyboard. There are twelve function keys, F1-F12, and an embedded numeric keypad. The mouse keys and cursor control directional keys are situated below the keyboard. See Figure A.15 on page A-17. Numeric Keypad The numeric keypad is embedded in the keyboard area. The embedded keypad emulates the numeric keypad typically found on a full-size keyboard. It is arranged like a calculator for applications that require A-16 MRX920 User’s Manual Appendix A: MRX920 Legacy Operations you to key many numbers or for use with the Calculator in the standard Windows Accessories. Be sure you press Num Lock and then press and hold FN with the numbers you want to use. Num lock Fn Figure A.15 Numeric Keyboard Using the Touchpad The touchpad is a pointing device that provides all the features of a twobutton mouse. Its primary function is to move the cursor around the screen. Figure A.16 Touchpad MRX920 User’s Manual A-17 Appendix A: MRX920 Legacy Operations Your Touchpad Clicking First, place your fingers on the keyboard in the normal typing position. The touchpad is easily accessible by moving either your left or right thumb off the space bar and on to the touchpad. Gently move your thumb across the touchpad in the direction you want the cursor to move. The pad detects the change in pressure and moves the cursor in the corresponding direction. The touchpad on your MRX920 laptop is electrically sensitive to finger touch. It will not respond if touched by anything other than your fingers, such as a stylus or pencil. With the touchpad, there is another method of making selections in an MRX920 host software program called double-tapping. This function corresponds to double-clicking with a mouse. Once the cursor has been moved to the object you want to select, lightly double-tap the pressure sensitive touchpad. This double-tapping on the touchpad will select the desired item and prompt the software to perform the related operation. The left and right buttons located directly below the touchpad are the same in function as those on a two-buttoned mouse. Clicking these buttons makes selections, drags objects, or performs a variety of other functions depending on the software. To select an object, first move the pointer over the object you want to select, and then press the left button one time. The functions of these buttons are software specific. Double-Clicking Double-clicking is a common technique for selecting objects or launching programs from icons. Once you have moved the pointer over the object you wish to select, rapidly press the left button two times. This action is commonly referred to as “double-clicking” an object. A-18 MRX920 User’s Manual Appendix A: MRX920 Legacy Operations Dragging You can also drag items solely using the touchpad. Move the pointer to the desired location then press down the left button. While still holding down the left button, move the pointer to the desired location. Release the button. Move the pointer to the desired location. Tap the touchpad twice quickly as if you were double-clicking; however, do not remove your finger after the second tap. Move the cursor to the desired location. Lift your finger to finish dragging. Adjust the touchpad settings by selecting Settings/Control Panel/Mouse/ Buttons. These settings allow you to change the orientation of the touchpad from right-handed to left-handed, and fine-tune the pointer movement and timing of clicks. Touchpad Precautions If not properly cared for, the touchpad can be easily damaged. Please take note of the following precautions. Do not rest heavy objects on the touchpad or the touchpad buttons. Using the Transmitter (MTX950 Only) The MTX950 transmitter emits the wake-up tone required for Itron electric ERT transmitters. This section applies to the MTX950 only. This feature is not available for the MRX920. MRX920 User’s Manual A-19 Appendix A: MRX920 Legacy Operations If you have Itron electric ERT transmitters that require a wake-up tone, you will use the transmitter to emit that tone. To use the transmitter, you must manually initiate it when you begin reading a route. Access to the transmitter and its settings are on the Route Selection window, shown in Figure A.17. Use transmitter check box Transmitter settings button Figure A.17 Using the Transmitter Initiating the Transmitter To initiate the transmitter, select the check box for Use Transmitter. A check mark appears in the box. The Use Transmitter check box is gray if there are no meters requiring a transmitter in the routes loaded into the unit. You can also change the frequency and tone of the transmitter by following this procedure. A-20 MRX920 User’s Manual Appendix A: MRX920 Legacy Operations 1 Access the Route Selection window. At the top of the window, there is a Transmitter Settings button, shown in Figure A.17 on page A-20. 2 Click Transmitter Settings. The Specify Transmitter Data dialog box appears as illustrated in Figure A.18. Figure A.18 Specify Transmitter Settings MRX920 User’s Manual 3 Change the settings in the Carrier Frequency or Wake Up Tone fields as required. 4 Select OK. A-21 Appendix A: MRX920 Legacy Operations Troubleshooting Legacy Units Use the following table to help identify possible solutions to problems that could occur. Table A.5 Troubleshooting Table Problem Probable Cause Loose connection at vehicle power supply receptacle. Loose connection between MRX920 and power cable. No power to the unit. Bad power cable. Things to Check Make sure you can hear the unit’s internal fans. Check the continuity of the cable with ohm meter. Dead battery or fuse in util- Check the electrical status ity vehicle. of the utility vehicle. Power is applied, the MX900 host software executes, but no route data is available. Power is on but the screen is blank or unreadable. No power to vehicle power supply receptacle. Insert lighter and check to see if it heats up. USB flash drive not inserted. Make sure USB flash drive is properly inserted. Incompatible data on USB flash drive. See “Performing Diagnostics,” on Page A -23. Select Self-Diagnostics tab to verify that the data on the USB flash drive is compatible. Intensity settings too high or too low. Check Intensity settings. No power to PC. Make sure I-O (On/Off) key has been pressed. Antenna not connected The software appears to be properly or not installed. working but does not collect data. Broken antenna cable. A-22 Check antenna connection. MRX920 User’s Manual Appendix A: MRX920 Legacy Operations Performing Diagnostics The MX900 host software performs diagnostics when you access the System Check screen. This allows you to check the status of the system components. Displaying the Software Self Diagnostics Follow this procedure to display the software System Check screen. 1 Press the Start screen. button from the software Welcome The Route Import screen (Figure A.19) appears. Figure A.19 Route Import Screen 2 MRX920 User’s Manual Press the System Check tab to display the System Check screen as shown in Figure A.20. A-23 Appendix A: MRX920 Legacy Operations Figure A.20 MX900 System Check Screen The MX900 host software System Check screen contains the following fields for meter-reading components: A-24 • Meter Reader — name of the meter reader as obtained from USB flash drive files • HD Space — verification that the laptop has sufficient hard disk space • USB Flash Drive Space — the amount of available free space on the memory card • Collection Method — identification of the meter reading data collection method being used • DBDC API Version — software version installed on the MRX920 • DBDC Firm Ware Version — firmware version on the DMR board MRX920 User’s Manual Appendix A: MRX920 Legacy Operations 3 • Software Version — identification of the version number of the MX900 host software • Temperature — notifies the user whether or not the temperature of the unit is okay for operation To exit the MX900 host software System Check screen, select another screen from the tabs. Importing Route Data If Route Data File is Not Found If the USB flash drive is not inserted in the USB port when the software is started, the following dialog appears allowing you to select the location for the import file. See Figure A.21. Figure A.21 Import File Location Dialog MRX920 User’s Manual A-25 Appendix A: MRX920 Legacy Operations Selecting the Import File To select and load the import file, do the following: 1 On the Open file dialog, click G: (or the appropriate drive letter) to verify that the roadmaps.imp file is located on the USB flash drive. 2 Select roadmaps.imp and click Open. If the roadmaps.imp file is not found, go back to the host computer and be sure the file is loaded on the USB flash drive. Once the file is loaded on the USB flash drive, restart the laptop. If the USB Flash Drive is Not Recognized 1 Go to My Computer or Windows Explorer to verify that the USB flash drive is recognized by the laptop. If the USB flash drive is recognized, My Computer or Windows Explorer will show a drive letter for the USB flash drive, usually G:. If the USB flash drive is not recognized by the laptop, try rebooting your laptop. A-26 2 Click G: (or the appropriate drive letter) to verify that the roadmaps.imp file is located on the USB flash drive. 3 If the roadmaps.imp file is found, shut down the laptop as described in “Turning off the Laptop,” on Page A 4-44. 4 Remove the flash drive. 5 Reboot the laptop and insert the USB flash drive. Then repeat steps 1 to 3 to verify that USB flash drive is recognized by the laptop and the import file is found on the USB flash drive. MRX920 User’s Manual Glossary central processing unit Often abbreviated as CPU, it is the brain of the computer. Sometimes referred to as the processor or central processor, the CPU is where most calculations take place. In terms of computing power, the CPU is the most important element of a computer system. default setting A computer term that is similar in meaning to factory setting. The default setting is one that the MX900 host software automatically applies to an item. For example, the default setting for Beeper On/Off mode is Beeper Off. The beeper is always off unless the meter reader changes the beeper setting. direction keys Special keys on the laptop keyboard that allow you to move up or down a list of items. The direction keys, the Up (F5) and Down (F4) keys are indicated by arrow key icons on the laptop display. display The top part of the laptop computer where selections and information about routes and accounts are shown. download The process of sending readings and route information from the Host Computer to the USB flash drive used for readings. function key Special key on the laptop keyboard that allows you to perform tasks quickly. The function keys used by the software are on the top row of the laptop computer (PF1 - PF7) and in the two rows of F keys (F1 - F17). PF keys and F keys have an equivalent function in the MX900 host software. MRX920 User’s Manual G-1 Glossary highlighted Describes an item that is selected. When you select an item using the direction keys, the software lets you know that it has been selected by accenting the item in negative image. host computer A computer that is accessed by a user working on another PC or workstation; for example, the host computer contains all the Mobile, RouteMAPS, or EZRouteMAPS data to which the billing computer and other PC operators can connect. IP Internet Protocol. It is the communication protocol for communication between computers on the Internet. TCP/IP defines how electronic devices (like computers) should be connected to the Internet, and how data should be transmitted between them. message area A portion of a screen that displays a message. meter number The number by which a utility identifies a meter. MHz Abbreviation for megahertz. One MHz represents one million cycles per second. microprocessor A chip that contains a central processing unit. At the heart of all personal computers and most workstations is a microprocessor. Microprocessors also control the logic of almost all digital devices. MIU ID An abbreviation for Meter Interface Unit Identifier, which is a discrete number used to identify a specific meter interface unit. operating system A critical program that runs on a computer that is used to run other programs. Operating systems perform basic tasks, such as, recognizing input from the keyboard, sending output to the display screen, keeping track of files and directories, and controlling any peripheral devices such as disk drives, ports, and printers. PC An abbreviation for personal computer, in the case of MRX920, this refers to the laptop. G-2 MRX920 User’s Manual Glossary personal computer A general-purpose, single-user microcomputer designed to be operated by one person at a time. All are based on the microprocessor technology that enables manufacturers to put an entire central processing unit on one chip. screen The graphic portion of a display. The MX900 host software screens show information in three different areas to present the information shown on the display: - a meter reading and loading indicator area with a graphic progress bar and pulsing reading indicator - a message and information display area - an active function key display bar select To choose a route or address by positioning a highlighted area using function keys. The highlighted item is selected. TCP Transmission Control Protocol. It is the communication protocol for communication between computers on the Internet. TCP/IP defines how electronic devices (like computers) should be connected to the Internet, and how data should be transmitted between them. upload The process of sending readings and route data from the MRX920 to the host computer via WiFi/USB/serial port connection. USB flash drive A small device that allows you to add memory, mass storage, and other capabilities to portable computers. USB flash drives are sometimes called thumb drives. Windows The operating system that supports 32-bit applications. Versions of Windows supported by the MRX920 are Windows XP, Windows Vista, and Windows 7. See “Hardware Requirements,” on Page 2-3. MRX920 User’s Manual G-3 Glossary Notes: G-4 MRX920 User’s Manual Index Numerics 3rd-party laptop installing 3-4 setting up 3-15 specifications 2-3 using 3-27, A-15 A adjust brightness A-14 volume A-14 adjustments, laptop settings A-14 antenna 3-23 to 3-24, A-22 cable 3-23 to 3-24 installing 3-23 to 3-24 automatic meter reading 3-1 B beeper function 3-27, 4-14, A-13 settings 4-2 begin MRX900 software 3-26 beginning meter reading 4-12 board, CPU G-1 brightness, adjust A-14 broken antenna cable A-22 button, power A-11 buttons MIU Details 3-35, 4-20 mouse A-18 touchpad A-18 C cable antenna 3-23 to 3-24 vehicle power supply 3-22, A-10 cable, for 3rd-party laptop A-5 captured reads 3-34 captured reads, storage 3-1 case, laptop cover A-8 Caution icon 1-4 center view 4-42 MRX920 User’s Manual code reason 4-19 skip note 4-19 trouble 4-19 coded notes 3-30, 4-18, 4-21 codes, skip 3-30, 4-21 collection methods A-24 communication, wireless 4-2 computer, laptop A-12 computer, PPC A-12 connect, power supply 3-23, A-10 connect power supply 3-22, A-10 connecting receiver to 3rd-party laptop A-5 connecting the MRX920/MTX950 antenna 3-23 to 3-24, A-10 contrast, display A-14 control volume A-14 convention in manual 1-4 cord, cigarette lighter power A-10 cover, laptop A-8 CPU G-1 CPU board G-1 cursor, touchpad A-17 customer support 1-4, 1-5 D data, collection 1-2 data logger activating 4-25 buttons 4-31 explained 4-23 graph, daily 4-29 graph, displaying different information 4-29 graph, hourly 4-33 graph, view 4-28 light sensor 4-25 menu options 4-30 meter combinations 4-27 report 4-33 report, daily 4-33 report, hourly 4-36 using 4-24\+4-36 using with no route loaded 4-24 DB9 serial cable A-5 I-1 Index dimensions legacy MRX920 A-2 legacy MTX950 A-3 dimensions and weight MRX920 2-2 MTX950 A-2, A-3 double-clicking A-18 double-clicking, with a mouse A-18 double-tapping A-18 dragging, object with a pointer A-19 drive, flash 3-25 to 3-26 durability, specs 2-3 E electrical specifications 2-3 e-mail, customer support 1-6 environmental conditions 2-3 exit route reading 3-30 exiting software self diagnostics A-23 the software 4-43 F fax, customer support 1-6 feature center view, mapping 4-42 GPS 4-39, 4-40 GPS, mapping 4-39 map view 4-36 to 4-40 tracking 4-40 travel view 4-40 flash drive 3-25 to 3-26 inserting 3-26, A-13 remove 4-44 to 4-45 G Global Positioning System, See GPS 4-37 GPS capabilities 4-42 mode 4-41 modes 4-40 options 4-41 settings 4-40 GPS feature 4-39 GPS option 4-40 I-2 H hardware setup 1-3, 3-1 host software 1-2 host software, troubleshooting 5-3 I icons caution 1-4 note 1-4 warning 1-4 identifying missed accounts 4-18 import routes, USB drive 4-1 indicators, reading 3-35 installation, antenna 3-23 installing Maps component 3-27 intensity settings A-22 K keyboard A-1 keyboard, specifications A-4 keyboard, picture A-12 keypad, numeric A-16 L laptop computer A-12 connecting the receiver to 3rd-party laptop A-5 keyboard A-12 third-party 3-4 laptop computer, keyboard A-4 laptop, secured by seat belt 3-20 laptop, setup for 3rd-party laptop 3-15 legacy MRX920 dimensions A-2 legacy MTX950 dimensions A-3 light sensor 4-25 loose connections 5-1, A-22 M manual, conventions 1-4 map view 4-36\+4-40 Maps component, install 3-27 messages, e-mail 1-6 meter automatic reading 3-1 diagram of operations 1-2 MRX920 User’s Manual Index meter reading 1-2 missed reads 3-34 MIU Details button 3-35, 4-20 screen 4-19, 4-20 MIU icons, inactive 3-35 mobile system 3-1 mouse, two-button A-17 MRX900 software, upgrade 3-36 MRX920, placement (illus.) 3-20 MRX920/MTX950 beeper 4-2 data exchange 3-1 display A-4 display areas 3-32, G-3 keyboard A-1 operating environment conditions 2-1 operating system A-4 plug-in cigarette lighter power 3-23 power cord A-10 system settings A-14 touchpad A-17 troubleshooting 5-1 turning on A-11 MX900 software, starting A-11 N navigation on the route display screen 4-15 Note icon 1-4 notes coded 3-30, 4-18, 4-21 skip codes 4-18 numeric keypad A-16 O opening, carrying case cover A-8 operation 1-2 orange icon, GPS option 4-40 P passenger seat, MRX920 unit placement 3-20 PC Card space A-24 PC memory card, removing 4-45 performing diagnostics A-23 MRX920 User’s Manual placement of laptop 3-20 of MRX920 unit 3-20 placing the MRX920/MTX950 unit in a vehicle A-5 plugging in the MRX920/MTX950 power cable 3-23, A-10 plug-in power cord, cigarette lighter A-10 plug-in power cord 3-23, A-10 portable collector 3-1 ports, USB A-13 positioning your vehicle 4-11 possible symptoms, troubleshooting 5-1 power button, location on keyboard A-11 power cable, vehicle power supply 3-22, A-10 power supply 3-22 to 3-24, A-10 power supply, connect A-10 power, on and off A-11 problems, troubleshooting 5-1 problems, identifying reads 4-36 product support 1-4 version number 1-4 product support 1-4 R R900 MIU icons 3-35 reading icon 4-12 reading meters 4-12 reads captured 3-34 missed 3-34 reason code 4-19 receiver, for use with 3rd-party laptop 3-4 receiver, MRX920/MTX950 3-4 remove, USB flash drive 4-44 to 4-45 removing, MRX920/MTX950 carrying case cover A-8 re-reading missed accounts 4-18 resuming automatic reading 4-23 route display 3-34 selection screen 3-33 S screen, MIU Details 4-19, 4-20 I-3 Index screens Captured Reads 3-34 Missed Reads 3-34 Route Selection icons 3-30 seat belt retention loops A-5, A-6 seat belt, to secure laptop 3-20 selection, route information 4-15 serial port, 3rd-party laptop A-5 set up hardware 3-1 unit 1-3 set up MRX920 3-15 set up3rd-party laptop 3-15 settings adjust A-14 touchpad A-19 skip codes 3-30, 4-18, 4-21 SkipNotes 4-19 software data exchange 3-1 starting A-11 troubleshooting 5-3 version number 1-4 software, start 3-26 specifications 3rd-party laptop 2-3 electrical 2-3 environmental conditions 2-3 laptop computer A-4 start the software 3-26 starting MRX920 laptop A-11 the MX900 software A-11 storage, data 3-1 supply, vehicle power 3-22, A-10 support 1-4 customer 1-4 version number 1-4 support, customer 1-5 symptoms, troubleshooting 5-1 I-4 system how it works 1-3 portable 3-1 processing 4-1 settings A-14 T third-party laptop 3-4 tone, audible 3-1 touchpad A-17 track feature 4-40 transmitter settings, changing A-20 travel view 4-40 TroubleCode 4-19 troubleshooting 5-1 troubleshooting MRX920 problems 5-1 turning on, beeper 4-2 U upgrade MX900 software 3-36 USB flash drive 4-1 USB port A-13 insert flash drive 3-26 location 3-26 using the 3rd-party laptop 3-27, A-15 V vehicle power supply, power cable 3-22, A-10 version number 1-4 viewing account details 4-18 route detail 4-8 routes 4-15 volume, beeper A-14 W Warning icon 1-4 weight MRX920 2-2 MTX950 A-2, A-3 wireless connection 4-2 MRX920 User’s Manual Neptune Technology Group Inc. 1600 Alabama Highway 229 Tallassee, AL 36078 USA Tel: (800) 633-8754 Fax: (334) 283-7293 Neptune Technology Group (Canada) Ltd. 7275 West Credit Avenue Mississauga, Ontario L5N 5M9 Canada Tel: (905) 858-4211 Fax: (905) 858-0428 Neptune Technology Group Inc. Ejército Nacional No. 418 Piso 12, Desp. 1201-1202 Col. Chapultepec Morales Delegación Miguel Hidalgo 11570 México, Distrito Federal Tel: (525) 55203 5294 / (525) 55203 5708 Fax: (525) 55203 6503 UM MRX920 03.13 Part No. 12508-002 © Copyright 2005-2013, Neptune Technology Group Inc. Neptune is a registered trademark of Neptune Technology Group Inc TAKE CONTROL neptunetg.com