1
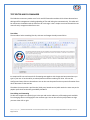
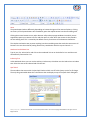
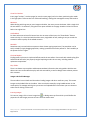
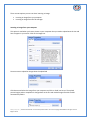
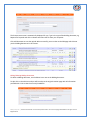
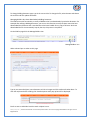
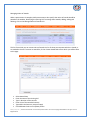
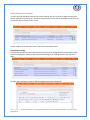
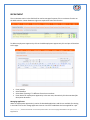
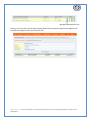
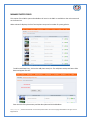
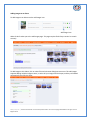
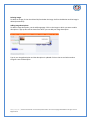
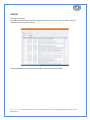
Content Management System User Manual Website Implementation Phase II Millennium Challenge Account - Namibia Content Management System User Manual Prepared For Millennium Challenge Account - Namibia Prepared by Beaton N. Nyamapanda 13.08.2010 Confidential Document This document is confidential and its contents are considered proprietary to the interests of Millennium Challenge Account – Namibia and may not be disclosed outside of the receiving company. All contents Copyright 2010, Millennium Challenge Account – Namibia. No part of this document may be reproduced or transmitted in any form or by any means, electronic or mechanical, including photocopying, for any purpose, without the express written permission of Millennium Challenge Account – Namibia. BN Nyamapanda | Private and Confidential - Document Prepared for MCA-N. All contents Copyright © 2010 MCA-N. All rights reserved. Page 2 of 53 Revision History Revision 1.0 Date 01-08-2010 Author Beaton N. Nyamapanda Changes Preparation of the first draft of the user manual BN Nyamapanda | Private and Confidential - Document Prepared for MCA-N. All contents Copyright © 2010 MCA-N. All rights reserved. Page 3 of 53 Sign Off – User Manual Signing this document records your agreement to the contents of the Conceptual Design/Prototype, and confirms the order to proceed with the remainder of the project. Name and Signature Date P. Amupadhi MCA-N Contract Manager Date Beaton N. Nyamapanda Contractor Date BN Nyamapanda | Private and Confidential - Document Prepared for MCA-N. All contents Copyright © 2010 MCA-N. All rights reserved. Page 4 of 53 Project Definition General Information CLIENT MCA-N PROJECT CODE PROJECT NAME MCA-N Website Development Phase II PROJECT START DATE 05-03-2010 CONSULTANT(S) Beaton Nyamapanda MCAN/CIF/6.2.3b Overview Project: Conceptualize the website architecture and design based on the specifications further described in this document Design and develop the website code, including all graphical elements Manage the testing, repairing and evaluation of the website prototype Manage the deployment of the final website draft on a Web server chosen by MCA-N Produce a website administration manual and provide training to MCA-N staff on website administration BN Nyamapanda | Private and Confidential - Document Prepared for MCA-N. All contents Copyright © 2010 MCA-N. All rights reserved. Page 5 of 53 Content Management System User Manual........................................................................................................ 2 PROJECT DEFINITION ........................................................................................................................................... 5 General Information .......................................................................................................................................... 5 INTRODUCTION ...................................................................................................................................................... 9 Access Levels ..................................................................................................................................................... 9 ACCESSING THE CMS .......................................................................................................................................... 10 CMS Browser Requirements ..............................................................................................................................10 Supported Browsers............................................................................................................................ 10 Flash Player ......................................................................................................................................... 10 Sessions and Cookies .......................................................................................................................... 10 Logging in .........................................................................................................................................................10 Successful Login .................................................................................................................................. 11 CMS Basics ........................................................................................................................................................12 Main Components............................................................................................................................... 12 TEXT EDITOR AND FILE MANAGER .............................................................................................................. 14 Text Editor ........................................................................................................................................................14 Text Editing and Formatting ..............................................................................................................................14 Paste.................................................................................................................................................... 15 Numbered and Bulleted Lists .............................................................................................................. 15 Indenting Text ..................................................................................................................................... 15 Spell Check .......................................................................................................................................... 15 Visual Link Anchors ............................................................................................................................. 16 Maximize ............................................................................................................................................. 16 Visible Blocks ....................................................................................................................................... 16 Resizable ............................................................................................................................................. 16 Find and Replace ................................................................................................................................. 16 Easy Tables .......................................................................................................................................... 16 Images and the File Manager ............................................................................................................................16 Inserting Images .................................................................................................................................. 16 Inserting links ...................................................................................................................................................20 BN Nyamapanda | Private and Confidential - Document Prepared for MCA-N. All contents Copyright © 2010 MCA-N. All rights reserved. Page 6 of 53 Link an existing item in Media repository ........................................................................................... 20 Inserting a link to another resource on the internet .......................................................................... 21 WEB ADMINISTRATION .................................................................................................................................... 22 User Management ............................................................................................................................................22 Add User.............................................................................................................................................. 22 Activate/Deactivate a User account ................................................................................................... 22 Edit User Details .................................................................................................................................. 23 Delete User ......................................................................................................................................... 23 Email Management ...........................................................................................................................................23 PROJECTS ............................................................................................................................................................... 25 The Interface ....................................................................................................................................................25 Projects ............................................................................................................................................................26 Add a Project ....................................................................................................................................... 26 Editing a Project .................................................................................................................................. 26 Activities ...........................................................................................................................................................27 Add Activity ......................................................................................................................................... 27 Edit Activity ......................................................................................................................................... 27 Delete Activity ..................................................................................................................................... 27 Sub activities.....................................................................................................................................................28 Add Sub-activity .................................................................................................................................. 28 Edit and Delete.................................................................................................................................... 28 Project Posting ..................................................................................................................................................28 Add Project Posting ............................................................................................................................. 28 Edit and Delete.................................................................................................................................... 29 NEWS AND EVENTS ............................................................................................................................................ 30 Articles .............................................................................................................................................................30 Add Article........................................................................................................................................... 30 Editing and Deleting ............................................................................................................................ 31 Events ...............................................................................................................................................................31 Add Event ............................................................................................................................................ 31 Editing and Deleting ............................................................................................................................ 32 BN Nyamapanda | Private and Confidential - Document Prepared for MCA-N. All contents Copyright © 2010 MCA-N. All rights reserved. Page 7 of 53 MANDATORY REPORTING ............................................................................................................................... 33 Compliance Score Cards ....................................................................................................................................33 Add Scorecard ..................................................................................................................................... 33 Edit/Delete .......................................................................................................................................... 34 Mandatory Postings ..........................................................................................................................................34 Edit/Delete .......................................................................................................................................... 35 BACKGROUND INFORMATION ....................................................................................................................... 36 Manage About Pages ........................................................................................................................................36 Adding a New About Page .................................................................................................................. 36 PROCUREMENT ................................................................................................................................................... 39 General Procurement Notices ...........................................................................................................................39 Adding a Project .................................................................................................................................. 40 Adding a Procurement ........................................................................................................................ 40 Editing/Deleting .................................................................................................................................. 41 Manage Specific Procurement Notices ..............................................................................................................41 Adding an SPN ..................................................................................................................................... 42 Editing/DeletingSPNs .......................................................................................................................... 42 Adding Bidding Documents to an SPN ................................................................................................ 42 Editing/Deleting Bidding Documents .................................................................................................. 43 Editing/Deleting Notice of Awards ..................................................................................................... 46 Procurement Postings .......................................................................................................................................46 Editing/Deleting Procurement Postings.............................................................................................. 47 RECRUITMENT ..................................................................................................................................................... 48 Managing Applicants.........................................................................................................................................48 MANAGE PHOTO ESSAYS .................................................................................................................................. 50 Adding Images to an album ...............................................................................................................................51 Deleting Images ................................................................................................................................................52 Adding Image Descriptions ................................................................................................................................52 LOG FILE ................................................................................................................................................................. 53 BN Nyamapanda | Private and Confidential - Document Prepared for MCA-N. All contents Copyright © 2010 MCA-N. All rights reserved. Page 8 of 53 INTRODUCTION The MCA website comes with an advanced content management system designed to allow MCA staff to modify all content that appears on the main site. This content management system is only accessible to authenticated users and has a fine grained access control levels to limit Content Management Users (CMS) users to their specific sections. Access Levels The CMS has 5 access levels which control which section of the website you can control. Any attempt to access any CMS section where you have no rights will be denied. Any attempt to access the CMS without logging in will also be denied and be redirected to the login page. All invalid login attempts are logged and automatically sent to the web master. Accounts are created by the Webmaster. The access levels are as follows: Administrator Public Relations Project Manager Human Resources Procurement Accessing the Manual Online BN Nyamapanda | Private and Confidential - Document Prepared for MCA-N. All contents Copyright © 2010 MCA-N. All rights reserved. Page 9 of 53 ACCESSING THE CMS To access the CMS use the following link: http://www.mcanamibia.org/cms/ This link can be accessed from any computer which is connected to the internet. When not logged in you will be taken to the login screen from which you will enter the login details provided to you by your web admin. Note: during the final week of training and testing, replace the above link with the following, th http://www,nammywood.com/cms/ - please note this link will not work after the 31 of September 2010 CMS Browser Requirements Supported Browsers For the CMs to work properly, please make sure to use the following browsers: Internet Explorer 7+ Safari 4+ Chrome 5+ Firefox 3x Opera 10+ Internet Explorer 6 in not supported in the CMS, although some sections might work, nothing is guaranteed. Flash Player For managing photo essays and uploading images in the CMS, Flash player version 9+ is required. In most cases most browsers are already equipped with flash player and this should not be a problem. If the CMS detects that flash is not installed, it will automatically prompt you to install the latest flash player from Adobe. Sessions and Cookies To login into the CMS cookies should be enabled in your browser. In most cases they are enabled on all browsers. When logged in, the system has an inbuilt security feature that automatically logs you out after twenty minutes if there’s no activity in the CMS. This makes sure that no one is left logged in for long periods and to protect against users forgetting to log out of their machines Logging in When you open the link highlighted above, you are taken to the login page which looks like the image below. If the CMS detects that you are already logged in, it automatically redirects you to the CMS’ home page. BN Nyamapanda | Private and Confidential - Document Prepared for MCA-N. All contents Copyright © 2010 MCA-N. All rights reserved. Page 10 of 53 Image: Login Screen Enter your username and password and enter the verification code as indicated. If you cant see whats written on the image click on the refresh icon and a new one is generated. Although this image verification might seem like an irritation, it is required to maintain integrity and security of the CMS and block automated brute force attacks on the login page. Successful Login Successful login will result in you being redirected to the home page page giving you access to the section to which you have rights. Image: CMS Home Page after login BN Nyamapanda | Private and Confidential - Document Prepared for MCA-N. All contents Copyright © 2010 MCA-N. All rights reserved. Page 11 of 53 CMS Basics There are some components in the CMS that work the same across the different sections. This includes the main drop down menu, the submenus, the advanced text editor and the file manager. These will be explained later in the manual. Main Components Main Menu Sub-menu, depend on current page Page Heading List Headings List content items Floating CMS footer Action icons Main Menu This menu does not change on every page on the CMS. It contains a drop down menu containing all the important first and second level navigation links. Sub Menu These menu items are placed here to immediately show whats possible within that section. This sub menu id depended on the section selected. Every section has a different sub-menu. Clicking on these menu options is the same as clicking on the options on the main drop down menu. Page Heading This shows the heading of the current page highlighting what is containted on that page. BN Nyamapanda | Private and Confidential - Document Prepared for MCA-N. All contents Copyright © 2010 MCA-N. All rights reserved. Page 12 of 53 List Headings Depending on the page selected, this list headings show what data will be displayed in the list directly below this headings. List Content Items This is the actual data which in most cases will be displayed in list format. This can be alist of projects, or list of posting or list of news items etc. Floating CMS Footer This floating footer contains those options that are usually used more often. Action Icons Action icons are buttons that allow a user to perform certain actions no list items. These actions include editing, add items, delete or preview. Action to be perfomed depends on item selected BN Nyamapanda | Private and Confidential - Document Prepared for MCA-N. All contents Copyright © 2010 MCA-N. All rights reserved. Page 13 of 53 TEXT EDITOR AND FILE MANAGER The CMS where necessary makes use of a rich and full featured text editor which allows advanced text editing and file management including uploading of files and linking them automatically. This editor will be used across the website and the functions do not change. It has a simple to use interface which most users wil easily recognise and be free to use. Text Editor The text editor looks something like this, with text and images already inserted inline: Its comprised of icons and controls for formatting text together with a large text box space where you type in your text. It has the ability to embed pictures and other media types inline. You can also configure and setup links on selected text. You can also use the paste function to paste information from other documents to the text box. The editor also comes with a spell checker (third party hosted service) which works the same way as the popular spell check functionality provided by MS Word. Text Editing and Formatting To edit text to appear as required, type in the text and use the wide array of formatting tools available from changing colour to changing font size and font type. You can also use the justify buttons to align your text either left or right. BN Nyamapanda | Private and Confidential - Document Prepared for MCA-N. All contents Copyright © 2010 MCA-N. All rights reserved. Page 14 of 53 Paste The paste buttons behave differently depending on browser being used. On Internet Explorer, clicking on the any of the 3 paste buttons will immediately paste the copied content into the text editing area. Clicking these same buttons on any other browser will produce a popup windows into which you are supposed to paste your content into first and then press ok, after which the content is then placed in the text editing area. This is caused by the default security restrictions of the browsers themselves. The simplest and easiest way to paste anything into the text editing area that works the same across all browsers is to use the universal pasting shortcut key combination which is to press Control + V. Numbered and Bulleted Lists Type in your list, select the list and click on the numbered list icon or the bullet list icon and the text is automatically converted to a list. Indenting Text Unlike Ms Word where you can use the tab key to indent text, this editor uses the indent icons to indent text. Select the text to be indented and click the icon. Spell Check The text editor also comes with a helper Spell checker which runs off a third party service fre of charge. The only thing noticeable about this is the adverst that are display on top of the spell check dialog box. BN Nyamapanda | Private and Confidential - Document Prepared for MCA-N. All contents Copyright © 2010 MCA-N. All rights reserved. Page 15 of 53 Visual Link Anchors Insert page "anchors", so other pages (or even the same page) can link to them, positioning the reader in the right place. These anchors are visible while editing, making their management easy and intuitive. Maximize When dealing with long texts or even images and tables, the more you see the better. With a single click the text editor is "maximized", filling the entire space available in the page. Another click and it returns back to its original size. Visible Blocks For those who want to have full control over the structure of their text, the "Show Blocks" feature comes to help. It's a visual tool which outlines every single block of text, making it easy to control the semantics and the quality of the edited contents. Resizable Sometimes we just need a bit more space to have a better typing experience. The text editor can be easily resized by simply dragging operation, making it possible to have the perfect fit. That's usability at the power of users' fingers. Find and Replace Finding words in the text is simple and effective with the text editor. Even words with mixed styling (like half bold and half italics) are properly caught. Replacing words is also as easy, including massive replacement operations. Easy Tables There is no better way to explain and demonstrate data information than using tables. With the text editor users can create tables that play well with accessibility, as well as design them to better present their contents. Images and the File Manager The text editor has an inbuilt tool that makes loading images and other media very easy. This means images can be loaded inline in the editor. Links can also be created by using loaded content. It also comes with a file manager which gives you access to all uploaded files from where you can choose to select files for linking in other text. Inserting Images To insert an image, click on insert image icon . A dialog comes up from which you will define the properties for the images you want to insert into the content area. BN Nyamapanda | Private and Confidential - Document Prepared for MCA-N. All contents Copyright © 2010 MCA-N. All rights reserved. Page 16 of 53 There are two options you can use when inserting an image. Inserting an image from your computer Inserting an image from the file manager Inserting an image from your computer This option is used when you have a picture on your computer that you need to upload onto the site and have it appear in your article. Click on the image icon. Since we want to upload an image select the upload tab Click Browse and select the image from your computer and click on Send it to Server. The upload process begins and on completion it changes back to the first tab marked Image Info with the URL automatically filled in. BN Nyamapanda | Private and Confidential - Document Prepared for MCA-N. All contents Copyright © 2010 MCA-N. All rights reserved. Page 17 of 53 At this stage the image has been uploaded and ready to be placed in the text area. If the image is large (check the text boxes with width and height), change the width value to something smaller, the height is automatically adjusted. A value of between 400px and 600px is advisable. Use the Align option to align your image either left or right of the text. Choose alignment and click on ok to insert image. After inserting a left aligned image with a width of 200px, this is the end result: As you can see, despite aligning the text left, there is not gap between the text and the image. This can be correct by right clicking the image and selecting image properties, from which you are taken back to the image properties dialog box. To leave the gap (either to the right or left), click on the advanced tab: BN Nyamapanda | Private and Confidential - Document Prepared for MCA-N. All contents Copyright © 2010 MCA-N. All rights reserved. Page 18 of 53 In the text box written Style sheet Classes, type in either right or left or both with space in between. Typing in right leaves a 10px gap between the text and the picture and typing left leaves a 10px gap between the text and the picture. Press ok to apply the change. Inserting an image from the file manager You can insert an already uploaded image into your text area. To do this click on the same image icon and the image properties dialog box will appear. Click on Browse Server to view the files that have been loaded into the media repository so you can select your image. Note: The demo message will not appear on the final version of the website Double click your image to select and insert into document. After selecting the images, the instructions above for applying a gap and aligning the image also apply. BN Nyamapanda | Private and Confidential - Document Prepared for MCA-N. All contents Copyright © 2010 MCA-N. All rights reserved. Page 19 of 53 Inserting links Inserting links in content can be in three forms. The first one is inserting a link to an already existing document or file in the media repository or inserting a normal link pointing to another resource on the internet and inserting a link to a file on you desktop which will be uploaded first. Link an existing item in Media repository To insert a link, first type in the link text for example Click here to download document. Select the text and click on the link icon. On the dialog box that comes, select Browser server and a browse window appears. Double click the file you wish to link and this file is automatically inserted as the url in the Link properties dialog box. Click on Ok to finish link creation. BN Nyamapanda | Private and Confidential - Document Prepared for MCA-N. All contents Copyright © 2010 MCA-N. All rights reserved. Page 20 of 53 Inserting a link to another resource on the internet Inserting this type of link is even easier. Copy your link location from where you want the link to point to. Type in your link text and click on the Link icon. In the link dialog box, paste the copied link into the URL field and click ok to finalise the link creation. Creating a link to a file on your computer Type in your link text and select it. Click on the link icon and on the link dialog box that comes out, select the upload tab. From this tab select browse and choose your file. Click send it to server to automatically upload the file and insert the link of the file. Click on ok to complete the link creation. BN Nyamapanda | Private and Confidential - Document Prepared for MCA-N. All contents Copyright © 2010 MCA-N. All rights reserved. Page 21 of 53 WEB ADMINISTRATION This function of the CMS requires administrator rights, which are only reserved for the webmaster. This right gives you full access to the website’s CMS. User Management Using this function the administrator is able to create addiotional user accounts for logging in into the CMS. When selected, this option produces this page: Image: User Management Add User To add a user the administrator has to fill in the details for the user including rights. If no rights are specified, the add user request fails and a message is displayed. When all required fields are entered, the user is added with the status of account set to disabled. Activate/Deactivate a User account When an account is created in the CMS is created with a status of disabled. This can be changed by the administrator by clicking on the activate or deactivate icons. BN Nyamapanda | Private and Confidential - Document Prepared for MCA-N. All contents Copyright © 2010 MCA-N. All rights reserved. Page 22 of 53 The last icon denotes the activate option, click on it to perform required action. User icon with red x means the account is active, clicking on it deactivates the account. The account is only deactivated but remains in the system. However an account in this state cannot be used to log in. Edit User Details An administrator can also modify the details of a user. By clicking on the edit icon . The details for the user loaded in the text boxes where they can be modified. Enter the new details and click on Add/Update User. If no password change is required, leave the password fields blank. If administartor is setting a new pssword for the user, just enter the new password in the two textboxes and click on update user. Delete User This option permanently delete a user account from the system and is not reversable. Confirmation is required first before the system actually deletes the user. Email Management The web administrator has a tool in the CMS that allows him to communicate certain events, activities or website/cms related news to users of the CMS and the website. He has the ability to address all users (CMS and website), or CMS users only or website users only. To view this email management page, select Email Management and the following screen appears: Image: Email Management BN Nyamapanda | Private and Confidential - Document Prepared for MCA-N. All contents Copyright © 2010 MCA-N. All rights reserved. Page 23 of 53 Type in your subject, message and select to whom the email is going out to and click on send email and the emails wil be automatically sent. BN Nyamapanda | Private and Confidential - Document Prepared for MCA-N. All contents Copyright © 2010 MCA-N. All rights reserved. Page 24 of 53 PROJECTS The CMS also has a dedicated section for managing projects on the MCA website. This is only availabe to users with Project Manager rights. It is from this section that a user is able to add/modify information for MCA projects, activities and subactivities, add/modify project postings, basically news items relating to project activities and subactivities. Although projects, activities and subactivities will be preloaded in the CMs, the project manager will have full control over what appears in these projects. Although not advisable the system also has a function to delete projects, add new projects, delete activities and subactivities. The Interface Project Name Activities with their associated sub-activities Add Activity Add Sub-Activity The interface is straightforward with a hierarchy that follows this structure: Project -> Activity -> Sub-activities BN Nyamapanda | Private and Confidential - Document Prepared for MCA-N. All contents Copyright © 2010 MCA-N. All rights reserved. Page 25 of 53 Projects Add a Project Although it’s highly unlikely that a new project will be added in the system, the function to add a new project is available by clicking on the Add Project Link. When selected the following Screen appears: Image: Add Project Fill in the fields as highlighted by the form and click add project. If no errors are found in your data the project is added. To use the text editor correctly refer to notes under Text editor and File Manager. Editing a Project To edit a project, select the edit icon next to the project and you are taken to the edit project page. Modify your information and click update project and your information is updated. BN Nyamapanda | Private and Confidential - Document Prepared for MCA-N. All contents Copyright © 2010 MCA-N. All rights reserved. Page 26 of 53 Activities Add Activity An activity can be added only if a project exists. This is because every activity is linked to a project. To add a new activity, click on the add icon under the relevant project on the Manage Projects Page. You are immediately taken to the add activity page which automatically fills in the project information for you. Enter all requested information and click Add activity. The activity is immediately created. Edit Activity To edit an activity, click the edit icon under the activity and you will be taken to the edit page. Modify your information as requested and click update activity upon which the activity is updated. Delete Activity Use this option when absolutely necessary otherwise just use the edit option as highlighted above. Click on the delete icon under the activity in question. A confirmation box should pop up. Click yes and the activity is immediately deleted. This action is permanent and cannot be undone. BN Nyamapanda | Private and Confidential - Document Prepared for MCA-N. All contents Copyright © 2010 MCA-N. All rights reserved. Page 27 of 53 Sub activities Add Sub-activity Sub activities can be added under a specific Activity. Click on the add icon under a specific activity. This mean the sub activity being added falls under the selected activity. An add sub activity page is displayed, with the project name and activity name automatically filled in: Enter the sub activity name and type in/paste the required information and click on add sub activity to complete operation. Edit and Delete To edit a sub activity use the edit icon to re-open the sub activity and modify information. Where necessary you can use the delete icon under the sub activity to delete it permanently from the CMS. Project Posting These are news event and actions happening in Projects. Project managers have the ability manage their own project postings. When selected the list of postings is grouped by project and by activity. Add Project Posting To add a project posting, select under which activity the posting falls and select the appropriate add posting link. You are then taken to the add project posting page where the activity information is automatically preloaded for you. BN Nyamapanda | Private and Confidential - Document Prepared for MCA-N. All contents Copyright © 2010 MCA-N. All rights reserved. Page 28 of 53 Type in title and content for posting and click on add activity posting to complete action. Edit and Delete To edit a posting, click on the edit icon of the posting to be edited. You will be taken to the edit page for the posting from where you can modify your information and save it back into the database. To delete a posting, click the delete icon on the item to be deleted. Confirm the action and the posting will be deleted. BN Nyamapanda | Private and Confidential - Document Prepared for MCA-N. All contents Copyright © 2010 MCA-N. All rights reserved. Page 29 of 53 NEWS AND EVENTS This section requires Public Relations rights to access. Main purpose of this section is to allow the management of the news articles, events and press releases that appear on the MCA website. Main actions involve upload press releases and adding news articles of activities happening within MCA Namibia. Clicking on the news and event link will take you to a list of loaded news articles. You can use the second level navigation menu to select other options. Articles Add Article To add an article, click on the Add Article link and the add article page is displayed. BN Nyamapanda | Private and Confidential - Document Prepared for MCA-N. All contents Copyright © 2010 MCA-N. All rights reserved. Page 30 of 53 Select type of article, Announcement or Press Release. Select your desired publish and expiry dates. Type in the title If you have selected the type as press release, click browse to attach the press release document In the text editing area type in or paste your document content. Use the insert image functions described above to insert images and links in your article. Click ad article when all information has been selected. If no errors are generated, your article is added and you are taken back to the list of article which is sorted by publish date. Editing and Deleting To edit an article, select the edit icon for the article and you will be taken to the edit article page from where you can modify your article details. To delete article, select the delete icon for the item to be deleted and after confirmation the article is deleted. Events Add Event To add an event, click on the add event link and the create event page will open. Type in Event Name Select Event Date Select Time Type in Venue/Location BN Nyamapanda | Private and Confidential - Document Prepared for MCA-N. All contents Copyright © 2010 MCA-N. All rights reserved. Page 31 of 53 Type in other important information for the event in te text editing area, including images, files etc required for users to view or download. If the even requires automated event registration select the option Require Registration. Editing and Deleting To edit an event, select the edit icon for the event and you will taken to the edit event page from where you can modify your event details. To delete event, select the delete icon for the item to be deleted and after confirmation the event is deleted. Automated Event registration This function allows the Public Relations staff to see the people who have registered for a specific event and use their details for either contacting them directly or sending them updates on the event. To access this function, click on Automated Event registration and the following screen will be displayed which shows all the events that have the registration flag set. To view people who have registered for a specific event, select the first icon [view registrants] and another page opens showing the events details together with the list of people who have registered for that event. BN Nyamapanda | Private and Confidential - Document Prepared for MCA-N. All contents Copyright © 2010 MCA-N. All rights reserved. Page 32 of 53 MANDATORY REPORTING Mandatory reporting will mainly be used to update the public on MCA Namibia internal activities. This will mostly be in the form of reports, minutes of meetings, board resolutions etc. Public Relations rights are required to access this section. Compliance Score Cards Clicking the Mandatory reporting link will take you to the list of loaded compliance score cards. Add Scorecard To add a new compliance score card, click on the Add Compliance Score card link and the following page will be displayed: BN Nyamapanda | Private and Confidential - Document Prepared for MCA-N. All contents Copyright © 2010 MCA-N. All rights reserved. Page 33 of 53 Scorecards on the website will be displayed graphically in the form of image charts. This means the image to be uploaded needs to be the correct size otherwise it won’t appear correctly. Select the year for which the score card is for. Select the area of the score card Click browse to select the image which is the scorecard Type in supporting text for the image. Click add scorecard to begin the upload and saving of the score card. On successful upload, you are taken back to the list of scorecards. Edit/Delete To edit or delete scorecards use the Manage Compliance scorecards. Use the edit icon to edit a scorecard and use the delete icon to delete a scorecard permanently. Mandatory Postings Mandatory posting are news article related to MCA’s mandatory reporting. They will be displayed on the Mandatory Reporting page on the website. Add Posting To add a new mandatory reporting post, click on add postings feed. Type in the title of the posting Type in the Type for the posting eg Audit Reports and reports/ evaluations by external reviewers Select Publish and expiry date Type in/paste your content in the text editing area. Click on add posting to complete the add BN Nyamapanda | Private and Confidential - Document Prepared for MCA-N. All contents Copyright © 2010 MCA-N. All rights reserved. Page 34 of 53 Edit/Delete To edit or delete postings use the Manage Postings link. Use the edit icon to edit a psoting and use the delete icon to delete a posting permanently. BN Nyamapanda | Private and Confidential - Document Prepared for MCA-N. All contents Copyright © 2010 MCA-N. All rights reserved. Page 35 of 53 BACKGROUND INFORMATION This section allows users to modify information that will appear under About Us on the website. Manage About Pages The CMS comes with 3 preloaded about Pages, About MCA Namibia, About MCC and About Namibia. Under these pages you can add any number of sub-pages containing any information you feel is required to explain MCA’s story. Use the edit icon to edit an existing about page or subpage. Click on the browse button to preview an about page. Adding a New About Page If a new section needs to be added, click on Add About Page link where you will be taken to the add about page: BN Nyamapanda | Private and Confidential - Document Prepared for MCA-N. All contents Copyright © 2010 MCA-N. All rights reserved. Page 36 of 53 Type in the name of the page and the page content in the text editing area and click on Add Page to add page. On completion you are taken back to the pages list from where you can add sub pages under this about page. Manage funding Timeline This function allows a user to add funding timeline items as they occur at MCA. Selecting this link will take you to a page which contains a list of existing timeline items. To add a new funding timeline item, click on add funding timeline link and a page like this will be displayed: Select type, Milestone or Task Type in Title Enter the timing, eg November 2005 - April 2006 or gust 2010 Select the beginning of the milestone/task date. This will be used for sorting purposes. Enter the content text in the text editing area. BN Nyamapanda | Private and Confidential - Document Prepared for MCA-N. All contents Copyright © 2010 MCA-N. All rights reserved. Page 37 of 53 Click add funding time line item BN Nyamapanda | Private and Confidential - Document Prepared for MCA-N. All contents Copyright © 2010 MCA-N. All rights reserved. Page 38 of 53 PROCUREMENT The procurement section in the CMS shall be used to manage all aspects of the Procurement function on the MCA website. Procurement rights are required to access this function. General Procurement Notices When opened the procurement function displays the current general procurement notice together with the loaded procurements. It is from this page that you can manage the procurements that are contained in the GPN document. The GPN page looks like this: This page contains items in this order: GPN -> Project -> Procurement Under a GPN you can add projects eg Tourism, Agriculture, Admin etc and under these projects you can then add procurements. To add a project under a GPN click on the add button on the GPN row. To add a procurement click on the add button on the project row. BN Nyamapanda | Private and Confidential - Document Prepared for MCA-N. All contents Copyright © 2010 MCA-N. All rights reserved. Page 39 of 53 Adding a Project This defines a project name together with the cost that is apportioned to that project. When selected, it display the following page: Enter Project name and any associated text and click add GPN project. On complete, a new project will appear under the GPN. Adding a Procurement A procurement is added under an associated project. Click on the add buton on the project row, and you are taken to the add procurement page. The GPN title and Project are automatically inserted on the add procurement page. Type in procurement Code Type in Procurement Name Select Procurement Type, if they are multiple, use the text box below the type drop down box Select Selection Method Type in estimated date Type in/Paste details of the procurement in the text editing area Click on Add Procurement to add procurement BN Nyamapanda | Private and Confidential - Document Prepared for MCA-N. All contents Copyright © 2010 MCA-N. All rights reserved. Page 40 of 53 If there are no errors the procurement is loaded and you are taken to the GPN page containing the other procurements. Editing/Deleting To edit or delete either a GPN, project or procurement, use the icons next to the items. Manage Specific Procurement Notices This function allows procurement staff to load SPNs in the CMS and have them displayed in the website. When selected, it display the current list of procurements together with any SPNs that are already loaded. BN Nyamapanda | Private and Confidential - Document Prepared for MCA-N. All contents Copyright © 2010 MCA-N. All rights reserved. Page 41 of 53 Adding an SPN An SPN is loaded under a GPN. To add an SPN click on the add button of the procurement you want to add an SPN to. You are then taken to the Add SPN Page Enter all fields as they are all required. Select Start date and End dates that are valid. Type in or paste the description text for the SPN. Optionally you can provide a link to the SPN document by linking it in the text editor. Editing/DeletingSPNs To edit or delete either an SPN use the icons next to the SPN. Deleting an SPN deletes that SPN and its associated bidding documents. Adding Bidding Documents to an SPN When bidding documents are published, they have to be added to the SPN. On the row containing the SPN, under the actions tab, click the add button, which takes you to the add bidding document page. BN Nyamapanda | Private and Confidential - Document Prepared for MCA-N. All contents Copyright © 2010 MCA-N. All rights reserved. Page 42 of 53 The Procurement name is automatically displayed for you. Type in the type of the Bidding document, eg Request for Proposal and click on Browse and select the file from your computer. Click add document to start the upload. When successful, you are taken to the SPN page which shows you the bidding documents in this format: Editing/Deleting Bidding Documents To delete a bidding document, use the delete icons next to the bidding document. To edit click on the edit icon and you will be taken to the original creation page with all information prefilled with a link to view the currently loaded file: BN Nyamapanda | Private and Confidential - Document Prepared for MCA-N. All contents Copyright © 2010 MCA-N. All rights reserved. Page 43 of 53 To change bidding document type, type in the correct title. To change the file, select browse and choose the new file and click update document. Managing Bidders who have downloaded a Bidding Document The CMS comes with functionality to notify all bidders who have downloaded a particular document. For example after editing a bidding document, you can use this function to notify all those users who have downloaded the document that a new document has been loaded. Since a copy of all users who have downloaded the file is automatically kept by the site, this process is simplified. On the SPN list page click the Manage Bidders icon Manage Bidders icon When selected you are taken to this page Type in you text and subject, insert document as links or images and click send emails when done. To view the recipients before sending click View Recipients and a pop up box will be displayed: Email are sent as individual emails to each recipient in turn. BN Nyamapanda | Private and Confidential - Document Prepared for MCA-N. All contents Copyright © 2010 MCA-N. All rights reserved. Page 44 of 53 Managing Notice of Awards When a procurement is complete, MCA procurement rules specify that notice of awards should be posted on the website, identifying the winning bid. To manage these awards, adding, editing and deleting, click on the Manage Notice of Awards Link. This list from which you can create notice of awards is a list of those procurements which are closed, or are marked as closed. To create an award list, click on Create Award Notice from which you will be taken to this page: Select Award Date Enter the name of the winning bid Type in Duration of the contract Enter Price of the awarded contract Type add in the Summary scope of supply Click Add award notice to complete process BN Nyamapanda | Private and Confidential - Document Prepared for MCA-N. All contents Copyright © 2010 MCA-N. All rights reserved. Page 45 of 53 Editing/Deleting Notice of Awards To access the edit and delete functions for notice of wards, you have to open the page containing the notices themselves by clicking on View Notice of Award link. The list that will be displayed will be the list of awards that are currently in the system. To edit or delete an award notice use the icons next to the award notice. Procurement Postings Procurement postings are procurement articles that need to be highlighted on the procurement page. These are managed by clicking on the Procurement Postings links. Clicking this link takes you to this page: To add a new Procurement Posting, click on the Add Procurement Posting link BN Nyamapanda | Private and Confidential - Document Prepared for MCA-N. All contents Copyright © 2010 MCA-N. All rights reserved. Page 46 of 53 Type in title of the procurement posting and the corresponding text and click add posting. Editing/Deleting Procurement Postings To access the edit and delete functions for procurement postings, you have to open the page containing the postings by clicking on Manage Procurement Postings link. The list that will be displayed will be the list of postings that are currently in the system. BN Nyamapanda | Private and Confidential - Document Prepared for MCA-N. All contents Copyright © 2010 MCA-N. All rights reserved. Page 47 of 53 RECRUITMENT The recruitment section in the CMS shall be used to manage all aspects of the recruitment function on the MCA website. Human Resources rights are required to access this function. To add an employment opportunity click on the Add employment opportunity link and you will be taken to this page: Enter job title Select deadline Select date of posting if it’s different from the current date Enter details for employment opportunity in the text area; alternatively link the associated job description document. Managing Applicants When an employment opportunity is active all submitted applications and CVs are available for viewing in the CMS. Click on the manage applicants icons to view list of candidates who have applied for a job. BN Nyamapanda | Private and Confidential - Document Prepared for MCA-N. All contents Copyright © 2010 MCA-N. All rights reserved. Page 48 of 53 Manage/View Applicants Icon Clicking on this icon takes you the page showing details of the employment opportunity together with the applicants together with a link to view the CVs BN Nyamapanda | Private and Confidential - Document Prepared for MCA-N. All contents Copyright © 2010 MCA-N. All rights reserved. Page 49 of 53 MANAGE PHOTO ESSAYS This section of the CMS is open and available to all users in the CMS. Its available on the main menu and on the footer bar. When selected it displays the list of active photo essays and a number of system galleries. To add a new Photo Essay, click on the add photo essay link. The add photo essays text boxes slide down and appear like this: Enter the title of the photo essay and the description and click add album. BN Nyamapanda | Private and Confidential - Document Prepared for MCA-N. All contents Copyright © 2010 MCA-N. All rights reserved. Page 50 of 53 Adding Images to an album To add images to an album use the add images icon: Add images icon When clicked it takes you to the add images page. This page requires Flash Player version 9+ to work correctly. To add images to this album, click on select files and a browse dialog box comes out. This add images supports adding multiple images at once, so select all your images and click open, and they will loaded automatically one after the other. BN Nyamapanda | Private and Confidential - Document Prepared for MCA-N. All contents Copyright © 2010 MCA-N. All rights reserved. Page 51 of 53 Deleting Images To delete an image, click on the delete link/icon below the image. Confirm the deletion and the image is deleted permanently. Adding Image Descriptions To add an image description, use the add image page. Click on the image on which you want to add a description. A pop-up box will be shown from which you can add your image description. Type in your image description and the description is updated. Click on close to and select another image to enter the description. BN Nyamapanda | Private and Confidential - Document Prepared for MCA-N. All contents Copyright © 2010 MCA-N. All rights reserved. Page 52 of 53 LOG FILE Opening the Log Files The CMS has an inbuilt log function that logs every action taken by every user in the CMS. This list if viewable by all users and is read-only. Fields highlighted are all automatically recorded in the course of using the CMS. BN Nyamapanda | Private and Confidential - Document Prepared for MCA-N. All contents Copyright © 2010 MCA-N. All rights reserved. Page 53 of 53