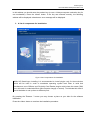
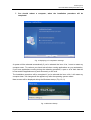
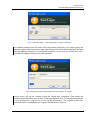
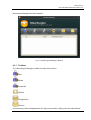
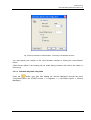
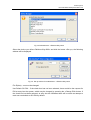
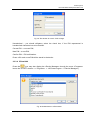
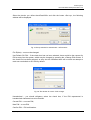
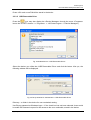
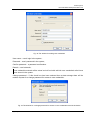
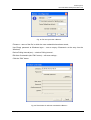
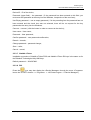
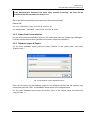
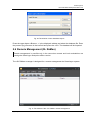
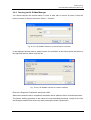
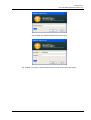
1
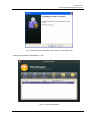
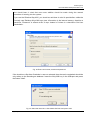
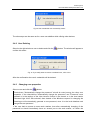
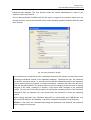
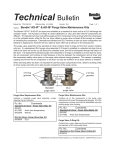
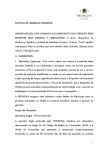
SmartLogon™
User manual
Personal Edition/Enterprise Edition v.3.9 для OS Windows
9x/ME/2000/XP/2003 Server ™
Version for contactless devices without internal memory,
Russian Intellectual Card (RIC) and electronic key
1
General Description..............................................................................................................2
2
System Administrator's Guide ..............................................................................................3
2.1
System requirements ...................................................................................................3
2.2
Installation....................................................................................................................3
2.2.1
Hardware..................................................................................................................3
2.2.2
Software ...................................................................................................................4
2.3
Interface description...................................................................................................12
2.3.1
Toolbars .................................................................................................................13
2.3.2
System menu .........................................................................................................14
2.4
Users Setups .............................................................................................................14
2.4.1
New user addition ..................................................................................................14
2.4.2
User Deleting .........................................................................................................20
2.4.3
Changing user properties.......................................................................................20
2.5
SmartLogon Setup .....................................................................................................22
2.5.1
Check Boxes: .........................................................................................................22
2.5.2
Master Password ...................................................................................................23
2.5.3
Authenticators ........................................................................................................23
2.5.3.1
Default Keys ...................................................................................................23
2.5.3.2
Proximity Card Reader RS-232......................................................................24
2.5.3.3
Rainbow iKey1000 / iKey 2000 ......................................................................25
2.5.3.4
EPass1000 .....................................................................................................27
2.5.3.5
USB Removable Drive ...................................................................................29
2.5.3.6
iButton ............................................................................................................32
2.5.3.7
Aladdin eToken ..............................................................................................34
2.5.3.8
RIC .................................................................................................................34
2.5.4
Smart Card Personalization. ..................................................................................36
2.5.5
Database Import & Export......................................................................................36
2.6
3
Remote Management (SL ReMan) ............................................................................37
2.6.1
SL ReMan Manager Menu .....................................................................................38
2.6.2
Toolbar ...................................................................................................................38
2.6.3
Running the SL ReMan Manager...........................................................................39
User's Manual.....................................................................................................................40
SmartLogon™
Personal Edition/Enterprise Edition v.3.9
1 General Description
SmartLogon is a hardware and software complex used to monitor and control access to
information resources based on two-factor authentication.
SmartLogon is designed for information and control access protection.
IIG SmartLogon system, developed by the Info Industries Group, is used for information
security upgrading due to an additional authentication and control of users' access to
information resources.
The system supports hardware tools for access control and information protection
implementing:
•
ISO 30 proximity cards manufactured by Motorola
•
HID proximity cards
•
E-Marine proximity cards
•
Rainbow Technologies iKey1000/iKey2000
•
Feitian Technologies ePass1000
•
Aladdin eToken PRO
•
Aladdin eToken R2
•
iButton
•
Russian Intellectual Card (RIC)
•
Eutron CryptoIdentity
•
portable USB-devices
The list of supported devices is constantly growing.
The system is easy to install and easy to use. The SmartLogon utilizing may extremely ease
installation, setup and use of hardware protection tools.
New system is able to upgrade information security level of corporate information resources
and electronic commerce systems.
Руководство пользователя
2
SmartLogon™
Personal Edition/Enterprise Edition v.3.9
2 System Administrator's Guide
2.1 System requirements
•
USB-port available (for the Rainbow iKey1000, Aladdin eToken PRO, Aladdin eToken
R2);
•
COM-port available (for the Proximity card reader, iButton);
•
option of a power pad mounting on the system unit back board (for the Proximity card
reader);
•
CD-ROM or DVD-ROM drive;
•
One of the following systems should be installed: Windows 2003 Server, Windows
2000, Windows XP pro, Windows XP Home Edition, Windows 9x/ME.
•
Monitor resolution of 800 х 600 and higher for installation
2.2 Installation
2.2.1 Hardware
The Proximity card reader installation:
1. Switch off a computer
2. Remove the system unit cover and mount a power pad for the reader in one of the
vacant places.
3. Connect the power pad power connector of to one of the vacant power connectors of
the system.
4. Replace the system unit cover.
5. Connect the reader:
•
Connect the reader's power connector to the power pad's connector
•
Information connector connect to the system unit COM-port
6. Switch on the computer.
Note: Only for the Proximity card reader
USB extension cables may be necessary for a more convenient utilization of electronic keys
(especially for the cases when a USB-port is not available on the system unit front board).
For RIC utilization you should connect any standard reader.
Руководство пользователя
3
SmartLogon™
Personal Edition/Enterprise Edition v.3.9
2.2.2 Software
Insert the SmartLogon disk in the CD(DVD)-ROM drive. If the autostart function is disabled,
open the explorer or "My computer" and run the file «setup.exe» from the root directory of the
CD. Follow the installation program prompts.
For IIG ® SmartLogon ™ installation the setup.exe is used, including the following steps:
1. The Installation Wizard is ready. You must prompts from that will help you to
complete the software installation process in a series of sequential steps.
Fig. 1 SmartLogon Setup is Preparing Install Shield Wizard
Press "Cancel" to abort Smart Logon installation.
Fig. 2 The system is ready for Smart Logon installation
Руководство пользователя
4
SmartLogon™
Personal Edition/Enterprise Edition v.3.9
Press the button "Next" to continue the installation procedure.
2. Then "Smart Logon license agreement and limited warranty" terms will be
displayed.
Fig. 3 Displaying of "license Agreement"
Press «Yes» button to continue the installation procedure. Press "No" to abort SmartLogon
installation.
Fig. 4 Enter valid Product Key
Руководство пользователя
5
SmartLogon™
Personal Edition/Enterprise Edition v.3.9
In this window you should enter the product key (or use a 14-days computer evaluation key for
one workstation). Press the «Next» button. If the key was entered correctly, the following
window will be displayed; otherwise an error message will be displayed.
3. A list of components for installation:
Fig. 5 A list of components for installation
While IIG SmartLogon installing it is recommended to install plugins only for those devices
which will be used in order to accelerate operating system load. Bear in mind that
simultaneous use of iButton and Proximity Card Reader plugins which share the same COMport, will result in undesired effects (like computer hangup or restart). To eliminate this effect it
should be better to set up them to different ports.
By pressing the "Browse…" button you may choose a place on your disc for the software
installation.
Press the «Next» button to continue the installation procedure.
Руководство пользователя
6
SmartLogon™
Personal Edition/Enterprise Edition v.3.9
4. The "Startup" menu folder is displayed to add program icons.
Fig. 6 A menu folder for icons
Programs icons will be stored in a new SmartLogon programs folder by default. To store them
in the other folder choose it from the list below.
Press the «Next» button to continue the installation procedure.
Руководство пользователя
7
SmartLogon™
Personal Edition/Enterprise Edition v.3.9
5. Enter the Supervisor Password (Master Password).
Fig. 7 You may choose the Master Password here.
The Master password (if defined) should be request during the «SmartLogon Manager» start
and deinstallation.
During the SmartLogon installation before Master password entering check that the keyboard is
set to English, and the Caps Lock is switched off, otherwise you can't reset it anymore.
Руководство пользователя
8
SmartLogon™
Personal Edition/Enterprise Edition v.3.9
6. The software package is installing. Installation procedure is displayed in the
status bar.
Fig. 8 Displaying of the installation procedure.
The installation procedure will be aborted after pressing the «Cancel» button, and all software
components will be deleted from your computer.
Руководство пользователя
9
SmartLogon™
Personal Edition/Enterprise Edition v.3.9
7. You should reboot a computer, when the installation procedure will be
completed.
Fig . 9 Displaying of a completion message
A system will be rebooted automatically if you've selected the item «Yes, I want to restart my
computer now». To continue you should exit all other running applications on your workstation.
If you have applications running during the rebooting procedure, a part or all of their data will
be lost and the applications may work incorrectly or not at all.
The installation procedure will be completed if you've selected the item ««No, I will restart my
computer later». All changes will be applied only after the operating system restart.
New screens will be displayed during the Windows startup. (Fig. 10,11)
Fig. 10 Windows Startup
Руководство пользователя
10
SmartLogon™
Personal Edition/Enterprise Edition v.3.9
Fig. 11 Insert Proximity – card to the reader or press Ctrl-Alt-Del
If the Master password was not preset «Don’t ask master password» is no chosen during the
operating system reboot procedure, then after pressing Ctrl-Alt-Del will be displayed the alert
message «Master Password is not configured correctly». In this case you should click «OK»;
otherwise the «Master Password» will be requested.
Fig. 12 Enter your name and password and click «Enter» or «Logon»
Device drivers will not be installed during the SmartLogon installation. They should be
installed separately before the first start of the appropriate devices. Drivers may be displayed
on the manufacturer's web-site or on the CD IIG SmartLogon. The program product has
passed the test for compatibility with original CD-ROM drivers' versions.
Руководство пользователя
11
SmartLogon™
Personal Edition/Enterprise Edition v.3.9
2.3 Interface description
After the program package installation in the menu "Programs" there will be displayed a folder
with IIG icons
SmartLogon Manager, Device Manager and Remote Manager, enabling SmartLogon Manager
and Device Manager applications running. Device Manager running is reviewed in the items.
Ошибка! Источник ссылки не найден. Authenticators. SmartLogon Manager interfaces will
be described bellow.
During the SmartLogon Manager startup procedure there will be displayed a supervisor
(administrator) password request window «Supervisor Password» (if the Master-password has
been set):
Fig. 13 Supervisor password request window
Enter the password and click «OK» (a password has been set by a delivery moment. A
password request window will not appear, if a supervisor password hasn't been set or if it is a
blank password.
Руководство пользователя
12
SmartLogon™
Personal Edition/Enterprise Edition v.3.9
SmartLogon Manager has been installed:
Fig. 14 «SmartLogon Manager» Window
2.3.1 Toolbars
The «SmartLogon Manager» toolbar consists of six buttons:
Add
Delete
Properties
Refresh
Configuration
Devices
A context menu will be displayed after the right mouse button clicking over the main window:
Руководство пользователя
13
SmartLogon™
Personal Edition/Enterprise Edition v.3.9
Fig. 15 A context menu
2.3.2 System menu
The system menu also contains a submenu with rarely using actions:
Fig. 16 System menu
Export Users – export users database;
Import Users - import users database;
About SmartLogon Manager – about the program.
2.4 Users Setups
During the SmartLogon system setup one may add, remove and edit users, assign
authenticators to users and specify the SmartLogon system actions.
2.4.1 New user addition
Insert the Proximity – Card into the reader. Сlick the button
«New user addition» Wizard will start.
Руководство пользователя
on the toolbars, and the
14
SmartLogon™
Personal Edition/Enterprise Edition v.3.9
Fig. 17 The «New user addition» Wizard
Follow the Wizard prompts. Assign an authenticatation deice.
Fig. 18 Assign an authenticator
You may limit the period of the Proximity Card or other media reading in this window by clicking
the radio button "Next" and entering data and time of the time-out period of the media running
in the appropriate windows.
Руководство пользователя
15
SmartLogon™
Personal Edition/Enterprise Edition v.3.9
Enter user's name, domain and password. «User's name» and «password» shall coincide with
the name and password, set in the specified «domain».
Fig. 19 Enter user's name, domain and password.
Three types of pattern fills of the window are readily available:
•
All boxes are not filled – in this case to enter into the system you should insert the
Proximity-card in the reader, and specify user's name, password and domain in the
appropriate boxes;
•
The boxes : «User's name» and «domain» were filled - – in this case to enter the
system you should follow the same procedure as in the previous case, but you should
enter only a «password»;
•
All boxes are not filled and the check-box "password" is selected - to enter the system
you should just insert the Proximity-card in the reader.
See. User's Features Updates – it refers to this window as well
Руководство пользователя
16
SmartLogon™
Personal Edition/Enterprise Edition v.3.9
Fig. 20 The procedure is completed - the system is in the Ready state
A new user appeared: Administartor – IIG
Fig 21. A new user appeared
Руководство пользователя
17
SmartLogon™
Personal Edition/Enterprise Edition v.3.9
You should bear in mind that new users addition should be made during the manual
procedure of entering into the system.
If you use the Rainbow iKey1000, you should as well bear in mind its peculiarities: unlike the
Proximity card Rainbow iKey1000 keys store information in the internal memory, therefore a
check-box "Password" is absent at the ¾ step. Instead of it there is a check-box «Set User
Credentials».
Fig. 22 Enter user's name, domain and password
If the check-box «Set User Credential » was not selected, then the user's credentials should be
only written to the SmartLogon database. Insert the iKey1000 key in the USB-port and press
the button "Next".
Fig. 23 Select the check-box «Use default SO PIN» and press «OK»
Руководство пользователя
18
SmartLogon™
Personal Edition/Enterprise Edition v.3.9
Select the check-box «Use default SO PIN» and press «OK» or enter the SO PIN manually.
If you enter a user only to the SmartLogon database, press the «Cancel» button.
Fig. 24 User credentials are successfully saved
User credentials are successfully saved - press «OK».
Steps 1/4 , 2/4 , 4/4 for a new user addition are the same as for a new user addition while
utilizing the «Proximity card».
A new user addition procedure for ePass1000 is the same as for the Rainbow iKey1000
If you use portable USB-devices , then after the 3-rd step, as in the case with the Rainbow
iKey1000, the following window will be displayed .
Fig. 25 Specify a device and access password
You should select a device from the dropdown list, where user credentials shall be saved, and
enter a password (in case of need) in the fields «Password» and «Confirm» for the access (this
password must be requested during the entering into the system, and these fields are not
obligatory for filling).
Press the «OK» button.
Руководство пользователя
19
SmartLogon™
Personal Edition/Enterprise Edition v.3.9
Fig. 26 User credentials are successfully saved
The other steps are the same as for a new user addition while utilizing other devices.
2.4.2 User Deleting
Select in the right window a user to delete and click the
confirm this action.
button. The window will appear to
Fig. 27 If you really want to remove a selected user, click «Yes»
After the confirmation the user's credentials will be deleted.
2.4.3
Changing user properties
Select a user and click the
button.
Check-boxes "Automatically change the password" should be noted among the other user
properties. If the check-boxes "Automatically change the password" and "Password" were
selected or in the settings of the User Account Control in the domain or in the local station
"Password Age Limit" was selected, then instead of the Windows request for changing the
SmartLogon will automatically generate a new password, store it to the local database and
change the user password
If the user had an access to some work stations, then after automatically changing of the
password he should immediately have an access just to the work station, on which the
Руководство пользователя
20
SmartLogon™
Personal Edition/Enterprise Edition v.3.9
password was changed. The user should contact his system administrator in order to get
access to other work stations.
All the aforementioned conditions will be the same in regard to the devices which have no
internal memory, such as the Proximity Card under operating systems Windows 2000 Pro and
later versions.
Fig. 28 «User properties» window
You should bear in mind that all user credentials entered to this window, will be stored in the
SmartLogon database instead of the Windows database. Therefore the user, his password
and domain should be actual, i.e. should coincide with the credentials stored in the operating
system (domain and group names or locality information), otherwise this card can't be use to
enter the operating system. This window may be used for changing of the card user or making
changes in the name, password or domain, if they have been changed in the operating
system. You may also correct the procedure of entering the operating system: if the check box
"Password" was not selected, the user should enter the password to enter the operating
system.
While utilizing electronic keys (Rainbow iKey1000 или ePass1000) and USB-devices only
user should be added to the database, and all his credentials should be stored in the key.
Wind 9.x. if the check box "Automatically change the password" was selected, the password
will be changed in two weeks.
Руководство пользователя
21
SmartLogon™
Personal Edition/Enterprise Edition v.3.9
If in the system domain was selected an option "Don't change a password", the password
shouldn't be changed. The password shouldn't be also changed in the case when the user
shouldn't be allowed to change a password.
user validation in the domain is made in the case when there are no user limitations
If the password change is assigned for the domain, the change should be made when the
user has entered the system.
If the password expired, the user can't enter the system. The domain administrator should
unlock "The password must be changed" in the user settings.
2.5 SmartLogon Setup
To start SmartLogon setup click the button
.
Fig. 29 Setup window «Configuration»
There are three check boxes in this window: the pop-down menu for the SmartLogon behavior
selection during removal the authentification device from the reader and two buttons for the
"Master password" request.
2.5.1 Check Boxes:
Allow the SmartLogon – if the appropriate check box has been selected, the procedure of
entering the operating system, and the SmartLogon will define its behavior.
Allow unauthorized access – has been selected: allow the entrance from unauthorized devices,
such as USB devices to store user credentials (name and password). When the Proximity-card
Руководство пользователя
22
SmartLogon™
Personal Edition/Enterprise Edition v.3.9
is used this check box selection means that the user is allowed for performing the operation to
enter his credentials.
No request for the master password – hasn't been selected: in this case when the user will
enter the operating system there will be a request for the password set in the "Master
password" (see below).
2.5.2 Master Password
There are two password types which may be defined as the "Master password":
Supervisor Password – SmartLogon System Administrator password has been set
User Password - the user password has been set .
If the check-box No request for the master password hasn't been selected the additional
password will be requested (if the smart card be not available). In this case you should enter
the Supervisor Password or the User Password to protect the system from an unauthorized
access.
The Supervisor Password will be also requested at the SmartLogon Manager startup.
Fig. 30 The Master password change window
The Master password will be requested if the smart card be not available, i.e. when you enter
the operating system the usual way, by pressing Ctrl-Alt-Del and entering the user credentials.
This option increases protection level of the operating system from an unauthorized access.
You should also note that there will be the request for the Master password and in the
Windows «safe mode», if the option "No request for the master password' hasn't been
selected (see Fig. 34)
2.5.3 Authenticators
2.5.3.1 Default Keys
If you have acquired IIG hardware authenticators, you will always know the default key settings
for the authenticator (Transport Key, SOPIN, PIN etc.). If you have acquired hardware
authenticators by your own, you should request default key settings from your supplier. A
device may be locked after a number of incorrect key entries.
Руководство пользователя
23
SmartLogon™
Personal Edition/Enterprise Edition v.3.9
Default keys for some devices are shown below in standard (manufacturer) delivery for
reference only. If you have acquired devices of other manufacturers, we can't ensure that they
will have the same keys.
Rainbow iKey 1000
SOPIN: rainbow
User PIN (hex): 12345678
ePass 1000
SOPIN: rockey
User PIN: 12345678
2.5.3.2 Proximity Card Reader RS-232
(you may also display the «Device Manager» through the menu
Press the button
«Programs» items: the «START» button -> « Programs » -> «IIG Smart Logon» -> «Device
Manager»).
You may disable devices in this window: non selected devices will be temporarily disabled
(Fig.34).
Fig. 31 Authenticators: «Proximity Card Reader RS-232»
Select the device you utilize «Proximity Card Reader RS-232» and click the button «Set up»,
the following window will be displayed:
Руководство пользователя
24
SmartLogon™
Personal Edition/Enterprise Edition v.3.9
Fig. 32 Set up window for authenticators: «Proximity Card Reader RS-232»
You may specify port number in the «Port Number» window or clicking the «Auto-Detect»
button.
Check boxes define if the beeping will be made during insertion the card in the reader or
removing it.
2.5.3.3 Rainbow iKey1000 / iKey 2000
button (you may also display the «Device Manager» through the menu
Press the
«Programs» items: the «START» button -> « Programs » -> «IIG Smart Logon» -> «Device
Manager»).
Руководство пользователя
25
SmartLogon™
Personal Edition/Enterprise Edition v.3.9
Fig. 33 Authenticators: «Rainbow iKey1000»
Select the device you utilize «Rainbow iKey1000» and click the button «Set up», the following
window will be displayed:
Fig. 34 Set up window for authenticator: «Rainbow iKey1000»
File ID(hex) – must not be changed
Use Default SO PIN – if the check box has not been selected, there would be the request for
PIN at entry into the system, which may be changed by pressing the «Change PIN» button. If
the check box has been selected, at entry into the Windows there will be made an attempt to
read user credentials on SO PIN by default.
Руководство пользователя
26
SmartLogon™
Personal Edition/Enterprise Edition v.3.9
Fig. 35 The window for user's «PIN» change
Hexadecimal – you should obligatory select the check box, if the PIN represented in
hexadecimal characters has to be entered.
Current PIN – a current PIN;
New PIN – a new PIN;
Confirm PIN – PIN confirmation.
Press «OK» and a new PIN will be stored in the device.
2.5.3.4 EPass1000
(you may also display the «Device Manager» through the menu «Programs»
Press the
items: the «START» button -> « Programs » -> «IIG Smart Logon» -> «Device Manager»).
Fig. 36 Authenticators: «ePass1000»
Руководство пользователя
27
SmartLogon™
Personal Edition/Enterprise Edition v.3.9
Select the device you utilize the«ePass1000» and click the button «Set up», the following
window will be displayed:
Fig. 37 Set up window for authenticator: «ePass1000»
File ID(hex) – must not be changed
Use Default SO PIN – if the check box has not been selected, there would be the request for
PIN at entry into the system, which may be changed by pressing the «Change PIN» button. If
the check box has been selected, at entry into the Windows there will be made an attempt to
read user credentials on SO PIN by default.
Fig. 38 The window for user's «PIN» change
Hexadecimal – you should obligatory select the check box, if the PIN represented in
hexadecimal characters has to be entered.
Current PIN – a current PIN;
New PIN – a new PIN;
Confirm PIN – PIN confirmation.
Руководство пользователя
28
SmartLogon™
Personal Edition/Enterprise Edition v.3.9
Press «OK» and a new PIN will be stored in the device.
2.5.3.5 USB Removable Drive
(you may also display the «Device Manager» through the menu «Programs»
Press the
items: the «START» button -> « Programs » -> «IIG Smart Logon» -> «Device Manager»).
Fig. 39 Authenticators: «USB Removable Drive»
Select the device you utilize the «USB Removable Drive» and click the button «Set up», the
following window will be displayed:
Fig. 40 Set up window for authenticator: «USB Removable Drive»
Directory – a folder in the device for user credentials storing.
Use Empty password at Windows logon – if the check box has not been selected, there would
be made the Password request for the access to the user credentials, stored in the device.
Руководство пользователя
29
SmartLogon™
Personal Edition/Enterprise Edition v.3.9
If the check box has been selected, at entry into the Windows at first there will be made an
attempt to read user credentials using Empty password.
The Password for the access to the user credentials as well as the user credentials may be
changed, pressing the «Edit» button.
Fig. 41 The window for editing user credentials
Path – USB disk name in the system.
Password – a password for the access to the user credentials;
Use Empty password – to use an «Empty password» for the access to the user credentials;
Connect – get the access to the user credentials.
Some USB disks manufacturers haven't comply with the standards for exchangeable devices.
It manifests itself in the fact that the system define such exchangeable disks as the standard
hard disk and consequently the disk has not been displayed immediately in the window for
editing user credentials. In order to correct the situation you should remove and reinsert the
disk without exit from the window.
Руководство пользователя
30
SmartLogon™
Personal Edition/Enterprise Edition v.3.9
Fig. 42 The window for editing user credentials
User name – user's login in the system ;
Password – user's password in the system ;
Confirm password – a password confirmation.
Domain – user's domain;
User credentials entered will be actual and will coincide with the user credentials which have
been stored in the system.
Change password – if this check box has been selected then at data storage there will be
made a request for a change password for access to user credentials:
Fig. 43 The window for a change password for access to user credentials stored in the device
Руководство пользователя
31
SmartLogon™
Personal Edition/Enterprise Edition v.3.9
Password – a new Password;
Confirm – a new Password confirmation.
Press the «OK» and user credentials will be stored in the device with a new password.
If you don't like to have a password request, and you have put a check mark Use Empty
password at Windows logon, then you shouldn't fill these fields.
2.5.3.6 iButton
Press the
button (you may also display the «Device Manager» through the menu
«Programs» items: the «START» button -> « Programs » -> «IIG Smart Logon» -> «Device
Manager»).
Fig. 44 Authenticators: «iButton»
Select the device you utilize the «iButton» and click the button «Set up», the following window
will be displayed:
Руководство пользователя
32
SmartLogon™
Personal Edition/Enterprise Edition v.3.9
Fig. 45 The set up window «iButton».
Filename – name of the file, in which the user credentials have been stored;
Use Empty password at Windows logon – use an empty «Password» at the entry into the
Windows;
Device Polling Interval(sec) – a device Polling Interval ;
Edit User Credentials (the “Edit” button) – edit user settings ;
Click the “Edit” button.
Fig. 46 The window for edit user credentials «iButton»
Руководство пользователя
33
SmartLogon™
Personal Edition/Enterprise Edition v.3.9
Device ID – ID of the device;
Password (upper field) – the password ( if the password has been entered to this field, you
must enter this password at the entry into the Windows, irrespective of the next item);
Use Empty password – use an empty password ( if in the preceding item the password has not
been entered and the check box was not selected, there will be no request for the key
password at the entry into the Windows;
Connect – connect ( click the button in order to connect to the device);
User name – User name ;
Password – User password;
Confirm password – user password confirmation;
Domain – domain;
Change password – password change;
Save – write;
Cancel – cancel;
2.5.3.7 Aladdin eToken
Installation procedure of Aladdin eToken PRO and Aladdin eToken R2 keys is the same as for
the Rainbow Technologies iKey1000 keys.
Default password – 1234567890.
2.5.3.8 RIC
(you may also display the «Device Manager» through the menu «Programs»
Press the
items: the «START» button -> « Programs » -> «IIG Smart Logon» -> «Device Manager»).
Руководство пользователя
34
SmartLogon™
Personal Edition/Enterprise Edition v.3.9
Fig. 47 The window for user settings editing «RIC»
Select the utilized device «RIC» and click the button «Set up», the following window will be
displayed:
Fig. 48 Set up window for the «RIC»
Use default User password – use default user password ;
Edit User Credentials – edit User credentials ;
Change User Password – change user password ;
Change Administrator Password – change administrator password ;
Unlock User Password – unlock user password (if the user has entered an incorrect password
ten times, the User Password will be locked).
Руководство пользователя
35
SmartLogon™
Personal Edition/Enterprise Edition v.3.9
If the Administrator Password has been triply entered incorrectly, the card will be
locked and will be unsuitable for further use.
Edit of this device properties is the same as for the previous devices
Default PIN:
For user : 33333333 - (hex) 33 33 33 33 33 33 33 33
For administrator : 44444444 - (hex) 34 34 34 34 34 34 34 34
2.5.4 Smart Card Personalization.
For the smart card personalization insert it in the reader and open the «SmartLogon Manager».
Further procedures have been specified in the section «New user additionT».
2.5.5 Database Import & Export
For the users database export press the button "Actions" in the system menu and select
"Export Users…".
Fig. 49 The window «Users database export»
Enter the file names for the database export in the displayed window and the protocol (log)
names and press the «ОК». The database will be stored in the assigned place.
For the users database import press the button «ОК» in the system menu and select the
«Import Users…».
Руководство пользователя
36
SmartLogon™
Personal Edition/Enterprise Edition v.3.9
Fig. 50 The window «Users database import»
Press the upper button «Browse…» in the displayed window and select the database file. Enter
the protocol (log) file name in the low field and press the «ОК». The database will be imported.
2.6 Remote Management (SL ReMan)
Remote management is possible only in the case when remote and local workstations are
running the SmartLogon enterprise edition version.
The «SL ReMan» manager is designed for a remote management the SmartLogon system.
Fig. 51 The window of the «SL ReMan» remote management
Руководство пользователя
37
SmartLogon™
Personal Edition/Enterprise Edition v.3.9
2.6.1
SL ReMan Manager Menu
•
Action;
•
Connect – connect ;
•
Synchronize – synchronize (renew);
•
Disconnect – disconnect;
•
Exit – exit ;
•
User – user u;
•
Add User – add user;
•
Delete – remove user ;
•
Properties – user's properties;
•
Settings – settings ;
•
Configuration – configuration;
•
View – view;
•
Toolbars – toolbars;
•
Standard Toolbar – standard toolbar ;
•
Status Bar – status bar;
•
Help – help;
o
Help Topics – help topics;
o
About SLReMan – about the program;
2.6.2 Toolbar
- Connect
- Synchronize
- Add User
- Delete User
- User’s properties
- Configuration
Руководство пользователя
38
SmartLogon™
Personal Edition/Enterprise Edition v.3.9
2.6.3 Running the SL ReMan Manager
You should connect the remote station in order to add, edit or remove its users. Press the
button Connect or select in the menu: Action -> Connect.
Fig. 52 The «SL ReMan" window of a remote station connection
In the displayed window enter a station's name for connection in the field or press the button to
the right and select a station from the list.
Fig . 53 The «SL ReMan» window for a station selection
Enter the «Supervisor Password» and press «OK».
When the connection will be completed, the station will be added to the list of authorized users.
The further working procedure is the same as it was described previously, except for the fact
that changes made will be active only after pressing the button Synchronize.
Руководство пользователя
39
SmartLogon™
Personal Edition/Enterprise Edition v.3.9
3 User's Manual
User's manual for SmartLogon Personal Edition and SmartLogon Enterprise Edition
SmartLogon enables alternative settings of entries into the operating system Windows and its
choice depends upon the SmartLogon system administrator.
Here are some versions of entry into the operating system Windows while utilizing SmartLogon
(all procedures are described under the assumption of the Proximity-card use, the operation
algorithm for other devices will be fully identical):
Insert You Proximity-card in the reader and switch on your PC. If the SmartLogon was preset in
a way, that you shouldn't enter the name, password and domain, the operating system will start
automatically, without additional confirmations. See also item 4 of this section.
Enter the name, password and domain at the entry into the system. SmartLogon was preset in
a way, that you should enter the name, password and domain. At the entry into the Windows
operating system you should fill appropriate fields in the dialogue window of entry into the
operating system. Bear in mind that you should insert Proximity-card in the reader.
Fig. 54 Enter the login, password and domain name (in case of need and click Logon)
Enter the password at the entry into the system. Insert the Proximity-card in the reader and
switch on your PC. During operating system loading you will be asked to enter your password.
If you haven't got a smart card, but your User Account have been stored before, you may enter
into the operating system in a common way: press Ctrl-Alt-Del and enter your login, password
and domain or group. Note, that depending upon the SmartLogon setup, you may be asked to
enter an additional password (contact your SmartLogon administrator).
Руководство пользователя
40
SmartLogon™
Personal Edition/Enterprise Edition v.3.9
Fig. 55 Enter your Master Password and click Logon
Fig. 56 Enter your login, password and domain (in case of need and click Logon).
Руководство пользователя
41
SmartLogon™
Personal Edition/Enterprise Edition v.3.9
About Us:
Info Industries Group (IIG) is an IT consulting and software development services provider.
Established in the year 2000 in Moscow, Russia by the international team, IIG has rapidly
developed into strong professional organization, capable of fulfilling complex software
development tasks for its clients in Russia and abroad.
•
Moscow Based IT Consulting & Software Development House
•
Owned and Managed by Russian and Western Managers
•
Over 50 Project management and development staff
•
European and Russian Client Base
•
With wide ranging technical, business and professional skills
•
Ready to start working on your projects today!
Contact Us:
11 Zolotorozhsky val, bldg 21, Moscow, Russia, 111033
Phone/Fax: +7 (495) 741 77 85
E-mail: [email protected], [email protected]
Web: www.smartlogon.biz
Руководство пользователя
42