1
Keyboard Security USB
USB-KS1
User Manual
1
Contents
1. Hardware Installation .................................................................................. 3 2. Software Installation.................................................................................... 4 3. Basic Usage .................................................................................................. 5 4. Advanced Setting ......................................................................................... 6 4.1 Adapter Menu......................................................................................................... 6 4.2 Adapter Setting Dialog ............................................................................................ 7 4.2.1 Security Status ................................................................................................... 7 4.2.2 Enable Options................................................................................................... 8 4.2.3 Support List ...................................................................................................... 10 5. Notation .................................................................................................... 15 5.1 Adapter Encrypted Key.......................................................................................... 15 5.2 Limitation ............................................................................................................. 15 5.3 Uninstallation ....................................................................................................... 16 2
1. Hardware Installation:
Keyboard Security USB Adapter (USB-KS1)
a. Plug your standard USB keyboard or wireless keyboard (male connector) to USB‐KS1 Adapter (female connector of USB). b. Plug USB‐KS1 male connector to your PC (desktop or laptop). c. Install the software as next section. 3
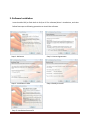
2. Software Installation
Insert bundled CD (or flash built‐in disk) to PC for software/driver’s installation, and then follow few steps as following procedure to install the software Step 1: Welcome Step 2: License Agreement Step 3: Installation Folder Step 5: Installation Successful 4
Step 4: Ready to Install 3. Basic Usage
If you install of software completed, then next time when your re‐boot it will auto‐run by default setting. The icon will appear on system tray area. There are 4 states of icon on system tray for representing USB‐KS1 status. Enabled: When the software is enabled and hardware is ready. Connected: When the USB‐KS1 is connected to the application software. The data from keyboard are protected in this state. Disabled: When the software is disabled. Disconnected: When the USB‐KS1 hardware is not found. When the USB‐KS1 is connected to application software, the data from keyboard in the application will be protected by The Anti‐keylogger System. The System will auto change the encrypted key by mouse click, <Tab> key, <Caps Lock> key and <Enter> key. The hacker only can get the meaningless encrypted data.
5
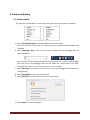
4. Advanced Setting
4.1 Adapter Menu
By right click the Software in system tray, the system menu will appear as follows. a. Select [Disable]/[Enable] to Disable/Enable the security mode. Win+Ctrl keys are the hot key for switching security mode between Enabled and Disabled. b. Select [Keylogger Bar] or left click the icon in system tray, the Keylogger Bar will appear as below: You can know the encrypted characters for each word when you are typing. Right click the icon on the Keylogger Bar will pull down the system menu, too. When
Keylogger Bar was turn-off, you can click the icon to turn-on again. c. Select [Setting] in the menu or left click the icon on the Keylogger Bar will open the setting dialog. d. Select [Help(pdf)] to open the User Manual. e. Select [About] to read the information about the system. f. Select [Exit] to close the software.
6
4.2 Adapter Setting Dialog
4.2.1 Security Status
a. On For Active Window This status will be ticked when USB‐KS1 is connecting to application software; your typing data are protected. The system tray icon will show: (Connected) b. On For Laptop PC Embedded Keyboard This status will be ticked if you have installed the Driver for your laptop PC embedded keyboard. 7
4.2.2 Enable Options
a. Security Mode When this option is ticked, the software will be enabled. The system tray and
Keylogger bar will show
or
. If Security Mode is disable then icon change to
.
b. Security Mode On/Off by Win+Ctrl Keys When this option is ticked, security mode can be turned on/off by using the Win+Ctrl keys. c. Keylogger Bar Off After 5 Seconds Without Keying When this option is ticked, Keylogger Bar will turn off after 5 seconds without keying. Win+Ctrl keys are the hot key for turn on/off the Keylogger Bar. d. Keylogger Bar On Active Window Title When this option is ticked, Keylogger Bar will always on the top of the active window. If move the cursor to the Keylogger Bar icon
, then right click will show the menu
as following.
e. Auto Run After Reboot When this option is ticked, the software will always auto‐run after system reboot.
8
f. Vision Signal In Text Window When Active
When this option is ticked, the icon will be showed on the right-top corner or right side
of a text bar when the system is connected to target application software.
9
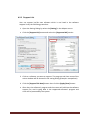
4.2.3 Support List
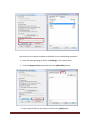
User can support her/his own software which is not listed in the software support list by the following procedure: 1. Open the Setting Dialog by select the [Setting] in the Adapter menu. 2. Click the [Support List] button and select the [Supported AP] section.
3. Click to a software you want to support. The program and class name of the active window will be showed in the setting dialog (Example: notepad.exe) 4. Click the [Support This Now] button then click the [Apply/Save] button. 5. After that, the software’s program and class name will add into the software support list, user’s typing data in the supported software’s program and class will be protected by the system.
10
11
Moreover, user can set software to the system’s Black AP list if the software is not compatible with the system by the following procedure: 1. Open the Setting Dialog by select the [Setting] in the Adapter menu. 2. Click the [Support List] button and select the [Black AP] section.
3. Click to a software you want to set to the Black AP list. The program and class name of the active window will be showed in the system’s setting dialog (Example: notepad.exe) 4. Click the [Block This Now] button then click the [Apply/Save] button. 5. After that, the software’s program and class name will add into the Black AP list, the software in the Black AP list will not protected by the system and cannot add into the Support list in order to prevent conflict.
12
User also can set a specific website to the Black list by the following procedure: 1. Open the Setting Dialog by select the [Setting] in the system menu. 2. Click the [Support List] button and select the [Black URL] section.
3. Input a specific URL to the input bar and click the [Add] button. 13
4. After that, the specific URL will add into system’s Black URL list, the Adapter security status will automatic turn off when user enters the website by Internet Explorer. 5. Note: The Black URL function only works for Internet Explorer.
14
5. Notation
5.1 USB-KS1 Encrypted Key
The system only encrypts the character keys, number keys and symbol keys in keyboard. We do not encrypt the function keys. a. USB‐KS1 Encrypted Keys: a A b B c C d D e E f F g G h H i I j J k K l L m M n N o O p P q Q r R s S t T u U v V w W x X y Y z Z 0 ) 1 ! 2 @ 3 # 4 $ 5 % 6 ^ 7 & 8 * 9 ( = + ‐ _ \ | [ { } ] ; : ’ “ , < . > / ? b. USB‐KS1 Non‐Encrypted Keys: “Space bar”, “Enter” and “~” do not encrypted by USB‐KS1 for software compatibility purpose. “.” Key in numeric keypad also do not encrypt by USB‐KS1 due to limitation of firmware. c. Special case in different keyboard layout: In most of the European keyboard layout, the “ . ” key in the numeric keypad do not encrypted by USB‐KS1 due to limitation. In the French keyboard layout, user cannot type the symbols keys on the top of the keyboard layout when USB‐KS1 is connected due to limitation. 5.2 Limitation
Due to the limitation of software, when user is switching his/her active window, we recommend user to wait for USB‐KS1 connected to the new active window before start typing to prevent miss‐type or incorrect‐type. 15
5.3 Uninstallation
The uninstallation will removed the related files of the system, if the software is currently running; please close it before proceeding with the uninstallation. After uninstallation, some Keyboard Security USB files will be removed after next reboot, please click Finish to exit or click Reboot to restart your PC. 16