1
Ta
able of Conttents
Ta
able of C
Contentts
1 Overview ...................................................... ....................................................................................... 5 5
1.1 Key ffeatures........................................ ....................................................................................... 5 5
1.2 Packkage conten
nt ................................. ....................................................................................... 5 5
1.3 Note
es on safetyy ................................... ....................................................................................... 6 6
1.4 Syste
em requirem
ments .......................... ....................................................................................... 6 6
1.5 The STAEDTLE
ER Digital pen ............. ....................................................................................... 7 7
1.5.1
1 Insertin
ng / replacin
ng a refill .... ....................................................................................... 7 7
1.5.2
2 Insertin
ng / replacin
ng the pen b
battery ............................................................................ 8 8
1.6 The receiver ........................................ ....................................................................................... 9 9
1.6.1
1 Descrip
ption of rece
eiver .......... ....................................................................................... 9 9
1.6.2
2 Resetting the device ............. ..................................................................................... 10
0 1.6.3
3 LCD display .......................... ..................................................................................... 11 1.6.4
4 Chargin
ng the batte
ery ............. ..................................................................................... 11 1.6.5
5 Attaching the rece
eiver to the p
paper ............................................................................ 11 1.6.6
6 Range of the receiver ........... ..................................................................................... 13
3 1.6.7
7 Connecction to the computer .. ..................................................................................... 13
3 2 Installation
n for Window
ws (2 CDs).................. ..................................................................................... 14
4 2.1 Syste
em requirem
ments .......................... ..................................................................................... 14
4 2.2 MySccript Studio
o Notes Edittion ............ ..................................................................................... 14
4 2.2.1
1 Installa
ation of MyS
Script Studio
o Notes Ediition and My
y Script Ink Retriever ............... 14
4 2.2.2
2 Activating MyScrip
pt Studio No
otes Edition
n .................................................................. 17
7 2.3 Mobiile Note Takker (Note Manager)
M
.... ..................................................................................... 20
0 2.3.1
1 Installin
ng Mobile Note
N
Taker . ..................................................................................... 20
0 3 Installation
n for MAC (2
2 CDs) ........................ ..................................................................................... 22
2 3.1 MySccript Studio
o Notes Edittion ............ ..................................................................................... 22
2 3.1.1
1 Activating MyScrip
pt Studio No
otes Edition
n .................................................................. 25
5 3.2 Note
e Taker (Notte Managerr) ................ ..................................................................................... 28
8 3.2.1
1 Installin
ng Note Tak
ker ............. ..................................................................................... 28
8 4 Creating notes.............................................. ..................................................................................... 31 4.1 Offlin
ne mode ....................................... ..................................................................................... 31 4.2 Onlin
ne mode ....................................... ..................................................................................... 32
2 4.2.1
1 Functio
ons of the STAEDTLER
S
R Digital pens .............................................................. 32
2 4.2.2
2 Using the
t STAEDT
TLER Digita
al pen in Windows Vistta Ink appliccations ................... 35
5 4.3 Uploading notess onto the computer
c
.... ..................................................................................... 35
5 4.3.1
1 1 / 98
Upload
ding notes with
w MyScrip
pt Studio No
otes Edition
n ................................................ 36
6 ST
TAEDTLER Digital pen
n
Table
e of Conten
nts
4.3.2 Uplo
oading note
es with Mob ile Note Tak
ker ................................................................... 36 5 Editing notes with MyScript
M
Sttudio Notess Edition............................................................................... 37 5.1 Co
onfiguring the
t upload settings......
s
........................................................................................... 37 5.1.1 "Abo
out" tab ....................... ........................................................................................... 37 5.1.2 "Rettrieval settin
ngs" tab ..... ........................................................................................... 38 5.1.3 "Peg
gasus settin
ngs" tab ..... ........................................................................................... 39 5.2 Prreferences .................................... ........................................................................................... 40 5.2.1 "Gen
neral" tab .................... ........................................................................................... 40 5.2.2 "Lan
nguages" ta
ab ............... ........................................................................................... 41 5.2.3 "Nottes" tab ....................... ........................................................................................... 41 5.3 Usser interfacce ................................. ........................................................................................... 42 5.3.1 Wind
dow ............................ ........................................................................................... 42 5.3.2 Shortcuts .......................... ........................................................................................... 43 5.4 M
Managing no
otes ............................. ........................................................................................... 44 5.4.1 Impo
orting notes
s ................ ........................................................................................... 44 5.4.2 Ope
ening a note
e................. ........................................................................................... 44 5.4.3 Navigation with
hin a note ... ........................................................................................... 44 5.4.4 Disp
play of notes
s in accorda
ance with destination
d
path
p
................................................ 45 5.4.5 Expo
orting notes
s ................ ........................................................................................... 45 5.4.6 Printing notes ................... ........................................................................................... 46 5.4.7 Adding / deletin
ng folders ... ........................................................................................... 46 5.4.8 Man
naging tags.................. ........................................................................................... 46 5.4.9 Searching throu
ugh notes .. ........................................................................................... 49 5.4.10 Mod
difying the size
s
of a notte page ............................................................................... 51 5.4.11 Dele
eting notes .................. ........................................................................................... 51 5.4.12 Cha
anging the standard
s
lan
nguage ................................................................................ 51 5.5 Ed
diting handw
written text .................. ........................................................................................... 53 5.5.1 Sele
ecting the in
nk ............... ........................................................................................... 53 5.5.2 Adding / erasing ink.......... ........................................................................................... 53 5.5.3 Cop
pying / cuttin
ng / pasting ink ..................................................................................... 54 5.5.4 Splittting ink ....................... ........................................................................................... 54 5.5.5 Cha
anging ink lin
ne spacing ........................................................................................... 55 5.5.6 Cha
anging ink size / ink col or ....................................................................................... 56 5.5.7 High
hlighting ink
k ................. ........................................................................................... 56 5.6 Co
onverting notes ............................ ........................................................................................... 56 5.6.1 Setttings ............................ ........................................................................................... 56 STAEDTLE
ER Digital pen
p
2 / 98
Ta
able of Conttents
5.6.2
2 Converrting text on
nly notes .... ..................................................................................... 57
7 5.6.3
3 Notes with
w shapes
s or drawing
gs .................................................................................. 58
8 5.6.4
4 Converrting tables .................. ..................................................................................... 60
0 5.6.5
5 Areas for
f special contents
c
.... ..................................................................................... 60
0 5.6.6
6 Excluding areas .................... ..................................................................................... 61 5.7 Editin
ng converte
ed notes ...................... ..................................................................................... 62
2 5.7.1
1 Text on
nly note ....................... ..................................................................................... 62
2 5.7.2
2 Text wiith graphic ................... ..................................................................................... 62
2 5.7.3
3 Copying and selec
cting text .... ..................................................................................... 63
3 5.7.4
4 Replaccing a shape
e ................ ..................................................................................... 64
4 5.8 Expo
orting conve
erted notes .................. ..................................................................................... 64
4 5.8.1
1 Exporting into the standard te
ext editing program
p
...................................................... 64
4 5.8.2
2 In an e-mail applic
cation ......... ..................................................................................... 65
5 5.8.3
3 Into a text editor .................... ..................................................................................... 65
5 5.8.4
4 As an image .......................... ..................................................................................... 65
5 5.9 Personal recogn
nition profile
es .............. ..................................................................................... 65
5 5.9.1
1 Creatin
ng a recognition profile ..................................................................................... 65
5 5.9.2
2 Managing recognition profiless .................................................................................... 71 5.9.3
3 Exporting / importiing recognittion profiles
s .................................................................. 71 5.10 Dictio
onary ............................................ ..................................................................................... 71 5.10..1 Adding words ........................ ..................................................................................... 71 5.10..2 Editing / deleting entries
e
....... ..................................................................................... 72
2 5.10..3 Importing / exporting the perssonal diction
nary ............................................................ 73
3 5.10..4 Managing automatic replacem
ments ............................................................................ 73
3 6 Editing the
e notes with Mobile Notte Taker (N ote Manage
er) .............................................................. 76
6 6.1 Defin
ning prefere
ences........................... ..................................................................................... 76
6 6.1.1
1 Accesss to preferen
nces: ......... ..................................................................................... 76
6 2 6.1.2
"Generral" tab ........................ ..................................................................................... 76
6 6.1.3
3 "Mobile
e" tab ........................... ..................................................................................... 77
7 6.1.4
4 "Print" tab .............................. ..................................................................................... 77
7 6.1.5
5 "Paper holder" tab
b ................. ..................................................................................... 78
8 6.2 Toolb
box ............................................... ..................................................................................... 78
8 6.3 Uploading notess onto the PC
P .............. ..................................................................................... 79
9 6.4 Editin
ng notes ....................................... ..................................................................................... 81 6.5 Printting notes ...................................... ..................................................................................... 82
2 6.5.1
1 3 / 98
Printing
g a note from a file ...... ..................................................................................... 83
3 ST
TAEDTLER Digital pen
n
Table
e of Conten
nts
6.5.2 Printing an ope
ened note ... ........................................................................................... 83 6.6 Sttoring notess .................................. ........................................................................................... 83 6.7 Re
enaming no
otes ............................. ........................................................................................... 83 6.8 M
Moving notess .................................. ........................................................................................... 84 6.9 Fiinding notess ................................. ........................................................................................... 84 6.10 Exxporting nottes .............................. ........................................................................................... 84 6.10.1 Expo
orting as JP
PEG ........... ........................................................................................... 84 6.10.2 Expo
orting in a file
f format .. ........................................................................................... 85 6.11 Im
mporting datta formats ................... ........................................................................................... 86 6.12 Se
ending / recceiving note
es ............... ........................................................................................... 87 6.12.1 Via e-mail
e
......................... ........................................................................................... 87 6.12.2 Sending via the
e local netw
work ..................................................................................... 87 6.12.3 Receiving via th
he local nettwork ................................................................................... 88 6.13 Ad
dding notess in other ap
pplications . ........................................................................................... 88 6.14 Creating stickky notes ...................... ........................................................................................... 89 6.15 Creating pap
per holder notes........... ........................................................................................... 90 6.16 Se
electing pen
n styles ....................... ........................................................................................... 91 6.17 M
Managing follders............................ ........................................................................................... 92 6.17.1 Crea
ating new fo
olders ........ ........................................................................................... 92 6.17.2 Renaming folde
ers ............. ........................................................................................... 92 6.17.3 Dele
eting folders
s ................ ........................................................................................... 92 6.18 Re
eminder fun
nction .......................... ........................................................................................... 93 6.18.1 Settting a reminder ............ ........................................................................................... 93 6.19 Ba
acking up and
a restoring the note d
database............................................................................. 94 6.19.1 Backing up the database.. ........................................................................................... 94 6.19.2 Restoring the database
d
.... ........................................................................................... 94 7 Trouble
eshooting....................................... ........................................................................................... 96 7.1 Overview ........................................ ........................................................................................... 96 8 Informa
ation regarding disposa
al ................ ........................................................................................... 98 8.1 Fo
or EC counttries ............................ ........................................................................................... 98 8.2 Fo
or non-EC countries
c
..................... ........................................................................................... 98 STAEDTLE
ER Digital pen
p
4 / 98
1 Overview
1.1 Key features
1 Overview
Thank you for choosing to purchase this efficient, quality product!
The STAEDTLER Digital pen allows all handwritten notes and
drawings on regular paper to be recorded and stored in the internal
Flash memory. This proves particularly practical whenever there is no
computer immediately at hand and you would like to retain
spontaneous thoughts or important matters. Recorded notes can then
be uploaded onto the computer via USB connection.
Comprising of a writing implement and a receiver, the STAEDTLER
Digital pen combines ultrasonic and infrared technologies with
sophisticated algorithms. This provides a precise tracking and
positioning system which traces movement of the pen tip on any
surface and converts it into a vector image of the user's handwriting.
The digital pen transfers this vector image to the receiver for storage.
Notice!
Please refer to the user manual for more detailed information
regarding all practical functions of the device!
1.1 Key features
• Record handwritten notes and drawings, even when no computer
is immediately at hand.
• Store handwritten notes in the integrated Flash memory.
• Upload the recorded handwritten notes onto a computer via USB
connection.
• Functions as a digital pen to write directly into Windows and Office
2007.
• Selectable mouse indicator function.
• No installation required for Digital Ink Features in Vista or higher
and Office 2007.
• No special paper necessary.
1.2 Package content
• Digital pen
• 2 SR41 button batteries
• 3 ballpoint pen refills in D-format
• Stylus refill
• Tweezers
• Receiver
• USB cable
• Metal box
• 2 CDs (Mobile Note Taker/ MyScript Studio Notes Edition)
• User manual (in various languages)
5 / 98
STAEDTLER Digital pen
1 Overview
1.3 Notes on safety
1.3 Notes on safety
Warning!
Risk of explosion if batteries are not inserted correctly! It is
imperative that correct polarity of the batteries is observed to
avoid injury!
Under no circumstances may batteries be thrown onto fires,
forced open, short circuited or recharged!
In the event of a leaking battery, avoid contact with skin, eyes
or mucous membranes at all costs. Rinse affected areas
immediately with plenty of clean water. Then seek immediate
medical attention.
Store batteries in a safe place inaccessible to small children.
Swallowing batteries could prove fatal. If a battery is
swallowed, seek immediate medical attention!
Keep packaging material and parts small enough to be
swallowed out of reach of children. There is a serious risk of
choking or suffocation!
Once the batteries have drained, or if the STAEDTLER Digital pen
will not be used for lengthy periods, remove the batteries from the
pen. This will prevent damage caused by leakage from the batteries.
Notice!
Only use batteries of equivalent type!
Do not expose the STAEDTLER Digital pen, the receiver or the
batteries to intense fluctuations in temperature, moisture, direct
sunlight, dusty conditions or shocks.
Do not carry out any repairs on the STAEDTLER Digital pen or its
accessories. The product could become damaged if repairs are not
carried out correctly.
Under no circumstances may the STAEDTLER Digital pen be
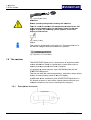
dismantled! This could lead to malfunctioning of the pen!
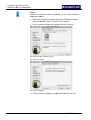
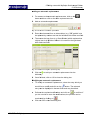
Fig. 1 Do not dismantle the pen!
1.4 System requirements
To be able to install and utilize the Software CDs included in delivery,
your system must fulfill the following requirements:
• Microsoft ® Windows XP (Sp3) or higher
• 100 MB available fixed-disk storage
• At least 128 MB working memory (512 MB recommended)
STAEDTLER Digital pen
6 / 98
1 Overview
O
1.5
5 The STAE
EDTLER Digital pen
• Minimum
M
di splay scree
en resolution
n (1024 x 7768 pixels)
• 32bit
3
color q
quality
• Free
F
USB p
port
1.5 The S
STAEDTL
LER Digittal pen
1.5.1
Insertin
ng / replacing a refil l
Twe
eezers are rrecommend
ded for removal of the refill!
Nottice!
Onlly D-format ballpoint pe
en refills (length 67 mm
m - diameter 2.35 mm)
are suitable forr the STAED
DTLER Dig
gital pen!
Nottice!
The
e ballpoint p
pen refills arre delivered
d with a prottective gel plug
p
fitted
to th
he tip. If thiss is still present, it mus
st be removved prior to insertion
i
off
the refill.
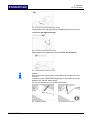
Rem
moving a re
efill with th
he tweezers
s
1. Remove th
he pen cap from the ST
TAEDTLER
R Digital pen
n.
2. Apply the ttweezers on
nto the refill of the STA
AEDTLER Digital
D
pen.
3. Grip the pe
en securely
y in one hand and pull tthe refill slowly from
the casing .
Fig. 2 Removing tthe refill with th
he tweezers
Rem
moving a re
efill with th
he pen cap
The
e upper secction of the pen
p cap can
n also be ussed as an extraction
e
dev
vice.
1. Remove th
he pen cap from the ST
TAEDTLER
R Digital pen
n
2. Place the rrefill in the middle
m
of the extractionn device. Grip the pen
securely in
n one hand and apply pressure
p
to the pen witth the
extraction device.
Fig. 3 Extraction d
device
Atte
ention!
Und
der certain
n circumsta
ances, the electronics
e
s inside the
e pen
cou
uld sustain
n damage as
a a result of
o excess p
pressure being
app
plied by the
e extraction
n device off the pen ccap.
3. Remove th
he used refill.
7 / 98
ST
TAEDTLER Digital pen
n
ew
1 Overvie
1.5 The S
STAEDTLE
ER Digital pe
en
Fig.
F 4 Removin
ng the refill
Inserting a refill
4. Insert th
he refill into
o the pen tip
p.
Fig.
F 5 Inserting
g the refill
5.
5 Push th
he new refill down lightly with the ffingers so th
hat it sits
snugly.
Fig.
F 6 Inserting
g the refill
Attention!
A
Under
U
certa
ain circumstances, th
he electron
nics inside the pen
could
c
susta
ain damage if the refiill is pusheed too hard
d!
1.5.2
Inserrting / replacing the pen batte
ery
1.
1 Remove
e the cover of the batte
ery comparttment.
2.
2 Insert tw
wo SR41 ba
atteries with
h the positivve poles fac
cing upwards.
3.
3 Close th
he cover of the battery compartmeent.
STAEDTLE
ER Digital pen
p
8 / 98
1 Overview
O
1.6
6 The receivver
Fig. 7 Replacing th
the battery
Atte
ention!
Ens
sure correc
ct polarity when
w
inserrting the baatteries.
The
ere is a risk
k of explos
sion if the replacemen
r
nt batteries
s are not
of the
t require d battery ty
ype. As the
e battery p ower for th
he pen
beg
gins to draiin, the follo
owing symbol appearrs on the LCD
display of the
e receiver:
Fig. 8 Battery sym
mbol
Nottice!
This
s symbol is displayed for
f each new note. Thee application
n icon in
the taskbar cha
anges when
n the batterries are repllaced.
Fig. 9 Application icon in the tas
skbar
1.6 The re
eceiver
The
e STAEDTL
LER Digital pen is a unique piece oof equipment which
reco
ords handw
written notes
s on regularr paper, storres these notes to
mem
mory and th
hen uploads
s them onto
o a computeer.
It is possible to
o record and
d store up to
o 100 DIN A
A4 sides with the
STA
AEDTLER D
Digital pen.
The
e user can rread the currrent page number,
n
thee battery charge statuss
and
d the curren
nt operating mode on th
he LCD dispplay.
A USB
U
cable a
allows conne
ection of the
e STAEDTLLER Digital pen to a
PC whether at home or in
n the office. Upload storred notes onto
o
your
mputer wherre they can then be subsequently managed.
com
1.6.1
9 / 98
Descrip
ption of receiver
ST
TAEDTLER Digital pen
n
1 Overvie
ew
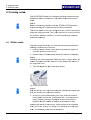
1.6 The receivver
Fig.
F 10 Receivver
1 USB port
2 Function b
button
3 LCD displlay
4 Clip
5 RESET bu
utton
USB
U
port
Allows
A
conn
nection to th
he PC by wa
ay of a USB
B cable.
Function
F
b utton
In
I offline mo
ode:
Press
P
brieflyy to create a new note or to switchh to a new page.
p
Hold
H
presse
ed for appro
ox. 5 second
ds to switchh the device
e on or off.
In
I online mo
ode:
Press
P
brieflyy to switch between mouse modee and note mode.
m
LCD
L
displa
ay
All
A relevant information
n is provided
d on the dissplay.
Clip
C
For
F attachin
ng the receiv
ver onto the
e paper.
RESET
R
buttton
Initiates a re
eset of the receiver
r
Notice!
N
minutes, the device wiill
Following
F
a period of in
nactivity of approx.
a
60 m
shut
s
down a
automaticallly.
1.6.2
Rese
etting the device
d
A RESET b utton is loca
ated on the back of thee receiver. This
T
can be
e
applied
a
whe
enever the device
d
fails to respond . To reset th
he receiver,
insert a sha
arp impleme
ent into the opening
o
circcled in the drawing.
d
Fig.
F 11 RESET
T button
STAEDTLE
ER Digital pen
p
10 / 98
1 Overview
O
1.6
6 The receivver
1.6.3
LCD dis
splay
The
e following ssymbols are
e represente
ed on the LLCD display,
dep
pending on tthe respecttive operatin
ng state.
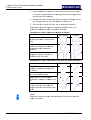
Symbo
ol
Meaning
M
Receiver
R
is connected
c
tto PC.
The
T memory
y of the receeiver is at le
east 90%
fu
ull. Transferr your notess to the PC or delete
th
he data.
The
T pen battteries are ruunning low and must
be
b replaced..
The
T battery in the receivver is running low and
should be ch
harged.
The
T STAEDTLER Digitaal pen is in note
mode.
m
The
T STAEDTLER Digitaal pen is in mouse
mode.
m
Number
N
of stored
s
notess.
1.6.4
Chargin
ng the batttery
The
e receiver fe
eatures an internal
i
rech
hargeable bbattery. No external
batttery is nece
essary. Whe
en the battery begins too run low, simply
rech
harge the b
battery by co
onnecting th
he receiver to your activated
com
mputer with the USB ca
able include
ed in deliverry.
The
e batteries w
will begin ch
harging as soon
s
as thee device is connected
c
to your
y
function
ning PC. Th
he charge time totals aapprox. 3.5 hours.
Fullly charged b
batteries ha
ave an operrational life oof approx. 15
1 hours.
1.6.5
Attachin
ng the rec
ceiver to th
he paper
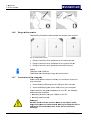
The
e following i llustrations demonstrate the attacchment posiition for
you
ur receiver.
Nottice!
Forr optimum re
esults, it is recommend
r
ded that thee device be
pos
sitioned cen
ntrally at the
e top!
In Windows
W
Vis
ista and higher, the cen
ntral positioon at the top
p has
bee
en preset an
nd cannot be
b changed.
It is recommen
nded that yo
our receiverr be attacheed centrally
y at the top
p
to attain
a
optimu
um results:
11 / 98
ST
TAEDTLER Digital pen
n
1 Overview
1.6 The receiver
Fig. 12 Receiver positioned centrally at the top
Left-handers have the opportunity of attaching the receiver to the
notepad on the right at the top:
Fig. 13 Receiver positioned on the right
Right-handers can attach the receiver on the left at the top.
Fig. 14 Receiver positioned on the left
Notice!
Do not block the signals being transmitted from the pen tip to the
receiver.
Inclination of the STAEDTLER Digital pen to the paper should be
between 45° and 90° when writing.
Do not hold the pen as you would a paintbrush.
Fig. 15 Writing correctly
STAEDTLER Digital pen
Fig. 16 Receiver obscured
12 / 98
1 Overview
O
1.6
6 The receivver
Fig. 17 Receiver o
obscured
1.6.6
Fig.
F 18 Incorreect grip
Range of
o the rece
eiver
The
e following i llustrations demonstrate the rangee of your re
eceiver.
Fig. 19 Range of tthe receiver
1. Range of rreceiver when positione
ed on the leeft at the top
p.
2. Range of rreceiver when positione
ed on the riight at the to
op.
3. Range of rreceiver when positione
ed centrallyy at the top.
Nottice!
The
e paper size
e is DIN-A4..
The
e dotted line
e indicates the
t range fo
or each possition.
1.6.7
Connec
ction to the
e compute
er
Use
e the USB ccable included in delive
ery to conneect the rece
eiver to
you
ur computerr.
1. Insert the m
mini USB plug into the USB port oof the receiv
ver.
2. Insert the U
USB plug in
nto a free USB port on your computer.
Onc
ce connecti on has bee
en established to your P
PC, the follo
owing
optiions becom
me available:
• Uploading
U
o
of notes from
m your rece
eiver to the PC
• Working
W
in o
online mode
e
Atte
ention!
Do NOT move
e or tilt the receiver when
w
in usee. Attach to
o the
edg
ge of the pa
aper as sho
own above
e. Moving o
or tilting the device
can
n lead to in consistentt strokes off the pen o
or inaccurate
drawings!
13
3 / 98
ST
TAEDTLER Digital pen
n
2 Installatiion for Wind
dows (2 CD
Ds)
22.1 System requiremen
nts
2 Insta
allation for
f Windows (2
2 CDs)
2.1 Sys
stem requirements
See
S chapte r 1.4 System
m requirements
2.2 MyS
Script Sttudio Nottes Editi on
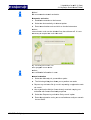
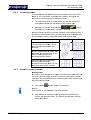
2.2.1
Installation of MyScript Studio No
otes Editio
on and Myy Script Ink
k Retrieve
er
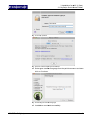
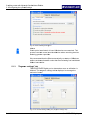
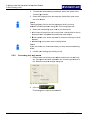
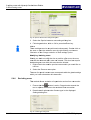
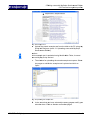
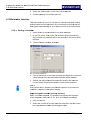
1.
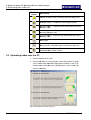
1 Insert th
he installatio
on CD into the CD-RO
OM drive.
The
T followin
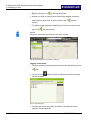
ng window opens:
o
Fig.
F 20 Installa
ation assistantt for MyScript Studio Notes Edition
Notice!
N
The
T setup a
application should
s
startt automaticaally. If not, start
s
the
application
a
m
manually by
y activating the CD-RO
OM directly via the
drive.
d
2.
2 Click on
n Next to prroceed.
3.
3 Select tthe languag
ge from the pull-down m
menu in whiich the
software
e is to be in
nstalled and click on Neext.
4.
4 Tick the
e box in fron
nt of the language(s) inn which the notes are
usually recorded. Then
T
click on
o Next.
5.
5 Read th
hrough the licensing ag
greement. S
Select the I accept the
agreem
ment option and
a click on
n Next.
Notice!
N
If
I you do no
ot accept the
e license ag
greement, itt will not be possible to
o
install
i
the so
oftware.
6.
6 Click on
n Next to ins
stall the sofftware in thee folder indicated. Clickk
on Searrch to selec
ct an alterna
ative folder ffor installatiion.
STAEDTLE
ER Digital pen
p
14 / 98
2 Installation ffor Window
ws (2 CDs)
2.2
2 MyScript S
Studio Note
es Edition
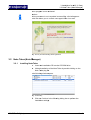
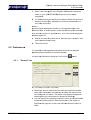
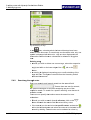
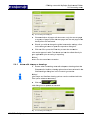
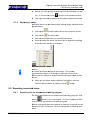
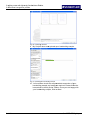
Fig. 21 Defining th
he folder for in
nstallation
7. Tick the Crreate deskttop icon option should yyou wish to
o create an
icon on yo ur desktop. Then click on Next.
8. Click on th
he Back buttton to review
w or to cha nge your se
ettings.
Click on th
he Install button to startt installationn of the softtware.
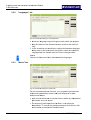
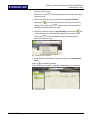
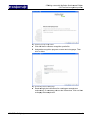
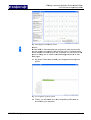
Fig. 22 Starting in
nstallation
Win
ndows will n
now initiate installation. After a few
w seconds the setup
window appea rs for the in
ntegrated My
M Script Inkk Retriever software:
s
15
5 / 98
ST
TAEDTLER Digital pen
n
2 Installatiion for Wind
dows (2 CD
Ds)
2.2 MyScrript Studio Notes
N
Editio
on
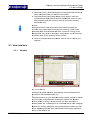
Fig.
F 23 Setup A
Assistant for My
M Script Ink Retriever
R
9.
9 Close a
all active applications other than thhe installatio
on and then
n
click on Next.
10.
1 Read th
hrough the licensing ag
greement. S
Select the I accept the
agreem
ment option and
a click on
n Next.
Notice!
N
If
I you do no
ot accept the
e license ag
greement, itt will not be possible to
o
install
i
the so
oftware.
11.
1 Click on
n Finish to conclude
c
the
e installatioon.
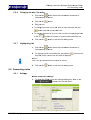
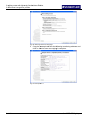
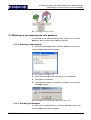
Configuring
C
g My Scrip
pt Ink Retrie
ever
Upon
U
installlation of the
e software, the
t followin g window appears
a
on
your
y
displayy screen:
Fig.
F 24 Dialog box following
g installation
1.
1 Perform
m the setting
gs in compliance with tthe instructions in chap
pter
5.1 Con
nfiguring the
e upload settings.
The
T softwarre must now
w be activated.
STAEDTLE
ER Digital p
pen
16 / 98
2 Installation ffor Window
ws (2 CDs)
2.2
2 MyScript S
Studio Note
es Edition
2.2.2
Activatiing MyScrript Studio
o Notes Ed
dition
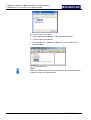
1. Open the M
MyScript Sttudio Notes Edition proogram via th
he desktop
icon or via the Start menu.
m
The fo
ollowing winndow appea
ars:
Fig. 25 Activation of MyScript Studio
S
Notes Edition
E
2. To activate
e the application, click on the Activvate button.
The
e following w
window ask
ks you how you
y would llike to carry
y out
activation: auto
omatically via
v Internet or
o manuallyy via your mailbox.
m
Fig. 26 Selecting ttype of activattion
Nottice!
We recommen
nd using auttomatic actiivation.
Auttomatic acttivation
1. Establish cconnection to the Intern
net.
2. Select the Automatica
ally via Interrnet option.
3. Enter the a
activation co
ode and clic
ck on the Acctivate butto
on.
Nottice!
The
e activation code can be
b obtained from the sooftware CD.. It is not
nec
cessary to re
equest the code by e-m
mail!
17
7 / 98
ST
TAEDTLER Digital pen
n
2 Installatiion for Wind
dows (2 CD
Ds)
2.2 MyScrript Studio Notes
N
Editio
on
Fig.
F 27 Enterin
ng the activatio
on code
Your
Y
applica
ation is now
w active.
Notice!
N
No
N confiden
ntial informa
ation is sentt!
Manual
M
acttivation
1.
1 Select tthe Manual via your ma
ailbox optio n.
2.
2 The foll owing dialo
og box allow
ws you to caarry out two tasks:
•
Requestt my activattion file by e-mail:
e
requuesting a registration
code via e-mail.
• Use my a
activation fiile that I hav
ve already rreceived: ca
arrying out
activation
n with licens
se file alrea
ady acquiredd.
3.
3 Select tthe Request my activattion file by ee-mail. optio
on
4.
4 Enter th
he registration code, yo
our e-mail aaddress and
d your name
e in
the text fields.
Fig.
F 28 Reque
esting the regis
stration file
STAEDTLE
ER Digital p
pen
18 / 98
2 Installation ffor Window
ws (2 CDs)
2.2
2 MyScript S
Studio Note
es Edition
Nottice!
The
e activation code can be
b obtained from the sooftware CD..
The
e program a
automatically creates an e-mail meessage rela
aying all
nec
cessary info
ormation.
5. Click on th
he Send buttton.
Nottice!
No confidentia l information is sent!
A lic
cense file w
will be sent to
t you via e-mail.
6. Store the l icense file onto
o
your ha
ard drive.
7. Repeat the
e activation procedure. This time, select the Use
U my
activation ffile that I ha
ave already received opption.
8. Click on Se
earch and select
s
the lic
cense file w
which was sent to you.
Confirm yo
our selection.
Nottice!
If yo
ou cannot ssee the storred license file
f during thhe search, select
s
the
"All files" option
n under "Fille type".
Fig. 29 Selecting tthe registration file
You
ur program is now activ
vated.
Nottice!
If th
he procedurre is not com
mpleted suc
ccessfully, a link will ap
ppear.
This
s link allowss you to con
ntact MyScrript Studio N
Notes Editio
on
sup
pport via e-m
mail.
19
9 / 98
ST
TAEDTLER Digital pen
n
2 Installatiion for Wind
dows (2 CD
Ds)
2.3 Mobile Note
te Taker (No
ote Manage
er)
Fig.
F 30 Link prrovided followiing failed regis
stration
2.3 Mob
bile Note
e Taker (Note Ma nager)
2.3.1
Installing Mobiile Note Ta
aker
1.
1 Insert th
he installatio
on CD into the CD-RO
OM drive.
The
T followin
ng window opens:
o
Fig.
F 31 Selectiing the langua
age
Notice!
N
The
T setup a
application should
s
startt automaticaally. If not, start
s
the
application
a
m
manually by
y activating the CD-RO
OM directly via the
drive.
d
2.
2 Select tthe languag
ge in which software
s
shhould be ins
stalled.
3.
3 Click on
n Next in the
e following dialog box tto perform the
t
installattion settings
s.
STAEDTLE
ER Digital pen
p
20 / 98
2 Installation ffor Window
ws (2 CDs)
2.3
3 Mobile No
ote Taker (N
Note Manag
ger)
4. Click on Ch
Change to se
elect an alte
ernative foldder for insta
allation or
click on Ne
ext to install the softwa
are in the follder indicate
ed.
Fig. 32 Selecting ffolder for insta
allation
5. Select the Back button to change
e your settinngs or click on Install
to begin in stallation.
6. Click on th
he Finish bu
utton to conc
clude instal lation.
Nottice!
If yo
ou are startting the app
plication for the first tim
me following the
insttallation pro
ocess, a new
w folder with
h the name My Notes is
i created
in th
he My Docu
uments dire
ectory. All off your notess are stored
d in this
dire
ectory. If no My Docum
ments directo
ory exists, tthe installatiion
app
plication cre
eates a new
w My Docum
ments folderr on your ha
ard drive.
De--installing, u
upgrading or
o re-installin
ng of the sooftware will not
n cause
the notes in thiis directory to be delete
ed.
21 / 98
ST
TAEDTLER Digital pen
n
3 Instaallation for MAC
M
(2 CD
Ds)
3.1 MyScrript Studio Notes
N
Editio
on
3 Insta
allation for
f MAC
C (2 CDs
s)
3.1 MyS
Script Sttudio Nottes Editi on
1.
1 Installattion of MyScript Studio
o Notes Edittion and My
y Script Ink
Retrieve
er
2.
2 Insert th
he installatio
on CD into the CD-RO
OM drive.
3.
3 Unpackk the MyScrriptStudioNo
otesEdition--1.1.1.119-O
OEMInstallerr.zip file by double click
king.
4.
4 The MyyScriptStudiioNotesEdition-Installerr folder and
d the
corresp
ponding MyS
ScriptStudio
oNotesEditio
ion.mpkg installation file
nder Downlo
oads. Openn these files
s by double
can be obtained un
clicking .
owing windo
ow appears:
The follo
Fig.
F 33 Note o
on safety
5.
5 Click on
n Continue. The installa
ation assista
tant opens.
Fig.
F 34 Installa
ation assistantt for MyScript Studio Notes Edition
Notice!
N
The
T setup a
application does
d
not sta
art automatitically. Startt the
application
a
m
manually by
y activating the CD-Room directly via
v the drive
e.
6.
6 Click re
epeatedly on
n Continue.
7.
7 Read th
hrough the license agre
eement andd click on Ac
ccept.
STAEDTLE
ER Digital pen
p
22 / 98
3 Installation ffor MAC (2 CDs)
3.1
1 MyScript S
Studio Note
es Edition
Nottice!
If yo
ou do not acccept the lic
cense agree
ement, it wiill not be po
ossible to
insttall the softw
ware.
8. Select the language in
n which the software s hould be installed
ull-down me
enu. Then click
c
on Conntinue.
from the pu
9. Click on th
he hard drive
e icon and then
t
click oon Continue.
Fig. 35 Defining th
he installation location
10. Click on In
nstall.
Fig. 36 Start insta
allation
11. Enter yourr user name
e and your password
p
annd click on OK.
23
3 / 98
ST
TAEDTLER Digital pen
n
3 Instaallation for MAC
M
(2 CD
Ds)
3.1 MyScrript Studio Notes
N
Editio
on
Fig.
F 37 Securitty question
Fig.
F 38 Driver software My Script
S
Ink Retrriever
12.
1 Select yyour standa
ard language
e from the ppull-down menu
m
and th
hen
click on Continue.
Fig.
F 39 Selectiing the standa
ard language
13.
1 Installattion conclud
ded success
sfully
STAEDTLE
ER Digital pen
24 / 98
3 Installation ffor MAC (2 CDs)
3.1
1 MyScript S
Studio Note
es Edition
Fig. 40 Installation
n concluded
3.1.1
Activatiing MyScrript Studio
o Notes Ed
dition
1. Open the M
MyScript Sttudio Notes Edition appplication und
der
Programs. The following window appears:
Fig. 41 Activation of MyScript Studio
S
Notes Edition
E
2. Click on th
he Activate button
b
to ac
ctivate the pprogram.
3. Select in th
he following
g window ho
ow you wouuld like to ca
arry out
activation: automatica
ally via Interrnet or man ually via yo
our mailbox.
Fig. 42 Selecting ttype of activattion
25
5 / 98
ST
TAEDTLER Digital pen
n
3 Instaallation for MAC
M
(2 CD
Ds)
3.1 MyScrript Studio Notes
N
Editio
on
Notice!
N
We
W recomm
mend autom
matic activatiion.
Automatic
A
activation
1.
1 Establissh connectio
on to the Internet.
2.
2 Select tthe Automatically via In
nternet optioon.
3.
3 Enter th
he activation
n code and click on thee Activate button.
b
Notice!
N
The
T activatiion code can be obtain
ned from thee software CD.
C It is nott
necessary
n
tto request th
he code via
a e-mail!
Fig.
F 43 Enterin
ng the activatio
on code
Your
Y
progra
am is now active.
a
Notice!
N
No
N confiden
ntial informa
ation is sentt!
Manual
M
acttivation
1.
1 Select tthe Manuallly via your mailbox
m
optiion.
2.
2 The foll owing dialo
og box allow
ws you to peerform two tasks:
t
• Request my activatiion file by e-mail: requeesting a reg
gistration co
ode
via e-ma il.
• Use my a
activation fiile that I hav
ve already rreceived: ca
arrying out
activation
n with licens
se file alrea
ady acquiredd.
3.
3 Select tthe Request my activattion file by ee-mail. optio
on
4.
4 Enter th
he registration code, yo
our e-mail aaddress and
d your name
e in
the text fields.
STAEDTLE
ER Digital p
pen
26 / 98
3 Installation ffor MAC (2 CDs)
3.1
1 MyScript S
Studio Note
es Edition
Fig. 44 Requestin
ng the registrattion file
Nottice!
The
e activation code can be
b obtained from the sooftware CD..
The
e program ccreates an e-mail
e
mess
sage autom atically with
h all
info
ormation req
quired to cre
eate your lic
cense.
5. Click on th
he Send buttton to send the requesst message.
Nottice!
No confidentia l information is sent!
A lic
cense file w
will be sent to
t you via e-mail.
6. Store the l icense file onto
o
your ha
ard drive.
7. Repeat the
e activation procedure. This time, select the Use
U my
activation ffile that I ha
ave already received opption.
8. Click on Se
earch and select
s
the lic
cense file w
which was sent to you.
Confirm yo
our selection.
Fig. 45 Selecting tthe registration file
27
7 / 98
ST
TAEDTLER Digital pen
n
3 Instaallation for MAC
M
(2 CD
Ds)
3.2 Note
te Taker (No
ote Manage
er)
Your
Y
progra
am is now activated.
a
Notice!
N
If
I the proced
dure is not completed successfully
ly, a link willl appear.
This
T
link allo
ows you to contact ourr support teaam via e-mail.
Fig.
F 46 Link prrovided followiing failed regis
stration
3.2
No
ote Takerr (Note Manager)
M
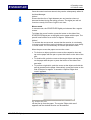
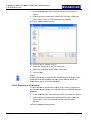
3.2.1
Installing Note
e Taker
1.
1 Insert th
he installatio
on CD into the CD-RO
OM drive.
2.
2 Initiate iinstallation of the Note Taker by ddouble clicking on the
Note Ta
aker.pkg file
e.
The
T followin
ng window opens:
o
Fig.
F 47 Directo
ory
3.
3 Click on
n Continue in the follow
wing dialog box to perfo
orm the
installattion settings
s.
STAEDTLE
ER Digital pen
p
28 / 98
3 Installation ffor MAC (2 CDs)
3.2
2 Note Take
er (Note Ma
anager)
Fig. 48 Installation
n
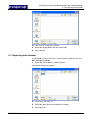
4. Select a ta
arget drive and
a click on Continue.
Fig. 49 Target drivve
5. Click on In
nstall to insta
all the softw
ware.
Fig. 50 Installation
n
29
9 / 98
ST
TAEDTLER Digital pen
n
3 Instaallation for MAC
M
(2 CD
Ds)
3.2 Note
te Taker (No
ote Manage
er)
6.
6 It is posssible follow
wing installation to channge the des
stination patth
by click ing on Chan
nge location
n for installaation… and then
specifyi ng the new
w destination
n path.
Fig.
F 51 Destina
ation path
Notice!
N
De-installing
D
g, upgradin
ng or re-installing of thee software will
w not causse
the
t notes in
n this directo
ory to be de
eleted.
STAEDTLE
ER Digital p
pen
30 / 98
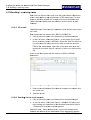
4 Creating
C
no
otes
4.1
1 Offline mo
ode
4 Creatin
ng notes
s
The
e STAEDTL
LER Digital pen offers two
t
operatinng modes to
o create
han
ndwritten no
otes and ske
etches. The
e offline modde and the online
mod
de.
Nottice!
Beffore comme
encing opera
ation with th
he STAEDT
TLER Digita
al pen,
ens
sure that the
e pen is equ
uipped with a refill and batteries.
The
e mouse bu
utton on the pen casing
g does NOT
T have to be
e pressed
duri
ring the writiing process
s. This is on
nly required for mouse functions.
Forr optimum, fflawless ope
eration, we recommendd using a sm
mooth
and
d sturdy und
derlay!
4.1 Offline mode
The
e offline mod
de allows you
y to record
d and storee important notes
n
in
mee
etings, confferences or lectures.
1. Hold the fu
unction button on the re
eceiver presssed for approx. 5
seconds to
o switch on the device.
2. Open the cclip on the back
b
and attach the recceiver to the
e paper.
Nottice!
If working
w
with operating system
s
Windows Vistaa or higher, attach
a
the
rece
eiver centra
ally at the to
op. Selection of the attaachment fun
nction is
not supported here!
3. Take the d
digital pen and
a commen
nce writing.
Fig. 52 Writing in o
offline mode
Nottice!
Grip
p the pen in
n such a wa
ay that the signals
s
transsmitted from
m the pen
tip to
t the receivver do not become
b
blocked.
4. Once you have finishe
ed writing your note, prress the fun
nction
button brie
efly to store the current page and / or to begin
n a new
page. Follo
owing storage, the disp
play screen of the rece
eiver
indicates th
hat the num
mber of page
es has increeased by on
ne.
All notes
n
are sttored in the
e receiver. These
T
notess can be uploaded
onto
o your PC ffor viewing, for editing or for sendiing via e-ma
ail (see
cha
ap. 4.3 Uplo
oading notes
s onto the computer).
c
31 / 98
ST
TAEDTLER Digital pen
n
4 Creating note
es
4.2 Online mod
de
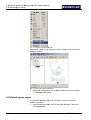
4.2 Online mode
In online mo
ode, it is possible to up
pload notes onto your PC
P from the
e
receiver,
r
wrrite notes orr to create sketches
s
ussing the digital pen.
Moreover,
M
t he STAEDT
TLER Digita
al pen can bbe used as a mouse in
online
o
mode
e. Special fu
unctions wh
hich can onlly be used in
i online
mode
m
are allso available. These fu
unctions aree described in detail in
the
t following
g sections.
Before
B
conn
necting the device to yo
our PC, enssure that the
e software
delivery (My
included in d
yScript Stud
dio Notes E
Edition and Mobile Note
e
Taker)
T
is insstalled. Lau
unch this sofftware.
Notice!
N
Installation
I
o
of the softw
ware include
ed in deliverry "Mobile Note
N
Taker""
is
i a minimum
m requirem
ment for impllementationn of the Onlline function
n.
Fig.
F 53 Writing
g in online mod
de
Notice!
N
We
W highly re
recommend placing the
e STAEDTLLER Digital pen
p in the
position
p
rep
presented when
w
not in use
u to avoidd any confliict with the
mouse.
m
Fig.
F 54 STAED
DTLER Digitall pen when no
ot in use
If the pen re
emains inac
ctive, the rec
ceiver shutss down auto
omatically
after
a
approxx. 60 minute
es. Your notte, howeverr, will be sto
ored.
Push
P
the bu
utton on the
e receiver to
o quit powerr saving mo
ode.
Attention!
A
Do
D not con
nnect more than one receiver
r
at any given time. The
devices
d
co uld interfere with one
e another.
4.2.1
Func
ctions of th
he STAED
DTLER Dig
gital pens
The
T digital p
pen supportts a note mode and a m
mouse mod
de.
The
T standarrd mode can be set in 2 different w
ways:
STAEDTLE
ER Digital pen
p
32 / 98
4 Creating notes
4.2 Online mode
• With initial start of the Mobile Note Taker application or
• via the Mobile Note Taker Configuration menu ("set digital note
mode").
When in use, it is possible to alternate the respective mode between
different types:
• Press the function button briefly on the receiver.
• Right-click on the Mobile Note Taker taskbar icon.
• Tap on the virtual area with your pen.
Fig. 55 Virtual area
Notice!
Following each mode change, a speech bubble with information
regarding the current mode appears and the affiliated LED lights up.
MAC information
Changeover between the different modes results automatically for the
MAC. The mouse mode becomes active as soon as the cursor is
drawn over a menu. If writing is initiated over a "free" field on the
desktop, an ink well window displaying the text is opened
automatically. This text is converted automatically and inserted into
an active text field of an application document (e.g. Indesign).
Note mode
Note mode allows the entry of sketches and notes to be observed
simultaneously on the display screen.
As soon as you write or sketch something with your digital pen, a
virtual note sheet appears on your display screen.
Fig. 56 Note window
This note sheet replicates anything which is written on actual paper
attached to the receiver. The note window toolbar allows you to
execute various basic functions such as storage, editing, sending via
e-mail or the copying of notes.
33 / 98
STAEDTLER Digital pen
4 Creating notes
4.2 Online mode
Once the notes have been stored, they can be subsequently edited in
the Note Manager.
Notice!
Ensure that the line of sight between pen and receiver does not
become blocked during the writing process. The digital pen will not
function correctly if the line of sight is not clear.
Mouse mode
In mouse mode, the STAEDTLER Digital pen behaves like a regular
mouse.
To initiate the cursor function, press the button on the side of the
STAEDTLER Digital pen or tap lightly on the paper with the pen. The
pen will now function as a cursor for approx. 30 seconds.
Notice!
To activate the mouse mode, ensure that the receiver is not already
in mouse mode and then press the button on the receiver once briefly
in online mode. It is not necessary to hold the pen button down!
Move the pen across the paper to move the cursor.
• To click on an object, point the cursor at the respective icon and
tap on the paper with the pen or press the button on the side of the
pen.
• To double-click, point the cursor at the target object and tap twice
on the paper with the pen or press the button on the side of the
pen twice.
• To perform a right-click, point the cursor at the object and hold the
pen tip pressed on the paper. Alternatively, press the button on the
side of the pen for approx. 2 seconds. A special "Right-click
cursor" appears.
Fig. 57 Right-click cursor
Lift the pen tip from the paper. The regular "Right-click menu"
appears and the desired function can be selected.
STAEDTLER Digital pen
34 / 98
4 Creating
C
no
otes
4.3
3 Uploading
g notes onto
o the compu
uter
4.2.2
Using th
he STAED
DTLER Dig
gital pen in
n Window
ws Vista In k applicattions
The
e STAEDTL
LER Digital pen allows the utilizatioon of Windo
ows Vista
Ink application s such as Journal
J
or Short
S
notes, for example, or to
d Ink-notes iin Office 20
007 applicattions.
add
Nottice!
The
e receiver o
of the STAE
EDTLER Dig
gital pen muust be conne
ected to
the PC in orde r to be able
e to execute
e these funcctions.
Using the STA
AEDTLER Digital
D
pen in Journall
1. Select the mouse mod
de.
2. Start up W
Windows Jou
urnal.
3. Begin writi ng on the paper
p
while at the samee time obse
erving the
display scrreen.
nctions suc
4. Various fun
ch as Highlig
ght text withh Lasso or
Recognitio
on can be uttilized here.. Furthermoore, you also
o have the
opportunityy to delete or
o highlight text etc.
Using the STA
AEDTLER Digital
D
pen in MS Worrd 2007
1. Open a Mi crosoft Word 2007 doc
cument.
2. Click on Sttart freehan
nd input in th
he Check m
menu.
3. Select the red pen fro
om the writin
ng instrumeent toolbar. Various
V
ink
options no
ow become available to
o you. It is ppossible for example to
o
eces with co
omments.
write or to provide pie
4. Click on th
he blue pen on the yello
ow note in tthe writing implement
toolbar (inkk comment)). A speech bubble opeens on the right-hand
r
side which
h can be use
ed for your handwrittenn comments
s.
Using the Tab
blet PC entry field in Office
O
appllications (a
available
for Windows V
Vista and higher)
h
A ta
ablet PC en
ntry field is featured in every
e
Officee application
n on the
left--hand pane of the display screen. Only the eddge is visible.
1. Tap on the
e edge of the tablet PC
C entry field.. It now app
pears fully
on the disp
play screen.
2. Write some
e sentences
s or individu
ual letters. Y
Your handw
writing is
recognized
d automatic
cally: word fo
or word or l etter for lettter.
Nottice!
In th
he event tha
at the mous
se ceases to respond, tap the pen
n once on
the paper. Thiss will awake
en the progrram from sle
leep mode.
4.3 Uploa
ading nottes onto the com
mputer
35
5 / 98
You
ur notes can
n be upload
ded from the
e receiver oonto the PC in online
mod
de using the
e software. Ensure befforehand th at the softw
ware is
insttalled and th
hat your rec
ceiver is con
nnected to tthe USB po
ort of your
PC with the afffiliated USB
B cable.
ST
TAEDTLER Digital pen
n
4 Creating note
es
4.3 Uploading nnotes onto the
t computter
The
T followin
ng symbol appears
a
on the LCD of your receiv
ver througho
out
the
t USB co nnection.
Fig.
F 58 USB co
onnection
4.3.1
Uploa
ading note
es with My
yScript Sttudio Note
es Edition
See
S chapte r 5.1 Config
guring the upload settinngs
4.3.2
Uploa
ading note
es with Mo
obile Note
e Taker
See
S chapte r 6.3 Uploading notes onto the PC
C
STAEDTLE
ER Digital pen
p
36 / 98
5 Editing
E
note
es with MyS
Script Studio
o Notes Edittion
5.1
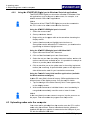
1 Configurin
ng the uploa
ad settings
5 Editing
g notes with My
yScript Studio Notes Edition
E
This
s program i s a fully-dig
gital note su
uite which alllows you complete
free
edom as reg
gards your handwritten
h
n notes.
Add
ditionally, M
Mobile Note Taker can be
b used to eexport yourr notes to
the MyScript S
Studio Notes
s Edition character recoognition engine.
s software a
allows you to:
t
This
• View,
V
mana
age and highlight your notes,
n
• Search
S
text in your orig
ginal note files,
• Convert
C
you
ur handwriting, shapes and tabless in digital te
ext with
outstanding
o
g accuracy,
• Edit
E convertted digital te
ext directly in the progrram window
w,
• Send
S
the fin
nal results to
o Microsoft Word or ot her text editing
programs
p
in
n a text file or
o to your sttandard e-m
mail applica
ation.
5.1 Config
guring th
he uploa
ad setting
gs
The
e ink retrieva
al settings are
a displaye
ed the first ttime the My
yScript
Studio Notes E
Edition application is ac
ctivated andd then each
h time
ndows is sta
arted. The la
atter only applies, how
wever, if the Do not
Win
sho
ow this page
e on next sttartup option
n remains ddeactivated..
If th
he program window forr configuring
g the note im
mport is nott opened
auto
omatically, yyou have th
he option off opening it manually.
1. Open the m
menu of the
e My Script Ink Retrieveer by right-c
clicking on
the toolbarr icon
.
2. Select the Configure option.
o
5.1.1
"About"" tab
Clic
ck on the lin
nk Checking
g the list for compatiblee devices in
n the About
tab in dialog bo
ox My Scrip
pt Ink Retrie
ever to obtaiin a list of supported
s
dev
vices.
Sele
ect the Do n
not display this page upon
u
next sttartup option if the
dialog box sho
ould not be opened
o
upo
on next start
rtup of the MyScript
M
Studio Notes E
Edition softw
ware.
37
7 / 98
ST
TAEDTLER Digital pen
n
5 Ed
diting notes with MyScrript Studio Notes
N
Editio
on
5.1 Configuuring the up
pload setting
gs
Fig.
F 59 Ink retrrieval settings
s dialog box (A
About tab)
5.1.2
"Retrrieval settings" tab
Select
S
the fo
older in the Retrieval settings
s
tab into which the
t notes
from
f
your re
eceiver are to be stored
d.
1.
1 Click on
n Browse to
o select a folder.
2.
2 Next, yo
ou must dec
cide how the files are tto be downloaded.
• Choose w
whether all files featuring identicaal names witthin the fold
der
are to be
e overwritten
n.
• Choose w
whether the
e notes are to be retainned on the device
d
or
whether you would like to delette the devicce memory after
a
download
ding.
• Choose w
whether My
yScript Stud
dio Notes Eddition is to search
s
through a
and check each
e
conne
ected USB ddevice for th
he presence
e
of "digita
al inks".
STAEDTLE
ER Digital pen
p
38 / 98
5 Editing
E
note
es with MyS
Script Studio
o Notes Edittion
5.1
1 Configurin
ng the uploa
ad settings
Fig. 60 Retrieval ssettings dialog
g box
Nottice!
If th
his option iss activated, all new USB
B devices aare searched. This
process can ta
ake some co
onsiderable
e time whenn searching devices
featturing greatter capacitie
es.
We recommen
nd that the Start
S
automatically on sstartup of Windows
W
i order that file monitooring can be
e initiated
optiion remainss activated in
with
hout interve
ention.
5.1.3
"Pegasu
us setting
gs" tab
The
e STAEDTL
LER Digital pen is detected as sooon as utilization is
initiated. The P
Pegasus settings tab is
s displayed to manage the
retrieval of note
es.
Fig. 61 Ink retrieva
al settings dia
alog box (Pega
asus settings ttab)
39
9 / 98
ST
TAEDTLER Digital pen
n
5 Ed
diting notes with MyScrript Studio Notes
N
Editio
on
5.2
2 Preference
es
1.
1 Enter a file name prefix
p
in the Pegasus seettings tab so that the
notes o n your STA
AEDTLER Digital
D
pen aare more rea
adily
recognizzed.
2.
2 It is esssential that you
y specify the locationn in which the
t receiverr is
attache d to the pap
per, otherwise an incorrrect repres
sentation of
es could occ
cur.
the note
Notice!
N
Selection
S
off the attachm
ment positio
on is not suupported hig
gher than
Windows
W
Vi
Vista. A centtral position at the top w
will always be
b assumed
d.
If
I an incorre
ect position is specified
d here, yourr notes will be
b displayed
skewed
s
on tthe PC!
3.
3 Should you wish to
o transfer the ink files oonto your co
omputer, click
on the D
Download in
nk button.
4.
4 Then cl ick on OK.
5.2 Preferences
s
It is possible
e to define preferences
p
s which will influence standard
s
application
a
ccharacteristics for certain elementts.
To
T open the
e Preferences dialog bo
ox, click on the
5.2.1
bu
utton.
"Gen
neral" tab
Fig.
F 62 Prefere
ences dialog box
b (General tab)
t
• Should yyou wish to retain fixed lines with tthe original line breaks
within yo
our handwrittten text, ac
ctivate the K
Keep line re
eturns when
n
convertin
ng text only option. This option on ly applies to
o segmentss
featuring
g text only conversions (no shapess or drawing
gs).
• You can specify the respective location in which all co
onverted file
es
ed following export. Entter the file ppath in the Folder
F
for
are store
exported
d files segment or click on the Brow
wse button to select a
folder.
STAEDTLE
ER Digital pen
p
40 / 98
5 Editing
E
note
es with MyS
Script Studio
o Notes Edittion
5.2
2 Preferencces
5.2.2
"Langua
ages" tab
Fig. 63 Preference
es dialog box (Languages ta
ab)
• Select
S
the la
anguage required for you
y to work within the program.
p
• Use
U the Sellect all and Deselect bu
uttons wherrever the lis
st is too
long.
• In the eventt that you would
w
like to change thee standard language
l
being
b
used for the searrch and recognition, seelect the res
spective
language fro
om the list and
a then click on the C
Change buttton.
Nottice!
Clic
ck on the Ge
et more link
k to obtain additional
a
laanguages.
5.2.3
"Notes"" tab
Fig. 64 Preference
es dialog box (Notes tab)
For the note m
managementt functions, your prograam inspects
s certain
fold
ders and auttomatically inserts new
w notes dispplayed in the
ese
defiined note fo
olders.
• Click
C
on the
e Add button
n to select a folder in w
which any ha
andwritten
documents
d
are to be sttored.
• To
T tempora rily halt insp
pection of a folder, it caan simply be
deactivated
d
. To remove
e the folderr permanenttly from the list, click
on
o the folde
er and selec
ct the Remo
ove button.
41 / 98
ST
TAEDTLER Digital pen
n
5 Ed
diting notes with MyScrript Studio Notes
N
Editio
on
5.3 User
U
interfacce
• Select th
he Look in sub-folders
s
option
o
to inccorporate th
he content of
o
other sub
b-folders intto your defined note foolders.
• Select th
he Search in
n existing in
ndexes onlyy option if yo
ou have
e amount off newly handdwritten notes on yourr
recently ffiled a large
disk but w
would now like to search through previously existing
documen
nts only.
Notice!
N
During
D
this ssearch, new
w documents which woould normallly be
included
i
forr a regular search
s
are ignored.
i
Inddexing, whic
ch could
potentially
p
ta
take some considerable
c
e time, conttinues running in the
background
b
d: this option
n is practica
al in cases w
where you do
d not have
e
the
t time to w
wait for the indexing off new noticees.
• Once all changes ha
ave been made,
m
click oon OK to co
onfirm your
changes .
5.3 Use
er interfa
ace
5.3.1
Wind
dow
Fig.
F 65 User in
nterface
Functions
F
fo
or general actions
a
and opening off the prefere
ences are
provided
p
in the standarrd toolbar (1
1).
The
T search panel (2), into which key
k words ccan be enterred to searcch
for
f your note
f
in the
t upper eedge of the window.
w
es, is also featured
A list of note
es for a tag, a binder, a book, an oopen docum
ment or
search
s
resu
ults etc. is displayed in an individuaal tab for ea
ach categorry.
Buttons
B
for closing, min
nimizing and maximizinng the wind
dow, as welll
as
a for displa
aying the he
elp files, are
e featured inn the upper right-hand
corner
c
of the
e window (3
3).
STAEDTLE
ER Digital pen
p
42 / 98
5 Editing
E
note
es with MyS
Script Studio
o Notes Edittion
5.3
3 User interrface
The
e control pa nel (4) featu
uring an arrray of diversse functions
s is
situated on the
e lower edge
e of the worrking area ((selection of the
func
ction will va
ary dependin
ng on the re
espective taask being ex
xecuted.)
The
e status barr (5) can be viewed on the lower eedge of the display
d
scre
een. This re
elays inform
mation regarrding the tassk currently
y being
exe
ecuted, or prrovides ass
sistance by pointing thee cursor dire
ectly at a
func
ction button
n.
Info
ormation reg
garding the notes curre
ently being ddisplayed in
n the main
field
d can be vie
ewed in the bottom left-hand panee (6).
The
e tab for ope
ening the no
ote hierarch
hy (7), arrannged in accordance
with
h binders orr tags, is dis
splayed in th
he left-handd pane.
Nottice!
No menu bar iss featured within
w
the ap
pplication. U
Use the fun
nctions
and
d/or contextt menus (by
y right-clickin
ng with the mouse) forr all tasks.
5.3.2
Shortcu
uts
As the
t program
m window does not feature any acctual menus
s, it proves
prac
ctical to pro
ovide a list of
o essential,, executablee actions an
nd their
sho
ortcut keys.
Forr the note m
management view:
43
3 / 98
Crea
ate new doccument
Ctrl - N
Ope
en documen
nt on the dis
sk
Ctrl - O
Storre current d
document
Ctrl - S
Clos
se current d
document
Ctrl - F4
F
Und
do last actio
on
Ctrl - Z
Re-e
establish prreviously un
ndone action
Ctrl - Y
Cop
py selection of notes
Ctrl - C
Cut selection o
of notes
Ctrl - X
Pas
ste selection
n of notes
Ctrl - V
Dele
ete selectio n
Del
Inse
ert bold prin
nt to text
Ctrl - B
Inse
ert italic face
e to text
Ctrl - I
Inse
ert underlini ng to text
Ctrl - U
Prin
nt ink docum
ment
Ctrl - P
ST
TAEDTLER Digital pen
n
5 Ed
diting notes with MyScrript Studio Notes
N
Editio
on
5.4 Ma
anaging note
es
For
F docum
ment naviga
ation:
Zoom
Z
in
Ctrl - +
Zoom
Z
out
Ctrl - -
Go
G to beginn
ning of document
Ctrl - Pos1
Go
G to end off documentt
Ctrl - End
Go
G to next p
page
PAG
GE DOWN
5.4 Man
naging notes
n
5.4.1
Impo
orting note
es
Regularly
R
ussed note folders can be fixed in thhe preferenc
ces folder
(see
(
chap. 5
5.2 Preferen
nces). All notes filed inn these folde
ers are
displayed
d
au
utomatically
y in the MyS
Script Studi o Notes Ed
dition
application.
a
5.4.2
Open
ning a note
e
Should
S
you wish to ope
en an existing file with handwritten
n notes:
• Double-cclick on a do
ocument in the note maanagementt view or rightclick on tthe docume
ent and sele
ect Open.
• Or use th
he
button to import a file from
m the disk. Then
T
double
eclick on tthe actual file.
Notice!
N
It
I is also posssible to us
se the Ctrl - O shortcut key.
5.4.3
Navig
gation within a note
e
If your docu
ument conta
ains several pages, it iss possible to
o navigate
from
f
page to
o page.
• Go to firsst page: clic
ck on the
button aloongside the
e documentt or
use the sshortcut key
y Ctrl - Pos1
1.
• Go to lasst page: clic
ck on the
- End.
• Browse fforwards: click on
use the P
PAGE DOW
WN key.
• Browse b
backwards: click on
STAEDTLE
ER Digital pen
p
C
button orr use the shortcut key Ctrl
as
a many tim
mes as is ne
ecessary orr
or use thee PAGE UP
P key.
44 / 98
5 Editing
E
note
es with MyS
Script Studio
o Notes Edittion
5.4
4 Managing
g notes
5.4.4
Display
y of notes in accorda
ance with destination path
All incoming
i
do
ocuments are
a filed in th
he note ringg binder as standard.
A new standarrd destinatio
on path can be definedd by right-clicking on
the respective binder and selecting th
he Define aas standard binder
w documents
s will now be
b stored auutomatically
y in this
optiion. All new
loca
ation.
Nottice!
The
e display do
oes not func
ction as a Fiile Explorerr. For examp
ple, it is
not possible to
o create a ne
ew folder on
n your compputer.
u can, howe
ever, file nottes and various binderrs and store
e in
You
acc
cordance wi th subject, date, type etc.
e
• Begin
B
by cli cking on the
tab in
i the left-haand pane.
• Should
S
you wish to display all note
es, click on the
my
m notes.
ab on All
ta
• To
T display n
notes stored
d in a speciffic folder, cllick on the
the
t symbol for this folder.
tab on
Notice
e!
Any giiven docum ent may on
nly be stored
d in one foldder.
• Should
S
you wish to store a docum
ment in a speecific binder, drag the
document
d
frrom the list into the des
sired binderr.
• If notes whicch are not present
p
in note
n
folders defined by you are
featured
f
on your disk, e.g.
e notes received
r
viaa e-mail, imp
port these
notes
n
onto tthe
tab
b.
- Click on the folder in
nto which yo
ou would likke to importt the notes
- and clickk on the
button
Notice
e!
Files can
c be impo
orted in the *.notes form
mat.
5.4.5
Exporting notes
MyS
Script Studiio Notes Ed
dition can ex
xport the nootes as:
- An attach
hment in a new e-mail message
- An image
e file in num
merous form
mats
Atta
aching the note to an
n e-mail
Clic
ck beneath tthe handwrritten docum
ment in the ccontrol pane
el on the
button.
45
5 / 98
ST
TAEDTLER Digital pen
n
5 Ed
diting notes with MyScrript Studio Notes
N
Editio
on
5.4 Ma
anaging note
es
The
T entire n
note is conv
verted into JPG
J
and NO
OTES files. These are
forwarded
f
a
as an attach
hment in a new
n
e-mail tto your stan
ndard e-maiil
client.
c
Exporting
E
a
as an imag
ge file
1.
1 Click be
eneath the handwritten
h
n document in the contrrol panel on
n
the
button.
2.
2 Open th
he File type drop-down list in the ddisplayed diialog box an
nd
select a
an image format.
3.
3 Select tthe file destination path
h and file naame and click on Save or
press th
he Enter key
y.
5.4.6
Printing notes
1.
1
Open th
he respectiv
ve documen
nt.
2.
2 Click on
n the
5.4.7
button
b
beneath the notee to initiate printing.
Addin
ng / deleting folders
s
Binders
B
faciilitate organ
nization of your
y
notes. T
They manage the note
es
in the left-ha
and pane in
n the
tab.
• To add a new binde
er in the left--hand panee, click on th
he
buttton
or right-cclick on the window sec
ction and seelect the Crreate folder
option.
• Should yyou wish to delete a bin
nder, selectt the respec
ctive binder
and clickk on the
button in the window
w section. It is also
possible to right-clic
ck on the bin
nder and theen select th
he Delete
ption. You will
w be reque
ested to connfirm the de
elete action.
binder op
Notice!
N
When
W
a bind
der is deletted, all notes incorporaated within are
a deleted
and
a remove
ed complete
ely from you
ur disk. If neecessary, move
m
your
notes
n
to ano
other binder before delleting the orriginal binde
er.
5.4.8
Mana
aging tags
s
Tagging
T
allo
ows you to identify you
ur notes usinng your own
n personal
key
k words. T
This will help facilitate sorting andd searching of your nottes.
Your
Y
notes can thus be
e viewed the
ematically i n the note managemen
m
nt
view
v
in acco
ordance witth your own personal ccriteria. Crea
ate your tag
gs
to
t comply w
with key worrd or subjec
ct and color.. You can th
hen organizze
your
y
notes b
by assigning them a tag or severaal tags.
STAEDTLE
ER Digital pen
p
46 / 98
5 Editing notes with MyScript Studio Notes Edition
5.4 Managing notes
• Begin by clicking on
in the left-hand pane.
• Should you wish to view all notes (both those tagged, as well as
those without tags), click on All my notes in the
section.
window
• To display notes assigned a specific tag, click on the name of the
tag in the
window section.
Notice!
Any given document may feature more than one tag.
Fig. 66 Displaying notes in accordance with tags
Tagging a document
• To tag a document, drag the document onto the desired tag on the
tab.
• Or click on the
can be selected.
button to open a dialog box in which the tags
Fig. 67 Tags dialog box
• Or right-click on the document and select Tag selected item to
open the same dialog box.
47 / 98
STAEDTLER Digital pen
5 Editing notes with MyScript Studio Notes Edition
5.4 Managing notes
Removing a tag
• Should you wish to remove assignment of a tag from a document,
right-click on the respective document and select Delete tag.
Notice!
Deleting the tag will not delete the file itself! Only the tag will be
removed from this document.
Creating a tag
• To create a new tag in your list, click on the lower edge of the
tab on the
button.
Fig. 68 Creating tags
• The tags feature a standard name and a standard color. Right-click
on the tag to change their color, to rename them or to perform
other actions:
STAEDTLER Digital pen
48 / 98
5 Editing
E
note
es with MyS
Script Studio
o Notes Edittion
5.4
4 Managing
g notes
Fig. 69 Modifying the tags
In th
he
view
w, colored symbols
s
ind
dicate whichh tags have
e been
add
ded to each document. If several tags use thee same colo
or, only one
sym
mbol is displlayed with this
t
color. Tags are alsso displayed
d in the
info
ormation secction where
ever a docum
ment is seleected in any
y given
view
w.
Deleting a tag
g
• Should
S
you wish to delete one or more
m
tags, select the respective
r
tag(s)
t
and cclick on the lower edge
e of the
button.
b
tab on the
e
• A warning iss displayed requesting you to con firm deleting of the
tags
t
with OK
K. The tags
s are removed from thee hierarchy and all
allocated
a
do
ocuments.
5.4.9
Searchiing throug
gh notes
Enter your sea
arch word / search
s
word
ds into the ssearch field
d
. If more
m
than oone word is entered,
the system willl search for all notes co
ontaining anny one of th
he
resp
pective worrds. To searrch for a specific wordi ng, enter th
he text in
quo
otation markks.
You
u must now specify the
e location where the seearch is to be
b
und
dertaken:
• Should
S
you wish to sea
arch through
h all notes,, click on the
button
b
bene
eath the sea
arch field an
nd select Allll my notes.
• If the search
h is to be ca
arried out in
n specific n
notes, activate the
tab
t in the le
eft-hand pan
ne and select the notess to be inclu
uded in the
search
s
by cclicking. Sev
veral notes can be seleected at a time by
49
9 / 98
ST
TAEDTLER Digital pen
n
5 Editing notes with MyScript Studio Notes Edition
5.4 Managing notes
pressing the [Ctrl] key.
Then click on the
Selected notes.
button beneath the search field and select
• Should you wish to carry out the search in specific binders,
activate the
tab in the left-hand pane and select a binder by
clicking. Then click on the
button beneath the search field
and select Selected binders or tags.
• Should you wish to search in specific tags, activate the
tab
in the left-hand pane and select the tags to be searched. Then
click on the
button beneath the search field and select
Selected binders or tags.
Fig. 70 Selection for the search
• No selection is necessary for searches within your handwritten
notes.
Click on
to initiate the search.
The results are arranged in a special view according to relevance:
Fig. 71 Search results
STAEDTLER Digital pen
50 / 98
5 Editing
E
note
es with MyS
Script Studio
o Notes Edittion
5.4
4 Managing
g notes
Nottice!
Sea
arches mayy only be carried out in the respecttive standarrd
lang
guage!
If a search is in
nitiated and
d some docu
uments havve not yet be
een
ado
opted into th
he directory
y, this will be
e implemennted during the
t
sea
arch. This w
will slow dow
wn the searc
ch. Should yyou not wis
sh to wait
for conclusion of the searc
ch, select th
he Search in existing in
ndexes
only
y option (Prreferences dialog
d
box, Notes tab).. With this option
o
actiive, only tho
ose notes which
w
are alrready beingg displayed are
inclluded in the
e search.
5.4.10
0 Modifying the siz
ze of a notte page
mprove pre
Notte pages ca
an be adapte
ed in variou
us ways to im
esentation
of th
heir contentt.
• Click
C
on the
e
the
t docume
ent.
butto
on in the control panel to increase
e the size off
• Click
C
on the
e
the
t docume
ent.
butto
on in the control panel to reduce the size of
• Should
S
you wish to mo
odify the size
e so that thee page conforms
precisely
p
to the size of the window
w section, cllick on the
function
f
buttton (this bu
utton is activ
vated as staandard).
• To
T adapt the
e current pa
age to the width
w
of the window section, click
on
o
.
5.4.11
1 Deleting
g notes
It is possible to
o delete a note docume
ent in a foldder on your computer
dire
ectly in the p
program win
ndow.
• Right-click
R
o
on the docu
ument in the
e document manageme
ent window
and
a select tthe Delete file
f from disk
k option.
• You
Y must co
onfirm the delete
d
proce
edure. The document is then
deleted
d
and
d deposited into the Windows recyycle bin.
5.4.12
2 Changin
ng the sta
andard lan
nguage
Upo
on installatio
on of your MyScript
M
Studio Notes Edition app
plication, a
stan
ndard langu
uage applies for recogn
nition and ssearch. This
s language
he language of the use
is id
dentical to th
er interface.. If required
d, the
lang
guage can b
be changed
d in the prefferences forr search and
reco
ognition.
51 / 98
ST
TAEDTLER Digital pen
n
5 Ed
diting notes with MyScrript Studio Notes
N
Editio
on
5.4 Ma
anaging note
es
Notice!
N
MyScript
M
Sttudio Notes Edition indiicates all doocuments automatically
a
ly
in
i order thatt they may be searched more quicckly. The prrogram also
o
indicates
i
alll documents
s which you
u have impoorted manua
ally. If the
standard
s
lan
nguage is changed,
c
alll of your nottes will be in
ndexed
again
a
in the
e new langu
uage (this may
m take connsiderable time).
t
The
T standarrd language
e is changed as followss:
1.
1 To open
n the Preferrences dialo
og box, clickk on the
button.
2.
2 Click on
n the Langu
uages button
n.
3.
3 Click on
n the new sttandard language in thhe list of working
languag
ges and clic
ck on the Ch
hange buttoon.
Fig.
F 72 Prefere
ences dialog box
b (Language
es tab)
Notice!
N
If
I the standa
ard languag
ge installed by you is thhe only sele
ection option
n
available
a
to you, additio
onal langua
ages can bee downloade
ed under
http://www.v
h
visionobjectts.com/en/w
webstore/geet-more-lang
guagesstudio-ne-w
s
win-11.
STAEDTLE
ER Digital p
pen
52 / 98
5 Editing
E
note
es with MyS
Script Studio
o Notes Edittion
5.5
5 Editing ha
andwritten te
ext
5.5 Editin
ng handw
written te
ext
Nottice!
"Ink
k" relates to
o your notes
s in their han
ndwritten foorm.
It is possible to
o store the modification
m
ns in a docuument by cliicking on
the
functi on button.
Nottice!
Sho
ould you no
ot wish to wo
ork in the orriginal note,, right-click on the
doc
cument and
d select Sav
ve as. Enter a file namee and confirrm with
Sav
ve. MyScrip
pt Studio No
otes Edition creates a ccopy of yourr note file
and
d files it in th
he current directory.
d
5.5.1
Selectin
ng the ink
• Click
C
on the
e
butto
on above the
e handwritteen document to
initiate editin
ng of the ink.
d like to cho
oose a recta
angle optionn, activate th
he
• If you would
function
f
and
d drag it aro
ound the are
ea which yoou would lik
ke to select.
• If you would
d like to cho
oose an irregular optionn, e.g. an in
ndividual
word
w
or a sm
mall symbol, activate th
he
funnction and drag
d
it
around
a
the a
area which you would like to selecct.
• Use
U Ctrl - A to select th
he overall in
nk on the paage or Ctrl - I to invert
the
t selected
d and non-s
selected are
eas.
• Click
C
on the
e
5.5.2
butto
on to exit the
e ink editingg mode.
Adding / erasing ink
Add
ding ink
1. Click on th
he
the ink.
buttton above th
he documennt to initiate
e editing of
2. Activate th
he
func
ction and insert the addditional text or objects.
3. Click on th
he
buttton to exit th
he ink editinng mode.
Era
asing ink
1. Click on th
he
buttton above th
he handwrittten docume
ent to
initiate editting of the ink.
2. Should you
u wish to de
elete segme
ents of yourr notes, activate the
functiion and drag the curso
or over the innk which yo
ou would
like to erasse.
53
3 / 98
ST
TAEDTLER Digital pen
n
5 Ed
diting notes with MyScrript Studio Notes
N
Editio
on
5.5 Editing han
ndwritten te
ext
3.
3 Click on
n the
5.5.3
button
b
to exit the ink edditing mode.
Copy
ying / cuttiing / pasti ng ink
1.
1 Click on
n the
button
b
above the handw
written docu
ument to
initiate e
editing of th
he ink.
2.
2 Select tthe required
d ink using the
t
or
functio
ons.
3.
3 Edit the
e selected in
nk:
• Copy the
e selection with
w Ctrl - C (or
• Cut the sselection with Ctrl - X (o
or
).
).
• Paste the
e selection into the sam
me documeent with Ctrl - V (or
).
Drag the
e ink into its new positio
on. Should yyou wish to add the
selection
n into anothe
er documen
nt, open thee respective
e document (or
click on tthe correspo
onding tab), open the iink editing and
a add the
e
selection
n.
4.
4 Click on
n the
5.5.4
button
b
to exit the ink edditing mode
Splittting ink
If two texts a
are written over one an
nother withiin a note, it is likely tha
at
you
y have fo
orgotten to create
c
a new
w page. Thiis can be re
ectified in
MyScript
M
Sttudio Notes Edition usin
ng a speciaal splitting fu
unction.
1.
1 Open th
he documen
nt which con
ntains the ssuperimpose
ed ink.
2.
2 Click on
n the
button
b
above the handw
written docu
ument to
initiate e
editing of th
he ink.
3.
3 Click on
n the
the doc ument.
function buttton: a sliderr is displaye
ed beneath
Notice!
N
This
T
slider sselects the handwritten
h
n text in acccordance wiith the time it
was
w written rather than
n its spatial position.
p
4.
4 Drag on
ne slider to position the
e beginning of the selection. Drag
the othe
er slider to mark
m
the en
nd of the se lection: the selected in
nk
changess color.
STAEDTLE
ER Digital pen
p
54 / 98
5 Editing
E
note
es with MyS
Script Studio
o Notes Edittion
5.5
5 Editing ha
andwritten te
ext
Fig. 73 Selecting tthe text
5. When you are satisfie
ed with the selection,
s
cllick on the
to split the ink.
button
Nottice!
The
e selection iis copied into a new do
ocument (thhis documen
nt should
then
n be saved..) The origin
nal docume
ent is not chhanged. This
s
procedure mayy be repeate
ed should you
y wish to split furtherr
seg
gments of th
he handwrittten text.
6. To close th
he slider, ac
ctivate any one
o of the oother functio
on buttons.
7. Click on th
he
5.5.5
buttton to exit th
he ink editinng mode.
Changin
ng ink line
e spacing
1. Click on th
he
buttton above th
he handwrittten docume
ent to
initiate editting of the ink.
2. To change
e the way lin
nes are spaced, activatte the
function.
3. Indicate th e point at which
w
you would
w
like to change the
e spacing
and drag th
he cursor upwards to reduce
r
the sspacing or downwards
d
s
to increase
e the spacin
ng.
Dra
ag downwarrds to
incrrease the
spa
acing.
Dra
ag upwards to
reduce the spa
acing.
4. Click on th
he
55
5 / 98
buttton to exit th
he ink editinng mode.
ST
TAEDTLER Digital pen
n
5 Ed
diting notes with MyScrript Studio Notes
N
Editio
on
5.6 Con
nverting note
es
5.5.6
Chan
nging ink size
s
/ ink c
color
1.
1 Click on
n the
button
b
above the handw
written docu
ument to
initiate e
editing of th
he ink.
2.
2 Click on
n the
button.
b
3.
3 Edit you
ur ink:
• To chang
ge the colorr of your ink
k, open a coolor selectio
on with the
buttton and clic
ck on the ne
ew color.
• To chang
ge thickness of your ink, click on tthe correspo
onding butto
on
in the
4.
4 Click on
n the
5.5.7
functio
on to increase or reducce thickness
s of the ink.
button
b
to exit the ink edditing mode.
Highllighting in
nk
1.
1 Click on
n the
button
b
above the handw
written docu
ument to
initiate e
editing of th
he ink.
2.
2 To high light some notes with color,
c
activaate the
drag the
e cursor ove
er the ink yo
ou wish to hhighlight.
function and
Notice!
N
This
T
color iss indicated in
i the conve
ersion resullts.
3.
3 Click on
n the
button
b
to exit the ink edditing mode.
5.6 Con
nverting notes
5.6.1
Settin
ngs
Global
G
con
nversion se
ettings
1.
1 To open
n the Globa
al conversion settings ddialog box, click
c
on the
button
n in the conttrol panel.
Fig.
F 74 Globall conversion se
ettings dialog box
STAEDTLE
ER Digital pen
p
56 / 98
5 Editing
E
note
es with MyS
Script Studio
o Notes Edittion
5.6
6 Converting notes
2. To select tthe elementt being conv
verted, seleect the optio
on in the
Content typ
ype section.
3. Select the language from the language list inn which you
ur notes
written.
are to be w
Nottice!
The
e languagess in this list are the lang
guages whiich you hav
ve
sele
ected in the
e Preference
es dialog bo
ox in the Laanguages ta
ab.
4. Select the handwriting
g style used
d in your doocument:
• Print:
P
letter--for-letter font can be converted. P
Prerequisite
e for this is
that
t
each le
etter is finish
hed before the
t new lettter begins.
• Block
B
capita
als: your entire docume
ent is writte n exclusively in block
capitals.
c
• Handwriting
H
g: every other style including italicss
Nottice!
If yo
ou are unsu
ure, we reco
ommend tha
at you keepp natural handwriting
actiive.
5. Confirm yo
our settings by clicking on OK.
5.6.2
Convertting text only
o
notes
s
1. Ensure wh
hen converting notes which
w
contai n text only that
t
only
the Text op
ption has be
een selecte
ed in the Coontent type section
s
in
the Globall conversion
n settings dialog box:
Fig. 75 Text only ccontent type
2. Click on
.
g box is opened as stan
ndard.
This dialog
57
7 / 98
ST
TAEDTLER Digital pen
n
5 Ed
diting notes with MyScrript Studio Notes
N
Editio
on
5.6 Con
nverting note
es
Fig.
F 76 Converrting the dialo
og box
3.
3 Choose
e whether all pages of a documentt, only the current
c
page
e
or a gro
oup of pages (enter the
e start page and the en
nd page in th
he
are to be co
boxes) a
onverted.
4.
4 Should you wish to
o change the global connversion se
ettings, clickk
on the C
Change buttton to open
n the respecctive dialog box.
5.
5 Click on
n OK or press the Ente
er key to staart the conve
ersion.
The
T results appear in Rich
R
Text fo
ormat and caan be edite
ed directly in
n
your
y
applica
ation prior to
o saving or exporting.
Notice!
N
Press
P
Esc. tto cancel th
he conversio
on
5.6.3
Notes
s with sha
apes or drrawings
1.
1 Ensure when conv
verting notes
s with shapees or drawings that the
e
Shape a
and/or freefform drawin
ng options hhave been selected
s
in the
t
Global ssettings dia
alog box in the Contentt type sectio
on.
Notice!
N
The
T Shape and freeforrm drawing options cann be combin
ned with the
e
Text
T
option wherever necessary.
n
2.
2 Click on
n
.
This
T
dialog box is open
ned as standard.
Fig.
F 77 Converrting the dialo
og box
STAEDTLE
ER Digital pen
p
58 / 98
5 Editing
E
note
es with MyS
Script Studio
o Notes Edittion
5.6
6 Converting notes
3. Choose wh
hether all pa
ages of a document, oonly the currrent page
or a group of pages (e
enter the sta
art page annd the end page
p
in the
boxes) are
e to be conv
verted.
4. Should you
u wish to modify the global converrsion setting
gs, click on
the Changee button to open the re
espective diialog box.
5. Click on O
OK or press the Enter key to start tthe conversion.
The
e results con
ntain all sha
apes or draw
wings withinn the notes: it is
pos
ssible to cha
ange the typ
pe of shape
e as requiredd.
Forr optimum results, sh
hapes are drawn
d
as fo
ollows
NOT GO
OOD
GOOD
Dra
aw the lines of the shap
pes as
eve
enly as posssible: avoid "shaky"
lines
When drawing closed sha
apes,
ens
sure that the
e end points
s meet
one
e another ass precisely as
a
pos
ssible
It is possible to
o draw open
n
poly
ygons, how
wever, they must
m
con
nsist of only four lines
Forr optimum results, lin
nes and arrows must be drawn as
a follows
OOD
NOT GO
Stra
aight lines m
must be dra
awn as
stra
aight as posssible; avoid
d hooks
or curves
c
Line
es featuring
g several cu
urves are
not converted a
as shapes
Man
ny types of arrows can
n be
con
nverted as sshapes, how
wever, not
all
Res
spect the sizze of the arrrow tips
– th
hey should n
not be draw
wn too
larg
ge in relation
n to the length of the
sha
aft
GOOD
Alw
ways finish d
drawing one
e shape beffore beginniing with the next.
Nottice!
The
e fewer liness used whe
en drawing shapes,
s
thee more accu
urate the
sha
ape converssion.
59
9 / 98
ST
TAEDTLER Digital pen
n
5 Ed
diting notes with MyScrript Studio Notes
N
Editio
on
5.6 Con
nverting note
es
5.6.4
Conv
verting tab
bles
It is possible
e with this application
a
to
t convert taables which
h you have
drawn
d
in yo ur documen
nt, as well as
a their conttent, as long as the
conversion
c
settings hav
ve been defined correcctly.
1.
1 To convvert text which includes
s tables, goo into the co
onversion
settingss and selectt text and sh
hape as thee content typ
pe.
2.
2 Convertt your text as
a usual witth the
The ressult is a com
mbination of graphics a nd text.
button.
Draw
D
the ta bles carefully to achiev
ve optimum
m conversion
n accuracy. If
the
t table is not drawn correctly,
c
yo
ou will end uup with scra
ambled lines
or
o an endlesss number of table cellls rather thaan a clean table.
t
NOT G
GOOD
GOOD
Always
A
draw
w a complette table,
including an
n outer bord
der: do not
simply
s
draw
w lines betw
ween the
contents.
c
Ensure
E
thatt the table is
s drawn with
h
horizontal
h
a
and vertical lines. If the
table
t
is draw
wn skewed,, the
conversion
c
w
will be flawed.
The
T same n
number of lines and
columns
c
mu
ust be draw
wn
throughout
t
tthe entire ta
able. Do not
draw
d
stray ccells within the table.
5.6.5
Areas
s for spec
cial conten
nts
Adding
A
are
eas
An
A area for special con
ntents is a part
p of the ddocument de
efined by yo
ou
for
f which yo
ou can assig
gn another conversion mode and//or another
language. Y
You can therefore also exclude a ppart of the content
c
from
m
the
t converssion process
s.
1.
1 Click on
n the
fu
unction buttton for activvation.
Notice!
N
This
T
functio
on is not ava
ailable in ink
k editing moode.
2.
2 Use the
e mouse to drag
d
a bord
der around tthe area wh
hich is to
contain the speciall content. The Special content are
ea settings
dialog b
box opens.
STAEDTLE
ER Digital pen
p
60 / 98
5 Editing
E
note
es with MyS
Script Studio
o Notes Edittion
5.6
6 Converting notes
Fig. 78 Special co
ontent area settings dialog box
b
3. Select the Special con
ntents area settings diaalog box.
4. Following sselection, click
c
on OK or press thee Enter key.
Nottice!
The
ese settingss can also be
b performed subsequeently. Doublle click on
the area or ope
en the selec
ction menu by right-cliccking on the
e area.
Clic
ck also on th
he Change selection of area settinngs option.
Mod
difying / de
eleting area
as
Sho
ould you wissh to modify
y the size or position of an area, the area
mus
st first be re
emoved and
d a new one
e created. T
This does no
ot require
thatt drawings o
or text within this area also be del eted.
1. Right-clickk in the area
a for special content whhich you wo
ould like to
remove.
2. Select the Remove arrea option.
The
e area for sp
pecial conte
ent now corresponds w
with the glob
bal settings
which you have
e selected for
f this docu
ument.
5.6.6
Excluding areas
This
s method alllows exclus
sion of a pa
articular secction from co
onversion.
1. Ensure tha
at the
button
b
is active. Drag a border aro
ound the
text or obje
ects which are
a to be ex
xcluded from
m conversio
on.
2. Deactivate
e all options
s under Content type inn the display
yed
Settings diialog box:
Fig. 79 Content tyype dialog box
x
61 / 98
ST
TAEDTLER Digital pen
n
5 Ed
diting notes with MyScrript Studio Notes
N
Editio
on
5.7 Editing con
nverted note
es
3.
3 Confirm
m with OK.
This
T
section
n will now be ignored during the coonversion.
5.7 Editting converted notes
5.7.1
Text only note
The
T text con
ntent can be
e edited usiing the keybboard as if it were a
regular
r
text editing program. Deletting and ad ding text, shifting text
around,
a
cuttting, copyin
ng or pasting
g. This typee of editing applies
a
for
text
t
which w
was convertted with these settings::
Fig.
F 80 Conten
nt type dialog box
Alternatively
A
y, it is possiible to selec
ct the respeective text, open
o
the texxt
editing
e
funcctions with
and apply these fuunctions:
• Modify fo
ont size
• Bold prin
nt
• Italics
• Underline
e text
• Align parragraphs (le
eft align
justified
, right aliggn
or
, cen
ntered
)
• Modify fo
ont color
• Arrange text in lists with bullet points
.
If exporting to Word, th
he formatting in the doccument is re
etained.
5.7.2
Text with graphic
This
T
type off editing app
plies to text which was converted using these
e
settings:
s
texxt and shape and/or fre
eeform draw
wing:
STAEDTLE
ER Digital pen
p
62 / 98
5 Editing
E
note
es with MyS
Script Studio
o Notes Edittion
5.7
7 Editing co
onverted notes
Fig. 81 Content tyype dialog box
x
1. Open the rresults editing functions by clickingg on the
above the conversion results.
2. If the
button
ctivate by cclicking.
button is not active, ac
3. Click on th
he line of tex
xt which you
u would likee to edit.
4. Edit the texxt as desire
ed and then press the E
Enter key or click on
OK
5.7.3
Copying
g and sele
ecting textt
Sele
ected text ccan be copie
ed into the clipboard inn order that it may be
use
ed again elssewhere. Ple
ease note that the shaapes cannott be copied
usin
ng this meth
hod. This ap
pplies for te
ext which is converted using
u
this
settting:
Fig. 82 Content tyype dialog box
x
1. Open the rresults editing functions by clickingg on the
above the conversion results.
2. Click on th
he
button
func
ction button for activatioon.
Nottice!
The
e indicator a
arrow is represented in
n the form off a standard
d white
arro
ow.
3. Drag the a
arrow over the text lines
s which youu would like to select.
4. If you wou ld like to co
opy all results for the cuurrent page, use the
ortcut key.
Ctrl - A sho
63
3 / 98
ST
TAEDTLER Digital pen
n
5 Ed
diting notes with MyScrript Studio Notes
N
Editio
on
5.8 Exxporting con
nverted note
es
5.
5 Should you wish to
o copy the selection
s
intto the clipbo
oard, use th
he
Ctrl - C shortcut ke
ey or the
function iin the stand
dard toolbarr.
6.
6 This cop
py can then
n be added into any othher program
m as desired
d.
5.7.4
Repla
acing a sh
hape
Geometric
G
fforms can be
b replaced with anotheer shape se
elected from
ma
predefined
p
llist.
1.
1 Click on
n the
function buttton above tthe conversion results.
2.
2 Click on
n the
function
f
buttton.
3.
3 Click on
n the shape
e which you would like tto replace.
4.
4 Select a shape with which you
u would likee to replace the existing
g
shape ffrom the ope
ened list of shapes.
Fig.
F 83 Selectiing a shape
Notice!
N
A number iss featured alongside
a
ea
ach shape. This numbe
er
represents
r
tthe degree of certainty
y from MySccript Studio Notes
Edition
E
that the respective shape matches
m
thee original sh
hape drawn
n
by
b you.
5.
5 When yyou are happy with the editing of thhe shape, close
c
the
results e
editing func
ctions by clic
cking on thee
butto
on.
5.8 Exp
porting converted
c
d notes
5.8.1
Expo
orting into the stand
dard text editing
e
pro
ogram
To
T export co
onverted text into the standard
s
texxt editing prrogram, clicck
button in the control panel. Youur text is ope
on
o the
ened in Rich
Text
T
format in the standard text ed
diting prograam.
Should
S
yourr documentt include sha
apes or draawings, thes
se will also be
exported
e
in Rich Text format.
f
The text is dispplayed in ind
dividual textt
fields.
f
STAEDTLE
ER Digital pen
p
64 / 98
5 Editing
E
note
es with MyS
Script Studio
o Notes Edittion
5.9
9 Personal recognition profiles
If ex
xporting texxt only, use Text Only format.
f
A neew page is also
crea
ated in the ttext editing program fo
or each pagee of your do
ocument.
5.8.2
In an e-mail appliication
To send
s
your cconversion result to your standardd e-mail app
plication,
click on the
b
the converted ttext.
button beneath
ur text is sen
nt directly to
o your e-ma
ail messagees in Text Only
O
format
You
Nottice!
In th
his format, n
no shapes or drawings
s may be inccluded in th
he text.
5.8.3
Into a te
ext editor
To send
s
your cconverted te
ext to a Notepad (or yoour standard
d editing
prog
gram for sim
mple text), click
c
on the
con
nverted text..
buttonn beneath the
t
You
ur text is cop
mple text in
pied into the standard editing proggram for sim
Tex
xt Only form
mat with the original file name.
5.8.4
As an im
mage
1. Click on th
he
func
ction button beneath thhe conversio
on results.
2. Open the F
File type dro
op-down list in the dispplayed dialo
og box and
select an im
mage forma
at.
3. Select the file destina
ation path an
nd file namee and click on Save or
Enter key.
press the E
5.9 Perso
onal reco
ognition profiles
p
My Script Train
ner allows you
y to create your own personal re
ecognition
proffile. First wrrite a samplle text in the
e training prrogram usin
ng your
STA
AEDTLER D
Digital pen. This samplle will be ussed by the program
p
to
crea
ate your ow
wn personal recognition
n profile.
5.9.1
Creating
g a recogn
nition pro
ofile
1.
65
5 / 98
Open the G
Global conv
version setttings
and
click on th e Change conversion
c
profile
p
buttoon. Then click on the
Create new
w profile bu
utton in the following
f
di alog box. The
T window
for My Scrript Trainer opens.
ST
TAEDTLER Digital pen
n
5 Ed
diting notes with MyScrript Studio Notes
N
Editio
on
5.9 Perssonal recogn
nition profile
es
Fig.
F 84 Dialog box My Scrip
pt Trainer
2.
2 Click on
n Next to cre
eate a recognition proffile file.
3.
3 Assign tthe recognition program a name aand a langu
uage. Then
click on Next.
Fig.
F 85 Selectiing name and
d language
4.
4 Read th
hrough the instructions for creatingg an examp
ple text
meticulo
ously, if nec
cessary prin
nt out the innstructions. Click on Ne
ext
to displa
ay the exam
mple text.
STAEDTLE
ER Digital pen
66 / 98
5 Editing
E
note
es with MyS
Script Studio
o Notes Edittion
5.9
9 Personal recognition profiles
Fig. 86 Selecting n
name and language
5. Copy the e
example tex
xt into the fo
ollowing twoo dialog win
ndows and
click on Ne
ext as soon as copying
g is complette.
Fig. 87 Example te
text 1
67
7 / 98
ST
TAEDTLER Digital pen
n
5 Ed
diting notes with MyScrript Studio Notes
N
Editio
on
5.9 Perssonal recogn
nition profile
es
Fig.
F 88 Examp
ple text 2
6.
6 Upload the stored example text from the disk to the PC using My
M
Script In
nk Retriever (see 4.3.1 Uploadingg notes with MyScript
Studio N
Notes Editio
on).
Notice!
N
Note Takerr, it cannot
If
I the examp
ple text is uploaded
u
using Mobile N
be
b read by M
My Script Trainer!
T
7.
7 The win
ndow for uploading the stored exaample text opens.
o
Selecct
the pag es on which
h the example text is pprinted and click on
Open.
Fig.
F 89 Upload
ding the exam
mple text
8.
8 In the e
event that yo
ou have selected the w
wrong pages
s, modify yo
our
selectio
on here. Clic
ck on Next to
t confirm thhe pages.
STAEDTLE
ER Digital p
pen
68 / 98
5 Editing
E
note
es with MyS
Script Studio
o Notes Edittion
5.9
9 Personal recognition profiles
Fig. 90 Confirming
g selection
9. My Script T
Trainer now
w uploads yo
our handwrriting sample.
Fig. 91 Uploading
g the handwritiing sample
10. You must n
now check the recomm
mended connversion of your
y
g sample and modify as
handwriting
a required.. Please folllow the
instructionss in the My Script Train
ner. Once yyou are hap
ppy with
your handw
writing sample, click on
n Next.
69
9 / 98
ST
TAEDTLER Digital pen
n
5 Ed
diting notes with MyScrript Studio Notes
N
Editio
on
5.9 Perssonal recogn
nition profile
es
Fig.
F 92 Modifyying the handw
writing sample
Notice!
N
At
A least 80%
% of valid ex
xamples are
e required iin order that a profile
can
c be crea
ated succes
ssfully. With less than 880% of valid
d examples,,
check
c
wheth
her the train
ning units are completee. You can return to the
e
previous
p
dia
alog box to create new
w handwritingg samples or
o to add
new
n
pages.
11.
1 My Scri pt Trainer now
n
creates
s your own ppersonal re
ecognition
profile.
Fig.
F 93 A recog
gnition profile is created
12.
1 Finally, you will obttain your ow
wn recognitiion profile which
w
is
stored o
onto your co
omputer.
STAEDTLE
ER Digital p
pen
70 / 98
5 Editing
E
note
es with MyS
Script Studio
o Notes Edittion
5.1
10 Dictionarry
Nottice!
To ensure
e
thatt My Script Ink
I Retrieve
er can acceess the crea
ated
proffile, copy th
he folder Vis
sion Objects into the ffollowing loc
cation:
WIN
N XP:
from
m C:\Docum
ments and Settings\Use
S
er name\Appplication
Datta\Vision O
Objects
to C:\Documen
C
nts and Setttings\User name\Applic
n
cation data
VIS
STA, WIN7:
from
m C:\User\U
User name\A
Application Data\Roam
ming\Vision
n Objects.
to C:\User\Use
C
er name\App
pData\Roam
ming.
To be
b able to vview the Applicable datta folder, hid
idden system
m folders
mus
st be recove
ered.
5.9.2
Managing recogn
nition proffiles
1. Open the G
Global conv
version settings
to
obtain acce
ess to the recognition
r
e Change
profile and click on the
conversion
n profile buttton. The Re
ecognition pprofiles dialog box
opens.
2. Should you
u wish to ac
ctivate another profile, click on the
e language.
Then click on the proffile in the lis
st and click oon the Sele
ect button.
3. Clicking on
n the Check
k button will open the trraining sam
mple so that
you can ve
erify whethe
er validation
n has been ccarried out correctly.
4. Clicking on
n the Boost button will create anotther profile level.
Additional samples orr special sym
mbols are aannounced for the
s applies for Asian langguages ONLY.
learning prrocess. This
5. To delete a
an undesire
ed profile, se
elect the resspective pro
ofile and
click on De
elete.
5.9.3
Exporting / imporrting reco
ognition prrofiles
• Exporting:
E
cclick on the Export button. Select a name and
d the
path for the
destination
d
e profile and
d click on thhe Save button.
• Importing: cclick on the Import proffile button. N
Navigate to the profile
file,
f
click on
n the file and
d then click on Open.
5.10 Dictio
onary
5.10.1
1 Adding words
Sho
ould it be de
etermined th
hat the prog
gram is exp eriencing problems
reco
ognizing so
ome frequen
ntly used wo
ords or term
ms, add them
m into the
dicttionary. The
ese words can
c be individual name s, terms or
abb
breviations. This proces
ss will allow
w the prograam to correc
ctly identify
thes
se words m
much more easily.
e
1. Click on th
he
71 / 98
buttton and then
n on the Dicctionary tab
b.
ST
TAEDTLER Digital pen
n
5 Ed
diting notes with MyScrript Studio Notes
N
Editio
on
5.10 Dictiona
ary
2.
2 In the D
Dictionary ta
ab, click on Lexicon. Ann insertion point
p
is
displaye
ed in the ma
ain text field
d:
Fig.
F 94 Prefere
ences dialog box
b (Dictionary
y tab)
3.
3 Enter th
he new word
d and click on the
Enter ke
ey to confirm
m the word.
button, or press
p
the
4.
4 Add as many word
ds as you lik
ke using thiss method.
5.
5 Click on
n OK to con
nfirm the new
w entry or eentries.
6.
6 If you do
o not wish to
t confirm the modificaations, click on the
Cancel button.
5.10.2 Editin
ng / deleting entries
s
Editing
E
dic
ctionary enttries
1.
1 To edit a dictionary
y entry, click
k on
Dictiona
ary tab.
.T
Then click on
o the
2.
2 Select tthe word wh
hich you wo
ould like to eedit from the
e Lexicon ta
ab,
and clicck on the
button.
Notice!
N
The
T selecte
ed word is displayed
d
in the text fielld with a flashing
insertion
i
po
oint.
Fig.
F 95 Prefere
ences dialog box
b (Dictionary
y tab)
STAEDTLE
ER Digital pen
p
72 / 98
5 Editing
E
note
es with MyS
Script Studio
o Notes Edittion
5.1
10 Dictionarry
3. Perform th
he required modification
ns and clickk on
to
o confirm. If
ve the modifications, cclick on
you do nott wish to sav
to cancel.
4. Once finish
hed, click on OK to con
nfirm and too close the dialog
d
box.
Deleting dictio
onary entriies
1. If you wou ld like to de
elete a dictio
onary entry,, first click on
o
y.
Then click on the Dicttionary entry
.
2. Click on th
he entry which you wou
uld like to deelete from the entry
list beneat h the Lexico
on tab.
3. Click on th
he
buttton.
4. Click on O
OK to conclu
ude the proc
cess.
5.10.3
3 Importin
ng / exporrting the p
personal dictionary
d
Imp
porting the dictionary
y
1. Click on th
he Import bu
utton in the Personal diictionary dia
alog box.
Nottice!
It is
s also possib
ble to imporrt your own text files inn UTF-8 form
mat.
2. Select the file and clic
ck on Open, or double--click on the
e file name.
Exp
porting the
e dictionary
y
1.
n
To export the contentt of the current dictionaary, click on
then click on the Dictiionary tab.
and
2. Click on th
he Export bu
utton in the dialog box.
3. Select a lo
ocation into which the dictionary
d
shhould be sto
ored. Enter
a file name
e.
Nottice!
The
e dictionary,, including all
a words an
nd automatiic replacem
ments, is
storred as a texxt file. The standard
s
file
e destinationn path for th
he export
/ im
mport of dictiionaries is: My files/My
yScript Docuuments/exp
port.
4. Click on th
he Save button as confirmation.
5.10.4
4 Managing automa
atic replac
cements
You
ur applicatio
on manages
s replaceme
ents automaatically: if
abb
breviations, initials or acronyms arre used in yyour notes, these
t
can
be replaced
r
au
utomatically
y by a complete name oor term duriing
con
nversion.
73
3 / 98
ST
TAEDTLER Digital pen
n
5 Ed
diting notes with MyScrript Studio Notes
N
Editio
on
5.10 Dictiona
ary
Adding
A
an automatic replaceme
ent
1.
1 For acccess to the automatic
a
re
eplacementts, click on the
t
button a
and then click on the Auto
A
replaceements tab.
2.
2 Add an automatic replacemen
r
nt:
Fig.
F 96 Text fie
elds for autom
matic replacem
ment
3.
3 Enter th
he shortene
ed form or abbreviation (e.g. "GB")) which is to
o
be repla
aced by ano
other text into the left-hhand side off the text fie
eld.
4.
4 Then en
nter the long
g form (e.g.. Great Britaain) which replaces
r
the
e
original text in all positions
p
wh
here it is loccated in the right-hand
side of tthe text field
d.
Fig.
F 97 Prefere
ences dialog box
b (Dictionary
y tab)
5.
5 Click on
n
to add your autom
matic replaccement into the
dictiona
ary.
6.
6 Once fin
nished, click on OK to close the d ialog box.
Modifying
M
a
an automatic replacement
1.
1 To mod
dify an autom
matic replac
cement, sellect the entrry which you
would li ke to modiffy and click on the
bbutton. The
e selected
an be displa
ayed in the text
t
fields aand may be edited.
entry ca
2.
2 Perform
m the require
ed modifica
ations and cclick on
m. If
to confirm
you do not wish to save the modifications
m
s, the proce
ess can be
termina
ated by click
king on
.
3.
3 Click on
n OK to clos
se the dialog box.
STAEDTLE
ER Digital pen
74 / 98
5 Editing
E
note
es with MyS
Script Studio
o Notes Edittion
5.1
10 Dictionarry
Fig. 98 Preference
es dialog box (Dictionary tab)
Deleting an au
utomatic re
eplacement
1. To delete a
an automatic replacem
ment, click oon the entry which you
would like to remove from
f
the listt.
2. Click on th
he
buttton.
3. Once finish
hed, click on OK to close the dialoog box.
75
5 / 98
ST
TAEDTLER Digital pen
n
6 Editing the notes with Mobile Note
te Taker (No
ote Manage
er)
66.1 Defining
g preference
es
6 Editin
ng the notes
n
with
w Mob
bile Notte Takerr (Note M
Manage
er)
The
T Note M
Manager allo
ows you to store,
s
displaay, search, copy and
export
e
notess.
It is set in W
Windows Ex
xplorer forma
at so that yoou can search through
h
your
y
files in the left-han
nd section and
a observee them in th
he right-hand
section.
s
Fig.
F 99 Note M
Manager
6.1 Deffining pre
eference
es
Define
D
the sstandard pre
eferences such
s
as notee color, automatic
storage
s
cha
aracteristics, print prefe
erences etc.. in the prefference dialog
window.
w
The
T dialog w
window is divided
d
into four registraation cards, each
controlling
c
a different aspect
a
of the
e system: ggeneral, prin
nting and ink.
6.1.1
Acce
ess to prefferences:
Open
O
the C
Configuration
n menu in th
he Note Maanager and select the
Preferences
P
s option.
6.1.2
"Gen
neral" tab
• The time
e interval (in
n minutes) can
c be deterrmined in th
he Auto-savve
note in e
entry field on
nce the systtem has alre
ready stored
d your notess.
Notice!
N
This
T
Auto-sa
ave activate
es a restore
e function auutomatically
y which
restores
r
you
ur data in th
he version in
n which it w
was last storred in the
event
e
of a ssystem shuttdown or po
ower failure..
• Tick the L
Load when Windows starts
s
checkkbox to open Mobile No
ote
Taker au
utomatically each time the computter is switch
hed on.
• Tick the Save sticky
y notes on exit
e checkboox to store all
a newly
memos auto
omatically. The stored memos appear as soo
on
created m
as the PC
C is switche
ed on next time
t
or wheen the Mobille Note Takker
is restartted.
STAEDTLE
ER Digital pen
p
76 / 98
6 Editing
E
the n
notes with Mobile
M
Note
e Taker (No
ote Manager)
6.1
1 Defining p
preferencess
Fig. 100 Preferencces dialog box
xes (General tab)
t
6.1.3
"Mobile
e" tab
An automatic u
upload can be set in the Mobile taab. Three diffferent
sele
ection possiibilities are available to
o you.
• YES
Y
- Your notes are uploaded
u
au
utomaticallyy as soon as
s the
receiver
r
is cconnected to
t the PC.
• NO
N - Your n
notes must be uploaded manually .
• ASK
A
ME - Y
You will be asked
a
by the Mobile Noote Taker each
e
time
the
t receiverr is connectted whetherr you would like to uplo
oad your
notes.
n
Fig. 101 Preferencces dialog box
x (Mobile tab)
6.1.4
"Print" tab
The
e settings fo
or printing can be perfo
ormed here..
• Tick
T the No te per page
e checkbox to verify thaat only one note per
page
p
will be
e printed.
• Tick
T the Cen
n page chec
ckbox to veerify that nottes will
nter note on
always
a
be p
printed centered.
Fig. 102 Preferencces dialog box
x (Print tab)
77
7 / 98
ST
TAEDTLER Digital pen
n
6 Editing the notes with Mobile Note
te Taker (No
ote Manage
er)
6.2 Toolbo
ox
6.1.5
"Paper holder"" tab
In the Pape r holder tab
b, it is possible to adjusst transpare
ency of the
paper ho
older.
• Pull the sslider benea
ath Opacity
y of the papeer holder to the require
ed
degree o
of transpare
ency.
Once
O
all setttings have been performed, confiirm your entry by clicking
on
o OK.
Fig.
F 103 Prefe
erences dialog
g box (Paper holder tab)
6.2 Too
olbox
The
T Note M
Manager toolbox include
es buttons w
which grantt you easy
access
a
to th
he menu commands us
sed most reegularly.
The
T followin
ng table con
ntains a list of all buttonns in the too
olbox along
with
w a funct ional descriiption.
Toolbox
button
Descriptiion
Upload – In online mode,
m
it is poossible to upload all off your
notes from
m the receiv
ver onto thee PC using the Mobile Note
Taker sofftware.
Convert your
y
notes into text usinng MyScript Studio No
otes
Edition (o
only possible
e if the recoognition softtware is
installed.))
Cut – Cutts out the se
elected notees and store
es them in the
t
clipboard.
Copy – Copies
C
the selected nottes and storres them in the
clipboard.
Paste – In
nserts every
ything whichh was mostt recently sttored
in the clip
pboard by co
opying or cuutting.
Delete – Deletes
D
sele
ected note((s)
Edit notes
s – Edits a selected
s
noote.
Print – Prrints selecte
ed note(s).
STAEDTLE
ER Digital pen
p
78 / 98
6 Editing
E
the n
notes with Mobile
M
Note
e Taker (No
ote Manager)
6.3
3 Uploading
g notes onto
o the PC
To
oolbox
button
D
Description
n
D
Display as sticky note – Converts a note to stiicky note.
A
As paper holder – Conv
verts a notee to paper holder.
S
Small thumb
bnail – Displays small tthumbnails in the Note
M
Manager vie
ew.
M
Medium thum
mbnail - Dis
splays mediium-sized th
humbnails in
th
he Note Ma
anager view.
L
Large thumb
bnail - Displays large thhumbnails in
n the Note
M
Manager vie
ew.
N
Note mode
M
Mouse mode
e – Allows the
t pen to fuunction as a mouse
A
About Mobile
e Note Take
er – Displayys information regardin
ng
th
his Mobile Note
N
Taker version.
6.3 Uploa
ading nottes onto the PC
1. Start up M obile Note Taker.
T
2. Upon initia
al startup of the program
m, select thhe position in which
your receivver was atta
ached to the
e paper andd click on OK.
O This
setting can
n be change
ed in the Co
onfigurationn > menu un
nder Set
device orie
entation.
Fig. 104 Aligning tthe base unit dialog box
79
9 / 98
ST
TAEDTLER Digital pen
n
te Taker (No
ote Manage
er)
6 Editing the notes with Mobile Note
6.3 Uploaading notes
s onto the PC
P
Notice!
N
Selection
S
off the attachm
ment positio
on is not suupported hig
gher than
Windows
W
Vi
Vista. The ce
entral positio
on at the topp is genera
ally preset.
If
I an incorre
ect position is specified
d here, yourr notes will be
b displayed
skewed
s
on yyour PC!
3.
3 Upon in
nitial startup
p of the prog
gram, a messsage appe
ears stating
that the
e STAEDTLER Digital pen
p is beingg used in mouse mode
e.
Confirm
m by clicking
g on OK. Th
his setting ca
can be changed at any
time (se
ee chapter 4.2.1
4
Functions of the S
STAEDTLE
ER Digital
pen).
M
MAC information
This
T
is store
ed on the MAC
M
in TIFF-format wheen uploadin
ng the
handwritten
h
n notes onto
o the MAC via
v the Mobiile Note Taker software
e.
Notes
N
in TIF
FF format, however,
h
ca
annot be traansferred in the MyScriipt
Studio
S
Note
es Edition ha
andwriting recognition
r
w
software, whereby
conversion
c
of the notes
s in computter writing iss impossible
e. To conve
ert
the
t notes in
n computer writing,
w
uplo
oading musst be carried
d out via Myy
Script
S
Ink R
Retriever.
The
T Mobile Note Takerr transfers the notes onn your receiver
automatical
a
ly onto the MAC and deletes
d
the m
memory of the receiver.
It is thereforre essentiall that autom
matic deletinng of the rec
ceiver memory
ed under Note
N
Taker preferences
p
.
is deactivate
Fig.
F 105 Deacctivating autom
matic deleting
4.
4 Select tthe Upload option in the File menuu. All notes on your
receiverr are now uploaded on
nto the PC.
You
Y will be asked upon
n conclusion
n of the proocess wheth
her you wou
uld
like to delete
e all notes on
o the receiver.
• Select Ye
Yes to delete
e all notes on
o the receivver.
• Select No to retain the
t notes.
Notice!
N
If
I you selectt 'No', the notes
n
which are alreadyy present on
n the PC wiill
not
n be uploa
aded again during the next uploadd.
If
I the notes are deleted
d from your PC, howevver, these no
otes will be
uploaded
u
ag
gain.
STAEDTLE
ER Digital pen
p
80 / 98
6 Editing
E
the n
notes with Mobile
M
Note
e Taker (No
ote Manager)
6.4
4 Editing no
otes
6.4 Editin
ng notes
Nottes can be e
edited at an
ny time: rega
ardless of w
whether they are still
to be
b drafted o
or whether th
he notes are already st
stored in the
e Note
Man
nager.
1. To edit a n
note, click on the Edit note
n
button
or righ
ht-click on
the note an
nd select Ed
dit note in the menu whhich appears.
The
e Edit notess window op
pens.
Fig. 106 Edit note
es window
2. Edit your n
note
button in
• Use
U the Sellect area
n the toolbaar or the Sellect option
from
f
the To
ools menu to
o select a sp
pecific line oor a group of
o lines
• In the Edit m
menu, click on Select all
a to select the entire note.
n
Nottice!
It is
s still possib
ble to continue drawing or writing w
within the no
ote using
the pen while tthe note is being
b
edited
d.
Edit note includ
des menus and a toolb
bar to grant you access
s to a wide
sele
ection of ed
diting functio
ons.
The
e Toolbar is situated on
n the right-h
hand pane oof the Edit note
n
window:
Se
elect area – Allows you
u to select aan area by clicking
an
nd dragging
g with the mouse.
m
en – Allows
s you to draw
w freehandd using yourr mouse.
Pe
81 / 98
ST
TAEDTLER Digital pen
n
6 Editing the notes with Mobile Note
te Taker (No
ote Manage
er)
6.5 Printing
P
note
es
Highlight – Allows you to highlighht each are
ea freehand
using your mouse.
Line – Allo
ows you to insert a linee of any leng
gth.
Circle – Allows
A
you to
o insert a ci rcle of any size.
Rectangle
e – Allows you
y to insertt a rectangle
e of any sizze.
Text – Allo
ows you to insert typedd text.
Change pen / highlighting color – Allows yo
ou to select or
change co
olor of the pen
p strokes,, the highlig
ghter or the
text.
Line width
h – Allows you
y to select
ct or modify width of the
e
line.
The
T Manag
ger toolbar is situated below in thee Edit notes
s window.
e completely – Deletess the entire note
Erase note
represente
ed on the display screeen.
Undo – De
eletes the previous
p
acttion.
Repeat – Restores th
he action prreviously de
eleted.
Enlarge – Enlarges view
v
of the nnote.
Adapt parrameter auto
omatically - Returns view of the no
ote
to the orig
ginal view size.
Reduce – Reduces view
v
of the nnote.
Rotate to the right – Rotates
R
thee entire note
e image 180
0°
to the righ
ht.
Rotate to the left – Ro
otates the eentire note image
i
180° to
the left.
6.5 Prin
nting nottes
A note can b
be printed from
f
any of the 3 note interfaces – the Note
window,
w
the
e Edit note window
w
or the Note Maanager.
STAEDTLE
ER Digital pen
p
82 / 98
6 Editing
E
the n
notes with Mobile
M
Note
e Taker (No
ote Manager)
6.6
6 Storing no
otes
6.5.1
Printing
g a note frrom a file
1. Click on th
he note nam
me or on the
e thumbnail in the Note
e Manager.
2. Click the P
Print preview
w option in the
t File mennu to obtain
n a preview
of the noticce prior to printing.
p
Nottice!
Sev
veral notes can be inclu
uded in the preview sim
multaneous
sly. Select
the first note, h
hold the <Cttrl>-key pre
essed and thhen select the
t other
note
es.
3. Select the Print option
n in the File menu or cllick on the
button.
4. Select the desired print settings and
a print prroperties.
5. Then click on OK.
6.5.2
Printing
g an opene
ed note
• Select
S
the P
Print option in the File menu
m
in thee Edit notes window or
click
c
on the
button
n.
6.6 Storin
ng notes
Nottes can be sstored at an
ny time durin
ng creation . They are stored
s
auto
omatically in
n the standard folder and
a named in accordan
nce with
n. Once sto
date
e of creation
ored, notes can be renaamed at any time.
• Click
C
on the
e Save and close button in the notte window to
oolbar
to
t store the note in the Miscellane
eous standaard folder.
• Click
C
on the
e Save in folder
of
o your choiice.
bu
utton to storre the note in
i a folder
Nottice!
It is
s also possib
ble to set an
n Auto-save
e.
6.7 Renam
ming nottes
When creating
g and saving
g a new note, this is auutomatically
y named in
acc
cordance wi th the curre
ent date and
d time. Notees can be re
enamed at
any
y time.
1. Right-clickk on the note
e which you
u would likee to rename
2. Select Ren
name in the
e menu whic
ch appears.. The name is now
highlighted
d.
3. Enter a ne
ew name forr the note.
83
3 / 98
ST
TAEDTLER Digital pen
n
6 Editing the notes with Mobile Note
te Taker (No
ote Manage
er)
6.8 Moving
M
note
es
6.8 Mov
ving note
es
It is possible
e to relocate
e a note fro
om its currennt folder to another
folder.
f
1.
1 Select tthe name off the note or the thumbbnail in the Note
N
Manage
er.
2.
2 Click on
n the Move to option in the File meenu.
3.
3 Select tthe folder in
nto which the note is to be filed.
Notice!
N
The
T note ca
an also be moved
m
via 'D
Drag and Dr
Drop'.
6.9 Find
ding notes
It is possible
e to search for a speciffic note withhin your stored notes.
1.
1 Select tthe Find notte option in the Edit meenu.
2.
2 Select tthe folder(s)) which you would like to search.
3.
3 To searrch for desc
criptions or note
n
namess, select by description
n
and entter the name
e or the des
scription of the note in the Search
h
for entryy field.
4.
4 To searrch by creattion date pa
arameters, sselect All no
otes created
d
and the
en enter the time period
d for which yyou would like to carryy
out the search.
5.
5 Click on
n Find.
Fig.
F 107 Findin
ng a note
6.10 Exp
porting notes
n
6.10.1 Expo
orting as JPEG
Each
E
note ccan be expo
orted in JPE
EG file formaat which ca
an then be
converted
c
to
o an image file. This prroves practiical, for exa
ample, shou
uld
you
y wish to add notes in documen
nts created in other app
plications
such
s
as MS
S Word or PowerPoint.
STAEDTLE
ER Digital pen
p
84 / 98
6 Editing
E
the n
notes with Mobile
M
Note
e Taker (No
ote Manager)
6.1
10 Exporting notes
1. In the Note
e Manager, select the note
n
which you would like to
export.
2. Right-clickk on the note
e name or open
o
the Fille menu. Se
elect the
Export opt ion. Click on JPEG in the
t list that appears.
An Export dialo
og window appears.
Fig. 108 Export no
ote as JPEG file
f dialog box
3. Select the target path in the File name field.
4. Define the resolution quality unde
er Resolutioon.
5. Click on Sa
ave.
Nottice!
It is
s possible to
o export sev
veral notes simultaneouusly. Hold the
t <Ctrl>key
y pressed on
n the keybo
oard and the
en select thee note whic
ch you
wou
uld like to exxport in the Note Mana
ager.
6.10.2
2 Exporting in a file
e format
It is also possib
ble to exporrt each note
e in vector fformat (.peg
gvf-file) to
allow another d
digital pen user
u
to impo
ort this file i nto the Notte Manager
data
abase.
1. In the Note
e Manager, select the note
n
which you would like export.
2. Right-clickk on the note
e name or open
o
the Fille menu. Se
elect the
Export opt ion. Click on Export as
s data file inn the list which
appears.
An Export dialo
og window appears.
85
5 / 98
ST
TAEDTLER Digital pen
n
6 Editing the notes with Mobile Note
te Taker (No
ote Manage
er)
6.111 Importing data forma
ats
Fig.
F 109 Exporrt note as diallog box .pegvff file
3.
3 Select tthe target pa
ath in the File
F name fieeld.
4.
4 Click on
n Save.
6.11 Imp
porting data form
mats
It is possible
e to import each file in vector form
mat (.pegvf file)
f
into the
e
Note
N
Manag
ger databas
se.
1.
1 Select tthe Import option
o
in the
e File menu .
The
T Import dialog box appears.
Fig.
F 110 Imporrting data dialo
og box
2.
2 Select tthe data which you wou
uld like to eexport.
3.
3 Click on
n Open.
STAEDTLE
ER Digital pen
p
86 / 98
6 Editing
E
the n
notes with Mobile
M
Note
e Taker (No
ote Manager)
6.1
12 Sending / receiving notes
6.12 Sendiing / rece
eiving no
otes
Eac
ch note can be sent via
a e-mail or via
v the locall network. Notes
N
sent
as an
a e-mail ap
ppear to the
e recipient as
a a JPEG--attachmentt. To send
a no
ote in the lo
ocal network
k, the receiv
ver must haave the Mob
bile Note
Tak
ker software
e installed, and
a this sofftware mustt be active on
o their
com
mputer.
6.12.1
1 Via e-mail
The
e Mobile No
ote Taker us
ses your sta
andard e-maail client to send notes
via e-mail.
ch stored no
ote can be sent
s
as a JP
PEG or PEG
GVF file.
Eac
1. Click on th
he note nam
me or the thu
umbnail in tthe Note Ma
anager.
2. In the File menu, sele
ect the Send
d to > e-maiil option if you
y would
like to send
d the note as
a a JPEG file.
f
Select tthe Send to
o >Send via
a
e-mail as d
data file opttion should you wish too send the note
n
as a
PEGVF file
e. Alternativ
vely, right-click on the nnote name or
o on the
thumbnail and select Send to > e-mail
e
or Seend via e-mail as data
file.
A new e-mail fo
form opens with the note as a JPE
EG or PEGV
VF
achment.
atta
Fig. 111 Note sen
nt via e-mail with
w JPEG attac
chment
3. Enter the e
e-mail addre
ess of the desired
d
recippient, the su
ubject and
the e-mail text.
4. Send the e
e-mail.
6.12.2
2 Sending
g via the local netw
work
1. Click on th
he note nam
me or the thu
umbnail in tthe Note Ma
anager.
2. In the File menu, click
k on the Sen
nd to > Netw
work PC op
ption and
on the note
e name or th
he thumbnaail and selec
ct Send to
right-click o
> Networkk PC in the menu
m
which
h appears.
87
7 / 98
The
e Send note
e… dialog window
w
open
ns. A list of all network
k users
insttalled and in
nitiated by the Mobile Note
N
Taker application appears.
ST
TAEDTLER Digital pen
n
6 Editing the notes with Mobile Note
te Taker (No
ote Manage
er)
6.13
3 Adding nootes in otherr application
ns
3.
3 Select tthe name orr the IP add
dress of the person to which
w
you
would li ke to send the note. Several recippients can be
b selected
simultan
neously by pressing the <Ctrl> keey.
Notice!
N
The
T note ca
an be sent to
t all networrk users in tthe list by pressing
p
the
e
Select
S
all bu
utton.
4.
4 Click on
n Send.
6.12.3 Rece
eiving via the
t local n
network
It is possible
e for users of a local ne
etwork to reeceive notes
s via the LA
AN.
Upon
U
receip
pt of a note,, this appea
ars automat ically on your PC display
screen
s
and a signal ton
ne sounds.
Right-click
R
o
on the receiived note to
o obtain the following options:
o
Fig
F 112 Option
ns upon receip
pt via a local network
n
• Edit & Re
eply (the us
ser may add
d text or skeetches).
• Print note
e
• Save notte
• Forward note to other network users
• Close no
ote
Notice!
N
Notes
N
which
h have been
n received via
v the LAN
N are stored
d in the
Received
R
no
otes folder in the Note Manager.
6.13 Add
ding note
es in oth
her applic
cations
It is possible
e to add each stored note in anothher applicattion. In this
case,
c
the no
ote is conve
erted autom
matically intoo a JPEG im
mage.
1.
1 Select tthe note or the
t thumbnail in the Noote Manage
er.
2.
2 Open th
he Edit men
nu or right-click on the nnote name or the
thumbn ail .
3.
3 Select C
Copy or Cutt.
Notice!
N
Cutting
C
the note will de
elete the notte from the current pag
ge.
4.
4 Open th
he applicatio
on into whic
ch you woulld like to ad
dd the note.
5.
5 Select tthe Add option in the opened appllication.
STAEDTLE
ER Digital pen
p
88 / 98
6 Editing
E
the n
notes with Mobile
M
Note
e Taker (No
ote Manager)
6.1
14 Creating
g sticky note
es
Nottice!
It is
s also possib
ble to copy the note wh
hich you aree currently editing.
e
To
do this,
t
click on
n the
button
b
in the
e note toolbbar.
6.14 Creating stick
ky notes
Stic
cky notes ca
an be create
ed in the following mannner:
1. Select a no
ote by clicking in the Note Manageer,
2. Right-clickk on the note
e and selec
ct Show as ssticky note.
Fig. 113 Creating a sticky note
Alte
ernatively, cclick on the Show as stticky note buutton in the toolbar.
Fig. 114 Show as sticky note bu
utton
Nottice!
The
e note can a
also be drag
gged onto th
he desktop using the Drag
D
&
Dro
op feature.
89
9 / 98
ST
TAEDTLER Digital pen
n
6 Editing the notes with Mobile Note
te Taker (No
ote Manage
er)
6.15 Creaating paperr holder note
es
Right-click
R
o
on the sticky
y note to ob
btain furtherr sticky note
e options.
Fig.
F 115 Stickyy note options
s
• Convert iinto text: this option co
onverts handdwriting on the sticky
note into
o text using the MyScrip
pt Studio Nootes Edition
n software.
• Print: allo
ows printing
g of the sticky note.
• Hide: sellect Hide to conceal a sticky
s
note in the application icon..
ay a hidden note again, right-click on the app
plication icon
n
To displa
in the tasskbar and select
s
My stiicky notes. Then click on the note
e
which yo
ou would like
e to restore.
Fig.
F 116 Resto
oring hidden notes
n
Notice!
N
Sticky
S
notess will also be shown ag
gain each tim
me the app
plication is
restarted.
r
• Close: cl oses the sticky note.
6.15 Cre
eating pa
aper hold
der notes
s
A paper hol der note alllows you to view your nnotes in the
e foreground
d
at
a all times. Furthermore, it is also
o possible too adjust their
transparenc
t
cy.
1.
1 Select tthe note which you wou
uld like to ddisplay in the
e Note
Manage
er by clickin
ng on it.
2.
2 Right-cllick on this note and se
elect Displayy as paper holder.
STAEDTLE
ER Digital pen
p
90 / 98
6 Editing
E
the n
notes with Mobile
M
Note
e Taker (No
ote Manager)
6.1
16 Selecting
g pen styless
Fig. 117 Creating a paper holde
er note
Alte
ernatively, cclick on the Display as paper holdeer button in the Note
Man
nager toolb ar.
Fig. 118 Display a
as paper holde
er button
3. Adjust the transparency of your paper
p
holdeer notes (see chapter
ng preferenc
ces)
6.1 Definin
6.16 Selecting pen styles
It is possible to
o modify the
e color and width of thee on-screen
n pen
stro
oke at any tiime.
1. Open the C
Configuratio
on menu in the Note M
Manager. Se
elect the
Pen styless option.
91 / 98
ST
TAEDTLER Digital pen
n
6 Editing the notes with Mobile Note
te Taker (No
ote Manage
er)
6.17 Managing folde
ers
2.
2 Click on
n the arrow on the rightt-hand side of the curre
ent color to
obtain a list of colo
ors. Select the desired ccolor.
3.
3 Use the
e arrows on the right-ha
and side of the current pen width to
t
select a pen width between 1 and 10. Thee desired width
w
may also
be ente
ered directly
y into the field.
4.
4 Click on
n OK to con
nfirm selection or click oon Cancel to
t abort
selectio
on.
Notice!
N
Click
C
on the
e Default bu
utton to resto
ore the defaault settings
s.
6.17 Man
naging fo
olders
The
T Note M
Manager is in
nstalled with
h predefineed folders Miscellaneou
M
us,
Deleted
D
Item
ms, Contactts, Follow up, Receivedd Notes and
d Mobile
Notes.
N
This
T
folder ccan be used
d for storing
g your notess or, if required, to crea
ate
additional
a
u ser-defined
d folders.
6.17.1 Creatting new folders
f
A new folde
er can be created in diffferent wayss:
1.
1 Select tthe folder in
n which you would like tto create a sub-folder by
clicking .
2.
2 Click in the File me
enu and select the New
w folder option.
Fig.
F 119 Creatting new folde
ers
3.
3 Enter th
he name of the new folder.
6.17.2 Rena
aming fold
ders
All
A folders w
with the exception of prredefined foolders Misce
ellaneous,
Deleted
D
Item
ms, Contactts, Follow up, Receivedd Notes and
d Mobile
Notes
N
can b
be renamed
d.
1.
1 Right-cllick on the folder
f
which
h you wouldd like to rena
ame
2.
2 Click on
n the Renam
me option. The
T file nam
me is now highlighted.
3.
3 Enter a new name for the folder.
6.17.3 Deletting folderrs
All
A folders w
with the exception of prredefined foolders Misce
ellaneous,
Deleted
D
Item
ms, Contactts, Follow up, Receivedd Notes and
d Mobile
Notes
N
can b
be deleted.
1.
1 Right-cllick on the folder
f
which
h you wouldd like to dele
ete.
STAEDTLE
ER Digital pen
p
92 / 98
6 Editing
E
the n
notes with Mobile
M
Note
e Taker (No
ote Manager)
6.1
18 Reminde
er function
2. Select the Delete option in the menu which aappears.
3. Confirm de
eleting of the folder with Yes.
6.18 Remin
nder function
The
e notes storred on your PC can also be used aas reminderrs. Define
a prrecise date and a prec
cise time for a selected note so tha
at this will
then
n appear au
utomatically
y on your dis
splay screeen at the desired time.
6.18.1
1 Setting a reminde
er
1. Select a no
ote or the th
humbnail in the Note M
Manager.
2. In the File menu, click
k on the Sett reminder ooption.Alternatively,
on the note
e and select Set remindder in the menu which
right-click o
appears.
3. Tick the En
nable remin
nder checkb
box.
Fig. 120 Setting a reminder
4. Click on th
he arrow on the right alongside thee Reminderr on list and
date from th
select the d
he drop-dow
wn calenda r which app
pears.
5. Should you
u wish to de
etermine a specific
s
timee for the rem
minder,
use the arrrow alongside the At lis
st or enter tthe desired time.
Nottice!
If no
o specific tim
ime is enterred, the rem
minder appeears as soon
n as the
com
mputer is bo
ooted on tha
at particularr day.
Sup
ppressing tthe remind
der (snooze
e function)
When a remind
der appears
s, it is possible to supppress this re
eminder
untiil it reappea
ars again aftter 5, 10, 15
5 or 20 minuutes accord
dingly.
1. Click on Sn
nooze
2. Select the number of minutes fro
om the drop--down list after
a
which
essed remin
nder should appear agaain.
the suppre
93
3 / 98
ST
TAEDTLER Digital pen
n
6 Editing the notes with Mobile Note
te Taker (No
ote Manage
er)
6.1
19 Backing up and resttoring the note databasse
Fig.
F 121 Settin
ng the snooze function
6.19 Bac
cking up and resttoring th
he note database
d
It is possible
e to use the
e Note Mana
ager as a bbackup for your
y
entire
database,
d
a
and to restore this back
kup as requ ired.
6.19.1 Back
king up the
e database
e
1.
1 Select F
File >Backu
up/Restore > Backup daatabase in the menu.
The
T followin
ng dialog wiindow appears:
Fig.
F 122 Seleccting a destina
ation path
2.
2 Select tthe destinattion path forr backup of your database.
3.
3 Click on
n the Save button.
b
4.
4 Once ba
ackup has been
b
conclu
uded succeessfully, the following
messag
ge appears:
Fig.
F 123 Datab
base has been
n backed up successfully
s
diialog box
6.19.2 Resto
oring the database
d
1.
1 Select F
File > Backu
up/Restore > Restore ddatabase in
n the menu.
The
T followin
ng dialog wiindow appears:
STAEDTLE
ER Digital pen
p
94 / 98
6 Editing
E
the n
notes with Mobile
M
Note
e Taker (No
ote Manager)
6.1
19 Backing up and restoring the note
n
databasse
Fig. 124 Selecting
g a destination
n path
2. Select the destination
n path for yo
our databasse backups.
3. Click on th
he Restore button.
b
4. If successfful, your dattabase is re
estored in a new folderr in the
Note Mana
ager.
Fig. 125 Restored
d database
Nottice!
This
s new folde
er is named "Restored database"
d
aand includes the date
on which
w
resto
ore was implemented.
95
5 / 98
ST
TAEDTLER Digital pen
n
7 Troubleshooting
7.1 Overview
7 Troubleshooting
7.1 Overview
Problem
Possible cause
Solution
The LCD display is blank
following activation.
The battery of the receiver is too
low.
Connect the receiver to the
computer.
Batteries of the pen are too low.
Replace the pen batteries (SR
41).
The refill is not inserted
properly.
Insert the refill correctly (see
1.5.1 Inserting / replacing a
refill)
The USB cable is not connected
properly.
Connect the USB cable again.
The USB cable is damaged.
Replace the USB cable with a
new one.
The Note Manager is active. Start up the Note Manager.
The receiver is not connected
properly to the PC.
Connect the receiver again.
The pen is in mouse mode.
Convert the pen to pen mode
(see 4.2 Online mode)
In offline mode, the pen symbol
is not flashing in the LCD
display when writing
The battery symbol is not
flashing during the charging
process.
See 0
The pen stroke is not visible on
the display screen in online
mode.
The pen is out of range of the
receiver.
Fig. 15 Writing correctly
Fig. 17 Receiver obscured
Range of the receiver
The pen stroke is awry or is not
complete.
The battery of the digital pen is
too low.
Replace the pen batteries (SR
41).
There is an obstacle between
pen and receiver.
Remove the obstacle (see 1.6.5
Attaching the receiver to the
paper).
The pen is being gripped too
STAEDTLER Digital pen
For correct pen grip, see 1.6.5
96 / 98
7 Troubleshooting
7.1 Overview
close to the pen tip.
Transmission from the pen tip is
being blocked by the fingers.
Attaching the receiver to the
paper
The writing underlay is not even
enough or the paper has not
been flattened correctly.
Use a firm and smooth underlay.
The pen battery is too low.
Replace the pen batteries (SR
41).
The pen is not in mouse mode.
Convert the pen to mouse mode
(see 4.2 Online mode)
See 0
The mouse is not responding.
The pen is out of range of the
receiver.
Fig. 15 Writing correctly
Fig. 17 Receiver obscured
Range of the receiver
Text is represented skewed.
Alignment of the receiver is
incorrectly set.
See 4.3 Uploading notes onto
the computer
Two texts have been written on
top of one another
You have forgotten to create a
new page.
Can be rectified in MyScript
Studio Notes Edition, (see. 5.5.4
Splitting ink)
97 / 98
STAEDTLER Digital pen
8 Inform
mation regarding dispossal
8.1 For EC countrie
es
8 Inform
mation regardiing disp
posal
The
T productt, its packag
ging and the
e batteries included in delivery ha
ave
been
b
manuffactured fro
om quality materials
m
whhich can be reused.
Reusing
R
sellected parts
s or raw materials from
m used products
tal
contributes
c
substantially to a reduction in wasste and to environmen
e
protection.
p
8.1 Forr EC coun
ntries
Please
P
disp
pose of indiv
vidual comp
ponents by sseparating in an
appropriate
a
manner. More
M
detailed
d informatioon regarding
g your nearrest
recycling
r
co
ollection point can be obtained
o
from
m your loca
al authoritiess.
E
Electronic equipmentt identified
d with this symbol
s
ma
ay
n
not be disp
posed of to
ogether witth regular domestic
d
w
waste!
Every
E
consu
umer is lega
ally obliged to dispose of electrica
al waste
separately
s
ffrom domes
stic waste.
Information regarding recycling
r
co
ollection poi nts which will
w accept
electrical
e
wa
aste free off charge can
n be obtaineed from you
ur local
authorities
a
o
or city councils.
D
Do not disp
pose of battteries and battery pac
cks together
w
with domes
stic waste!
Every
E
consu
umer is lega
ally obliged to return alll empty battteries and
battery
b
packks. Used ba
atteries and battery paccks can be surrendered
to
t public co llection poin
nts of the lo
ocal authoritties or city councils
c
or to
t
any
a shop sp
pecializing in the trade of batteriess.
Batteries
B
an
nd battery packs
p
containing contam
e identified
minants are
with
w the follo
owing letterrs:
Pb
P = Lead, Cd = Cadm
mium, Hg = Mercury.
8.2 Forr non-EC countrie
es
Please
P
disp
pose of indiv
vidual comp
ponents in aaccordance with
directives
d
va
alid for yourr respective
e country.
STAEDTLE
ER Digital pen
p
98 / 98