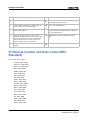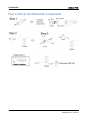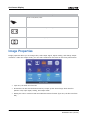
1
Multi Format IO Module User Manual 020-000699-01 Multi Format IO Module User Manual 020-000699-01 NOTICES COPYRIGHT AND TRADEMARKS Copyright © 2014 Christie Digital Systems USA Inc. All rights reserved. All brand names and product names are trademarks, registered trademarks or trade names of their respective holders. REGULATORY The product has been tested and found to comply with the limits for a Class A digital device, pursuant to Part 15 of the FCC Rules. These limits are designed to provide reasonable protection against harmful interference when the product is operated in a commercial environment. The product generates, uses, and can radiate radio frequency energy and, if not installed and used in accordance with the instruction manual, may cause harmful interference to radio communications. Operation of the product in a residential area is likely to cause harmful interference in which case the user will be required to correct the interference at the user’s own expense. CAN ICES-3 (A) / NMB-3 (A) 이 기기는 업무용 (A 급 ) 으로 전자파적합등록을 한 기기이오니 판매자 또는 사용자는 이점을 주의하시기 바라며 , 가정 외의 지역에서 사용하는 것을 목적으로 합니다 . GENERAL Every effort has been made to ensure accuracy, however in some cases changes in the products or availability could occur which may not be reflected in this document. Christie reserves the right to make changes to specifications at any time without notice. Performance specifications are typical, but may vary depending on conditions beyond Christie's control such as maintenance of the product in proper working conditions. Performance specifications are based on information available at the time of printing. Christie makes no warranty of any kind with regard to this material, including, but not limited to, implied warranties of fitness for a particular purpose. Christie will not be liable for errors contained herein or for incidental or consequential damages in connection with the performance or use of this material. The product is designed and manufactured with high-quality materials and components that can be recycled and reused. This symbol means that electrical and electronic equipment, at their end-of-life, should be disposed of separately from regular waste. Please dispose of the product appropriately and according to local regulations. In the European Union, there are separate collection systems for used electrical and electronic products. Please help us to conserve the environment we live in. Canadian manufacturing facility is ISO 9001 and 14001 certified. GENERAL WARRANTY STATEMENTS For complete information about Christie’s limited warranty, see the Christie website (www.christiedigital.com) or contact your Christie dealer. In addition to the limitations that may be specified in Christie’s limited warranty, the warranty does not cover: a. Problems or damage occurring during shipment, in either direction. b. Projector lamps (See Christie’s separate lamp program policy). c. Problems or damage caused by use of a projector lamp beyond the recommended lamp life, or use of a lamp supplied by a supplier other than Christie or an authorized distributor of Christie lamps. d. Problems or damage caused by combination of a Product with non-Christie equipment, such as distribution systems, cameras, DVD players, etc., or use of a Product with any non-Christie interface device. e. Problems or damage caused by the use of any lamp, replacement part or component purchased or obtained from an unauthorized distributor of Christie lamps, replacement parts or components including, without limitation, any distributor offering Christie lamps, replacement parts or components through the internet (confirmation of authorized distributors may be obtained from Christie). f. Problems or damage caused by misuse, improper power source, accident, fire, flood, lightening, earthquake or other natural disaster. g. Problems or damage caused by improper installation/alignment, or by equipment modification, if by other than Christie service personnel or a Christie authorized repair service provider. h. Problems or damage caused by use of a Product on a motion platform or other movable device where such Product has not been designed, modified or approved by Christie for such use. i. Problems or damage caused by use of a projector in the presence of an oil-based fog machine or laser-based lighting that is unrelated to the projector. j. For LCD projectors, the warranty period applies only where the LCD projector is in “normal use.” “Normal use” means the LCD projector is not used more than 8 hours a day, 5 days a week. k. Except where the Product is designed for outdoor use, problems or damage caused by use of the Product outdoors unless (i) such Product is protected from precipitation or other adverse weather or environmental conditions and the ambient temperature is within the recommended ambient temperature set forth in the specifications for such Product and (ii) if the Product is an LCD flat panel, such LCD flat panel is not exposed to direct sunlight. l. Image retention on LCD flat panels. m.Defects caused by normal wear and tear or otherwise due to normal aging of a Product. n. Products where the serial number has been removed or obliterated. o. Products sold by a Reseller to an End User outside of the country where the Reseller is located unless (i) Christie has an office in the country where the End User is located or (ii) the required international warranty fee has been paid. p. Products when there is failure to perform maintenance as required and in accordance with the maintenance schedule. q. This warranty does not obligate Christie to provide any on site warranty service at the Product site location. PREVENTATIVE MAINTENANCE Preventative maintenance is an important part of the continued and proper operation of your product. Please see the Maintenance section for specific maintenance items as they relate to your product. Failure to perform maintenance as required, and in accordance with the maintenance schedule specified by Christie, will void the warranty. Addendum Translated copies of this document are provided on the CD in the back of this document. The CD may also contain additional product documentation. Read all instructions before using or servicing this product. 本 文 档 的 翻译副本在本文档背面 的 C D 上提供。该 CD 中还可能包含其他产品 文 档 。 使 用 或维修本产品之前请务 必阅读所有说明。 文 件 背 面 的光碟提供了本文件的 翻譯副本。這張光碟可能另外包含其他產品 文 件 。 請 先 閱 讀 所有指示再使用或送修 本產品。 Le CD au dos de ce document contient des traductions de celui‐ci dans différentes langues. Ce CD peut également contenir de la documentation supplémentaire sur le produit. Lisez toutes les instructions avant d'utiliser ou d'entretenir ce produit. Übersetzte Versionen dieses Dokuments werden auf der CD auf dem Vorsatzblatt dieses Dokuments bereitgestellt. Die CD kann auch zusätzliche Produktdokumentation enthalten. Bitte lesen Sie diese Anweisungen vor der Verwendung dieses Produkts oder vor der Ausführung von Wartungsarbeiten am Produkt. Le copie tradotte di questo documento sono fornite sul CD, sul retro di questo documento. Il CD potrebbe anche contenere altra documentazione sul prodotto. Si prega di leggere tutte le istruzioni prima di utilizzare questo prodotto o sottoporlo a manutenzione. このドキュメントの翻訳版がこのドキュメントの裏面の CD で提供されています。CD に は追加の製品マニュアルも収められています。この製品を使用したり、機能させたりする 前に、すべての指示をお読みください。 이 문서의 번역된 사본이 이 문서 후면의 CD 에서 제공됩니다 . 이 CD 에는 추가 제품 설명서 가 포함되어 있을 수 있습니다 . 이 제품을 사용하거나 수리하기 전에 모든 지침을 확인하 십시오 . Copias traduzidas deste documento são fornecida no CD contido na parte de trás deste documento. O CD pode conter documentação adicional do produto. Leia todas as instruções antes de usar ou prestar serviço com este produto. Перевод данного документа представлен на компакт-диске на оборотной стороне документа. Компакт-диск может также содержать дополнительную документацию по продукту. Перед использованием или обслуживанием продукта ознакомьтесь со всеми инструкциями. Las copias traducidas de este documento se proporcionan en el CD que se encuentra en la parte trasera. En el CD también puede encontrar documentación adicional del producto. Lea todas las instrucciones antes de utilizar o realizar el mantenimiento de este producto. Перекладені екземпляри цього документа містяться на компакт-диску, який додано до цього документа. На компакт-диску може також бути додаткова документація до виробу. Перш ніж користуватися виробом або його обслуговувати, прочитайте всі інструкції. Table of Contents Overview. . . . . . . . . . . . . . . . . . . . . . . . . . . . . . . . . . . . . . . . . . . . . . . . . . . . . . . . 1 Introduction . . . . . . . . . . . . . . . . . . . . . . . . . . . . . . . . . . . . . . . . . . . . . . . . . . . . 1 Features . . . . . . . . . . . . . . . . . . . . . . . . . . . . . . . . . . . . . . . . . . . . . . . . . . . . . . 1 What is Included . . . . . . . . . . . . . . . . . . . . . . . . . . . . . . . . . . . . . . . . . . . . . . . . . 1 Hardware . . . . . . . . . . . . . . . . . . . . . . . . . . . . . . . . . . . . . . . . . . . . . . . . . . . . . . 2 Front Panel ................................................. 2 Back Panel .................................................. 3 Typical Application of Multi Format IO Module ........................... 6 Control Ports . . . . . . . . . . . . . . . . . . . . . . . . . . . . . . . . . . . . . . . . . . . . . . . . . . . 6 Remote Controller . . . . . . . . . . . . . . . . . . . . . . . . . . . . . . . . . . . . . . . . . . . . . . . . 7 IR Remote Custom and Data Codes (NEC Standard) ........................ 8 IR Extender . . . . . . . . . . . . . . . . . . . . . . . . . . . . . . . . . . . . . . . . . . . . . . . . . . . . 11 IR Extender Connection . . . . . . . . . . . . . . . . . . . . . . . . . . . . . . . . . . . . . . . . . . . .11 How to Set Up the IR Extender Components . . . . . . . . . . . . . . . . . . . . . . . . . . . .12 On-Screen Display . . . . . . . . . . . . . . . . . . . . . . . . . . . . . . . . . . . . . . . . . . . . . . 13 On Screen Display overview . . . . . . . . . . . . . . . . . . . . . . . . . . . . . . . . . . . . . . . . .13 Picture . . . . . . . . . . . . . . . . . . . . . . . . . . . . . . . . . . . . . . . . . . . . . . . . . . . . . . .14 Image Setup . . . . . . . . . . . . . . . . . . . . . . . . . . . . . . . . . . . . . . . . . . . . . . . . . . .15 Image Properties . . . . . . . . . . . . . . . . . . . . . . . . . . . . . . . . . . . . . . . . . . . . . . . .16 Video Wall . . . . . . . . . . . . . . . . . . . . . . . . . . . . . . . . . . . . . . . . . . . . . . . . . . . . .17 Options . . . . . . . . . . . . . . . . . . . . . . . . . . . . . . . . . . . . . . . . . . . . . . . . . . . . . . .19 Serial Commands . . . . . . . . . . . . . . . . . . . . . . . . . . . . . . . . . . . . . . . . . . . . . . . 21 RS232 Protocol and Commands . . . . . . . . . . . . . . . . . . . . . . . . . . . . . . . . . . . . . .21 Ethernet TCP Setup Guide . . . . . . . . . . . . . . . . . . . . . . . . . . . . . . . . . . . . . . . . . .21 Data String Format . . . . . . . . . . . . . . . . . . . . . . . . . . . . . . . . . . . . . . . . . . . . . . .22 Commands Key . . . . . . . . . . . . . . . . . . . . . . . . . . . . . . . . . . . . . . . . . . . . . . . . . . . .23 . . . . . . . . . . . . . . . . . . . . . . . . . . . . . . . . . . . . . . . . . . . . . . . . . . . . . . .24 Power . . . . . . . . . . . . . . . . . . . . . . . . . . . . . . . . . . . . . . . . . . . . . . . . . . . . . .24 Mute . . . . . . . . . . . . . . . . . . . . . . . . . . . . . . . . . . . . . . . . . . . . . . . . . . . . . . .24 Source . . . . . . . . . . . . . . . . . . . . . . . . . . . . . . . . . . . . . . . . . . . . . . . . . . . . .25 Resolution . . . . . . . . . . . . . . . . . . . . . . . . . . . . . . . . . . . . . . . . . . . . . . . . . . .25 Brightness . . . . . . . . . . . . . . . . . . . . . . . . . . . . . . . . . . . . . . . . . . . . . . . . . .26 Contrast . . . . . . . . . . . . . . . . . . . . . . . . . . . . . . . . . . . . . . . . . . . . . . . . . .26 Multi Format IO Module User Manual 020-000699-01 Rev. 1 (03-2014) i Hue . . . . . . . . . . . . . . . . . . . . . . . . . . . . . . . . . . . . . . . . . . . . . . . . . . . . . . 27 Saturation . . . . . . . . . . . . . . . . . . . . . . . . . . . . . . . . . . . . . . . . . . . . . . . . . 27 Sharpness . . . . . . . . . . . . . . . . . . . . . . . . . . . . . . . . . . . . . . . . . . . . . . . . . 27 Auto . . . . . . . . . . . . . . . . . . . . . . . . . . . . . . . . . . . . . . . . . . . . . . . . . . . . . . . 27 H-Zoom . . . . . . . . . . . . . . . . . . . . . . . . . . . . . . . . . . . . . . . . . . . . . . . . . . 28 V-Zoom . . . . . . . . . . . . . . . . . . . . . . . . . . . . . . . . . . . . . . . . . . . . . . . . . 28 H-Pan . . . . . . . . . . . . . . . . . . . . . . . . . . . . . . . . . . . . . . . . . . . . . . . . . . . 28 V-Pan . . . . . . . . . . . . . . . . . . . . . . . . . . . . . . . . . . . . . . . . . . . . . . . . . . . 29 Overlap-L . . . . . . . . . . . . . . . . . . . . . . . . . . . . . . . . . . . . . . . . . . . . . . . . 29 Overlap-R . . . . . . . . . . . . . . . . . . . . . . . . . . . . . . . . . . . . . . . . . . . . . . . . . 29 Overlap-T . . . . . . . . . . . . . . . . . . . . . . . . . . . . . . . . . . . . . . . . . . . . . . . . 30 Overlap-B . . . . . . . . . . . . . . . . . . . . . . . . . . . . . . . . . . . . . . . . . . . . . . . . 30 Language . . . . . . . . . . . . . . . . . . . . . . . . . . . . . . . . . . . . . . . . . . . . . . . . . . . 30 Reset . . . . . . . . . . . . . . . . . . . . . . . . . . . . . . . . . . . . . . . . . . . . . . . . . . . . . . 31 Button . . . . . . . . . . . . . . . . . . . . . . . . . . . . . . . . . . . . . . . . . . . . . . . . . . . . . 31 Timeout . . . . . . . . . . . . . . . . . . . . . . . . . . . . . . . . . . . . . . . . . . . . . . . . . . . . 31 Video Timing List . . . . . . . . . . . . . . . . . . . . . . . . . . . . . . . . . . . . . . . . . . . . . . . . 33 HDMI Video Timing List . . . . . . . . . . . . . . . . . . . . . . . . . . . . . . . . . . . . . . . . . . . . 33 VGA Video Timing List . . . . . . . . . . . . . . . . . . . . . . . . . . . . . . . . . . . . . . . . . . . . . 35 DisplayPort Video Timing List . . . . . . . . . . . . . . . . . . . . . . . . . . . . . . . . . . . . . . . . 37 Specifications . . . . . . . . . . . . . . . . . . . . . . . . . . . . . . . . . . . . . . . . . . . . . . . . . . . 41 ii Input Resolution Support . . . . . . . . . . . . . . . . . . . . . . . . . . . . . . . . . . . . . . . . . 42 Output Resolution Support . . . . . . . . . . . . . . . . . . . . . . . . . . . . . . . . . . . . . . . . . 44 Multi Format IO Module User Manual 020-000699-01 Rev. 1 (03-2014) Overview Introduction The ASC-MIO1 is a video graphics scaler that accepts seven types of signals: analog video, S-Video, component video, VGA, DVI, HDMI, and DisplayPort signals. It scales the input signals into either VGA or HDMI signals, supporting higher full HD resolutions of 480i/p, 720p, and 1080i/p. The scaler is designed to solve problems of compatibility between source devices and monitors. Use it to deliver one single image on a video wall. In addition to the front panel buttons and the IR remote control, users may control the scaler using a PC through the RS232 serial port or Ethernet port. Features • Compliant with HDMI 1.4, DVI 2.0, and HDCP 2.0. • Input support: Analog: analog video, S-Video, composite video, VGA; Digital: DVI, HDMI, and DisplayPort • Output support: VGA and HDMI 1080p with deep color 36-bit • Output audio support: S/PDIF, stereo audio • Supports a wide range of HD resolutions ranging from XGA to WUXGA 1920 x 1200 to HDTV/DTV resolutions 480i/480p, 576i/576p, 720p, 1080i, and 1080p. • Compatible with all HDMI source devices, PC monitors, plasma HD displays, HDTVs, and audio receivers/amplifiers. • Supports intelligent color adjustment (discrete RGB color adjustment, hue, saturation, sharpness, contrast, brightness, and preset color modes). • Rackmountable: 19-inch rear rackmount. • Various user interface control, including front-panel push buttons, IR wireless remote control, third-party RS232 controller (via simple ASCII), and Ethernet with built-in Web browser. • Supports IR extender with maximum extend distance reaching 300 meters. • Supports TV wall function, allowing the image to be divided on multiple displays/monitors. • Includes 12-VDC power supply, universal-type switch, 100–240 VAC, 50/60 Hz. What is Included Your package should contain the following items. • Main console unit • IR remote controller • 19" ear mount bracket Multi Format IO Module User Manual 020-000699-01 Rev. 1 (03-2014) 1 Overview • IR extender receiver • CD-ROM containing this user manual in PDF format and IP changing software • RS232 cable (1.8 meters) • 12-VDC, 2-A power supply, universal-type switch, 50/60 Hz, 100–240 VAC • HDMI to DVI cable (15 cm) Hardware Front Panel 2 1 Power Switch The power switch turns the unit on and off. The LED lights blue to indicate that the switch is ON and receiving power. The scaler will remember the last setting during a power cycle. When turned ON again, it will automatically apply the setting last used. 2 Menu Press Menu to open the on-screen display (OSD) interface. Press again to exit the menu. For guidance on the OSD options, see On-Screen Display on page 13. 3 Enter Press Enter to confirm your entries. 4 Arrow keys Use the arrow keys to move between the OSD options. Press the up key to enter the upper layer and the down key to enter the next layer. Press the left and right keys to select options in the same layer or change the value of a parameter. 5 IR sensor The IR sensor receives IR commands from the supplied remote controller or a thirdparty IR emitter. 6 Output select buttons Select the desired resolution supported by your display devices. Press “OTHERS” for resolutions other than XGA, WXGA, 720p, and 1080p. The button will light blue to indicate it is selected. Advanced resolution adjustment is an OSD option. 7 Input select buttons Select from one of the seven buttons the video signal to scale. The button will light blue to indicate it is selected. Multi Format IO Module User Manual 020-000699-01 Rev. 1 (03-2014) Overview Back Panel Component Description Picture Specifications 1 DC power inlet/ outlet The scaler has a DC power plugpack input connector. Make sure the plug-pack used is of an approved type and is the correct current, voltage output, and connector polarity: 12-VDC, 2-A power supply. Power jack: DC jack: Inner OD = 2.1 mm Outside OD = 5.5 mm Power input: 12 VDC, 2 A 2 Ethernet connection Connect a CAT5 cable to the Ethernet port to control the scaler from a computer. 8P8C/RJ-45 connector 3 RS232 connection Connect a serial cable to the RS232 port to control the scaler from a computer. DB9 female connector 4 Link Connect the link port for firmware updates. Terminal block connector 5 IR extender control Supports remote control via IR extender. Maximum extend distance reaches about 1000 feet (300 meters). IR extender jack: Female jack: Inner OD = 3.5 mm Multi Format IO Module User Manual 020-000699-01 Rev. 1 (03-2014) 3 Overview Component 6 4 YPbPr + AR/AL audio input Description Picture Specifications Connect a component video signal directly to the female RCA connector, which supports component video (YPbPr) to HDTV display devices. Connect the output port of your source audio device to the AR/AL inputs. Component video via (3) RCA female connectors Stereo audio via (2) RCA female connectors 7 VGA + VGA audio output Connect a VGA (RGBHV) signal to the HD15 female connector. Connect the output port of your source device to the audio input. VGA video jack: Female HD15 connector 8 DVI + DVI audio input Connect a DVI signal to the digital video connector. Connect the output port of your source audio device to the audio input. Female DVI connector 9 HDMI input Connect an HDMI direct digital video/audio signal link to the HDMI connector, which supports HDMI digital video/audio and DVI digital video sources. HDMI female jack 10 DisplayPort input Connect a DisplayPort signal to the DP port, which supports digital video and audio. Display port digital video and audio connector. Multi Format IO Module User Manual 020-000699-01 Rev. 1 (03-2014) Overview Component Description Picture Specifications 11 Video + AR/AL audio input Connect a composite video signal to the RCA connector. Connect the output port of your source audio device to the AR/AL inputs. Female RCA connector Stereo audio (AR/AL) via one 3.5-mm earphone jack connector, with one female phone jack for each channel. 12 S-Video + AR/AL audio input Connect an S-Video signal to the connector. Connect the output port of your source audio device to the AR/AL inputs. Mini-DIN connector Stereo audio (AR/AL) via one 3.5-mm earphone jack connector, with one female phone jack for each channel. 13 SPDIF Connect the digital audio output. Female RCA connector. 14 VGA output Connect a VGA (RGBHV) to the VGA connector. VGA video jack: Female HD15 connector 15 HDMI output Connect an HDMI direct digital video/audio signal link to this female HDMI connector, which supports HDMI digital video/audio and DVI digital video sources. HDMI digital video/audio connector HDMI female connector Multi Format IO Module User Manual 020-000699-01 Rev. 1 (03-2014) With proper adapters, the scaler can be used with DVI digital video signals and is HDCP compliant. 5 Overview Typical Application of Multi Format IO Module C A B D E F O G M N L K J H I A Audio out I DisplayPort in B Audio amplifier J Blue-ray DVD C Composite plus audio in K HDMI in D Ethernet L DVI plus audio in E PC/Ethernet RS232 control M HDMI out F RS232 N VGA out G Component in O HDMI HDTV H Mac Control Ports 1. Front panel—function key press buttons. 2. IR remote—IR remote controller. 3. RS232 interface—RS232 interface system. 4. Ethernet—Ethernet interface system. The Multi Format IO Module with DisplayPort supports seven inputs and two outputs, control IR, and RS-232 interface system ports. Inputs 1–7 Port Source Signals: Component video, AV, DVI, HDMI, DisplayPort (5 input ports connected) Outputs 1–2 Port Display Signals: VGA, HDMI 6 Multi Format IO Module User Manual 020-000699-01 Rev. 1 (03-2014) Remote Controller Before connecting anything to the scaler, observe the following: • Make sure the voltage supply matches the label on the supplied plug-pack (±10%). • Make sure the power switch is off. • Make sure that all system grounds are connected to a common point. • Avoid powering the device within a system of multiple power sources that are separated by a large distance. • Connect all audio/video source and display devices. • Power on all source and display audio-visual devices. • To yield video/audio to an output, select the input source by using the front panel input buttons, the supplied IR remote control, or through the RS232 serial communication port. • When powering on, the scaler will automatically apply the setting last used. For information on the on-screen display (OSD) options, see On-Screen Display on page 13. Multi Format IO Module User Manual 020-000699-01 Rev. 1 (03-2014) 7 Remote Controller 1, 2 Power ON and OFF: Turn the scaler on or off. 8 Menu: Open the OSD menu. 3 Mute: Stop playing sounds. 9 Info: Check the connection status of input/ output/RS-232/Ethernet ports. 4 Source (HDMI, VGA, DVI, DP, YPbPr, Video, SVideo): Select your input signal type. 10 Exit: Leave the OSD menu. 5 Enter: Confirm your selection/enter the next layer of OSD options. 11 Output (XGA, WXGA, 720p, 1080p, and others): Select the desired output resolution supported by your display device. 6 Arrow keys: Move up, down, left, or right between the OSD options. Use the left and right arrow keys to adjust the value of a parameter. Use the down key to enter the next layer of options and the up key to move back. 12 OSD timeout: Adjust the OSD menu display time. 7 Return: Return to the upper layer of OSD options. 13 Video wall: Open the video wall options. IR Remote Custom and Data Codes (NEC Standard) How to set up IR codes: Custom Code: 20 DF Power on: 20DF 5DA2 Power off: 20DF 5EA1 Mute: 20DF 02FD HDMI: 20DF 1FE0 VGA: 20DF 0AF5 DVI: 20DF 50AF DP: 20DF 59A6 YPbPr: 20DF 58A7 Video: 20DF 5AA5 S-Video: 20DF 5BA4 Return: 20DF 11EE Menu: 20DF 19EA Info: 20DF 1BE4 Exit: 20DF 5CA3 Enter: 20DF 51AE Up: 20DF 44BB Right: 20DF 48B7 Left: 20DF 1CE3 Down: 20DF 1DE2 8 Multi Format IO Module User Manual 020-000699-01 Rev. 1 (03-2014) Remote Controller XGA: 20DF 08F8 WXGA: 20DF 4BB4 720p: 20DF 05FA 1080p: 20DF 06F9 Others: 20DF 03FC OSD timeout: 20DF 15EA Video wall: 20DF 15EB Example 1: Select input VGA and output HDMI. The IR data code: 20DF 0AF5 20DF 07F8 Example 2: Open OSD > move right > move down to next layer > enter to confirm selection. The IR data code: 20DF 15EA 20DF 48B7 20DF 1DE2 20DF 51AE Multi Format IO Module User Manual 020-000699-01 Rev. 1 (03-2014) 9 IR Extender IR Extender Connection i When you plug the external IR extender into the scaler, the front panel IR receiver remains active. Multi Format IO Module User Manual 020-000699-01 Rev. 1 (03-2014) 11 IR Extender How to Set Up the IR Extender Components 12 Multi Format IO Module User Manual 020-000699-01 Rev. 1 (03-2014) On-Screen Display On Screen Display overview Layer 1 Picture Layer 2 Layer 3 Brightness Contrast Hue Saturation Sharpness Image Setup Automatic Manual Clock/Phase/Save Horizontal Position Vertical Position Image Properties Video Wall Options Color Preset Mode/Custom Input Signal DVI/HDMI/VGA/DisplayPort/Component/Composite/S-Video Scaling Original AR/Full Screen Output Mode 720 x 480, 800 x 600, 1280 x 800, 1280 x 1024, 1360 x 768, 1400 x 1050, 1600 x 1200, 1024 x 768, 1280 x 768, 1280 x 720, 1920 x 1080, 1920 x 1200 Zoom Horizontal Zoom/Vertical Zoom Pan Horizontal Pan/Vertical Pan Overlap Left/Right/Top/Bottom (Edges)/Reset Information Language English Reset Reset All/Reset Video Wall Accessibility Button Repeat Rate (off, default, slow)/Menu Timeout/Logo Timeout Setting Mute Box ID Profile Network (serial port, Ethernet) Multi Format IO Module User Manual 020-000699-01 Rev. 1 (03-2014) 13 On-Screen Display Picture Picture allows you to digitally adjust the brightness, contrast, hue, saturation, and sharpness of the images. An unlit icon suggests the function is not available. To enable it, the unit color must be set in custom mode. To change the setting in color, select Image properties > Color > Custom > Save. Be sure to save your setting. Otherwise, the value will not be set. • Layer one, the first icon from left. • Choose the icon and use the down arrow key to open the next layer, which has five options: brightness, contrast, hue, saturation, and sharpness. • The hue, saturation, and broadcast icons light only when AV, S-Video, or component video signals are present on the scaler. Icon Description Brightness: Use arrow key right and left to adjust the value. Contrast: Use arrow key right and left to adjust the value. Hue: Use arrow key right and left to adjust the value. Adjustable only when the unit receives valid AV, S-Video, or component video signals. 14 Multi Format IO Module User Manual 020-000699-01 Rev. 1 (03-2014) On-Screen Display Icon Description Saturation: Use arrow key right and left to adjust the value. Adjustable only when the unit receives valid AV, S-Video, or component video signals. Sharpness: Use arrow key right and left to adjust the value. Adjustable only when the unit receives valid AV, S-Video, or component video signals. Image Setup To enable the image setup, a valid VGA signal must be present on the scaler. An illuminated icon indicates the presence of a VGA signal. • First layer, the second icon from the left. • Choose the icon and use the down arrow key to open the second layer, which has four options: automatic, manual, horizontal position, and vertical position. Icon Description Automatic: ASC-MIO1 reads the input signal and automatically sets the optimal value for the output. Multi Format IO Module User Manual 020-000699-01 Rev. 1 (03-2014) 15 On-Screen Display Icon Description Manual: Clock/Phase /Save Horizontal Position: Move the image to the right or left. Vertical Position: Move the image up or down. Image Properties Image properties allow you to change color, select input signal, adjust scaling, and change output resolution. Under the output mode, you can select resolutions not listed on the front panel button. 16 • Layer one, the third icon from left. • Choose the icon and use the down arrow key to open up the second layer, which has four options: color, input signal, scaling, and output mode. • Setting the color in custom mode can enable the Picture function (layer one, the first icon from left). Multi Format IO Module User Manual 020-000699-01 Rev. 1 (03-2014) On-Screen Display Icon Description Color Preset Mode: Standard, RGB, warm, cold Custom: Red, Green, Blue, Save Input Signal DVI, HDMI, VGA, DisplayPort, Component, Composite Video, S-Video Scaling Original AR, full screen Output Mode Select one desired output resolution from the following 11 choices: • Others, 720 x 480, 800 x 600, 1280 x 800, 1280 x 1024, 1360 x 768, 1400 x 1050, 1600 x 1200, 1920 x 1200 • XGA: 1024 x 768 • WXGA: 1280 x s • 720p: 1280 x 720 • 1080p: 1920 x 1080 When you press the front panel button “Others,” the scaler will automatically apply the resolution 1360 x 768. Users may continue pressing “Others” to cycle through the following four resolutions: 1360 x 768 —> 1280 x 1024 —> 1600 x 1200 —> 1920 x 1200 Video Wall The ASC-MIO1 scaler can send divided images on multiple display devices and build a video wall of, for example, 1x2, 2x2, or 10x10. A video wall of 15x15 is the maximum size the scaler can generate. An ASC-MIO1 is required for each output. Users may arrange the position and adjust the size of each image block under the Video Wall function. Multi Format IO Module User Manual 020-000699-01 Rev. 1 (03-2014) 17 On-Screen Display • Layer one, the third icon from the left. • Choose the Video Wall icon, use the down arrow key to open the next layer, which has three options: zoom, pan, and overlap. Parameter Zoom Description Use right/left key to adjust the value of the parameter. Horizontal zoom: enlarge the image on the left and right ends. Vertical zoom: enlarge the image upwardly and downwardly. Pan Arrange the relative position of the image in the TV wall: assign the number of displays horizontally and vertically connected. Then, assign numbers to indicate relative position. Two examples of TV walls are shown below. 3x2 video wall (Horiztonal: 3; Vertical: 2) Display No. 4 should be assigned: • Horizontal Zoom = 1 • Vertical Zoom = 2 • Display No. 5 should be assigned: • Horizontal Zoom = 2 • Vertical Zoom = 2 Overlap Align the overlapping images for visual continuum. Move the image up, down, or to left, right by adjusting the parameters of the top edge, bottom edge, left edge, and right edge. To return to the original setting, press “Reset.” 18 Multi Format IO Module User Manual 020-000699-01 Rev. 1 (03-2014) On-Screen Display Options Options allows you to check the connection status, change menu language, return to factory defaults, save settings, and make adjustments to the OSD menu settings. • Layer one: the fifth icon from the left. • Press the down arrow key to open up the second layer, which has five options: information, language, reset, accessibility, and setting. Parameter Description Information Check the connection status of the input/output ports, the model name, the connection status of RS-232/Ethernet ports, and the firmware version. Language Change the OSD language to English, Simplified Chinese, or Traditional Chinese. Reset Return to the factory default setting. Reset all: Reset all options. Reset video wall: Reset all the options relating to video wall function only. Accessibility Button repeat rate: Adjust the unit response time when the Menu button is pressed. • Off: Press the “Menu” button, and the menu shows up/disappears once. • Default: Return to the factory default setting. • Slow: Press the “Menu” button and hold it on for longer than a few seconds, and the unit will take more time than the default to respond. Menu timeout: Adjust the length of time the OSD menu stays on screen. • On: The OSD menu will disappear after a period of time. You can lengthen or shorten the display time. • Off: Stop the OSD menu from disappearing automatically. When the function is turned off, the OSD menu will not disappear until you press the “Menu” button again. Logo timeout: Adjust the length of time the logo stays on screen when the unit is turned on. Setting Mute: Stop playing sounds. Box ID: Check the ID of the unit. Profile: Save and reload the settings. The unit can memorize a total of five different settings. Network: Serial port, Ethernet. Multi Format IO Module User Manual 020-000699-01 Rev. 1 (03-2014) 19 Serial Commands RS232 Protocol and Commands • Transmission rate: 9600 bps • Data format: 8 data bits, no parity, 1 start bit, and 1 stop bit • Flow control: None Also known as 9600, n, 8, 1. Ethernet TCP Setup Guide The Ethernet (TCP) port allows control of the unit through a computer by redirecting serial commands (COM port) to the unit’s IP address. To connect to the unit: 1. Set your PC within the same subnet of the unit (default IP address 192.168.0.3), and the netmask 255.255.255.0. 2. Open up a telnet connection to the unit’s IP address with port 5000. 3. Send commands as you would with serial. To change the network settings of the unit: 1. Set your PC within the same Class C subnet of the unit. For example, if the unit’s default IP address is 192.168.0.3, the PC’s IP address could be 192.168.0.5. Multi Format IO Module User Manual 020-000699-01 Rev. 1 (03-2014) 21 Serial Commands 2. Set your PC’s netmask to 255.255.255.0. 3. Run the software included on the software CD that came with the unit. 4. Click the search button and select your unit when it is found. 5. Change the unit’s network setting as desired and submit. To change your computer’s network settings: 1. Set up your computer in the same network of the unit. 2. Go to Start and click Control Panel. 3. Double-click Network Connections. 4. Click Properties. 5. Select Internet protocol (TCP/IP) and click Properties. Data String Format The data string contains four elements. [Command] [ ] [Data] [;] The format is: 1. Command 2. Space 3. Data 4. ; There is a single space after the command and before the data string. The data string must conclude with a semicolon “;” (without the quotation marks). All text is full ASCII code and is not casesensitive. LINK is the same as Link. You can use either capital letters or lower-case letters and get the same result. The Link command must be sent first. This establishes a communications link between an external controller (or computer) and the device you wish to control. When you have an established link, communication via the IR port is disabled. The front panel remains operational. The format is: LINK 01; This will establish the link. Your commands: LINK 00; This will terminate the link. Devices that are firmware version x.x or higher will return a status. Status is command dependent. For example: Response: [SKU] [ ] [Status] [;]| The status is a two-digit numerical code. 22 Multi Format IO Module User Manual 020-000699-01 Rev. 1 (03-2014) Serial Commands Specific details are discussed later in this document. i If at any time the ASC-MIO1 receives an invalid command, a response of “ASC-MIO1 01” is returned. Commands Not all commands are supported on all devices. Item Command Description 1 Key Set the OSD key. 2 Power Set/check the power status. 3 Mute Set/check the mute status. 4 Source Set/check the source status. 5 Resolution Set/check the resolution status. 6 Brightness Set/check the brightness status from the OSD. 7 Contrast Set/check the contrast status from the OSD. 8 Hue Set/check the hue from the OSD. 9 Saturation Set/check the saturation status from the OSD. 10 Sharpness Set/check the sharpness status from the OSD. 11 Auto Set/check the auto adjustment status from the OSD. 12 H-Zoom Set/check the H-zoom status from the OSD. 13 V-Zoom Set/check the V-zoom status from the OSD. 14 H-Pan Set/check the H-pan status. 15 V-Pan Set/check the V-pan status. 16 Overlap–L Set/check the overlap-L status from the OSD. 17 Overlap-R Set/check the overlap-R status from the OSD. 18 Overlap-T Set/check the overlap-T status from the OSD. 19 Overlap-B Set/check the overlap-B status from the OSD. 20 Language Set/check the language status from the OSD. 21 Reset Set/check the reset status from the OSD. 22 Button Set/check the button status from the OSD. 23 Timeout Set/check the timeout status from the OSD. Multi Format IO Module User Manual 020-000699-01 Rev. 1 (03-2014) 23 Serial Commands Key Function Set Key Command Response Description Key +000; ASC-MIO1 00; Set Menu Key Key +001; ASC-MIO1 00; Set Up Key Key +002; ASC-MIO1 00; Set Down Key Key +003; ASC-MIO1 00; Set Left Key Key +004; ASC-MIO1 00; Set Right Key Key +005; ASC-MIO1 00; Set Enter Key Power Function Command Response Description Power OFF Power +000; ASC-MIO1 00; Power OFF Power ON Power +001; ASC-MIO1 00; Power ON Check the status of condition Power ?; Power +000; Power OFF Power +001; Power ON Mute Function Command Response Description Mute OFF Mute +000; ASC-MIO1 00; Mute OFF Mute ON Mute +001; ASC-MIO1 00; Mute ON Check the Mute status Mute ?; Mute +000; Mute OFF Mute +001; Mute ON 24 Multi Format IO Module User Manual 020-000699-01 Rev. 1 (03-2014) Serial Commands Source Function Set Source Check Source Command Response Description Source +000; ASC-MIO1 00; Source set to VGA Source +001; ASC-MIO1 00; Source set to DVI Source +002; ASC-MIO1 00; Source set to HDMI Source +003; ASC-MIO1 00; Source set to DP Source +004; ASC-MIO1 00; Source set to YPbPr Source +005; ASC-MIO1 00; Source set to video Source +006; ASC-MIO1 00; Source set to S-Video Source ?; Source +000; Source set to VGA Source +001; Source set to DVI Source +002; Source set to HDMI Source +003; Source set to DP Source +004; Source set to YPbPr Source +005; Source set to video Source +006; Source set to S-Video Resolution Function Set Resolution Command Response Description Resolution +000; ASC-MIO1 00; Set resolution to 720 x 480, 60 Hz Resolution +001; ASC-MIO1 00; Set resolution to 1280 x 720, 60 Hz Resolution +002; ASC-MIO1 00; Set resolution to 1920 x 1080, 60 Hz Resolution +003; ASC-MIO1 00; Set resolution to 800 x 600, 60 Hz Resolution +004; ASC-MIO1 00; Set resolution to 1024 x 768, 60 Hz Resolution +005; ASC-MIO1 00; Set resolution to 1280 x 800, 60 Hz Resolution +006; ASC-MIO1 00; Set resolution to 1280 x 1024, 60 Hz Resolution +007; ASC-MIO1 00; Set resolution to 1360 x 768, 60 Hz Resolution +008; ASC-MIO1 00; Set resolution to 1400 x 1050, 60 Hz Resolution +009; ASC-MIO1 00; Set resolution to 1600 x 1200, 60 Hz Resolution +010; ASC-MIO1 00; Set resolution to 1920 x 1200, 60 Hz Multi Format IO Module User Manual 020-000699-01 Rev. 1 (03-2014) 25 Serial Commands Function Check Resolution Command Resolution ?; Response Description Resolution +000; Resolution is 720 x 480, 60 Hz Resolution +001; Resolution is 1280 x 720, 60 Hz Resolution +002; Resolution is 1920 x 1080, 60 Hz Resolution +003; Resolution is 800 x 600, 60 Hz Resolution +004; Resolution is 1024 x 768, 60 Hz Resolution +005; Resolution is 1280 x 800, 60 Hz Resolution +006; Resolution is 1280 x 1024, 60 Hz Resolution +007; Resolution is 1360 x 768, 60 Hz Resolution +008; Resolution is 1400 x 1050, 60 Hz Resolution +009; Resolution is 1600 x 1200, 60 Hz Resolution +010; Resolution is 1920 x 1200, 60 Hz Brightness Command Example BRIGHTNESS +015; Function Check Brightness Response ASC-MIO1 00; Command BRIGHTNESS ?; Description Set Brightness to 15. Response Description BRIGHTNESS +001; Brightness setting is 1. BRIGHTNESS +015; Brightness setting is 15. Contrast Command Example CONTRAST +015; Function Check Contrast 26 Response ASC-MIO1 00; Command CONTRAST ?; Description Set Contrast to 15. Response Description CONTRAST +001; Contrast setting is 1. CONTRAST +015; Contrast setting is 15. Multi Format IO Module User Manual 020-000699-01 Rev. 1 (03-2014) Serial Commands Hue Command Example Response HUE +015; Description ASC-MIO1 00; Function Set Hue to 15. Command Check Hue HUE ?; Response Description HUE +001; Hue setting is 1. HUE +015; Hue setting is 15. Saturation Command Example Response SATURATION +015; Description ASC-MIO1 00; Function Set Saturation to 15. Command Check Saturation Response SATURATION ?; Description SATURATION +001; Saturation setting is 1. SATURATION +015; Saturation setting is 15. Sharpness Command Example Response SHARPNESS +015; Function Check Sharpness Description ASC-MIO1 00; Command SHARPNESS ?; Set Sharpness to 15. Response Description SHARPNESS +001; Sharpness setting is 1. SHARPNESS +015; Sharpness setting is 15. Auto Function Set Auto Command Auto +001; Multi Format IO Module User Manual 020-000699-01 Rev. 1 (03-2014) Response ASC-MIO1 00; Description Set VGA auto adjustment. 27 Serial Commands H-Zoom Function Command Set H-zoom H-ZOOM XXXX; Command Example H-ZOOM +001; Function Check H-zoom Variables xxxx = H zoom number +000 – +009 Response Description ASC-MIO1 00; Command H-ZOOM?; Set H-Zoom to 1. Response Description H-ZOOM +001; H-zoom setting is 1. V-Zoom Function Set V-zoom Command V-ZOOM XXXX; Command Example V-ZOOM +001; Function Check V-zoom Variables xxxx = V zoom number +000 – +009 Response ASC-MIO1 00; Command V-ZOOM?; Description Set V-Zoom to 1. Response V-ZOOM +001; Description V-zoom setting is 1. H-Pan Function Set H-Pan Command Example H-PAN +001; Function Check H-Pan 28 Command H-PAN XXXX; Variables xxxx = H-Pan number +000 – +009 Response ASC-MIO1 00; Command H-PAN?; Description Set H-Pan to 1. Response H-PAN +001; Description H-Pan setting is 1. Multi Format IO Module User Manual 020-000699-01 Rev. 1 (03-2014) Serial Commands V-Pan Function Set V-Pan Command V-PAN XXXX; Command Example V-PAN +001; Function Check V-Pan Variables xxxx = V-Pan number +000 – +009 Response Description ASC-MIO1 00; Command V-PAN?; Set V-Pan to 1. Response Description V-PAN +001; V-Pan setting is 1. Overlap-L Function Set Overlap Left Edge Command OVERLAP-L XXXX; Command Example OVERLAP-L+050; Function Check Overlap-L Variables xxxx = Overlap-L number +-600– +600 Response Description ASC-MIO1 00; Command OVERLAP-L?; Set Overlap-L to +50. Response Description OVERLAP-L +050; Overlap-L setting is +50. Overlap-R Function Set Overlap Right Edge Command OVERLAP-R XXXX; Command Example OVERLAP-R +050; Function Check Overlap-R xxxx = Overlap-R number +-600– +600 Response ASC-MIO1 00; Command OVERLAP-R?; Multi Format IO Module User Manual 020-000699-01 Rev. 1 (03-2014) Variables Description Set Overlap-R to +50. Response OVERLAP-R +050; Description Overlap-R setting is +50. 29 Serial Commands Overlap-T Function Command Set Overlap Top Edge Variables OVERLAP-T XXXX; Command Example OVERLAP-T +050; xxxx = Overlap-T number +-600– +600 Response Description ASC-MIO1 00; Function Set Overlap-R to +50. Command Check Overlap-T OVERLAP-T?; Response OVERLAP-T +050; Description Overlap-T setting is +50. Overlap-B Function Command Set Overlap Bottom Edge OVERLAP-B XXXX; Command Example Check Overlap-B xxxx = Overlap-B number +-600– +600 Response OVERLAP-B +050; Function Variables ASC-MIO1 00; Command OVERLAP-B?; Description Set Overlap-B to +50. Response OVERLAP-B +050; Description Overlap-B setting is +50. Language Function Set Language Check Language 30 Command Response Description LANGUAGE +000; ASC-MIO1 00; Set language to English. LANGUAGE +001; ASC-MIO1 00; Set language to simplified Chinese. LANGUAGE +002; ASC-MIO1 00; Set language to traditional Chinese. Language ?; LANGUAGE +000; Language is English. LANGUAGE +001; Language is simplified Chinese. LANGUAGE +002; Language is traditional Chinese. Multi Format IO Module User Manual 020-000699-01 Rev. 1 (03-2014) Serial Commands Reset Function Set Reset Command Response Description RESET +001; ASC-MIO1 00; Reset all settings. RESET +002; ASC-MIO1 00; Reset video wall settings. Button Function Set button Check button Command Response Description BUTTON +000; ASC-MIO1 00; Set button to repeat rate off. BUTTON +001; ASC-MIO1 00; Set button to repeat rate default. BUTTON +002; ASC-MIO1 00; Set button to repeat rate slow. Button?; BUTTON +000; Button is repeat rate off. BUTTON +001; Button is repeat rate default. BUTTON +002; Button is repeat rate slow. Timeout Function Command Variables Set TimeOut TIMEOUT XXXX; xxxx = Timeout number +000 – +060 Command Example Response Description TIMEOUT +015; ASC-MIO1 00; Set timeout to 15 seconds. Function Check Timeout Command TIMEOUT?; Multi Format IO Module User Manual 020-000699-01 Rev. 1 (03-2014) Response Description TIMEOUT +001; Timeout setting is 1 second. TIMEOUT +015; Timeout setting is 15 seconds. 31 Multi Format IO Module User Manual 020-000699-01 Rev. 1 (03-2014) Video Timing List HDMI Video Timing List Resolution H. Freq. (kHz) V. Freq. (Hz) Pixel Clock (MHz) H. Total Pixel H. Display Pixel H. Front Porch H. Sync. Width H. Sync. Pol. V. Total Lines V. Display Lines V. Front Porch V. Sync. Width V. Sync. Pol. 31.484 59.97 25.1875 800 640 16 96 N 525 480 10 2 N 640 x 480 @72 Hz 37.861 72.809 31.5 832 640 24 40 N 520 480 9 3 N 640 x 480 @75 Hz 37.5 75 31.5 840 640 16 64 N 500 480 1 3 N 720 x 400 @70 Hz 31.458 70.063 28.3125 900 720 16 108 N 449 400 13 2 P 800 x 600 @56 Hz 35.156 56.25 36 1024 800 24 72 P 625 600 1 2 P 800 x 600 @60 Hz 37.879 60.317 40 1056 800 40 128 P 628 600 1 4 P 800 x 600 @72 Hz 48.077 72.188 50 1040 800 56 120 P 666 600 37 6 P 800 x 600 @75 Hz 46.875 75 49.5 1056 800 16 80 P 625 600 1 3 P 848 x 480 @59 Hz 29.83 59.659 31.5 1056 848 23 80 N 500 480 3 5 P 848 x 480 @60 Hz 31.02 60 33,75 1088 848 16 112 P 517 480 6 8 P 1024 x 768 @60 Hz 48.363 60.004 65 1344 1024 24 135 N 806 768 3 6 N 1024 x 768 @70 Hz 56.476 70.069 75 1328 1024 24 136 N 806 768 3 6 N 1024 x 768 @75 Hz 60.023 75.029 78.75 1312 1024 16 96 P 800 768 1 3 P 1152 x 864 @75 Hz 67.5 75 108 1600 1152 64 128 P 900 864 1 3 P 1280 x 720 @48 Hz 35.539 47.961 58 1632 1280 48 128 N 741 720 1 3 P 1280 x 720 @50 Hz 39.618 49.822 60.25 1632 1280 48 128 N 741 720 1 3 P 1280 x 720 @60 Hz 44.621 59.814 74.25 1664 1280 56 136 N 746 720 1 3 P 1280 x 768 @60 Hz 47.396 59.995 68.25 1440 1280 48 32 P 790 768 3 7 N 1280 x 768 @60 Hz 47.776 59.87 79.5 1664 1280 64 128 N 798 768 3 7 P 1280 x 768 @75 Hz 60.289 74.893 102.25 1696 1280 80 128 N 805 768 3 7 P Video Timing List 33 640 x 480 @60 Hz H. Freq. (kHz) V. Freq. (Hz) Pixel Clock (MHz) H. Total Pixel H. Display Pixel H. Front Porch H. Sync. Width H. Sync. Pol. V. Total Lines V. Display Lines V. Front Porch V. Sync. Width V. Sync. Pol. 020-000699-01 Rev. 1 (03-2014) Multi Format IO Module User Manual 1280 x 800 @60 Hz 49.702 59.81 83.5 1680 1280 72 128 N 831 800 3 6 P 1280 x 700 @75 Hz 62.795 74.934 106.5 1696 1280 80 128 n 838 800 3 6 P 1280 x 960 @60 Hz 60 60 108 1800 1280 96 112 P 1000 960 1 3 P 1280 x 1024 @60 Hz 63.981 60.02 108 1688 1280 48 112 P 1066 1024 1 3 P 1280 x 1024 @75 Hz 79.976 72.025 135 1688 1280 16 144 P 1066 1024 1 3 P 1360 x 768 @60 Hz 47.712 60.015 85.5 1792 1360 64 112 P 795 768 3 6 P 1360 x 768 @60 Hz 48 60 72 1500 1366 13 56 P 800 768 1 3 P 1400 x 1050 @60 Hz 64.744 59.948 101 1560 1400 48 32 P 1080 1050 3 4 N 1400 x 1050 @60 Hz 65.317 59.978 121.75 1864 1400 88 144 N 1089 1050 3 4 P 1400 x 1050 @75 Hz 82.278 74.867 156 1896 1400 104 144 N 1099 1050 3 4 P 1440 x 900 @60 Hz 55.935 59.887 106.5 1904 1440 80 152 N 934 900 3 6 P 1440 x 900 @75 Hz 70.506 74.847 136.5 1936 1440 96 152 N 942 900 3 6 P 1440 x 1050 @60 Hz 65.234 59.903 125.25 1829 1440 88 152 N 1089 1050 3 10 N 1600 x 1200 @60 Hz 75 60 162 2160 1600 64 192 P 1250 1200 1 3 P 1680 X 1050 @60 Hz 65.402 60.057 146.5 2240 1680 104 176 N 1089 1020 2 6 P 1920 x 1200 @60 Hz 74.038 59.95 154 2080 1920 48 32 P 1235 1200 3 6 N 720 x 480p @59 Hz 31.469 59.94 27 858 720 16 62 N 525 480 9 6 N 720 x 480p @59 Hz 31.469 59.94 27 858 720 16 62 N 525 480 9 6 N 720 x 576p @50 Hz 31.25 50 27 864 720 12 64 N 625 576 5 5 N 720 x 576p @50 Hz 31.25 50 27 864 720 12 64 N 625 576 5 5 N 1280 x 720p @50 Hz 37.5 50 74.25 1980 1280 440 40 P 750 720 5 5 P 1280 x 720p @60 Hz 60 74.25 1650 1280 110 40 P 750 720 5 5 P 1280 x 720p @100 Hz 100 148.5 1980 1280 440 40 P 750 720 5 5 P 1280 x 720p @120 Hz 120 148.5 1650 1280 110 40 P 750 720 5 5 P 1920 x 108p @24 Hz 24 74.25 2750 1920 638 44 P 1125 1080 4 5 P Video Timing List 34 Resolution Multi Format IO Module User Manual 020-000699-01 Rev. 1 (03-2014) Resolution H. Freq. (kHz) V. Freq. (Hz) Pixel Clock (MHz) H. Total Pixel H. Display Pixel H. Front Porch H. Sync. Width H. Sync. Pol. V. Total Lines V. Display Lines V. Front Porch V. Sync. Width 1920 x 108p @30 Hz 30 74.25 2200 1920 88 44 P 1125 1080 4 5 P 1920 x 108p @50 Hz 50 148.5 2640 1920 528 44 P 1125 1080 4 5 P 1920 x 108p @60 Hz 60 148.5 2200 1920 88 44 P 1125 1080 4 5 P V. Sync. Pol. VGA Video Timing List Resolution H. Freq. (kHz) V. Freq. (Hz) Pixel Clock (MHz) H. Total Pixel H. Display Pixel H. Front Porch H. Sync. Width H. Sync . Pol V. Total Lines V. Display Lines V. Front Porch V. Sync. Width V. Sync. Pol 31.563 60.119 25.1875 800 640 16 96 N 525 480 10 2 N 640 x 480 @72 Hz 37.861 72.809 31,5 832 640 24 40 N 520 480 9 3 N 640 x 480 @75 Hz 37.5 75 31.5 840 640 16 64 N 500 480 1 3 N 720 x 400 @70 Hz 31.528 70.218 28.3125 900 720 16 108 N 449 400 12 2 P 800 x 600 @56 Hz 35.156 56.25 36 1024 800 24 72 N 625 600 1 2 P 800 x 600 @60 Hz 37.879 60.317 40 1056 800 40 128 N 628 600 1 4 P 800 x 600 @72 Hz 48.077 72.188 50 1040 800 56 120 N 666 600 37 6 P 800 x 600 @75 Hz 46.875 75 49.5 1056 800 16 80 P 625 600 1 3 P 848 x 480 @59 Hz 29.83 59.659 31.5 1056 848 24 80 N 500 480 3 5 P 848 x 480 @60 Hz 31.02 60 33.75 1088 848 16 112 P 517 480 6 8 P 1024 x 768 @60 Hz 48.363 60.004 65 1344 1024 24 136 N 806 768 3 6 N 1024 x 768 @70 Hz 56.476 70.069 75 1328 1024 24 136 N 806 768 3 6 N 1024 x 768 @75 Hz 60.023 75.029 78.75 1312 1024 16 96 N 800 768 1 3 P 1152 x 864 @75 Hz 67.5 75 108 1600 1152 64 128 P 900 864 1 3 P 1280 x 720 @48 Hz 35.539 47.961 58 1632 1280 48 128 N 741 720 1 3 P 1280 x 768 @60 Hz 47.396 59.995 68.25 1440 1280 48 32 P 790 768 3 7 N 35 Video Timing List 640 x 480 @60 Hz H. Freq. (kHz) V. Freq. (Hz) Pixel Clock (MHz) H. Total Pixel H. Display Pixel H. Front Porch H. Sync. Width H. Sync . Pol V. Total Lines V. Display Lines V. Front Porch V. Sync. Width V. Sync. Pol 1280 x 768 @60 Hz 47.776 59.87 79,5 1664 1280 64 128 N 798 768 3 7 P 1280 x 768 @75 Hz 60.289 74.893 102.25 1696 1280 80 128 N 805 768 3 7 P 1280 x 800 @60 Hz 49.792 59,81 83,5 1680 1280 72 128 N 831 800 3 6 P 1280 x 800 @75 Hz 62.795 74.934 106.5 1696 1280 80 128 N 838 800 3 6 P 1280 x 960 @60 Hz 60 69 108 1800 1280 96 112 P 1000 960 1 3 P 1280 x 1024 @60 Hz 63.981 60.02 108 1688 1280 48 112 P 1966 1024 1 3 P 1280 x 1024 @75 Hz 79.976 75.025 135 1688 1280 16 144 P 1066 1024 1 3 P 1360 x 768 @60 Hz 47.712 60.015 85.5 1792 1360 64 112 P 795 768 3 6 P 1400 x 1050 @60 Hz 64.744 59.948 101 1560 1400 48 32 P 1080 1050 3 3 N 1400 x 1050 @60 Hz 65.317 59..978 121.75 1864 1400 88 144 N 1089 1050 3 4 P 1400 x 1050 @75 Hz 82.278 74.867 156 1896 1400 104 144 N 1099 1050 3 4 P 1440 x 900 @60 Hz 55.935 59.887 106.5 1904 1440 80 152 N 934 900 3 6 P 1440 x 1050 @60 Hz 65.234 59.903 125.25 1920 1440 88 152 N 1989 1050 3 10 N 1600 x 1200 @60 Hz 75 60 162 2160 1600 64 192 P 1250 1200 1 3 P 1680 x 1050 @60 Hz 65.179 59.852 146 2240 1680 104 176 N 1089 1050 3 6 P 1920 x 1200 @60 Hz 74.038 59.95 154 2080 1920 48 32 P 1235 1200 3 6 N Video Timing List 36 Resolution 020-000699-01 Rev. 1 (03-2014) Multi Format IO Module User Manual Multi Format IO Module User Manual 020-000699-01 Rev. 1 (03-2014) DisplayPort Video Timing List Resolution H. Freq. (kHz) V. Freq. (Hz) Pixel Clock (MHz) H. Total Pixel H. Display Pixel H. Front Porch H. H. Sync. Sync Width . Pol. V. Total Lines V. Display Lines V. Front Porch V. Sync. Width V. Sync. Pol. 31.56 60.12 25.1875 800 640 16 96 N 525 480 10 2 N 640 x 480 @72 Hz 37.86 72.81 31.5 832 640 24 40 N 529 480 9 3 N 640 x 480 @75 Hz 37.5 75 31.5 840 640 16 64 N 500 480 1 3 N 720 x 400 @70 Hz 31.46 70.06 28.3125 900 729 16 108 N 449 400 13 2 P 800 x 600 @56 Hz 35.16 56.25 36 1024 800 24 72 P 625 600 1 2 P 800 x 600 @60 Hz 37.88 60.32 40 1056 800 40 128 P 628 600 1 4 P 800 x 600 @72 Hz 48.08 72.19 50 1040 800 56 120 P 666 600 37 6 P 800 x 600 @75 Hz 46.88 75 49.5 1056 800 16 80 P 625 600 1 3 P 848 x 480 @59 Hz 29.83 59.66 31.5 1056 848 24 80 P 500 480 3 5 P 848 x 480 @60 Hz 31.02 60 33.75 1088 848 16 112 P 517 480 6 8 P 1024 x 768 @60 Hz 48.36 60 65 1344 1024 24 136 N 806 768 3 6 N 1024 x 768 @70 Hz 56.48 70.07 75 1328 1024 24 136 N 806 768 3 6 N 1024 x 768 @75 Hz 60.02 75.03 78.75 1312 1024 16 96 P 800 768 1 3 P 1152 x 864 @75 Hz 67.5 75 108 1600 1152 64 128 P 900 864 1 3 P 1280 x 720 @48 Hz 35.54 47.96 58 1632 1280 48 128 N 741 720 1 3 P 1280 x 720 @50 Hz 36.92 49.82 60.25 1632 1280 48 128 N 741 720 1 3 P 1280 x 720 @60 Hz 44.62 59.81 74.25 1664 1280 56 136 N 746 720 1 3 P 1280 x 768 @60 Hz 47.4 59.99 68.25 1440 1280 48 32 P 790 768 3 7 N 1280 x 768 @60 Hz 47.78 59.87 79.5 1664 1280 64 128 N 798 768 3 7 P 1280 x 768 @75 Hz 60.29 74.89 102.25 1696 1280 80 128 N 805 768 3 7 P 1280 x 800 @60 Hz 49.7 59.81 83.5 1680 1280 72 128 N 831 800 3 6 P 1280 x 960 @60 Hz 60 60 108 1800 1280 96 112 P 1000 960 1 3 P 1280 x 1024 @60 Hz 63.98 60.02 108 1688 1280 48 112 P 1066 1024 1 3 P 37 Video Timing List 640 x 480 @60 Hz H. Freq. (kHz) V. Freq. (Hz) Pixel Clock (MHz) H. Total Pixel H. Display Pixel H. Front Porch H. H. Sync. Sync Width . Pol. V. Total Lines V. Display Lines V. Front Porch V. Sync. Width V. Sync. Pol. 020-000699-01 Rev. 1 (03-2014) Multi Format IO Module User Manual 1280 x 1024 @75 Hz 79.98 75.02 135 1688 1280 16 144 P 1066 1024 1 3 P 1360 x 768 @60 Hz 47.71 60.02 85.5 1792 1360 64 112 P 795 768 3 6 P 1366 x 768 @60 Hz 48 60 72 1500 1366 14 56 P 800 768 1 3 P 1400 x 1050 @60 Hz 64.74 59.95 101 1560 1400 48 32 P 1080 1050 1 4 N 1400 x 1050 @60 Hz 65.32 59.98 121.75 1864 1400 88 144 N 1089 1050 3 4 P 1400 x 1050 @75 Hz 82.28 74.87 156 1896 1400 104 144 N 1099 1050 3 4 P 1440 x 900 @60 Hz 55.93 59.89 106.5 1904 1440 80 152 N 934 900 3 6 P 1440 x 900 @75 Hz 70.51 74.85 136.5 1936 1440 85 152 N 942 900 3 6 P 1440 x 1050 @60 Hz 65.23 59.9 125.25 1920 1440 88 152 N 1089 1050 3 10 N 1600 x 1200 @60 Hz 75 60 162 2160 1600 64 192 P 1250 1200 1 3 P 1600 x 1200 @65 Hz 81.25 65 175.5 2160 1600 64 192 P 1250 1200 1 3 P 1600 x 1200 @70 Hz 87.5 70 189 2160 1600 64 192 P 1250 1200 1 3 P 1600 x 1200 @75 Hz 93.52 74.81 292 2160 1600 64 192 P 1250 1200 1 3 P 1680 x 1050 @60 Hz 65.18 59.85 146 2240 1680 104 176 N 1089 1050 3 6 P 1920 x 1200 @60 Hz 74.04 59.95 154 2080 1920 48 32 P 1235 1200 3 6 N 1920 x 1200 @60 Hz 74.46 59.81 193 2592 1920 136 200 N 1245 1200 3 6 P 2560 x 1600 @60 Hz 98.53 59.86 268 2720 2560 48 32 P 1646 1600 3 6 N 720 x 480p @59 Hz 31.47 59.94 27 858 720 16 62 N 525 480 9 6 N 720 x 480p @59 Hz 31.47 59.94 27 858 720 16 62 N 525 480 9 6 N 720 x 576p @50 Hz 31.25 50 27 864 720 12 64 N 625 576 5 5 N 720 x 576p @50 Hz 31.25 50 27 864 720 12 64 N 625 576 5 5 N 1280 x 720p @50 Hz 37.5 50 74.25 1980 1280 440 40 P 750 720 5 5 P 1280 x 720p @60 Hz 45 60 74.25 1650 1280 110 40 P 750 720 5 5 P 1280 x 720p @100 Hz 75 100 148.5 1980 1280 440 40 P 750 720 5 5 P 1280 x 720p @120 Hz 90 120 148.5 1650 1280 110 40 P 750 720 5 5 P Video Timing List 38 Resolution Multi Format IO Module User Manual 020-000699-01 Rev. 1 (03-2014) Resolution H. Freq. (kHz) V. Freq. (Hz) Pixel Clock (MHz) H. Total Pixel H. Display Pixel H. Front Porch H. H. Sync. Sync Width . Pol. V. Total Lines V. Display Lines V. Front Porch V. Sync. Width V. Sync. Pol. 1920 x 108i @50 Hz 28.13 5 74.25 2640 1920 528 44 P 1125 1080 2 5 P 1920 x 108p @24 Hz 27 24 74.25 2750 1920 638 44 P 1125 1080 4 5 P 1920 x 108p @30 Hz 33.75 30 74.25 2200 1920 88 44 P 1125 1080 4 5 P 1920 x 108p @50 Hz 56.25 50 148.5 2640 1920 528 44 P 1125 1080 4 5 P 1920 x 108p @60 Hz 67.5 60 148.5 2200 1920 88 44 P 1125 1080 4 5 N Video Timing List 39 Specifications Technical Specifications Advanced Video Processing High-quality video and graphics scaling up and down Frame rate conversion Approvals CE, FCC, RoHS (2002/95/EC) Audio Input Signal Digital Audio (PCM), Stereo Audio Audio Output Signal 1x S/PDIF Digital Audio, 1x Analog Audio RH/LH, 1x HDMI Audio Chassis Material Metal Control IR remote control, RS232, front panel push buttons Dimensions 11.96"H x 5.90"W x 1.73"D (30.4 x 15 cm x 1.1 cm) HDCP Support Automatic scanning of input/output status HDMI Cable Distance Max. 15 meters (49 feet), depending on cable quality HDMI Compliance HDMI 1.4a receiver and transmitter Infrared Frequency 38 KHz Input Resolution DVI/ HDMI/ Display Port, compliant with HDCP 2.0 Intelligent Color Adjustment Discrete RGB, color adjustment, hue, saturation sharpness, contrast, brightness, four preset color modes IR Extend Distance 300 meters (984 feet) line cable via IR extender Output Resolution Up to 1080p-60, 1920x1200 Power Supply Input: 100–240 VAC, 50/60 Hz Output: 12 VDC, 2 A Rackmount 19-inch panel type (1U-44L) Scaler Type 7 in/2 out HDMI Video Scaler Source Status Automatic scanning of input/output status System Control Box ID for easy independent control through IR, RS232, and five selectable profiles settings for difference display. Ethernet control module with RJ45 connector. ASCII control protocol over RS232 and Ethernet. Temperature Video Input Signal 32–100° F (0–32° C) one Composite/one S-Video/one Component one VGA/one DVI/one HDMI/one DP Video Output Signal Multi Format IO Module User Manual 020-000699-01 Rev. 1 (03-2014) one VGA, one HDMI 41 Specifications Technical Specifications Video Wall Magnify, scroll, pan through all inputs Video wall function: Image split, cropping, and assign display location Pixel based overlap adjustment in all edges, up to 15x15 matrix displays Up to 2560 x 1600 input resolution via display port Weight Shipping weight: 3.42 lb. (2.05 kg) Input Resolution Support For a detailed list of timing by resolution, see Video Timing List on page 33. i Resolution 640 x 350 @ 85 Hz 480p/480i 640 x 400 @ 85 Hz 576p/576i 640 x 480 @ 60 Hz 720p 640 x 480 @ 72 Hz VGA 640 x 480 @ 75 Hz VGA 720 x 400 @ 70 Hz DOS 720 x 400 @ 85 Hz 1080p/1080i 800 x 600 @ 56 Hz SVGA 800 x 600 @ 60 Hz SVGA 800 x 600 @ 72 Hz Component VGA HDMI DisplayPort √ √ √ √ √ √ √ √ √ √ √ √ √ √ √ √ √ √ √ √ √ √ √ √ √ √ √ √ √ √ √ SVGA √ √ √ √ 800 x 600 @ 75 Hz SVGA √ √ √ √ 832 x 624 @ 75 Hz SVGA √ √ √ √ 848 x 480 @ 59 Hz WVGA √ √ √ √ 848 x 480 @ 60 Hz WVGA √ √ √ √ 852 x 480 @ 60 Hz 480p √ 1024 x 768 @ 60 Hz XGA √ √ √ √ 1024 x 768 @ 70 Hz XGA √ √ √ 1024 x 768 @ 75 Hz XGA √ √ √ √ 1152 x 864 @ 75 Hz XGA+ √ √ √ √ 1280 x 720 @ 48 Hz HD 720 √ 1280 x 720 @ 50 Hz HD 720 √ √ √ √ 1280 x 720 @ 60 Hz WXGA √ √ √ √ 1280 x 768 @ 75 Hz WXGA √ √ √ √ 42 √ DVI √ √ √ Multi Format IO Module User Manual 020-000699-01 Rev. 1 (03-2014) Specifications Resolution Component VGA DVI HDMI DisplayPort 1280 x 768 @ 60 Hz WXGA √ √ √ 1280 x 800 @ 60 Hz WXGA √ √ √ 1280 x 800 @ 75 Hz WXGA √ √ √ 1280 x 960 @ 60 Hz SXGA √ √ √ 1280 x 1024 @ 60 Hz SXGA √ √ √ √ 1280 x 1024 @ 75 Hz SXGA √ √ √ √ 1360 x 768 @ 60 Hz SXGA √ √ √ √ 1360 x 768 @ 75 Hz SXGA √ 1366 x 768 @ 60 Hz WXGA √ 1400 x 788 @ 60 Hz WXGA+ √ 1400 x 1050 @ 60 Hz SXGA+ √ √ √ √ 1400 x 1050 @ 75 Hz SXGA+ √ √ √ √ 1400 x 1050 @ 60 Hz SXGA+ √ √ √ 1440 x 900 @ 60 Hz WXGA+ √ √ √ 1440 x 900 @ 75 Hz WXGA+ √ √ 1440 x 1050 @ 60 Hz SXGA+ √ √ √ √ 1600 x 1200 @ 60 Hz UXGA √ √ √ √ 1600 x 1200 @ 65 Hz UXGA 1600 x 1200 @ 70 Hz UXGA 1600 x 1200 @ 75 Hz UXGA 1680 x 1050 @ 60 Hz WSXGA+ √ √ √ √ 1792 x 1344 @ 60 Hz √ 1856 x 1392 @ 60 Hz √ √ √ √ √ √ √ 1920 x 1200 @ 60 Hz WUXGA 1920 x 1200 @ 60 Hz WUXGA √ 1920 x 1440 @ 60 Hz WUXGA √ 1920 x 1440 @ 75 Hz WUXGA √ 720 x 480p @ 59 Hz DVD “NTSC” √ √ 720 x 480p @ 59 Hz DVD “NTSC” √ √ √ 720 x 576p @ 50 Hz DVD “PAL” √ √ √ 720 x 576p @ 50 Hz DVD “PAL” √ √ √ 1280 x 720p @ 50 Hz HDTV 720p √ √ √ 1280 x 720p @ 60 Hz HDTV 720p √ √ √ 1280 x 720p @ 100 Hz HDTV 720p √ √ √ Multi Format IO Module User Manual 020-000699-01 Rev. 1 (03-2014) √ 43 Specifications Resolution Component 1280 x 720p @ 120 Hz HDTV 720p 1920 x 1080p @ 24 Hz VGA DVI HDMI √ DisplayPort √ √ 1080p HD √ √ 1920 x 1080p @ 30 Hz 1080i HD √ √ 1920 x 1080p @ 50 Hz 1080p HD √ √ 1920 x 1080p @ 60 Hz 1080p HD √ √ 1920 x 1080p @ 24 Hz Full HD 1080p √ √ 2048 x 1280 @ 60 Hz 2560 x 1600 √ √ WQXGA √ Output Resolution Support i • When you press the front panel button “OTHERS,” the scaler automatically applies the resolution 1360 x 768. Continue pressing “OTHERS” to cycle through the following four resolutions: 1360 x 768 > 1280 x 1024 > 1600 x 1200 > 1920 x 1200 • To adjust the settings in output mode, select 720 x 480, 800 x 600, 1280 x 800, or 1400 x 1050, open the OSD menu and go to Image Properties. Front Panel Buttons Resolution VGA HDMI XGA 1920 x 1200 √ √ WXGA 1024 x 768 √ √ 720p 1280 x 720 √ √ 1080p 1920 x 1080 √ √ OTHERS 720 x 480 √ √ 800 x 600 √ √ 1280 x 800 √ √ 1280 x 1024 √ √ 1360 x 768 √ √ 1400 x 1050 √ √ 1600 x 1200 √ √ 44 Multi Format IO Module User Manual 020-000699-01 Rev. 1 (03-2014) *000-104309-01* ASSY TECH DOCS Multi Format IO Module Corporate offices Worldwide offices USA – Cypress ph: 714-236-8610 Australia ph: +61 (0) 7 3624 4888 Canada – Kitchener ph: 519-744-8005 Brazil ph: +55 (11) 2548 4753 Consultant offices China (Beijing) ph: +86 10 6561 0240 Italy ph: +39 (0) 2 9902 1161 China (Shanghai) ph: +86 21 6278 7708 Eastern Europe and Russian Federation ph: +36 (0) 1 47 48 100 France ph: +33 (0) 1 41 21 44 04 Germany ph: +49 2161 664540 India ph: +91 (080) 6708 9999 Singapore ph: +65 6877-8737 Japan (Tokyo) ph: 81 3 3599 7481 Spain ph: + 34 91 633 9990 Korea (Seoul) ph: +82 2 702 1601 United Arab Emirates ph: +971 4 3206688 Republic of South Africa ph: +27 (0)11 510 0094 United Kingdom ph: +44 (0) 118 977 8000 For the most current technical documentation, please visit www.christiedigital.com