1
NUGGET
Reference Manual
Version 2.5
Compliant with: Firmware Version 1.4.28-24
NUG-SDI Version 84
NUG.OM.000105.DRM
07 / 2007
Page 1
Version 2.5
Doremi Labs, Inc.
TABLE OF CONTENTS
1
INTRODUCTION ................................................................................................................................. 10
2
NUGGET MODELS ............................................................................................................................. 11
2.1
2.2
2.3
3
CONTROLLING THE NUGGET .......................................................................................................... 12
3.1
3.2
3.3
3.4
3.5
3.6
3.7
4
DOREMI ASSET MANAGER ............................................................................................................... 12
NUGGET IP ADDRESS ..................................................................................................................... 12
FILE TRANSFER............................................................................................................................... 12
PLAYLISTS ...................................................................................................................................... 12
AUTO START................................................................................................................................... 12
TIMECODE OFFSET .......................................................................................................................... 12
EMULATION..................................................................................................................................... 13
TRANSFERING FILES TO THE NUGGET ......................................................................................... 14
4.1
4.2
4.3
4.4
4.5
4.6
5
NUGGET FRONT PANEL ................................................................................................................... 11
NUGGET REAR PANEL ..................................................................................................................... 11
NUGGET PRO REAR PANEL ............................................................................................................. 11
DOREMIAM INSTALLATION............................................................................................................... 14
DESCRIPTION.................................................................................................................................. 14
RUNNING DOREMIAM FOR THE FIRST TIME ...................................................................................... 14
ADDING NUGGET UNITS TO DOREMIAM ........................................................................................... 14
TRANSFERRING FILES TO NUGGET UNITS ......................................................................................... 14
SUPPORTED VIDEO FORMATS .......................................................................................................... 15
SYNCHRONIZING MULTIPLE NUGGET UNITS ............................................................................... 16
5.1
CONSTANT PLAY LATENCY .............................................................................................................. 16
5.2
SYNCHRONIZED PLAYBACK .............................................................................................................. 16
5.2.1
Locking to Sync IN ................................................................................................................ 16
5.2.2
Locking to LTC IN.................................................................................................................. 16
5.3
SYNCHRONIZED START ................................................................................................................... 16
5.3.1
Gang Start ............................................................................................................................. 17
5.3.2
Chase .................................................................................................................................... 17
5.4
SYNCHRONIZING NUGGET UNITS USING CHASE ................................................................................ 17
5.5
SYNCHRONIZING NUGGET UNITS AUTOMATICALLY ............................................................................ 18
5.6
SYNCHRONIZING MORE THAN 2 NUGGET UNITS ................................................................................ 18
5.7
LTC IN LATENCY ............................................................................................................................ 18
6
VIDEO OUTPUTS................................................................................................................................ 19
6.1
6.2
6.3
6.4
6.5
7
DVI-I CONNECTOR ......................................................................................................................... 19
HD-SDI CONNECTOR ..................................................................................................................... 19
SD-SDI CONNECTOR ..................................................................................................................... 19
COMPOSITE CONNECTOR ................................................................................................................ 19
COLOR SPACE SETTING .................................................................................................................. 19
NUGGET VIDEO SETTINGS .............................................................................................................. 20
7.1
7.2
7.3
BEST SETUP FOR 1080I, 720P AND SD FORMATS ............................................................................ 20
BEST SETUP FOR 1080P FORMATS .................................................................................................. 20
VIDEO OUT AUTO MODE.................................................................................................................. 20
NUG.OM.000105.DRM
07 / 2007
Page 2
Version 2.5
Doremi Labs, Inc.
7.4
RECOMMENDED SETTINGS .............................................................................................................. 20
8
VIDEO OUTPUTS GENLOCK ............................................................................................................ 21
9
NTSC CLOSED CAPTION .................................................................................................................. 21
10
10.1
10.2
10.3
LOGO OVERLAY AND BURN IN WINDOW (BIW) ........................................................................ 22
LOGO DESIGN ................................................................................................................................. 22
LOGO FILE TRANSFER ..................................................................................................................... 22
BURN IN W INDOW ........................................................................................................................... 22
11
FIRMWARE UPGRADE INSTRUCTIONS ...................................................................................... 23
12
NUGGET MPEG2 FILE STRUCTURE ............................................................................................ 24
13
VIDEO DURATION LIMITATIONS .................................................................................................. 24
14
CONTROL PROTOCOL .................................................................................................................. 25
14.1 CONTROLLING THE NUGGET USING THE SERIAL PORT....................................................................... 25
14.1.1 Wiring of the Standard RS422 Cable .................................................................................... 26
14.1.2 Wiring of the NUGGET RS422-PC Cable ............................................................................. 27
14.1.3 Wiring of the Nugget RS422-Mac Cable ............................................................................... 28
14.1.4 Wiring of the DB-25 Audio Connector ................................................................................... 29
15
15.1
15.2
15.3
15.4
SPECIFICATIONS ........................................................................................................................... 30
INTERFACE ..................................................................................................................................... 30
AUDIO ............................................................................................................................................ 30
VIDEO ............................................................................................................................................ 30
TIMECODE ...................................................................................................................................... 30
NUG.OM.000105.DRM
07 / 2007
Page 3
Version 2.5
Doremi Labs, Inc.
WARRANTY
Doremi's warranty obligations are limited to the terms set forth below:
Doremi Labs, Inc. ("Doremi") warrants this hardware product against defects in materials and workmanship for a period of ONE (1)
YEAR from the date of original retail purchase.
If you discover a defect, Doremi will, at its option, repair, replace, or refund the purchase price of this product at no charge to you,
provided you return it during the warranty period, with transportation charges prepaid, to your nearest Doremi Labs repair facility. To
each product returned for warranty service, please attach your name, address, telephone number, and a copy of the bill of sale
bearing the appropriate Doremi serial numbers as proof of date of the original retail purchase. You will also need to contact Doremi
Labs technical support to receive a return authorization number (RMA).
This warranty applies only to hardware products manufactured by or for Doremi that can be identified by the "Doremi Labs"
trademark, trade name, or logo affixed on them. Doremi software is warranted pursuant to a separate written statement packed with
the software. Doremi does not warrant any products that are not Doremi products. This warranty does not apply if the product has
been damaged by accident, abuse, misuse, or misapplication; if the product has been modified without the written permission of
Doremi; or if any Doremi serial number has been removed or defaced.
THE WARRANTY AND REMEDIES SET FORTH ABOVE ARE EXCLUSIVE AND IN LIEU OF ALL OTHERS, WHETHER ORAL
OR WRITTEN, EXPRESS OR IMPLIED. DOREMI SPECIFICALLY DISCLAIMS ANY AND ALL IMPLIED WARRANTIES,
INCLUDING, WITHOUT LIMITATION, WARRANTIES OF MERCHANTABILITY AND FITNESS FOR A PARTICULAR PURPOSE.
No Doremi distributor, agent, or employee is authorized to make any modification, extension, or addition to this warranty.
DOREMI IS NOT RESPONSIBLE FOR SPECIAL, INCIDENTAL, OR CONSEQUENTIAL DAMAGES RESULTING FROM ANY
BREACH OF WARRANTY, OR UNDER ANY OTHER LEGAL THEORY, INCLUDING BUT NOT LIMITED TO LOST PROFITS,
DOWNTIME, GOODWILL, DAMAGE TO OR REPLACEMENT OF EQUIPMENT AND PROPERTY, AND ANY COSTS OF
RECOVERING, REPROGRAMMING, OR REPRODUCING ANY PROGRAM OR DATA STORED IN OR USED WITH DOREMI
PRODUCTS.
NUG.OM.000105.DRM
07 / 2007
Page 4
Version 2.5
Doremi Labs, Inc.
Software License Agreement
THIS SOFTWARE LICENSE AGREEMENT (this “Agreement”) is provided by Doremi Labs, Inc. ("Licensor") to you, the customer
(the “Customer”). PLEASE READ IT'S TERMS CAREFULLY, AS THE CUSTOMER’S USE OF THE SOFTWARE WILL
CONSTITUTE THE CUSTOMER’S ACCEPTANCE OF THE TERMS OF THIS AGREEMENT.
1. License. Licensor hereby grants to the Customer a non-transferable (except as otherwise provided herein) and non-exclusive
license to use the software and associated documentation being provided with the Doremi Labs equipment being acquired by the
Customer (respectively, the "Software" and the "Documentation") on a single piece of Doremi Labs equipment at one site. The
Software and the piece of Doremi Labs equipment must remain at the same location for the term of this license. The number of
users of the Software is not limited and the users are not required to be personally identified to Licensor.
2. Restrictions. Customer acknowledges that the Software and its structure, organization and source code constitute valuable trade
secrets of Licensor and its suppliers. Accordingly, Customer agrees not to and shall not allow others to (a) modify, adapt, alter,
translate, or create derivative works from the Software; (b) merge the Software with other software; (c) sublicense, lease, rent, loan
or otherwise transfer the Software to any third party; (d) make the Software available to any third party as part of any time-sharing,
ASP, or service bureau arrangement or otherwise operate the Software for the benefit of any third party; (e) reverse engineer,
decompile, disassemble or otherwise attempt to derive the source code for the Software (except to the extent the provisions of this
clause (e) are expressly prohibited by applicable law); or (f) otherwise use or copy the Software except as expressly allowed in
Section 1. Title in, ownership of, and all right associated with the Software shall remain vested in the Licensor. Licensor reserves all
rights not expressly granted to the Customer.
3. Confidentiality of the Software. The Customer acknowledges and agrees that the Software and the Documentation constitute
valuable proprietary products and trade secrets of the Licensor embodying substantial creative efforts and confidential information,
ideas and expressions. The Customer agrees to maintain in all respects the confidentiality of the Software including, without
limitation, agreeing not to disclose or otherwise make available to any other person or entity, in any manner, the Software in any
form whatsoever, except that such disclosure or availability shall be permitted to an employee of the Customer whose duties and
responsibilities require access to the Software in the course of his or her employment or to agents or independent contractors of the
Customer performing maintenance or support services requiring access to the Software. The Customer further agrees not to alter or
remove any copyright or other proprietary rights notice or identification which indicates the Licensor's ownership from any part of the
Software.
4. License Non-Transferable. Neither the license granted by this Agreement nor any copies of the software, the documentation, or
any other materials delivered by the Licensor to the Customer pursuant to this Agreement may, in whole or in part, be assigned,
sublicensed, loaned out, distributed, or otherwise transferred by the Customer to any other person or entity without the prior written
consent of the Licensor, except as provided below. Any attempt to assign, sublicense, loan, distribute or otherwise transfer such
materials in violation of the terms of this Agreement shall be deemed null and void. If the Customer desires to transfer the license
granted by this Agreement in connection with a sale of the Doremi Labs equipment being purchased by another customer of
Doremi, the Licensor hereby consents to the assignment of the license provided (a) such sale otherwise complies with the terms of
this agreement and applicable law; (b) the transferee reads and agrees to accept the terms and conditions of the agreement; and (c)
the transferee must be another customer of Doremi.
5. Export by Law Assurances. The Customer agrees and certifies that neither the Software and documentation nor any direct
product thereof is being or will be downloaded, shipped, transferred, exported, or re-exported, directly or indirectly, into any country
to which export is prohibited by the laws and regulations of the United States.
6. Government End Users. If acquiring the Software on behalf of any unit or agent of the United States government, the Customer
agrees that: (a) the Software is "Commercial Computer Software" as the term is defined in paragraph 27.401 of the DoD
Supplement to the Federal Acquisition Regulations (the "Supplement") or is within the equivalent classification of any other federal
agencies' regulations; (b) the Software was developed at private expense, and no part of it was developed with government funds:
(c) the government's use of the Software is subject to "Restricted Rights" as that term is defined in clause 52.227-7013 (b) (3) (ii) of
the supplement or in the equivalent clause of any other federal agencies' regulations; (d) the Software is a "trade secret' of the
licensor for all purposes of the Freedom of Information Act; and (e) each copy of the Software will contain the Following Restricted
Rights Legend:
"Restricted Rights Legend"
Use, duplication, or disclosure is subject to restriction as set forth in the subdivision (b) (3) (ii) of the Rights in the Technical Data
and Computer Software clause at FAR 52.227-7013. Manufacturer: Doremi Labs, Inc., 306 E. Alameda Ave., Burbank, CA 91502.
The Customer agrees to indemnify Licensor for any liability, loss, costs and expense (including court cost and reasonable attorney's
fees) arising out of any breach of the provisions of this Agreement relating to use by the government.
7. Term. The license is effective until terminated. Customers may terminate it at any time by destroying the Software together with
all copies permitted by this Agreement. Licensor may terminate this license upon thirty (30) days prior written notice to Customer if
Customer materially breaches any provision of this Agreement and fails to cure such breach, if curable, during such thirty (30) day
period; provided that if Customer breaches the provisions of Sections 2 or 3, Licensor shall have the right to terminate this
Agreement immediately upon written notice to Customer. The license will also terminate upon conditions set forth elsewhere in this
Agreement. The Customer agrees upon such termination to destroy all copies of the Software.
NUG.OM.000105.DRM
07 / 2007
Page 5
Version 2.5
Doremi Labs, Inc.
8. Disclaimer of Warranty.
THE SOFTWARE IS PROVIDED "AS IS" WITHOUT WARRANTY OF ANY KIND, EITHER EXPRESS OR IMPLIED, WITH
RESPECT TO ITS MERCHANDABILITY OR ITS FITNESS FOR ANY PARTICULAR PURPOSE. THE ENTIRE RISK AS TO THE
QUALITY AND PERFORMANCE OF THE SOFTWARE IS WITH THE CUSTOMER. SHOULD THE SOFTWARE PROVE
DEFECTIVE, THE CUSTOMER (AND NOT LICENSOR OR A LICENSOR AUTHORIZED DISTRIBUTOR) ASSUMES THE ENTIRE
COST OF ALL NECESSARY SERVICING, REPAIRING, OR CORRECTION.
LICENSOR DOES NOT WARRANT THAT THE FUNCTIONS CONTAINED IN THE SOFTWARE WILL MEET THE CUSTOMER'S
REQUIREMENTS OR THAT THE OPERATION OF THE SOFTWARE WILL BE UNINTERRUPTED OR ERROR FREE OR THAT
DEFECTS IN THE SOFTWARE WILL BE CORRECTED. IF ANY MODEL OR SAMPLE WAS SHOWN TO THE CUSTOMER,
SUCH A MODEL OR SAMPLE WAS USED MERELY TO ILLUSTRATE THE GENERAL TYPE AND QUALITY OF THE
SOFTWARE AND NOT TO REPRESENT THAT THE SOFTWARE WOULD NECESSARILY CONFORM TO SUCH A MODEL OR
SAMPLE.
Some states do not allow the exclusion of implied warranties, so the above exclusion may not apply to the Customer.
9. Limitation of Remedies. The Licensor shall not, under any circumstances, be liable to the Customer for any indirect,
consequential or incidental damages arising out of the use, or results of use of, the software and documentation or otherwise
relating to the functioning thereof or arising out of this agreement or any breach of this agreement by the Licensor, even if the
Licensor has been advised of the possibility of such damages. Licensor's liability to the Customer for actual damages for any cause
whatsoever, and regardless of the form of the action, will be limited to the greater of $300 or the money paid for the Software that
caused the damages or that is the subject matter of, or is directly related to, the cause of action. Some states do not allow the
limitation or exclusion of liability for incidental or consequential damages so the above limitation or exclusion may not apply to
customer.
10. General.
(a) The terms of this Agreement are intended as a final expression of the parties' agreement with respect to such terms as are
included in this Agreement and may not be contradicted by evidence of any prior or contemporaneous agreement. This Agreement
constitutes the complete and exclusive statement of its terms and no extrinsic evidence whatsoever may be introduced in any
judicial proceeding, if any, involving this Agreement.
(b) This Agreement shall be construed and enforced in accordance with the laws of the State of California applicable to contracts
made and to be performed entirely in the State of California without regard to such state’s conflict of laws provisions.
(c) If any portion of any provision of this Agreement is ruled invalid or unenforceable under any applicable law, that provision will be
enforced to the maximum extent permissible, and the remainder of this Agreement shall continue in full force and effect.
(d) All waivers must be in writing. Any waiver or failure to enforce any provision of this Agreement on one occasion will not be
deemed a waiver of any other provision or of such provision on any other occasion.
NUG.OM.000105.DRM
07 / 2007
Page 6
Version 2.5
Doremi Labs, Inc.
WARNING
THIS APPARATUS MUST BE EARTHED
IMPORTANT WARNING
Power requirements for electrical equipment vary from area to area. Please ensure that your NUGGET
meets the power requirements in your area. If in doubt, consult a qualified electrician or your Doremi Labs
dealer.
AVIS
Le voltage peut différer d’un pays à l’autre. Il faut que le NUGGET soit ajuste au voltage du pays.
LA SOURCE DE PUISSANCE DOIT AVOIR UN CONDUCTEUR CONNECTE A LA TERRE. Toutes
réparations doivent être effectuées par une personne qualifiée. AFIN D’EVITER UN CHOC
ELECTRIQUE, VEUILLEZ NE PAS ENLEVER LE CAPOT.
Nugget Power Ratings
•
•
AC Input: 100-240V~, 4-2A, 60-50Hz
Maximum Power Consumption: 180W
Rack Mount and Thermal Information
•
•
•
•
Maximum operating ambient temperature is 40°C.
Never restrict the airflow through the devices’ fan or vents.
When installing equipment into a rack, distribute the units evenly. Otherwise hazardous
conditions may be created by an uneven weight distribution.
Connect the unit only to a properly rated supply circuit. Reliable earthing (grounding) of rackmounted equipment should be maintained
PROTECTING YOURSELF AND THE NUGGET
Never touch the AC plug with wet hands.
Always disconnect the NUGGET from the power supply by pulling on the plug, not the cord.
Allow only a Doremi Labs, Inc. dealer or qualified professional engineer to repair or reassemble the
NUGGET. Apart from voiding the warranty, unauthorized engineers might touch live internal parts and
receive a serious electric shock.
Do not put, or allow anyone to put any object, especially metal objects into the NUGGET. Use only an AC
power supply. Never use a DC power supply.
If water or any other liquid is spilled into or onto the NUGGET, disconnect the power, and call your dealer.
Make sure the unit is well ventilated, and away from direct sunlight. To avoid damage to internal circuitry,
as well as the external finish, keep the NUGGET away from sources of direct heat (stoves, radiators,
etc.).
Avoid using aerosol insecticides, etc. near the NUGGET. They may damage the surface, and may ignite.
Do not use denatured alcohol, thinner or similar chemicals to clean the NUGGET. They will damage the
finish.
Modification of this equipment is dangerous, and can result in the functions of the NUGGET being
impaired. Never attempt to modify the equipment in any way.
In order to ensure optimum performance of your NUGGET, select the setup location carefully, and make
sure the equipment is used properly. Avoid setting up the NUGGET in the following locations:
1. In a humid or dusty environment
2. In a room with poor ventilation
3. On a surface which is not horizontal
4. Inside a vehicle such as a car, where it will be subject to vibration
5. In an extremely hot or cold environment
NUG.OM.000105.DRM
07 / 2007
Page 7
Version 2.5
Doremi Labs, Inc.
WARNING!!
To prevent fire or shock hazard, do not expose this appliance to rain or moisture
CAUTION
RISK OF ELECTRIC SHOCK
DO NOT OPEN
CAUTION:
!
TO REDUCE THE RISK OF ELECTRIC SHOCK,
DO NOT REMOVE COVER (OR BACK).
NO USER-SERVICEABLE PARTS INSIDE.
REFER SERVICING TO QUALIFIED SERVICE PERSONNEL.
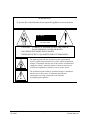
The lightning flash with the arrowhead symbol superimposed
across a graphical representation of a person, within an equilateral
triangle, is intended to alert the user to the presence of uninsulated
“dangerous voltage” within the product’s enclosure; that may be
of sufficient magnitude to constitute a risk of electric shock.
!
NUG.OM.000105.DRM
07 / 2007
The exclamation point within an equilateral triangle is intended to
alert the user to the presence of important operating and
maintenance (servicing) instructions in the literature
accompanying the appliance.
Page 8
Version 2.5
Doremi Labs, Inc.
CE NOTICE
Marking by the symbol indicates compliance of the device to the EMC (Electromagnetic
Compatibility) directive and to the Low Voltage directive of the European Community. Such
marking is indicative that this device meets or exceeds the following technical standard:
•
EN 55022 "Limits and Methods of Measurement of Radio Interface Characteristics of
Information Technology Equipment."
A "Declaration of Conformity" in accordance with the above standard has been made and is
on file at Doremi Labs, Europe, Valbonne, France.
NUG.OM.000105.DRM
07 / 2007
Page 9
Version 2.5
Doremi Labs, Inc.
1 INTRODUCTION
Thank you for your Nugget player purchase. Nugget is a high quality HD and SD MPEG2 video player
that decodes MPEG2 files up to 80Mbits/sec. Nugget decodes both MPEG2 4:2:2 and 4:2:0 files.
Using the Doremi Asset Manager application, you can transfer, MPEG2 stream files, QuickTime, AVI,
WMV and MXF files to the Nugget.
The Pro version of the Nugget adds HD-SDI, SD-SDI, Genlock and LTC IN/OUT. Genlock can be used to
synchronize several units to play at the same speed. LTC IN /OUT can be used to chase several units to
keep them in frame accurate sync. HD-SDI and SD-SDI can be used to connect to professional monitors
or to high definition recorders.
NUG.OM.000105.DRM
07 / 2007
Page 10
Version 2.5
Doremi Labs, Inc.
2 Nugget Models
Nugget players come in 5 different models: Nugget, Nugget-Pro, Nugget-ProSD, Nugget-2u and Nugget2uPro.
Nugget: MPEG2 player 422/420 up to 80 Mbits/sec with DVI-I video
Nugget-Pro: Same as Nugget plus, HD-SDI out, Sync in and LTC in/out.
Nugget-ProSD: Same as Nugget-Pro but can only load SD files. Can be upgraded to Nugget-Pro.
Nugget-2u: Same as Nugget but 2RU high with a removable drive
Nugget-2uPro: Same as Nugget-Pro but 2RU high with a removable drive
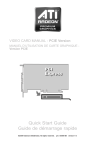
2.1 Nugget Front Panel
PWR: Lights when the unit is on
HDD: Indicates hard drive access
LAN: Indicates network access via Ethernet
2.2 Nugget Rear Panel
Ethe
rnet
2.3 Nugget Pro Rear Panel
Ethe
rnet
•
The audio breakout cable is manufactured by Hosa part number DTM-803, it will provide 3
pairs of AES/EBU on XLRs 1,2,3 and 3 pairs of unbalanced analog channels for monitoring
purpose on XLRs 5,6,7 (two unbalanced analog audio channels per XLR. Pin1=GND,
pin2=left, pin3=right).
•
The RS422 port can be used to control the Nugget players using the Odetics protocol.
•
Ethernet (100BT) is used for file transfer, firmware update and control.
NUG.OM.000105.DRM
07 / 2007
Page 11
Version 2.5
Doremi Labs, Inc.
3 Controlling the Nugget
3.1 Doremi Asset Manager
The Nugget player ships with a Software program designed by Doremi to take full advantage of the
Nugget features by providing file transfer, settings modification and control capabilities. Please refer to
Doremi Asset Manager (DoremiAM) for further information.
3.2 Nugget IP Address
All Nugget players ship with the default IP address: 192.168.100.191. You can use DoremiAM to change
the IP address of the Nugget. If you have changed the IP address of the Nugget and don’t remember it,
you can use DoremiAM with the RS232 to RS422 cable provided with your unit to get or change the IP
address using the computer’s serial port.
3.3 File Transfer
Media files can be transferred to the Nugget using DoremiAM.
3.4 Playlists
DoremiAM provides full playlist management.
3.5 Auto Start
Using DoremiAM you can set the Nugget to automatically play a specific file or playlist after boot. You can
also set the Loop mode ON or OFF to keep the playback going in a loop.
3.6 Timecode offset
Using Device Settings you can set the Nugget to either A-Time or Timecode.
•
•
A-Time: The first frame of video will start at timecode 00:00:00:00 unless you define a TC offset in
the Info tab. This type of offset is created on the Nugget clip and is only active in A-Time mode.
Timecode: The first frame of video will start at the Timecode offset value shown under “Database
information > Timecode tab”. If the source file supports timecode (all mpeg2 streams), the
Timecode offset value will be automatically calculated during the import process, otherwise it will
be set to 00:00:00:00. In that case, you can create a timecode offset by changing its value in the
Database information window. This type of offset is created on the Database and is active in
Timecode mode. Use Timecode offset when you send one clip to multiple Nugget devices to
avoid creating an A-Time offset on each unit.
NUG.OM.000105.DRM
07 / 2007
Page 12
Version 2.5
Doremi Labs, Inc.
3.7 Emulation
A controlling device will always try to identify the controlled device by sending a Device ID command.
Settings the emulation mode to Doremi, DVW500 or BVW75 will cause the Nugget to respond with a
Doremi, DVW500 or BVW75 device ID. Default is Doremi.
NUG.OM.000105.DRM
07 / 2007
Page 13
Version 2.5
Doremi Labs, Inc.
4 Transfering files to the Nugget
To transfer media files to the Nugget, use Doremi Asset Manager. A brief description of DoremiAM will be
provided in this manual, for more details, please refer to the Doremi Asset Manager manual.
4.1 DoremiAM Installation
Install the application by double clicking on the DoremiAssetManager-x.x.x_y.y.y-y_z.exe icon. Where:
x.x.x = DoremiAM version number
y.y.y-y = Nugget Firmware number
z = NUG-SDI Firmware number
PS: SOME COMPUTERS REQUIRE A REBOOT AFTER THE INSTALLATION IS COMPLETE. IF YOU
HAVE PROBLEMS TRANSFERRING FILES TO THE NUGGET USING DOREMI ASSET MANAGER,
YOU MUST REBOOT THE SYSTEM AFTER THE INSTALLATION IS COMPLETE.
4.2 Description
DoremiAM runs as a service indicated by a green circle icon in the right section of the toolbar. The icon
will be red if any failure occurs.
4.3 Running DoremiAM for the First Time
When you run DoremiAM for the first time, it will prompt you to define a database location. The database
(DB) folder created inside the folder you specify will hold copies of all files you transfer to the Nugget
using DoremiAM. The database location can be on the internal drive, USB or Fire Wire drive or on a NAS
connected to the PC running DoremiAM.
4.4 Adding Nugget Units to DoremiAM
If DoremiAM is minimized, double click on its icon to bring it up. Under the Devices tab, select the Default
Group or create a new Group then click on New Device.
Type the Name, as you want it to appear, and type the IP address of the Nugget you want to add. You
can organize the units by groups if needed.
Add all Nugget units in your facility.
4.5 Transferring Files to Nugget Units
•
•
•
•
Using Windows Explorer select all the files you want to transfer and Right Click on one of them
Scroll down to Send To and select “Doremi devices”
Select all Nugget units to send the files to. You can Shift Select or Ctrl Select multiple Nugget
units.
Click Finish to start the transfer
If you bring the DoremiAM window up and click on the Tasks tab, you can see the progress of the file
transfer.
All media files will be added to the Database before they get transferred to the Nugget units. The Clip
database tab will show you all files in the database.
NUG.OM.000105.DRM
07 / 2007
Page 14
Version 2.5
Doremi Labs, Inc.
4.6 Supported Video Formats
DoremiAm supports most common video formats:
MPEG2 Streams
-Transport Streams
-Program Streams
-Elementary Streams
QuickTime
-Blackmagic uncompressed 8bit and 10bit
-Component YUV uncompressed
-Photo JPEG. MJPEG-A, MJPEG-B
-H264
-MPEG
-Avid DNxHD codec
WMV (Windows Media)
- All WMV files are accepted except files with WMAPro (WMAV3) audio codec which requires a special
lisence.
AVI
-DIVX
-XVID
-MPEG2
-DVCPro25
-Matrox MPEG2
MXF format
-DV
-MPEG2
Image Sequences
-TIFF
-TARGA
-JPEG
NUG.OM.000105.DRM
07 / 2007
Page 15
Version 2.5
Doremi Labs, Inc.
5 Synchronizing Multiple Nugget Units
Multi-screen applications, like 3D and Stereoscopic, require continuous, frame accurate lock that can be
easily achieved on the Nugget players.
Synchronizing two or more units require two major features: Constant Play Latency and Synchronized
Playback.
5.1 Constant Play Latency
The Play (Stop) Latency is the number of frames that will pass from the time a server gets a PLAY (Stop)
command until it actually starts playing back (stops). You can send a PLAY command to two servers at
the same exact time, but if the Play Latency of the servers is not the same, each will start on a different
frame and the playback will not be synchronous. The Nugget players have a Play Latency that can be
defined using DoremiAM Device Settings, default value is 5.
5.2 Synchronized Playback
If two servers start playback in sync, but each is playing back with its own internal clock, after a certain
time they will drift apart and the frame accurate lock will be lost. The Nugget Pro players can synchronize
their playback to two different external sources: Sync IN and LTC IN
5.2.1 Locking to Sync IN
For 25, 29.97 and 59.94 FPS formats, bi-level video sync can be fed using a low cost sync generator.
For 23.98, 24 and 60 FPS formats, tri-level video sync can be fed. Because tri-level sync generators are
expensive, we came up with a very cost effective and innovative way to synchronize multiple Nugget Pro
players using the LTC input.
5.2.2 Locking to LTC IN
This is the easiest way to achieve synchronized playback without the need for an external sync generator.
You must designate one of the Nugget Pro players as the Master and set its Sync Source to Internal. All
other Nugget Pro players will be designated as Slave and their Sync Source must be set to LTC IN.
The LTC OUT of the Master should be fed to the LTC IN of all Slave players. For one Slave, use a
standard video BNC to BNC cable. For multiple Slave players, use a standard audio or video distribution
amplifier, feed it from the LTC OUT of the master and distribute it to the LTC IN of all Slave players.
Locking to LTC requires NUG-SDI version 60 or higher.
5.3 Synchronized Start
There are many ways to start a multi-screen system based on multiple units, two will be discussed in this
manual: Gang Start and Chase
NUG.OM.000105.DRM
07 / 2007
Page 16
Version 2.5
Doremi Labs, Inc.
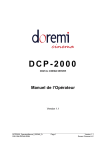
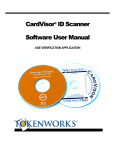
5.3.1 Gang Start
Gang start requires a controlling device connected to all Nugget players and capable of sending
commands, like load the proper files, locate to the beginning timecode and send the Play command. The
Doremi RCV2-9P can be used as a Gang controller for a 2-screen operation.
If you don’t have a controller with Gang capability like the RCV2, you can make a special cable that
gangs the send lines and receives only from one Nugget. This will allow you to use a single machine
controller to send the same exact commands to two players.
Ribbon Cable
DB9 FEMALE Face Up
DB9 MALE Face Up
PIN-1
DB9 MALE Face Up
1
1
6
1
6
6
2
2
7
2
Cut here
7
Cut here
7
3
3
8
3
8
8
4
4
9
5
Connect to Controlling Device
Using Standard pin to pin, male
to male P2 cable
4
9
9
5
5
Connect directly to Controlled
Device number 1
Connect directly to Controlled
Device number 2
Sony 9pin Gang Cable
Our Vsynchronizer application can be used to Gang start multiple units.
Batch files can also be created using our Sertest command prompt application to achieve Gang start.
5.3.2 Chase
A player in Chase mode can read the incoming timecode and start synchronized playback without the
need for an external controller. Chase mode requires a Master Slave relationship just like the Sync to
LTC described above. The current version of firmware supports Chase.
5.4 Synchronizing Nugget Units using Chase
To synchronize 2 Nugget Units:
•
•
•
•
•
•
•
Designate one unit as Master and the other as Slave.
Connect the LTC Out from the Master to the LTC IN of the Slave
Set the SYNC SRC on the Master to Internal
Set the CHASE MODE on the Master to OFF
Set the SYNC SRC on the Slave to LTC IN
Set the CHASE MODE on the Slave to ON
Set the Chase mode DRIFT to 0 except for 720p formats where the DRIFT must be set to at least
2.
If you control the Master unit and start playing, the Slave will follow based on the LTC connection
between Master and Slave.
NUG.OM.000105.DRM
07 / 2007
Page 17
Version 2.5
Doremi Labs, Inc.
5.5 Synchronizing Nugget Units Automatically
If you want to setup the Nugget units to start synchronous playback at power up:
•
•
•
•
•
•
•
•
•
•
Designate one unit as Master and the other as Slave
Connect the LTC Out from the Master to the LTC IN of the Slave
Set the SYNC SRC on the Master to Internal
Set the SYNC SRC on the Slave to LTC IN
Set the CHASE MODE on the Slave to ON (CHASE MODE on the Master MUST stay OFF)
Set the LOOP MODE on the Master to ON
Set the LOOP MODE on the Slave to ON
Set the AUTO START on the Master to File, select the filename and set auto start to Play
Set the AUTO start on the Slave to File, select the filename and set auto start to Pause
Save Defaults on both Master and Slave.
If you reboot both units, the Master will load the designated file automatically and starts playback. The
Slave will also load the designated file automatically and because Chase is ON on the Slave, it will start
reading LTC from the Master and follow. Since LOOP MODE is ON, both Master and Slave will keep on
looping for continuous playback.
5.6 Synchronizing more than 2 Nugget Units
If you have more than 2 Nugget units to synchronize:
• Designate one unit as Master and the rest as Slaves
• Connect the LTC OUT of the Master to an analog video distribution amplifier (an analog audio DA
is more suitable, but a video DA is easier to connect because it has BNC connectors)
• Follow the same synchronization instructions in the previous 2 paragraphs.
PS: We strongly recommend using a DA to distribute the LTC from the Master to multiple slave units as
opposed to daisy chaining LTC between units, but if a DA is not available, daisy chaining will be
acceptable.
5.7 LTC IN Latency
If you want the Nugget to chase 1 or 2 frames ahead of the incoming LTC, you can set the LTC IN
Latency to 1 or 2. Values up to 5 are allowed, default value is 0.
NUG.OM.000105.DRM
07 / 2007
Page 18
Version 2.5
Doremi Labs, Inc.
6 Video Outputs
There are 5 different video outputs on the Nugget, they are mapped as follows:
Output
HD-SDI
DVI-D
DVI-A
SD-SDI
Composite
Signal Type
Digital
Digital
Analog
Digital
Analog
Connector Type
BNC
DVI-I
DVI-I
BNC
BNC
Video Out or Aux Out
Video
Video
Video
Aux
Aux
6.1 DVI-I Connector
The DVI-I connector carries 2 signals, analog and digital. The resolution and frame rate of the DVI signal
follows the Video Out settings and can be: 1080i, 1080p, 1080psf or 720p.
•
To connect to an analog YPbPr or RGB display device, use a DVI-I to VGA or DVI-I to BNC
cable.
•
To connect to a DVI digital display device, use a DVI-D-to-DVI-D cable.
6.2 HD-SDI Connector
The resolution and frame rate of the HD-SDI signal follows the Video Out settings and can be 1080i,
1080p, 1080psf or 720p. It also carries up to 6 channels of embedded audio.
6.3 SD-SDI Connector
The resolution and frame rate of the SD-SDI signal follows the Aux Out settings and can be 480i (NTSC)
or 576i (PAL). It also carries up to 6 channels of embedded audio.
6.4 Composite Connector
The resolution and frame rate of the Composite signal follows the Aux Out settings and can be NTSC or
PAL.
6.5 Color Space Setting
The color space of the Aux Display is always YUV.
The color space of the Main Display can be set to RGB or YPbPr using DoremiAM Device Settings.
•
For use with HD-SDI or analog YPbPr display devices, you must set the color space to YPbPr
•
For use with DVI-D or analog RGB display devices, you must set the color space to RGB.
If you look at the HD-SDI output while the color space is set to RGB, the colors will not look correct.
If you look at the DVI-D output while the color space is set to YPbPr, the colors will not look correct.
NUG.OM.000105.DRM
07 / 2007
Page 19
Version 2.5
Doremi Labs, Inc.
7 Nugget Video Settings
The Nugget has two video settings, Video Out and Aux Out.
•
The Video Out settings controls the signals on the DVI-A, DVI-D and HD-SDI connectors
•
The Aux Out settings control the signals on the Composite and SD-SDI connectors.
7.1 Best Setup for 1080i, 720p and SD Formats
If you work in 1080i, 720p or SD formats at 29.97 (59.94) or 25 (50) frames per second, both Video Out
and Aux Out can be active at the same time. Using DoremiAM Device Settings set:
•
•
Video Out: Format=Auto and Aspect Ratio=None
Aux Out: Anamorphic
7.2 Best Setup for 1080p Formats
For 1080p formats including 23PSF and 24PSF, the Aux output must be disabled for proper playback.
Using DoremiAM Device Settings set:
•
•
Video Out: Format=Auto and Aspect Ratio=None
Aux Out: OFF
7.3 Video Out Auto Mode
When the Video Out is set to Auto, the output format will be the same as the file format. This eliminates
any scaling from the output and yields the best quality picture.
7.4 Recommended Settings
Output Settings depend on the how you are using the Nugget player and the display device connected to
it.
•
•
•
If you want to run playlists and have seamless transitions, all files should have the same format
and must be encoded in I-Only. Set the Video Out to Auto or force it to the same format the files
were encoded with. If the format is 108i or 720p, you can set the Aux Out ON.
If you want to run playlists but don’t care about seamless transitions, files can have different
formats, and the output can be set to Auto or be forced. If you want to avoid monitor flickers
caused by format changes, force the output and don’t set it to Auto. If you want to avoid bad
frames displayed during transitions, have some black at the start and end of every clip.
If you are connected to a monitor that does not support the file format you are using, you must
force the output. For example if the file is encoded in 24p and your HD-SDI monitor does not
support 24p, but support 24pSF, you must force the output to 1080i-47.95 and disable the Aux
Out.
For best HD performance we recommend:
•
•
Video Out: Format=Auto, Aspect=None
Aux Out: OFF.
NUG.OM.000105.DRM
07 / 2007
Page 20
Version 2.5
Doremi Labs, Inc.
8 Video Outputs Genlock
All video outputs of the Nugget can be locked to external sync. If your Main video output is 1080i-59.94
and your Aux output is Anamorphic, the HD-SDI, SD-SDI and Composite outputs can all be locked to the
same bi-level or tri-level sync source.
To genlock on the pixel and line of the sync signal, you can change the H and V values. For some
formats, the Nugget might not be able to line and pixel lock on all three outputs, for that reason we have
an extra setting called Lock HD/SD.
•
When Lock is set to HD, VTRIG is adjusted internally so when VT is set to 0, the HD-SDI is line
locked to the sync source, The SD-SDI and composite output will still be locked to the sync
source, but for some formats, they will not be line locked.
•
When Lock is set to SD, VTRIG is adjusted internally so when VT is set to 0, the SD-SDI is line
locked to the sync source, The HD-SDI and composite output will still be locked to the sync
source, but for some formats, they will not be line locked
To line lock the composite output, it’s best to set the Lock to SD, and then change the VT until the
composite output is line locked to the sync source.
The HZ value can be changed for pixel lock.
9 NTSC Closed Caption
The Nugget supports closed caption on extended NTSC video files encoded as 512x720. When such file
is loaded, you can adjust the VBI using DoremiAM to move the video so the closed caption data in the file
will align with video line 21. For files that are properly encoded the closed caption will be aligned with
video line 21 when VBI is set to +3, which is the default value. If your file is not properly aligned, you can
change the VBI value until the closed caption data aligns with video line 21.
NUG.OM.000105.DRM
07 / 2007
Page 21
Version 2.5
Doremi Labs, Inc.
10 Logo Overlay and Burn In Window (BIW)
The Nugget can display a small logo overlay on the HD-SDI output.
10.1 Logo Design
Logo files should be designed as PNG without compression with the following restrictions:
64x64 with 15 colors + transparency or 128x64 with 3 colors + transparency. Gimp is a free software
utility that can be used to generate the PNG file.
10.2 Logo File Transfer
Use DoremiAM’s Logo Manager to send the PNG logo file from your PC to the Nugget.
10.3 Burn In Window
The Nugget can display a burn in window on both HD-SDI and SD-SDI outputs. DoremiAM provides
separate controls for BIW on both outputs.
HD-SDI Options are:
•
BIW: OFF, White on Black, Black on White, White on background, Black on background
•
Mode: Normal or Enhanced. Normal shows the timecode only, while enhanced shows timecode,
video format and servo lock status
•
Position: Top Left, Top Center, Top Right, Bottom Left, Bottom Center and Bottom Right.
•
Size: Auto, Small and Large. Auto will change the size to small or large based on the format
specified.
SD-SDI Options are:
•
BIW: OFF, White on Black, Black on White, White on background, Black on background
•
Mode: Normal or Enhanced. Normal shows the timecode only, while enhanced shows timecode,
video format and servo lock status.
NUG.OM.000105.DRM
07 / 2007
Page 22
Version 2.5
Doremi Labs, Inc.
11 Firmware Upgrade Instructions
The Nugget has two firmware packages: Nugget Firmware and NUG-SDI firmware. The later one is only
needed for Nugget Players with the SDI option.
Doremi Asset Manager is packaged with the adequate Nugget firmware packages. Please refer to the
DoremiAM manual for upgrade instructions.
NUG.OM.000105.DRM
07 / 2007
Page 23
Version 2.5
Doremi Labs, Inc.
12 Nugget MPEG2 File Structure
A Clip ID that is 8 characters long represents each file. In addition to Clip ID, DoremiAM shows a Title
field that has a longer name (usually the original file name unless changed by the user during import).
When browsing from an Odetics controller like the RCV2, ListMaker, or a third party controller or
automation software, only the Clip ID is visible.
Each clip ID has 7 different files placed automatically by DoremiAM in the video data directory:
Filename.aif:
Filename.aif.idx:
Filename.aif.nfo:
Filename.m2v:
Filename.m2v.idx:
Filename.m2v.nfo:
Filename.nug:
Audio elementary stream file
Audio index file
Audio information file
Video elementary stream
Video index file
Video information file
A/V information file
These files are transparent to the user.
13 Video Duration Limitations
The Nugget Player has some minor limitations:
•
To use a file in loop mode or in a playlist, the file duration must be at least 31 frames.
•
Any clip in a playlist must also be at least 31 frames long to keep the playlist going, shorter clips
will cause the playlist to stop.
If you set Loop Mode ON during the last 60 frames of playback, the unit will not loop mode until you cue
up to start and hit play again.
NUG.OM.000105.DRM
07 / 2007
Page 24
Version 2.5
Doremi Labs, Inc.
14 Control Protocol
The Nugget can be controlled using the RS422 port or using TCP/IP.
The Nugget uses the standard P2 protocol or otherwise known as the Sony 9-pin protocol for non-file
related functions and it uses the Odetics protocol to load and browse files.
Developers can send an email to [email protected] to get a complete Nugget Control Protocol
document.
14.1 Controlling the Nugget using the Serial Port
To control the nugget using the serial port, you need to have the proper RS422 cable.
•
If you are using a controller with an RS422 serial port, use the standard RS422 cable.
•
If you are using a PC with an RS232 port, use the RS422-PC cable included with the Nugget
•
If you are using a Mac with a mini-DIN8 RS422 cable, use the RS422-MAC.
•
All these cables are described in the following paragraphs.
NUG.OM.000105.DRM
07 / 2007
Page 25
Version 2.5
Doremi Labs, Inc.
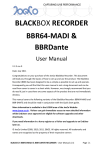
14.1.1
Wiring of the Standard RS422 Cable
CONTROLLING DEVICE
(RCV2-9P)
DB9-M
Front View
1
2
6
3
7
8
1
NUG.OM.000105.DRM
07 / 2007
4
RXA
2
TXB
3
CONTROLLE DEVICE
(Nugget)
DB9-M
Front View
1
5
9
2
6
Frame GND
3
7
4
8
5
9
1
2
TXA
Receive B
3
RXB
4
GND
4
5
SPARE
5
6
GND
6
RXB
7
Transmit B
7
TXB
TXA
8
Receive A
8
RXA
9
Frame GND
9
Page 26
Version 2.5
Doremi Labs, Inc.
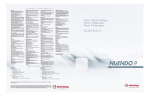
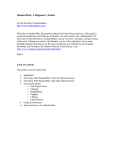
14.1.2
Wiring of the NUGGET RS422-PC Cable
CONTROLLING DEVICE
(PC/RS232)
DB9-F
Front View
5
4
9
3
8
1
2
7
CONTROLLED DEVICE
(Nugget)
DB9-M
Front View
1
6
6
3
7
4
8
5
9
CD
1
1
Frame GND
RXD
2
2
TXA
TXD
3
3
RXB
DTR
4
4
RX_GND
GND
5
5
SPARE
DSR
6
6
TX_GND
RTS
7
7
TXB
CTS
8
8
RXA
RI
9
9
Frame GND
Shell
Wiring List:
2
Shell
Nugget (1) to Nugget Shell to PC Shell
Nugget (2) to PC (2)
Nugget (8) to PC (3)
Nugget (3 + 4 + 6) to PC (5)
Note: For a true RS422 connection, you can use an adapter made by KK Systems (Part Number K42299). This adapter connects to the RS232 port on the PC and provides an RS422 connection on the
other side. To connect the K422-99 to the NUGGET, use a standard RS422 cable (See wiring of
the standard RS422 cable). A true RS422 connection allows for a better connection and longer
cables.
NUG.OM.000105.DRM
07 / 2007
Page 27
Version 2.5
Doremi Labs, Inc.
14.1.3
Wiring of the Nugget RS422-Mac Cable
CONTROLLING DEVICE
Mac DIN8-M
Front View
6
7
CONTROLLED DEVICE
(Nugget) DB9-M
Front View
8
1
3
4
5
1
2
6
3
7
4
8
5
9
2
1
RXA
5
TXB
6
4
Frame GND
1
2
TXA
Receive B
3
RXB
GND
4
5
5
4
GND
6
RXB
8
Transmit B
7
TXB
TXA
3
Receive A
8
RXA
9
NUG.OM.000105.DRM
07 / 2007
Page 28
Version 2.5
Doremi Labs, Inc.
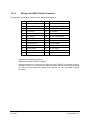
14.1.4
Wiring of the DB-25 Audio Connector
The Nugget-Pro has a DB-25 audio connector with the following pinout:
Pin#
Signal Description
Pin#
Signal Description
1
No Connection
14
No Connection
2
No Connection
15
Ch 5 analog
3
Ch 6 analog
16
Ch 5 & 6 analog GND
4
Ch 3 analog
17
Ch 4 analog
5
Ch 3 & 4 analog GND
18
Ch 1 analog
6
Ch 2 analog
19
Ch 1 & 2 analog GND
7
IEC-958 plus
20
IEC-958 minus
8
IEC-958 GND
21
Ch 5 & 6 plus
9
Ch 5 & 6 minus
22
Ch 5 & 6 GND
10
Ch 3 & 4 plus
23
Ch 3 & 4 minus
11
Ch 3 & 4 GND
24
Ch 1 & 2 plus
12
Ch 1 & 2 minus
25
Ch 1 & 2 GND
13
No Connection
•
Analog audio is unbalanced (300mV).
•
Digital audio is balanced (XLR compatible)
•
The audio breakout cable is manufactured by Hosa part number DTM-803, it will provide 3 pairs of
AES/EBU on XLRs 1,2,3 and 3 pairs of unbalanced analog channels for monitoring purposes
on XLRs 5,6,7 (two unbalanced analog audio channels per XLR. Pin1=GND, pin2=left,
pin3=right).
NUG.OM.000105.DRM
07 / 2007
Page 29
Version 2.5
Doremi Labs, Inc.
15 Specifications
15.1 Interface
RS-422 Serial: Differential 0 to +5 Volts
RS232 Serial: 2U versions only used for Debug purposes using a Null Modem Cable –8V to +8V.
Ethernet: Gigabit (older units were shipped with 100BT)
15.2 Audio
Analog: 6 unbalanced –10dB (DB-25)
Digital: 3 pairs of AES/EBU (DB-25)
Digital: IEC-958: AC3 encoded output on BNC
Digital: Embedded on SD-SDI and HD-SDI BNC connectors
15.3 Video
Analog: Composite output on BNC
Analog: YPbPr or RGB on DVI-I connector
Analog Sync: Bi-Level or Tri Level Sync on BNC
Digital: DVI Digital on DVI-I connector
Digital: SD-SDI on BNC connector
Digital: HD-SDI on BNC connector
15.4 TimeCode
Analog: LTC IN, accepts signals from 1Vpp to 2Vpp centered at 0V. Signals below 1Vpp will not be read
properly.
Analog: LTC OUT, 1Vpp
Digital: Embedded on HD-SDI BNC connector.
NUG.OM.000105.DRM
07 / 2007
Page 30
Version 2.5
Doremi Labs, Inc.