1
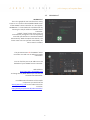
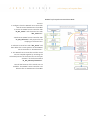
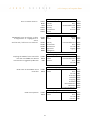
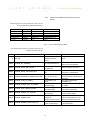
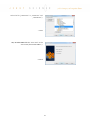
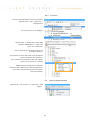
XENAX® Powerlink PLCopen Library Version 1.2 June 2015 XENAX® Ethernet Servo Controller with POWERLINK® fieldbus module Functional safety, TÜV certified Force processes for “Force Control“ General This manual describes the integration of the XENAX® Xvi75V8 Servo Controller into a B&R PLC with the Automation Studio. Therefore the Jenny Science PLCopen library “JsMcLib” based on the CANopen Motion Profile DS402 will be used. This documantation includes examples with configurations, program integration and testing. Contents 1 Development environment 1.1 Controller, Tools, Libraries 1.2 WebMotion® 1.3 XENAX® Servo Controller 1.3.1 1.3.2 1.4 1.5 1.6 1.7 2 4 4 5 6 Socket XENAX® State LEDs on the Powerlink fieldbus module. Powerlink connection from B&R PLC to XENAX® Industrial Hub for more than 4 XENAX® Firmware Update LINAX®, ELAX® Linear Motor Axis Automation Studio 2.1 New Project 2.2 Import of the JsMcLib library 2.2.1 3 JsMcLib User Help 13 Configuration XENAX® based on the xdd description View I/O Mapping JsMcLib 3.1 State Diagram of the Function Blocks 3.1.1 3.1.2 13 14 16 17 18 18 Profile Position Mode Cyclic Synchronized Mode 19 19 3.2 JsMcLib Operation Mode 3.3 Function blocks of the JsMcLib 3.3.1 3.3.1 7 7 7 8 9 9 12 2.3 Embed XENAX® CANopen object file (.XDD) 2.4 Embed XEANAX® Servo Controller in project 2.4.1 2.4.2 6 6 20 23 Minimum and Maximum Values of Function Blocks Error in the Function Block 27 27 4 Point to Point or Interpolated Position Mode 4.1 Hardware Setup 4.2 Hardware Setup 4.3 Embedding XENAX® Error Messages 30 30 31 32 5 Program example “Profile Position Mode“ 5.1 Get program example and save it 5.2 Import program example to the project 5.3 Configure Ethernet interface 5.4 Move Program example into Task 5.5 I/O Mapping, connect .xdd channels to program variables 5.6 Start Program Example 34 34 35 36 37 38 39 6 Program example Cyclic Synchronous Position Mode 6.1 Integrate second XENAX® Servo Controller in project. 6.2 Include virtual Axis 40 40 41 2 6.3 Insert interface for virtual axis 6.3.1 6.3.2 6.3.3 6.4 6.5 6.6 6.7 6.8 44 Insert the NC-Mapping Table Parameter-Adjustments Cycle time 45 46 48 Insert Program Example Configure Ethernet Interface Move Program Example to Task with Desired Cycle Time I/O Mapping, connect the .xdd Channels with the program variables. Start Program Example 3 48 49 50 51 52 1 1.1 Automation Studio Software for the configuration of the B&R PLC with project handling. Software for configuration and programming of the B&R PLC, including project management. This manual is based on Automation Studio V4 Electronic data sheet XDD-file (XML Device Description) is a standard XML-format according to ISO 15745-4. This file includes communication parameter and objects of the XENAX® Servo Controller. These are necessary for the integration into Automation Studo V4. JsMcLib (Jenny Science Motion Control Library) This PLCopen library is based on the motion profile DS 402 including the corresponding “state-machine”. Using the Jenny Science library will simplify the “motion”-programming. B&R PLC with Powerlink For example the X20-System, controls the cyclic data communication and defines the clock pulse for the “cyclic synchronous position mode” which is used for axis interpolation. 4 Development environment Controller, Tools, Libraries 1.2 WebMotion® This is the graphical user interface from Jenny Science. It is stored in the embedded Web server of the XENAX® Servo Controller as a Java applet. WebMotion ® is launched with a web browser by entering the TCP/IP address of XENAX® Servo Controller. LINAX® / ELAX® linear motor axes are automatically recognized. The corresponding controller parameters are saved and loaded automatically. With the Quick Start button, the linear motor axis can operate immediately. No user manual is needed. . The parametrization of the XENAX® Servo Controller is made over an Ethernet TCP/IP connection. You can find the pre-set IP-address on the backside of your XENAX® Servo Controller. Web address: http://192.168.2.1xx/XENAX.html To change the IP/ Web address you can use the Lantronix DeviceInstaller. For additional information of the TCP/IP connection you could use the “Xvi75_Manual_E.pdf“or the video Tutorial on YouTube. http://www.jennyscience.de/video-tutorials/. 5 WebMotion® 1.3 XENAX® Servo Controller XENAX® Ethernet Servo Controller With additional POWERLINK fieldbus module. To use the JsMcLib v2.10.1 or higher the XENAX® Servo Controller firmware v3.64D or higher and the POWERLINK fieldbus module firmware v2.0 or higher are required. 1.3.1 RS232 Powerlink Busmodul Status LEDs Socket XENAX® Pin1 MOTOR TCP/IP 1.3.2 Pin3, 4 Pin1, 2 Power Logik ENC HALL OPTIO PLC START-UP / Master-Slave State LEDs on the Powerlink fieldbus module. These are the states of the LED on the Powerlink fieldbus module. LED state RUN (STAT) ERR ST1 Status 1 <OFF> <ON> In init process or no power Operational state Bus module no error State bus off <Blink> Pre-Operational state ST2 Status 2 Bus module l ready No application in the flash Protocol download in progress 6 1.4 Powerlink connection from B&R PLC to XENAX® IN Typically the Powerlink fieldbus is controlled with a linear structure from device to device. Shielded RJ45 cables go from the IN to the OUT to connect the devices with each other. RJ45 Kabel OUT 1.5 Industrial Hub for more than 4 XENAX® 1.6 Firmware Update A maximum of 4 XENAX® Servo Controllers can be connected in a row. If there are more than 4 Servo Controller used, an industrial hub from B&R will be necessary. Each contact can be used for 4 Servo Controller. For example: With the HUB Nr. 0AC808.9-1 from B&R. A maximum of 7*4 = 28 controllers could be connected. The firmware can easily be updated with the according tutorial video “Ethernet TCP/IP Connection to XENAX” under www.jennyscience.de/en/ -> Video Tutorials. 7 1.7 LINAX® Linear Motor-Axis Are available in different lengths and types. The LINAX® linear motor axes are highly modular and can be combined flexibly amongst each other. The XENAX® Servo Controller identifies the connected LINAX® linear motor axis and configures the control parameters automatically. Each XENAX® Servo Controller can control one linear motor axis. ELAX® Linear Motor Slide The ELAX® Linear Motor Slide are predestined for fast, precise positioning tasks. It’s a Modular system with strokes of 30-150mm. The variable one-cable connection can be mounted on the back or sidewise. The XENAX® Servo Controller identifies the connected ELAX® and parametrizes automatically. 8 LINAX®, ELAX® Linear Motor Axis 2 2.1 In the following steps it will be shown how a new project can be opened. Start the Automation Studio from B&R. File -> New Projekt -> Enter your project name e.g. „JSC_Project_1“ The storage path will be shown and can be changed. Select Copy Automation Runtime support….. Use Automation Runtime Simulation. It is not necessary to run a simulation if the PLC is used as hardware. -> Next 9 Automation Studio New Project A Configuration name suggestion will be shown. Our Configuration name is: „Hardware_Config_1“ Define a new hardware configuration manually The basic hardware for the configuration can be assembled from the following pages of the wizard. This option has to be selected if Automation Studio is used for the first time and no B&R control is connected to the PC. Identify hardware configuration online The hardware configuration will be loaded automatically from the connected B&R control The hardware configuration is automatically visible in the configuration. Reference an existing hardware configuration The existing hardware configuration from another Automation Studio project or from another configuration in the same project can be used as a reference. -> Next We choose the B&R PLC X20CP1485-1 -> Finish 10 You can choose between three different views: Logical View, Physical View and Configuration View. After including the B&R control, each view has now basic settings. The Logical View represents the hardware independent view of the application. Use this view to list and manage data type declarations, variable declarations, packages, programs, libraries, data objects and documentation files. The Configuration View represents the hardware dependent application perspective. Use this view to display and manage the hardware configuration, software configuration files, declaration of permanent variables, I/O routings, Automation Runtime configuration, configuration NC, NC routings, VC keyboard mapping, configuration-specific data objects and documentation files. The Physical View provides the hardware point view of the active configuration. It displays the active configuration hardware modules in a directory tree. 11 2.2 In the Logical View right click on the folder Libraries, -> Add Object… Categories -> Library -> Existing Library -> Next In the following step you have to select the “JsMcLib” library. If there are several versions, you can select the latest version in the “Version” drop-down list on the left side. -> Next With “Yes, to active CPU” the “library” is added to the active “CPU”. By choosing “Yes, to all CPUs” the library is added to all CPU's, in the case of more than a configured CPU. By choosing “No, do nothing”, the “library” will not be assigned to any CPU. The assignment has to be done manually. -> Finish The inserted library is now visible in the Logical View -> Libraries.. 12 Import of the JsMcLib library 2.2.1 JsMcLib User Help The help for the function blocks of the JsMcLib library, can be opened by selecting the JsMcLib library and then press the “F1” button. 2.3 The XENAX® Servo Controller is operating according to the device profile for electric drives CANopen DS402. This device profile then goes on the Powerlink Ethernet fieldbus (CANopen over Powerlink). T The CANopen object list is included in the description file “Xenax_Powerlink.xdd” and will be integrated into the Automation Studio. Main menu -> Tools -> Import Fieldbus Device…. These objects are provided in readable form by the “Xenax_Powerlink.html” file on the delivered CD under XENAX® _Xvi_75V8 \ XENAX® _Xvi_Powerlink\ or on www.jennyscience.de/en/. 13 Embed XENAX® CANopen object file (.XDD) Choose the path of the .xdd-File -> Open. „… imported successfully“ will be shown on the „Output“ window 2.4 Include „Servo Controller XENAX Xvi“ from Toolbox into the project Physical View-> select the Power Link Interface -> right click -> System Designer. Toolbox-> Hardware Catalog select “Servo Controller XENAX Xvi” and doubleclick it to include to the System Designer. 14 Embed XEANAX® Servo Controller in project For the connection, the „Node Number” hast to be the same as the “Card Identifier” (CI) on the XENAX® Servo Controller. The CI number can easily be changed on the WebMotion® under “by command line” with the ASCII code e.g. “CI2” Read with “CI?” The Servo Controller XENAX® Xvi75V8 can now be seen in the Physical View under PLK(Powerlink). 15 2.4.1 Configuration XENAX® based on the xdd description Physical View/PLK/Servocontroller_XENAX_Xvi -> right click -> Configuration. 2.4.1.1 In the submenu “ Channels” all usable objects will be shown. Important: The Objects 1001h (Error bit register) and 1F8Ch (NMT_CurrNMTState,-> Network Managment status) are not mapable as PDO. This information should not unnecessarily burden the real-time cycle. Objects which are transferred cyclic, can be activated. Fort the JsMcLib library the following objects have to be transferred cyclic in order that the “Cyclic Synchronized Mode” can be used. Name of the Object ProcessStatusRegister_I2006 Controlword_I6040Out Statusword_I6041 PositionActualValue_I6064 TargetPosition_I607AOut Mode of transmission Read Write Read Read Write 16 Cyclic transmission If the „Profile Position Mode“ is used, the following object have to be transferred additionally. Name of the Object Mode of transmission S_CurveProfile_I2000Out Write ProfileVelocity_I6081Out Write ProfileAcceleration_I6083Out Write A detailed description of the Objects can be found in the document Xvi75V8_CANopen_Ethernet at page 17. The document can be found on our website: www.jennyscience.ch/downloads Note: If there are several XENAX® Servo Controller used, the object settings can easily be copied: 1. Select all object settings with „Ctrl“+ „A“. 2. Right click-> Copy 3. Open I/O Configuration of the second Servo Controller select all objects with „Ctrl“+ „A“. 4. Right click -> paste 2.4.2 The objects will be visible under the I/O Mapping (Physical View). In case the objects can’t be seen, please check the settings of the I/O Configuration. The I/O mapping should look like displayed on the right . 17 View I/O Mapping 3 3.1 The following diagram shows the state and the behaviour of the axis when multiple motion control function blocks are “simultaneously” active. Each motion command is a transition that changes the state of the axis and, as a consequence, influences the method of calculation of the current movement. All function blocks which do not appear in the state diagram, do not affect the state of the axis. The current state of the axis can be determined with the function block “JS_MC_ReadStatus”. If a function block is called where it is not allowed, the function block reports an error. The notes describe the necessary conditions that must be met for a change in an axis state. Important: In the states “Stopping”, “ErrorStop”, ”Disabled” and “Reference” no motion blocks can be called. In standstill condition, an axis must always be referenced before starting a movement. 18 JsMcLib State Diagram of the Function Blocks 3.1.1 Profile Position Mode 3.1.2 Cyclic Synchronized Mode In the Cyclic Synchronized mode the JS_MC_ReadStatus will be in „Standstill” after the reference. To know which motion-commands can be used, the “MC_ReadStatus” of the virtual Axis has to be executed. 19 Note 1: From any state. An error in the axis occurred. Note 2: From any state. JS_MC_Power.Enable = FALSE and there is no error in the axis. Note 3: JS_MC_Reset AND JS_MC_Power.Status = FALSE. Note 4: JS_MC_Reset AND JS_MC_Power.Status = TRUE AND JS_MC_Power.Enable = TRUE Note 5: JS_MC_Power.Enable = TRUE AND JS_MC_Power.Status = TRUE Note 6: JS_MC_Stop.Done = TRUE AND JS_MC_Stop.Execute = FALSE 3.2 To operate a XENAX® Servo Controller via Powerlink, we provide a library in the Automation Studio with the name JsMcLib (Jenny Science Motion Control Library). Below, you find an overview of the sequences for the two different coupling types, Profile Position Mode and Cyclic Synchronise Mode for which the JsMcLib is required as well as a description of the JsMcLib application. Profile Position Mode: The „Profile Position” Mode, is a point to point connection. The trajectory will be calculated by the XENAX® itself. The following parameters have to be set: Endposition Speed Acceleration S-Curve Cyclic Synchronous Position Mode: The „Cyclic Synchronous Position” Mode, is an interpolated drive. The trajectory is calculated by the B&R PLC. The only parameter is the position. For this Mode a virtual B&R axis will be necessary. 20 JsMcLib Operation Mode XENAX® Profile Position Mode Process: 1. Configure XENAX® Servo Controller with the Automation Studio 2. Power on with “JS_MC_Power”. 3. Reference XENAX® Servo Controller with “JS_MC_Reference”. 4. XENAX® Servo Controller is now ready to move e.g. an absolute way with the function block “JS_MC_MoveAbsolute”. 21 XENAX® Cyclic Synchronous Position Mode Process: 1. Configure from the XENAX® Servo Controller and the virtual ACOPOS axis from B&R. 2. Power on XENAX® Servo Controller with “JS_MC_Power” and the virtual axis with “MC_Power on”. 3. Reference XENAX® Servo Controller with “JS_MC_Reference” and prepare for the coupling to the virtual axis. 4. Reference virtual axis with “MC_Home” and then define the current position of the XENAX® Servo Controller as “HomePosition”. 5. The XENAX® Servo Controller and the virtual axis are coupled together by attaching the calculated position of the virtual axis to the input “Position” of the function block “JS_MC_MoveCyclicPosition”. Now all the features of the virtual axis are available. The XENAX® Servo Controller now behaves like an ACOPOS axis from B&R. 22 3.3 Function blocks of the JsMcLib The function blocks of the JsMcLib intend to simplify the use of XENAX® Servo Controllers in the Automation Studio. The function blocks of the JsMcLib are described below. Function blocks: JS_MC_Power Output stage power on/ off UDINT Axis BOOL Enable Status Valid Error ErrorID BOOL BOOL BOOL UINT Done Busy CommandAborted Error ErrorID BOOL BOOL BOOL BOOL UINT JS_MC_Stop Stops the active movement and changes to the “Stopping” state (The output stage turns off). UDINT Axis BOOL Execute UDINT Deceleration JS_MC_Halt Stops the active movement and changes to the “Standstill” state (The output stage remains active). UDINT Axis BOOL Execute UDINT Deceleration Done Busy CommandAborted Error ErrorID BOOL BOOL BOOL BOOL UINT JS_MC_Reset Deletes an error on the XENAX® Servo Controller. Drive to an absolute position. UDINT Axis BOOL Execute UDINT BOOL DINT UDINT UDINT UDINT 23 Done Busy Error ErrorID BOOL BOOL BOOL UINT JS_MC_MoveAbsolute Axis Done Execute Busy Position CommandAborted Velocity Error Acceleration ErrorID Scurve BOOL BOOL BOOL BOOL UINT Drive a relative distance. UDINT BOOL DINT UDINT UDINT UDINT JS_MC_MoveRelative Axis Done Execute Busy Distance CommandAborted Velocity Error Acceleration ErrorID Scurve BOOL BOOL BOOL BOOL UINT JS_MC_JogVelocity Driving with a pre-set velocity, as long as “JogPositive” or “JogNegative” is active And the end / soft limit is not reached. Coupling the XENAX® Servo Controller with the virtual B&R axis. Motion commands are triggered by B&R Axis. UDINT Axis BOOL Enable UDINT UDINT UDINT BOOL BOOL Active BOOL Busy BOOL Velocity Acceleration Deceleration JogPositive JogNegative CommandAborted Error ErrorID Jogging BOOL BOOL UINT BOOL JS_MC_MoveCyclicPosition UDINT Axis Valid BOOL Enable CommandAborted DINT Position Error ErrorID BOOL BOOL BOOL UINT JS_MC_ReadStatus Read status of the XENAX® Servo Controller. UDINT Axis BOOL Enable Read actual position. UDINT Axis BOOL Enable Valid Error ErrorID Errorstop Disabled Stopping Standstill DiscreteMotion Reference ContinuousMotion BOOL BOOL UINT BOOL BOOL BOOL BOOL BOOL BOOL BOOL JS_MC_ReadActualPosition 24 Valid Error ErrorID Position BOOL BOOL UINT DINT Read axis error from XENAX® Servo Controller. UDINT BOOL BOOL UDINT UINT STRING[12] JS_MC_ReadAxisError Axis Valid Enable Busy Acknowledge Error DataAddress ErrorID DataLength ErrorRecordAvailable DataObjectName BOOL BOOL BOOL UINT BOOL JS_MC_Error ErrorRecord Record UINT AxisErrorCount UINT AxisWarningCount UINT FunctionBlockErrorCount Read digital inputs from XENAX® Servo Controller JS_MC_ReadDigitalInput UDINT Axis BOOL Enable Valid Axis Error Enable ErrorID DigitalInput JS_MC_ReadDigitalOutput Read digital outputs from XENAX® Servo UDINT Axis Controller BOOL Enable Valid Error ErrorID DigitalOutput BOOL BOOL UINT USINT JS_MC_ReadParameter Read parameter values from XENAX® Servo UDINT Axis Controller BOOL Enable INT ParameterNumber Valid Error ErrorID Value BOOL BOOL UINT UDINT JS_MC_WriteParameter Write parameter value to the XENAX® Servo UDINT Axis Controller. BOOL Execute INT ParameterNumber DINT Value Done BOOL Error BOOL ErrorID UINT JS_MC_WriteDigitalOutput Write digital outputs for XENAX® Servo UDINT Axis Done BOOL Controller. BOOL Execute Error BOOL USINT DigitalOutput ErrorID UINT * The Jenny Science specific objects are described in the document “Xvi75V8_CANopen_Ethernet” and can be found under www.jennyscience.de/en/. 25 JS_MC_AxisErrorCollector Check if there is an axis or a function block error UDINT Axis pending. BOOL Enable Valid Busy Error ErrorID FunctionBlockError AxisError AxisWarning Errorstop BOOL BOOL BOOL UINT BOOL BOOL BOOL UINT JS_MC_ReadActualCurrent Read actual current of the connected linear motor UDINT Axis axis. BOOL Enable Valid Error ErrorID Current BOOL BOOL UINT INT JS_MC_ReadPSR Read Jenny Science process status register. UDINT Axis BOOL Enable Valid BOOL Error BOOL ErrorID UINT ProcessStatusRegister JS_MC_Reference Execute the reference of the linear motor. UDINT Axis Done BOOL Execute Busy CommandAborted USINT ReferenceMode Error UDINT ReferenceSpeedRot ErrorID UDINT ZMarkSpeedRot JS_MC_Init_IS_ ProcStat BOOL BOOL BOOL BOOL UINT JS_MC_Init In the init code, this function block has to be called once for every connected axis. JS_MC_ IoMap AdrIoMap UDINT pDevice USINT Node SINT OperationMode Axis UDINT JS_MC_CyclicIn This function block has to be called at the UDINT Axis beginning of the synchronous cyclic mode to get BOOL Enable the actual values of the Powerlink fieldbus. Valid BOOL Error BOOL ErrorID UINT JS_MC_CyclicOut This function block need to be called at the end of a Cyclic move to send new position values to the Powerlink fieldbus. UDINT Axis 26 3.3.1 Minimum and Maximum Values of Function Blocks Following minimum and maximum values of the function blocks should be adhered to. name Velocity linear Velocity rotative Deceleration Acceleration S-curve datatype UDINT UDINT UDINT UDINT UDINT min 10 inc/s 10 inc/s 2000 inc/s2 2000 inc/s2 1% max 9000000 inc/s 100000000 inc/s 1000000000 inc/s2 1000000000 inc/s2 100 % 3.3.1 Error in the Function Block The following ErrorIDs can be generated by the JsMcLib function blocks. Value Name 0 ERR_OK 50000 jsmcERR_NIL_POINTER 50001 jsmcERR_DRIVE_NOT_READY 50002 jsmcERR_DRIVE_SWITCHED_OFF 50004 jsmcERR_REFERENCE_WRONG_METHOD 50006 jsmcERR_ACCE_TO_SMALL 50008 jsmcERR_SCURVE_NOT_IN_RANGE 50010 jsmcERR_SDO_COMM_FAILURE 50011 jsmcERR_POWER_UP_FAILURE 50012 jsmcERR_POWER_LOST 50013 jsmcERR_WRONG_STATE_FOR_FB Description Correction FUB executed correctly with no errors None. No axis passed to FB Ensure function block call only with correct axis passed. controller is not ready to switch on controller is switched off Reference method is not correct for the motor Acceleration is to small Scurve is not in allowed range Failure during SDO communication Failure during power up sequence Power was turned off outside of JS_MC_Power control The FB cannot be used in the current state 27 Check controller for errors Don't call function block when controller is switched off Check documentation for allowed reference methods for the motor Use larger acceleration (>=2000 inc/s) Use Scurve in allowed range (1...100%) Check power link connection to the Servo Controller Check Servo Controller for correct power supply Check and quit errors from other function blocks or axis, which caused the power off Check program to call FB's only in allowed states Only use allowed FB's for the The FB cannot be used desired mode of operation 50014 jsmcERR_WRONG_OP_MODE_FOR_FB in the current mode of (profile position or cyclic operation synchronized) The FB failed during Check and quit errors from 50015 jsmcERR_EXECUTION_ERROR execution by an other function blocks or axes, external error which caused the fault The buffer for the Put a pointer to a buffer for 50016 jsmcERR_BUFFER_TO_SMALL error text string is to the error text string which size small is at least 50 characters Enter correct name of the error text object and ensure, Error text object or that the error text object 50017 jsmcERR_TEXT_OBJ_NOT_FOUND function block text (JsMcEtxDe/JsMcEtxEn) and object not found the function block text object (JsMcFBtxEn) are present in the project Ensure that the error text Error text or function object (JsMcEtxDe/JsMcEtxEn) 50018 jsmcERR_TEXT_READOUT_FAILURE block text could not and the function block text be read successfully object (JsMcFBtxEn) are present in the project Set a supported general mode general mode of of operation in JS_MC_Init 50019 jsmcERR_WRONG_GENERAL_OP_MODE operation not (OperationMode = supported jsmcMODE_PROFILE_POSITION or jsmcMODE_CYCLIC_SYNC) Reference speed for Use reference speed in 50020 jsmcERR_REF_SPEED_NOT_IN_RANGE rotative motors is out allowed range (0...250000 of range inc/s) Z-Mark speed for Use Z-Mark speed in allowed 50021 jsmcERR_ZMARK_SPEED_NOT_IN_RANGE rotative motors is out range (0...100000 inc/s) of range Use velocity in allowed range Velocity is out of (10...9000000 inc/s for linear 50022 jsmcERR_VELOCITY_NOT_IN_RANGE range motor, 10...100000000 inc/s for rotative motor) Use smaller acceleration Acceleration is to 50023 jsmcERR_ACCE_TO_LARGE (smaller than 1000000000 large inc/s^2) Use correct cycle time setting (powerlink bus cycle time >= Cycle time setting 50024 jsmcERR_CYCLE_TIME_FAILURE 400us and software task cycle failure time >= powerlink bus cycle time) Deceleration is to Use larger deceleration 50025 jsmcERR_DECE_TO_SMALL small (>=2000 inc/s) 28 50026 jsmcERR_DECE_TO_LARGE Deceleration is to large 50027 jsmcERR_FW_VERS_FAILURE Firmware version failure 50028 jsmcERR_PDO_MAPPING_CHK_FAILURE 50029 jsmcERR_PDO_MAPPING_MISSING 50030 jsmcERR_NO_DATA_ADDRESS_ASSIGNED Failure during PDO mapping check Necessary PDO mapping missing No data address for error text string assigned 50031 jsmcERR_SDO_ACCESS_FAILURE Invalid SDO access 50032 jsmcERR_CYCLIC_COMM_INTERRUPTED Cyclic communication interrupted 29 Use smaller deceleration (smaller than 1000000000 inc/s^2) For library use, at least XENAX firmware V3.64D and powerlink bus module firmware V2.0 or higher are required Error in AsIOPVInfo() function block of AsIO library Check, if all necessary PDOs are mapped in I/O Mapping Assign valid data address for error text string Check input values DataObject, SubID and DataLength and set correct values Don't enable power until JS_MC_CyclicIn is valid and so cyclic communication is running 4 Point to Point or Interpolated Position Mode Point to Point, Profile Position Mode: In the „Profile Position“ mode, the parameters of distance, velocity, acceleration and s-curve will be transmitted to the XENAX®. The trajectory for the drive will be calculated internally in the XENAX® Servo Controller. Interpolated, Cyclic Synchronous Position Mode: In the „Cyclic Synchronous Position“ mode the position value will be transmitted cyclically (e.g. every millisecond) to every connected XENAX® Servo Controller. In this mode a virtual axis (no hardware mapping) for every connected XENAX® Servo Controller is necessary. 4.1 Using a XENAX® Servo Controller and a B&R PLC: X20CP1485-1 - - XENAX® Xvi75V8 Servo Controller with additional Powerlink fieldbus module Include the XENAX® Xvi75V8 Servo Controller into a new project in Automation Studio. 30 Hardware Setup 4.2 Hardware Setup X20CP-1485-1 Profile Position Mode XENAX® Servo Controller 1x B&R PLC X20CP1485-1 1x XENAX® Servo Controller with Powerlink fieldbus module. 1x Ethernet connection from B&R PLC to a PC 1x RJ45 cable for the connection of the B&R PLC and the XENAX® Servo Controller. 1x LINAX® Lxc 85F10 linear motor axis LINAX® Cyclic Synchronous Position Mode 1 x B&R PLC X20CP1485-1 2x XENAX® Servo Controller with Powerlink fieldbus module 2x Ethernet connection from B&R PLC to a PC 2x RJ45 cable for the connection of the B&R PLC and the XENAX® Servo Controller. 2x ELAX® linear motor slide as X-Y cross table. 31 ethernet cable power cable RJ45 cable 4.3 Error on the XENAX® Servo Controller can be read with the „JS_MC_ReadAxosError” function block. To provide this function block with an error text the “JsMcEtxEn” file has to be integrated into the Automation Studio. Under JsMcLib Library_Use -> Error_Text, the corresponding file in in German or English can be selected. Specify a desired location and extract the file by clicking right and press -> Extract All. In Logical View select the project name, „JSC_Project_1“, -> Right click -> Add Object Categories: Data Object -> Templates: Existing Data Object ->Next 32 Embedding XENAX® Error Messages Select the file („JsMcEtxDe” or „JsMcEtxEn” and „JsMcFBtxEn“). -> Next Yes, to active CPU adds the “Error text” to the active CPU (here X20CP1485-1.). -> Finish 33 5 5.1 The program example is stored as c-coder or structured text in the “user help” menu of the JsMcLib. Firstly the example needs to be saved to the PC and then it can be imported to the project. Logical View -> select JsMcLib Library -> press F1 to open the user’s help. Under Examples the program examples can be found. In our Example we choose “Single_Axis_Profile_Position_C” and click on “Import Package”. Then we save this file on the PC and extract the .zip-file. Right click -> “extract all” Note: Program A program has direct access to all variables, functions and function blocks. Package Bigger Applications including a big amount of data objects, variables, functions and so on can be split into single units. The summary of these units is called a „Package“ and can be named and imported. 34 Program example “Profile Position Mode“ Get program example and save it 5.2 Under Logical View, select the, „JSC_Project_1“. -> Right click -> Add Object Categories -> Program -> Templates ->Existing Program -> Next Select the program example, „Single_Axis_Profile_Position_C“. -> Next Yes, to active CPU adds the program example to the active CPU (here X20CP1485-1.). -> Finish 35 Import program example to the project Check Under Logical View the „Single_Axis_Profile_Position_C“ now appears. 5.3 With double click on the “Single_Axis_Profile_Position_C.c” the program code is opened. The program code includes the Ethernet Powerlink interface address (IFx), Node number and the used error object. Ethernet Powerlink address EPL: The following line of the program example has to match the interface used. instJS_MC_Init.pDevice = (UDINT)”IF3”; Node nr. Setting: The Node number is set to 2 in the Line instJS_MC_Init.Node= 2;. Set the Node number of the connected XENAX® Servo Controller (Node / Card Identifier CI, set with WebMotion®, see chapter “Card Identifier”). 36 Configure Ethernet interface 5.4 To see the Software Configuration go to Physical View and double click on B&R PLC (here X20CP1485-1). The default cycle of the program is “Cyclic #4” (100ms). We move the program by drag & drop in “Cyclic #1” which has a shorter cycle time (10ms). To verify the correct integration, the error objects can be found in „Data Objects“. Example: If the XENAX® Servo Controller shows the Error 50 on the display, the function block “JS_MC_ReadAxisError” will show, “50 position deviation is too large”. 37 Move Program example into Task 5.5 To use the .xdd channels (cyclic data from the XENAX®) in the library, they have to be connected to the “Process Variable”. Physical View, double click XENAX® Servo Controller -> I/O Mapping. Select the Channel on the row “Process Variable” (e.g. S_CurveProfil_I2000Out). Click on the symbol. The “Select” window will open. You can open the according program which you like to use, with the symbol In the tree layout of „stIoMap“ are all “Process Variables” which have a data type which matches the channel. -> OK After selecting the variable, the path of the variable can be seen in the I/O Mapping. The assignment of a “Process Variable” has to be completed for every channel. 38 I/O Mapping, connect .xdd channels to program variables 5.6 Logial View -> double click on the B&R PLC -> right click on the program example „Single_Axis_Profile_Position_C“ -> Open -> Watch An empty window will be opened, right click -> Insert Variable The window „Insert Variable“ will be opened. Every function block and variable which is used in the program example can be seen. Select the required variables and function blocks. You will need at least the following: Execute_Demo instJS_MC_ReadAxisError instJS_MC_Reset szAxisErrorText ->Add To Start the program example set the „Enable_Prog_Functions“ to TRUE. With FALSE the program is idling in a loop. If an error occurs it can be quit by putting the variable “Execute” on TRUE in the function block “JS_MC_Reset”. 39 Start Program Example 6 Program example Cyclic Synchronous Position Mode The program example is stored as c-coder or structured text in the user’s help of the JsMcLib. Firstly the example needs to be saved to the PC and then it can be imported to the project. Logical View, select JsMcLib Library, press F1 to open the user’s help. Under “Examples” the examples program can be found. In our Example we choose “XY_Axes_Cyclic_Sync_C” and click on “Import Package”. Then we save this file on the PC and extract the .zip-file. Right click -> “extract all” This program example works with an X-Y cross table and interpolates a circle. Therefore two XENAX® Servo Controllers are needed. 6.1 Integrate an additional XENAX® Servo Controller in project like seen above under „ Embed XEANAX® Servo Controller in project“ Please note that the node numbers (1 and 2) have to be different in the program code. 40 Integrate second XENAX® Servo Controller in project. 6.2 For the Cyclic Synchronous Position Mode, a virtual axis is needed in the Automation Studio. The Virtual Axis calculates and transmits a new position for the XENAX® Servo Controller every [ms] In Physical View select right click the power link interface (PLK) -> System Designer. From the “Toolbox Hardware Catalog” add the „AOPOS servo drive 8V1010.00-2“ by double click. The window „New Drive“ can be confirmed three times with ->Next. 41 Include virtual Axis Choose the language for the error messages of the virtual axis. ->Next Write a name for the virtual axis. ->Next Confirm this window with ->Next 42 Confirm the „Configuration summary“ with ->Finish In the Physical View under the B&R PLC (here X20CP1485-1) the new virtual Axis with all its functionalities can be seen. Because we only use this Axis virtual, we need to delete all the function objects. Select all -> right click-> Delete Because there is no real connection between the B&R PLC and the virtual Axis, we need to disable the Axis. Right click -> Disable 43 Note: This example works with 2 Axis. A second virtual Axis has to be included. 6.3 In the Configurations View under X20CP1485_1 -> Motion. Mark “Acp10map.ncm“ and delete. To open the NC Manager configuration double click on “Acp10cfg.ncc”. Right click on an empty spot in the NC manager Configuration -> Insert Interface… 44 Insert interface for virtual axis Select Smart Device Controller (SDC) and confirm with OK. Note: This step has to be made twice, once for each axis. 6.3.1 The NC Mapping table will be used for every virtual axis and needs to be inserted only once. Under Configuration View -> X20CP1485_1 -> right click on Motion -> Add Object... Categories -> Motion -> Templates -> New NC Mapping Table -> Next 45 Insert the NC-Mapping Table Insert name „AxNcMap.ncm“ -> Finish To open The NC Mapping Table double click AxNcMap.ncm in the “Configuration View”. Right click “Add NC Object” The following parameters need to be set for the NC object. „NC Object Name“ is similar to the name of the inserted virtual Axis. This step is also taken twice 6.3.2 Open the Logical View select the inserted virtual Axis: gAxisXXobj -> gaxisXXi double click. The following parameter need to be adjusted: 46 Parameter-Adjustments Input function ACP10AXIS_typ -> dig_in -> level Adjust the Input functions as follows: pos_hw_end to „ncACTIV_HI” neg_hw_end to „ncACTIV_HI” trigger2 to „ncACTIV_HI“ Velocity, Acceleration and brake ramp Set the maximum velocity (Speed), maximum acceleration (Acceleration) and maximum brake ramp (Deceleration), for the Project. ACP10AXIS_typ -> limit -> parameter Speed (v_pos und v_neg),4’500’000 Acceleration (a1_pos und a1_neg),1.0e + 8 Deceleration (a2_pos und a2_neg),1.0e + 8 Set to the maximum of the linear motor axis. Stroke The Stroke has to match the mechanical limits of the linear motor. In our example a ELAX® Ex30F20 is used. The maximum stroke of it is 30000 µm: neg_sw_end = 0 pos_sw_end = 30000 Time Time adjustment ACP10AXIS_typ -> controller-> position t_predict t_total Note: This parameter adjustment has to be done for every virtual Axis. 47 6.3.3 Cycle time The time used should be as short as possible. Physical View -> PLK -> right click -> Configuration The cycle time is set to 1000[µs] Physical View -> double click on the B&R PLC(here X20CP1485-1) -> right click Cyclic #1 -> Properties. Set the duration for the virtual Axis in the Cyclic#1 to 1000 µs. The Duration must be the same as the Powerlink Cycle Time which was set before. The “Tolerance” must be 0ms and “I/O outputs delay“ has to be set to „no delay Note: If these settings aren’t made like explained, the initialisation will be stopped by an error and a commissioning of the virtual axis won’t be possible. 6.4 Logical View -> JSC_Project_1 -> right click-> Add Object… 48 Insert Program Example Categories: program ->Existing program -> Next Select the path of the “XY_Axes_Cyclic_Sync_C”. -> Next The program can be seen now in the Logical View. 6.5 With double click on „XY_Axes_Cyclic_Sync_C.c“, the program code will be opened. In the code are the Ethernet Powerlink Interface Adress (Ifx) the node number and the used error object. 49 Configure Ethernet Interface Ethernet Powerlink Address EPL: Adapt the line instJS_MC_Init.pDevice = (UDINT)”IF4”;. The Powerlink address is for both XENAX® Servo Controller the same. Node Nr. The node number is defined in the line instJS_MC_Init.Node= 1 (here 1 & 2). The node number has to be the same as the CI (Card Identifier) of the XENAX® Servo Controller. The CI is explained above. Coupling the virtual Axis In the row: Virtual_Axis_Ref_1 = (int) & (gAxis01); und instJS_MC_MoveCyclic_1.Axis = Axis_Ref_1; the axis names (gAxis01 & gAxis02) are visible. The name in the program code hase to correspond the axis name to succesfully couple the virtual axis. 6.6 Under Physical View -> B&R PLC -> double click -> Software Configuration The program example is always in Cyclic #4(100ms) as default. We move the program example to the „Cyclic #1“, which has a shorter cycle time (1ms). 50 Move Program Example to Task with Desired Cycle Time 6.7 To use the .xdd-Channels (cyclic data of the XENAX®) in the library they have to be connected to a “Process Variable”. Physical View, double click on XENAX® Servo Controller -> I/O Mapping. Select in the row „Process Variable“ the cell of the desired Channel (e.g.: S_CurveProfile_I2000Out). Click on the Symbol. The Window “Select” will be opened Please open the according program with the symbol. In the tree layout of „stIoMap“ there are all “Process Variables” which have a data type that matches the channel. Select the corresponding variables for the channel. -> OK After the process variables are selected, the path can be seen in the “I/O Mapping”. Every channel needs to be connected to a process variable. This has to be done for every XENAX® 51 I/O Mapping, connect the .xdd Channels with the program variables. 6.8 Logial View -> double click on the B&R PLC (here X20CP1485-1) -> right click on the program example „XY_Axes_Cyclic_Sync_C“-> Open -> Watch An empty window will be opened, right click -> Insert Variable… The „Insert Variable“ window is opened with all the function blocks and variables of the program example. Select the required variables and function blocks. You will need at least the following: Enable_Prog_Functions instJS_MC_ReadAxisError_1 instJS_MC_ReadAxisError_2 instJS_MC_Reset_1 instJS_MC_Reset_2 szAxisErrorText_1 szAxisErrorText_2 bReset_1 ->Add Set the “Enable_Prog_Functions” to TRUE to start the program. With FALSE the program is idling in a loop. A Error can be quit by setting the bReset_1 to TRUE. Note: In the help of the library there is a program example with 1 Axis in Cyclic Synchronized mode. 52 Start Program Example Notes This instruction manual contains copyright protected information. All rights are reserved. This document may not be in its entirety or partially copied, duplicated or translated without the prior consent of Jenny Science AG. Jenny Science AG grants no guarantee on, or will be held responsible for, any incidents resulting from false information. Information in this instruction manual is subject to change. Jenny Science AG Sandblatte 7a CH-6026 Rain, Schweiz Tel +41 (0) 41 455 44 55 Fax +41 (0) 41 455 44 50 www.jennyscience.ch [email protected] © Copyright Jenny Science AG 2015 53