1
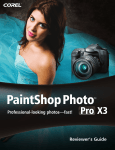
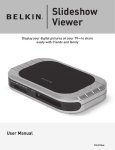
Addo Stuur A Short Guide to Digital Photo Editing An introduction to the world of digital photography and photo-editing software © 2005 Visual Steps B.V. Translated by Grayson Morris and Marleen Vermeij June 2005 All rights reserved. No part of this publication may be reproduced, stored in a retrieval system or transmitted in any form or by any means, electronic, mechanical, photocopying, recording, scanning or otherwise, except as permitted under Sections 107 or 108 of the 1976 United States Copyright Act, without the prior written permission of the Publisher. LIMIT OF LIABILITY/DISCLAIMER OF WARRANTY: While the publisher and author have used their best efforts in preparing this book, they make no representations or warranties with respect to the accuracy or completeness of the contents of this book and specifically disclaim any implied warranties of merchantability or fitness for a particular purpose. No warranty may be created or extended by sales representatives or written sales materials. The advice and strategies contained herein may not be suitable for your situation. You should consult with a professional where appropriate. Neither the publisher nor author shall be liable for any loss of profit or any other commercial damages, including but not limited to special, incidental, consequential or other damages. Trademarks: Visual Steps is a trademark of Visual Steps B.V. in the Netherlands. Windows is a registered trademark or trademark of Microsoft Corporation in the United States and/or other countries. All other trademarks are the property of their respective owners. Website: www.visualsteps.com Table of Contents Foreword ..................................................................................................................................... 4 The Visual StepsTM Newsletter .................................................................................................. 4 The Visual StepsTM Concept...................................................................................................... 4 Getting Started with Digital Photos .......................................................................................... 5 The Photo-Editing Program ....................................................................................................... 5 ArcSoft PhotoStudio .............................................................................................................. 6 Acquiring Digital Photo Files..................................................................................................... 9 The Digital Camera................................................................................................................ 9 Advantages and Disadvantages of a Digital Camera ................................................... 9 What Does Resolution Mean?.................................................................................... 10 Megapixels ................................................................................................................. 11 The Parts of the Digital Camera ................................................................................. 12 What Should You Look For When Buying a Digital Camera? .................................... 13 Transferring Photos from Your Camera to Your Computer ........................................ 15 Resolution and Print Size ........................................................................................... 16 Photo Sizes and Image Sizes .................................................................................... 16 Memory....................................................................................................................... 17 Scanners.............................................................................................................................. 17 Types of Scanners ..................................................................................................... 17 Scanner Settings ........................................................................................................ 19 Scan Resolution ......................................................................................................... 19 Saving and Printing Options ................................................................................................ 20 Photos on CD ............................................................................................................. 20 The Online Photo Lab ................................................................................................ 21 In-Store Printing Service............................................................................................. 21 4 Foreword Dear reader, Digital photography has grown enormously in a short time. This success is not accidental. The digital camera’s ease of use and the ability to edit photos on the computer and share them with others over the Internet or e-mail have won over many new enthusiasts. Many people have already replaced or supplemented their regular camera with a digital photo camera. You don’t necessarily need a digital camera to edit photos on your PC, by the way. You can digitize your old slides or printed photos by scanning them. If you want to keep using your regular camera, you can have your photos stored as digital files on a CD when you get them developed. To work with digital photos, you’ll need software. This useful information booklet will help you choose among the many programs that are available. In addition, you’ll get information about the Visual Steps book available on this topic. We’ll also explain in plain English some important basic concepts for digital cameras and digital photography. I hope you enjoy this short guide! Addo Stuur Your comments and suggestions are most welcome. My e-mail address is: [email protected] The Visual StepsTM Newsletter Sign up for our periodic Newsletter which features information about our new titles, special offers and discounts, recommendations, and more — delivered straight to your desktop for free! www.visualsteps.com/newsletter The Visual StepsTM Concept The Visual Steps concept is a step-by-step instruction method which quickly and easily teaches you how to use a computer program. The books are written in plain English and feature a larger print. Place the book next to your computer and follow the instructions step by step. Each step in the book is illustrated with a screen shot. You can compare what you see on your computer monitor to these screen shots in the book to make sure you are on the right track. All Visual Steps books are written according to the same easy step-by-step method. After you have worked through one of our books you will know what to expect in any other Visual Steps title. If this method appeals to you, don’t hesitate to try another title from Visual Steps. A Short Guide to Digital Photo Editing 2005 Addo Stuur / Visual Steps A Short Guide to Digital Photo Editing 5 Getting Started with Digital Photos For many computer owners, digital photo editing is one of the most popular applications for the PC. Because computers continue to become faster and more powerful, you can easily edit your digital photos on today’s standard computers. To edit photos, you’ll need special software. One good program is ArcSoft PhotoStudio. You can use this program for example to lighten or darken, sharpen or blur, and resize or crop your photo. Many of the features a professional photographer can use in the darkroom are available to you on the computer with this program. To edit photos on your computer, you’ll also need digital photo files. You can acquire these in several ways. If you don’t have a digital camera, you can scan your printed vacation photos into your computer using a simple scanner. You can also have your photos stored onto a CD-ROM when you have your regular roll of film developed. You can then edit these digital photo files on the computer. In this booklet, you’ll find information on the following topics: the Visual Steps book on digital photo editing general concepts in digital photography the parts and operation of a digital camera scanners photo CD-ROMs Please note: All Visual Steps books are written according to the same step-by-step method. The book mentioned in this guide has been written for people who haven’t worked with the PhotoStudio program before. You do need to have a basic knowledge of Windows. You should be able to do the following: click, double-click, and right-click with the mouse start and stop programs type and edit a piece of text The Photo-Editing Program You may have experimented with editing your digital photos before using the simple Paint program included with Windows. You only have a few editing options in Paint. If you’d like more features, you’ll have to move up to a true photo-editing software package. One well-known and good photo-editing program is ArcSoft PhotoStudio. This program offers more than enough features for the beginning hobbyist. A Short Guide to Digital Photo Editing 2005 Addo Stuur / Visual Steps 6 A Short Guide to Digital Photo Editing ArcSoft PhotoStudio The ArcSoft PhotoStudio program is a good package for beginning photo editors who want tools for the most common editing tasks. The program is simple to operate and the program window is well organized. You can make photos larger, smaller, lighter, darker, blurrier, or sharper. You can adjust the color balance in the photo and even remove parts of the photo you don’t want to see. Using various special effects, you can transform simple photos into artistic masterpieces. Another nice feature is the ability to create panoramas by pasting two or more photos together. Many of the tools a professional photographer uses in the darkroom are available to you on your computer with this program. You can learn to take full advantage of this program by working through the following book: Digital Photo Editing for Seniors ISBN: 90 5905 064 9 Prijs: US $ 24.95 Canada $ 33.95 Including a CD-ROM containing the complete program and practice files The book has its own website: www.visualsteps.com/digital. On the website www.visualsteps.com, you can view the table of contents and read part of a chapter. This book is part of the Bookware series. This series can be recognized by the logo you see next to the book above. Bookware = book + complete software in one purchase. That means you get the complete program, with a value of US $ 79.99, on the CD-ROM included in the book. And that means you can get started right away. The book covers the following topics: • acquiring photos from your scanner, digital camera, or a photo CD-ROM • improving, retouching, and cloning • working with selections and layers • create a panorama and use special effects • everything about printing, paper, and printers The minimum system requirements for PhotoStudio 5.5 are: • Pentium II-based PC or equivalent • Windows 98SE/Me/2000/XP • 64 MB RAM (128 MB recommended) • 50 MB free hard disk space A Short Guide to Digital Photo Editing 2005 Addo Stuur / Visual Steps A Short Guide to Digital Photo Editing Here are a few screen shots from ArcSoft PhotoStudio: The PhotoStudio window with toolbar on the left Stitch - Create a panoramic photo by pasting two photos together A Short Guide to Digital Photo Editing 2005 Addo Stuur / Visual Steps 7 8 Auto Enhance function - for quick repair of underexposed photo Scratch Removal tool - remove scratches and dirt A Short Guide to Digital Photo Editing 2005 Addo Stuur / Visual Steps A Short Guide to Digital Photo Editing 9 A Short Guide to Digital Photo Editing Acquiring Digital Photo Files To work with photos on your computer, you’ll need to have some digital photo files available. You can acquire these in several ways. Photos you take with a digital camera are already digital files. You can also digitize printed photos by scanning them into your computer. A third option is to have your photos put onto a CD-ROM when you have your film developed. You’ll read more about these topics in the following sections. The Digital Camera Are you considering replacing your regular camera with a digital one? Or would you like to use a digital camera in addition to your regular one? Various factors can play a role in your choice of camera. The most important questions are: what do you want to use your camera for, and what requirements must the camera meet? In this section, you’ll read practical background information on various aspects of digital cameras and digital photography. Advantages and Disadvantages of a Digital Camera Digital cameras have both advantages and disadvantages compared with regular cameras. Advantages The most obvious advantage of a digital camera is that you no longer have to buy rolls of film. Nor do you have to wait for your photos to be developed and printed. You can immediately view the photos you take on the LCD screen on the back of the camera. You can see right away if the photo turned out well, and you can delete a bad photo on the spot. Camera with LCD screen In addition, you can take more photos with a digital camera than the 36 maximum on a roll of film. Another advantage is that you can easily connect the camera to your computer. You can quickly send your photos to family and friends by e-mail. You can also edit your photos with a photo-editing program such as PhotoStudio. -Continue reading on the next page- A Short Guide to Digital Photo Editing 2005 Addo Stuur / Visual Steps 10 A Short Guide to Digital Photo Editing Disadvantages A digital camera does have some disadvantages. Although prices continue to drop, digital cameras are still more expensive than standard 35-mm cameras. Price differences among digital cameras can be great. These differences are related to the features offered by the camera and its resolution. If you want to use your camera to take photos for your website, you can choose a camera with a low resolution. If you want to print enlargements of your photos, however, you’ll need a more expensive camera with a higher resolution. The higher the photo resolution, the more memory you need for the photo files. The price of memory cards for the camera increases as the storage capacity increases. Some digital cameras suffer from a bothersome delay between the moment you press the button and the moment the photo is actually taken. This can lead to unsuccessful photos of moving objects in particular, because the right moment has already passed. More expensive cameras have less delay or none at all. Some LCD screens reflect (sun)light, which can make it difficult for you to see what’s on the screen when taking or viewing photos. What Does Resolution Mean? All types of computer images (drawings and photos) are made up of thousands of small dots. These dots are called pixels. The quality of the photo depends on the number of dots it contains. If the photo contains many pixels, it will be sharp and clear. If the photo contains fewer pixels, it will be grainy or blurry. The number of pixels in the image is called the resolution. Take a look at the examples below: If you enlarge a photo significantly, you can see the pixels: Here you see part of a lowresolution photo: This photo was taken at a resolution of 640 pixels wide and 480 pixels high. -Continue reading on the next page- A Short Guide to Digital Photo Editing 2005 Addo Stuur / Visual Steps A Short Guide to Digital Photo Editing 11 This is the same photo, but taken with a high-resolution camera: This photo was taken at a resolution of 2048 pixels wide and 1536 high. Megapixels The term megapixel is often used to describe a camera’s resolution. The number of megapixels is usually stated right on the camera: One megapixel is equal to 1 million pixels. That means a resolution of 800 x 600 pixels is equal to 0.48 megapixel. The 3.3 megapixels stated on the camera in the picture correspond to a resolution of 2048 x 1536 pixels. A Short Guide to Digital Photo Editing 2005 Addo Stuur / Visual Steps 12 A Short Guide to Digital Photo Editing The Parts of the Digital Camera Though digital cameras come in many shapes and sizes, several parts are common to all. Camera Front: Shutter release: Flash: Sensor: Viewfinder: Lens: The available settings and number of buttons differ greatly among cameras. Some cameras have only a few settings, which you can usually access on the LCD screen on the back. Camera Back: Primary settings, such as shooting and displaying: Viewfinder: A selector switch for e.g. the flash: The LCD screen: The zoom button: There’s a compartment on the side for the memory card and a rechargeable battery: In addition, many cameras have a port for a USB cable, so that you can connect the camera directly to your computer and upload the photos. A Short Guide to Digital Photo Editing 2005 Addo Stuur / Visual Steps A Short Guide to Digital Photo Editing 13 What Should You Look For When Buying a Digital Camera? Digital cameras are available in various models and price classes. This large selection can make it difficult to choose a camera that meets your needs. You can get extensive, up-to-date information on the features and specifications of many brands and types of cameras by reading comparative reviews. Consumer Reports regularly reviews digital cameras and publishes the results in its magazine and on its website. Other good sources are the Digital Photography Review website and various computer magazines. In a comparative review, you can easily compare the differences among cameras. You’ll need to consider the following points when buying a digital camera: Resolution and Megapixels A camera’s resolution is expressed in pixels. Pixel is an abbreviation for picture element. The more pixels a photo contains, the more detail it has. A camera’s resolution is, in fact, the number of pixels per photo the device can capture. It’s a way of expressing how much detail the camera can represent. Manufacturers often brag about the number of pixels their digital photo cameras have. The price of a camera rises with the number of megapixels (million pixels). To make a good choice, it’s important for you to think about what you want to do with your photos. Do you want to be able to enlarge your photos and print them out? Then you’ll need a camera with a lot of megapixels. If you just want to use your photos on the Internet or you’re satisfied with small prints, then you’ll do just fine with significantly fewer pixels. You’ll read more about pixels and print sizes later in this guide (page 14). The Image Sensor The photos you take with a digital camera are captured by the image sensor, usually a CCD (Charge-Coupled Device). The CCD is a chip composed of light-sensitive elements called photosites. This chip turns incoming light into a series of numbers through a complicated process. This digital signal is stored in the camera’s memory. Important considerations with CCDs are the number of colors they can distinguish among and the color quality. The higher the quality of the CCD, the higher the price. A less expensive, qualitatively inferior alternative to the CCD is the CMOS image sensor. The Memory Most digital cameras are sold with a standard memory card that holds only a limited number of photos. That can be a problem on a day when you’d like to take a lot of photos and can’t empty the memory card in between. The capacity of the memory card that comes with the camera is therefore important. Would you like to expand your digital camera’s memory? Make sure that the memory card included with your camera can be replaced with one with more capacity. You’ll read more about the different types of memory cards later in this guide (page 15). The LCD Screen and the Viewfinder You can use your camera’s LCD screen as a handy viewfinder, and to see your photos right after you’ve taken them. The disadvantage of an LCD screen is its high energy consumption and its sometimes mediocre image quality, as can happen in sunny weather. A camera with both an LCD screen and a traditional viewfinder is practical. Then you won’t be dependent on the quality of the LCD image. -Continue reading on the next pageA Short Guide to Digital Photo Editing 2005 Addo Stuur / Visual Steps 14 A Short Guide to Digital Photo Editing The Lens Special lenses have been developed for digital cameras that focus the light as directly as possible onto the CCD. This has solved the earlier complaints of underexposed corners and edges on digital photos. Here, too, the usual rule applies: the better the lens, the more expensive the camera. Rechargeable Batteries Digital cameras use a lot of power, particularly if you use the LCD screen or take films with the camera. That makes a camera with rechargeable batteries (either AA or its own proprietary battery) a good choice. If you have an extra set of batteries, you can keep on taking photos while the first set recharges. Optical Zoom and Digital Zoom Unlike regular cameras, most digital cameras don’t have exchangeable lenses. That means you can’t click a different lens onto the camera to extend its zoom range and bring distant objects closer by. The digital camera has to take care of the entire zoom range itself. Optical zoom is preferable. Optical zoom alters the angle of view, so that the camera can use the full resolution at every zoom ratio. The quality of the photo remains the same. The other option is digital zoom. Digital zoom “blows up” the photo electronically, so to speak. As a result, the photo loses some of its sharpness. Settings Just as with regular cameras, the settings available on digital cameras can vary enormously. Let your personal preferences guide you—and above all, choose a camera that’s user-friendly. It’s a good idea to have the salesperson thoroughly demonstrate how the camera works and which features it has, and especially to try them out yourself. Some cameras operate with menus. You can activate particular settings on the LCD screen. Not everyone likes this. Try it out, and see how you like it. Also make sure that any menus and the accompanying user manual are in a language you understand. Transferring Photos to Your Computer Most digital cameras these days have a USB port or a FireWire port. These connections are also present in most computers. You can quickly transfer files from your camera to your PC over a cable connecting these ports. Another option is to place the camera’s memory card into a special card reader connected to the PC. A Short Guide to Digital Photo Editing 2005 Addo Stuur / Visual Steps A Short Guide to Digital Photo Editing 15 Transferring Photos from Your Camera to Your Computer You can transfer photos from your camera to your computer in various ways. A camera with a USB port almost always comes with a cable you can use to connect the camera to your PC. Stick the narrow plug into your camera and the wider plug into the USB port on your computer. Now you can import the photos directly into a photo-editing program. Windows XP will recognize most cameras. In this case, you can easily copy your photo files to your hard drive in the usual Windows way. For older versions of Windows, you’ll need the software that came with your camera. If you can remove the memory card from your camera and you have a card reader for it, you can also use the following process. Take the memory card out of the camera: Place the memory card in the card reader, which you’ve connected to the USB port on your computer: Windows XP recognizes this kind of card reader as an external drive or a removable disk. Using the usual Windows commands, you can now copy the files from the card to your hard drive. For older versions of Windows, you’ll need the software that came with your camera. If you have a laptop computer, you can import the photos with an adapter that the memory card will fit into. Cheaper cameras and webcams don’t have these types of memory cards. You can only transfer photos from them to your computer using a USB cable. A Short Guide to Digital Photo Editing 2005 Addo Stuur / Visual Steps 16 A Short Guide to Digital Photo Editing Resolution and Print Size The more pixels a photo contains, the larger you can print it at a high quality (300 DPI). In the table below, you can see the connection between the resolution and the maximum print size. Resolution Pixels Print Size VGA (Webcam) 1 megapixel 2 megapixels 3 megapixels 4 megapixels 5 megapixels 640 x 480 1280 x 960 1600 x 1200 2048 x 1536 2272 x 1704 2560 x 1930 For the monitor only 3.5” x 5” 4” x 6“ 5” x 7” 8” x 10” 11” x 14” From the table, you can see that a photo should contain at least 2 megapixels for a standard 4” x 6” print. Photo Sizes and Image Sizes Conventional photos have an aspect ratio of 2:3 or 3:2. The following are some standard photo sizes: 4” x 6” 5” x 7” 8” x 10” Digital cameras, however, often have a different aspect ratio, such as 4:3. The following are some standard digital photo sizes: 640 x 480 1024 x 768 1152 x 864 1280 x 960 1600 x 1200 2048 x 1536 This means not every digital photo can be printed on conventionally sized photo paper. In certain situations part of the photo will be omitted, or conversely, the photo may acquire a white border. Some photo labs offer separate printing sizes for digital photos. In that case, the entire photo will be printed. A Short Guide to Digital Photo Editing 2005 Addo Stuur / Visual Steps 17 A Short Guide to Digital Photo Editing Memory The default memory is the amount of memory included with your camera when you buy it. Some less expensive cameras only have internal memory. Others use memory cards. A memory card is a little bit like a traditional roll of film: once it’s full, it has to be replaced with an empty one in order to take more pictures. You transfer the photos on a full memory card to your computer, after which you can erase the memory card. In this way, you can use your memory card over and over, in contrast to the traditional film roll. The storage capacity of a typical memory card ranges from 8 to 128 MB in average. Higher capacity is available but costs much more. These are some commonly used memory cards: SmartMedia card Memory Stick CompactFlash card Saving Memory The greater a memory card’s capacity, the more photos you can store on it. The higher the photos’ resolution, the fewer photos you can store. To save memory, you can set the camera to a lower resolution. This has consequences for the print quality, however. That’s why it’s important to decide beforehand what you want to use your photos for. If you want to put your photos on your homepage on the Internet, a low resolution will be just fine. If you want to print out enlargements of the photos, you’ll have to stick with a higher resolution. Scanners You don’t necessarily have to have a digital camera in order to edit photos. You can create your own digital photo files by scanning your printed photos. Negatives and slides can also be converted to digital files using a special scanner. Types of Scanners The most useful way to import an existing paper photo into the computer is by scanning it. You can scan not only printed photos, but also slides and negatives. The term resolution is also used in scanning. The standard unit for resolution is the number of dots per inch (or DPI). The higher the DPI, the sharper the scan. You can specify the resolution yourself in your scanner software window. Choose the desired DPI based on what you want to do with the photo. Be sure you always adjust your scanner’s DPI setting to match the purpose of the scan. Setting the default resolution too high can lead to enormous file sizes that your computer can barely process. In addition to the resolution, the color depth is important: the number of colors the scanner can distinguish. A scanner’s quality depends on the resolution, the color depth, and the scanning speed. -Continue reading on the next page- A Short Guide to Digital Photo Editing 2005 Addo Stuur / Visual Steps 18 A Short Guide to Digital Photo Editing The flatbed scanner is the most widely sold type of scanner. You place the photo on a glass plate and it’s scanned by a device that moves beneath it. Some types of flatbed scanners can scan slides and negatives in addition to photos. The scanner comes with special slide holders, into which you can place a series of slides or a negative strip. One advantage is that you can scan several images at once. The accompanying software can split these images into separate photo files. This lets you digitize your old family photos or vacation memories very quickly. After scanning, you can use PhotoStudio to enhance or touch up your photos as necessary. There are also special scanners made exclusively for slides or negatives. If you have a large number of slides, photos, and negatives you’d like to digitize, a scanner will be a good investment. The features of the accompanying software are also important. Pay attention to the kinds of features found in the accompanying software. A scanner which can read in multiple images at once can save you a lot of time. Before you purchase a scanner, be sure to ask about the available features. More information and new developments in scanning can be found in articles in computer magazines or by browsing the Internet. A Short Guide to Digital Photo Editing 2005 Addo Stuur / Visual Steps A Short Guide to Digital Photo Editing 19 Scanner Settings Scanners come with accompanying software, called a driver. You will need to install this software on your computer so that your computer can communicate with the scanner. In addition to the driver, most scanners come with other software, too. Typically, a scanning utility and some type of image editing application are included. You can operate your scanner as a stand alone device or you can activate the scanning functionality through your photo editing software. In the scanning software window, you can adjust the quality of the scan, also called the resolution, expressed in DPI (dots per inch). Depending on what you’ll use the scanned photo for, you can choose a DPI from 75 to a maximum of 1200. A photo you’re going to e-mail to someone or put on your website, for example, doesn’t need to have a very high quality. In this case, 75 DPI is sufficient. If you want to print out a photo after you’ve scanned it, you should choose a resolution that matches the maximum resolution of your printer. If you have an inkjet printer with a resolution of 720 DPI, then you can choose this resolution for the scan. If you want to make extensive edits to the photo, however, you should scan it at the highest resolution. Don’t forget that very high resolutions (such as 1200 DPI) will result in enormous files of many, many megabytes. Many scanners will let you adjust several more settings, particularly settings for color. You can adjust these settings if the colors in the scanned photo deviate too much from the colors in the original. Once you’ve adjusted all the necessary settings, you can start scanning. You can find more information on scanning from within a photo-editing program in the Visual Steps book on photo editing. Scan Resolution A photo’s resolution is expressed in DPI. That means dots per inch. You select the resolution at which you’re going to scan depending on the intended use for the photo you’re scanning. For example: 75 DPI 200-300 DPI 720 DPI 600-1200 DPI 2400 DPI Your computer screen, the Internet Color print from an inkjet printer High-resolution inkjet printer Laser printer Professional printing Suppose you select color-photo quality, for example 300 DPI. The dimensions of a standard print photo are 4 inches high and 6 inches wide. That translates to 4 x 300 = 1200 scanned pixels high and 6 x 300 = 1800 pixels wide. In total, that’s 1200 x 1800 = 2,160,000 pixels. In practice, these measurements won’t match exactly. A Short Guide to Digital Photo Editing 2005 Addo Stuur / Visual Steps 20 A Short Guide to Digital Photo Editing Saving and Printing Options Photos on CD Even if you don’t have a digital camera or a scanner, you can enhance your pictures with photo editing software. You can make use of a special service offered by many photo labs. They will develop your roll of film and store the pictures on a CD-ROM. The photos on the CD-ROM are digital files that you can edit on your computer. These days, you can have your photos put onto a CD-ROM when you develop 35mm or APS film. You’ll receive a CD-ROM and an index print with your printed photos. This CD-ROM sometimes contains software for viewing the photos. You can open and edit the photos on the CD-ROM in PhotoStudio or other photoediting software. A Short Guide to Digital Photo Editing 2005 Addo Stuur / Visual Steps A Short Guide to Digital Photo Editing 21 The Online Photo Lab If you have Internet access, then you have a good alternative to printing your own photos: the online photo lab. This service has a number of advantages. Printing your own photos can be fairly expensive due to the higher cost of photo paper and ink cartridges. An online printing service is relatively cheap, especially if you want to print a series of standard-sized photos. Moreover, your photos will be professionally printed on high-quality photo paper, which also increases their “shelf life.” Several retailers such as Wal-Mart and K-Mart currently offer an online printing service. You send your photos to the company’s website. A few days later, you can pick up the printed photos in the store. The printing service’s website lists the required pixel dimensions for printing a photo at a certain size. Some online photo services will also let you publish your photos on the Internet. You get your own web page, where your photos are stored. You can give others access to your images this way: you send your family and friends an e-mail containing the hyperlink to your photo web page. One handy feature is that your visitors can order prints themselves. Then you don’t have to worry about that anymore. In-Store Printing Service Your local photo shop may offer a new kind of printing service. You can bring your digital photos to the store and read them into a computer there. Depending on the particular printing service, your photos can be read from a memory card, a CD-ROM, or a floppy disk. Using the store’s computer, you select the photos and sizes you want, then give the print command. Some printing services even offer a few options for enhancing or cropping the photo before you print it. A Short Guide to Digital Photo Editing 2005 Addo Stuur / Visual Steps 22 A Short Guide to Digital Photo Editing 2005 Addo Stuur / Visual Steps A Short Guide to Digital Photo Editing