1
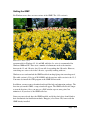
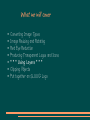
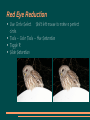
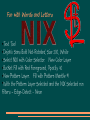
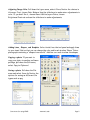
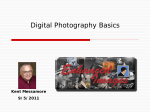
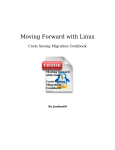
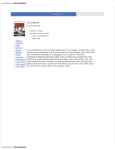
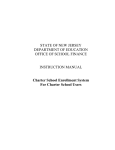
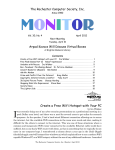
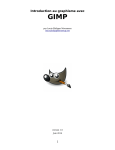
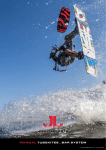
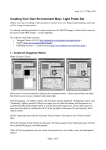
The GIMP By Robert Spotswood Open source's answer to Photoshop With consumer digital cameras becoming more and more common, so are digital pictures. Unfortunately, bad digital pictures are also becoming more and more common. While tips on taking good pictures are beyond the scope of this article, pictures you already have taken can sometimes be salvaged, and most of the time improved, with some good photo editing software. In addition, those pictures can be cut, folded, spindled, and mutilated to form new, sometimes better, pictures. There are a number of commercial photoediting software titles available, including Paint Shop Pro, Corel Draw, Picture It!, C1, and PhotoImpact. But the big name in graphics programs is Photoshop. It is extremely powerful, but is also expensive (~$650 MSRP). A cut down version of Photoshop called Photoshop Elements is only ~$99 (MSRP, street price a little less). Sometimes people will use whatever came with their scanner or digital camera. This software tends to offer few options and is only a pale imitation of any software listed above and the GIMP. However, all the software above has two things in common. None is available free (legally) and all of it only runs on MS Windows. If you want to use another operating system, you can't use the software natively. This is where the GIMP comes in. It is the only graphics manipulation software available for multiple platforms (MS Windows, Mac, and most Unix including Linux) and for free. Access to the source code and the right to modify it (and distribute your changes) is also available for free, something none of the others offer. Zero Cost, Full Power Don't let the cost fool you. Just because the GIMP is free doesn't mean it isn't powerful. An easy way to start a flame war on the Internet is to say the GIMP is better than Photoshop (or vice versa). There are some things the GIMP can do better and there are some things Photoshop can do better, but there are very few things that Photoshop can do that the GIMP can't (yet!). Almost all of those revolve around prepress work, which is something most home users won't need. Page 1 of 8 All the power tools a graphic artist would expect are available in the GIMP. Layers, masks, channels, paths, the clone tool, gradients, cropping, resizing, multiple picture format support, shearing, rotation, perspective, and more. A number of filters allow you to do other interesting transformations and improvements to your photos. Illustration 1: Final composite image For instance, figure 1 was created from the (fullsized original) 3 pictures in figure 2. The frame was created on the fly in the GIMP. This is an example of the cut, folded, spindled, and mutilated. Page 2 of 8 Illustration 2: Sources for the composite picture The Learning Curve Illustration 3: Logo from scratch in under a minute. Working with digital images requires some understanding of what you want to do. If you want the best results, it will almost never be “pick a tool, one click and you're done”. This is true for all graphics programs, and the GIMP is no exception. However, the GIMP comes with a host of preprogrammed tools that can help do a variety of jobs. Some can even generate graphics starting from nothing. Page 3 of 8 For instance, figure 3 took less than 1 minute to create from scratch using one of the scripts. The script did nothing that could not be done by hand, but it did do it faster. The GIMP is fully scriptable, and you can write your own scripts or add ones others have written. You can also create your own art in the GIMP by hand as well. Figure 4 took about 20 minutes to create from start to finish (some of which was figuring out what to create). Illustration 4: The GIMP art created by hand Mastering any advanced graphics program, the GIMP included, takes time, patience and studying, but the GIMP has a number of free resources available to help master it. First is the GIMP User's Manual (http://docs.gimp.org), and the second is “Grokking the GIMP”. “Grokking the GIMP” is available in both book form and as a free download (http://the GIMPsavvy.com/BOOK/). Beyond those are the GIMP help files, and online tutorials too numerous to list. There are also several other books on the GIMP that can be purchased and Usenet offers the comp.graphics.apps.gimp newsgroup if you need additional help. There are also several mailing lists available as well. Many of the tutorials and books are for the 1.2.x version of the GIMP. Between versions 1.2 and 2.0, the menus have been rearranged to try to make the GIMP easier to use. However, virtually all of the tutorials still work if you are willing to search through the Page 4 of 8 menus when something isn't where it's supposed to be. People new to the GIMP should look at the introduction to the GIMP (http://members.home.nl/m.weisbeek/the GIMP/). Be warned that the interface does take some getting used to, but can be quite easy to navigate once you do get used to it. One little known tip for using the file open/save dialogs is to use the tab key. Type in the first letter or letters of what you are looking for and press tab. The box will now only show files and directories that start with what you've typed in. Improving Your Pictures Don't be put off by the amount of learning you have to do to truly master the GIMP. For those looking to improve your pictures, it only takes a few minutes of study to learn how to use perhaps the two most useful tools for improving your pictures: the levels and crop tools. The auto button for levels works wonders most of the time. Compare the two pictures below. The first is the original (scan) while the second has had auto levels applied. Notice how the colors are better now. While the effect can sometimes be subtle, it does make a difference in how your image is perceived. In addition, haze and cloudiness can sometimes be removed as well, if they are present. Illustration 5: Raw image Page 5 of 8 Illustration 6: After applying auto levels The third picture is the final version. The third involved some use of the clone tool to remove the people (above the tulips and the part of the person just showing behind the left tree) and several other minor enhancements. Page 6 of 8 Getting the GIMP For Windows users, there are two versions of the GIMP. The 1.2.5 version is Illustration 7: Final version recommended for Windows 95, 98, and ME, while the 2.x series is recommended for Windows 2000 and XP. There were a number of refinements made to the interface between the 1.2 and 2.0 series, but 1.2 can still do everything that 2.0 can do. However, some things are easier to do in the 2.0 series, especially working with text. Windows users can download the GIMP installer from http://gimpwin.sourceforge.net/ . The stable version is 2.0.x (as of 10/14/2004) and the previous stable version is the 1.2.5. You must also install the GTK program or the GIMP will not work. In addition, you may want to download and install the help and animation packages. The first time you run the GIMP, a setup wizard will appear. The GIMP will also take longer to start the first time. Also, you may see a DOS window open at some point. Just minimize it. If you close it, the GIMP will close. Linux users may already have the GIMP installed; and if they don't, they should look to their distributions for installation methods. Knoppix (a live Linux CD) comes with the GIMP already installed. Page 7 of 8 Conclusion If you're looking for advanced photo editing, graphics manipulation software, you need look no further than the GIMP. It can compete with the commercial programs at a price and openness that can't be beat. With a $0 cost and ability to give away copies to all your friends, there's no reason for anyone to be without quality graphics/photoediting software anymore. Page 8 of 8 Introduction to GIMP From the point of view of a Software Developer with just enough artistic skills to draw a stick person. What is GIMP ● ● ● GNU Image Manipulation Program Created in 1995 as a Computer Science Project by Spencer Kimball and Peter Mattis. Runs on Linux, most versions of Unix, Mac OS, and Windows Goal of this Presentation To demonstrate the basic functionality of GIMP from the point of view of a Unix Software Developer with hopes to motivate the audience to want to learn and use the tool on their own. About Scott Nesler ● ● ● ● Live in Chesterfield with my Wife Lisa, 9 year old son Andrew, and 6 year old Ben. I'm having trouble converting Andrew and Ben to Linux because EA Games (Sims) do not run on Linux. They do like TuxRacer though I am Software Developer who prefers developing on a Unix / Linux platform. In the past twenty years I have been fortunate to work for firms whose I.T. Platform was one Unix flavor or another or I have been able to introduce one or two Linux boxes to keep my C/C++, Command Line, and LAMP craving fed. Sometimes I have to program / integrate in a Microsoft environment to keep food on the table. 1987 Computer Science Grad from SIUE. What we will cover ● ● ● ● ● ● ● Converting Image Types Image Resizing and Rotating Red Eye Reduction Producing Transparent Logos and Icons * * * Using Layers * * * Clipping Objects Put together an SLUUG Logo Converting Image Types ● ● ● ● ● ● ● ● ● ● ● ● .xcf (Native Format, Saves Layers) .fli (Autodesk) .dcm and .dicom (DICOM) .ps, .ps.gz, and .eps (PostScript) .fits, .fit (FITS) .ico (Microsoft Icon) .avi (Microsoft Video) .psp, .tub (Paintshop Pro) .pnm, .ppm, .pgm, .pbm (PNM) .gif, .jpg, .png, .tif (Most Common Image Formats) .xbm, .xwd (X Bitmap) .pdf (Adobe) Image Resizing Image Rotating Red Eye Reduction ● ● ● ● Use Circle Select. Shift left mouse to make a perfect circle. Tools – Color Tools – Hue Saturation Toggle R Slide Saturation Transparent Backgrounds Take the Square out of Icons and Logos Layer – Transparency – Add Alpha Channel ●Select Region By Color ●Select White ●Cntrl – K for Clear ●Select red, add select border of letters, feather edge. ScriptFu – Shadow – Drop Shadow ● Layers (Blending Images) Layers (More Blending - Opacity) Fun with Words and Letters Text Tool ●DejaVu Sans Bold Not-Rotated, Size 200, White ●Select NIX with Color Selector. New Color Layer ●Bucket Fill with Red Foreground, Opacity 40 ●New Pattern Layer. Fill with Pattern Marble #1 ●With the Pattern Layer Selected and the NIX Selected run Filters – Edge-Detect - Neon ● Layers – 3D Paste Clipping Objects Logo Project Splinters of GIMP GimpShop – Modification of GIMP with the intent to replicate the feel of Adobe Photoshop CinePaint - descendant of GIMP. Expands on file format compatibility. Proper color management. Targeted audience is movie retouching. Krita – Koffice paint utility. Aimed at graphic professionals. 32bit color management system. CMYK and RGB. Python and Ruby engine allows scripting similar to Adobe's Action scripts. Reference Books ● ● ● ● ● Beginning GIMP – From Novice to Professional by Akkana Peck, Published in 2006 Apress Publishing Essential GIMP for Web Professionals by Michael Hammel, Pearson Education/April 2001 The Gimp Pocket Reference by Sven Neurmann, O'Reilly 2000 Grokking the GIMP by Carey Bunks, Pearson Education/February 2000 Guerilla Guide to Great Graphics with the GIMP by David Busch, Premier Press / January 2000 Web/Other References ● ● ● Official Site - www.gimp.org Linux Journal, July 2007, Quick Takes, Deep Images – CinePaint, descendant of GIMP. Expands on file format compatibility. Proper color management. Targeted audience is movie retouching. – Krita – Koffice paint utility. Aimed at graphic professionals. 32-bit color management system. CMYK and RGB. Python and Ruby engine allows scripting similar to Adobe's Action scripts. Slashdot (Questions – Flame War) – June 5th – Alternatives to Adobe's Creative Suite – January 27th, Using The GIMP to Improve Photos? NOTE: ● ● I sent a note to Bill Kendrick who performed a demonstration of GIMP to a Sacramento PC Group in 2002. I asked if he still used GIMP and what his thoughts were on the state of GIMP. He mentioned that he only uses GIMP for real work. He is also the author of Tux Paint. He feels Krista is make great strides in the Open Source Imaging sector. He will always have a fondness for GIMP. On-Line Tutorials http://gug.sunsite.dk/tutorials Conclusion ● ● ● Gimp is a powerful tool for free It is mature with loads of documentation and web support. Load it, learn it, use it, load it for others, and teach it. GIMP Demonstration and Tutorial © 2003, 2004 Paul Suda - [email protected] Originally created April 2003 for NPOTechs Chicago <http://npotechs.org>. Last revised 2004-08-09, updated for GIMP v. 2.0. This document is licensed for use under the terms of the GNU General Public License. See http://www.gnu.org/licenses/gpl.txt for the full text of the license. This is a demonstration of abilities and tutorial for The GIMP. This outline was developed using GIMP version 2.0. See http://gimp.org for more details about how to obtain a copy of the GIMP for free. Table of Contents Freehand drawing + the Basics ..............................................................................................2 Creating a New Image.........................................................................................................2 Selecting Colors, Paintbrushes, and Tool Options.............................................................2 Pencil and Paintbrush Tools................................................................................................2 Undo and Redo...................................................................................................................3 Saving Images.....................................................................................................................3 Image Types........................................................................................................................3 Introduction to Photo Retouching............................................................................................4 Rotating the Image..............................................................................................................4 Cropping and Image Size. ..................................................................................................4 Simple Color Correction......................................................................................................4 Using the Clone Tool...........................................................................................................4 Advanced Color Correction.................................................................................................5 Using Layers............................................................................................................................5 Please leave the levels-example.jpg photograph from the last section open. In this example we will add a caption to our photograph. To do this we will create a new layer, which functions as an overlay placed over our photo.........................................................5 Creating a New Layer..........................................................................................................5 Filling and Adjusting Layer Opacity.....................................................................................5 Adding Caption Text to the Photo.......................................................................................6 Moving the Caption..............................................................................................................6 Using Selections......................................................................................................................6 Selecting Areas in an Image...............................................................................................6 Using the Paint Tools With Selections................................................................................7 Applying a Filter to Selected Areas.....................................................................................7 References...............................................................................................................................7 Freehand drawing + the Basics Creating a New Image In the main dialog, select New, under the File menu. In the New Image dialog, click OK. We will create our new image with the default size of 256x256 pixels and RGB color mode. The new, blank, image that is created will look like this. Selecting Colors, Paintbrushes, and Tool Options Double-click the foreground or background color, or the current brush, to open dialog boxes to select new colors and shapes for your tools to use. Pencil and Paintbrush Tools Try out the pencil and paintbrush tools and doodle a little bit in the blank image we created in the first step in this section. Notice the difference between the hard edged pencil lines and the softer paintbrush strokes when using the fuzzy edged brushes. Be sure to use the Color Selection and Brush Selection dialogs, which you should already have open, to create an image using a number of different brushes and colors. Undo and Redo The keyboard shortcuts are ctrl-z for undo, and ctrl-y for redo. These features can also be accessed through the Edit image menu. The image menu is accessed by right clicking on the image window, or by selecting one of the menu items in the menu bar at the top of the image you're working on. Every image operation in the GIMP is available through this menu system. Note: A default limit of 5 steps can be undone. To set this limit to a higher value, see the Environment section of the preferences dialog found under the File - Preferences... menu item in the main dialog. Saving Images To save the image: 1) From the image menu, select File - Save As... 2) Make sure that the file type XCF is selected. This is the GIMP's native file type, and will preserve all information about your image. 3) Enter a name and select OK. Note that there are many other file types available. For publishing photographs to the web, JPEG is a good choice. PNG and GIF are lossless formats that are preferred for publishing designed images, such as logos. If you are saving a work in progress that you plan on editing again in the GIMP, XCF is the best file type to use, as it is the GIMP's native file type. Image Types GIMP images can be one of three modes: • • • RGB – Images with a full range of colors. Typically used for PNG, JPG, and XCF format images. Indexed – Images with a fixed pallet of colors or grays. GIF images load as this type. Grayscale – Black and white images. These are also typically saved as PNG, JPG, or XCF format files. Introduction to Photo Retouching In this section, we will correct a variety of common image quality problems with some example photographs. Open the photo-example.jpg file, which we will retouch in the following steps. Rotating the Image Use the Image - Transform - Rotate 90 degrees CW menu item, in the image menu to rotate the image 90 degrees, or right side up. Or, use the Rotate tool to rotate images any number of degrees, getting it as close as you can to right side up. Cropping and Image Size. You can use the crop tool to cut down an image. Keeping in mind what the subject of your photograph is, cut off any extra portions of the photograph that seem to contain too much empty space, or material that is not interesting. For the photoexample.jpg, this might mean cutting away all of the photo but the tower. Simple Color Correction The Tools - Color Tools menu contains the GIMP's tools for correcting and enhancing the overall color characteristics of an image. The Color Balance and Hue-Saturation dialogs have sliders to perform basic color adjustments. Using the Clone Tool The clone tool is used to duplicate parts of the image, using the current paintbrush. Ctrlclick to select a spot on your image to clone, then click and paint, in the same way as using the paintbrush or pencil tool, to paint a duplicate copy of that portion of the image in another location. It is important to note that the current paintbrush sets the pattern in which the cloned image is painted onto the new location. Try using the clone tool to remove any unwanted objects from the photo. Advanced Color Correction Open the levels-example.jpg file, which we will use for this step. Sometimes the color correction tools covered above do not feature enough control to produce the desired result. This is particularly true when one end of the brightness spectrum needs adjustment, but the other does not. The levels-example.jpg is such a case, so we will use the levels utility to selectively enhance the brightness and contrast of the image. Open the levels dialog from Tools - Color Tools - Levels... in the image menu. Using Layers Please leave the levels-example.jpg photograph from the last section open. In this example we will add a caption to our photograph. To do this we will create a new layer, which functions as an overlay placed over our photo. Creating a New Layer Use the Dialogs - Layers menu item (or the shortcut key ctrl-L) to access the layers dialog. You will see the single, background, layer of the current image you are editing. Click the new layer button to create a new layer. Next, right click on the new layer, in the Layers dialog, and select Layer Boundary Size... from the menu. Our layer should have a new width of 300, and a new height of 100. Don't forget to click the button, to unlink the sizes from being constrianed to the image size ratio. Filling and Adjusting Layer Opacity Make sure that the new layer is selected in the Layers dialog, or you will fill over the photograph instead of just the caption area. We will now fill in the background for the caption box. First, select the color you would like to use for the background. Then select the whole layer area by pressing ctrl-a, and fill using the paint bucket tool . Now, use the Opacity slider in the Layers dialog, to adjust the layer so that it is subtly accented from the photograph. Adding Caption Text to the Photo Before you add any text, select the color you would like to use for the text as the foreground color. Use the text tool to add text to the new layer. Click on the location you would like to add text, using the text cursor. You will then be prompted to enter the text and choose a font. Enter the caption “Train Yard” for this picture. Once you have clicked ok in the text tool dialog, you will notice that there is a new layer called Train Yard. This new layer contains the next that you've entered. You can go back and edit this text at any time, or adjust the size and font characteristics in the tool options for the text tool. Moving the Caption You can now use the move tool photograph. to move the caption layer to the best position within the Using Selections Selections are used in the Gimp to define areas of an image where an effect will take place. Selections are a very powerful feature, and provide the basis for most graphic design related functions in the Gimp. Please leave the levels-example.jpg photograph from the last section open, we will use it in these examples. Selecting Areas in an Image There are six different select tools available in the Gimp. With most of these tools, these mouse and keyboard combos can be used to select complex shapes... • Holding shift when clicking with a select tool will add to the current selection. • Holding shift while dragging to make a selection will select an area of equal height and width. • Holding control when clicking to make a selection will subtract from the current selection. • Holding control while dragging to make a selection will select an area centered around the selection starting point. Using the Paint Tools With Selections Once you have selected an area, switch to the paint bucket tool , and click to fill the image. Notice that only the selection is filled with the current color. Try using the pencil and paintbrush tools to see how they are affected by selections. Applying a Filter to Selected Areas Select an area of the photograph on which you would like to try out some special effects. Then select the Filters - Artistic - Cubism... menu item. The Gimp provides a huge number of filters and effects, the best way to get to know what all of them do is through experimentation. Also, most of the Tools - Color Tools menu operations are affected by selections in a similar way as filters. References The GIMP Homepage http://gimp.org The main site for the GIMP project. Check here for the most recent GIMP package and plug-in downloads, as well as documentation and tutorials. GIMP for Photo Editing Download GIMP from http://www.gimp.org/ Install the software. GIMP stands for GNU Image Manipulation Program. It is open source software. Getting Started. Click Start > Programs > GIMP. Pull down the File menu, select Open. Browse for a graphic file in Documents > My Pictures. Click Open. Resizing a Photo. Pull down the Image menu and select Scale Image. Resize large photos to 1024x768 or 800x600 for printing. Resize photos to 150-250 pixels height for web publishing. Set the resolution to 72 pixels (dpi). Click Scale. The photo below is 200 pixels high. Cropping a Photo. Choose the Selection Tool from the Pull down the Tools panel. Select the area you wish to keep. Pull down the Image menu and select Crop Image. Directions for using GIMP Annette Lamb Page 1 Adjusting Image Color. Pull down the Layer menu, select Colors. Notice the choices in this area. First, choose Color Balance. Use the slide bars to make minor adjustments in color. If you don’t like it, choose Reset. Within Layer>Colors, choose Brightness/Contrast and use the slide bars to make adjustments. Adding Lines, Shapes, and Graphics. Select tools from the tool panel and apply them to your visual. Notice that you can change the color and brush strokes. Ideas: Take a photograph containing a “shapes in our world.” Add line s or ovals to show the shapes. Copying a photo. If you want to copy your photo to another software package, pull down the Edit menu, select Copy to Clipboard. Saving a photo. Pull down the File menu and select Save As. Notice the options for saving as different file types such as png. Directions for using GIMP Annette Lamb Page 2