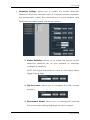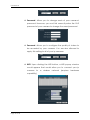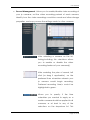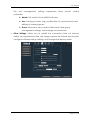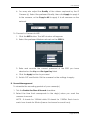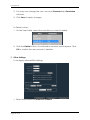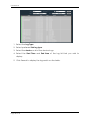
1
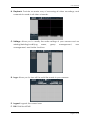
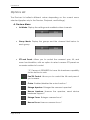
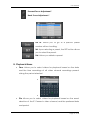
MDMS Multiple Device Monitor System v1.0 User Manual User Manual © Copyright 2014 All rights reserved. No part of this document may be reproduced, republished, or retransmitted in any form or by any means whatsoever, whether electronically or mechanically, including, but not limited to, by way of photocopying, recording, information recording, or through retrieval systems without the express written permission. We reserve the right to revise this document at any time without the obligation to notify any person and/or entity. All other company or product names mentioned are used for identification purposes only and may be trademarks of their respective owners. LIMITATION OF LIABILITY AND DAMAGES THE PRODUCT AND THE SOFTWARES WITHIN ARE PROVIDED "AS IS," BASIS. THE MANUFACTURER AND MANUFACTURER’S RESELLERS (COLLECTIVELY REFERRED TO AS “THE SELLERS”) DISCLAIM ALL WARRANTIES, EXPRESS, IMPLIED OR STATUTORY, INCLUDING WITHOUT LIMITATION THE IMPLIED WARRANTIES OF NON-INFRINGEMENT, MERCHANTABILITY OR FITNESS FOR A PARTICULAR PURPOSE, OR ANY WARRANTIES ARISING FROM COURSE OF DEALING, COURSE OF PERFORMANCE, OR USAGE OF TRADE. IN NO EVENT WILL THE SELLERS BE LIABLE FOR DAMAGES OR LOSS, INCLUDING BUT NOT LIMITED TO DIRECT, INDIRECT, SPECIAL WILLFUL, PUNITIVE, INCIDENTAL, EXEMPLARY, OR CONSEQUENTIAL, DAMAGES, DAMAGES FOR LOSS OF BUSINESS PROFITS, OR DAMAGES FOR LOSS OF BUSINESS OF ANY CUSTOMER OR ANY THIRD PARTY ARISING OUT OF THE USE OR THE INABILITY TO USE THE PRODUCT OR THE SOFTWARES, INCLUDING BUT NOT LIMITED TO THOSE RESULTING FROM DEFECTS IN THE PRODUCT OR SOFTWARE OR DOCUMENTATION, OR LOSS OR INACCURACY OF DATA OF ANY KIND, WHETHER BASED ON CONTRACT, TORT OR ANY OTHER LEGAL THEORY, EVEN IF THE PARTIES HAVE BEEN ADVISED OF THE POSSIBILITY OF SUCH DAMAGES. THE ENTIRE RISK AS TO THE RESULTS AND PERFORMANCE OF THE PRODUCT OR ITS SOFTWARE IS ASSUMED BY CUSTOMER. BECAUSE SOME STATES DO NOT ALLOW THE EXCLUSION OR LIMITATION OF LIABLITY FOR DAMAGES, THE ABOVE LIMITATION MAY NOT APPLY TO THE PARTIES. IN NO EVENT WILL THE SELLERS’ TOTAL CUMULATIVE LIABILITY OF EACH AND EVERY KIND IN RELATION TO THE PRODUCT OR ITS SOFTWARE EXCEED THE AMOUNT PAID BY CUSTOMER FOR THE PRODUCT. Page 2 of 40 User Manual Contents About the Software ................................................................................................. 4 Requirements............................................................................................. 4 Operating Systems Supported ................................................................. 4 Installation Steps ........................................................................................ 5 Login using the Default Account..................................................................... 6 The MDMS GUI .......................................................................................................... 7 The Graphic User Interface ............................................................................... 7 System Button List ................................................................................................. 8 Label List ................................................................................................................. 8 Options List ...........................................................................................................10 Real Time Preview ..............................................................................................20 Video Control Options ......................................................................................23 Using the MDMS ..................................................................................................... 24 Preview ..................................................................................................................24 Playback ...............................................................................................................26 Settings ..................................................................................................................27 Logs ........................................................................................................................37 Page 3 of 40 User Manual About the Software The Multiple Device Monitor System (MDMS) allows you to perform both basic and advanced controls of your IP cameras. These may include the viewing of images/videos, adding of devices, management of groups, pan/tilt/zoom oriented controls, and other similar functions. Requirements Your computer must meet the following minimum requirements.. Pentium IV (4) Series and Above (CPU frequency above 2G) 2G Memory (Or Higher) 120G and above Free Hard Disk Space 1024 x 768 Monitor Resolution Size Operating Systems Supported The following operating systems below are supported by the MDMS. Windows 2000 Windows XP Windows 2003 Windows Vista Windows 7 Window 8 Page 4 of 40 User Manual Installation Steps Installing the MDMS is quick and easy. Follow the steps provided below to start using your MDMS. 1. Unzip the INSTALLATION zip file. This can be done with the following steps a. Right click on the MDMS Zip File. b. Click Extract All. c. Select a Destination folder (by default this displays the current folder where the zip file is) and click Extract. A folder containing the Multiple Device Monitor System (version#).exe would appear just beside your zip file. 2. Double click on the Multiple Device Monitor System (version#).exe to begin the installation. Simply follow the steps provided in the setup, and you’re ready to use the software. NOTE: A Shortcut icon would be created on the desktop for an easier access of the MDMS. Page 5 of 40 User Manual Login using the Default Account By default, the MDMS requires its users to LOGIN with the necessary credentials before you are allowed to use its full features. You may login using the default username : admin and click the OK button. NOTE: By default, the admin account DOES NOT require any password to login. Simply enter the admin as its username, and click OK to login. This can be configured later on. Page 6 of 40 User Manual The MDMS GUI The Graphic User Interface The MDMS Graphic User Interface or GUI has seven (7) essential blocks which will allow you to fully maximize the usage of your IP Cameras. A. System Button List D. Real Time Preview B. Label List E. Video Control Options C. Options List Page 7 of 40 User Manual System Button List Allows you to open the user manual, minimize and maximize the MDMS window, and close the MDMS. It has the following buttons: Opens the MDMS User Manual. Minimizes the MDMS Window. Maximizes the MDMS Window. Closes / Exits the MDMS. Label List Functions as the Main menu of your MDMS. It allows you to access all of the features present in your MDMS. The Label list also displays the current user account used in logging in, and the time and date used by the MDMS as well. It has the following menus: A. Preview. The default page of the MDMS. The preview button focuses more on the display of videos, the devices that are accessible, and mostly camera control oriented functions. Page 8 of 40 User Manual B. Playback. Provides an easier way of accessing all video recordings, and screenshots made in all video channels. C. Settings. Allows you to modify the entire settings of your camera such as adding/deleting/modifying areas, group management, user management, and similar functions. D. Logs. Allows you to view all the activities made in your camera. E. Logout. Logouts the current user. F. Exit. Exits the MDMS. Page 9 of 40 User Manual Options List The Devices List reflects different values depending on the current menu selected (applies only to the Preview, Playback, and Settings). A. Preview Menu List Mode. Display the settings and available video channels. Group Mode. Display the groups and the channel that below to each group. PTZ and Preset. Allows you to control the camera’s pan, tilt, and zoom functionalities, with an option to select camera PTZ presets as an easier method of control. * IP Camera is REQUIRED to have this hardware capability for the button to work Pan/Tilt Control. Allows you to control the tilts and pans of your camera. Cruise. Enables/disables the cruise function.* Enlarge Aperture. Enlarges the camera’s aperture* Narrow Aperture. Narrows the aperture, need device hardware support.* Enlarge Focus. Enlarges camera focus.* Narrow Focus. Narrows camera focus.* Page 10 of 40 User Manual Forward Focus Adjustment.* Back Focus Adjustment.* Go To. Allows you to go to a specific preset number without scrolling. Set. Upon selecting a preset, the SET button allows you to select the preset. Del. Allows you delete a preset. B. Playback Menu Time. Allows you to select videos for playback based on the date and the time recordings of all video channel recordings present during the period selected. File. Allows you to select videos for playback based on the exact selection of the IP Camera’s video channel, and the preferred date and period. Page 11 of 40 User Manual C. Settings Menu The Options list for the Settings menu allows you to add devices and areas, manage multiple cameras and group these cameras according to preference, configure the camera’s settings (e.g. password, quality, environment model etc), enable recording plans and the path of the record files, add/edit/delete users, and change other related settings. Device Management Record Management Group Management User Management Parameter Settings Other Settings Device Management. The default option displayed in the settings page. The device management submenu allows you to add/modify/delete an area, add/modify/delete devices, organize the grouping of devices according to area, and search for devices on the network. Page 12 of 40 User Manual Displays the UID of the Cameras detected in the network. Displays the areas and cameras under the network/each area. Adds an Area. Allows you to modify an area’s properties. Allows you to delete an area. Allows you to add an ip camera. Allows you to modify an ip camera’s properties. Allows you to delete an ip camera entered on the MDMS. Allows you to assign detected ip camera/s to a particular area/s. Allows you to search for ip camera/s present in the network. Allows you to select all detected ip cameras. Group Management. Allows you to create groups which will organize the cameras that you have. Page 13 of 40 User Manual Displays the cameras and areas that you currently have in the network. Displays the groups that you currently have. This area is also where your newly created group will appear. Allows you to add a group and determine its number of cameras. No. is determined by the selected Split Number upon adding a group (e.g. if Split Number property of Cam Sample 1 is set to 4, 4 Channels will show in this table). By default, each channel field requires you to assign a camera. Allows you to modify the name and the number of cameras in a certain group. Allows you to delete a group. Allows you to assign a camera to a particular channel. Allows you to remove an assigned camera from a group’s channel. Upon selecting a channel on a certain group, this button allows you to re-assign the number of a particular channel to a lower camera NO. (lowest is 1) on every click. Upon selecting a channel on a certain group, this button allows you to re-assign the number of a particular channel to a higher camera NO. (highest is 16) on every click. Page 14 of 40 User Manual Parameter Settings. Allows you to modify the motion detection feature of all your ip cameras, each IP camera’s screen properties, the environment model, the password set on each camera, and determine the video quality of each ip camera. Motion Detection. Allows you to obtain the current motion detection sensitivity set on your camera, or manually change the sensitivity. NOTE: The higher the sensitivity value set the higher alarm trigger percentage. Flip the Screen. Allows you to configure the video screen property. Environment Model. Allows you to permanently indicate the environment settings (lightings) for each camera. Page 15 of 40 User Manual Password. Allows you to change each of your camera’s password. However, you must first correctly enter the OLD password of your camera to change its current password. Password. Allows you to configure the quality of videos to be recorded by your camera. You are also allowed to apply this setting to all of your ip cameras. WiFi. Upon clicking the WiFi button, a WiFi popup window would appear that would allow you to connect your ip camera to capability). Page 16 of 40 a wireless network (requires hardware User Manual Record Management. Allows you to enable/disable video recording of your ip cameras, set the video recording periods of each camera, identify how the video recordings would be saved and other storage properties, and copy or save the settings made to other cameras. After selecting a camera on the list, ticking/unticking this checkbox allows you to enable or disable the video recording feature of your camera(s). After enabling the plan of record, left click (or drag if applicable) on the preferred time schedules wherein your ip camera would begin recording. Preferred recording time/s would be highlighted in green. Allows you to specify if the time schedules you wanted to apply on a certain camera should be applied to all cameras, or at least to any of the selections on the dropdown list. This Page 17 of 40 User Manual section also allows you to save the changes you have made. Allows you to specify the method used by the MDMS when recording videos. Ticked Storage(s). Once these storage(s) are full, the camera would immediately delete the oldest recordings present in these ticked storage(s) to continue recording. If none are ticked. The camera would stop recording General Record Length. Allows you to specify the length of videos to be recorded. Remaining disk begins recovery Control. Allows you to specify the overall size limit of videos to be made in each storage. User Management. Allows you to add/modify/delete users and assign permissions to each. Page 18 of 40 User Manual The user management settings implements three access control authorities: Admin. Full control of the MDMS software. User. Viewing of video, logs, modification of own password, and editing of channel groups. Guest. Allowed to view current video feeds, alter group management settings, and change own password. Other Settings. Allows you to modify the connection time out interval, define the log retention time, the image capture file format and its path, configure software startup settings, and change the display mode. Page 19 of 40 User Manual Real Time Preview Displays the current/real time video preview of each active IP camera. It also allows you to identify if there is currently a sound feed and audio on the previewed area, verify if the current channel or video has an alarm, and identify if a certain channel is currently being recorded. These can be monitored through each video channels’ icon. If active, the Talk Status icon indicates where the MDMS is currently feeding sounds. If active, the Audio Status icon indicates if the current channel has its audio enabled. If active, the Alarm Status icon indicates if the current channel has alarms set. Page 20 of 40 User Manual If active, the Record Status icon indicates if the current channel is being recorded. Device List Fold/Unfold Button. Hides or displays the Devices List block. In addition, the Real Time Preview block displays different controls that depend on the current menu selected (applies only to Preview and Playback menu). A. Preview Menu On the Playback menu, the Real Time Preview control allows you to zoom in, feed sounds (if mic is present)to a selected camera, increase/decrease each video’s volume, activate recording, capture an image, change the screen preview of all present cameras. These can be done with the buttons below: Zoom Button. Zooms in on the selected channel. Audio Talk Button. Enables the talk feature on your own station (the PC that runs the MDMS) and feeds the captured audio on the selected channel. Once enabled, the will popup on the corresponding channel you have selected to indicate that you are feeding sounds in that particular video channel. Listen Button. Enables/disables/controls the audio of one or multiple selected channels. Record Button. Enables or disables the recording in one or multiple channels. Once enabled, the will popup on the corresponding channel/s you have selected to indicate that you are currently recording the video/s captured in that camera. Page 21 of 40 User Manual Snapshot Button. Allows you to capture an image or snapshot on the current video channel selected. Multi-picture Button. Allows you to change the current view of the video channels. Full Screen Button. Allows you to preview all of the channels present in the Real Time Preview block in full screen (excluding the controls). Press the Esc button to exit the full screen mode. Fold/Unfold Button. Hides or displays the Video Control Options block. B. Playback Menu On the Playback menu, the Real Time Preview control allows you to perform video controls on selected video channel recordings such as stop, pause, enable single frame play, image capture, zoom in, full screen mode, adjusting of playback speed, and other similar functions. These can be done with the buttons below: Play Button. Plays the selected video recording. Stop Button. Stops the selected video recording. Single Frame Play Button. Allows you to enable SINGLE frame play (one click one frame picture play) Snapshot Button. Allows you capture an image from the selected video recording. Enlarge Button. Allows you to ZOOM in on the video being played. Full Screen Button. Displays the Real Time Preview block in full screen. Page 22 of 40 User Manual Playback Speed. Allows you to select a playback speed for the recorded videos. Listen Button. Enables/disables/controls the audio of one or multiple selected channels. Select Start Time. Allows you to select a start time where the video recording would start playing. Upon entering the preferred start time, click the button to begin playing from the entered time. Fold/Unfold Button. Hides or displays the Video Control Options block. Video Control Options The Video Control Options block displays different values and capabilities for both Preview and Playback menu. A. Preview Menu On the Preview Menu, the video control options displays the time, the source (or ip camera), and the event that triggered the alarm. B. Playback Menu On the Playbak Menu, the video control options allow you to navigate on the video records of four channels through its timeline. Page 23 of 40 User Manual Using the MDMS Preview To configure the properties of all video channels in the parent area: 1. Right Click the Parent Area of your MDMS (in this case, Sample). 2. You may connect or disconnect all devices under the parent area, start or stop manual recording, or configure some quick settings to be applied in the entire parent area, its sub areas, and devices. Connected All. Connect all device in selected area. Disconnected All. Disconnect all device in selected area. Start Manual Record of Area. Enable manual record in selected area Stop Manual Record of Area. Disable manual record in selected area Quality. Selected can choose the image quality Auto Adjust All. Device in selected area auto adjusts view proportion Full Display All. Device in selected area adjusts image proportion according to the size of window of multi-picture view. Page 24 of 40 User Manual To configure the properties of one device: 1. Right Click the device UID (in this case, Sample). 2. You may connect or disconnect the device, start or stop manual recording, or configure some quick settings to be applied to the device. Connected Device. Connect device. Disconnected Device. Disconnect device. Start Manual Record of Device. Enable manual record in selected device Stop Manual Record of Device. Disable manual record in selected area Quality. Selected can choose the image quality Auto Adjust Device. Selected device auto adjusts view proportion Full Display Device. Selected device adjusts image proportion according to the size of window of multi-picture view. Page 25 of 40 User Manual Playback To search time for Playback: 1. Define the file type and searching time 2. Select windows to playback, then select device channel on list tree 3. If there is record file matching to searching condition, the file should display on the timeline frame 4. Double click on channel to playback Schedule record: alarm record: manually record: Note: Move the mouse on timeline and it will display the time point of the current position. Click to view the video. You may also right click on timeline and the display length should turn into 2-hour from 24-hour. Page 26 of 40 User Manual To search file for Playback: 1. Select the file type and device channel. 2. Select searching time then click Search, the eligible files would display on device tree 3. Select playback windows then double click record file to view video. The MDMS can support one video displaying on four windows simultaneously. Settings Click the Settings menu on the label list to access the management settings below. A. Device Management To add an area: 1. Click the Add Area button. The Add Area window would appear. 2. On the Add Area window, enter the preferred Area Name. Page 27 of 40 User Manual 3. Click OK to finish. 4. You will find the newly added area on the right hand table, as seen below. To modify an area: 1. On the rightmost table, tick the area that you want to modify. 2. Click the Modify Area button. The Edit Area window would appear. 3. You may now change the name of the selected area. 4. Click OK to apply changes. To delete an area: 1. On the rightmost table, tick the area that you want to delete. 2. Click the Delete Area button. The Check window would appear asking for your confirmation to delete the area. 3. Click OK to delete the area. To add a device: You may either do the following actions. Page 28 of 40 User Manual Click Add device and enter its own UID, the preferred name that you wish to assign to the IP camera, its password, and the area where you wish to assign the IP Camera. Click OK to finish. Note: You cannot use this method if you have not created an AREA. Click the Search button to detect all connected ip cameras in the network. To modify a device: 1. On the rightmost table, tick the device that you want to modify. 2. Click the Modify Device button. The Edit Device window would appear. 3. You may now change the name, password, and designated area of the selected device. 4. Click OK to apply changes. To delete a device: 1. On the rightmost table, tick the area that you want to delete. Page 29 of 40 User Manual 2. Click the Delete Device button. The Check window would appear asking for your confirmation to delete the device. 3. Click OK to delete the device. B. Group Management To add a group: 1. Click the Add Group button. The Add Group window would appear. 2. Enter the preferred Group Name, and Split Number. NOTE: The Split Number determines the number of screens which would display upon accessing the group later on. 3. Click OK to add the group. To edit a group: 1. On the rightmost table, select the group that you want to modify. 2. Click the Edit Group button to edit the selected group. The Edit Group window would appear. 3. Change the properties that you want to change then click OK to apply changes. To delete a group: 1. On the rightmost table, select the group that you want to delete. Page 30 of 40 User Manual 2. Click the Delete Group button to delete the selected group. The Check window would appear asking for your confirmation to delete the group. 3. Click OK to delete the group. To assign cameras in a group: 1. On the rightmost table, select the group that you want to assign ip cameras on. 2. On the left table that lists down the areas with its respective devices, select the camera that you wish to assign to the group you have selected. NOTE: You may have to add devices first before you can assign a camera(s) to a specific group. 3. After selecting, click the camera, click the to move it to the first vacant slot. 4. If you wish to adjust the IP camera’s current number (this will affect the display of the real time channel preview) click the button to shift its current number. C. Parameter Settings To change a camera’s settings: 1. Select the camera that you wish to edit on the list. Page 31 of 40 User Manual NOTE: The UID and password of the camera you selected would be displayed. 2. If you want to adjust the motion detection sensitivity, select the preferred Sensitivity on the dropdown list and click Apply. NOTE: The higher sensitivity, the more often the camera would be triggering its alarm upon the detection of movements. 3. Change the Flip the Screen properties if needed and click Apply.This would affect the method by which the video capture is displayed on screen. 4. Change the environment model if the current applied environment does not suite the camera’s current location then click Apply to proceed. 5. You may also change the Password of the camera you have selected. Simply correctly enter the old password of the camera, enter and re-enter the preferred password then click Apply. Page 32 of 40 User Manual 6. You may also adjust the Quality of the videos captured by the IP Camera (s). Select the preferred Quality, then click Apply to apply it to the camera, or the Copy to All to apply it to all cameras on the network. To Connect a Camera to WiFi 1. Click the WiFi button. The WiFi window will appear. 2. Select the preferred Wireless network on the SSID list. 3. Enter and re-enter the correct password of the SSID you have selected on the Key and Re-type Key fields. 4. Click the Apply button to proceed. 5. Switch OFF and Switch ON the camera for the settings to apply. D. Record Management To schedule the recording periods of your camera(s) 1. Tick the Enable the Plan of Record checkbox. 2. Select the time that corresponds to the day(s) when you want the camera to record. NOTE : 0 stands for 1200AM while 23 stands for 1100PM. Each box in each hour stands for 30mins (hence two boxes for each hour). Page 33 of 40 User Manual 3. If you want to copy the said setting to some camera(s), select the preferred copying method on the dropdown list then click the Copy button. You may also just click Save if you just want the said setting to apply on the camera you have selected. 4. By default, the MDMS would allot a default setting of 10Gb space that should not be used for videos. Once the allotted file size has been reached, it would be moving to another disk where a 10Gb space is once again allotted and so on. By ticking Disk(s) on the list, once the selected disk has reached the <10Gb storage, the MDMS would be deleting the oldest record to make a storage for the new video/s. NOTE: The MDMS supports up to 24 disk partitions. The default path is D:/. 5. You may change the General Record Length (default is 5 mins, max is 30 mins), and change the recovery control capacity (10Gb by default). 6. Click Save to apply settings to the camera. To manually record videos: 1. Go to Preview. 2. On the Real Time Preview block, select the video channel that you want to start recording. Page 34 of 40 User Manual 3. Click the to manually start the recording. E. User Management To add a User: 1. Click the Add button. You may now add the necessary fields. 2. Enter the preferred Username (spaces are allowed). 3. Enter and confirm the preferred Password for the account. 4. Enter the Permission or the account authority for the account. 5. Click Save to save and apply changes. To Modify a User: 1. On the Users table, select the user that you want to modify. 2. Click the Modify button. The information fields of the selected user can now be modified. Page 35 of 40 User Manual 3. You may now change the user’s account Password and Permission authority. 4. Click Save to apply changes. To Delete a User: 1. On the Users table, select the user that you want to delete. 2. Click the Delete button. A confirmation window would appear. Click OK to confirm the user account’s deletion. F. Other Settings To configure other MDMS settings 1. Select the preferred Connection Timeout. Page 36 of 40 User Manual 2. Select the preferred Log Retention Time. This avoids the deletion of the logs if the time set in this area (e.g. 6 months) has not been reached by the logs yet. 3. Select the preferred image file Capture Format for image capturing. 4. Identify the destination of the image capture files. 5. Select the preferred Display Mode. 6. Click the Save button to save and apply changes. 7. If you wish to backup the current configurations click the Export Parameters and select the folder where you wish to save the config file. 8. If you wish to update the current configurations using a previously saved configuration file, click Import Parameters and select the file you have previously exported. Logs Log Types: All logs. Contains all information of system System log. Contains the information of user logins/logouts and user account configuration, and other user related modifications Operation log. Contains the record of user activities. Alarm log. Contains the record of all device alarm information To display preferred log: Page 37 of 40 User Manual 1. Select the Log Type. 2. Select preferred Sub log type. 3. Select the device or all of the devices logs. 4. Select the Start Time and End time of the log list that you wish to display. 5. Click Search to display the log results on the table. Page 38 of 40 User Manual Page 39 of 40 User Manual Copyright © 2014 Aztech Technologies Pte Ltd (CRN:199800635M). All rights reserved. Page 40 of 40