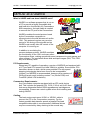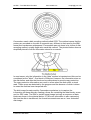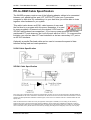
1
64HDD – The CBM Drive Emulator
www.64hdd.com
[email protected]
User Manual
© COPLIN 1999 – 2006
MSDO
S 7.x
© COPLIN 1999-2006
Compatible
Tolerant
1 of 136
Compatible
Also for:
VIC20,
Plus4, C16,
C128
v0.7alpha8
64HDD – The CBM Drive Emulator
www.64hdd.com
[email protected]
Copyright Notice
Alpha & Beta versions of this software before version 1.0 are freeware.
The Professional version of 64HDD is available for purchase from the 64HDD
website or authorised dealers.
Code is being developed by Nicholas Coplin,
Email:
[email protected]
Website:
www.64hdd.com
Both the freeware and Professional versions of 64HDD are copyrighted. Distribution
with other products or on compilation disks without prior permission from the author
is prohibited.
© COPLIN 1999-2006
Commodore™ and C=™ logo are registered trademarks Tulip Computers International B.V. and their licensees.
© COPLIN 1999-2006
2 of 136
v0.7alpha8
64HDD – The CBM Drive Emulator
www.64hdd.com
[email protected]
64HDD at a Glance
What is 64HDD and how does it 64HDD work?
64HDD is a software program that is run on
a PC to provide a highly compatible disk
and hard drive functionality for Commodore
8-Bit computers. A simple cable is needed
to connect the PC port to the Commodore.
64HDD emulates the serial protocol used
by the Commodore computers to
communicate to the disk drives such as the
1541. This protocol requires very precise
control of the timing of the signals and so
64HDD must usually take full control of the
computer it is running on.
In addition to emulating the
communications protocol, 64HDD emulates
the functionality of the 1541 and many other
Commodore drives, making operations seem transparent to most games and
other software. The emulation allows disk and tape images (D64, T64, PRG,
etc) to be directly used.
PC Requirements:
Almost any PC capable of operating a version of MSDOS and equipped with
a LPT port and CPU speed of at least 33MHz is suitable. Some slower PCs
have been known to work, whilst some portable PCs with speedstepping technologies have been found to be incompatible.
Version 6.xx MSDOS is recommended, however other versions of
DOS will largely work including version 7.xx (Win9x DOS) and
FreeDOS (some LFN limitations).
Commodore Requirements:
Any Commodore computer equipped with an IEC serial device
bus. This includes the popular C64, C128, C16/+4 ad Vic20. Note
that some aftermarket kernel ROM upgrades and cartridges are
incompatible. Please use a stock system when first installing and
testing 64HDD.
Cabling:
The basic setup requires an X1541 or XE1541 cable to
connect the PC to the Commodore computer. For the
fastest possible data transfer speeds a parallel PwrLoad
compatible data cable is recommended. Additional drives
may be connected by daisy chaining in the normal way.
© COPLIN 1999-2006
3 of 136
v0.7alpha8
64HDD – The CBM Drive Emulator
www.64hdd.com
[email protected]
64HDD Compared to the original 1541:
Feature / Function
Type
C= support:
C64
C128
C16/P4
VIC20
Serial Cable
(for compatibility)
Disk Image Support
File support:
Read
Write
PRG, SEQ
REL
Direct Access
Directory:
Standard
Advanced
Command Channel
Compatibility:
Fastloaders
GEOS
Cartridge
JiffyDOS
Max Capacity
CDROM Drive Support
User Subdirs
User Partitions
^
Original 1541
6644H
HD
DD
D
Hardware
PC Software
Yes
Yes
Yes
Yes
Yes
Yes
Yes
Yes
Yes
Yes – X/XE
No
D64, D71, D81,
D2M, T64, etc
Yes
Yes
Yes
Yes
Yes
Yes
Yes
Yes
Not yet
Yes
Yes
Yes
Yes
Yes
Yes
Yes
Yes
Yes
Yes
Yes
No CPU
Yes^
Mostly
Tolerant
Only limited by PC
used
166kb
No
Yes
No
Yes
nil
990
Disk driver required
© COPLIN 1999-2006
4 of 136
v0.7alpha8
64HDD – The CBM Drive Emulator
www.64hdd.com
[email protected]
64HDD Compared to the Cartridge Alternatives:
Feature / Function
IDE64
MMC64
6644H
HD
DD
D
Type
C= support:
C64
C128
C16/+4
VIC20
Serial Cable
(for compatibility)
Disk Image Support
Cartridge
Cartridge
PC Software
Yes
No
No
No
Menu Only
No
No
No
Yes
Yes
Yes
Yes
No
No
Yes – X/XE
Extracted D64
Transfer D64 to
real 1541
D64, D71, D81,
D2M, T64, etc
Yes
Yes
Yes
Yes – v0.9
No
Menu Only
No
Menu Only
No
No
Yes
Yes
Yes
Not yet
Yes
Yes
???
No
No
Yes
Yes
Yes
No
Yes
No
Yes %
No
Tolerant
2GB, two drives
(??)
No
No
No
Tolerant
No CPU
Yes^
Mostly
Tolerant
Only limited by
PC used
File support:
Read
Write
PRG, SEQ
REL
Direct Access
Directory:
Standard
Advanced
Command Channel
Compatibility:
Fastloaders
GEOS
Cartridge
JiffyDOS
Max Capacity
CDROM Drive Support
User Subdirs
User Partitions
^
%
MMC/SD Limit
Yes
No
Yes
Yes
Yes
Yes
16 on v0.9
nil
990
Disk driver required
Drive / CF card must be dedicated to GEOS only and GEOS requires a disk driver.
© COPLIN 1999-2006
5 of 136
v0.7alpha8
64HDD – The CBM Drive Emulator
www.64hdd.com
[email protected]
Quick Start Guide
Please read the INSTALL.TXT file included with your distribution of 64HDD for more
detailed information. 64HDD is intended to run from MSDOS, so you will need to
boot to DOS or shutdown from Windows to the DOS prompt. Some of the
installation can however be accomplished whilst within Windows. For those not
familiar with DOS, or those who may have forgotten, a “DOS for Commies” guide is
available for download from the 64HDD website.
Installation
64HDD Professional users should refer to the Quick Start installation leaflet
provided with their software disks.
64HDD CD-Edition users should refer to the CD-Edition user guide available for
download from the 64HDD website.
For freeware users, and those who prefer to manually install they software, the
easiest way to use 64HDD is to install it with a default setup. From the c:\ prompt,
and using the DOS version of PKUNZIP:
PKUNZIP -d 64HDD.ZIP
The -d is important as it will create the correct file system structure:
c:\64hdd
c:\64hdd\system
...and so on...
If using the Windows version of an UNZIP tool, such as WinZip, then check that the
option to extract with “sub-folders” is enabled.
You will need to add C:\64HDD to your MSDOS path by modifying your
autoexec.bat file.
The GO64HDD batch file is the ideal way to run 64HDD. It will accept addition
parameters after the "code", and you can permanently modify the batch file to suit
your configuration. It is advisable to start of with the most standard configuration and
tailor it only when you know it works.
If you run "64hdd.exe -h" you get the following help screen that lists all valid
command-line options. These command line options will allow you to tailor the
runtime configuration. Command-line options will change depending upon the
version of 64HDD you are using. The general usage of the command is as shown
below:
© COPLIN 1999-2006
6 of 136
v0.7alpha8
64HDD – The CBM Drive Emulator
www.64hdd.com
[email protected]
usage: 64HDD.EXE [option1] [option2] […]
You *must* enable at least one device with '-X' or '+X filename' (with X equal 8, 9,...)
or the emulator will not be that useful.
NOTE:
filename given must include an absolute path to its location
The “Scroll-Lock LED” if enabled will function as an activity indicator, but will slow
down transmissions (particular from the command channel) considerably (and may
even be incompatible with some PCs). Professional users have a virtual indicator for
each activated device number.
Enabling “Pentium TSC” support requires that a Pentium CPU is installed in the PC
and that EMM386 is not installed. The CPU speed should be given as an integer (in
MHz), but if omitted and +p is the last command line parameter 64HDD will attempt
to compute it. Some Pentium systems will work with the standard PIT timing method
- really depends on how compatible your "compatible" is!
LongFileName (LFN) support needs a special module installed. See the
INSTALL.TXT file for information and the relevant chapter in the User Manual for
specifics. Special attention should be paid to ensure adequate FILES, BUFFERS,
and FCBS are allocated - the LFN tools can stretch these requirements.
As the emulator may reset when the RESET signal on the serial line is RESET (eg
when the Commodore computer is switched "on" or reset), it is recommended that
the 64HDD program be controlled via the example batch file provided
(GO64HDD.BAT). This batch file is also configured for working with the "EXIT"
command. This batch file may be modified by the experienced user. The "-noreset"
command line option may also be used.
The GO64HDD.BAT file has been configured to accept command-line parameters
so that (as in the registration example below) additional information can be given:
GO64HDD -xyz
The number of parameter passed to the batch file and the length of the final
command-line is limited by MSDOS rules and this can vary between DOS versions.
You might need to be mindful of the number of items listed and the size of paths
specified. Extra drives can be activated via the command channel once 64HDD is
running.
To run the emulator, either start the GO64HDD from within the installed directory or
have the batch and EXE programs on the MSDOS PATH. As noted above, you
should add the 64HDD directory to your MSDOS PATH. Professional users should
use PRO64HDD if they would like to take advantage of the functions made available
by 64GUI and 64CONFIG.
© COPLIN 1999-2006
7 of 136
v0.7alpha8
64HDD – The CBM Drive Emulator
www.64hdd.com
[email protected]
Accessing emulated disk drives
If you have the emulator running on PC (e.g. with device 8 activated) you can load
the directory as usual with:
LOAD"$",8
This gives the directory of the device which may be a directory on the harddisk, a
disk-image (.D64, .D71, .D81, .D2M), a tape-image (.T64) or an archive created by
the LYNX archiver (.LNX).
Loading works as usual too:
LOAD"filename",8
To change the directories on the PC, the directory loading command is slightly
changed. Wildcards will show files matching this pattern, and will not work to change
directories:
LOAD"$..",8
LOAD"$/dir1/dir2",8
LOAD"$d:/",8
LOAD"$d:/dir1/dir2",8
goes to the higher level PC directory
change to absolute PC directory
change PC drives
change PC drive and directory
LOAD"$directory",8
LOAD"$diskimage.D64",8
changes the current PC directory
attaches a diskimage in the current
PC directory
attaches a diskimage in the current
PC directory
attaches a diskimage in the current
PC directory
attaches a tapeimage
attaches a LYNX archive
LOAD"$diskimage.D71",8
LOAD"$diskimage.D81",8
LOAD"$tapeimage.T64",8
LOAD"$lynxarchive.LNX",8
Wildcards '*' can be used to load the first file in a disk /tape image, or MSDOS file
system.
Also, filetype specifiers are allowed when reading directories (see documentation for
complete listing).
Unit numbers are also supported and have the special function in that they can be
predefined as "shortcuts" to either directories or images.
© COPLIN 1999-2006
8 of 136
v0.7alpha8
64HDD – The CBM Drive Emulator
www.64hdd.com
[email protected]
Table of Contents
64HDD – The CBM Drive Emulator.................................................... 13
Overview ..............................................................................................................13
Features ...............................................................................................................13
Connectivity ......................................................................................................13
Disk Functions ..................................................................................................14
Cross-Platform Functions .................................................................................15
External Functions ............................................................................................15
Graphical User Interface Functions (Professional version only) .......................15
Print Spooling and Emulation Functions (Professional version only) ................15
Introduction...........................................................................................................16
Background ..........................................................................................................17
Compatibility.........................................................................................................18
CBM Computer Compatibility............................................................................18
PC Compatibility ...............................................................................................19
Protocol Speed .................................................................................................19
Cartridge / DOS Wedge Compatibility ..............................................................21
64HDD – User Interface (Professional only).........................................................22
64GUI – Disk / Partition Tool (Professional version only) .....................................23
Setup and Configuration.................................................................... 25
Basic Requirements .............................................................................................25
Optional Requirements.........................................................................................26
Building the PC.....................................................................................................26
64CONFIG – Setup Tool ......................................................................................27
Configuring 64HDD ..............................................................................................27
Configuring 64HDD for Use with a Boot Floppy or Boot CD.................................28
64HDD Command line Parameters ......................................................................29
Using a RAMDISK to speed things up (especially for LFN and Power-Loader
Operation) ............................................................................................................30
Trouble Shooting 64HDD .....................................................................................31
Accelerating Data Transfer................................................................ 33
Overview ..............................................................................................................33
Serial vs Parallel Cables ......................................................................................33
PWRLOAD ROM Upgrade ...................................................................................34
64HDD Speed-Up Cartridges ...............................................................................34
Disk Acceleration for 64HDD Professional Users.................................................34
FastLoader and X-Loader Disk Accelerators for the C64 .................................35
Z-Loader Disk Accelerator for the C128 ...........................................................38
64HDD System Plug-ins..................................................................... 40
Overview ..............................................................................................................40
LongFileName Support ........................................................................................40
CD-Audio Extensions ...........................................................................................40
Power-Loader Extensions ....................................................................................41
PSID for DOS .......................................................................................................41
Networking with 64HDD .......................................................................................41
USB Drives with 64HDD.......................................................................................41
© COPLIN 1999-2006
9 of 136
v0.7alpha8
64HDD – The CBM Drive Emulator
www.64hdd.com
[email protected]
EZ-Load Functions ............................................................................. 42
Device Number Swapping ................................................................. 43
Multi-Disk Program Compatibility..................................................... 44
Flipping disks with “Disk-Flip” ...............................................................................44
Automating “Disk-Flip” Tables ..............................................................................45
Copy Protection Support ................................................................... 46
Introduction...........................................................................................................46
TRACK18 Emulation ............................................................................................49
MSD TRACK&SECTOR Copy Protection ............................................................49
Native C128 Mode Support ................................................................ 51
Boot Sector Support for Disk Images ...................................................................51
Boot Sector Support for MSD/LFN File Systems..................................................51
CP/M Support.......................................................................................................51
GEOS 2.0 Support .............................................................................. 52
Introduction...........................................................................................................52
Choice of Different GEOS-KERNALs ...................................................................52
What will your 64HDD-GEOS configuration look like?......................................53
What will not work with 64HDD-GEOS? ...........................................................54
First-time Installation Procedure...........................................................................54
Re-Compiled 64HDD-GEOS Kernals ...................................................................55
Booting GEOS from 64HDD (Re-Compiled Kernals) ........................................55
Using CONFIGURE (Re-Compiled Kernals).....................................................57
XP-GEOS (XP Kernals)........................................................................................59
Booting GEOS from 64HDD (XP Kernals) ........................................................59
Using 64HDD-GEOS Supplied Utilities ................................................................60
Using Other GEOS Utilities ..................................................................................62
Command: Clear/Set Master-Disk-Protection flag .....................................62
64HDD-GEOS Disk and Utilities (Screenshots) ...................................................63
Print Spooling and PrintEngines ...................................................... 65
Print Jobs .............................................................................................................65
Print Engines ........................................................................................................66
64GUI – PrintManager .........................................................................................66
Disk Access Command Reference Guide ........................................ 68
Directory and Disk Image Access /Loading ..........................................................68
Command: Select and/or view 64HDD directory .......................................68
Command: Request EZ-Load format for 64HDD directory ........................70
Command: Fast 64HDD Directory Reading...............................................71
File Handling Commands .....................................................................................73
Command: Open File for Read/Write.........................................................73
MSDOS ASCII Compatibility ................................................................................74
Text Exchange (Cross-Platform Compatibility).....................................................74
Error Channel Reading.........................................................................................75
Command: Reading the error channel.......................................................75
Standard Commodore Drive Commands .............................................................76
Command: Scratch file(s) from current device /directory ...........................76
Command: Rename file on /in current device /directory ............................77
Command: Copy file on /in current device /directory to new name............78
Command: Initialize device........................................................................79
Command: Validate device /disk ...............................................................79
© COPLIN 1999-2006
10 of 136
v0.7alpha8
64HDD – The CBM Drive Emulator
www.64hdd.com
[email protected]
Command: Warm boot / Cold boot ............................................................80
Command: 1581 Partition Selection ..........................................................80
Command: 1581 Partition Creation ...........................................................81
Direct Access Commands ....................................................................................82
Drive Simulation Model .....................................................................................82
Command: Block Read..............................................................................83
Command: Block Write ..............................................................................83
Command: Block Allocate..........................................................................83
Command: Block Free ...............................................................................84
Command: Block Pointer ...........................................................................84
Command: Memory Read..........................................................................84
Command: Memory Write..........................................................................84
Extended Drive Commands..................................................................................86
Device Dependent Commands .........................................................................86
Command: Copy (Kopy) files between 64HDD virtual devices ..................86
Command: Make MSDOS directory...........................................................87
Command: Change MSDOS directory.......................................................87
Command: Remove MSDOS directory ......................................................88
Command: Locking and Unlocking file(s) from a directory.........................88
Command: Create and Name Blank Disk Image .......................................89
Device Independent Commands.......................................................................90
Command: Get /Set 64HDD Time .............................................................90
Command: Get /Set 64HDD Date..............................................................90
Command: Get 64HDD Day ......................................................................91
Command: Get 64HDD Device Space Information....................................91
Command: Exit 64HDD and set error_level upon exit ...............................92
Command: Read PC Mouse Position and button status (ASCII) ...............93
Command: Read PC Mouse Position and button status (Binary) ..............93
Command: Run an external MSDOS application.......................................94
Command: Report protocol speed mode and Pentium CPU speed...........94
Command: Switch to ShortFileName Mode...............................................95
Command: Switch to LongFileName Mode ...............................................95
Command: Activate another 64HDD Device..............................................95
Command: Set /reset “strict” directory mode in MSDOS ...........................96
Command: Set /reset “CMD” mode for 64HDD operation..........................97
Command: Identify what is the current path ..............................................97
Command: Activate a new 64HDD Device ................................................98
Command: De-activate a 64HDD Device ..................................................98
Command: Sort MSDOS directory filename order .....................................99
Partitions and Unit Support (Shortcuts) ..............................................................101
Command: Change partition to path defined by unit number...................102
Command: Add current path /image to partition table .............................103
Command: Delete current partition table definition ..................................103
Command: Information about partition.....................................................104
Command: Assign common name to a partition definition.......................104
Command: Get “common name” assigned to a partition .........................105
Command: Load /save /open from /to unit path.......................................105
Command: Load partition table................................................................106
Command: Load “common name” partition table.....................................107
CMD Compatible Time and Date Commands ....................................................108
© COPLIN 1999-2006
11 of 136
v0.7alpha8
64HDD – The CBM Drive Emulator
www.64hdd.com
[email protected]
Command: Read /set RTC in CMD ASCII format ....................................108
Command: Read /set RTC in CMD decimal format .................................109
Command: Read /set RTC in CMD BCD format......................................109
Command: Load Directory with TimeStamp ............................................110
1541 COPY and Transfer Commands................................................................111
Command: Transfer D64 image to 1541FDD connected as Device #8 ...111
Command: Create D64 from 1541FDD connected as Device #8 ............112
Command: Interrogate 1541FDD connected as Device #8 .....................113
1581COPY Commands......................................................................................114
Command: Transfer D81 image to 1.44FDD using 1581COPY...............114
Command: Transfer 1581 disk in 1.44FDD to D81 with 1581COPY .......115
Extended CMD Compatible Drive Commands ...................................................116
Command: Set / Clear Write Protection Mode.........................................116
Command: SCSI Command ....................................................................116
Command: G-P Get-Partition information ................................................117
Command: R-H Rename Disk Header.....................................................117
Device Number Swapping ..................................................................................118
Command: Device number Swapping .....................................................118
Print Spooling and PrintEngines.........................................................................119
Command: Increment to next JobNumber ...............................................119
Command: Viewing the PrintQueue.........................................................119
Command: Printing a specific JobNumber...............................................120
Command: Delete a specific JobNumber ................................................120
Command: Flush the print queue for a device .........................................121
Error Codes and Messages................................................................................122
Summary of 64HDD Error Messages .............................................................122
Description of DOS Error Messages...............................................................123
Specifications Guide ........................................................................ 129
Dependent Devices ............................................................................................129
Independent Devices..........................................................................................130
64HDD File Systems Modes ..............................................................................131
CBM Disk Images (D64, D71, D81) ................................................................131
CMD Disk Images (D2M, etc) .........................................................................131
CBM Tape Images (T64) ................................................................................131
Archive (LNX) .................................................................................................131
Zips (ZIP) (Professional version only) .............................................................131
MSDOS File System .......................................................................................132
MSDOS LongFileName Support.....................................................................132
Setting up the LFN Utilities..........................................................................133
Notes, Tips and Suggestions ......................................................................134
PC-to-CBM Cable Specification .........................................................................136
X1541 Cable Specification..............................................................................136
XE1541 Cable Specification ...........................................................................136
© COPLIN 1999-2006
12 of 136
v0.7alpha8
64HDD – The CBM Drive Emulator
www.64hdd.com
[email protected]
64HDD – The CBM Drive Emulator
{This manual is being developed in conjunction with the program. The general
sections of the manual will discuss items as if the functions and capabilities have
been verified and proven, however the “general” section may get ahead of the
current technical capability of the software. For what the program actually does in
its present form please refer to the Configuration, Command Reference and
Specification sections.
The same manual describes both the standard and Professional capabilities of
64HDD. Commands and functions available only to the Professional versions are
identified by yellow highlighting.}
Overview
64HDD is PC software that provides many of the 8-bit Commodore computer range
with drive emulation without the need of special drivers or kernal patches. In very
simple terms, it makes the PC think, and act, like it is an enhanced 1541, 1571 or
1581 disk drive system.
It does this through a X1541 or XE1541 cable connecting the
LPT port of a PC system or controller and the CBM
computer. Real CBM drives can still be daisy chained into
the system. A parallel transfer cable can also be added to
dramatically reduce program load times. 64HDD supports all
MSDOS based mass storage hardware and various CBMemulator disk images. It also emulates most CBM drive
commands, omitting only those that require the 65xx
hardware (for example M-E, memory execute).
When you become fully familiar with all its features, you will
see that 64HDD can be a lot whole more than a disk drive.
Features
64HDD supports an extensive range of both CBM DOS standard and non-standard
functions. To help provide the user with an overview of the functions, not necessarily
the syntax, a summary of these features is outlined below:
Connectivity
• Standard CBM serial mode support with no need to have special “drivers”
loaded on the CBM computer
• Both X1541 and XE1541 cables are supported
• Serial FastLoader support that uses the standard X-Cable, no special driver
or ROM needed for it to work simple LOAD (Professional version Only)
© COPLIN 1999-2006
13 of 136
v0.7alpha8
64HDD – The CBM Drive Emulator
•
•
•
•
•
•
•
•
•
•
www.64hdd.com
[email protected]
Parallel cable support for high transfer rates, no special driver or ROM
needed for it to work simple LOAD.
Neither the serial or parallel modes interfere with the cartridge port, so you
are free to use 64HDD in conjunction with an REU or cartridge
Compatible with the C64, C128, VIC20, C16 and Plus4 computers
Compatible with both NTSC and PAL systems
JiffyDOS tolerant and compatible with various disk and cartridge DOS wedge
systems (turbo functions should generally be switched off)
EZ-Loader feature allows automatic listing of device number at the end of the
line for users who do not have a built-in DOS-wedge. FastLoader prefix can
be automatically enabled also (Professional version Only)
GEOS Compatible with the appropriate 64HDD-GEOS disk driver
installed/configured, includes RTC support. FastSaver and large 800kb disk
support is also available (Professional version Only)
Can be configured to various drive numbers (and multiple drives
simultaneously #8 through #15). Professional users can assign any device
number from #0 though #30 (devices #0 through #3 require a modified Kernal
ROM) (Professional version Only)
PC specification is minimal (386SX25 or higher), MSDOS (or equivalent). To
tolerate JiffyDOS reliably a slightly higher spec 386DX33 machine may be
needed. To gain the full benefit of FastLoader, GEOS FastSaver and XLoader a faster PC may be required (486DX33 or P100 respectively)
(Professional version Only)
Graphical User Interface for configuration, device and partition / ShortCut
management. The GUI also provides detailed run-time information (Professional
version Only)
Disk Functions
• Support for standard image types such as T64,
D64, D71, D81 and LNX, and also raw PRG,
SEQ, USR files
• Supports other emulator formats such as P00
and N64, as well as built-in functions to
decompress ZIP files (Professional version Only)
• Support for native mode providing unlimited file
sizes and structures
• Native mode files can support 16.3 character names without special headers
(format is Win95 compatible)
• Directory listing and filtering using wildcards. Extended directory information
such as file count and block count can be requested (Professional version Only)
• Changing between directories via the command channel or LOAD
• Assigning of “partitions” or short-cuts to disk images or directories including
the use of easy to remember names instead of path details (Professional version Only)
• Changing between partitions and other management functions
• File time and date stamping, including files on D64, D71 and D81 disk image
formats (Professional version Only)
• Block Read /Error handling to support many low-level disk copy protection
schemes, with special T18 and T&S error modes for providing this emulation
in the MSD/LFN file system (Professional version Only)
© COPLIN 1999-2006
14 of 136
v0.7alpha8
64HDD – The CBM Drive Emulator
•
•
•
•
•
•
•
www.64hdd.com
[email protected]
“Disk-Flipping” for compatibility with applications spanning several disks.
Commands to assign new drives “on-the-fly”
Simple “ON” and “OFF” commands to control which device numbers respond
and which will not (Professional version Only)
Supplied with a large selection of demonstration programs and utilities
Special CMD drive “compatibility mode” to improve operation with tools
designed for CMD products (Professional version Only)
Built-in function to transfer disks to and from D64 disk images (Professional version
Only)
Device Number Swapping (Professional version Only)
Cross-Platform Functions
• Copying of files between MSDOS drives with a single command (great for
transferring images or files from PC floppy to your file system
• “On-the-Fly” ASCII translation between standard and PETASCII
External Functions
• Reading and writing of 1581 and FD2000 compatible disks
• Co-processing on the PC’s CPU possible (for example PKZIP, crosscompilers, etc can do the job in seconds compared to minutes)
• PC Mouse support for custom CBM applications via the command channel
• Control of CD-Audio Playback
• Reading and setting of Real Time Clock /Calendar
Graphical User Interface Functions (Professional version only)
• Various functions can be co-ordinated from the PC keyboard and mouse
• 64HDD supports hot-keys for shelling to MSDOS, resetting 64HDD or the
C64 (doesn’t work with all cables/CBM computer types), and for changing
certain operational modes (toggle LFN and CMD modes).
• 64HDD’s GUI provides details about the Track and Sector being accessed,
the filename and path, progress during the data transfer and error
information.
• 64GUI can be spawned from the 64HDD screen at
the press of a key. 64GUI allows attachment of new
files/paths to devices, the activation/deactivation of
devices and maintenance of the partition and shortcut tables.
• 64CONFIG allows many of the steps needed as
part of the installation and configuration to be automated, and it can make
recommendations about changes needed to your MSDOS system files.
• FileManager built-in for copying, renaming, moving and deleting files, with
"Favorites list"
Print Spooling and Emulation Functions (Professional version only)
• Jobs to devices 4 and 5 can be spooled to the PrintSpooler
• New commands to control jobs on the "PrintQueue"
• 64GUI includes a PrintManager
• "PrintEngines" allow conversion or redirection of print jobs (eg TXT, HTML)
© COPLIN 1999-2006
15 of 136
v0.7alpha8
64HDD – The CBM Drive Emulator
www.64hdd.com
[email protected]
Introduction
64HDD is a program for a PC based “system” which emulates the serial bus
protocol of Commodore equipment and additionally provides emulated devices on
this bus. Primarily, the vision for 64HDD is to allow a PC based controller to be built
up and to serve the Commodore computers as a mass storage device. However,
many users will simply configure 64HDD to run off their main home PC when they
are not using it for regular applications.
Though there have been several hard disk drives developed over time for the
Commodore 8-bit machines, most have been expensive, rare and… expensive (I
intentionally said that twice). The mass storage products by CMD (Creative Micro
Designs) are today the most readily available, and indeed CMD was one of the few
companies who until recent years still support us Commodore users and collectors.
Since CMD’s demise Maurice Randall has taken over these products.
The older 1541, 1571, 1581 devices were based around micro-systems using the
65xx hardware. These days 386/486 hardware is getting cheap enough to dedicate
these systems as micro-controllers to 64HDD mass storage device. Also many
386/486 boards exist with all I/O on-board simplifying construction, and there is a
wealth of applications which have proven the use of X1541 and XE1541 cables as a
way of controlling, reading and writing to a CBM drive. The 64HDD emulator does
the reverse and acts as a server (intelligent drive controller) for the Commodore
computer (any CBM computer which uses the standard CBM serial bus protocol:
Vic20, C64, C128, Plus/4, C16 etc).
Additionally, the 64HDD program can support any media device that can be
supported by the 386/486, for which an MSDOS compatible driver /system is
required. These include: FDD, HDD, CDROM, RamDrive etc. In addition to
supporting the hardware, various CBM image formats can be supported including
disk (D64, D71, D81), Tape (T64) and archive (LNX). Raw binary and text files
saved in the MSDOS filing system can also be “loaded”. The MSDOS file system
can be configured in a way which allows 16character filenames to be used (these
use the Windows95 LongFileName (LFN) format). Also, 1581 emulation with a
1.44Mb 3.5” floppy drive is possible with the appropriate program add-ins.
Emulation of the standard CBM drive command set has been extended with a
number of new commands added to provide Real-Time-Clock information (from the
PC controller’s RTC) and to manage the new hardware and devices. Mouse support
for the Commodore computer is provided by command channel functions when a
PC mouse is attached and configured to the 64HDD host.
Very few standard commands, namely those requiring the specific 65xx hardware
such as memory execute are not supported, however reads and writes to drive RAM
/ROM are generally supported whilst accessing CBM disk images (and for all file
systems when using the professional version).
The hardware specification level of the PC controller is reasonably minimal, and the
design of 64HDD is for user-free operation once configured (as such a keyboard
and /or video card is not required and can be flagged “off” in the PC BIOS).
© COPLIN 1999-2006
16 of 136
v0.7alpha8
64HDD – The CBM Drive Emulator
www.64hdd.com
[email protected]
Because of this, the basic freeware version has no “pretty” user screen, but special
commands are provided to manage the PC hardware via the Commodore computer.
If the user wants a functional and informative graphical user interface then the
purchase of 64HDD Professional should be considered.
Background
64HDD was born in 1999. The concept of 64HDD was inspired by the number of PC
based Commodore emulators being released and the relative drop in the price of PC
hardware comparative to that of specialist CBM compatible hardware.
My initial thoughts were that someone “out there” must have a “product” which
would do what emulators do, especially as there were programs readily available to
create disk images from a LPT port controlled 1541 (my recommendation is
Trans64).
An extensive search on the Internet identified many programs that provided PC-toC64 communication, but required either software drivers or kernal patches. These
also often necessitated specialist cables and did not support “standard” commands
and direct disk access. Only two programs where identified at the time that
attempted what I was hoping was possible:
VC1541
This program works well (particularly v0.3pl3) on a 486, but had no
write or command channel support. Unfortunately only the newer
versions introduced the SAVE and command functions, but required
Pentium processors (even the 486 version of this program worked
unreliably on my 486DX2/66). Pentiums were not yet the commodity I
could dedicate to this project. Additionally, the direction of the program
was going down the “user interface path” rather than the “black box”
system controller that was my primary objective.
SERVER64 This is another good program and has both read and write capabilities,
unfortunately it also had no command channel support and could only
work with one image or directory per initialisation. It also appears work
on this stopped long ago.
Consequently, the 64HDD project was born with the purpose of implementing some
of the features the above two programs did, plus a range of other functions.
Ultimately, the aim is to make this a viable option for those not able to get their
hands on a CMD hard disk, and further more, allow those with many emulator disk
images to use them easily with their original CBM equipment.
There were various sources of information regarding the protocol documented on
the Internet, and even some code in various programming languages. The
implementation of the protocol supported by the aforementioned programs was
unfortunately not adequate for detailed emulation, the reason being that they
employed “streaming” of data rather than true control of data transmission with ATN
signal acknowledgment. Basically, what this meant was that the simple streaming
techniques worked fine for streaming a PRG file, but could not be used to control
© COPLIN 1999-2006
17 of 136
v0.7alpha8
64HDD – The CBM Drive Emulator
www.64hdd.com
[email protected]
SEQ data or byte-by-byte transmissions as required for command control. This was
new ground for the 64HDD project, and implementation was made all the more
difficult because of the CPU constraint imposed.
In recent times two other programs have been identified that attempt to do PC
based drive emulation: PC-DISK 3.0 and 1541EMU, the later being a new comer
with a fairly steep PC speed requirement but promises better CPU emulation (but
requires a specialised cable and a fast PC/IO system).
Compatibility
CBM Computer Compatibility
Since 64HDD emulates Commodore’s serial bus protocol it is expected to be
compatible with all CBM models that had a CBM serial port and could connect to
drives such as the 1541. This serial port is technically referred to as an IEC serial
port. CBM models using this port include:
C64, C64c, SX64, C128, C128D, and C128DCR C16, Plus/4 (and
presumably also C116, etc) and VIC20 (and VC20)
Of course, not every software release will be fully tested with each of these
machines. Some of these machines ran at slightly different speeds to the C64, but
in general all had their kernals developed to be compatible with the 1541. The
64HDD emulator is primarily being developed with a C128DCR and tested in both
C64 and C128 modes.
Please note, as the 64HDD emulator does not support cycle emulation and CPU
execution, schemes that are NTSC /PAL sensitive cannot be expected to work.
64HDD has been tested with standard CBM Kernals and the JiffyDOS Kernal for the
C64. It is not intended to support alternate turbo Kernals that do not attempt to
identify the device before initiating turbo transactions.
Special Note for troublesome communications: for the IEC communications to
work reliably with some installations of 64HDD you may need to have a real
CBM disk drive (eg 1541) connected as part of the daisy chain, and it must
be switched “on”. This is generally observed to be needed if the PC’s timing
is not accurate or reliable or fast enough and the use of a real drive may
reduce the likelihood of hang-ups in these installations.
The only two characters which may give rise to unexpected results when used in a
filename, these being the “/” and “$” characters which now are used to control
directory access. It is also worth noting that some CBM characters displayed are not
true ASCII as the PETASCII map contains several duplications. For example “~” is
CHR$(126), and not CHR$(255) as would be sent if contained in filename quotes.
Remember though that JiffyDOS and other DOS wedges to not accept constructed
filenames, eg /“abc”+chr$(126)+”xyz” will not work with JD which will issue
© COPLIN 1999-2006
18 of 136
v0.7alpha8
64HDD – The CBM Drive Emulator
www.64hdd.com
[email protected]
/”abc” only. Such commands will unfortunately need to be send the long-hand way
with OPEN.
64HDD will co-exist with GEOS (providing 64HDD is set to device numbers greater
than 11), and from version 0.7a0 GEOS can actually be booted from 64HDD, though
specialised kernels need to be used /configured. Refer to the GEOS section of this
manual for detailed information.
64HDD will work with the Handic “Vic-Switch” and will presumable work with other
IEC multiplexing /networking devices. For the Handic configuration a real CBM drive
was found to be definitely required in the daisy-chain.
If a particular disk drive command is not support then one of the following errors will
be reported:
31,SYNTAX ERROR
This means commands is not understood or syntax is incorrectly given.
8x,COMMAND NOT SUPPORTED (xxxxx)
This means that the command is understood, but that its function has not been
implemented yet or is unavailable with the selected file system. Error 89 means that
64HDD does not yet support the function and a series of “beeps” will be sounded
each time such a command is given (for example with M-E). In C128 mode, 64HDD
will also beep as the burst load command is tested for, but loading will continue as
normal after this.
Some additional error codes have also been added such as error 78 for when an
MSDOS device is “Not Ready”
PC Compatibility
The development PC hosting the emulator is a 486SX33, but a range of PCs up to
2.4GHz have been tested at one time or other. Mobile PC processors (Centrino and
M type for example) may be incompatible because they do not necessarily run at a
fixed clock speed since they are optimised for low power applications.
64HDD is a DOS program. This is necessitated by the Commodore serial bus
protocol being intolerant of errors in timing and therefore necessitating the 64HDD
program to very accurately monitor and control the timing of its communications.
Although some users have reported getting 64HDD to work from a MS Windows
DOS-Box, the use of 64HDD in such an environment can not be guaranteed since
interruptions may cause the communications with a Commodore to hang or error.
Protocol Speed
The transfer rate for 64HDD can be configured by the user using command-line
switches. The default setting uses timings that are essentially to Commodore
© COPLIN 1999-2006
19 of 136
v0.7alpha8
64HDD – The CBM Drive Emulator
www.64hdd.com
[email protected]
specifications so any improvement in transfer rate is in the reduction of “seek” and
decode times.
However, optimisation of the timings is possible via the use of the –faster and the
–fastest command line switches. These switches reduce the duration of the high
and low CLOCK transitions to the minimum levels, thus maximising data throughput.
These options however might not work with your particular PC hardware
configuration as they are dependent on the speed of the PC running 64HDD. Higher
clock rate 486 PC controllers (>40MHz) should use the –faster setting, slower
clock rate PCs (<33MHz) should use the –fastest setting. An optimised system
should be capable of attaining LOAD and SAVE performance at least comparable to
a 1581 drive, and generally similar to the CMD HDD with the best settings. If you are
using with a VIC20 the –vic option will set timings to the 1540 standard.
A parallel cable connection is available for use with 64HDD. This cable, in
combination with the PwrLoaders should speed communications up by 30-50 times
over a standard CBM1541. See separate documentation is with this plug-in
package.
© COPLIN 1999-2006
20 of 136
v0.7alpha8
64HDD – The CBM Drive Emulator
www.64hdd.com
[email protected]
Cartridge / DOS Wedge Compatibility
Since default configuration of 64HDD uses the serial bus only, users are generally
free to use their favourite cartridge in the expansion port. The 64HDD emulator has
been tested with a number of Cartridge and DOS Wedge utilities and an
assessment of compatibility is outlined in the table below. Incompatibility is normally
a result of using non-standard communications or unimplemented functions, for
example trying to read the native directory using M-R (not supported in freeware) or
trying to install and execute fast-loader routines. The latter may be outside the
scope of 64HDD as the fast-loader usually tries to run its own drive code, and CPU
emulation is not yet supported by 64HDD.
Cartridge /DOS Aid
DOS Wedge 5.1 (C64)
BASIC 7.0 (C128)
JiffyDOS 6.01 Wedge
Works
(directory
/status)
Yes/Yes
Yes/Yes
Yes/Yes
Final Cart III
Yes/Yes
KCS Power Cart
Yes/Yes
Cockroach TurboROM
Yes/Yes
MACH5
Yes/Yes
Freeze Machine
No/No
Warp Speed (64/128)
Epyx FASTLOAD
Yes/Yes
Yes/Yes
Action Replay V6.0
Yes/Yes
SureData 30-in-1
SnapShot v3.0 (LMS)
Yes/Yes
Yes/Yes
© COPLIN 1999-2006
Freezer
/BackUp
Remarks
DIRECTORY, DS$ is valid, DLOAD works.
@ and @$, on slow PC set-ups, use a real
1541 in the drive daisy-chain
Yes,
BACKUP
only to #8
Neither
YES, use
“Standard”
#8 or #9
Works from both command-line and GUI.
To avoid the built in FC3 fast-loader either use
the KILL command or
POKE816,165:POKE817,244
Use QUIT 1 or #48 or #49 for LOADs
To avoid the built in fast-loader either use:
POKE816,165:POKE817,244
Seems to work only for device #8.
Use Í D to disable MACH-DOS, but keep
extra commands active.
$ works. @ command hangs. Loader can also
hang C64 / PC
^K to disable fast-loader
$ and /$ works use POKE186,drive to swap.
@ works also. /filename does not work!!
Use OFF to turn turbo load off.
Seems to work only for device #8.
TurboLOAD/SAVE must be switched off from
menu
21 of 136
v0.7alpha8
64HDD – The CBM Drive Emulator
www.64hdd.com
[email protected]
64HDD – User Interface (Professional only)
64HDD Professional features a GUI for displaying runtime information. The
display lists details about the setup used at boot time (parameters in black),
the status of various other modes detectable during runtime (parameters in
red) and information about every device. Note, some runtime parameters are
indicated as present until detected otherwise.
The information displayed for each device includes:
• Path of directory or disk image attached
• The file system mode being used
• Name of file being transferred, or command being processed
• Progress status shown as block count
• Track, Sector and Error status of block being transferred
• Activity “LED” (green) or Error “LED” (red with code)
An online help screen is available to remind users of special hot-keys. Just
press [H] to activate the display, any other key to clear. Esc as always exits
64HDD.
© COPLIN 1999-2006
22 of 136
v0.7alpha8
64HDD – The CBM Drive Emulator
www.64hdd.com
[email protected]
64GUI – Disk / Partition Tool (Professional version only)
64GUI is a new tool which allows users
who operate 64HDD from the PC (rather
than the Commodore) to easily navigate
their way through their disk collections
and selected which devices are
active/disabled.
This tool also allows easy and accurate
management of partitions and shortcuts.
After either a device or partition number
is selected, pressing “Attach” or
“Change” respectively will open a file
browser allowing you to navigate your
way to the desired disk image or
directory. Filtering is possible to provide
a clearer view of files being searched
for.
Filetype filtering is supported for
standard Commodore types, common
text format files and for user defined.
The GUI can also optionally display the
Long File Name of the currently selected
file or disk image.
The preview screen can be set to
automatically be displayed. This will list
the contents of supported disk images
so that you can verify the contents are
what you are looking for. The contents of
standard text types used as indexes on
many popular C64 CDROM compilations
are also viewable.
Commonly used file locations can be
added to you “favourites” list allowing
you to jump straight to these locations…
© COPLIN 1999-2006
23 of 136
v0.7alpha8
64HDD – The CBM Drive Emulator
www.64hdd.com
[email protected]
Directory contents can be sorted with
the appropriate MSDOS plug-in tools.
This helps make files easier to find. Note
however that this option requires lots of
DOS memory and so may only be
available in some modes of starting
64GUI.
System Info is available from most
screens so that you can keep track of
details such as date, time and free DOS
memory.
The partition assistant will allow you to
configure the partition table, including
specification of multiple disk sets.
A built-in FileManager allows you to
copy, move, rename and delete files.
The FileManager works on the “source”
and “destination” format, and includes
Preview support.
Operations are carried out in both DOS
and LFN names.
If changes are made you should “Exit”
64GUI. If you try to “Quit” after changes
have been made, 64GUI will verify if this
is what you want to do. Note: Changes
are saved to the directory sysdir 64HDD
is currently using. If you want to save
changes to the c:\64hdd\system then
“check the box” before exit.
© COPLIN 1999-2006
24 of 136
v0.7alpha8
64HDD – The CBM Drive Emulator
www.64hdd.com
[email protected]
Setup and Configuration
The details below generally apply to both the freeware and Professional versions. In
some cases 64HDD Professional has a slightly higher system requirements, and
some optional requirements are needed to make use of the advanced features.
Remember that other important information may be found in the readme.txt and
FAQ supplied with the installation files.
If you are not building your PC from scratch, you can skip the first few sub-sections.
The 386/486/Pentium hardware platform chosen can be a stand-alone PC device in
a standard PC case, or can be integrated in one of the following ways:
1) Small (Baby-AT form factor) all-in-one 486 board fitted within the case of a
C128DCR; or
2) Small (Sub-Baby-AT form factor) all-in-one 486 board fitted in the case of
a 1571 or 1541 drive (for transportability).
If you are new to the world of MSDOS, or even just a little rusty don’t forget
to download a copy of “MSDOS for Commies” from the 64HDD website.
Basic Requirements
• 386/486 PC controller (or motherboard with CPU). Minimum speed is believed to
be a 386SX25 (for basic LOAD type operations). You can also use a Pentium or
higher system, but you may need to use the additional +p command-line setting.
A faster 486 or Pentium machine may be required to take full advantage of the
FastLoader and X-Loader options available in the Professional package.
• 1x LPT port mapped to a standard location (LPT1, LPT2, LPT3). The LPT port
needs to be an old SPP type if an X1541 cable/adaptor is used. A PS2 type bidirectional port might work. On-board LPT ports on Pentium and newer
machines may not operate as SPP correctly even if set to do so. For these
systems you will need to install and “old” 8- or 16-bit I/O card or alternatively use
a XE1541 cable/adaptor.
• X1541 or XE1541 cable (refer to LPT port requirements). Alternatively, an X1541
or XE1514 adaptor can be used in conjunction with a standard CBM serial cable
(my preference for shielding reasons).
• 1x mass storage device capable of booting (FDD or HDD)
• 512kB RAM (generally the minimum for this spec of machine, rather than a
64HDD requirement). 64HDD professional has additional memory requirements
for spawning to 64GUI and as such 640kB of conventional RAM is needed (with
at least 550kB free). XMS memory is needed for caching during FastLoad and
for activated device memory maps. If you need to use the +p option and do not
have enough DOS memory free, you should consider using a non-MS XMS
manager such as QEMM386 (QEMM is compatible with the +p option).
• MSDOS 6.xx (or compatible). MSDOS 7.x (Win9x) appears to be compatible if
you have a faster PC type, but differences in the MS kernel may necessitate
tweaking of the +p speed parameter.
© COPLIN 1999-2006
25 of 136
v0.7alpha8
64HDD – The CBM Drive Emulator
www.64hdd.com
[email protected]
Optional Requirements
• 1.44MB 3.5” Floppy Disk Drive for file transfer to the machine and for 1581
support
• PC Speaker for “start-up” beep, and “clicking” to signal activity after each block is
transferred.
• keyboard (for maintenance), not scroll-lock light will flicker to represent 64HDD
“disk activity”
• display card /monitor (for maintenance, personally during program development I
use a CGA card as its output drives a 1901 or 1084 Commodore monitor, so at a
“flick of a switch” you can see either the PC or CBM screen – of course you have
to change cables to view the C128 80column screen)
• 2MB of memory configured as Extended Memory and HIMEM.SYS driver (for
XMS support allowing better emulation of drive memory maps). At a minimum
64k for each drive supported is needed, so at least 512k of XMS is needed for 8
devices, with surplus XMS used for caching and other performance
enhancements. XMS is dynamically allocated by 64HDD.
• CDROM drive and DOS driver (for mega mass storage)
• PC Mouse and DOS driver (for MOUSE: command channel support)
• A real CBM disk drive such as a 1541, 1571, or 1581 may be required as part of
the daisy-chain if you find that your PC’s timing is sensitive
Building the PC
Information on constructing a PC from boards, etc is readily available, so rather than
dwell on the detail only the highlights will be given. Construction of a PC in a CBM
case is trickier, and an example is shown on 64HDD website.
•
•
•
•
•
•
•
•
Mount main board (often a mother board to the case)
Add “cards” for video, etc and RAM SIMMs
Change any jumpers on the main board necessary to disable functions
duplicated by the add-on cards. For example, if you add a CGA card and the
main board has “on-board” video, you will need to disable it. You may also need
to set a jumper for selecting video mode (normally determine whether bios uses
colour or not)
Install your mass storage device. If you will not be installing a floppy drive make
sure the HDD has been pre-formatted and an operating system installed,
otherwise install also a floppy drive. Install any other “drives” at this point.
Connect power cables to the main board and drives; connect keyboard and
monitor.
Start machine, enter BIOS set up (usually hold DEL-key) configure options to
make your system run (do not ask me what these are!). If you will ultimately be
using the PC without keyboard or display either set these options as “not
installed” or disable “halt on errors”.
Re-boot machine, if starting with an unformatted mass media device format this
and install the MSDOS system, as well as any device drivers and the
HIMEM.SYS XMS driver.
Check that the machine works reliably as a PC before going further…
© COPLIN 1999-2006
26 of 136
v0.7alpha8
64HDD – The CBM Drive Emulator
www.64hdd.com
[email protected]
64CONFIG – Setup Tool
(Professional version only)
This tool is both the
setup and maintenance
program for 64HDD.
Power users can make
changes using the
command-line functions
options also.
Elsewhere in the manual
or readme.txt file, details
about the options is
given.
During installation a
dialog box provides
details to the user about
what is being done.
64GONFIG will not make
changes to
AUTOEXEC.BAT or
CONFIG.SYS but rather
will create files with a
.64H extension which will
list recommendations
only.
Installation and upgrades to 64HDD Professional require keying with the original
distribution disk. Once keyed to a system, no further keying is needed until the
software is upgraded or transferred to another machine. If you are using a
RAMDISK, note that the c: drive copy will need to be keyed so that changes are
saved when you switch off your PC.
Note: Changes made to the configuration will only take effect when the changes
are “installed”. To speed up the process, uncheck any options that have been
previously successfully installed.
Configuring 64HDD
• 64HDD Professional Users should also consult the information supplied with
their package. The 64CONFIG or SETUP file will perform many of the installation
and configuration duties.
• 64HDD is distributed in either a ZIP or EXE compressed file. Expand the file
(typically using the –d option) and follow included installation instructions in the
README.TXT file. The documentation below is comparatively too general.
• Know beforehand the LPT number to which the X1541 or XE1541 cable is
connected. You might need to manually set the LPT number should auto
© COPLIN 1999-2006
27 of 136
v0.7alpha8
64HDD – The CBM Drive Emulator
•
•
•
•
•
•
•
•
•
www.64hdd.com
[email protected]
detection not work. You will need to specify –xe if you are using the XE1541
cable, refer to README.TXT.
Decide which “paths” you want, and how you wish to configure your device
numbers. Real CBM peripherals and the 64HDD emulator cannot have the same
device number (they will clash and lock the system up). You can set the device
/path for each number used on the command line calling 64HDD (or in the batch
file). You may need to modify /install one of the example batch files to do what
you want. See README.TXT for more information. Remember that the MSDOS
command-line is limited in length and that these limits should not be exceeded.
Connect to default paths if you want to start many devices simultaneously.
Connect the PC to the CBM computer using the cable. You can daisy chain other
CBM peripherals as normal. Obviously, you’ll need either a double X1541
adaptor or an external disk drive (which has double ports) if you want several
external devices attached.
Generally speaking, a PC LPT port will pull lines “low” when not “running”. This
has the effect of pulling the ATN line low which holds all real CBM products at
“attention” – ie waiting for a command. It also conflicts with some CBM
computers (eg the C128) which have an auto-booting mode (hence, the machine
will not get to the cursor until the PC has released the ATN line).
Note:
This has not been found to be dangerous to the CBM hardware, but
the practice of booting the PC before switching on CBM equipment
may be recommended if you are worried.
Modify the PATH statement to include the 64HDD EXE file location
Note:
This can be done with the following command to append the existing
path to the 64HDD directory with:
PATH=c:\64hdd;%PATH%
Start the GO64HDD batch file controlling 64HDD. As 64HDD boots check to see
that the devices and paths are as you require and that the X1541 LPT port is
found.
When 64HDD is up and running (signalled by a long “beep” if your PC has a
speaker) switch “on” the CBM machine.
Note:
If your X1541 cable connects the RESET line from the IEC serial port,
the 64HDD emulator will reset when the CBM computer resets. This
occurs when you switch on the CBM computer, but by using the batch
file supplied with 64HDD, the emulator will restart. 64HDD can be
reset by resetting the CBM computer. The 64HDD emulator will not be
reset by pressing the “drive reset” on a C128D or DCR.
After the emulator has started issue the LOAD”$”,device command. If a PC
directory is listed then you are in business. If not, see trouble shooting.
Attach one of the disk images supplied with 64HDD utilities and work through the
examples to test function and capability.
If you wish to have LongFileName support in the MSDOS environment refer to
details in that section of the manual and follow the instructions carefully.
Configuring 64HDD for Use with a Boot Floppy or Boot CD
For those 64HDD users who must use a boot floppy since their PC system does not
have the option to reboot to MSDOS (eg WinNT, Win2000 or WinXP) here are some
tips which may be useful:
© COPLIN 1999-2006
28 of 136
v0.7alpha8
64HDD – The CBM Drive Emulator
•
•
•
•
www.64hdd.com
[email protected]
Use a RAMDISK to store key MSDOS components; this will improve system
performance
Use the MSDOS COMSPEC variable to point the search for COMMAND.COM to
either a hard drive or RAM drive location
USE the NTFSDOS.EXE utility to read your NTFS disks. The freeware version
downloadable from the internet allows read-only access to your NTFS drives (so
you can still store your Commodore archives on disk)
If configuring a DOS boot disk seems too hard, an autoconfiguring boot CDROM
can be purchased from the 64HDD website.
64HDD Command line Parameters
There are many command-line parameters that can be used to change the way
64HDD operates. Most users will only use a couple of these. Further, not all the
command-line options are available to all users as some control 64HDD
Professional functionality. The list below details the most important parameters. The
README.TXT file has the most up to date details. The inbuilt 64HDD help list can
also be invoked by starting 64HDD with the –h option.
usage: 64HDD.EXE [-{h|8|9|10|11}] [+{8|9|10|11} filename] [+lpt {1|2|3}]
-h:
-8..-15:
+8..+15
+sysdir
+prtndir
-lfn
+pwr xxx
-faster
-fastest
-nocredits
-noreset
-RegNo
+lpt x
-xe
-sl
+p mhz
-vic
-nup
-cmd
+snd x
@dev
+ss x:
-mse
-ez
-pl
-xl
-zl
© COPLIN 1999-2006
the help screen
activate device 8..15 (default is 'c:\')
filename: activate device 8..15 and attach to 'filename'
non-default path of 64HDD system directory
non-default path of CMDPRTN.TBL (default is SysDir)
support Win95 LongFileNames in MSDOS (v1.55 required)
set default PwrLoader (default is '990')
speed up load transmissions (should only be used with 386 and
486 computers)
speed up load transmissions (should only be used with 386 and
486 computers)
speeds up 64HDD start up by not pausing for credits
prevents 64HDD resetting when the Commodore is reset
registration code, replace 'RegNo' with real 'code'
use printer port x (default is '1')
use XE1541 protocol (default is 'X1541')
enable Scroll-Lock LED (default is 'off')
use Pentium TSC, with CPU at (1-9999)MHz
enable 1540 /VIC20 timings (use only with a VIC20)
limit video updates (for when using 64HDD Pro on slow PCs)
enable CMD ROMs and Partition Format
tweak sound output (x=0 for 'off')
activate devices listed in DEVICES.TBL
Screen Saver after x seconds (0=disable)
use left+right mouse click to shell 64GUI
set EZ-Load directory format
include !: to EZ-Load
include !X: to EZ-Load
include !Z: to EZ-Load
29 of 136
v0.7alpha8
64HDD – The CBM Drive Emulator
www.64hdd.com
[email protected]
Using a RAMDISK to speed things up
(especially for LFN and Power-Loader Operation)
The use of a RAMDISK can improve the performance of 64HDD in several ways.
Firstly, each time 64HDD is subsequently loaded, it is done so from RAM which is
faster. Secondly, the DOS ROM images which are stored in the system directory will
also be faster to access. Thirdly, the directory scratch files will be created faster.
And fourthly, there will be significant improvements to the speed of LFN and PwrLoad support functions as these also will be available in RAM and any temporary
files can be created in RAM also.
•
•
•
•
•
•
•
•
Install RAMDRIVE.SYS (or RAMDISK.SYS) as per the instructions that come
with your version of MSDOS. Depending upon your system is it recommended to
use extended memory, and as much of it as is available since 64HDD make no
other use of it.
Replicate the 64HDD directory structure on the RAMDRIVE. COPY or LCOPY all
EXE and BAT files to their corresponding locations and also all files in the
64HDD\SYSTEM directory
Modify the PATH statement to include the EXE location on the RAMDRIVE as
the first item
If you wish to always use the RAMDISK configuration, make the above changes
part of your CONFIG.SYS and AUTOEXEC.BAT files.
Modify GO64HDD.BAT such that it starts the copy of 64HDD.EXE residing on
the RAMDRIVE. This is important as it will force the LFN tools to also be loaded
from the RAMDRIVE.
Modify the GO64HDD.BAT file so that it copies back the CMDPRTN.TBL file to a
permanent location (otherwise the updates will be lost when power is switched
off)
Modify the GO64HDD.BAT file such that calls to 64HDD include the +sysdir
option to set the system directory as the RAMDRIVE location. The path to the
system directory is limited to 32characters.
You may also modify the GO64HDD.BAT file such that calls to 64HDD include
the +prtndir option to set the CMDPRTN.TBL save directory to a location that is
not the same as +sysdir (such as the HDD). This change will ensure that all
changes to the partition table are saved to non-volitile memory, but will slow
down operation. The path to the partition directory is limited to 32characters, and
the option must be set after the +sysdir option.
Notes:
• A “SmartDrive” style disk cache system may give similar benefits in disk
operating speed.
• The MSDOS command prompt is limited in size (limited by Microsoft, not
64HDD) and so be mindful about the number of options used. Remember, you
can enable drives to the default path with –9, -10, etc.
• To conserve RAMDISK space, it should be pointed out that not all 64HDD files
need to be on the RAMDISK. It is possible to leave files not critical for 64HDD
data transfers on a real disk, and the path for both locations included in the
PATH statement, eg: PATH = e:\64hdd;c:\64hdd;%PATH%
© COPLIN 1999-2006
30 of 136
v0.7alpha8
64HDD – The CBM Drive Emulator
www.64hdd.com
[email protected]
Trouble Shooting 64HDD
• Trans64 Compatibility: Note TR64 will not work when the X1541 cable is
connected to a CBM Computer instead of, or in addition to, CBM disk drives
(even if the CBM computer is “off”). The following fix was provided by Jochen
Adler:
After a reset the C64 sets clock to active (0V) and thus TRANS64 cannot use
this line. The poke56576,7 sets all serial lines to inactive (5V) and TRANS64
then works.
• X1541 LPT port not known: use MSD (Microsoft Diagnostics) or another PC
utility to identify the printer ports you have available and their addresses.
• X1541 connection not working:
- Have you used a X1541 cable before (eg with TRANS64, etc)?
- Have you got the X1541 cable attached to the correct LPT port?
- Is the LPT port you are using the correct type?
- Is the connector securely fastened (I often find this is the problem – a
bumped cable)?
• Intermittent operation: check that idle indicator (twirling bar) works when 64HDD
started and after loading
• Suspended operation: if data transmission is lost soon after the transfer begins
it is likely that the PC controller is not running the emulator fast enough. Keep in
mind the program’s minimum specification, and avoid unnecessary TSRs which
take away from processing performance (eg if you do not need a mouse driver,
do not install it).
• Trouble with Pentiums: if your Pentium hangs after a long load, but normally
works, then it is possible the +p mhz setting is not 100% accurate. Try the autocalibrated value or try something a little higher or lower than the actual processor
speed (or even leave out the +p). This seems only to be an occasional problem
with early /slow Pentiums.
• Searching for….:
If you are using the XE1541 cable, chances are that you
have not specified –xe option when starting 64HDD.
• Can save and send commands, but not load: more than likely an XE1541 cable
is used, but not specified on the command line.
check that device is activated when 64HDD is
• Device Not Present Error:
initialised. If you get this message during serial and /or GET# data transfers it
may be a serial bus timing error – please notify the author. Some problems are
known with the C16/Plus4/Vic20 during GET# data transfers. This indicates that
the emulator is not running fast enough or is installed on a PC controller which is
not able to run the program fast enough. Solutions are to use a faster PC or to
run a real CBM drive in the daisy chain. There should not be any problems with
operation on a C64/C128 as the signals are slightly different (slower) but similar
solutions may also be possible if your configuration has this problem.
• Load Error:
this may be the same problem as above, and can be resolved
by adding a real CBM drive to the daisy chain.
• 64HDD beep-beep-beep:
the emulator has been given a command that is
not currently support. For example the M-E command is not processed. Some
“fast” loader schemes rely on drive programming and will probably not work with
64HDD. Note: when using 64HDD with a C128, there will be three beeps, but
© COPLIN 1999-2006
31 of 136
v0.7alpha8
64HDD – The CBM Drive Emulator
•
www.64hdd.com
[email protected]
the load operation proceeds. These beeps are because the C128 checks
whether 64HDD is capable of burst mode before reverting to normal load
routines.
HDD is not there when I boot from a floppy disk: are you using Win98 or higher
with an incompatible FAT system? You will need a DOS7.x disk to read FAT32.
To read an NTFS formatted disk you will need a third party NTFS driver. Earlier
versions MSDOS do not have access to these disks formats.
© COPLIN 1999-2006
32 of 136
v0.7alpha8
64HDD – The CBM Drive Emulator
www.64hdd.com
[email protected]
Accelerating Data Transfer
Overview
64HDD emulates the standard serial protocol used to communicate for example with
the 1541 disk drive. Because this protocol is emulated so well, 64HDD’s number #1
strength is its "out of the box" compatibility with a huge range software written for
these computers. Unlike many other cartridge based storage devices, programs run
without the need to be patched.
However, compatibility with Commodore's IEC protocol comes at the price of the
traditional slow 1541 transfer speed that we all have grown to hate.
The bottleneck to fast loading is in the serial transfer of data from the disk drive
controller to the computer. The C64/C128 is even slower than the VIC20 it replaced
because or the DMA characteristics of the VIC-II graphics chip.
There are several things
however that you can do to
enhance your basic 64HDD
system and reduce your
1541
loading times. All 64HDD users
64HDD
can take advantage of a range
of cable, ROM and cartridge
64HDD (fast-loader)
upgrades. 64HDD Professional
64HDD (Turbo/XE)
users also have a range of
64HDD (PwrLoad)
plug-ins which can be installed
on their system to enhance the
0
performance of their 64HDD
system using only their
standard X1541 or XE1541 cables.
Time to LOAD a 154 Block PRG File (seconds)
10
20
30
40
50
60
70
80
90
100
Serial vs Parallel Cables
To get started all 64HDD requires is your basic X1541 or XE1541 cable. This cable
is a serial cable, meaning data is sent as a stream of bits rather than as a single
byte.
64HDD also supports an 8bit parallel cable, the PwrLoad cable, that connects the
PC’s LPT port to both the Commodore’s userport and IEC serial port. Commands
travel down the serial link, but data is LOADed through the userport connection. This
instantly equates to at least an 8x improvement, but because of the optimisation of
the clocking between the computers data rates are actually 30-50times faster when
loading.
© COPLIN 1999-2006
33 of 136
v0.7alpha8
64HDD – The CBM Drive Emulator
www.64hdd.com
[email protected]
In order to use the PwrLoad cable software plug-ins have to be installed to your
basic 64HDD system. Some of these plug-ins are available for download from the
64HDD website, whilst others are included with 64HDD Professional. The GEOS
drivers supplied the 64HDD Professional and the DriveGhost program can take
advantage of the PwrLoad cable for both read and write operations.
PWRLOAD ROM Upgrade
One way to guarantee that the PwrLoad cable is used as often as it can be is to
upgrade the KERNAL ROM chip within your C64 or C128. The image for a very
basic version of the PwrLoad ROM is included in the plug-in download from the
64HDD website. The online 64HDD Shop sells a range of enhanced upgrade
ROMs. The upgrade ROMs are compatible with all versions of 64HDD.
64HDD Speed-Up Cartridges
For those who do not want to tinker inside their
beloved Commodore, there is a range of 64HDD
Speed-up cartridges available to accelerate both
serial and parallel systems. The Turbo/XE range
allows for an 8x increase in loading speeds. The
Pwr/Cart and Pwr/Link range provides a 30-50x
increase. Complete information is available on the 64HDD website, including the
cartridge user manual and FAQ. The upgrade cartridges are compatible with
freeware, CD and Professional of 64HDD.
Disk Acceleration for 64HDD Professional Users
Many software developers have created their own disk fast-loaders to overcome the
slow “performance” of the 1541, but unfortunately, there is no standardised “fast”
method. GEOS, Epyx, ActionReplay, etc, all developed their own methods. Some
provide a speed up of 2-3times, others like JiffyDOS, claim up to a 10-12times
improvement (with sector interleave optimally set).
Often these transfer methods are reliant on the fact that both the 1541 and the
Commodore 64 run at 1MHz, hence there is no problem in synchronising the
activities of each machine.
On the other hand, CPUs in PCs run at a variety of speeds and they cannot be
relied up on to be synchronised to the 1MHz Commodore computer. Because of
this, the chances of 64HDD synchronising itself with every PC and disk fast-loading
method are pretty small.
To overcome this, 64HDD uses its own serial disk acceleration method. The method
used simply sends the requested file as a bit stream, the rate of which is controlled
© COPLIN 1999-2006
34 of 136
v0.7alpha8
64HDD – The CBM Drive Emulator
www.64hdd.com
[email protected]
by the slowest computer in the partnership; the C64! Presently only the C64 and
C128 are support, but with time it is hoped to adopt the method to the other
Commodore computers used with 64HDD.
FastLoader and X-Loader Disk Accelerators for the C64
(Professional version only)
Since the C64 is now the boss, the PC must be fast enough to respond to the
requests. For this reason XMS (extended memory) is used to buffer the file for
transfer directly from RAM – it would not be possible to keep up with the
Commodore if the file were to be read straight from the disk during the transmission.
Also, different speed PCs respond at different rates, and as such, even the humble
C64 can be too fast for some low-specification PCs!
So, how does the C64 know about the new transfer method? A small 1-block autorun file is sent when a special load request is made. This auto-run file is specific to
the Commodore model, and so different files will be needed for each member of the
Commodore family. Two types of fast-loaders can be requested. The first works
even on many i386 models, however the maximum load rate comes with the second
FastLoader designed for faster 64HDD systems.
The new load commands are compatible with older CBM type disk units as the
prefix is ignored by them and translated to the equivalent of 0:filename
Loader Name
FastLoader
X-Loader
Command examples
LOAD“!F:filename”,9,1
or
%!F:filename
LOAD“!X:filename”,9,1
or
%!X:filename
Remarks
Faster 386, eg 386DX40
x4 improvement
Faster 486, eg 486DX33
x6 – x8 improvement
The FastLoad prefix can be extended to include path or partition details, for example
%!X:7:filename
When 64HDD receives the command it first sends the loader then buffers the
requested file to 64HDD’s XMS cache (this is done so that it can subsequently send
the file independently of the type of disk it was read from). If your system does not
have enough XMS to support the creation of this cache, the file will not be
transferred and an error will be indicated. Once buffered to cache, the file will then
be transferred using the loader previously downloaded to the Commodore. Whilst
the transfer takes place the 64HDD screen will look unchanged (the PC doesn’t
have much free time…) but the borders on the Commodore screen will scroll
indicating that the transfer is taking place. The rate of the boarder scroll will depend
upon the type of loader you have selected.
There are several variants of the X-Loader, each offering progressively faster
transfer times. During installation try the slowest first, then progressively experiment
© COPLIN 1999-2006
35 of 136
v0.7alpha8
64HDD – The CBM Drive Emulator
www.64hdd.com
[email protected]
with the faster ones until you identify that loads become unreliable. The 64CONFIG
program will allow you to set-up these.
Option (64CONFIG)
Default
X0Ldr
…
X5Ldr
X6Ldr
X7Ldr
Remark
Installs FastLoader also
as the X-Loader
Slowest of the X-Loaders
Fastest of the X-Loaders
Faster still, but screen
blanked
May not work with many
PCs as they only get 2us
to do their stuff!
Most programs will be compatible with the auto-run file, however some no doubt will
not be.
1. Files programmed or saved on a C128 or non-C64 machine.
Note: These will contain an incorrect “load address” header can be
“repaired” by first slow loading then in C64 mode, and then saving
them to disk again. The header will now point to the C64’s load
address.
2. Files which themselves auto-run and hence over-write 64HDD’s loader
3. Files which load over the C64’s datasette buffer
4. Files longer than approximately 202blocks as these will over-write the IO
memory map and scramble the C64’s hardware.
The ROM resident version of the fast-loader will probably overcome
many of these limitations. As with the advanced PwrLoad ROM it
should be able to load “under” the IO area, but with a small penalty in
transfer speed.
Multi-part programs will only be subsequently FastLoaded if the filenames are
prefixed with the appropriate code, or if the ROM resident version automatically
does it. It should be easy to “fix” some multi-part games by using this technique:
a) Open the disk image in a binary editor
a) Find where the filename is stored and usually appears in PETACSII, for
example “filename”
b) Modify the filename to include the prefix, for example “!X:file*”
Note:
your modified name cannot contain more characters than the
original, so you may need to use wildcards as in the example
above (this is because the file is binary not text)
c) Save the changes
© COPLIN 1999-2006
36 of 136
v0.7alpha8
64HDD – The CBM Drive Emulator
www.64hdd.com
[email protected]
The serial FastLoader will only work with LOAD operations and will not accelerate
byte-by-byte disk accessing of data files.
© COPLIN 1999-2006
37 of 136
v0.7alpha8
64HDD – The CBM Drive Emulator
www.64hdd.com
[email protected]
Z-Loader Disk Accelerator for the C128
(Professional 128 version only)
C128 Professional users also have access to a powerful serial fast-loading system.
Z-Loader can be considered as the C128 equivalent of the 64’s X-Loader.
There are several variants of the Z-Loader, each offering progressively faster
transfer times, though not all support RAM1 Bank loading. During installation try the
slowest first, then progressively experiment with the faster ones until you identify
that loads become unreliable. The 64CONFIG program will allow you to set-up
these.
Option (64CONFIG)
Default
RAM Banking
Yes
Z0Ldr
Yes
…
Z5Ldr
Yes
No
Z6Ldr
No
Z7Ldr
No
Remark
Installs the slowest ZLoader
Slowest of the ZLoaders
Fastest of the ZLoaders
Faster still, but screen
blanked
May not work with
many PCs as they
only get 2us to do their
stuff!
Programs which LOAD/RUN can use any of the above fast loaders. Rather than
using an auto-run scheme the Z-Loader can be operated by one of two ways.
Firstly, using the BOOT command (see note below):
BOOT”!Z:filename”[,Ud[,Dn]]
The default value used for “d” (the device number) is 8, but other devices can
be specified for example U9 for device #9.
The default partition number is “0”, but again other numbers can be specified.
The !Z: prefix requests the Z-Loader.
Note: due to a bug in early versions of the C128 Kernal ROM this method
will not work on all C128 computers. If you do not have the latest ROM
(version –04) then you may be forced into the MONITOR when you
execute this command. There are several other bugs in the early C128
ROM including the lower case “q” when caps-lock is used.
Commodore’s latest –04 Kernal ROM can be obtained from the author.
© COPLIN 1999-2006
38 of 136
v0.7alpha8
64HDD – The CBM Drive Emulator
www.64hdd.com
[email protected]
Secondly, using the LOAD /SYS commands:
LOAD”!Z:filename”,dv,1
SYS 11*256
Where “dv” is the device number. These steps can be automated by
using a loader and the dynamic keyboard technique.
Unlike the C64, the C128 has two RAM banks. Whilst most programs load into the
default RAM0 bank, some programs like the GEOS system needs to be loaded into
the RAM1 bank. This is where the second load method is useful. Location 198
stores a flag to indicate which RAM bank should be loaded. A simple POKE198,1
will cause the load to be into RAM1. For example:
LOAD”!Z:ram1-file”,dv,1
POKE198,1
SYS 11*256
Omitting the poke will default to loading the file into RAM0. If you are intending to
take advantage of GEOS128 support, do not install a driver higher than Z4Ldr.
Note:
PC processors come in all sort of “flavours” and from various manufacturers. Likewise the
same processor can be installed in differing main-boards, with differing amounts of cache,
etc. Some, like laptops have processors that feature power-saving features such as SpeedStep. These variations can lead to variability in the timing of the precise control signals that
must pass between the PC and the Commodore during data transfer. It is possible that some
PCs that cope with the standard slow CBM serial transfer method may be incompatible with
the FastLoad methods employed in 64HDD. To avoid disappointment, users are encouraged
to test compatibility using the GEOS fast-serial disk driver that is distributed from the 64HDD
website.
© COPLIN 1999-2006
39 of 136
v0.7alpha8
64HDD – The CBM Drive Emulator
www.64hdd.com
[email protected]
64HDD System Plug-ins
Overview
64HDD’s capabilities can be expanded by the use of plug-ins. Plug-ins are
executable programs and drivers which can be called by 64HDD to do new things,
such as play audio CDs, networking or enhance the loading of files. Officially
supported 64HDD plug-ins usually get their own commands which can be issued
from the Commodore’s keyboard. Alternately users can execute other PC programs
via the MSD command. This, for example, could be done to run a cross-compiler or
other tool.
Below are listed a number of plug-ins supported by 64HDD and downloadable from
the 64HDD webpage.
LongFileName Support
This plug-in allows 64HDD to support 16-character
filenames in MSDOS using the Win95 LongFileName
format. This means most Commodore filenames can
be transferred as PRG files and have their names
preserved rather than being truncated to DOS's 8.3
format. Upper and lower case, spaces and most other
characters…
Full setup details are given elsewhere in this manual.
CD-Audio Extensions
By adding this software to your 64HDD system you
can control the playback of audio CDs from your
Commodore. To listen to the playback all you need is
a set of headphones or speakers connected to your
CD-ROMs front panel socket or with the special audiolead connected you can mix the CD sound using the
C64's SID chip. Use the CD sound for your latest
programming project or just sit back and listening to
music whilst you work on your Commodore. You can
used the Commodore CD-Player available from the
64HDD website, or write your own.
© COPLIN 1999-2006
40 of 136
v0.7alpha8
64HDD – The CBM Drive Emulator
www.64hdd.com
[email protected]
Power-Loader Extensions
By adding these loaders and a parallel cable to your
64HDD system you can reduce loading times to a
minimum. The Pwr-Load plug-ins speed-up access to
single file programs by 30-50times compared to
standard 1541 loads. The speed up is available to
standard Commodores, however with a replacement
Kernal ROM or 64HDD Cartridge you can use PwrLoad transparently with almost every application.
Instructions for the Pwr-Load cable are included in the
plug-in download. Alternately, the Pwr/XE cable can
be ordered from 64HDD Shop.
PSID for DOS
64HDD user Nils Andreas came up with this idea to
interface Roland Hermans' SID file converter to
64HDD. Roland obliged by porting his software to
DOS, whilst Nils put together a simple utility to control
it directly from the C64 keyboard. Now you can
sample all those SID tunes with ease!
Networking with 64HDD
64HDD user Peter Simmonds worked out how to
network 64HDD systems running in DOS with other
PC which are running either DOS or Windows. The
NETWORK.TXT file included with 64HDD has the
details, but you may need to download the MS
networking client package.
USB Drives with 64HDD
This MSDOS device driver allows many USB "mass
storage class" devices to be identified and made
available to DOS programs. Mass storage class
devices include "thumb drives" (Flash memory sticks),
card readers (for CompactFlash, SD, MMC, etc) and
even many new Digital cameras. By using this driver,
the USB devices identified when DOS boots will be
accessible by your Commodore through 64HDD.
© COPLIN 1999-2006
41 of 136
v0.7alpha8
64HDD – The CBM Drive Emulator
www.64hdd.com
[email protected]
EZ-Load Functions
(Professional version only)
Users who do not have a DOS wedge system, such as that written into the JiffyDOS
ROM, now have an easy way to load files and directories without the hassle of
having to cursor to the end of the line to add the device number or delete the
filetype.
EZ-Load is activated by one of three ways:
• Prefix the directory request with !EZ:
LOAD”$!EZ:*”,9
• Suffix the directory request with ,EZ
LOAD”$!*,EZ”,9
• Make it default with the –ez command-line option
EZ-Load adds three features to the standard directory format:
•
The filetype is changed to display the current device number (for example
PRG is replaced with “,9:”. This is done automatically for all PRG files, in all
file modes. LOADing a file or changing directories requires only the word
LOAD to be typed at the start of the line.
•
If LFN support has been installed, all files with short names will have their
Long File Name displayed on the following line.
•
(Optionally) The X-Loader or PwrLoad prefix is added for Professional users,
and the absolute LOAD suffix is added after the device number. This
functionality can only be set from the command-line, but can be toggled on
and off by using the LOAD version of EZ-Loader.
EZ-Load basic functions
© COPLIN 1999-2006
EZ-Load with X-Loader Prefix enabled
42 of 136
v0.7alpha8
64HDD – The CBM Drive Emulator
www.64hdd.com
[email protected]
Device Number Swapping
Many C64 programs were written expecting there would only be one disk drive and
that it would be numbered as device #8. Most users have a 1541 in addition to
64HDD. As each device on the Commodore serial bus must have a unique number
it is not possible to have both 64HDD and another drive enabled as #8.
The easiest way to avoid the conflict is to switch-off the other device if not required.
Alternatively the other device can be “re-numbered” either by hardware (modifying
jumpers and installing switches if needed) or by software (for example by using the
one of the demo programs supplied with 64HDD). For 64HDD Professional users,
there is a third way – device number swapping.
(Professional version only)
Device number swapping is a procedure introduced by CMD devices to cater for
occasions where software must be booted from a real disk due to copy protection or
fastloader, but once booted, can be run from a compatible device. The errorextended disk image formats used by 64HDD overcome many of these limitations,
but the same technique can be used with software that uses fast-loaders or GCR
type copy protection or won’t work from the larger D81 image type. The other
situation that may require swapping is for programs which were written with only
drive #8 in mind.
Two types of device-swapping are catered for:
•
When swapping to device #8, the last accessed 64HDD device number and
path is exchanged.
•
When swapping to device #9, 64HDD device #29 is used
To use in combination with a program that requires booting from a real floppy disk,
first activate and assign an image of the program to the appropriate 64HDD device.
Then boot the original in #8, swapping once the boot process is complete.
The device-swap function can also be invoked directly from the PC keyboard or by
push buttons connected to the LPT port.
•
•
Pressing the F11 key on the PC keyboard is the equivalent of S-8. Pressing it a
second time will cancel the “swap”.
Pressing the RESET64HDD and DISK-FLIP switches can also be used to invoke
a swapping operation. Firstly, press and hold DISK-FLIP, momentarily press and
release RESET64HDD, then release DISK-FLIP. The action is equivalent to S-8
the first time it is done. The second time the sequence is done the “swap” will be
cancelled.
Note:
The initial swap may not occur if the C64 has just been started and no serial bus
commands have been issued. This can occur with JiffyDOS which does not release
all signal lines on start-up (it doesn’t expect another device to want to have control).
Simply issue a disk command, and the bus will be freed.
© COPLIN 1999-2006
43 of 136
v0.7alpha8
64HDD – The CBM Drive Emulator
www.64hdd.com
[email protected]
Multi-Disk Program Compatibility
Flipping disks with “Disk-Flip”
Some C64 programs were distributed on multiple 1541 disks. With some of these
programs it is possible to copy the contents to a 1581 image and use all levels of a
game for example without “flipping” the disk. However, many programs will not
transfer to formats other than that of the original disk. Nor, do some programs allow
you to enter disk commands so that you can re-assign which disk image is attached
to the current disk. The problem also occurs when you have “program” and “data”
disks, for example with a compiler, word-processor and GEOS. This has been a
problem for CMD hard drive users for quite some time now.
To help in these situations, 64HDD now supports disk “flipping” at the push of a
button. There are two ways to use this feature:
•
•
You can add a switch to you X1541 or XE1514 connection. This suits users
who do have a standalone 64HDD system. The modification involves
connecting a switch to pin15 of the LPT plug and to ground (pins18-25). The
X1541 cable may already use pin15 for the “detection” loop, but this link can
be removed and the cable will still work. The XE1541 cable has no such link
in place. This switch is the “disk-flip” button.
You use the F12 key on systems that have a keyboard.
In order to use the “multiple-disk” feature, disk images or directories need to be
assigned as partitions, or short-cuts. The “disk-flip” function is only available when
device #8 is activated on 64HDD.
Partition/short-cut [001] through [010] take on a special meaning when the “disk-flip”
button is pressed. Each press of the button causes 64HDD to search for the next
valid definition. This definition is then attached to device #8 and becomes the default
for subsequent accesses. If a partition/short-cut in the [001]-[010] range is
undefined, 64HDD skips to the next. After partition/short-cut [010], 64HDD jumps
loops back to [001].
Notes:
• Each press of the "disk swap" button when 64HDD is "idling" (that is twirling
bar is rotating), will increment the "disk number" between 1 and 10. If a valid
partition is assigned to this number, the partition is assigned to device #8.
The partition can be a disk /tape /LNX image or native MSDOS partition
• Blank definitions are skipped. Therefore if a 2-disk game is used only
partitions 1 and 2 should be defined. If 3 double-sided disks make up the
game only partitions 1,2,3,4,5,6 should be defined. Hence a maximum
“game” size is 5 double-sided 1541 disks or ten 1581 disks.
• When a valid partition (that is, “disk”) is changed to, the corresponding
number of beeps is given, for example 1 for disk1, 2 for disk2, etc. The
current disk number should also be shown on the PC display (top line).
© COPLIN 1999-2006
44 of 136
v0.7alpha8
64HDD – The CBM Drive Emulator
•
•
www.64hdd.com
[email protected]
The button should have no effect during loads, but may upset SEQ
transmissions because 64HDD may idle between blocks. 64HDD does put
the C64 into hold-off mode though during the swap, and so may not be a
problem (except for transmission is now from another source)
The 64HDD distribution includes a sample program to demonstrate clearing
and assigning partition definitions (this has long been a feature of 64HDD).
This could be modified to suit the particular program, and you could create
one per game and include the drive number swap code.
Automating “Disk-Flip” Tables
(Professional version only)
A special way exists to automate the Disk-Flip partition table by using extended
“common name” partition tables. The method is fully described in the section on
Partition and Unit Definitions (ShortCuts).
© COPLIN 1999-2006
45 of 136
v0.7alpha8
64HDD – The CBM Drive Emulator
www.64hdd.com
[email protected]
Copy Protection Support
Introduction
Many commercial programs written for the C64 where distributed on copy-protected
disks. The schemes employed by these programs were many and varied and even
to this day, not all can be transferred to emulator disk image format. The information
below provides an overview of how disks work and how the emulator formats
capture the information that is on them.
The above describes the structure of a typical 1541 disk. The standard disk has 35
tracks (or concentric rings), with the directory on track 18. Each track is divided into
a number of segments called sectors. These sectors are shown pictorially below.
Some Commodore disks can vary the number of sectors stored on a track on a
track-by-track basis. The actual 1541 drive was physically capable of formatting
more that 35tracks, in fact it could easily be made to format 40tracks. Even more
extreme, some schemes used the fact that “half-tracks” and tracks up to 42.5 could
be accessed and so made use of these as part of their copy-protection.
© COPLIN 1999-2006
46 of 136
v0.7alpha8
64HDD – The CBM Drive Emulator
www.64hdd.com
[email protected]
Commodore used a disk recording method called GCR. The method means that the
sectors are recorded on the disk in a special way, different to that used by the IBM
format that has become widespread. Commodore was not alone in its choice of disk
recording method, notably Apple also used this method. The pictorial below shows a
simplified pictorial of all the information stored in one sector.
In most cases, only the information in the “data” section is important and this can be
considered as the “block”. One block is 256bytes. However, the information store on
the disk before and after the block can be manipulated to provide copy protection.
The copy protection information can result in errors when the disk sector or track
read. These errors are detected by the program and the absence of which is taken
to mean the disk has been tampered with.
The disk image formats used by Commodore emulators try to capture the
information on these disks by creating a linear file containing the data blocks, errors
and /or GRC code. The D64 or similar format image is simply a sequence of data
blocks as shown in the pictorial below. If T&S error information is also captured at
the time the disk is transferred, the format becomes known as an “error extended”
disk image.
© COPLIN 1999-2006
47 of 136
v0.7alpha8
64HDD – The CBM Drive Emulator
www.64hdd.com
Disk data
Image Type
Track 1, Sector 0
Track 1, Sector 1
…
Track n, Sector m-1
Track n, Sector m
Error T1,S0
Error T1,S1
…
Error Tn, Sm-1
Error Tn, Sm
D64 or similar
[email protected]
256bytes per block
Error Extended
1byte per block
The original D64 image format knows nothing about the “half-tracks” and so in its
standard form, only 35track disks are stored. A 40track version of the disk also now
exists and is supported by 64HDD.
For 64HDD, or indeed any other emulator, to work with a copy-protected disk
enough information needs to be captured from the disk when it originally transferred
to disk image.
The table below outlines some the schemes employed and how compatible they are
with the disk images supported by 64HDD.
Copy Protection
none
Disk Image Type
D64 or similar
Hidden files
T&S error
D64 or similar
D64 (error extended)
40Track Disks
D64 or similar
Half-Tracks
D64 or similar
Half-Tracks
G64
GCR errors
G64
64HDD Support?
Yes, disk image or MSD/LFN
modes
Yes, disk image only
Yes, disk image or transfer to
MSD/LFN with T&S emulation
Yes, disk image or MSD/LFN
modes, Read-only on disk
image though.
Depending upon the method,
some ½ track schemes block
physical backups, but not D64
backups as for example
T20.5 will be saved as T20
upon the second read attempt
File format not supported by
64HDD
Not supported, no X1541
cable tools exist to create
image from real disks
Fortunately, many programs can be archived without any copy-protection being
present and these will often be the easiest to use with 64HDD. Parameter tools such
as Maverick can de-protect many programs, or alternatively back-up cartridges such
© COPLIN 1999-2006
48 of 136
v0.7alpha8
64HDD – The CBM Drive Emulator
www.64hdd.com
[email protected]
as ActionReplay can make single file back-ups of most games, and AR for example
can save backups directly to 64HDD (when active as device #9).
D71, D81 and other disk image formats work in a similar way, but it is less likely that
these will contain copy-protection information. However, the extended error
information is a useful check on whether the disk contains physical errors due to
aging or surface damage.
TRACK18 Emulation
(Professional version only)
Many commercial programs written for the C64 directly access the directory located
in Track 18. They do this for reasons of speed, but the technique only works if the
disk drive is a 1541. Many of these programs will fail to work if transferred to D81
format as the 1581’s directory is located in an entirely different disk track. This would
be a serious modern day limitation as is prevents programs being transferred to the
64HDD native file system where they can be more efficiently run without the 1541’s
drive space constraints. However, 64HDD Professional can overcome all this.
The 64HDD MSD file system uses the native file system of MSDOS or the LFN
extension of it. The MSD file system doesn’t have a CBM compatible directory
structure and so cannot be normally accessed with block-read commands.
TRACK18 emulation corrects for this by intercepting the block-read command, and
either creating or responding with the equivalent directory block information.
This enhancement, combined with the mapping of the 1541’s ROM, allows
programs such as GoDot to use the unrestricted space of the MSD/LFN file system,
whilst keeping the program “thinking” it is working with a 1541 drive.
This emulation scheme alone however, will not overcome all incompatibilities as
some programs, most notably GEOS and programs with copy-protection, will access
data blocks not on the disk directory’s track (see next sub-section).
MSD TRACK&SECTOR Copy Protection
(Professional version only)
Many commercial programs use disk errors as part of their copy protection
schemes. Early copy protection schemes used errors located in a particular tracksector location. These errors can be transferred to a disk image by using the errorextended disk format when the disk is first transferred to D64, D71 or D81 format.
64HDD copes with these “errors” and sends the appropriate response when the
copy protection scheme tries to detect a copy.
However, when the disk’s contents are transferred to the MSD file system, not all
commercial programs will work as the track and sector error information is not
present. The T&S error information can be transferred to the MSD directory by using
the disk interrogate command (I1541), or by manually creating a file called 64HDT&S.ERR containing the track-sector-error table for the original disk.
© COPLIN 1999-2006
49 of 136
v0.7alpha8
64HDD – The CBM Drive Emulator
www.64hdd.com
[email protected]
Despite this enhanced mode, there are still many other copy protection schemes
which 64HDD cannot cope with. The newer G64 format was hoped to overcome
these limitations. However, many of these error schemes cannot as yet be
transferred to a disk image by the CBM-PC copy software. There are however tools
available to convert the data in G64 images to D64 files. This conversion will lose
the copy protection information in most cases, preventing the program from booting
– but will still allow other data to be accessed by 64HDD.
© COPLIN 1999-2006
50 of 136
v0.7alpha8
64HDD – The CBM Drive Emulator
www.64hdd.com
[email protected]
Native C128 Mode Support
Boot Sector Support for Disk Images
Disk image booting is supported by all versions of 64HDD greater than v0.7a0. It
should be noted that although the C128 kernal will allow the boot sector from any
device number to be requested, subsequent operations default to device #8. If you
wish the boot process to be completed, ensure 64HDD is configured as device #8.
Boot Sector Support for MSD/LFN File Systems
(Professional 128 Only)
BOOTing from the native MSD/LFN file system is only supported by 64HDD
Professional for the 128. Using a boot sector creation tool (such as AUTOBOOT
supplied in the distribution zip), pseudo boot sectors can be created. The boot
sector information is stored as a special file identified as BOOTSECT.64H
The same disk image rules apply to booting from the MSD/LFN file system.
CP/M Support
Although 64HDD is intended primarily to support native Commodore modes of
operation, some limited CP/M compatibility is possible. Support presently is limited
to the use of the disk images file system, namely D64 types because the operation
of CP/M is via direct track /sector accesses. Only disk images compatible with the
GCR system are usable with 64HDD. This means that MFM disks cannot be utilised.
Multiple device numbers can be utilised, each number being associated with the
appropriate device letter, for example A: instead of #8, D: instead of #11
It has been reported that some CP/M utilities such as SPORT.COM can be used to
send disk commands to 64HDD for the purpose of changing disk images etc. It
should also be remembered that Disk-Flipping and 64GUI (Professional 128 Only) can also
be used to change disks.
Presently there is only minimal demand for a better CP/M support, and so there is
no intention of spending time to develop these capabilities further. If you require
better CP/M support, please discuss this requirement with the author.
Note: There is presently no Z-Loader or PwrLoader support for the CP/M operating
system.
© COPLIN 1999-2006
51 of 136
v0.7alpha8
64HDD – The CBM Drive Emulator
www.64hdd.com
[email protected]
GEOS 2.0 Support
Introduction
GEOS support is available to 64HDD and you have three
options:
Compatible
1. Download the pre-keyed D64 images from the
CMDRKEY website. These are essentially “load and go” images, but you will
only be able to use the basic GEOS applications. You may skip most of the
information in this section of the 64HDD manual if you take this option.
2. Download the freeware driver disks from the 64HDD website and follow the
instructions in this section of the manual on how to key these kernal drivers to
match your personal GEOS disks
3. Use the XP GEOS-Kernals distributed with 64HDD Professional. To use your
existing applications, the keying procedure will need to be followed.
64HDD provides support for GEOS via the use of a specialised GEOS-kernal. The
kernal is the code that is always available to applications running under GEOS. The
kernal routines that talk to the disk drives have been modified to talk to 64HDD in a
special way, and 64HDD knows how to talk back. This communication method is not
the same as that used by real 1541/81 disk drives, but that doesn’t not matter to
99% of the applications written for GEOS.
If you go for methods 2 or 3, your GEOS system needs to be configured before it will
work. Like the original GEOS, your 64HDD copy needs to be “keyed” with the serial
number on your original boot disk, but once done you need not use your original
floppies again.
Choice of Different GEOS-KERNALs
There are several new GEOS-kernals to choose from depending upon the disk
hardware configuration and disk format you are using. The recommended drivers
are those that include a fast-loader disk routine as they will dramatically improve
performance.
There are two families of GEOS-Kernals available for 64HDD Users:
Re-Compiled GEOS-Kernals for GEOS64:
These are back-bone of the kernals available to freeware users of 64HDD.
(Professional version only)
Extended functionality based on these kernals is also available to
Professional users.
© COPLIN 1999-2006
52 of 136
v0.7alpha8
64HDD – The CBM Drive Emulator
www.64hdd.com
[email protected]
These 64HDD-Disk Drivers have been built by studying the information in the
GEOS Programmer’s Reference Guide and examining the reverse-engineered
source code for GEOS 2.0 made available by Maciej/YTM. Many thanks go to
Maciej for the work to reverse engineer the GEOS Kernal. Those wanting to
program for GEOS using should check out these sources, and other examples
of his applications (usable with TASS and ACME PC-cross-assemblers).
Maciej is also responsible for the GEOS library included with CC65, which can
be used to write GEOS applications in C.
XP GEOS-Kernals for GEOS64 and GEOS128: (Professional version only)
These are the next generation of Xtra-Performance (XP) kernals available
exclusively to 64HDD Professional users. These kernals work on the principle
of loadable disk-drivers and offer a higher degree of overall compatibility with
non-standard GEOS applications (such as those that patch the system).
What will your 64HDD-GEOS configuration look like?
By using 64HDD you will not need to have a stack of 5.25” GEOS disks any more.
All these disks will be accessible as images available from your 64HDD-GEOS
drive.
Your new configuration can include one or two 64HDD drives and a REU, or one
64HDD drive and a real disk (should you need to transfer data to real disks). The
configuration details will be discussed in detail below.
The other benefits of having GEOS run from 64HDD (other than eliminating your
stack of disks) is that
•
•
•
•
You’ll be able to launch applications located on different disk images by using
simple to configure disk ShortCuts and thus avoid the disk shuffling
You’ll have an accurate clock as the driver included will set the time from the
64HDD system when you boot
You will be able to spool print jobs to files, using 64HDD Professional
You’ll have access to lots more features yet to be finalised (why not help by
coding some)
The basic D64 driver set is available to all versions of 64HDD. The professional
version also includes support for the D81 image format and for Pwr-Loader support.
In the future, additional support will be developed to make use of the features
provided by 64HDD (eg PC-Mouse driver). However, there is no intention for me to
develop a new GEOS. Wheels and MegaPatch3 seem like fine products and should
you wish for 64HDD to be usable with these products, discuss it with their respective
authors. I am willing to assist the authors with coding the necessary disk-drivers.
If you wish to use replacement desk-tops such as Dual-Top and Mini-Desk, you can
try them. These desk-top replacements are merely file management applications
that lie over the kernal and providing they use the standard kernal jump-table calls,
should work. Not all at present work with the Re-Compiled kernals, but most work
with the XP version.
© COPLIN 1999-2006
53 of 136
v0.7alpha8
64HDD – The CBM Drive Emulator
www.64hdd.com
[email protected]
All official GeoWorks products have been tested and these do work. This includes:
GEOS,
geoPAINT
geoWRITE
geoCALC
geoCHART
geoPUBLISH
geoPROGRAMMER
geoBASIC
and various utilities supplied on the disks.
What will not work with 64HDD-GEOS?
In addition to Wheels and MP3, Gateway is not expected to work with the 64HDDGEOS kernal. Maurice Randall has released the driver code for the 1581 Wheels
disk drivers, so it should be possible to modify this to work with 64HDD. Anyone
interested in helping should contact me for information.
It is also expected that some programs that apply patches to the GEOS kernal will
not work with the reverse-engineered kernals. This is because the actual code within
the kernal is differently organised to the original GEOS. This may include patches
for the SCPU and TurboMaster accelerators. If you have the need for such devices,
send me some details and I’ll investigate what can be done.
Additionally, drivers for other non-standard drive types may conflict with 64HDD.
Though it has not been verified, it is not expected for example to use the CMD HD,
64HDD and an REU concurrently. Only one drive type other than 64HDD is
expected to work, so you may be able to only get some combinations working.
First-time Installation Procedure
The disk keying and setup process can be avoided by using the pre-keyed disk
images available directly from the CMDRKEY website.
For certain GEOS applications to work they require the GEOS kernal to report a
serial number that matches that “keyed” to the application you own. The installation
procedure described below will take care of that, ensuring your GEOS applications
continue to work.
Also, GEOS is still available as a commercial program. In order to respect the rights
of those who own the rights to it, you need to perform the initial boot from a real disk
to validate that you are entitle to the 64HDD upgrading. Other files such as DeskTop etc must be provided from your original disks. Before following the steps below,
read through the rest of this section on GEOS support so that you are familiar with
all the options you have.
© COPLIN 1999-2006
54 of 136
v0.7alpha8
64HDD – The CBM Drive Emulator
www.64hdd.com
[email protected]
Step 1)
Copy all your GEOS disks to D64 format
If you haven’t done this before, do so using TRANS64 or
StarCommander. There is also a large range of Public Domain GEOS
software available on the internet.
Step 2)
If required, copy the DESK-TOP and other utilities to the 64HDDGEOS boot disk image you hope to use
This should be done using Trans64, StarCommander or another diskmanagement utility that works with disk images and understands the
GEOS file format. CONFIGURE should be placed after at least one
auto-exec driver, eg after the 64HDD clock driver or renamed to
CONFIGUREx so that it is not automatically started by the DESK-TOP.
The boot disk image to use depends upon which disk-driver version
you will be using (slow, fast, pwr-load). You should try the fast drivers
first and only if not compatible should you revert to the slow driver (see
notes below)
Step 3)
Copy the 64HDD-GEOS boot D64 to a real 5.25” floppy
This physical copy of the 64HDD boot disk will contain the application
that will be used to “key” your 64HDD D64 boot disk image. The
keying application must be run from a real disk drive after booting your
original disk.
Step 4)
Start up 64HDD with your 64HDD-GEOS boot disk image attached as
drive #15, and no other 64HDD drives active
Only the image in drive #15 will be keyed by the registration program.
The EXIT:15 command can be sent to restart the GO64HDD batch file,
or you can set this path manually.
Step 5)
Boot GEOS 2.0 using your original disk in #8, swap to the copy of the
64HDD disk and launch the keying program
This GEOS application will “key” your 64HDD D64 boot disk image
and transfer your serial number.
Re-Compiled 64HDD-GEOS Kernals
Booting GEOS from 64HDD (Re-Compiled Kernals)
Before proceeding with the first-time installation process, you will have to make
some decisions about which disk protocol and which disk image format you will be
using. The freeware release is limited to D64 and a choice of “slow” or “fast” serial
routines. The “slow” format uses the standard CBM way of talking to drives, it will
work, but it is slow. The “fast” serial routines use a custom disk speeder. The “fast”
routines may not be compatible with very slow PC processors; you will have to try it
for yourself. You may also run into problems on very fast PCs which use a variable
clock speed (especially some modern notebooks).
© COPLIN 1999-2006
55 of 136
v0.7alpha8
64HDD – The CBM Drive Emulator
www.64hdd.com
[email protected]
For each disk image type (D64, D81, etc) there are three disk protocols and two
modes to choose from. This may seem complicated, but there are good reasons for
this. For each of these combinations you will have a choice of kernal to use. The
initial release is limited to D64. Refer to the table below:
Re-Compiled 64HDD-GEOS Kernals
Protocol
D64 images
Slow IEC routines
GEO1541S
GEO1541S.REU
Fast IEC routines
GEO1541F
GEO1541F.REU
Pwr-Load routines
GEO1541P
(Professional version only)
GEO1541P.REU
D81 images
GEO1581S
GEO1581F
GEO1581P
It is good practice to leave both drivers on your boot disk:
•
•
one for working with a real disk drive, and
one for working with an REU.
Professional version only
A new Pre-Configure tool means that you only need to keep a minimum of one
Kernal type that can be modified by the auto-exec PreConfig application to support a
second disk of type real, 64HDD, or RAM. See information later in this chapter. The
professional version also has a simple BASIC boot program to allow selection of
multiple options.
If you like you could order these two files such that the most often used is first in the
directory, so that LOAD”*” gets your most popular configuration loaded. Note: that
these files may be compressed and may take some time to de-compress after you
type RUN
GEOS has the limitation built-in that it can only work with two drives – A and/or B;
with drives C and/or D needing to be swapped for usage (to/from the REU). 64HDDGEOS will also only work with only two drives shown, A and/or B.
•
•
One or both of these drives has to be a 64HDD
At least one drive (64HDD or real) has to be of non-RAM type (either
1541/71/81) in order for CONFIGURE to allow you to save/exit.
The table below shows which drivers you need to use depending up your drive setup.
© COPLIN 1999-2006
56 of 136
v0.7alpha8
64HDD – The CBM Drive Emulator
Configuration
Real Drive
1541/71/81
Real Disk
Drives only
Real Disk
Drives + REU
64HDD +
Real Disks
64HDD +
REU
Two 64HDD
Drives
www.64hdd.com
RAM Drive
“inside REU”
64HDD Drive
“disk image”
X
X
[email protected]
64HDD Driver
N/A
X
N/A
X
X
X
X
X2
RAM-type
GEOxxxxx
Non-RAM
GEOxxxxx.REU
Non-RAM
GEOxxxxx.REU
The “xxxxx” will depend on the disk format and protocol (slow, fast, pwr) being used,
as noted above. There may not be any 1581 “REU” versions of the kernal as these
are only supplied with the professional version which also has the PreConfig
application.
Using CONFIGURE (Re-Compiled Kernals)
Most of the time you will be able to work from one 64HDD “drive”. This will be come
clear later when the utilities supplied with 64HDD-GEOS are explained in detail.
Should you need to use other devices such as a real disk drive, a REU or another
64HDD-drive, you will need to run CONFIGURE.
Currently some precautions apply to the use of the CONFIGURE program. Normally
CONFIGURE auto-runs on boot-up and detects the drives that are attached to the
system. The problem is, CONFIGURE has a default way of checking drives which
will cause GEOS to hang when it talks to a 64HDD drive. Until a patched version of
CONFIGURE is developed the following work-around has to be used.
•
•
•
•
•
•
Place CONFIGURE after the auto-exec programs. The D64 supplied with
64HDD includes a clock driver “Get 64HDD RTC”, place CONFIGURE after
this file.
Manually start CONFIGURE after the desktop is first booted. From here,
select the additional device to be used.
For CONFIGURE to let you save or exit, at least one of the attached device
needs to be of non-RAM type
Do not have CONFIGURE on your non-boot disks. Logging these disks will
activate the program and cause the system to hang. A simple work-around is
to rename the file to CONFIGUREx
Do not run applications from a real disk in Drive A. This will result in Drive B
(your 64HDD drive) disappearing. When you next try C= B, CONFIGURE on
that disk will be automatically run and will attempt to detect the 64HDD drive
causing the system hang. A real drive should be used for transferring files
into and out of your system, not usually for running applications.
Do not use directory shadowing.
© COPLIN 1999-2006
57 of 136
v0.7alpha8
64HDD – The CBM Drive Emulator
www.64hdd.com
[email protected]
Example #1
•
64HDD drive is #9, D64 boot image, fast-load disk driver
1) Start 64HDD on #9, attach the GEOS disk image
2) Load and run GEO1541F
3) When Desk-Top finishes loading, you are ready to use GEOS. No further
operations are needed. Drive A will report an error if you try to access it with
C=A, but the error is not fatal.
4) Within programs the “DRIVE” button should be not visible.
Example #2
•
•
64HDD drive is #9, D64 boot image, fast-load disk driver
real 1541 is #8
1)
2)
3)
4)
Start 64HDD on #9, attach the GEOS disk image
Load and run GEO1541F
When Desk-Top finishes loading, start CONFIGURE.
The 64HDD drive #9 will be of type RAM-1541. Select drive #8 as 1541.
“Save Configuration”. “Quit”.
5) Use C= A to activate drive #8. Use C= B to activate drive #9. Alternatively,
click the disk A/B icons.
6) Within programs the “DRIVE” button should be visible.
7) Note: to copy files between Drives A and Drive B using the Desk-Top, the
disk names should be different (this is a GEOS rule).
Example #3
•
•
64HDD drive is #9, D64 boot image, fast-load disk driver
you want to have your REU available
2)
3)
4)
5)
6)
Start 64HDD on #9, attach the GEOS disk image
Switch off your real #8 if possible
Load and run GEO1541F.REU
When Desk-Top finishes loading, start CONFIGURE.
The 64HDD drive #9 (B) will be of type 1541. Select #10 (C) to be the same.
Then select drive #8 (A) as RAM-1541 or RAM-1571 or RAM-1581
depending upon the size of your REU. Then select the DMA option if you
wish to use that access method. “Save Configuration”. “Quit”.
7) Use C= A to activate drive #8. Use C= B to activate drive #9. Alternatively,
click the disk A/B icons. A Ghosted C drive may exist, ignore this.
8) Within programs the “DRIVE” button should be visible.
9) You REU can be used to store the Desk-Top and other files regularly
accessed.
© COPLIN 1999-2006
58 of 136
v0.7alpha8
64HDD – The CBM Drive Emulator
www.64hdd.com
[email protected]
Example #4
•
•
64HDD drive is #9, D64 boot image, fast-load disk driver
64HDD drive as #8 also
1) Switch-off #8 or renumber it to either 10 or 11
2) Start 64HDD with #8 and #9 active.
3) Attach the GEOS disk image to drive # you wish to boot from. Attach another
D64 to the other drive #
4) Load and run GEO1541F.REU
5) When Desk-Top finishes loading, start CONFIGURE.
6) The 64HDD boot drive # will be of type 1541. Set the other drive # also to
1541. “Save Configuration”. “Quit”.
7) Use C= A to activate drive #8. Use C= B to activate drive #9. Alternatively,
click the disk A/B icons.
8) Within programs the “DRIVE” button should be visible.
9) Note: to copy files between Drives A and Drive B using the Desk-Top, the
disk names should be different (this is a GEOS rule).
10) You may additionally have an REU also active for caching, etc but this may
not work for swapping. In fact, you may need to activate it before selecting
the disk for #8.
XP-GEOS (XP Kernals)
Booting GEOS from 64HDD (XP Kernals)
(Professional version only)
The XP kernals greatly simplify the boot process, though some of the general rules
discussed above also apply to this system. XP is available for both GEOS64 and
GEOS128. Each GEOS master disk contains a boot-menu program that allows
runtime selection of the disk driver to load.
There are currently six disk drivers to select from. The default is to configure only
the boot drive as type “real”. The PreConfig utility is used to change the 64HDD
drive to type “RAM” if you wish to use GEOS with a real 1541 disk drive. In general,
the same rules as above apply to mixing real, 64HDD and REU drives. The table
below outlines the disk driver protocols that are support. If you do not use any of the
disk drivers, they can be deleted to recover further disk space. By re-ordering the
location of the files on the desktop, the first driver file will become the default type.
1
2
3
4
5
6
Disk Driver Names
DRV1541FF or DRV1581FF
DRV1541PF or DRV1581PF
DRV1541SS or DRV1581SS
DRV1541FS or DRV1581FS
DRV1541PS or DRV1581PS
DRV1541PP or DRV1581PP
© COPLIN 1999-2006
Reads
Fast
PwrLoad
IEC
Fast
PwrLoad
PwrLoad
Writes
Fast
Fast
IEC
IEC
IEC
PwrLd
59 of 136
Remarks
Faster PCs, X-Cable
Faster PCs, PwrCable
All systems
Slower PCs, X-Cable
Slower PCs, PwrCable
Bi-dir LPT, PwrCable
v0.7alpha8
64HDD – The CBM Drive Emulator
www.64hdd.com
[email protected]
With GEOS XP, CONFIGURE will appear as a file in the border of your boot disk.
The CONFIGURE file should be left there to prevent it from executing automatically
on boot-up. You will only need to use CONFIGURE (instead of, or in addition to
PreConfig) if you wish to use a REU device.
To activate your REU, 1) start CONFIGURE after booting has finished, 2) enable the
option “DMA for MOVEDATA”, 3) enable RAM1541 or RAM1571 drive type.
Following this sequence is necessary for correct operation of the REU driver.
Using 64HDD-GEOS Supplied Utilities
There are a number of utilities supplied with the 64HDD-GEOS system and more
will be added in the future. The purpose of most of these utilities will be to assist with
disk image navigation and/or to take advantage of other 64HDD features.
Disk-Flip:
With 64HDD-GEOS configured for Drive A as either the boot or as a
second 64HDD drive, the disk-flip function can be used to swap
through a list of D64 disk images. Care should be taken to only swap
the “disk” when GEOS would normally consider it to be safe to do so.
64GUI:
The GUI interface built into 64HDD Professional can be used to
navigate and set GEOS disks. It is recommended to first “close” or
“disk” before attaching a new one image to the assigned device
number. Note: you can only exchange to a disk of the same type.
ShortCuts:
Supplied with 64HDD is a small application called ShortCut. This
application should be copied to all your disks. This application allows
you to attach a new disk image by simply running it. In addition to
attaching a new disk, the name of an application to launch can be
specified.
This application can be remained to suit your needs. The information
in the InfoBox (C=Q) identifies where the short-cut goes to. For
example, say you want a short-cut to your GEO-Publish disk.
• Copy ShortCut to a new name, eg geoPublish
• Change the text in the info box to point to the name and location
of the disk image, eg d:/geos/geopub.d64
• If you also want to start the application, add the name of the
application to the path after a * character, eg
d:/geos/geopub.d64*GEOPUBLISH
• Note: GEOS is case sensitive when it comes to application
names.
• A special use of the ShortCut feature is to replace the “DESK
TOP” file that is 120blocks in size with a 2block short-cut called
“DESK TOP” pointing back to your boot disk. This will give your
applications more room to save data. For example,
d:/geos/geosboot.d64
© COPLIN 1999-2006
60 of 136
v0.7alpha8
64HDD – The CBM Drive Emulator
www.64hdd.com
[email protected]
Whenever applications finish, they will return to your first boot
disk where you can have all your short-cuts.
The InfoBox can also be used as a convenient way of sending
commands to 64HDD to do house keeping functions such as checking
on drive space with FREE: or setting the date with DATE: The reply
from 64HDD will appear in a dialog box.
ShortCut+:
Supplied with 64HDD Professional is an enhanced version of
ShortCut, called ShortCut Plus. This application has additional
capabilities compared to the standard ShortCut tool. By modifying the
parameters in the info-box these functions can be activated. The new
features allow you to:
1) Spawn a copy of the ShortCut utility on the target disk.
By adding a # at the end of the path, the new disk image
will firstly be attached, but before returning to the
desktop, ShortCut+ will create a new “blank” ShortCut on
the disk so that it can be redefined and/or copy. Eg:
$d:/geos/geopub.d64# will attach the geopub.d64
disk image, then create a new ShortCut on that disk
image.
2) Attach a new disk image to a particular device number
(not just the current device). For example, appending ,8
will apply the request to device 8 regardless of whether
ShortCut+ was launched from device 8, 9 or 10 (A, B or
C in GEOS speak). Eg $d:/geos/geopub.d64,8
The latest version of this utility works with both GEOS64 and
GEOS128.
RTC Clock: Supplied with 64HDD is a small application called “Get 64HDD RTC”.
This is an auto-exec application and will on boot-up set the GEOS time
to that set on your 64HDD-PC. The latest version of this utility works
with both GEOS64 and GEOS128.
PreConfig:
Supplied with 64HDD Professional is new auto-exec tool which allows
the Pre-Configuration of the 64HDD GEO-Kernal at start up. The tool
also performs the functions done by the RTC driver thereby reducing
the number of auto-execs that need to be run at boot-up. PreConfig
lets each drive be set as either “real” or “RAM” type. The setting is
changed by editing the InfoBox data.
If you want to use a real RAM expansion device such as a C1750,
then the 64HDD device should be set as “real”. If you want to use a
real disk drive such as a 1541 with 64HDD, then you should identify
the 64HDD disk as “RAM” type. PreConfig will run before the desktop
is loaded, or can be re-run manually by double-clicking the icon. If you
are using a Commodore Disk or RAM Device, you will need to
manually start CONFIGUREx to ensure the driver code is installed for
them. The latest version of this utility works with both GEOS64 and
GEOS128.
© COPLIN 1999-2006
61 of 136
v0.7alpha8
64HDD – The CBM Drive Emulator
www.64hdd.com
[email protected]
Using Other GEOS Utilities
Other GEOS tools can be used to control 64HDD during your GEOS session. These
utilities include CMD_MOVE (for copying or changing between disk images attached
as “partitions” (CMD compatibility mode with 64HDD Professional must be
activated). “DOS wedge” by Jim Collette is another utility that can be used to
enhance your GEOS session by allowing you to send commands to your 64HDD
system. Others to try include geoShell.
Command:
Applicability:
Clear/Set Master-Disk-Protection flag
All
MSDOS
D64
Syntax:
“GMP:0”
“GMP:1”
D71
D81
D2M
T64
LNX
Examples:
Clear protection flag on current diskimage
OPEN 1,11,15,”GMP:0”
CLOSE 1
Errors:
•
Notes:
• When bit is set, files cannot be directly deleted from the desktop, but only via
dragging to the border.
• Booting from a diskimage will re-activate the protection flag, and so the only way
to clear flag from a boot disk is temporarily by using a utility running under GEOS
© COPLIN 1999-2006
62 of 136
v0.7alpha8
64HDD – The CBM Drive Emulator
www.64hdd.com
[email protected]
64HDD-GEOS Disk and Utilities (Screenshots)
64HDD-GEOS Disk
This disk contains you’re
the start-up kernels and
some utilities. DeskTop
needs to be added and
the D64 keyed with your
GEOS serial number
before it will work as a
boot disk image.
Key-in 64HDD
This is the application
that will perform the
keying operation. You
must have the D64
transferred to a real disk
and run from there after
booting the original and
64HDD.
Non-Keyed Error
If your 64HDD-GEOS
boot disk image has not
been keyed you will get
this error screen – pretty
obvious.
Try keying the disk
image again.
© COPLIN 1999-2006
63 of 136
v0.7alpha8
64HDD – The CBM Drive Emulator
www.64hdd.com
[email protected]
Desk Top Error
This will result if you
successfully key your
64HDD boot disk, but
either you forgot to put
desk-top on the D64
(you need to do this as it
is not supplied) or the
driver has experienced
an error whilst trying to
load desk-top (might
mean your PC is not fast
enough to use the fast
drivers)
64HDD Clock Driver
This is an auto-exec that
will run each time your
64HDD-GEOS boots to
set the date and time
automatically.
It will only work if your
boot /current drive is a
64HDD drive.
ShortCut Utility
This is small application
can be used to connect
and run applications not
on the currently attached
D64 disk image.
It’s one of the ways of
moving between your
various without
physically swapping
disks.
© COPLIN 1999-2006
64 of 136
v0.7alpha8
64HDD – The CBM Drive Emulator
www.64hdd.com
[email protected]
Print Spooling and PrintEngines
(Professional version only)
Commodore serial printer devices normally are assigned device numbers 4, 5 or 6.
64HDD Professional had the ability to trap the information being sent to these
device numbers and re-direct this information to disk. Each job started and trapped
is assigned a “JOB” number. These jobs can then be processed by custom Print
Engines to either translate the data for a different printer or provide some type of
emulation.
For 64HDD to trap devices 4, 5, and 6:
• Switch off any device with the same number as the one trapped by 64HDD
• Activate device spooling from either 64GUI or by adding the appropriate device
switch on the command line, eg –4 for activating device #4
The 64HDD screen will indicate that the SPOOLER is active.
Refer also to the command reference sections of this manual for detail on command
channel control of printing features.
Print Jobs
Communication to serial printers essentially follows the same protocol as disk drives
do. The devices listen as data is sent to them, whilst in the background the actually
“print” the information to paper. Communication to a printer begins with the OPEN
command. If the OPEN command includes a secondary address (eg OPEN4,4,7)
then 64HDD knows this to be the start of a new “job” and so closes off the current
“job”, assigns it a new number and starts the next spool file. However, there are
several instances that may cause some variation to this.
• Print jobs which do not specify a secondary address: eg OPEN4,4 When this
happens 64HDD will continue to spool the information to the current job. To
overcome this and initiate a new job, 64HDD includes a special command that
can be sent over the command channel.
• Some programs that continually open and close the printer device, even though
they are only printing a single job. The most notable software of this type is that
written for C1520 plotter that is designed to use the secondary channels to
define special actions. Fortunately the C1520 is reserved as device #6, but if you
come across other such software then you may need to have a specialised
PrintEngine written.
Fortunately, most programs including listing of source code and GEOS are well
behaved and so should not cause to many problems. When listing BASIC source
using the CMDx redirection command, just remember to include a secondary
address when opening the printer device and the rest will take care of itself.
For each print job, two files are created. The first is an APPSPOOL.USR file, that for
now contains the secondary address used to open the file, but will in future contain
© COPLIN 1999-2006
65 of 136
v0.7alpha8
64HDD – The CBM Drive Emulator
www.64hdd.com
[email protected]
additional information about the print job. The second is the JOBSPOOL.USR file,
which contains the stream of data the Commodore application was sending to the
printer device.
Print Engines
Print Engines are standalone programs that read in a Print Job and process it.
Print Engines can be written to perform a number of purposes:
• Translation: from Commodore format to another format, for example PC Text or
HTML.
• Redirection: this involves taking the data that was destined for a Commodore
printer and streaming it to another devices connected to a PC (eg another LPT
port) or to another Commodore device (for example connected as #5). It should
be noted that the latter can also easily be written as a Commodore program.
Print Engines are written as separate pieces of software. They can be written in any
language that compiles to a MSDOS EXE. A number of PrintEngines are included
with 64HDD Professional and these may be supplemented by others still to be
coded. PrintEngines should be stored in a location that is on the MSDOS Path, and
the naming convention is: 64PE-xxx.EXE where xxx is the file extension created by
the PrintEngine.
64GUI – PrintManager
(Professional version only)
64GUI includes a PrintManager to help you manage jobs on your print queues. For
some, this is easiest way to delete or “print” jobs. The use of the PrintManager is
fairly straight forward; select the device, select the job and click on the option. There
are a number of Print Engine options, or you can use a custom Print Engine by
clicking “other” and typing in its name.
All the functions of the PrintManager can also be invoked through the 64HDD
command channel directly from your Commodore keyboard if you prefer to work it
that way.
Unlike the rest of 64HDD which can be installed in alternate drives, the printing
functions need to be installed on the C: drive. The following directory structure is
created when the installation zip is correctly expanded:
C:\64hddpro\device02
C:\64hddpro\device04
C:\64hddpro\device05
C:\64hddpro\device06
C:\64hddpro\fonts
C:\64hddpro\temp
Each of the “deviceXX” directories is where the respective spool files are created.
© COPLIN 1999-2006
66 of 136
v0.7alpha8
64HDD – The CBM Drive Emulator
www.64hdd.com
[email protected]
The “fonts” directory contains TrueTypeTM fonts that may be used by the HTML
based print engines. The fonts need to be installed into your appropriate MS
Windows folder (see Windows Help on how to do this). The “fonts” allow
representation of Commodore’s special characters on your Windows PC and thus
allow you to print these to documents to modern day printers supported by the
Windows platform.
The built-in PrintManager provides
a convenient interface with which
to re-direct spooled print jobs.
The PrintManager uses context
sensitive action buttons.
© COPLIN 1999-2006
67 of 136
v0.7alpha8
64HDD – The CBM Drive Emulator
www.64hdd.com
[email protected]
Disk Access Command Reference Guide
Directory and Disk Image Access /Loading
Loading and saving, reading and writing from disk images and the native PC file
system should be completely transparent to most Commodore programs. The
standard access commands used with your 1541 will work, however there are some
extensions provided to access new 64HDD specific features.
Command:
Applicability:
Select and/or view 64HDD directory
All
MSDOS
D64
D71
D81
D2M
T64
LNX
Syntax:
LOAD”$drive:/path=type”,device
LOAD”$drive:/path=type[,options]”,device
OPEN fileno,device,15,”$drive:/path=type”:CLOSE
(Professional version only)
Where types allowed include:
P
for PRG files in MSDOS mode (PRG can also be used)
and N64 and P00 files (Professional version Only)
S
for SEQ files in MSDOS mode (SEQ can also be used)
and S00 files (Professional version Only)
U
for USR files in MSDOS mode (USR can also be used)
R
for REL files in MSDOS mode (REL can also be used)
C
for CBM files in disk image file systems
B
for directories in MSDOS and disk image file systems
G
gives GEOS information such as type/purpose
DIR for MSDOS directories
D64 for D64 images
D71 for D71 images
D81 for D81 images
D2M for D2M images (from FD2000 made by 1581COPY)
D*
for all supported disk images
T64 for T64 images
LNX for LNX images
MSD for all other files
Z
for all ZIP files (Professional version Only)
Wildcards ? and * permitted for filtering the directory listing
Options include:
I
for giving tally of blocks used by displayed files
II
for giving tally and other extended information, including
subtotals for file(s), dir(s), image(s)
© COPLIN 1999-2006
68 of 136
v0.7alpha8
64HDD – The CBM Drive Emulator
www.64hdd.com
[email protected]
Examples:
Load current directory assigned to this device for viewing (use LIST as per CBM
practice to see it)
LOAD”$”,11
Load only directory header and blocks free information
LOAD”$$”,11
Load current directory but only files matching this type
LOAD”$,D64”,11 (only works in MSDOS mode)
LOAD”$,D64,P”,11
(only in MSDOS mode, multiple types)
LOAD”$T?ST*,P”,11
Set C:\ as current directory for future commands
LOAD”$C:/”,11
Set C:\ as current directory for future commands
OPEN1,11,15,”$C:/”
INPUT#1, EN,EM$,T,S
CLOSE1
PRINT “NEW PATH:”;EM$
Change to D:\ as current directory for future commands
LOAD”$D:/”,11
Set “this-dir” as directory for future commands
LOAD”$THIS-DIR”,11
Get directory listing with extended information
LOAD”$*,II”,11
Attach “this D64 image” as an emulated disk for future commands
LOAD”$THIS.D64”,11
Dettach “this D64 image” and set root on current drive
LOAD”$/”,11
Errors:
• With the OPEN format of the command the error message returns the new
path attached, but error code will be set to [0].
• If a partition change is requested, but not available, then error [77] may result
• If a partition change or drive is requested that is not available or would
normally result in a “Drive Not Ready” message in MSDOS then error [78]
may result
Notes:
• Image files will be listed with the file extension in both the name and the type.
The image can only be attached if the file extension is given in the name (else a
file of that name is assumed).
© COPLIN 1999-2006
69 of 136
v0.7alpha8
64HDD – The CBM Drive Emulator
•
•
•
•
•
•
•
•
•
•
•
www.64hdd.com
[email protected]
The MSDOS directory listing allocates an extra digit for block size information
(this is because files and disk images can have 4digit values for their size – not
possible on a 1541!)
The MSDOS directory separator “\” is exchanged for “/” on the CBM machine as
the CBM keyboard has no “\” key.
When an image or MSDOS directory is attached the directory is sent if a LOAD
was issued. It is not sent if the command channel was used.
An image can be detached by setting the directory to a known MSDOS location,
eg. LOAD”$/”,11. Be sure to set to a known /existing directory.
LOAD”$..”,11 can also be used to return to the MSDOS directory the disk
image was attached from.
In MSDOS modes, relative paths may be used (eg. LOAD”$..”,11) but
remember that path length is limited to 255 characters by some versions of
MSDOS. It is recommended to frequently set directory to root when using
relative paths.
In MSDOS mode, a new drive may be logged by giving the absolute path to a
directory, for example the root directory: “D:\”
Pressing RUN/STOP will abort the directory load.
With the OPEN command format the directory is set for the device, but no listing
is sent on this channel. The device’s directory can be retrieved using the normal
CBM directory read from secondary address 0 for the device with file name $, eg
OPEN fileno,device,0,”$” and use GET#
In MSDOS mode, “blocks free” is number of blocks available on the drive, limited
to 63999 because of BASIC line number limitations
In LNX and T64 modes, “blocks free” will always be zero as write support is not
provided for these image types.
Incompatibility: because $name is now used to change to the directory or disk
image, if “name” is not a directory a file not found message or default directory
load will be performed. This will have some incompatibility with programs that try
to identify “blocks free” by reading the information after they execute a
OPEN1,11,0,”$!#$%” command. To patch such instances, change the last
character to a wildcard, eg “$!#$*”
Command:
Request EZ-Load format for 64HDD directory
(Professional version only)
Applicability:
All
MSDOS
D64
D71
D81
D2M
T64
Syntax:
LOAD”$!EZ:drive:/path=type”,device
LOAD”$drive:/path=type,EZ”,device
LNX
Where types allowed include:
As for regular directory requests
Examples:
Load current directory assigned to this device for viewing (use LIST as per CBM
practice to see it)
LOAD”$!EZ:*”,11
© COPLIN 1999-2006
70 of 136
v0.7alpha8
64HDD – The CBM Drive Emulator
www.64hdd.com
[email protected]
Errors:
• Same as for normal directory requests
Notes:
• Complete LFN name displayed for files, disk images and directories (LFN
given on second line – use short name to access)
• Professional users can activate EZ-Load permanently by command- options
• Display of prefix for FastLoader, X-Loader or PwrLoad can be requested by
setting command-line options
Command:
Applicability:
Fast 64HDD Directory Reading
All
MSDOS
D64
D71
D81
D2M
T64
LNX
Syntax:
OPEN fileno,device,3,”$drive:/path”
Examples:
Get current directory using fast read
1 OPEN 1,11,3,”$”
2 INPUT#1,D$
5 INPUT#1,BL,FL$,TY$
6 IF TY$=”FRE” THEN 10
7 PRINT BL,FL$,TY$
8 GOTO 5
10 PRINT BL;FL$
15 CLOSE 1
Errors:
• See previous
Notes:
• Directory access with secondary address of 3 will initial fast directory read format
(this is not supported by real CBM DOS).
• The fast format means that directory information only is sent and not the normal
BASIC format detail as per a read of $ with secondary channel of 0
• First INPUT# gets the directory or disk header. This contains information such
as disk id, disk name, path or file system depending upon what is attached. The
DOS version in the header can be used to identify which file system is active
according to the following:
1T
T64 image attached
1L
LNX image attached
PC
MSDOS directory
LF
MSDOS directory, but with LongFileName support
2A
D64 image (unless disk image has corrupt DOS Version)
2A
D71 image (unless disk image has corrupt DOS Version)
3D
D81 image (unless disk image has corrupt DOS Version)
1H
D2M image (unless disk image has corrupt DOS Version)
• Second and subsequent INPUT# fetch three items in the format:
Blocks, Filename$, Type$
© COPLIN 1999-2006
71 of 136
v0.7alpha8
64HDD – The CBM Drive Emulator
•
•
•
www.64hdd.com
[email protected]
Filetype FRE is reserved for use as a flag that the details just received is block
free information and there is no further data to be sent
The notes for normal directory access should also be reviewed, but the 63999
block free limitation does not apply.
LFN file type is used to signify that entry is the Long File Name of the previous
file shown.
© COPLIN 1999-2006
72 of 136
v0.7alpha8
64HDD – The CBM Drive Emulator
www.64hdd.com
[email protected]
File Handling Commands
Command:
Applicability:
Open File for Read/Write
All
MSDOS
D64
D71
D81
D2M
Syntax:
“filename,type,mode”
Examples:
Open file to write ASCII data to it
OPEN 1,11,1,”TESTFILE,S,W”
FOR X=1TO10:PRINT#1,”NUMBER:”;X:NEXT
CLOSE 1
T64
LNX
Open file to read ASCII data from it
OPEN 1,11,1,”TESTFILE,S,R”
FOR X=1TO10:INPUT#1,A$:PRINT A$:NEXT
CLOSE 1
Save currently loaded basic program
SAVE”TESTFILE”,11
Load program file
LOAD”TESTFILE”,11
Errors:
• errors returned for file not able to be open or found or existing
Notes:
• In the MSDOS file system, the name is limited to 8characters unless LFN
support is selected and installed, in which case the limit is 16characters. If a type
is specified, then this is converted to a 3character extension. If no file type is
specified, PRG is assumed.
• PRG file load supported in all file systems.
• SEQ file reads supported in MSDOS and disk image file systems.
• RUN/STOP key press supported for PRG files.
• FILE NOT FOUND supported for PRG and SEQ formats
• File creation supported for MSDOS, D64, D71 and for root partition for D81 files.
In the supported file systems, file exist warning is given, but if not tested by the
user program the file will be overwritten
• Writes to disk images do not use the standard CBM-DOS interleave. The
interleave is irrelevant for a virtual disk, and instead blocks are written in the next
available order starting at Track=1, Sector=0. The only thing you may notice is
that these disk may be slightly slower to read when copied back to real media.
© COPLIN 1999-2006
73 of 136
v0.7alpha8
64HDD – The CBM Drive Emulator
www.64hdd.com
[email protected]
MSDOS ASCII Compatibility
A special ASCII exchange mode is supported by 64HDD. If the file type is specified
with a “shifted” type specifier, basic alphabetic ASCII translation is performed. This
means for example, by writing a file with the “shift-S” filetype, a sequential file will be
written, but upper and lower case will be correctly viewable in an MSDOS editor.
Likewise reading an MSDOS text file by changing filetype to USR and then opening
it with a “shift-U” filetype will result in the MSDOS ASCII codes being exchanged for
PETASCII equivalents.
Text Exchange (Cross-Platform Compatibility)
Let’s face it; from time to time there is the need to exchange text data between the
Commodore machine and the rest of the world. 64HDD is capable of performing onthe-fly ASCII text translations by simply opening the file with a {shift-type} rather
than the normal {type} specifier. Alpha-translation is only performed.
The possibilities are endless, and combined with the other cross-platform functions
within 64HDD some level of co-operative processing is possible. Consider the
following examples:
•
Using a Cross-platform Compiler: write a batch file on your 64HDD machine
that compiles your source code (saved on-the-fly to true-ASCII) into a PRG
file. The batch file is called by 64HDD’s MSD: command. Output from the
compiler is redirected to the MSD.SEQ file in the system directory, and can
be read using the on-the-fly ASCII translator.
•
use one of the popular
Use a PC finder tool to locate files on a CD:
whereis utilities available on the PC by calling it with the MSD: command.
The results can be viewed in the MSD.SEQ file in the system directory.
Notes:
• on-the-fly translations are modal, meaning that the last file open determines if
it is on or off. Therefore the last file open will determine whether the ASCII
translation occurs for all other files that are also open.
• 64HDD waits on the drive that has been set to have the system directory. As
a result, MSD programs are most easily controlled by running a batch file that
can specify the full path name of the utility and any associated input output
files. Additionally the batch file can set any local environmental variables.
• Remember, the location of the MSD.SEQ file is in partition 255. If 64HDD
users have configured their system properly, the partition number can be
used as a universal way of locating the file.
© COPLIN 1999-2006
74 of 136
v0.7alpha8
64HDD – The CBM Drive Emulator
www.64hdd.com
[email protected]
Error Channel Reading
Command:
Applicability:
Reading the error channel
All
MSDOS
D64
D71
D81
D2M
T64
Syntax:
See example,
Return format is:
err_number, err_string, err_track, err_sector
Examples:
Read error information on this “device” (using INPUT#1)
OPEN 1,11,15
INPUT#1, EN, EM$,ET,ES
PRINT EN, EM$,ET;ES
CLOSE 1
LNX
Read error information on this “device” (using GET#1)
10 OPEN 1,11,15
20 GET#1, A$:PRINT A$;
30 IF ST<>64 THEN 20
40 CLOSE 1
Errors:
Notes:
• Error information returned regardless of mode in which the emulator is operating
in
• Only last error flagged is return
• Error may not be a fault, but informational. Error number will be set to 0 in this
case, or error 99 if emulator interrogated before error flag set.
• Errors 8x are new and indicate if error was a result of the 64HDD emulator not
supporting the previous command channel request.
• Dependent Devices only respond with errors compatible with error messages to
the real CBM device plus the appropriate error 8x and 99 codes.
© COPLIN 1999-2006
75 of 136
v0.7alpha8
64HDD – The CBM Drive Emulator
www.64hdd.com
[email protected]
Standard Commodore Drive Commands
Below are listed the standard commands supported by 64HDD. These work
identically to your regular 1541 or other Commodore drive, however 64HDD
provides for these to work on both disk images and the native MSD/LFN file system.
Command:
Applicability:
Scratch file(s) from current device /directory
All
MSDOS
D64
D71
D81
D2M
Syntax:
“S:filename[;M]”
“S0:filename[;M]”
“SCRATCH:filename[;M]”
“SCRATCH0:filename[;M]”
Where:
;M
T64
LNX
specified that filenames should be treated as
explicitly give, as is the case when working
with MSDOS files.
This option is only valid in the MSDOS file
system.
Examples:
Scratch this file only
OPEN 1,11,15,”S:TESTFILE”
CLOSE 1
Scratch this MSDOS file only
OPEN 1,11,15,”S:TESTFILE.JPG;M”
CLOSE 1
Scratch files matching this spec
OPEN 1,11,15,”S:TE?TFIL*.PRG”
CLOSE 1:
Scratch files matching this spec (all extensions /types)
OPEN 1,11,15,”S:TE?TFIL*”
CLOSE 1:
Errors:
• Error [62] returned for file not able to be found or can not be scratched
• File delete count may not be valid if using LFN mode (this is a limitation of the
external LDEL program)
Notes:
• In the MSDOS file system, 8.3 filename validity is omitted an error 62 returned if
file not found
© COPLIN 1999-2006
76 of 136
v0.7alpha8
64HDD – The CBM Drive Emulator
•
www.64hdd.com
[email protected]
In the MSDOS file system, if “;M” has not been specified attempts will be made
to delete the given filename with extension “.PRG”, “.SEQ” and “.USR”. This
should not disturb existing CBM programs as they would only expect one file of a
given name in each as type checking is not done by CBM DOS.
Command:
Applicability:
Rename file on /in current device /directory
All
MSDOS
D64
D71
D81
D2M
T64
Syntax:
“R:newfilename=oldname[;M]”
“R0:newname=oldname[;M]”
“RENAME:newname=oldname[;M]”
“RENAME0:newname=oldname[;M]”
Where:
;M
LNX
specified that filenames should be treated as
explicitly give, as is the case when working
with MSDOS files.
This option is only valid in the MSDOS file
system.
Examples:
Rename this file
OPEN 1,11,15,”R:NEWFILE=OLDFILE”
CLOSE 1
Rename this MSDOS file
OPEN 1,11,15,”R:NEWFILE.JPG=OLDFILE.JPG;M”
CLOSE 1
Errors:
• Errors [62] and [60] returned as appropriate
• If using LFNs Ok is always reported (limitation of the external LREN program)
Notes:
• In the MSDOS file system, if “;M” has not been specified, three attempts are
made to rename the file using extensions PRG, SEQ and USR. Each rename
attempt is to the same “file type”, eg PRG will be renamed to PRG.
• In the MSDOS file system, 8.3 filename validity is omitted for both oldfile and
newfile as a robust “check and approve” strategy still needs development, hence
correct renaming is up to the user and presently requires filename extensions to
be given.
• In the MSDOS file system, do not put space characters on either side of the “=”
© COPLIN 1999-2006
77 of 136
v0.7alpha8
64HDD – The CBM Drive Emulator
Command:
www.64hdd.com
Copy file on /in current device /directory to new name
Merge multiple sequential files to one combined file
Applicability:
All
MSDOS
D64
D71
D81
Syntax (copy):
“C:backup=original[;M]”
“C0:backup=original[;M]”
“COPY:backup=original[;M]”
“COPY0:backup=original[;M]”
Where:
;M
[email protected]
D2M
T64
LNX
specified that filenames should be treated as explicitly give, as
is the case when working with MSDOS files.
This option is only valid in the MSDOS file system.
Syntax (merge):
“C:combined=file1,file2,file3,file4”
“C0:combined=file1,file2,file3,file4”
“COPY:combined=file1,file2,file3,file4”
“COPY0:combined=file1,file2,file3,file4”
Examples:
Copy this file
OPEN 1,11,15,”C:BACKUP=ORIGINAL”CLOSE 1
Copy this file
OPEN 1,11,15,”C:BACKUP.TAS=ORIGINAL.TAS;M”CLOSE 1
Copy this disk image from current location to a:
OPEN 1,11,15,”C:A:/GAMES.D64=GAMES.D64”
CLOSE 1
Merge these files
OPEN 1,11,15,”C:All=FILE1,FILE2,FILE3”
CLOSE 1
Merge these files
OPEN 1,11,15,”C:All.SEQ=FILE1.SEQ,FILE2.SEQ,FILE3.SEQ”
CLOSE 1
Errors:
• Errors [62] and [25] returned as appropriate
Notes:
• In the MSDOS file system, if “;M” has not been specified, three attempts are
made to copy the file using extensions PRG, SEQ and USR. Each copy attempt
is to the same “file type”, eg PRG will be renamed to PRG.
• In the MSDOS file system, 8.3 or 16.3 filename validity is checked for merge and
SEQ file type is forced (ie only SEQ files can be merged).
• In the MSDOS file system, 8.3 or 16.3 filename validity is omitted for copy as a
robust “check and approve” strategy still needs development, hence correct
naming is up to the user and presently requires filename extensions to be given.
© COPLIN 1999-2006
78 of 136
v0.7alpha8
64HDD – The CBM Drive Emulator
•
•
•
•
www.64hdd.com
[email protected]
In the MSDOS file system, 8.3 or 16.3 filename name may be the name of a disk
image and if a full pathname given for the destination, a disk image may be
copied between drives (note: the source must be in the default location and no
path given)
In the MSDOS file system, do not put space characters on either side of the “=”
or “,” unless it is truly part of the LongFileName.
In the MSDOS file system, there is no limitation on the number of files which may
be merged.
For disk image formats, only the simple COPY version of the command is so far
supported. The MERGE version is not yet available.
Command:
Applicability:
Initialize device
All
MSDOS
D64
D71
Syntax:
“I”
“I0”
“INITIALIZE”
“INITIALIZE0”
Examples:
Initialize this device
OPEN 1,11,15,”I”
CLOSE 1
D81
D2M
T64
LNX
Errors:
• Always error [0] returned
Notes:
• In the MSDOS file system, the command is acknowledged, but not acted upon.
Command:
Applicability:
Validate device /disk
All
MSDOS
D64
D71
Syntax:
“V”
“V0”
“VALIDATE”
“VALIDATE0”
Examples:
Validate this device
OPEN 1,11,15,”V”
CLOSE 1
D81
D2M
T64
LNX
Errors:
• Always error [0] returned
© COPLIN 1999-2006
79 of 136
v0.7alpha8
64HDD – The CBM Drive Emulator
www.64hdd.com
[email protected]
Notes:
• In the MSDOS file system, the command is acknowledged, but not acted upon.
Command:
Applicability:
Warm boot / Cold boot
All
MSDOS
D64
Syntax:
“UI”
“UJ”
“U9”
Examples:
Warm boot this device
OPEN 1,11,15,”UI”
INPUT#1, EN,EM$,T,S
CLOSE 1
D71
D81
D2M
T64
LNX
Errors:
• Error [73] returned with EM$ containing 64HDD version message. The last four
letters of EM$ are “EMUL” can be used to detect that this is an emulated drive
and as such advanced 64HDD features can be implemented.
Notes:
• Currently the error message is identical regardless of file system being used
• Active devices and partitions remain unchanged
• UI- will set protocol timings to 1540 (ie VIC20 or blanked screen required on
C64/C128). With this timing the data valid pulse width is shorter and does not
take into account the C64’s bad-line requirements.
• UI+ will return timings to 1541 protocol
Command:
Applicability:
1581 Partition Selection
All
MSDOS
D64
D71
Syntax:
“/”
“/:”
“/0:”
Examples:
Select partition called “SUB-PART”
OPEN 1,11,15,”/SUB-PART”
INPUT#1, EN,EM$,T,S
CLOSE 1
D81
D2M
T64
LNX
Select root partition
OPEN 1,11,15,”/”
INPUT#1, EN,EM$,T,S
CLOSE 1
© COPLIN 1999-2006
80 of 136
v0.7alpha8
64HDD – The CBM Drive Emulator
www.64hdd.com
[email protected]
Errors:
• Error [77] returned if partition invalid, else error [2] if partition is selected with
track and sector detailing the start/end track for the partition.
Notes:
• Refer to the 1581 User Manual for further detail
• Attaching a new D81 disk image always logs the root directory
Command:
Applicability:
1581 Partition Creation
All
MSDOS
D64
D71
D81
D2M
T64
LNX
Syntax:
“/name,”+CHR$(starting track)+CHR$
(starting sector)+CHR$(<# of sectors)+CHR$(>#
of sectors)+",C"
“/:name,”+CHR$(starting track)+CHR$
(starting sector)+CHR$(<# of sectors)+CHR$(>#
of sectors)+",C"
“/0 name,”+CHR$(starting track)+CHR$
(starting sector)+CHR$(<# of sectors)+CHR$(>#
of sectors)+",C"
Examples:
Create partition called “SUB-PART” starting Track=60, 120blocks long
OPEN 1,11,15
PRINT#15,"/0:SUB-PART,"
+CHR$(60)+CHR$(0)+CHR$(120)+CHR$(0)+",C"
INPUT#1, EN,EM$,T,S
CLOSE 1
Errors:
• Error [0] returned if partition successfully created.
• Error [62] if name exists
• Error [65] if block allocation fails (already allocated)
• Error [72] if trouble creating directory entry
Notes:
• Refer to the 1581 User Manual for further detail, particularly about sizing
limitations, etc
• Note: the created sub-partition needs formatting before it can be used as a
directory. 64HDD may not support N: command at this present time.
© COPLIN 1999-2006
81 of 136
v0.7alpha8
64HDD – The CBM Drive Emulator
www.64hdd.com
[email protected]
Direct Access Commands
Drive Simulation Model
Those who have extensively programmed the 1541 drive will realise that it is
possible to interrogate the drive for information or to manipulate the buffers, and
memory locations to support functions not normally available by user commands.
Many commercial programs make use of Block-Read and buffer Memory-Reads to
identify which drive is attached to the system and to access directory information.
Even though 64HDD does not as yet support CPU emulation, each drive attached to
the system can have a virtual map associated with it. For the virtual map to be
available the following conditions must be satisfied:
•
•
•
A disk image must be attached (a T64 file – or tape unit – does not have a
memory map!) Note: the MSDOS system is also presently without a memory
map.
The specific ROM file must be available in the +sysdir location. Each disk
image type has its own specific ROM. A generic ROM is supplied with the
64HDD distribution as shown in the table:
Image
Type
Drive
Type
D64
D71
D81
D2M
MSD/LFN
1541
1571
1581
FD2000
CMDHD
ROM filename
Included in
ZIP
distribution
DOS1541.ROM
Yes
DOS1571.ROM
Yes
DOS1581.ROM
Yes
DOS2000F.ROM
No
DOSCMDHD.ROM No
XMS must be available. XMS is extended memory, which is available in DOS
only when a driver such HIMEM.SYS is included in the config.sys settings.
64HDD assigns just over 64k of RAM for each device number attached to the
64HDD system. Therefore if there are 8 possible devices, 512kb of XMS is
needed. 64HDD will work without XMS, but direct access commands will fail.
Every virtual map has a 64k linear memory layout. ROM is implemented as writeprotected RAM in this 64k layout in the locations specific to the drive. The rest of the
space is allocated as RAM, and presently simulation of the I/O devices is not
included. Likewise, the RAM contents in locations $0000-$2FFF are not as yet fully
simulated.
Direct Access Commands normally operate through buffers. Buffer 0 is at hex
location $0300-$03FF, buffer 1 at $0400-$04FF, etc. 64HDD supports 15 such
buffers regardless of the device type being emulated. The buffer number is normally
requested by the # filename; for example OPEN 1,11,2,”#2” would request /assign
buffer #2 and commands such as U1 (disk block read) will then fill location $0500$05FF. Request of a NULL buffer assigns buffer #0, not the next “free” buffer, so
care must be taken when programming specifically for 64HDD. Typically, any
© COPLIN 1999-2006
82 of 136
v0.7alpha8
64HDD – The CBM Drive Emulator
www.64hdd.com
[email protected]
serious drive programming requests buffers by number or only uses one NULL
buffer thus 64HDD can generally cope without buffer conflicts. Buffers reserved for
BAM blocks are the same as the associated drive type, eg D64 Î 1541 map.
The details about specific Direct Access Commands will not be described below,
instead the keen user is directed to the user manuals which come with the
Commodore disk drives or to reference books such as “Inside Commodore Dos”.
Command:
Applicability:
Block Read
All
MSDOS
D64
Syntax:
U1
B-R
BLOCK-READ
D71
D81
D2M
T64
LNX
Notes:
• The B-R and BLOCK-READ versions work exactly as the U1 version does. The
original bugs have been corrected.
• The drive number parameter is always ignored and 64HDD refers only to the
drive that received the command.
Command:
Applicability:
Block Write
All
MSDOS
D64
Syntax:
U2
B-W
BLOCK-WRITE
D71
D81
D2M
T64
LNX
Notes:
• The B-W and BLOCK-WRITE versions work exactly as the U2 version does. The
original bugs have been corrected.
• The drive number parameter is always ignored and 64HDD refers only to the
drive that received the command.
Command:
Applicability:
Block Allocate
All
MSDOS
D64
D71
Syntax:
B-A
BLOCK-ALLOCATE
D81
D2M
T64
LNX
Notes:
• The original bugs have been corrected as BAM is updated directly on disk image
and not only to memory.
© COPLIN 1999-2006
83 of 136
v0.7alpha8
64HDD – The CBM Drive Emulator
•
www.64hdd.com
[email protected]
The drive number parameter is always ignored and 64HDD refers only to the
drive that received the command.
Command:
Applicability:
Block Free
All
MSDOS
D64
Syntax:
B-F
BLOCK-FREE
D71
D81
D2M
T64
LNX
Notes:
• The original bugs have been corrected as BAM is updated directly on disk image
and not only to memory.
• The drive number parameter is always ignored and 64HDD refers only to the
drive that received the command.
Command:
Applicability:
Block Pointer
All
MSDOS
D64
D71
Syntax:
B-P
BLOCK-POINTER
D81
D2M
T64
LNX
Notes:
• The drive number parameter is always ignored and 64HDD refers only to the
drive that received the command.
Command:
Applicability:
All
MSDOS
Syntax:
M-R
Memory Read
D64
D71
D81
D2M
T64
LNX
Notes:
• If number of bytes is not specified, 13 may be accidentally transferred as the CR
at the end of the PRINT# statement will be parsed.
Command:
Applicability:
All
MSDOS
Syntax:
M-W
Memory Write
D64
D71
D81
D2M
T64
LNX
Notes:
• If number of bytes is not specified, 13 may be accidentally transferred as the CR
at the end of the PRINT# statement will be parsed. In this case the actual data
would be invalid values.
© COPLIN 1999-2006
84 of 136
v0.7alpha8
64HDD – The CBM Drive Emulator
•
www.64hdd.com
[email protected]
If the write operation would involve over-writing the ROM, then the entire M-W is
cancelled. This will not normally be a problem as most CBM drives do not have
RAM next to ROM in their memory map.
© COPLIN 1999-2006
85 of 136
v0.7alpha8
64HDD – The CBM Drive Emulator
www.64hdd.com
[email protected]
Extended Drive Commands
Below are listed the special commands supported by 64HDD. These allow use of
additional features such as creating and manipulating directories, reading the time
and date, and so on. Many of these commands are similar to those used by CMD
devices, but often an additional 64HDD syntax is also provided for specifying
additional options.
Device Dependent Commands
Command:
Copy (Kopy) files between 64HDD virtual devices
(Professional version only)
Applicability:
All
MSDOS
D64
D71
D81
(copy):
“K:backup#=original”
“KOPY:backup#=original”
Where:
backup#
D2M
T64
LNX
is other 64HDD device number with either a directory or
supported disk image attached.
Examples:
Copy this file from the current 64HDD device(11) to another(10)
OPEN 1,11,15,”K:10=ORIGINAL”CLOSE 1
Errors:
• Errors [62] and [25] returned as appropriate
• Error [74] if target device is not active
• Sometimes the error channel has to be read twice
Notes:
• The file is first read to a temporary file in the 64hdd/system directory, and then to
the target drive. The transfer is done entirely by 64HDD.
• Both devices must be 64HDD drives. You cannot KOPY to a non-64HDD drive.
You can KOPY from disk image to image, LFN/MSD to image, or image to
LFN/MSD.
• Wildcards can be used, but only the first filename match is used
• LFN names are preserved if transferring from disk image to the LFN file system.
The filetype is preserved.
• LFN names are only preserved when transferring from LFN to disk image if the
full file name is given. The filetype is preserved only if specified, eg ,S for SEQ in
the source name.
© COPLIN 1999-2006
86 of 136
v0.7alpha8
64HDD – The CBM Drive Emulator
Command:
Applicability:
www.64hdd.com
[email protected]
Make MSDOS directory
All
MSDOS
D64
D71
D81
Syntax:
“MD:new_dirname”
“MD0:new_dirname”
Examples:
Create this new directory
OPEN 1,11,15,”MD:NEW-DIR”
CLOSE 1
D2M
T64
LNX
Errors:
• Error [77] returned if failure to create
Notes:
• In the MSDOS file system, 8.0 filename validity is enforced. The new directory is
created branching from the current path. Wildcards are not permitted.
Command:
Applicability:
Change MSDOS directory
All
MSDOS
D64
D71
Syntax:
“CD:dirname”
“CD0:dirname”
Examples:
Change to this directory
OPEN 1,11,15,”CD:NEW-DIR”
CLOSE 1
D81
D2M
T64
LNX
Change to the root
OPEN 1,11,15,”CD:/”
CLOSE 1
Change to the root of drive D:
OPEN 1,11,15,”CD:D:/”
CLOSE 1
Errors:
• Error [77] returned if failure to create
• Error [2] returned if successful
Notes:
• In the MSDOS file system, 8.3 filename validity checking is omitted so as to be
compatible with directory structures created before 64HDD. Therefore it is up to
the user to correctly enter valid directory names. Wildcards are not permitted.
• To log a new drive use absolute naming for the directory, eg “d:/”
© COPLIN 1999-2006
87 of 136
v0.7alpha8
64HDD – The CBM Drive Emulator
Command:
Applicability:
www.64hdd.com
[email protected]
Remove MSDOS directory
All
MSDOS
D64
D71
Syntax:
“RD: dirname”
“RD0: dirname”
Examples:
Remove this directory
OPEN 1,11,15,”RD:TEMP”
CLOSE 1
D81
D2M
T64
LNX
Errors:
• Error [77] returned if failure to delete
Notes:
• In the MSDOS file system, 8.3 filename validity checking is omitted so as to be
compatible with directory structures created before 64HDD. Therefore it is up to
the user to correctly enter valid directory names. Wildcards are not permitted.
Command:
Locking and Unlocking file(s) from a directory
(Professional version only)
Applicability:
All
MSDOS
D64
D71
D81
Syntax:
“F-L:filename[;M]”
“F-L0:filename[;M]”
“F-U:filename[;M]”
“F-U0:filename[;M]”
D2M
T64
LNX
Where:
Filename can be a wildcard using * or ?
[;M] is used to specify an exact MSD filename,
including extension
Examples:
Lock (set write protection) for a file called TESTFILE
OPEN 1,11,15,”F-L:TESTFILE”
CLOSE 1
Lock the MSDOS file called TESTFILE.JPG
OPEN 1,11,15,”F-L:TESTFILE”
CLOSE 1
Or
OPEN 1,11,15,”F-L:TESTFILE.JPG;M”
CLOSE 1
Unlock files matching this spec
OPEN 1,11,15,”F-U:TE?TFIL*”
CLOSE 1:
© COPLIN 1999-2006
88 of 136
v0.7alpha8
64HDD – The CBM Drive Emulator
www.64hdd.com
[email protected]
Errors:
• Error [3] returned for file(s) successfully locked
• Error [4] returned for file(s) successfully unlocked
• Error Track shows the number of files locked or unlocked (only for disk images)
• Error codes are those used by CBM DOS 10.0 written for the C64DX (otherwise
known as the C65)
Notes:
• In the MSDOS file system, 8.3 filename validity is omitted and a wildcard is
appended to allow the request to apply regardless of file extension. To specify a
particular file extension, use the ;M option
• In the MSDOS file system, ATTRIB is used to change the state of the read-only
attribute. ATTRIB is only compatible with ShortFileNames!!!
• Some DOS wedges such as that in JiffyDOS have a different definition for
commands beginning with “F”. You will need to use a quote:
@”F-L:filename
@”F-U:filename
Command:
Create and Name Blank Disk Image
(Professional version only)
Applicability:
All
MSDOS
D64
D71
D81
Syntax:
N:diskname.typ[,id]
N0:diskname.typ[,id]
D2M
T64
LNX
Where:
“diskname”must be a valid MSD filename
“.typ”
is .D64 .D71 .D81 .D2M
id
is ignored
Examples:
Create a blank D64 called MY-PROGS
OPEN 1,11,15,”N:MY-PROGS.D64”
CLOSE 1:
Errors:
• Error [0] if successful, else
• Syntax error [31] if invalid image type given, error [77] if image cannot be created
or attached (eg disk is write protected)
Notes:
• Command only works if in a MSD directory. The resultant disk will be created in
that directory.
• Diskname can be up 8characters long and should not contain illegal MSD
characters
• The disk’s header is renamed to diskname, however the disk ID is left as default
• 64HDD will attach the device to the new disk ready for access
© COPLIN 1999-2006
89 of 136
v0.7alpha8
64HDD – The CBM Drive Emulator
•
www.64hdd.com
[email protected]
The appropriate BLANK???.COM file must be on the MSDOS path for this
command to work.
Device Independent Commands
Command:
Get /Set 64HDD Time
Applicability:
All
MSDOS
D64
D71
D81
D2M
T64
Syntax:
T:hhmmss
T0:hhmmss
TIME:hhmmss
TIME0:hhmmss
Examples:
Get time from 64HDD and set CBM time string
OPEN 1,11,15,”T:”
INPUT#1, EN,EM$,ET,ES: TI$=LEFT$(EM$,6)
CLOSE 1:
LNX
Set 64HDD RTC time to 13:20:30 (hhmmss, 24hr clock)
OPEN 1,11,15,”T:132030”:CLOSE 1:
Errors:
• Current time returned as the error text. EN, ET, ES always 0
• Syntax error [30] returned if format is too long /short
Notes:
• “hhmmss” must be an ASCII string
• works regardless of disk image /directory selected
• no checking that time setting was successful or that time was valid
Command:
Applicability:
Get /Set 64HDD Date
All
MSDOS
D64
D71
D81
D2M
T64
Syntax:
D:dd/mm/yyyy
D0:dd/mm/yyyy
DATE:dd/mm/yyyy
DATE0:dd/mm/yyyy
Examples:
Get date from 64HDD and print string
OPEN 1,11,15,”D:”
INPUT#1, EN,EM$,ET,ES: PRINT “DATE: “;EM$
CLOSE 1:
© COPLIN 1999-2006
90 of 136
LNX
v0.7alpha8
64HDD – The CBM Drive Emulator
www.64hdd.com
[email protected]
Set 64HDD RTC date to 30/01/1999 (dd/mm/yyyy)
OPEN 1,11,15,”D:30/01/1999”
CLOSE 1:
Errors:
• Current date returned as the error text. EN, ET, ES always 0
• Syntax error [30] returned if format is too long /short
Notes:
• “dd/mm/yyyy” must be an ASCII string
• though “/” are returned other delimiters may be used for setting, eg: space and ““
• works regardless of disk image /directory selected
• no checking that date setting was successful or that date was valid
• Y2K compliance is a function of the RTC chip used in the PC, and not the
64HDD program
Command:
Applicability:
Get 64HDD Day
All
MSDOS
D64
D71
D81
D2M
T64
LNX
Syntax:
DAY:
DAY0:
Examples:
Get day-of-week from 64HDD and print string
OPEN 1,11,15,”DAY:”
INPUT#1, EN,EM$,ET,ES: PRINT “TODAY IS: “;EM$
CLOSE 1:
Errors:
• Current day-of-week returned as the error text. EN, ET, ES always 0
Notes:
• works regardless of disk image /directory selected
• full name of day returned, eg: MONDAY
• Y2K compliance is a function of the RTC chip used in the PC, and not the
64HDD program
• Availability of day-of-week is a function of the RTC type and MSDOS version
being used as the emulator O/S
Command:
Applicability:
Get 64HDD Device Space Information
All
MSDOS
D64
D71
D81
Syntax:
F:drive_letter
F0:drive_letter
FREE:drive_letter
© COPLIN 1999-2006
D2M
91 of 136
T64
LNX
v0.7alpha8
64HDD – The CBM Drive Emulator
www.64hdd.com
[email protected]
FREE0:drive_letter
Examples:
Get blocks free on drive D
OPEN 1,11,15,”F:D”
INPUT#1, EN,EM$,ET,ES: PRINT EM$
BL=VAL(EM$)
CLOSE 1:
Errors:
• Current device space (in CBM blocks) is returned. EN, ET, ES always 0
• Syntax error [30] returned if format is too short or drive_letter < A
• If drive not responding then error text indicates this as “ERROR CHECKING
DRIVE n”, where for example n = D.
• If drive information is available, VAL can be used to strip number of blocks from
error message
Notes:
• works regardless of disk image /directory selected
• only reports what space MSDOS “sees” for the device
• when used whilst a disk image is “logged”, it reports space for the device not the
image
Command:
Applicability:
Exit 64HDD and set error_level upon exit
All
MSDOS
D64
D71
D81
Syntax:
E:error_level
E0:error_level
EXIT:error_level
EXIT0:error_level
Examples:
Exit with error_level = 8
OPEN 1,11,15,”EXIT:8”
INPUT#1, EN,EM$,ET,ES: PRINT EM$
CLOSE 1
D2M
T64
LNX
Errors:
• Return is Ok or equivalent EN, ET, ES always 0
• Syntax error [30] returned if format is too short or error_level < 0
Notes:
• works regardless of disk image /directory selected
• 64HDD will exit when the next file closure is made, and the emulator returns to
idle mode (hence all other CBM files /channels should already be closed before
executing this command)
• The error_level is used to control execution of a BATCH file on the PC controller.
The batch file can be configured to restart 64HDD, or to restart it with different
device assignments (see example batch files).
© COPLIN 1999-2006
92 of 136
v0.7alpha8
64HDD – The CBM Drive Emulator
Command:
Applicability:
www.64hdd.com
[email protected]
Read PC Mouse Position and button status (ASCII)
All
MSDOS
D64
D71
D81
Syntax:
M:
M0:
MOUSE:
MOUSE0:
Examples:
Read PC mouse position and button status
OPEN 1,11,15,”M:”
INPUT#1, EN,EM$,MX,MY
B=VAL(EM$)
CLOSE 1
D2M
T64
LNX
Errors:
• Return is Button information with EN=0, MX=X mouse position (0-511), MY = Y
mouse position (0-255)
• B=1 is left Button, B=2 is right Button, B=3 is both Buttons
Notes:
• works regardless of disk image /directory selected
Command:
Applicability:
Read PC Mouse Position and button status (Binary)
All
MSDOS
D64
D71
D81
D2M
T64
LNX
Syntax:
M1:
MOUSE1:
Examples:
Read PC mouse position and button status
OPEN 1,11,15,”M1:”
GET#1,X1: GET#1,XL :GET#1,XH :GET#1,Y :GET#1,B
X=XL+256*XH
CLOSE 1
Errors:
• X mouse position (0-319), MY = Y mouse position (0-199)
• B=1 is left Button, B=2 is right Button, B=3 is both Buttons
Notes:
• works regardless of disk image /directory selected
© COPLIN 1999-2006
93 of 136
v0.7alpha8
64HDD – The CBM Drive Emulator
Command:
Applicability:
www.64hdd.com
[email protected]
Run an external MSDOS application
All
MSDOS
D64
D71
D81
Syntax:
MSD:application_name
MSD0:application_name
D2M
T64
LNX
Examples:
Shell to application
OPEN 1,11,15,”MSD:application”
CLOSE 1
Errors:
• Return is Ok or equivalent EN, ET, ES always 0
Notes:
• works regardless of disk image /directory selected
• 64HDD shells to the application, which must be on the path or a path must be
given
• an application which writes to the screen may corrupt the 64HDD display, this
may not be a problem if you do not need to refer to the display (for example in a
dedicated system)
• the screen output of many programs is diverted rather than displayed with
>MSD.SEQ with the file being written to the +sysdir\MSD.SEQ
• This command may be used for example to run PC based cross compilers
Command:
Applicability:
Report protocol speed mode and Pentium CPU speed
All
MSDOS
D64
Syntax:
SPEED:
SPEED0:
D71
D81
D2M
T64
LNX
Examples:
Report
OPEN 1,11,15,”SPEED:”
INPUT#1, EN,EM$,ES,ET
CLOSE 1
Errors:
• Return is Ok, with ET defining the mode, 1=std, 2=faster, 3=fastest, +10 if UIhas been previously issued. ES defines CPU MHz if Pentium TSC is being used
for microsecond timings. ES=0 if Programmable Interval Timer (PIT) is used for
timings.
Notes:
• works regardless of disk image /directory selected
© COPLIN 1999-2006
94 of 136
v0.7alpha8
64HDD – The CBM Drive Emulator
Command:
Applicability:
www.64hdd.com
[email protected]
Switch to ShortFileName Mode
All
MSDOS
D64
Syntax:
SFN:
SFN0:
D71
D81
D2M
T64
LNX
Examples:
Switch to SFN mode for future 64HDD access
OPEN 1,11,15,”SFN:”
CLOSE 1
Errors:
• Return is Ok, with ES=0 and ET defining the mode, 0=SFN, 1=LFN
Notes:
• works regardless of disk image /directory selected
• filename functions will now be in 8.3 MSDOS format
Command:
Applicability:
Switch to LongFileName Mode
All
MSDOS
D64
Syntax:
LFN:
LFN0:
D71
D81
D2M
T64
LNX
Examples:
Switch to LFN mode for future 64HDD access
OPEN 1,11,15,”LFN:”
INPUT#1, EN,EM$,ET,ES
CLOSE 1
Errors:
• Return is Ok if LFN mode was available at 64HDD boot-up, with ES=0 and ET
defining the mode, 0=SFN, 1=LFN
• Error [160] returned if LFN was not successfully booted on 64HDD start-up
Notes:
• works regardless of disk image /directory selected
• filename functions will now be in 16.3 MSDOS format
• with JiffyDOS on you CBM computer you will need to enclose the command in
quotes as follows so as to avoid the “lock” command which begins with L also:
@”LFN:
Command:
Applicability:
Activate another 64HDD Device
All
MSDOS
D64
D71
D81
Syntax:
U0>+chr$(device_number)
© COPLIN 1999-2006
D2M
95 of 136
T64
LNX
v0.7alpha8
64HDD – The CBM Drive Emulator
www.64hdd.com
[email protected]
Examples:
Activate device 10
OPEN 1,11,15,”U0>”+CHR$(10)
INPUT#1, EN,EM$,ET,ES
CLOSE 1
Errors:
• Return is Ok if device_number within allowable range
• Error [89] if DEVICE_NUMBER is not supported by 64HDD
Notes:
• works regardless of disk image /directory selected
• command will not work when sent by @ in JiffyDOS, use syntax above instead.
• device will be activated to the default path, c:\64hdd
Command:
Applicability:
Set /reset “strict” directory mode in MSDOS
All
MSDOS
D64
Syntax:
STR:n
STR0:n
STRICT:n
STRICT0:n
D71
D81
D2M
T64
LNX
Where n=0, 1 or 2
Examples:
Set strict display mode
OPEN 1,11,15,”STR:1”
INPUT#1, EN,EM$,ET,ES
CLOSE 1
Errors:
• Return is always [0], with status confirmed in test as either mode clear or set
Notes:
• works regardless of disk image /directory selected
• the higher the value of n, the higher the strictness level
• when strict “set” to 1, the file header is reported strictly and the blocks free is
limited to 32000 for compatibility with programs that expect a value in the signed
16bit range
• when strict “set” to 2, no MSDOS directory names or disk /tape images are listed
when a directory is requested.
• All directories and images can be attached regardless of whether the directory
listing shows them or not
© COPLIN 1999-2006
96 of 136
v0.7alpha8
64HDD – The CBM Drive Emulator
Command:
www.64hdd.com
[email protected]
Set /reset “CMD” mode for 64HDD operation
(Professional version only)
Applicability:
All
MSDOS
D64
Syntax:
CMD:n
CMD0:n
D71
D81
D2M
T64
LNX
Where n=0, 1 or 2
Examples:
Set CMD mode for 64HDD
OPEN 1,11,15,”CMD:1”
INPUT#1, EN,EM$,ET,ES
CLOSE 1
Errors:
• Return is always [0], with status confirmed in test as either mode clear or set
Notes:
• works regardless of disk image /directory selected
• when CMD mode is “set”, among other things 64HDD changes the way partitions
information is displayed
• when CMD = 0 64HDD uses the 1541’s ROM for the MSD mode memory map
• when CMD = 1 the CMDHD ROM map gets loaded in MSD mode. Having a
CMD memory map resident means some CMD compatible programs will now
allow you to use additional options. Other file systems use their respective ROM,
for example D64 uses the 1541 map
• when CMD = 2 the CMDHD ROM map gets loaded in all file system mode this
effectively does three things: 1) 1541 specific software will not detect the drive as
1541 (useful for some programs); 2) allows 64HDD to better emulate the
CMDHD; and 3) drive letters are appended to the directory listing.
• the mode change applies to all activated 64HDD devices
• this option can also be set from the command line when starting 64HDD or
through function keys
Command:
Identify what is the current path
(Professional version only)
Applicability:
All
MSDOS
D64
Syntax:
“CWD”
D71
D81
D2M
T64
LNX
Examples:
Find the current working directory path for the selected device
OPEN 1,11,15,”CWD”
REM READ OUT PATH USING GET# LOOP
CLOSE 1
PRINT EM$
© COPLIN 1999-2006
97 of 136
v0.7alpha8
64HDD – The CBM Drive Emulator
www.64hdd.com
[email protected]
Errors:
• Error [0] returned with the EM$ containing the current path
Notes:
•
Command:
Activate a new 64HDD Device
(Professional version only)
Applicability:
All
MSDOS
D64
Syntax:
“ON:x”
D71
D81
D2M
T64
LNX
Examples:
Activate device #11
OPEN 1,11,15,”ON:11”
INPUT#1, EN,EM$,ET,ES
CLOSE 1
Errors:
• Error [91] returned when device is successfully activated /deactivated
• Error [89] returned if device is outside allowable range
• Error [74] returned if requested to activate more devices than 64HDD has
memory to handle.
Notes:
• x is an ASCII expression representing the device number. CBM serial devices
can only range from 0-30, but not are accessible with the standard kernal ROM.
• Do not activate a device number that is identical to that of another device on the
daisy-chain. The serial bus will hang if that device number is accessed as two
devices will attempt to respond
• Some DOS wedges such as that in JiffyDOS have a different definition for
commands beginning with “O”. You will need to use a quote:
@”ON:11
Command:
De-activate a 64HDD Device
(Professional version only)
Applicability:
All
MSDOS
D64
Syntax:
“OFF:x”
D71
D81
D2M
T64
LNX
Examples:
Activate device #11
OPEN 1,11,15,”OFF:11”
INPUT#1, EN,EM$,ET,ES
CLOSE 1
© COPLIN 1999-2006
98 of 136
v0.7alpha8
64HDD – The CBM Drive Emulator
www.64hdd.com
[email protected]
Errors:
• Error [91] returned when device is successfully activated /deactivated
• Error [89] returned if device is outside allowable range
Notes:
• x is an ASCII expression representing the device number. CBM serial devices
can only range from 0-30, but not are accessible with the standard kernal ROM.
• Do not activate a device number that is identical to that of another device on the
daisy-chain. The serial bus will hang if that device number is accessed as two
devices will attempt to respond.
• Some DOS wedges such as that in JiffyDOS have a different definition for
commands beginning with “O”. You will need to use a quote:
@”OFF:11
Command:
Sort MSDOS directory filename order
(Professional version only)
Applicability:
All
MSDOS
D64
Syntax:
“SORT:x”
D71
D81
D2M
T64
LNX
Examples:
Activate device #11
OPEN 1,11,15,”SORT:N”
CLOSE 1
Errors:
• Return is Ok or equivalent EN, ET, ES always 0
Notes:
• MSDOS, like the 1541, fills the directory in order that files are saved, meaning
also that “holes” in the directory are left when files are deleted.
• x is an ASCII expression representing sort sequence required, for example:
N
sort by name
D
sort by date
S
sort by size
E
sort by extensions
–
prefix for reverse sort, eg –N
/S
sort subdirectories recursively
• SORT makes use of an external sort tool called by the batch file
LFNSORTR.BAT and which can be configured by the user. Refer to
LFNSORT.TXT before using.
• LFNSORT.EXE v1.5 © D.Murdoch is recommended if you want sort LFN files on
a FAT32 formatted disks. Other freeware tools are available if you want to use
only on FAT16 formatted disks. If there are errors on the disk, it is possible
LFNSORT will pause waiting for a Y/N response
© COPLIN 1999-2006
99 of 136
v0.7alpha8
64HDD – The CBM Drive Emulator
•
www.64hdd.com
[email protected]
SORT function also available from the 64GUI, but may not work if there is not
enough free memory (run 64GUI direct from MSDOS, or use F9 rather than via
the F1 key)
© COPLIN 1999-2006
100 of 136
v0.7alpha8
64HDD – The CBM Drive Emulator
www.64hdd.com
[email protected]
Partitions and Unit Support (Shortcuts)
Both the Lt.Kernal and CMD Hard Drives support the concept of multi-unit support.
Originally Commodore used the unit number to differentiate the two drives in a dual
disk system, for example LOAD”0:TEST”,11 for drive0 and LOAD”1:TEST”,11
for drive1. These two third-party hard drives however implemented the unit
numbering system to call up a predefined number of “partitions”, or what were
effectively images of floppy disk software. Both had disk units 0 through 255
available, with 0 being the current image. CMD uses unit 255 as the system
partition.
64HDD also supports partitioning in this regard, but extends the concept further in a
couple of ways:
1)
2)
3)
units 0 to 999 are available (you should reserve units 900-999 for future
usage if you wish them to be compatible)
units can point to disk images or MSDOS directories or paths, for example
unit 10 can be defined to be your CDROM at d:\, whilst unit 5 can be you
favourite game.
units 0 to 999 are mapped across all 8 possible device numbers supported by
64HDD, thus unit 8 can be available from device 8 and device 11 at the same
time.
Unit numbers can be thought of as “shortcuts” and can be set up to alleviate a lot of
keyboard typing.
Unit definitions are saved in the file CMDPRTN.TBL in the 64HDD “System
Directory” or “Partition Directory” if specified on command line. This file is in ASCII
format and may be edited using a text editor. The first five characters of each line
are reserved [abc] for the unit number label. After this is the path definition. The
units must be sequential listed and are left bank if undefined. For example:
----[009]
[010]c:\64hdd\utils
[011]
[012]c:\test.d64
[013]
----The partition file can also be modified using the appropriate 64HDD commands.
Remember, that if the 64HDD “system directory” is stored on a RAMDisk for speed it
should be copied back to a real disk by the GO64HDD batch file if changes are to be
kept for future use. The following conventions should be adhered to:
© COPLIN 1999-2006
101 of 136
v0.7alpha8
64HDD – The CBM Drive Emulator
Unit 0
Unit 255
Units 900-999
www.64hdd.com
[email protected]
Default “partition”, re-definitions ignored
System “partition” for CMD compatibility, set to 64HDD “System
Directory” location
Reserved for future 64HDD functions
(Professional version only)
In addition to unit definitions are saved in the file CMDPRTN.TBL, a second file
NAMEPRTN.TBL also stored in the 64HDD “System Directory” or “Partition
Directory” if specified on command line, contains descriptive information about the
partition definition. This is particularly useful when so many disk images are labelled
with cryptic 8.3 format names.
This NAMEPRTN.TBL file is in ASCII format and may be edited using a text editor.
Like CMDPRTN.TBL, the first five characters of each line are reserved [abc] for the
unit number label. After this is the “common name” definition, however “spaces” are
not allowed and should be substituted with “.”. The units must be sequential listed
and are left bank if undefined. Alternatively, with the professional version both TBL
files can be edited using 64GUI and this tool will make all necessary substitutions.
A special feature of the NAMEPRTN.TBL is that a suffix can be used to identify
disks that are part of a multi-disk set. There are some basic rules to follow. The first
disk is identified by the :01 suffix, the second with :02 and so on. 64GUI can also
automate this process.
Command:
Change partition to path defined by unit number
(Professional version only)
Applicability:
All
MSDOS
D64
Syntax:
“CPx”
“cPn”
D71
D81
D2M
T64
LNX
Examples:
Change to partition defined as unit 10
OPEN 1,11,15,”CP10”
CLOSE 1
Change to partition defined as unit 10
open 1,11,15,”cP”+chr$(10)
close 1
Errors:
• error [77] set if partition not found
• error [0] or error [2] set if partition was found and change successful
Notes:
• x is ASCII partition number and allows 0-999 values to be used
• n is binary partition number and allows only 0-255 values to be used
© COPLIN 1999-2006
102 of 136
v0.7alpha8
64HDD – The CBM Drive Emulator
•
www.64hdd.com
[email protected]
Professional feature:
• If the command is applied to device 8, and the partition’s common name
identifies the definition as being part of a multi-disk sequence, then it and
subsequent “disks” will be attached to the “Disk-Flip” table (units 1-10)
Command:
Applicability:
Add current path /image to partition table
All
MSDOS
D64
Syntax:
“APx”
“aPn”
D71
D81
D2M
T64
LNX
Examples:
Set current path /image to partition table unit 20
OPEN 1,11,15,”AP20”
CLOSE 1
Set current path /image to partition table unit 20
open 1,11,15,”aP”+chr$(20)
close 1
Errors:
• error [77] set if partition not found
• error [0] or error [2] set if partition was found and change successful
Notes:
Command:
Applicability:
Delete current partition table definition
All
MSDOS
D64
Syntax:
“DPx”
“dPn”
D71
D81
D2M
T64
LNX
Examples:
Delete definition of unit 7
OPEN 1,11,15,”DP7”
CLOSE 1
Delete definition of unit 7
open 1,11,15,”dP”+chr$(7)
close 1
Errors:
• error [77] set if partition not found
• error [0] or error [2] set if partition was found and change successful
© COPLIN 1999-2006
103 of 136
v0.7alpha8
64HDD – The CBM Drive Emulator
www.64hdd.com
[email protected]
Notes:
Command:
Applicability:
Information about partition
All
MSDOS
D64
Syntax:
“IPx”
“iPn”
D71
D81
D2M
T64
LNX
Examples:
Get definition of unit 7 and assign to EM$
OPEN 1,11,15,”IP7”
INPUT #1, EN, EM$, ET, ES
CLOSE 1
Get definition of unit 7 and assign to EM$
open 1,11,15,”iP”+chr$(7)
INPUT #1, EN, EM$, ET, ES
close 1
Errors:
• error [0]
Notes:
• undefined partitions are returned as “.” signifying that no partition change would
be made if called
• partitions 990-999 return “RESERVED”
• only partitions 0-255 can be requested using the binary method
Command:
Assign common name to a partition definition
(Professional version only)
Applicability:
All
MSDOS
D64
Syntax:
“NPx”
D71
D81
D2M
T64
LNX
Examples:
Change “common name” to partition defined as unit 20
OPEN 1,11,15,”NP20:name”
CLOSE 1
Set up a multi-disk sequence beginning at unit 30
OPEN 1,11,15,”NP30:disk1.d64:01”
PRINT #1,”NP31:disk2.d64:02”
PRINT #1,”NP32:disk3.d64:03”
PRINT #1,”NP33:disk4.d64:04”
CLOSE 1
© COPLIN 1999-2006
104 of 136
v0.7alpha8
64HDD – The CBM Drive Emulator
www.64hdd.com
[email protected]
Errors:
• error [77] set if partition not found
• error [0] or error [2] set if partition was found and change successful
Notes:
• x is ASCII partition number and allows 0-999 values to be used
• if the common name contains “spaces” 64HDD will replace these with “.”
(necessary for 64HDD)
Command:
Get “common name” assigned to a partition
(Professional version only)
Applicability:
All
MSDOS
D64
Syntax:
“INx”
D71
D81
D2M
T64
LNX
Examples:
Get definition of unit 7 and assign to EM$
OPEN 1,11,15,”IN7”
INPUT #1, EN, EM$, ET, ES
CLOSE 1
Errors:
• error [0]
Notes:
• undefined partitions are returned as “.” signifying that no partition name has been
set
• partitions 990-999 return “RESERVED”
Command:
Applicability:
Load /save /open from /to unit path
All
MSDOS
D64
D71
D81
D2M
T64
LNX
Syntax:
LOAD“pn:$dirspec”,device
LOAD“pn:filename”,device
LOAD“pn//dir1/dir2:filename”,device
SAVE“xpnfilename”,device
OPEN lfn,dev,sec,“x:filename,type,mode”
Examples:
Load default program from disk image associated with unit200
LOAD”200:*”,11
Load program “test” from path associated with unit205
LOAD”205:test”,11
Load program from path building on definition in unit4, note full progname required!!!
LOAD”4//64hdd/utils:errorchk.prg”,11
© COPLIN 1999-2006
105 of 136
v0.7alpha8
64HDD – The CBM Drive Emulator
www.64hdd.com
[email protected]
Load directory from path associated with unit100
LOAD”100:$”,11
Errors:
• error [77] set if partition not found
• error [62] set if file not found
• error [0] or error [2] set if partition was found and change successful
Notes:
• if unit definition is not a found the change is ignored and an attempt is made to
load from the current path (ie unit 0)
• with the syntax “pn/dir1/dir2:” the last directory name terminates with a “:” and
not “/” and the full progname (including type) is required
Command:
Applicability:
Load partition table
All
MSDOS
D64
D71
D81
D2M
T64
Syntax:
LOAD“$=P”,device
LOAD“$=P:=type[>pn][<pn]”,device
LNX
Type can include:
4 for 1541 (D64)
7 for 1571 (D71)
8 for 1581 (D81)
D64, D71, D81, T64
D* for all disk images
L for LNX
Where:
>pn
<pn
lists only unit definitions > pn
lists only unit definitions < pn
Examples:
Load complete partition table
LOAD”$=P”,11
Load partition table only with definitions to disk images
LOAD”$=P:=D*”,11
Errors:
• Errors typical of a directory read
Notes:
• partition table can currently only be called from a device attached
• partition information is displayed in wide format (not exactly CMD compatible,
unless you have activated CMD mode on the professional version)
• type only allows restriction of the types to be controlled. No naming pattern
match is considered.
© COPLIN 1999-2006
106 of 136
v0.7alpha8
64HDD – The CBM Drive Emulator
•
•
www.64hdd.com
[email protected]
partition definitions longer than the display name are abbreviated and are show
with only the start and end portions of the definition
Professional feature:
• When CMD mode is set, the partition table closely resembles the layout
returned by a CMD device
Command:
Load “common name” partition table
(Professional version only)
Applicability:
All
MSDOS
D64
D71
D81
D2M
T64
Syntax:
LOAD“$=N”,device
LOAD“$=N:,type[>pn][<pn]”,device
LNX
Type can include:
4 for 1541 (D64)
7 for 1571 (D71)
8 for 1581 (D81)
D64, D71, D81, T64
D* for all disk images
L for LNX
Where:
>pn
<pn
lists only unit definitions > pn
lists only unit definitions < pn
Examples:
Load complete partition table
LOAD”$=N”,11
Load partition table only with definitions to disk images
LOAD”$=P:,D*”,11
Load selected range of partition table only with definitions to disk images
LOAD”$=P:*,D*>100<200”,11
Errors:
• Errors typical of a directory read
Notes:
• partition table can currently only be called from a device attached
• partition information is displayed in wide format (not exactly CMD compatible,
unless you have activated CMD mode on the professional version)
• name pattern match is used as part of the filtering allowed.
• partition definitions longer than the display name are abbreviated and are show
with only the start and end portions of the definition
© COPLIN 1999-2006
107 of 136
v0.7alpha8
64HDD – The CBM Drive Emulator
www.64hdd.com
[email protected]
CMD Compatible Time and Date Commands
CMD FD and HD series devices support an option RTC device. 64HDD supports
compatible commands, though the preference is to use the native commands as
these are simpler to convert (for example to CBM native TI$) and have no Y2K
related issues.
The CMD commands are provided only to ensure compatibility with programs
written for CMD RTC equipped devices (not including SmartMouse). It must be
pointed out that the CMD operating system has Y2K compatibility issues as it uses
only a 2-digit year format. As a consequence setting the date using the CMD
commands may set the PC’s RTC to the wrong date. 64HDD makes the
assumption that the year will be 2000+set_year, but this precludes initialising the
system at an earlier date. If you wish to do this use the native commands. If you are
still using 64HDD in the year 2100 you will also have problems, use the 64HDD
native command to avoid these issues.
Command:
Applicability:
Read /set RTC in CMD ASCII format
All
MSDOS
D64
D71
D81
D2M
T64
Syntax:
“T-RA”
“T-WAdow. mo/da/yr/ hr:mi:se xM”
LNX
Examples:
See Notes.
10 OPEN15,11,15,"T-RA"
20 GET#15,A$:T$=T$+A$:IF ST<>64 THEN 20
30 CLOSE 15
t$ contains the time in this order:
"dow. mo/da/yr hr:mi:se xM"+chr$(13)
day-of-week: 4 letters + one space
SUN. MON. TUES WED. THUR FRI. SAT.
mo month: 01-12
da day
yr year
hr hour: 01-12
mi minute: 00-59
se second: 00-59
x
A or P : AM/PM
Errors:
• Error [30] returned if time/date setting string the wrong length
• Error is [0] if length Ok
Notes:
• See examples bundled with the 64HDD software, or refer to the CMD user
manuals.
© COPLIN 1999-2006
108 of 136
v0.7alpha8
64HDD – The CBM Drive Emulator
Command:
Applicability:
www.64hdd.com
[email protected]
Read /set RTC in CMD decimal format
All
MSDOS
D64
D71
Syntax:
“T-RD”
“T-WD”+9bytes
D81
D2M
T64
LNX
Examples:
See Notes, decimal format means byte is 0-99.
byte 0: day-of-week 0=sun, 1=mon...
byte 1: year
byte 2: month
byte 3: day
byte 4: hour (0-12)
byte 5: minute
byte 6: second
byte 7: AM/PM flap 0=AM <>0 = PM
byte 8: chr$(13)
Errors:
• Always returns error [0] regardless
Notes:
• See examples bundled with the 64HDD software, or refer to the CMD user
manuals.
Command:
Applicability:
Read /set RTC in CMD BCD format
All
MSDOS
D64
D71
Syntax:
“T-RB”
“T-WB”+9bytes
D81
D2M
T64
LNX
Examples:
See Notes, BCD format means high/low nibble is 0-9.
byte 0: day-of-week 0=sun, 1=mon...
byte 1: year
byte 2: month
byte 3: day
byte 4: hour (0-12)
byte 5: minute
byte 6: second
byte 7: AM/PM flap 0=AM <>0 = PM
byte 8: chr$(13)
Errors:
• Always returns error [0] regardless
Notes:
• See examples bundled with the 64HDD software, or refer to the CMD user
manuals.
© COPLIN 1999-2006
109 of 136
v0.7alpha8
64HDD – The CBM Drive Emulator
Command:
Applicability:
www.64hdd.com
[email protected]
Load Directory with TimeStamp
All
MSDOS
D64
D71
D81
D2M
T64
Syntax:
LOAD“$=T:dirspec,type”,device
LNX
Examples:
Load directory from default path with CMD timestamp format
LOAD”$=T”,11
Load directory from default path with CMD Long timestamp format
LOAD”$=T,L”,11
Load directory from default path with 4digit timestamp format
LOAD”$=T,LL”,11
Load timestamped directory from default path with name matching files*
LOAD”$=Tfiles*”,11
Errors:
•
Notes:
• only MSDOS file system has timestamp information currently
• CMD date selection fields are not yet supported
© COPLIN 1999-2006
110 of 136
v0.7alpha8
64HDD – The CBM Drive Emulator
www.64hdd.com
[email protected]
1541 COPY and Transfer Commands
(Professional version only)
64HDD supports the direct communication between a 1541 compatible drive and
itself allow the copying of a 1541 disk to a D64 image, or vice-versa, with the issuing
of one simple command. The transfer scheme iterates through individual block
read/write commands using the native Commodore protocol. Though highly
compatible with most genuine and third-party drives it is not the fast protocol
available today and if you have many disks to copy a dedicated 1541-to-PC copy
utility may be a better choice.
For the functions described in this section to work the 64HDD connection and PC
setup must be accurately setup and timed.
Command:
Transfer D64 image to 1541FDD connected as Device #8
(Professional version only)
Applicability:
All
MSDOS
D64
D71
D81
D2M
Syntax:
“T1541:filename.D64[,F]”
T64
LNX
Examples:
Transfer D64 image in current directory to 1541
OPEN 1,11,15,”T1541:DUCKS.D64”
CLOSE 1
Transfer D64 image in current directory to 1541, but format disk first!
OPEN 1,11,15,”T1541:DUCKS.D64,F”
CLOSE 1
Errors:
• Error [182] returned for any system error
• Other errors as appropriate if disk image has problems
• Error [0] Ok if transfer is successful
Notes:
• This command is only designed to work with a 1541 or a 1571 “locked” in 1541
mode.
• The D64 Disk image has to be in the current directory (else the relative path
must be specified)
• The transfer is performed by 64HDD directly “talking” and “listening” to a 1541
device connected as #8.
Note: No other bus activity is allowed during the disk transfer as it will
result in a bus contention (due to multiple talkers) and will result in a
failure to complete the operation.
© COPLIN 1999-2006
111 of 136
v0.7alpha8
64HDD – The CBM Drive Emulator
•
•
•
www.64hdd.com
[email protected]
Progress is displayed on 64GUI and can also be inferred from the status of the
1541’s activity light.
The transfer scheme employs generic U1 and U2 disk block read commands
making it very compatible, but unfortunately very slow. The transfer is however
faster than a Commodore doing the work as only a one-way transfer is needed.
Support is only offered in MSDOS file system as a precaution against
transferring a disk image that is currently active.
Error information contained in the disk image is not transferred to the real disk.
You must use additional tools to create these errors.
• CBMDISK will show you a disk images error table
• Several small disk tools distributed with 64HDD will let you re-create some
T&S errors on the real disk
Command:
Create D64 from 1541FDD connected as Device #8
(Professional version only)
Applicability:
All
MSDOS
D64
D71
D81
Syntax:
“F1541:filename.D64”
D2M
T64
LNX
Examples:
Transfer 1541 disk to a D64 image in current directory with given name
OPEN 1,11,15,”F1541:TEST.D64”
CLOSE 1
Errors:
• Error [183] returned for any error detected
• Other errors as appropriate if disk image has problems
• Error [0] Ok if transfer is successful
Notes:
• This command is only designed to work with a 1541 or a 1571 “locked” in 1541
mode.
• The D64 Disk image will be created in the current directory (else the relative path
must be specified)
• The transfer is performed by 64HDD directly “talking” and “listening” to a 1541
device connected as #8.
Note: No other bus activity is allowed during the disk transfer as it will
result in a bus contention (due to multiple talkers) and will result in a
failure to complete the operation.
•
Progress is displayed on 64GUI and can also be inferred from the status of the
1541’s activity light.
The transfer scheme employs generic U1 and U2 disk block read commands
making it very compatible, but unfortunately very slow. The transfer is however
faster than a Commodore doing the work as only a one-way transfer is needed.
© COPLIN 1999-2006
112 of 136
v0.7alpha8
64HDD – The CBM Drive Emulator
•
•
www.64hdd.com
[email protected]
Support is only offered in MSDOS file system as a precaution against
transferring a disk image that is currently active.
T&S errors contained on the real disk will be transferred to the error extended
disk image. These errors may be either copy protection or physical errors. It is
also possible some errors will cause the 1541 to lock-up!
Command:
Interrogate 1541FDD connected as Device #8
(Professional version only)
Applicability:
All
MSDOS
D64
Syntax:
“I1541:”
D71
D81
D2M
T64
LNX
Examples:
Transfer 1541 errors disk to 64HD-T&S.ERR in the current directory
OPEN 1,11,15,”I1541:”
CLOSE 1
Errors:
• Error [183] returned for any error detected
• Other errors as appropriate if 64HDD has problems
• Error [0] Ok if transfer is successful
Notes:
• This command is only designed to work with a 1541 or a 1571 “locked” in 1541
mode.
• The error file is created in the current directory. Typically, you will have already
transferred the program files to this directory.
• The transfer is performed by 64HDD directly “talking” and “listening” to a 1541
device connected as #8.
Note: No other bus activity is allowed during the disk transfer as it will
result in a bus contention (due to multiple talkers) and will result in a
failure to complete the operation.
•
•
Progress is displayed on 64GUI and can also be inferred from the status of the
1541’s activity light.
The transfer scheme employs generic U1 and U2 disk block read commands
making it very compatible, but unfortunately very slow. The transfer is however
faster than a Commodore doing the work as only a one-way transfer is needed.
Support is only offered in MSDOS file system as a precaution against
transferring to a disk image.
© COPLIN 1999-2006
113 of 136
v0.7alpha8
64HDD – The CBM Drive Emulator
www.64hdd.com
[email protected]
1581COPY Commands
The 1581COPY program by Wolfgang Mosser (Womo) is supported by 64HDD and
allows the emulator to treat the 1.44FDD as a 1581 drive indirectly. It should be
noted that you must use DD disks as these are most compatible with the real 1581
disk drive. 64HDD will work with disk images transferred using this utility - it cannot
directly read a 1581 formatted disk.
Before attempting to use 1581COPY from 64HDD make sure that your system is
indeed compatible and capable of producing 1581 readable disks. I have in the past
had problems with both incompatible FDD controllers and poor quality floppy disks.
As 1581COPY is used as an external resource error information and control is
limited. Control of 1581COPY is via two batch files, T1581.BAT and F1581.BAT,
and these files together with 1581COPY.EXE need to be on the “path” searched by
MSDOS.
The extended error information available is controlled within the two BAT files. If the
64HDD system directory is in a different location to that shown in these files, these
files must be modified to reflect the new path. For example, the default is
c:\64hdd\system, but if a RAMdisk is used the path may be e:\64hdd\system. Be
sure to change all occurrences in both T1581 and F1581 files.
Command:
Applicability:
Transfer D81 image to 1.44FDD using 1581COPY
All
MSDOS
D64
D71
D81
Syntax:
“T1581:filename.D81”
“T1581:”
D2M
T64
LNX
Examples:
Transfer D81 image in current directory to 1.44FDD
OPEN 1,11,15,”T1581:DUCKS.D81”
CLOSE 1
Format 1.44FDD using 1581COPY but with no transfer
OPEN 1,11,15,”T1581:”
CLOSE 1
Errors:
• Error [180] returned for any system error
• Error [35] and appropriate message returned for other errors
Notes:
• D81 Disk image has to be in the current directory (else path must be specified)
• The transfer is controlled by shelling to the T1581.BAT file. Modify this file as
needed. You require Womo’s 1581COPY program (version greater than 0.52) to
run this function. The emulator will not respond to other commands whilst the
© COPLIN 1999-2006
114 of 136
v0.7alpha8
64HDD – The CBM Drive Emulator
•
www.64hdd.com
[email protected]
transfer takes place (this is because 1581COPY is a stand alone program and
not integrated into 64HDD)
Support is only offered in MSDOS file system as a precaution against
transferring a disk image which is currently active.
Command:
Applicability:
Transfer 1581 disk in 1.44FDD to D81 with 1581COPY
All
MSDOS
D64
D71
D81
Syntax:
“F1581:filename.D81”
D2M
T64
LNX
Examples:
Transfer 1581 disk from 1.44FDD to D81 image in current directory with given name
OPEN 1,11,15,”F1581:TEST.D81”
CLOSE 1
Errors:
• Error [181] returned for any error detected
• Error [35] and appropriate message returned for other errors
Notes:
• D81 Disk image is written in the current directory (else path must be specified)
• The transfer is controlled by shelling to the F1581.BAT file. Modify this file as
needed. You require Womo’s 1581COPY program (version greater than 0.52) to
run this function.
• The emulator will not respond to other commands whilst the transfer takes place
(this is because 1581COPY is a stand alone program and not integrated into
64HDD)
• Support is only offered in MSDOS file system as a precaution against
transferring a disk image which is currently active.
© COPLIN 1999-2006
115 of 136
v0.7alpha8
64HDD – The CBM Drive Emulator
www.64hdd.com
[email protected]
Extended CMD Compatible Drive Commands
(Professional version only)
The CMD FD and HD series devices support a number of additional command
channel operations. To enhance compatibility of 64HDD with software written for the
CMD drives, these additional commands are supported in the professional version
(though there may be alternate 64HDD ways to achieve the same result using native
commands).
Command:
Set / Clear Write Protection Mode
(Professional version only)
Applicability:
All
MSDOS
D64
Syntax:
“W-0”
“W-1”
D71
D81
D2M
T64
LNX
Examples:
Set write protect mode.
10 OPEN15,11,15,"W-1":CLOSE 15
Errors:
• Error [26] returned attempt made to write with protection set
Notes:
• See examples bundled with the 64HDD software, or refer to the CMD user
manuals.
• T64 and LNX file systems are always in write protect mode as 64HDD does not
support creation of these file types.
Command:
SCSI Command
(Professional version only)
Applicability:
All
MSDOS
D64
Syntax:
“S-C”
D71
D81
D2M
T64
LNX
Examples:
Errors:
• Error [4x] returned upon attempt to issue a particular SCSI command
Notes:
• As 64HDD does not require a SCSI controller, all attempts to perform low level
commands are responded to with a SCSI controller error. This should give the
CMD application the chance to abort the process.
© COPLIN 1999-2006
116 of 136
v0.7alpha8
64HDD – The CBM Drive Emulator
Command:
www.64hdd.com
[email protected]
G-P Get-Partition information
(Professional version only)
Applicability:
All
MSDOS
D64
Syntax:
“G-Pn”
“G-D”
D71
D81
D2M
T64
LNX
Examples:
Errors:
•
Notes:
• See examples bundled with the 64HDD software, or refer to the CMD user
manuals.
• There are easier ways to access partitions with 64HDD, however, this command
is included to provide compatibility with several programs already designed for
the CMD series of device, for example FCOPY and FCOPY+
Command:
R-H Rename Disk Header
(Professional version only)
Applicability:
All
MSDOS
D64
D71
D81
Syntax:
“R-H:diskname[,id]”
D2M
T64
LNX
Examples:
Set current disk’s name to “MY HOMEWORK”
10 OPEN15,11,15,“R-H:MY HEADER”:CLOSE 15
Errors:
• Errors as would typically be associated with disk block accesses
• Error [0] if successful
• Error [31] is : omitted
Notes:
• See examples bundled with the 64HDD software, or refer to the CMD user
manuals
• Renaming “disk id” is optional
• Disk contents and BAM remain unaltered
© COPLIN 1999-2006
117 of 136
v0.7alpha8
64HDD – The CBM Drive Emulator
www.64hdd.com
[email protected]
Device Number Swapping
(Professional version only)
In addition to the use of function keys and hardware button control, device number
swapping can be performed by the following command channel commands.
Command:
Device number Swapping
(Professional version only)
Applicability:
All
MSDOS
D64
Syntax:
“S-8”
“S-9”
“S-D”
D71
D81
D2M
T64
LNX
Examples:
Swap device 8 and 28.
10 OPEN15,11,15,"S-8":CLOSE 15
Errors:
•
Notes:
• See examples bundled with the 64HDD software, or refer to the CMD user
manuals.
• S-8 swaps with #8. Device #8 has its number changed to the last accessed
64HDD disk device via direct communication between 64HDD and that device.
The 64HDD device #8 is activated, and the path definition assigned to 64HDD’s
device number is transferred to #8.
• Device swapping should only be done whilst the IEC serial bus is idle. This must
be the case as during a swap, 64HDD uses the bus to communicate with the
other devices. The swapping is performed by 64HDD directly “talking” and
“listening” to a 1541 device connected as #8.
Note:
•
•
•
•
No other bus activity is allowed during the swap operations as it will
result in a bus contention (due to multiple talkers) and will result in a
failure to complete the operation.
S-9 is similar to S-9 except the swap is between devices #9 and #29
S-D restores the original device number drives #8 and #9, cancels 64HDD’s
activation of these devices and restores the assignments to devices the original
device numbers.
Various beeps and squeaks will sound to signify that the swapping action has
occurred. Refer to the 64HDD display for more information.
Resetting 64HDD will clear all 64HDD assignments, but may not clear the
renumbering of real #8 and #9 devices (depends upon the wiring of your reset
switches). If your real drive ends up stuck on a “wrong” number, simply issue a
“UI” command to it, or reset the Commodore machine.
© COPLIN 1999-2006
118 of 136
v0.7alpha8
64HDD – The CBM Drive Emulator
www.64hdd.com
[email protected]
Print Spooling and PrintEngines
(Professional version only)
Command:
Increment to next JobNumber
(Professional version only)
Applicability:
All
MSDOS
D64
D71
Syntax:
“PNEXT:dev”
D81
D2M
T64
LNX
Examples:
Increment to next job number on device #4
OPEN 1,11,15,”PNEXT:4”
CLOSE 1
Errors:
• Always OK or Syntax Error [31]
Notes:
• Must be issued to the command channel of a 64HDD device (can be a drive or
printer)
• When issued using JiffyDOS or a DOS-wedge, use a “ before the P, eg:
@”PNEXT:4
• PNEXT is needed to increment job numbers when a program does not use the
secondary channel to talk to a printing device.
Command:
Viewing the PrintQueue
(Professional version only)
Applicability:
All
MSDOS
D64
D71
Syntax:
“PPAUSE”
LOAD”$”,pdev
D81
D2M
T64
LNX
Examples:
Pause the print spooler and look at what is in the Print Queue for device #4
OPEN 1,11,15,”PPAUSE”
CLOSE 1
LOAD”$”,4
LIST
Errors:
• Always OK or Syntax Error [31]
Notes:
© COPLIN 1999-2006
119 of 136
v0.7alpha8
64HDD – The CBM Drive Emulator
•
•
•
•
www.64hdd.com
[email protected]
Must be issued to the command channel of a 64HDD device (can be a drive or
printer)
When issued using JiffyDOS or a DOS-wedge, use a “ before the P, eg:
@”PPAUSE
PPAUSE is needed to allow the $ command to be passed on without being
trapped by the spooler routine.
Only files with the JOBxxxxx.USR name will be listed. APP files and files
generated by the Print Engines will not be shown. To see these you will need to
change to the directory using one of the drive device numbers.
Command:
Printing a specific JobNumber
(Professional version only)
Applicability:
All
MSDOS
D64
D71
D81
D2M
T64
Syntax:
“PPRINT:dev:jobnumber:PrintEngine”
LNX
Examples:
Print job number 015 on device #4 to a PrintEngine caller 64PE-TXT
OPEN 1,11,15,”PPRINT:4:15:64PE-TXT”
CLOSE 1
Errors:
• Always OK or Syntax Error [31]
Notes:
• Must be issued to the command channel of a 64HDD device (can be a drive or
printer)
• When issued using JiffyDOS or a DOS-wedge, use a “ before the P, eg:
@”PPRINT:4:15:64PE-TXT
• 64HDD will not be available until the job has been handled by the PrintEngine.
Command:
Delete a specific JobNumber
(Professional version only)
Applicability:
All
MSDOS
D64
D71
D81
Syntax:
“PDEL:dev:jobnumber”
D2M
T64
LNX
Examples:
Delete job number 015 on device #4
OPEN 1,11,15,”PDEL:4:15”
CLOSE 1
Errors:
• Always OK or Syntax Error [31]
Notes:
© COPLIN 1999-2006
120 of 136
v0.7alpha8
64HDD – The CBM Drive Emulator
•
•
•
•
www.64hdd.com
[email protected]
Must be issued to the command channel of a 64HDD device (can be a drive or
printer)
When issued using JiffyDOS or a DOS-wedge, use a “ before the P, eg:
@”PDEL:4:15
PDEL will delete both the JOB and APP file associated with than job
dev is a given as single digit, eg 4 not 04
Command:
Flush the print queue for a device
(Professional version only)
Applicability:
All
MSDOS
D64
D71
Syntax:
“PFLUSH:dev”
D81
D2M
T64
LNX
Examples:
Delete all jobs in the queue for device #4
OPEN 1,11,15,”PFLUSH:4”
CLOSE 1
Errors:
• Always OK or Syntax Error [31]
Notes:
• Must be issued to the command channel of a 64HDD device (can be a drive or
printer)
• When issued using JiffyDOS or a DOS-wedge, use a “ before the P, eg:
@”PFLUSH:4
• PFLUSH will delete all files in the device spooling directory.
• dev is a given as single digit, eg 4 not 04
© COPLIN 1999-2006
121 of 136
v0.7alpha8
64HDD – The CBM Drive Emulator
www.64hdd.com
[email protected]
Error Codes and Messages
64HDD reports error codes and messages that closely match those of real CBM
drives, such as the 1541, 1571, 1581. These error codes are listed in a number of
other sources, but for the convenience of 64HDD users are reproduced below. In
addition to standard error codes, 64HDD has some extended error codes, usually to
give additional feedback to users about features not built into standard CBM drives.
64HDD Professional users will also have access to a range of codes reported by
CMD compatible drives in response to CMD specific commands.
It should be noted that some error codes are used as part of copy protection
schemes and are not real errors cause by 64HDD or the PC. In these cases the
error code is read from the extended information on some D64 and other disk
images, or from special T&S error files in native MSD partitions when using 64HDD
Professional.
64HDD Professional also displays the same error codes on its GUI as and when
they occur. Reading the error channel clears the error code, as it would on the
original CBM drives.
Summary of 64HDD / CBM DOS Error Messages
0
1
2
3
4
5-19
20
21
22
23
24
25
26
27
28
29
30
31
32
33
34
39
43
44-48
50
51
OK, no error exists
Files scratched response. Not an error condition
Partition selected. Not an error condition
Files locked response. Not an error condition
Files unlocked response. Not an error condition
Unused error messages: should be ignored
Block header not found on disk
Sync character not found
Data block not present
Checksum error in data
Byte decoding error
Write-verify error
Attempt to write with write protect on
Checksum error in header
Data extends into next block
Disk id mismatch
General syntax error
Invalid command
Long line
Invalid filename
No file given
Command file not found
Status Error (pseudo SCSI error)
Controller Error (pseudo SCSI error)
Record not present
Overflow in record
© COPLIN 1999-2006
122 of 136
v0.7alpha8
64HDD – The CBM Drive Emulator
52
60
61
62
63
64
65
66
67
70
71
72
73
74
75
76
77
78
79
80-89
92
94
160
180
181
182
183
200
www.64hdd.com
[email protected]
File too large
File open for write
File not open
File not found
File exists
File type mismatch
No block
Illegal track or sector
Illegal system track or sector
No channels available
Directory error
Disk full or directory full
Power up message, or write attempt with DOS Mismatch
Drive not ready
Format error
Controller error
Selected partition illegal
Selected path not available
SYSDIR error
Command not supported (actual code depends on mode)
Pwr-Load driver missing
Fast-Load driver missing
LFN mode not available
D81 TO 1.44FDD transfer error
1.44FDD TO D81 transfer error
D64 TO 1541 transfer error
1541 TO D64 transfer error
CD-AUDIO error
Description of 64HDD / CBM DOS Error Messages
Codes 00-19 are not errors, but status messages. Codes greater than or equal to 20
are true error messages.
00: OK – No error, last requested operation was successfully performed
01: FILES SCRATCHED – returns information about the number of files scratched
by the last scratch command
02: PARTITION SELECTED – returns information about the partition number
selected or if used on a D81 the successful changed to a partition
03: FILES LOCKED – returns information about the number of files locked by the
last F-L command
04: FILES UNLOCKED – returns information about the number of files unlocked by
the last F-U command
© COPLIN 1999-2006
123 of 136
v0.7alpha8
64HDD – The CBM Drive Emulator
www.64hdd.com
[email protected]
20: READ ERROR (block header not found) – 64HDD has a problem reading from
the PC’s device (disk or other). This message may also occur on extended disk
images containing track and sector error information and is sometimes used as copy
protection. In this case the disk controller was unable to locate the header of the
requested data block. It may have been caused by an illegal block number, or the
header has been destroyed.
21: READ ERROR (no sync character) – This message will only occur on extended
disk images containing track and sector error information and is sometimes used as
copy protection. In this case the disk controller was unable to detect a sync mark on
the desired track when the image was created. It may be caused by misalignment of
the read/writer head, no diskette was present, or unformatted or improperly seated
diskette.
22: READ ERROR (data block not present) – This message will only occur on
extended disk images containing track and sector error information and is
sometimes used as copy protection. In this case the disk controller was requested to
read or verify a data block that was not properly written. This error message occurs
in conjunction with the BLOCK commands and indicates an illegal track and/or block
request.
23: READ ERROR (checksum error in data block) – This message will only occur on
extended disk images containing track and sector error information and is
sometimes used as copy protection. This error message indicates that there was an
error in one or more of the data bytes. The data has been read into the DOS
memory, but the checksum over the data is in error.
24: READ ERROR (byte decoding error) -- This message will only occur on
extended disk images containing track and sector error information and is
sometimes used as copy protection. The data or header was read into the DOS
memory, but a hardware error has been created due to an invalid bit pattern in the
data byte.
25: WRITE ERROR (write-verify error) – This message is generated if
64HDD detects a mismatch between the written data and the data in the DOS
memory.
26: WRITE PROTECT ON – This message is generated when 64HDD
has been requested to write a data block while the write protect mode is selected
professional version) or the disk image is of read-only type.
27: READ ERROR (checksum error in header) – This message will only occur on
extended disk images containing track and sector error information and is
sometimes used as copy protection. In this case the disk controller detected an error
in the header of the requested data block. The block had not been read into the
DOS memory.
28: WRITE ERROR (long data block) – This message will only occur on extended
disk images containing track and sector error information and is sometimes used as
copy protection. In this case the disk controller attempted to detect the sync mark of
© COPLIN 1999-2006
124 of 136
v0.7alpha8
64HDD – The CBM Drive Emulator
www.64hdd.com
[email protected]
the next header after writing a data block. If the sync mark did not appear within a
predetermined time, the error message was generated.
29: DISK ID MISMATCH – This message will only occur on extended disk images
containing track and sector error information and is sometimes used as copy
protection. In this case the disk controller had requested to access a disk image
which had not been initialized.
30: SYNTAX ERROR (general syntax) – 64HDD cannot interpret the command sent
to the command channel. Typically, this is caused by an illegal number of file
names, or pattems are illegally used. For example, two file names may appear on
the left side of the COPY command.
31: SYNTAX ERROR (invalid command) – 64HDD does not recognize the
command. The command must start in the first position.
32: SYNTAX ERROR (invalid command) -- The command sent is longer than 58
characters. 64HDD has a longer command buffer than the real CBM DOS, but in
some operating modes limits itself to the 1541 limit for improved compatibility.
33: SYNTAX ERROR (invalid file name) – Pattern matching is invalidly used in the
OPEN or SAVE command.
34: SYNTAX ERROR (no file given) – the file name was left out of a command or
64HDD does not recognize it as such. Typically, a colon
(:) has been left out of the command,
39: SYNTAX ERROR (invalid command) – This error may result if the command
sent to command channel (secondary address 15) is unrecognized
64HDD.
43: STATUS ERROR – pseudo SCSI error when in CMD mode. No actual attempt
to perform the low level SCSI command is made.
44-48: CONTROLLER ERROR – pseudo SCSI error when in CMD mode. No actual
attempt to perform the low level SCSI command is made.
50: RECORD NOT PRESENT – Result of disk reading past the last record through
INPUT#, or GET# commands. This message will also occur after positioning to a
record beyond end of file in a relative file. If the intent is to expand the file by adding
the new record (with a PRINT# command), the error message may be ignored.
INPUT or GET should not be attempted after this error is detected without first
repositioning.
51: OVERFLOW IN RECORD – PRINT# statement exceeds record boundary.
Information is cut off. Since the carriage return is sent as a record terminator is
counted in the record size. This message will occur if the total characters in the
record (including the final carriage return) exceeds the defined size.
© COPLIN 1999-2006
125 of 136
v0.7alpha8
64HDD – The CBM Drive Emulator
www.64hdd.com
[email protected]
52: FILE TOO LARGE – Record position within a relative file indicates that disk
overflow will result.
60: WRITE FILE OPEN – This message is generated when a write file that has not
been closed is being opened for reading.
61: FILE NOT OPEN – This message is generated when a file is being accessed
that has not been opened in the DOS. Sometimes, in this case, a message is not
generated; the request is simply ignored.
62: FILE NOT FOUND – The requested file does not exist on the indicated
drive/device.
63: FILE EXISTS – The file name of the file being created already exists on the
drive/device/disk-image.
64: FILE TYPE MISMATCH – The file type does not match the file type in the
directory entry for the requested file.
65: NO BLOCK – This message occurs in conjunction with the B-A command. It
indicates that the block to be allocated has been previously allocated. The
parameters indicate the track and sector available with the next highest number. If
the parameters are zero (0), then all blocks higher in number are in use.
66: ILLEGAL TRACK AND SECTOR – 64HDD has attempted to access a track or
block which does not exist in the format being used. This may indicate a problem
reading the pointer to the next block.
67: ILLEGAL SYSTEM T OR S – This special error message indicates an illegal
system track or block.
70: NO CHANNEL (available) – The requested channel is not available, or all
channels are in use. A maximum of five sequential files may be opened at one time
to the 1541 DOS. Direct access channels may have six opened files.
71: DIRECTORY ERROR – The BAM does not match the internal count.
There is a problem in the BAM allocation or the BAM has been overwritten in DOS
memory. To correct this problem, reinitialize the diskette to restore the BAM in
memory. Some active files may be terminated by the corrective action. NOTE:
BAM = Block Availability Map
72: DISK FULL – Either the blocks on the diskette are used or the directory is at its
entry limit.
73: DOS MISMATCH – This message is available when 64HDD is first started or
when it is reset by commands UI or UJ. This message will reveal the current version
of the 64HDD core being run and can be used to detect a 64HDD device, for
example “CBM DOS V0.78 EMUL”. On the original CBM drives it also identifies an
incompatibility between DOS versions. CBM DOS 1 and 2 are read compatible, but
not write compatible. Disks may be interchangeably read with either DOS, but a
© COPLIN 1999-2006
126 of 136
v0.7alpha8
64HDD – The CBM Drive Emulator
www.64hdd.com
[email protected]
disk formatted on one version cannot be written upon with the other version because
the format is different. This error is displayed whenever an attempt is made to write
upon a disk which has been formatted in a non-compatible format.
74: DRIVE NOT READY – An attempt has been made to access a drive/disk/diskimage/partition which is not valid or available.
75: FORMAT ERROR – 1581 compatible error. Unlikely to be seen when working
with disk images.
76: CONTROLLER ERROR – 1581 compatible error. Unlikely to be seen when
working with disk images.
77: SELECTED PARTITION ILLEGAL – requested partition change is not available
or partition number illegal. Valid for 1581 emulation mode (D81) and 64HDD
partition table.
78: SELECTED PATH NOT AVAILABLE – requested path change is not available or
legal
79: SYSDIR ERROR – problem with locating the 64HDD SYSDIR directory
80-89: COMMAND NOT SUPPORTED – various codes as below which can occur if
the request function is not supported. Some commands are specific to particular
emulation modes, whilst in a few cases some commands are not supported by the
current version of 64HDD.
80:
81:
82:
83:
84:
85:
86:
87:
89:
COMMAND NOT SUPPORTED (MSDOS)
COMMAND NOT SUPPORTED (D64)
COMMAND NOT SUPPORTED (D71)
COMMAND NOT SUPPORTED (D81)
COMMAND NOT SUPPORTED (D2M)
COMMAND NOT SUPPORTED (T64)
COMMAND NOT SUPPORTED (LNX)
COMMAND NOT SUPPORTED (H64)
COMMAND NOT SUPPORTED (64HDD)
92: PWR-LOADER MISSING – the request to send the file by the Pwr-Load method
is not possible because the required driver file is not located in the SYSDIR directory
94: FAST-LOADER MISSING – the request to send the file by the Fast-Load or XLoad or Z-Load method is not possible because the required driver file is not located
in the SYSDIR directory
160: LFN MODE NOT AVAILABLE – LFN mode was not activated during 64HDD
start-up and so the requested LFN command cannot be supported
180: D81 TO 1.44FDD ERROR – there was an error encountered whilst using
1581COPY to transfer the requested D81 image to the floppy in A:
© COPLIN 1999-2006
127 of 136
v0.7alpha8
64HDD – The CBM Drive Emulator
www.64hdd.com
[email protected]
181: 1.44FDD TO D81 ERROR – there was an error encountered whilst using
1581COPY to transfer the floppy in A: to the requested D81 image
182: D64 TO 1541 ERROR – there was an error encountered whilst transferring the
requested D64 image to the floppy disk in device #8
183: 1541 TO D64 ERROR – there was an error encountered whilst transferring the
floppy disk in device #8 requested D64 image
200: CD-AUDIO ERROR – there was an error encountered with the last issued CDAudio command
Additional extended modes error text which maybe assigned to error/status code 00
instead of the default OK, for example:
MSD==>RESULTS IN [SYSDIR]/MSD
64HDD DRIVE (DE)ACTIVATED
STRICT MODE SET/CLEAR
CBM DRIVE EMU (C) COPLIN
CMD EMU MODE SET/CLEAR
Time, Date and Day output
Mouse commands
© COPLIN 1999-2006
128 of 136
v0.7alpha8
64HDD – The CBM Drive Emulator
www.64hdd.com
[email protected]
Specifications Guide
Dependent Devices
File system devices are termed dependent devices. The behaviour of the emulator
depends upon the mode the file system is in.
For example, when a D64 image is logged the emulator will respond and emulate a
1541 drive (unless 1571 mode is specified by the appropriate CBM command).
Because the mode is dependent, only applicable commands will be available and
ROM/RAM maps will reflect the mode specified. A D64 image can of course be
“seen” with both a 1541 and 1571 as in real life. A D81 image can only be accessed
via a 1581 emulated interface.
Files within the MSDOS file structure are treated in a mode which is neither
1541/1571/1581. Here the file extension defines the type of file with the following
conventions used:
PRG
SEQ
USR
Default /program file
Sequential file
User file (only PRG /SEQ format though)
Logging of a file with a disk, tape or archive image extension will switch modes to
the appropriate device interface.
Files in the MSDOS structure other than the above types are treated as binary and
can also be loaded. In the CBM directory listing they are identified as type “MSD”
(abbreviation for MSDOS, though they may really be CBM binary and text files). For
these to load the complete name (including file extension) must be used. The full
name will be shown in the CBM directory listing.
64HDD has up to 8 dependent devices (devices 8, 9, 10, 11, 12, 13, 14 and 15) and
not all need to be activated. Optionally a “boot floppy” in drive A: can be used to reconfigure the system as required, or preferably 64HDD is set up to work in
conjunction with batch file which respond to error_level commands sent by the
emulator’s EXIT command. The numbering of these devices cannot however
conflict with real devices on the CBM serial bus. This conflict can easily occur if you
have a SX64 or a C128D with internal drive(s). You will have to soft/hard change
the number in these drives before starting (or restarting) the emulated drive. Each
“initialised” dependent device needs to have a path assigned at 64HDD start-up,
else a default “c:\” location is assumed. More than one device can be logged to a
given path, but only one device should be logged to disk image (this is because a
disk image may get corrupted if one device modifies the image whist the other is not
watching).
© COPLIN 1999-2006
129 of 136
v0.7alpha8
64HDD – The CBM Drive Emulator
www.64hdd.com
[email protected]
Independent Devices
These devices are not file system devices. They are for example devices that
receive and send data, but are not used for storing file data. A good example is the
Real-Time-Clock (RTC) in the PC controller. The time /date for this device can be
set via the command channel regardless of whether in 1541 /1571 /1581 /etc mode
(none of which support RTC commands). The concept of “independent” devices is
used also for interrogating the functioning of the controller and emulator without
having to work from a keyboard and monitor attached to the PC controller.
A PC compatible mouse may be attached to a 64HDD serial or PS2 port. With the
appropriate MSDOS mouse driver installed, the position of the mouse and button
status can be read by the CBM computer and the information used in the program
you write.
Other device independent functions will be added as concepts are defined.
© COPLIN 1999-2006
130 of 136
v0.7alpha8
64HDD – The CBM Drive Emulator
www.64hdd.com
[email protected]
64HDD File Systems Modes
CBM Disk Images (D64, D71, D81)
• PRG, SEQ, USR, GEOS (SEQ and VLIR, with 64HDD-GEOS)
• 35 track D64 format images
• 70 track D71 format images
• 80 track D81 format images
• Error setting for T&S error encoded disk images
• Read / Write
• Direct Access Support
• Command Channel support
• REL not yet supported
• Refer to project specification sheet for intended capabilities.
CMD Disk Images (D2M, etc)
• PRG, SEQ, USR
• 80 track D2M format images
• Error setting for T&S error encoded disk images
• Read only at present
• Direct Access Support
• Command Channel support
• REL not yet supported
• Partitions and native directories not yet supported
• CMD Native Partitions not yet supported
• Refer to project specification sheet for intended capabilities
CBM Tape Images (T64)
• Read only of directory “track” and PRG files for T64 format images
• No command channel support is planned (Error 8x will always be returned)
Archive (LNX)
• Read only of directory track and PRG files for LNX format images
• No command channel support is planned (Error 8x will always be returned)
Zips (ZIP) (Professional version only)
• Built-in decompression of ZIP archive to the MSDOS file system
• C:\64HDDPRO\TEMP is used at the destination path
• An external MSDOS batch file is used to perform the decompression. This can
be adjusted by the user to suit their particular ZIP program, or even an
alternative decompressor. By default, the 64UNZIP.BAT file will delete all files in
the decompression directory using DELTREE and then use PKUNZIP to perform
the actual decompression.
• Note: if you chose to use a LFN based decompression tool, be sure to use a LFN
compatible DELetion tool.
© COPLIN 1999-2006
131 of 136
v0.7alpha8
64HDD – The CBM Drive Emulator
www.64hdd.com
[email protected]
MSDOS File System
• Read and write of PRG, SEQ and USR files (OPEN 1,11,2,”filename,type” where
type is “P”, “S” or “U”)
• Name is searched as requested, but if not found an attempt will be made to
append the appropriate extension (default is PRG)
• P00, P01, S00, S01 type files created by the old PC64 emulator are treated as a
special case of the PRG format. 64HDD will skip the header information and
continue as if the file was of PRG type (Professional version only)
• N64 type files created by the old 64NET emulator are treated as a special case
of the PRG format. 64HDD will skip the header information and continue as if the
file was of PRG type (Professional version only)
• All other non-disk files are streamed from start to finish as if SEQ
• Command channel support for working with directories, scratching, copying and
modifying files.
• Refer to project specification sheet for intended capabilities.
• By default, 64HDD will only create files with valid 8.3 names, and will substitute
legal file extensions where not provided. Generally upon reads (files or
directories) will be as requested, and only upon failure will substitution be tried.
For example, if a file “TEST FOR ERROR” is saved, 64HDD will save it as
“TESTFORE.PRG” in order to obey MSDOS rules. An attempt to load it by the
name “TEST FOR ERROR” file be attempted, but as this will fail a retry with the
name “TESTFORE.PRG” will be made without an error being flagged to the CBM
user. For file or directory deletion or copying the complete MSDOS filename
(with extension) or a wildcard is required.
• If the LongFileName (LFN) system has been correctly installed, 64HDD will allow
the creation of valid 16.3 filenames. The LFN system uses a naming /file format
which is Windows95 compatible and as such, files can be transferred to /from a
Windows95 system.
MSDOS LongFileName Support
64HDD can support most CBM 16character filenames in the MSDOS file system
providing Odi’s LongFileName (LFN) utilities are installed. Use of LFNs improves
CBM software compatibility. Version 1.55 of the LFN tools is required along with an
installation of 64HDD v0.6a3 and higher. This version of the LFN tools allows some
support long names to be read on ISO9660 format CD-ROMs.
MSDOS FileNames in 8.3 format
© COPLIN 1999-2006
LongFileNames in 16.3 format
132 of 136
v0.7alpha8
64HDD – The CBM Drive Emulator
www.64hdd.com
[email protected]
In LFN mode, 64HDD uses 16.3 format names instead of the 8.3 format dictated by
MSDOS. The 16.3 format is subset of the LFN format introduced by Windows95.
However, Windows95 or MSDOS7x did not provide tools that allow the LFN files to
be created or copied in any environment except for when Windows95 is actually
running in its Graphical Mode.
There are several tools available for free which allow the Windows95 LFN format to
be used in MSDOS, each having advantages and disadvantages. 64HDD has
chosen to use Odi’s LFN Utilities. The LFN utilities included in the Zip distributed
with 64HDD are the only LFN utilities that have been verified for correct operation
with 64HDD.
MSDOS LFN support has many benefits and so it is likely to be important to the
64HDD user, but before it will work correctly the LFN utilities need to be installed
correctly. If the utilities are not correctly installed, then there is the risk that 64HDD
or the tools will corrupt the directory structure. Before you proceed it is
recommended to read the LFN.TXT file distributed in the LFNFILES Zip.
There are three important steps to follow:
1)
Install the LFN utilities into the correct directory
2)
Unzip and/or LCOPY and/or LFN-FIX the LFN$$$16CHAR$LFN.$$$ file to
the correct directory
3)
Check that the CONFIG.SYS file has sufficient BUFFERS and FILES
available
4)
Modify the PATH statement to include 64HDD directory containing EXE files
64HDD performs several tests before it will allow LFN mode to be selected. These
tests should catch 95% of possible installation errors, and should errors be found a
double “beep” and prompt will be displayed.
LFN mode is selected only when the –lfn command line switch is used when
starting 64HDD, and should be added to the relevant line in the GO64HDD.BAT file.
Setting up the LFN Utilities
Step 1:
The LFN utilities are distributed in a Zip file called LFNFILES.ZIP. This
Zip contains one LongFileName file that is used by 64HDD as the
name template for creating all new LFNs. To create this LFN file you
can use one of the following methods:
1)
2)
© COPLIN 1999-2006
Unzip the LFN files using a DOS based de-compressor (don’t
forget to use the –d option), and then from the 64HDD directory
run the LFN-FIX.BAT utility.
Use a Windows95 version of WinZip (ie versions 6+). The LFN
template file is called LFN$$$16CHAR$LFN.$$$ and is the only
file which must be created under the Windows95 LFN system.
The rest of the Zip can be expanded with DOS “PKUNZIP –d”
for example.
133 of 136
v0.7alpha8
64HDD – The CBM Drive Emulator
www.64hdd.com
[email protected]
Only a subset of Odi’s LFN utilities are included and these must be
located in the directory from which 64HDD.EXE is executed.
Additionally, the directory must be on the MSDOS PATH as 64HDD
will need to find them. The **must have** utilities are: LDIR.EXE,
LREN.EXE, LCOPY.EXE and LDEL.EXE
64HDD checks to see if these files are correctly located.
Step 2:
If you are using the non-default location for the 64HDD system
directory you will need to move the LFN template file.
The LFN template file LFN$$$16CHAR$LFN.$$$ must be moved to
the 64HDD system directory as defined by +sysdir or the default
c:\64hdd\system location if not specified. The file can only be
correctly copied using the LCOPY utility or Windows95. If necessary
you will LCOPY it to a floppy disk, and then LCOPY it to the location. If
you are using a RAMDISK for the 64HDD system directory, you will
also need to LCOPY the file to the RAMDISK. You can use LDIR to
see that the LFN is as shown above. The MSDOS name should be
LFN$$$~1.$$$
If you used an MSDOS unzip tool it is likely that there will be a
LFN$$$16.$$$ file in the 64HDD system directory. This must be
deleted or fixed using LFN-FIX.BAT. Use LDEL in preference to DEL
as it will correctly delete any LFN files. You may need to use DEL if
LDEL says the file was not found (that is no LFNs were found).
Step 3:
Check the setting of the BUFFERS and FILES in the CONFIG.SYS
file. LFNs need lots of channels open for assembling the filename. Be
generous and set FILES=50 and BUFFERS=17,0 and FCBS=8,0
You will need to re-boot the PC for these new settings to take effect.
Step 4:
The 64HDD directory can be added to the PATH using this modifier
command, but only from within a batch file:
PATH=c:\64hdd;%PATH%
Notes, Tips and Suggestions
• You can create LFNs in the root directory of a disk, however should errors
result the disk structure may be damaged. It is perhaps best to limit these
files to floppy disks that can easily be re-formated.
• If you’ve decided to use LFNs with 64HDD use LCOPY, LREN and LDEL in
preference to DEL, REN and COPY when doing you disk house-keeping.
This will ensure directory entries do not get corrupted.
• A corrupted directory entry can only be cleared by using ScanDisk for
Windows95 or by removing the entire directory. For this reason it may be
recommended practice that LFNs be created in subdirectories and not the
root directory of your Hard Disk.
© COPLIN 1999-2006
134 of 136
v0.7alpha8
64HDD – The CBM Drive Emulator
•
•
•
•
•
•
www.64hdd.com
[email protected]
The LFN tools only work on drives which use the FAT system or ISO9660 CD
file system (LFN tools v1.55). This generally includes Floppy and Hard Disks,
and some CD-ROMs. Only CD-ROMs written using the ISO9660 standard
will work. {note: directory names need to follow the 8.3 format as per the
following note}
64HDD only implements LFNs for filenames. Directories are limited to
8character names and LFN named directories are only accessible by their
shortname.
Disk /tape /LNX image names are also assume to be in 8.3 format. If not the
name may be truncated and the extension incorrectly displayed. The image
may still be attached to, but only if you know the complete name.
Automatic recognition of files by their extension type is only possible if the
three character extension is capitalised in the LFN format when viewed with
LDIR (ie “test file.PRG” is recognised as a PRG, “test file.prg” is identified as
a MSD file). 64HDD creates capitalised PRG, SEQ and USR extensions.
Files with non-capitalised extensions must have their whole name specified
or a wildcard used. Capitalisation refers to how the names appear when
viewed with LDIR and not how they appear on the CBM machine.
Some characters are still invalid in the Windows95 LFN system and 64HDD
checks and removes these. This includes / and \ which are directory
specifiers and other punctuation used for redirection. However, spaces and
periods are allowed as part of the 16.3 name. Upper and lower characters are
accepted and used in the name. 64HDD, when LFN is enabled, does some
translation for PETASCII characters such that they are mapped to the true
ASCII. Also, you may find that some illegal characters are translated to
graphic equivalents, for example \ will be substituted for a CBM graphic that
looks similar.
When LFN mode is used, directories may take a little longer to generate
before they are sent to the CBM computer. This is normal and can be
improved by the use of a RAMDISK or SMARTDRIVE cache.
© COPLIN 1999-2006
135 of 136
v0.7alpha8
64HDD – The CBM Drive Emulator
www.64hdd.com
[email protected]
PC-to-CBM Cable Specification
The 64HDD program requires one of the following adaptor cables to be connected
between your parallel printer port (LPT1/LPT2/LPT3) and your Commodore
computer or disk drive. By connecting it to your disk drive you will be able to chain
together other hardware to you system.
This cable is also known as X1541 cable because it was used
the first time by a program with this name. Nowadays, it is used
by many programs. At present only the original X1541 and the
XE1541 cable schemes are supported. If you have a newer machine with on-themainboard LPT ports chances, are it will not work with the X1541. To overcome this
limitation you need an older LPT card installed in a slot as a secondary LPT port or
an XE1541 interface.
Optionally a parallel PwrLoad cable can be used to increase the speed of data
transfers during load and read operations.
X1541 Cable Specification
XE1541 Cable Specification
(One of the X1541 schematics above also shows optional tape connector for use on the C64S emulator. Alternate details are
in the README.TXT file. X1541 and XE1541 schematics can also be found in the Star Commander documentation or on their
website. The diode specification is BAT85 or 1N5819 types, but for some LPT interfaces 1N4148 or 1N4005 diodes will work
equally well.)
Note: the XM and XA1541 cables are not as yet supported. Until support is available you can modify your XE cable by
swapping two wires on the Commodore plug (DATA and RESET). Some people have modified their cable with a switch to
allow it to operate as both types. If you are thinking that you need to buy an XA cable to protect your modern PC, but already
have an XE cable; then try the XE first as it will not do any damage (according the the designers), and it may work anyway!
© COPLIN 1999-2006
136 of 136
v0.7alpha8