1
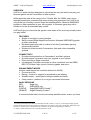
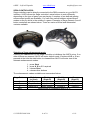
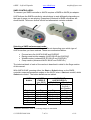
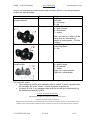
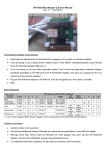
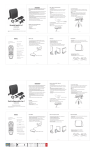
64JPX – JoyPad eXpander
www.64hdd.com
[email protected]
64JPX – JoyPad eXpander
for Commodore and Atari compatible systems
User Manual
© COPLIN 2008-2014
1 of 10
v1.01
64JPX – JoyPad eXpander
www.64hdd.com
[email protected]
OVERVIEW
64JPX is a small interface designed to rejuvenise the way with which you play your
favourite games on the Commodore or Atari system.
Whilst joysticks were all the range in the ‘70s and ‘80s, the 1990’s saw a move
towards joypad style controllers with more buttons and ergonomic feel. 64JPX not
only allows you to safely connect Sega Genesis/MegaDrive, Nintendo SNES/NES
joypads or other controllers to your retro system, it enhances game play with a
number of on-the-fly selectable play modes.
64JPX will give your favourite old games a new lease of life, and may actually make
you play better!
FEATURES
• Simple to use plug-in smart interface
• Safely connect Sega MegaDrive/Genesis, Nintendo SNES/NES joypads,
or other controllers
• Enhances game play with a number of on-the-fly selectable gaming
enhancement modes
• Works out-of-the-box with Commodore, Atari and other compatible
systems
CONNECTIVITY:
• Provides diode protection to Commodore* and Atari systems
• Provides signal conversion from your joypads to your system
• Direct connect to Sega controllers
• (via adaptors) Provides connection to other controllers such as SNES,
NES, PC Wheels, flight yokes, 8-button joypads, and more...
ENHANCEMENT MODES
(buttons used depend on controller attached to 64JPX)
• Fire and auto-fire
• Racing – buttons or triggers for acceleration and braking
• Waddle modes – sports game left/right waddle simulation
• Creep modes – platform or run-n-gun movement slow-down
64JPX VERSIONS
RED
Sega only
BLUE
SNES/NES only
PURPLE
Sega/SNES/NES Combo**
ORANGE
Sega/PCanalog Combo**
A coloured sticker label over the microchip identifies which version you have.
*
Previously documented by CMD in Commodore World (volume 1, issue 5), connecting the Sega joypads
without diode protection has the potential to damage the CIA chips inside your Commodore. Whilst the Sega
connector is similar to the Commodore/Atari connector, the pinout and signalling is different!
** only the combo boards have the controller detection circuit
© COPLIN 2008-2014
2 of 10
v1.01
64JPX – JoyPad eXpander
www.64hdd.com
[email protected]
INTRODUCTION
64JPX is a small interface unit that plugs into either joystick port on your
Commodore, Atari or compatible system. To the other end of the interface you
connect your Sega Genesis joypad controller; or optional pin-adaptor and supported
controller.
The 64JPX interface contains both circuitry and a small micro-controller. The
circuitry provides the signal conditioning and routing, whilst the micro-controller
provides the smarts to read and alter the signals from the controller which is
connected.
The enhancements are provided by the onboard micro-controller directly and no
patching or training of your favourite software is needed to benefit from the new
functionality offered by 64JPX.
64JPX INTERFACE:
The interface consists of a small circuit board with two DB9 connectors. The female
connector is inserted into you Commodore, Atari or compatible computer. In the
male connector your Sega controller or pin-adaptor is inserted. The 64JPX interface
has one status LED. The LED indicates the operating mode and may be on, off or
blinking.
64JPX interface
Two 64JPX interfaces side-by-side
To connect your 64JPX interface follow these steps:
1. switch-off your computer/console
2. insert your 64JPX interface into the desired joystick port
3. connect your Sega controller to the other side of the 64JPX
interface (or pin-adaptor and compatible controller)
4. switch-on your computer/console
© COPLIN 2008-2014
3 of 10
v1.01
64JPX – JoyPad eXpander
www.64hdd.com
[email protected]
SEGA CONTROLLERS:
Sega controllers can be directly connected to the DB9 connector on your 64JPX
interface. 64JPX allows the Sega controller’s extra buttons to work differently
depending on the type of game you are playing. A number of pre-defined gaming
enhancement modes are available. You can even switch between enhancement
modes on-the-fly whilst in the middle of a game. Examples of Sega Genesis 3 and 6
button controllers are shown below. There are various official and aftermarket
variants available.
Selecting a Sega enhancement mode:
Pressing the Start button on the Sega controller re-initialises the 64JPX micro. If no
other buttons are pressed, 64JPX will enter default mode. If buttons A, B, or C are
pressed at the time the start button is released then 64JPX will enter one of the
alternate enhancement modes.
1.
2.
3.
4.
press Start
press A, B or C if required
release Start
release other buttons
The enhancement modes available are summarised below:
Sega Button
A
B
C
Start
Default
(or Start)
Fire
Rapid fire 1
Rapid fire 2
© COPLIN 2008-2014
Racing
Waddle
Creep
(Start+A)
(Start+B)
(Start+C)
Fire
Fire
Fire
Up (Accel)
Waddle 1
Creep L
Down (Brake)
Waddle 2
Creep R
Mode select in combination with A, B, C
4 of 10
v1.01
64JPX – JoyPad eXpander
www.64hdd.com
[email protected]
Remember, you can change mode at any time just by pressing the Start button – no
need to restart your computer or game.
Default mode:
In the default mode, button A is the regular “fire” or action button. Button A
will work in your games exactly as the “fire” button on your conventional
joystick works. Button B is a fast rapid fire button. Button C is a slow rapid fire
button. Depending on your game either or both buttons will be of benefit as
you blast aliens from the skies.
Racing mode:
This mode is primarily designed for racing games where pushing on the
directional controller is supplemented by buttons for accelerating and
decelerating. In these games, button A is your conventional “fire” button,
usually hi/lo gear change. Button B is “up” or “accelerate”; whilst button C is
“down” or “brake”. Note: you can now “brake” at the same time as
“accelerating”, helpful in some games!
This mode will also suit some platform games where it may be easier to
press buttons B or C for climbing ladders, etc.
Waddle mode:
This mode is primarily designed for sporting games, such as Summer Games
and Decathlon, where waddling the joystick left and right caused your hero to
run the 100m sprint in a new world record – that’s if you didn’t break your
stick in the process!
In these games, button A is your conventional “fire” button, usually “jump” in
hurdle events. Button B and C simulate the waddling of the joystick left and
right. Several waddle modes and speeds are selectable depending on how
you start the waddle. You may find some modes work better for your
particular game; or you may just want to give your friends a chance at
catching you…
Waddle
Mode
1
Combination
Left/Right bit pattern
Remarks
10,01,10,01,10,01,…
Fastest
10,01,10,01,10,01,…
Fast
3
Hold right, then
press/hold B
Hold right, then
press/hold C
Press/hold B
00,11,00,11,00,11,…
Slow
4
Press/hold C
00,11,00,11,00,11,…
Slowest
2
© COPLIN 2008-2014
5 of 10
v1.01
64JPX – JoyPad eXpander
www.64hdd.com
[email protected]
Creep mode:
This mode is primarily designed for platform games, such as Impossible
Mission, Pitfall, etc, where you often need to creep up to an edge before
jumping (or falling to your peril). In these games, button A is your
conventional “fire” button; usually jump. Button B is “creep left”; whilst button
C is “creep right”. In creep mode your character will very slowly be “tapped”
along in the request direction. The movement speed depends on the game
played. The creep function can also be used to turn the character left/right
with minimum risk of moving in that direction (and hence avoiding
plummeting to your death!).
Using a 6-button Sega Controller
The controller’s mode button should have no effect on the operation of 64JPX.
64JPX ignores the operation of buttons X, Y, Z. If your controller is equipped with a
slider switch, then it should be left in “normal” mode unless you want to use auto-fire
mode (which will be routed to the controller buttons before the signal is sent to
64JPX). The slow mode on these controllers simply pulses the start button and as a
result will repeatedly activate 64JPX’s initialisation (not very helpful!).
© COPLIN 2008-2014
6 of 10
v1.01
64JPX – JoyPad eXpander
www.64hdd.com
[email protected]
SNES CONTROLLERS:
To connect you SNES controller to 64JPX requires a SNES-to-64JPX pin-adaptor.
64JPX allows the SNES controller’s extra buttons to work differently depending on
the type of game you are playing. Examples of Nintendo’s SNES controllers are
shown below. There are various official and aftermarket variants available.
Selecting a SNES enhancement mode:
The enhancement modes available are different depending upon which type of
64JPX interface you have ordered. These are summarised below:
•
•
•
•
Fire and auto-fire (64JPX BLUE and PURPLE)
Racing mode button mapping (64JPX BLUE and PURPLE)
Waddle modes (enhanced 64JPX BLUE and PURPLE+)ii
Creep modes (enhanced 64JPX BLUE and PURPLE+)
The technical detail of each of the modes is described in detail in the Sega section
of this manual.
With 64JPX BLUE, pressing either the Start or Select buttons on the SNES
controller swaps enhancement modes on the 64JPX micro. Start sets mode0, whilst
Select sets mode1. The button definitions are tabled:
SNES
button
A (red)
B (yellow)
X (blue)
Y (green)
L
R
Select
Start
ii
64JPX
PURPLE
(pre-2013)
Dn (brake)
Fire
Auto-Fire
Up (accel)
Dn (brake)
Up (accel)
Auto-Fire
64JPX BLUE
64JPX PURPLE+
Mode 0
Mode 1
Dn (brake)
Waddle
(Left+A =
fast Waddle)
Fire
Fire
Auto-Fire
Auto-Fire
Up (accel)
Auto-Fire
Dn (brake)
Creep Left
Up (accel)
Creep Right
Î Mode 1
Î Mode 0
PURPLE+ introduce in 2013 as a running change for new builds
© COPLIN 2008-2014
7 of 10
v1.01
64JPX – JoyPad eXpander
www.64hdd.com
[email protected]
NES CONTROLLERS:
To connect you NES controller to 64JPX requires a NES-to-64JPX pin-adaptor. As
NES connectors are difficult to find and expensive to buy, the easiest solution
seems to be to snip the existing connector and replace it with a DB9. You can
modify both ends of the “snip” so that the NES controller remains usable on your
Nintendo.
Example of Nintendo’s NES controller is shown below. There are various official and
aftermarket variants available.
Selecting a NES enhancement mode:
64JPX allows the NES controller’s extra buttons to work differently depending on the
type of game you are playing, however, as there is only one extra button compared
to a conventional C64 or Atari joystick, the range of enhancements is limited to:
•
•
Fire and auto-fire
Up/accel button
The technical detail of each of the modes is described in detail in the Sega section
of this manual.
With 64JPX BLUE, pressing either the Start or Select buttons on the NES controller
swaps enhancement modes on the 64JPX micro. Start sets mode0, whilst Select
sets mode1. The button definitions are tabled:
NES button
A
B
Select
Start
© COPLIN 2008-2014
64JPX
PURPLE
(pre-2013)
Up (accel)
Fire
Auto-Fire
8 of 10
64JPX BLUE
64JPX PURPLE+
Mode 0
Mode 1
Up (accel)
Auto-Fire
Fire
Fire
Î Mode 1
Î Mode 0
v1.01
64JPX – JoyPad eXpander
www.64hdd.com
[email protected]
PC CONTROLLERS:
PC controllers (conventional DB15 connector type, not USB) can be connected to
64JPX by the use of the optional pin-adaptor.
PCanalog pin-adaptor
PC controllers are essentially analog devices, or digitally implemented analog
devices. Typically, PC controllers have X and Y directions, with 2, 4, 6 or 8 buttons.
Buttons may be numbered (1, 2, 3, …) or labelled (A, B, C, …). Controllers with 6 or
8 buttons are typically implemented by converting additional analog inputs into
“digital” buttons.
64JPX automatically converts the analog signals into digital and routes the
information to the appropriate pins. The analog-to-digital conversion is set to
“responsive” so as to minimise the free-play in some controls.
64JPX supports two directional inputs and 3 buttons:
• Direction X is supported and is usually also left/right on steering and yoke
controllers
• Buttons A, B and C are supported. Button A is the default “fire” button, B is
routed by 64JPX to “up” and C is routed by JPX to “down”
•
© COPLIN 2008-2014
9 of 10
Direction Y is user configurable by the
jumper on pin-adaptor. In its default
position, Y is up/down on a conventional
joypad/stick (or in/out on a yoke
controller). In its “right” position, Y is
buttons 5 and 7 on an 8-button controller;
whilst with the jumper in its “left” position
Y is buttons 6 and 8 (or Z-axis on a 3-axis
controller, eg throttle on a flying yoke).
v1.01
64JPX – JoyPad eXpander
www.64hdd.com
[email protected]
As you can see there are many modes and controller options. It is perhaps easiest
to describe typical setups:
Controller
Conventional Joystick
(jumper=default)
Game
Arcade
PC Wheel (jumper=default)
Racing
PC Yoke (jumper=default)
Flying
8-button Joypad
(jumper=right)
Racing
Controls
Left/Right
Up/Down
A = fire/jump/…
B = up
Left/Right
A = gear change
B = accelerate
C = brake
Note: you can now “brake” at the
same time as “accelerating”,
helpful in some games – it is like
“drifting”!
Left/Right
In/Out=Up/Down
A = fire
Left/Right
A = gear change
B = accelerate
C = brake
Right-top = up/accelerate
Right-bot = down/brake
PC Controller notes:
• Upon power-up 64JPX auto calibrates where “centre” is so its important that
the controller be in the “centre” or neutral position at power-up
• If buttons A, B or C are equipped with auto-fire this will be routed directly to
the buttons and read by 64JPX
Copyright, Trademarks and Warranties
CMD, MSDOS and SEGA are trademarks of their respective owners.
64JPX are copyright COPLIN © 1999-2014
Although all care has been taken in the development of the hardware and software, the fitness of the hardware and/or
software to perform the prescribed functions should be verified by the end user. No warranties implied or expressed.
© COPLIN 2008-2014
10 of 10
v1.01