1
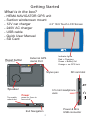
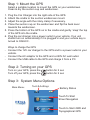
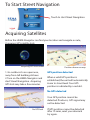
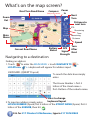
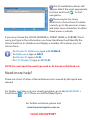
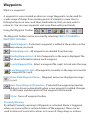
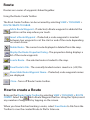
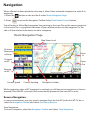
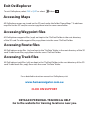
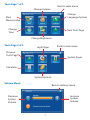
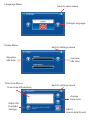
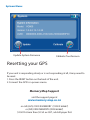
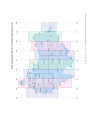
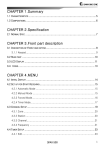
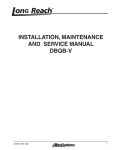
H E M A N AV I G AT O R
QUICK USER GUIDE
2
POWERED BY
Getting Started
What is in the box?
- HEMA NAVIGATOR GPS unit
- Suction windscreen mount
- 12V car charger
4.3” 16:9 Touch LCD Screen
- 240V AC charger
- USB cable
- Quick User Manual
- SD Card
External GPS
Aerial Port
Reset button
(push lightly with pen)
Indicator lights
Red = Charging
Green = Battery full
Orange = no GPS lock
RESET
serial #: HNV11008050001
Stylus pen
Speaker
3.5 mm Headphone
Jack
Power
Top cradle
mount slot
SD card slot
press for 2 sec to
turn on/off
Power & Mini
USB connector
Exit Navigation
2
Step 1: Mount the GPS
Select a suitable location to mount the GPS on your windscreen.
Clean & dry the suction cup and windscreen.
Plug the Car Charger into the right side of the GPS.
Attach the cradle to the suction windscreen mount.
Adjust the angle with the rotary clamp if necessary.
Place the suction cup on the windscreen and flip the back lever
towards the windscreen.
5. Press the bottom of the GPS on to the cradle and gently ‘snap’ the top
of the GPS into the cradle.
6. Plug the car charger into a power outlet in your vehicle. Your unit
should turn on automatically if it is plugged in and your vehicle key is
turned to ON/ACC.
1.
2.
3.
4.
Ways to charge the GPS
- Connect the 12V car charger to the GPS and to a power outlet in your
vehicle.
- Connect the AC adaptor to the GPS and a 240V AC wall outlet.
- Connect the USB cable to the GPS and charge it from a PC.
Step 2: Turning on your GPS
Turn on your GPS, press the
Turn off your GPS, press the
button for 2 sec
button for 2 sec
Step 3: System Menu Options
Main Menu:
Tools & Settings
Battery Status
Touch To Start
Street Navigation
Touch to Start 4WD and
Topographical GPS
To Start Street Navigation
Touch to start Street Navigation
Acquiring Satellites
Before the HEMA Navigator can find your location and navigate a route,
it requires GPS satellite lock.
Acquiring GPS lock screen
1. Go outdoors to an open area,
away from tall buildings & trees.
2. Turn on the HEMA Navigator and
start Street Navigation. Acquiring
GPS lock may take a few minutes.
Position shown on map
GPS position detected
When a valid GPS position is
established, the unit will automatically
zoom to street level. Your GPS
position is indicated by a red dot.
No GPS detected
Your GPS position cannot be
detected. If indoors, GPS signal may
not be detected.
No GPS lock
If GPS position cannot be detected
after 10 mins, reset your device &
try again.
What's on the map screen?
Next Turn Road Name
Compass
(Red points North)
Zoom
In
Zoom
Out
Next
Turn
Distance to
next turn
Map
ETA
Main
Menu
Remaining
Time
Remaining
Distance
Speed
Current Road Name
Navigating to a destination
Battery
Status
GPS
Signal
Strength
Turn
After
Next
Finding an address
1. Touch
to enter the MAIN MENU > touch NAVIGATE TO
LOCATIONS
> a keyboard will appear for address input.
KEYBOARD: (QWERTY layout)
>
To search the data base simply
enter
The House Number > first 4
letters of the street name >
first 4 letters of the suburb name.
Press to change
keyboard
layout
2. To input an address, simply enter
HOUSE NUMBER (Space) first 4 letters of the STREET NAME (Space) first 4
letters of the SUBURB, then hit
E.G. for 217 Flinders St Melbourne, type in 217 FLIN MELB
A list of available locations will
appear. Select the most appropriate
location and touch
to start
navigation.
There may be too many
locations to choose from. To refine
a search, go to the previous screen
and enter more characters to either
street name or suburb.
If you do not have the HOUSE NUMBER or STREET NAME or SUBURB? Don’t
worry, just type in the information you have. QuickSearch will identify the
closest match in it’s database and display a number of locations you can
choose from.
for Flinders St Melbourne, type in FLIN MELB
for Melbourne, type in MELB
for Flinders St, type in FLIN
for 217 Flinders St, type in 217 FLIN
NOTE: Do not input the road type such as St, Street or Rd, Road. etc
Need more help?
There are a host of other software features not covered by this quick user
manual
For further assistance on your street navigation, go to the MAIN MENU >
Scroll down
> HELP. There you will find help topics.
For further assistance, please visit
www.hemanavigator.com.au
CLICK ON SUPPORT
To Start OziExplorer
Touch to start OziExplorer
Acquiring Satellites
Before the HEMA Navigator can find your location, it requires GPS satellite lock.
1. Go outdoors to an open area, away
from tall buildings & trees.
2. Turn on the HEMA Navigator and
start OziExplorer. Acquiring GPS lock
may take a few minutes.
3. Press or to scroll through
various screen views.
Red = No GPS lock, Green = GPS lock
Open A Map
To open a map, either select on the Main Tool bar, FILE > OPEN MAP FILE. Or
click the OPEN MAP ICON.
OK button
Folders
map files
Scroll
Up/Down
Select the desired map file and press OK button
Waypoints
What is a waypoint?
A waypoint is a user created position on a map. Waypoints can be used for
a wide range of things from marking points of interest to camp sites, to
fishing hotspots on rivers and lakes, landmarks etc, that you may wish to
return to. You can save waypoints and swap them with your friends.
Using the Waypoint Toolbar
The Waypoint Toolbar can be accessed by selecting VIEW > TOOLBARS >
WAYPOINT TOOLBAR.
Add a Waypoint - If selected, a waypoint is added at the position on the
map where you touch.
Delete Waypoints - All waypoints are deleted from the map.
Display Waypoint List - A list of waypoints on the map is displayed. The
list shows information about each waypoint.
Load a Waypoint File - Select a waypoint file (.wpt) to load onto the map.
Save Waypoints to File - All waypoints currently on the map are saved to
a waypoint file (.wpt).
Show/Hide Waypoint Name - Waypoint names are displayed on map /
or not.
Auto Show Waypoint Properties - If selected, the waypoint properties
dialog is shown automatically when a new waypoint is added. Changes
to the name and description of the waypoint can be made.
Close - Turns off waypoint toolbar.
Proximity Warning
By default, Proximity warning to Waypoints is activated. Alarm is triggered
when you come within a certain distance of the waypoint. These can be
used to inform of arrival at locations or to warn of sharp drops or inclines.
Route
Routes are a series of waypoints linked together.
Using the Route Create Toolbar
The Rout Create Toolbar can be accessed by selecting VIEW > TOOLBARS >
ROUTE CREATE TOOLBAR.
Add a Route Waypoint - If selected, a Route waypoint is added at the
position on the map where you touch.
Insert a Route Waypoint - If selected, a route waypoint is inserted
between two waypoints or at the start or end of the route depending
on a best choice.
Delete Route - The current route displayed is deleted from the map.
Display the Route Properties Dialog - The properties dialog displays a
list of the route waypoints.
Load a Route - the selected route is loaded to the map.
Save Route to File - The currently loaded route is saved as a (.rt2) file.
Show/Hide Route Waypoint Name - If selected, route waypoint names
are displayed.
Close - Turns off Route Create toolbar.
How to create a Route
Bring up the Route Create Toolbar by selecting VIEW > TOOLBARS > ROUTE
CREATE. Select the
Add a Route Waypoint button. Using the Stylus, insert
any number of waypoints by tapping on the screen.
When you have finished creating a route, select Save Route to File from the
Toolbar to save the created Route to file for later use.
Navigation
When a Route has been plotted on the map, it allows Voice activated navigation to each of its
waypoints.
1. Select the
button on the tool bar & select Route Navigation Page.
2. Select
to active the Navigation Toolbar. Select Start Route Forward button.
You will notice a Yellow/Red navigation line pointing as the crow flies to the nearest waypoint
in that route. This is a graphical indication of your relative position to that waypoint. On the
side is all the relevant information to aid in navigation.
Route Navigation Page
Map Zoom Level
Distance
Remaining
in Route
Zoom
In
Distance
to WP
Zoom
Out
Bearing
to WP
Current Speed
Current Heading
Navigation Toolbar
While navigating, when a WP (waypoint) is reached, you will hear voice instruction on how to
proceed. Once the WP is passed, it will automatically proceed to the next WP in route.
Reverse Navigation.
In some circumstances, you may want to navigate from the last WP to the first WP. To do so,
select the Navigation Toolbar and select Start Route Reverse.
Stop Navigation.
To cancel navigation, select the Navigation Toolbar and select Stop Navigation.
Exit OziExplorer
To exit OziExplorer, select FILE > QUIT or select
than
Accessing Maps
All OziExplorer maps are stored on the SD card under the folder “Hema Maps”. To add new
map files to the SD card, be sure to copy them into the same same folder.
Accessing Waypoint files
All OziExplorer waypoint files (.wpt) are kept in the “OziData” folder in the root directory
of the SD card. To add waypoint files, copy them into the same “OziData” folder.
Accessing Route files
All OziExplorer route files (.rte) are kept in the “OziData” folder in the root directory of the SD
card. To add route files, copy them into the same “OziData” folder.
Accessing Track files
All OziExplorer track files (.plt) are kept in the “OziData” folder in the root directory of the SD
card. To add track files, copy them into the same “OziData” folder.
For a detailed instruction manual on OziExplorer, visit
www.hemanavigator.com.au
CLICK ON SUPPORT
DETAILED PERSONAL TRAINING & HELP
Go to the website for training locations near you.
Tools Page 1 of 2
Back to main menu
Change Volume
Change
Language Options
Start
Memory Map
Change
Time
Next Tools Page
Change Brightness
Tools Page 2 of 2
mp3 Player
Previous
Tools Page
Back to main menu
System Power
Calculator
System Options
Volume Menu:
Back to settings menu
Increase
System
Volume
Decrease
System
Volume
4
Language Menu:
back to main menu
Change Language
Power Menu:
decrease
Idle time
back to settings menu
increase
Idle time
Time zone Menu:
Time zone information
back to settings menu
change
time zone
Adjust for
Daylight
Savings
adjust
time & date format
Systems Menu:
Update System Firmware
Calibrate Touchscreen
Resetting your GPS
If your unit is responding slowly or is not responding at all, it may need to
be reset.
1. Press the RESET button on the back of the unit.
2. Connect the GPS to a power source.
Memory Map Support
visit the support page at
www.memory-map.co.nz
or call (AUS) 1900 9 MEMORY (1900 9 63667)
or (NZ) 0900 MEMORY (0900 63667)
$2.50 first min then $0.50. ex GST, ask bill payer first
Albany
Perth
Geraldton
Carnarvon
Port Hedland
13/5/08
Great Desert
Tracks North
Central Sheet
Katherine
Darwin
Region
Page 1
Gregory
NP
Red
Centre
Flinders
Ranges
Port Lincoln
Simpson
Desert
Mt Remarkable
NP
Mt Isa
Great Desert
Tracks North
East Sheet
Port
Augusta
Cape York
Longreach
Hay
Cairns
Townsville
Lakes
Entrance
Mackay
Rockhampton
Brisbane
Port Macquarie
Newcastle
Wagga
Sydney
Canberra
Wagga
Dubbo
NEW SOUTH
WALES
Charleville
QUEENSLAND
Broken Hill
Mildura
Hobart
TASMANIA
Melbourne
VICTORIA
Adelaide
Mount
Gambier
Warrnambool
Vulkathunha
-Gammon
Ranges NP
Coober Pedy
SOUTH
AUSTRALIA
Alice
Springs
TERRITORY
Tennant
Creek
NORTHERN
Darwin •
11:38 AM
Top End & Gulf
Wyndham
Kimberley
Keep River NP
Broome
Halls
Creek
WESTERN
Warburton
Great Desert
Tracks South
Central Sheet
AUSTRALIA
Kalgoorlie
Esperance
Great Desert
Tracks South
West Sheet
Wiluna
Rudall
River NP
regional key map:regional navigator key
Great Desert
Tracks North
West Sheet
Millstream
Chichester NP
Mt Augustus NP
Pilbara
Karijini NP
Cape
Range NP
Kennedy
Range NP
Francois Peron NP
Kalbarri NP
Mid West
Western
Australia
KEY TO HEMA REGIONAL MAPS
Also includes: Australia map and State maps: Queensland, New South Wales, Northern Territory,
South Australia, Victoria, Western Australia, Tasmania
Cape York Tip
Nhulunbuy Region
Lakefield Nat Park
Tropical North Queensland
Boodjamulla
(Lawn Hill) NP
Eastern Australia
Tourism Routes
Great Desert
Tracks South
East Sheet
Fraser Island
Girraween & Sundown
Nat Parks
North East NSW
High Country
South East NSW
East Gippsland
Tasmania
IMPORTANT SAFETY AND PRODUCT INFORMATION
Failure to avoid the following
potentially hazardous situations
could result in an accident or
collision resulting in death or
serious injury.
- When installing the unit in a
vehicle, place the unit securely so it
does not obstruct the driver’s view
of the road or interfere with vehicle
operating controls, such as the
steering wheel, foot pedals, or
transmission levers. Do not place in
front of or above any airbag.
- When navigating, carefully
compare information displayed on
the unit to all available navigation
sources, including information
from street signs, visual sightings,
and maps. For safety, always
resolve any discrepancies or
questions before continuing
navigation and defer to posted
road signs.
- Always operate the vehicle in a
safe manner. Do not become
distracted by the unit while
driving, and always be fully
aware of all driving conditions.
Minimize the amount of time
spent viewing the unit’s screen
while driving and use voice
prompts when possible. Do not
input destinations, change
settings, or access any functions
requiring prolonged use of the
unit’s controls while driving. Pull
over in a safe and legal manner
before attempting such
operations.
- The unit is designed to provide
route suggestions. It is not
designed to replace the need for
driver attentiveness regarding
road closures or road conditions,
traffic congestions, weather
conditions, or other factors that
may affect safety while driving.
Battery Warnings
- Do not incinerate.
- Contact your local waste
disposal department to properly
dispose of the unit/battery
- Do not leave the unit exposed
to a heat source or in a high
temperature location, such as in
the sun in an unattended vehicle
on a hot day. To prevent damage,
remove the unit from the vehicle
or store it out of direct sunlight
If these guidelines are not
followed, the internal,
non-user-replaceable,
rechargeable lithium-ion battery
may experience a shortened life
span or may present a risk of
damage to the GPS unit, fire,
chemical burn, electrolyte leak,
and/or injury.
- When storing the unit for a
limited length of time, store within
the following temperature range:
-10˚ to 55˚C. When storing the unit
for an extended time, store within
the following temperature range:
0˚ to 25˚C.
- Do not operate the unit outside
the following temperature range:
-20˚ to 55˚C.
- Do not remove or attempt to
remove the battery.
Important Information
MAP DATA INFORMATION: One of
the goals of the HEMA Navigator is
to provide customers with the
most complete and accurate
cartography that is available to us
at a reasonable cost. Along with
Hema’s extensive field work, we
use a combination of
governmental and private data
sources, which we identify in
product literature and copyright
messages displayed to the
consumer. Virtually all data sources
contain some inaccurate or
incomplete data. In some counties,
complete and accurate map
information is either not available
of is prohibitively expensive.
Declaration of Conformity
Hereby, HEMA Navigator declares
that this product is in compliance
with the essential requirements
and other relevant provisions of
Directive 1999/5/EC.
FCC Compliance
This product has been tested and
found to comply with Part 15 of
the FCC interference limits for
Class B digital devices FOR HOME
OR OFFICE USE. These limits are
designed to provide reasonable
protection against harmful
interference in a residential
installation, and are more
stringent than ‘outdoor’
requirements.
Operation of this device is
subjected to the following
conditions: (1) this device may
not cause harmful interference,
and (2) this device must accept
any interference received,
including interference that may
cause undesired operation.
This product does not contain
any user-serviceable parts.
Repairs should only be made by
an authorized HEMA Navigator
service centre. Unauthorized
repairs or modifications could
result in permanent damage to
the equipment, and void your
warranty and your authority to
operate this device under Part 15
regulations.
Limited Warranty
This HEMA Navigator product is
warranted to be free from defects in
materials or workmanship for one
year from the date of purchase.
Within this period, HEMA-VMS will, at
its sole option, repair or replace any
components that fail in normal use.
Such repairs or replacement will be
made at no charge to the customer
for parts or labour, provided that the
customer shall be responsible for
any transportation costs. This
warranty does not cover failures due
to abuse, misuse, accident, or
unauthorised alterations or repairs.
Batteries included is warranted for a
period of 12 months from the date of
purchase.
THE WARRANTIES AND REMEDIES
CONTAINED HEREIN ARE EXCLUSIVE
AND IN LIEU OF ALL OTHER
WARRANTIES EXPRESSED, IMPLIED,
OR STATUTORY, INCLUDING ANY
LIABILITY ARISING UNDER ANY
WARRANTY OF MERCHANTABILITY
OR FITNESS FOR A PARTICULAR
PURPOSE, STATUTORY OR
OTHERWISE. THIS WARRANTY GIVES
YOU SPECIFIC LEGAL RIGHTS, WHICH
MAY VARY FROM STATE TO STATE.
IN NO EVENT SHALL HEMA-VMS BE
LIABLE FOR ANY INCIDENTAL,
SPECIAL, INDIRECT, OR
CONSEQUENTIAL DAMAGES,
WHETHER RESULTING FROM THE
USE, MISUSE,
OR INABILITY TO USE THIS PRODUCT
OR FROM DEFECTS IN THE
PRODUCT. Some states do not
allow the exclusion of incidental or
consequential damages, so the
above limitations may not apply
to you.
HEMA-VMS retains the exclusive
right to repair or replace the unit
or software or offer a full refund of
the purchase price at its sole
discretion. SUCH REMEDY SHALL
BE YOUR SOLE AND EXCLUSIVE
REMEDY FOR ANY BREACH OF
WARRANTY. To obtain warranty
service, contact your local Hema
Navigator dealer or call HEMA VMS
product support for shipping
instructions and RA tracking
number. Securely pack the unit
and a copy of the original sales
receipt, which is required as the
proof of purchase for warranty
repairs. Write the RA (Returns
Authorisation) tracking number
clearly on the outside of the
package. Send the unit, freight
charges prepaid to any HEMA
Navigator service centre.
Online Auction Purchases:
Products sold through online
auctions are not eligible for
rebates or other special offers
from HEMA VMS. Online auction
confirmations are not accepted for
warranty verification. To obtain
warranty service, an
original or copy of the sales receipt
from the original retailer is
required. HEMA VMS will not
replace missing components from
any package purchased through
an online auction.
INTERNATIONAL PURCHASES: A
separate warranty is provided by
international distributors for units
purchased outside of Australia &
New Zealand. This warranty is
provided by the local in-country
distributor and this distributor
provides local service for your unit.
Distributor warranties are only
valid in the area of intended
distribution. Units purchased in
Australia or New Zealand must be
returned to the HEMA Navigator
service centre in Australia.
cause this unit to malfunction.
- Never use a hard or sharp
object to operate the
touchscreen or damage may
result.
CLEANING THE UNIT
The Navigator is constructed of
high-quality materials and does
not require user maintenance
other than cleaning. Clean the
unit’s outer casing (not the
touchscreen) using a cloth
dampened with a mild detergent
solution, and then wipe dry.
Avoid chemical cleaners and
solvents that can damage plastic
components.
CLEANING THE TOUCH SCREEN
Clean the touch screen with a
CARING FOR YOUR NAVIGATOR soft, clean, lint-free cloth. Use
Your HEMA navigator contains
water, isopropyl alcohol, or
sensitive electronic components
eyeglass cleaner, if needed. Apply
that can be permanently damaged
the liquid to the cloth, and then
if exposed to excessive shock or
gently wipe the touch screen.
vibration. To minimize the risk of
damage to your navigator, avoid
AVOIDING THEFT
dropping your unit and operating
- To avoid theft, remove the
it in high-shock and high-vibration
Navigator and mount from sight
environments.
when not in use. Remove the
- Do not store the Navigator where
residue on the windscreen left by
prolonged exposure to extreme
the suction cup.
temperatures can occur, because it
can cause permanent damage.
- Do not expose the Navigator to
water. Contact with water can
Software License Agreement
BY USING THE Navigator, YOU
AGREE TO BE BOUND BY THE
TERMS & CONDITIONS OF THE
FOLLOWING SOFTWARE LICENSE
AGREEMENT. PLEASE READ THIS
AGREEMENT CAREFULLY.
HEMA VMS grants you a limited
license to use the software embedded in this device (the “software”)
in binary executable form in the
normal operation of the product.
Title, ownership rights, and intellectual property rights in and to the
software remains in HEMA VMS.
You acknowledge that the Software is the property of HEMA VMS
and is protected under Australia
copyright laws and international
copyright treaties. You further
acknowledge that the structure,
organization, and code of the
software are valuable trade secrets
of HEMA VMS and that the software in source code form remains
a valuable trade secret of HEMA
VMS. You agree not to de compile,
de scramble, modify, reverse
assemble, reverse engineer, or
reduce to human readable form
the software or any part thereof or
create any derivative works based
on the software.
SPECIFICATIONS
Size:
100 x 76 x 20 mm (W x H x D)
Weight: 175g
Display: 4.3 diagonal (10.9 cm), 480 x 272
pixels; WQVGA TFT landscape
display with white backlight and
touch screen
Data storage: Internal memory and
removable 2GB SD card
Computer interface: USB mass storage
Power input: DC vehicle power using
included 240V AC vehicle power cable.
Usage:
Charge time:
Battery life:
5W max.
Approx 5 hours
up to 5 hours
CAUTION: the HEMA NAVIGATOR
is not water proof.