1
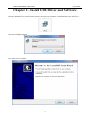
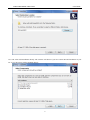
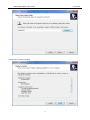
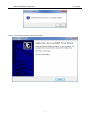
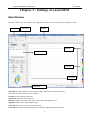
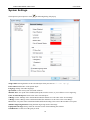
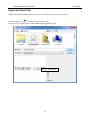
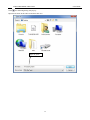
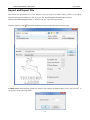
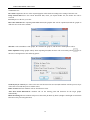
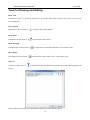
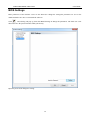
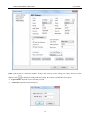
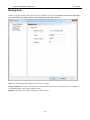
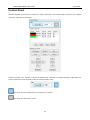
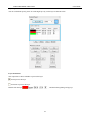
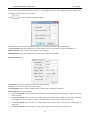
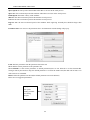
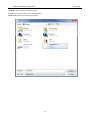
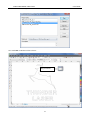
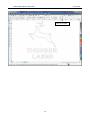
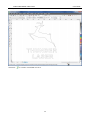
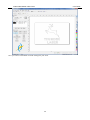
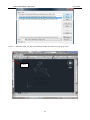
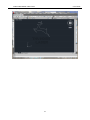
THUNDER LASER SYSTEMS LaserGRAV USER’S MANUAL Version 2.1 www.thunderlaser.com [email protected] WWW.THUNDERLASER.COM LaserGRAV The operation mode and settings may differ due to upgrades of software. Any differences are subject to the software 1 WWW.THUNDERLASER.COM LaserGRAV Contents Chapter 1 - Introduction................................................................................................................................................3 Chapter 2 - Install USB Driver and Software ...............................................................................................................4 Chapter 3 - Settings of LaserGRAV .............................................................................................................................9 Main Window .......................................................................................................................................................9 System Settings ...................................................................................................................................................10 Open and Save File .............................................................................................................................................12 Import and Export File........................................................................................................................................14 Tools for Drawing and Editing ...........................................................................................................................16 Select Object .......................................................................................................................................................19 Edit Object ..........................................................................................................................................................20 Advanced Tools ..................................................................................................................................................23 Default Parameters..............................................................................................................................................30 Chapter 4 - Laser Process Settings .............................................................................................................................31 Relative Position .................................................................................................................................................31 Array Mirror Image ............................................................................................................................................32 BIOS Settings .....................................................................................................................................................34 Extra Settings ......................................................................................................................................................38 Rotary Axis .........................................................................................................................................................40 Save/Load System Settings ................................................................................................................................41 Control Panel ......................................................................................................................................................42 Machine Control .................................................................................................................................................47 Chapter 5 - CorelDRAW Plug-in ................................................................................................................................55 Chapter 6 - AutoCAD Plug-in ....................................................................................................................................61 2 WWW.THUNDERLASER.COM LaserGRAV Chapter 1 - Introduction How to Use This User’s Manual Thank you for purchasing a Thunder laser system. Your Thunder Laser system has been designed to be easy to operate, but you will utilize it to its fullest potential bytaking some time to read this user’s manual prior to use. You will be ready to use the Thunder laser system as soon as you read this manual. Software Versions LaserGRAV CorelDraw Plug-in AutoCAD Plug-in Supported Formats Vector format: dxf, ai, plt, dst, dsb etc. Bitmap format: JPG,PNG,BMP, GIF,MNG,TIF,TGA,PCX,JP2,JPC,PGX,RAS,PNM,SKA,RAW Suggested PC System and Software Above PIII or PIV recommended Memory, above 1G recommended Windows2000/XP/VISTA/WIN7 CoreDrawX1-X5 and AutoCad 2004-2012, and other Cad software 3 WWW.THUNDERLASER.COM LaserGRAV Chapter 2 - Install USB Driver and Software Insert the Thunder Laser software DVD. Open the file named "LaserGRAV" and then double click “Setup.exe” Select the installing language: Now Click Next to continue. 4 WWW.THUNDERLASER.COM Set the Installation Path LaserGRAV User can select Full installation directly. The software will detect if you have AutoCAD and CorelDraw in your PC. If yes, the plug-in will be installed directly. 5 WWW.THUNDERLASER.COM Choose where to put the shortcut and then click Next LaserGRAV Click Install to continue installing 6 WWW.THUNDERLASER.COM The below information means the USB driver is installed successfully Choose if to launch the software and then click Finish 7 LaserGRAV WWW.THUNDERLASER.COM LaserGRAV Click the icon to start the software, a welcome page will show up: 8 WWW.THUNDERLASER.COM LaserGRAV Chapter 3 - Settings of LaserGRAV Main Window Most job is done in the main window. It is suggested to read this section carefully before using the software. Menu Bar Object Bar Tool Bar Edit Bar Control Panel Color Bar Align Bar Status Bar Menu Bar: the major functions of the software will be achieved by the following orders: File, Edit, Draw, Tool, Options, View and Help. Tool Bar: Some frequently used tools. Object Bar: adjust the selected objects. Edit Bar: editing tools used to draw lines, circle, square and adding text etc. Align Bar: tools used to align multiple objects. Color Bar: change the color of the selected objects. Control Panel: set the cutting speed and power and other important settings for the job. 9 WWW.THUNDERLASER.COM LaserGRAV System Settings Click options/system options or click ,the following dialog will pop up Nudge Offset:moving distance of the selected object when press arrow“←”,“→”,“↑”,“↓” Paste Offset:shift distance of the pasted object. Language: change into other languages. Speed Unit: set the velocity unit used in the software. Machine Zero: zero point of the machine(limit point) must be correct, or you will have reverse engraving. Color of Selected Objects: border color of the selected object. X Range: set the X Range of the Virtual Work Table,the default size is the same as the X-axis Range. Y Range: set the Y Range of the Virtual Work Table,the default size is the same as the Y-axis Range. Zero:set the zero point of the Virtual Work Table,the default setting is the same as the machine’s zero point. Simulate Engraving Result:showing the final engraving result of the image. Popup Welcome Page:Always show the welcome screen when launching the software. Grid Distance: set the size of the grid you need. 10 WWW.THUNDERLASER.COM LaserGRAV Show Grid:tick “show grid”,the work area will be filled with grid as showed below: Grid Language Setting: click Help/Language Settings to change the language directly. there're four selections, the third one is English. 11 WWW.THUNDERLASER.COM LaserGRAV Open and Save File All the information,including parameters of the layers and orders will be saved in the pwj file. Click File/Open or click , the following dialog will pop up: Select the file you want to open(ex:THUNDERLASER.pwj)and click open. Preview current image 12 WWW.THUNDERLASER.COM Click LaserGRAV , the following dialog will pop up: Input the file name in the edit box and then click save. Input file name 输入文件名 13 WWW.THUNDERLASER.COM LaserGRAV Import and Export File The software use pwj format to save files, therefore when you need to use other formats, you have to use import function. The supported formats are: dxf, ai, plt, dst, dsb, JPG,PNG,BMP, GIF,MNG,TIF,TGA,PCX, JP2,JPC,PGX,RAS,PNM,SKA,RAW etc. And you can also export files as plt format. Click File/import or click ,the following dialog will pop up.select the object and click open. Combine Lines:when importing graphs, the software will combine the adjacent lines as one. You can click to set tolerance as the following picture: 14 WWW.THUNDERLASER.COM LaserGRAV Tolerance: when the distance between adjacent lines is less than the combination tolerance,the lines will be combined as one. PLT Unit: length unit, the size of the imported graphs will be differ according to the setting of the PLT unit. Keep Current File:reserve the current document data, when you import another file, the former file will be reserved. Preview:preview the file you select. DST Auto Smooth:when impoting DST/DSB formats,the graphic data will be optimize(smooth the graphs to make the laser work more smooth) Smooth: set the smoothness of the graphs, the smoother the graph is, and the more anamorphic it will be. Route Optimize:arrange graphs orderly when importing files(thus the laser will work orderly).click to set the rules of arrangement as the following picture. Order by Layer Color:layers of the same color will be lasered in succession(the machine will first process layer of the same color and then process another color) Inner to Outer:the laser machine will cut from Inner to Outer. Auto Start Point Direction:the machine will set the starting point and direction for the target graphs automatically. Block Processing:the laser machine will process the whole job block by block. (Height is the height of each block. Direction is the processing direction) 15 WWW.THUNDERLASER.COM LaserGRAV Tools for Drawing and Editing Draw a line Click menu or click in the edit tool bar,now you can draw lines in the work Area. If you press “ctrl”, you can draw straight line. Draw polyline Click polyline in draw menu or in edit tool bar to draw polyline. Draw Bezier Click Bezier in draw menu or in edit tool bar to draw bezier. Draw Rectangle Click Rectangle in draw menu or in edit tool bar to draw Rectangle.Press “Ctrl”to draw square. Draw Ellipse Click ellipse in draw menu or in edit tool bar to draw ellipse. Press “Ctrl”to draw circle. Edit text Click text in draw menu or in edit tool bar, and then double left click the mouse,the following dialog will pop up Choose font and choose the size of the character and then input the text then click ok. 16 WWW.THUNDERLASER.COM LaserGRAV Edit Node Click edit node in draw menu or click , these buttons (add node) (delete node) (connect node) (separate node) in the edit object bar will be activated. Select Object Click object to select it. The " " is the node of the selected object.A selected rectangle is as below: Point in the selected object Click the line of the selected object to edit a point" " Select a point Click the node" " of the selected object as below Select a node PS:press "shift" to select more than one node. Add Node Select a point as below: Select a point Then click add node in edit menu or click in edit object bar to add a node as below: The selected point turn to a node Delete Node Select a node as below: Select a node 17 WWW.THUNDERLASER.COM Then click delete node or LaserGRAV in the edit object bar to delete a node as below: The node has been deleted Separate Node Select a node as below: Select a node Then click separate node or in the edit object bar to separate a node as below: The node has been separeted Unite Node Select two node as below: Then click unite node or in the edit object bar to unite two node as below: Two nodes have been united as one 18 WWW.THUNDERLASER.COM LaserGRAV Select Object When the object is selected, there is a "×" in the center of it and 8 control points in the corner and the color of it's frame will turn to the default color. Click select in draw menu or to switch to select mode. Below are five ways to select an object: Click select all in edit menu or "Ctrl+A" to select all objects. Click mouse to select a single object Click the object as below: Select multiple objects:press mouse and draw a rectangle to select multiple objects. Add selected objects/reduce selected objects: Add: select an object and then press shift and hold it down and then click other objects to select more. Reduce: press shift and hold it down and then click an object to release it Select an object by color of the layer: Click in edit object bar and a dialog will pop up as below: Select the color and then click ok, all objects of the same color will be selected. Color of an Object Select an object and then choose of the below color to change the color of an object. 19 WWW.THUNDERLASER.COM LaserGRAV Edit Object This will only change an object's position,direction,size and quality. Flip Flip an object horizontally or vertically Click in edit object bar to flip an object horizontally Click in edit object bar to flip an object vertically Rotate an Object There are two ways to use this function: use in edit object bar, input the number and then click to rotate the object. double click an object and the object will be as below: Move the mouse to the arrows and draw the object to the destination as below: Move the right place and release mouse. Change the Size of an Object You can drag an object directly to change the size or you can click in edit object bar and input the size of the object and then press Enter. When the lock is ticked, the size of the object will be changed in equal proportion. 20 WWW.THUNDERLASER.COM LaserGRAV Array Clone Select an object and then click in manage object bar, a dialog will show as below: QTY:number of objects you like to clone. Offset:distance between the original object and the clone object. Multiple:distance between each clone objects will be enlarge by times. Direction:relative position of the clone objects. Input the number you need and click ok. Move an Object to Original Position Select an object and click to move the object to original position. Align Objects Select multiple objects and click to align the objects as below: 21 WWW.THUNDERLASER.COM LaserGRAV Group Objects User can group multiple objects as one object as below: select the objects click in tool bar to group the objects now objects of the same group will move together. PS: you can ungroup objects and then group with other objects again by using or Zoom In and Zoom Out Click in tool bar and right click mouse to zoom out or left click mouse to zoom in. Click to view the whole object. Click to view all objects. Click to view the whole page. Rolling the scroll wheel of the mouse allows you to zoom in or zoom out. 22 . WWW.THUNDERLASER.COM LaserGRAV Advanced Tools Below are some useful tools to make your work more convenient. Manual order User can arrange the cutting order of an object by using this function. Click manual order in tool menu as below: Staring point Cutting direction Change the cutting order Drag the item in the order list to change the cutting orders. Click Rev_Order to reverse the order. Change the starting point of cutting The starting point is showed as “ ”.You can click the object to change the staring point. Change the cutting direction The cutting direction is showed as .User can click Rev_Dir to change the direction. 23 WWW.THUNDERLASER.COM LaserGRAV Image invert Select the image and then click in Align Bar to invert the image: Image Invert Halftone Screen Selet the image and then click in Align Bar and a dialog will pop up: Input the Dot Size you need(the smaller the higher resolution) and then click OK. Halftone Screen 24 WWW.THUNDERLASER.COM LaserGRAV Create Image Outline Import a Picture and then click Tool/Create Image Outline to get a vector outline of the image. 25 WWW.THUNDERLASER.COM LaserGRAV DST Contour If the vector file is not so perfect, you can use the DST Contour function to make it more smooth. Click Tool/DST Contour to create a more smooth file. 26 WWW.THUNDERLASER.COM LaserGRAV 27 WWW.THUNDERLASER.COM LaserGRAV Light Barrier Click on the tool bar to use the light barrier function. This function is usually to draw the designs engraved on acrylic to make light barrier. User can change the different settings to make the design freely. After doing the settings, click “apply to project” to confirm the settings and draw the design. 28 WWW.THUNDERLASER.COM User can use this function to make many different designs. 29 LaserGRAV WWW.THUNDERLASER.COM LaserGRAV Default Parameters When the software parameters are in a mess, user can use this function to set the software parameters back to default.Click default parameters in Options Menu to reset the parameters as below: Select machine zero point and set X/Y Range, then click ok. 30 WWW.THUNDERLASER.COM LaserGRAV Chapter 4 - Laser Process Settings Relative Position The laser head’s relative position to the figure. Click to set relative position for the laser head as below: Choose the relative position to fit your work.The default relative position is the same as machine zero point. Look at the following examples to set relative position(the crossing point is the laser): Top_Left Center_ Left Bottom_Left Top_Center Center Bottom_Center 31 Top_Right Center_ Rgiht Bottom_Right WWW.THUNDERLASER.COM LaserGRAV Array Mirror Image Click to set array parameters as below: X Size/ Y Size: size of the object. QTY: number of the object you need. Offset: interval of each object. X Range/ Y Range: size of the whole work. Auto Fill Calculate: machine will fill the work area with max objects. Target Material size: size of the material you’re going to cut. 32 WWW.THUNDERLASER.COM Look at the following example: LaserGRAV 33 WWW.THUNDERLASER.COM LaserGRAV BIOS Settings Basic parameters of the machine. Users are not allowed to change the setting.The parameters are save in the mainboard and won’t miss even reinstall the software. Click and a dialog will pop up, then click BIOS Settings to change the parameters. The final user is not allowed to have the password unless told by the factory. Input the password to change the setting: 34 WWW.THUNDERLASER.COM LaserGRAV There are two ways to change the parameters: Click Read Parameter and then change the parameters and click Save Parameter. Click Load Settings to read parameters and then click Save Parameter. You can click Save Settings to save the parameters as a file. 35 WWW.THUNDERLASER.COM Click Read Parameter to show the default parameter. LaserGRAV Pulse: send an pulse to control the machine. If this is not correctly set, the cutting size will be incorrect. If this happens, click to change the settings,after this setting, the software will find the correct pulse. Expected Size: input the correct size that you need Actual Size: input the actual cutting size 36 WWW.THUNDERLASER.COM LaserGRAV Datum: rotating direction of motor, if this setting is incorrect,the laser head will move to the opposite direction. Range: max range of work area Initial speed: start speed of the machine. Max Acc: Max accelerate speed of the machine. Max Speed: Max speed of the machine. IO Settings: addtional settings to control some special functions. Tick to activate each function. Open Flap Protection: laser machine will stop working if the front cover of the laser machine is opened. Blow Air:air compressor will work only when laser is working.(need extra part) Water Protection:laser machine will stop working if the water cooling system is not working. Laser Mode: three types of laser tubes are supported Glass Tube RF Laser Tube(No Preignition) RF Laser Tube(Preignition) PWM Frequency: the normal frequency is between 10000~20000. Max power: Set a limit for the max power of the laser tube,the default is 98% Z/U Axis Settings: Z Axis: used to control the motorized table U Axis: used to control the auto feeding conveyor 37 WWW.THUNDERLASER.COM LaserGRAV Extra Settings When the mechanical struture of the laser machine is not so perfect, you can set these parameters to fix some of the cutting/ engraving problems. Curve Disperse: the smaller the number,the higher the resolution, the slower the speed. When cut acrylics, user can set the number smaller. The default is 0.15. Circle speed: if the circle is too small, user need to set max speed for it to improve the quality. Engrave Reverse offset: The edges of figure may be unsmooth because of the extending of machine strap when the laser bilaterally scanning the picture. So we increase the reverse interval to for the amendment. There is certain reverse interval under certain speed; Generally speaking, the faster the speed is, the bigger the reverse interval is. 38 WWW.THUNDERLASER.COM LaserGRAV When speed is 200mm/s,the reverse offset should be 0.30mm;when the speed is slower than 200mm/s,the speed is proportional to reverse offset.Thus, when the speed is 100mm/s,the reverse offset should be 0.30*(100/200) =0.15mm When the speed is 300mm/s,reverse offset is 0.50mm;when the speed is between 200~300mm/s,the speed is proportional to reverse;thus when the speed is 250mm/s,the reverse offset should be 0.30+(300-250)/(300-200)×(0.5-0.3)=0.40mm; When the speed is faster than 300mm/s,the reverse offset is the same as 300mm/s(0.50mm). 39 WWW.THUNDERLASER.COM LaserGRAV Rotary Axis There're two types of rotary, tick to activate when you need to use one of them. When you do not use the rotary axis, please do not tick either of them, or the cutting/engraving will be in a mess. Pulse: this setting should be totally the same as the Y axis Pulse. Pulse per Round: this setting = subdivision of your motor driver*gear ratio of your rotary axis. for example, in our standard machine, this setting=6400*2=12800 Diameter: diameter of the round item that you want to engrave. 40 WWW.THUNDERLASER.COM LaserGRAV Save/Load System Settings Click Options/Save(Load) System Settings then you can save/load the all the System Settings. 41 WWW.THUNDERLASER.COM LaserGRAV Control Panel The laser machine is connected to Computer by using a USB cable, if the COM setting is incorrect, the computer will fail to control the laser machine. Click Find COM, if the machine is turned on and has been connected to computer through a USB cable, the correct COM will be showed and the USB icon will turn to Blue color. This means the laser machine has been connected to computer This means the connection is cut off 42 WWW.THUNDERLASER.COM LaserGRAV Layer Options You can set different speed, power for each single layer by set the layer to different colors. Layer Parameters Tick output bar to choose whether to process the layer. means process the layer means not to process the layer. Double click the layer and the following dialog will pop up: 43 WWW.THUNDERLASER.COM LaserGRAV Layer:the color shows the current layer you select. Left click the colors to choose the layer you want to edit. Work Mode: you can choose Cut, Engrave, Engrave&Cut or Draw Dot. If the current layer is BMP layer, you can choose Engrave Mode only(since BMP file is only for engraving) Cut Parameters Choose Cut or Engrave&Cut Mode and then set the parameters for the layer Speed(mm/s): max cutting speed of the laser while working Power(%): max power of the laser while working Corner power(%): since the laser head moves slower when making a turn, you need to set this into a smaller power than the normal power to keep the laser dot at the same size while processing. 44 WWW.THUNDERLASER.COM LaserGRAV Overlap: if this setting is added, laser will still keep moving a bit even the job is cutting is done. This will revise some of the mechanical problem.(but usually it is not suggested to use this setting,it’s better to imporve the mechanical structure/parts of the machine) Click to set the Advance Settings(Cut Mode): Power2(%):if your machine has two laser heads, you can set the power for the second head here. Corner Power2(%):if your machine has two laser heads, you can set the power for the second head here. Ignite Delay(ms): turn on the laser power before start working Shut Delay(ms): delay the turning off the laser power after the work is finished. Engrave Parameters: Speed(mm/s): max engraving speed of the laser while working Power(%): max power of the laser while working Scan Gap(mm): interval of each scanning strip, in other words, resolution of the layer. Engrave Mode: there are four Mode X_Two-way Beam: default setting. the laser beam is on when engraving from left side to right side or right side to left side. X_One-way Beam: the laser beam is on when engraving from left side to right side. But when engraving from right side to left side, there’s no beam. And this will cause doule time to finish the same job. Y_Two-way Beam: the laser beam is on when engraving from upper side to bottom side or bottom side to upper side. Y_One-way Beam: the laser beam is on only when engraving from upper side to bottom side 45 WWW.THUNDERLASER.COM LaserGRAV Ramp Engrave:choose yes to engrave ramp.(this function is usually used for stamp engraving) Min Power(%):min power of the laser beam. Usually, this should be set a lot smaller than the Power,and the difference between these two power settings will create the ramp.(like when the power is set to 50%, you can set the min power to 15%) Dot parameters: Select Draw Dot in the work mode and then click Dot Parameters: Speed: speed of the laser. Power: power of the laser while drawing holes. Power2: power of the second laser head Interval: interval of each holes Time: the longer the time, the larger the hole will be. Adjust the orders of the layers The default working order is from Top to Bottom. If you want to change the order of each layer, just select the layer and then click to change its order. Attention: this function will work only when you tick Order by Layer Color in route optimize. 46 WWW.THUNDERLASER.COM LaserGRAV Machine Control Some major settings to control the machine. Control Parameters These parameters are saved in the main board. The data won’t miss even if you reinstall the software. Click Settings, the dialog will pop up: 47 WWW.THUNDERLASER.COM LaserGRAV Click read parameters, the software will read the parameters saved in the main board as below: Select the parameters and change the settings and then click save parameters to save the data in mainboard. 48 WWW.THUNDERLASER.COM LaserGRAV Work Parameters Space Speed: the max speed of the machine when there’s no laser in the work process. Space Acc: the accelerated speed of the machine when there’s no laser in the work process. Initial Speed: the initial velocity of the machine. Min Acc: the min accelerated speed of the machine in work process Cut Acc: the max accelerated speed of the machine in work process Engrave Acc: the max accelerated speed of the machine while engraving. normally this should be larger than 8000 Parameter List: user can save the parameters here. click Parameter List the dialog will pop up: Load: load one parameter from the parameter list on the left. Save: add the current parameter to the parameter list. Set as Default: set the current parameter as default parameter(users are not allowed to use this function.this setting is done by the factories only) the default parameter is saved in the main board, the data will not miss even if the software is reinstalled. Delete: delete the parameter in the list(the default parameter can not be deleted) Below are two suggested parameters: High precision low speed cutting. suitable for cutting acrylics 49 WWW.THUNDERLASER.COM LaserGRAV High speed low precision for cutting fabric Control Panel Parameters Track Frame Speed: speed of tracking the frame. Cut Frame Speed: speed of cutting the frame. Origin: there’re two selection here. If set to Machine Zero, the laser head will move to the machine zero after the job is done. If set to Origin, the laser head will move back to the orgin point(start cutting point) where you set after the job is done. Other Parameters Cut Mode:there are two modes,Precise Cut is for jobs need higher precision but slow speed and Quick Cut is for jobs need fast speed but low precision. Reset Speed: moving speed of the laser head when you press the Reset button. Outage Delay: when the power is suddenly cut off, you can still continue the unfinished work. The default setting is 1000ms. Focus:The table will move down by using your setting when the auto focus sensor is activated. If you set 1mm here, the table will move down 1mm when auto focus function is used. 50 WWW.THUNDERLASER.COM LaserGRAV Load Job to Machine Click , the following dialog will pop up: Current File Options File Name: name of the files which will be loaded to the laser machine. Repeat Times:set the repeat times of the same work. If the setting is set to 2, the job will be repeated 2 times.this function is usually used for repeated cutting the same job. Interval: interval between each cutting, this setting is used to change the materials after each cutting is done. :set the Auto Feed Length. Feed length: the moving distance of U(auto feed Axis) axis between each process. This function is used only when the laser machine has a auto feeding conveyor. Weaker Power in Corners: when this is ticked, the laser will use less power when turning the Route Optimize: please refer to page 13. Load File: Send the file to the laser machine. Save File as *.UD: save the current file as UD format.User can use this fucntion to save the file in memory stick and then the machine can read files from the memory stick directly. This means the user can send the files to the machine even without a Computer nearby. 51 WWW.THUNDERLASER.COM LaserGRAV Save the file as UD format Files Saved in Machine Refresh: read all the files saved in the mainboard. And this will activate the rest buttons. two files are currently saved in mainboard Work: select a certain file in the list and click work to start laser the file. 52 WWW.THUNDERLASER.COM LaserGRAV Delete: select a certain file in the list and click delete to delete it from mainboard. All Delete: delete all files in the main board. Format: format all the files saved in the mainboard Read *.UD: load the UD format files from PC. 53 WWW.THUNDERLASER.COM LaserGRAV Control Buttons Start/Pause:start processing the job. When press again, job will be paused. Stop: the current work will be canceled. Track: machine will track the frame of the current work. This function is used to test if the material is put at the correct position. Cut: machine will cut the frame of the current work. Origin: Set the starting postion(home position) Focus: laser machines with auto focus function can use this function. When use auto focus, user need to set the correct focus distance first. X/Y Reset: Reset the X/Y axis of machine. Z Reset: reset the Z axis. X- / X+ / Y- / Y+ / Z-/ Z+ ::arrow directions to control laser head. 54 WWW.THUNDERLASER.COM LaserGRAV Chapter 5 - CorelDRAW Plug-in Add Plug-in to CorelDRAW After installing the Plug-in, please start CoreldDRAW to run it. 55 WWW.THUNDERLASER.COM LaserGRAV Click Tools/Macros/Run Macro... select GlobalMacros (PH_CorelEx.Gms) 56 WWW.THUNDERLASER.COM then select PHLaserCut.PH_Init LaserGRAV Now click Run to add the tool bar as below: Plug-in tool bar 57 WWW.THUNDERLASER.COM LaserGRAV Drag Plug-in Tool Bar to where you want as below: Plug-in Tool Bar 58 WWW.THUNDERLASER.COM Create jobs in CorelDRAW Then click LaserGRAV to switch to LaserGRAV as below: 59 WWW.THUNDERLASER.COM LaserGRAV Now you can use LaserGRAV to do the settings for your work. 60 WWW.THUNDERLASER.COM LaserGRAV Chapter 6 - AutoCAD Plug-in Add Plug-in to AutCAD After installing Autocad Plug-in,there should be a Toolbar below: Click Tools/Macro/Macros... 61 on the left. If not, user can add by themselves as WWW.THUNDERLASER.COM LaserGRAV Choose "…PHLaserCut.PH_Init_EN" and click Run and then the toolbar will pop up as below: Toolbar 62 WWW.THUNDERLASER.COM Now create your job in AutoCAD LaserGRAV 63 WWW.THUNDERLASER.COM Then click LaserGRAV to switch to LaserGRAV as below: Now you can use LaserGRAV to do the settings for your work. 64