1
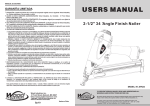
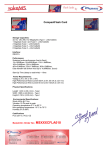
INSTRUCTION MANUAL
TO BE KEPT FOR FUTURE REFERENCE
PCM - MOINEAU
Series
Type
I – ID
0.03 – 0.4 – 1 – 1.6 - 2.6 – 4 - 6 – 13 – 20 – 25 – 30 –35 - 40
45 – 50 - 60 - 62 – 90 – 100 – 120 – 150 - 180 - 240
4, 5, 10, 15, 16, 45 et 52 bars
Serial no.
Year of manufacture
Reference:
NIPMI01A
Date approved: May 2001
Date issued: May 2001
PCM POMPES-17 RUE ERNEST LAVAL-BP 35-92173 VANVES CEDEX FRANCE
TEL: (33) 01 41 08 15 15 – FAX: (33) 01 41 08 15 00 – TELEX : 634129 F - Internet: http:/www.pcmpompes.com - E-mail: [email protected]
DECLARATION OF INCORPORATION
We declare that the subassembly covered by the technical description may not be put
into operation before the machine in which it is to be incorporated has been declared
compliant with the conditions of the Council Directive 89/392/CEE, modified machine
directive 91/368/CEE (93/44/CEE and 93/68/CEE), and with the domestic legislation
transcribing it.
The subassembly is compliant with harmonised EN 292 standards.
Vanves, 23 April 1996
For the company – NAME and TITLE
Innovations Manager
B. Lafont
: (33) 1 41 08 15 15
: (33) 01 41 08 15 00
: http:/www.pcmpompes.com
Thank you for choosing a pump from the PCM range.
6 PRODUCT LINES
PCM MOINEAU
The widest range of progressive-cavity industrial pumps.
PCM PRECI-POMPE
Diaphragm and plunger electro-magnetic dosing pumps.
PCM MOINEAU OILFIELD
Progressive-cavity pumps for oil extraction.
PCM DELASCO
The most complete range of peristaltic pumps.
PCM DOSYS
High-precision dosers and continuous mixers.
PCM EQUIPEMENT
Lobe pumps and pumpliners.
PCM markets its products worldwide via a distribution network comprising, in
particular, sales offices and agents. All are approved by PCM and qualified for
providing Service and Assistance.
: (33) 1 41 08 15 15
: (33) 01 41 08 15 00
: http:/www.pcmpompes.com
CONTENTS
0. INTRODUCTION
1
0.1
General information
1
0.2
Limits of guarantee
2
1. SPECIFICATIONS AND INSTALLATION
3
1.1
Operating principle
3
1.2
1.2.1
1.2.2
Specifications
Build specifications
Operating specifications
4
4
13
1.3
1.3.1
1.3.2
1.3.3
1.3.4
1.3.5
1.3.6
Equipment installation
Installation precautions
Connecting the piping
Fixing to the ground
Alignment
Lubricating the sealing system
Connecting the motor
15
15
15
15
15
16
16
2. OPERATION
18
2.1
2.1.1
2.1.2
First commissioning
Before start-up
Start-up
18
18
18
2.2
2.2.1
2.2.2
2.2.3
2.2.4
Normal operating procedure
Start-up procedure
General operating requirements
Cleaning
Shut-down procedure
18
18
19
19
19
2.3
Operating procedure in the event of an incident
19
2.4
Automatic control
19
: (33) 1 41 08 15 15
: (33) 01 41 08 15 00
: http:/www.pcmpompes.com
3. MAINTENANCE
20
3.1
List of spare parts
20
3.2
Handling equipment and procedure
20
3.3
Storage conditions
21
3.4
3.4.1
3.4.2
3.4.3
Preventive maintenance
Periodic inspection
Lubrication
Tightening torque
21
21
21
22
3.5
3.5.1
3.5.2
Corrective maintenance
Troubleshooting
Pump disassembly (see sectional drawings in appendix)
22
22
24
3.5.3
Pump reassembly (see sectional drawings in appendix)
29
3.6
3.6.1
Equipment storage when not in use
Storage of rubber components
36
36
3.7
Accessories
36
3.8
Seals
36
4. APPENDICES
•
•
•
•
•
•
•
Standard painting procedure
Sectional drawings
Description of Training option
Special seal notes
Technical Description
Accessories (optional)
Automatic control (optional)
: (33) 1 41 08 15 15
: (33) 01 41 08 15 00
: http:/www.pcmpompes.com
0. INTRODUCTION
0.1
General information
The pump that you have just purchased has been manufactured and checked with the utmost
care.
This manual is intended to help you maintain the pump in proper working order.
Rating plate
Pump type
Serial no.
Maximum pressure
Maximum flow
Customer reference
This plate, which is placed on the pump, provides the following information:
a)
b)
Serial no.
Pump code, which can be broken down according to the example below
_ Pump model code
01MR25I5
01MR; specifies mounting type according to drive motor type
25; specifies flow at 0 bar in cubic metres per hour (m³/h) at maximum
speed
I; specifies pump type (I: industrial version)
5; specifies the maximum admissible hydraulic pressure in bar
Note:
c)
d)
e)
The coding of supplied equipment is clearly explained in this form in the technical
description in Section 4 – Appendices
Maximum flow of pump at 0 bar.
Maximum pressure admissible by pump depending on drive motor.
Customer reference
This information is required for all spare parts orders (contact our Customer Services
Department).
The pump characteristics (flow, pressure, rotation speed, construction, pump rotation
direction, etc.) must not be modified without the written agreement of our Customer
Services Department.
Page 1
: (33) 1 41 08 15 15
: (33) 01 41 08 15 00
: http:/www.pcmpompes.com
0.2
Limits of guarantee
Before carrying out any work on the pump, check that all precautions have been taken:
upstream and downstream valves closed, piping cleaned and purged, power supply
disconnected and implementation of all regulatory procedures in force relating to staff
safety.
On reception of the pump, immediately inspect it for any obvious signs of damage. If it is visibly
damaged, clearly note on the shipper's papers that the merchandise has been received
damaged, briefly describing the type of damage observed. Send a letter by registered post with
acknowledgement of receipt to inform the shipper within 48 hours and a copy to our Customer
Services Department in the event that you accept the damaged equipment.
Storage and handling conditions are explained in Section 3, paragraphs 3.2 and 3.3.
To avoid any damage or accidents (in particular, when the pumped fluids are hazardous), it is
essential that this equipment not be used for applications other than those foreseen in our
technical description (see Section 4 – Appendices).
To maintain the original qualities of the pump, it is essential that parts from PCM POMPES be
used.
Page 2
: (33) 1 41 08 15 15
: (33) 01 41 08 15 00
: http:/www.pcmpompes.com
1. SPECIFICATIONS AND INSTALLATION
1.1
Operating principle
Pipe
(Discharge or Suction)
Stud bolt
Connection
Body
Flange
(Suction or Discharge)
Stator
Rotor
Driving shaft
Support
Connecting rod
Spacer
The PCM MOINEAU-type progressive-cavity (or eccentric-screw) pump is essentially made up
of two internal spiral gears, each of which has the following particular features:
- The stator (external element) has one tooth more than the rotor (internal element).
- For any given cross section, each rotor cross-section is in contact with the stator.
- The helix pitch for both elements depends on the number of teeth.
The rotational movement generates an axial displacement of the closed cells, delimited by the
rotor and the stator, from the suction port to the discharge.
The PCM MOINEAU pump is a positive displacement vacuum pump whose cylinder capacity is
equal to the cell volume.
The drive system, flanged directly to the pump, turns the driving shaft which itself turns the rotor
via a connecting rod.
The bearing option, which enables drive via semi-elastic coupling, is available for our entire
range.
Direction of rotation
An arrow on the upper part of the spacer indicates the direction of rotation. The direction of
rotation for discharge on the pipe side is counterclockwise for an observer positioned at the end
of the drive shaft. The suction port is marked on the pump, the other port being for discharge.
Page 3
: (33) 1 41 08 15 15
: (33) 01 41 08 15 00
: http:/www.pcmpompes.com
1.2
Specifications
1.2.1
Build specifications
These are given in the table below
Suction body and pipe
Stator and sheath
Rotor
Connecting rod
Seal
Driving shaft
Spacer
Pump type
FGL250 Cast Iron or Z3CND17.11.02 Stainless Steel
Hypalon, Neoprene, Nitrile or Viton
Z30C13 with or without chrome plating
Z3CND17.11.02 with or without chrome plating
Z30C13
Z3CND17.11.02
Stuffing box assembly lubricated or not
Single or double mechanical seal, lubricated or not
Z30C13 with or without chrome plating
Z3CND17.11.02 with or without chrome plating
FGL 250 Cast Iron
Use of Stainless Steel and Cast Iron equipment names is in accordance with the AFNOR standard.
The PCM MOINEAU progressive-cavity I-series pumps, in the MONOBLOCK and BEARING versions,
are fitted with ISO or ANSI standard flanged unions, and can be installed on a base provided as an
optional extra.
There are two build types: monoblock and bearing.
The name of the monoblock pumps, given on the rating plate, begins with two figures followed by one
or two letters: M – MR – MV or R (e.g.: 01MR45I5 corresponds to size 45I5 with a 01 type mounting
geared motor).
The name of the bearing pumps do not have the same elements as described before. Returning to the
previous example, this therefore gives us the following code: 45I5
The space occupied by the pumps will be defined below.
Note: Ft indicates that the equipment is made out of cast iron and In indicates stainless steel
Page 4
: (33) 1 41 08 15 15
: (33) 01 41 08 15 00
: http:/www.pcmpompes.com
1.2.1.1 00 bearing monoblock pump general dimensions
K
DN2
4 x d1
DN1
Øa1
Øc1
I
H
Øb1
J
Z
A
M
g1
e1
Ø f1
TYPE
F
G
L
DN1 DN2
A
0.03ID10
F
G max
72
98
00 bearing pumps
K
K
H
I
J
(CI) (ST)
297
0.4I10
0.4ID10 PN10 DN20
28
1I10
1ID10
6I5
PN16 DN40
47
60
65
90
116
2.6I10
2.6ID10
80
48
L
(CI)
90
80
6ID5
L
(ST)
414
M
(CI)
346
313
18
350
327
17
400
512
450
430
350
467
403
380
501
615
553
513
635
557
723
845
767
432
555
475
557
680
600
Mounting type
a1
b1
c1
d1
e1
f1
g1
02
200
165
130
12
8
25
49
6
20
39
8
25
49
6
19
39
8
24
49
8
25
49
03
04
160
130
110
13
05
06
200
165
130
12
07
08
160
130
110
13
The Z dimension is the minimum length required for pump disassembly
Page 5
: (33) 1 41 08 15 15
M Mass in
(ST)
Kg
: (33) 01 41 08 15 00
: http:/www.pcmpompes.com
18
Z
70
175
145
19
300
24
160
740
26
370
450
21
120
575
24
250
530
1.2.1.2 0 bearing monoblock pump general dimensions
K
DN2
4 x d1
DN1
Øa1
Øc1
I
H
Øb1
J
Z
B
A
E
M
g1
e1
Ø f1
F
G
L
0 bearing pumps
TYPE
DN1 DN2
A
B
6I10
(*)
45
288
6I20
(**)
43
520
229
13I5
13I10
PN16 DN50
45
H
I
J
K
K
L
L
M M Mass
(CI) (ST) (CI) (ST) (CI) (ST) in Kg
814
70
140
112
112
(***)
46
462
103
573
569
30
1379
597
597
33
450
753
897
573
28
210
962
1106
597
33
420
1327
1471
573
55
740
602
47
405
a1
b1
c1
d1
01
160
130
110
6
200
165
130
11
160
130
110
6
03
04
08
09
200
165
130
956
994
1160
985
Mounting type
02
848
e1
f1
g1
8
25
49
6
20
39
8
24
49
6
19
39
11
(*): Cast Iron pumps DN1=PN16 DN50 and DN2=PN10 DN50
Stainless Steel pumps DN1=PN16 DN40 and DN2=PN10 DN50
(**): Cast Iron pumps DN1=DN2=PN25 DN50
Stainless Steel pumps DN1=PN25 DN40 and DN2=PN25 DN50
(***): Cast Iron pumps DN1=PN16 DN80 and DN2=PN16 DN65
Page 6
: (33) 1 41 08 15 15
: (33) 01 41 08 15 00
Z
1066
100
803
13ID10
20I4
438
F
G
max
: http:/www.pcmpompes.com
569
210
1.2.1.3 II bearing monoblock pump general dimensions
K
DN2
4 x d1
DN1
Øa1
Øc1
I
H
Øb1
J
Z
B
E
M
A
M
g1
e1
Ø f1
F
G
L
TYPE
DN1 DN2
A
1.6I45
Rp3/4
30
13I20
(*)
20I16
(**)
25I5
PN16 DN100
25I10
50
B
In
E
60
74
40ID10
77
90
180
125
140
831
170
130
80
130
180
1260 1305
386
62I5
62ID5
170
120
746
125
L
1220
1315 1640
671
71
185
470
180
420
129
700
948 1289 1096 1069
108
305
1400 1740
188
390
219
750
153
390
c1
d1
e1
f1
g1
11
8
30
59
250
215
180
15
12
40
79
200
165
130
11
8
25
49
10
35
64
250
215
180
15
12
40
79
200
165
130
11
8
30
59
25
49
250
215
180
15
10
35
DN1=PN40 DN65 and DN2=PN16 DN100
DN1=PN16 DN100 and DN2=PN16 DN125
Cast Iron A=50 and Stainless Steel A=47
Cast Iron A=50 and Stainless Steel A=65
Page 7
: (33) 01 41 08 15 00
676
1175
130
: (33) 1 41 08 15 15
722
157
b1
12
127
1834 2175
165
11
980
87
a1
10
700
915
200
09
90
125
764 1085 910
01
08
470
1058 1379 1200 1209
Mounting type
04
59
676
1620 1943
03
Z
1584 1930 722
1760 2100
606
02
M M Mass
(CI) (ST) in Kg
1065 1370
130 1360 1701
130
185
K
980 1296 1145
130
PN16 DN125
45I5
(*):
(**):
(***):
(****):
J
(****)
785
40I10
170
I
795
50
30I4
II bearing pumps
H
H
F G max
CI ST
(***) 1033 1082
40ID5
90I5
B
Ft
: http:/www.pcmpompes.com
1047
1.2.1.4 III bearing monoblock pump general dimensions
K
DN2
4 x d1
DN1
Øa1
Øc1
I
H
Øb1
J
Z
A
E
M
B
g1
e1
Ø f1
F
G
L
TYPE
DN1 DN2
A
B
4I52
Rp2
115
733
20I20
(*)
180
862
35I20
(**)
PN16
DN150
177
1081
60I10
215
100I10
120I5
150I10
E
130
200
PN10
DN200
234
112
250
140
280
100
180
660
2332
462
230
1605
280
150ID10
3372
660
180I5
1085
280
Mounting type
01
a1
K
L
M
Mass in
Kg
120
164
1917
911
106
770
160
1775
2120
920
191
1050
2093
2480
1064
251
1160
1874
2255
1052
280
890
2382
2795
1318
370
1150
3630
4042
1318
525
2380
1710
2103
270
600
2902
3315
385
1650
4670
5082
630
3400
2333
2726
351
1200
180
160
830
1085
100ID10
III bearing pumps
G
F
H
I
J
max
200
180
190
b1
c1
d1
300
265
230
M12
03
350
300
250
M16
04
300
265
230
M12
05
350
300
250
M16
02
1249
e1
f1
g1
14
50
99
12
40
79
14
50
99
(*): DN1=PN40 DN100 and DN2=PN16 DN125
(**): DN1=PN40 DN125 and DN2=PN16 DN150
Page 8
: (33) 1 41 08 15 15
: (33) 01 41 08 15 00
: http:/www.pcmpompes.com
Z
1.2.1.5 00 bearing pump general dimensions
DN2
K
DN1
I
H
J
Z
M
A
E
P
e1
Ø f1
G
F
L
TYPE
DN1 DN2
A
0.03ID10
F
G
max
72
98
H
00 bearing pumps
K K L
L M M
I
J
P
(CI) (ST) (CI) (ST) (CI) (ST)
0.4I10
0.4ID10
PN10 DN20
28
1I10
1ID10
6I5
PN16 DN40
47
60
65
90
116
2.6I10
2.6ID10
80
48
90
80
6ID5
313
19
350
327
18
512
450
430
467
403
380
414
400
350
501
615
553
513
635
557
723
845
767
432
555
475
557
680
600
: (33) 01 41 08 15 00
Mass in
Kg
346
297
19
177
6
20
Z
70
175
145
20
300
25
160
740
27
370
450
22
120
575
25
250
530
Page 9
: (33) 1 41 08 15 15
e1 f1
: http:/www.pcmpompes.com
1.2.1.6 0 bearing pump general dimensions
DN2
K
DN1
I
H
J
Z
B
A
M
E
P
e1
Ø f1
F
G
L
TYPE
DN1 DN2
A
B
6I10
(*)
45
288
6I20
PN25 DN50
43
520
PN16 DN50
45
438
(**)
46
462
229
13I5
13I10
G
max
H
814
848 956
1066
70
140
112
112
100
803
13ID10
20I4
F
0 bearing pumps
K L
L M M
I
J K (CI)
P e1
(ST) (CI) (ST) (CI) (ST)
597
753
897
573
962
1106
597
1471
1327
103
994 573
1379
985
1160
Mass
in Kg
Z
569
31
210
597
38
450
30
210
35
420
573
56
740
602
49
405
569
(*): Cast Iron pumps DN1=PN16 DN50 and DN2=PN10 DN50
Stainless Steel pumps DN1=PN16 DN40 and DN2=PN10 DN50
(**): Cast Iron pumps DN1=DN2=PN25 DN50
Stainless Steel pumps DN1=PN25 DN40 and DN2=PN25 DN50
(***): Cast Iron pumps DN1=PN16 DN80 and DN2=PN16 DN65
Page 10
: (33) 1 41 08 15 15
: (33) 01 41 08 15 00
f1
: http:/www.pcmpompes.com
220
8
28
1.2.1.7 II bearing pump general dimensions
DN2
K
DN1
I
H
J
Z
B
M
A
E
P
M
e1
Ø f1
G
F
L
TYPE
DN1
DN2
A
1.6I45
Rp3/4
30
13I20
(*)
20I16
(**)
25I5
25I10
30I4
50
170
77
90
795
180
140
831
170
125
130
224
180
1260 1305
386
170
746
120
185
K
L
M M
Mass
P e1 f1
(CI) (ST)
in Kg
1065 1370
1220
1315 1640
671
130 125
606
95
700
140
980
764 1085 910
915
77
185
95
470
92
420
129 10
722
676
38
135
135
700
1834 2175
165
1175
948 1289 1096 1069
115
305
1400 1740
195
390
245
750
230
390
1760 2100
1047
DN1=PN40 DN65 and DN2=PN16 DN100
DN1=PN16 DN100 and DN2=PN16 DN125
Cast Iron A=50 and Stainless Steel A=47
Cast Iron A=50 and Stainless Steel A=65
Page 11
: (33) 01 41 08 15 00
470
1058 1379 1200 1209
1620 1943
: (33) 1 41 08 15 15
65
676
130 1360 1701
130
Z
1584 1930 722
980 1296 1145
130
PN16
DN125
62I5
(*):
(**):
(***):
(****):
F
II bearing pumps
G
H H
I
J
max CI ST
60
785
74
40ID10
90I5
E
PN16 (****)
DN100
50
40I10
62ID5
B
In
(***) 1033 1082
40ID5
45I5
B
Ft
: http:/www.pcmpompes.com
1.2.1.8 III bearing pump general dimensions
DN2
K
DN1
I
H
J
Z
M
B
A
E
P
e1
G
F
Ø f1
TYPE
DN1 DN2
A
B
4I52
Rp2
115
733
(*)
180
862
20I20
20I40
35I20
35ID20
35I40
50I15
50ID15
60I10
(**)
213
PN16 DN150 215
PN10 DN200 234
140
200
180
295
160
1085
280
2332
462
660
280
230
3372
180I5
1085
280
1268
320
2416
660
240ID5
(*):
(**):
(***):
(****):
PN10 DN250 102
911
3319
2724
150ID10
240I5
164
2093
250
160
1605
M
2790
1268
830
120
K
160 1775
2304
100I10
120I5
112
1081
100ID10
150I10
F
130
177 2307
(***)
(****)
E
III bearing pumps
G
H
I
J
max CI
180
180
190
660
1064
200
140
770
225
1050
312
1850
285
1160
365
2390
380
2320
1400
1336
525
2800
315
890
2382 1318
405
1150
3630 1318
580
2380
1710
305
600
2902
440
1650
685
3400
4670
16
1249
2435
3582
55
385
1360
Page 12
: (33) 01 41 08 15 00
Z
387
DN1=PN40 DN100 and DN2=PN16 DN125
DN1=PN40 DN125 and DN2=PN16 DN150
DN1=PN40 DN125 and DN2=PN10 DN200
DN1=PN16 DN150 and DN2=PN10 DN200
: (33) 1 41 08 15 15
Mass in
Kg
3568 1342
2333
250
f1
920
1874 1052 168
200
e1
2562
4000
180
P
: http:/www.pcmpompes.com
440
695
1200
2350
1.2.2
Operating specifications
Pump specifications (flow, pressure, rotation speed, construction, etc.) must not
be modified without the written agreement of our Customer Services
Department.
Operating specifications are given in the Technical Description for the supplied equipment. The
equivalent continuous A-weighted sound pressure level for PCM pumps is less than 70 dB(A).
I-series MOINEAU pumps are used in the following industries: Starch, Building and public
works, Ceramics, Chemistry, Purification and environment, Oil mills, Mining, Paper,
Petrochemicals, Oil, Soap and Sugar, etc.
With their strong design, I-series MOINEAU pumps are used for clear, viscous, abrasive,
heterogeneous, slurry, fragile and emulsifying liquids.
IMPORTANT
The operating temperature range is defined according to the stator material and the specifications
indicated in the Technical Description provided in the Appendix. Do not use the pump in conditions
other than those stipulated in this document, without obtaining prior authorisation from our
Customer Services Department.
Pump performance curves
The rotation speeds and the pressures indicated on the curves correspond to typical
performance levels for water at 20°C. In the event of operating conditions that differ from this
standard, it is necessary to limit performance according to:
• Fluid properties (viscosity, fragility, abrasiveness).
• Characteristics of the application (operating conditions, discharge pressure, available
NPSH)
The curves that appear below were achieved in the following conditions:
- Water base at 20°C
- Maximum discharge pressure = 4 bar or 6 bar per increment
Page 13
: (33) 1 41 08 15 15
: (33) 01 41 08 15 00
: http:/www.pcmpompes.com
L/h
300000
200000
150000
100000
80000
60000
50000
40000
30000
20000
15000
10000
240I5 ; 240ID5
8000
6000
5000
4000
3000
180I5
150I10 ; 150ID10
100I10 ; 100ID10
120I5
90I5
50I15 ; 50ID15
60I10 ; 62I5 ; 62ID5
2000
1500
1000
800
45I5
30I4 ; 35I20-40 ; 35ID20
; 40I10 ; 40ID5-10
600
500
400
20I4-16-20-40 ; 25I5-10
300
200
160
100
80
60
50
40
13I5-10-20 ; 13ID10
4I52
6I5-10-20 ; 6ID5-10
30
2.6I10 ; 2.6ID10
1.6I45
15
1I10 ; 1ID10
10
8
20
6
5
4
3
0.4I10 ; 0.4ID10
2
0.03ID10
10
20
30
40
50 60 70 80 90 100
200
300
400 500
700
900 1000
1500 1800
tr/mn
For further information, refer to the curve for your pump or ask our Customer Services
Department for a copy.
Page 14
: (33) 1 41 08 15 15
: (33) 01 41 08 15 00
: http:/www.pcmpompes.com
1.3
Equipment installation
1.3.1
Installation precautions
It is important to leave enough space around the pump to allow for maintenance and
adjustments. Avoid mounting the pump in places where the ambient temperature is not within
the pump operating temperature limits (see Technical Description in the Appendix). If installed
outside, protection above the equipment and anti-frost protection are both recommended.
We also recommend the installation of a removable connection component to allow easy
maintenance of the motor-pump unit. (see dimension Z on the floor space requirement
diagrams in paragraph 1.2.1). A discharge pressure relief valve will protect the pump and
installation. PCM has a wide selection of accessories; contact our Customer Services
Department for all your needs.
Some recommendations for optimum pump operation
a) The pump should preferably be placed under load with suction below the fluid to be pumped.
b) If there is a valve on the downstream circuit, it is IMPERATIVE that a pressure relief valve
and/or break contact be installed for authorising pump operation.
Note: A discharge valve, in the absence of circuit interlock, is often the cause of improper
operations resulting in the deterioration of the pump or piping.
1.3.2
Connecting the piping
An easily removable element will be installed on the end of the stator. This will enable both the
stator and the rotor to be disassembled easily (see dimension Z on the floor space requirement
diagrams in paragraph 1.2.1), without having to dismantle the whole pump from its support. The
pump does not have to support the weight of the piping.
1.3.3
Fixing to the ground
The pump and its driving device must be aligned with the base, which can be provided by PCM
Pompes. It must be fixed in place by screws and pegs or foundation bolts in an sufficiently
large concrete block.
1.3.4
Alignment
Pumps that we at PCM mount onto a base with the drive are aligned in the workshop.
Alignment must nevertheless be checked once the pump has been installed definitively
(foundation, etc.). However, in some cases, the following steps should be taken:
_ Remove the protective casing and the coupling sleeve fixing screws.
_ Separate these items.
_ Using a ruler, check that the alignment specifications are compliant with the diagrams
below:
Maximum radial misalignment
Page 15
: (33) 1 41 08 15 15
: (33) 01 41 08 15 00
: http:/www.pcmpompes.com
Maximum axial misalignment
Maximum angular misalignment
_ In the event of an unacceptable alignment, change the motor-pump unit ground setting
and possibly the motorisation and/or pump setting.
_ Put back the protective casing and fix it in place.
1.3.5
Lubricating the sealing system
If the sealing system is fitted with a lubrication system, connect the barrage fluid inlet and outlet
ports. Refer to the specific instructions about sealing provided in the appendix.
1.3.6
Connecting the motor
Warning! Prior to any connection, ensure that the electrical supply corresponds to the
specifications that appear on the motor plate. However, the connection diagram is located
in the motor terminal box.
Three-phase motor
Connection of 220V to 240V in "triangle" position
V2
W1
L3
V2
W1
L2
U2
V1
L2
U2
V1
L3
W2
U1
L1
W2
U1
L1
Connection of 380V to 460V in "star" position
V2
W1
L3
V2
W1
L2
U2
V1
L2
U2
V1
L3
W2
U1
L1
W2
U1
L1
Page 16
: (33) 1 41 08 15 15
: (33) 01 41 08 15 00
: http:/www.pcmpompes.com
Warning! All our pumps are delivered with a "star" connection. Do not forget to connect the pump
earthing.
In terms of thermal protection, the operating value is the current specified on the motor plate.
Once all connections have been made (three-phase), start the pump (at minimum speed if
possible using the frequency mechanical or hydraulic variable speed drive) and check the
rotation direction of the motor according to the arrow on it.
Page 17
: (33) 1 41 08 15 15
: (33) 01 41 08 15 00
: http:/www.pcmpompes.com
2. OPERATION
2.1
First commissioning
2.1.1
Before start-up
Ensure that the:
_ Electric connections are compliant
_ Reducing gear lubricant has been refilled or is at correct level
_ Vent plug on reducing gear is present and protection has been removed
_ Rotation direction of shaft complies with desired circulation direction of product
_ Product to be pumped is present in tank and in pump body
_ Seal is lubricated if pump is fitted with a sprayed seal
_ Valves installed upstream and downstream of pump are open
_ Maximum setting of variable speed drive thrust bearings is correct
2.1.2
Start-up
NEVER OPERATE THE PUMP DRY!
If the pump is not under a load, the pump body should be filled manually. If the pump is
temporarily drained, the small amount of fluid remaining in the pump will be sufficient for stator
lubrication until the next priming. During the first few minutes of operation, check the following
points:
_ Pumped fluid exits from the delivery piping
_ Pump does not vibrate
_ No abnormal noises
_ No leaks from sealing system (see specific documentation in appendix)
_ If a pressure gauge is installed, check the pressure stabilisation
_ No abnormal heating at the:
· stator
· sealing system
Check that the following operating parameters:
_ Speed
_ Flow
_ Pressure
_ Fluid viscosity
_ Temperature
correspond to the parameters for which the pump was designed.
For any values other than those indicated, the PCM
Customer Services Department must be contacted.
2.2
Normal operating procedure
2.2.1
Start-up procedure
Before each start-up, check the following points:
_ Presence of fluid to be pumped
_ Valves on the suction and delivery pipes open
_ Temperature of fluid to be pumped is correct.
Page 18
: (33) 1 41 08 15 15
: (33) 01 41 08 15 00
: http:/www.pcmpompes.com
2.2.2
General operating requirements
Ensure that the following conditions are met:
_ Pump is constantly supplied with fluid to be pumped and power.
_ Discharge pressure remains stable and lower than maximum pump capacity.
_ Pumped fluid temperature remains within the operating limits described in the technical
description in Section 4 - Appendices.
_ Compliance with the process operating requirements in force on the production site.
2.2.3
Cleaning
External cleaning
Remove any dirt which may damage paint or corrode the pump.
Internal cleaning
The cleaning procedures and frequency depend on specific pump use and the fluid pumped.
However, the minimum procedure is described below.
When the pump is in operation, use the suction to supply it with a cleaning product that is
compatible with the pumped fluid and the materials from which the pump is made. The pump
process determines cleaning time. When this time is up, stop the pump in accordance with
Section 2.2.4.
2.2.4
Shut-down procedure
The shut-down procedure depends on the type of fluid pumped. Refer to specific
characteristics given in the technical description given in Section 4 - Appendices.
The shut-down procedure is therefore defined by the process.
However, stopping the pump and then closing the suction and discharge valves constitutes the
minimum procedure.
Warning! In the case of a fluid that decants, the pump must be cleaned to allow a startup without damage.
2.3
Operating procedure in the event of an incident
In the event of operating anomalies, such as:
_ Pump does not start.
_ Pump does not prime.
_ Flow too low or irregular.
_ Pump stops.
_ Pump produces no flow.
_ Pump abnormally noisy.
Proceed as follows:
_ Stop the pump in accordance with the shut-down procedure in Section 2.2.4.
_ Hydraulically isolate the pump (suction, discharge).
_ Refer to Section 3.5.1 - Troubleshooting.
2.4
Automatic control
The use of devices which automatically authorise or prohibit pump operation is recommended.
For example, valves with electrical contacts for position, dry running protection probe
(capacitance probe).
Page 19
: (33) 1 41 08 15 15
: (33) 01 41 08 15 00
: http:/www.pcmpompes.com
3. MAINTENANCE
3.1
List of spare parts
The list of spare parts for your pump can be obtained by contacting your Customer Services
Department and providing the serial number of your equipment, which can be found on the
manufacturer's plate, (see paragraph 0.1).
Rotor
Stator
Sheath
Body gasket
Sealing
Quantity
1
1
1
2
1
3.2
Name
Stator
Rotor
Sealing (see specific note in appendix)
Sheath
Body gasket assembly
Handling equipment and procedure
Pump parts that cannot be handled manually can be lifted using a hoist and sling (or other
similar lifting equipment).
Metallic slings (chain, cable, etc.) are not recommended.
Fragile parts, such as the rotor, drive shaft, etc., must be handled with particular care to avoid
any impact.
Page 20
: (33) 1 41 08 15 15
: (33) 01 41 08 15 00
: http:/www.pcmpompes.com
Following disassembly, they should be placed on wooden blocks, in a stable manner and
protected against impact.
For handling the whole pump, refer to the applicable
procedure and comply with legislation relating to the safety
of nearby personnel.
3.3
Storage conditions
A) In standard PCM packing
Pumps and pump parts must be stored in their original packing, in a stable manner, protected
from impacts and in a dry room.
B) After unpacking
. Protect equipment against impacts and dust
C) When packed according to S.E.I. 4c
Every six months,
. Change the desiccator bags
. Check machined surfaces and grease as necessary
. Close the cover hermetically
NOTE: Every month, turn the pump four to five turns using the ventilator or bearing shaft.
3.4
Preventive maintenance
All maintenance operations must be performed by personnel trained and qualified in
accordance with the instructions of this manual.
Any breach of this rule releases PCM of all responsibility.
Before carrying out any work on the pump, check that all precautions have been taken:
upstream and downstream valves closed, piping cleaned and purged, power supply
disconnected and blocked. All usual methods must be implemented in accordance with
regulations in force relating to personnel safety.
3.4.1
Periodic inspection
If the pump is operated intermittently or for less than five hours per day, monthly testing is
sufficient.
If the pump is operated for more than five hours per day, check the following points on a weekly
basis:
_ Sealing at suction and discharge pump connections
_ Sealing between body and drive
_ Tightness of assembly fixing screws {pipe, stator, body, spacer, drive}
_ Drive lubricant level, if applicable
_ Anchoring to floor, if applicable
_ Motor output and cleanliness of drive ventilation grilles
_ Condition of power cable sheaths
3.4.2
Lubrication
The pump drive is supplied with oil (except for a single motor). Check lubricant level in drive
before operating.
The precautions to be taken for drive lubrication, if any, must be applied according to the
manufacturer's documentation given in the Appendix.
However, the table below indicates the recommended lubricants to be used when working on
the pump:
Lubricated element
Recommended lubricants
Page 21
: (33) 1 41 08 15 15
: (33) 01 41 08 15 00
: http:/www.pcmpompes.com
Supplier
ANTISEEZE 76772
TOTAL FM
AVIATION N°10
UPTON 400
GLYCERINE
Sheathed connections
Roller bearings
Stator (for mounting)
3.4.3
LOCTITE
TOTAL
ELF
LABO
Tightening torque
The general tightening torque value for the fixing screws is defined in the table below:
Screw diameter
Max. torque
M8
7.4 N.m
M 10
15 N.m
M 14
40 N.m
M 16
61 N.m
3.5
Corrective maintenance
3.5.1
Troubleshooting
FINDING
POSSIBLE CAUSES & SOLUTIONS
- Pump does not start
1, 2, 7, 8, 13, 14, 16, 17, 18, 22, 23, 30
- Pump does not prime
3, 4, 5, 9, 10, 11, 14, 15, 16, 17, 20, 21, 24, 26, 27, 29
- Flow is too low
3, 4, 5, 9, 10, 15, 16, 19, 20, 21, 22, 23, 24, 26, 29
- Discharge pressure too low
3, 4, 5, 9, 10, 15, 20, 21, 22, 23, 24, 26
- Pump stops
2, 7, 8, 13, 14, 16, 17, 18, 19, 22, 23, 29, 30
- Pump no longer produces any 3, 4, 5, 7, 9, 10, 13, 15, 16, 17, 18, 20, 21, 23, 24, 26, 27, 29
flow
- Drive overload
1, 2, 3, 8, 12, 13, 14, 16, 17, 18, 19, 22, 25, 26, 29
- Pump is noisy or vibrates
abnormally
3, 4, 5, 6, 12, 13, 14, 17, 20, 23, 25, 26, 27, 28
- Drive sealing leaks
9, 10, 11, 28
- Stator prematurely worn
2, 3, 5, 14, 16, 17, 18, 19, 20, 21, 25, 26, 27, 30
- Rotor prematurely worn
3, 14, 16, 17, 18, 19, 20, 25, 30
- Flow not constant
9, 10, 20, 21, 22, 23, 26
- Connections deteriorate quickly
2, 3, 14, 16, 17, 18, 19, 20, 25, 26, 30
Page 22
: (33) 1 41 08 15 15
: (33) 01 41 08 15 00
: http:/www.pcmpompes.com
N°
POSSIBLE CAUSES
SOLUTIONS
1
2
- For a new pump or new stator, static
tightening torque is too high.
- Stator has expanded.
3
- Stator has become hard and brittle.
4
- Stator is worn.
5
- Rotor is worn.
6
- Connections are worn
7
- Rotor drive system is broken.
8
- Stuffing box assembly has seized or
stuck.
9
- Leak from mechanical seal.
10
11
- Shaft damaged
- Incorrect rotation direction.
12
13
- Misalignment between pump and motor.
- Coupling worn or broken.
14
- Temperature of pumped fluid too high.
15
18
- Temperature of pumped fluid is lower
than expected.
- Percentage of dry content too high.
- Fluid sedimentation or precipitation in
pump.
- Solids contained in fluid too thick.
- Fill the pump and turn the motor fan about
ten times by hand.
- The stator material expands when in contact
with the pumped fluid. Check that the fluid is
the one provided on the order. Otherwise,
contact our Customer Services Department
to determine a new elastomer grade.
- Check that the temperature of the pumped
fluid is below the maximum admissible
temperature for the stator.
- Replace the stator and check the condition of
the rotor.
- Determine the cause of this wear: abrasion,
corrosion, cavitation. Contact our Customer
Services Department to determine a new
grade. Install a new rotor.
- Check the condition of the sheaths and, as
for the stators, contact our Customer
Services Department to determine a new
elastomer grade. Repair the connection.
- Determine the cause of this incident by
checking points 1, 2, 14, 20 and 30.
Replace the damaged parts.
- First of all, unscrew the nuts in the gland and
turn the pump allowing the pumped fluid to
escape. Re-tighten gently in order to curb
the leak. If this is not enough, disassemble
and then reassemble using new parts.
- Replace mechanical seal (see specific note
in Section 4 - Appendices).
- Change shaft and recondition seal
- Change the motorisation rotation direction by
inverting the two motor phases.
- Re-align group.
- Replace the coupling and redo the alignment.
Diagnose the reasons for the breakage.
- Check acceptable temperature range for
stator and replace if necessary.
- Replace stator with tighter stator.
19
- Discharge pressure too high.
20
- Net positive suction head too low
(NPSHd < NPSHr).
21
- Air suction at the pump intake.
16
17
- Decrease fluid dryness ratio.
- Clean and rinse pump after each use.
- Remove these solids by sieving or use
another pump with larger cells.
- Measure the pressure using a pressure
gauge and compare the reading with that in
the technical description.
- Reduce head losses in the suction piping,
lower the temperature, increase the intake
level and reduce pump speed.
- Check for leaks in the piping, re-tighten the
stuffing box assembly if the pump is sucking
in air on this side (apply lubrication if there is
none).
Page 23
: (33) 1 41 08 15 15
: (33) 01 41 08 15 00
: http:/www.pcmpompes.com
22
- Electrical installation is non-compliant.
23
- Equipment that drives the pump is worn
or broken.
- Rotation speed too low.
- Rotation speed too high.
- Installation, piping and accessories must
be checked.
24
25
26
27
- Pump operates dry.
28
- Roller bearings worn.
29
- Viscosity of pumped fluid is higher than
expected.
- Pump blocked by foreign body.
30
3.5.2
- Check the mains voltage, motor coupling and
fuse rating.
- Change the defective parts and check motor
load.
- Replace the motor or change reduction ratio.
- Replace the motor or change reduction ratio.
- Check that piping is not blocked by foreign
bodies or a faulty valve, and that there are
no permanent accidental leaks: poorly
sealed valve, leaking safety valve, etc.
- Review pump installation conditions or install
a safety system that prohibits dry operation.
- Disassemble the bearing, change roller
bearings and gaskets.
- Ensure that viscosity is not higher than that
expected.
- Disassemble pump, clean it, change any
damaged components.
Pump disassembly (see sectional drawings in appendix)
To maintain the pump in its original condition, it is essential that
PCM spare parts be used.
Pump maintenance must be performed by qualified personnel only,
in accordance with the regulations in force.
The reference number of the drawing corresponding to your model is given in the table below:
Sectional drawing
reference
Pump model
0.03ID10 – 0.4I10 – 0.4ID10 – 1I10 – 1ID10 – 2.6I10 –
2.6ID10 – 6I5 – 6ID5 – 6I10 – 6I20 – 13I5 – 13I10 – 13ID10 –
20I4
1.6I45 – 13I20 – 20I16 – 25I5 – 25I10 – 30I4 – 40ID5 – 40I10
– 40ID10 – 45I5 – 62I5 – 62ID5 – 90I5
4I52 – 20I20 – 35I20 – 35ID20 – 35I40 – 50I15 – 50ID15 60I10 – 100I10 – 100ID10 – 120I5 – 150I10 – 150ID10 – 180I5
– 240I5 – 240ID5
Page 24
: (33) 1 41 08 15 15
: (33) 01 41 08 15 00
: http:/www.pcmpompes.com
TPC0056
TPC0057
TPC0058
ORDER OF PUMP DISASSMBLY
Disassemble pump from site
SECTIONS TO BE
REFERRED TO
→
§ 3.5.2.1
→
§ 3.5.2.2
→
§ 3.5.2.3
→
§ 3.5.2.4
→
§ 3.5.2.5
→
§ 3.5.2.6
→
§ 3.5.2.7
→
§ 3.5.2.8
→
§ 3.8
→
§ 3.5.2.9
→
See documentation in Section
4 - Appendices
↓
Disassemble stator
↓
Disassemble body
↓
Disassemble rotor
↓
Disassemble connecting rod
↓
Disassemble sheaths
↓
Disassemble driver on motor side
↓
Disassemble connection gaskets
(depending on model)
↓
Disassemble seal
↓
Disassemble spacer and bearing
↓
Disassemble drive
Before disassembly
- Ensure that the pump has stopped and that it has been disconnected both electrically and
hydraulically to prevent the pump from accidentally starting.
- Remove all pressure at discharge and suction ports, isolate the pump from the rest of the
installation and purge the pump body and piping.
- Empty the pump body.
- Prepare the tools required for the corresponding disassembly phase, referring to the tables
given in the appendix of this document.
3.5.2.1
On-site pump disassembly
•
•
•
•
•
Isolate the pump from the electrical circuit and secure it.
Close the suction and discharge valves.
Obtain information about the pumped fluid so as to implement any precautions required for
personal safety.
Empty the pump.
Remove the pump from the installation and mark the motor connection (for rotation
direction when reassembling).
Page 25
: (33) 1 41 08 15 15
: (33) 01 41 08 15 00
: http:/www.pcmpompes.com
3.5.2.2 Removal of stator (Ref. 1)
• Take out the removable element from the discharge pipe.
• Immobilise the pump body to prevent it from falling.
• Remove the nuts, washers, stud bolts (Ref. 80) or fixing screws, and the pipe (Ref. 54) and
possibly the supports (Ref. 48 and 384) depending on the case.
• Remove the stator (Ref. 1) from the rotor (Ref. 20) by rotating the pump drive shaft if
necessary. Depending on the model, remove the adaptor rings between the body and stator
and then mark them.
• Check the condition of the rotor and stator
3.5.2.3
Removal of body (Ref. 50)
• Remove the fixing screws from the body (Ref. 50) on the spacer (Ref. 88).
• Slide the body along the shafting (rotor Ref. 20 and connecting rod Ref. 22).
• Isolate the body thereby protecting it from impact.
Note:
3.5.2.4
Mark the adaptor washer between the body and seal (depending on model) so as to
facilitate reassembly.
Removal of rotor (Ref. 20)
According to the model and size of the bearing, the connections are protected by sheaths (Ref.
3) or pins (Ref. 11). The unit is therefore identified by the contents of the list of parts provided in
Section 4 - Appendices.
Pump with sheath (Ref. 3)
Pump with pins (Ref. 11)
- Turn the sheath (Ref. 3) on the rotor side
back on itself.
- Unscrew the fixing screws (Ref. 100)
and disengage the set collar (Ref. 31)
(or depending on the model 23).
- Remove the screw (Ref. 100) and the
driver gasket (Ref. 23).
- Drive out the pin (Ref. 21) to disengage
the rotor (Ref. 20) from the connecting
rod (Ref. 22).
3.5.2.5
- Drive out the pin (Ref. 21) to disengage
the rotor (Ref. 20) from the connecting
rod (Ref. 22).
Removal of connecting rod (Ref. 22)
According to the model and size of the bearing, the connections are protected by sheaths (Ref.
3) or pins (Ref. 11). The unit is therefore identified by the contents of the list of parts provided in
Section 4 - Appendices.
Pump with sheath (Ref. 3)
Pump with pins (Ref. 11)
- Turn the sleeve (Ref. 3) on the drive side
back on itself.
- Unscrew the fixing screws (Ref. 100)
and disengage the set collar (Ref. 31).
- Remove the screw (Ref. 100) and the
driver gasket (Ref. 23).
- Drive out the pin (Ref. 21) to disengage
the connecting rod (Ref. 22) from the
driver (Ref. 26).
- Drive out the pin (Ref. 21) to disengage
the connecting rod (Ref. 22) from the
driver (Ref. 26).
Page 26
: (33) 1 41 08 15 15
: (33) 01 41 08 15 00
: http:/www.pcmpompes.com
3.5.2.6
Removal of sheaths (Ref. 3) or pins (Ref. 11)
According to the model and size of the bearing, the connections are protected by sheaths (Ref.
3) or pins (Ref. 11). The unit is therefore identified by the contents of the list of parts provided in
Section 4 - Appendices.
3.5.2.7
Pump with sheath (Ref. 3)
Pump with pins (Ref. 11)
- Cut the sheaths (Ref. 3) to disengage
them from the ends of the connecting
rod (Ref. 22).
- Take out the pins (Ref. 11) from the
ends of the connecting rod (Ref. 22).
- Disengage the set collar (Ref. 23) (or 31
depending on model).
Removal of driver (Ref. 26) (or 36) on motor side
According to the model and size of the bearing, the driver is fixed onto the drive shaft either by
axial pins, keys or tangential pins. The unit is therefore identified by the contents of the list of
parts provided in Section 4 - Appendices.
3.5.2.8
Pump with axial pins
(Ref. 108)
Pump with key (Ref.
142) (or 141)
With tangential pins
(Ref. 108)
- Unscrew the fixing screw
(Ref. 139).
- Disengage the driver
(Ref. 26) of the drive
shaft (Ref. 33).
- Unscrew the fixing screw
(Ref. 139).
- Disengage the driver
(Ref. 26) of the drive
shaft (Ref. 33).
- Remove the circlips (Ref.
97).
- Slide the 1st gasket (Ref.
69) towards the drive
shaft (Ref. 33).
- Drive out the 1st pin (Ref.
108).
- Slide the 2nd gasket (Ref.
69) towards the drive
shaft (Ref. 33).
- Drive out the 2nd pin (Ref.
108).
- Disengage the driver
(Ref. 26), gaskets (Ref.
69) and circlips (Ref. 97)
of the drive shaft (Ref.
33).
Removal of connection gaskets (Ref. 204 and 206)
• Drive out the gaskets (Ref. 206) of the driver (Ref. 26) and/or of the rotor (Ref. 20) with the
clamp.
• Drive out the gaskets (Ref. 204) of the connecting rod (Ref. 22) with the clamp following the
diagram below.
Page 27
: (33) 1 41 08 15 15
: (33) 01 41 08 15 00
: http:/www.pcmpompes.com
3.5.2.9
Removal of spacer or bearing
3.5.2.9.1
Removal of spacer (Ref. 88)
• Unscrew the drive fixing screws on the spacer (Ref. 88).
• Disengage and isolate the pump drive.
• Separate the spacer (Ref. 88) from the pump base.
3.5.2.9.2
Removal of bearing
3.5.2.9.2.1 Removal of protective casing
• Unscrew the fixing screws of the pump base.
• Disengage the protective casing from below.
3.5.2.9.2.2 Removal of transmission system
• Unscrew the fixing screws from the drive on the pump base.
• Isolate the pump drive.
• Disassemble the coupling half of the drive output shaft.
3.5.2.9.2.3 Bearing 0 and 00
• Unscrew the spacer fixing screws (Ref. 88).
• Separate the bearing-holder (Ref. 60) from the spacer (Ref. 88).
• Remove the key (Ref. 87) once its coupling half has been removed.
• Unscrew the locknut (Ref. 70) and remove the thrust washer (Ref. 34).
• Disassemble the gasket (Ref. 5) and then drive out the shaft (Ref. 33).
• Remove the inner gasket of the roller bearing (Ref. 65) of the shaft (Ref. 33) and then
remove the outer gaskets of the roller bearing (Ref. 65) of the bearing-holder (Ref. 60).
3.5.2.9.2.4 Bearing II
• Remove the gasket (Ref. 7).
• Unscrew the spacer fixing screw (Ref. 88).
• Separate the bearing-holder (Ref. 60) from the spacer (Ref. 88).
• Remove the key (Ref. 87) once its coupling half has been removed.
• Unscrew the locknut (Ref. 70) and remove the thrust washer (Ref. 34)
• Disassemble the gaskets (Ref. 5A and 5B) and then drive out the shaft (Ref. 33).
• Remove the inner gasket of the roller bearing (Ref. 65) of the shaft (Ref. 33) and then
remove the outer gaskets of the roller bearing (Ref. 65 and 66) of the bearing-holder (Ref.
60).
3.5.2.9.2.5 Bearing III and IV
• Remove the flap (Ref. 72) that may be present depending on the model.
• Remove the key (Ref. 87) once its coupling half has been removed.
• Unscrew the locknut (Ref. 70) and remove the thrust washer (Ref. 34)
• Disassemble the gaskets (Ref. 5A and 5B) and then drive out the shaft (Ref. 33).
• Remove the inner gasket of the roller bearing (Ref. 65) of the shaft (Ref. 33) and then
remove the outer gaskets of the roller bearing (Ref. 65 and 66) of the bearing-holder (Ref.
60).
Page 28
: (33) 1 41 08 15 15
: (33) 01 41 08 15 00
: http:/www.pcmpompes.com
3.5.3
Pump reassembly (see sectional drawings in appendix)
To maintain the pump in its original condition, it is essential that
PCM spare parts be used.
Pump maintenance must be performed by qualified personnel only,
in accordance with the regulations in force.
The reference number of the drawing corresponding to your model is given in the table below:
Pump model
Sectional drawing
reference
0.03ID10 – 0.4I10 – 0.4ID10 – 1I10 – 1ID10 – 2.6I10 –
2.6ID10 – 6I5 – 6ID5 – 6I10 – 6I20 – 13I5 – 13I10 – 13ID10 –
20I4
1.6I45 – 13I20 – 20I16 – 25I5 – 25I10 – 30I4 – 40ID5 – 40I10
– 40ID10 – 45I5 – 62I5 – 62ID5 – 90I5
4I52 – 20I20 – 35I20 – 35ID20 – 35I40 – 50I15 – 50ID15 60I10 – 100I10 – 100ID10 – 120I5 – 150I10 – 150ID10 – 180I5
– 240I5 – 240ID5
ORDER OF PUMP REASSEMBLY
Reassemble drive
TPC0056
TPC0057
TPC0058
SECTIONS TO BE
REFERRED TO
→
See documentation in Section
4 - Appendices
→
§ 3.5.3.1
→
§ 3.8
↓
Reassemble spacer or bearing
↓
Reassemble seal
↓
→
Reassemble connection gaskets
(depending on model)
§ 3.5.3.2
↓
Reassemble driver on motor side
→
§ 3.5.3.3
→
§ 3.5.3.4
→
§ 3.5.3.5
→
§ 3.5.3.6
→
§ 3.5.3.7
→
§ 3.5.3.8
→
3.5.3.9
↓
Reassemble sheaths
↓
Reassemble connecting rod
↓
Reassemble rotor
↓
Reassemble body
↓
Reassemble stator
↓
Reassemble pump on site
Page 29
: (33) 1 41 08 15 15
: (33) 01 41 08 15 00
: http:/www.pcmpompes.com
3.5.3.1
Reinstallation of spacer and bearing
3.5.3.1.1
Reinstallation of spacer (Ref. 88)
• Secure the spacer (Ref. 88) onto the drive using its fixing screws.
• Secure the spacer (Ref. 88) (and the drive) onto the pump base.
3.5.3.1.2
Reinstallation of bearing
3.5.3.1.2.1 Bearing 0 and 00
• Clean the bearing-holder (Ref. 60).
• Install the outer gaskets of the roller bearing (Ref. 65) in the bearing-holder (Ref. 60) with
the clamp.
• Grease the outer gaskets of the roller bearing (Ref. 65) with grease (see section 3.4.2).
• Install the first inner gasket of the roller bearing (Ref. 65) when hot onto the shaft (Ref. 33)
(stoving of gasket at 100°C for 45 mins) or use an induction instrument.
• Install the shaft (Ref. 33) thus fitted in the bearing-holder (Ref. 60) and then install the other
inner gasket of the roller bearing (Ref. 65) when hot.
• Insert the gasket (Ref. 5) and the washer (Ref. 34).
• Install the locknut (Ref. 70) with LOCTITE 577 thread locking liquid (yellow) to ensure a
backlash-free assembly, a shaft that is not free to move and manual rotation without
coupling.
• Mount the obtained assembly onto the spacer (Ref. 88) and secure it using the screws.
• Mount the key (Ref. 87) and then the coupling half.
3.5.3.1.2.2 Bearing II
• Clean the bearing-holder (Ref. 60).
• Install the outer gaskets of the roller bearing (Ref. 65 and 66) in the bearing-holder (Ref. 60)
with the clamp.
• Grease the outer gaskets of the roller bearing (Ref. 65 and 66) with grease (see section
3.4.2).
• Install the inner gasket of the roller bearing (Ref. 65) when hot onto the shaft (Ref. 33)
(stoving of gasket at 100°C for 45 mins) or use an induction instrument.
• Install the shaft (Ref. 33) thus fitted in the bearing-holder (Ref. 60) and then install the other
inner gasket of the roller bearing (Ref. 66) when hot.
• Insert the gaskets (Ref. 5A and 5B) and the washer (Ref. 34).
• Install the locknut (Ref. 70) with LOCTITE 577 thread locking liquid (yellow) to ensure a
backlash-free assembly, a shaft that is not free to move and manual rotation without
coupling.
• Install the obtained assembly onto the spacer (Ref. 88) and secure it using the screws.
• Install the key (Ref. 87) and then the coupling half.
• Install the gasket (Ref. 7) in its housing.
3.5.3.1.2.3 Bearing III and IV
• Clean the bearing-holder (Ref. 60).
• Install the outer gaskets of the roller bearing (Ref. 65 and 66) in the bearing-holder (Ref. 60)
with the clamp.
• Grease the outer gaskets of the roller bearing (Ref. 65 and 66) with grease (see section
3.4.2).
• Install the inner gasket of the roller bearing (Ref. 65) when hot onto the shaft (Ref. 33)
(stoving of gasket at 100°C for 45 mins) or use an induction instrument.
Page 30
: (33) 1 41 08 15 15
: (33) 01 41 08 15 00
: http:/www.pcmpompes.com
• Install the shaft (Ref. 33) thus fitted in the bearing-holder (Ref. 60) and then install the other
inner gasket of the roller bearing (Ref. 66) when hot.
• Insert the gaskets (Ref. 5A and 5B) and the washer (Ref. 34).
• Install the locknut (Ref. 70) with LOCTITE 577 thread locking liquid (yellow) to ensure a
backlash-free assembly, a shaft that is not free to move and manual rotation without
coupling.
• Install the key (Ref. 87) and then the coupling half.
• Install the flap (Ref. 72) which may be present depending on the model.
• Install the gasket (Ref. 7) in its housing.
3.5.3.1.2.4 Reinstallation of transmission system
• Install the coupling half of the drive output shaft.
• Put the drive onto the pump and attach it to the latter using its coupling assembly.
3.5.3.1.2.5 Reinstallation of protective casing
• Replace the protective casing from above.
• Put the protective casing fixing screws into position on the pump base.
• Check that there is no friction when the protective casing is moved.
Since this component is vital for personnel safety, PCM disclaims all
responsibility for any breach of this section.
3.5.3.2
Reinstallation of connection gaskets (Ref. 204 and 206)
• Apply LOCTITE 638 to the gaskets (Ref. 206) of the driver (Ref. 26) and/or the rotor (Ref.
20).
• Preheat the drivers and fix the gaskets (Ref. 206), thus prepared with the clamp level with
the external diameter of the drivers.
• Apply LOCTITE 638 to the gaskets (Ref. 204) of the connecting rod (Ref. 22).
• Preheat the ends of the connecting rod (Ref. 22) and then fix the gaskets (Ref. 204) with the
clamp positioning them according to the diagram below.
Incorrect installation
3.5.3.3
Correct installation
Reinstallation of driver (Ref. 26 or 36) on motor side
According to the model and size of the bearing, the driver is fixed onto the drive shaft either by
axial pins, keys or tangential pins. The unit is therefore identified by the contents of the list of
parts provided in Section 4 - Appendices.
Page 31
: (33) 1 41 08 15 15
: (33) 01 41 08 15 00
: http:/www.pcmpompes.com
Pump with axial pins
(Ref. 108)
Pump with key (Ref.
142) (or 141)
With tangential pins
(Ref. 108)
- Replace the driver (Ref.
26) fitted with its pins
(Ref. 108) and the gasket
(Ref. 27) (depending on
model) on the drive or
roller bearing shaft.
- Check that the key is in
good condition (Ref. 142)
(or 141) and that it is
correctly positioned on
the drive or roller bearing
shaft (Ref. 33).
- Replace the circlip (Ref.
97) onto the drive shaft
(Ref. 33).
- Once engaged, tighten
the screw (Ref. 139) with
the tightening torque
indicated in section 3.4.3.
- Install the gasket (Ref.
27)
(depending
on
model) and replace the
driver (Ref. 26) on the
drive or roller bearing
shaft (Ref. 33) fitted with
its key (Ref. 142) (or
141).
- Once engaged, tighten
the fixing screw (Ref.
139) with the tightening
torque
indicated
in
section 3.4.3.
3.5.3.4
- Return the driver (Ref.
26) fitted with its rings
(Ref. 69) and gaskets
(Ref. 27 and 351) on the
drive shaft (Ref. 33).
- Slide the two gaskets
(Ref. 69) onto the drive
shaft
(Ref. 33) and
engage the first pin (Ref.
108).
- Slide the first ring (Ref.
69) towards the driver
(Ref. 26) and engage the
second pin (Ref. 108).
- Slide the second ring
(Ref. 69) towards the
driver (Ref. 26) and
install the circlip (Ref. 97)
onto this.
Reinstallation of Sleeves (Ref. 3) or Pins (Ref. 11)
According to the model and size of the bearing, the connections are protected by sleeves (Ref.
3) or pins (Ref. 11). The unit is therefore identified by the contents of the list of parts provided in
Section 4 - Appendices.
3.5.3.4.1
Mounting with sleeves (Ref. 3)
1) Use two long handle screwdrivers with no
protruding edges. Grease the end of the
connecting rod and the inside of the sleeve
well.
2) Perpendiculaire position to the connecting
rod.
Page 32
: (33) 1 41 08 15 15
: (33) 01 41 08 15 00
: http:/www.pcmpompes.com
3) Engage the screwdrivers on the inside
and the outside of the connection rod end.
4) Pivot towards the connecting rod axis.
5) In the connecting rod axis, oull the
screwdrivers apart.
6) Changeover onto end of connecting rod.
7) Take hold of sleeve to turn it over.
8)Slide the upper part along.
9) Rotate 90°.
10) Take hold of the part that was not turned
over.
11) Grease the external part of the sleeve
Page 33
: (33) 1 41 08 15 15
: (33) 01 41 08 15 00
: http:/www.pcmpompes.com
3.5.3.4.2
Installation with pins (Ref. 11)
• Engage the set collar (Ref. 23 or 31) on each connecting rod end (Ref. 22).
• Put the pins into place (Ref. 11) on each connecting rod end (Ref. 22).
3.5.3.5
Reinstallation of Connecting Rod (Ref. 22)
According to the model and size of the bearing, the connections are protected by sleeves (Ref.
3) or pins (Ref. 11). The unit is therefore identified by the contents of the list of parts provided in
Section 4 - Appendices.
Pump with sleeves (Ref. 3)
Pump with pins (Ref. 11)
- Grease the inside of the connection with
grease (see section 3.4.2).
- Grease the inside of the connection with
grease (see section 3.4.2).
- First mount the set collars (Ref. 23) on
each connecting rod end (Ref. 22).
- Mount the connecting rod (Ref. 22) in the
driver.
- Mount the connecting rod (Ref. 22) in the
driver.
- Inser the pin (Ref. 21) and put the set
collar (Ref. 23) in its final position.
- Insert the pin (Ref. 21) and put the set
collar (Ref. 23) in its final position.
- Put the screws in (Ref. 100) and tighten
them until it is secure in the driver.
- Put the screws in (Ref. 100) and tighten
them until it is secure in the driver.
- Turn the sleeve over (Ref. 3) to cover
the assembly (see diagram below).
3.5.3.6
Reinstallation of Rotor (Ref. 20)
According to the model and size of the bearing, the connections are protected by sleeves (Ref.
3) or pins (Ref. 11). The unit is therefore identified by the contents of the list of parts provided in
Section 4 - Appendices.
Page 34
: (33) 1 41 08 15 15
: (33) 01 41 08 15 00
: http:/www.pcmpompes.com
Pump with sleeve (Ref. 3)
Pump with pin (Ref. 11)
- First mount the set collar (Ref. 23) on the
connecting rod (Ref. 22)
- Grease the inside of the connection with
- Mount the rotor (Ref. 20) on the connecting
rod end (Ref. 22)
- Mount the rotor (Ref. 20) on the connecting
rod end (Ref. 22).
- Insert the pin (Ref. 21) and place the set
collar (Ref. 23) in its final position.
- Insert the pin (Ref. 21) and place the set
collar (Ref. 23 or 31) in its final position.
- Put the screws in place (Ref. 100) and
tighten them until it is secure in the driver.
- Put the screws in place (Ref. 100) and
tighten them until it is secure in the driver.
grease (see section 3.4.2).
- Grease the inside of the connection with
grease (see section 3.4.2) and turn the
sleeve over (Ref. 3) to cover the assembly
(see diagram below).
3.5.3.7
Reinstallation of Body (Ref. 50)
Comment:
Prior to any operation and at this stage of reinstallation, protect the rotor and the
connections from any possible impact.
• Place the body gaskets and the centring ring(s) (depending on model) on the seal body.
• Slide the body (Ref. 50) along the shafting and move it to the desired position.
• Wedge the body (Ref. 50) to prevent it from falling.
3.5.3.8
Reinstallation of Stator (Ref. 1)
• Attach the stator (Ref. 1) onto the rotor (Ref. 20), which has already been lubricated (see
section 3.4.2), turning the drive or roller bearing shaft (Ref. 33) if required.
Comment:
In some versions, an intermediary support (Ref. 48 and 384) (depending on model) is
to be positioned before this stage.
• Mount the pipe (Ref. 54) and then the stud bolts (Ref. 80), the washers and the nuts or fixing
screws depending on the case, and tighten with the torque given in section 3.4.3.
• Fix the pump supports to the base or ground.
3.5.3.9
Reinstallation of Pump on Operating Site
•
•
•
Put the pump into place and connect the motor (See the whole of section 1.3).
Familiarise yourself with the product specifications so as to implement all the necessary
precautions relating to personnel safety.
Follow the start-up instructions (see section 2.11, then 2.1.2 and 2.2.1).
Page 35
: (33) 1 41 08 15 15
: (33) 01 41 08 15 00
: http:/www.pcmpompes.com
3.6
Equipment storage when not in use
• Release pressure at the suction and discharge.
• Clean the pipes and the pump using a product that is compatible with the pumped product
and the materials from which the pump is made.
• Run the pump for a few seconds to drain the body and the pipes.
• Stop the pump.
• Isolate the pump from the rest of the circuit.
3.6.1
Storage of rubber components
•
3.7
For rubber parts, we recommend storing them in a cool area, out of the light to protect them
from UV rays.
Accessories
See special notes in Section 4 - Appendices.
3.8
Seals
See special notes in Section 4 - Appendices.
Page 36
: (33) 1 41 08 15 15
: (33) 01 41 08 15 00
: http:/www.pcmpompes.com
4. APPENDICES
•
•
•
•
•
•
•
Standard painting procedure
Sectional drawings
Description of Training option
Special seal notes
Technical Description
Accessories (optional)
Automatic control (optional)
Page 37
: (33) 1 41 08 15 15
: (33) 01 41 08 15 00
: http:/www.pcmpompes.com
PAINTING
SPECIFICATION
PCM
Drafted on: 05/01/2000
PROCESS:
I121F/d
by: FAVREAU
(21/03/96)
Folio: 1/1
Standard 1 (a)
Application Field: PCM standard procedure for protection of pumps.
PRELIMINARY OPERATIONS:
SHOT BLASTING and SOLVENT DEGREASING.
1 COAT: PRIMER (Protection of components before storage, cast-iron parts, chassis, stators, etc.).
COLOUR: grey
RAL:
THICKNESS: 20 microns
REMARKS: PRODUCT APPLIED: Single-component vinyl: Primer wash
ref. PCM; 42911 902G.
1 COAT: PRIMER (Protection of unpainted components after assembly).
COLOUR: grey
RAL:
THICKNESS: 20 microns
REMARKS: PRODUCT APPLIED: Single-component vinyl: Primer wash
2
ref. PCM; 42911 902G.
COAT: TOP.
COLOUR: Specification to order
RAL: 5019 or 9010
THICKENESS: 35 microns
REMARKS PRODUCT APPLIED: Two-component Acrylic Vinyl Polyester
ref PCM 42930 5019 or 9010.
Min. drying time at 23°C: 5h
7 parts of HY for 1 part HYA340
TOTAL THICKNESS APPLIED: 55 Microns.
Page 38
: (33) 1 41 08 15 15
: (33) 01 41 08 15 00
: http:/www.pcmpompes.com
116
Seal
Drawing TPC0056
315
42
For pumps 0.03ID10-0.4I10-0.4ID101I10-1ID10-2.6I10-2.6ID10-6I5-6ID56I10-6I20-13I5-13I10-13ID10-20I4
44
40
115
Representation with seal by nonlubricated stuffing box assembly.
44
Shafting
21
206
139
181
23
36
22
14
100
21
100
3
206
3
20
23
206
Body and stator assembly
250
328
75
122
40
260
50
327
110
88
13
80
150
110
1
54
110
150
240
261
48
Page 39
: (33) 1 41 08 15 15
: (33) 01 41 08 15 00
: http:/www.pcmpompes.com
Seal
Drawing TPC0057
115
42
44
40
For pumps 1.6I45-13I20-20I16-25I525I10-30I4-40ID5-40I10-40ID1045I5-62I5-62ID5-90I5
Representation with seal by nonlubricated stuffing box assembly.
315
116
108
Shafting
26 *
227
23
36
27
3
22
21
100
139
3
204 *
206 *
204 *
20
23
100
206 *
* Depending on model
21
122
Body and stator assembly
172
75
88
392*
13
172
392*
122
393* 394*
110*
75
392*
80
172*
1
110
107
50
393* 394*
110*
54
* Depending on model
102
Page 40
: (33) 1 41 08 15 15
: (33) 01 41 08 15 00
: http:/www.pcmpompes.com
42
116
Drawing TPC0058
115
44
For pumps 4I52-20I20-35I20-35ID2035I40-50I15-50ID15-60I10-100I10100ID10-120I5-150I10-150ID10-180I5240I5-240ID5
Representation with seal by nonlubricated stuffing box assembly.
40
315
23
3
227
206*
181*
227
6
36
22
139
204*
26
23
21
206*
204*
21
206*
6
20
227
* Depending on model
206*
172*
122
75
88
40*
392*
13
393*-394*
122
107
251-242
102
304
1
50
107
110
102
110
110
54
48
304
98
110
48
* Depending on model
98
Page 41
: (33) 1 41 08 15 15
: (33) 01 41 08 15 00
: http:/www.pcmpompes.com
NOTES
Page 42
: (33) 1 41 08 15 15
: (33) 01 41 08 15 00
: http:/www.pcmpompes.com