1
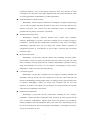
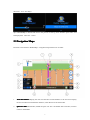
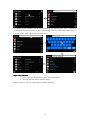
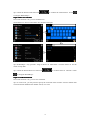
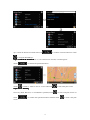
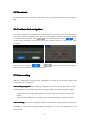
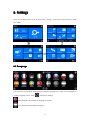
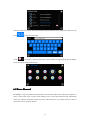
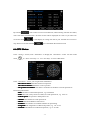
KudosMap7+
User Manual
Shen Zhen Kudos Digital Company Limited
www.kudosmap.com
Table of Content
1.
2.
3.
4.
Welcome to KudosMap7+..................................................................................................3
1.1
Precautions.................................................................................................................. 3
1.2
Introduction to KudosMap7+......................................................................................3
Getting Started................................................................................................................... 5
2.1
Quick Reference..........................................................................................................5
2.2
Getting Started............................................................................................................ 6
2.3
Navigation Maps......................................................................................................... 7
2.4
Keyboards................................................................................................................... 8
Selecting a destination....................................................................................................... 9
3.1
One touch to go........................................................................................................... 9
3.2
Quick Search Entry................................................................................................... 10
3.3
Go To Entry.............................................................................................................. 10
3.4
Set Destination.......................................................................................................... 11
3.4.1.
Search a destination by Address....................................................................... 11
3.4.2.
POI Search near Current Position......................................................................16
3.4.3.
POI Search in City.............................................................................................. 17
3.4.4.
POI Search by Phone No....................................................................................18
3.4.5.
Select a destination in Address Book................................................................ 20
3.4.6.
Select a destination in Recent Destinations...................................................... 20
3.4.7.
Select a point on map as destination................................................................ 21
3.4.8.
Search a destination by Coordinates.................................................................21
3.4.9.
Go Home............................................................................................................22
Route Plan........................................................................................................................ 23
4.1
Destination Management.......................................................................................... 23
4.1.1.
Add or delete destination(s)..............................................................................23
4.1.2.
Change the sequence of destination.................................................................23
4.1.3.
Change the starting point..................................................................................24
4.2
Route Options........................................................................................................... 24
1
4.3
5.
Navigation........................................................................................................................ 26
5.1
6.
7.
Select Navigation Mode............................................................................................25
Visual Options...........................................................................................................27
5.1.1
Navi Visual......................................................................................................... 27
5.1.2
Map Visual......................................................................................................... 27
5.2
Route Information..................................................................................................... 27
5.3
Route Plan................................................................................................................. 28
5.4
Detour....................................................................................................................... 28
5.5
Terminate.................................................................................................................. 29
5.6
Continue last navigation..................................................................................................
5.7
Auto-routing..............................................................................................................29
Settings.............................................................................................................................29
6.1
Language...................................................................................................................30
6.2
Safety Alert............................................................................................................... 30
6.3
Set home....................................................................................................................31
6.4
Address Book............................................................................................................31
6.5
Trace Record............................................................................................................. 32
6.6
GPS Status................................................................................................................ 33
6.7
Volume......................................................................................................................34
6.8
Regional.................................................................................................................... 34
6.9
Day/Night Mode....................................................................................................... 34
6.10
Demo.........................................................................................................................35
6.11
About.........................................................................................................................35
Appendix.......................................................................................................................... 35
7.1
Attention................................................................................................................... 35
7.2
POI Icons.................................................................................................................. 37
7.3
Copyright notices...................................................................................................... 38
2
1. Welcome to KudosMap7+
Thank you for choosing KudosMap7+ as your global in-car navigator. This manual is a detailed
description of the navigation software. Though you can easily learn to use it and we still
recommend you to read this manual to understand screens and operation steps of KudosMap7+.
Precautions
1.1
1.1Precautions
For your safety concern, we recommend that you operate KudosMap7+ before start of journey. Do
not operate KudosMap7+ while driving as this might lead to collision or damage. Please ask your
passenger to operate it if necessary.
Local driving regulations and driving conditions have to be observed all the time. They have
precedence over the driving instructions given by KudosMap7+.
Although all safety considerations have been taken into account while designing the KudosMap7+,
the use of this software “provided by KudosMap7+” is not warranted against the accident or the
consequences of any.
Introduction to KudosMap7+
1.2
1.2Introduction
KudosMap7+ has the following features:
�
Enhanced Overall Quality
KudosMap7+ is designed to enhance its quality of map display, route calculation,
human-computer interaction, and resource consumption. The enhancement comes from
the redefinition of electronic map navigation software’s each functional module.
KudosMap7+ team adopts meticulous research and development method and establishes
comprehensive and rigorous testing standard and regulation, operating by the
regulations of product lifecycle management and project management. Enhancement of
product quality is the primary goal in the process of product design, research, test,
release, and so on.
�
Optimized Overall Performance
Compared to other oversea versions, KudosMap7+ improves 50% in route
3
calculation efficiency, 30% in map display efficiency, while 10% decrease in RAM
consumption. The innovative new engine algorithm and new product architecture make
an overall optimization of KudosMap7+ product performance.
�
Smoother Human-Computer Inaction
KudosMap7+ human-computer interaction is redesigned to simplify operation steps
so as to make navigation operation smoother in the process of driving. With the new
features of junction view, camera alert, lane information and so on, KudosMap7+
guarantees driving safety, convenience, and smooth.
�
Visualized 3D Junction View
KudosMap7+ integrates numerous junction views. Unlike other navigation
softwares, KudosMap7+ provides a clear and visualized view of winding overpasses,
roundabouts, viaducts and other complicated road junctions in big cities. Accordingly,
KudosMap7+ guarantees that you can clearly and visually discern conditions of
complicated junctions to avoid detours as well as adds a practical and eye-friendly
navigation effect.
�
Practical Camera Alert
KudosMap7+ pre-provides numerous camera alerts including red light camera,
speed camera, section start camera and section end camera with voice alert and sound
alert, according to driving speed and road conditions. KudosMap7+ guarantees driving
safety and eliminates the concern of to be fined for overspeeding or other reasons.
KudosMap7+ makes you more relax during driving.
�
Convenient Signpost
KudosMap7+ pre-provides visualized and vivid signpost including detailed road
information (driving direction and turn information) of the next intersection with the
effects of shaded display and day/night switch, according to driving speed and the route
of advance. KudosMap7+ makes you master road conditions and the next lane
regulation in advance, and inspires your confidence in arriving destinations smoothly
when driving on unfamiliar road sections.
�
Detailed Lane Information
KudosMap7+ pre-provides the lane information including the exit, overpass,
roundabout, viaduct and other complicated road, according to driving speed and the
route of advance. KudosMap7+ supports split screen and dynamic arrow guidance,
making navigation and lane information show at the same time, and allowing you see
the correct lane direction with a quick glimpse. KudosMap7+ is designed to provide a
variety of convenience for you.
4
�
Humanized Continuous Turn Information
KudosMap7+ pre-provides the current turn, the next turn, and the continuous turn
information, according to driving speed and the route of advance. KudosMap7+ displays
all the lanes turn information with the highlight and voice guidance of the current lane to
avoid you driving on the wrong lane, arriving destination smoothly.
�
Multi Routing Styles
KudosMap7+ adopts optimized route calculation to provide multi route planning
including the shortest route, the quickest route, IQ route for you.
�
Localized Data Query
KudosMap7+, a highly customized navigation software, can increase ways or rules
of localized data query. Take PND navigation product distributed to Singapore for
instance. Singapore zip-code and HDB can be added.
�
Abundant Extended POI
KudosMap7+, an extensible navigation software, can extend POI data such as
camera data, POI data from map industry customers to provide a diverse and unique
navigation application, according to partners’ PND marketing strategy or value-added
services.
�
Fast and Flexible Customization
KudosMap7+, a highly customized navigation software, can provide customized
functional modules of high quality such as software interface, basic data, extended data
and voice guidance, according to partners’ PND marketing strategy or value-added
services. KudosMap7+ can meet personalized requirements of the third party to expand
marketing share in different regions.
On the whole, KudosMap7+ is electronic map navigation software with the features of
enhanced product quality and performance, abundant product functions, eye- friendly interfaces
and smoother human-computer interaction.
2. Getting Started
KudosMap7+ is a good choice for in-car navigation. You can easily use it by tapping the screen or
drawing the map with your fingers.
Quick Reference
2.1
2.1Quick
This chapter gives you a brief introduction of how to use KudosMap7+. Before we explore all the
5
detailed functionalities provided by this application, please make sure that:
� KudosMap7+ searches for positioning information from at least three satellites and
your position is fixed once the application starts.
When you use the GPS receiver for the first time, it may take 2-3minutes to secure satellite
information and orientate accurate position (Cold start). Your position fix is stored in the
memory. For subsequent use of the GPS receiver, it will only take 1-3 minutes to locate your
position (Warm start). Once your position is fixed by the GPS receiver, the system starts
navigation immediately without any extra operation when you start the application.
Icons in the manual represents:
Icon
Description
Operations need to be done.
Enter the next interface.
Two paralleled interfaces and can be switch back and forth.
The current position is selected. In KudosMap7+, the selected
country, city, road, list item or others will become blue magnified
font.
Getting Started
2.2
2.2Getting
When start KudosMap7+ for the first time, system enters “System Attention” screen. Touch
system will enter “Free Navi Map"; touch
system will exit
navigation application.
Tips: Mark “Don’t show this statement again” will not display the interface in the subsequent
start-up.
It takes about 15s to automatically switch “System Attention” screen to “Welcome” Screen and
6
then enter “Free Navi Map".
Tips: If KudosMap7+ detects GPS error in the process of start-up, alert “Failed to open GPS!” will
be displayed in “Welcome” screen.
Navigation Maps
2.3
2.3N
Functions of each item in KudosMap7+ navigation map interface are as below:
1.
Turn information: Display the next turn direction and the distance to the next turn. Display
the next turn direction without the distance, if the distance is less than 250m.
2.
Split View Bar: Retractable, default the split view bar is unfolded. After retraction, touch to
restore to the default.
7
3.
Remaining Distance to the Destination
estination:: Display the remaining distance to the destination.
4.
Current Speed: Display the current speed.
5.
Current Time: Display the current time.
6.
Next Road: Display the name of the next approaching road.
7.
Speed Camera
Camera:: Display the different types of Camera.
8.
GPS Status: Touch to view detailed GPS status.
9.
2D/3D Mode: Touch to switch 2D/3D mode.
10. Zoom in/out button: Turn Auto Zoom on/off in Visual Options> Navi Visual interface.
11. Scale Bar: Turn Scale on Map on/off in Visual Options>Map Visual interface.
12. Menu: Touch to enter the main menu.
13. Trace Record: Trace record is working.
14. Current Road: Display the name of the current road.
15. Speed Limit: Display the speed limit.
Keyboards
2.4
2.4Keyboards
KudosMap7+ keyboard has smart keystroke function and enables only those keys that can lead to
a valid entry. It greatly improves the search efficiency.
You could input letters, numeric and punctuations. You can switch between English, Cyrl and
Greek keyboard by touch
.
: Touch and return to high-level screen.
: Indicates the number of results.
: Confirm entry or select a record.
: Touch and delete the last letter you entered.
: Space key. If the space key is unavailable it is gray.
8
: Touch to switch between the numeric and punctuatuion keyboard.
: Touch to change to the keyboards of special characters.
: Touch to change to the keyboards of different countries.
3. Selecting a destination
In order to navigate with KudosMap7+ or to plan a route, you have to enter a destination first and
then calculate a route.
KudosMap7+ provides three ways of destination entry as below:
1.
One touch to go.
2.
Touch the quick search button in the map interface to enter different selections of
destination.
3.
Touch Menu>Go To button to enter different selections of destination.
One touch to go
3.1
3.1One
KudosMap7+ supports you in selecting a point on map as destination to enter the navigation.
Operation steps are as below:
Step1: In free navigation, browse map and select a point as destination;
9
Step2: Touch “one touch to go
go”” button
KudosMap7+
KudosMap7+..
Tips
Tips:
1.
to enter route plan interface and navigate
Display the direction and distance of the current map center point to the
current car icon. Touch to back to the current car icon interface immediately.
2.
Display the direction and distance of the current map center point to home.
Touch to back to home interface immediately.
Quick Search Entry
3.2
3.2Quick
In free navigation, KudosMap7+ supports you in touching quick search button
to enter
“Search Menu” screen. Set destination in different ways is as below(Please refer to Chapter3.4):
Go To Entry
3.3
3.3Go
In free navigation, KudosMap7+ supports users in touching menu button
to enter “Main
Menu” screen. Touch “Go To” to enter “Search Menu” screen. Set destination in different ways is
as below(Pleease refer to Chapter3.4):
10
3.4 Set Destination
KudosMap7+ supports multi ways of setting destination.
3.4.1.
Search a destination by Address
For example: No.12, Cleveland Avenue London, United Kingdom
Step1: Touch Search Menu>Address to enter “Address Search
Search”” screen
Step2: Country selection
1. For the first time, the item show “Click here to Search Country”;
2. The item will store the last selected country.
Touch country item to enter the country list and select.
11
Tips: In country list interface, you can set destination by the following three ways: 1) Scroll the
list and select the desired country; 2) Touch page turning button and select the desired country; 3)
Enter the country name and select the desired country.
Step3: City Selection
1. For the first time, the item show “Click here to Search City”;
2. The item will store the last selected country.
Touch city item to enter city smart keyboard interface and input.
12
Tips: In city list interface, you can set destination by the following three ways: 1) Scroll the list
and select the desired city; 2) Touch page turning button and select the desired city; 3) Enter the
city name and select the desired city.
Tips: Touch the desired city and touch
to confirm the city selection. Touch
to navigate KudosMap7+.
Step4: Road Selection
Touch road to enter road smart keyboard interface. Input the road name or prefix and then return
city list automatically once the navigation engine detects highly authentic roads.
13
Tips: Touch the desired road and touch
to confirm the road selection. Touch
to navigate KudosMap7+.
Step5: House No. Selection
Once road selection is ok, you can set House No..
Touch House No. item to enter House No. interface and input.
Tips: KudosMap7+ may provide a range of house no. rather than a concrete house no. for the
reason of map data.
Tips: Touch the desired house no. and touch
to confirm house no. selection. Touch
to navigate KudosMap7+.
Step6: CrossRoad Selection
Once road selection is ok, you can set CrossRoad.
Tips: In some cases, you may need to specify the crossroad of the location. Need to mention that
crossroad search disable house number search, vice versa.
14
Tips: Touch the desired crossroad and touch
to confirm crossroad selection. Touch
to navigate KudosMap7+.
Step7: Confirm the location of No.12, Cleveland Avenue London, United Kingdom
Touch
Touch
to confirm the specified location.
to back to “Address Search” screen and touch
to enter route plan screen.
Step8: Route Planning
Once City, Road, House No. or CrossRoad is specified, touch
touch
to enter route plan screen. Or
to confirm the specified location and then touch
screen.
15
to enter route plan
More operation details for “Route Plan” please refer to chapter 4.
3.4.2.
POI Search near Current Position
“POI Search near Current Position” displays 300 POIs at most around your current position from
near to far.
Please notice that:
When GPS fixed, “current position” is the place where your vehicle locates.
When GPS does not fix, “current position” is the latest GPS-fixed place.
Step1: Touch Search Menu>POI near Current Position to enter “POI Category
Category”” screen
Step2: Select one POI category
In POI Category list, you can:
a) Scroll the list and select one POI category.
b) Touch page turning button and select one POI category.
c) If you are not sure of the category, you can select “All Category POI", then system will
displays POIs of all categories near current position.
16
When you confirm the selection, touch
and system enters “Nearest POI list”.
Step3: Select a POI among results and touch
to enter “Route Plan
Plan”” screen
In “Nearest POI List” screen, you could:
a) Select the desired POI
b) Touch keyboard to enter POI name or the prefix
c) Check POI location on map
More operation details for “Route Plan” please refer to chapter 4.
3.4.3.
POI Search in City
You can search POI in city by the way of Around Address.
For example: London Biggin Hill Airport, London, United Kingdom
Step1: Touch Search Menu>POI in City to enter “POI Category
Category”” screen
Step2: Country Selection
1. For the first time, country button will display “Country” to suggest you selecting
one country;
2. The item will store the last selected country;
More operation details please refer to 3.4.1 step2 “Country Selection”.
Step3: City Selection
1. For the first time, city button will display “City” to suggest you selecting one city;
2. The item will store the last selected city;
More operation details please refer to 3.4.1 step3 “City Selection”.
Step4: POI Category Selection
17
Select one POI category and Touch
button.
Step5: POI Search
In POI search interface, you can input POI name to search smartly, or Touch
directly to
enter POI list and search by the following three ways: 1) Scroll the list and select the desired POI;
2) Touch page turning button and select the desired POI; 3) Input POI name and select the desired
POI.
Step6: Select a POI among results and touch
to enter “Route Plan
Plan”” screen
In “POI List” screen, you could:
a) Select the desired POI
b) Touch keyboard to enter POI name or the prefix
c) Check POI location on map
More operation details for “Route Plan” please refer to chapter 4.
3.4.4.
POI Search by Phone No.
KudosMap7+ supports you in searching destination by phone no..
18
Step1: Touch Search Menu>POI Search by Phone No. to enter “Phone No.
No.”” input screen.
Step2: Country Selection
1. For the first time, country button will display “Country” to suggest you selecting
one country;
2. The item will store the last selected country;
More operation details please refer to 3.4.1 step2 “Country Selection”.
Step3: City Selection
1. For the first time, city button will display “City” to suggest you selecting one city;
2. The item will store the last selected city;
More operation details please refer to 3.4.1 step3 “City Selection”.
Step4: POI Search by Phone No.
Input phone no. , touch
You can touch
and return POI list.
directly to enter POI list and search by the following three ways: 1) Scroll
the list and select the desired POI; 2) Touch page turning button and select the desired POI; 3)
Input phone no. and select the desired POI.
Step5: Select a POI among results and touch
to enter “Route Plan
Plan”” screen
In “POI List” screen, you could:
a) Select the desired POI
b) Touch keyboard to enter POI name or the prefix
c) Check POI location on map
More operation details for “Route Plan” please refer to chapter 4.
19
3.4.5.
Select a destination in Address Book
You can select a destination from Address Book and navigate KudosMap7+.
Step1: Touch Search Menu>Address Book to enter “Address Book
Book”” screen
You can select a destination by the following ways: 1) Scroll the list and select the desired
destination; 2) Touch page turning button and select the desired destination.
Tips: When the record is empty, “Address Book” screen displays “No Record”.
Step2: Select a Address Book record among results and touch
to enter “Route Plan
Plan””
or check Address Book location on map
screen
screen,or
More operation details for “Route Plan” please refer to chapter 4.
3.4.6.
Select a destination in Recent Destinations
You can select a destination from Recent Destinations and navigate KudosMap7+.
Step1: Touch Search Menu>Recent Destinations to enter “Recent Destinations
Destinations”” screen
You can select a destination by the following ways: 1) Scroll the list and select the desired
destination; 2) Touch page turning button and select the desired destination.
Tips: When the record is empty, “Recent Destinations” screen displays “No Record”.
Step2: Select a Recent Destinations record among results and touch
Plan
Plan”” screen
In “Recent Destinations List” screen, you could:
a) Select one Recent Destinations record;
b) Check Recent Destinations location on map;
c) Delete one Recent Destinations record.
20
to enter “Route
More operation details for “Route Plan” please refer to chapter 4.
3.4.7.
Select a point on map as destination
KudosMap7+ supports setting a destination by scrolling the map to the desired location.
Step1: Touch Search Menu>Point on Map to enter map interface
Step2: Scroll the map and tap on one point on map;
On the “Map Search” screen, you can find places that you are interested in by zooming in/out or
moving the map; meanwhile, you can touch the POI or road to view its information. You could
touch
Step3: Touch
to check the other POI information if more than one POI is located at one point.
to enter “Route Plan
Plan”” screen.
After you find your destination, touch
to add it as a destination. More operation details for
“Route Plan” please refer to chapter 4.
3.4.8.
Search a destination by Coordinates
If you know the geographic coordinates of your destination, you can navigation to the desired
location by entering Coordinates.
Step1: Touch Search Menu
>Coordinates to enter “Coordinates
Menu>Coordinates
Coordinates”” screen
In the “Search Menu” screen, select “Coordinates” to enter the “Coordinates” input screen
Step2: Touch “Format
Format”” to change the type of coordinates
KudosMap7+ supports two kinds of coordinate format inputs: Degree Format and Digital Format.
21
You can touch the “Format” button to switch between these two formats.
In the Degree format, touch the “Lon” (Longitude) input area you should input “E” (East
Longitude) or “W” (West Longitude) before you input the degree number of the longitude. Before
inputting the degree number of the latitude, you should input “N” (North Latitude) or “S” (South
Latitude).
In the Digital format, you should input “-” (West Longitude/South Latitude) or “+” (East
Longitude/North Latitude) before you input the digital number of the longitude or the latitude.
Step3: Enter the coordinates and touch
to enter “Route Plan
Plan”” screen.
In coordinates screen, you could check coordinates location on map;
More operation details for “Route Plan” please refer to chapter 4.
3.4.9.
Go Home
KudosMap7+ Navi System enables you to navigate directly to a specified home address in an easy
and efficient way. In the “Search Menu”, select “Go Home” and the system will automatically
start navigating to the position of My Home.
If the place of My Home has not been specified, when you touch “Go Home”, the system will
prompt as Picture:
Touch “Yes”, the system enters “Search Menu” screen to set up home address. For operation
details, please refer to chapter 3.4.
After specifying home address, system enter “Route Plan” screen. Please refer to chapter 4 for
“Route Plan” operation details.
22
4. Route Plan
With KudosMap7+ you can enter the desired destination (as described in Chapter 3) and also
specify how the route to be calculated.
KudosMap7+ enables three waypoints during navigation. The system calculates a proposed route
according to the sequence of the waypoints you specified, and guides you to the final destination.
After you enter waypoints/destination, the system enter “Route Plan" screen. This chapter will
describe all the functions of this screen.
Destination Management
4.1
4.1Destination
4.1.1. Add or delete destination(s)
KudosMap7+ allows you to add up to three waypoints and destinations. Usually the starting point
is the GPS-fixed current position and can only be modified.
: Touch it and enter “Search Menu” to search waypoint/destination (refer to Chapter 3).
: Touch it and the highlight waypoint/destination in blue is deleted.
4.1.2. Change the sequence of destination
: Touch it to move up the highlight waypoint/destination.
: Touch it to move down the highlight waypoint/destination.
Gray key means the function is disabled.
23
4.1.3. Change the starting point
: Touch it to change the starting point. When touch it, KudosMap7+ will prompt that would
you like to change the starting point?
If yes, system will enter “Search Menu"(refer to Chapter 3).
If No, system will calculate the route.
4.2
Route Options
4.2Route
KudosMap7+ offers you optimization settings of navigation. These settings are the basis
parameters for calculating the route.
Touch
on “Route Plan” screen and enter “Route Options” screen。
KudosMap7+ enable user to select road type and routing style according to different navigation
situations.
Routing style:
IQ Route: Route calculation based on the real average speeds measured on roads every day
compared to speed limits. In the process of route planning, KudosMap7+ will automatically
consider various factors which may affect drivers arriving destination such as traffic signs, steep
slopes, traffic jam sections and so on(the real average speeds measured on these roads are lower.).
IQ route depends on Traffic Pattern data provided by the third party
24
Use of IQ Route;
Non-use of IQ Route
Shortest Route: The shortest distance between the starting point and the destination.
Use of Shortest Route;
Non-use of Shortest Route
Quickest Route: The shortest arrival time between the starting point and the destination.
Use of Quickest Route;
non-use of Quickest Route
Tips: Users must choose one routing style at least.
Road type:
Most Use of Motorway;
Least Use of Motorway
Most Use of Ferries;
Least Use of Ferries
Avoid Toll Roads;
Allow toll roads
Tips: Users can choose any road type or cancel all.
Select Navigation Mode
4.3
4.3Select
KudosMap7+ has three navigation modes as below:
Route Navigation
Navigation:: Real-time navigation among start, waypoint and destination, when GPS
position is present.
n: Lifelike simulation of the routing among start, waypoint and destination. It
Simulate Navigatio
Navigation:
enables you to check POI or route information along the route. Simulate mode is mostly used
when no GPS position is present.
n: Real-time navigation without destination when GPS position is present.
Free Navigatio
Navigation:
In the “Route Plan” screen you can select between two modes: Route Navi (Navigation) or
Simulate.
25
Route Navigation mode
mode::
Touch “Go” means you select route navigation mode. And the system will automatically enter
“Route Calculating” screen and wait for GPS signal.
Before route calculation finishes, you can touch the
button at any time to end the
operation.
e:
Simulate Navigation mod
mode:
Touch “Simulate” means you select simulate navigation mode.
After route calculation and when GPS position has been fixed, the system will begin navigating.
5. Navigation
After selecting destination and planning route, the system calculates the optimized route and starts
navigation.
All the information you need for driving is provided clearly and comprehensively in the Route
Navi Map, please refer to Chapter 2.3. Meanwhile, you can set additional navigation settings or do
other possible navigation operations on Route Navi Menu.
On “Route Navi Map” screen, touch Main menu to enter Route Navi Menu.
26
Visual Options
5.1
5.1Visual
You can access Visual Options both from Free Navi Menu and Route Navi Menu.
KudosMap7+ Visual Options includes Navi Visual and Map Visual.
5.1.1 Navi Visual
Motorway Signpost
Signpost:: Turn on/off the function to display Motorway signpost on map.
Auto Zoom
Zoom:: Turn on/off the function to adjust the map scale automatically according to driving
speed and provides you a better view of the map.
Split Screen
Screen:: Turn on/off the function to display Split Screen on map.
Navigation Lane
Lane:: Turn on/off the function to display Navigation Lane on map.
Junction View
View:: Turn on/off the function to display Junction View on map.
5.1.2 Map Visual
Map Mode
Mode:: Switch the map between 2D and 3D mode.
Map Color: Switch the map background between day and night modes.
Navigation Mode
Mode::
a) “Heading Up
Up””: Rotate map according to the direction of movement.
b) “North Up
Up””: Map is fixed to keep facing North and allows you to view driving
conditions ahead.
Scale on map
map:: On Map displays scale on the map, Disable vice versa.
Route Information
5.2
5.2Route
In the “Route Navi Menu” screen, touch “Route Information” to display the entire route in text.
27
Route Information includes: Start, waypoints, Routing style, Destination, distance, next street
name, distance between two turns, and turn type.
Route Plan
5.3
5.3Route
KudosMap7+ enables you to change destination or add more destinations during navigation.
Touch Route Plan on “Route Navi Menu” screen. Please refer to Chapter 4 for details.
Detour
5.4
5.4Detour
In the “Route Navi Menu” screen, touch “Detour” to enter the “Detour” screen .When there is a
traffic jam, you can estimate the distance to the blocking point and select an appropriate detour,
KudosMap7+ will calculate a detouring route.
The Magenta line represents the original route and the light green line represents the new route
after detour.
28
Terminate
5.5
5.5Terminate
By touching the button “Terminate", the system will stop navigation and enter Free Navigation
Map.
5.6 Continue last navigation
If the last navigation is not finished, turn off the navigation device, the system will automatically
save work in progress navigation route. After you turn navigation software will be asked whether
to continue on the navigation, click "
" into the map interface, click "
" will
be more than a destination for the end of the current vehicle location as a starting point, again
navigation.
If the user does not select "
" or "
software will automatically enter the map interface.
" after a certain time, the navigation
Auto-routing
5.7
5.7Auto-routing
With the consideration of driving safely, KudosMap7+ provides the auto-routing function that
works under two circumstances:
Auto starting navigation: After setting up a destination, touch “Go” in the “Route Plan” screen
and KudosMap7+ will automatically start the navigation. Below we will describe the procedure:
1. Proceed to the next step if GPS signals are received. Otherwise, wait for receiving GPS
signals;
2. Set the current GPS position as starting point, use the optimal route and start navigation.
Auto re-routing
re-routing:: If you have accidentally missed a recommended turning point about 100 meters,
KudosMap7+ will activate re-routing module to calculate a new route. This guarantees you will
never get lost.
29
6. Settings
There are 10 setting items can be accessed from “Settings” screen in Free Navi Menu or Route
Navi Menu.
6.1
Language
6.1Language
You can select voice/program language by touching the language icon. There are 12 languages as
in setting language screen. Touch
and return to Settings.
: Blue highlight button means the language is selected.
: Gray button means disable the language.
30
Safety Alert
6.2
6.2Safety
Speeding Alert warns you when you exceed the local road speed limit. This setting allows you to
decide whether you want to receive speeding alert or not.
Users can also decide whether they need the sound remind of speed camera by turn on or off the
speed camera tone.
Touch “Safety Alert” in the “Settings” screen to enter the “Safety Alert” screen
When speeding alert turns on, you can set speeding tolerance value among 0%, 5%, 10%, 15%
and 20%.
Set home
6.3
6.3Set
Touch “Set Home Address” and enter “Search Menu” screen, more operation steps please refer to
chapter 3.
Address Book
6.4
6.4Address
KudosMap7+ can save up to 500 Addresses/POIs.
Touch
to enter “Search Menu” to search/add address/POI to Address Book.
Touch
to delete one record in Address Book.
Touch
to view the address location on map.
Touch
to enter “Address Book Edit” screen.
31
Touch the field you want to edit, and touch the keyboard after the cursor jump to the field. You can
touch
Touch
to switch input format.
on to enter “POI Icon Selection” screen. When you approach the POI in address
book, system will beep to remind you.
Trace Record
6.5
6.5Trace
KudosMap7+ logs all positioning information received from GPS receiver during navigation. It
draws a trail of the track on map, which enables you to review the historical track information
when you re-launch navigation system next time. This function is very useful when you drive in
rural areas such as deserts or forests.
32
By touching
, users switch on trace record function; while touching “Record off” button,
users close trace record function. All trace records will be displayed on screen. If you select one
record and touch
, it will display an orange line that is your selected trace record on
map. Select one record and touch
, you could delete the selected record.
GPS Status
6.6
6.6GPS
In the “Settings” screen, touch “GPS Status” to display the “GPS Status” screen. You also could
touch
on “Route Navi Map” or “Free Navi Map” to access GPS Status.
In the “GPS Status” screen, you can get below information:
1. The GPS be active: GPS has fixed current position.
The GPS be inactive: GPS does not fix a position.
2. The position of satellites: The relative orientation of satellites to current position fix.
Positioning information:
1. Date: The date of a fixed GPS position, e.g. 2012/04/24.
2. Time: The time (always shown as GMT) of a GPS position fix, e.g. 14:03:37.
3. Vehicle speed: The speed of a GPS position fix.
4. Altitude: The altitude of a GPS position fix.
5. HDOP: Horizontal Dilution of Precision.
6. Satellites: The numbers of available satellites for positioning.
7. Longitude: The longitude of a GPS-fixed position, e.g. 121°27’1E
8. Latitude: The latitude of a GPS-fixed position, e.g. 31°16’44S.
33
Volume
6.7
6.7Volume
Users can set the volume of voice guidance and select touch tone when operation.
Touch
Touch
to adjust volume to lower while touch
to make volume be louder.
to make the system be mute. Once you have configured the settings, touch
and the system will save your settings and return to the “Settings” screen.
Mark “Touch tone when operation” means there is touch tone in operation.
Regional
6.8
6.8Regional
Users can set measure unit, time format, date format and time zone in “Regional” screen.
Touch
or
to set the desired time zone.
Day/Night Mode
6.9
6.9Day/Night
Users can set day/night mode and day time.
34
System will automatically store the last defined day time.
6.10 Demo
TurboDog7 + supports the following four Demo function demonstrates: Junction View, Split
Screen, Motorway SighPost, Navitation Lane.
6.11 About
“About” screen provides KudosMap7+ basic system information, which is useful for software
upgrade or device maintenance.
7. Appendix
Attention
7.1
7.1Attention
It is not a system failure under circumstances listed below:
Situations that can affect the GPS positioning:
�
Sometimes, when you are driving on the Motorway/viaduct, the floating point swings.
�
When you are driving on a very steep road.
�
When you are driving on spiral road, you will find that the floating point swings. It is
nothing to do with the radius of the road and the driving speed of your vehicle. One
reason might be that the real road condition may differ from the information of the
electronic map.
�
When you make a right/left turn to enter a road and that has parallel roads nearby (less
than 50m distance), you might find that the floating point may go to another road.
�
When driving on a wide road in a snaky line, you may experience that the floating
point may swing due to the mismatch of real distance.
�
Before returning to a ground road after you have been driving in an underground car
35
park or a spiral path of the multi-level car park, you will find that the floating point
may swing. When your car is in a rotary elevator, the arrow of the floating point may
not point to the right direction.
�
Providing voice prompt at a branching path ahead.
�
The guided distance may deviate from the actual distance rate.
When any of those situations occurs, the GPS satellite will automatically adjust the current
position fix if you keep driving.
Problems caused by map files:
�
When you return from a road which is newly constructed to a road recorded in map file,
you may find floating point swings because the map file may not reflect the real road
conditions. After you keep driving for a while, the system will adjust it to the right
position using GPS signal information
�
No through way due to road closure or pedestrian path
�
Open of a new road and closure of old road;
�
Guide to a no-through way;
�
Route re-computed again without changing the proposed route;
�
Guide to a normal road instead of a viaduct, or vice versa;
�
If there are only small lanes without a normal road near the destination, the system will
only guide you to a place near to your destination;
�
Instruct you to make a U-turn;
�
No indication at a branching road;
�
Turning instruction mismatch the real road condition;
�
No indication of direction or voice prompt about entrance/exit while guiding on
Motorway/express way;
�
Schematic map may mismatch real road conditions.
Places having difficulties to receive GSP signals
�
In tunnels;
�
Between high buildings;
�
Under viaducts;
�
In trees/forests;
When using external GPS antenna, we recommend that you place it on the roof of the car. If there
is rack on the roof of your car, please make sure to separate the rack and the antenna.
GPS is managed by the department of defense of USA. It may purposely reduce the accuracy of
the GPS signals so that the car may swing.
Use Notice
�
The floating point may swing before the GPS signal is received when you turn the
power on.
� The floating point may swing when you use the system at the first time after installation.
The system will automatically adjust its position and direction using GPS signals when the
floating point mismatches real condition.
36
POI Icons
7.2
7.2POI
KudosMap7+ POI Category:
Icon
Name
Icon
Name
Accommodation
Airport
Automotive
Business
Center of Settlement
All category POI
Finance
Government
Medical
Museum
Musical Center
Nightlife
Parking
Petrol Station
Police Station
Railway Station
Recreation
Restaurant
Service
Shopping
Sight
Zoo
37
Copyright notices
7.3
7.3Copyright
Great care was taken in preparing this manual. Constant product development may mean that
some information is not entirely up to date. The information in this document is subject to change
without notice.
Kudos shall not be liable for technical or editorial errors or omissions contained herein; nor for
incidental or consequential damages resulting from the performance or use of this material. This
document contains information protected by copyright. No part of this document may be
photocopied or reproduced in any form without prior written consent from Kudos.
Software:KudosMap
Data Source:Map data NAVTEQ
2013Q1. All rights reserved.
38