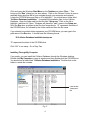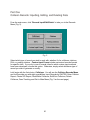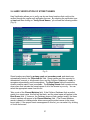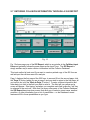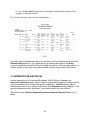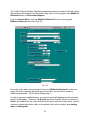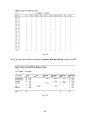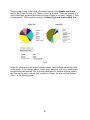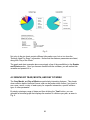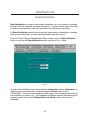
1
traffic collision
database system
user’s manual
CROSSROADS SOFTWARE
210 W. Birch Street, Suite 207
Brea, CA 92821
(714) 990-6433
Fax: (714) 990-5628
www.crossroadssoftware.com
TABLE OF CONTENTS
Preface: Some Basics Before You Begin
1
Chapter One: Installing the Traffic Collision Database
Step One
Step Two
Step Three
Step Four
Step Five
Step Six
Step Seven
Step Eight
Step Nine
Step Ten
Step Eleven
3
3
5
5
6
7
7
8
10
11
13
17
Chapter Two: The Traffic Collision Database
Introduction
18
18
Part One: Collision Records: Inputting, Editing,
and Deleting Data
2.1 Input Records by SWITRS
2.2 Street Name Verification
2.3 Soft Verification of Street Names
2.4 Hard Verification of Street Names
2.5 Verifying a Specific Location
2.6 Entering Collision Reports Using the Collision
Input Form
2.7 Entering Collision Information Through a 555
Report
2.8 Read/Write Collisions
2.9 Edit and Print Collision Records
2.10 Delete Collisions
i
20
21
23
25
27
30
30
33
36
38
40
Part Two: Citations and DUIs
2.11 Citations and DUIs
2.12 Delete Citations or DUIs
2.13 Edit Reports
2.14 Read/Write Reports
41
41
44
46
49
Part Three: Parking Citations
2.15 Parking Citations
2.16 Edit Parking Citations
2.17 Delete Parking Citations
51
51
52
54
Chapter Three: Queries and Reports
3.1 General Query
3.2 Intersection Historical
3.3 Intersection High Incidence
3.4 Ranking by Collision Rate
3.5 Using Page 2 of the Intersection High Incidence
Form
3.6 Midblock Historical Report
3.7 Midblock High Incidence
3.8 Reports by Officer
3.9 Collision Reports
3.10 Queries by the Month
3.11 Collision Statistical Report
3.12 Custom Query Menus
3.13 Citation Reports
3.14 Citation General Query
Chapter Four: Graphs and Charts
55
56
59
69
75
75
77
80
81
82
85
87
88
89
91
94
4.1 Producing Graphs and Charts
4.2 Graphs by Year, Month, and Day of Week
Chapter Five: Data Verification
94
98
101
5.1 Duplicate Records Check
102
ii
Chapter Six: Configuration
105
iii
PREFACE
Some Basics Before You Begin
Before you begin using Crossroads Software's Traffic Collision Database, you should be
familiar with the basic layout of the structure and several commands (or, rather, “clicks”)
that you will use often.
The Traffic Collision Database employs the familiar Windows Software, which means
you will rely on buttons, pull-down menus, and similar features. If this were the 1980s
(and be thankful that it's not), you would have to enter those annoying and easily
forgettable DOS key commands. Fortunately, DOS (at least for most of us) is a thing of
the past.
Moving back and forth through the program is actually quite easy. Buttons, or, rather,
descriptive boxes, will take you to different features of the software. All that is required
is a simple mouse click.
To return to the previous screen, simply click on the “exit” button, which looks like this:
Note that the “door” button is not present in every screen in the Database. When it is
not present, you will see other buttons that allow you to complete your tasks and then
return to the previous screen. These buttons might say “exit,” “input”, “cancel,” or
“delete.” In output report screens, you can click on the “File” menu at the top to pull
down the menu, scroll your cursor over “Exit” or “Close” and then click once to execute
the command.
To return to the main menu, simply select the “exit to main menu” button:
When inputting data, some fields are structured for ease of use and feature drop-down
menus. You can utilize this feature by a simple mouse-click on the down arrow to the
right of the input box.
1
Two other wonderful features include “auto-match” and “limit to list.” As you type an
entry into a drop-down list, the software will match the entry, filling in possible matches
as you type and saving you key-strokes and time. This is the “auto-match” feature.
“Limit to List” applies to those fields in the Database that have drop-down menus. Not
every field is a “Limit to List” field, but some are -- this means that the information you
enter into the field must be contained within the items in the drop-down list. If the
information is not among the list, the Database will tell you that it cannot accept your
entry. An example of this is a “Direction” field which contains a drop-down list with
“North,” “South,” “East,” and “West.” If you were to enter a direction other than one of
these four -- say, “up” or “down” or “north by northwest” -- you will be notified that you
need to use one of the selections among the list.
Important aspects of the Collision Database, things to remember, and other noteworthy
items are marked by a “hand icon”:
When you see the hand note, make sure you take a moment to read what follows; it is
often important information about using the Traffic Collision Database.
Chapter and Verse...
This manual is divided into chapters for reading convenience, and each chapter is
divided into sections. The pattern for chapter divisions is the chapter number followed
by the section number, and the sections follow in consecutive order. So, for example,
the first section is labeled “1.1”, the second “1.2”, the third “1.3,” and so on. Each
section has its own heading, typically in bold letters, such as this: Soft Verification of
Street Names. You can also use the Table of Contents to find your way through this
book, particularly when you want to look up only one or two items.
2
CHAPTER ONE
Installing the Traffic Collision Database
If you are familiar with installation of Windows-based programs, then installing
Crossroads Software's Traffic Collision Database should be quite simple. If you are not
familiar with Windows-based programs, then guess what? Installing the Traffic Collision
Database is still quite simple!
Crossroads Software has provided you with a CD containing the Traffic Collision
Database application and data files.
Before installing the software, remember to close all Windows programs, otherwise they
might interfere and create problems. Also make sure that your computer's hard
drive has about 120 MB of free disk space.
With the CD in hand, just follow the steps...
STEP ONE
Place the Crossroads Software CD in your computer’s CD-ROM drive. You need to
locate and open the Setup.exe file. There are two ways to do this: using Run in the
Start Menu or using My Computer.
Installing Through Run
Fig. 1
3
Click and open the Windows Start Menu on the Taskbar and select “Run…” This
brings up the “Run” dialog box, as seen above. Click on the “Browse” button to open a
separate dialog box that will let you navigate through your computer and network.
Locate the CD-ROM drive and click on it to highlight it. You should see a folder titled
“Collision Database Installation.” It contains the installation files for the Collision
Database. Open the folder and find the file titled “Setup.exe.” Click on the file to
highlight it and then hit “Open.” Windows will place the “path” name to the Setup.exe
file in the Run box, as shown in the Run box image above. “D” represents the letter of
the CD-ROM drive; it's followed by the folder name and then the file name.
If you already know which letter represents your CD-ROM drive, you can type in the
path name in the Run box. It should have the following format:
D:\Collision Database Installation\setup.exe
“D” represents the letter of the CD-ROM drive.
Click “OK” to run setup. Go to Step Two.
Installing Through My Computer
If you prefer, you can install the Collision Database through the Windows desktop.
Double-click My Computer to open its window and then double-click the CD-ROM icon.
You should see a folder titled “Collision Database Installation.” Double-click on the
folder to reveal the contents.
Look for the
“Setup.exe”
file
Fig. 2
4
STEP TWO
After opening the Setup.exe file, you will see a welcome screen (Fig. 3).
Fig. 3
The welcome screen contains a few preliminary instructions as well copyright
information. To continue with setup, just hit “OK.” If you do not want to install the
Database at this moment, choose “Exit Setup.” And if you want further information on
setup, click “Help.”
STEP THREE
The third step involves selecting a directory; in other words, telling the software where
to place the program files and data. Setup creates a default directory, containing a
“Crossroads” folder (abbreviated “Crossrds”)we recommend that you use the default
directory. Of course, it can be changed, but for ease of use and for the ease of future
updates, it is best to use the given path.
5
Fig. 4
As shown in Fig. 4, the default directory is C:\Crossrds. To change the destination, use
the “Change Directory…” button. You can also exit setup if necessary.
To proceed, just click “OK.”
STEP FOUR
Now you are ready to begin installation. Click on the “Complete” button (Fig. 5). You
still have the option of changing the directory or exiting setup.
Click
“Complete”
to begin
installation.
Fig. 5
6
STEP FIVE
When new programs are installed in Windows, Windows itself sometimes creates
“program groups.” A program group connotes several programs or program-related
files that are placed together in one location, usually a single folder. After beginning the
installation process, the Collision Database setup will specify a program group.
You can change the program group if you want, but setup does create a default
program group. We do recommend that you stay with the default group.
Fig. 6
After verifying the program group, hit “Continue.”
STEP SIX
Sit back, relax, and wait while the program installs. You might be asked to restart
Windows to complete the setup; if this happens, go ahead and restart. Once the files
have been installed from the CD, you should see a window containing the program
icons that are contained in the “Programs” section of the Windows Start menu (Fig. 7).
7
Fig. 7
The main icon is the “Crossroads Collision Database” icon, which opens the Collision
Database.
STEP SEVEN
The Launch Menu
Installing the Collision Database from the CD is the main part of the setup process, but
it is not the entire process. Once the program is installed, open the Database by either
double-clicking the program icon (it will probably be the shortcut in the Start menu
folder, as shown in Fig. 7 above) or by clicking Start, navigating to Programs, moving
over to Crossroads Collision Database, and then highlighting and clicking the
Crossroads Collision Database icon. Opening the program will bring up the Launch
Menu (Fig. 8).
8
Fig. 8
The Launch Menu provides a variety of options, which include:
Full Collision Database: includes all input and edit options, all queries and
reports, and all verification capabilities.
Laptop Module: the “laptop” version of the Database for use by officers in the
field.
Input Module: allows only the input of data (no editing, verification, queries, or
reports).
Query Only Module: allows only queries and reports, graphs and reports (no
input or edit features).
Submit Module: works as an “approval process” to oversee and check data
input and collision reports before the data is input into the full Traffic Collision
Database; used in particular with data input through the Input Module and Laptop
Module.
Configuration: configures the Database so that it can run properly; make sure to
use this feature after installation but before running the Database.
Repair a Database: every once in a while, you might receive an error message
stating that the Database files are corrupt; click on this feature to fix the problem.
9
Exit to Windows: closes the entire Database program.
STEP EIGHT
Program Status
When you select Show Program Status in the Launch Menu, a series of fields
appears listing the main components of the Database, their location, and their status.
Fig. 9
The left column lists the necessary components: local program files, contained in
“Crossrds.mdb” (“mdb” stands for “Microsoft Database”); local data files, embodied in
“Collisnl.mdb”; and data files, contained in “Collisn.mdb.”
You've probably noticed that the data files have slightly different names: the local data
files have an “l” at the end of “Collisn,” while the main data files do not. The reason is
that, depending on how your computer is set up, the program will read to different data
files.
10
The local data files simply include the data inputted in the computer on which you are
working. If you work on a computer network, all of the inputting done on local
computers will be read into the main data files located on the network's central server.
In addition, if you are working in the “Input Module” or the “Laptop Module,” data will
be placed in the local data files until transferred to the main data files.
The important thing to remember here is that, if you are working on a network, the data
files and their locations should be setup properly so that the Database functions
correctly, and this is where Program Status comes in. Notice that the column in the
middle shows the path names and locations of the data files. The columns on the right
show the current status. If the status of each is “Connected,” then the Database will
run properly. If the status says “Not Connected,” then either the data files (the “mdb”
files) need to be placed in their proper locations or the path names need to be changed.
If you need to change the path names, you must enter the Configuration screen and
make the appropriate changes (see Step Nine below).
Once you have made the proper corrections, you can check to see if all the files are set
up properly. Just hit the “Re-Evaluate Status” button to have the program recognize
the corrections. If the status of each component is “Connected,” you're ready to go!
STEP NINE
Configuration
Through Configuration, you specify the location of the “Crossrds” folder, the “Data”
folder (which contains the “Collisn.mdb” file), and the Windows directory (which is
important because installation of the Database places an “ini” file in Windows). After
installing the Collision Database, it is a good idea to open Configuration and ensure
that the file locations and directories are correct.
11
Fig. 10
Fig. 10 shows the Launch Configuration Menu. This is where you “configure” the
software so that you can “launch” the Database. If you need to change any of the
directories in the fields on the right, click the “Select” button of that directory. A
Windows dialog box will appear in which you can find and select a specific folder
location.
Fig. 11
12
Select the drive which contains the “Crossrds” or “Data” folder, locate the folder, click on
it to select it, and then hit “OK.” The folder's path name will appear in the Configuration
menu.
When you are finished, hit “Exit” to return to the Launch Menu.
STEP TEN
Setting Up GIS
The last item to setup is the GIS feature, which provides mapping functions for the
Collision Database. To setup GIS, you first need to make sure that the computer on
which you are installing the Collision Database has the GIS folder. The folder itself is a
separate item on the Installation CD. Copy the GIS folder into the “Crossrds” folder
(dragging and dropping the folder will move all of its contents simultaneously). The
easiest way to copy the GIS folder is to use Windows Explorer, which shows you all of
the contents of your computer.
Next, navigate to the GIS folder on the hard drive and open it. Hit Ctrl+A on the
keyboard to select all of the folder's contents and hit “Properties” on the Windows
Explorer taskbar. When the Properties dialog box opens, the checkbox labeled “Read
Only” should be checked. Uncheck the Read Only box so that the files can be used
and manipulated in the Database. Finally, open the sub-folder in the GIS folder (it's
known as the street categories directory, and it should bear your city's name -- or at
least an abbreviation of it). Repeat the process for these files to change their properties
as well. The Read Only option must be unchecked.
For the next step in setting up GIS, enter the full Collision Database and then click the
“Configuration” button in the Main Menu (Fig. 12).
13
Click here to
access
Configuration.
Fig. 12
Once you hit the “Configuration” button, you'll see the Configuration screen (Fig. 13
below). At the top of the screen is a blank field labeled “Custom Configuration
Selection List”note the small down arrow at the right of the field.
Fig. 13
Click on the arrow to open the drop-down menu, which contains a list of all
customizable options. While the list is open, scroll down until you find Confirm Tables
Are Attached. Click on it to highlight it; the drop-down list will disappear and “Confirm
Tables Are Attached” will appear in the field at the top.
14
Click the down-arrow to open the drop-down list.
Scroll through the drop-down list by using the scroll bar.
Fig. 14
Next, hit the “Configure” button. A message should appear telling you that the
Database needs to attach the necessary ArcView tables (Fig. 15).
Fig. 15
When you click “OK,” a Windows dialog box will open, and you will need to locate the
“aat.dbf” file. It should be in the following path:
c:\crossrds\gis\[street coverage folder]
Where “C” represents the hard drive on which the crossrds folder is placed, and
“[street coverage folder]” represents the folder that bears your city's name (or an
abbreviation of the name) and contains more “dbf” files. Find the aat.dbf file; click on
the file to select it and then hit “OK.”
The Database will then confirm that the proper tables are now attached.
15
In the Event of the “Uninstallable ISAM” Error Message
Depending on the operating system you are running (whether Windows 95/98 or
Windows NT), you might get the dreaded “Uninstallable ISAM” error message while
attaching the GIS tables. If this happens, the first thing to remember is not to panic!
The problem has a very easy remedy.
Navigating through either My Computer or the Windows Explorer (which shows you
everything on your computer), locate the Windows folder if you are running Windows
95/98 or the WinNT folder if you have Windows NT. Within the Windows or the WinNT
folder, locate the crossrds.ini file and double-click to open it (it will open automatically
in Notepad.
You can also use the “Find” feature in the Windows Start menu to locate files and
folders. Just enter “crossrds.ini” as the name you want to find, set the feature to look in
the hard drive which stores the Windows folder, and then hit “Find Now.” When
Windows locates the crossrds.ini file, double click to open it.
To fix the Database so that the error message no longer appears and the Database
works properly with GIS, you need to change one line in the crossrds.ini file.
Fig. 16
The Crossrds.ini File
16
Scroll through Notepad until you find the section in the file labeled “[Installable ISAMs]”
(it's between the “[ISAM]” section and the “[dBASE III]” section). Locate the line
“dBASE III=C:\WINDOWS\SYSTEM\xbs200.dll”if the Database was configured for
Windows NT, the line will read “dBASE III=C:\WINNT\SYSTEM\xbs200.dll.” If you had
the “uninstallable ISAM” message, you need to change the path name to reflect the
correct name of your operating system.
Simply click your cursor in that line to edit it. If you are running Windows 95/98, the line
should read:
dBASE III=C:\WINDOWS\SYSTEM\xbs200.dll
If you are running Windows NT, the line should read:
dBASE III=C:\WINNT\SYSTEM\xbs200.dll
So all you are changing is the OS name in the line just after the “C:\” Be careful not to
overwrite anything else.
Once you have made the change, go to the File menu at the top of Notepad, select
“Save” to save the change, and then close Notepad.
You now have to backtrack a bit and repeat Step Ten to reattach the GIS tables. After
that, your GIS table configuration should now work fine, and the Database is ready to
use (once you finish the last step, Step Eleven, explained below).
STEP ELEVEN
The Final Step!
From the Launch Menu, select which form of the Database you wish to run by clicking
on its button. For instructions on inputting data, editing data, and running queries and
reports, consult your Crossroads Software Traffic Collision Manual and the Data
Input Module Manual.
17
CHAPTER TWO
The Traffic Collision Database
Fig. 1
TRAFFIC COLLISION DATABASE MAIN MENU
The main menu (Fig. 1) is the key with which you can enter, change, or delete data,
generate reports and charts, customize the database to your own specifications, and
perform other operations. The nine options in the main menu include:
Records Input/Edit/Delete
This will take you to the Records Menu, from which you can work with records for
collisions, citations, DUIs, or parking citations. This is where you go to put records into
the system and manage the information. For more information, see continue through
this chapter.
Queries and Reports
This option will take you straight to the Queries Menu. This is where you go to get
information out of the system; a variety of queries and reports are possible. For more
information, go to Chapter Three.
18
Street Name Verification
Street name verification allows you to verify the correct name of a street (or streets) in
collision records. For more information, head to section 2.2.
Graphs and Charts
Beyond this door lay multiple possibilities for charts and graphs covering collision types,
degree of injury, weather conditions, and more. For more information, navigate to
Chapter Four.
Data Verification
Provides the tools you need to improve data accuracy, including vehicle codes,
completeness of reports, and general data scrubbing functions. For more information,
head over to Chapter Five.
Configuration
This will take you to the Configuration Menu, where you can customize the database to
suit your specific needs. Consult Chapter Six for more details.
Exit to Launch Menu
Clicking this button simply takes you back to the Crossroads Software Main “Launch”
Menu.
Streets
This section is used to prepare and edit the street layout table that is the foundation of
all location information in collision, citation, and DUI records.
Exit to Windows
Well, to clarify the obvious, this option exits the program and takes you back to
Windows.
19
Part One
Collision Records: Inputting, Editing, and Deleting Data
From the main menu, click “Records Input/Edit/Delete” to take you to the Records
Menu (Fig. 2).
Fig. 2
Select which type of record you wish to work with, whether it's for collisions, citations,
DUIs, or parking citations. Custom Input Forms include customized records formats
for specific cities. If your city is one of several cities for which custom input methods
have been developed, choose this option. Otherwise, simply select whichever type of
record you wish to generate or modify.
Let's begin with the first choice, Collisions. You will see the Collision Records Menu,
and it will provide you with eight possibilities: Input Records by SWITRS; Enter Collision
Report; Create 555 Report; Read/Write Collisions; Edit/Print Collisions; Delete
Collisions; Case Tracking; and Exit to Main Menu (Fig. 3 on the next page).
20
Fig. 3
2.1 INPUT RECORDS BY SWITRS
The first step in this process requires inputting starting and ending dates corresponding
to the first and last collisions records you wish to read in (Fig. 4). The date format
gives you two options, long or short. The default format is long, i.e. four digits for the
year. The California Highway Patrol provides SWITRS records with four-digit years.
Use the long-date format to read in these records; it's the older SWITRS records that
use the two-digit date format. If you are using an older SWITRS record, simply push the
drop-down menu arrow and select “short.”
2.
1.
Fig. 4
21
Once you have entered the dates (step 1 in Fig. 4) and selected the appropriate date
format, click the Select SWITRS File button (step 2 in Fig. 4). You will see a familiar
Windows dialogue box (Fig. 5) that allows you to select the type of file you wish to
retrieve as well as the various drives available to you. Select whichever drive has the
SWITRS file, navigate to the location of the SWITRS file, select the file to highlight it,
and then click “OK.”
Fig. 5
If you have chosen the wrong date format, a dialog box will appear
and tell you that “The file does not seem to be in the proper SWITRS
format. Check the file and try again…” When you reply by clicking
“OK,” a second dialog box will appear asking, “Would you like to go
to the Street Verification Menu now?” Simply select “No,” which will
return you to the Collision Records Menu, and click again on the
“Input Records by SWITRS” button to begin the process again.
Once you have selected an individual SWITRS file and hit “OK,” the software
immediately begins importing the data. As it goes through its multiple calculations in
just a few seconds, you will be informed that the program is “Reading Input File…”
followed by “Total Records in File” and the “Records Read.”
22
When the program is finished reading the SWITRS file, it will tell you so (“Finished
reading the SWITRS input file”). For the sake of this lesson, let's suppose the SWITRS
file you chose contains 850 new collisions. The program will tell you that “850 collisions
were found in the file. 850 new collision reports were actually read into the database.”
Hit “OK.” You will then be asked, “Would you like to go to the Street Name
Verification Menu now?” Either click “Yes” or simply hit return to bring up the Street
Name Verification Screen (Fig. 6).
Fig. 6
2.2 STREET NAME VERIFICATION
Street Name Verification is the second step in inputting collision data; it allows you to
clean up your SWITRS report by making sure the street names conform to the formal,
uniform names in the Collision Database. Once your data is cleaned up, you can
generate much more accurate queries, reports, graphs, and other material.
The Street Name Verification feature will not work until starting and ending dates are
enteredthis is already done if, before you got to this screen, you already selected your
SWITRS file.
23
One of the wonderful features of Crossroads Software's Traffic
Collision Database is its intuitive, user-friendly interface As you type
in the street name, the program will automatically fill in possible
“matches”. Thus, if you type “c” and “a,” you might see “caBOT
ROAD” filled in, spelling “Cabot Road.” Instead of having to type the
entirety of the street name, you can simply hit “enter” if the program
fills in the street name you desire. If it doesn't, keep typing; your street
name will eventually appear (if it exists in the street layout table).
The Street Name Verification Menu gives you a variety of options.
Open Street Name Verification Report will generate a report of collisions during a
specified period of time and will tell you how many collision locations could not be
verified, as well as the percent verified.
Unique Unverified Locations creates a report of those unique locations that cannot be
verified by the Collision Database, along with the number of collisions at each of these
locations.
Unverify Collision Records is a feature to help “bail you out” in the event of numerous
errors or mistakes. By unverifying your collision records, you “undo” all verification, thus
returning you to your starting point.
Check Collision Verification checks the Street Name Verification against a series of
collision records and then gives you a report of those locations whose verification is
suspect.
Verify Collisions in Check List is a “follow-up” step after doing “Check Collision
Verification.” The Check Collision Verification will compare the primary and second
streets against the formal, uniform names in the street layout table and then produce a
report of unverified streets. This report, or “check list,” can then be verified with soft and
hard verification.
Verify Street Names checks all unverified locations against the formal, uniform street
names in the database and then generates a Street Name Verification Report.
24
2.3 SOFT VERIFICATION OF STREET NAMES
Because Street Name Verification allows you to clean up collision reports by making
sure the street names conform to the formal, uniform names in the street layout table of
the Collision Database, it is a very important step towards using the other features of
the Database. For example, a query that asks for all collisions by location during a
specific time period will not yield accurate location results until street name verification
is completed first.
Soft verification checks all the street names from your collision reports against all of
the formal street names in the Database's street layout table. Due to the individual
practices, preferences, and mistakes of each person who originally fills out a collision
report, total, perfect verification is not possible through soft verification. The Database
does its best to match all street names, but typically the process will result in a number
of unmatched names. This is where hard verification comes in (see section 2.4).
Let's try verifying street names and then generate a Street Name Verification Report.
With starting and ending dates in the appropriate fields, make sure verification type is
selected as soft (step no. 1 in Fig. 7) and then click on “Verify Street Names” (step no.
2 in Fig. 7). This begins the verification process, which in most cases should take no
more than a few minutes.
2.
1.
Fig. 7
When the program asks if you would like to open a report, simply click “Yes” (or hit
return). You will see a report that looks very similar to the one in Fig. 8 (next page).
25
Fig. 8
This is a sample report for the period from February 1, 1999 through December 21,
1999. The total number of collisions for the period is 2,397. 770 location names could
not be verified, and the percent of verified locations is 67.88.
Soft verification compares location information for collision records
with the street layout table, changing as many reported street names as
it can on its own. After completion, the hard verification process will
let you correct street names for collision records that the soft
verification process was not able to correctly identify. After the hard
verification process, the percentage of verified street names will
increase, usually some point between 97 and 98 per cent. Getting as
close to complete verification100 percentis ideal, of course, but is not
achievable, primarily due to the personal, idiosyncratic, and sometimes
erroneous practices of human beings!
26
2.4 HARD VERIFICATION OF STREET NAMES
Hard Verification allows you to verify one-by-one those locations that could not be
verified through the regular soft verification process. By selecting the verification type
as hard and then clicking on “Verify Street Names,” you will see the following screen
(Fig. 9):
Fig. 9
Street locations are listed by primary road and secondary road, and streets are
automatically listed in the “Reported As” field. Street names are often reported in
abbreviated, unusual, or idiosyncratic form, and the Collision Database is unable to
recognize automatically such nomenclature. The Best Guess field will contain the
closest possible match if one is available. The Existing Streets field contains a dropdown menu that includes the formal names of all of the streets in your city. You can
select the appropriate name from this list.
Take a note of the Closest Matches field. If the Collision Database finds a perfect
match for a street name, this field will be blank, and the street name will appear in the
Best Guess field. If, however, the Database does not find a perfect match, the three
closest matches will appear in the Closest Matches field. (The Closest Matches
search is based on locating similar letters among all the street names in the street
layout table.) If the proper street name appears in this list, you can select it by clicking
on it with the mouse.
27
“Scratch Pad”
Another of Crossroads Software's user-friendly features is the Scratch Pad, located at
the center of the Select Street Names screen (see Fig. 9). You can use the Scratch
Pad if the Collision Database is unable to find perfect matches for the reported street
names. Either type in the name of the primar y or secondary road in the Street
Name field of the Scratch Pad or select it from the drop-down menu (just hit the
down-arrow on the right). Once you find a match, click on the drop-down menu of
the Cross Street name to bring up a list of all the streets that cross the first Street
Name. Once you find the appropriate name, click on it to highlight and place it in
the field box.
Note that when you select a street name from any of the boxes above the Scratch
Pad, the street name will appear in the Scratch Pad. A convenient way to pick the
correct street names is to select a street name for either the “Primary” or
“Secondary” road from above that you know to be correct, and then select the
correct “Cross Street” name from the Scratch Pad.
Once you have verified a location, simply click the “OK” button to enter it into the
collision report and to proceed to the next unverified location.
“Aliases”
Some street names, typically major streets, have commonly-used abbreviations. For
example, if your city has a Martin Luther King Avenue, chances are it is often
abbreviated as “MLK Ave” or “MLK.” Such “aliases” can be added to the database
by simply clicking the “Add Primary to Alias Table” if it's a primary street name or
“Add Secondary to Alias Table” if it's a secondary street name. Use this feature
only when the abbreviated street name translates to one, and only one, possible
solution street.
28
The reason why aliases can only be used with one, and only one,
possible solution street is because the Collision Database will always
translate the alias into one, and only one, formal street name. Thus
“MLK” is entered as an alias for Martin Luther King Boulevard; from
that point on, the Database will always read “MLK” as Martin Luther
King Boulevard. Avoid using aliases if there is more than one possible
solution street. Let's say, for example, that “Rt 30” (meaning “route”
30) is a typical abbreviation for Main Street. But the same street
eventually changes names and becomes First Street. If the alias “Rt
30” is entered for Main Street but a collision actually occurred on First
Street, the collision report will therefore be incorrect.
At the bottom half of the hard verification screen are the “Selected Street Names”
boxes (Fig. 10). If a street name has been selected (by clicking on it), that name will
appear in either the primary or secondary road field of this section. These are the street
names that will go directly into the collision report. Notice that the form also contains
date, time, distance, direction, and other information about the collision.
Fig. 10
Once you have finished hard verification of your street names, click “OK” to proceed to
the collision record.
29
2.5 VERIFYING A SPECIFIC LOCATION
If you want to run a verification for specific street-name spelling of a primary or
secondary road, enter the names in the street name and/or cross street fields on the
Street Name Verification form.
2.6 ENTERING COLLISION REPORTS USING THE COLLISION INPUT
FORM
If you are not entering traffic collision information in SWITRS format or through a 555
report (for entering 555 reports, see section 2.7), you can input collision reports through
the Collision Input Form. From the Traffic Collision Database Main Menu, click
“Records Input/Edit/Delete,” and click “Collisions.” From the Collision Records
Menu, select the “Enter Collision Report” option; this will take you directly to the
Collision Input Form screen (Fig. 11).
Fig. 11
30
Simply enter in the conventional collision information in the appropriate fields, such as
city, judicial district, county, date, time, officer ID number, etc. Note that some of the
fields offer drop-down menus, as well as the user-friendly “fill-in” feature that suggests
possibilities as you type. See the separate Collision Type Manual for detailed
descriptions of each entry.
Near the bottom of the screen are seven buttons, grouped according to type, that will
take you to additional screens. For example, to add a new party, simply click on the
“Add a Party” button; to edit a partywell, there's an “Edit a Party” button as you might
expect.
The “Add a Party” screen looks just like Fig. 12 below.
Fig. 12
Once you have entered all of the necessary information, select “Input This Party,”
unless you decide not to keep the data. In that case, select “Delete This Party.”
The Conditions screen (Fig. 13) in the Collision Input Form allows you to enter
information concerning weather, road conditions, and other condition and party
information found on page two of the 555 collision report form. Once in this screen, you
may enter additional party information. When finished with the Conditions form, simply
click the “Back to Page 1” button to return to the Input Form.
31
Fig. 13
Finally, you can use the remaining additional forms (or screens) to enter additional data
about witnesses, passengers, or victims, as well as a narrative about the traffic collision
and custom information.
When you have finished filling out the Collision Input Form, the collision record itself
cannot be entered into the database until you hit the “Input This Record” button at the
top right of the form (Fig. 14). If for any reason you wish not to input this record and
want to delete the information -- hey, we all make mistakes, right? -- simply select the
“Cancel this Record” button at the top right.
If You Change Your Mind
When You’re Finished
Fig. 14
32
2.7 ENTERING COLLISION INFORMATION THROUGH A 555 REPORT
Fig. 15
Fig. 15 shows page one of the 555 Report, which is very similar to the Collision Input
Form and generally follows the same steps as the Input Form. The 555 Report is
simply another way to enter collision information into the Collision Database.
This input method is best used if you want to create a printed copy of the 555 form as
well as input the collision record for analysis.
Page 1 displays the first page of the 555 form; to see and fill out the second page, click
the “Page 2” button (when you are at page 2 and you wish to return to the first page, all
you have to do is hit the “Back to Page 1” button). To enter collision information and
other data, just click in the field you wish to write in. The field will turn yellow and a
cursor will appear. Start typing, and when you complete each field, press the “tab” key
to advance to the next one. Note that, like many other parts of the Collision Database,
the 555 Report has drop-down menus that allow you to select a street name, weather
condition, or other information from a list of possibilities -- or the Database's smart
features will fill in those possibilities as you type.
33
Some of the fieldssuch as date and timehave fixed spaces or digits. For
example, you can enter a maximum of eight digits for the date. Once
you have reached the total number of spaces or digits, the cursor
automatically jumps to the next field, thus saving you a keystroke or a
mouse-click. Some of these fixed fields have alterable settings, which
can be changed in the Configuration feature of the Collision
Database. For more information, go to chapter five.
Like the Collision Input Form, the 555 Report Form has options to:
Add a Party
Edit a Party
Add Injured/Witness/Passengers
Edit Injured/Witness/Passengers
Create a Narrative (556 Report)
There is one option available only to the 555 Report Form: the Collision Investigation
Manual. The Collision Investigation Manual will reference the actual CHP Collision
Investigation Manual for each field in the 555 Report. The feature will not work if you
have not selected one of the fields in the report form. If you have selected a particular
field and wish to look it up in the manual, click the “Collision Investigation Manual”
button, and the manual will appear in a separate pop-up window (Fig. 16)
Fig. 16
34
The “Add a Party,” “Edit a Party,” “Add or Edit Injured/Witness/ Passengers,” and
“556” options work quite similarly -- click on whichever feature you wish to use, enter
your data in the appropriate fields, and then click “Input” or “Delete” to enter the
information into the Database or to delete it completely.
Let's look at an example. From the 555 Input Form, hit the “Add a Party” button.
Click Here
You should now see the Party Input Form as shown in Fig. 17 below.
35
Fig. 17
The other add and edit features follow the same principle, although one extra step is
added if you edit a party or edit injured/witness/passengers: a dialog box will appear
allowing you to select a specific party or injured/witness/passengers from a list. Click
the one you want to edit and then hit the “OK” button.
2.8 READ/WRITE COLLISIONS
A very uncomplicated feature of the Collisions Database, the Read/Write Collisions
option allows collision records to output to an external database or to be read into the
internal, Crossroads Software Database from an external database. From the Records
Menu, select “Read/Write Collisions.” Once the “Archive Collision Records” screen
appears, simply enter a range of dates and then click on the appropriate button at the
top left, whether you wish to write the records into another, external database or you are
reading the records into this Database (see Fig. 18).
36
Fig. 18
When you output records to an external database, the program will tell you how may
collisions records it will export and prompt you to confirm the process. Fig. 19 is a
sample of such a message. Once you click this “Yes” button, a dialog box appears for
you to specify the location and name of a database file that you will create that will hold
the collision records. Note that this process “copies” the collision records out; it does
not “move” them out.
Fig. 19
When you read records into the Collision Database, a Windows dialog box will appear
allowing you to find the data file you wish to import. Select whichever drive has the file,
navigate to the location of the file, click on it to highlight it, and then click “OK” (Fig. 20).
Any collision records in the selected database, and within the specified date range, will
be copied into your database.
37
Fig. 20
2.9 EDIT AND PRINT COLLISION RECORDS
Fig. 21
Fig. 21 shows the screen of the Edit/Print Collisions option, one of the wonderfully
ingenious features of the Collision Database. You can edit the information for any
collision record or make a print-out of any collision record. And to find a specific
collision, you only need one piece of information, whether it's a date, report number, or
street name. Of course, the more information you enter to find a specific collision, the
quicker it is to bring that record up.
38
Looking at the Edit/Print Collisions screen in Fig. 21, notice that there are four blank
fields covering date, report number, street name, and cross street. Enter whatever
appropriate information you have. If you only know the date of the collision, put in the
date. If you only know the street name, enter it. Once you have entered the search
criteria, click on the “Find Collisions” button at the top of the screen. The database will
find and display all relevant collisions virtually instantaneously. The resulting collision
records will appear in the “Collisions” field at the bottom.
For example, using our hypothetical database for Hill Valley and entering only a date of
January 30, 1995, the Collision Database will give all collisions that occurred on that
day within the city and then display the records in the Collisions field (see Fig. 22
below).
Fig. 22
If you search for collisions using only a date or a street name, there is a good chance
the database will present you with more than one collision record. If that happens,
simply click on the collision record you wish to edit, print, or delete. After you have
selected it, it will appear in the Collisions field.
39
Once you have located the collision record you wish to edit or print, the next step
involves the five large buttons at the center of the screen. They look like this:
Fig. 23
These options should be relatively self-explanatory. To view either the 555 report or the
556 report of the collision you have selected, just click the appropriate button.
If you choose the “Edit this Collision” option, the collision information will appear in the
collision report format, the very same format used for the Enter Collision Report
feature. Once you have made the appropriate changes, click the “Keep Edit Changes”
button to enter the changes into the database or the “Cancel Edit Changes” if you
decide to discard whatever amendments you have made.
“Delete This Collision” does exactly what it says--it removes the specific collision
record from the database.
2.10 DELETE COLLISIONS
The next-to-last option in the Records Menu is “Delete Collisions.” This allows you to
delete all collisions within a range of dates. So, for instance, if you want to delete all
records between February 1, 1995 and March 31, 1995, all you would need to do is
enter the starting date and ending date and then click the “Delete From Collision
Database” button (Fig 24).
Fig. 24
40
Keep in mind that the dates you enter are through the starting and
ending dates, not up to those dates. This means that if you want to
delete records between January 1 and January 31, 1996, including the
collisions that occurred on January 1 and 31, you would make
“01/01/1996” your starting date and “01/31/1996” your ending date.
But if, for example, you want to delete records from January 1 up to
January 31 (meaning, not including January 31), you would make
“01/01/1996” your starting date and “01/30/1996” your ending date.
Part Two
Citations and DUIs
2.11 CITATIONS AND DUIs
Fig. 25
From the Main Menu (Fig. 25), select the “Citations” button to bring up the “Citations
Records Menu” (Fig. 26).
41
Fig. 26
The “Citation Records Menu” gives you four possibilities: enter citations, edit
reports, read/write records, and delete citations. For detailed, step by step
instruction for entering citation information, please refer to your Data Input Module. In
the meantime, you will find some brief explanations of the citations features below,
along with a few screen shots to help you through the process.
Fig. 27
42
Fig. 27 displays the Citation Input Form. Like the other forms in the Collision
Database, each field highlights in yellow when you click it, and the cursor appears. To
move to the next field, all you have to do is hit the tab key. If the field has a fixed length,
the cursor will automatically jump to the next field once you have filled in the maximum
number of spaces.
Note that many of the fields have drop-down lists -- just click on the down arrow -- and
you can select from the available options or (without clicking the down-arrow) you can
start typing and the Collision Database will fill in possibilities.
Another way to open the drop-down list is to hit the <F4> key.
Upon completing the form, click the “Input Citation” button to enter the citation or, if you
decide you want to trash the citation, click the “Cancel Input” button.
The DUI Input Form works essentially the same way and possesses the same
features. From the DUI Records Menu (Fig. 28), hit the “Enter DUI Reports” button;
this will bring up the Input Form (Fig. 29).
Click Here!
Fig. 28
43
Fig. 29
Enter all the relevant data in the fields and then click the appropriate button to input the
DUI record (or to cancel the record). Once again, for a more detailed description of the
DUI Input form, see your Data Input Module manual.
2.12 DELETE CITATIONS OR DUIs
To delete citations or DUIs, select the Delete Citations option from the Citations
Record Menu (Fig. 30) or the Delete DUI Reports from the DUI Records Menu (easy,
isn't it?). Both delete features will ask you to enter a range of dates; once that is done,
just click the Delete button to the right of the date fields (Fig. 31). If you want to bail out
without deleting any records, click the back button.
44
Click Here!
Fig. 30
For details about entering dates, see the “hand note” at the end of section
2.10.
Fig. 31
Enter Dates
Click Here to Finish the Job
45
2.13 EDIT REPORTS
If you have read every page so far (and thank you if you have!), you might remember
the section on editing and printing collisions (section 1.9). The Edit Report option in
both the Citation Records Menu and the DUI Records Menu provides similar editing
and printing power, but at three times the capability. It allows you to find, edit, delete,
and view DUIs, citations, and collisions.
So, how do you use this powerful feature? All it requires is a few set of clicks and data
input.
First, click the “Edit Reports” from either the Citation Records Menu or the DUI
Records Menu (Fig. 32).
Click Here
Fig. 32
This will bring up the following screen (Fig. 33):
46
Fig. 33
As the instructions at the top of the screen state, you can “enter any available
information” that you might have, or you can fill all the fields. Notice the three large
buttons at the very top: “Find DUIs,” “Find Cites,” and “Find Collisions.” Simply click
the type of record you wish to search, and the results will appear in the respective field
at the bottom of the screen. To select a specific citation, DUI, or collision record, click it
once to highlight it.
Now, notice the seven large grey buttons on the left and the right. These do exactly as
they're labeled -- edit or delete citations, edit or delete DUIs, and edit or delete
collisions. The “Show 555 Form” button will bring up the respective 555 report, which
you have the option of printing.
For an example, take a look at Fig. 34 below. In this sample, we have a starting date
of January 1, 1999 and an ending date of January 31, 1999. With only those two fields
completed and the others blank, we hit the “Find Cites” button, and it brings up a list of
all citations for the month of January. Notice that the records are presented in a list in
the Citations field near the bottom.
47
Fig. 34
Go to the next page to learn about reading and writing records into and out of the
Database …
48
2.14 READ/WRITE RECORDS
The Read/Write Records feature can be accessed from either the Citation Records
Menu or the DUI Records Menu by simply selecting the “Read/Write Records” option.
One mouse click will bring up the External File Input/Output Screen (Fig. 35).
Fig. 35
Inputting or outputting collision, citations, or DUI records to or from an external database
is a relatively easy process, and it works much like that of the Read/Write Collision
feature in the Collision portion of this database (see section 2.8). The first step requires
setting the parameters of the data you wish to import or export, or, in other words, the
starting date and the ending date. This will include all collision, citation, or DUI
records between and including those dates (for more on entering dates, see the “hand
note” at the end of section 2.10).
Once you have entered a range of dates, take a look at the buttons in the menu. All the
buttons on the left are for inputting data from an external database; all the buttons on
the right are for outputing data to an external database. If you are importing records,
simply select the type of records you will be retrievingcollision, citations, or DUIand a
Windows dialog box will appear, from which you can select the appropriate file (Fig. 36).
49
Fig. 36
Select the drive your database is located on, navigate to the folder that contains the file,
click on the file to highlight it, and then hit “OK.” The Collision Database program will
then read the file, allowing you to use the data with any of the program's features.
If you are outputting records to an external database, make sure you have a range of
dates entered, and then hit the relevant button (whether collision, citation, or DUI). The
program will tell you the exact number of records to be exported and ask you if you are
certain about outputting them (Fig. 37).
Fig. 37
Click “Yes” or hit return. A Windows dialog box just like the one in Fig. 36 will pop up.
Type in a name for your new file, select the folder you wish to place it in and the drive
on which you want to place it, and then hit “OK.” The Collision Database software will
then create the external database with the records you have chosen.
50
Part Three
Parking Citations
2.15 PARKING CITATIONS
Entering parking citations into the Traffic Collision Database is as easy as giving them
out to mis-parked motorists! From the Main Menu (Fig. 2), select the “Parking
Citations” option to open the Parking Citations Records Menu (Fig. 38 below).
Fig. 38
Let's begin with entering parking citations. Clicking on the “Entering Parking Citation”
button will take you straight to the Parking Citation Input Form, where you can enter
all your citation information (Fig. 39). The form works the same way as our other forms
do -- you can click on a field to enter information, and it will turn yellow and contain a
blinking cursor. If the field has a fixed length, the cursor will jump to the successive field
automatically, or, if this does not occur, you can tab over to the next field or click in it
with the mouse. A few fields contain drop-down menus (notice the down arrows) to
simplify your work. Once you have entered all of the necessary information, select
“Input Citation” to enter the record into the database. If you decide you do not want
the citation or if you wish to start over, hit the “Cancel Input” button.
51
Fig. 39
There are two other features in the Parking Citation Records Menu: Edit Parking
Citations and Delete Parking Cites.
2.16 EDIT PARKING CITATIONS
If there is any information in a parking citation that you wish to change, you can edit the
recordyou guessed itby hitting the “Edit Parking Citations” button on the Parking
Citations Records Menu. This will bring up the Parking Citation Table (Fig.40), which
includes a column of fields in which you can edit any amount of the parking citation
information that you wish.
52
Fig. 40
Once you have finished making your changes, simply click the exit button:
53
2.17 DELETE PARKING CITATIONS
Deleting parking citation reports is a simple two-step process: first, enter a range of
dates for those parking citations you wish to excise; second, hit the aptly-named
“Deleting Parking Citation Reports” box (Fig. 41). (For more detail on entering dates,
see the “hand note” at the end of section 2.10.)
Fig. 41
The program will prompt you once it has calculated the exact number of records to be
deleted; it will ask you to confirm your decision to throw out those records. Hit “Yes” to
delete the records (well, of course!).
54
CHAPTER THREE
Queries and Reports
In this chapter, you will learn how to generate the many queries and reports available
through Crossroads Software's Traffic Collision Database. These queries and reports
illustrate the amazing capacity of the software and give you the power to use your traffic
collision data in important, productive, and efficient ways. In a sense, the Queries &
Reports and the Graphs & Charts section are the heart of the Database and represent
the most substantial features of this product. We'll reserve Graphs & Charts for the
next chapter, but let's go ahead and plunge into Queries & Reports.
Let's start at the beginning. From the Traffic Collision Database Main Menu, select
the “Queries and Reports” option.
This will take you to the “Queries Menu” screen, as seen in Fig. 1 below.
Fig. 1
55
3.1 GENERAL QUERY
Let's start with making a general query in the Collision Database. Click the “General
Query” button at the top of the left column in the Queries Menu. A general query
allows you to extract data on collisions that occurred during a specific time period. But
the really important thing is that you can be as inclusive or as exclusive, as exhaustive
or specific, as you wish, all depending on the type of information you desire or the type
of report you want to generate. For example, you can run a query on all collisions
between a starting date or an ending date. Or you can look at all collisions that
occurred on a specific street, or that occurred on a specific day of the week; you can
just as easily run a query on head-on collisions only, or perhaps a query based on a
specific number of injured parties.
Fig. 2
56
Fig. 2 above shows page 1 of the General Query screen. Notice the buttons at the top.
The General Query option has four pages, one for collision info (page 1), one for
party info (page 2), one for victims/conditions (page 3), and one for custom input
(page 4). After those buttons, the remaining are:
query type: here, you have three options, which will control the amount of information
to be printed in a report: “summary,” “complete,” or “abbreviated.”
sort by: tell the program how you want to sort the query results; you have twenty-four
different settings to choose from.
run Query: the most important button on the screenonce you have entered the
information by which you want to query the Database, hit this button and let the program
do the rest of the work!
Pages two, three, and four operate by the same procedures. If you want to conduct a
query according to party information, use the fields on page two; if you want to execute
it with weather or road condition or victim information, go to page three; and if you want
to use a custom input, well, that's what page four is for.
At each page, you simply enter the data with which you want to run a query, select the
“query type” and then tell the Database how you want your information sorted. Note
that the default setting for “Query Type” is “summary,” and the default setting for “Sorted
by” is “date and time.” To change each field, click the down-arrow to open the dropdown menu and select your choice by clicking on itor begin typing in one of the fields
and the program will auto-match your choice.
Sample Query
Let's try running a sample general query to give you a concrete idea of how the process
works. For our city of “Hill Valley,” we'll run a query for all collisions during 1997 that
occurred on “Commonwealth Avenue,” were rear-end type collisions, and that took
place on Fridays. We'll leave the “Query Type” and “Sorted by” with their default
settings.
The steps for the query would be as follows:
1. In the Street Name field, enter the name of the street (in this case,
“Commonwealth Avenue”).
2. Enter Starting and Ending Dates if they are not there already (in this case,
“01/01/1997” and “12/31/1997”).
3. In the Collision Type field, click on the down-arrow to open the drop-down
menu, find the type “rear-end,” and click it to highlight it.
4. In the Day of the Week field, click on the down-arrow to open the drop-down
menu, find “Friday,” and click it to select it.
5. Finally, click the Run Query button.
57
Once the program calculates the results, it will open a Collision Summary Report that
will look similar to that in Fig. 3 below.
Fig. 3
You might be thinking, “Well, what if I want to run a query that includes collision
information and party and condition information?” The answer is: you can do it! The
Collision Database General Query feature allows the user to combine various types of
information across the four pages for a search and for generating reports.
In this manual, we'll use another example from the city of “Hill Valley.” This time, let's
say we want to run a query based on the following information: collisions involved with
any pedestrian between the ages of five and eighteen that occurred during 1997 on
clear days.
The steps for this query would be:
1. On Page 1 of the General Query screen, in the field noted “Involved With,”
click the down-arrow to open the drop-down menu, find “Pedestrian” and click it
once to select it. Check the Starting Date and Ending Date fields to make sure
the proper dates have been entered.
2. At the top of the screen, hit the “Page 2 Party Info” button to go to the second
page of the General Query screen.
3. In the field marked “Age (between),” type a “5” in the first box and an “18” in
the second box.
4. Go to page three by pushing the “Page 3 Victims/Cond” button.
5. In page three, locate the “Weather” field (it's the first one at the top) and click
the down-arrow. Find the word “clear” and click it to highlight it.
58
6. Last, hit “Run Query” and just try counting the milliseconds it takes for the
program to generate results.
Fig. 4 is the summary report for this sample query:
Fig. 4
Hopefully, these examples have given you an idea of just how flexible and powerful the
General Query feature is. It's a good idea to go through each page of the Query
screen to familiarize yourself with all of the fields and options, and you might want to run
various queries of your own using different fields to help you get used to this feature.
3.2 INTERSECTION HISTORICAL
Another powerful tool in Crossroads Software's Traffic Collision Database, the
Intersection Historical query, creates collision reports and diagrams of collision activity
during a specified period of time at a specific intersection. Reports are text-based,
table-oriented print-outs of collision information while diagrams include a diagram of the
specified intersection and “directional,” color-coded images for each collision.
Take a look at the Collision Diagram/Intersection Historical Report Form in Fig. 5
below.
59
Fig. 5
Gander at the large buttons across the top and the fields running from top to bottom in
the screen. You'll notice that there are two pages (Fig. 5 is a screen shot of page 1),
each asking for different types of collision data. Let's go through this step by step,
although you will probably realize fairly quickly how easy this powerful tool is to use.
For the first step, you must provide the Database with “Collision Diagram
Specifications.” Working from the top down, enter the names of the intersecting
streets in the Street Name and Cross Street fields (note the drop-down menus, from
which you can select your street names).
Now enter the Starting Date and Ending Date to specify the time period.
Below the date fields are the distance fields (Fig 6).
Fig. 6
60
“Distance” refers to the distance from the specified intersection in which all collisions
occurred. So, for example, you can have the collision diagram and report include all
collisions within fifty feet of the intersection (the default setting) or within any distance
you prefer. You may select a second distance for rear-end collisions, “on approach” to
the intersection. This allows you to define rear-end collisions (that are approaching the
intersection) as intersection-related collisions even further back if you desire. The
default is 150 feet, but you can change this measurement as well.
If you want to exclude all collisions that occurred outside the intersection and include
only those that occurred inside it, click the box in the “at intersection” field:
Before you generate a report or collision diagram, there are two more
options to consider: which type of information you want to show on
the collision diagram and whether or not you want a “collision rate” to
be reported.
Take a look at the box in the bottom left of the Collision Diagram/ Intersection
Historical Report Form. This little box allows you to select the type of information to
include in your collision diagram (fig. 7 below).
Fig. 7
The collision diagram will show the date of each collision and one of the three additional
options: primary collision factor, time of collision, distance and direction. It is not
possible to include all of this information on the same collision diagram because doing
so would make the diagram too overcrowded and unreadable. But you can go through
each option and generate three separate reports on the same collisions.
61
At the bottom right of the Report Form is a field for “traffic volume” (Fig. 8). You have
the option of including typical 24-hour traffic volume for the specified intersection in your
Intersection Historical report. The volume figure represents the number of
automobiles that pass through the specified intersection in a 24-hour period. If you
enter a volume for this intersection, the “collision rate” will be calculated and shown on
the report.
Fig. 8
To include the 24-hour volume in your report, simply click the “Get Volume” button.
Now, on to page two …
62
Fig. 9
Take a look at the figure above. This is page two of the Intersection Historical Report
form. These fields allow you to narrow the types of collisions that will appear in your
historical report and collision diagram. You have the option of filling in all the fields,
some of the fields, or none of them. All of the fields, save two, have drop-down menus
from which you can select possibilities. Look over the fields to get an idea of the
parameters with which you can narrow the report and diagram. For example, you can
restrict the primary collision factor, selecting “unsafe speed” or “improper turning.” If you
want to set the query to include information about pedestrians, collision type, lighting,
day of the week, time, or direction, you can do so by filling in the appropriate fields.
These settings will be listed in your historical report. If, however, you choose not to list
them, just click in the little box next to the option “Disable 'Settings Used for Query'
Section on Report.”
Once you have taken all of the necessary steps, just click on the “Intersection
Historical Report” to generate the report or on the “Intersection Collision Diagram” if
you want to bring up a diagram.
63
No matter which button you hit first -- either the “Intersection
Historical Report” or the “Intersection Collision Diagram” -- the
Database preserves the query specifications you entered. Thus if you
generate the report first and then want to create the diagram, you are
not required to re-enter your specs. When you go back to the Report
Form, you will find that your query parameters have remained intact,
allowing you to hit the “Intersection Collision Diagram” button
immediately. Of course, you have the option of changing any, or all,
of your specifications if you so desire.
Sample Intersection Historical Report
Let's look at an example. We'll take a sample from the city of “Hill Valley,” asking the
Database to generate an Intersection Historical Report for the intersection of Chapman
Avenue and Harbor Boulevard involving broadside collisions during the entire year of
1996.
After entering the street names and the dates on page 1 and then setting the “Collision
Type” at “Broadside” on page 2, the resulting Intersection Historical Report looks like
this:
Fig. 10
64
Notice that the report categorizes collision data by category: time, distance (from
intersection), direction, and so on. We can look at a detail of the report to illustrate the
type of collision information in the report (Fig. 11).
Fig. 11
Look over this detail to make yourself familiar with the format and the type of information
in the report.
Well, if you think that's impressive, wait until you see the Collision Diagram …
Sample Intersection Collision Diagram
The Intersection Collision Diagram provides a “diagram” of the specified intersection
with color-coded, directional images for the collisions. The top of the diagram lists the
street names and the dates included in the query; the bottom of the diagram has a table
of the number of collisions and a legend for understanding the images in the diagram.
Fig. 12 below is a detail of the top half of the Collision Diagram.
65
Fig. 12
In this particular Intersection Collision Diagram, notice that:
Each collision is represented by two symbols and two phrases of information -in this case, the date and the “primary collision factor.”
Each arrow represents one party.
In the collision near the bottom, there is only one arrow and a bicycle,
signifying, of course, that a motorist collided with a cyclist.
Now, notice that the arrows are different colors. These colors correspond to
the extent of injury, whether it is property damage only, injury, severe injury, or a
fatality. The color key is on page 2 of the collision diagram, along with a list of
the settings used to specify the query. If you want to change the key to the
color coding, click on the “Color Configuration” button at the top of the
Collision Diagram/ Intersection Historical Report form. You will see the
following screen:
66
Fig. 13
You can use the default color settings or you can select colors of your own. Click in the
box of whichever field you wish to alter, and then left-click once on the color you want.
Right now, the “Fatal” field is maroon, but we can change it to, say, light blue:
Fig. 14
Notice the change, done simply by clicking here.
67
You can also set the color coding to basic black and white by clicking the “Black
and White” button at the top of the Color Configuration screen.
If you decide you do not want to use the color changes you have made, just hit
the “Restore Default” button to return to the original color settings.
You should also notice that in the Collision Diagram some of the arrowheads are
hollow while some are solid; some of the arrows contain circles and other
shapes. To decipher these images, all you need to do is consult the legend,
which will appear at the bottom of the Intersection Collision Diagram, as seen in
Fig. 15.
Fig. 15
The “answer key”!
This particular Collision Diagram contains the date of each collision and “Primary
Collision Factor” (which, you might recall, can be selected from the Collision
Diagram/Intersection Historical Report form.) Here's a detail:
68
But we can ask the Database to include date and, say, distance and direction instead of
primary collision factor. If so, the diagram would read:
Notice that the “distance and direction” information is now included with the date.
In this case, the distance is listed as “0” because the collision occurred in the
intersection. If a collision occurs outside the intersection, the number of feet and the
direction are recorded, as in this example:
Notice that the “distance and direction” are now listed below each date.
This is essentially how the Intersection Collision Diagram feature works. It is a
powerful, yet simple, tool.
3.3 INTERSECTION HIGH INCIDENCE
The next feature in the Queries Menu is Intersection High Incidence. You can query
the Database about the intersections with the highest incidences of collisions over a
specified period of time. To begin, take a look at page 1 of the Intersection High
Incidence input form (Fig. 16).
69
Fig. 16
First, look at the large buttons at the top of the screen. “Page 2” will take you to the
second page of the form, where you can add more specific information to limit your
query. The “Top Locations” field is set at “10” as a default, which means that when you
run a query, the resulting report will include those ten locations with the highest
incidences of collisions. You can, however, change this number by clicking with the
mouse in the box and then typing a larger or smaller number.
Before we look at the option on page 2, let's look at the steps involved in running a
query from page 1 only.
!
!
!
!
!
the starting date and ending date must be entered in the Database's standard
format (“00/00/0000”).
the distance fields work the same way as the distance fields in the Collision
Diagram/Intersection Historical Report form. The default for “All Collisions” is
50 feet, and the default for “Rear-End” is 150 feet. You can change the distance
field if you wish.
if you want to include only those collisions that occurred in the intersection, click
the box in the “At Intersection” field.
“Update GIS Map”: for information on this option, refer to the Collision GIS
Mapping Manual.
“Select Shapefile Location”: allows you to give the resulting GIS map a name
and specify where it will be saved on the hard drive in your computer.
70
!
!
if you want to list the intersections according to collision rate (highest to lowest),
click the box in the field “Rank Intersections by Collision Rate.”
finally, you can alter the minimum number of collisions in the last field of page 1.
The default minimum number is 1.
Now take note of the three large buttons on the left side of the screen.
Fig. 17
Click on each one to generate a specific report -- each one shows the top intersections
as specified, but the “collision severity summary” breaks each intersection down by the
number of each degree of injury (fatal, severe injury, etc.). The “collision type summary”
breaks down the collision at each intersection by number of rear-end, head-on,
sideswipe, and other collisions. Let's take a look at the Collision Ranking Summary
report (Fig. 18). The intersections are ranked by number of collisions, highest to lowest.
In the figure below, the time period is the entire year of 1997.
71
Fig. 18
There is more than one intersection listed for the tenth location because, as you can
see in the report, several intersections had the same number of collisions over the
course of the year.
A copy of Collision Severity Summary report can be seen in Fig. 19. It covers a oneyear period.
72
Fig. 19
The Collision Severity Summary takes the “highest incidence” intersections from the
Collision Ranking Summary and reports the extent of collision injury across five fields
(fatal, severe, other visible injury, complaint of pain, and non-injury).
Lastly, there is the Collision Type Summary, which takes the “highest incidence”
intersections and provides data on the number of each of eight collision types for each
intersection (rear-end, head-on, side-swipe, broadside, hit object, overturn, vehicle and
pedestrian, and other; there's also a “not stated” category, just in case!).
Take a look at Fig. 20 below. This is a sample Collision Type Summary.
73
Fig. 20
The layout is very simple; each column represents one type of collision. So, for
example, the intersection of Chapman Avenue and Lemon Street had 3 rear-end, 1
head-on, and 6 broadside collisions during 1997.
You might notice that in Fig. 18, 19, and 20, each report states
“Number of Collision for the Top 10 Locations.” Remember that the
default number of locations is ten, but you can change the number if
you wish to include fewer or more locations. Simply enter the number
of locations you want in the box at the top of the Intersection High
Incidence input form (see Fig. 16).
74
3.4 RANKING BY COLLISION RATE
If you decide to rank the intersections by Collision Rate, this will add two additional
columns of data to the report. The Collision Rate is the number of collisions per one
million vehicles that enter an intersection.
Fig. 21
The sample Collision Ranking Summary report above ranks the locations by collision
rate.
3.5 USING PAGE 2 OF THE INTERSECTION HIGH INCIDENCE FORM
When you click the “Page 2” button at the top of the Intersection High Incidence form,
you will see the following screen (Fig. 22):
75
Fig. 22
Page 2 allows you to set the parameters for each type of query and report. You can
select such fields as “primary collision factor,” “collision type,” “lighting,” “day of the
week,” among others. Take a few minutes to familiarize yourself with the various
parameters in page 2. Virtually every field, save a few, have drop-down menus that
contain available options and that can save you some key strokes (and, hopefully, the
dangers of metacarpal-tunnel syndrome!). Also notice the three options at the bottom;
here you can tell the Database to show only those locations with no volume information,
to include “T” intersections only, or to disable the “Settings Used for Query” section on
the report. The “Settings Used for Query” looks like this (Fig. 23):
76
Fig. 23
Simply click in the box at the bottom of Page 2 to toggle this feature “off” if you do not
want it to appear in your report.
You can set as many parameters as you wish in the fields on Page 2;
you are not limited to any particular combination of parameters either.
What is more, the parameters themselves will not limit the amount of
collision and location information in the ranking, summary, or
collision type reports. Thus if you ask the Database to generate a
ranking summary with the top 10 locations, it will still produce a
report with the top 10 locations.
To use the features on page 2, all you need to do is:
!
fill in whichever parameters you wish to set for your query and report.
!
check any, or all, of the three options at the bottom if you want to use them.
!
click the “Page 1” button at the top to return to page 1.
!
select which type of report you want to generate by clicking the “Collision
Ranking Summary,” “Collision Severity Summary,” or “Collision Type
Summary” button.
3.6 MIDBLOCK HISTORICAL REPORT
It certainly doesn't take a genius to know that not every automobile collision occurs in an
intersection. Many collisions occur quite some distance from intersections, in the
“middle,” so to speak, of highways, avenues, and streets.
77
The Traffic Collision Software Database programmers were well aware of this fact when
they designed the software, and the feature they built in to the program is the Midblock
Historical section of Queries and Reports.
From the Queries Menu, click the “Midblock Historical” button to bring up the
Midblock Historical input form (Fig. 24).
Fig. 24
Like many of the other query and report forms, the Midblock Historical form has two
pages, the first for entering essential query information, the second for selecting
additional parameters. Fig. 24 above shows page 1.
In order to process a midblock query, you need to give the Database several important
pieces of information. These are: the Arterial (the street that the collision occurred on);
Limit 1 and Limit 2 (the two cross streets that will serve as limits to the arterial; collision
occurring outside these limits, while on the arterial, will not be included); and starting
date and ending date.
78
When you enter the arterial, begin typing in the field, and the Database will offer
possible matches as you type. You also have option of selecting the street name from
the drop-down menu.
Once an arterial is selected, you can enter the first and second limits. One way is to
open the drop-down menu in either the Limit 1 or Limit 2 field; the menu will provide
you with the names of all possible cross streets, as well as the direction of these streets.
Click to highlight and select the street name you want, or you can simply type it in.
Enter the starting date and ending date.
You can now generate a Midblock Historical report with this information -- just click the
“Open Report” button at the top of the screen. Notice, however, that you can alter
some of the query data, as well as select more parameters if you need to.
In page 1, the default values for “Distance” (for all collisions) is set at 50 feet, while that
for rear-end collisions is set at 150 feet. You can change these values if necessary.
You can also ask the Database to generate a GIS map for your query (for more, refer to
the Collision GIS Mapping Manual) or to limit the query to “only movement on
arterial.” Selecting “only movement on arterial” will limit the query results to those
collisions that had at least one party that was traveling on, or turning out or off of, the
specified arterial. In other words, this will eliminate all purely “cross-street” collisions.
If you wish to use Mileposts, simply click the box next to the command (Mileposts are
still in use in most counties to measure distance from a given point). You can lookup
ADT Volumes (Average Daily Traffic) and include these in the query. Click on the
button to look them up:
If you want to include ADT volume data in your report, you need to enter the volume
number in the blank ADT Volume field, just below the “Lookup” button. The field looks
like this:
Finally, you can set your query to include Primary Collision Factor and/or Highest
Degree of Injury. Just type within each field or use the drop-down menu to select your
choice.
Once you have adjusted these settings, just click the “Open Report” button to create
the report.
Now, on to page 2 …
79
Page 2 of the Midblock Historical form (click the “Page 2” button at the top of page 1)
allows you to set parameters for your query, just like page 2 of the Intersectional
Historical and Intersection High Incidence forms. Fig. 25 below is an image of page
2.
Fig. 25
Just like the other second pages of the other historical report forms, you can select as
few or as many of the parameters as you wish, simply by typing in the fields you want to
include or selecting options from the drop-down menus. If you want to disable
“Settings Used for Query” section, make sure to check the box at the bottom of the
screen.
Once you are finished with page 2, hit the “Page 1” button to return to the first page;
then hit the “Open Report” button to create the report.
3.7 MIDBLOCK HIGH INCIDENCE
The Midblock High Incidence form works the same way as the Intersection High
Incidence form. It has two pages, as well as the same fields, and allows you to
generate the same three reports: Collision Ranking Summary, Collision Severity
Summary, and Collision Type Summary. For details on making a query and
generating reports, see the instructions for Intersection High Incidence above, section
2.3.
80
3.8 REPORTS BY OFFICER
Through the Queries Menu, you can ask the Collision Database to create reports and
graphs of collisions, officer activity, citations, and DUIs. This is an incredibly easy
feature to use. First, take a look at the Reports by Officer screen (Fig. 26). Notice the
seven buttons at the top and the two fields in the middle.
Fig. 26
You have five reports, one graph, and an exit button to choose from, and all you need to
enter are the starting date and ending date. Once the dates have been entered, you
can generate the following reports:
1. Citations by Officer: this report will list each officer's name and the number of
citations issued during the specified time period.
2. Officer Activity Report (DUIs by Cites): this option breaks down the total
number of citations by category (e.g., unsafe speed, failure to yield, safety belt)
and lists the number of citations issued for DUIs.
3. Officer Activity Report (DUIs by Arrests): produces a report similar to the
Activity Report above, but lists arrests for DUIs, as opposed to citations for DUIs.
4. DUIs by Officer (Based on Cites): lists the names of officers and the number
of DUIs reported. Some police departments, however, choose to issue DUI
citations as well, and this is why this report is possible. It bases its results on the
number of citations.
5. DUIs by Officer (Based on Arrests): this report is similar to the other DUI
report, except it bases its information on the number of arrests entered for DUIs.
You can produce a graph of officer activity, the Officer Activity Graph, which is a more
“visually accessible” report, providing a colored graph of the number of citations and
DUIs by officer during a specified time period.
81
After you have entered beginning and ending dates, just click the “Officer Activity
Graph” button. Fig. 27 is a detail of a sample Activity Graph.
Fig. 27
3.9 COLLISION REPORTS
By entering a range of dates, you can use the Collision Reports section to generate a
variety of reports that, in essence, provide summary collision information in many
categories. Fig. 28 shows the Collision Reports screen.
Fig. 28
82
You can also run the query by city name, although notice that this can only be used for
the Collisions by Day and Time report.
You'll notice that nine of the buttons in the Collision Reports screen
are in gray type, as opposed to black type: this means that these reports
are unavailable. Crossroads Software will make them available in the
near future. You can generate these reports in the Monthly Reports
section, but, as the name implies, only for individual months. The
Collision Reports section here is a “variable date” section, which
allows reports to be produced for varying date ranges.
Because there are so many reports possible through this section, we won't provide a
sample for each one, but, rather, give you a few screen images so you can obtain an
overall idea of this part of the Database.
To use the Collision Reports feature, simply enter a range of dates using the standard
Database date format (“00/00/0000”). Change the values in the Distance fields if
necessary (the defaults, as usual, are 50 feet for all collisions, 150 feet for rear-end
collisions). And then just click the appropriate button for the report you wish to
generate.
Once you have generated a report and it appears on your screen, you have the option
of printing the report out. Click on “File” to open the File Menu and select “Print Report.”
If you wish to return to the input form, open the File Menu and select “Close” or just click
the “exit” button:
This will take you back to the Collision Reports form, and the dates you originally
entered will still be there, in case you want to generate another report.
If you do not want to print the report but wish to save it, you can save it to your hard
drive. Click on the “File” menu and click and select “Output to.” A dialog box will appear
asking you to select a file format -- “xls” for an Excel spreadsheet, “rtf” for rich-text
format, or “txt” for MS-DOS text. Click to highlight and select the format you want and
hit “OK.” A Windows dialog box appears allowing you to name your file and specify a
drive location and a folder location where you will place your file.
Fig. 29 below is a sample “Collisions by Day and Time” report for the city of “Hill
Valley” for 1999.
83
Fig. 29
In Fig. 30, we have a detail of a sample “Involved with by Severity” report for 1999.
Fig. 30
84
Finally, Fig. 31 shows a sample “Collisions by PDO/Injury/Fatal” report.
Fig. 31
3.10 QUERIES BY THE MONTH
Through Crossroads Software's Traffic Collision Database, you can run queries for
collision, DUI, and citation data and generate tabular reports, all based by a particular
month and year. The tabular reports are informative and easy to read. To run the
queries and generate the report, open the Queries by the Month (Fig. 32) screen by
clicking the appropriate button in the Queries Menu.
85
Fig. 32
You have ten possible queries/reports to choose from, each represented by a large
button at the top of the screen. As far as specifying data is concerned, all you need to
do is pick the month and the year for which you want to run a query. The month field
has a drop-down menu to make it easy for you to select a month with a simple click of
the mouse.
Once you have entered the month and year, simply click the button for the query/report
you need. When you are finished, or if you decide not to run a query, just click the
“back” button at the top right of the screen.
Fig. 33 (on the following page) shows a detail of the Citation Activity Log.
86
Fig. 33
This is the tabular format used for all of the reports in this section of the Database.
3.11 COLLISION STATISTICAL REPORT
The Collision Statistical Report is the only query/report (in the Queries by the Month
section) that asks you for more information than just the month and the year.
Once you enter a month and year in the Queries by Month screen, you will see the
following screen (Fig. 34 on the next page):
87
Fig. 34
As the instructions at the top of the screen state, enter data for counter reports, DUI
arrests, and hit and run investigations. “YTD,” of course, stands for “Year to Date” and,
in the Hit & Run field, “Closed” means closed investigations, “open” means that the
investigation is still pending.
Once you have entered your information, click the “OK” button. The program will return
you to the previous screen and then automatically generate a report.
Remember that, like all reports in Crossroads Software's Collision
Database, these reports can be printed out. Open the “File” menu at
the very top of the screen, move your cursor to “Print Report,” and
then click your mouse button. When you are finished viewing your
report on-screen, pull down the “File” menu and select “Close” (or hit
the “exit” button) to return to the Queries by the Month screen.
3.12 CUSTOM QUERY MENUS
These menus will be pertinent only if custom queries have been designed by
Crossroads Software for your city. You are welcome to try out some of these reportsyou
might find them quite useful.
88
3.13 CITATION REPORTS
Fig. 35
The figure above is the Citation Reports screen, accessed via the Citation Reports
button near the bottom of the Queries Menu. As you can see in this screen, you can
run a variety of separate queries.
Because each query/report uses the same basic procedure, we won't run through all of
thembut we'll provide a few examples to give you an idea of the options, as well as the
power, embodied in this part of the Database.
All you need to do is enter a range of dates (starting date and ending date, of course),
and then click the appropriate button for the report you want to create. Like other
reports in Crossroads Software's Traffic Collision Database, you can print each report
by selecting the “Print Report” command from the “File” menu.
Let's take a look at two sample reports. Fig. 36 below shows a sample “Breakdown of
Citation Statistics” report for the date range 01/01/1999-12/31/1999.
89
Fig. 36
For the same date range, let's look at a sample “Citations by Day and Time” report.
Notice that the times are listed at the column on the left; the days are listed along the
row at the top (Fig 37 on the following page).
90
Fig. 37
3.14 CITATION GENERAL QUERY
The one query in the Citation Reports section that requires more than a range of dates
is the Citation General Query. This query works quite similar to the General Query
process we looked at earlier (see section 2.1). This Citation General Query allows you
to extract data on citations that were issued during a specified time period, and you can
be as inclusive or as exclusive, as exhaustive or specific, as you wish, all depending on
the type of information you desire or the type of report you eventually want to generate.
If you want, you can run a query on all citations covering a range of dates; or a query on
all citations covering a specific street name; or perhaps a query on all citations given to
male drivers between the ages of 18 and 25. It all depends on the amount of
information you have or the type of report you desire.
From the Citation Reports screen, enter a range of dates and then click the “Citation
General Query” (steps 1 and 2 in Fig. 38).
91
2.
1.
Fig. 38
Simply enter your information in the appropriate fields, either by typing the information
or by using the drop-down menus. Once you have entered your information, click the
“Run Query” button at the top right of the screen.
Fig. 39
92
Each query will produce a report, and each report can be printed out.
For some fields, you can enter only partial information. For example,
you do not have to enter an entire citation number if you want a report
of all citations that begin, say, with “L” or with “1MR” or any other
letters or numbers. Or you might want to run a query on all citations
issued to vehicles with license numbers that begin with “R”. In each
case, enter the “partial data,” followed by an asterisk (*), and then click
the “Run Query” button. A report will follow.
Finally, you can include GIS mapping in your query. Notice the two fields at the top
center of the “Citation General Query” screen:
Click either field, or both, if necessary. For more on GIS mapping, refer to the Collision
GIS Mapping Manual.
93
CHAPTER FOUR
Graphs and Charts
Crossroad Software's Traffic Collision Database includes a Graph Query Form (Fig. 1
below) through which you can produce graphs and charts for collision information.
Fig. 1
4.1 PRODUCING GRAPHS AND CHARTS
The Graphs and Charts feature is quite easy to use. It has two pages of entry fields
and can generate a variety of graphs and charts. The procedures for producing the
graphs and charts are akin to those for such features as Intersection Historical and
Intersection High Incidence: by inputting a small amount of data -- particularly street
names and a range of dates -- you can output some sophisticated results.
Let's start with the first page. There are four steps you need to follow.
1. Enter the street name and the cross street (optional). This constitutes
the particular intersection on which a query will be based, but it is not required.
Enter street names if you want to query a specific intersection. By not entering
an intersection or street, the Database will query “jurisdiction-wide.”
2. Enter the starting date and the ending date (using the standard date
format for this Database: “00/00/0000”). Of all the four steps, this one is
absolutely required.
94
3. There are two Distance fields, one for “all collisions” and one for “rear-end
collisions.” All collisions that occurred within the distance specified -- distance
from the intersection, measured in feet and covering all directions -- will be
included in the query. Notice the drop-down menu in each field. The menus give
you more options by letting you set additional distance parameters: less than or
equal to (<=), less than (<), greater than (>), or greater than or equal to (>=). Pull
down the menu and then click and highlight the option you wish to use.
4. Click the “At Intersection” field if you wish to query only those collisions that
occurred within the intersection.
Once you have completed these steps, you can generate a graph or chart by selecting
the one you want to generate among the choices at the top of page 1; or you can go on
to page 2 first to enter additional collision information (Fig. 2).
Fig. 2
Let's deal with page 2 first. There are a number of separate fields that allow you to limit
your query; by setting specific parameters, you can directly affect the query and the
information in each resulting report. So, for example, you can ask for collision
information on collisions with a specific degree of injury, a specific type of accident,
whether or not a pedestrian was involved, a specific type of lighting, and so on. All of
the fields, except two, have drop-down menus from which you can select from a list of
possibilities.
95
Use as few or as many of the fields you need. You are not required to fill in any of the
fields in page 2 to run a query and generate a report (but they're present in case you
need them, thanks to the thoughtful folks at Crossroads Software!).
If you need to return to page 1 before running your query, just hit the “Page 1” button. If
not, go ahead and click the button that corresponds to the type of query and report you
need. Note that your choices are:
!
!
!
!
!
!
!
!
!
!
Highest Degree of Injury & Primary Collision Factor
Collision Type & Involved With
Weather & Lighting Conditions
Primary Collision Factor
Collision Type
Involved With
Degree of Injury
Year
Month
Day of Week
Each option will produce a report, which you can then print out (as usual, open the “File”
menu at the top and click the “Print Report” command).
Fig. 3 is a sample graph produced by a “Collision Type” query for the entire year of
1999.
Fig. 3
96
This bar graph is one of the handy, informative features of the Graphs and Charts
section, but it is not the only one. Take a look at Fig. 4 below. This is an example of a
color-coded chart, produced by entering a range of dates (in this case, January 1, 1999
to December 31 1999) and then running a “Collision Type and Involved With” query.
Fig. 4
Notice the information in the bottom left-hand corner; these indicate the settings used
for the query. In the example above, a basic query was done, with only a starting date
and an ending date entered. But, if we add parameters for distance and then specify,
say, that we only want collisions that occurred on Fridays, the chart will look like this
(Fig. 5, on the following page):
97
Fig. 5
Not only do the pie charts contain different information now, but so too does the
“Settings Used For Query” information. Notice that the distance parameters are listed,
along with “Day of the Week.”
The graph and chart examples above are simply a few of the possibilities in the Graphs
and Charts section. Once you become familiar with the software, you will realize how
versatile and powerful it is.
4.2 GRAPHS BY YEAR, MONTH, AND DAY OF WEEK
The Year, Month, and Day of Week are particularly interesting features. They break
down collision data in historical format, and can be broken down further if you want to
run a year, month, or day of week query for a specific intersection, specific collision
type, or other parameter.
By simply entering a range of dates and then clicking the “Year” button, you can
generate a historical graph that displays the number of collisions per year, as seen in
Fig. 6.
98
Fig. 6
Note that the years are listed on the horizontal axis at the bottom, the number of
collisions on the vertical axis; also notice that the exact number of collisions for each
year is printed at the top of each bar. Now, it is possible to take the data in this graph
and create a more specific query. Suppose we want a historical graph covering the
same time period (in this case, 1995-1998) but only want to query the number of
broadside collisions per year. All we need to do is keep the dates as they are in the
date fields, go to page 2, and then select “Broadside” from the Collision Type dropdown menu.
The resulting graph appears in Fig. 7:
99
Fig. 7
Notice that the total number of collisions, as well as the total for each year, is lower
because this is a graph based on one type of collision.
These are just examples -- you can break down the Year, Month, and Day of Week
queries/graphs even more by setting other parameters.
100
CHAPTER FIVE
Data Verification
Data Verification is an easy-to-use feature that allows you to run checks on duplicate
records, citations, mileposts, and other information. It checks various parts of the data
in collisions and citations to see if the information is conflicting or inaccurate.
All Data Verification requires from you are two basic pieces of information: a starting
date and an ending date. It doesn't get much easier than that, does it?
From the Traffic Collision Database Main Menu, simply click the “Data Verification”
button to bring up the Data Verification screen, as seen in Fig. 1 below.
Fig. 1
All eight of the verification procedures require a starting date and an ending date, so
make sure you enter these first, using the standard Database date format
(“00/00/0000”). Once you have entered the date range, click the appropriate button for
the verification you wish to run. The Database will retrieve and sort the data and then
produce a report (except with Duplicate Records Check), which you can print if
necessary.
101
5.1 DUPLICATE RECORDS CHECK
The Duplicate Records Check does not produce a report, but, rather, allows you to
select and delete unnecessary duplicate records. Once you have entered starting and
ending dates in the Data Verification screen (Fig. 1 above), click the “Duplicate
Records Check” button; you will see a screen similar to the one in Fig. 2 below.
Fig. 2
Notice that there are two “windows,” one containing a list of all duplicate records found,
the other one blank. As the instructions at the top of the screen state, you create a list
of those duplicate records you want to delete by double-clicking each record, one by
one. The records you select for deletion will appear in the bottom window. Once you
have selected all the records that need to be deleted, simply hit the “Delete Collisions
in Bottom List” button at the top of the screen. This will delete those duplicate records,
thereby “cleaning up” the Database.
Fig. 3 below shows the Duplicate Record Check with a list of duplicates in the bottom
window.
102
Click here to complete the process.
Fig. 3
Double-click the duplicate records to be deleted, and then view the records to verify them.
If you mistakenly double-click on a record that you do not want deleted, all you need to
do is locate that record among the list of “Collisions to Delete” in the bottom window and
double click on it. It will disappear!
Sample Data Verification Report
Let's take a look at sample Data Verification report, just to give you an idea of the type
of report available to you in this section of the Database. Fig. 3 (on the following page)
shows a detail of a Standard Collision Data Verification report.
103
Fig. 4
To produce this verification report, all that was required was the entry of a starting date
and an ending date, followed by a single mouse-click on the “Standard Collision Data
Verification” button.
Now, take a look at Fig. 4. The first seven columns contain collision information, and
the final column at the right, labeled “Problem,” states the discrepancies found within
the collision data.
104
CHAPTER SIX
Configuration
Configuration allows you to “configure” or “customize” the database by changing and
setting default values for a variety of fields, set headings for various reports, and create
lists of available options for other fields. Once you have made changes, they will
automatically appear on input screens, query menus, and reports. Think of it as altering
various default values in order to customize the Collision Database for your specific
needs.
To open the Configuration screen, select “Configuration” from the Traffic Collision
Database Main Menu. The Configuration screen is shown in Fig. 1 below.
Fig. 1
Take a look at the Configuration screen. As you can see the customizable fields are
laid out in this screen, allowing you to change default values for twenty-two different
fields. You can:
!
set the default starting and ending dates for all of your queries
!
set the default distance value (number of feet) for all of your queries
!
configure the format for report numbers
!
set default city, county, and district names
!
set prefixes for citations and cases
105
!
!
configure report headings
and other default values
Note the Custom Configuration Selection List at the top (Fig. 2).
Fig. 2
This drop-down list allows you to select different customizable options. You can
configure settings for:
!
tow companies
!
hospitals
!
transportation companies
!
vehicle body styles
!
officers
!
city names
!
race
!
reporting districts
!
vehicle codes
!
custom input fields
!
custom party input fields
!
collision input screen
!
citation input screen
!
DUI input screen
!
database locations and versions
You can also:
!
reattach tables
!
input officer table from file
!
input RD list from file
!
confirm tables are attached
Each selection from the drop-down list will open a table or form. For details on each
feature of the Custom Configuration Selection List, please refer to your Data Input
Module. It will explain how to customize each selection in the list (because the
Data Input Module contains detailed instructions for the Configuration section, we
won't get into those instructions in this manual).
106
We hope this manual has helped you use our Traffic Collision Database.
We also hope that it answers questions you might have about inputting,
editing, and deleting data, running queries and reports, configuring, and
performing other tasks. If you find that you need further assistance or
have technical concerns, you can contact Crossroads Software at (714)
990-6433. Our fax number is (714) 990-5628. You might also visit us on
the world wide web at www.crossroadssoftware.com. Our web site
contains product information, upgrades, online manuals, and much more.
107