1
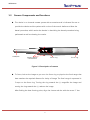
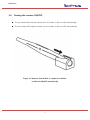
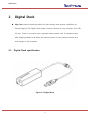
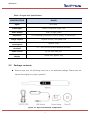
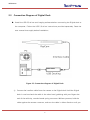
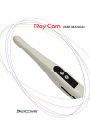
USER Manual TABLE OF CONTENTS RAY CAM INTRAORAL CAMERA .............................................................. 2 1 1.1 FEATURES .............................................................................................. 2 1.2 RAY CAM SPECIFICATIONS ........................................................................ 3 1.3 CAMERA COMPONENTS AND FUNCTIONS ................................................... 4 1.4 TURNING THE CAMERA ON/OFF .............................................................. 5 2 DIGITAL DOCK ............................................................................................. 6 2.1 DIGITAL DOCK SPECIFICATION ................................................................... 6 2.2 PACKAGE CONTENTS ................................................................................ 7 2.3 CONNECTION DIAGRAM OF DIGITAL DOCK ................................................. 8 2.4 SYSTEM REQUIREMENTS........................................................................... 9 3 HYGIENIC COVER INSTRUCTIONS ......................................................... 10 4 IMPORTANT SAFETY PRECAUTIONS..................................................... 11 4.1 WARNING ............................................................................................ 11 4.2 HANDLING CAUTION............................................................................. 12 4.3 WARRANTY ......................................................................................... 13 4.4 PRODUCT WARRANTY ........................................................................... 14 1 USER Manual 1 Ray Cam Intraoral Camera 1.1 Features The Ray Cam Intraoral Camera provides live video display, freeze, and capture capabilities for dental imaging. Displays live video on a standard TV monitor or LCD monitor with VGA connection via the image capture unit, which is controlled from the camera hand-piece. Digital video is displayed via the USB2.0 input to any computer, PC or MAC. Image capture and storage is accomplished with the image capture button on the camera hand-piece. The Ray Cam is the highest resolution camera, with 5 step focus ring for the dental industry. Below are some of the unique features of this revolutionary dental camera. ① Proprietary 7-element glass optical lens for unsurpassed image quality. ② Sony high resolution hyper head CCD sensor. ③ Has capture control capability directly on the hand-piece with touch switching. ④ Has high definition imaging with Max. 40x magnification. ⑤ Camera disconnects from its docking station allowing full portability. ⑥ Uses a bright LED light source. ⑦ Allows intraoral and extra oral imaging without a lens change. ⑧ Compact, easy to install and operate. 2 USER Manual 1.2 Ray Cam Specifications Table 1.1 Ray Cam PLUS Specifications CLASSIFICATION Power Details DC 5V Image Sensor 1/4" Sony Ex view HAD CCD Ⅱ 270,000 pixels Signal System NTSC/PAL Effective Pixel NTSC 976(H) X 494(L) / PAL 976(H) X 582(L) Resolution 520 TV lines Auto Gain Control Automatic White Balance Automatic Illumination Focusing Type Frame Capture Cable Length Connect Terminal Video Output Length & Weight Operating condition 4 High luminance white chip LED's 5 step motorizing by stepping motor Single/four frame, max. 16 images storing with Memory dock 640X480, 30 frames/sec with Digital USB II dock 2.7m (Integral cable) 6Pin Connect Terminal Composite 212mm, 57g 5℃ ~ 40℃... at 10% to 80% Relative Humidity 3 USER Manual 1.3 Camera Components and functions This device is an intraoral camera system with accessories and is indicated for use to provide the dentist and the patient with a view of the mouth before and after the dental procedure, which assists the dentist in describing the dental procedure being performed as well as showing the results. Head/LED Image capture touch button Focus ring Focus ring Figure 1.1 Description of camera To focus, look at the image as you turn the focus ring to pinpoint the focal range that best matches the required distance for clarity of image. The focal range is expressed in 5 steps on the focus ring. Turning the ring towards the (+) magnifies the image and turning the ring towards the (-) reduces the image. After finding the best focusing point, align the closest red dot with the center “l” bar. 4 USER Manual 1.4 Turning the camera ON/OFF To turn Camera ON remove camera from its holder, it will turn ON automatically. To turn camera OFF replace camera into the holder, it will turn OFF automatically. Figure 1.2 Remove from holder or replace into holder, it will turn ON/OFF automatically 5 USER Manual 2 Digital Dock Ray Cam intraoral camera provides live video display, and capture capabilities for Dental imaging. The Digital dock system connects directly to your computer via a USB 2.0 port. There is no need to use a separate video capture card. It integrates easily with imaging software and allows the capture button on the camera to freeze, and save images in the computer. 2.1 Digital Dock specification Figure 2.1 Digital Dock 6 USER Manual Table 1.2 Digital dock Specifications CLASSIFICATION Details Signal NTSC/PAL Video Input 1.0Vp-p Composite Video 75Ω. Video Output USB 2.0 High Speed Resolution NTSC(640X480 pixels)/PAL(720X576 pixels), 30 frames/sec. Image Capture Capture button/ Foot pedal USB Power consumption Operating condition 2.2 Approx. 1.5W 5℃ ~ 40℃ at 10% to 80% Relative Humidity. Power source DC 5V from USB port. Dimension & Weight 83X25 mm, approx. 30g Package contents Please ensure that the following items are in the delivered package. Please read this manual thoroughly for proper operation. Figure 2.2 Ray Cam contents composition 7 USER Manual 2.3 Connection Diagram of Digital Dock Install the USB 2.0 driver and imaging software before connecting the Digital dock to the computer. Follow the USB 2.0 driver instructions provided separately. Read the user manual thoroughly before Installation. Figure 2.3 Connection diagram of Digital Dock ① Connect the interface cable from the camera to the Digital dock. Hold the Digital dock in one hand and the cable in the other hand, grabbing with your fingers the end of the cable tip, rounded metal spring connector. Without pressure, hold the cable against the camera connector, and turn the cable in either direction until you 8 USER Manual feel the groove. This indicates that the 6 male pins are aligned with the female connector. Then push the cable into the connector. ② Connect the Digital dock to the USB 2.0 port on the computer. ③ Place the camera in the holder to turn the camera off. Removing the camera from the holder turn the camera on. ④ Reboot the computer. System is now ready to use with imaging software. Check Ray Cam Digital Dock is designed to operate with USB 2.0. Proper operation of the device is not guaranteed with systems that it does not support USB 2.0. If your system does not meet our system requirements, we cannot guarantee the performance of the Ray Cam Digital Docking System. 2.4 System Requirements System requirements are as follows Pentium IV (2 GHz or faster), High Speed USB 2.0 port, 256 MB RAM, 40 GB of Hard Disk, High Resolution SVGA Monitor (1024x768 pixels or higher) Higher version than Windows XP Home or Pro with Service Pack 2. 9 USER Manual 3 Hygienic Cover Instructions A. Hold sheath and insert the camera between the white tab and the paper with the optical side facing he paper. B. Gently slide the camera until the camera head reaches the tip of the sheath. Do Not Force. C. Peel back the protective top cover. D. Peel away the paper backing. E. Apply gentle downward pressures to ensure the sleeve is tight. The camera is now protected and ready for normal use. F. After use, hold the white tab and remove the sheath. G. To order more covers, please contact our local sales representative. Caution The sheath must be removed after each patient use and the intraoral camera and hand-piece must be cleaned and disinfected after each patient use and prior to the replacement with a new sheath by rubbing with Isopropyl Alcohol for at least one minute. Check The hygienic cover is disposable. Replace it every time before putting it in a patient's mouth. The hygienic cover is designed only for intraoral use. If you use it for taking extra oral images, the images will not be clear as compared to intraoral use because the transparent film reflects light and changes the focus. 10 USER Manual 4 Important Safety Precautions 4.1 Warning Failure to follow instructions may result in serious bodily injury or death. ① When the camera is not in use, place the camera in the camera holder. Keeping the power on over prolonged periods may cause the camera to heat. ② If the camera and docking unit gets wet, do not attempt to dry with a heater or microwave. ③ During severe thunderstorms, stop using the camera & unplug the electrical power cord from the docking unit. Failure to do so may cause damage to the product, or fire. ④ Do not disassemble, drop, or otherwise subject the camera & docking unit to hard shocks. It may cause electric shock, short circuit, or fire. The warranty is null and void in such cases. ⑤ The power adapter provided by the manufacturer should only be used with the docking unit provided and not with any other equipment. Failure to do so may cause damage to the equipment. The warranty is null and void in such cases. ⑥ Make sure that the power cord is plugged securely, and hold the plug when removing it from the outlet. When the power connection is not secure, it can cause excessive heat or start a fire. ⑦ Do not damage the power cord by altering, bending, pulling, or exposing to excessive heat. Using a damaged power cord may cause fire or electric shock. 11 USER Manual 4.2 Handling Caution Failure to follow instructions may result in slight bodily injury or damage to the product. ① The intraoral camera system should only be used for dental purposes. ② The camera, docking unit and all its accessories are not waterproof. Do not immerse in water and avoid situations where water or other foreign matter could get on or inside the product. Failure to do so may damage the product. ③ If the camera or docking unit is wet, or if your hands are wet, do not use the product. ④ Avoid subjecting the camera & docking unit to vibrations or shocks. When the product is not in use, disconnect the power plug and keep it in a safe place. ⑤ Be careful not to use damaged products. Doing so may cause injury. ⑥ Avoid using the camera & docking unit in a dusty environment, and keep the power cord away from any heat source. 12 USER Manual 4.3 Warranty DEXCOWIN (“Warrantor”) guarantees parts and labor for each product purchased by the end user (“Customer”) for the term of one year from the date of purchase. During the warranty period, we will repair or replace any defective part at no charge. This guarantee does not cover damage resulting from improper installation, misuse, alterations, or accidents. After one year, WINUS reserves the right to collect a reasonable fee from the Customer for services mutually agreed upon. If a problem develops with the product, the dealer or Customer shall take the following steps: ① Promptly notify Warrantor of such a problem by phone +1 626 993 6716(USA) or +82 2 2027 2880(Korea). ② Provide all information requested by Warrantor including product serial number, customer name, address, telephone number and proof of purchase. A copy of the receipt showing the purchase from the dealer or Warrantor must accompany the returned product. ③ Customer shall agree to prepay for all non-warranty repairs. If the repair work is under warranty, Warrantor agrees to repair or replace and ship the product within 1 week from the time it was received. Repaired products will be shipped "Ground Service" unless specifically instructed otherwise. Warrantor will pay for ground shipping to return the repaired product to the customer. 13 USER Manual 4.4 Product Warranty Product Warranty Device name Intra Oral Camera Type name Manufacturing number Manufacture date Customer name Contact information Customer Address information 1. 2. 3. 4. Place of purchase Product assurance period E-mail Purchase date iCAM PLUS 1 year after purchase This product is manufactured under strict quality assurance standard and inspection process. If breakdown occurs during warranty period under normal usage, free repair service will be provided. If breakdowns are due to incorrect usage or negligence, there will be charges for repair services even if within warranty period. If you have other questions or product related inquiries, please contact Dexcowin customer service center. For better management of quality and customer service, fill out all of the above, and fax or email to our company. Phone 1 626 993 6726 Fax 1 626 993 6601 Address: 155 N. Lake Ave. Suite 800, Pasadena CA91101, USA 14 USER Manual 15