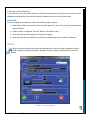
1
SNaP SNaP User’s Manual S Remote Measurements & Controls Inc. www.RMC-INST.com Table of Contents TABLES .......................................................................................................................................5 Editing .................................................................................................................................................................................. 5 Navigation............................................................................................................................................................................. 5 Maintenance ......................................................................................................................................................................... 6 BOM Table ........................................................................................................................................................................... 6 Part Table:............................................................................................................................................................................ 7 Vendor Table:....................................................................................................................................................................... 9 Task Table ............................................................................................................................................................................ 9 Labor Table:....................................................................................................................................................................... 10 Order Table:....................................................................................................................................................................... 10 Buy (Purchase Order) Table: ............................................................................................................................................. 12 Item List.............................................................................................................................................................................. 13 Changing the Status of a Purchase Order.......................................................................................................................... 13 Sell Table: ........................................................................................................................................................................... 14 TOOLS .......................................................................................................................................15 Schedule .............................................................................................................................................................................. 15 TRANSFER ................................................................................................................................16 UTILITY ......................................................................................................................................16 Help..................................................................................................................................................................................... 17 ORDERS AND MATERIALS......................................................................................................18 Material Fields.................................................................................................................................................................... 18 How to Generate an Order................................................................................................................................................. 18 1 SNAP Manual – RMC Managing the Order ........................................................................................................................................................... 19 The Order ‘Buy’ Table....................................................................................................................................................... 20 The Order ‘Stock’ Table .................................................................................................................................................... 21 Issuing Parts to the Job ...................................................................................................................................................... 21 The Order ‘Task’ Table ..................................................................................................................................................... 22 STOCK ROOM...........................................................................................................................23 Creating an Area ................................................................................................................................................................ 23 Selecting an Area ................................................................................................................................................................ 24 Deleting an Area ................................................................................................................................................................. 24 Adding an Assembly........................................................................................................................................................... 24 Editing a bin ....................................................................................................................................................................... 24 REVISION CONTROL................................................................................................................25 Reviewing Records ............................................................................................................................................................. 26 Status .................................................................................................................................................................................. 26 Editing the Current Revision ............................................................................................................................................. 26 Creating a New Revision .................................................................................................................................................... 27 Approvals............................................................................................................................................................................ 27 SETUP........................................................................................................................................27 FILE STRUCTURE.....................................................................................................................28 BARCODE READERS ...............................................................................................................28 2 SNAP Manual – RMC Figures Figure 1 - purchase order window.......................................................................................................... 12 Figure 2 – customer Order Window........................................................................................................ 14 Figure 4 - order window ........................................................................................................................ 19 Figure 5 - order management................................................................................................................. 20 Figure 6 - order stock table .................................................................................................................... 21 Figure 7 - order task table ...................................................................................................................... 22 Figure 8 - Stock Room Window.............................................................................................................. 23 Figure 9 - New Area Window ................................................................................................................. 24 Figure 10 - Bin Edit Window................................................................................................................... 24 Figure 11 - revision control process ....................................................................................................... 25 Figure 12 - Revision control window....................................................................................................... 26 Figure 13 – Setup Window..................................................................................................................... 27 3 SNAP Manual – RMC INTRODUCTION SNAP is a user-friendly Material Resource Planning (MRP) tool that can be implemented early in the design process. SNAP bridges the gap between spread sheets and complex and expensive MRP systems while providing tracking and organization. At the heart of the system is a SQL database that tracks and correlates information about the product structure, vendor, assemblies, and operations. Key features include: VISUAL MATERIAL ANALYSIS & CONTROL SNAP software integrates easily and Self-Contained operation with no server setup. early into the design Linked BOM, Vendor, Labor, Requirement, and Purchasing Tables process when design Automatic Schedule Generation considerations, and Flexible Import and Export Data (Excel, CSV, Text) supply chain issues Error Checking and Reporting can be addressed. Automatic and manual generation of purchase orders VMAC combines the Requirements generate purchase orders control of MRP with Reports include Flat and Indented BOMs, schedules, BOM Trees, Routings, and more. complexity, cost the flexibility required during design changes. The product is aimed at the small company or project that desires more control and monitoring than a spreadsheet based approach, but cannot afford the complexity, cost, or time investment of using a full MRP system. VMAC combines the power of an SQL database with analysis and tools to move and SNAP Manual – RMC 4 control material. TABLES The heart of the VMAC system is an SQL database. The data table window on this database is a custom data grid that allows the user to not only select, edit, and delete data, but link to selected data such as files, documents, and websites. Data items may reference a file stored in a central location. All records contain user names & timestamps used to identify who and when the last time the record was modified. Editing To edit a field simply click on center of cell. Navigation Icons that appear in the data fields are used to jump to related data as defined below: Links to other tables and dialogs. Opens a file using the default program. Searches database for parts Links to a website or page related to the item. Start Default E-Mail Program with address indicated.. Error in the table. Click on icon for information on the error. Error Reporting An error marker shown in the first column of each record that shows the status of this record based on an icon. A check mark indicates no problem with this entry. A question mark indicates that one or more required fields were not entered. A yellow warning (exclamation point) icon indicates one or more of several possible errors including duplicates, missing assemblies, missing vendors, quantities don't match reference designators, etc. Click on the icon to get information on the error. 5 SNAP Manual – RMC Maintenance A menu directly above the grid as shown below is used to enter and delete information, display and hide columns, print, revision control. Assemblies may be added or deleted when in the Assy table. Add new line to the table Delete selected lines Displays dialog for displaying and hiding columns on the grid. Print the grid. Create a new assembly or BOM Deletes an assembly. Revision Control BOM Table: This table defines the item, part #,, quantity, assembly where it is used. A reference designator may be added for electrical assemblies. The part # entry links to the same name entry in the Part table. The assembly is selected by selecting the appropriate entry on the tree that appear to the left of the table. Item- The item number of the part. Duplicate item numbers will be flagged as an error. Quantity: The number of parts required. Picture- An optional picture of the part. May be a jpg. Quantity- The number of pars required. Part # -The manufacturers’ part number or id of the part. to the Part table. Description- This is the description of the part. This field is keyed and set identical to the part in the Part table. Information entered here will be reflected in the Description field of the Part table and all entries with this part name. 6 SNAP Manual – RMC Part Cost – This is the average cost of the part for estimating purposes. This field is keyed and set identical to the part in the Part table. Information entered here will be reflected in the Part Cost field of the Part table and all entries with this part name. Vendor – This is the vendor where the part can obtained or bought as opposed to the manufacturer. This field is keyed and set identical to the part in the Part table. Information entered here will be reflected in the Vendor field of the Part table and all entries with this part name. Reference Designator – These are references to circuit board components that may be used on some assemblies. For example R1,R2,R4-R8. The quantity must match the designator or an error will occur. Used On – This field show the assembly to which this part is attached. This field is filled in automatically and can not be edited.. Internal #- An internal number used to identify this part. Comments-Any user specified comments for this part. Created-A date stamp showing when the record was created. Updated- A date stamp showing when the record was updated. User- The user identified in the table. Part Table: The part record defines critical information about a part including who makes it, where it can be bought, how much it typically costs, and other key information. Document links are supported for the use of both purchasing and engineering personnel and to assist with second sourcing. Note: A part entry is used for both purchased parts AND assemblies. Part # - The manufacturer’s part number or id of the part. Used On – This field is automatically updated to show the assemblies to which this part is attached. Internal #- An internal number used to identify this part. Picture- Allows a picture in jpg format of the part or assembly to be stored in the database. Clicking on this field brings up a file selection dialog that is used to identify the picture. A copy of the file is made and stored in the PICTURE directory where the database file resides. Make/Buy - Either set to 'Make' if the part is assembled or 'Buy' if the part is bought. Description – A description of the part. Vendor - This is the organization that distributes the item. if a distributor is listed than an item will be bought from the distributor. If this field is blank, the assumption is that the item must be bought by the manufacturer. The entry links to the same name entry in the Vendor table. SNAP Manual – RMC 7 Vendor Part #- The part number used by the vendor. Manufacturer - The manufacturer of the part. Category – The broad category that part belongs. For example cable, electronic part, etc. Web Link – A link directly to the manufacturer’s web link for the part. Total Cost – Not used for bought items. The amount per unit in the currency stated. For higher level assemblies this field contain the rolled-up or total accumulated cost of parts and labor.. Part Cost - The amount per unit in the currency stated. For higher level assemblies this field contain the rolled-up or total accumulated cost of BOUGHT items. Labor Cost - The labor content is producing this assembly. For a bought item, this would be 0 (although it could be used to capture purchasing time). For higher level assemblies this field contain the total accumulated labor used to produce this assembly. Labor Hours - The labor hours for an assembly. Not valid for bought parts. Stock - The number of this items in stock. Allocated - The number of items in stock allocated to a requirement The number allocated can never be more than the number in stock. This number how many of these items are already apportioned to various requirements. On Order - The number of items that are ordered in automatically generated PO’s Document - Any document file associated with this part. May include a manufacturers spec sheet for bought items or a drawing file for fabricated items or an assembly. Drawings are copied into the DOCUMENT directory where the database is located. Category - Set to a general category for matching with vendors. May be PCB, Cable, Sheet Metal, Machined Metal, Mold, etc. For custom parts like sheet metal or cables, this allows a series of vendor to be selected base on price, delivery, etc. Loss- Typical loss, errors, or defect in percent for this part. The percentage over required number to order due to losses, error, or defects in a process. As an example an entry of “10” would mean 10% more of an ordered item would be ordered. A request for 100 units of this item would generate a purchase order with an actual quantity of 110. Revision-The number or letter of the current revision for this part. Package-The package of the part for electrical items. Say SOT23 Status-This entry can be set to either ‘Current’ or ‘Obsolete’ to show whether a part is still active. 8 SNAP Manual – RMC Vendor Table: The vendor record captures vendor information. A vendor may be a manufacturer or a distributor. If a distributor is listed for a manufacturer, VMAC will generate PO’s from the distributor. If no distributor is listed VMAC will generate a PO for manufacturer. Important Note: The details of your company are entered into this table under the name of your company and the details used in various documents such as purchase orders. Your company name must also be entered into the Setup window to link with this information. Vendor - The name of the vendor or your company. Category - Set to a general category for matching with vendors. May be PCB, Cable, Sheet Metal, Machined Metal, Mold, etc. For custom parts like sheet metal or cables, this allows a series of vendor to be selected base on price, delivery, etc. This entry links to the same named entry in the Part table. Manuf/Vendor-Set to Vendor for distributors and Manuf. for OEM manufacturers Logo – This is the logo for the company. It is used in various graphics and displays. Website - The main website for this vendor. Phone# - Phone number for this vendor Contact – Contact person at vendor E-Mail – Email for company or vendor. Fax# - Fax number for this vendor. Address - The address of the vendor. Country - Country Currency – The currency which this vendor normally deals. Task Table: This table defines the Task #, part #, task name, resource, description, assembly where it is used. The part # entry links to the same name entry in the Part table. Task # - A sequential step number associated with the labor element. Task Name – The name of the task, for example “Final Assembly”. 9 SNAP Manual – RMC Used On - The assembly where each labor element will be captured. Description: The description of the assembly test. Example: ”Perform final acceptance test”,”Inspect System Alignment”, or “Package for Shipment”. Resource: A resource that is defined in the labor table. Hours: The number of hours that a resource is used to perform this task on one item. Labor Table: The labor table is a record of labor or machine resources along with their hourly rates. Rates from the labor table are used to calculate total labor costs. This table may also be used to capture a service that is performed at a fixed rate per unit. For example, suppose an external painter is used to paint an item for $120.00 per unit. The resource would be entered as “ACME Painting Co.” with the rate set at $120.00. In the Assy table, you would select “ACME Painting Co” followed by a unit of 1 for hours. Resource – The resource name such as ‘electrical tech’,’assembler a’, etc. Rate- The hourly rate of the resource or cost per unit. Order Table: Each customer order for an assembly is entered into the Order table. When a new record is added a dialog will appear that prompts the user to select the assembly (or sub-assembly) and the quantity required. This request then automatically generates purchase orders used to procure material so that the assembly can be built. The new record will appear in a list. Order # – A unique number automatically generated by the program that references a requirement. Click this arrow to enter the Order dialog and manage all of the information associated with the order including related purchase orders and tasks. Description – A text description of the requirement. For example “6 units for customer xyz” Part # - The assembly for which the requirement is being generated. Quan – The desired quantity of the assembly to be built. Status – Is automatically set by the program and may be: Pending: Purchase orders have been generated. Gen PO: Purchase orders have been placed. SNAP Manual – RMC 10 Build: This requirement is underway… parts are being bought or assembled. Closed: The requirement is complete. The material has been allocated. Cancelled: The requirement was cancelled. PO’s that are pending will be automatically deleted. Customer – The customer who is ordering the part or the requirement. Eg six units for sales” Due Date – When the order is due. This date should be confirmed through the schedule. Target Parts: Cost of the parts which is automatically calculated based on the value of parts from the Part table. Target Labor – The target labor for the build calculated based on information in the Task and Labor tables. Target Total – The total expense in parts and labor. Actual Parts – The value of the purchase orders. This information is updated automatically as purchase orderers are placed and variables such as shipping and actual parts costs are figured. Actual Labor – The actual labor developed from the updated tasks in the task table. Actual Total – The actual total based on the values above. 11 SNAP Manual – RMC Buy (Purchase Order) Table: The purchase order record describes and manages the material purchased and received from a vendor. The life of the purchase order exists from when the Order is made through the actual order to the final receipt and acceptance of the material. When the purchase order is closed, material is moved into stock. Purchase orders may be manually or automatically generated. To be automatically generated, they must be generated by an Order. PO Number - A unique number letter combination. This number is automatically generated if the purchase order is generated by a requirement. Click on this arrow to manage and enter information for the purchase order as shown below:. FIGURE 1 - PURCHASE ORDER WINDOW Buyer-The buyer name/id used to obtain the purchase order Date-The date the order was created. 12 SNAP Manual – RMC Method-This is the method used to place the order could be Internet,Mail, or phone. Order ID-This field is automatically filled in when the PO is generated by a requirement. It can not be edited. Status-The current state of the PO. Pending, placed, shipping, received, inspected, closed, etc. Changing the status here will change the status of all items. Vendor - The name of the vendor. . The entry links to the same name entry in the Vendor table. Vendor Address - The address of the vendor built from the address, state, country and postal code. Contact Name - The name of the contact if needed. Contact EMail - The email of the vendor contact. Contact Fax - The fax of the contact or company Notes - Any notes concerning the order. Shipping Cost - The cost associated with shipping Shipping Address - Loaded with the default option address Shipper - Specify the shipper Fed Ex, UPS, etc. Terms- Net 30 etc. Currency - The currency used for the quote. Tax Rate - The percent tax, if required, for the purchase. Set to 0 if no tax. Item List The item list appears in separate scrollable window located at the bottom of the window. A list of items including the Quantity, Part #, description, Cost, and Web Page. The part # and description will be filled from the Part table if they exist. Subtotal and totals are automatically updated as quantities and prices change. Changing the Status of a Purchase Order The status of individual items may be changed by clicking the ‘Status’ column in the item list. The status of ALL items can be changed by clicking on the ‘Status’ entry in the main form window. 13 SNAP Manual – RMC Sell Table: The sell table is used to capture and generate customer orders for items to be sold. Customer Order # - A unique number letter combination. This number is automatically generated when the order is created Click on this arrow to manage and enter information for the customer order as shown below:. FIGURE 2 – CUSTOMER ORDER WINDOW Customer PO #r-The PO #, if any as provided by the customer. Date-The date the order was created. Status – Contains the status of the customer order. Order #- The Build Order # assigned to this customer. Vendor - The name of the vendor. . The entry links to the same name entry in the Vendor table. Vendor Address - The address of the vendor built from the address, state, country and postal code. Customer – The name of the customer or company contracted Contact - The name of the contact if needed. EMail - The email of the customer. SNAP Manual – RMC 14 Phone - The phone of the customer. Fax - The fax of the contact or company Address – The ship to or billing address Country – The country to ship or bill to. Currency - The currency used for the order. Terms- Net 30 etc. Notes - Any notes concerning the order. Promise Date – The date promised to the customer. Ship Date – The date delivered to the customer. Shipping Method - Specify the shipper Fed Ex, UPS, etc. Tracking # - Tracking number of common carrier Sub Total – The total of purchased items before taxes and shipping Tax - The percent tax, if required, for the purchase. Set to 0 if no tax. Shipping Cost - The cost associated with shipping Total – The total amount charged the customer TOOLS Tools are used to evaluate and process the table data in various ways. Schedule 15 The schedule function provides a Gannt chart based on an entered order. Data is gathered from Purchase Orders, Lead time data, Assembly and Labor tables to provide a provisional schedule of when products will be available. Clicking on the schedule items allows the user to edit either the SNAP Manual – RMC purchase order or edit assembly items. An option button allows the user to set the number of hours in a day and the non-work days of the week. The default is 8 hours/day with Saturday and Sunday off. Report The report function allows the user to preview and print several key report products. Reports may be generated from any top level product or sub-assembly selected with a tree control. Two different BOMs are available: An indented BOM and a Flat BOM. A drawing tree may also be generated for any product or sub-assembly. TRANSFER Import The Import window is used to import data from a Comma separated File (CSV). Files of this type are delimited by a comma between each field. The user selects the import file and the procedure attempts to match columns in order to import information into the system database. A table is shown with the import column on the left and the database column on the right. The user can override this selection by clicking on the database column. A summary shows the number of records that were successfully imported. Export The Export window will export any of the desired tables in Comma Separated File (CSV) format. Files of this type are delimited by a comma between each field. The Import procedure attempts to match columns in order to import information. Part Search This option is used to connect to an On-Linel database of parts and is useful for verifying and downloading part #’s, descriptions, pricing, pictures and data sheets. Matching parts are displayed in a selection grid. Hitting the ‘Transfer’ button moves description, picture, and cost information over to the part record. If the ‘Transfer PDF’ button is checked the datasheet will be transferred as well. If the rename part # is checked all part designations with the ‘Old’ number will be replaced with the new selected number in both Part and BOM designations.. UTILITY 16 SNAP Manual – RMC Setup The setup window is used to enter various options including: Company - Enter the name of your company. This identical name should be entered in the vendor table. It is used to populate address information for purchase orders and other forms. PO Prefix - These are letters that appear in front of the unique number for purchase orders. Order Prefix - These are letters that appear in front of the unique number for orders. User - This is your user name which can be any combination of letters and numbers. Language - Select your language from the list. The language will automatically adjust upon exiting. Database Button - Use this button to select a new or previous location of the desired database. This button may be used to direct the database toward a shared drive or network location. If a database does not exist it will be created. Help Shows help. 17 SNAP Manual – RMC ORDERS AND MATERIALS Orders drive material flow. The Order routine works in concert with the Purchase Order routine to determine what material is in stock and what material needs to be ordered without consuming material from other orders in progress. Material Fields In the Part table are 3 key fields in the database that track material they are: On-Order - Shows how many of that part is currently on order. When a Purchase Order is created by the program this field will be incremented by the quantity ordered. Allocated - Show how many of that part has been allocated to an Order. This is an important field as it keeps material in stock from being "raided" from a new requirement and creating shortages. The allocated field is added to when a requirement need parts from stock OR when a purchase order from a requirement moves it to stock. Stock - How many actual items of the part are in stock. This number should be equal to the physical count. FIGURE 3 - ORDER PROCESS When parts are Issued to an Order as the final part of the purchasing process, the allocated and stock number are decreased by the part quantity. How to Generate an Order 1. Click on Order table. 2. Select the ‘Add’ button. A window will appear as below. 18 SNAP Manual – RMC FIGURE 4 - ORDER WINDOW 3. Select the desired assembly and count to Order. An optional description may be entered. 4. Click on “OK”. The system will go through available material and attempt to fulfill orders using material from stock. If stock is available and not allocated it will be allocated to this order. If it is not available, it will be bought by having purchase orders generated. In this way the software reduces the need to purchase material by fully utilizing available stock. Managing the Order Managing the order involves ordering material, pulling stock, and finally assembling the items with the material. In Snap, Orders are managed from a single form. To manage the order click on the arrow next to the new Order record which will bring up the following form view: 19 SNAP Manual – RMC FIGURE 5 - ORDER MANAGEMENT There are three tables used to manage the Order process. The Order ‘Buy’ Table This table, shown above, are the purchase orders that were automatically generated by the program. Review and order material from each purchase order window associated with the requisition. Clicking on the purchase order shows the ‘PO’ form as described above in the purchase order section bove. Order the quantities as described in the purchase order window. There is one purchase order for each Vendor. Parts without Vendors are collected under ‘Unknown’. When the material arrives close the purchase order. The material will be moved from the On-Order field to the Stock field and the allocated field. 20 SNAP Manual – RMC The Order ‘Stock’ Table FIGURE 6 - ORDER STOCK TABLE This table is accessed by pressing the ‘Stock’ button. The table shown above shows a view of each item, quantity required for the job, and how many unit will be required to be pulled from stock or bought. If bought it shows the corresponding purchase order. As each PO is processed and material is received the status will change to Stocked. Issuing Parts to the Job When parts have been stocked they can be issued to the floor by changing the status from ‘Stocked’ to ‘Issued’ by clicking on the ‘Status’ column. By performing this transaction the quantity shown in the table is moved from the ‘Stock’ and ‘Allocated’ columns. 21 SNAP Manual – RMC The Order ‘Task’ Table FIGURE 7 - ORDER TASK TABLE This table is accessed by pressing the ‘Tasks’ button. The table shown above shows a view of each task and a total number of hours based on Targets that were set up in the Task table. These hours reflect standard labor times and can not be edited. The Actual numbers reflect the actual or real hours that were spent on this job. Labor rates are drawn from the Labor tables based on the resource or labor type. Totals are collected based on these actual numbers and presented in the main form. 22 SNAP Manual – RMC STOCK ROOM The Stock room is a unique feature that is used to organize and coordinate stock in your operation. Rather than tables, the stock room is organized as areas, shelves, and bins that match the physical layout of your stock area as shown below. Using this system speeds location of materials and keep parts synchronized with the database. Area – The area can be any rectangular arrangement of bins that are vertically stacked. Think of it as a shelving unit. Row-This would be the row where the bins are located. Bins – Bins hold one type of part and can be any color or size. Size – Bins can be sized to multiples of 1 unit size. Color – Many times bins are color coded. SnaP bins can be identically color coded. FIGURE 8 - STOCK ROOM WINDOW Creating an Area To create an area, click on the “New Area” menu option. The following window will appear. Enter the number of rows (vertical) and the number of bins (horizontal) for each shelf. 23 SNAP Manual – RMC FIGURE 9 - NEW AREA WINDOW Selecting an Area All areas will be listed in the pull down menu on the menu bar in the StockRoom window. Deleting an Area To delete an area, click on the “Delete Area” menu option after selecting the area from the pull-down menu. Adding an Assembly SnaP can automatically fill an area with Parts from an assembly by clicking the “Add Assy” menu option. Editing a bin To edit a bin simply click on the bin. You may select a new part, change the size and color of the bi, as well as the stock count. FIGURE 10 - BIN EDIT WINDOW 24 SNAP Manual – RMC REVISION CONTROL SnaP contains a simple yet sophisticated revision control system (RCS) that tracks and controls revisons to the BOM. Features include: The ability to change the current revision Support for alpha or numeric revision numbers. An automated approval and comment system Locking for revisions that are released or under approval. The ability to review and compare prior revisions to the current revision. FIGURE 11 - REVISION CONTROL PROCESS All revision control activities are accessed through the menu that appears on the BOM and Part tables with the icon: 25 SNAP Manual – RMC This dialog will appear: FIGURE 12 - REVISION CONTROL WINDOW Reviewing Records Changes to the BOM and Part records are shown in the table in the lower part of the window. You can select between BOM lists and Part records by hitting the “BOM” or “Part” buttons. Changes between the previous and current revision are highlighted in yellow. Selecting a previous revision in the table will bring up the approvals and comments that were used to release that part. Status There are three status levels for Part and BOM records. In-Process – This is the default status and allows editing of fields. Approve – This status “locks” most edits and allows the required approvers to approve or reject changes. The status can be changed from “Approve” back to “In-Process” to allow editing. Release – This status “locks” most edits. No status changes are allowed. In order to make changes at this status level a new revision must be created. Editing the Current Revision It is sometimes necessary to change the current revision so that the BOM or Part revision matches some other document system . To do this the status must be set to “In-Process”. Enter the updated revision in the edit box and hit the “Update” button. A revision must not have been previously used. 26 SNAP Manual – RMC Creating a New Revision A new revision moves the current revision to the archive and places a copy of it at a new revision in the database allowing editing. New revisions may be created for revisions at any Status level. Approvals In order to approve and release a record the following steps are taken: 1. Enter Setup (Gear Icon) and select the required “Approvers” from a list of users by checking the appropriate box. 2. Select a status of “Approve” from the “Status” drop down list box. 3. Have each required user approve or reject the changes. 4. When all approvals are made the record will be automatically set to a status of “Release” SETUP Setup is accessed through the main menu and allows the user setup key parameters used by SnaP including company information, database location, backups, and part search provider options. SNAP Manual – RMC 27 FIGURE 13 – SETUP WINDOW User - This is your user name which can be any combination of letters and numbers. Language - Select your language from the list. The language will automatically adjust upon exiting. Company - Enter the name of your company. This identical name should be entered in the vendor table. It is used to populate address information for purchase orders and other forms. Address/Country/Phone/Fax - This information is used for purchase orders and other forms. PO Prefix - These are letters that appear in front of the unique number for purchase orders. Order Prefix - These are letters that appear in front of the unique number for orders. Database Button - Use this button to select a new or previous location of the desired database. This button may be used to direct the database toward a shared drive or network location. If a database does not exist it will be created. Backup - Enter the backup period in days. A rolling backup will be made for the past backup period. Use the restore button below to restore to an earlier period. Part Search - Select a search provider from the pull-down. A special API key may be entered if required in the API Key section. FILE STRUCTURE The file structure consists of single database file, “SNAP.db” and three directories, “Pictures” and “Documents” and “Backups” located in the same directory as the database. The “Pictures” directory holds the images while the “Documents” directory holds pdf’s and word documents. The backup directory contains backups of databases. In order to move the entire database, both the database file and the three directories with contents must be moved. BARCODE READERS SnaP supports barcode readers that interface through the keyboard input either directly or through a virtual keyboard driver. In order for SnaP to correctly process barcodes a prefix and suffix of double quotes (“) must be used. For example: 12345678 should be sent to the computer as “12345678” .Consult your barcode manufacturers data for how to program a barcode reader with a prefix and suffix. 28 SNAP Manual – RMC