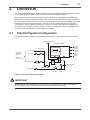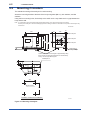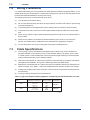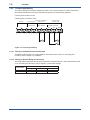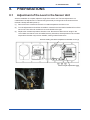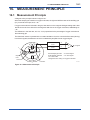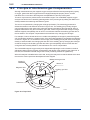
1
User’s Manual Model MG8E Paramagnetic Oxygen Analyzer IM 11P03A05-01E R IM 11P03A05-01E 3rd Edition Blank Page <INTRODUCTION> INTRODUCTION n Safety, Protection, and Modification of the Product • In order to protect the system controlled by the product and the product itself and ensure safe operation, observe the safety precautions described in this user’s manual. We assume no liability for safety if users fail to observe these instructions when operating the product. • If this instrument is used in a manner not specified in this user’s manual, the protection provided by this instrument may be impaired. • If any protection or safety circuit is required for the system controlled by the product or for the product itself, prepare it separately. • Be sure to use the spare parts approved by Yokogawa Electric Corporation (hereafter simply referred to as YOKOGAWA) when replacing parts or consumables. • Modification of the product is strictly prohibited. • The following symbols are used in the product and user’s manual to indicate that there are precautions for safety: Media No. IM 11P03A05-01E (CD) 3rd Edition :Jan. 2009 (YK) All Rights Reserved Copyright © 2007, Yokogawa Electric Corporation IM 11P03A05-01E ii <INTRODUCTION> n Notes on Handling User’s Manuals • Please hand over the user’s manuals to your end users so that they can keep the user’s manuals on hand for convenient reference. • Please read the information thoroughly before using the product. • The purpose of these user’s manuals is not to warrant that the product is well suited to any particular purpose but rather to describe the functional details of the product. • No part of the user’s manuals may be transferred or reproduced without prior written consent from YOKOGAWA. • YOKOGAWA reserves the right to make improvements in the user’s manuals and product at any time, without notice or obligation. • If you have any questions, or you find mistakes or omissions in the user’s manuals, please contact our sales representative or your local distributor. n Warning and Disclaimer The product is provided on an “as is” basis. YOKOGAWA shall have neither liability nor responsibility to any person or entity with respect to any direct or indirect loss or damage arising from using the product or any defect of the product that YOKOGAWA can not predict in advance. n Notes on Hardware l Appearance and Accessories Check the following when you receive the product: • Appearance • Standard accessories Contact our sales representative or your local distributor if the product’s coating has come off, it has been damaged, or there is shortage of required accessories. l Model and Suffix Codes The name plate on the product contains the model and suffix codes. Compare them with those in the general specification to make sure the product is the correct one. If you have any questions, contact our sales representative or your local distributor. IM 11P03A05-01E iii <INTRODUCTION> n Symbol Marks Throughout this user’s manual, you will find several different types of symbols are used to identify different sections of text. This section describes these icons. WARNING Indicates a potentially hazardous situation which, if not avoided, could result in death or serious injury. CAUTION Indicates a potentially hazardous situation which, if not avoided, may result in minor or moderate injury. It may also be used to alert against unsafe practices. IMPORTANT Indicates that operating the hardware or software in this manner may damage it or lead to system failure. NOTE Draws attention to information essential for understanding the operation and features. TIP Identifies additional information. SEE ALSO Identifies a source to be referred to. Clicking a reference displayed in green can call up its source, while clicking a reference displayed in black cannot. IM 11P03A05-01E iv <INTRODUCTION> u After-sales Warranty n Do not modify the product. n During the warranty period, for repair under warranty carry or send the product to the local sales representative or service office. Yokogawa will replace or repair any damaged parts and return the product to you. Before returning a product for repair under warranty, provide us with the model name and serial number and a description of the problem. Any diagrams or data explaining the problem would also be appreciated. l If we replace the product with a new one, we won’t provide you with a repair report. l Yokogawa warrants the product for the period stated in the pre-purchase quotation Yokogawa shall conduct defined warranty service based on its standard. When the customer site is located outside of the service area, a fee for dispatching the maintenance engineer will be charged to the customer. n In the following cases, customer will be charged repair fee regardless of war- ranty period. • Failure of components which are out of scope of warranty stated in instruction manual. • Failure caused by usage of software, hardware or auxiliary equipment, which Yokogawa Electric did not supply. • Failure due to improper or insufficient maintenance by user. • Failure due to modification, misuse or outside-of-specifications operation which Yokogawa does not authorize. • Failure due to power supply (voltage, frequency) being outside specifications or abnormal. • Failure caused by any usage out of scope of recommended usage. • Any damage from fire, earthquake, storms and floods, lightning, disturbances, riots, warfare, radiation and other natural changes. n Yokogawa does not warrant conformance with the specific application at the user site. Yokogawa will not bear direct/indirect responsibility for damage due to a specific application. n Yokogawa Electric will not bear responsibility when the user configures the product into systems or resells the product. n Maintenance service and supplying repair parts will be covered for five years after the production ends. For repair for this product, please contact the nearest sales office described in this instruction manual. IM 11P03A05-01E <CONTENTS> Model MG8E Paramagnetic Oxgen Analyzer IM 11P03A05-01E 3rd Edition CONTENTS INTRODUCTION........................................................................................................i u After-sales Warranty...........................................................................................iv 1. 2. 3. 4. NOTICE ON HANDLING............................................................................ 1-1 1.1 Precaution in Unpacking................................................................................... 1-1 1.2 Check of Model Name and Specifications...................................................... 1-2 OVERVIEW................................................................................................. 2-1 2.1 Standard System Configuration...................................................................... 2-1 2.2 System Configuration with Automatic Calibration........................................ 2-2 SPECIFICATIONS...................................................................................... 3-1 3.1 Standard Specifications.................................................................................... 3-1 3.2 Characteristics................................................................................................... 3-4 3.3 Model and Suffix Code...................................................................................... 3-5 3.4 External Dimensions......................................................................................... 3-6 INSTALLATION.......................................................................................... 4-1 4.1 Installation Location.......................................................................................... 4-1 4.2 Mounting Procedure.......................................................................................... 4-2 5. NAMES OF COMPONENTS...................................................................... 5-1 6. PIPING........................................................................................................ 6-1 7. WIRING....................................................................................................... 7-1 8. 7.1 External Connection Terminals........................................................................ 7-1 7.2 Wiring Precautions............................................................................................ 7-2 7.3 Cable Specifications.......................................................................................... 7-2 7.4 External Wiring................................................................................................... 7-3 7.4.1 Power Wiring and Grounding............................................................. 7-3 7.4.2 Analog Output Wiring.......................................................................... 7-3 7.4.3 Wiring for Solenoid Valves for Automatic Calibration......................... 7-4 7.4.4 Contact Output Wiring........................................................................ 7-4 7.4.5 Contact Input Wiring........................................................................... 7-6 PREPARATIONS........................................................................................ 8-1 8.1 Adjustment of the Level in the Sensor Unit.................................................... 8-1 8.2 Checking the Auxiliary Gas Pressure.............................................................. 8-2 8.3 Checking Sample Gas....................................................................................... 8-2 IM 11P03A05-01E vi <CONTENTS> 9. 10. OPERATIONS............................................................................................. 9-1 9.1 Operation Keys.................................................................................................. 9-1 9.2 Displays and Indicators..................................................................................... 9-2 9.3 Basic Operations............................................................................................... 9-3 IM 11P03A05-01E 9.3.2 Entering the Password........................................................................ 9-3 9.3.3 Changing the Function Number.......................................................... 9-4 9.3.4 Returning to MEAS Mode from MAINT mode.................................... 9-4 9.3.5 Entering Values................................................................................... 9-5 9.3.6 Selecting Data..................................................................................... 9-6 9.3.7 Functions Numbers............................................................................. 9-7 10.1 Supplying Power.............................................................................................. 10-1 10.2 Warm-up............................................................................................................ 10-2 10.3 Analog Output Loop Check............................................................................ 10-3 10.4 Setting the Output Range................................................................................ 10-3 10.5 Executing Calibrations.................................................................................... 10-4 10.5.1 Calibration Gas Requirements......................................................... 10-4 10.5.2 Setting Calibration Gas Concentrations........................................... 10-4 10.5.3 Manual Calibration............................................................................ 10-4 Adjustment for Interference Gas Compensation Using Process Gas....... 10-5 PARAMETER SETTINGS........................................................................ 11-1 11.1 12. Switching from MEAS Mode to MAINT Mode.................................... 9-3 START-UP................................................................................................. 10-1 10.6 11. 9.3.1 Output Hold...................................................................................................... 11-1 11.1.1 Setting the Output Hold Function During Calibration....................... 11-1 11.1.2 Setting the Output Hold Function When an Error Occurs................ 11-2 11.2 Setting the Fail Contact................................................................................... 11-3 11.3 Action of the Maintenance Status Contact................................................... 11-3 11.4 Setting the High/Low Limit Alarms................................................................ 11-4 11.5 Setting the Remote Range.............................................................................. 11-5 11.6 Setting the Range Switching Answerback Contact Output........................ 11-6 11.7 Setting the Low Auxiliary Gas Pressure Alarm Function............................ 11-7 CALIBRATION.......................................................................................... 12-1 12.1 Overview........................................................................................................... 12-1 12.2 Calibration Coefficient.................................................................................... 12-2 12.2.1 Zero Calibration Coefficient.............................................................. 12-2 12.2.2 Span Calibration Coefficient............................................................. 12-2 12.2.3 Checking the Calibration Coefficients............................................... 12-2 12.2.4 Initializing the Calibration Coefficients.............................................. 12-2 <CONTENTS> 12.3 13. 14. 15. Executing Calibrations.................................................................................... 12-3 12.3.1 Manual Calibration............................................................................ 12-3 12.3.2 Semiautomatic Calibration................................................................ 12-4 12.3.3 Automatic Calibration........................................................................ 12-5 OTHER FUNCTIONS................................................................................ 13-1 13.1 Checking the Temperature of the Constant Temperature Chamber (Function No. 30).............................................................................................. 13-1 13.2 Checking the Sensor EMF (Function No. 31)................................................ 13-1 13.3 Manual Operation of the Solenoid Valves for Automatic Calibration (Function No. 58).............................................................................................. 13-1 13.4 Checking the Firmware Revision (Function No. 98).................................... 13-1 13.5 Initializing Parameters (Function No. 99)...................................................... 13-2 INSPECTION AND MAINTENANCE....................................................... 14-1 14.1 Checking the Auxiliary Gas............................................................................ 14-1 14.2 Checking the Sample Gas............................................................................... 14-1 14.3 Precautions When Stopping and Restarting the Operation....................... 14-2 14.4 Fuse Replacement........................................................................................... 14-3 14.5 Other Instructions............................................................................................ 14-4 14.6 Replacing the Limited Life Component......................................................... 14-4 TROUBLESHOOTING............................................................................. 15-1 15.1 15.2 16. vii Errors and Remedies....................................................................................... 15-2 15.1.1 Checking the Error Code.................................................................. 15-2 15.1.2 Error Descriptions............................................................................. 15-3 Faulty Readings During Measurement.......................................................... 15-5 15.2.1 Fluctuations in Readings.................................................................. 15-5 15.2.2 Drift in Readings................................................................................ 15-5 15.2.3 Short-Term Shift in Readings............................................................ 15-5 15.3 When Calibration Cannot Be Executed......................................................... 15-5 15.4 In the Event of Power Failure.......................................................................... 15-5 15.4.1 Instantaneous Power Failure............................................................ 15-5 15.4.2 When the Power Returns.................................................................. 15-5 MEASUREMENT PRINCIPLE................................................................. 16-1 16.1 Measurement Principle................................................................................... 16-1 16.2 Principle of Interference-gas Compensation................................................ 16-2 Customer Maintenance Parts List...................................... CMPL 11P03A01-01E Revision Information................................................................................................i IM 11P03A05-01E Blank Page 1. 1-1 <1. NOTICE ON HANDLING> NOTICE ON HANDLING It is highly recommended that you read this instruction manual carefully before using this analyzer so that the analyzer an operate in the best condition. Instruments certified for their explosion-protected construction (flameproof instruments) are provided with a certification label and nameplate which describes their required specifications. All installation conditions should be provided in compliance with these specifications. WARNING Open circuit at non-hazardous location(*) before removing the MG8E cover. (*) The nameplate of the MG8E says “Open circuit at non-hazardous location before removing cover” because the internal energy does not decrease below the specified value. 1.1 According to "USERS' GUIDELINES for Electrical Installations for Explosive Gas Atmospheres in General Industry" (published by Tecnology Institution of Industrial Safety, in Japan) ,the expression “a non-hazardous area” is defined as “A non-hazardous area is considered a place where no occurrence of explosive gas atmosphere is guaranteed by the foreperson and confirmed by a written document.“ Therefore, if a non-hazardous area is secured, the work can be done on site. Precaution in Unpacking This analyzer is a precision instrument. Beware of the effect of shock on the analyzer, especially while unpacking, and avoid dropping it or letting it hit another object. IM 11P03A05-01E 1-2 <1. NOTICE ON HANDLING> 1.2 Check of Model Name and Specifications Check that the model number and main specifications on the name plate of the analyzer match the specifications of your purchase order. Installation Site MG8 Sample Gas Class A and B Class C hazardous gases*1 Applicable Mixed gases of 4 hazardous gas*1, Nonor Hazardous Range to 100% hydrogen excluding hazardous Mixed gases of less Area hydrogen*3 Area*2 than 4% hydrogen Atmosphere Sample gas Atmosphere Sample gas Atmosphere Sample gas 0-1 to 25% O2 (Not applicable OK NA NA NA OK OK OK NA for 21-25% O2) MG8E used as flameproof (Exd II BT4X*4) MG8E used as 0-1 to 25% O2 non-flameproof MG8G used as 0-5 to 25% O2 non-flameproof NA OK NA OK NA OK NA NA NA OK NA OK NA NA NA NA *1: Refer to the Users Guide to Installing Explosionproof Electrical Apparatus at Plants, issued by the Technology Institution of Industrial Safety, Japan. *2: The definition of the non-hazardous area is followed by the description in the Users Guide to Installing Explosionproof Electrical Apparatus at Plants, issued by the Technology Institution of Industrial Safety, Japan: As a non-hazardous area is considered a place where no occurrence of explosive gas atmospheres is guaranteed by the foreperson and confirmed by a written document. *3: Acetylene, carbon disulfide, hydrogen, and ethyl nitrate. *4: Exd II BT4X (a) Structure: Flameproof (b) Scope of area: Plants excluding hazardous areas in mining districts or hazardous areas in offices (c) Scope of sample gas or vapor: (c-1) Class A and B hazardous gases or vapor (c-2) Gas or vapor with ignition temperature of 135°C or greater (c-3) Hydrogen concentration must be below 4%. Not applicable for gases containing acetylene, carbon disulfide and ethyl nitrate. (d) Operating conditions (d-1) Before opening the cover, remove power and make sure of non-hazardous atmospheres. (d-2) Do not use for measuring oxygen concentration of gases other than those containing air or oxygen equivalent to or less than air, or those mixed with flammable gas or vapor. T1.1.ai IM 11P03A05-01E 2-1 <2. OVERVIEW> 2. OVERVIEW The model MG8E paramagnetic oxygen analyzer continuously and selectively measures the oxygen concentration in sample gases. Its detector and converter are integrated together. The analyzing cell in the detector has a special construction which is designed to be unaffected by other gases. It is highly sensitive and offers excellent response. Its detector has a sturdy construction to protect against vibration and shock. Gas flow ratio detection ensures long term stability and reliable measurement because sample gases do not directly come into contact with the sensor and thus components in sample gases do not stick to the sensor. Its analog output signals are isolated from the internal circuit. In addition to these features, its one-touch calibration function and self-diagnosis function provide high operability, maintainability, and reliability. 2.1 Standard System Configuration The standard system configuration of the MG8E paramagnetic oxygen analyzer is shown in Figure 2.1. Vent to atmosphere Model MG8E Analog output Contact output Stop Valve Zero gas Flow rate 300 to 800 ml/min Contact input Power supply Span gas Pressure 7 kPa or more Sample gas Filter Auxiliary gas Flow meter P 350 to 500kPa Needle Valve Pressure regulator Pressure gauge F2.1.ai Figure 2.1 System Configuration Diagram IMPORTANT Auxiliary gas (N2 gas) is required in accordance with the measurement principle of the instrument. Before supplying power to the instrument, be sure to introduce the auxiliary gas. IM 11P03A05-01E 2-2 2.2 <2. OVERVIEW> System Configuration with Automatic Calibration The system configuration that includes an automatic calibration option is shown in Figure 2.2. Vent to atmosphere Model MG8E Analog output Contact output Solenoid valve Zero gas V V Contact input V Span gas V Power supply V V Sample gas Filter V V V Flow meter P 350 to 500kPa Needle Valve Auxiliary gas V: Stop valve Note 1: Note 2: Pressure Pressure regulator gauge Use a deenergize-to-open (energized-closed) solenoid valve for the sample gas, and a deenergized-to-close solenoid valve for the others. These valves are used upon failure of the solenoid valve. F2.2.ai Figure 2.2 System Configuration with Automatic Calibration IMPORTANT Auxiliary gas (N2 gas) is required in accordance with the measurement principle of the instrument. Before supplying power to the instrument, be sure to introduce the auxiliary gas. IM 11P03A05-01E 3-1 <3. SPECIFICATIONS> 3. SPECIFICATIONS 3.1 Standard Specifications Measurement Object: Oxygen concentration in gaseous mixture Measurement System: Paramagnetic system Measurement Range: 0-1 to 0-25 vol%O2 3 ranges can be programmed arbitrarily within the above specified range. Self-diagnostic content: Sensor unit error, Constant temperature chamber error, Analog error, Memory error, Calibration coefficient error Analog output signal: 4 to 20mA DC (load resistance: Maximum 550Ω) Contact output: Contact rating: 3A at 250 VAC or 30 VDC, dry contacts Fail; Low auxiliary gas pressure alarm; 1 point, closed when pressure drops Factory default low limit pressure; 300kPa 1 point, open or closed when error occurs, user configurable Contact is activated when sensor unit error, constant temperature chamber error, analog error, memory error, or calibration coefficient error (when automatic or semiautomatic calibration is enabled) occurs Maintenance status; 1 point, closed during maintenance Range answerback or high/low alarm; 2 points, normally deenergized (open) Range answerback or high/low alarm contact output, user selectable Output to Operate Solenoid Valve: 3points Switching between zero and span calibration gas, and measured gas. Maximum load : AC 1 A. Contact input: Input specification: Contact ON : 200Ω or less, Contact OFF : 100 kΩ or greater Remote range switching: 2 points, Output ranges 1 to 3 can be switched by external contact signal. Calibration start; 1 point, calibration start command by external contact signal IM 11P03A05-01E 3-2 <3. SPECIFICATIONS> Measurement Gas Conditions: Gas Flow ; Setting range : 300 to 800 ml/min (standard 600 ml/min) Allowable range : ±10% of a set value Pressure : Approx. 7 kPa (approx. 700 mmH2O) in Analyzer inlet Temperature: 0 to 50°C Humidity : No moisture condensation in the flow path or the sensor Operating Conditions: s Measurement gas must be an explosive gas which has T4 ignition temperature and must be a hazardous gas less than or equal to the gas vapor-air mixtures. s Oxygen concentration in the measurement gas must be less than a mixture of air with a flammable gas (Exd II BT4X). However, this is an exception if it is ascertained that the gas explosion characteristics are safer than the equivalent gas. Auxiliary Gas: Type ; N2 gas (not containing O2 gas equal to or greater than 0.1 % of the maximum concentration of the measurement range) Pressure ; 350 to 500 kPa (average flow rate of approx. 35 ml/min. When sample gas contains hydrogen of 3% or greater, flow rate is approx. 55 ml/min) Calibration gas: Zero gas ; N2 gas Note: Zero gas should not contain O2 gas with a concentration equal to or greater than 0.1% of the upper range value. Span gas ; Dry air (instrument air O2: 20.95 vol%) or standard gas containing O2 gas with a concentration of 80 to 100% of the span value (balance nitrogen). Calibration methods: (1) Automatic calibration at set intervals by internal timer (2) Semiautomatic calibration started by external contact input (3) Manual calibration in the field Warm-up Time: Approx. 2.5 hours Installation Conditions: Ambient temperature: -5 to 55°C Humidity; 10-95%RH (No condensing) Vibration: 5 to 9 Hz : Vibration amplitude; 1.5 mm or less 9 to 150 Hz: Acceleration; 2 m/s2 or less Power Supply: IM 11P03A05-01E 100 to 115 V AC ±10%, 50 or 60 Hz <3. SPECIFICATIONS> 3-3 Power Consumption: 170 VA maximum, approx. 25 VA normally Materials in Contact with Gas: JIS SUS316 stainless steel, Fluorocarbon rubber, Hard glass Structure: flameproof (Exd II BT4X) Dimensions : 440(W) x 370(H) x 325(D) mm Color: Door: Munsell 2.0GY7.5/0.9, epoxy resin baked Case: Munsell 2.0GY3.1/0.5, epoxy resin baked Weight : Approx. 38 kg IM 11P03A05-01E 3-4 <3. SPECIFICATIONS> 3.2 Characteristics Repeatability : ±1% or less of span Linearity : ±1% or less of span Response Time : 90% response within 3 sec; measured by analog output signal change after gas is fed through the analyzer inlet. Drift and Influence in Ambient Temperature: Range Item Drift (zero, span) 0 – 1% O2 2% or less of span / week 0 – 2 to 4% O2 1.5% or less of span / week 0 – 5 to 25% O2 1% or less of span / week Influence in Ambient Temperature Variation of 2% or less of span / 10°C Variation of 1.5% or less of span / 10°C Variation of 1% or less of span / 10°C T3.1.ai Influence in Measurement Gas Flow: ±1% or less of span/ ±10% of set value Influence in Atmospheric Pressure: IM 11P03A05-01E ±1% or less of span/ 10 hPa 3.3 3-5 <3. SPECIFICATIONS> Model and Suffix Code Model MG8E Paramagnetic Oxygen Analyzer (Flameproof) Model Suffix Code Option Code Specification Paramagnetic oxygen analyzer MG8E Measurement range -1 -2 -5 Cell material 0 - 1 to 25 vol% O2 0 - 2 to 25 vol% O2 0 - 5 to 25 vol% O2 Standard Organic solvent resistant A B Auxiliary gas N2 gas W Flow rate of auxiliary gas 35 ml/min 55 ml/min, when sample gas contains H2 gas of 3% or greater and O2 in He N H Power supply Language Option 100 - 115 V AC, 50 / 60 Hz 5 Japanese English -J -E /B1 Balance gas: CO2 (20%)+N2 T3.2.ai (Note 1) For wiring to the MG8E paramagnetic oxygen analyzer, always use the specified external cable lead-in cable grands shown in the table below. (Note 2) Two pressure packing adapters (part number :G9601AE) are mounted on the MG8E cable inlet ports for power supply and output signal. (Blind plugs are mounted on the remaining four cable inlet ports.) (Note 3) If wiring to other than the power supply and output signal is necessary, prepare the following additional items as required.The number of external cable lead-in cable grands possible for mounting is as follows: • Cable grounding : Up to 6 pieces (Note 4) Material of measurement gas seal is Daielperfrow (tetrafluoroethylene/perfluoro methyl vinyl ether rubber) when cell material is organic solvent resistant. (Note 5) Consult Yokogawa for balance gas other than option code “/B1.” External Cable Lead-in Cable Grands Part No. Part Name G9601AE Cable grands K9356AG Cable grands Specification Cable of 10 to 13.5 mm O. D. Cable of 8.5 to 11 mm O. D. T3.3.ai STANDARD ACCESSORIES Item Parts No. Qty Description Fuse Hex-headwrench A1111EF 2 250V 2A User’s Manual 1 1 T3.4ai IM 11P03A05-01E 3-6 <3. SPECIFICATIONS> 3.4 External Dimensions 325 Unit: mm 440 75 320 250 25 55 400 360 approx. 65 Paramagnetic Oxygen Analyzer 305 <1> 55 133 M8, 3 holes; depth 12 <9> <8> <7> <6> <4> IM 11P03A05-01E 50 45 50 20 30 185 75 166 205 135 190 <3> Mounting holes M8, 4holes; depth 12 <5> 75 15 <2> <1> <2> <3> <4> <5> <6> <7> <8> <9> Cable inlet port : G3/4 Cable grand : (Cable O.D.: Φ10-13.5) Cable grand : (Cable O.D.: Φ10-13.5) Cable inlet port : G3/4 Cable inlet port : G3/4 Cable inlet port : G3/4 Measurement gas inlet port : Rc1/4 Auxiliary gas inlet port : Rc1/4 Gas outlet port : Rc1/4 F3.1.ai 4. <4. INSTALLATION> 4-1 INSTALLATION This chapter describes installation for the analyzer and procedures and precautions for wiring and piping work. Follow the procedures outlined in this chapter as much as possible. WARNING Open circuit at non-hazardous location before removing the MG8E cover. (*) The nameplate of the MG8E describes “Open circuit at non-hazardous location before removing cover” because the internal energy does not decrease below the specified value. 4.1 According to "USERS' GUIDELINES for Electrical Installations for Explosive Gas Atmospheres in General Industry" (published by Tecnology Institution of Industrial Safety, in Japan) ,the expression “a non-hazardous area” is defined as “A non-hazardous area is considered a place where no occurrence of explosive gas atmosphere is guaranteed by the foreperson and confirmed by a written document.“ Therefore, if a non-hazardous area is secured, the work can be done on site. Installation Location The following conditions must be observed in selecting the location: (1) A place that meets the explosion proof specifications (2) Minimum influence from shock or vibration (3) The least corrosive atmosphere (4) A daytime variation in the ambient temperature of less than 15 °C. (In particular, avoid installing the analyzer in a location where the temperature may abruptly change.) (5) No exposure to rain drop and direct sunlight (In a place where exposed to direct sunlight, provide a shade.) (6) No exposure to high radiant heat, steam, or heat convection from a process plant (7) Minimum influence from an electromagnetic field. Avoid as much as possible parallel wiring with power supply cables or areas close to motors, electromagnetic relays, or pumps. (8) Easy implementation of maintenance and inspection IM 11P03A05-01E 4-2 <4. INSTALLATION> 4.2 Mounting Procedure The standard mounting of the analyzer is a wall-mounting. Attach the mounting bracket to the back of the body using bolts (M8×14), lock washers, and flat washers. Using the four mounting holes, fix the body to the wall in such a way that there is no gap between the body and the wall. Note: In consideration of the instruments weight (approximately 38kg), use a channel steel support if necessary. Securely fix the analyzer so that the mounting angle does not change. Vibration or fluctuation in the position of the analyzer may cause errors. Unit: mm 75 320 250 25 Cable inlet port Cable inlet port 305 360 55 400 55 Cable inlet port 4-M8 depth12 (Mounting holes) Note that the instrument's weight is approximately 38kg. If the wall for mounting the instrument is not sufficiently sturdy, use an angle steel support. 3-M8 depth12 75 15 190 205 75 320 4- 10 holes 360 Position of holes for installation Figure 4.1 Mounting of Analyzer IM 11P03A05-01E F4.1E.ai 5. <5. NAMES OF COMPONENTS> 5-1 NAMES OF COMPONENTS Displays and Indicators Sensor Angle Adjustment Screw (Not provided for instrument with measuring range of 0-5% O2.) Operation Keys F5.1E.ai Figure 5.1 Operation Panel Sensor Angle Adjustment Knob External Connection Terminals Sensor Unit Auxiliary Gas Pressure Gauge (Note) (in Constant Temperature Chamber) Fuses F5.2E.ai Figure 5.2 Inside of Analyzer NOTE Note:The auxiliary gas pressure gauge reads the secondary pressure of the pressure regulator in the sensor unit and needs no adjustment. IM 11P03A05-01E Blank Page 6-1 <6. PIPING> 6. PIPING CAUTION Before connecting pipes to the MG8E (including the gas sampling unit), thoroughly purge the pipes and make sure that there are no moist air and other contaminants trapped inside. (1) Figure 6.1 shows the standard piping diagram. Connect metal piping tubes of approximately Ø6/Ø4 mm so that no leakage occurs. (2) A pressure regulator and pressure gauge (range : 0 to 1MPa) should be provided on the auxiliary-gas line to set the desired pressure. For pressure setting, see (3) of Section 8.2, “Setting the Auxiliary Gas Pressure.” (3) Calibration gases are required for zero and span calibrations. Piping should be arranged to enable the inlet to switch between the sample gas and the calibration gas. (4) Gas from the instrument should be vented to the atmosphere. The gas outlet should be designed so that the ingress of wind, rain and drain is prevented. Gas outlet (must be vented to the atmosphere.) Model MG8E Analog output Stop valve Contact output Zero gas Flow rate: 300 to 800ml/min Pressure: Provide a pressure of about 7 kPa Contact input Span gas Power supply Sample gas Filter Auxiliary gas Flow meter P 350 to 500kPa Needle valve Pressure Pressure regulator gauge F6.1E.ai Figure 6.1 Piping Diagram IM 11P03A05-01E Blank Page 7. 7-1 <7. WIRING> WIRING WARNING Open circuit at non-hazardous location(*) before removing the MG8E cover. (*) The nameplate of the MG8E says “Open circuit at non-hazardous location before removing cover” because the internal energy does not decrease below the specified value. 7.1 According to "USERS' GUIDELINES for Electrical Installations for Explosive Gas Atmospheres in General Industry" (published by Tecnology Institution of Industrial Safety, in Japan) ,the expression “a non-hazardous area” is defined as “A non-hazardous area is considered a place where no occurrence of explosive gas atmosphere is guaranteed by the foreperson and confirmed by a written document.“ Therefore, if a non-hazardous area is secured, the work can be done on site. External Connection Terminals The external connection terminals are located inside the operation panel. To open the panel, loosen the two screws on the panel. Figure 7.1 shows the diagram of the external connection terminals of the MG8E. The terminal numbers are indicated on the instrument. Be sure to make all connections correctly. The terminal screw thread is M4. Appropriate crimp terminals should be used. The FG terminals are connected to the case. Make sure that terminals G (26) and FG (27) should remain connected by a supplied jumper plate. Automatic calibration contact input Ground Output signal FG ANALOG OUTPUT 4-20mA DC + – 1 2 3 4 Remote range contact input CONTACT INPUT CAL START 5 High/Low limit alarm contact output or Maintenance mode range contact output contact output RANGE CHANGE COM R3 R2 6 7 FAIL contact output 8 9 Auxiliary gas pressure lowering contact output CONTACT O UTPUT RANGE-OUT/HL ALM R3/HI R2/LO COM 10 11 12 MAIT • CAL 13 14 Automatic calibration solenoid valve drive signal FG 19 21 22 15 LO AUX GAS 16 17 Power supply (AC) SV POWER OUTPUT AUTO CAL ZERO SPAN SMPL COM 20 FAIL 23 18 JUMPER PLATE POWER SUPPLY L N 24 25 G 26 FG 27 F7.1E.ai Figure 7.1 External Connection Terminals IM 11P03A05-01E 7-2 <7. WIRING> 7.2 Wiring Precautions For external cable wiring use only the flameproof cable glands specified by Yokogawa (Table 7.1). For details about wiring for the flameproof or explosionproof equipment, refer to the relevant guides of the local and international standards to ensure proper wiring. The following instructions must be observed when wiring: (1) Turn off all the power before wiring. (2) Do not route electrical wiring and wiring for large-capacity converters and motors or power wiring in the same wiring duct. (3) The thread parts must be waterproofed. (Non-hardening silicone sealant is recommended.) (4) To prevent errors due to noise, do not route signal cables and power cables in the same cable hole. (5) When running cables in a place where ambient temperature is high or low, use cables suited for that condition. (6) When running cables in an atmosphere where hazardous gas or liquid, or oil or solvent is present, use cables made of materials that can withstand such aggressive conditions. (7) For wire termination use crimp terminals (M4 screws) with insulating sleeves. 7.3 Cable Specifications (1) For the wiring, use PVC insulated PVC sheathed control cables (CVV), PVC insulated PVC sheathed shielded control cables (CVVS), or other suitable cables. If necessary, run the cable in a steel conduit or other suitable tube or duct for protection against damage. The thread parts must be waterproofed with a non-hardening sealant. (2) Flameproof cable glands for cable wiring must be the ones specified by Yokogawa. Flameproof cable glands are available in two types for different port sizes (see table below). (3) Measure the outside diameter of a cable to be used in two different directions in millimeters and take the average. From Table 7.1 select the cable gland with a diameter closest to the average. (4) Analog output cables must have a shield wire, which should be connected to the FG terminal of the instrument. (5) For the grounding, use 600 V PVC insulated wires. Table 7.1 Types of Flameproof Packing Adapters and Appropriate Outside Diameters of Cable Conduit Connection Appropriate Outside Identification Size * Diameters of Cable (mm) Mark on Packing G3/4 G3/4 8.5 to 9 9.1 to 10 10.1 to 11 10 to 11 11.1 to 12 12.1 to 13.5 9Φ 10Φ 11Φ 11Φ 12Φ 13.5Φ Part Number K9356AG G9601AE *: For conduit connection sizes, see Section 3.4, “External Dimensions.” IM 11P03A05-01E T7.1E.ai 7.4 <7. WIRING> 7-3 External Wiring 7.4.1 Power Wiring and Grounding Connect a power line to terminals L (24) and N (25) of the instrument and a grounding wire to terminal FG (27) or the external grounding terminal at the bottom of the case. The ground resistance should be 100 Ω or less. The jumper plate between terminals G (26) and FG (27) must remain connected. 7.4.2 Analog Output Wiring Connect an analog output cable to the ANALOG OUTPUT terminals, (3) and (4), and the shield wire to the FG terminal, (1) or (2), of the instrument. The load resistance including wiring resistance on the output should be 550 Ω or less. Automatic calibration contact input Ground Output signal FG ANALOG OUTPUT 4-20mA DC + – 1 2 3 4 Remote range contact input CONTACT INPUT CAL START 5 6 RANGE CHANGE COM R3 R2 7 8 9 Shield + – Receiver/Recorder F7.2E.ai Figure 7.2 Analog Output Wiring IM 11P03A05-01E 7-4 <7. WIRING> 7.4.3 Wiring for Solenoid Valves for Automatic Calibration This wiring is for the solenoid valves that switch zero, span, and sample gas lines in automatic or semiautomatic calibration. The power sources for solenoid valves are provided internally. Use solenoid valves that have the same power supply voltage and frequency specifications as the instrument. Use a normally open solenoid valve in sample gas line and normally closed solenoid valves for zero and span gas lines. Automatic calibration solenoid valve drive signal Power supply (AC) POWER SUPPLY SV POWER OUTPUT AUTO CAL ZERO SPAN SMPL COM FG 19 21 20 22 Solenoid Valve in Zero Gas Line, Normally Closed 23 L N G FG 24 25 26 27 Solenoid Valve in Sample Gas Line, Normally Open Solenoid Valve in Span Gas Line, Normally Closed F7.3E.ai Figure 7.3 Solenoid Valve Wiring IMPORTANT The power sources for solenoid valves are provided internally. Use solenoid valves that have the same power supply voltage and frequency specifications as the instrument. 7.4.4 Contact Output Wiring All outputs are voltage-free, dry contacts (mechanical relay contacts) and rated 3A at 250 V AC or 30 V DC. High/Low limit alarm contact output or Maintenance mode range contact output contact output FAIL contact output Auxiliary gas pressure lowering contact output CONTACT OUTPUT RANGE-OUT/HL ALM R3/HI R2/LO COM 10 11 12 MAIT ・CAL 13 LO AUX GAS FAIL 14 15 16 17 18 Higher-Level Devices, Annunciators, etc. F7.4E.ai Figure 7.4 Contact Output Wiring IM 11P03A05-01E 7-5 <7. WIRING> 7.4.4.1 Wiring for High/Low Alarm Contact Output/Range Answerback Contact Output Either high/low alarm contact output or range answerback contact output can be selected. For their detailed functions and setting procedures, refer to Chapter 11, Parameter Settings. Terminal 12 is a common terminal and the contact between terminals 10 and 12 and the one between terminals 11 and 12 will open or close in response to the instrument status. For external connections to higher-level devices or other instruments, refer to Figure 7.1. Both contacts are open when the instrument is not powered. Terminal No. 10-12 11-12 High/Low Alarm Contact Output High Alarm Low Alarm Closed Closed Range Answerback Contact Output Range 1 Range 2 Range 3 Open Open Closed Open Closed Open 7.4.4.2 Wiring for Maintenance Status Contact Output The contact between terminals 13 and 14 is closed during maintenance. For its functions, refer to Chapter 11, Parameter Settings. The contact is open when the instrument is not powered. 7.4.4.3 Wiring for Fail Contact Output The contact between terminals 15 and 16 will be activated when an error occurs. The output contact is user configurable to open or close when an error occurs. For the setting and functions, refer to Chapter 11, Parameter Settings. The contact is open when the instrument is not powered. 7.4.4.4 Wiring for Low Auxiliary Gas Pressure Alarm Contact Output The contact between terminals 17 and 18 will close when the pressure of the auxiliary gas being supplied to the instrument drops to the specified pressure or below. For its functions, refer to Chapter 11, Parameter Settings. The contact is open when the instrument is not powered. IM 11P03A05-01E 7-6 <7. WIRING> 7.4.5 Contact Input Wiring The input is designed to accept a voltage free contact. The contact will open or close in response to the resistance detected on the input. Note that the resistance includes wiring resistance. Contact closes at 200 Ω or less Contact opens at 100 kΩ or more Ground Output signal FG Automatic calibration contact input 1 CONTACT INPUT ANALOG OUTPUT 4-20mA DC + – 2 3 4 Remote range contact input CAL START 5 RANGE CHANGE COM R3 R2 6 7 8 9 F7.5E.ai Figure 7.5 Contact Input Wiring 7.4.5.1 Wiring for Calibration Start Contact Input A calibration will start when the contact between terminals 5 and 6 closes. For the setting and functions, refer to Chapter 12, Calibration. 7.4.5.2 Wiring for Remote Range Contact Input The range will be switched externally by the state of the contacts between 7 and 9 and between 8 and 9. For the setting and functions, refer to Chapter 11, Parameter Settings. Terminal No. 7-9 8-9 IM 11P03A05-01E Remote Range Contact Input Range 1 Range 2 Range 3 Open Open Closed Open Closed Open <8. PREPARATIONS> 8. PREPARATIONS 8.1 Adjustment of the Level in the Sensor Unit 8-1 After the installation is complete, adjust the angle of the sensor unit. The level adjustment is not needed here if the adjustment is conducted using the actual process gas when the instrument has reached a steady state after power up. (1) Remove the four screws and remove the constant temperature chamber cover. (2) Turn the adjustment knob until the air bubble is centered in the level that is installed in front of the sensor unit. Turn the knob clockwise to move the bubble to the right. (3) Replace the constant temperature chamber cover. Be sure that cables are not caught in the cover. Make sure that the cover is installed securely. Otherwise, the temperature in the constant temperature chamber may become unstable, causing measurement errors. Screws Holding Constant Temperature Chamber Cover (4) Sensor Angle Adjustment Knob F8.1E.ai Level Figure 8.1 Level Adjustment IM 11P03A05-01E 8-2 <8. PREPARATIONS> 8.2 Checking the Auxiliary Gas Pressure Supply the auxiliary gas at the specified pressure (350 to 00 kPa) to the instrument. Check that the needle on the pressure gauge that is installed in the instrument is in the center of the green zone. The pressure gauge measures the secondary pressure of the pressure regulator that is installed in the instrument to stabilize the auxiliary gas pressure. The pressure regulator is adjusted at the factory before shipment and needs no adjustment. 8.3 Checking Sample Gas Do not introduce sample gas before the instrument has reached a steady state. IM 11P03A05-01E <9. OPERATIONS> 9. OPERATIONS 9.1 Operation Keys 9-1 The operation keys on the panel are shown in Figure 9.1 and their functions are summarized in Table 9.1. SPAN ▲ FUNC ▲ SHIFT ▲INCR EXEC ▲ MEAS/MAINT D.P ZERO F9.1E.ai Figure 9.1 Operation Keys Table 9.1 Operation Keys and Their Functions Key MEAS/MAINT SPAN ZERO FUNC D. P SHIFT INCR EXEC Function Hold this key and press EXEC key to switch measurement (MEAS) mode and maintenance (MAINT) mode. Used to execute span calibration in calibration.Used to enter span gas concentration in setting. Used to execute zero calibration in calibration.Used to enter zero gas concentration in setting. Used to change the Function Number. Each press increases the number by one increment. The ten and ones digits change independently Used to move the decimal point in setting. Used to blink digit on DATA display or to move blinking digit in setting. Each press increases the active value by one increment in setting. Used to confirm data entry or to execute function. IM 11P03A05-01E 9-2 <9. OPERATIONS> 9.2 Displays and Indicators The displays and indicators and their functions are summarized in Table 9.2. Also refer to Figure 9.2, Operation Panel. OUTPUT FUNC DATA vol%O2 FAIL MEAS MAINT H-ALM L-ALM HEATER ENABL INHIBIT AUTO CAL SPAN ZERO RMT.RANGE LCL.RANGE F9.2E.ai Figure 9.2 Displays and Indicators Table 9.2 Displays and Indicators Display/Indicator DATA (4-digit number) FUNC (2-digit number) OUTPUT FAIL MEAS MAINT H-ALM L-ALM ENABLE INHIBIT SPAN ZERO HEATER AUTO CAL RMT.RANGE LCL.RANGE IM 11P03A05-01E Function Shows oxygen concentration in MEAS mode. Shows “–0.00” when measured concentration is below zero, regardless of value. Shows blinking value if auxiliary gas pressure falls below the setpoint when low auxiliary gas pressure alarm function is enabled. Shows setting parameters in MAINT mode. Shows Function No. in MAINT mode. Blank in MEAS mode. Indicates analog output value in 10-level indicator bar. Indicator runs showing actual output value even while the analog output is being held. Lights when error occurs. Lights when instrument is in MEAS mode. Blinks when built-in atmospheric sensor failed. Lights when instrument is in MAINT mode. Blinks when instrument is in stabilization period after warm-up period. Lights when measured oxygen concentration exceeds high limit alarm value. Lights when measured oxygen concentration falls below low limit alarm value. Lights when password entered is effective in MAINT mode. Lights when password is not effective in MAINT mode. Lights when span calibration is selected in calibration. Lights when span gas is selected in calibration gas concentration setting. Blinks when span calibration is required. Lights when zero calibration is selected in calibration. Lights when zero gas is selected in calibration gas concentration setting. Turns on and off in response to power on/off status of heater for constant temperature chamber. Lights when automatic calibration function is enabled. Lights when range switching function at contact input is enabled. Lights when range switching function at contact input is disabled. 9.3 9-3 <9. OPERATIONS> Basic Operations This section describes the basic operations of the MG8E paramagnetic oxygen analyzer. (pointer)” in the key operation fields indicates the key to be pressed and light gray In this section “ characters in DATA fields indicate blinking characters on the display. 9.3.1 Switching from MEAS Mode to MAINT Mode In MEAS mode the DATA display on the instrument shows oxygen concentrations in steady state and in MAINT mode operation parameters are set and confirmed or calibration is performed. When the instrument moves into steady state after a warm-up period, it is in MEAS mode. The instrument can be switched into MAINT mode from a warm-up period, stabilization period or steady state (MEAS mode). Key Operation SPAN MEAS/MAINT D.P ZERO FUNC DATA Press EXEC key while holding MEAS/ MAINT key.MAINT and INHIBIT lamps turn on.Maintenance status contact is activated. ▲ F UNC ▲ SHIFT ▲INCR Procedure EXEC 9.3.2 Entering the Password A password is required when setting data or performing calibration in MAINT mode. A password for the instrument is “007” which cannot be changed. The following describes how to enter the password. Key Operation ZERO SPAN MEAS/MAINT D.P SPAN D.P MEAS/MAINT SPAN MEAS/MAINT SPAN MEAS/MAINT D.P D.P FUNC SHIFT ▲INCR EXEC ZERO ▲ F UNC ▲ ZERO ZERO EXEC ▲ F UNC ▲ SHIFT ▲INCR ▲ F UNC ▲ SHIFT ▲INCR EXEC Procedure Press FUNC keys to show “00” on FUNC display.DATA display shows “P000” where the password is entered. ▲ F UNC ▲ SHIFT ▲INCR DATA EXEC Press SHIFT key repeatedly to move the blinking digit to the rightmost digit. Press INCR key repeatedly until “7” is displayed. Press EXEC key to accept. The digit stops blinking.ENABLE lamp turns on, indicating that the password has become effective. IM 11P03A05-01E 9-4 <9. OPERATIONS> 9.3.3 Changing the Function Number Each function is assigned to the Function Numbers. Parameters can be viewed and set in the relevant Function Number. The Function Number can be changed using the FUNC keys when the instrument is in MAINT mode. The following describes how to change the Function Number. Key Operation FUNC DATA Procedure Switch to MAINT mode.Enter the password. SPAN MEAS/MAINT D.P ZERO ▲ F UNC ▲ SHIFT ▲INCR EXEC Press the left FUNC key to increase the tens digit, and press the right FUNC key to increase the ones digit on FUNC display. When the Function Number is displayed, the assigned parameter is shown on DATA display. • The Function Number can be changed even if the password is not effective in MAINT mode. However, in some functions parameters are not shown unless the password is effective. In this case, the DATA display shows “----.”. For details, refer to Table 9.3. • In the Function Number to which no function is assigned, the DATA display shows “----.” 9.3.4 Returning to MEAS Mode from MAINT mode The instrument can be returned to MEAS mode from anywhere in MAINT mode by pressing the EXEC key while holding the MEAS/MAINT key. IM 11P03A05-01E 9-5 <9. OPERATIONS> 9.3.5 Entering Values This section explains how to enter values. As an example, the procedure for changing oxygen concentration value in Function No. 02 is shown below. The concentration of span gas is changed from 20.95 to 0.980. Key Operation ZERO SPAN MEAS/MAINT D.P SPAN D.P MEAS/MAINT SPAN D.P MEAS/MAINT SPAN D.P MEAS/MAINT SPAN D.P MEAS/MAINT SPAN D.P MEAS/MAINT SPAN MEAS/MAINT SPAN MEAS/MAINT D.P D.P FUNC SHIFT ▲INCR EXEC ZERO ▲ F UNC ▲ ZERO ZERO EXEC ▲ F UNC ▲ SHIFT ▲INCR ZERO EXEC ▲ F UNC ▲ SHIFT ▲INCR ZERO EXEC ▲ F UNC ▲ SHIFT ▲INCR ZERO EXEC ▲ F UNC ▲ SHIFT ▲INCR ZERO EXEC ▲ F UNC ▲ SHIFT ▲INCR ▲ F UNC ▲ SHIFT ▲INCR EXEC Procedure Switch to MAINT mode. Enter the password. Press FUNC keys to show “02” on FUNC display. ZERO lamp turns on. DATA display shows “0.000.” ▲ F UNC ▲ SHIFT ▲INCR DATA EXEC Press SPAN key. SPAN lamp turns on. DATA display shows “20.95,” the default of span gas concentration. (The default is dependent on the specifications.) Press SHIFT key. The leftmost digit of “2” blinks, indicating that the digit can be changed. Press INCR key repeatedly until “0” is displayed. Press SHIFT key to move the blinking digit to the right. Press INCR key repeatedly until “9” is displayed. In the same manner, change the remaining digits. Press DP key to move the decimal point to the desired position. Press EXEC key to accept. The digit stops blinking, indicating that the change has been accepted. IM 11P03A05-01E 9-6 <9. OPERATIONS> 9.3.6 Selecting Data This section explains how to select and set one of parameters. As an example, selection of the range is shown below. Key Operation ZERO SPAN MEAS/MAINT D.P SPAN D.P MEAS/MAINT SPAN MEAS/MAINT D.P SPAN MEAS/MAINT IM 11P03A05-01E D.P FUNC SHIFT ▲INCR EXEC ZERO ▲ F UNC ▲ ZERO ZERO EXEC ▲ F UNC ▲ SHIFT ▲INCR EXEC ▲ F UNC ▲ SHIFT ▲INCR Procedure Switch to MAINT mode. Enter the password. Press FUNC keys to show “11” on FUNC display. DATA display shows “1”, the currently selected range. ▲ F UNC ▲ SHIFT ▲INCR DATA EXEC Press SHIFT key. “1” blinks, indicating that the digit can be changed. Press INCR key to change the digit to the desired range number. The digit cycles through only the available values (in this case 1 through 3). Press EXEC key. The digit stops blinking, indicating that the change has been accepted. 9-7 <9. OPERATIONS> 9.3.7 Functions Numbers The functions assigned to the Function Numbers are listed in Table 9.3. In some functions parameters are not shown unless the password is effective in MAINT mode. Table 9.3 Function Numbers Func No. Function 00 Entering password 01 Executing calibrations 11 12 13 14 Setting calibration gas concentrations Checking calibration coefficients Setting output hold function during calibration Initializing calibration coefficient Setting remote range switching contact input Selecting range Setting span for range 1 Setting span for range 2 Setting span for range 3 16 Fixed analog output 20 21 Setting low limit alarm Setting high limit alarm Setting high/low limit alarm function Setting low auxiliary gas pressure alarm function Checking temperature (°C) of constant temperature chamber Checking sensor emf (mV) Executing error check Resetting sensor emf error status Resetting calibration coefficient error status 02 03 04 05 10 22 23 30 31 40 41 42 43 44 45 50 51 52 53 54 55 56 57 58 67 98 99 Setting and Range ZERO key: executes zero calibration SPAN key: executes span calibration ZERO key: for zero gas concentration, 0 to 6 SPAN key: for span gas concentration, 0.5 to 25 ZERO key: displays zero calibration coefficient SPAN key: displays span calibration coefficient 0: enabled 1: disabled Password Not Effective Effective ---- ---- 1: disabled 2: enabled 1: range 1 2: range 2 3: range 3 1 to 25% O2 1 to 25% O2 1 to 25% O2 ZERO key: 4 mA SPAN key: 20 mA 0 to 25% O2 0 to 25% O2 ---- 0: disabled 1: enabled 0: disabled 1: enabled ---- ---- ---- ---- ---- 1: enabled – output is held at last measured value Setting output hold function 2: disabled when error occurs 3: enabled – output is held at preset value Setting preset value –10 to 110% 0: contact closes when error occurs Setting contact output status when error occurs 1: contact opens when error occurs Setting initial wait time for 0 day 0 hour to 99 days 24 hours automatic calibration Setting interval for 0 day 1 hour to 99 days 24 hours automatic calibration Setting zero calibration time 1 to 99 minutes Setting span calibration time 1 to 99 minutes Setting purge time 0 to 99 minutes 0: not execute span calibration Executing span calibration 1: executes span calibration Setting the number of times of skipping span 0 to 99 times calibrations Starting automatic 0: OFF 1: ON calibration function ZERO key: opens solenoid valve in zero gas line Manual operations of solenoid valves SPAN key: opens solenoid valve in span gas line Checking error status For service Checking firmware revision Initialization : Data can only be viewed. : Data can be changed or functions can be executed. Note: Setting ranges depend on Model and Suffix Codes. IM 11P03A05-01E Blank Page 10-1 <10. START-UP> 10. START-UP This chapter describes the procedures for supplying power, setting operation parameters, and manual calibration. 10.1 Supplying Power Before supplying power to the instrument, make sure that: (1) the installation, piping and wiring have been done correctly; (2) the auxiliary gas is being supplied at the specified pressure; (3) the supply voltage meets the instrument specifications; and (4) no sample gas has been introduced. (5) the case cover is securely closed and the six cover bolts are firmly tightened. Then, supply power to the instrument. Upon power up, the instrument displays show as follows. Display Description FUNC All segments on both DATA and FUNC displays turn on for about two seconds. DATA FUNC The firmware revision appears for about three seconds. (The number shown at left is an example.) DATA FUNC DATA The instrument enters a warm-up period. As shown at left, the DATA display alternates between “uuuu” and the current heater temperature during the warm-up. DATA IM 11P03A05-01E 10-2 <10. START-UP> 10.2 Warm-up After power up the instrument goes through a warm-up period and then reaches steady state where it is ready for measurement. This section describes how the instrument behaves during the warm-up period. The instrument controls the temperature so that the temperature in the sensor unit is kept at 55 °C. It may take approximately 2.5 hours until the temperature in the sensor unit has stabilized at 55 °C. The required time varies depending on the temperature in the sensor unit at start-up or ambient temperature. At first the heater temperature rises to 60 °C to warm the sensor unit quickly, and then the heater temperature goes down to 55 °C as the sensor unit gets warmer. When the temperature in the sensor unit approaches 55 °C, the DATA display shows oxygen concentrations and the MAINT lamp starts to blink. At the same time the instrument provides analog outputs corresponding to the output range. This period is called a stabilization period and in this period a temperature drift may occur since the temperature in the sensor unit has not completely stabilized. A calibration cannot be executed in this period. When the temperature in the sensor unit stabilized completely, the MAINT lamp stops blinking and the MEAS lamp turns on. This is a steady state. During a warm-up period the analog output is fixed at 4 mA. During warm-up and stabilization periods the maintenance status contact is activated. Figure 10.1 shows the temperatures of the heater and in the sensor unit during warm-up and stabilization periods. Temperature Heater Temperature (shown on DATA display) 60 °C 55 °C Temperature in Sensor Unit Time Closed Open Power Up Maintenance Status Contact Action Warm-up Period Stabilization Steady State Period MAINT Lamp Blinking F10.1E.ai Figure 10.1 Temperatures of the Heater and in the Sensor Unit During Warm-up and Stabilization Periods IM 11P03A05-01E 10-3 <10. START-UP> 10.3 Analog Output Loop Check A loop check is for checking wiring between the analog output (terminals 3 and 4) of the instrument and the terminals of a higher-level device. (1) Switch to MAINT mode and enter the password. (2) Change the Function Number to “16.” (3) Press the ZERO key to provide 4mA output from the output terminals. (4) Press the SPAN key to provide 20 mA output from the output terminals. 10.4 Setting the Output Range The three ranges should be preset to range 1, 2 and 3, respectively and one of the three ranges should be selected. The following describes how to set each range and how to select a range. (1) Switch to MAINT mode and enter the password. (2) Change the Function Number to “12.” (3) Set the upper range value for range 1 using the SHIFT and INCR keys. Press the EXEC key to accept. For example, for the range of 0 to 25% O2, enter “025.” Now range 1 is set to 0 to 25%. (4) In the same manner, set the upper range values for ranges 2 and 3 in Function Numbers 13 and 14, respectively. (5) Change the Function Number to “11.” Select the desired range – “1” for range 1, “2” for range 2, or “3” for range 3 – using the SHIFT and INCR keys. Press the EXEC key to accept. NOTE The setting range is determined by the measuring range specified in the Model and Suffix Codes. IM 11P03A05-01E 10-4 <10. START-UP> 10.5 Executing Calibrations After start-up and switching to MEAS mode, zero and span calibrations must be executed. Always a zero calibration should be performed prior to a span calibration. Chapter 12, “Calibration” explains the calibration principle in detail. This section describes how to set the concentrations of calibration gases and how to perform zero and span calibrations manually. 10.5.1 Calibration Gas Requirements As the zero gas, use nitrogen gas of 99.999% purity or more when the measuring range is under 0 to 5% O2 or use nitrogen gas of 99.99% or more when the measuring range is 0 to 5% O2 or more. As the span gas, use a gas with an oxygen concentration of 80 to 90% of the upper range value of set range (e.g., for the range of 0 to 25%, the span gas should be 20 to 25% oxygen). 10.5.2 Setting Calibration Gas Concentrations (1) Switch to MAINT mode and enter the password. (2) Change the Function Number to “02.” (3) Press the SPAN key. (4) Set the oxygen concentration of the span gas using the SHIFT, INCR, and DP keys. Press the EXEC key to accept. The setting range is 0.5 to 25% O2. 10.5.3 Manual Calibration A zero calibration should be performed first, and then a span calibration. Zero and span calibrations must be conducted in the first calibration after start-up and after the initialization of the calibration coefficient. (1) Switch to MAINT mode and enter the password. (2) Change the Function Number to “01.” The DATA display shows the current oxygen concentration. (3) Press the ZERO key. Turn off the sample gas flow and apply the zero gas at the specified flow rate in the sample gas line. When solenoid valves for automatic calibration are installed, pressing the ZERO key closes the solenoid valve in sample gas line and opens the solenoid valve in zero gas line. (4) The oxygen concentration on the DATA display changes. When the reading has stabilized completely, press the EXEC key. The instrument is now calibrated to that value as the zero point. (5) Press the SPAN key. Turn off the zero gas flow and apply the span gas at the specified flow rate. When solenoid valves for automatic calibration are installed, pressing the SPAN key closes the solenoid valve in zero gas line and opens the solenoid valve in span gas line. (6) The oxygen concentration on the DATA display changes. When the reading has stabilized completely, press the EXEC key. The instrument is now calibrated to that value as the span point. (7) Turn off the span gas flow. Apply the sample gas and switch to MEAS mode. IM 11P03A05-01E <10. START-UP> 10-5 10.6 Adjustment for Interference Gas Compensation Using Process Gas This adjustment is usually not required. If necessary, the sensor angle should be adjusted using the actual process gas by turning the adjustment screw on the case door. The adjustment screw is not provided if the instrument has a measuring range of 0 to 5% O2 by the Model and Suffix Codes. Therefore the sensor angle of the instrument cannot be adjusted externally. (1) After manual calibration, introduce the process gas. (2) After the output has stabilized, turn the sensor angle adjustment screw in the center of the door until the output agrees with the oxygen concentration of the process gas. (3) If the composition of the process gas has changed, this adjustment should be conducted after zero and span calibrations. NOTE The sensor angle is adjusted at the factory before shipment. Upon installation on site, the factory adjustment can be reproduced by the level adjustment in accordance with the procedure described in Section 8.1, Adjustment of the Level in the Sensor Unit. Only if the factory adjustment is not sufficient due to strong interference, the adjustment using the accrual process gas is needed. For details, refer to Chapter 16, Measurement Principle. IM 11P03A05-01E Blank Page 11-1 <11. PARAMETER SETTINGS> 11. PARAMETER SETTINGS 11.1 Output Hold Analog output is held at a constant value when the instrument is in the following conditions. • During a warm-up period, analog output is held at 4 mA. • During calibration, analog output is held at the last measured value or is not held (user selectable). • When an error occurs, analog output is held at the last measured value or at a preset value, or is not held (user selectable). If more than one condition above occurs simultaneously, the output hold are prioritized in the following order. 1. When an error occurs 2. During calibration 3. During a warm-up period 11.1.1 Setting the Output Hold Function During Calibration The output hold function during calibration can be set to “enabled” or “disabled.” When the function is set to “enabled,” the analog output is held at the last measured value during calibration; when set to “disabled,” the instrument outputs measured values during calibration. The hold function deactivated after the purge time has elapsed in calibration. The purge time is the amount of time for sample gas to flow through the sensor unit to purge calibration gas in the unit after calibration and it is user configurable. For the setting of the purge time, refer to Chapter 12, Calibration. Zero Calibration Time Span Calibration Time Output Hold Time Purge Time F11.1E.ai Figure 11.1 Output Hold During Calibration (1) Switch to MAINT mode and enter the password. (2) Change the Function Number to “04.” (3) Set the output hold function during calibration using the SHIFT and INCR keys. To enable the function (i.e., the analog output is held at the last measured value), set to “0,” or to disable the function, set to “1.” Press the EXEC key to accept. IM 11P03A05-01E 11-2 <11. PARAMETER SETTINGS> 11.1.2 Setting the Output Hold Function When an Error Occurs The output hold function when an error occurs is selectable to: “enabled” – the analog output is held at the last measured value or at a preset value, or “disabled” – the analog output continues to provide concentration values. (1) Switch to MAINT mode and enter the password. (2) Change the Function Number to “43.” (3) Set the output hold function when an error occurs using the SHIFT and INCR keys. To enable the function and hold the analog output at the last measured value, set to “1,” to enable the function and hold the analog output at a preset value, set to “3,” or to disable the function, set to “2.” Press the EXEC key to accept. (4) To set a preset value, change the Function Number to “44.” (5) Set the desired preset value using the SHIFT, INCR and DP keys. Press the EXEC key to accept. A preset value is expressed as a percentage, where 4 mA is 0% and 20 mA is 100%. Enter “0” to set the preset value to 4 mA, or enter “100” to set to 20 mA. The setting range is from –10% (2.4 mA) to 110% (21.6 mA). The minus sign will appear by pressing the INCR key repeatedly when the leftmost digit is blinking. The number increases: “0,” “1,” “2,” … “9,” “–,” and returns to “0.” IM 11P03A05-01E <11. PARAMETER SETTINGS> 11-3 11.2 Setting the Fail Contact The Fail contact (terminals 15 and 16) is activated when an error occurs. The contact can be configured to open or close when an error occurs. The contact is open when the instrument is not powered. For details about errors, refer to Chapter 15, Troubleshooting. (1) Switch to MAINT mode and enter the password. (2) Change the Function Number to “45.” (3) Set the Fail contact state using the SHIFT and INCR keys. To set the contact to close when an error occurs, enter “0,” or to open when an error occurs, enter “1.” Press the EXEC key to accept. 11.3 Action of the Maintenance Status Contact The maintenance status contact (terminals 13 and 14) is closed during the following states and is otherwise open. The contact is open when the instrument is not powered. (1) Warm-up period (2) Stabilization period (3) MAINT mode The MAINT lamp is lit while the instrument is in MAINT mode. MAINT mode starts when the MEAS/MAINT key is pressed and held then the EXEC key is pressed and ends when the same key operations are done to return to MEAS mode. (4) Semiautomatic or automatic calibration The maintenance status contact is closed during calibration including the purge time. IM 11P03A05-01E 11-4 <11. PARAMETER SETTINGS> 11.4 Setting the High/Low Limit Alarms The contact is activated to give an alarm when the measured oxygen concentration is outside the limit. High and low alarm limit values can be set, respectively. When the measured value exceeds the high limit alarm value, the H-ALM lamp on the operation panel will turn on and the high limit alarm contact (terminals 10 and 12) will close. When the measured value falls below the low limit alarm value, the L-ALM lamp will turn on and low limit alarm contact (terminals 11 and 12) will close. The contacts are open when alarm is not generated and when the instrument is not powered. The following describes how to set the limit values. (1) Switch to MAINT mode and enter the password. (2) For the setting of the low limit alarm value, change the Function Number to “20,” and for the setting of the high limit alarm value, change to “21.” (3) Set the desired value using the SHIFT, INCR and DP keys. Press the EXEC key to accept. The setting range is 0 to 100% O2. (4) Change the Function Number to “22.” (5) Set to “1” using the SHIFT and INCR keys and press the EXEC key to accept. Now the high/low limit alarm function is enabled. When setting the high/low limit alarms, note that: • The alarm contact is activated when the measured value is equal to or higher than the high alarm setpoint or when the measured value is equal to or less than the low alarm setpoint. • The alarm contact does not operate if the high limit alarm value has been set equal to or lower than the low limit alarm value. NOTE Either the high/low limit alarm function or the range switching answerback function can be assigned to this contact. When the high/low limit alarm function is set to “enabled” in Function No. 22, the output range answerback function is disabled. IM 11P03A05-01E <11. PARAMETER SETTINGS> 11-5 11.5 Setting the Remote Range The remote range function enables the preprogrammed three ranges to be switched remotely by the range switching contact input (terminals 7, 8 and 9). When the remote range function is enabled, the RMT.RANGE lamp is lit, the range selected in Function No. 11 is invalid, and the range selected externally is used. The following describes how to set the remote range function. (1) Switch to MAINT mode and enter the password. (2) Change the Function Number to “10.” (3) Set to “2” using the SHIFT and INCR keys. Press the EXEC key to accept. Now the remote range function is enabled. The remote range contact states and ranges are shown in Table 11.1. When two contacts (terminals 7-9 and 8-9) are closed, the previously set range remains. Table 11.1 Remote Range Contact States and Ranges Terminal Number 7-9 (R3) 8-9 (R2) Open Open Open Closed Closed Open Closed Closed Range Selected Range 1 Range 2 Range 3 Previous range IM 11P03A05-01E 11-6 <11. PARAMETER SETTINGS> 11.6 Setting the Range Switching Answerback Contact Output The range switching answerback function enables the currently selected range to be output by the contact output (terminals 10, 11 and 12). Since either the range switching answerback function or the high/low limit alarm function can be assigned to this contact, the range switching answerback function cannot be used when the high/low limit alarm function is enabled. (1) Switch to MAINT mode and enter the password. (2) Change the Function Number to “22.” (3) Set to “0” to disable the high/low limit alarm function using the SHIFT and INCR keys. Press the EXEC key to accept. Now the range switching answerback function is enabled. The range answerback contact states and ranges are shown in Table 11.2. Table 11.2 Range Answerback Contact States and Ranges Terminal Number 11-12 (R2) 10-12 (R3) Open Open Open Closed Closed Open Range Selected Range 1 Range 2 Range 3 NOTE When the range answerback function is enabled, the high/low limit alarm function is disabled. IM 11P03A05-01E 11-7 <11. PARAMETER SETTINGS> 11.7 Setting the Low Auxiliary Gas Pressure Alarm Function Auxiliary gas is used in accordance with the measurement principle of the instrument. The pressure of the auxiliary gas is reduced to 180 kPa by a build-in pressure regulator. If the supply pressure drops below 180 kPa, the auxiliary gas flow will reduce, interfering with accurate measurement. If the pressure drops below approximately 300 kPa when the low auxiliary gas pressure alarm function is enabled, the DATA display will blink and the low auxiliary gas pressure contact (terminals 17 and 18) will close. The auxiliary gas cylinder should be replaced after the alarm occurs and before the pressure drops to approximately 180 kPa. The contact is open when the instrument is not powered. (1) Switch to MAINT mode and enter the password. (2) Change the Function Number to “23.” (3) Set to “1” using the SHIFT and INCR keys. Press the EXEC key to accept. Now the low auxiliary gas pressure alarm function is enabled. IMPORTANT The secondary pressure of the build-in pressure regulator varies with the instrument: there are variations from 180 kPa. Check the reading on the auxiliary gas pressure gauge when the gas is supplied at the specified pressure in advance. IM 11P03A05-01E Blank Page 12-1 <12. CALIBRATION> 12. CALIBRATION 12.1 Overview The instrument should be calibrated at two points using zero gas (nitrogen gas with an oxygen concentration of 0%) and span gas with a known oxygen concentration. Figure 12.1 shows the relationship between the sensor emf and the oxygen concentration. Sensor emf (mV) p2’ p2 c cz p1 p2 p1’ p2’ p1’ : : : : : : oxygen concentration of span gas zero calibration coefficient sensor emf at the initial zero calibration sensor emf at the initial span calibration sensor emf at zero calibration sensor emf at span calibration p1 0 cz c Oxygen Concentration (%O2) F12.1E.ai Figure 12.1 Sensor emf vs. Oxygen Concentration The ratio of the oxygen concentration to the sensor emf is calculated from the sensor emf values (p1 and p2) obtained in calibration. k= c p2 – p1 Assuming that the sensor emf when sample gas is applied is ps, the concentration of the sample gas, cs, is obtained from the following equation. cs = k × (ps – p1) Calibration is for obtaining k. When only a zero calibration is performed, the instrument is calibrated to the zero gas’s value and the ratio of the oxygen concentration to the sensor emf, k, that was obtained from the previous calibration, is used. IM 11P03A05-01E 12-2 <12. CALIBRATION> 12.2 Calibration Coefficient The calibration coefficient is a deviation from the initial calibration value. 12.2.1 Zero Calibration Coefficient The zero calibration coefficient is the deviation between the sensor emf obtained when a zero calibration is performed and the initial calibration value, and is expressed as the one corrected for oxygen concentration. It is cz (% O2) in Figure 12.1. When the zero calibration coefficient, cz, is outside of ±1.25% O2, a zero calibration coefficient error will occur. 12.2.2 Span Calibration Coefficient The span calibration coefficient is the deviation between the ratio of the oxygen concentration to the sensor emf, k’, obtained when zero and span calibrations are performed and the initial calibration value, and is expressed as the ratio to the ratio obtained at the initial calibration, k. Span calibration coefficient = k’ k Where: k : the ratio of the oxygen concentration to the sensor emf obtained at the initial calibration k’ : the ratio of the oxygen concentration to the sensor emf obtained in calibration When the span calibration coefficient is outside the range of 0.9 to 1.09, a span calibration coefficient error will occur. 12.2.3 Checking the Calibration Coefficients (1) Switch to MAINT mode. There is no need to enter the password. (2) Change the Function Number to “03.” (3) Press the ZERO key to check the zero calibration coefficient, and press the SPAN key to check the span calibration coefficient. 12.2.4 Initializing the Calibration Coefficients By initializing the calibration coefficients, the zero calibration coefficient is reset to “0” and the span calibration coefficient to “1.” Based on the sensor emf obtained in the next calibration after the initialization, the calibration coefficients will be calculated. The calibration after the initialization should be performed with special care. (1) Switch to MAINT mode and enter the password. (2) Change the Function Number to “05.” The DATA display shows “rES.” (3) Press the EXEC key to initialize the calibration coefficients. NOTE • The calibration coefficients disolayed in Function No. 03 are still the previous ones after the initialization. They will be updated only after zero and span calibrations after the initialization. • When the concentration of the zero gas is changed in Function No. 02, the zero reference will be changed. Accordingly the calibration coefficients will be initialized: this is the same action as the initialization by the above procedure. IM 11P03A05-01E <12. CALIBRATION> 12-3 12.3 Executing Calibrations Zero and span calibrations must be performed after the power is turned off and restarted. Without valid calibration oxygen concentration cannot be measured accurately. Before calibration, the following should be checked. (1) The auxiliary gas is being supplied at the specified pressure. (2) Auxiliary gas and zero gas with proper nitrogen purities are used. (3) The span gas concentration set in the instrument agrees with the actual gas concentration. (4) Calibration gases flow at the specified flow rate without fluctuation. 12.3.1 Manual Calibration A zero calibration should be performed first, and then a span calibration. A span calibration cannot be executed before a zero calibration. It is allowed to perform only a zero calibration, but not allowed to perform only a span calibration. (1) Switch to MAINT mode and enter the password. (2) Change the Function Number to “01.” The DATA display shows the current oxygen concentration. The display may show the minus sign. The instrument determines the value even if the measured concentration is below zero. The measured concentration when zero gas is applied may be a negative value. (3) Press the ZERO key. Turn off the sample gas flow and apply the zero gas at the specified flow rate in the sample gas line. When solenoid valves for automatic calibration are installed, pressing the ZERO key closes the solenoid valve in sample gas line and opens the solenoid valve in zero gas line. (4) The oxygen concentration on the DATA display changes. When the reading has stabilized completely, press the EXEC key. The instrument is now calibrated to the value as the zero point. (5) Press the SPAN key. Turn off the zero gas flow and apply the span gas at the specified flow rate. When solenoid valves for automatic calibration are installed, pressing the SPAN key closes the solenoid valve in zero gas line and opens the solenoid valve in span gas line. (6) The oxygen concentration on the DATA display changes. When the reading has stabilized completely, press the EXEC key. The instrument is now calibrated to the value as the span point. (7) Turn off the span gas flow. Apply the sample gas and switch to MEAS mode. IM 11P03A05-01E 12-4 <12. CALIBRATION> 12.3.2 Semiautomatic Calibration In the semiautomatic calibration zero and span calibrations are carried out under the preprogrammed conditions using the calibration start contact input (terminals 5 and 6). The instrument will start calibration when the dry (voltage free) contact connected to the input is closed. For the semiautomatic calibration, the following should be set. ● Zero calibration time (Function No. 52) The amount of time for zero gas to flow. The timer starts when the solenoid valve in zero gas line opens to allow the zero gas to flow through the sensor unit. Set the amount of time it takes for the reading to stabilize sufficiently. The setting range is from 1 to 99 minutes. ● Span calibration time (Function No. 53) The amount of time for span gas to flow. The timer starts when the solenoid valve in zero gas line closes and the solenoid valve in span gas line opens to allow the span gas to flow through the sensor unit. Set the amount of time it takes for the span gas to purge the zero gas in the sensor and for the reading to stabilize sufficiently. The setting range is from 1 to 99 minutes. ● Purge time (Function No. 54) The amount of time for sample gas to flow through the sensor unit to purge calibration gas after calibration. Set the amount of time it takes for the sample gas to purge the sensor unit completely. The setting range is from 0 to 99 minutes. The purge time is valid for manual calibration. When the output hold function during calibration is set to “enabled,” the analog output will be held during the calibration including the purge time. Also, the maintenance status contact will be closed during the calibration including the purge time. The zero calibration time, span calibration time and purge time can be set in Function Nos, 52, 53 and 54, respectively. (1) Switch to MAINT mode and enter the password. (2) Change the Function Number to “52.” (3) Set the zero calibration time using the SHIFT and INCR keys. Press the EXEC key to accept. (4) In the same manner, set the span calibration time in Function No. 53 and the purge time in Function No. 54. NOTE • For semiautomatic calibration, wiring and piping for automatic calibration are required to be made. • If the calibration start contact remains closed after calibration, the instrument will not accept the next calibration start contact input. The contact should be opened once and then closed again for the next calibration. • During MAINT mode, the calibration start contact input signal is not accepted. • During manual calibration or automatic calibration, the calibration start contact input signal is not accepted. • If the instrument is switched to MAINT mode by key operation while a semiautomatic calibration is being conducted, the calibration will be aborted. IM 11P03A05-01E 12-5 <12. CALIBRATION> 12.3.3 Automatic Calibration Calibration can be automatically executed for preprogrammed calibration times at preprogrammed intervals. For the automatic calibration, the following should be set. ● For the zero calibration time (Function No. 52), span calibration time (Function No. 53), and purge time (Function No. 54), refer to Section 12.3.2, Semiautomatic Calibration. ● Initial wait time (Function No. 50) The amount of time until the first calibration is executed after the automatic calibration function was started. The setting range is from 0 day 0 hour to 99 days 24 hours. When the time is set to “00 day 00 hour,” the initial wait time is equal to the time set as the calibration interval (Function No. 51). ● Calibration interval (Function No. 51) Set the time interval for automatic calibration. The setting range is from 0 day 1 hour to 99 days 24 hours. ● Execution of span calibration (Function No. 55) Set whether or not to execute span calibration. To execute only zero calibration and not to execute span calibration, set to “0.” To execute both zero and span calibrations, set to “1.” ● The number of times of skipping span calibrations (Function No. 56) The number of times of skipping span calibrations can be set only when “1” is set in Function No. 55. Setting to “0” here means that span calibration is not skipped, i.e., both zero and span calibrations are executed each time. Setting to “1” or greater means that span calibration is skipped the set number of times after the first zero and span calibrations. The setting range is from 0 to 99 times. ● Starting automatic calibration function (Function No. 57) Set to “1” to start the automatic calibration function. After the set initial wait time has elapsed, the first calibration starts. Figure 12.2 shows the timing diagram when the number of times of skipping span calibrations (Function No. 56) is set to “2.” Initial Wait Time Calibration Interval Calibration Interval Calibration Interval Zero Calibration Time Zero Calibration Span Calibration Time Span Calibration Purge Time Output Hold Maintenance Status Contact Action Automatic Calibration Function Starts F12.2E.ai Figure 12.2 Timing Diagram for Automatic Calibration IM 11P03A05-01E 12-6 <12. CALIBRATION> The following describes how to set the automatic calibration. For the settings of the zero calibration time, span calibration time and purge time, refer to Section 12.3.2, Semiautomatic Calibration. (1) Switch to MAINT mode and enter the password. (2) Change the Function Number to “50” to set the initial wait time. The DATA display shows “xx.xx.” The two left digits represent days (00 to 99 days ) and the two right digits time (00 to 24 hours). (3) Set the desired day and time using the SHIFT and INCR keys. Press the EXEC key to accept. (4) Change the Function Number to “51” to set the calibration interval. The DATA display shows “xx.xx.” The two left digits represent days (00 to 99 days) and the two right digits time (00 to 24 hours). Note that the minimum interval is one hour and “00.00” will be rejected. (5) Set the desired interval using the SHIFT and INCR keys. Press the EXEC key to accept. (6) Change the Function Number to “55” to set whether or not to execute span calibration. Set to “0” not to execute span calibration or set to “1” to execute span calibration, using the SHIFT and INCR keys. Press the EXEC key to accept. (7) When “1” is set in Function No. 55, the number of times of skipping span calibrations should be set in Function No. 56. Set the desired number of times of skipping span calibrations using the SHIFT and INCR keys. Press the EXEC key to accept. When “0” is set in Function No. 55, “—“ appears on the display and the number of times of skipping span calibrations cannot be set. (8) Change the Function Number to “57.” Set to “1” to start the automatic calibration function. Press the EXEC key. The timer starts counting and the AUTO CAL lamp turns on. NOTE • For automatic calibration, wiring and piping for automatic calibration are required. • If the time to start a calibration is reached while the instrument is in MAINT mode, the automatic calibration will be canceled. • Likewise, if the time to start a calibration is reached during manual calibration or semiautomatic calibration, including the purge time, the automatic calibration will be canceled. • If the instrument is switched to MAINT mode by key operation while an automatic calibration is being conducted, the automatic calibration is aborted. • If the sum of the zero calibration time, span calibration time and purge time is longer than the calibration interval, the next calibration will be canceled. • When the automatic calibration function is enabled, the internal timer runs even if the power supply to the instrument is interrupted. After power is restored, calibrations will be executed on schedule; there is no delay due to the power interruption. Note that the internal timer does not run when the power supply is interrupted during the calibration time. • Once the automatic calibration function is turned off by setting in Function No. 57, the timer will be reset. • It is recommended that after the settings for the automatic calibration have been completed manual calibration should be conducted once to verify whether the calibration is conducted properly. IM 11P03A05-01E 13-1 <13. OTHER FUNCTIONS> 13. OTHER FUNCTIONS 13.1 Checking the Temperature of the Constant Temperature Chamber (Function No. 30) The temperature (°C) in the sensor unit can be checked in Function No. 30. It is stable at 55 °C after the instrument entered MEAS mode. 13.2 Checking the Sensor EMF (Function No. 31) The sensor emf (mV) can be checked in Function No. 31. When the instrument is in a warm-up period, the DATA display will show “----.” 13.3 Manual Operation of the Solenoid Valves for Automatic Calibration (Function No. 58) When wiring and piping for the solenoid valves for automatic calibration have been installed, each solenoid valve can be operated manually. The DATA display shows oxygen concentrations. This manual operation can be used for checking readings. (1) Switch to MAINT mode and enter the password. (2) Change the Function Number to “58.” The DATA display shows an oxygen concentration. (3) Press the ZERO key to open the solenoid valve in zero gas line and close the solenoid valve in sample gas line. (4) Press the SPAN key to open the solenoid valve in span gas line and close the solenoid valve in sample gas line. (5) Change the Function Number to the one other than “58” to close the solenoid valves for calibration gas lines and open the solenoid valve in sample gas line. 13.4 Checking the Firmware Revision (Function No. 98) The revision of the firmware installed on the instrument can be checked in Function No. 98. IM 11P03A05-01E 13-2 <13. OTHER FUNCTIONS> 13.5 Initializing Parameters (Function No. 99) All parameters are initialized to the factory default settings which are summarized in Table 13.1. (1) Switch to MAINT mode and enter the password. (2) Change the Function Number to “99.” The DATA display shows “rES.” (3) Press the EXEC key. This has not yet changed the settings. (4) Turn the power off and on again. Now the instrument has been initialized to the factory default settings. Table 13.1 Factory Default Settings Func No. 00 01 02 03 04 05 10 11 IM 11P03A05-01E Function Entering password Executing calibrations Setting calibration gas concentrations Checking calibration coefficients Setting output hold function during calibration Initializing calibration coefficient Setting remote range switching contact input Selecting range 12 Setting span for range 1 13 14 16 20 21 22 23 30 31 40 41 42 43 44 45 50 51 52 53 54 55 56 57 58 67 98 99 Setting span for range 2 Setting span for range 3 Fixed analog output Setting low limit alarm Setting high limit alarm Setting high/low limit alarm function Setting low auxiliary gas pressure alarm function Checking temperature (°C) of constant temperature chamber Checking sensor emf (mV) Executing error check Resetting sensor emf error status Resetting calibration coefficient error status Setting output hold function when error occurs Setting preset value Setting contact output status when error occurs Setting initial wait time for automatic calibration Setting interval for automatic calibration Setting zero calibration time Setting span calibration time Setting purge time Executing span calibration Setting the number of times of skipping span calibrations Starting automatic calibration function Manual operations of solenoid valves Checking error status Checking firmware revision Initialization Factory Default ZERO key: 0.000, SPAN key: 20.95 0: enabled 1: disabled 3: range 3 Minimum range of the specified measuring range 010 (0 to 10% range) 025 (0 to 25% range) 00.00 25.00 0: disabled 0: disabled 1: enabled – at last measured value 00.00 0: contact closes when error occurs 00.00 (0 day 0 hour) 30.00 (30 days 0 hour) 10 (10 minutes) 10 (10 minutes) 10 (10 minutes) 1: executes span calibration 00 (no skipping) 0: OFF 14-1 <14. INSPECTION AND MAINTENANCE> 14. INSPECTION AND MAINTENANCE This chapter describes the inspection and maintenance procedures to ensure optimum performance of the instrument and to keep it in good operating condition. WARNING Open circuit at non-hazardous location(*) before removing the MG8E cover. (*) The nameplate of the MG8E says “Open circuit at non-hazardous location before removing cover” because the internal energy does not decrease below the specified value. According to “USERS' GUIDELINES for Electrical Installations for Explosive Gas Atmospheres in General Industry” (published by Tecnology Institution of Industrial Safety, in Japan), the expression “a non-hazardous area” is defined as “A non-hazardous area is considered a place where no occurrence of explosive gas atmosphere is guaranteed by the foreperson and confirmed by a written document.” Therefore, if a non-hazardous area is secured, the work can be done on site. 14.1 Checking the Auxiliary Gas Check that the needle on the auxiliary gas pressure gauge that is installed in the instrument is in the center of the green zone. When the gas is supplied from a gas cylinder, check the pressure gauge attached to the cylinder. If the pressure is low, replace the gas cylinder. The primary pressure of the built-in pressure regulator for auxiliary gas must be at least 300 kPa. A low auxiliary gas pressure alarm will occur when the pressure drops below approximately 300 kPa. When using a 47-liter gas cylinder, replace it within 24 hours after the alarm. IMPORTANT After the gas cylinder is replaced, zero and span calibrations should be conducted. If air is trapped in the auxiliary gas line during replacement, the reading will fluctuate and it will take long time for the reading to stabilize. After the reading has stabilized completely, perform the calibrations. 14.2 Checking the Sample Gas Check the flow rate of the sample gas on a timely basis. IM 11P03A05-01E 14-2 <14. INSPECTION AND MAINTENANCE> 14.3 Precautions When Stopping and Restarting the Operation The most common failure or trouble occurs when stopping or restarting the operation. Extreme care should be taken. (1) When sample gas contains corrosive components, turn off the sample gas flow with the auxiliary gas being supplied. After turning off the sample gas flow, allow nitrogen gas or instrument air to flow to purge the sample gas line. (2) If possible, it is recommended that the auxiliary gas be allowed to flow while the operation is suspended.. (3) Before restarting the operation, check the sample gas line for moisture due to condensation. If moisture is present, remove the sample gas line from the instrument and allow instrument air to flow to purge the pipe completely. Moisture in the sensor unit may result in a failure, and in the worst case, the instrument will need to be serviced at the factory. IM 11P03A05-01E <14. INSPECTION AND MAINTENANCE> 14-3 14.4 Fuse Replacement Two fuses are installed for live and neutral, respectively, in the power unit in the instrument. If the fuse blows, replace it using the following procedure. (1) Before replacement, turn off power to the instrument. (2) Open the instrument cover. Pull the fuse out from the fuse holder which is located near the power switch as shown in Figure 14.1. Turn the cap counterclockwise until it stops using a flat head screwdriver of the appropriate size. Pull out the cap together with the fuse. (3) Make sure that a new fuse is of the same rating. Attach the new fuse to the cap and insert it into the holder. Turn the cap clockwise while pushing it until it stops using the flat head screwdriver. Fuse specifications: Maximum rated voltage: 250 V Maximum rated current: 2.0 A Type: Time-lag Standards compliance: UL, CSA, VDE Part number: A1111EF The fuse deteriorates with time. It is recommended that the fuses be replaced every two years even if the fuse has not blown. IMPORTANT If the fuse blows again soon after replacement, there may be a malfunction in the circuit or in the external connections. Immediately turn off power to the instrument and investigate the cause. Fuses Cap Flat Head Screwdriver Socket Fuse F14.1E.ai Figure 14.1 Fuse Removal IM 11P03A05-01E 14-4 <14. INSPECTION AND MAINTENANCE> 14.5 Other Instructions (1) For inspection and maintenance of sampling systems, read corresponding user’s manuals. (2) For the cleaning and overhaul of the sensor unit, consult Yokogawa. 14.6 Replacing the Limited Life Component The following component has a limited life. It is recommended that it should be replaced approximately every five years. As for the replacement, ask Yokogawa. • Power unit (located on the back of the terminal block and normally not visible) IM 11P03A05-01E <15. TROUBLESHOOTING> 15-1 15. TROUBLESHOOTING This chapter describes errors detected by the self-diagnostic function and troubles during measurement, such as output fluctuations. WARNING Open circuit at non-hazardous location(*) before removing the MG8E cover. (*) The nameplate of the MG8E says “Open circuit at non-hazardous location before removing cover” because the internal energy does not decrease below the specified value. According to “USERS' GUIDELINES for Electrical Installations for Explosive Gas Atmospheres in General Industry” (published by Tecnology Institution of Industrial Safety, in Japan), the expression “a non-hazardous area” is defined as “A non-hazardous area is considered a place where no occurrence of explosive gas atmosphere is guaranteed by the foreperson and confirmed by a written document.” Therefore, if a non-hazardous area is secured, the work can be done on site. IM 11P03A05-01E 15-2 <15. TROUBLESHOOTING> 15.1 Errors and Remedies 15.1.1 Checking the Error Code An error will occur if a failure is detected in the sensor, constant temperature chamber, or analyzer’s internal circuit. When an error occurs, the FAIL lamp turns on and the Fail contact is activated. As for the calibration coefficient error, the FAIL lamp turns on and the Fail contact is activated only when semiautomatic or automatic calibration function is enabled. To check an error code, follow the procedure below. (1) Switch to MAINT mode and enter the password. (2) Change the Function Number to “40.” Press the EXEC key. The current error code will be displayed. (3) If no error is being generated, the DATA display shows “oooo.” The types of errors detected by the self-diagnostic function and remedies are summarized in Table 15.1. Table 15.1 Errors and Remedies Error Type Code Description 0000 No error is being generated. Sensor emf continues to exceed E-10 400 mV for at least 10 seconds. Sensor unit error Sensor emf continues to fall below E-11 –50 mV for at least 10 seconds. In stabilization period or steady state, E-20 heater temperature continues to fall below 50 °C for at least 10 seconds. In stabilization period or steady state, Constant E-21 heater temperature continues to temperature exceed 60 °C for at least 10 seconds. chamber In warm-up period, heater error E-22 temperature fails to rise. In warm-up period, heater E-23 temperature continues to exceed 65 °C for at least 10 seconds. Failure occurs in A/D converter on E-30 circuit. Analog error E-31 Voltage of sensor unit exceeds input E-32 range of A/D converter. E-33 E-40 Failure occurs in memory device on circuit. E-50 Zero calibration coefficient is outside of ±1.25% O2. E-51 Span calibration coefficient is below 0.9 or above 1.09. Atmospheric E-60 sensor error Atmospheric sensor output exceeds the normal range. Memory error Calibration coefficient error Action Remedy Remove the causes and reset the error status in Function No. 41. Turn off power to heater. Error code blinks on DATA display. Turn off power to heater. Turn off power to heater. Turn off power to heater. In manual calibration, error code appears on DATA display*. In semiautomatic or automatic calibration, Fail contact is activated and FAIL lamp turns on. MEAS lamp blinks. Atmospheric compensation is disabled. FAIL lamp does not turn on and Fail contact is not activated. Remove the causes. Turn the power off and on again to restart. If error occurs again, contact Yokogawa Service. Turn the power off and on again to restart. If error occurs again, contact Yokogawa Service. Turn the power off and on again to restart. If error occurs again, contact Yokogawa Service. Remove the causes. Recalibrate the instrument or reset the error status in Function No. 42. Turn the power off and on again to restart. If error occurs again, contact Yokogawa Service. * When a calibration coefficient error occurs during manual calibration, the Fail lamp dose not turn on and the Fail contact is not activated. IM 11P03A05-01E 15-3 <15. TROUBLESHOOTING> 15.1.2 Error Descriptions 15.1.2.1 Sensor Unit Errors (E-10, E-11) A sensor unit error occurs when the sensor emf is outside the range of –50 mV to 400 mV. Possible causes are: (1) The pressure of the auxiliary gas dropped. Check the auxiliary gas pressure. (2) The flow rate of the sample gas was greater than the specified one. Check the sample gas flow rate. Remove the causes and then reset the error status using the following procedure. (1) Switch to MAINT mode and enter the password. (2) Change the Function Number to “41.” The DATA display shows “rES.” (3) Press the EXEC key to reset the sensor emf error status. 15.1.2.2 Constant Temperature Chamber Errors (E-20, E-21) The temperature of the constant temperature chamber of the MG8E is normally stable at 55 °C during a stabilization period and in steady state. When a constant temperature chamber error occurs, turn the power off and on again to restart, and after the instrument enters a stabilization period, check the temperature of the constant temperature chamber in Function No. 30. If the temperature fluctuates, possible causes are: (1) The power supply voltage fluctuates (2) The ambient temperature is outside the specification range: –5 to 50 °C 15.1.2.3 Constant Temperature Chamber Errors (E-22, E-23) A constant temperature chamber error, E-22 or E-23, occurs while the instrument is in a warm-up period. Turn the power off and on again. After the constant temperature chamber has cooled down sufficiently, restart the instrument. If the same error occurs, there may be a failure in components for temperature control. Contact Yokogawa Service. (1) E-22: A possible cause is heater disconnection or action of the internal thermostat for over temperature protection. (2) E-23: A possible cause is a failure in of parts for heater power control. When an E-23 error occurs, the internal thermostat may be activated at the same time. The internal thermostat is activated when the temperature reaches approximately 70 °C, but is not reset automatically even when the temperature drops. 15.1.2.4 Analog Errors (E-30, E-31, E-32, E-33) An analog error occurs when there is a failure in the analog circuit. Turn the power off and on again to restart the instrument. If the error occurs again, contact Yokogawa Service. 15.1.2.5 Memory Error (E-40) A memory error occurs if there is a failure in reading or writing the memory device. Turn the power off and on again to restart the instrument. If the error occurs again, contact Yokogawa Service. IM 11P03A05-01E 15-4 <15. TROUBLESHOOTING> 15.1.2.6 Calibration Coefficient Errors (E-50, E-51) A calibration coefficient error occurs if the calibration coefficient obtained in zero or span calibrations is outside the normal range. A zero calibration coefficient error occurs if the zero calibration coefficient is outside of ±1.25% O2. A span calibration coefficient error occurs if the span calibration coefficient is outside the rage of 0.9 to 1.09. For details, refer to Chapter 12, Calibration. Error notification and remedial actions are different when the error occurs during manual calibration and when it occurs during semiautomatic or automatic calibration. When the error occurs during manual calibration, the DATA display shows the error code, but the FAIL lamp does not turn on and the Fail contact is not activated. When the error occurs during semiautomatic or automatic calibration, the DATA display shows no error code, but the FAIL lamp turns on and the Fail contact is activated. Possible causes are: • The calibration gas concentration set in the instrument does not agree with the actual concentration of the calibration gas used. • The pressure of the auxiliary gas was lower than the specified one. • Zero or span gas was not being supplied. • In manual calibration, a zero calibration was conducted with span gas flowing, or vice versa. Remove the causes and reset the error status by performing zero and span calibration again. If the calibration coefficient is outside the specification range due to a sensor drift or characteristics change with time, initialize the calibration coefficients and perform zero and span calibration again. When the error occurs during semiautomatic or automatic calibration, remove the causes and reset the error status using the following procedure. (1) Switch to MAINT mode and enter the password. (2) Change the Function Number to “42.” The DATA display shows “rES.” (3) Press the EXEC key to reset the calibration coefficient error status. IM 11P03A05-01E 15-5 <15. TROUBLESHOOTING> 15.2 Faulty Readings During Measurement This section describes faulty readings during measurement and possible causes. 15.2.1 Fluctuations in Readings • Check that the flow rate of the sample gas is the specified one and is stable. • Check the piping joints or connections in the line between the auxiliary gas cylinder and the analyzer for leaks. • Check that the temperature of the constant temperature chamber is stable. • Check the power supply voltage for fluctuations. • Check that the analyzer is not exposed to direct sunlight or radiant heat from a heat source such as a furnace. 15.2.2 Drift in Readings Check that the supply pressure of the auxiliary gas is appropriate. If the auxiliary gas pressure falls below the specified supply pressure, the output will drift as the pressure drops. 15.2.3 Short-Term Shift in Readings Check that the flow rate of the sample gas is the specified one and is stable. If the flow of the sample gas containing oxygen is turned off, the reading will shift toward 0% O2. 15.3 When Calibration Cannot Be Executed • Check that the password has been entered correctly and that the ENABLE lamp is lit. • Check that the instrument is in steady state. If the MAINT lamp blinks in MEAS mode, the instrument is in a stabilization period and calibration cannot be executed. • Check that the calibration gas concentrations are set properly. 15.4 In the Event of Power Failure 15.4.1 Instantaneous Power Failure The instrument will not be affected and will continue to work if the duration of a power failure is 80 ms or shorter. Even if the duration of a power failure is the above-mentioned time or less, the instrument may be restarted if the power failure occurs during the warm-up period because of the amount of time that the heater is turned on. 15.4.2 When the Power Returns If the temperature of the constant temperature chamber remains at 50 °C or higher when the power returns from a relatively short-term (a few minutes) power failure, the instrument will returns to MEAS mode in about 30 seconds. This applies only when the instrument was in steady state before the power failure. IM 11P03A05-01E Blank Page 16-1 <16. MEASUREMENT PRINCIPLE> 16. MEASUREMENT PRINCIPLE 16.1 Measurement Principle A diagram of the principle is shown in figure 16.1. When the sample gas contains no oxygen molecules, the right and left flow rates of the auxiliary gas (N2), QL and QR are equal, or QR = QL. If oxygen molecules are included in the gas, flow rate QL on the magnetic field-generating side is less than QR due to the force with which the magnetic field acts on the oxygen molecules, establishing QR > QL. The difference in the flow rate, DQ = QR - QL is proportional to the percentage of oxygen molecules in the measuring gas. The thermister sensor is operated in the constant-resistance circuit to convert the flow rates (velocity) into electric signals, the difference of which is obtained by amplifier A as an oxygen signal. F M.IN VR Constant-resistance circuit VL O2 signal A QR M.IN:Sample gas inlet QL R.IN Magnetic Field Constant-resistance circuit OUT Thermistor VR:QR flow signal R.IN:Auxiliary gas inlet VL:QL flow signal OUT :Gas outlet F:Magnetic force acting on oxygen molecules Thermistor F16.1E.ai Figure 16.1 Measurement Principle IM 11P03A05-01E 16-2 <16. MEASUREMENT PRINCIPLE> 16.2 Principle of Interference-gas Compensation Although measurements by the magnetic oxygen analyzer utilize the intense paramagnetic property of oxygen, gases other than oxygen also have a slight paramagnetic property. Hence, a small indication error occurs due to their magnetic susceptibilities for various process gases. This error may become a problem at low concentration ranges. The model MG8 magnetic oxygen analyzer cancels this error caused by paramagnetism of the process gas by utilizing the difference in density between the measuring and reference gases. The error is compensated by changing the cell angle (inclination). The measuring gas stream is divided into stream A and stream B as shown in Figure 16.2. The auxiliary gas (normally nitrogen gas) is introduced from the center of the cell and its stream is divided into the right and left. Since a magnetic field exists at only the one auxiliary gas outlet, if there is a gas other than nitrogen having a different magnetic susceptibility, then an error occurs because it affects the auxiliary gas flow ratio of the two streams. The analyzer compensates for this interference by changing the cell angle. For example, if carbon dioxide which has a smaller susceptibility than nitrogen is passed through the cell, the indication deflects to a negative value. If the cell is tilted (angled) to compensate the indication as shown in Figure 16.3, a counterforce acts to supply more auxiliary gas into path A due to the higher density of carbon dioxide, thus changing the flow ratio of the auxiliary gas. By changing the cell angle so that the change in the auxiliary gas flow ratio due to gas susceptibility cancels out the flow ratio change due to the density difference, the interference error can be compensated. The model MG8 magnetic oxygen analyzer is shipped after adjusting the cell inclination in the final adjustment stage using the magnetic characteristics and density of the measuring gas of the user. In this case, the inclination is stored using a built-in level (containing a bubble in a glass tube). When this analyzer is installed at the user's site, turning the rotary knob so that the bubble of this level returns to the center reproduces the adjustment when shipped. Measurement gas inlet Stream B Stream A Magnetic field Auxiliary gas inlet Thermistor Gas outlet F16.2E.ai Figure 16.2 Top of Cell IM 11P03A05-01E <16. MEASUREMENT PRINCIPLE> Stream B 16-3 Stream A Thermistor Inclination Auxiliary gas F16.3E.ai Figure 16.3 Cross Section of Cell l How to adjust the sensor angle If necessary, for example, if the composition of the process gas has changed, the sensor angle should be adjusted using the procedure described in Section 10.6, Adjustment for Interference Gas Compensation Using Process Gas. On the MG8E analyzer the sensor angle can be adjusted externally without compromising the explosionproof integrity of the enclosure, i.e., the sensor angle can be adjusted using the adjustment screw on the case door without opening the case. However, the adjustment screw is not provided if the instrument has a measuring range of 0-5% O2 by the Model and Suffix Codes. In this case, make sure that the installation site meets the requirements for nonhazardous areas. Then, open the door of the explosionproof enclosure and adjust the sensor angle. IM 11P03A05-01E Blank Page Customer Maintenance Parts List MG8G MG8E Paramagnetic Oxygen Analyzer External connection terminal 1 Item 1 Parts No. A1111EF Qty 2 Description Fuse © Copyright Dec. 1994 (YK). 2nd Edition : Sep. 1996 (YK) CMPL 11P03A01-01E Revision Information : Model MG8E Paramagnetic Oxygen Analyzer User’s Manual Title Manual No. : IM 11P03A05-01E Jan 2009/3rd Edition Style Change S3 and Doc No change to 11P03A05-01E from 11P3A5-01E May 2008/2nd Edition Revised and Corrected over all, IM Format and Style renewal (As a result of changing Data Source from paper to electric files and of applying Indesign software) Outline of change Chapter “Introduction” is newly added. Chapter 1: Description with WARNING (p1-1) and Table (p1-2) are added. Chapter 3: Rearrangement of sections and subsections Subsection 3.1.1: Some specifications are changed or added (e.g.: Contact Output, analog output signal, Installation conditions, color) Subsection 3.1.2: Expression of each characteristic is changed. Section 3.2 “Model and Suffix code” is added. Chapter 4: Auxiliary gas pressure is changed. Flow rate and pressure is added. Description with CAUTION is added. Chapter 6: Descriptions with WARNING(p6-1, 6-2, 6-7) or CAUTION(p6-8) are added. Fig 6.3: description about Fail contact output is changed. Note 5: description of 3rd paragraph is changed. Table 6.1: Connection size and Part Number is changed. Chapter 7: Figure 7.1: Explanation about Cell-angle adjustment is added. Chapter 8: Descriptions with WARNING (p8-1) and CAUTION (p8-3, 8-4, 8-8) are added. Section 8.1: Arrangement of subsection Subsection 8.1.3: description is changed. Subsection 8.2.2: Procedure and Status of Item 2 is changed. Chapter 9: Section 9.1: Item (3) is added to the description of FUNCTION No.02. Section 9.3: Item <4> is added to the description of E- - 2. About E- - 5, description of item (1) is changed. Chapter 10: Arrangement of sections and subsections Description with CAUTION (p10-4) is added. Parts of description are changed or added (in subsection 10.2.5, 10.7.2, 10.7.4 and 10.7.5) Chapter 11: Description with WARNUNG (p11-1) is added Section 11.2: Description is added and changed. Chapter 12: Description with WARNUNG (p12-1) is added Section 12.1, 12.2, 12.5, 12.6, 12.7: Description is added and changed. Section 12.8 is newly added. CMPL : On page 2, parts No. of item 3 is changed. Revision Information is newly added. Apr. 1994/1st Edition Newly published IM 11P03A05-01E ii n If you want have more information about Yokogawa products, you can visit Yokogawa’s home page at the following web site. Home page: http://www.yokogawa.com/ Environmental & Analytical Products PMK Group n Written by IA Div., Product Business Center Yokogawa Electric Corporation n Published by Yokogawa Electric Corporation 2-9-32 Nakacho, Musashino-shi, Tokyo 180-8750, JAPAN n Printed by KOHOKU PUBLISHING & PRINTING INC. IM 11P03A05 -01E User’s Manual Supplement Model MG8E Paramagnetic Oxygen Analyzer Thank you for selecting our MG8E Paramagnetic Oxygen Analyzer. In User's Manual, IM 11P03A05-01E, 3rd Edition, supplied with the product, some revisons/additions have been made. Please replace the corresponding pages in your copy with attached, revised pages. Note Revisions P.3-2, Section 3.1, "Standard Specifications," Installation Conditions: Changed of ambient temperature. P.3-3, Section 3.1, "Standard Specifications," Power Supply: Description changes. Section 3.1, "Standard Specifications," : Addition of "KC Marking". All Rights Reserved, Copyright © 1994, 2nd Edition: Apr. 2013 (YK) Subject to change without notice. IM 11P03A05-01E 3rd Edition 3-2 <3. SPECIFICATIONS> Measurement Gas Conditions: Gas Flow ; Setting range : 300 to 800 ml/min (standard 600 ml/min) Allowable range : ±10% of a set value Pressure : Approx. 7 kPa (approx. 700 mmH2O) in Analyzer inlet Temperature: 0 to 50°C Humidity : No moisture condensation in the flow path or the sensor Operating Conditions: Measurement gas must be an explosive gas which has T4 ignition temperature and must be a hazardous gas less than or equal to the gas vapor-air mixtures. Oxygen concentration in the measurement gas must be less than a mixture of air with a flammable gas (Exd II BT4X). However, this is an exception if it is ascertained that the gas explosion characteristics are safer than the equivalent gas. Auxiliary Gas: Type ; N2 gas (not containing O2 gas equal to or greater than 0.1 % of the maximum concentration of the measurement range) Pressure ; 350 to 500 kPa (average flow rate of approx. 35 ml/min. When sample gas contains hydrogen of 3% or greater, flow rate is approx. 55 ml/min) Calibration gas: Zero gas ; N2 gas Note: Zero gas should not contain O2 gas with a concentration equal to or greater than 0.1% of the upper range value. Span gas ; Dry air (instrument air O2: 20.95 vol%) or standard gas containing O2 gas with a concentration of 80 to 100% of the span value (balance nitrogen). Calibration methods: (1) Automatic calibration at set intervals by internal timer (2) Semiautomatic calibration started by external contact input (3) Manual calibration in the field Warm-up Time: Approx. 2.5 hours Installation Conditions: Ambient temperature: -5 to 50°C Humidity; 10-95%RH (No condensing) Vibration: 5 to 9 Hz : Vibration amplitude; 1.5 mm or less 9 to 150 Hz: Acceleration; 2 m/s2 or less IM 11P03A05-01E <3. SPECIFICATIONS> 3-3 Power Supply: Power supply Voltage 100 to 115 V AC; Rated voltage range: 100 to 115 V AC Allowable voltage range: 90 to 127 V AC Rated frequency; 50 to 60 Hz Allowable frequency range: 48 to 63 Hz Power Consumption: 170 VA maximum, approx. 25 VA normally KC Marking: Korea Electromagnetic Conformity Standard Materials in Contact with Gas: JIS SUS316 stainless steel, Fluorocarbon rubber, Hard glass Structure: flameproof (Exd II BT4X) Dimensions : 440(W) x 370(H) x 325(D) mm Color: Door: Munsell 2.0GY7.5/0.9, epoxy resin baked Case: Munsell 2.0GY3.1/0.5, epoxy resin baked Weight : Approx. 38 kg IM 11P03A05-01E