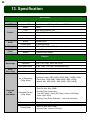
1
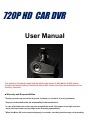
720P HD CAR DVR User Manual This manual is for both the model with No GPS and the model for GPS Model. All GPS related functions will not be working in the model with no GPS. Please check your machine before use to avoid any confusion ■ Warranty and Responsibilities • Driving recorder may not record all events, incidents, or accidents. It is not guaranteed. • Any loss of data shall not be the reasonability of the manufacturer. • In case of accident, the sensor may not recognize the shock if the impact is too light. And as a result, driving recorder may not begin event recording automatically. • When the Micro SD is not connected properly in recorder, recording functions may not be working. Contents Index Page 1. Before Using 3-4 2. Package Information 4 3. Parts & Function 5 4. Main Feature 6 5. Installation 7 6. Operation 8 7. Operation & LED Indication 8. Storage Card 9. Using Micro SD 9-10 11 12-13 10. Install PC Player 14-15 11. EZ Manager 16-18 12. EZ Tracker 19 13. Specification 20 14. Warranty Certification 21 3 1. Before Using Please read the following instructions carefully to use the product properly and protect the user’s safety. 1. Do not disassemble, repair, or alter the product. When malfunctions, error, or other accidents are found to be attributable to a user, a user may not be eligible for warranty service. 2. In case of smoke or burning smells, unplug the power cable immediately. 3. Do not spray water directly on to the device. It may cause damage, fire or electric shock. 4. Keep the device away from chemicals or detergents as they may change the surface of the camera and damage the device. 5. Avoid excessive impact and do not insert any foreign object into the device. It may cause damage to the device. 6. When a foreign materials or sticker blocks the lens, a normal operation is not possible. Please keep the lens clean and clear. Also, when other objects are placed around the camera, they may be reflected on the window and included in the video images. Please do not leave unnecessary objects around the device. 7. Make sure the camera is installed tightly and do not move the device after installation. And do not impact excessive shock to the product. 8. Make sure to use power cable provided in the package. Other power cables may cause damage to the product, fire or electric shock 9. Do not control or operate the device with wet hands. It may cause electric shock. 10. When a vehicle is parked, make sure to unplug the power cable of the device. Vehicle battery may be discharged. 11. Do not operate device while driving. 12. In extreme cases like when a vehicle enters or exit a tunnel with sudden change of light, when the light is too strong or when there is no source of light, recorded image may not be satisfactory condition. 13. If the windscreen of the car is tinted; recorded image may be poorly defined or distorted. 14. Some accidents with very low shock or impact may not be recorded automatically 15. If the power supply was disconnected by huge scale or accident; the event may not be recorded. 4 1. Before Using • Understanding of GPS 1. GPS which is used for commercial purpose inherently has the average range error of more than 15 meters. Near buildings, underground, underpasses, or roadside of trees, the range of error may be more than 100 meters. 2. GPS signal reception may take a few minutes. This may vary depending on weather and other environmental conditions 2. Package Information Please check if the following components are included in your package. If any item is missing or an incorrect item is included, please contact local store where you purchased the product. HD Car DVR Cord Fitting Kits Vehicle Power Adaptor Micro SD & Micro SD Card Reader User Manual AV Cable Installation CD 5 3. Parts & Function 2. Bracket 1. Megapixel Camera 3. Power 4. SD Card 5. AV Out 6. Parking Mode (Short Press) 7. Playback Mode (Long Press) 8. Manual Recording 9. Audio Rec. On/Off (Short Press) 10. Buzzer On/Off (Long Press) 1. Camera: 1.3M Pixel 720p HD CMOS Lens 2. Bracket with Angle Adjustment: Turn camera angle 360 degrees 3. Power: Connect vehicle power cable 4. Micro SD Slot: Input Micro SD to record 5. AV Out: Connect to external monitor 6. Parking Recording (Short Press): Start parking mode recording 7. Playback Mode (Long Press): Change to video playback mode. 8. Manual Recording: Start event recording manually 9. Audio Recording: Turn on or turn off MIC (Audio Recording) 10. Buzzer: Turn on or turn off Beep Buzzer 6 4. Main Feature Continuous Recording The HD car DVR records continuously in maximum recording speed of 30 frames per second with 140 degree wide camera angle. When recorded data gets full, it overwrites new data as deleting from the oldest data. Event Recording & Manual Recording As vehicle experiences hard breaking, sudden acceleration, or collisions, internal 3D gravity sensor catches it and triggers event recordings. It can store video files in event recording folder and it overwrites when event data is full. User also can force to trigger sensor recordings by manual recording button and it can store video files in manual recording folder. Parking Mode Recording As for vehicle surveillance while in park, user can set parking mode recording. When parking mode is triggered, it lowers recording resolution & recording speed for longer recording time. To use parking mode recording, The HD Car DVR power should be connected to car battery directly. Please note that frequent usage of parking mode may occur battery discharge of the vehicle. Event Information The HD Car DVR keeps g-sensor data which were triggered by hard breaking, sudden acceleration or collisions. User can view g-sensor graph & GPS information via Viewer program. Privacy Protection User can disable microphone (audio recording) with external button or manager setup. By pressing longer time, user can turn off Buzzer sound for quite environment. Viewer Program The HD Car DVR viewer program provides video and audio playback of recorded file. User can view video footages with time & location information. If necessary, user can also capture or print the images while playback. User Settings User can adjust own setting through viewer programs. GPS Tracking Program The GPS tracking application provides various driving information (Path, Speed, Time). User can save or load data upon if necessary. 7 5. Installation • For better performance & safety, Please install your HD Car DVR as following instructions 1. Insert Micro SD Card - After open memory card slot, please in put Micro SD card until it connects. Before insert Micro SD, Check proper position of card insert. 2. Connect Bracket - Connect bracket with the HD Car DVR. By loosing the screw of knob, user can adjust camera angle according to vehicle’s windshield. 3. Attach The HD Car DVR - Adjust angle knob in proper position and attach tape of bracket onto front window. Be aware to keep clear view for camera. When lens is covered, it may not record clear images. 4. Power Cable - Attach cord fitting kits in proper position and clip in power cable. 5. Connect Vehicle Power Adapter - Connect vehicle power adapter to cigar power socket. Make sure to use enclosed power cable. Otherwise, it may cause malfunction. 6. Connect Power - After connecting power to the HD Car DVR, please start your vehicle. If the HD DVR is installed properly, LED indicator will be turned on with beeping sound. A few seconds later, the HD Car DVR starts recording as LED blinks. 8 6. Operation Status POWER RECORDING PRIVACY PLAYBACK FW Operation LED LED Function Power On Power on Power on On On Power Off Power off Power off Fast Blink Fast Blink Continuous - Continuous recording Blink On/Off Event - Start event recording (1 min) Fast Blink On/Off Manual Manual button Start manual recording (1 min) Fast Blink On/Off Parking On Parking button Start parking recording (VGA 5fps) Off Blink Parking Off Parking button Start continuous recording Blink On/Off Mic. On Privacy button Start audio recording Blink On Mic. Off Privacy button Stop audio recording Blink Off Beep On/Off Privacy button (Long) Turn on/off beep sound - - Playback On Parking button (Long) Go to playback mode Blink Blink Playback Off Parking button (Long) Go to recording mode Blink Blink Next File Privacy button Play next recorded file Blink Blink Previous File Manual button Play previous recorded file Blink Blink Change Folder Parking button Change playback folder Blink Blink FW Upgrade - Start firmware upgrade Fast Blink Fast Blink 9 7. Operation & LED Indication LED A LED B Manual Button Privacy Button 1. Power Connect - When power is on, both LED is on with beep sound. - Both LED are on. 2. Power Off - When power is off, both LED blinks with beep sound - Both LED blinks fast. 3. Continuous Recording - After power is on, the HD DVR boots in a few seconds. It automatically starts continuous record with LED blinks and there is no recording before LED blinks. - LED ‘A’ blinks and LED ‘B’ can be either turned on or off due to audio recording status. 4. Event Recording - When G-Sensor triggers event recording, LED ‘A’ blinks fast with beep sound. - Event recording data is 1 minute and it goes back to continuous recording. - LED ‘A’ fast-blink / LED ‘B’ can be either turned on or off due to audio recording status. 5. Manual Recording - When user press manual recording, LED ‘A’ blinks fast with beep sound. - Manual recording data is 1 minute and it goes back to continuous recording. - LED ‘A’ fast-blink / LED ‘B’ can be either turned on or off due to audio recording status. 6. Privacy Button - User can turn on or off microphone and it indicates with LED and beep sound. - User can turn on or off beep sound and it only indicates with beep sound. - LED ‘B’ is turned off when microphone is off. 7. Parking Mode Recording - Regardless of original recording resolution & speed, the HD DVR lowers recording resolution & speed to VGA 5fps for longer recording time in parking mode. - When parking mode is on, it changes recording mode from ‘continuous’ to ‘parking 10 7. Operation & LED Indication 8. Playback Mode - User can view recorded files in playback mode. - Playback is available in each folders and users can choose folder to watch. - Both LED blinks 9. Screen Display No . Icon Description CON Continuous EVT Event MAN Manual PRK Parking Mode 2 PLAY Playback Mode 3 drf_2011.. 4 1/64 File No. / Total File No . Icon Description BUF Booting CON Continuous EVT Event MAN Manual PRK Parking Mode 2 REC Recording Mode 3 GPS GPS Signal Code 4 drf_2011.. 1 File Name PLAYBACK SCREEN 1 File Name LIVE SCREEN • Vision55 doesn’t record video during playback mode. • If recorded file is found defected during playback, it skip defected file and play next file. 11 8. Storage Card 1 2 4 5 3 6 7 1. Continuous Recording Folder - Indicate as ‘Dx_YYYYMMDD_HHMM’. - It is stored in continuous recordings 2. Event Recording Folder - Event has occurred, Vision55 stops continuous recording and start event recording. - Its data is stored in Event folder automatically and each file running time is 60 seconds. 3. Manual Recording Folder (Forced Event) - Manual record is triggered, Vision55 stops continuous, and start manual recording. - Its data is stored in Manual folder automatically and each file running time is 60 seconds. 4. INFO - System Information (System file Only. Do not delete) 5. GPS Log Data (For G10 GPS version Only) - Indicate as ‘Lx_YYYYMMDD_HHMM’. Each data file contains 10 mins of GPS data. - It can store up to 72 hours of GPS Data 6. SETUP - Saves user settings in Vision55 manager program (System file Only. Do not delete) 7. SYS INFO - Indicates Vision55 Firmware Information & Time Zone (System file Only. Do not delete) 12 9. Using Micro SD 1. Insert Micro SD - Insert memory card before power on. Before insert, please check proper insert position of Micro SD. (Refer to Guide Image) Insert Micro SD until it is completely connected to slot. Close memory card cover, and turn on power. Please check LED. 2. Memory Card Usage - Please use enclosed memory card or use proper memory card indicated below. Usable Memory: 4GB/8GB/16GB/32GB (Class 6 or higher) Check memory card compatibility before usage. 3. Awareness of Memory Card Usage - If memory card is not completely connected to slot, it may not operate properly and cause malfunction. Please do not touch metal part (connector) of Micro SD Please use memory card exclusively for driving recorder. Do not save other files in memory card. It may not operate properly and cause malfunction. Please use official licensed Micro SD product. If it is not an official licensed, it may not operate properly and cause malfunction due to compatibility issue. If proper memory is not operated properly, please contact your local retailer. 4. Recording Time Data - This is recording time data of each memory capacity. This is reference data only. It may not be correct in all occasions. The data result may vary, and it depends on environmental condition. Memory & Recording 4GB 8GB 16GB Continuous Cont-Evt-Man Continuous Cont-Evt-Man Continuous Cont-Evt-Man 720p 30fps 40 mins 1 hr 1 hr 20 mins 2 hrs 2 hrs 40 mins 4 hrs 720p 15fps 1 hr 20 mins 2 hrs 2 hrs 40 mins 4 hrs 5 hrs 20 mins 8 hrs VGA 30fps 1 hr 20 mins 2 hrs 2 hrs 40 mins 4 hrs 5 hrs 20 mins 8 hrs VGA 15fps 2 hrs 40 mins 4 hrs 5 hrs 20 mins 8 hrs 10 hrs 40 mins 16 hrs 20 mins Parking Mode 8 hrs - 16 hrs - 32 hrs - Recording Time Example: 720p 30fps 4GB = 40 mins of continuous recording or 1 hour of total recording includes continuous/event/manual) 13 9. Using Micro SD 5. Recording File System Continuous Recording Memory & Recording 4GB 8GB 16GB • • • Maximum Rec. File Event Recording Rec. Time (Each File) Maximum Rec. File 720p 30fps 1 mins 12 720p 15fps 2 mins 24 Maximum Rec. File 18 1 Min (Each File) 24 VGA 15fps 4 mins 48 Parki ng Mode 12 mins - - 720p 30fps 1 mins 24 18 720p 15fps 2 mins 48 18 36 1 Min (Each File) 48 VGA 15fps 4 mins 96 72 Parki ng Mode 12 mins - - 720p 30fps 1 mins 48 36 720p 15fps 2 mins 96 80 36 96 VGA 15fps 4 mins 192 144 Parki ng Mode 12 mins - - 160 1 Min (Each File) 72 1 Min (Each File) 2 mins VGA 30fps 1 Min (Each File) 36 2 mins VGA 30fps Rec. Time (Each File) 9 2 mins VGA 30fps 40 Rec. Time (Each File) Manual Recording 72 1 Min (Each File) Vision55 utilize VBR (Variable Bit Rate) recording system. Recording time is subjected to recording environment. Vision55 automatically recognizes memory capacity, adjust recording files & time. Recording File Breakdown Example: 720p 30fps 4GB = 40 continuous files with 1 min. + 12 event file with 1 min. + 9 manual files with 1 min. 14 10. Install PC Player • User can view video footages & GPS data through EZ Manager or EZ Tracker Applications. • Recording file is MP4 format. User can also view in other Media Players or Smart Phones. 1. Install DVR Application - Please open DVR Application folder in CD and run setup.exe. EZ Manager Viewer & EZ Tracker Application will be installed together. 2. DVR Application - Install DVR application software - If user’s computer doesn’t contains necessary codec files for Vision55, it automatically install codec files in prior to install application) - DVR codec files might be detected as virus Under certain computer environments. In this case, please turn off anti-virus program temporarily and install application again. 15 10. Install PC Player 3. Application Folder - Please indicate folder for DVR Applications Simply click ‘Next’ to automatic folder indication. 4. Installation Complete - Click ‘Close’ to finish installation. ‘EZ Manager’ & ‘EZ Tracker’ shortcut is installed in main screen. 5. Shortcuts - Shortcuts of G10 Application EZ Manager Viewer EZ GPS Tracker 16 11. EZ Manager - Viewer A 2 1 4 3 5 6 7 ■ User can view recorded video footages through EZ Manager program. User can set own setting of Vision55 and also view map data indications via Google map. 1. Main Screen – Shows recorded footages in file list. 2. 3. File List Organize recorded files in list by time order. Shows Date, Time, Description of Recordings (Continuous , Sensor , or Manual) By clicking file in the list. It automatically plays video clip G-Sensor Graph – Shows G-Sensor value while driving. 4. File Info, Playback Speed, Volume Control - Shows each files information (date, time, GPS data) - Control playback speed (x ¼, , x ½, x1, x2, x4) 5. GPS Data – Shows GPS data via Google Map (Not available in 10 ,No GPS) 6. Play bar – Indicates current playback file 7. Control Panel – Playback Control, Image Capture, Image Print, and User Settings A. Maximized Screen – User can see maximized screen view. 17 11. EZ Manager - Viewer MAXIMIZED SCREEN Maximized Screen - User can view recording files in HD resolution screen * Google map and G-Sensor graph does not show in maximized screen 18 11. EZ Manager - Setup 1 2 3 8 4 6 5 Through the user setting page, settings can be changed to your own preferences . To access this page, click ‘User Setting’ button and select the memory card from the windows explorer list. 1. Recording Setup – Recording Resolution, Speed, and AV Out Setup 2. G Sensor – Adjust Sensor Sensitivity (X-Right/Left, Y-Front/Back, Z-Up/Down) Setup both in normal recording & parking mode. 3. Audio Setup – Mic. On / Off 4. SD Format – Format SD card to correct format method 5. Default Setting – Back to initial settings 6. Time Setting – Synchronize time with the computer time. 7. Apply/Cancel – Apply to save settings. 8. Time Zone & DST - Choose correct GMT location to receive correct GPS time data - If the country using Day Light Saving Time, check DST box 7 19 12. EZ Tracker 4 1 2 3 5 ■ EZ Tracker loads GPS data from Vision55, shows driving information via Google map. It shows driving path, distance information, speed information (Not available in No GPS) 1. File List – Shows GPS data by date. (Road Icon: Driven Time / Palm Icon: Un-Driven Time) 2. Driving Info – Through GPS data, it provides various information of driving. (Total distance, Total driving time, Total stop duration, Average speed, Maximum speed) 3. Trip Info – User can take notes (memo) for each trip data. 4. Map – Shows driving path & time data via Google map. 5. Control Buttons – Controls EZ Tracker. (Languages, Data Open, Save Data, Data Print, Playback, Pause, Backward Playback, Time Balloon) To Open File - Click ‘Open’ and choose GPS Log data folder in memory card. To Save File – It is saved as (***.DAT), and user can run (***.DAT) file after saved. To Print File – User can print current opened file’s information & driving path. 20 13. Specification Specification G-Sensor Internal 3D G Sensor GPS Internal GPS Sensor Lens Camera Audio Memory Power Resolution 3-Axis (Acceleration, Breaks, Collisions & Impact) Non-Directional GPS Signal Receiver (SIRF III) CMOS High quality precision lens 1280 x 720 (720p), 640 x 480 (VGA) Angle 140˚(D) Sensitivity 0.8 Lux Buzzer Privacy Mode Micro SD Rated Voltage Adapter Internal Buzzer By External Button 4GB / 8GB / 16GB / 32GB (Class 6 or higher) 12-24V 300mA Cigarette power adaptor Features Format Recordings Resolution Recording Speed Audio Recordings 1280 x 720 (720p), 640 x 480 (VGA) 30 fps, 15fps, VGA 5fps (Parking Mode Only) Format AAC Bitrate 128kbps No. of Recordings (720p, 30fps) Recorded Files Information H.264 (MPEG Part10) •Continuous: Max. 40EA (4GB) / 80EA (8GB) / 160EA (16GB) • Event: Max. 12EA (4GB) / 24EA (8GB) / 48EA (16GB) • Manual: Max. 9EA (4GB) / 18EA (8GB) / 36EA (16GB) • Each File Size: Max. 55MB Recorded File Info (720p, 30fps) • Running Time (Continuous) 1min (HD 30fps) / 2mins (HD 15fps) / 2mins (VGA 30fps) 4mins (VGA 15fps) • Running Time (Event & Manual) – 1min in all occasions G-Sensor Sensitivity Parking Mode Depends on User Setting (0: Sensitive ~ 20: Insensitive) • Each File Size: Max. 55MB • Running Time: 12mins (VGA 5fps)